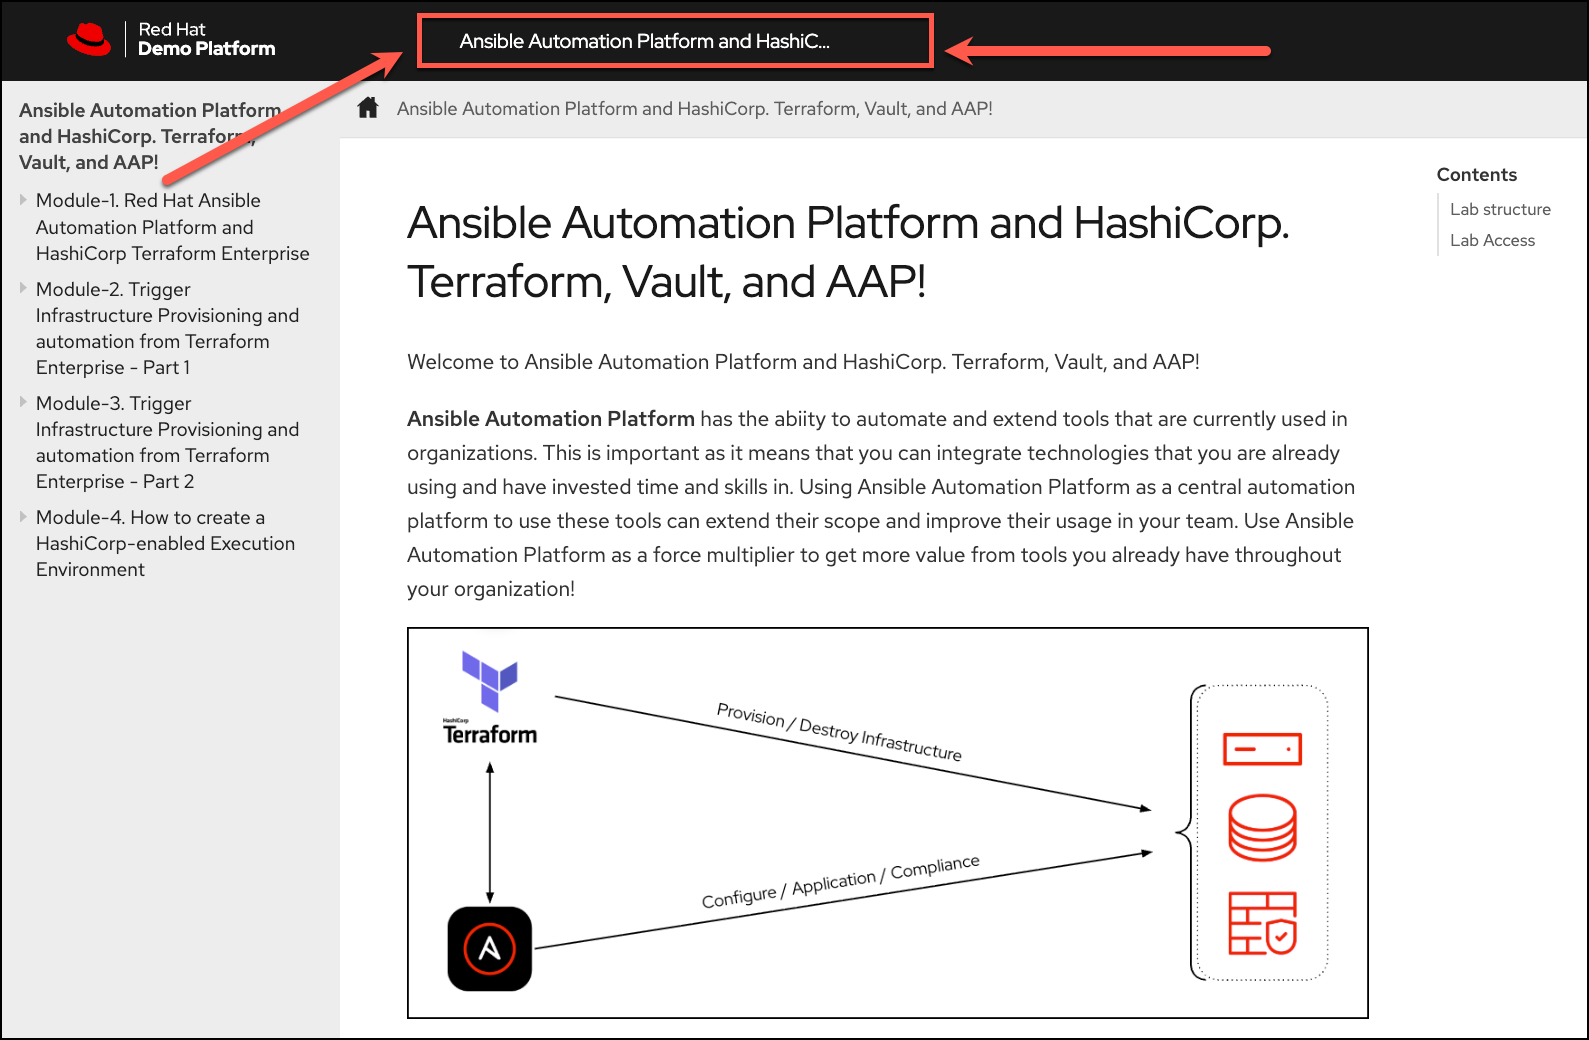
| To pop out the instructions in a new browser tab, you can click on the lab title at the top. |
Red Hat Ansible Automation Platform and HashiCorp Terraform Enterprise
-
Welcome to the
Terraform Enterprise & Red Hat Ansible Automation Platformlab.
Terraform (Enterprise and HCP Terraform) is a great tool you can use for deploying cloud infrastructure using delcarative Infrastructure as Code (IaC). It allows you to define infrastructure as code and then build, modify, and destroy these resources declaratively. Terraform (Enterprise and HCP Terraform) can be a simple way to deploy infrastructure, however if you add Ansible Automation Platform, together they can be used to automate the entire infrastructure lifecycle, from build to deploy, to manage, and to retire infrastructure, to enhance your automation journey!
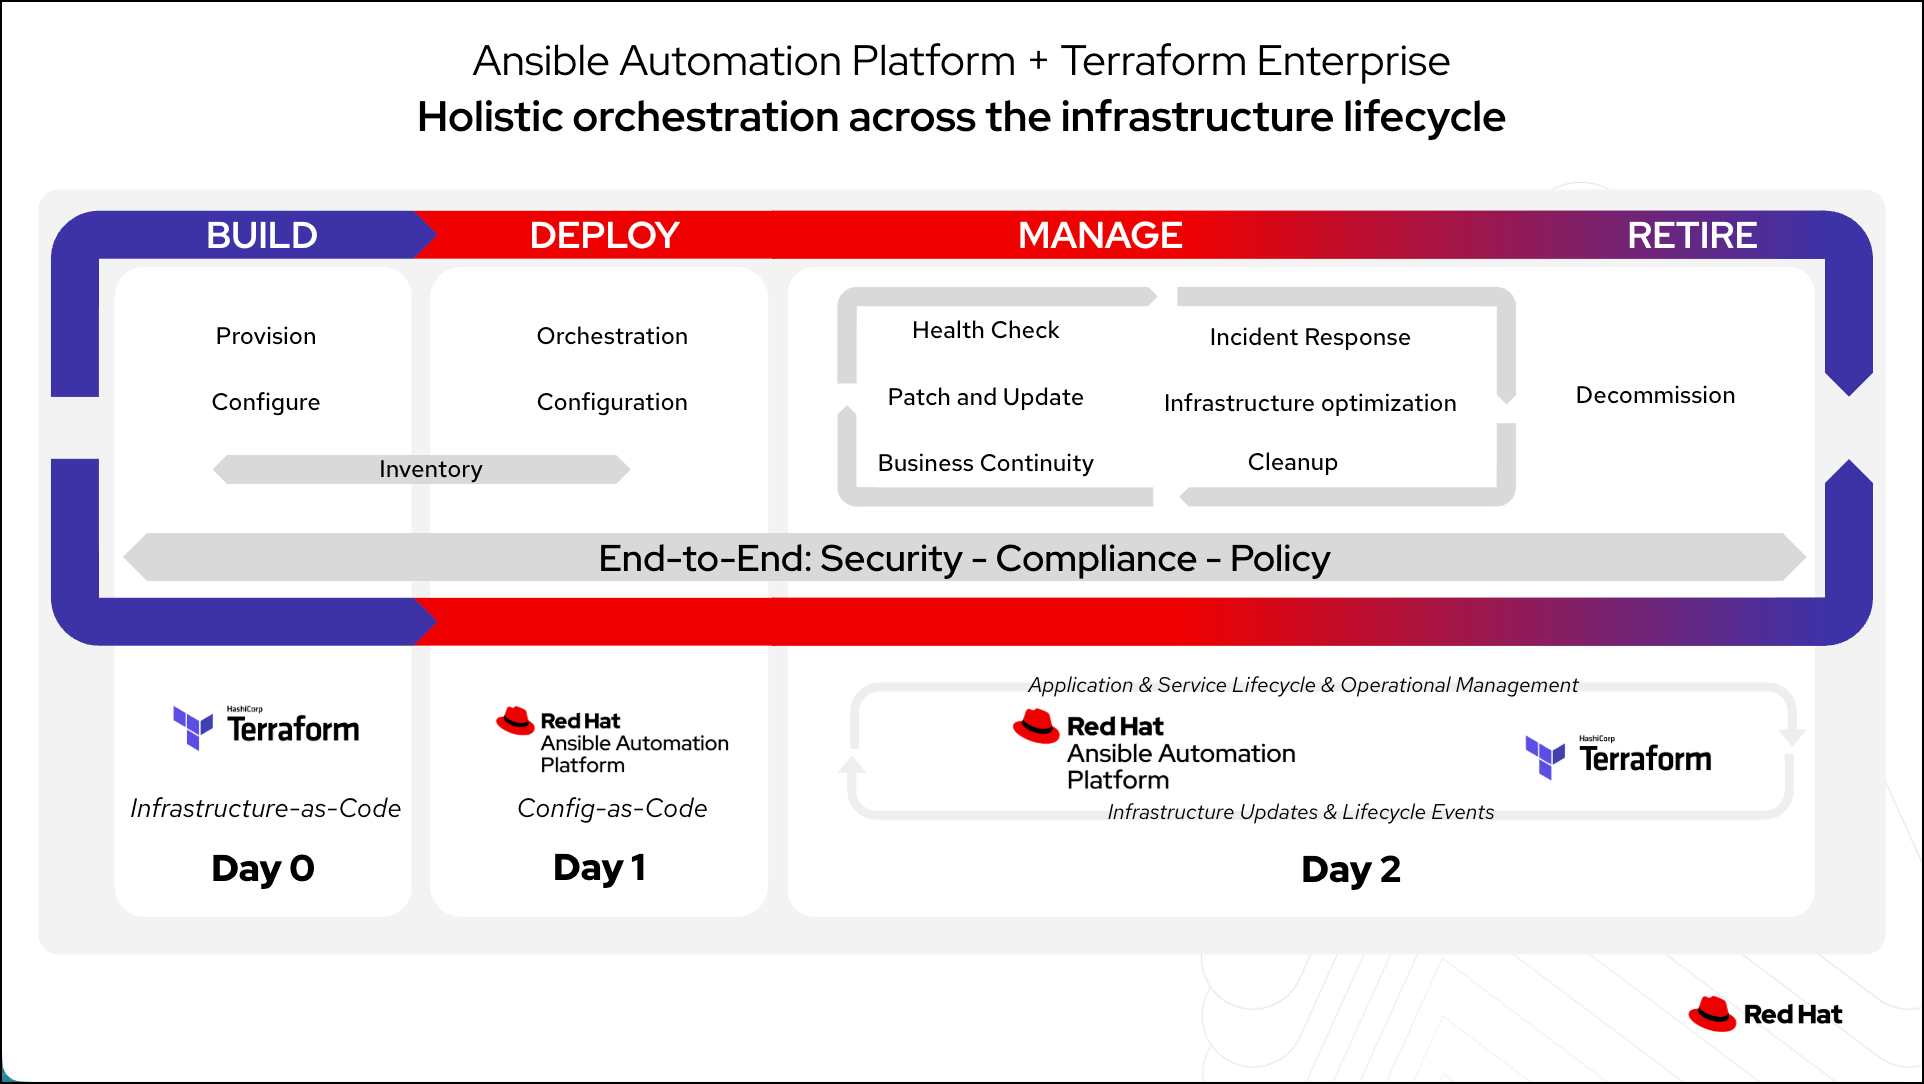
In the following challenge tasks you will use Ansible Automation Platform and Terraform Enterprise together. Centrally from Ansible Automation Platform you will trigger an Ansible Workflow that will use Terraform to create cloud Infrastructure, and then synchronize the inventory back into Ansible Automation Platform, and go on to perform other configuration and orchestration tasks.
-
In this first challenge you will learn
-
How to create an Ansible Workflow template and run it to create resources in AWS using Terraform Enterprise and Ansible Automation Platform will perform further configuration and orchestration tasks.
-
There are several prerequisites that you will need to complete before you can start this lab.
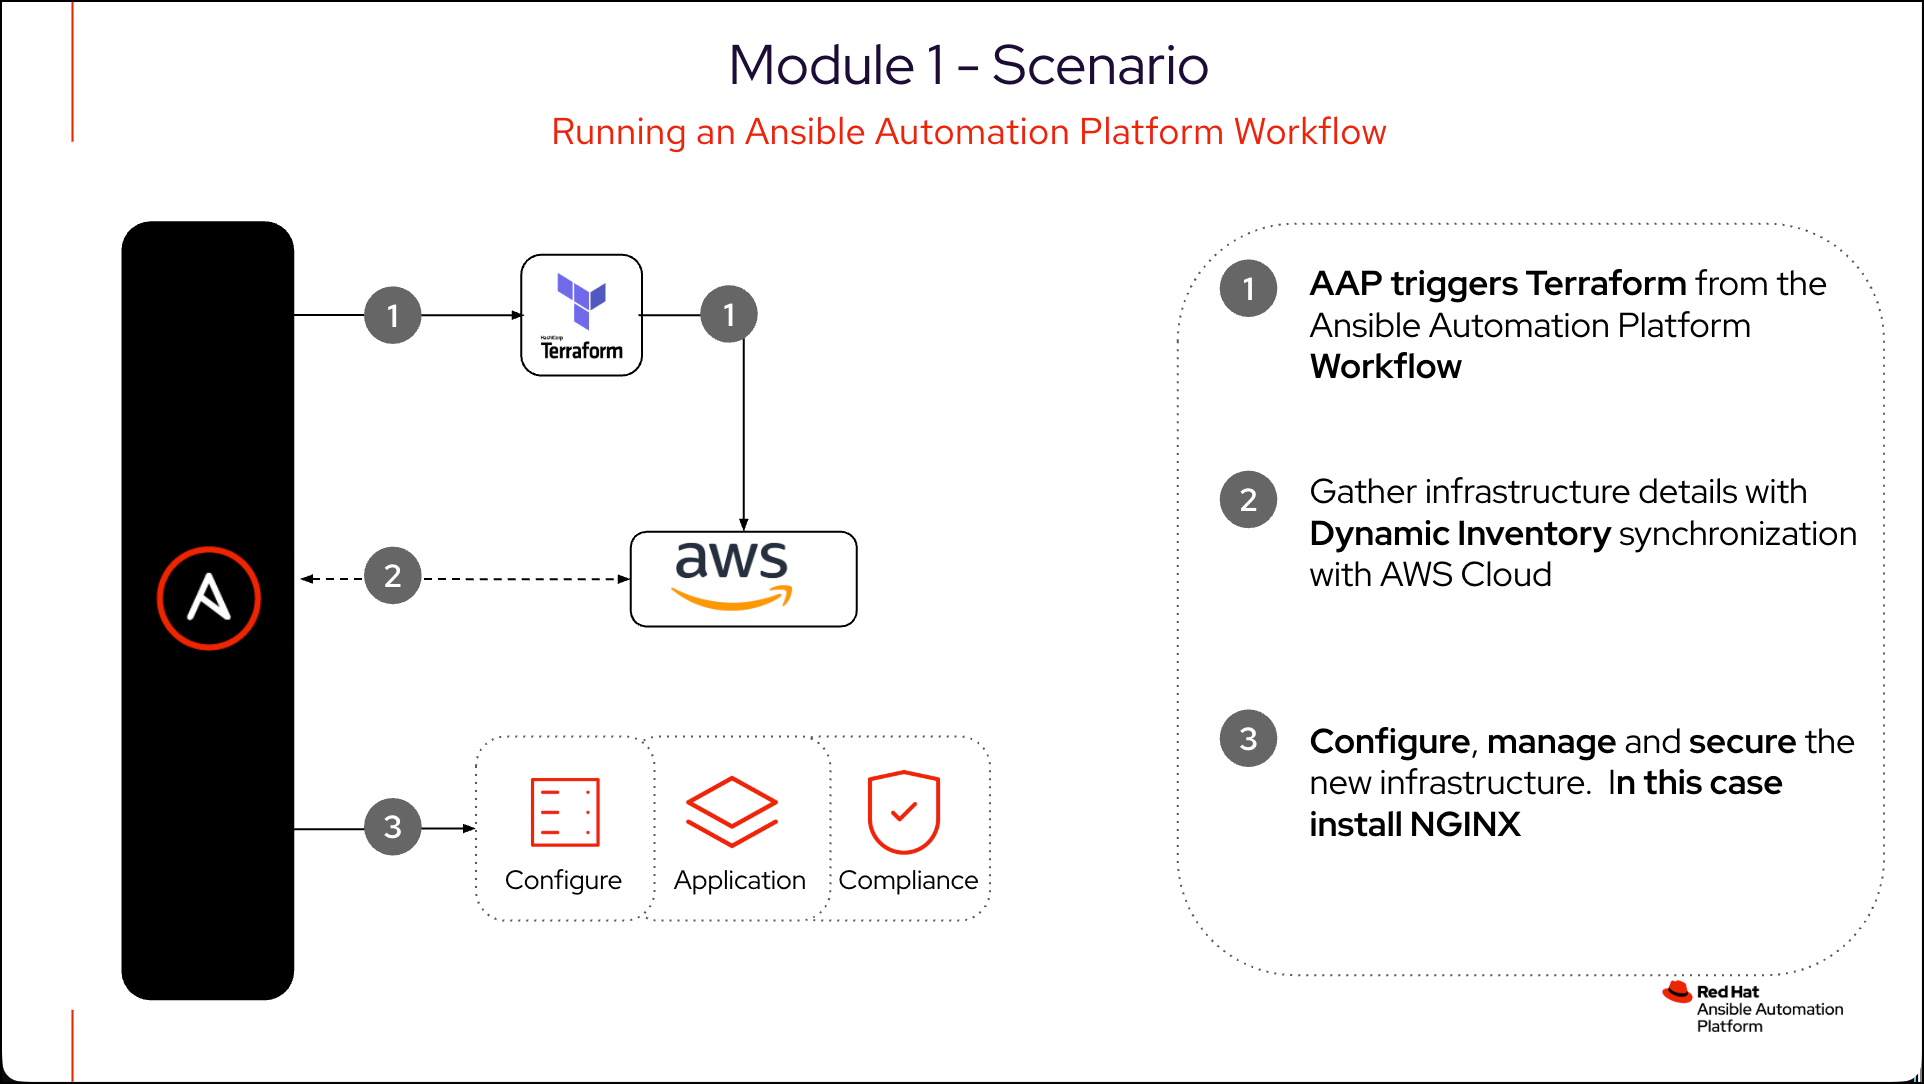
The following diagram shows the overall scenario that we will be covering in this lab section.
Create the Terraform Enterprise API token
You will need to create an API token in Terraform Enterprise to use in Ansible Automation Platform to authenticate against Terraform Enterprise.
This is the top menu of the lab. You can use this to pop out Ansible Automation Platform and Terraform Enterprise, and Vault Enterprise in new browser tabs.

Login to Terraform Enterprise using the following Login Credentials:
-
User: admin -
Password: ansible123! -
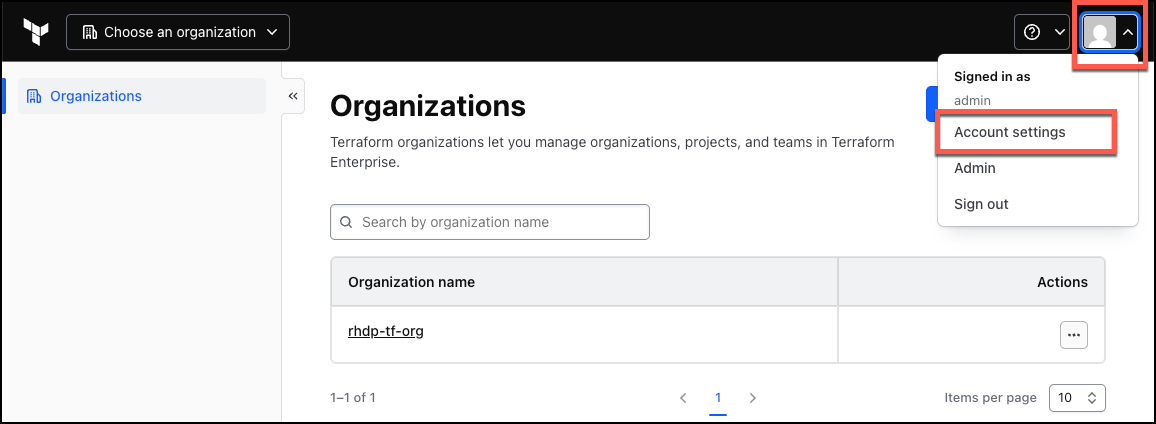
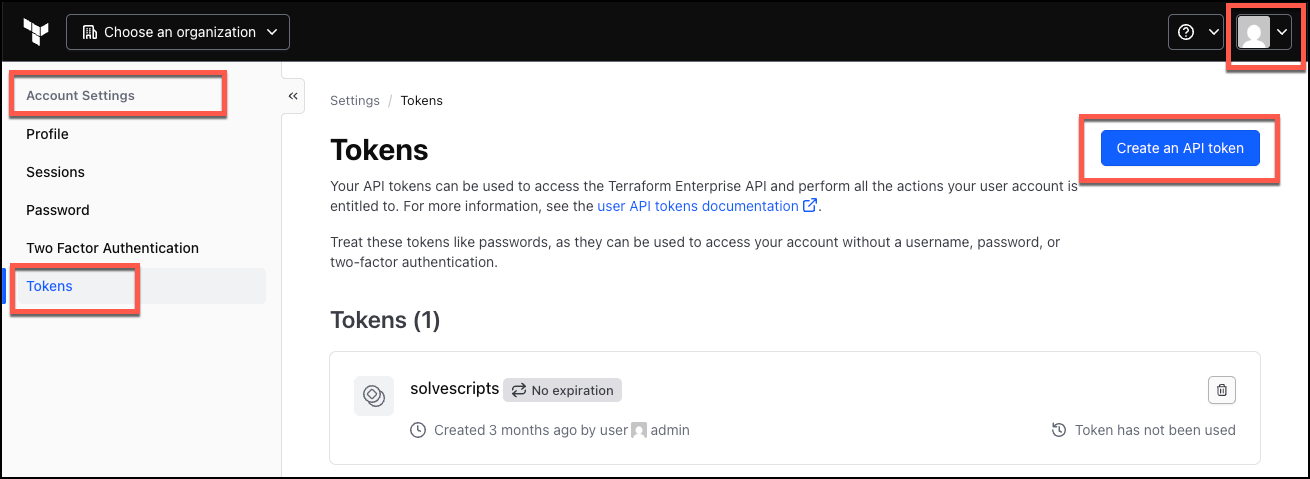
Select the
user iconin the top right. -
Select the
Account Settings. -
In the left menu, click on
Tokens. -
Click on the
Create an API tokenbutton in the top right. -
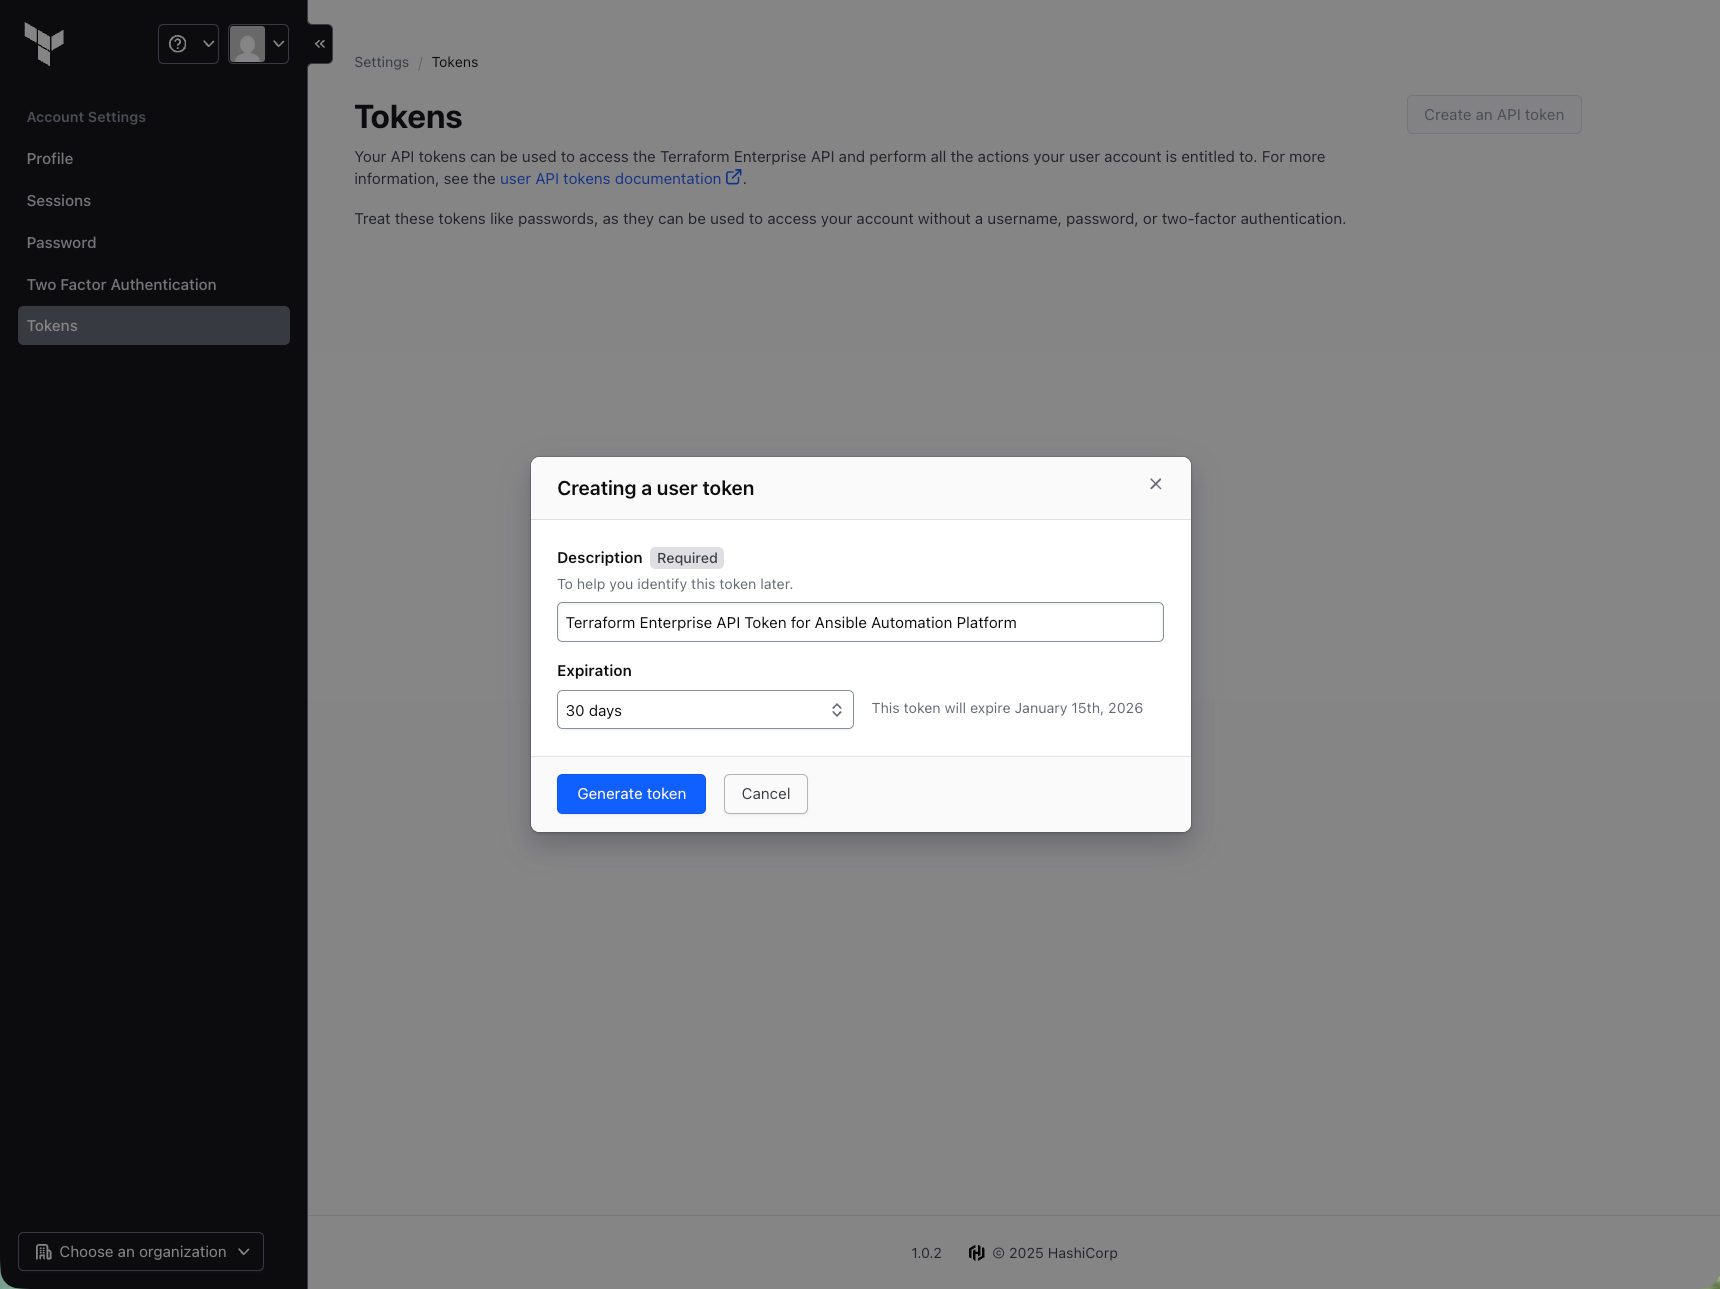
In the
Descriptionfield enterTerraform Enterprise API Token for Ansible Automation Platform. -
In the
Expirationfield keep the default value of30 days.
| Field | Value |
|---|---|
Description |
Terraform Enterprise API Token for Ansible Automation Platform |
Expiration |
30 days |
-
Click on
Generate Token, and then click on theCopy to clipboardbutton. -
Copy the API token to your clipboard, save it somewhere where you can easily find it.
Create a Terraform Enterprise Workspace
This task is done in Terraform Enterprise.
Create the Terraform Enterprise Workspace
Go back to the main menu by clicking on the Terraform Enterprise logo in the top left corner.
-
Select the organization
rhdp-tf-org. -
In the left menu, click on
Workspaces -
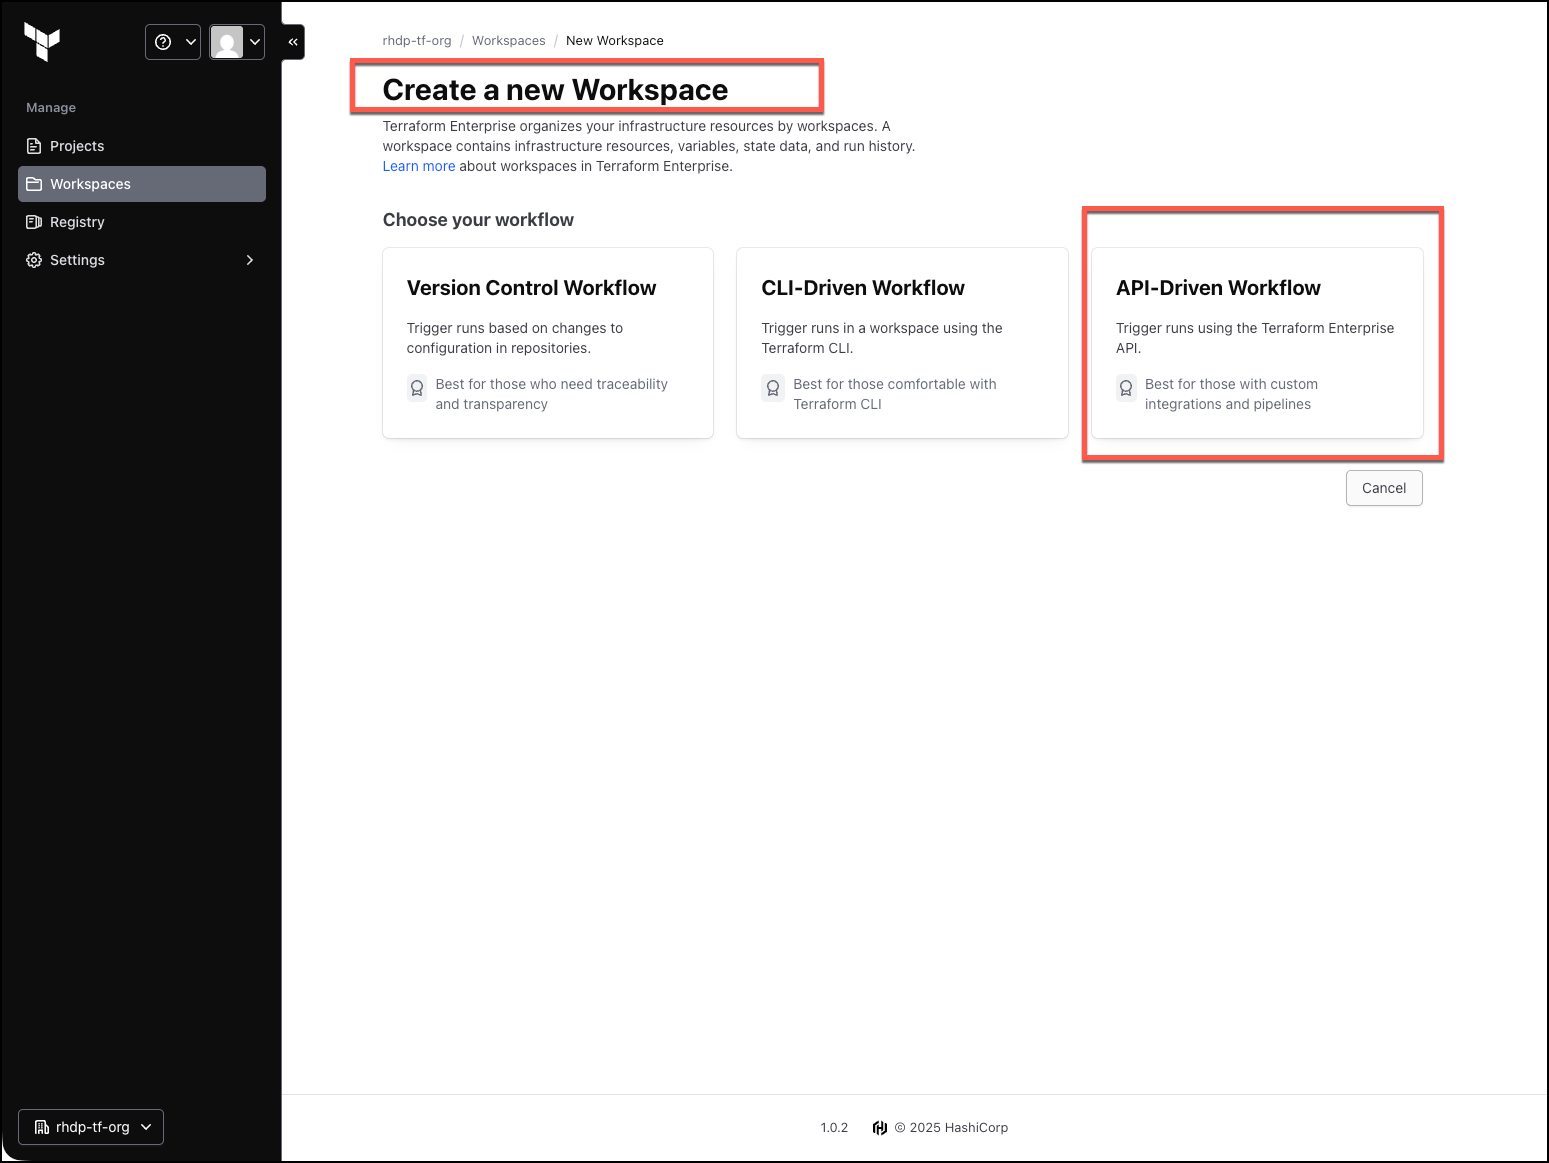
Click on
Create a workspace. SelectAPI-Driven Workflowas the type of workspace.
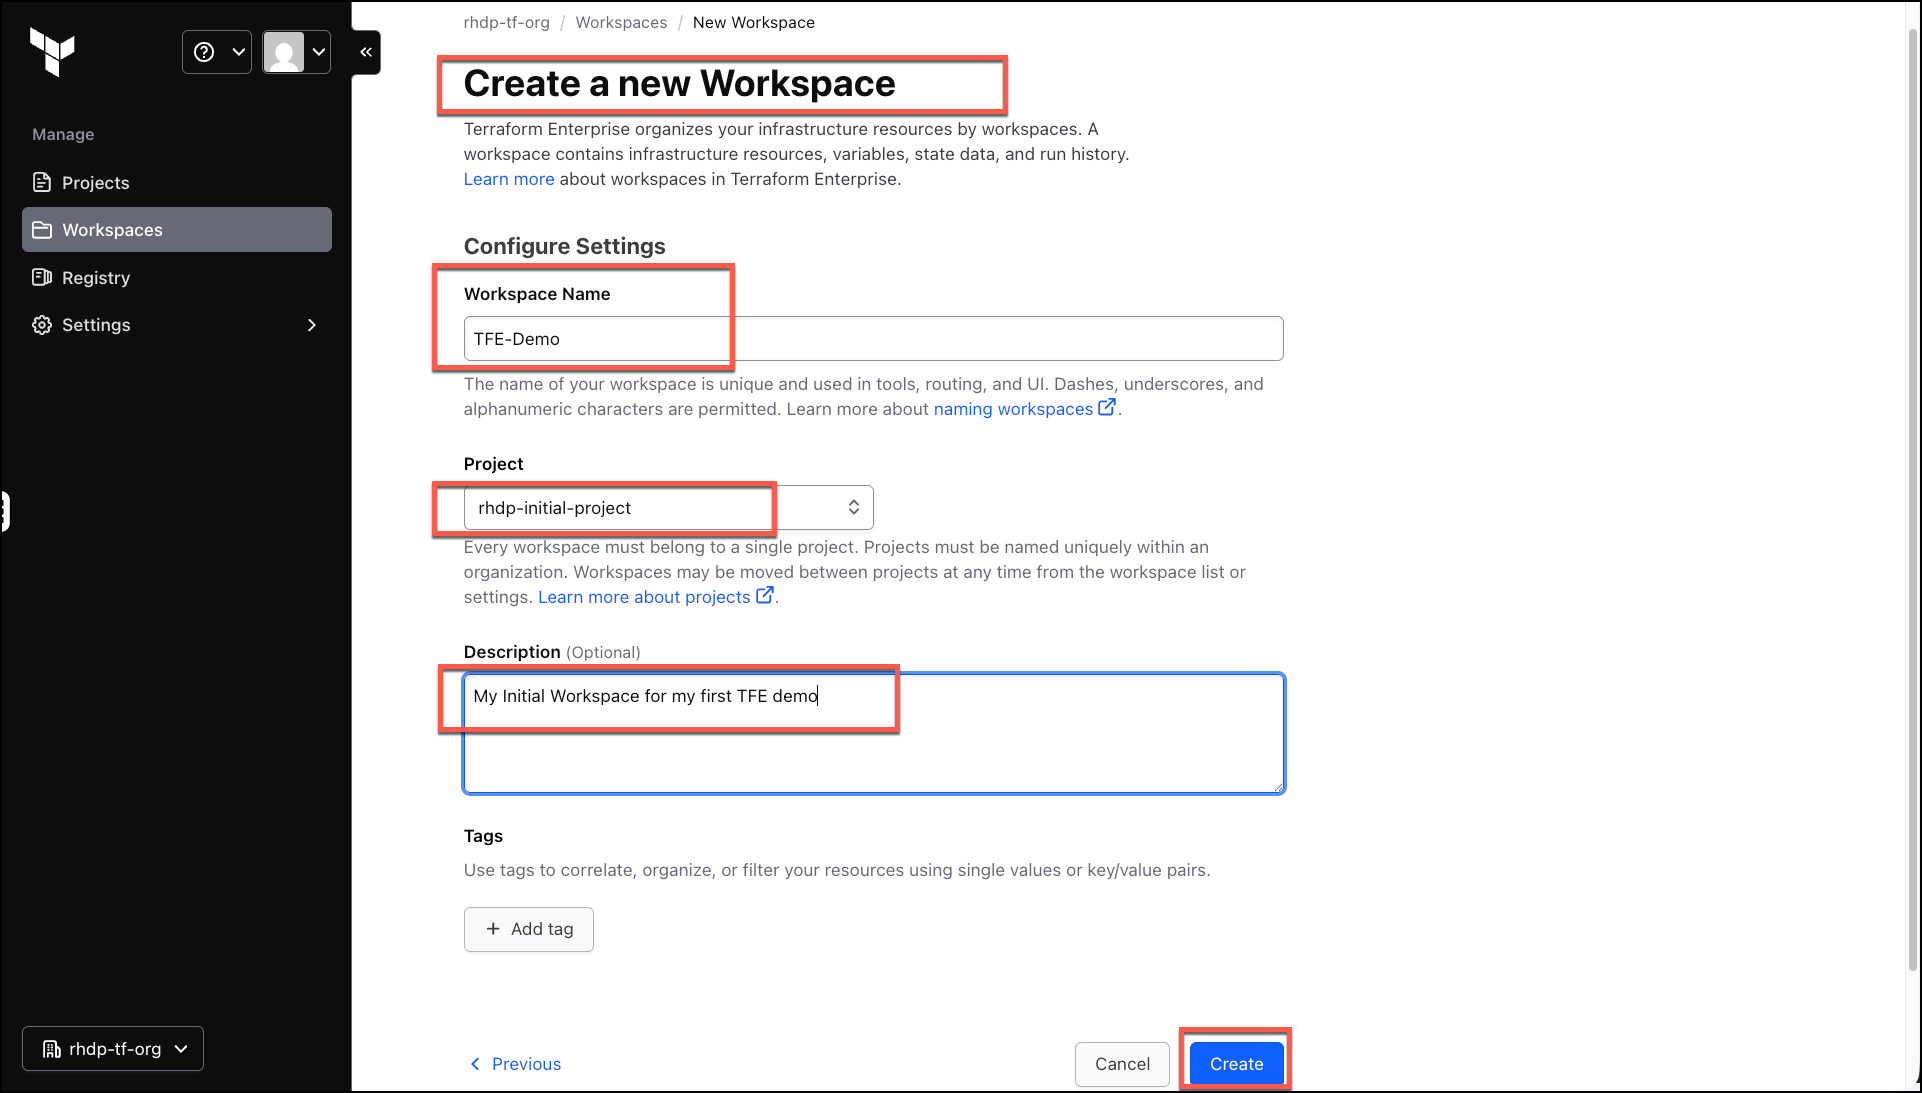
Fill out the following fields - Table below:
| Field | Value |
|---|---|
Name |
TFE-Demo (Please use that name exactly) |
Project |
rhdp-initial-project |
Description |
My Initial Workspace for my first TFE demo. |
Click on Create to save the workspace.
The workspace is now created. You can now use this workspace for Terraform Enterprise runs.
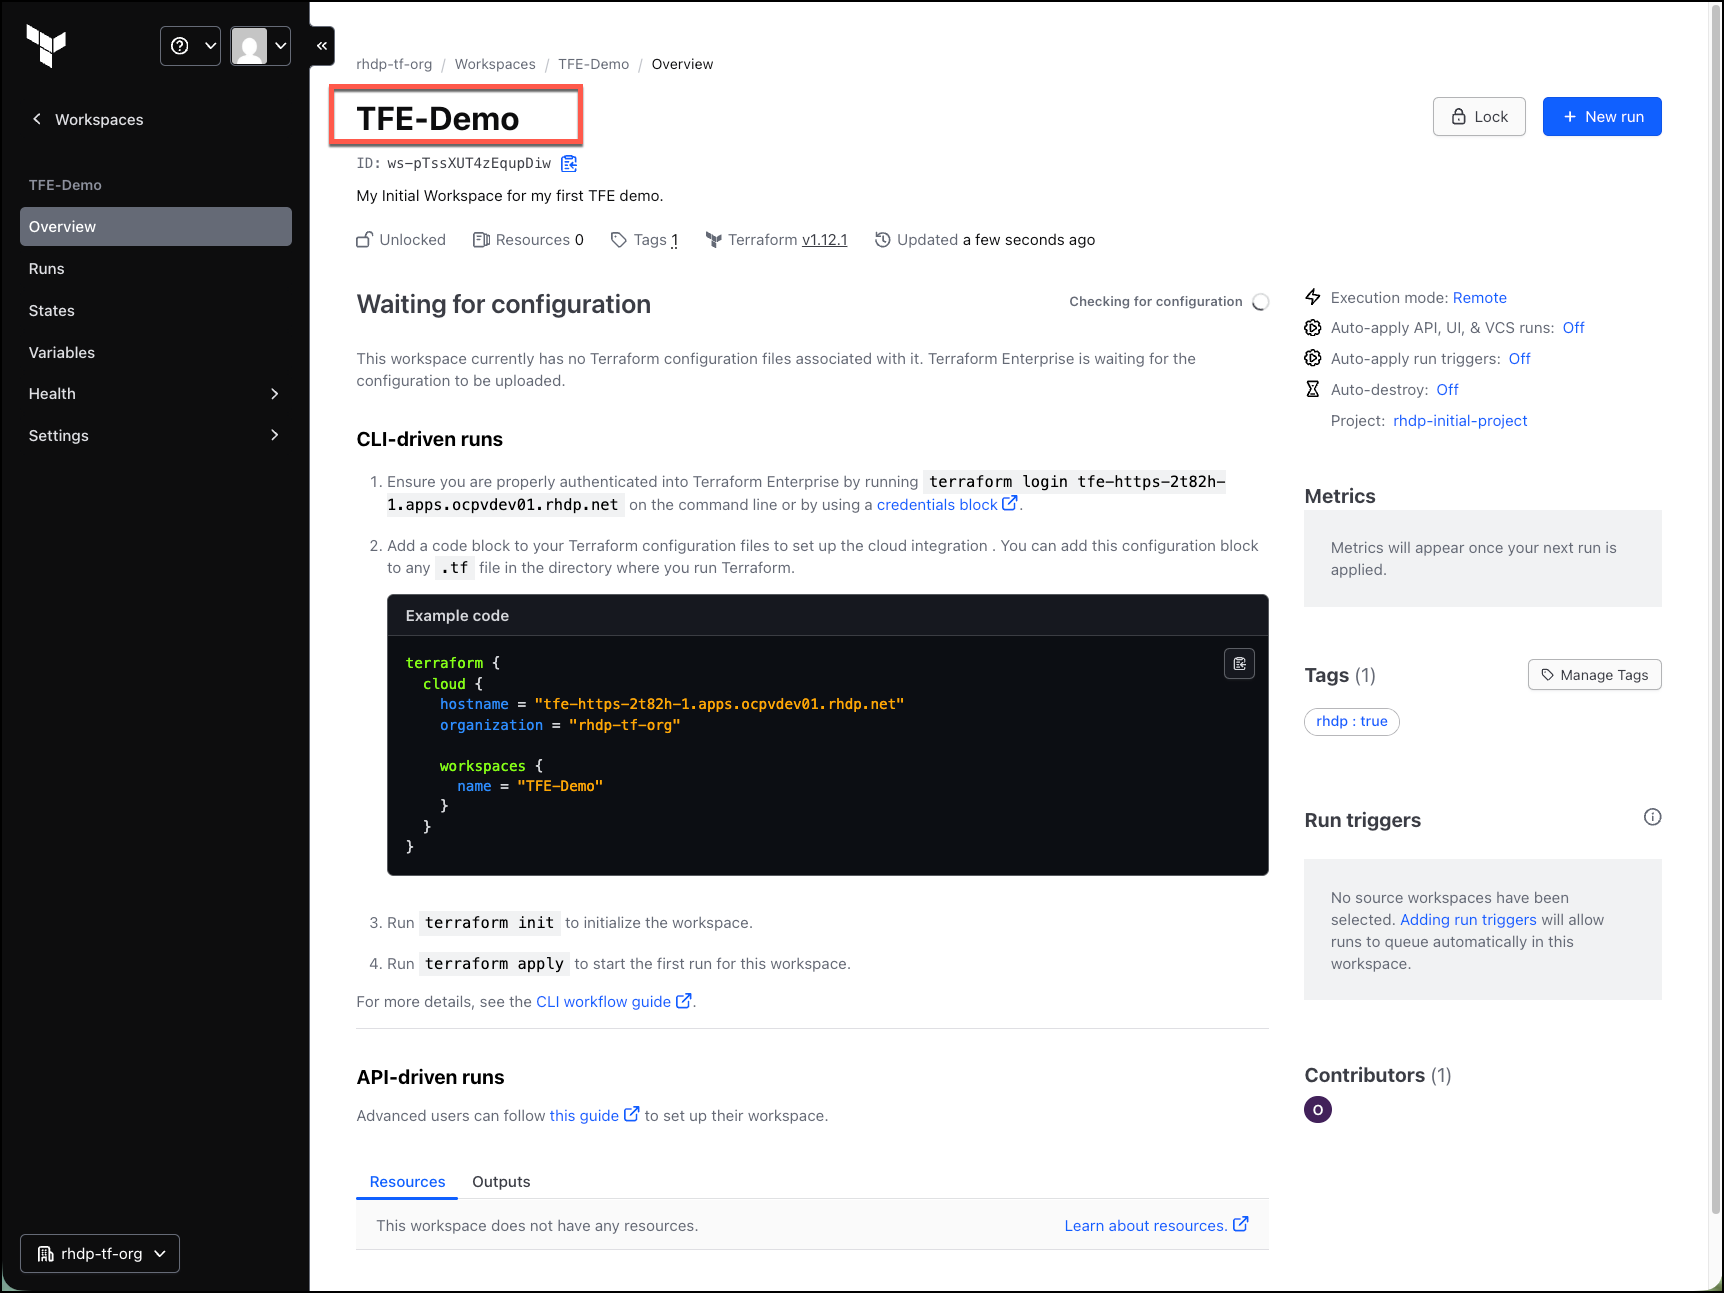
Add the AWS Keys to the Terraform Enterprise Workspace
While in the TFE-Demo workspace, click on the Variables menu option in the left menu.
Click on the Variables tab.
Click on the + Add variable button.
Enter the following details:
-
Select the
Environment variablevariable type. -
In the
Keyfield enterAWS_ACCESS_KEY_ID -
In the
Valuefield enter the AWS Access Key ID. Get this from theCloud(AWS)tab in your lab. -
Click on
Add variableto save the variable.
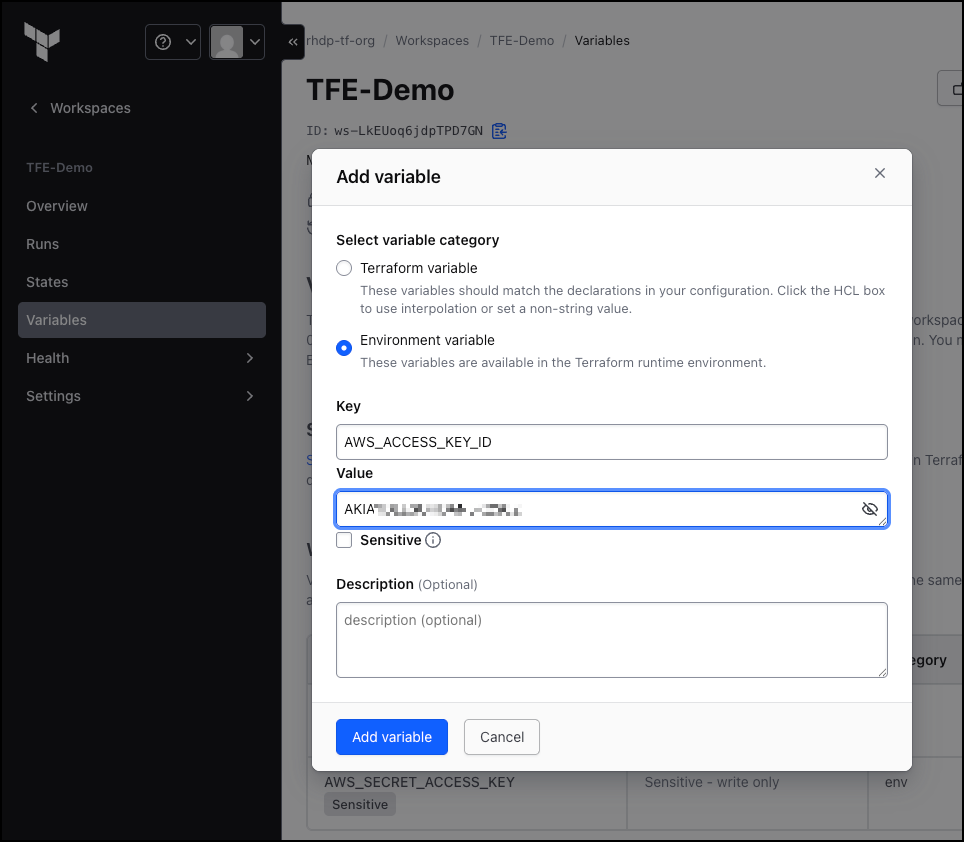
Repeat the process for the AWS_SECRET_ACCESS_KEY variable.
Click on the + Add variable button.
Enter the following details:
-
Select the
Environment variablevariable type. -
In the
Keyfield enterAWS_SECRET_ACCESS_KEY. -
In the
Valuefield enter the AWS Secret Access Key. Get this from theCloud(AWS)tab in your lab. -
Select the
Sensitivecheckbox. -
Click on
Add variableto save the variable.
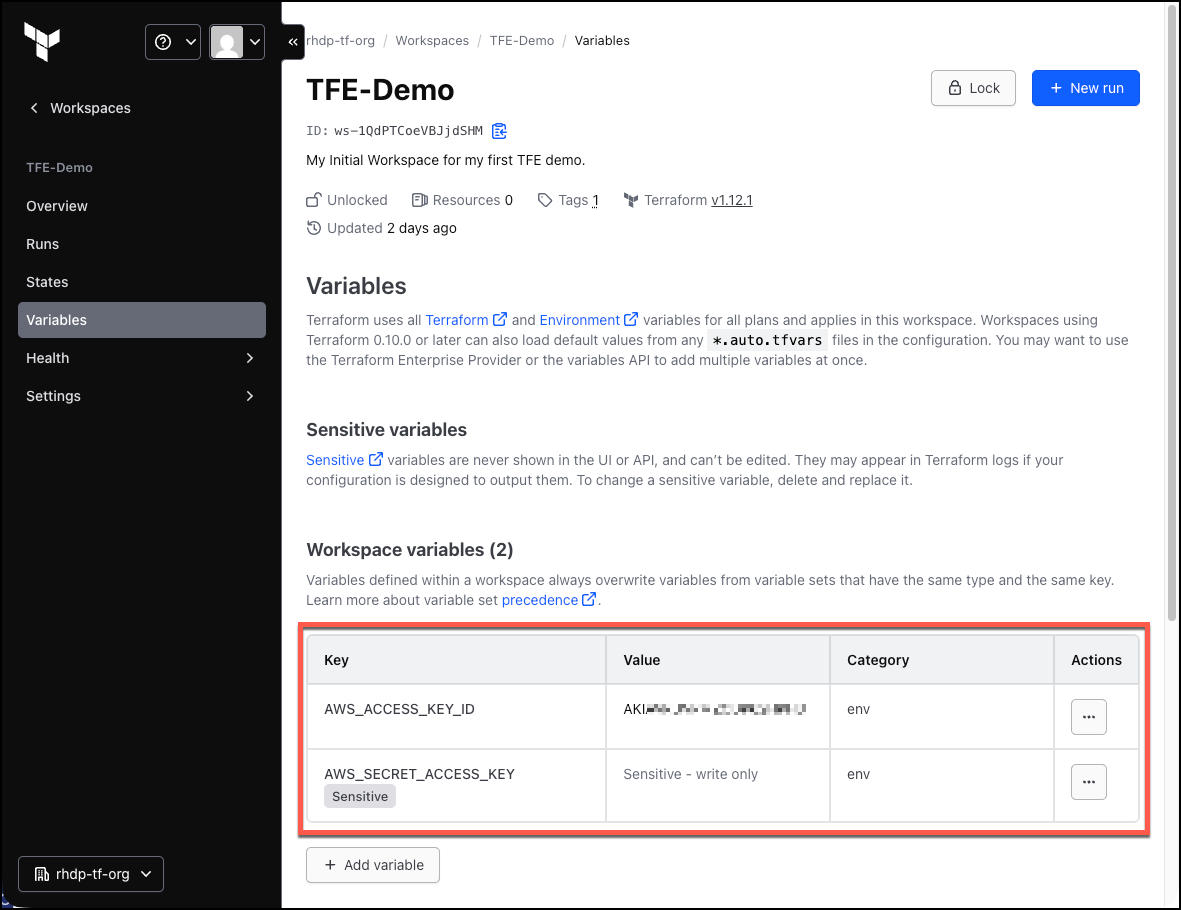
You have now added the AWS keys to the Terraform Enterprise Workspace. These keys can now be used by Terraform to authenticate against the AWS cloud account.
Create a Terraform Enterprise credential type.
This task is done in Ansible Automation Platform. Go back to the MAIN LAB WINDOW
Click on the Ansible Automation Platform tab at the top of lab.
Log in using the following Login Credentials:
-
User: admin -
Password: ansible123!
An Ansible Credential Type defines a structure (schema) for storing and using secrets like passwords, SSH keys, or API tokens, allowing secure management within Ansible Automation Platform for connecting to systems in this example Terraform Enterprise.
| A credential type for HCP Terraform (also works for Terraform Enterprise) will be native in AAP in the coming months. Stay tuned for this. At the moment you have to manually create this credential type. |
Expand: Automation Execution → Infrastructure → Credential Types → + Create Credential Type
| Field | Value |
|---|---|
Name |
Terraform Enterprise credential type |
Description |
Terraform Enterprise credential type for Terraform Enterprise |
For the Input configuration add the following:
---
#INPUT
fields:
  - id: hostname
    type: string
    label: Terraform Enterprise Hostname
  - id: org
    type: string
    label: Organization
  - id: workspace
    type: string
    label: Workspace
  - id: token
    type: string
    label: Token
    secret: true
required:
  - hostname
  - org
  - workspace
  - token
For the Injector configuration add the following:
---
#INJECTOR
extra_vars:
  tf_hostname: '{{ hostname }}' # e.g. https://tfe-https-1234567890.apps.ocpvdev01.rhdp.net
  tf_org: '{{ org }}'
  tf_workspace: '{{ workspace }}'
  tf_token: '{{ token }}'
Click on Create Credential Type to save the credential type.
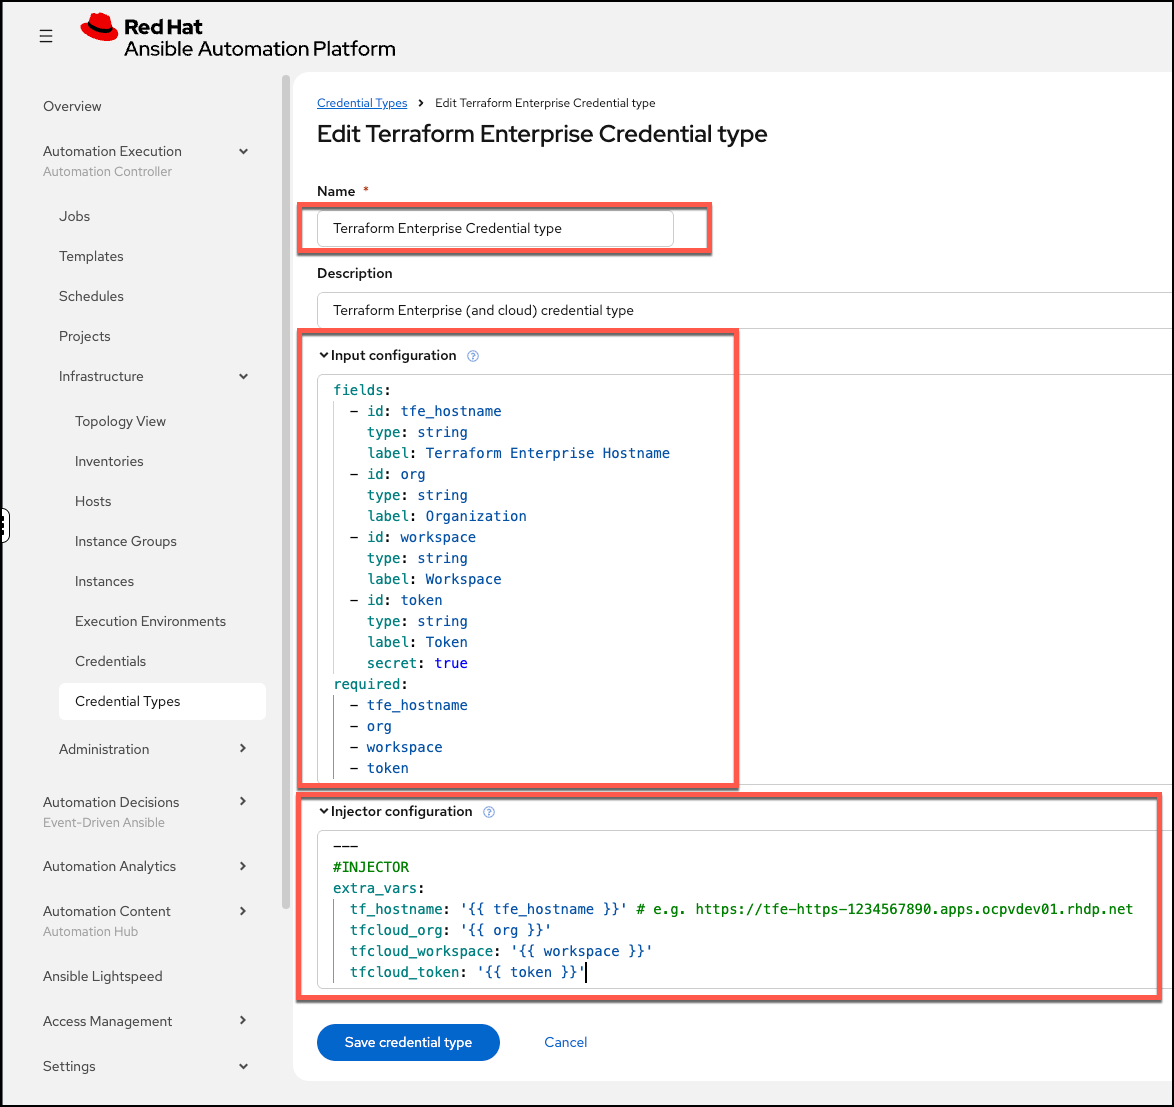
Create the Terraform Enterprise Credential in Ansible Automation Platform
Credentials are utilized for authentication when launching Jobs against machines, synchronizing with inventory sources, and importing project content from a version control system.
You will now create a credential in Ansible Automation Platform to use with the Terraform Enterprise credential type.
This task is done in Ansible Automation Platform.
Log in to the Ansible Automation Platform
Expand the Automation Execution menu on the left.
Automation Execution → Infrastructure → Credentials.
Click on the Credentials link and examine some of pre-configured credentials
| The keys are encrypted so no one, not even an administrator, can see the keys once placed in Ansible Automation Platfrom as a credential. |
-
Click on
+ Create credential -
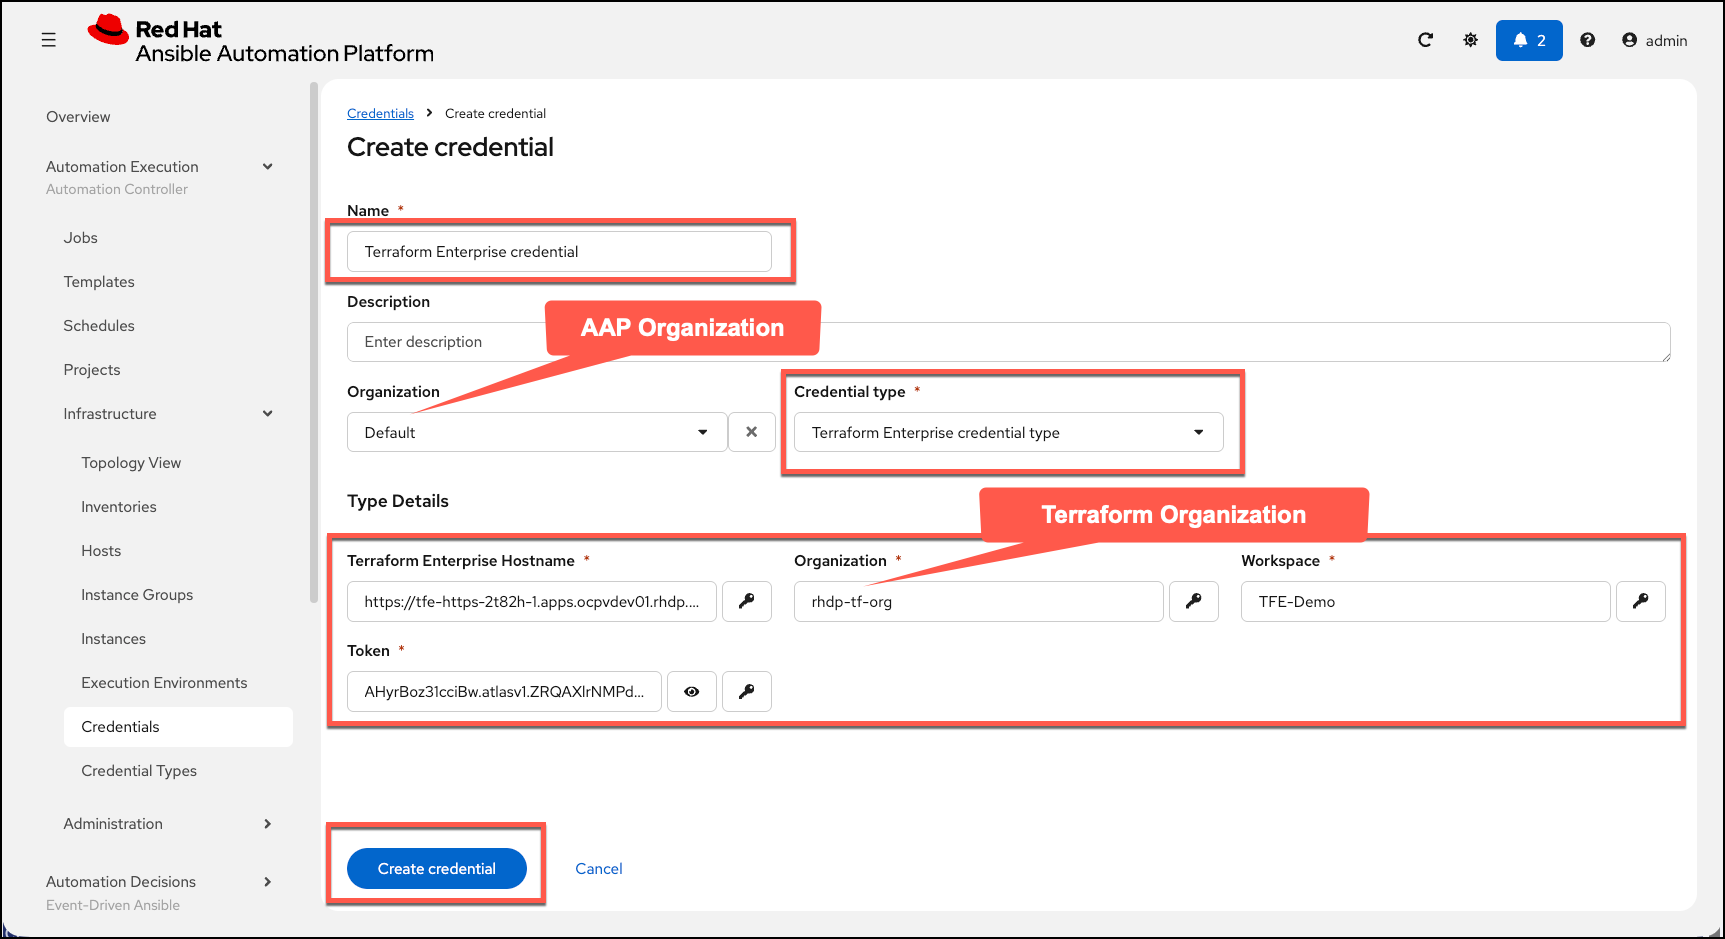
For the
NameenterTerraform Enterprise credential -
Expand the
Credential Typedrop-down, and selectTerraform Enterprise credential type(Start typing the name, OR click on theLoad morebutton to see the credential type) -
In the
Terraform Enterprise Hostnamesection enter<Your terraform hostname url> -
In the
Organization(Terraform Organization) section enterrhdp-tf-org -
In the
Workspacesection enterTFE-Demo -
In the
Tokensection enter the API token you generated earlier in Terraform Enterprise -
Click on
Create credentialto save the credential
| Field | Value |
|---|---|
Name |
Terraform Enterprise credential |
Credential Type |
Terraform Enterprise credential type (Start typing the name, OR click on the |
Terraform Enterprise Hostname |
https://tfe-https-my-guid.{domain} |
Organization (Terraform Organization) |
rhdp-tf-org |
Workspace |
TFE-Demo |
Token |
<Your terraform api token> # This is the API token you generated earlier in Terraform Enterprise |
Create a Terraform Inventory Source in Ansible Automation Platform
An Inventory is a collection of hosts against which automation jobs may be launched. Inventories. You can source your inventory data from external sources and cloud providers.
In Ansible Automation Platform, create the Terraform inventory source
-
Click on the
Ansible Automation Platformtab at the top of lab. (if not already) -
Expand the
Automation Executionmenu on the left.Automation Execution→Infrastructure→Inventories. -
Notice that there is an inventory that we’ve created for you called
Terraform Inventory. -
Click on this inventory, and then select the
Sourcestab. -
Click the
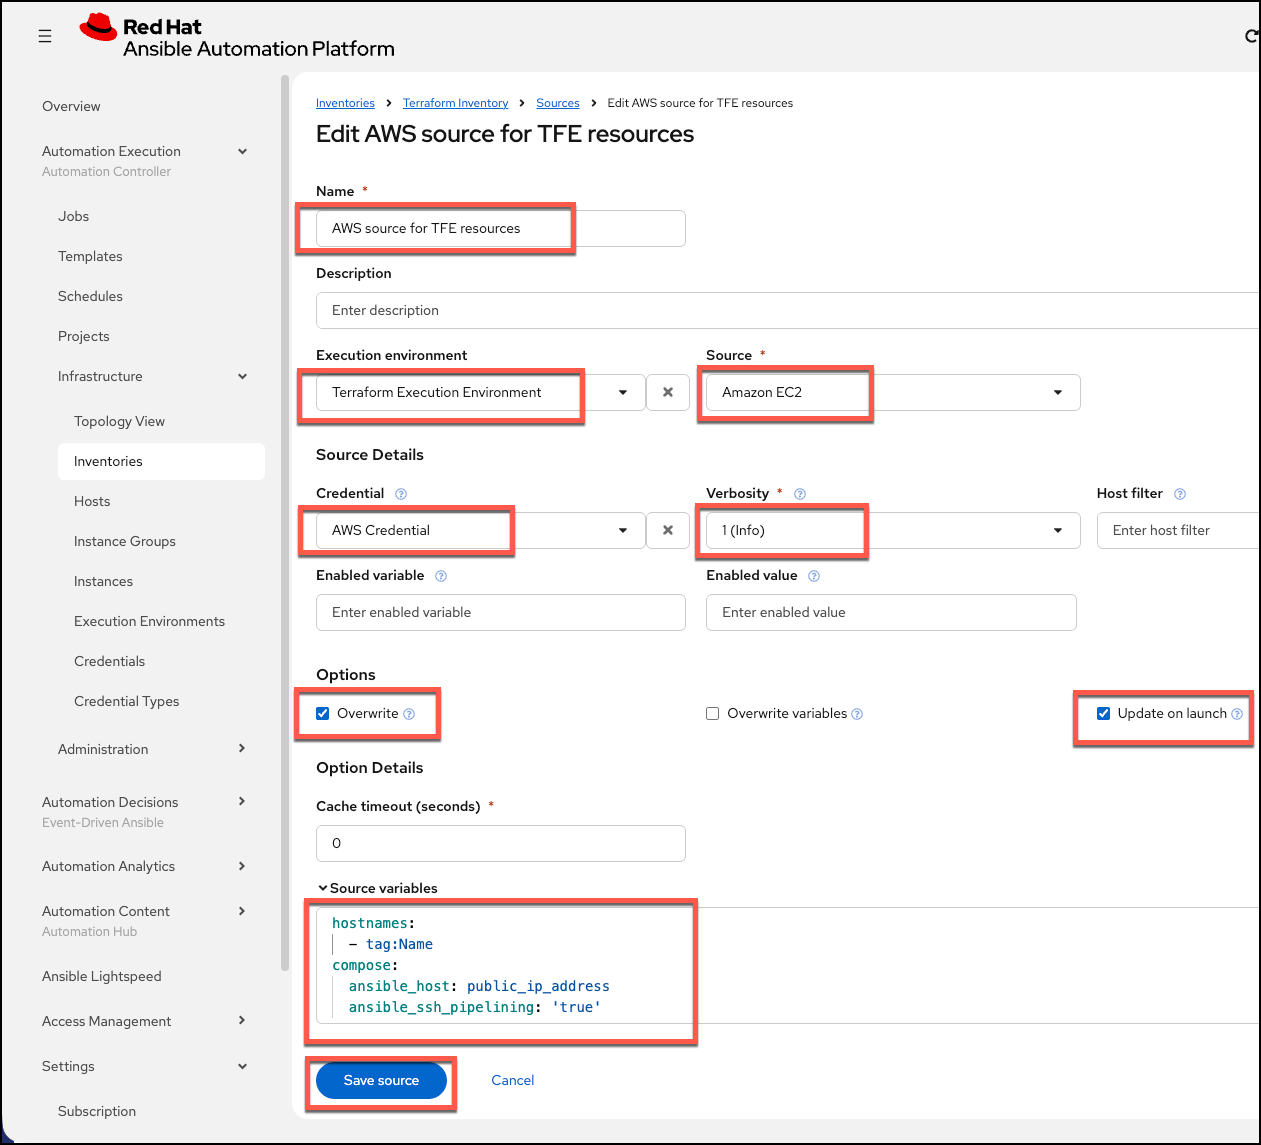
+ Create Sourceand then enter the following details.
| Field | Value |
|---|---|
Name |
AWS source for TFE resources |
Execution environment |
Terraform Execution Environment |
Source |
Amazon EC2 |
Credential |
AWS Credential |
Verbosity |
1 (Info) |
Overwrite |
Check |
Update on launch |
Check |
Cache timeout (seconds) |
0 |
ADD the following to the Source variables section
---
hostnames:
  - tag:Name
compose:
  ansible_host: public_ip_address
  ansible_ssh_pipelining: "true"
regions:
- us-east-2-
Scroll to the bottom Click the blue
Create sourcebutton to save the Inventory Source.
-
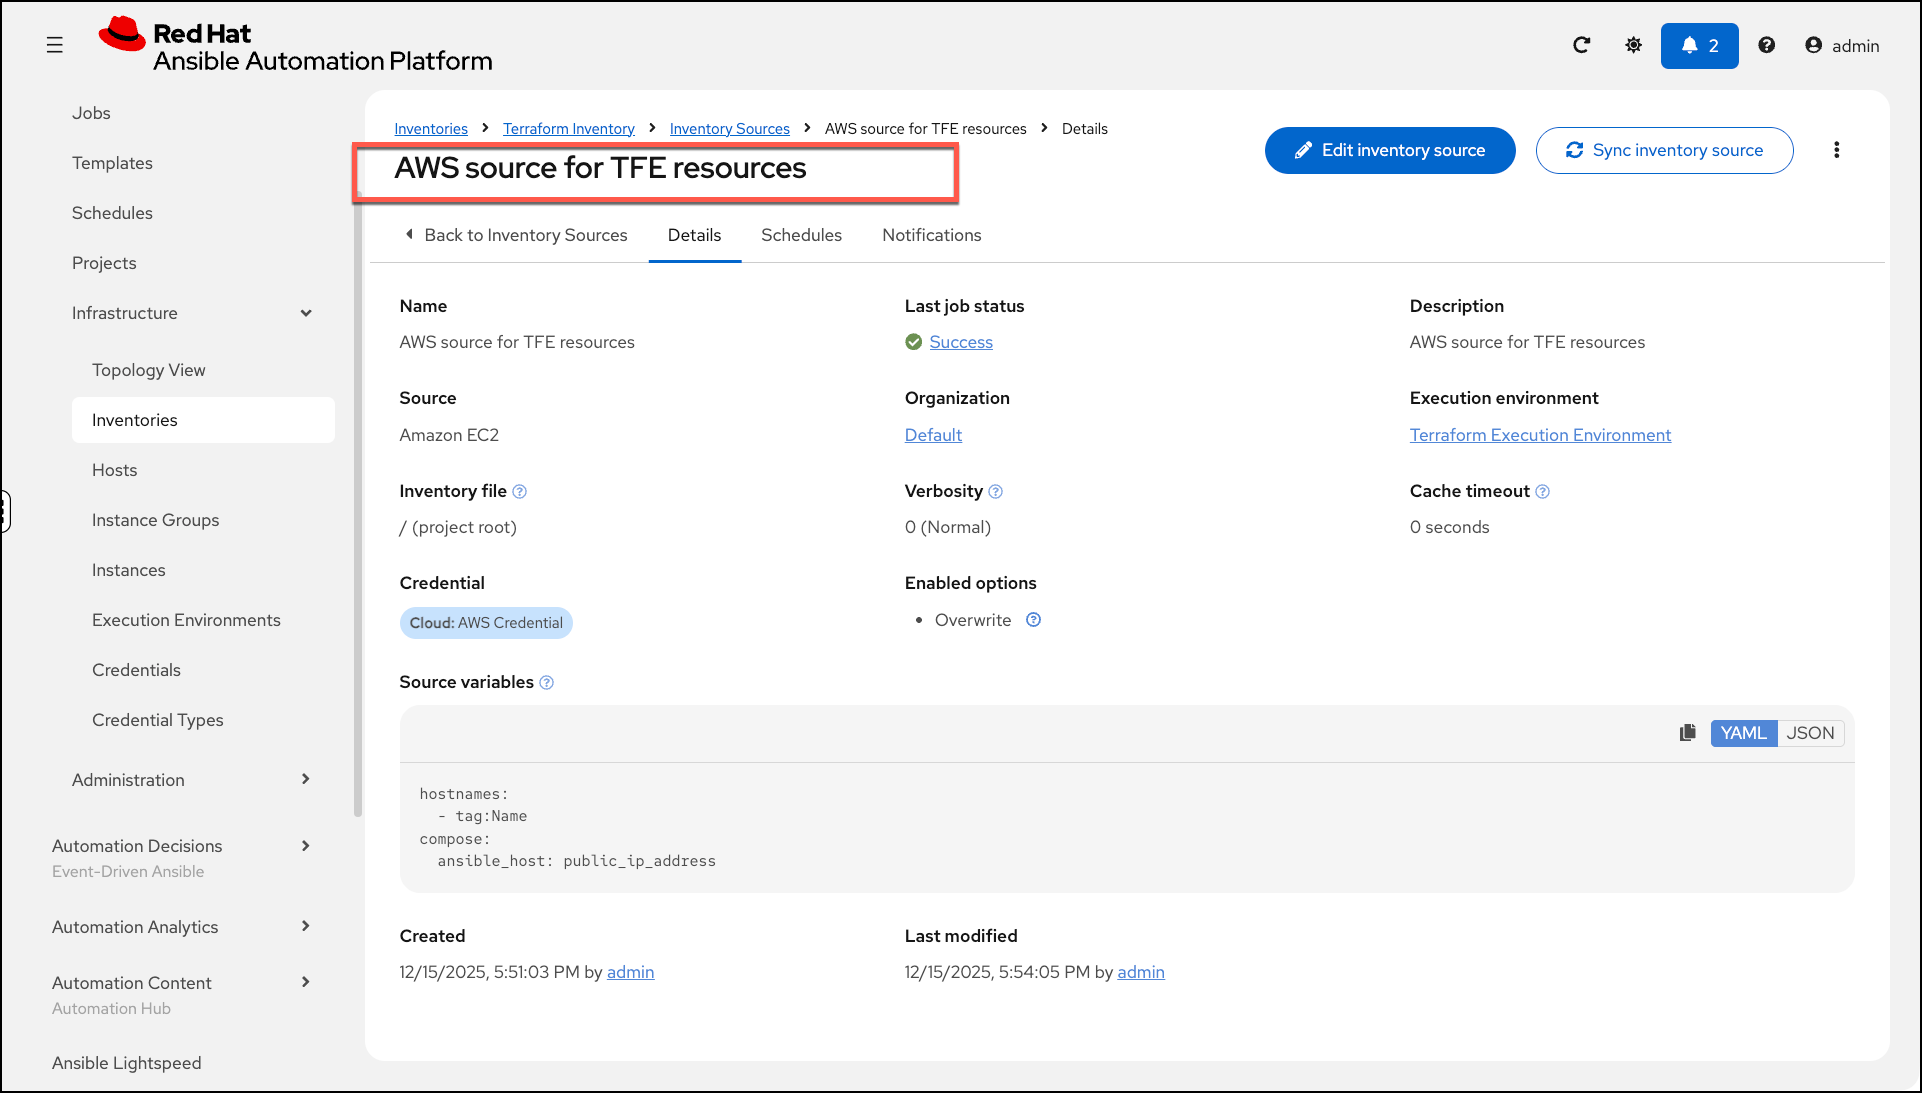
Click on the
Sync inventory sourcebutton in the top right corner of the screen to synchronize the inventory source. You should see a status ofSuccessshortly.
| This could take up to a minute as this is the first time we use the Execution Environment, and it needs to pull down the image from the registry. |
Create a Workflow Template to kick off a Terraform Enterprise PLAN and APPLY operation
In this Task we will create an Ansible Job Template that will kick off a Terrafrom project, and then create the Workflow Template that will kick off the Job Template, followed by synchronizing the inventory source, and then another job template installing Nginx on the new EC2 instances.
The Terraform project is a simple project that will leverage the AWS provider to create an EC2 instance in the AWS cloud account you are using.
| Please note that you can also do this in Azure and Google Cloud in the same way as you are here with AWS |
Create the Terraform Enterprise APPLY job template
Click on the Ansible Automation Platform tab at the top of lab.
(if not already) Expand the Automation Execution menu on the left.
Automation Execution → Templates → + Create template, then click on Create job template
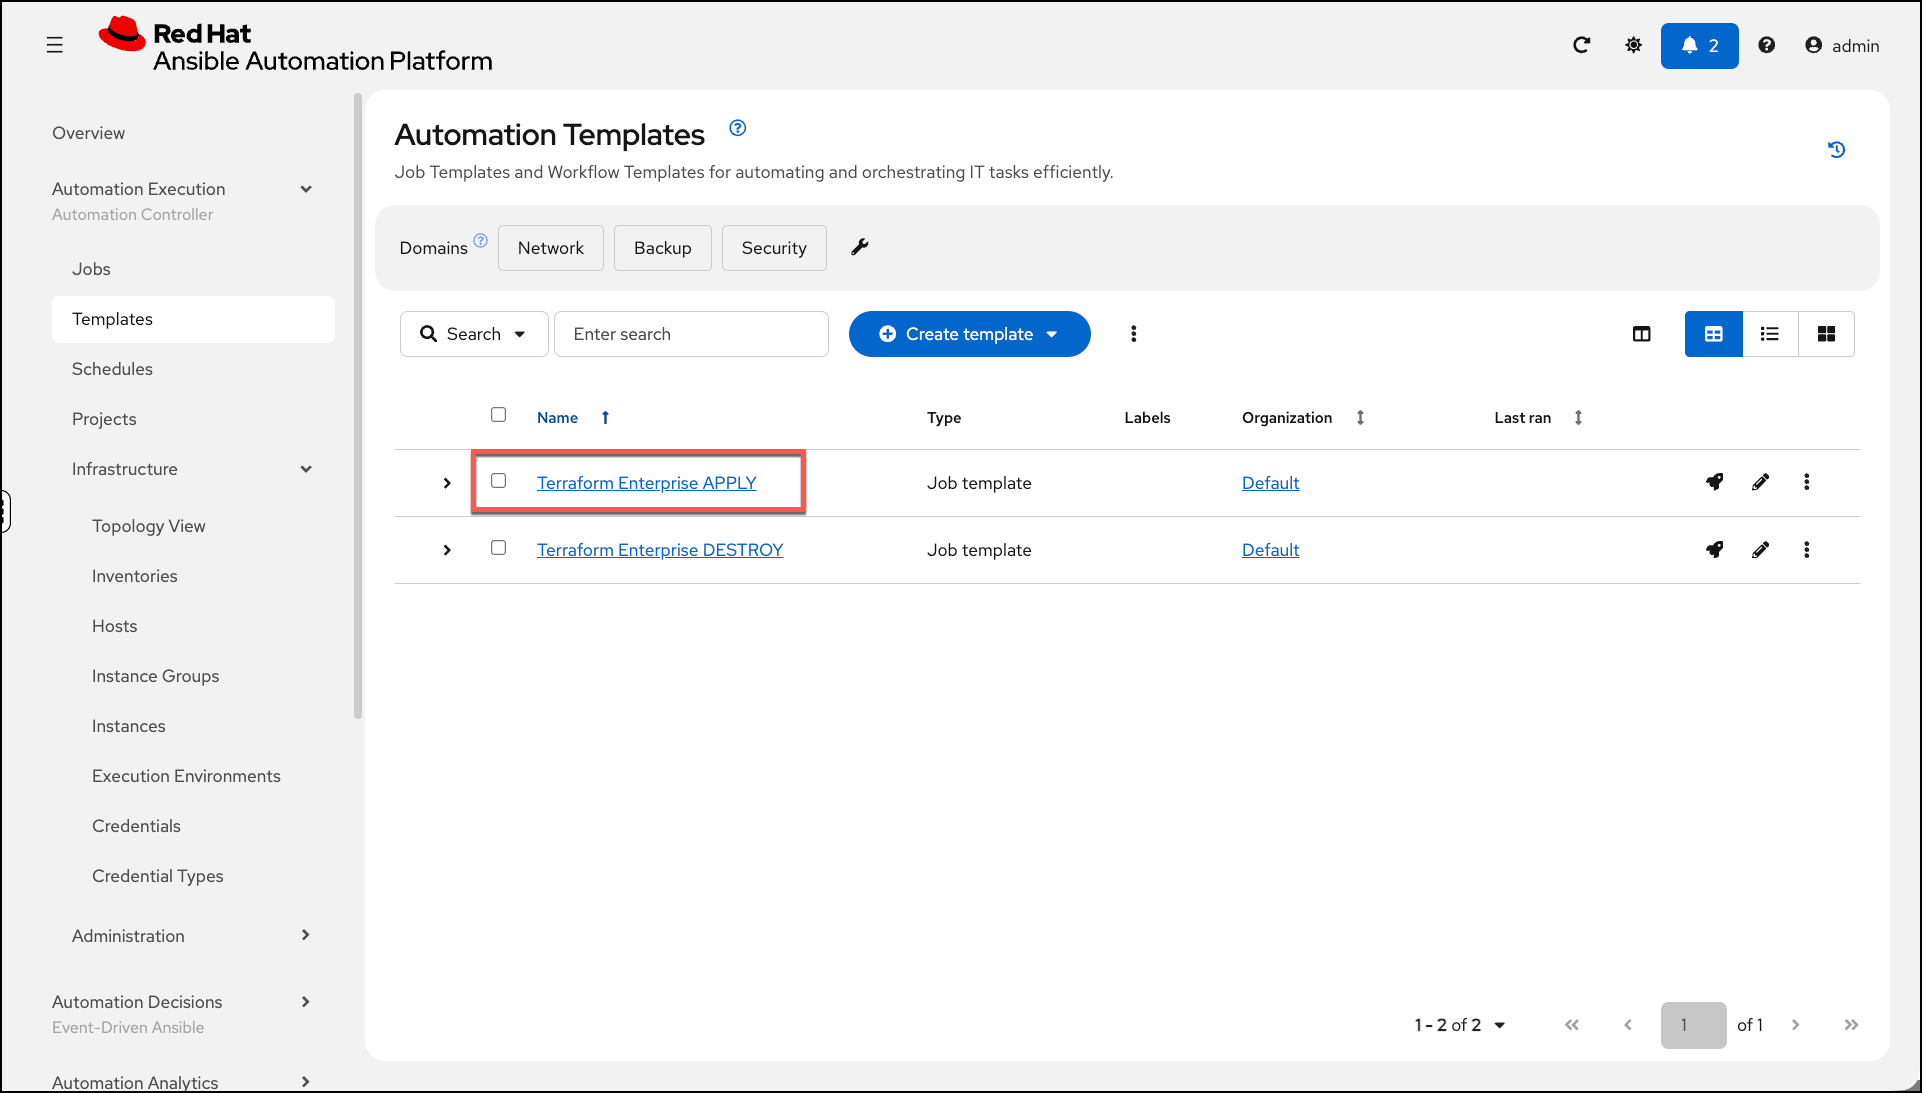
Fill out the following fields - Table below:
| Field | Value |
|---|---|
Name |
Terraform Enterprise APPLY |
Inventory |
Demo Inventory |
Project |
Terraform Demos Project |
Playbook |
playbooks/terraform_apply_plan.yml |
Execution environment |
Terraform Execution Environment |
Credentials |
Terraform Enterprise credential |
ADD the following to the Extra variables section
---
aws_region: us-east-2
aws_name_tag: tfevm
aws_instance_size: t3.micro
aws_instance_count: 1
aws_instance_public_key: ssh-ed25519 AAAAC3NzaC1lZDI1NTE5AAAAIAKzl1JGwZh92P1ABxIVHE52I2nJk+h7ED4B6GgbMXAl hmourad@hmourad-mac
Scroll to the bottom Click the blue Create Job Template button to save the job template.
Create the WF-Terraform Enterprise APPLY workflow template, and it’s nodes
-
Click on the
Ansible Automation Platformtab at the top of lab. (if not already) Expand theAutomation Executionmenu on the left.Automation Execution→Templates→+ Create template→ then selectCreate workflow job template
Fill out the following fields - Table below:
| Field | Value |
|---|---|
Name |
WF-Terraform Enterprise APPLY |
Organization |
Default |
Scroll to the bottom Click the blue Create Workflow Job Template button to save the Workflow.
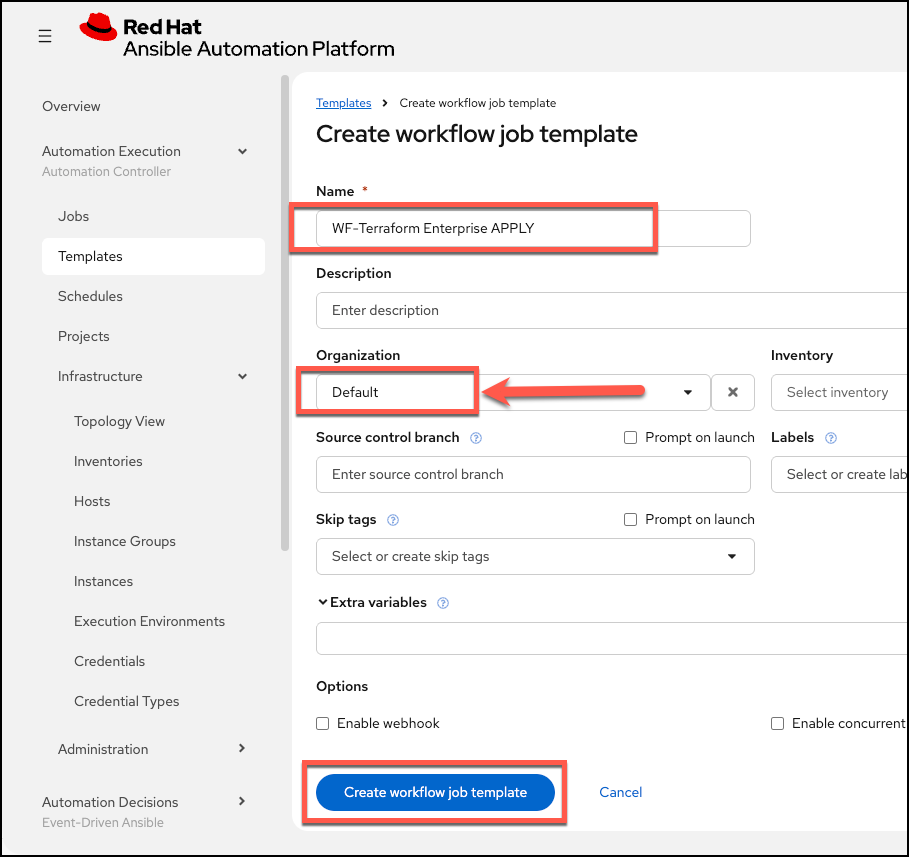
Create the nodes for the WF-Terraform Enterprise APPLY workflow template
-
Select
+ Add stepand then select theTerraform Enterprise APPLYjob template you created earlier, SelectNextto continue, and thenFinishto save the node.
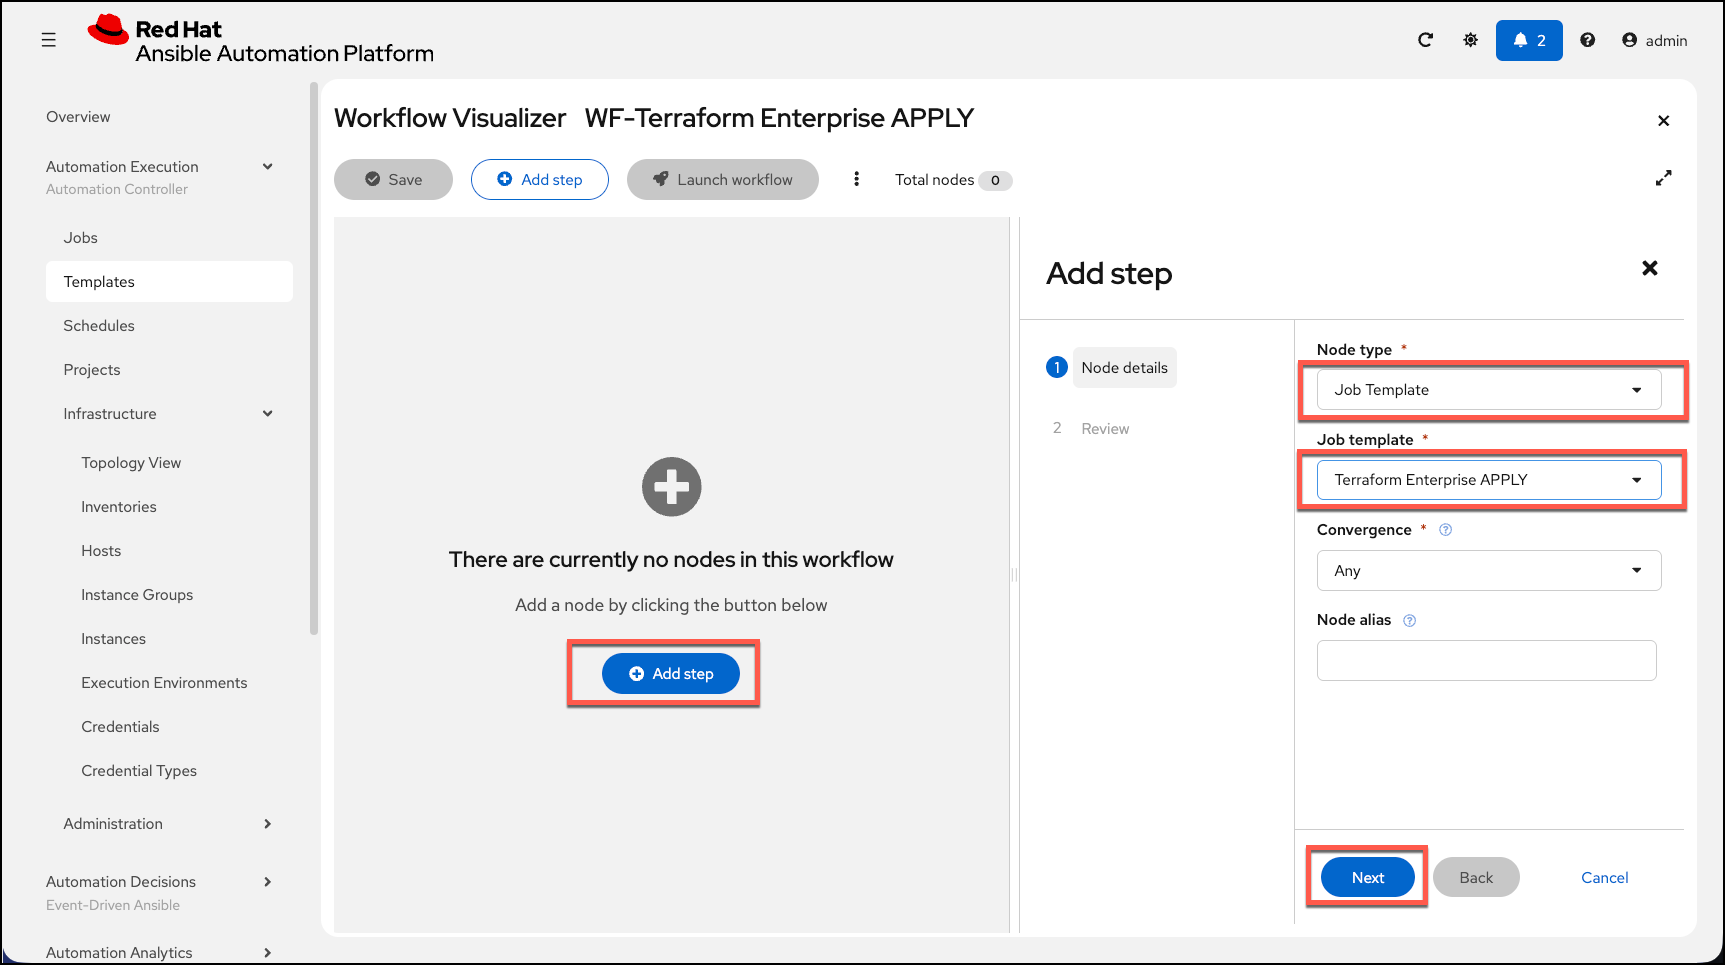
-
Click on the vertical ellipsis
…at the end of the node we just created, and then select+ Add step and link. -
For this next step
-
Change the
Node TypetoInventory Source Syncand select theAWS source for TFE resources. -
Change the
StatustoRun on Success.
-
-
Select
NextthenFinishto save this second step. This will synchronize the inventory source you created earlier.
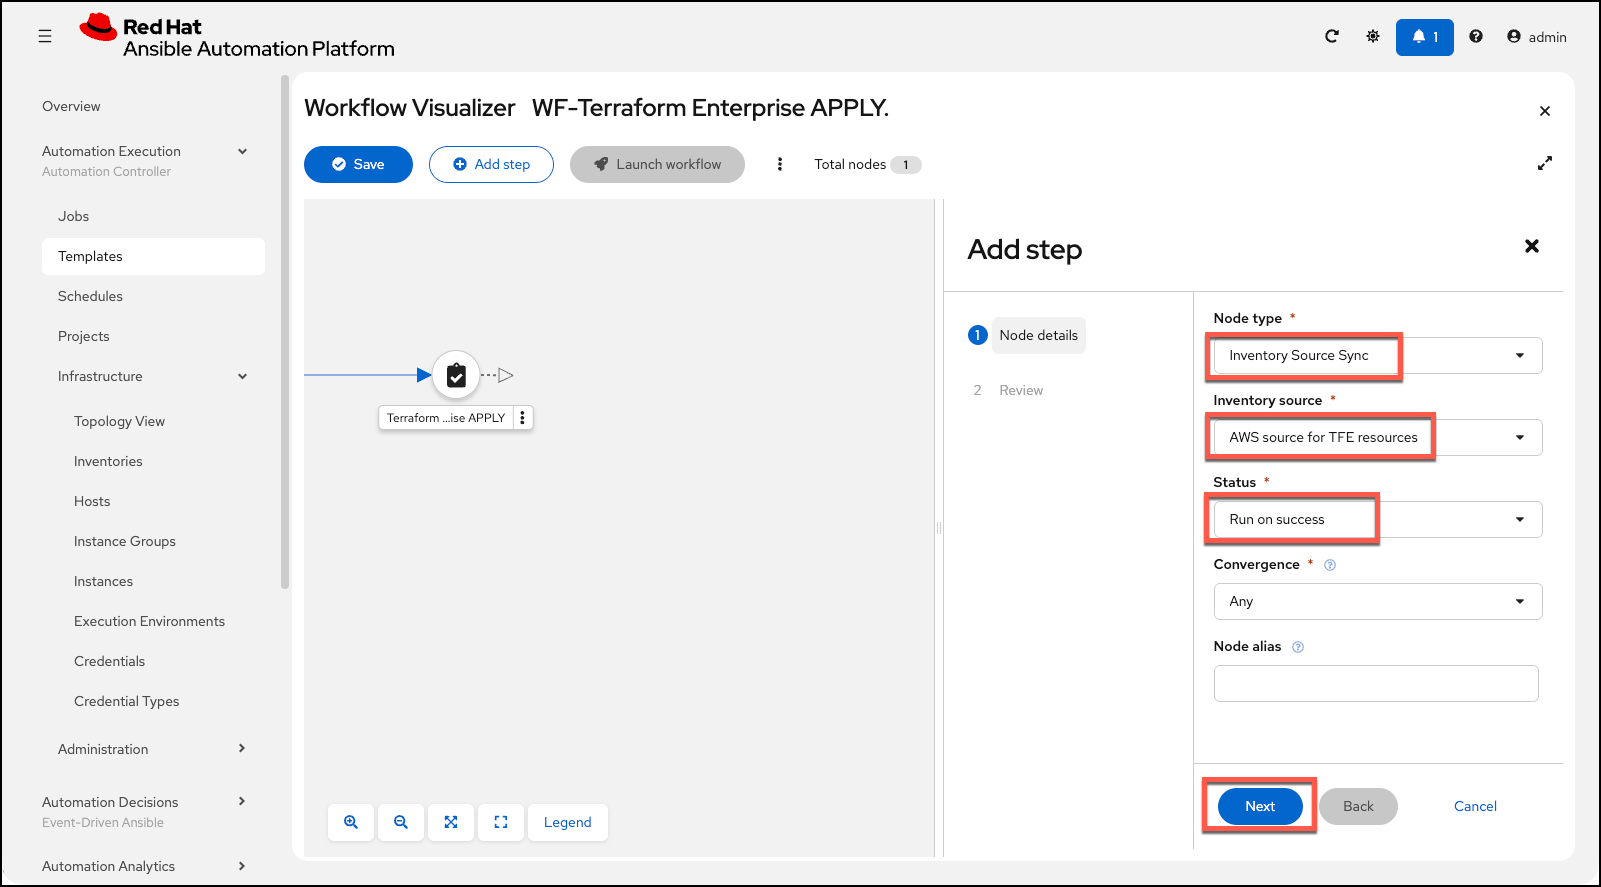
-
Click on the vertical ellipsis
…at the end of the node we just created, and then select+ Add step and link. -
For this next step
-
Keep the
Node TypetoJob Templateand select theInstall Nginx on RHELjob template. -
The
Install Nginx on RHELjob template is a job template that is already created for you in Ansible Automation Platform. It is used to install Nginx on the RHEL hosts. -
Change the
StatustoRun on Success.
-
-
Select
NextthenFinishto save this step. This will install Nginx on the RHEL hosts.
Click on the Save button to save the workflow template.
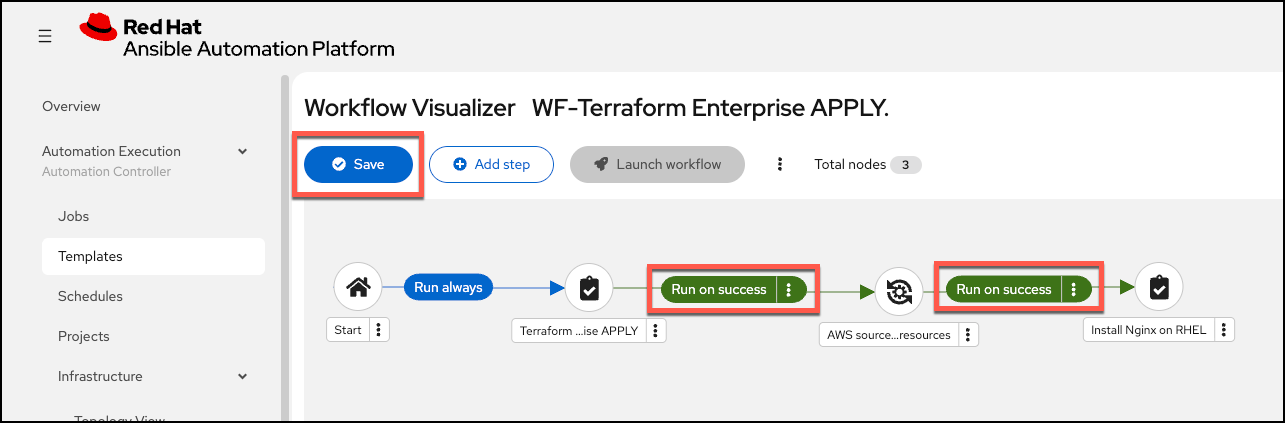
Launch the WF-Terraform Enterprise APPLY workflow template
Launch the WF-Terraform Enterprise APPLY workflow template by selecting it and clicking on 🚀 Launch template, or by simply clicking the Rocket Launcher 🚀 icon. The job status will show Running momentarily.
-
Observe the output of the Workflow Template run. You will see the nodes running and the workflow visualizer showing the flow of the workflow.
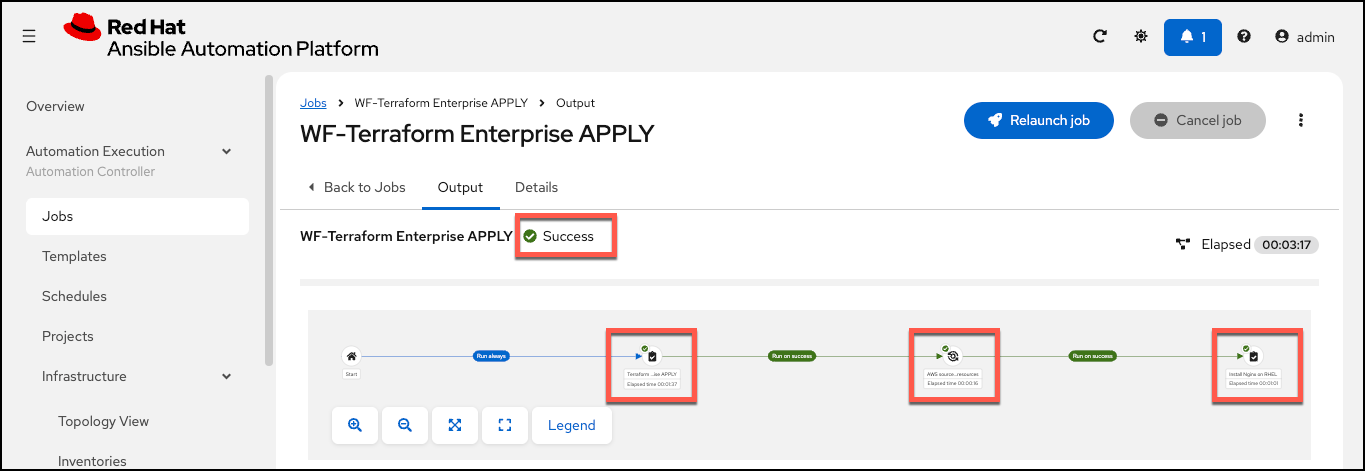
-
Quickly switch to the
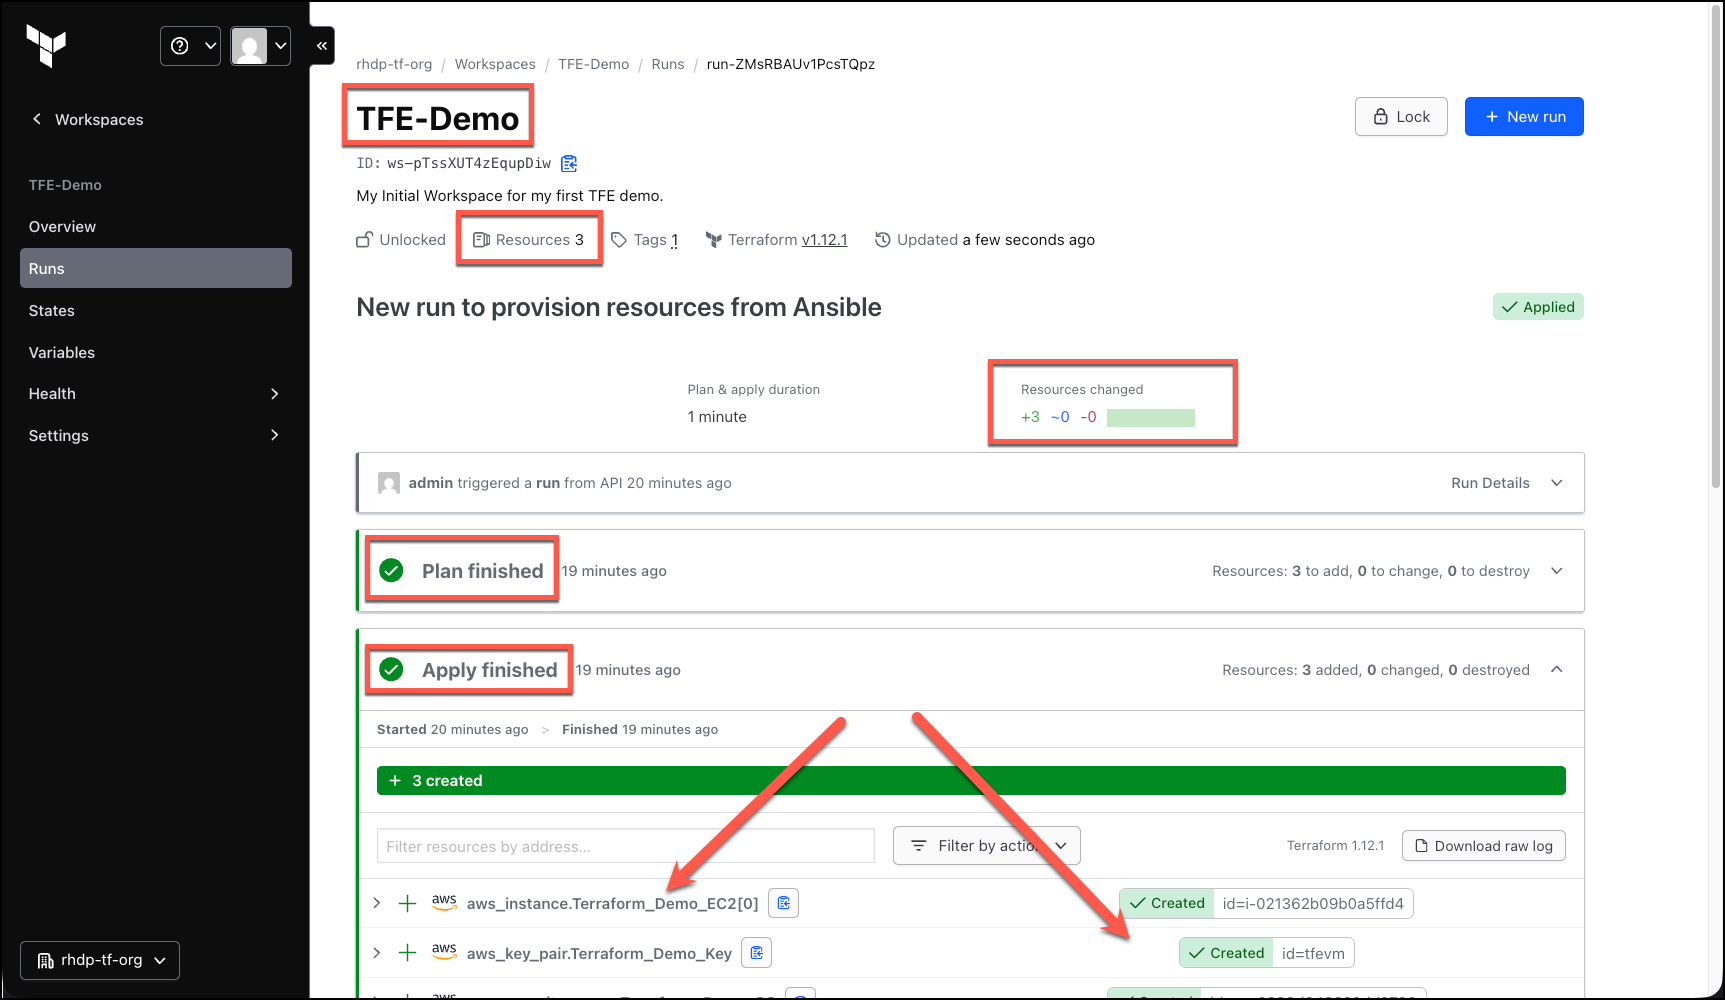
Terraform Enterprisetab in your lab and observe theplanand then theapplybeing performed. -
If you were still at the Adding of an API Token screen, click on the
Terraform EnterpriseLOGO in the top left. Select therhdp-tf-orgorganization, then select theTFE-Demoworkspace, and then click on theRunsmenu option on the left. -
Click on the
Runmenu option on the left. You will see theplanand then theapplybeing performed. Also notice the resouce count in the Terraform Enterprise console.
This shows that Ansible Automation Platform was able to trigger the Terraform Enterprise plan and apply operations successfully. Great Job!
Validate the Nginx installation
Please make sure that the Ansible Workflow completed successfully before proceeding. AAP has to have completed the entire workflow, including the Install Nginx on RHEL job template successfully before proceeding to validate the Nginx installation.
-
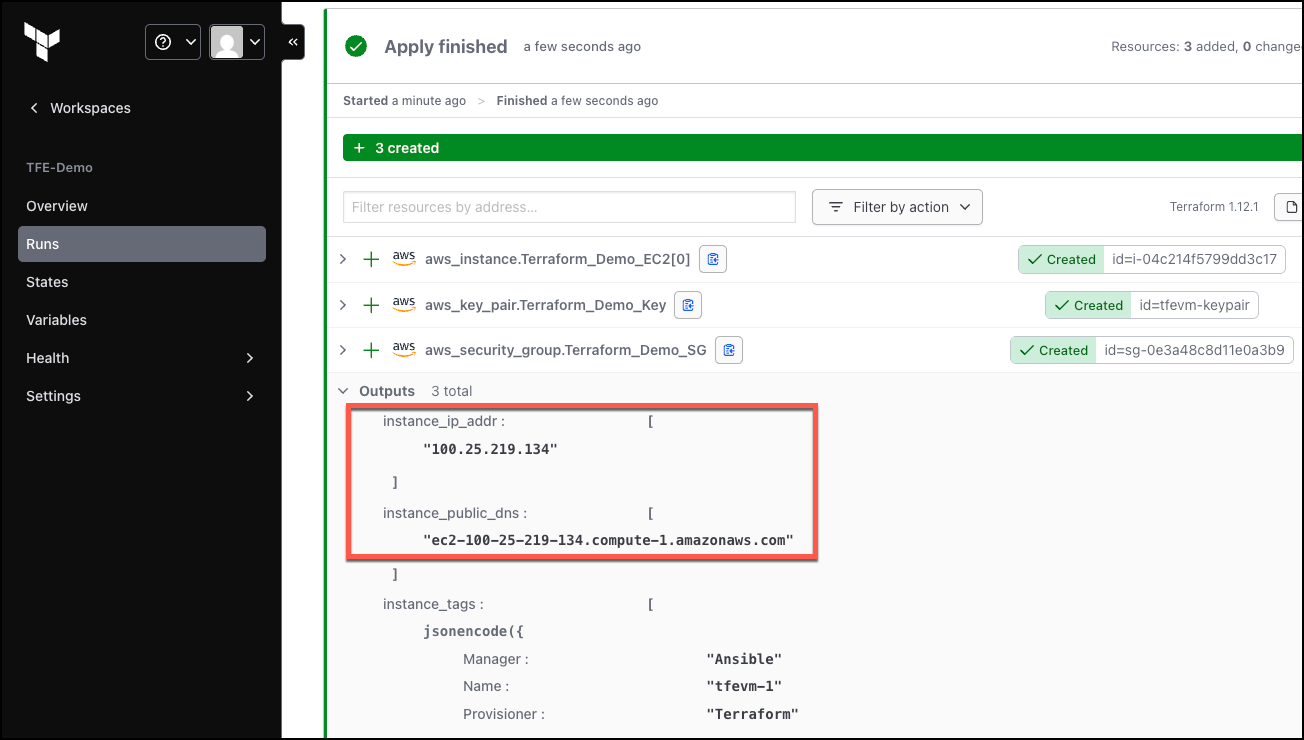
From the Terraform Enterprise console, in the job run output you will see the resources that were created by Terraform.
-
From here get the public IP address (or DNS name) of the EC2 instance that was created by Terraform.
-
You can also get the public IP address from the Ansible Automation Platform → Inventory → Terraform Inventory → Hosts. Click on the host and then click on the
Detailstab.
-
Open a browser tab and navigate to the public IP address of the EC2 instance that was created by Terraform.
-
Use
httpas the protocol. -
If prompted that the site doesn’t support a secure connection, please click on the
Continue to sitebutton.
You will see the following page:

Inspect the Terraform Inventory in Ansible Automation Platform
-
Switch back to the Ansible Automation Platform browser tab.
-
Expand the
Automation Executionmenu on the left.Automation Execution→Infrastructure→Inventories. -
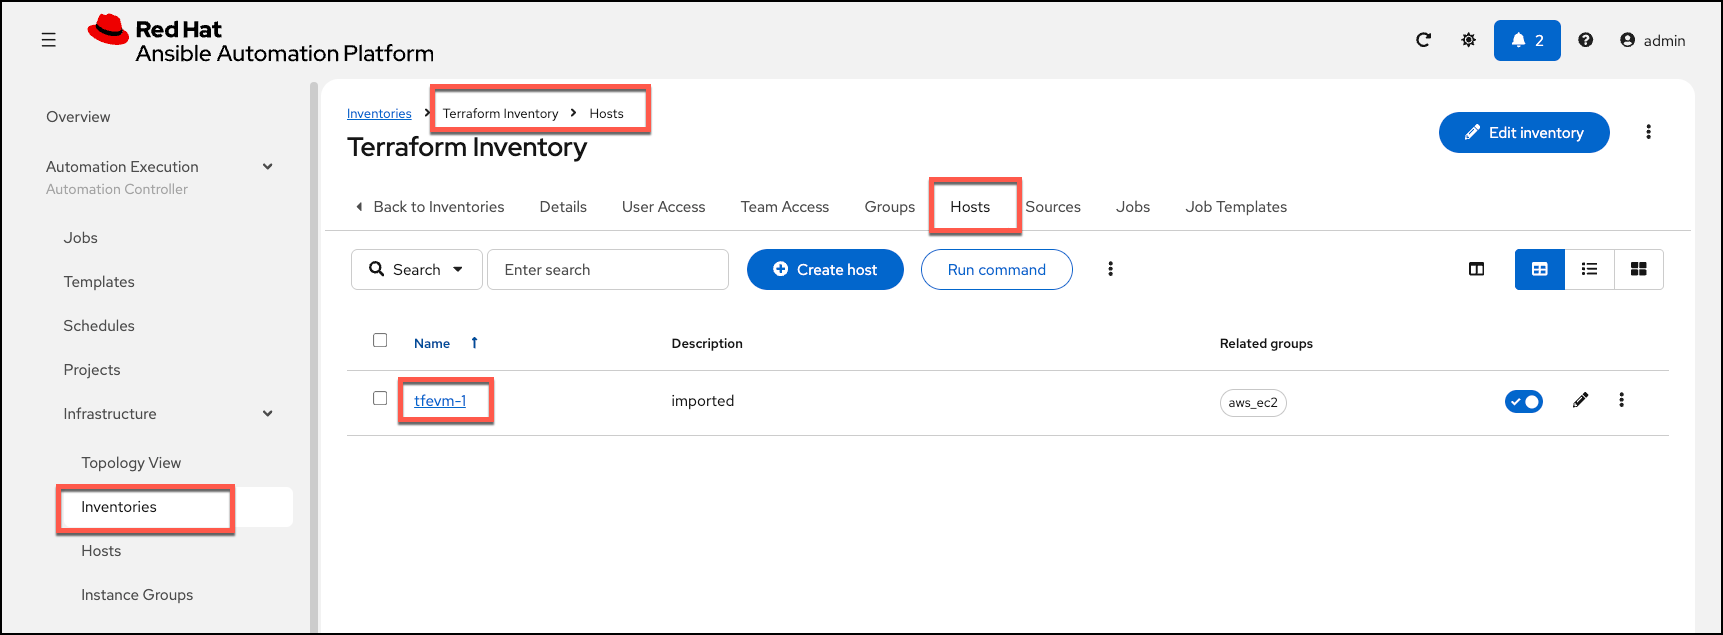
Select the
Terraform Inventory, and then click on theHostsmenu. Notice that there is a new host that was created by Terraform and is now part of your Ansible inventory, and hence can be used for further automation operations.
Create the WF-Terraform Enterprise DESTROY workflow template, and its nodes
In this task we will create a Workflow template to trigger a Terraform Enterprise DESTROY operation to destroy the previously created resources also followed up by and inventory sync to udpate the resources from the Ansible inventory.
-
Click on the
Ansible Automation Platformtab at the top of lab.
Create the Terraform Enterprise DESTROY job template
Start by creating the another job template to trigger a Terraform Entperprise destroy operation to destroy the created resources.
-
Click on the
Ansible Automation Platformtab at the top of lab. (if not already) -
Expand the
Automation Executionmenu on the left.Automation Execution→Templates. -
Now click on
+ Create Templatethen clickCreate job template
Fill out the following fields - Table below:
| Field | Value |
|---|---|
Name |
Terraform Enterprise DESTROY |
Inventory |
Demo Inventory |
Project |
Terraform Demos Project |
Playbook |
playbooks/terraform_destroy_plan.yml |
Execution environment |
Terraform Execution Environment |
Credentials |
Terraform Enterprise credential |
Scroll to the bottom Click the blue Create Job Template button to save the job template.
Create the Terraform Enterprise DESTROY Workflow workflow template, and it’s nodes
-
Click on the
Ansible Automation Platformtab at the top of lab.
(if not already) Expand the Automation Execution menu on the left.
-
Automation Execution→Templates→+Create template. -
Now click on
+ Create Workflow job template
Fill out the following fields - Table below:
| Field | Value |
|---|---|
Name |
WF-Terraform Enterprise DESTROY |
Organization |
Default |
Scroll to the bottom Click the blue Create Workflow Job Template button to save the Workflow.
Create the nodes for the WF-Terraform Enterprise DESTROY workflow template
-
Select
+ Add stepand then select theTerraform Enterprise DESTROYjob template you created earlier, SelectNextto continue, and thenFinishto save the node. -
Click on the vertical ellipsis
…at the end of the node we just created, and then select+ Add step and link. -
For this next step
-
Change the
Node TypetoInventory Source Syncand select theAWS source for TFE resources. -
Change the
StatustoRun on Success.
-
-
Select
NextthenFinishto save this second step. This will synchronize the inventory source you created earlier.
Click on the Save button to save the workflow template.
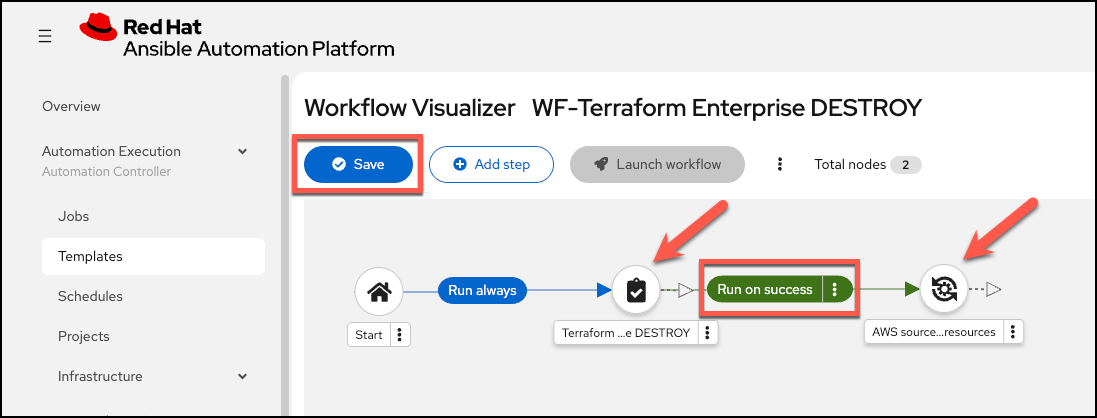
Launch the WF-Terraform Enterprise DESTROY workflow template
Launch the Terraform Enterprise DESTROY Workflow template by selecting it and clicking on 🚀 Launch template, or by simply clicking the Rocket Launcher 🚀 icon. The job status will show Running momentarily.
-
Observe the output of the Workflow Template run. You will see the nodes running and the workflow visualizer showing the flow of the workflow.
-
Quickly switch to the
Terraform Enterprisetab in your lab and observe thedestroybeing performed. Also notice the resouce count in the Terraform Enterprise console. You will see the resource count should be 0.
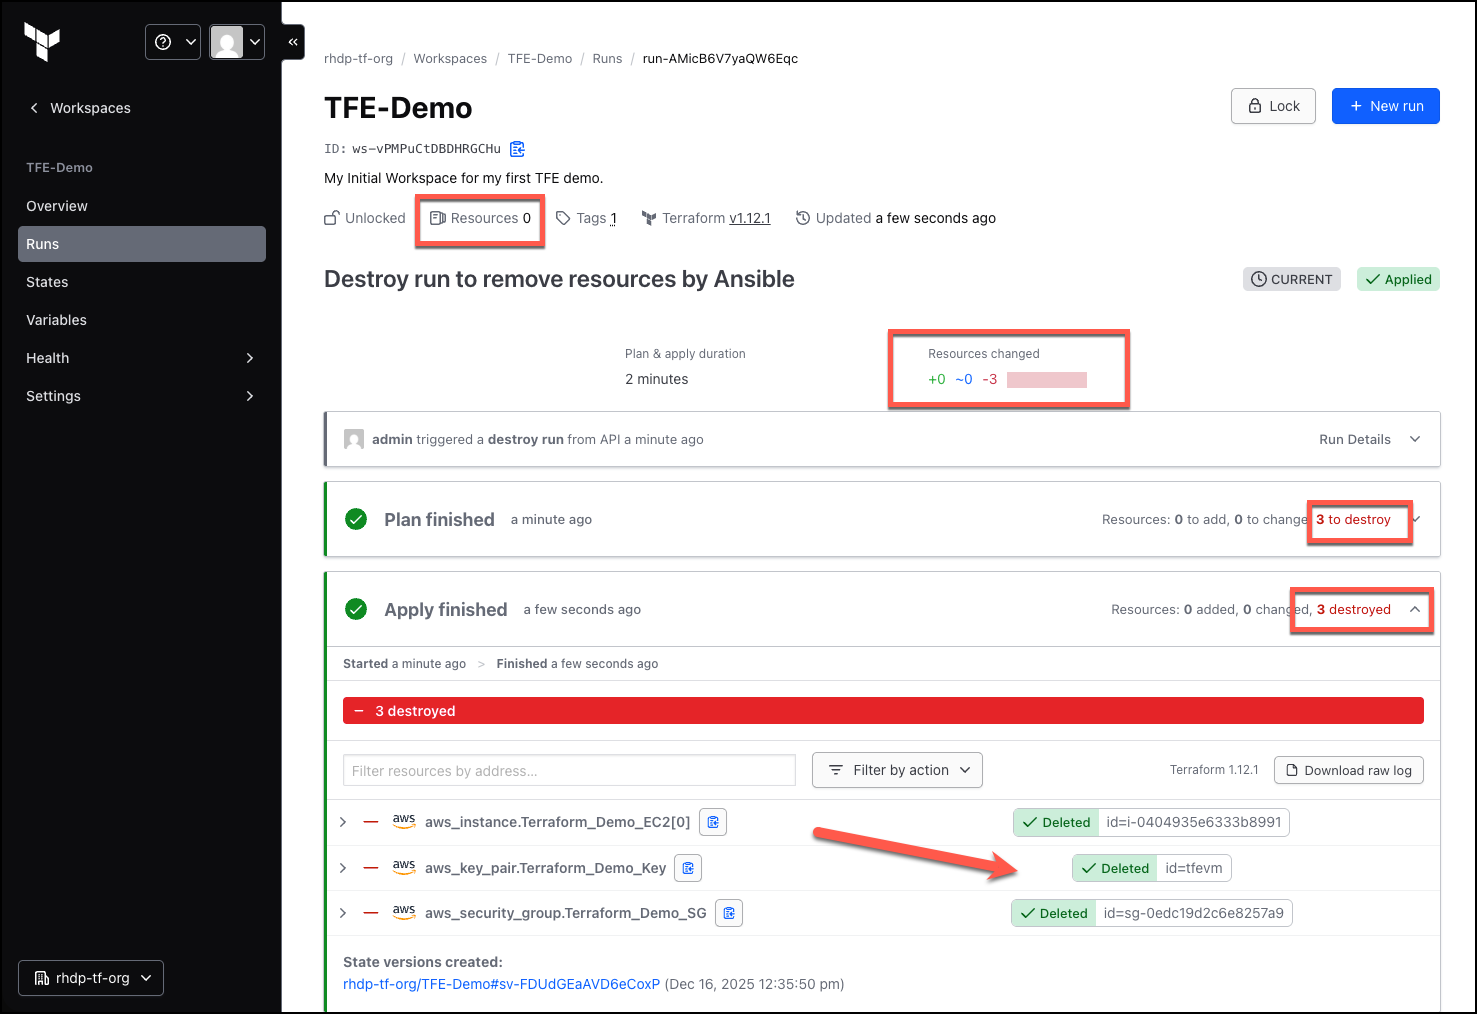
-
Observe the resources that were destroyed by Terraform in Ansible Automation Platform → Inventory → Terraform Inventory → Hosts.
-
Here you will see that the host has been removed from the inventory and the resources have been destroyed.
-
SUMMARY
-
In this lab section you created an configured AAP and Terraform Enterprise to work together.
-
You created Workflow templates in Ansible Automation Platform that kick off Terraform Enterprise to provision cloud resources, and then Ansible Automation Platform performed further automation operations on the resources.
-
You created a Workflow template to destroy the resources created by Terraform.
| Even though this lab is focused on Terraform Enterprise and Ansible Automation Platform, you can also use HCP Terraform (also known as Terraform Cloud) and Ansible Automation Platform together in the EXACT SAME WAY! |
This work further enhances the BETTER TOGETHER STORY!, and additionally providing more options and choice for Automators and Infrastructure operators!