Template and InstanceType Management
Introduction
Pre-configured Red Hat virtual machine templates are listed in the Virtualization → Templates page. These templates are available for different versions of Red Hat Enterprise Linux, Fedora, CentOS, Microsoft Windows Desktop, and Microsoft Windows Server editions. Each Red Hat virtual machine template is preconfigured with an operating system image, the default settings for the operating system, the flavor (CPU and memory), and the workload type (server).
The Templates page displays four types of virtual machine templates:
-
Red Hat Supported templates are fully supported by Red Hat.
-
User Supported templates are Red Hat Supported templates that were cloned and created by users.
-
Red Hat Provided templates have limited support from Red Hat.
-
User Provided templates are Red Hat Provided templates that were cloned and created by users.
Prepare for the lab
The VM you are about to create is a bit larger than previous VMs. To ensure that your environment has enough resources stop all other running VMs.
-
Navigate to Virtualization → Virtualmachines
-
Make sure you select All Projects to see all VMs in the environment.
-
If any VMs are showing a status of Running click the three dots to the right and select Stop.
Now all VMs should be in Stopped state.
Clone and Customize a Template
By default pre-configured templates provided by Red Hat OpenShift Virtualization cannot be customized. However you can clone a template and make adjustments to it for your particular workload in order to make it easier to request specific types of virtual machines for specific workloads. In this section of the lab we are going to do just this, by creating a template that will provide a database server on demand for our end users.
-
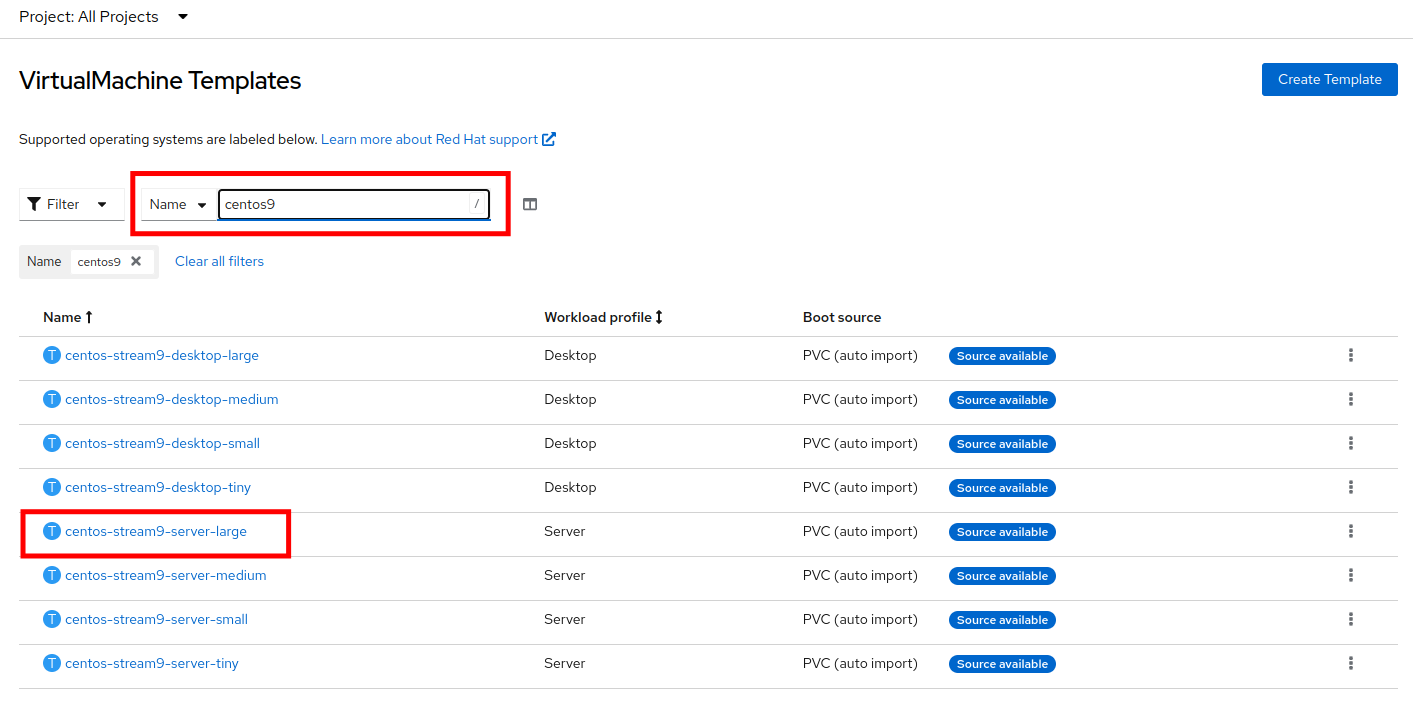
To begin, navigate to Virtualization → Templates and select All projects

-
In the search bar type in centos9 and in the list of templates that appear find the template for centos-stream9-server-large.
-
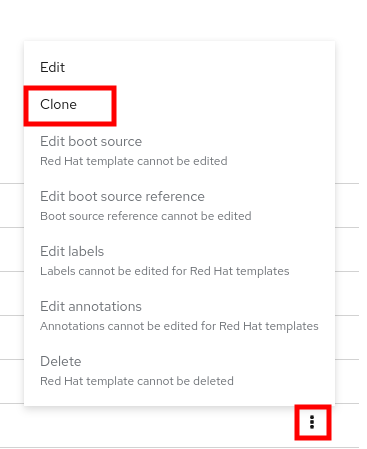
Select the three-dot menu to the far right, and click on the option to Clone from the menu that pops out.
-
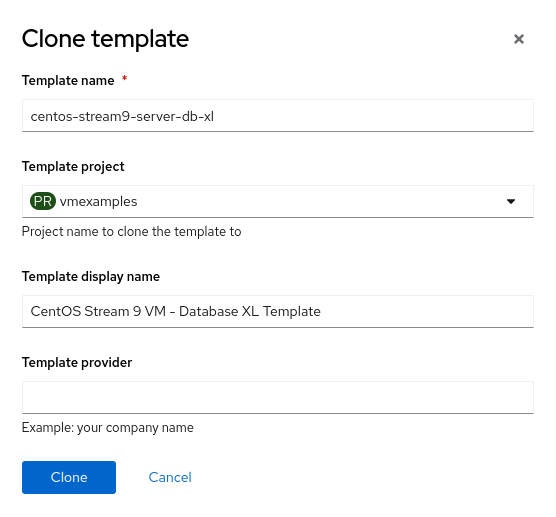
A new menu called Clone template will appear, fill in the the following values, and when finished click on the Clone button.
-
Template name: centos-stream9-server-db-xl
-
Template project: vmexamples
-
Template display name: CentOS Stream 9 VM - Database XL Template
-
-
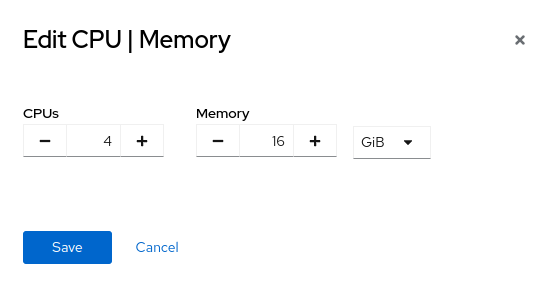
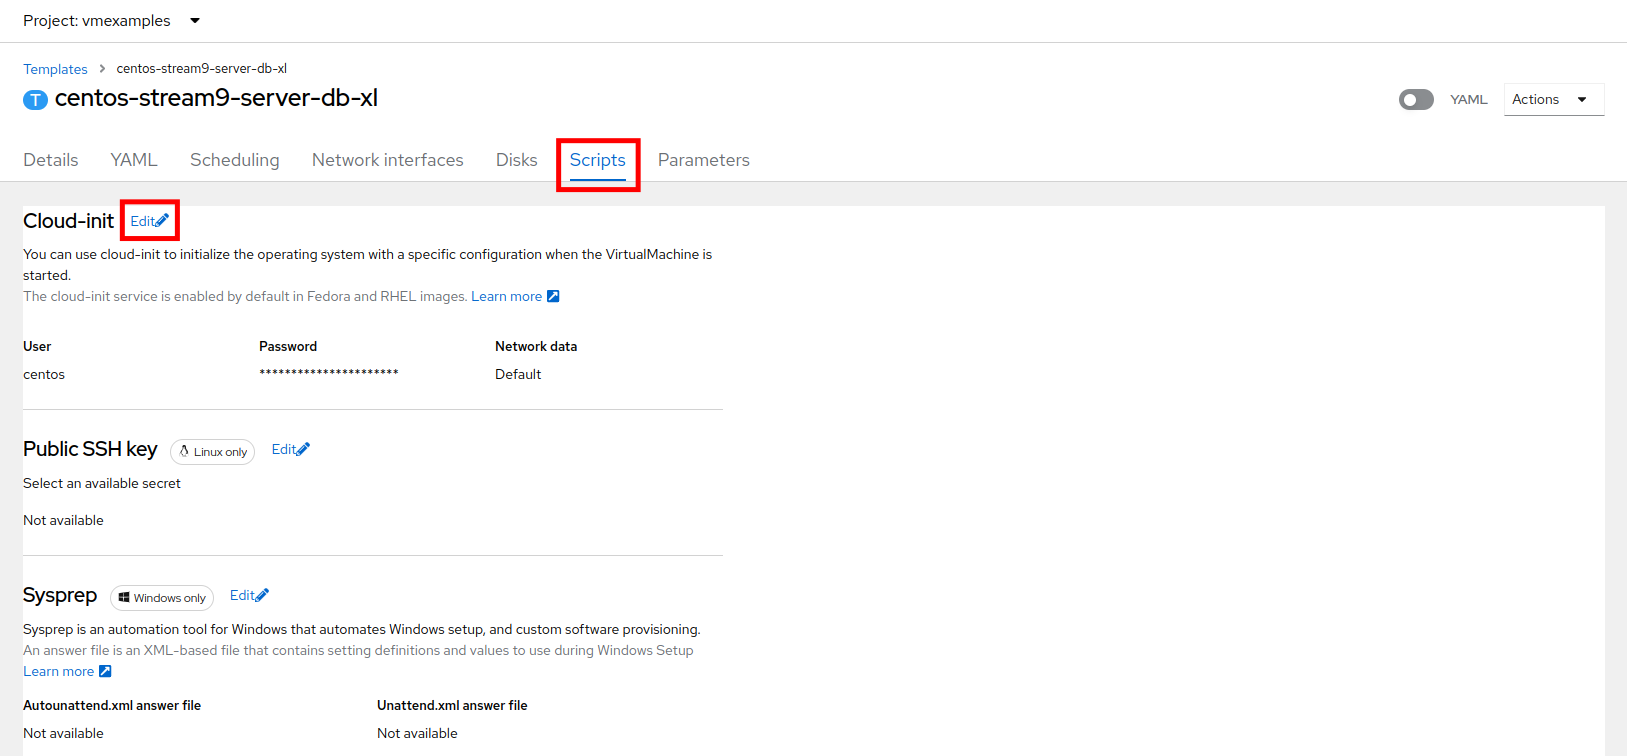
This will take you to the Details page for the template where we will be able to customize some options. Start by finding the CPU and Memory near the bottom of the page, and click on the pencil icon to edit it.

-
A new window will pop out where you can edit the amount of CPU and Memory. For our XL template set the value of CPUs to 4, and Memory to 16 GiB, and click the Save button.
-
Next click on the Scripts tab at the top, and in the section called Cloud-init click the Edit button.
-
When the Cloud-init dialog opens, click the radio button to Configure via: Script then replace the YAML with the following YAML snippet.
userData: |-
  #cloud-config
  user: centos
  password: ${CLOUD_USER_PASSWORD}
  chpasswd: { expire: False }
  packages:
  - mariadb-server
  runcmd:
  - systemctl enable mariadb
  - systemctl start mariadb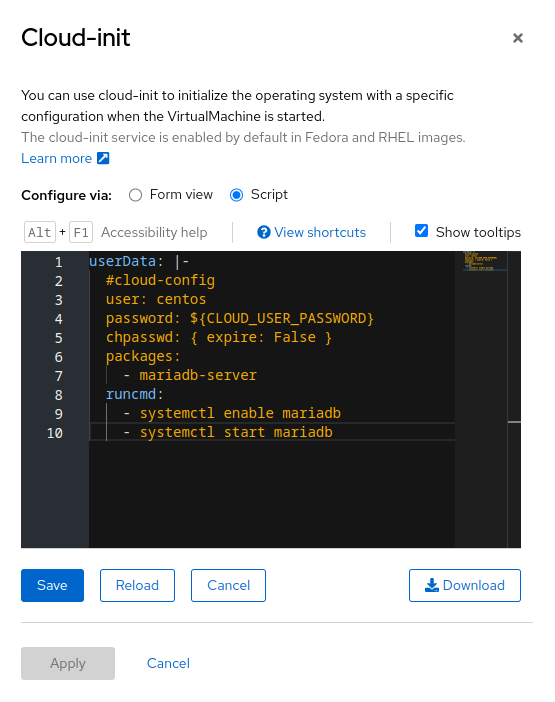
-
Click the Save button, followed by the Apply button.
-
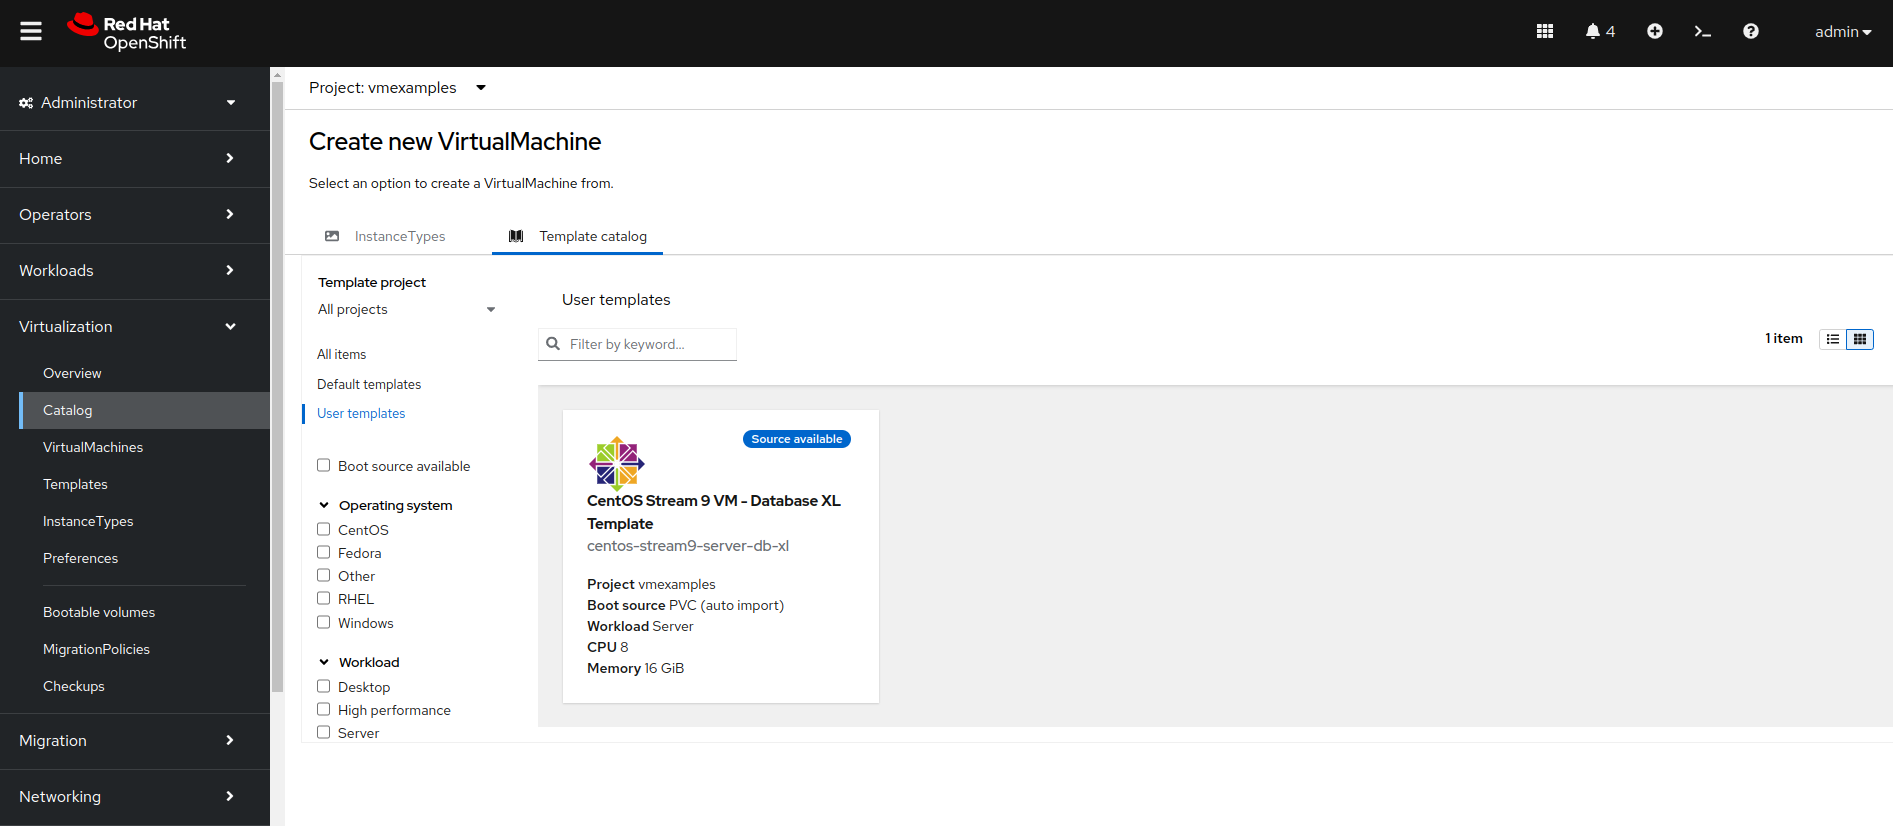
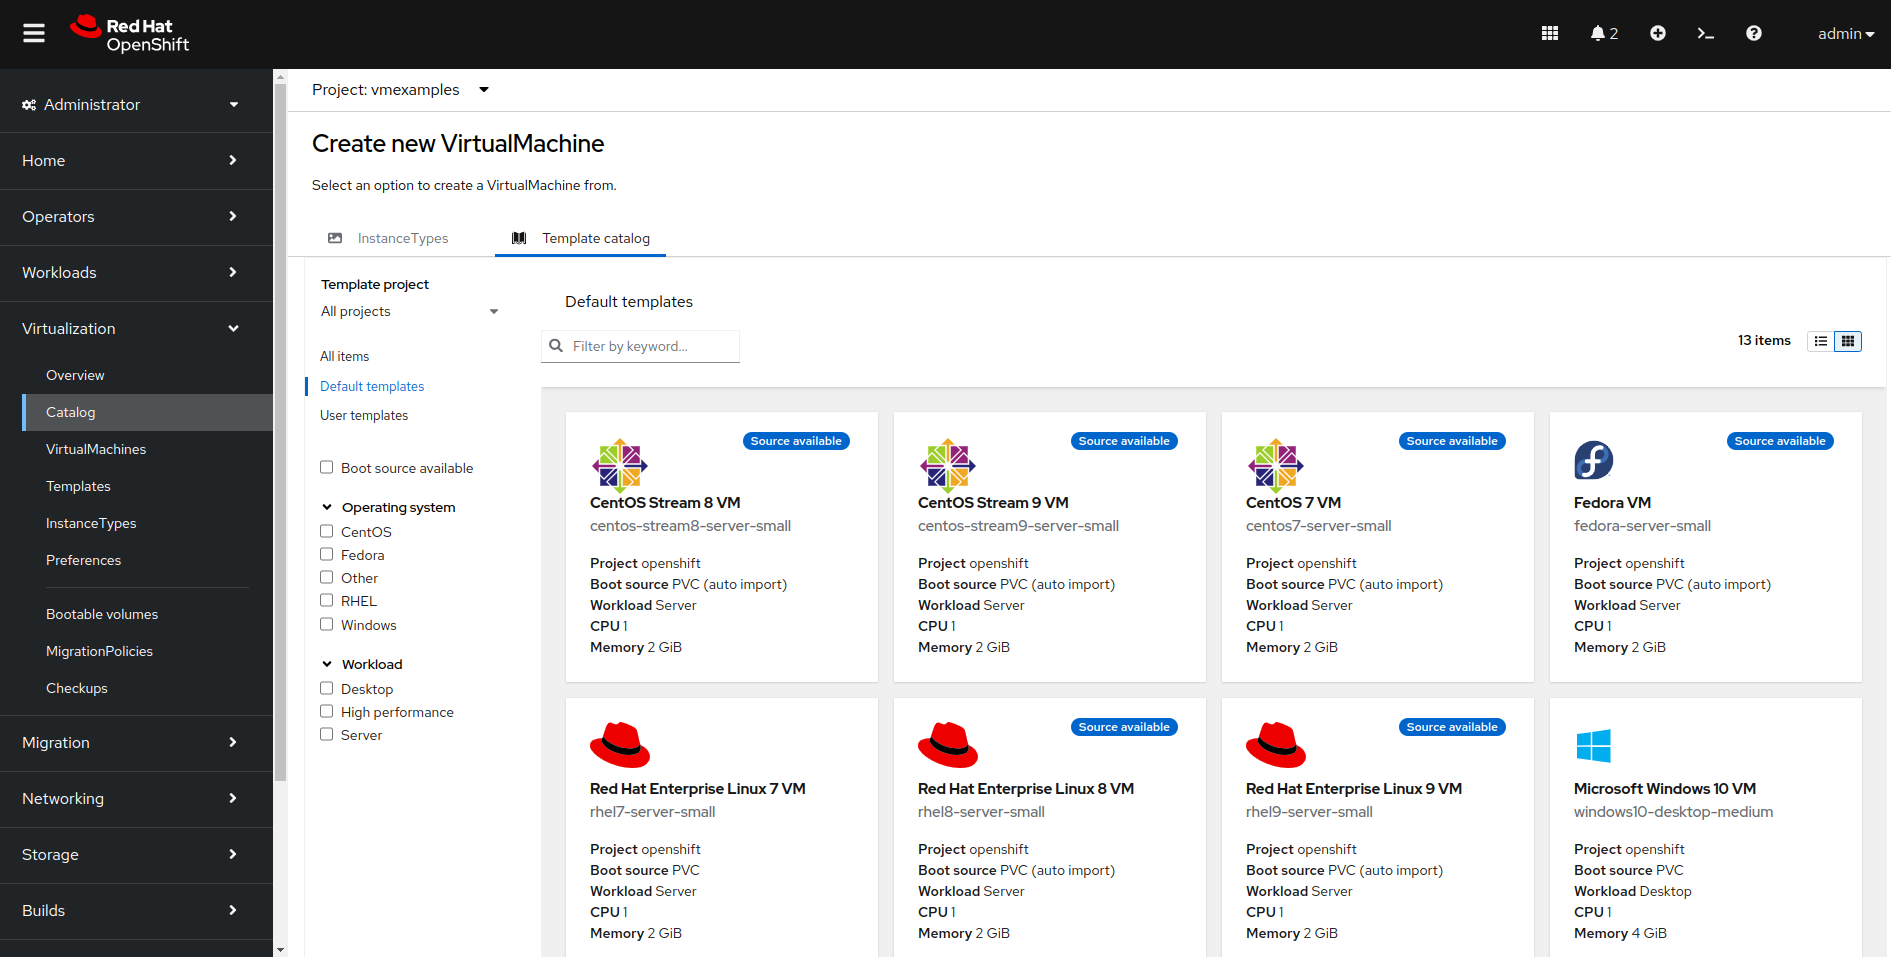
Now click on the Virtualization → Catalog menu on the left, select the Template catalog option and click on User templates. You should see our created template available as a tile.
-
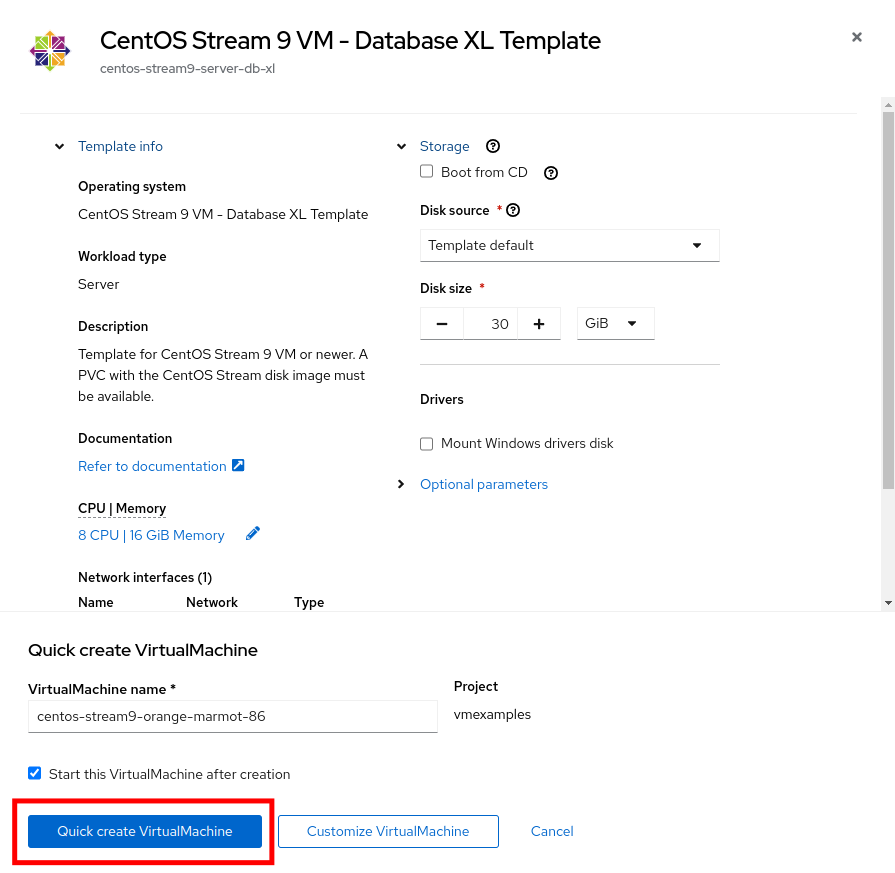
Click on the tile and you will be prompted with the VM startup screen. Click the Quick create VirtualMachine button.
-
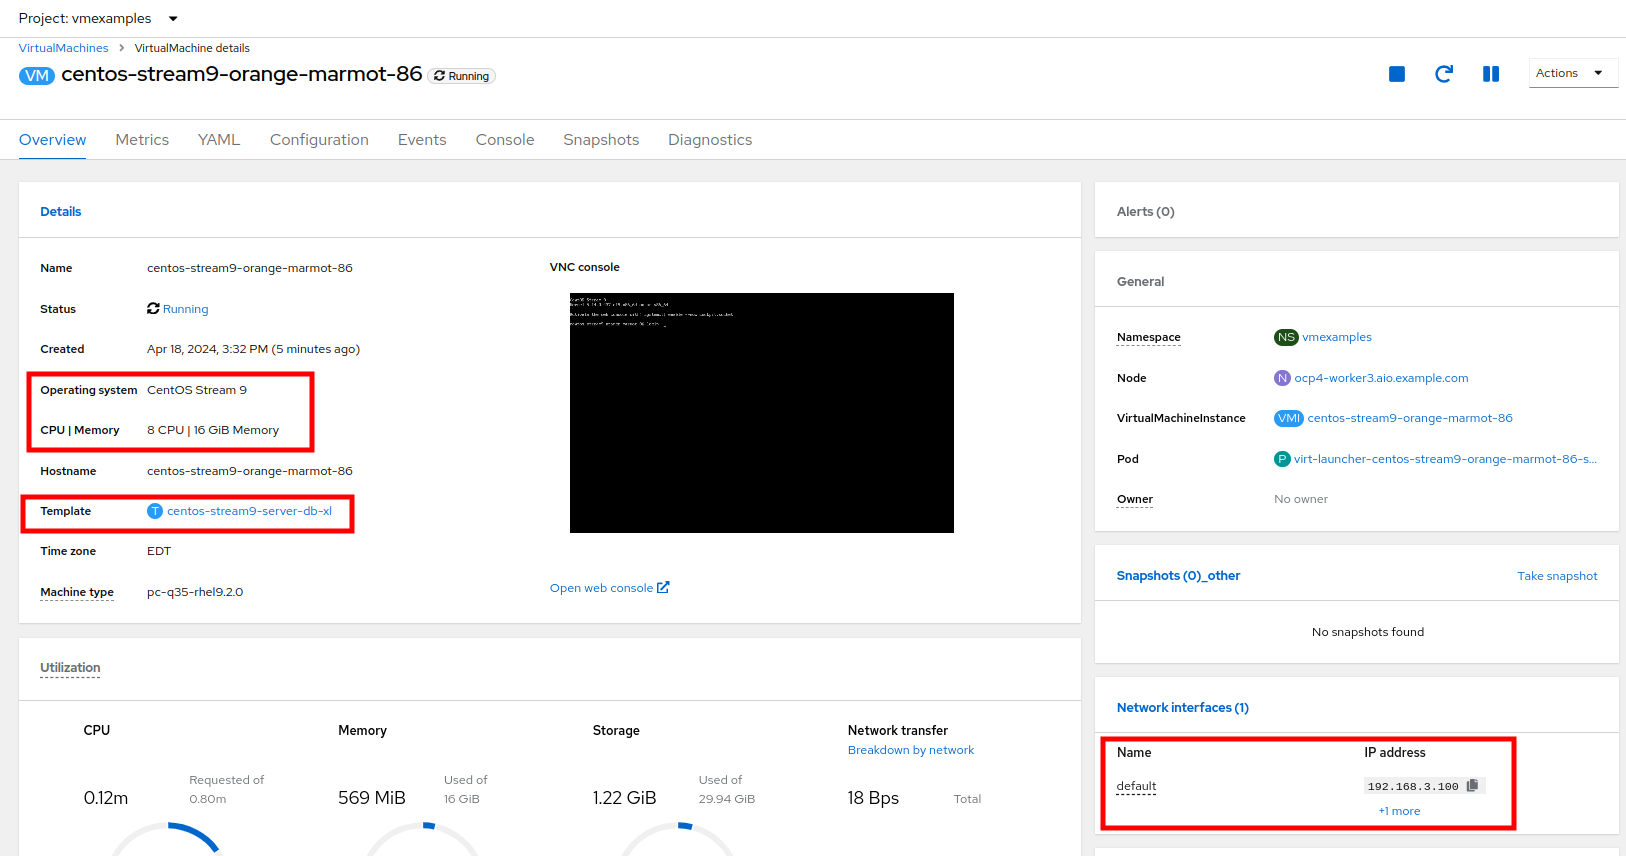
When the virtual machine boots you can see on the Overview page that it was created from our template, and has the system resources we defined, and is already attached to the Pod network with an assigned IP address.
-
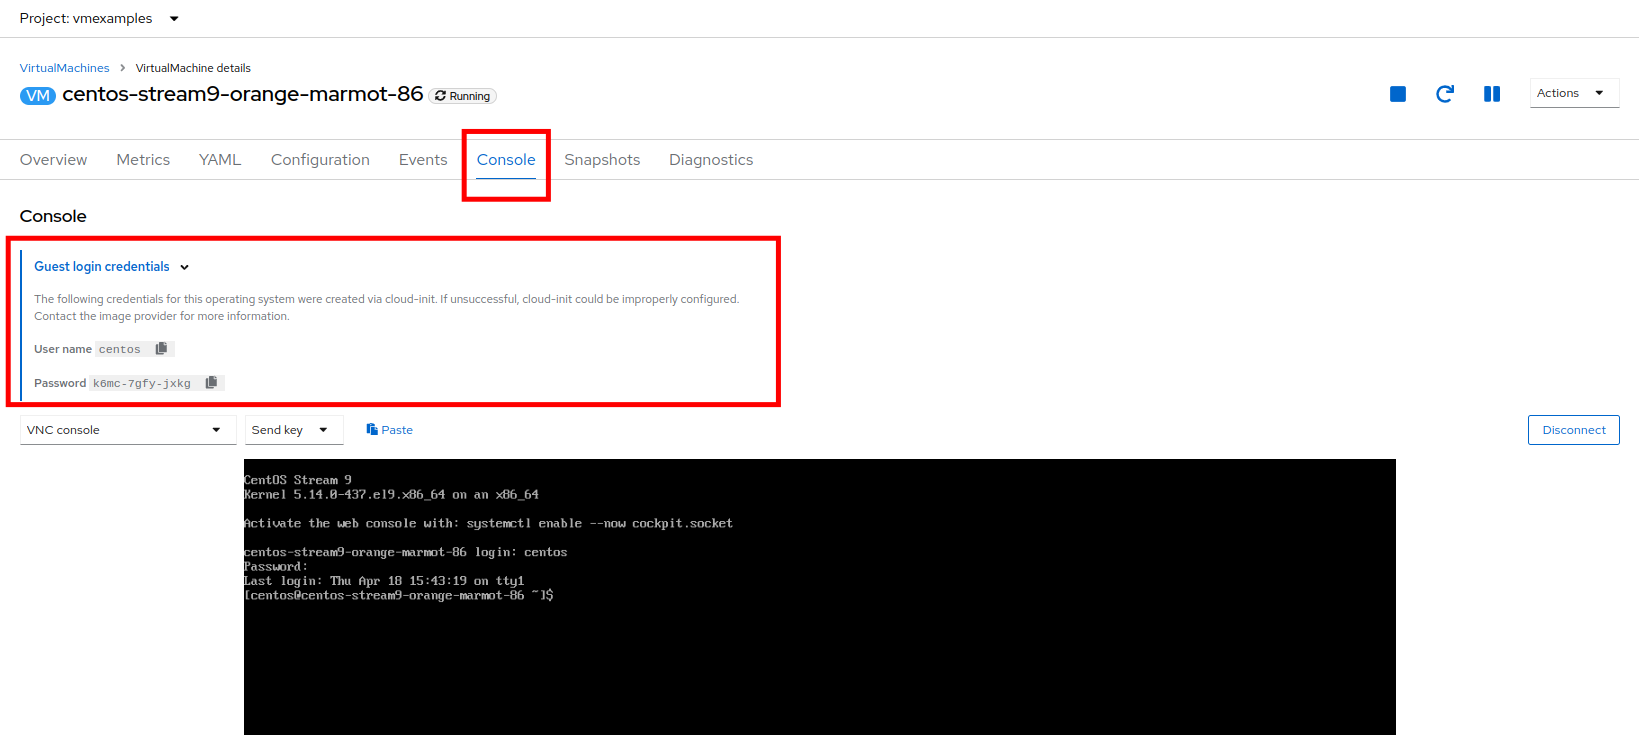
Click on the Console tab at the top and use the Guest login credentials option to login to the console of the virtual machine.
-
Once you are logged into the virtual machine, run the following command to test the install of MariaDB.
sudo mysql -u root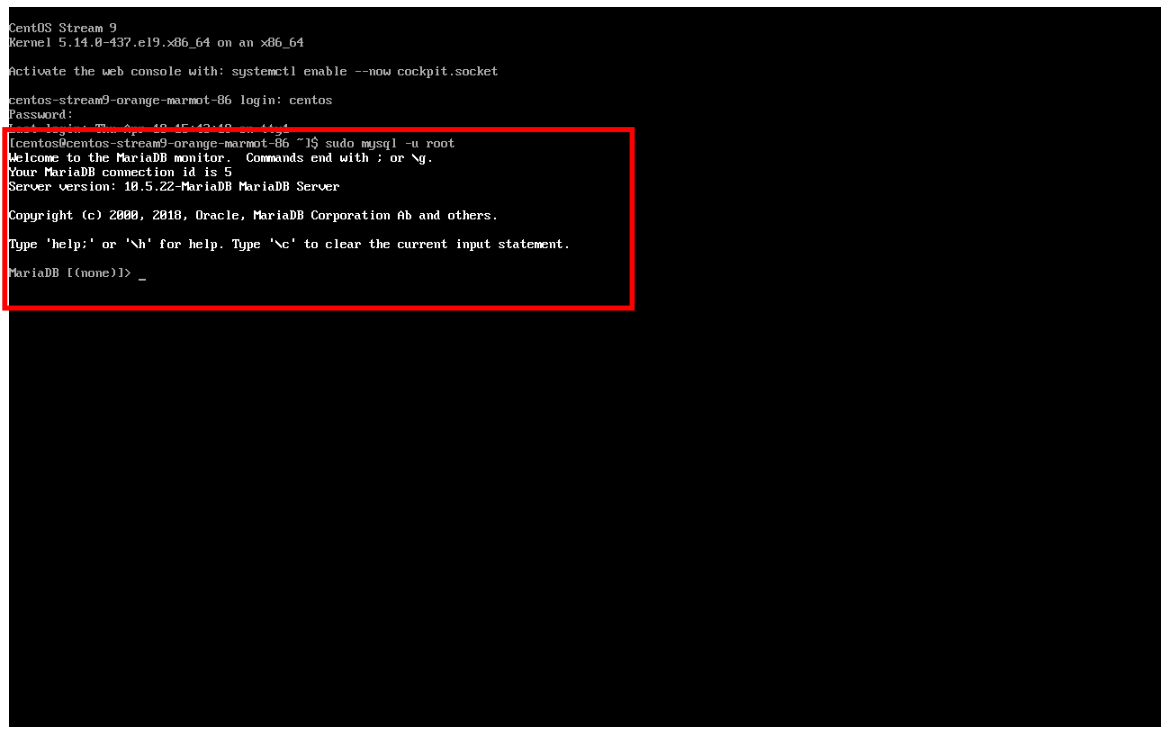
-
Hit
Ctrl-Dtwice to log out of the VM. -
Stop the VM to save resources:
-
Navigate to Virtualization → Virtualmachines
-
Make sure you select All Projects to see all VMs in the environment.
-
If any VMs are showing a status of Running (only the database VM should be running) click the three dots to the right and select Stop.
Create a Windows VM Template
In this segment of our lab, we will install Microsoft Windows Server 2019 using an ISO hosted on a web server. This represents one way to install an operating system to a virtual machine that takes advantage of the ability to source disks from many locations, including a web server, object storage, or other persistent volumes in the cluster.
This process can be streamlined after the initial operating system installation by creating a template from the virtual machine. The specific process for preparing the guest operating system to be used as a template will vary, be sure to follow your organization’s guidelines and requirements when preparing a template OS.
-
From the left menu, navigate to Virtualization → Catalog, and click on the Template catalog tab near the top..
-
Make sure you are in the vmexamples project.
-
Scroll down until you find the Microsoft Windows Server 2019 VM tile.
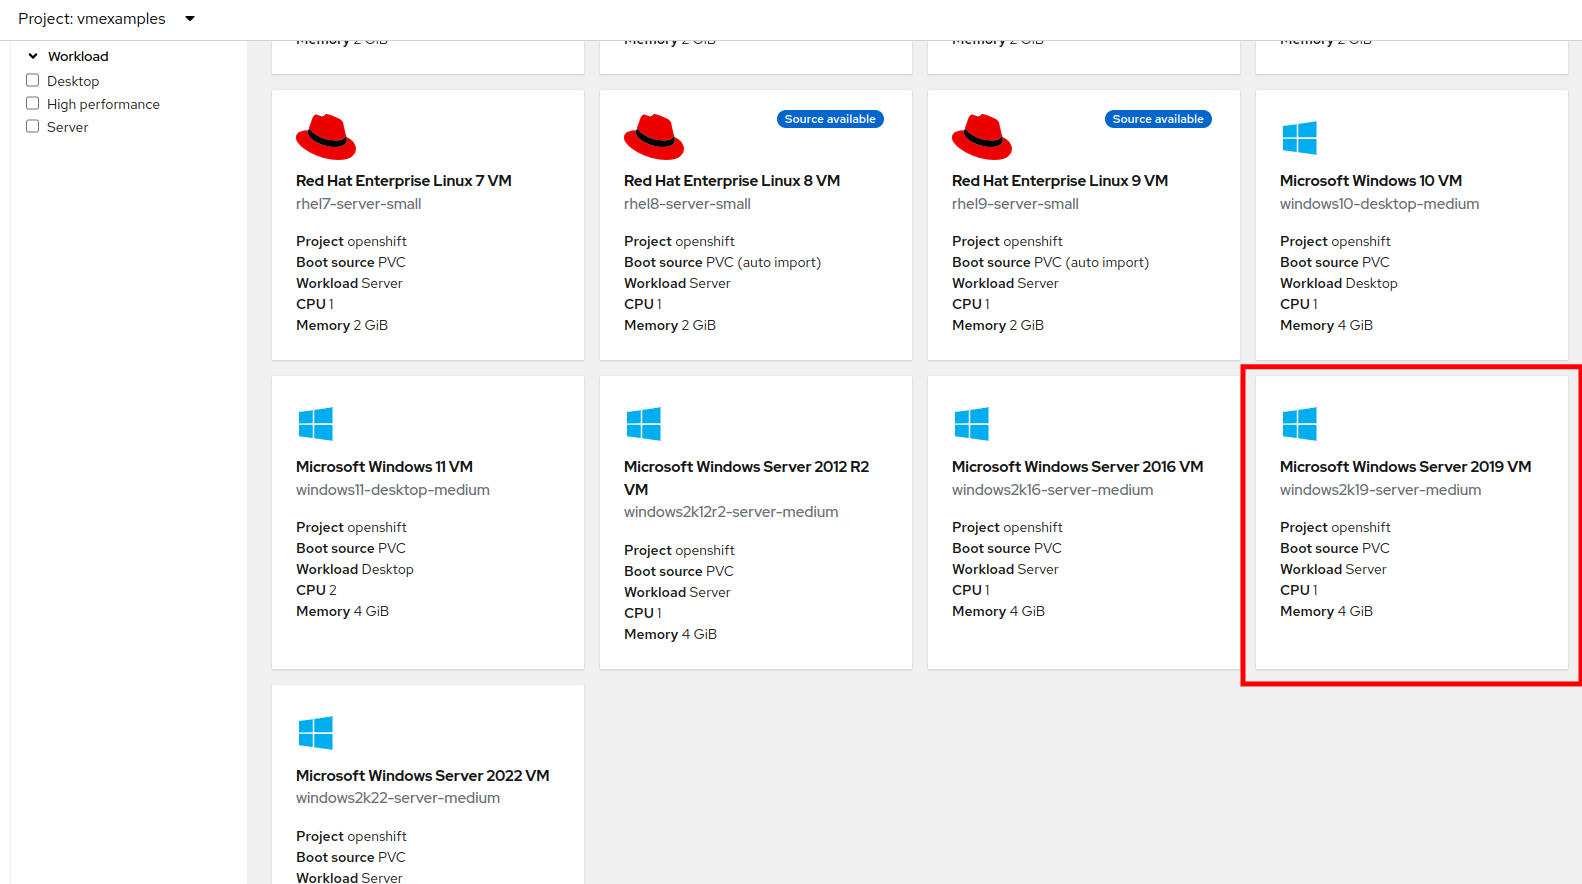
-
A dialog will appear showing the default configuration related to the template.
Notice that there is intially no option to quick create this VM, and we must customize the VM to fit our needs. 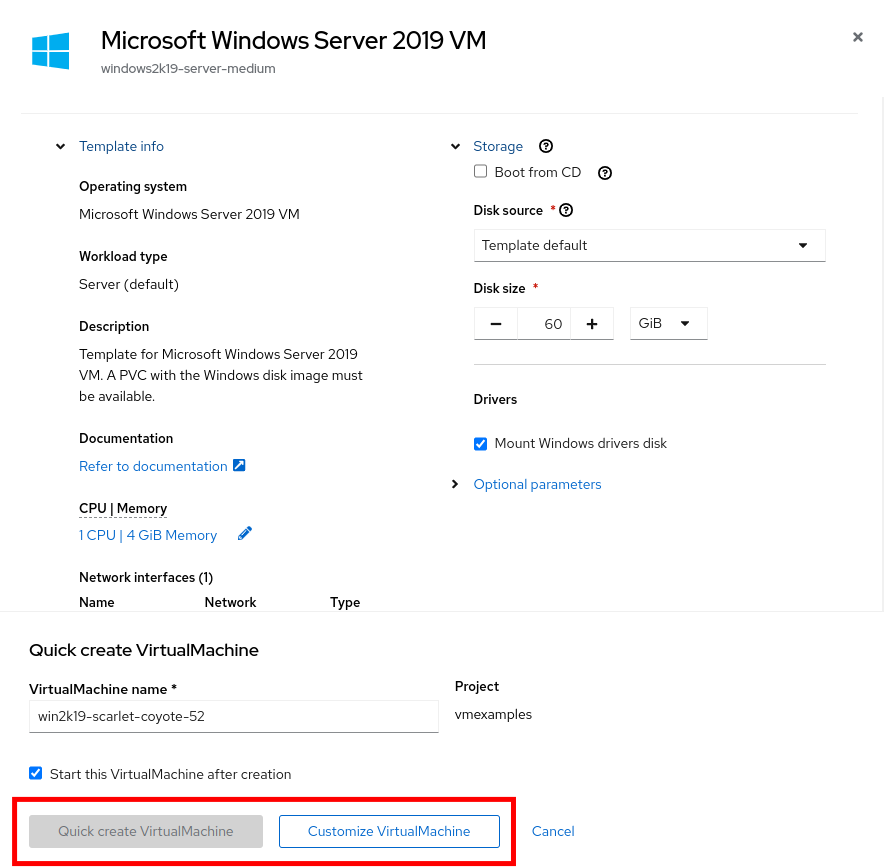
-
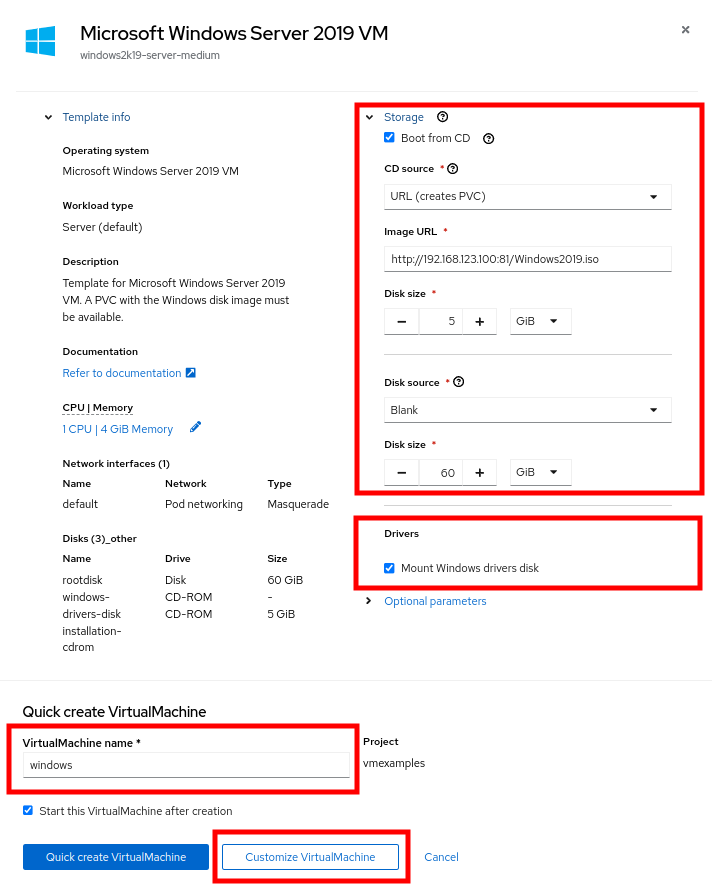
In this dialog:
-
Specify the name windows
-
Enable the checkbox Boot from CD
-
For CD Source choose URL (creates PVC) from the drop-down menu
-
Specify the image URL: https://catalog-item-assets.s3.us-east-2.amazonaws.com/qcow_images/Windows2019.iso
-
Reduce the CD disk size to 5 GiB
-
Keep the Disk source size disk to the default value 60 GiB
-
Ensure the Mount Windows drivers disk checkbox is enabled. This is required to install Windows systems, which will provide the drivers for VirtIO.
-
-
With the options filled out, we want to click on the Customize VirtualMachine button at the bottom to continue configuring our Template.
-
On the Customize and create VirtualMachine screen, click on the Scripts tab, and then scroll down to the Sysprep section and click on the Edit button.
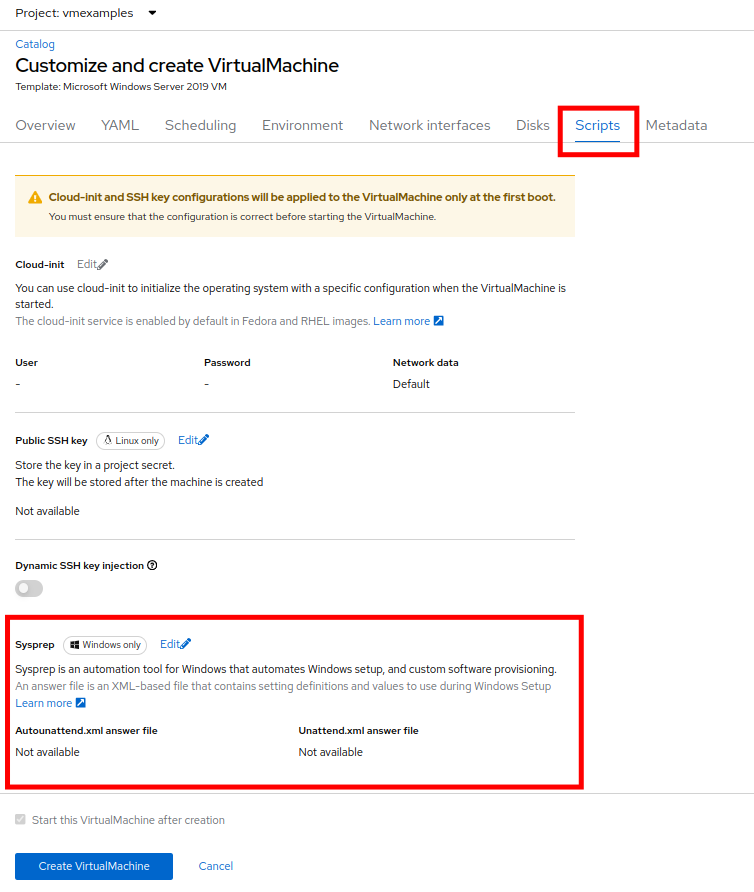
-
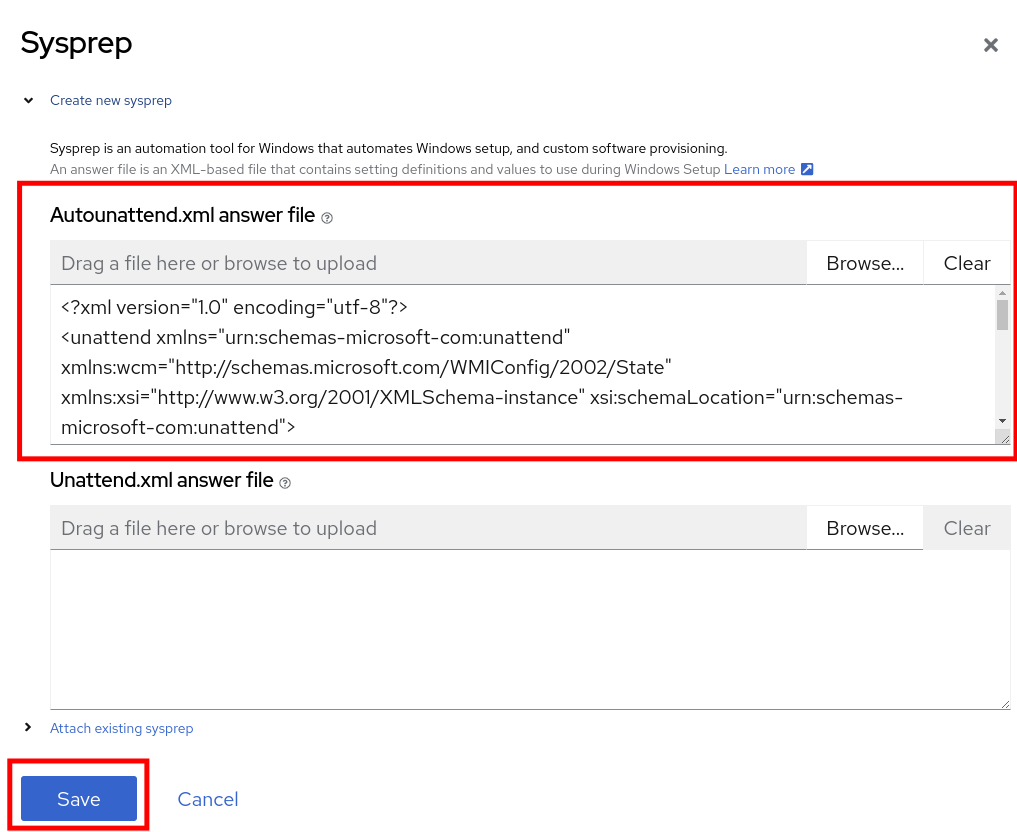
A new window will pop up for you to create Sysprep actions for your new template.
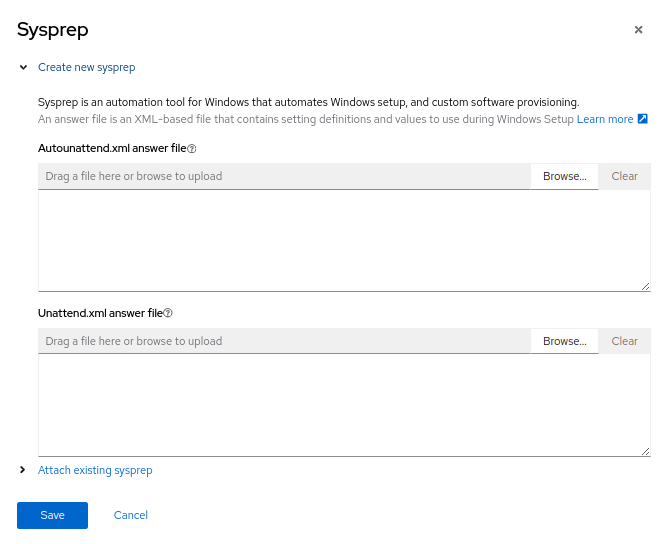
-
Copy and paste the following code block into the autounattend.xml section:
<?xml version="1.0" encoding="utf-8"?> <unattend xmlns="urn:schemas-microsoft-com:unattend" xmlns:wcm="http://schemas.microsoft.com/WMIConfig/2002/State" xmlns:xsi="http://www.w3.org/2001/XMLSchema-instance" xsi:schemaLocation="urn:schemas-microsoft-com:unattend"> <settings pass="windowsPE"> <component name="Microsoft-Windows-Setup" processorArchitecture="amd64" publicKeyToken="31bf3856ad364e35" language="neutral" versionScope="nonSxS"> <DiskConfiguration> <Disk wcm:action="add"> <CreatePartitions> <CreatePartition wcm:action="add"> <Order>1</Order> <Extend>true</Extend> <Type>Primary</Type> </CreatePartition> </CreatePartitions> <ModifyPartitions> <ModifyPartition wcm:action="add"> <Active>true</Active> <Format>NTFS</Format> <Label>System</Label> <Order>1</Order> <PartitionID>1</PartitionID> </ModifyPartition> </ModifyPartitions> <DiskID>0</DiskID> <WillWipeDisk>true</WillWipeDisk> </Disk> </DiskConfiguration> <ImageInstall> <OSImage> <InstallFrom> <MetaData wcm:action="add"> <Key>/IMAGE/NAME</Key> <Value>Windows Server 2019 SERVERSTANDARD</Value> </MetaData> </InstallFrom> <InstallTo> <DiskID>0</DiskID> <PartitionID>1</PartitionID> </InstallTo> </OSImage> </ImageInstall> <UserData> <AcceptEula>true</AcceptEula> <FullName>Administrator</FullName> <Organization>My Organization</Organization> </UserData> <EnableFirewall>false</EnableFirewall> </component> <component name="Microsoft-Windows-International-Core-WinPE" processorArchitecture="amd64" publicKeyToken="31bf3856ad364e35" language="neutral" versionScope="nonSxS"> <SetupUILanguage> <UILanguage>en-US</UILanguage> </SetupUILanguage> <InputLocale>en-US</InputLocale> <SystemLocale>en-US</SystemLocale> <UILanguage>en-US</UILanguage> <UserLocale>en-US</UserLocale> </component> </settings> <settings pass="offlineServicing"> <component name="Microsoft-Windows-LUA-Settings" processorArchitecture="amd64" publicKeyToken="31bf3856ad364e35" language="neutral" versionScope="nonSxS"> <EnableLUA>false</EnableLUA> </component> </settings> <settings pass="specialize"> <component name="Microsoft-Windows-Shell-Setup" processorArchitecture="amd64" publicKeyToken="31bf3856ad364e35" language="neutral" versionScope="nonSxS"> <AutoLogon> <Password> <Value>R3dh4t1!</Value> <PlainText>true</PlainText> </Password> <Enabled>true</Enabled> <LogonCount>999</LogonCount> <Username>Administrator</Username> </AutoLogon> <OOBE> <HideEULAPage>true</HideEULAPage> <HideLocalAccountScreen>true</HideLocalAccountScreen> <HideOnlineAccountScreens>true</HideOnlineAccountScreens> <HideWirelessSetupInOOBE>true</HideWirelessSetupInOOBE> <NetworkLocation>Work</NetworkLocation> <ProtectYourPC>3</ProtectYourPC> <SkipMachineOOBE>true</SkipMachineOOBE> </OOBE> <UserAccounts> <LocalAccounts> <LocalAccount wcm:action="add"> <Description>Local Administrator Account</Description> <DisplayName>Administrator</DisplayName> <Group>Administrators</Group> <Name>Administrator</Name> </LocalAccount> </LocalAccounts> </UserAccounts> <TimeZone>Eastern Standard Time</TimeZone> </component> </settings> <settings pass="oobeSystem"> <component name="Microsoft-Windows-International-Core" processorArchitecture="amd64" publicKeyToken="31bf3856ad364e35" language="neutral" versionScope="nonSxS"> <InputLocale>en-US</InputLocale> <SystemLocale>en-US</SystemLocale> <UILanguage>en-US</UILanguage> <UserLocale>en-US</UserLocale> </component> <component name="Microsoft-Windows-Shell-Setup" processorArchitecture="amd64" publicKeyToken="31bf3856ad364e35" language="neutral" versionScope="nonSxS"> <AutoLogon> <Password> <Value>R3dh4t1!</Value> <PlainText>true</PlainText> </Password> <Enabled>true</Enabled> <LogonCount>999</LogonCount> <Username>Administrator</Username> </AutoLogon> <OOBE> <HideEULAPage>true</HideEULAPage> <HideLocalAccountScreen>true</HideLocalAccountScreen> <HideOnlineAccountScreens>true</HideOnlineAccountScreens> <HideWirelessSetupInOOBE>true</HideWirelessSetupInOOBE> <NetworkLocation>Work</NetworkLocation> <ProtectYourPC>3</ProtectYourPC> <SkipMachineOOBE>true</SkipMachineOOBE> </OOBE> <UserAccounts> <LocalAccounts> <LocalAccount wcm:action="add"> <Description>Local Administrator Account</Description> <DisplayName>Administrator</DisplayName> <Group>Administrators</Group> <Name>Administrator</Name> </LocalAccount> </LocalAccounts> </UserAccounts> <TimeZone>Eastern Standard Time</TimeZone> </component> </settings> </unattend> -
Once the code is pasted, click the Save button on the dialog.
-
You will be returned to the Customize and create Virtual Machine screen, Click on the Disks tab, and locate the line for the installation-CDROM, click the three-dot menu on the right, and select Edit.

-
Select the option for Use this disk as a boot source, and click on the Save button at the bottom.
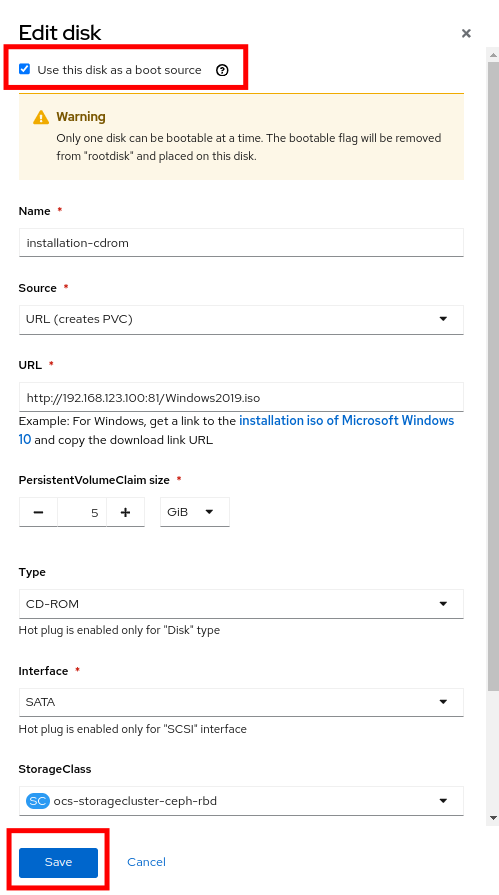
The disk may already be selected as boot source - in that case the checkbox is pre-checked and grayed out. In that case continue without changing anything.
-
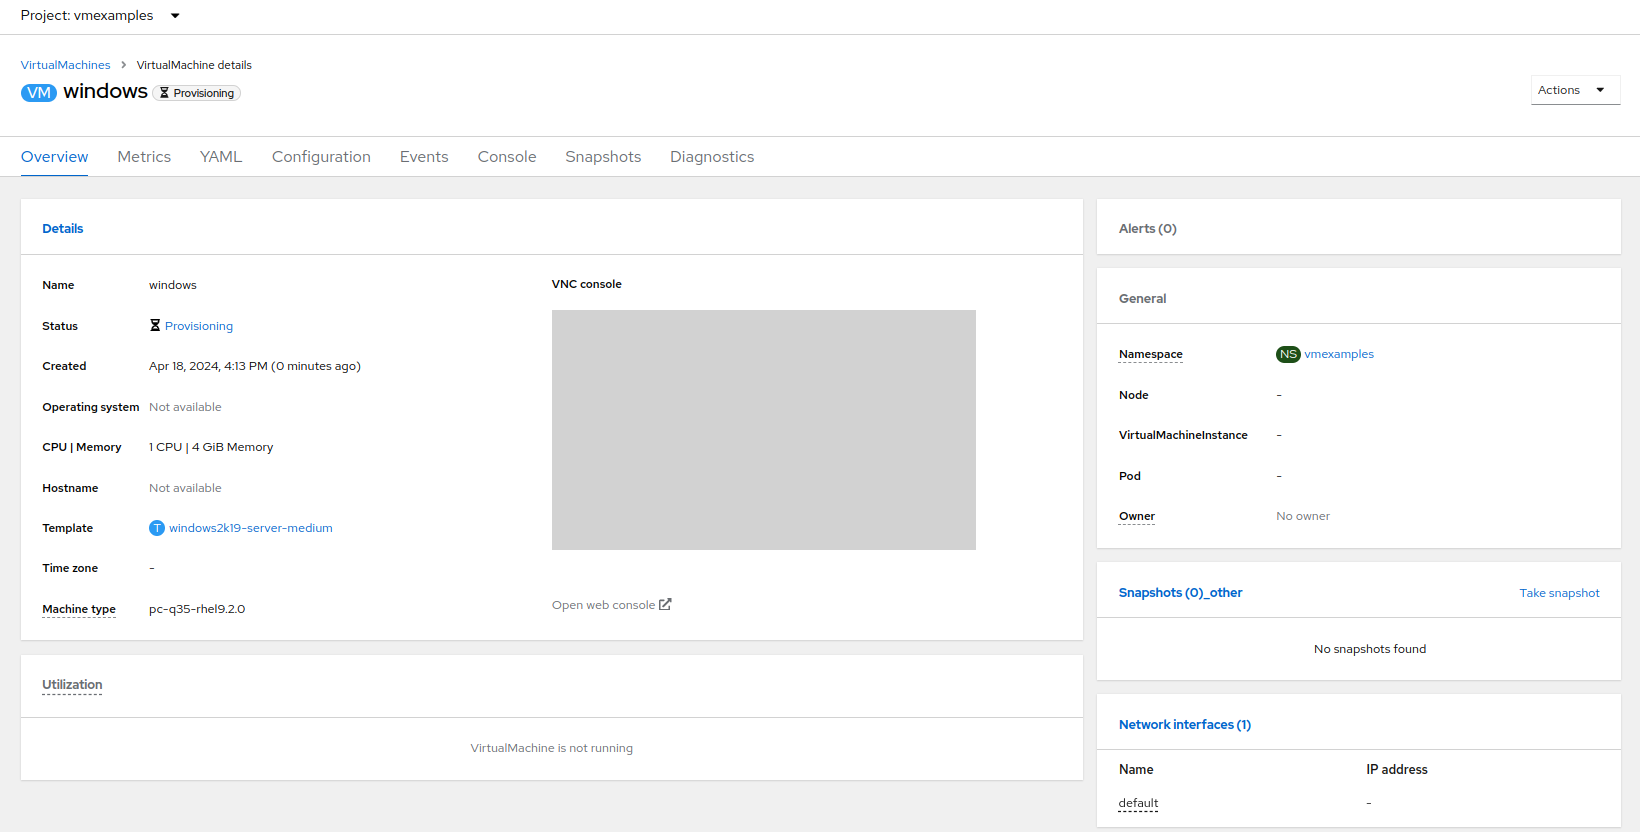
When you return to the Disks tab, click on the Create VirtualMachine button at the bottom.
-
The Virtual Machine will start the provisioning process by downloading the ISO image, configuring, and starting the instance.
-
After a few minutes, the Virtual VM will be in Running status. Switch to the Console tab:
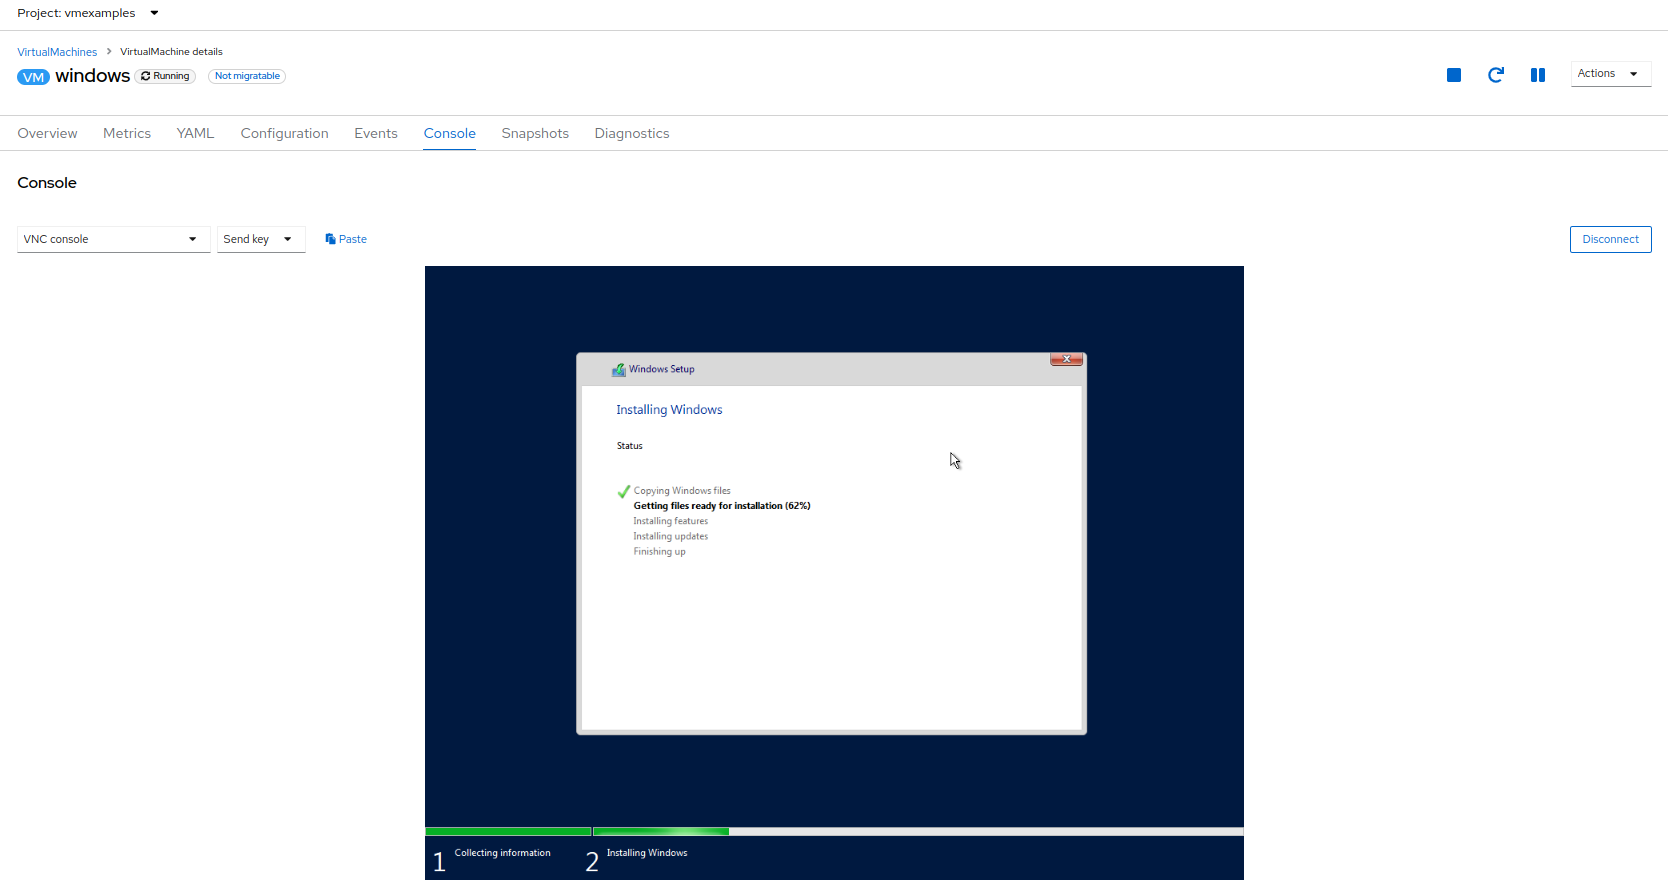
The VM is marked as "Not migratable" because a CD-ROM disk is attached. -
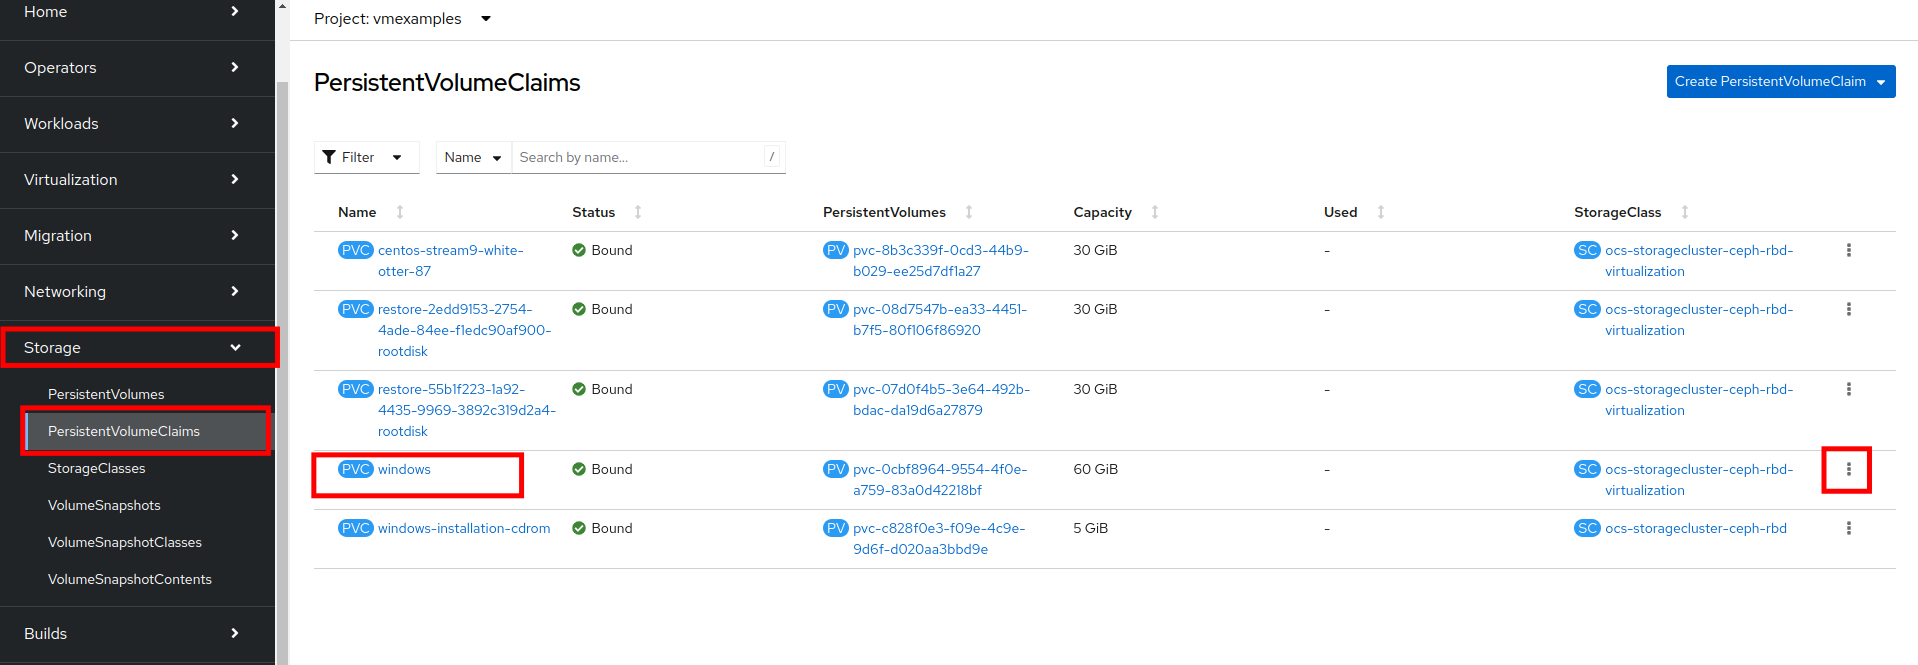
Once the VM installation process is complete (this will take a few minutes), go ahead and power it off with the stop button. We can now take a snapshot of the root disk, and use that to create a bootable volume template that we can use to boot other Windows 2k19 machines.
-
Click on Storage → PersistentVolumeClaims to see a list of PVCs available in the vmexamples namespace.
-
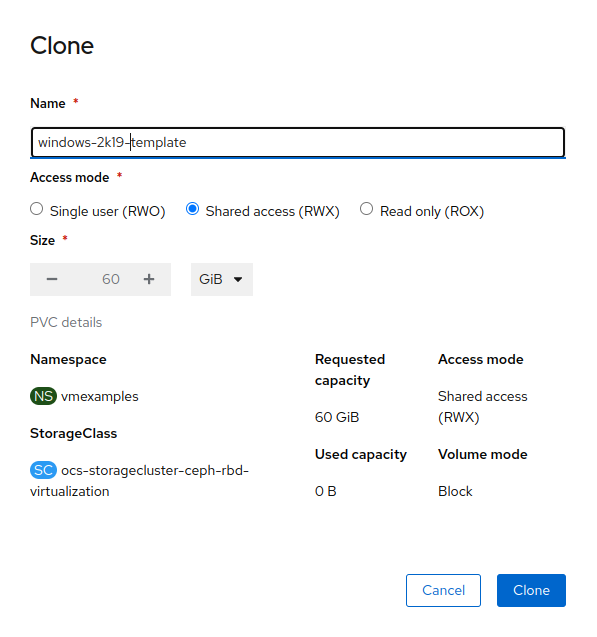
Find the windows PVC that is listed and using the three-dot menu on the right select Clone PVC. On the menu that pops up, name the new PVC windows-2k19-template.
-
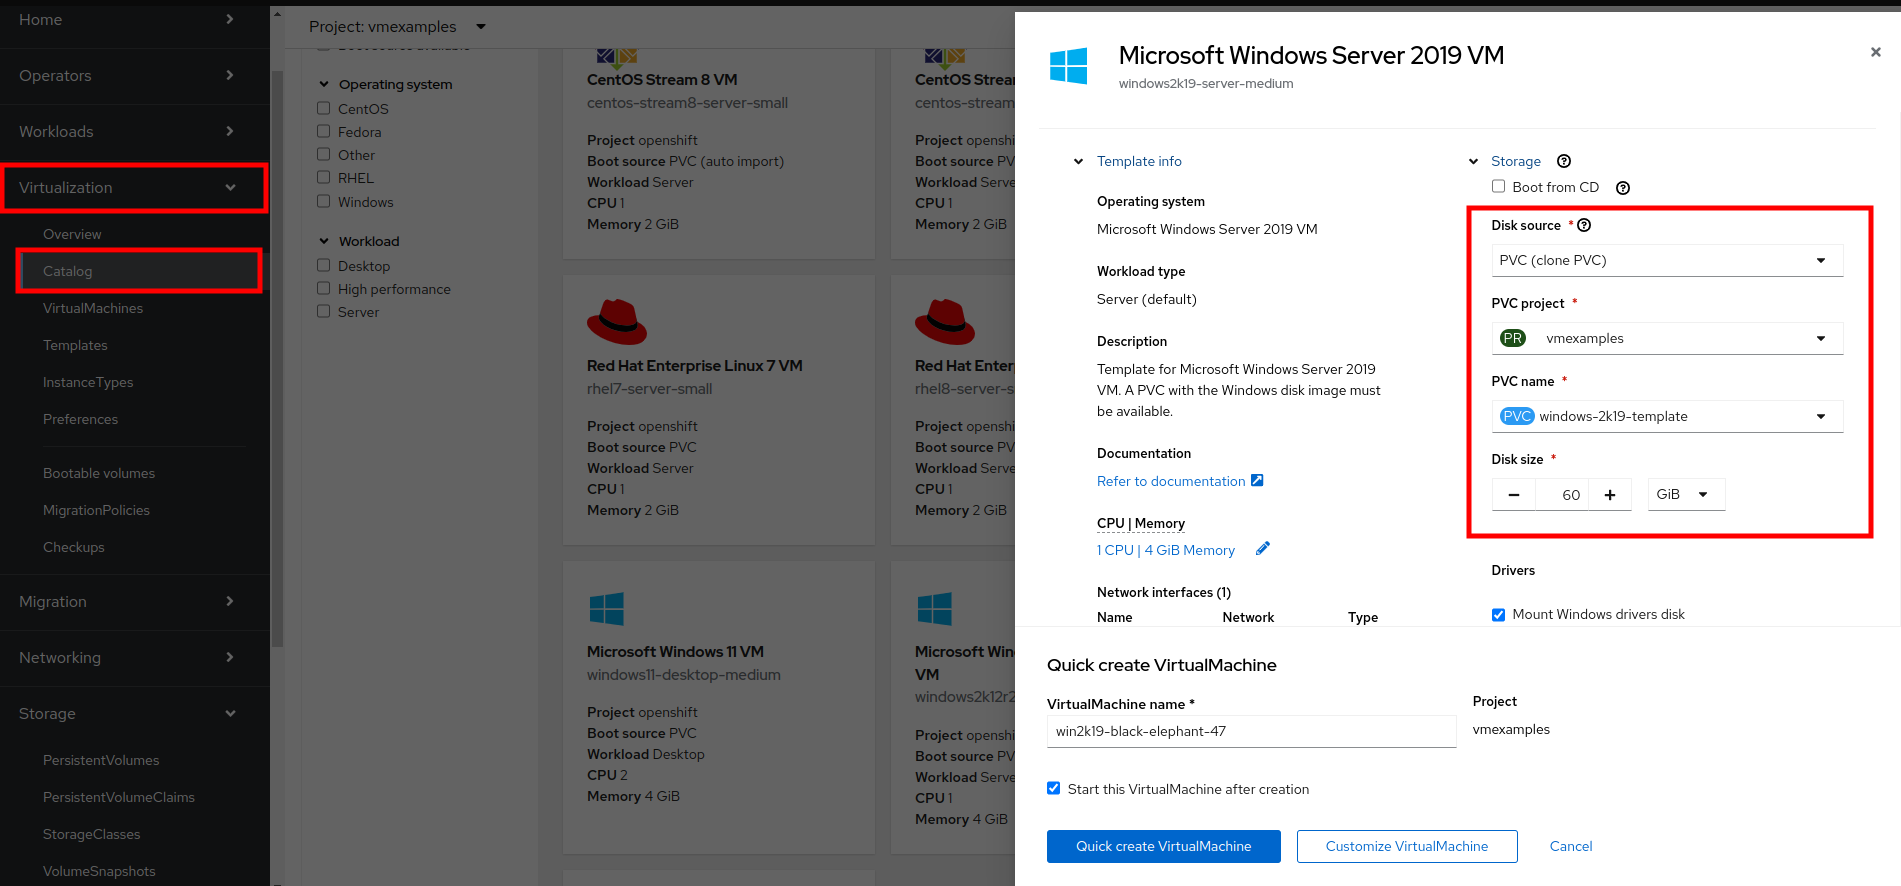
Once this is saved, you can return to the Virtualization → Catalog menu, and use this cloned PVC as a future boot source for creating new Virtual Machines by selecting the option for PVC (clone PVC) as the Disk source, and selecting the Windows-2k19-Template PVC as the PVC name to clone.
Introduction to Instance Types
In order to simplify the deployment process for virtual machines, starting with OpenShift 4.14 the default configuration mechanism was changed to emphasize the use of Instance Types. An instance type is a reusable object where you can define resources and characteristics to apply to a new VM. You can define custom instance types or use the variety that are included when you install OpenShift Virtualization when provisioning your own VM. This section explores provisioning a VM using an instance type.
-
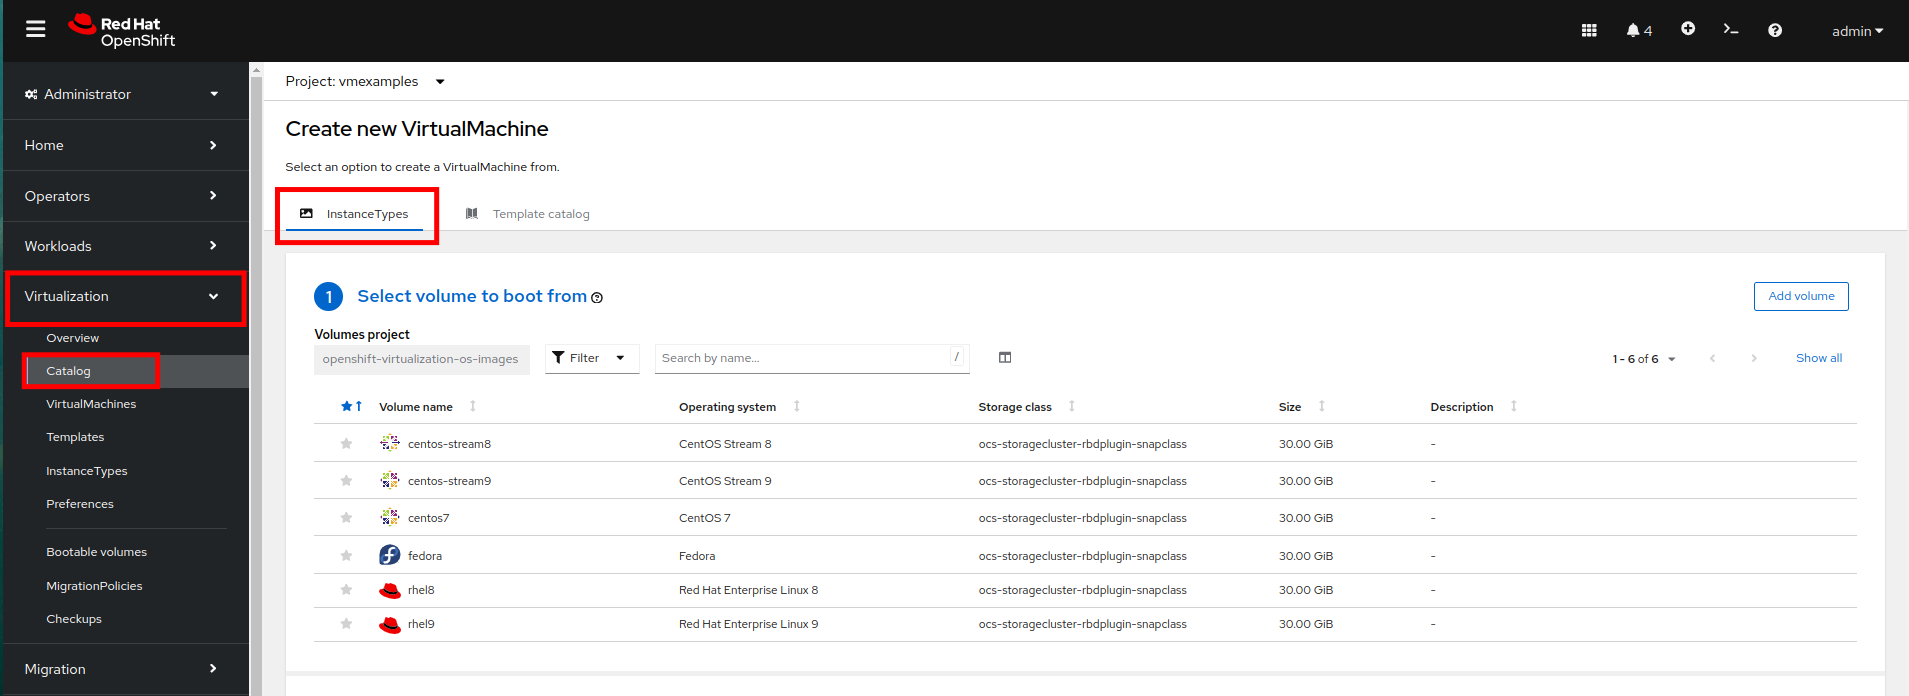
To get started click on Virtualization → Catalog on the left-side menu. You will see the default catalog item is InstanceType.
-
The first step to using an instance type is to select a volume to boot from. Similar to the templates that provide boot sources, those boot sources are available to use for an instance type, or you can upload your own with the Add volume button.
-
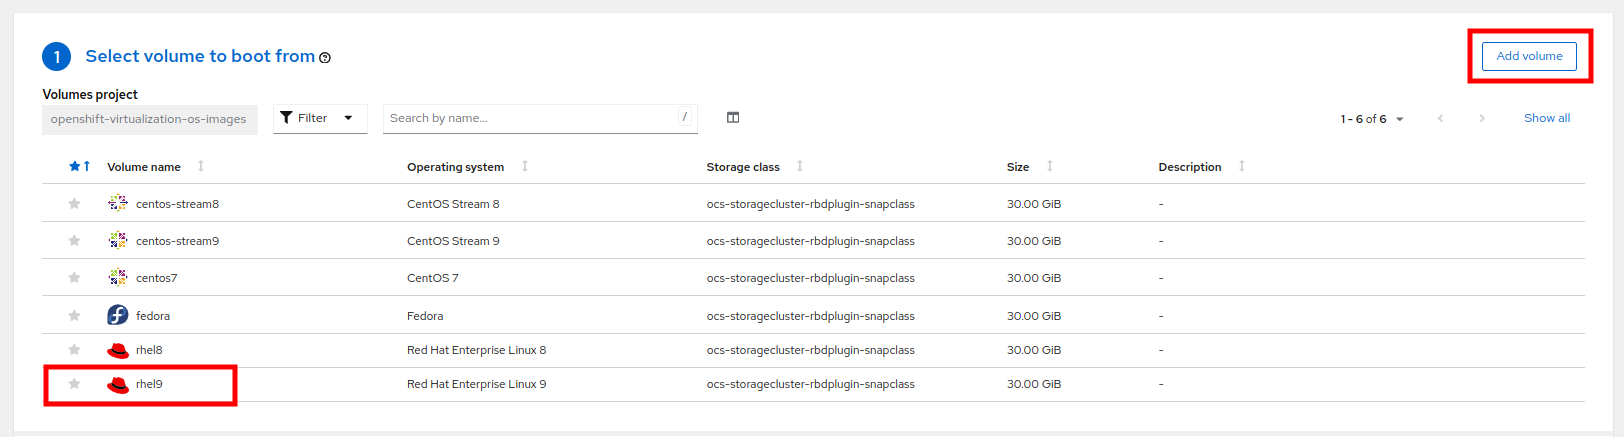
Click on rhel9 to create a VM with that boot source.
-
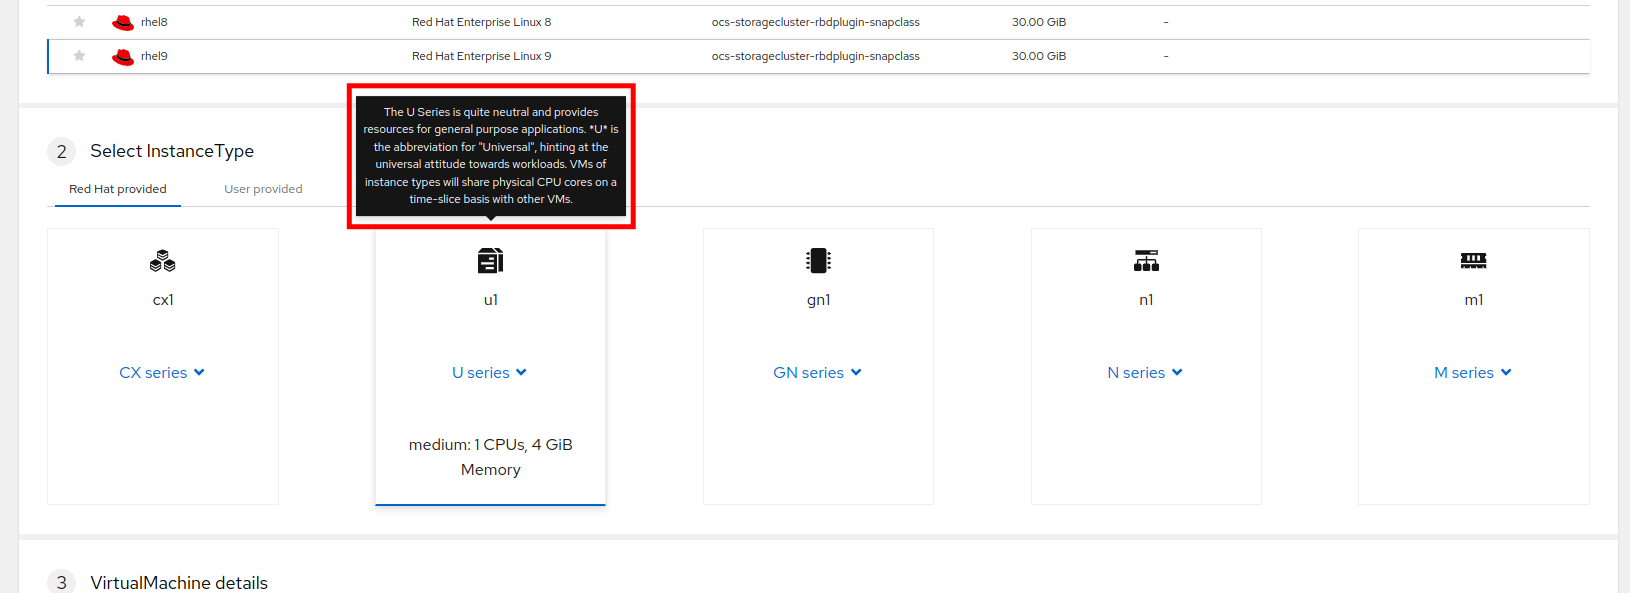
Next you can select the instance type you would like to use. There are Red Hat provided instance types by default, or you can create your own. If you hover over a provided instance type you can see a description of it’s intended use.
-
The Red Hat provided instance types are intended for the following uses:
-
cx1: Intended for compute intensive workloads
-
u1: The most general and "universal" workloads
-
gn1: Dedicated for VMs making use of the nVidia GPU operator.
-
n1: Designed for network intensive workloads like VNF
-
m1: Designed for memory intensive workloads.
-
-
-
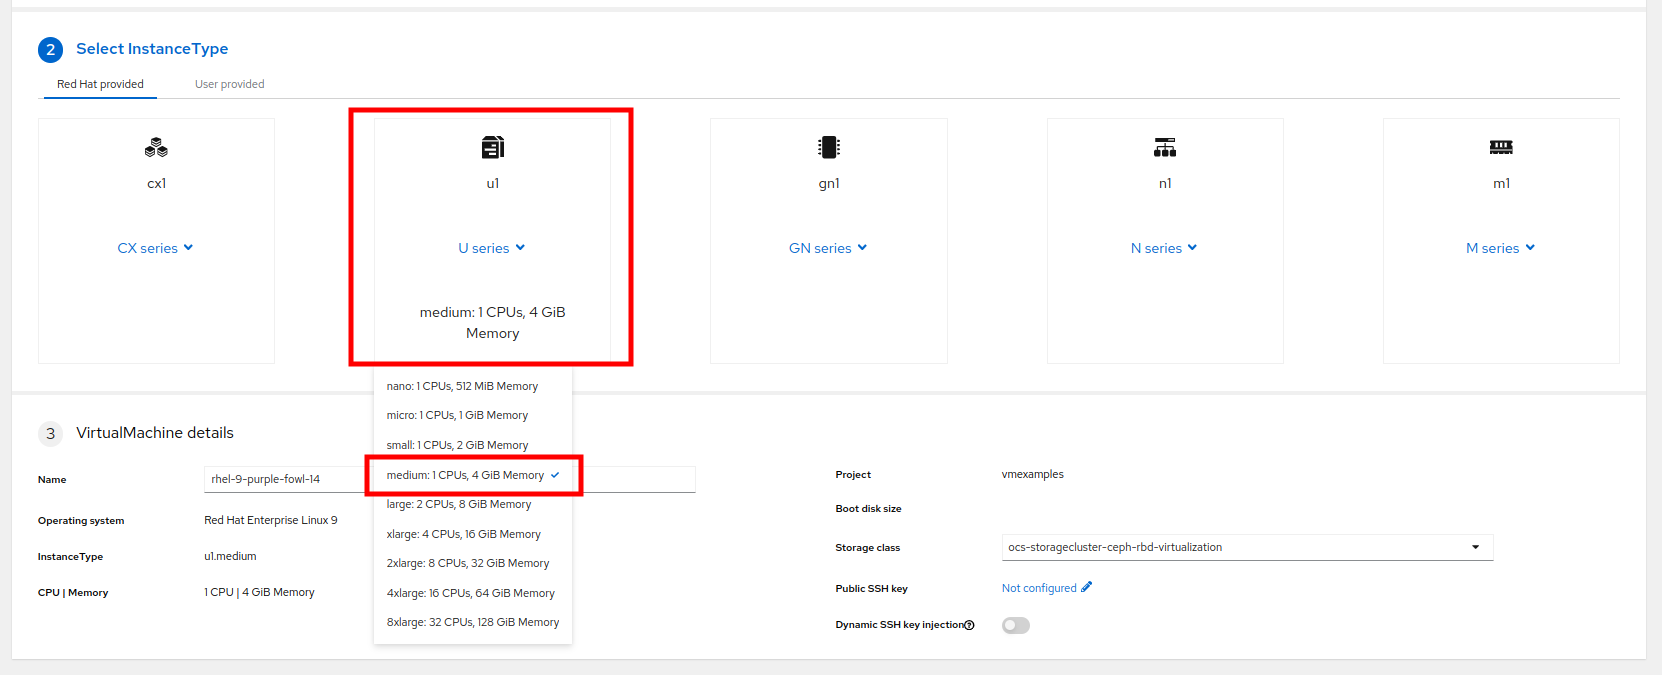
Click on the U series tile to see a dropdown list of defined resources for general instance types. The default option here is medium: 1 CPUs, 4 GiB Memory. Select it.
-
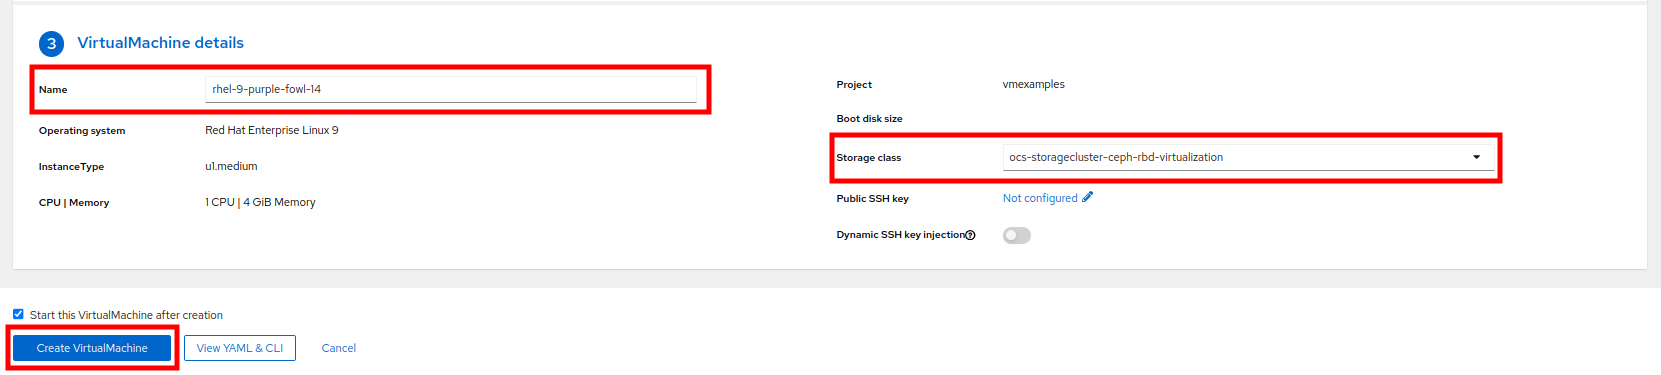
The last section that needs to be completed to provision using an instance type is similar to the template section. You need to provide a name for the virtual machine, and select the storage class to be used for a backing disk. By default, a name will be generated for the VM, and the default virtualization storage class will be selected. When you are satisfied, click the Create VirtualMachine button.
-
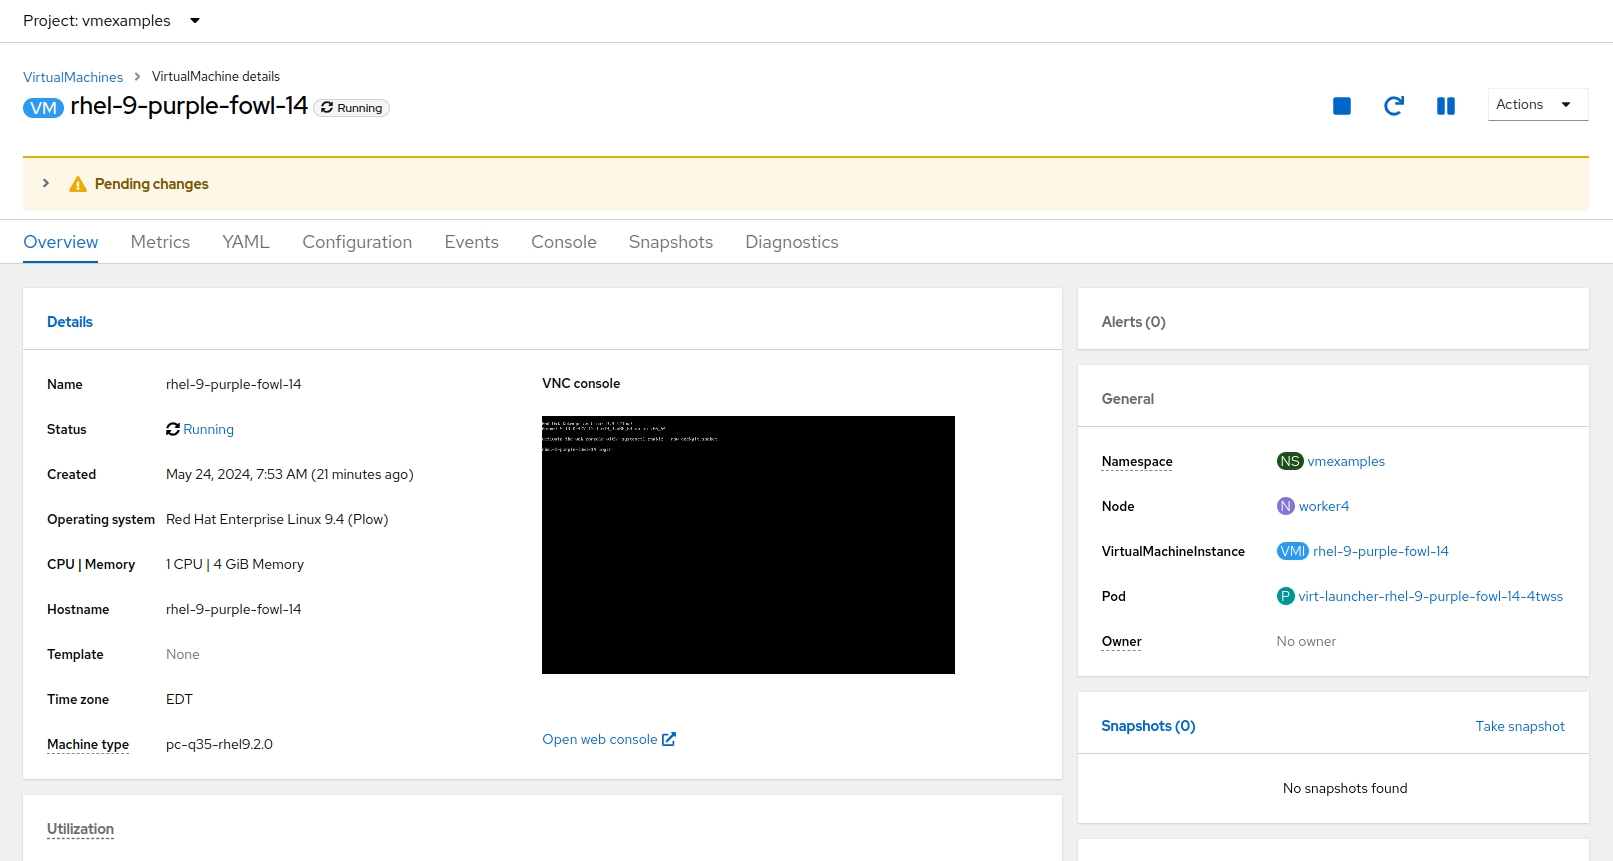
You will be directed to the virtual machine overview page, and see that the VM provisioned using an instance type is now up and running.
Cleanup
To save resources for the next lab, stop the VMs that you created in this module.
-
Navigate to Virtualization → Virtualmachines
-
Make sure you select All Projects to see all VMs in the environment.
-
If any VMs are showing a status of Running click the three dots to the right and select Stop.
Now all VMs should be in Stopped state.
Summary
In this section we learned how to clone and customize and existing template to create one that can be used for specific workloads like databases. We also learned how to configure one of the existing Windows templates that exists without a boot source, and automate it’s installation process, so we can create future templates by cloning the installation PVC that is created with that VM. We also introduced how to make use of instance types to further customize our virtual machines for specific workloads.