Scenario - Live Migration and High Availability for Virtual Machines
In this scenario, we will live migrate a virtual machine between nodes and then simulate a node failure to see how OpenShift Virtualization and Portworx keep our virtual machine and its data available.
| The {openshift_cluster_console_url}[OpenShift Web Console^] tab will open in a new browser window. |
The username is {openshift_cluster_admin_username} and the password is {openshift_cluster_admin_password}
Step 1 - Modify our VM
Let’s modify our VM to help verify that our changes are retained during a live migration and HA event.
Let’s write some data to a file:
virtctl ssh cloud-user@vm/centos-stream9-example -n vmtest \
  -i ~/.ssh/id_rsa \
  -t "-o StrictHostKeyChecking=no" \
  -c 'echo "Hello from Red Hat and Portworx" > ~/text'
We can read our file at any time by running:
virtctl ssh cloud-user@vm/centos-stream9-example -n vmtest \
  -i ~/.ssh/id_rsa \
  -t "-o StrictHostKeyChecking=no" \
  -c 'cat ~/text'
Step 2 - Test Live Migrations
In order for live migrations to be supported, OpenShift Virtual Machines must use a PVC with a ReadWriteMany access mode. We can verify this by running:
oc get pvc -n vmtestTask 1: Live Migrate a VM
In the OpenShift Console, navigate to Virtualization > VirtualMachines, select the vmtest project, and click on centos-stream9-example. On the Overview tab, note
the node where our VM is running.
We can now migrate the VM to a new node by selecting the Actions menu,
clicking Migration > Compute, and clicking Migrate VirtualMachine
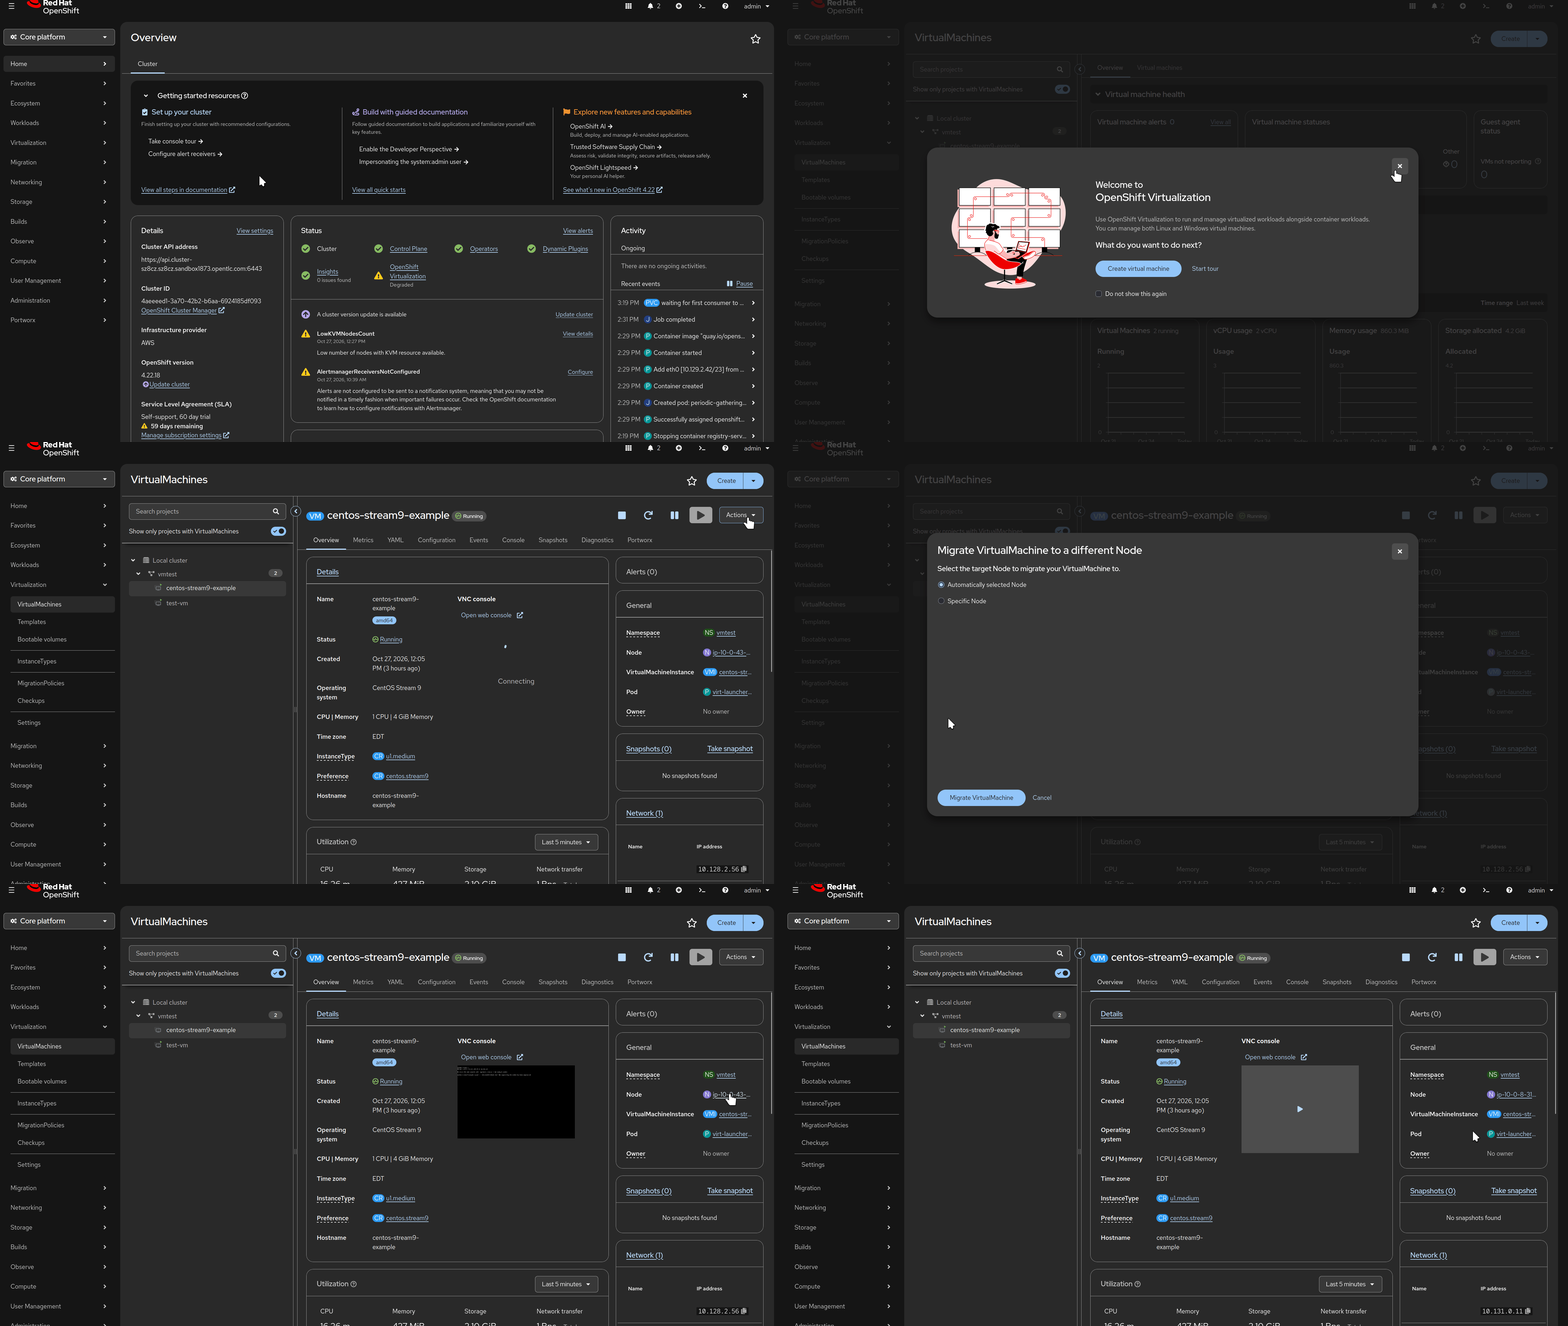
After a few moments the interface will update with the new node.
It is important to understand that in OpenShift Virtualization VirtualMachines run inside pods. This migration spawns a new pod on the destination node and live migrates the VM to that pod.
We can view the running pods by executing:
oc get pods -o wide -n vmtestNotice that one of the pods is in the Completed state because the virtual machine process has moved to another pod.
We can view the running VMs by typing:
oc get vms -n vmtestLet’s check to make sure our data is still there:
virtctl ssh cloud-user@vm/centos-stream9-example -n vmtest \
  -i ~/.ssh/id_rsa \
  -t "-o StrictHostKeyChecking=no" \
  -c 'cat ~/text'
Step 3 - Providing HA
Task 1: Proving HA
We will now induce a failure in our OpenShift cluster.
It is important to understand that in OpenShift Virtualization, Virtual Machines run inside pods. As we learned above, our virtual machine is actually running from inside a pod. The VirtualMachineInstance (VMI) object represents the running VM, and it records which node the VM is running on. Let’s find that node:
NODENAME=$(oc get vmi centos-stream9-example -n vmtest -o jsonpath='{.status.nodeName}')

echo "Your VM is running on node: ${NODENAME}"
Let’s reboot this node. We will now debug the node:
oc debug node/$NODENAME
Running oc debug node/$NODENAME can take a few seconds as a pod needs to be attached to the node.
|
Chroot to the host
chroot /hostAnd finally, reboot the OpenShift worker node hosting our running virtual machine:
reboot
It is possible that the showroom lab interface (where you are reading these instructions) is running on the node that you just rebooted. In that case the terminal on the right will disconnect. You will need to refresh your window until OpenShift notices that the node is down and re-schedules the showroom pod to an available node.
|
To speed up the re-creation of the pod you can also find the showroom pod in the showroom namespace and delete the currently running pod.
Let’s watch our VM and pod status in the vmtest namespace:
watch oc get pods,vms -o wide -n vmtestTake note of the NODE column. We will see a new launcher pod start on a new node.
This is where STORK comes in. STORK makes the OpenShift scheduler storage aware: it tells the scheduler which surviving nodes hold a replica of the VM’s disk, so the VM restarts quickly on a node that already has a copy of its data.
Once the new virt-launcher pod is Running, press ctrl-c to exit the watch command.
We can verify that our virtual machine is again running in the OpenShift Console, but because this was an unplanned outage, the VM has rebooted.
Let’s check to make sure our data is still there. The VM needs a minute or two to boot, so the command below retries until the VM accepts SSH connections:
until virtctl ssh cloud-user@vm/centos-stream9-example -n vmtest \
  -i ~/.ssh/id_rsa \
  -t "-o StrictHostKeyChecking=no" \
  -c 'cat ~/text'; do
    echo "waiting for the VM to boot"
    sleep 10
done
Task 2: Wait for the cluster to recover
Before moving on, let’s make sure that the node we rebooted has rejoined the
cluster and that Portworx is healthy again. The following command waits until
all nodes are Ready and all three Portworx nodes are online:
until [ "$(oc get nodes --no-headers | grep -c NotReady)" -eq 0 ]; do
  echo "waiting for the rebooted node to become Ready"
  sleep 10
done
until pxctl status 2>/dev/null | grep -q "3 node(s) with storage (3 online)"; do
  echo "waiting for all Portworx nodes to come online"
  sleep 10
done
pxctl status --color
Notice that our pxctl shortcut keeps working while the node is down. It
only uses a Portworx pod on a node that is Ready.
You are ready to move to the next lab.