RHEL AI and InstructLab: Get a taste in training your own model
1. Introduction to the Lab
Thanks for taking the time to learn about and use RHEL AI at Red Hat Summit Connect. During this hands-on exercise, you will learn what RHEL AI is and how you can use it to provide value to your company. You will also learn how to leverage RHEL AI to improve a Large Language Model (LLM), and train it using synthetic data generation. RHEL AI consists of several core components:
-
The Granite Large Language Model(s)
-
InstructLab for model alignment
-
Support and indemnification from Red Hat
InstructLab is a fully open-source project from Red Hat, and the MIT-IBM Watson AI Lab, that introduces Large-scale Alignment for chatBots (LAB). The project’s innovation helps during the instruction-tuning phase of LLM training. However, to fully understand the benefit of this project, you need to be familiar with some basic concepts of what an LLM is and the difficulty and cost associated with training a model.
1.1. What is a Large Language Model?
A large language model (LLM) is a type of artificial intelligence (AI) model that uses deep learning techniques to understand and generate human-like text based on input data. These models are designed to analyze vast amounts of text data and learn patterns, relationships, and structures within the data. They can be used for various natural language processing (NLP) tasks, such as:
-
Text classification: Categorizing text based on its content, such as spam detection or sentiment analysis.
-
Text summarization: Generating concise summaries of longer texts, such as news articles or research papers.
-
Machine translation: Translating text from one language to another, such as English to French or German to Chinese.
-
Question answering: Answering questions based on a given context or set of documents.
-
Text generation: Creating new text that is coherent, contextually relevant, and grammatically correct, such as writing articles, stories, or even poetry.
Large language models typically have many parameters (millions to billions) that allow them to capture complex linguistic patterns and relationships in the data. They are trained on large datasets, such as books, articles, and websites, using techniques like unsupervised pre-training and supervised fine-tuning. Some popular large language models include GPT-4, Llama, and Mistral.
In summary, a large language model (LLM) is an artificial intelligence model that uses deep learning techniques to understand and generate human-like text based on input data. They are designed to analyze vast amounts of text data and learn patterns, relationships, and structures within the data, and can be used for various natural language processing tasks.
| To give you an idea of what an LLM can accomplish, the entire previous section was generated with a simple question against the foundational model you are using in this workshop. |
1.2. How are Large Language Models trained?
Large language models (LLMs) are typically trained using deep learning techniques and large datasets. The training process involves several steps:
-
Data Collection: A vast amount of text data is collected from various sources, such as books, articles, websites, and databases. The data may include different languages, domains, and styles to ensure the model can generalize well.
-
Pre-processing: The raw text data is pre-processed to remove noise, inconsistencies, and irrelevant information. This may include tokenization, lowercasing, stemming, lemmatization, and encoding.
-
Tokenization: The pre-processed text data is converted into tokens (words or subwords) that can be used as input and output to the model. Some models use byte-pair encoding (BPE) or subword segmentation to create tokens that can handle out-of-vocabulary words and maintain contextual information.
-
Pre-training: The model is trained in an unsupervised or self-supervised manner to learn patterns and structures in the data.
-
Model Alignment: (instruction tuning and preference tuning): The process of encoding human values and goals into large language models to make them as helpful, safe, and reliable as possible. This step is not as compute intensive as some of the other steps.
1.3. How does this relate to InstructLab?
InstructLab leverages a taxonomy-guided synthetic data generation process and a multi-phase tuning framework. This allows InstructLab to significantly reduce reliance on expensive human annotations, making contributing to a large language model easy and accessible. This means that InstructLab can use the LLM to generate data, which is then used to further train the LLM. It also means that the alignment phase becomes most user’s starting point for contributing their knowledge. Prior to the LAB technique, users typically had no direct involvement in training an LLM. I know this may sound complicated, but hang in there. You will see how easy this is to use.
As you work with InstructLab, you will see the terms Skills and Knowledge. What is the difference between Skills and Knowledge? A simple analogy is to think of a skill as teaching someone how to fish. Knowledge, on the other hand, is knowing that the best place to catch a Bass is when the sun is setting while casting your line near the trunk of a tree along the bank.
2. Getting started with InstructLab
2.1. Install the ilab command line interface
We created a CLI tool called ilab that implements a local LLM developer experience and workflow. The ilab CLI is written in Python and works on the following architectures:
-
Apple M1/M2/M3 Mac
-
Linux systems
We anticipate support for more operating systems in the future. The system requirements to use the command line tool are as follows:
-
C++ compiler
-
Python 3.9+
-
Approximately 60GB disk space (entire process)
-
Disk space requirements are dependent on several factors. Keep in mind that we will be generating data to feed to the model while also having the model locally on our system. For example, the model we are working with during this workshop is roughly 5gb in size.
-
2.2. Installing ilab
The first thing we need to do is to source a Python virtual environment that will allow us to interact with the InstructLab command line tools. While you have two terminal windows available on your right, let’s start with the upper window.
-
Activate the python virtual environment by running the following commands:
cd ~/instructlab
source venv/bin/activate
Your Prompt should now look like this(venv) [instruct@instructlab instructlab]$
-
From your venv environment, verify ilab is installed correctly by running the ilab command.
ilabAssuming that everything has been installed correctly, you should see the following output:
Usage: ilab [OPTIONS] COMMAND [ARGS]... CLI for interacting with InstructLab. If this is your first time running ilab, it's best to start with
ilab initto create the environment. Options: --config PATH Path to a configuration file. [default: config.yaml] --version Show the version and exit. --help Show this message and exit. Commands: chat Run a chat using the modified model check (Deprecated) Check that taxonomy is valid convert Converts model to GGUF diff Lists taxonomy files that have changed since... download Download the model(s) to train generate Generates synthetic data to enhance your example data init Initializes environment for InstructLab list (Deprecated) Lists taxonomy files that have changed since . serve Start a local server test Runs basic test to ensure model correctness train Takes synthetic data generated locally with ilab generate...
Congratulations! You now have everything installed and are ready to dive into the world of LLM alignment!
2.3. Initialize ilab
Now that we know that the command-line interface ilab is working correctly, the next thing we need to do is initialize the local environment so that we can begin working with the model. This is accomplished by issuing a simple init command. Initialize ilab by running the following command:
ilab config initWelcome to InstructLab CLI. This guide will help you to setup your environment. Please provide the following values to initiate the environment [press Enter for defaults]: Path to taxonomy repo [taxonomy]:
| While traditionally you’ll be prompted to configure options and download the taxonomy, here you can just it ENTER for the default settings. |
Generatingconfig.yamlin the current directory... Initialization completed successfully, you're ready to start usingilab. Enjoy!
-
Several things happen during the initialization phase: A default taxonomy is located on the local file system, and a configuration file (config.yaml) is created in the current directory.
-
The config.yaml file contains defaults we will use during this workshop. After this workshop, when you begin playing around with InstructLab, it is important to understand the contents of the configuration file so that you can tune the parameters to your liking.
2.4. Download the model
With the InstructLab environment configured, you can now download a quantized (compressed and optimized) model to your local directory, to be used as a model server for API requests, or to help train a new model as we’ll do in this workshop. Run the ilab model download command.
ilab model download --repository instructlab/granite-7b-lab-GGUF --filename=granite-7b-lab-Q4_K_M.ggufThe ilab model download command downloads a model from the HuggingFace instructlab organization that we will use for this workshop. The output should look like the following:
Downloading model from downloading model from instructlab/granite-7b-lab-GGUF@main to models...
Downloading 'granite-7b-lab-Q4_K_M.gguf' to 'models/.huggingface/download/granite-7b-lab-Q4_K_M.gguf.6adeaad8c048b35ea54562c55e454cc32c63118a32c7b8152cf706b290611487.incomplete'
INFO 2024-05-06 16:46:24,394 file_download.py:1877 Downloading 'granite-7b-lab-Q4_K_M.gguf' to 'models/.huggingface/download/granite-7b-lab-Q4_K_M.gguf.6adeaad8c048b35ea54562c55e454cc32c63118a32c7b8152cf706b290611487.incomplete'100%|█████████████████████████████████████████████████████████████| 4.08G/4.08G [00:36<00:00, 110MB/s]
Now that the model has been downloaded, we can serve and chat with the model. Serving the model simply means we are going to run a server that will allow other programs to interact with the data similar to making an API call.
2.5. Serving the model
Let’s serve the model by running the following command:
ilab model serve --model-path models/granite-7b-lab-Q4_K_M.ggufAs you can see, the serve command can take an optional -–model-path argument. In this case, we want to serve the Granite model. If no model path is provided, the default value from the config.yaml file will be used.
Once the model is served and ready, you’ll see the following output:
INFO 2024-04-23 17:16:53,903 lab.py:296 Using model '/models/granite-7b-lab-Q4_K_M.gguf' with -1 gpu-layers and 4096 max context size.
INFO 2024-04-23 17:17:02,861 server.py:155 Starting server process, press CTRL+C to shutdown server...
INFO 2024-04-23 17:17:02,861 server.py:156 After application startup complete see http://127.0.0.1:8000/docs for API.
WOOHOO! You just served the model for the first time and are ready to test out your work so far by interacting with the LLM. We are going to accomplish this by chatting with the model.
2.6. Chat with the model
Because you’re serving the model in one terminal window, you will have to use a separate terminal window and re-activate your Python virtual environment to run the ilab chat command.
-
In the bottom terminal window, issue the following commands:
cd ~/instructlab
source venv/bin/activate(venv) [instruct@instructlab instructlab]$-
Now that the environment is sourced, you can begin a chat session with the ilab chat command:
ilab model chat -m models/granite-7b-lab-Q4_K_M.ggufYou should see a chat prompt like the example below.
╭───────────────────────────────────────────────────────────────────────────╮
│ Welcome to InstructLab Chat w/ MODELS/GRANITE-7B-LAB-Q4_K_M.GGUF (type /h for help)
╰───────────────────────────────────────────────────────────────────────────╯
>>>-
At this point, you can interact with the model by asking it a question. Example: What is openshift in 20 words or less?
What is openshift in 20 words or less?Wait, wut? That was AWESOME!!!!! You now have your own local LLM running on this machine. That was pretty easy, huh?
3. Integrating AI into an Insurance Application
The previous section showed you the basics of how to interact with InstructLab. Now let’s take things a step further by using InstructLab with an example application. We will use RHEL AI to leverage the granite LLM, add additional data in the form of knowledge and/or skills, train the model with new knowledge and enable it to answer questions effectively. This is done in the context of Parasol, a fictional company that processes insurance claims.
Parasol has a chatbot application infused with AI (the granite model) to provide repair suggestions for claims submitted. This would allow Parasol to expedite processing of various claims on hold. But at the moment, the chatbot does not provide effective repair suggestions. Using historical claims data that contain different repairs performed under different conditions, we show how users can add this knowledge to the granite model, train it on the additional knowledge and improve its recommendations.
3.1. Using the Parasol Application
Let’s start by taking a look at the current experience a claims agent has when interacting with the chatbot.
-
While you may currently be in the Terminals view, switch to Parasol to see the Parasol company’s claims application in your browser.
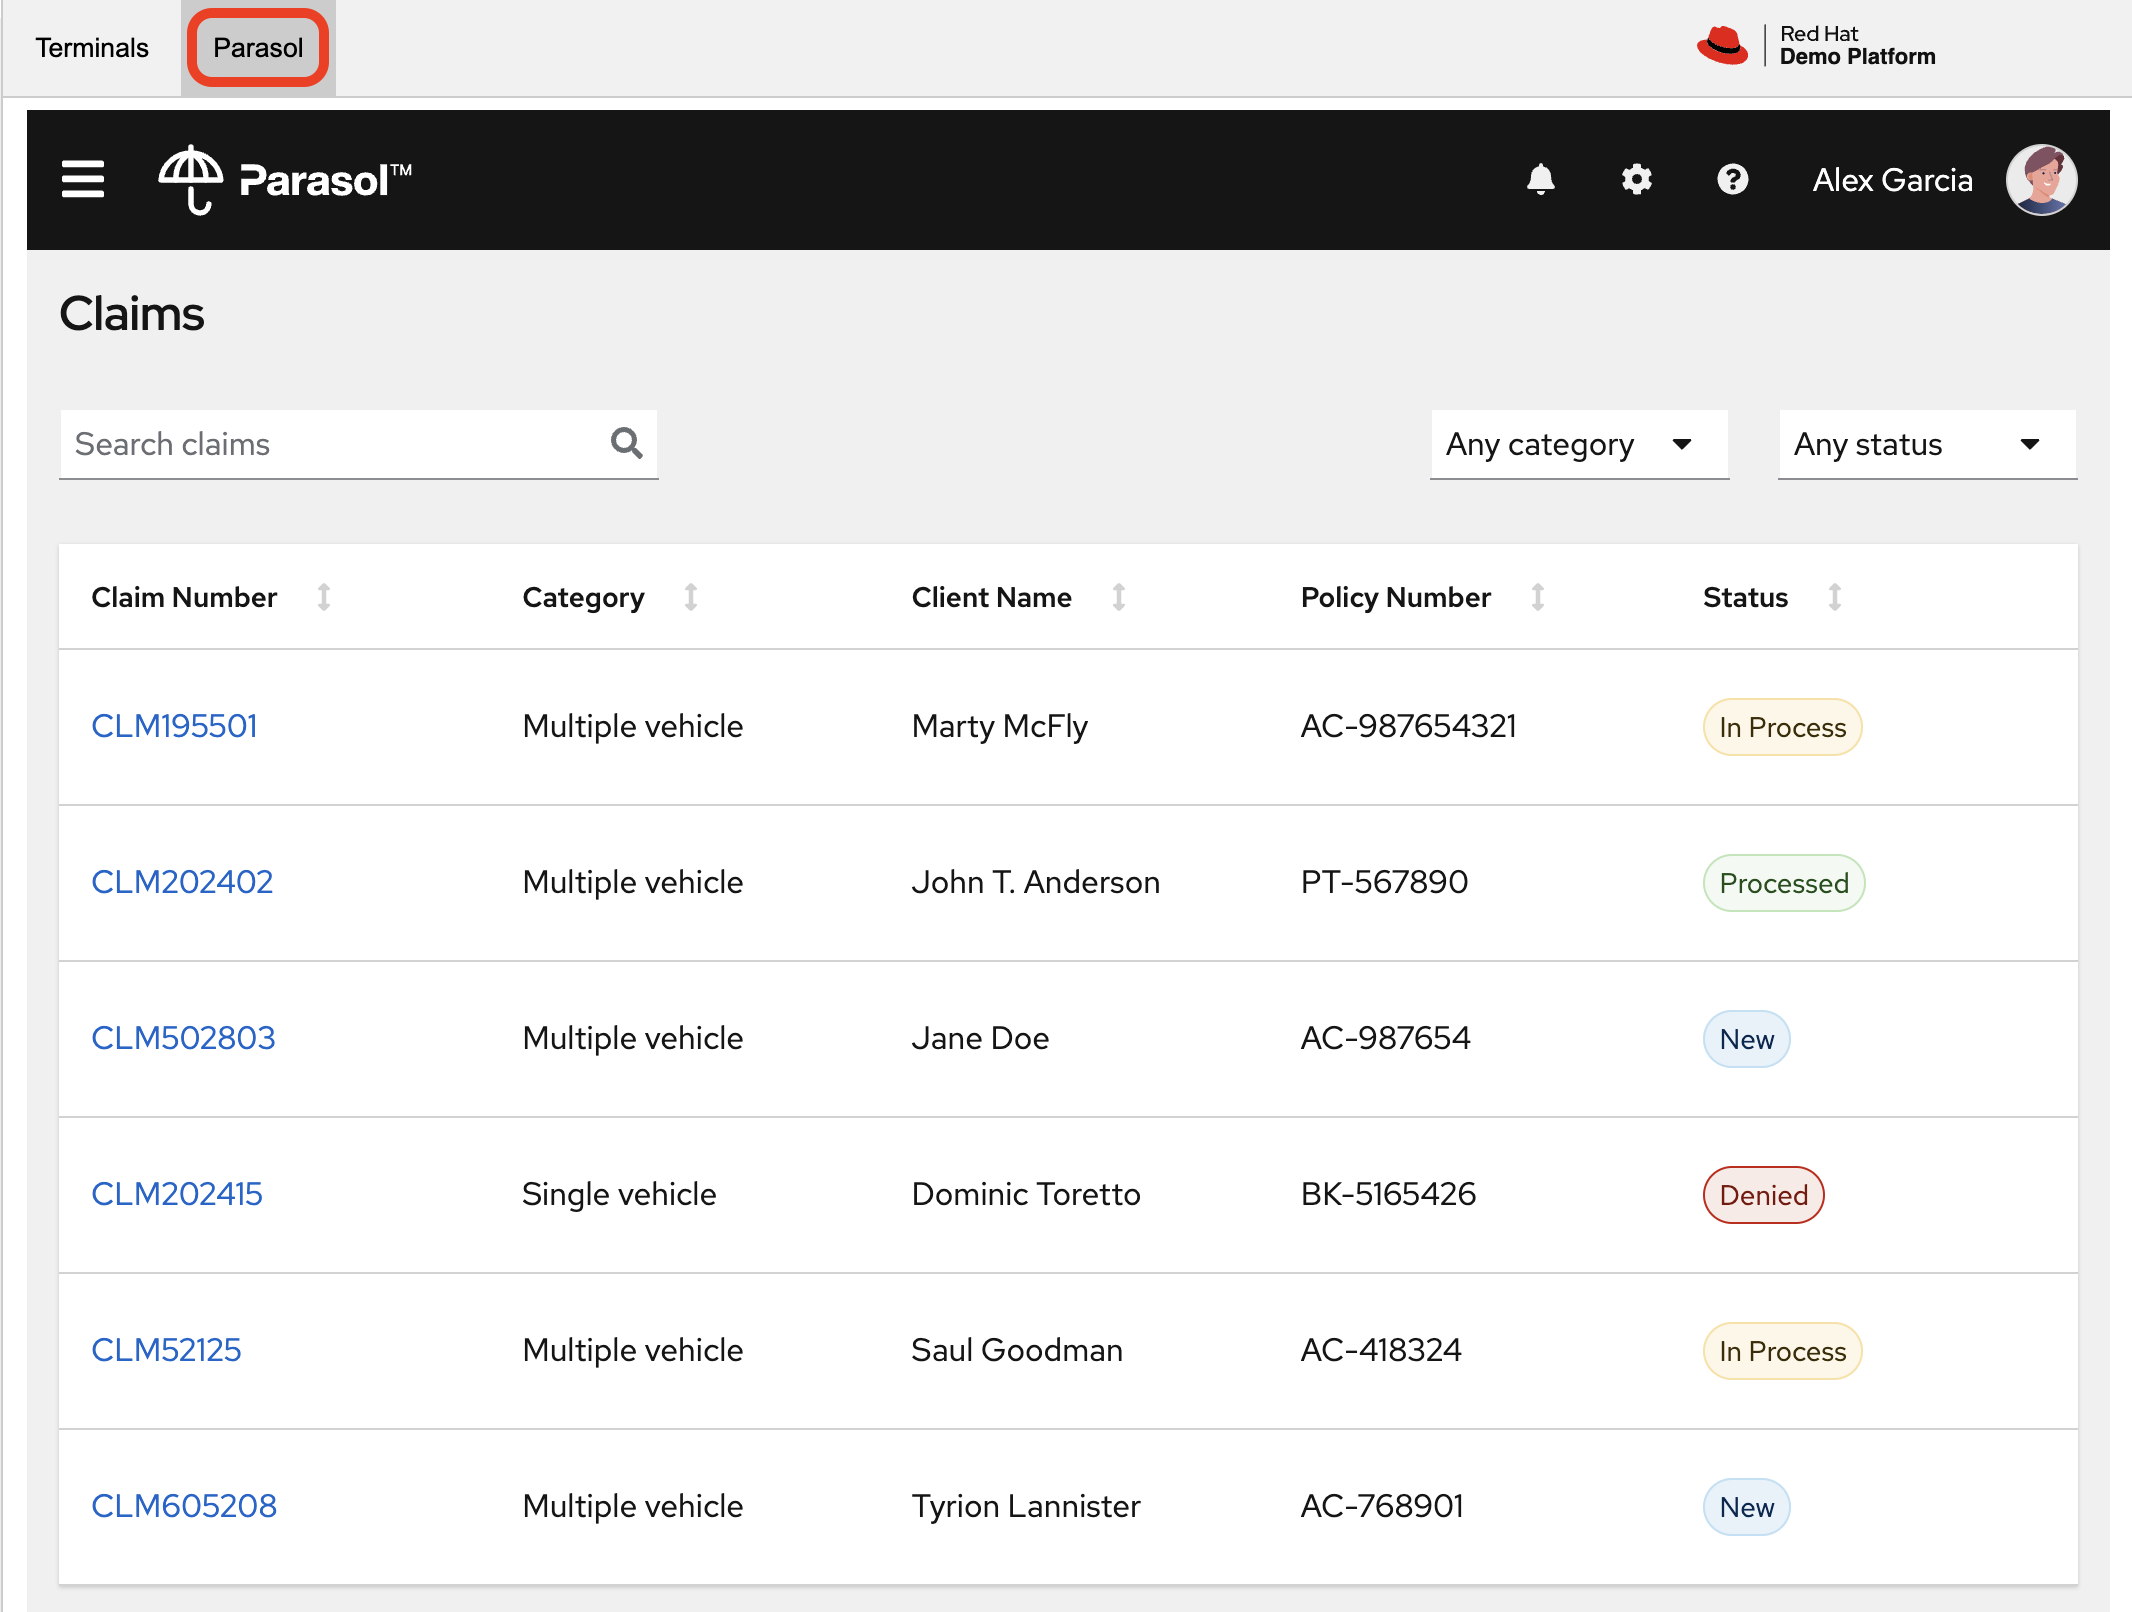
As a claims agent, you can navigate and view the existing claims by clicking on the claim number on the screen.
-
For this lab we will be investigating CLM195501 which is a claim that has been filed by Marty McFly, let’s click on this claim now.
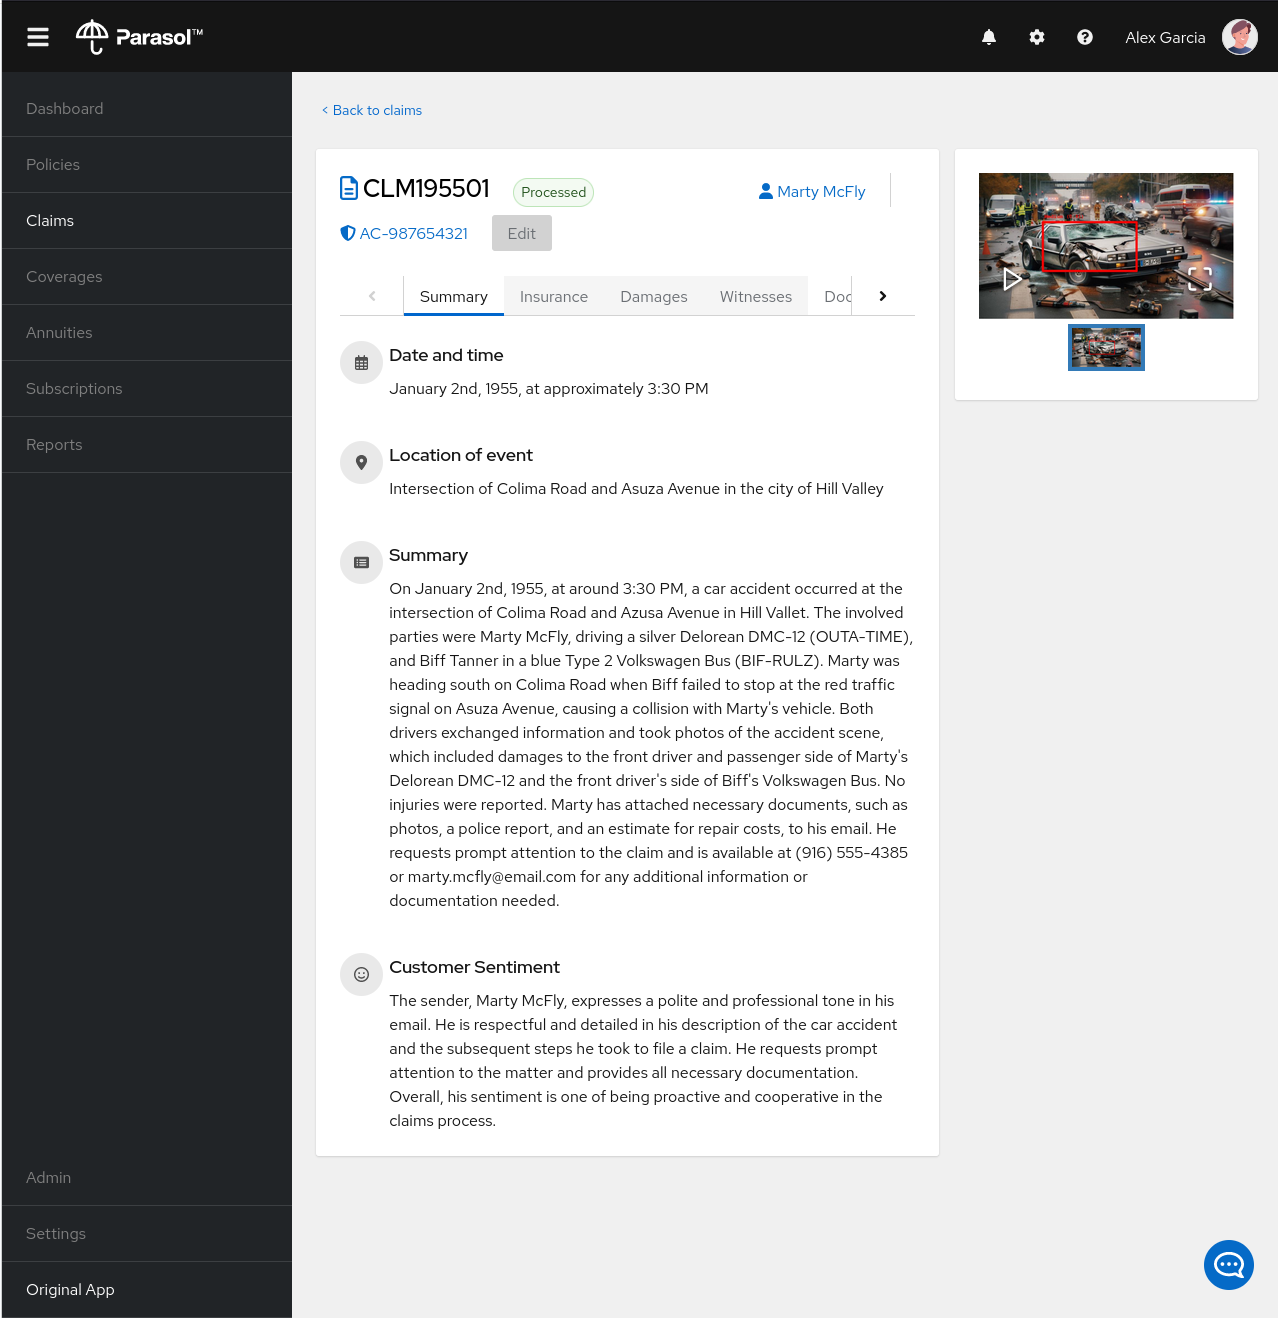
You can read the details of the claim on this page and even expand the image of the DeLorean to check out how badly Marty wrecked his ride (note the flux capacitor on the ground).
-
Once you read the claim you click on the chatbot using the small blue icon in the bottom right of the page.
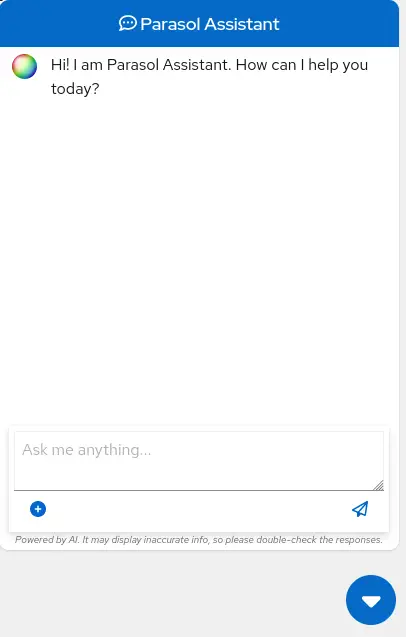
This chatbot is backed by the Granite model you served earlier, so if you killed that running process you will need to restart it in your terminal by running the following: ilab model serve --model-path models/granite-7b-lab-Q4_K_M.gguf
|
Let’s imagine as a claims agent you’d like to know how much it might cost to repair a flux capacitor on Marty’s DeLorean.
-
Ask the chatbot the following question:
How much does it cost to repair a flux capacitor?You should see something similar to the following. Note that LLMs by nature are non-deterministic. This means that even with the same prompt input, the model will produce varying responses. So, your results may vary slightly.

What we’ve already started to do is provide contextual information about the claim in each conversation with the LLM using Prompt Engineering. But unfortunately, the chatbot doesn’t know how much it costs to repair a flux capacitor, or any domain-specific knowledge for our organization. With InstructLab and RHEL AI, we can change that by teaching the model!
3.2. Understanding the Taxonomy
InstructLab uses a novel synthetic data-based alignment tuning method for Large Language Models (LLMs.) The "lab" in InstructLab stands for Large-scale Alignment for Chat Bots. The LAB method is driven by taxonomies, which are largely created manually and with care.
InstructLab crowdsources the process of tuning and improving models by collecting two types of data: knowledge and skills in the new InstructLab open source community. These submissions are collected in a taxonomy of YAML files to be used in the synthetic data generation process. To help you understand the directory structure of a taxonomy, please refer to the following image.
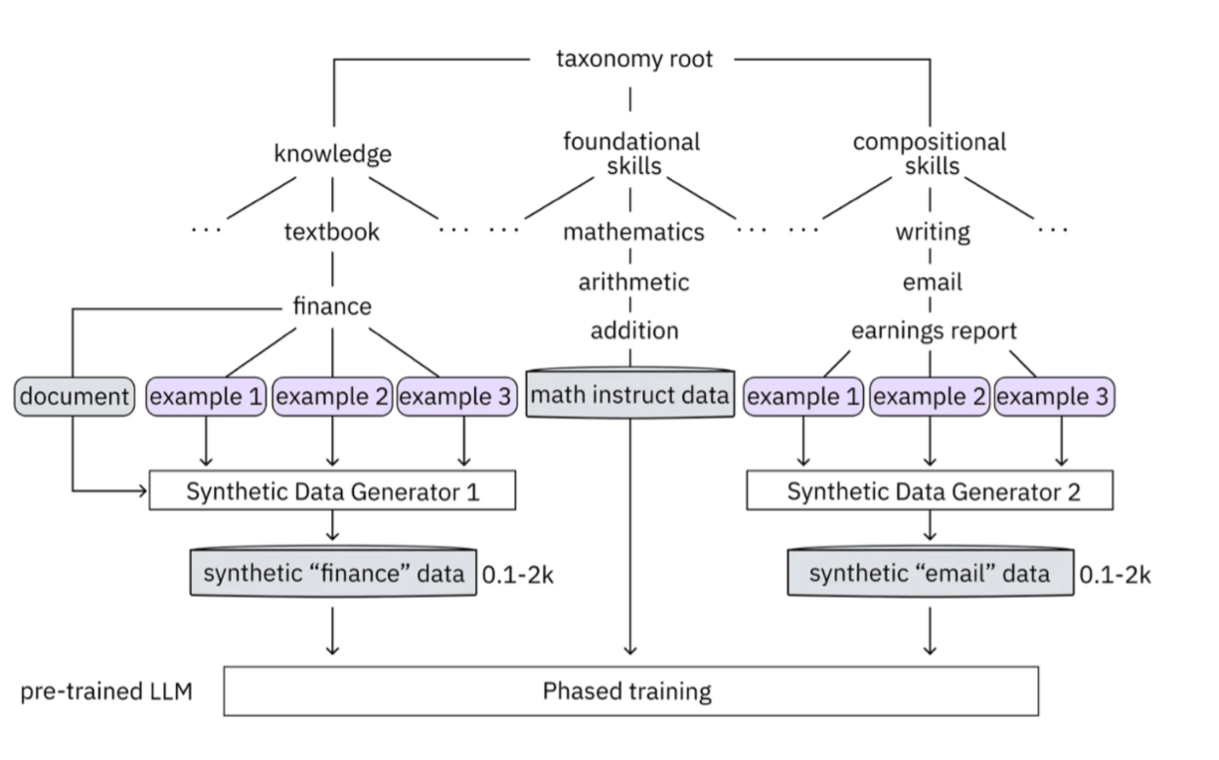
We are now going to leverage the taxonomy model to teach the model knowledge about a specific vehicle we cover and its details, from our organization’s collection of public (and private) internal data.
Navigate back to the Terminals view. In the terminal window where you are running chat, enter exit to quit the chat session.
-
Navigate to the taxonomy directory.
cd ~/instructlab
tree taxonomy | head -n 10taxonomy/
├── CODE_OF_CONDUCT.md
├── compositional_skills
│ ├── arts
│ ├── engineering
│ ├── geography
│ ├── grounded
│ │ ├── arts
│ │ ├── engineering
│ │ ├── geographyNow, we need to create a directory where we can place our files.
-
Create a directory to add new knowledge showing how to properly generate a knowledge on Instructlab
mkdir -p ~/instructlab/taxonomy/knowledge/parasol/claims-
Add new capabilities to our model through new knowledge.
The way the taxonomy approach works is that we provide a file, named qna.yaml, that contains a sample data set of questions and answers. This data set will be used in the process of creating many more synthetic data examples, enough to fully influence the model’s output. The important thing to understand about the qna.yaml file is that it must follow a specific schema for InstructLab to use it to synthetically generate more examples.
The qna.yaml file is placed in a folder within the knowledge subdirectory of the taxonomy directory. It is placed in a folder with an appropriate name that is aligned with the data topic, as you will see in the below command.
-
Instead of having to type a bunch of information in by hand, simply run the following command to copy this example
qna.yamlfile to your taxonomy directory:
cp -av ~/files/qna.yaml ~/instructlab/taxonomy/knowledge/parasol/claims/-
You can then verify the file was correctly copied by issuing the following command which will display the first 10 lines of the file:
head ~/instructlab/taxonomy/knowledge/parasol/claims/qna.yamlDuring this workshop, we don’t expect you to type all of this information in by hand - we are including the content here for your reference.
It’s a YAML file that consists of a list of Q&A examples that will be used by the trainer model to teach the student model. There is also a source document which is a link to a specific commit of a text file in git, where we’ve included that a flux capacitor costs an affordable $10,000,000. To help you understand the Q&A file format, we have included it below.
created_by: Marty_McFly(1)
domain: parasol(2)
seed_examples:(3)
- answer: The DeLorean was manufactured from 1981 to 1983.
  question: When was the DeLorean manufactured?
- answer: The DeLorean Motor Company manufactured the DeLorean DMC-12.
  question: Who manufactured the DeLorean DMC-12?
- answer: Transmission Repair costs between $2,500 and $4,000 for the Delorean DMC-12.
  question: How much does it cost to repair the transmission on a DeLorean DMC-12?
- answer: The top speed of the DeLorean DMC-12 was 110MPH and the 0-60 time was approximately 8.8 seconds.
  question: How fast was the Delorean DMC-12?
- answer: The DeLorean DMC-12 weighs 2,712lb (1,230kg).
  question: How much does the DeLorean DMC-12 weigh?
- answer: Maintenance on a DeLorean DMC-12 includes regular oil changes every 3,000 miles or 3 months,
    brake fluid change every 2 years, transmission fluid changes every 30,000 miles, coolant change every 2 years,
    and regularly checking the battery for corrosion and proper connection.
  question: What does maintenance for a DeLorean DMC12 look like?
- answer: It costs between $800 and $1000 to repair the suspension on a DeLorean DMC-12.
  question: How much does it cost to repair the supension on a DeLorean DMC-12?
task_description: 'Details on instructlab community project'(4)
document:(5)
  repo: https://github.com/gshipley/backToTheFuture.git
  commit: 8bd9220c616afe24b9673d94ec1adce85320809c
  patterns:(6)
- data.md| 1 | created_by: The author of the contribution, typically a GitHub username |
| 2 | domain: Category of the knowledge |
| 3 | seed_examples: Five or more examples sourced from the provided knowledge documents, representing a question for the model and desired response |
| 4 | task_description: An optional description of the knowledge for easily understanding the specific knowledge contribution |
| 5 | document: The source of your knowledge contribution, consisting of a repo URL pointing to the knowlege markdown files, and commit SHA that contains the specific files |
| 6 | patterns: A list of glob patterns specifying the markdown file(s) in your repository. |
-
Now, it’s time to verify that the seed data is curated properly.
InstructLab allows you to validate your taxonomy files before generating additional data. You can accomplish this by using the ilab taxonomy diff command as shown below:
| Make sure you are still in the virtual environment indicated by the (venv) on the command line. If not, source the venv/bin/activate file again. |
ilab taxonomy diffknowledge/parasol/claims/qna.yaml
Taxonomy in /taxonomy/ is valid :)3.3. Generating Synthetic Data
Okay, so far so good. Now, let’s move on to the AWESOME part. We are going to use our taxonomy, which contains our qna.yaml file, to have the LLM automatically generate more examples. The generate step can often take a while and is dependent on the number of instructions that you want to generate. In other words, this means that InstructLab will generate X number of additional questions and answers based on the samples provided. To give you an idea of how long this takes, generating 100 additional questions and answers typically takes about 7 minutes when using a nicely specced consumer-grade GPU-accelerated Linux machine. This can take around 15 minutes using Apple Silicon and depends on many factors. For the purpose of this workshop, we are only going to generate 5 additional samples. To do this, issue the following commands:
-
We will now run the command to generate data in the current terminal. The upper terminal should still be serving the Granite model from earlier. If the model is no longer being served, serve the model again with the following command (in the other upper window):
ilab model serve --model-path models/granite-7b-lab-Q4_K_M.gguf-
Now run the following command in the terminal window that is not serving the model, or the bottom window:
cd ~/instructlab
ilab data generate --model models/granite-7b-lab-Q4_K_M.gguf --num-instructions 5
After running this command, you should see the InstructLab is now synthetically generating 5 examples based on the seed data you provided in the qna.yaml file. Take a look at the generated questions and answers to see what the model has created!
Generating synthetic data using 'models/granite-7b-lab-Q4_K_M.gguf' model, taxonomy:'taxonomy' against http://127.0.0.1:8000/v1 server
Cannot find prompt.txt. Using default prompt depending on model-family.
  0%|                                                                                                                                       | 0/5 [00:00<?, ?it/s]Synthesizing new instructions. If you aren't satisfied with the generated instructions, interrupt training (Ctrl-C) and try adjusting your YAML files. Adding more examples may help.
INFO 2024-08-06 16:38:53,754 generate_data.py:505: generate_data Selected taxonomy path knowledge->parasol->claims
Q> What is the horsepower of the DeLorean DMC-12?
I>
A> The DeLorean DMC-12 has a horsepower of 130 hp.
Now that we have generated additional data, we can use the ilab train command to incorporate this data set with the model.
| Generating 5 additional examples is generally not enough to effectively impact the knowledge or skill of a model. However, due to time constraints of this workshop, the goal is to simply show you how this works using real commands. You would typically want to generate 100 or even 1000 additional data points. Even still, training on a laptop is more of a technology demonstration than something you’d want to do to train production LLMs. For training production LLMs, Red Hat provides RHEL AI and OpenShift AI. |
Once the new data has been generated, the next step is to train the model with the updated knowledge. This is performed with the ilab train command.
| Training using the newly generated data is a time and resource intensive task. Depending on the number of iterations desired, internet connection for safetensor downloading, and other factors, it can take from 20 minutes up to an hour. It is not required to train the model to continue with the lab as we will use an already trained model that was created using a generate step with 2500 instructions and 300 iterations. |
3.4. Training and Interacting with the Model
Due to the time constraints of this lab, we will not actually be training the model. A trained model will be provided for you. However, to illustrate how training works, you would issue the following command:
ilab model train --iters 10 --device cudaIf we were really training the model, you would see the following output:
LINUX_TRAIN.PY: NUM EPOCHS IS:  1
LINUX_TRAIN.PY: TRAIN FILE IS:  taxonomy_data/train_gen.jsonl
LINUX_TRAIN.PY: TEST FILE IS:  taxonomy_data/test_gen.jsonl
LINUX_TRAIN.PY: Using device 'cuda:0'
  NVidia CUDA version: 12.1
  AMD ROCm HIP version: n/a
  cuda:0 is 'NVIDIA A10G' (15.3 GiB of 22.1 GiB free, capability: 8.6)
  WARNING: You have less than 18253611008 GiB of free GPU memory on '{index}'. Training may fail, use slow shared host memory, or move some layers to CPU.
  Training does not use the local InstructLab serve. Consider stopping the server to free up about 5 GiB of GPU memory.
LINUX_TRAIN.PY: LOADING DATASETS
Generating train split: 5 examples [00:00, 265.43 examples/s]
Generating train split: 7 examples [00:00, 6582.99 examples/s]
/home/instruct/instructlab/venv/lib64/python3.11/site-packages/huggingface_hub/file_download.py:1150: FutureWarning: `resume_download` is deprecated and will be removed in version 1.0.0. Downloads always resume when possible. If you want to force a new download, use `force_download=True`.
  warnings.warn(
Special tokens have been added in the vocabulary, make sure the associated word embeddings are fine-tuned or trained.
LINUX_TRAIN.PY: NOT USING 4-bit quantization
LINUX_TRAIN.PY: LOADING THE BASE MODEL
Loading checkpoint shards: 100%|████████████████████████████████████████████████████████████████████████████████████████████████████| 3/3 [00:00<00:00, 5.95it/s]-
Since this process will take over an hour to complete we have provided a model that has already been through this process. First, let’s stop the current model server in the upper window, with bd:[CTRL+C]) on the keyboard. In order to serve the newly trained model you can now run the following in the upper command window:
ilab model serve --model-family merlinite --model-path /home/instruct/summit-connect-merlinite-lab-Q4.ggufIt may take some seconds to start, but you should see the following:
INFO 2024-08-06 17:04:12,748 serve.py:51: serve Using model 'models/summit-connect-merlinite-7b-lab-Q4_K_M.gguf' with -1 gpu-layers and 4096 max context size.
INFO 2024-08-06 17:04:15,452 server.py:218: server Starting server process, press CTRL+C to shutdown server...
INFO 2024-08-06 17:04:15,452 server.py:219: server After application startup complete see http://127.0.0.1:8000/docs for API.
3.5. Verifying the Application
Now for the moment of truth. You’ve added knowledge, generated synthetic data, and retrained the model. Refresh your browser window where you were viewing Marty McFly’s claim in the Parasol insurance application

Click on the blue chatbot icon in the bottom right corner of the screen to open the chatbot.

-
Let’s ask the chatbot the same question with the newly trained model and see if the response has improved.
How much does it cost to repair a flux capacitor?You should see something similar to the following (keep in mind that your output may look different due to the nature of large language models):
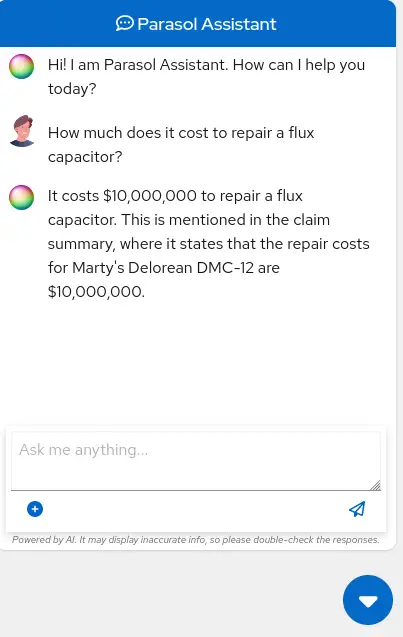
CONGRATULATIONS! You just trained a chatbot for Parasol insurance and will make every claims agent’s life a little better!
4. Conclusion
Woohoo young padawan, mission accomplished. Breathe in for a bit. We’re proud of you, and I dare say you’re an AI Engineer now. You’re probably wondering what the next steps are, so let me give you some suggestions.
Start playing with both skill and knowledge additions. This is to give something "new" to the model. You give it a chunk of data, something it doesn’t know about, and then train it on that. How could InstructLab-trained models help at your company? Which friend will you brag to first?
As you can see, InstructLab is pretty straightforward and most of the time you spend will be on curating new taxonomy content. Again, we’re so happy you made it this far, and remember if you have questions we are here to help, and are excited to see what you come up with!
Please visit the official project github at www.github.com/instructlab and check out the community repo to learn about how to get involved with the upstream community! Also, learn more about RHEL AI here (which includes support for InstructLab, idemification for model output with the Granite family of models, and a platform to run AI your own way on the hybrid cloud).