Working with Virtual Machines and Applications
Introduction
This section of our lab is dedicated to the Day-2 operations that many administrators would need to perform when working with virtual machines in their OpenShift Virtualization environment. We will make use of the understanding we have developed throughout this roadshow of how VMs operate in an OpenShift environment, and use those skills to complete the tasks in this section. In this particular case, we are going to work with the three virtual machines that we imported from VMware vSphere earlier in this roadshow, and we are going to make some minor configuration changes to enable the applications hosted on those servers to be accessed as they now run in OpenShift Virtualization. To accomplish this, we will expose our applications using the service/route method that is the default when making use of the OpenShift SDN pod network so that the application is reachable from outside of the cluster. Doing so provides a more modernized approach to virtual machine management by directly exposing the applications that reside on the VMs.
| If you have not completed the module Migrating Existing Virtual Machines, it is recommended that you do that module first. If you have not completed it, or if the migration process is still pending, you can complete this section by using the pre-existing virtual machines that have been staged for you for you in the vmimported-{user} project. Please skip to the appropriate section below based on if you are working with MTV-imported VMs or with Staged VMs. |
Exposing an Application with a Service/Route - MTV-Imported VMs
As we mentioned earlier, by default, virtual machines are connected to the SDN, which is a convenient and easy way to give them access to the rest of the network. However, it can be challenging for the virtual machines, and other pods in the OpenShift cluster, to find and connect to the virtualized applications. To solve this, we will use a Service to balance connections across the two Windows-based web servers, and create a DNS entry for each service discovery, then create a Route to allow external clients to access the application hosted within the virtual machines.
Introduction to Services
The Service identifies the source/target for traffic, and directs clients to the endpoints based on labels. Currently, the VMs do not have a label assigned yet.
In order to successfully associate the VMs with the Service, we need to do the following:
-
Add a label to the VMs. We will use the same label for both Windows IIS servers because they are both behind the same load balancer.
-
Create the service to make the two Windows IIS servers available for other workloads on the cluster. OpenShift will automatically make the load balancer internally accessible using the name of the Service as the DNS name.
-
Make the service available outside of OpenShift by creating a Route.
To begin, we’ll add labels to the virtual machines by modifying their definition in the OpenShift Virtualization GUI.
Label the Virtual Machines
-
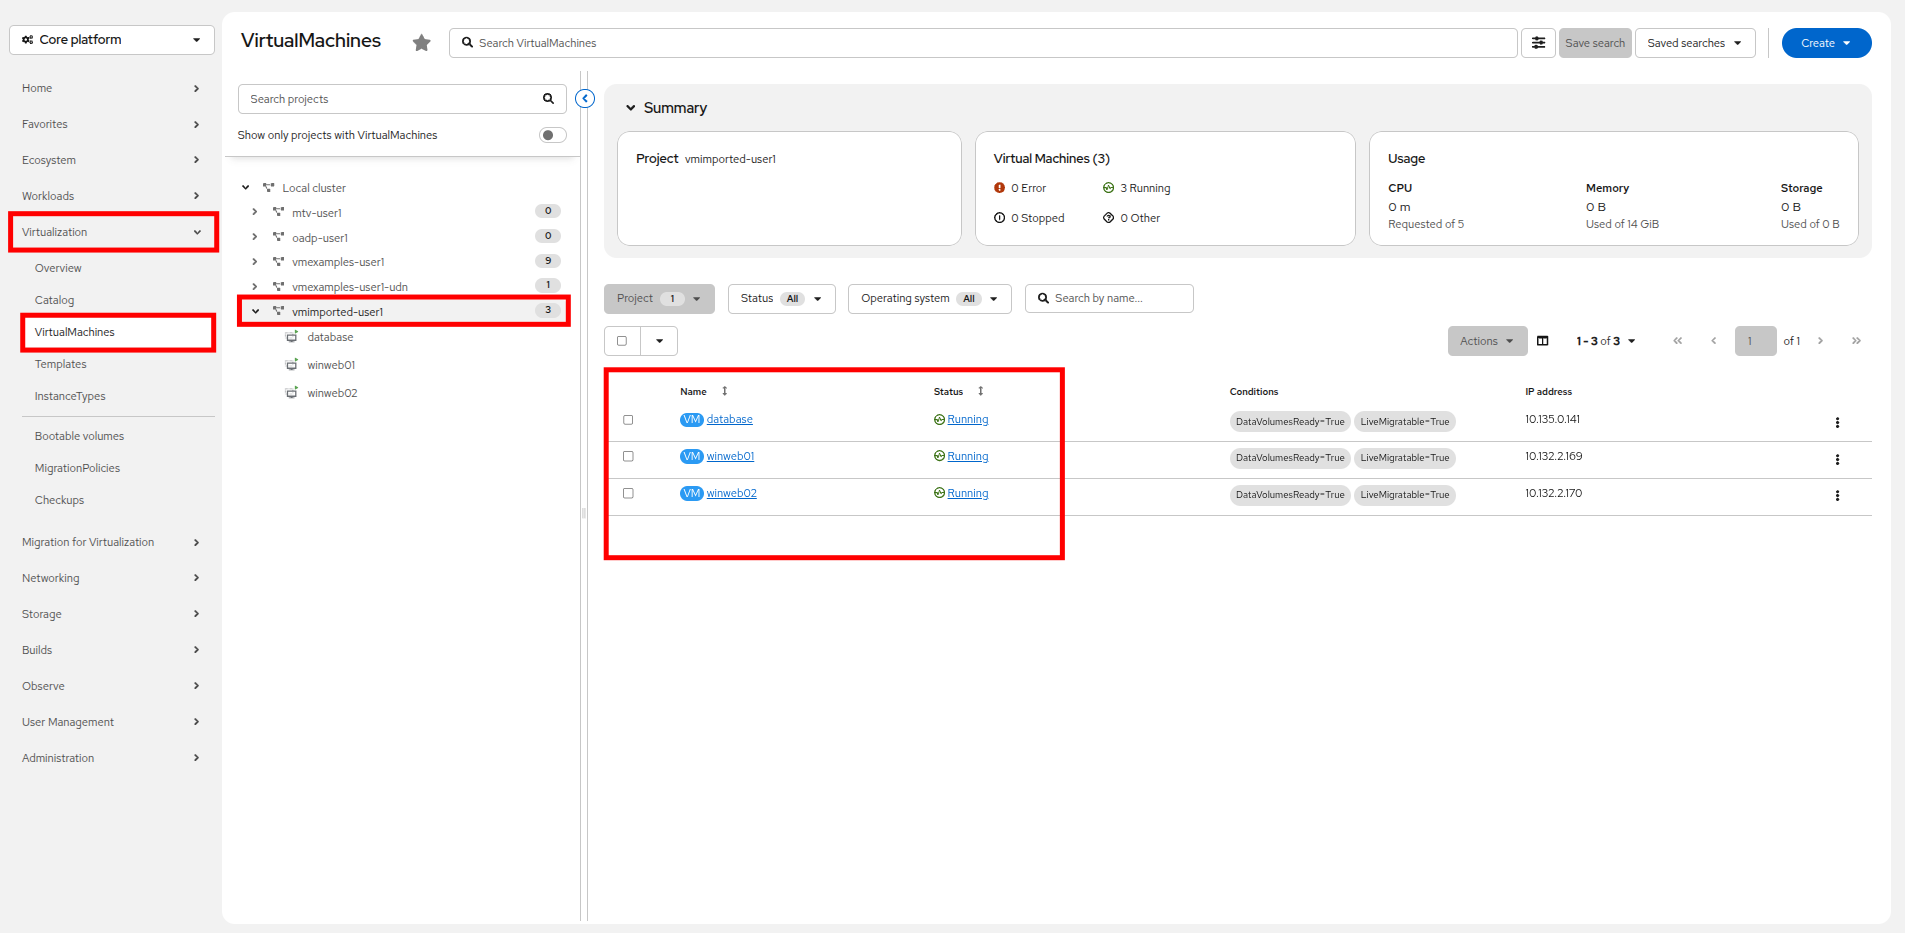
Click on Virtualization → VirtualMachines in the left-side menu, click on the vmexamples-{user} project and Start your three imported virtual machines: database-{user}, winweb01-{user}, and winweb02-{user}, if they are not already running. You can verify this easily by sorting by the Status column in the right-side tree view.
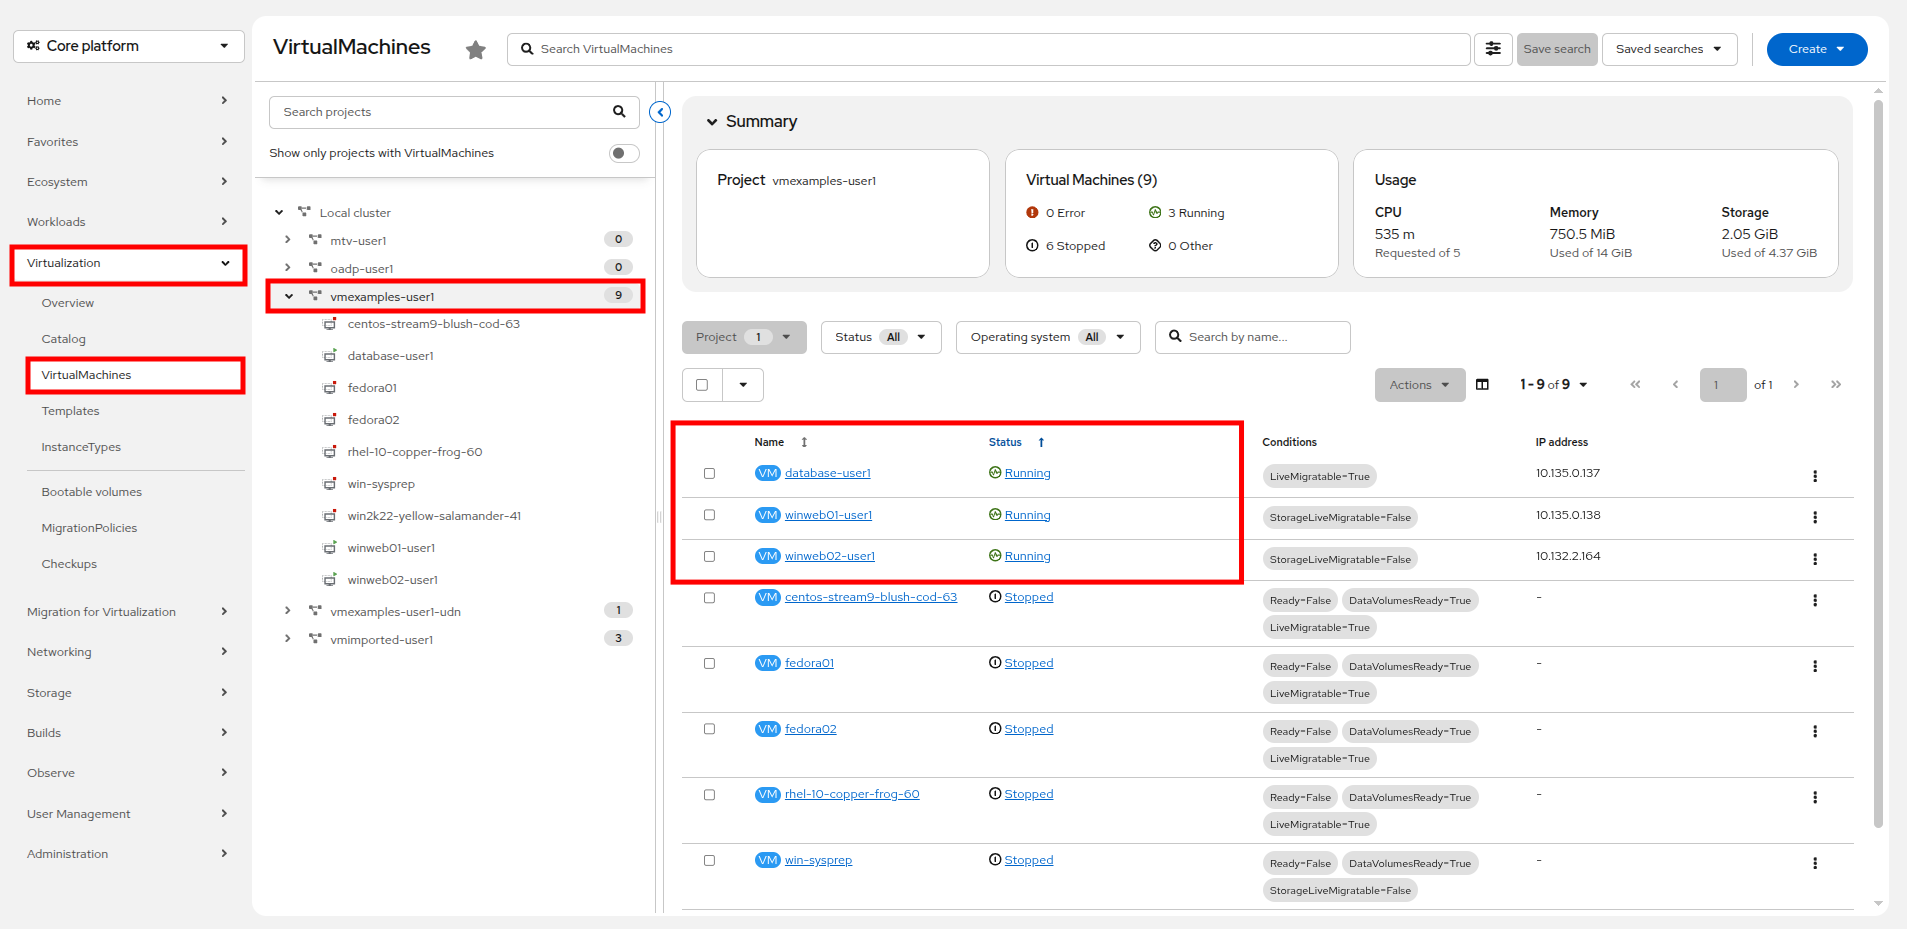
-
Select to the winweb01-{user} VM and navigate to the YAML tab.
-
Find the spec: section and under the template.metadata add the following to the labels section:
env: webappMake sure to get the indentation exactly right - just like in the screenshot below. 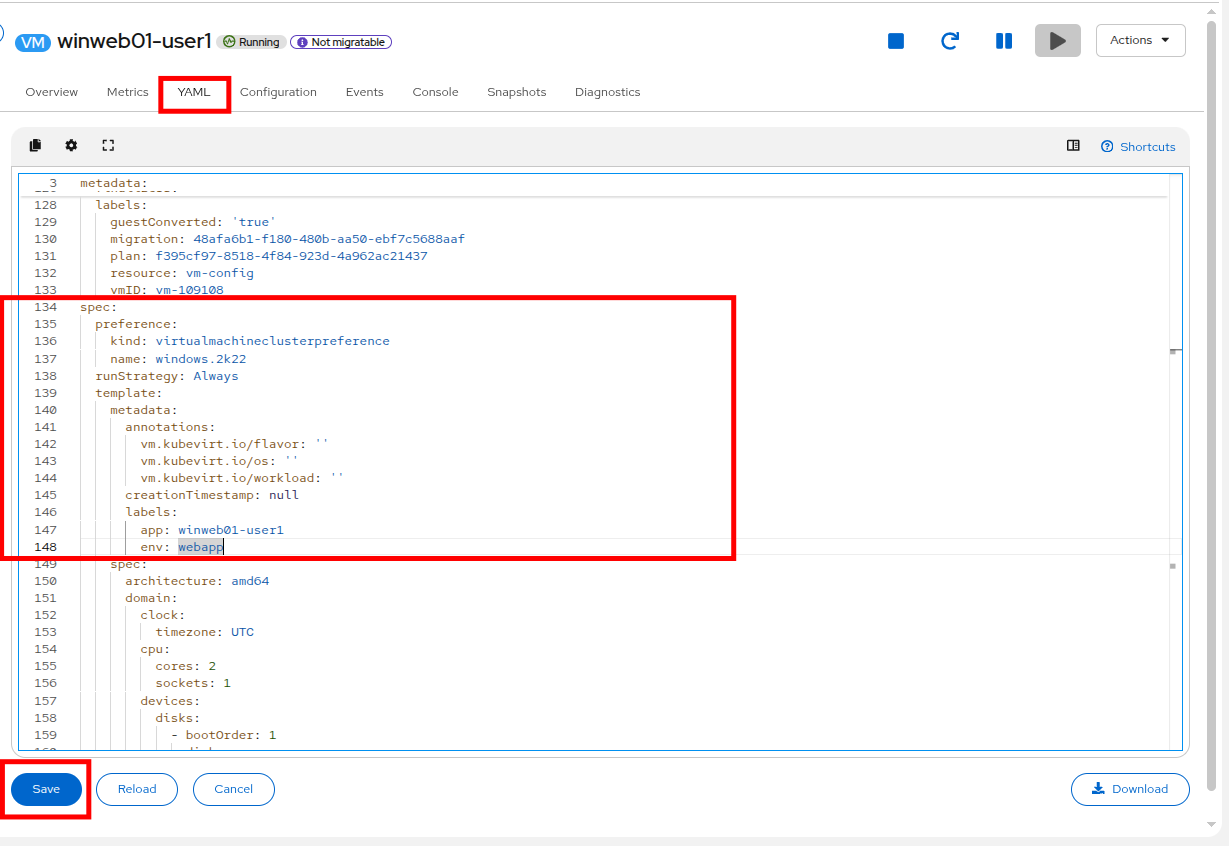
-
Click the Save button, and you will be prompted that the VM has been updated to a new version number.
-
Repeat the process for the VM winweb02-{user}.
-
After completing the configuration change, restart both winweb01-{user} and winweb02-{user}.
Ensure the VMs are properly working by accessing to the console tab of each VM.
Create the Service
-
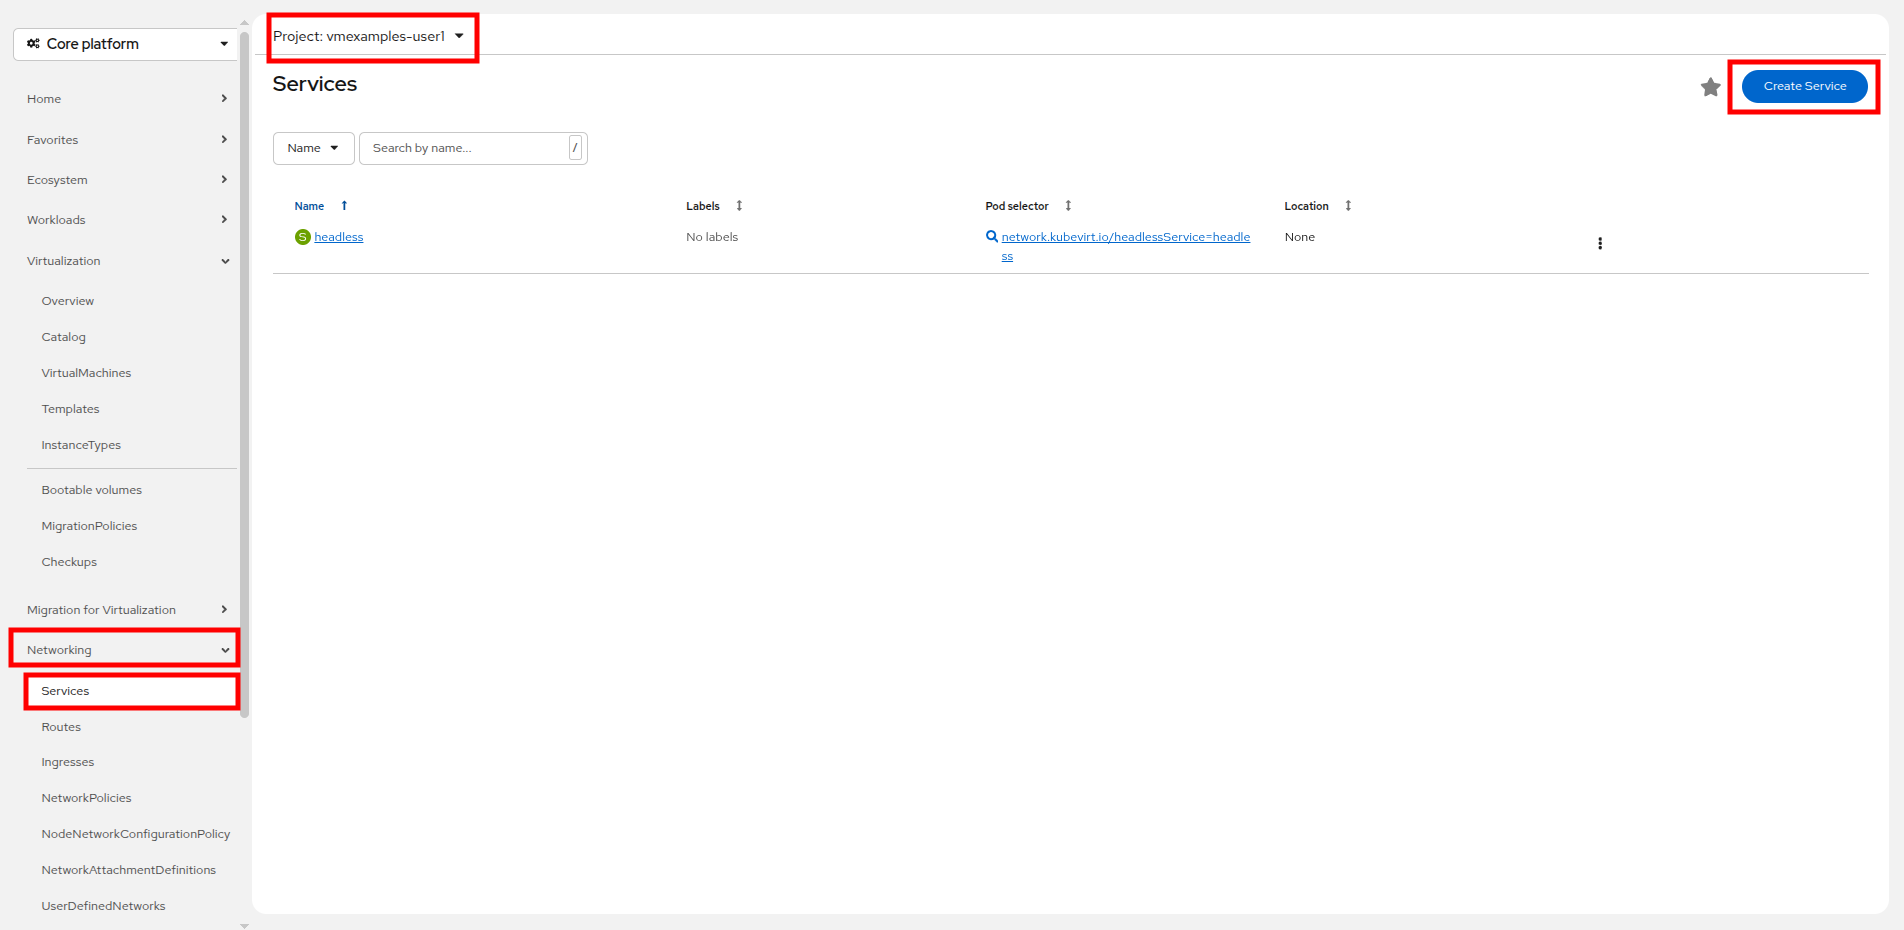
In the left-side menu expand Networking and click on Services. On the screen that loads, click the Create Service button in the corner.
-
Replace the YAML with the following definition
apiVersion: v1
kind: Service
metadata:
  name: webapp
  namespace: vmexamples-{user}
spec:
  selector:
    env: webapp
  ports:
  - protocol: TCP
    port: 80
    targetPort: 80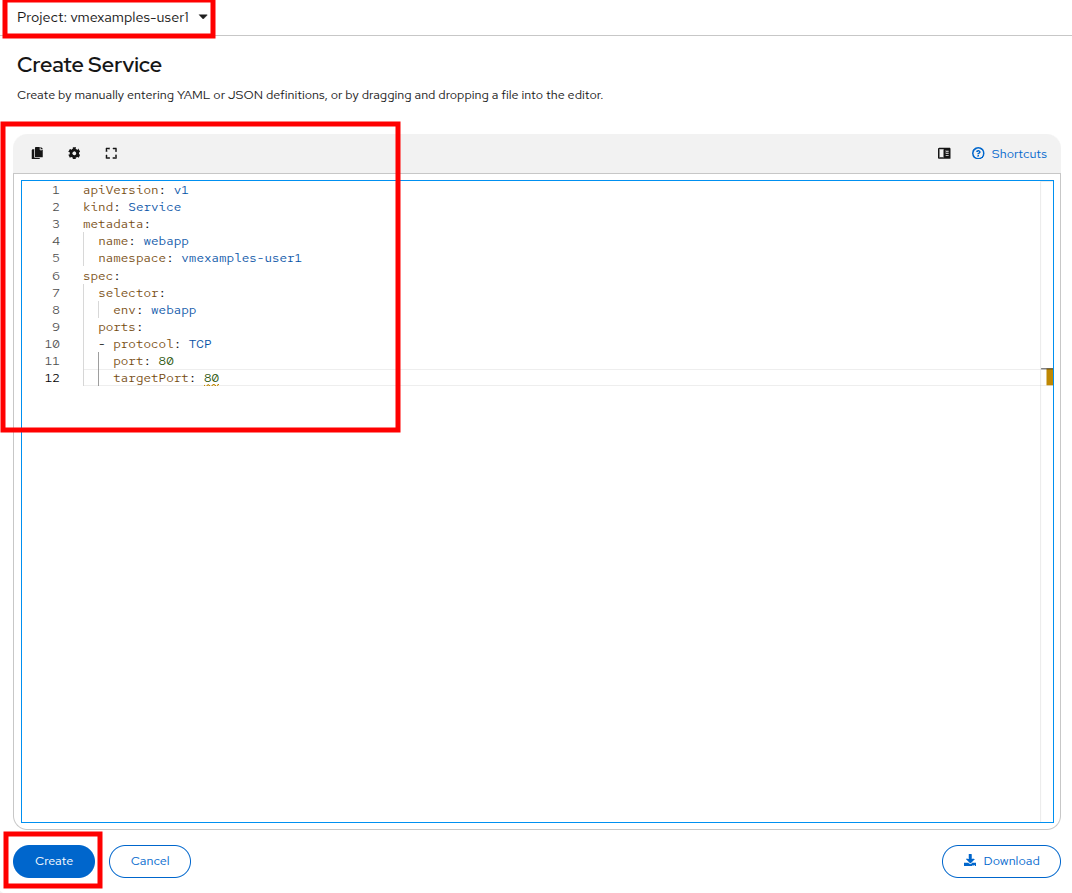
-
Click the Create button at the bottom. You will get a notification that the YAML has been saved.
-
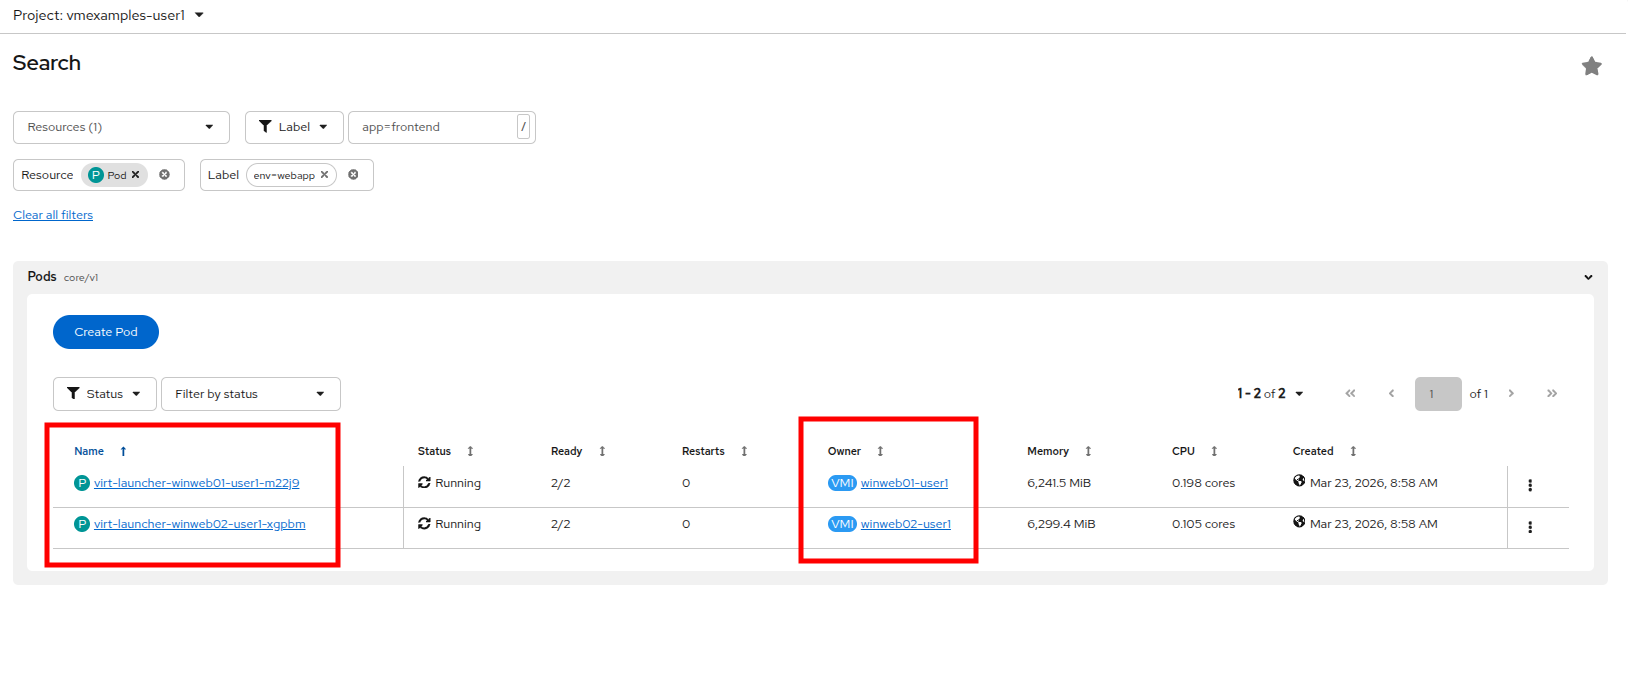
From the details page for the newly created webapp Service, locate Pod selector link and click it.
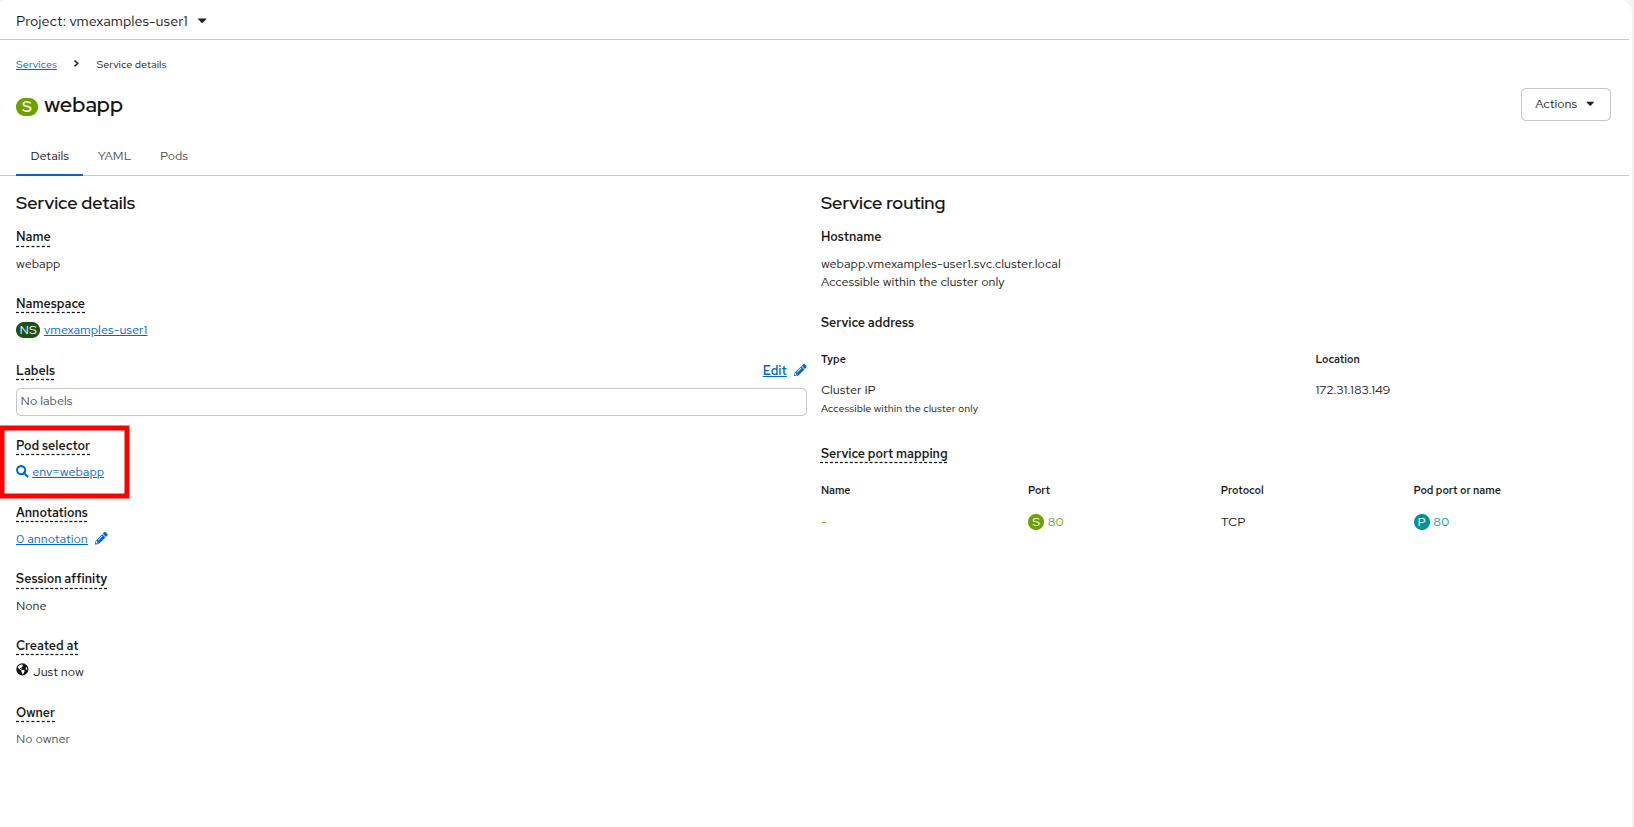
-
Verify the two Windows VMs are properly identified and targeted by the Service.
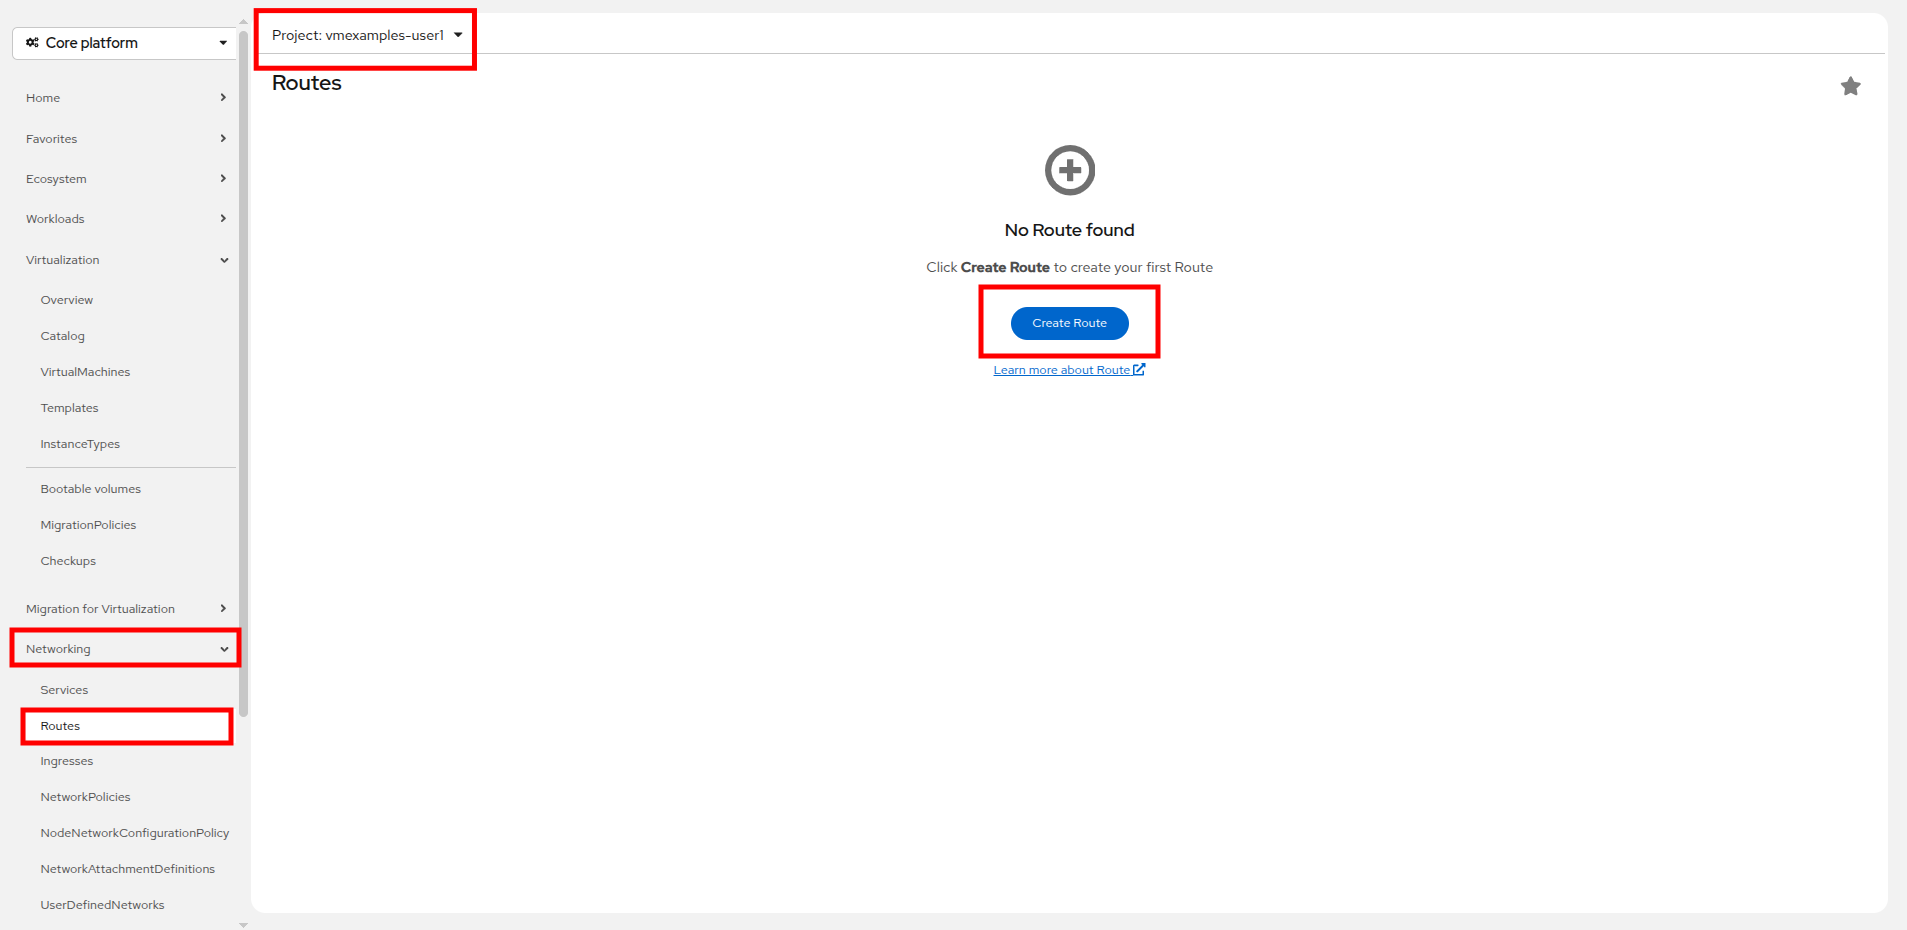
Create the Route
Now the Windows IIS servers are accessible from within the OpenShift cluster. Other virtual machines are able to access them using the DNS name webapp.vmexamples-{user}, which is determined by the name of the service + the namespace. However, since these web servers are the front end to an application, we want it to be externally accessible. This will be done by exposing it publicly using a Route.
-
Under Networking now click on the Routes option in the left navigation menu. Click the Create Route button in the center of the screen.
-
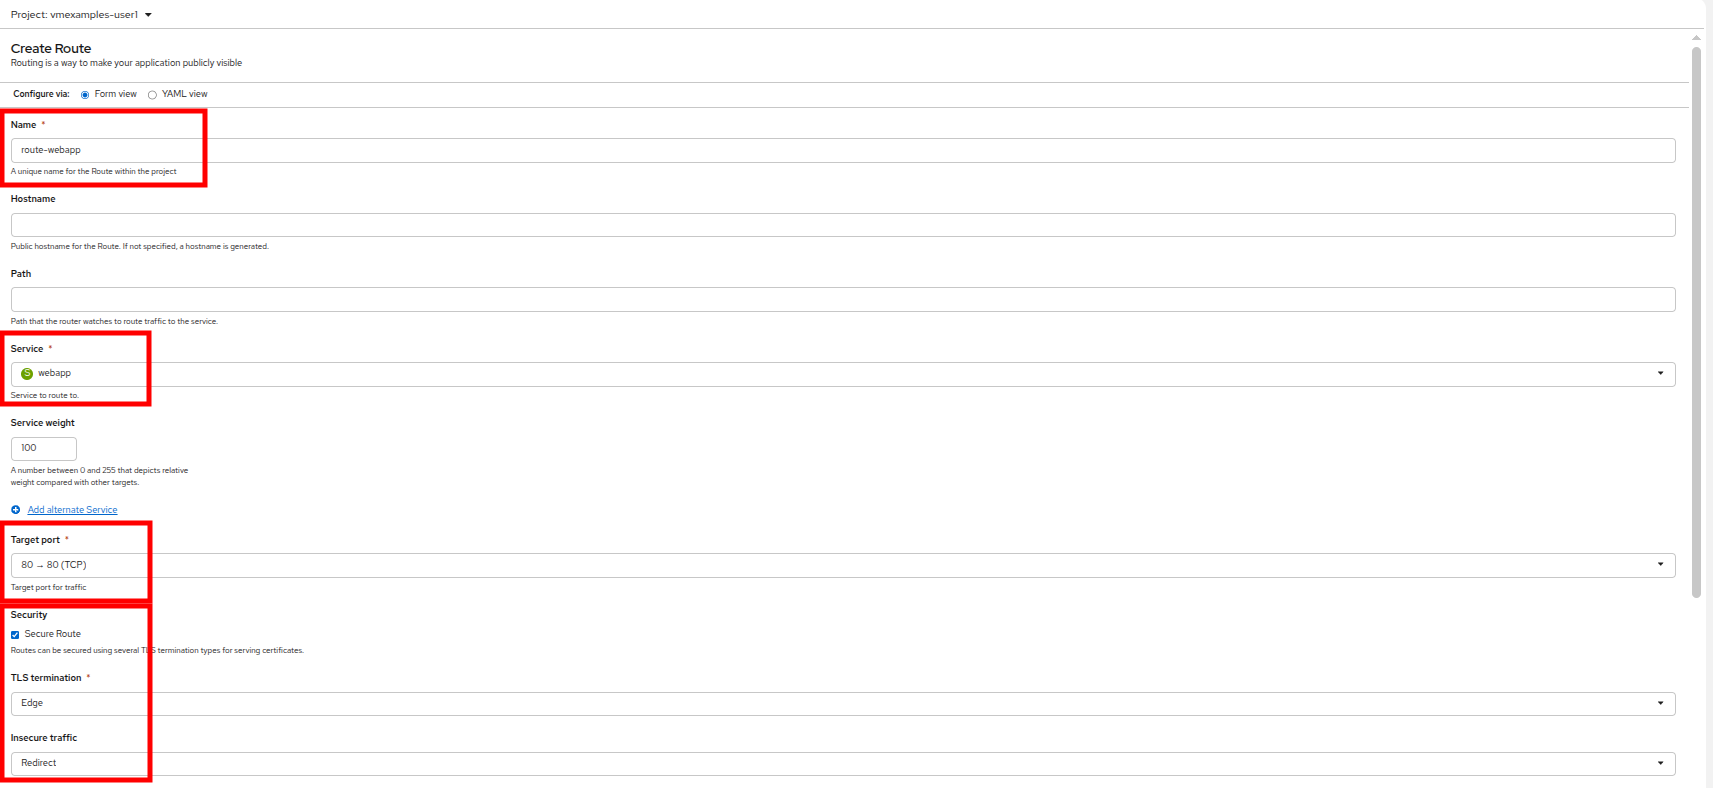
Fill the form using the information below, scroll to the bottom and click the Create button when done.
-
Name: route-webapp
-
Service: webapp
-
Target port: 80 → 80 (TCP)
-
Secure Route: Enabled
-
TLS termination: Edge
-
Insecure traffic: Redirect
-
-
Navigate to the address shown in Location field
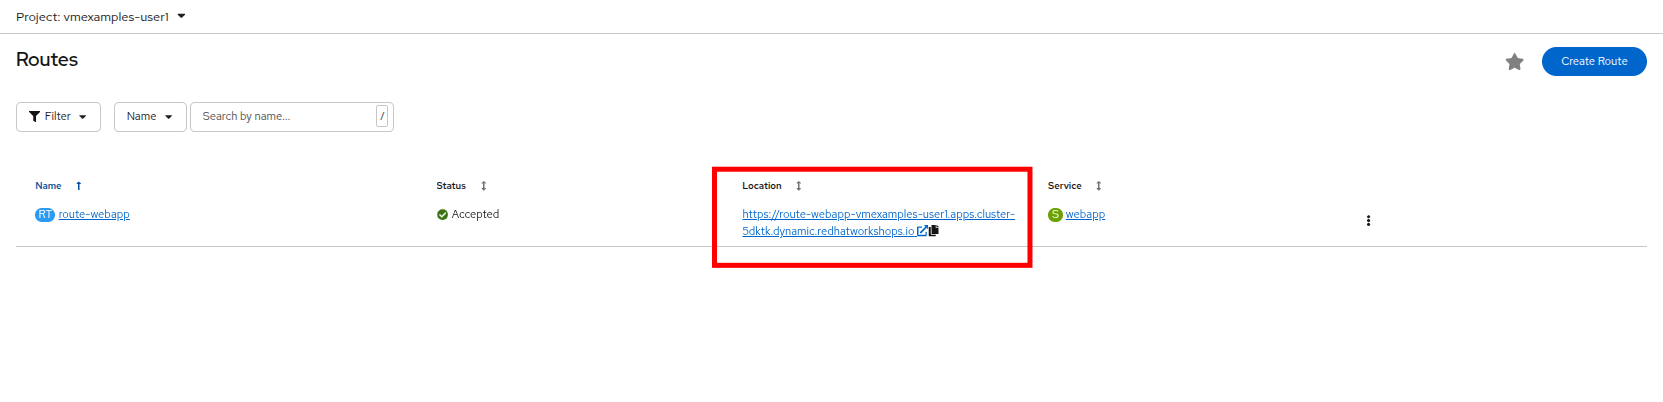
-
When the page loads, you will see an error, it’s not working as expected so something must be wrong.
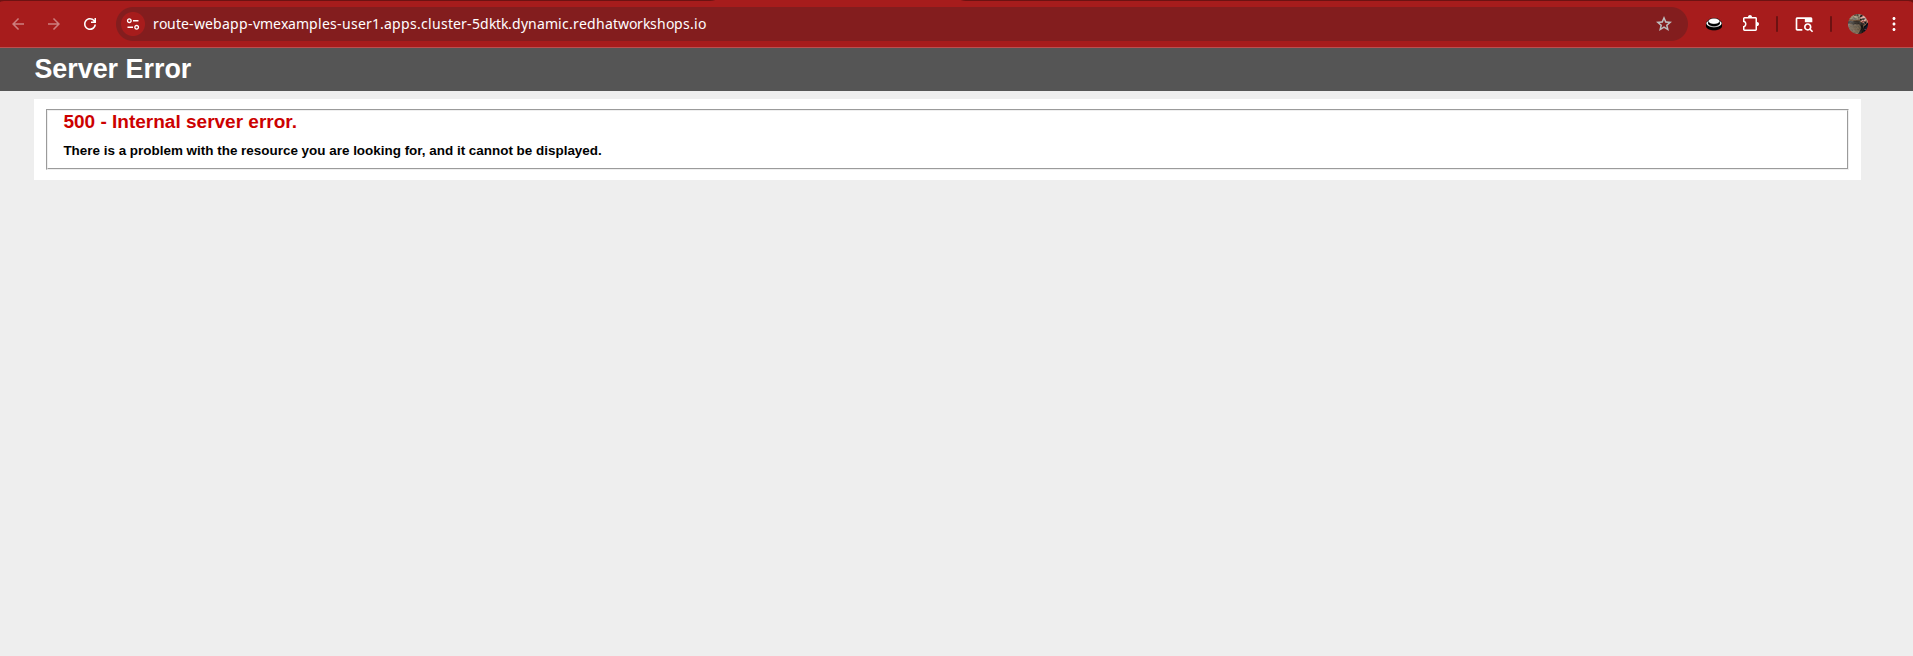
-
To address our connectivity issue, we will need to create a service for the database-{user} VM as well so that it can be accessed by the web servers.
-
Once again, navigate to Networking → Services and press the Create Service button. Replace the YAML with the following definition:
apiVersion: v1
kind: Service
metadata:
  name: database
  namespace: vmexamples-{user}
spec:
  selector:
    vm.kubevirt.io/name: database-{user}
  ports:
  - protocol: TCP
    port: 3306
    targetPort: 3306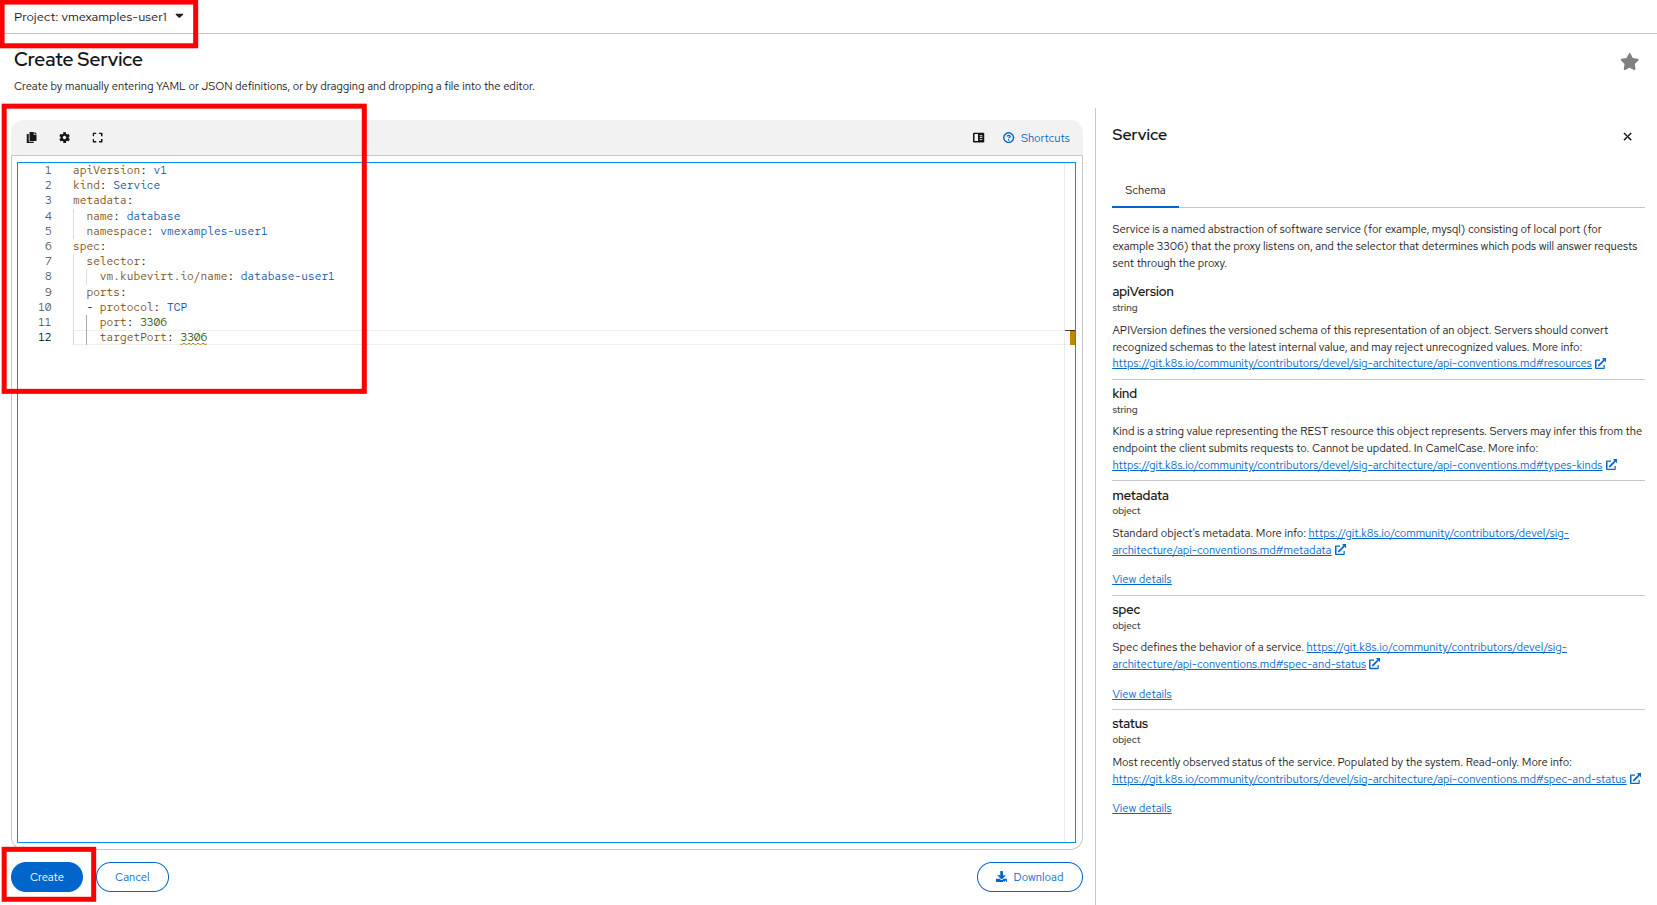
-
When the YAML is pasted, click the Create button.
-
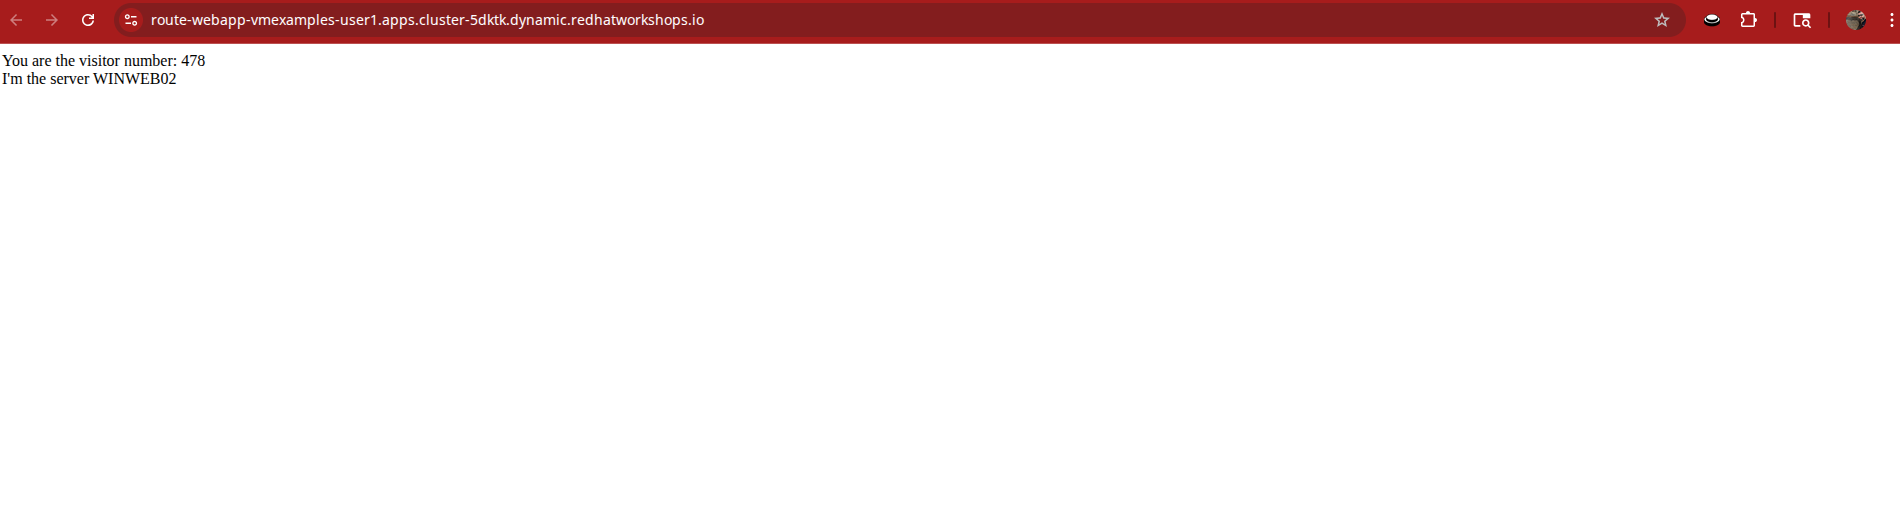
Reload the WebApp URL in your browser and expect to get the proper result of a working migrated web application.

-
Refresh the screen a couple of times, you should see which webserver is responding, and that the count of user accesses rises with each refresh.
-
Return to your OpenShift console, and click on Virtualization → VirtualMachines and shut down the web server that is handling your requests.

-
Return to your tab with the open WebApp URL and refresh the screen. You should see the remaining web server start returning requests, and the count continue to rise with each refresh. Configuring the service to load balance between two virtual web servers is shown to be successful.
While this is a simple example, keep in mind that there are a number of ways to configure load balancing services between virtual machines in OpenShift to meet the needs of your application.
Exposing an Application with a Service/Route - Staged VMs
As we mentioned earlier, by default, virtual machines are connected to the SDN, which is a convenient and easy way to give them access to the rest of the network. However, it can be challenging for the virtual machines, and other pods in the OpenShift cluster, to find and connect to the virtualized applications. To solve this, we will use a Service to balance connections across the two Windows-based web servers, and create a DNS entry for each service discovery, then create a Route to allow external clients to access the application hosted within the virtual machines.
Introduction to Services
The Service identifies the source/target for traffic, and directs clients to the endpoints based on labels. Currently, the VMs do not have a label assigned yet.
In order to successfully associate the VMs with the Service, we need to do the following:
-
Add a label to the VMs. We will use the same label for both Windows IIS servers because they are both behind the same load balancer.
-
Create the service to make the two Windows IIS servers available for other workloads on the cluster. OpenShift will automatically make the load balancer internally accessible using the name of the Service as the DNS name.
-
Make the service available outside of OpenShift by creating a Route.
To begin, we’ll add labels to the virtual machines by modifying their definition in the OpenShift Virtualization GUI.
Label the Virtual Machines
-
Click on Virtualization → VirtualMachines in the left-side menu, click on the vmimported-{user} project and Start your three imported virtual machines: database, winweb01, and winweb02. You can verify this easily by sorting by the Status column in the right-side tree view.
-
Select to the winweb01 VM and navigate to the YAML tab.
-
Find the spec: section and under the template.metadata section, and use the following syntax to add labels to the VM:
labels:
  app: winweb01
  env: webapp
Make sure to get the indentation exactly right - just like in the screenshot below. 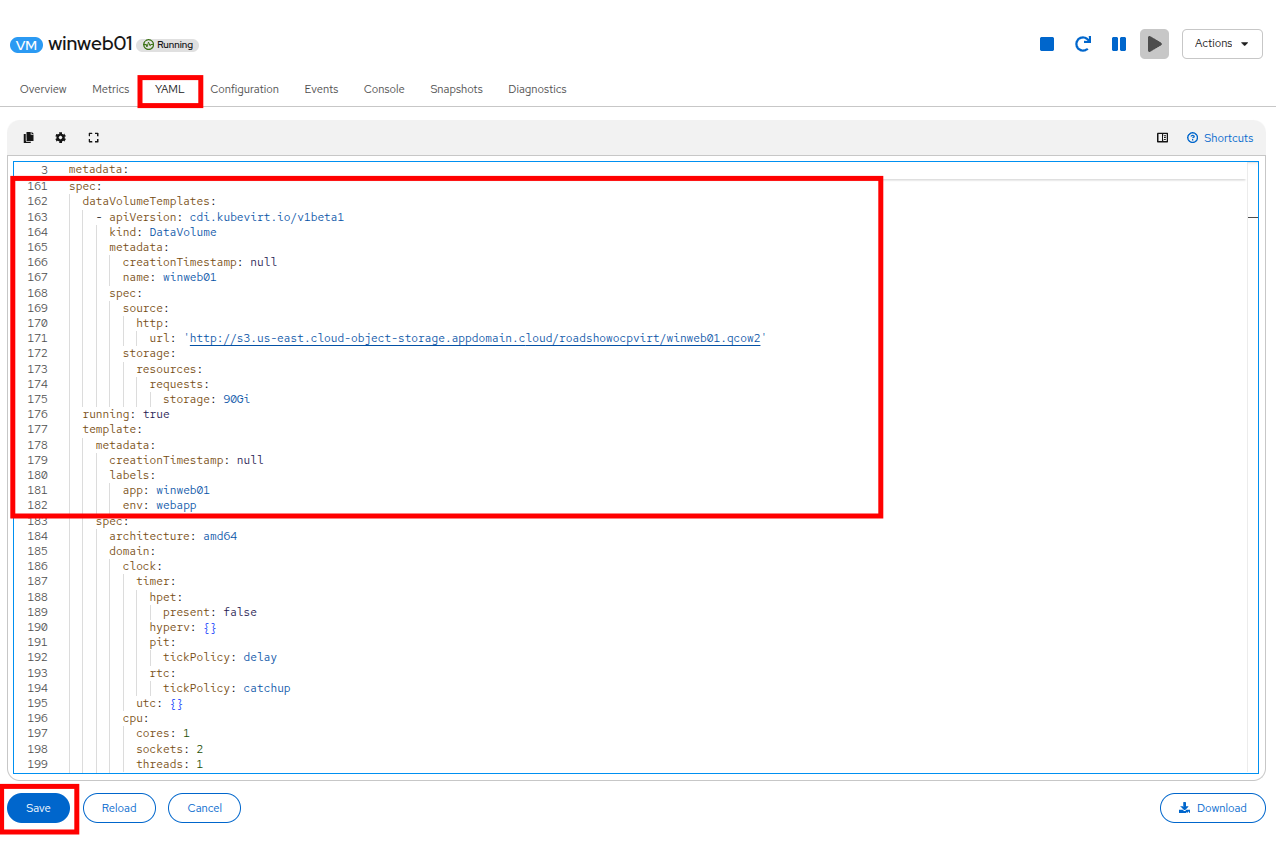
-
Click the Save button, and you will be prompted that the VM has been updated to a new version number.
-
Repeat the process for the VM winweb02 using the following syntax:
labels: app: winweb02 env: webapp -
After completing the configuration change, reboot both winweb01 and winweb02.
Ensure the VMs are properly working by accessing to the console tab of each VM.
Create the Service
-
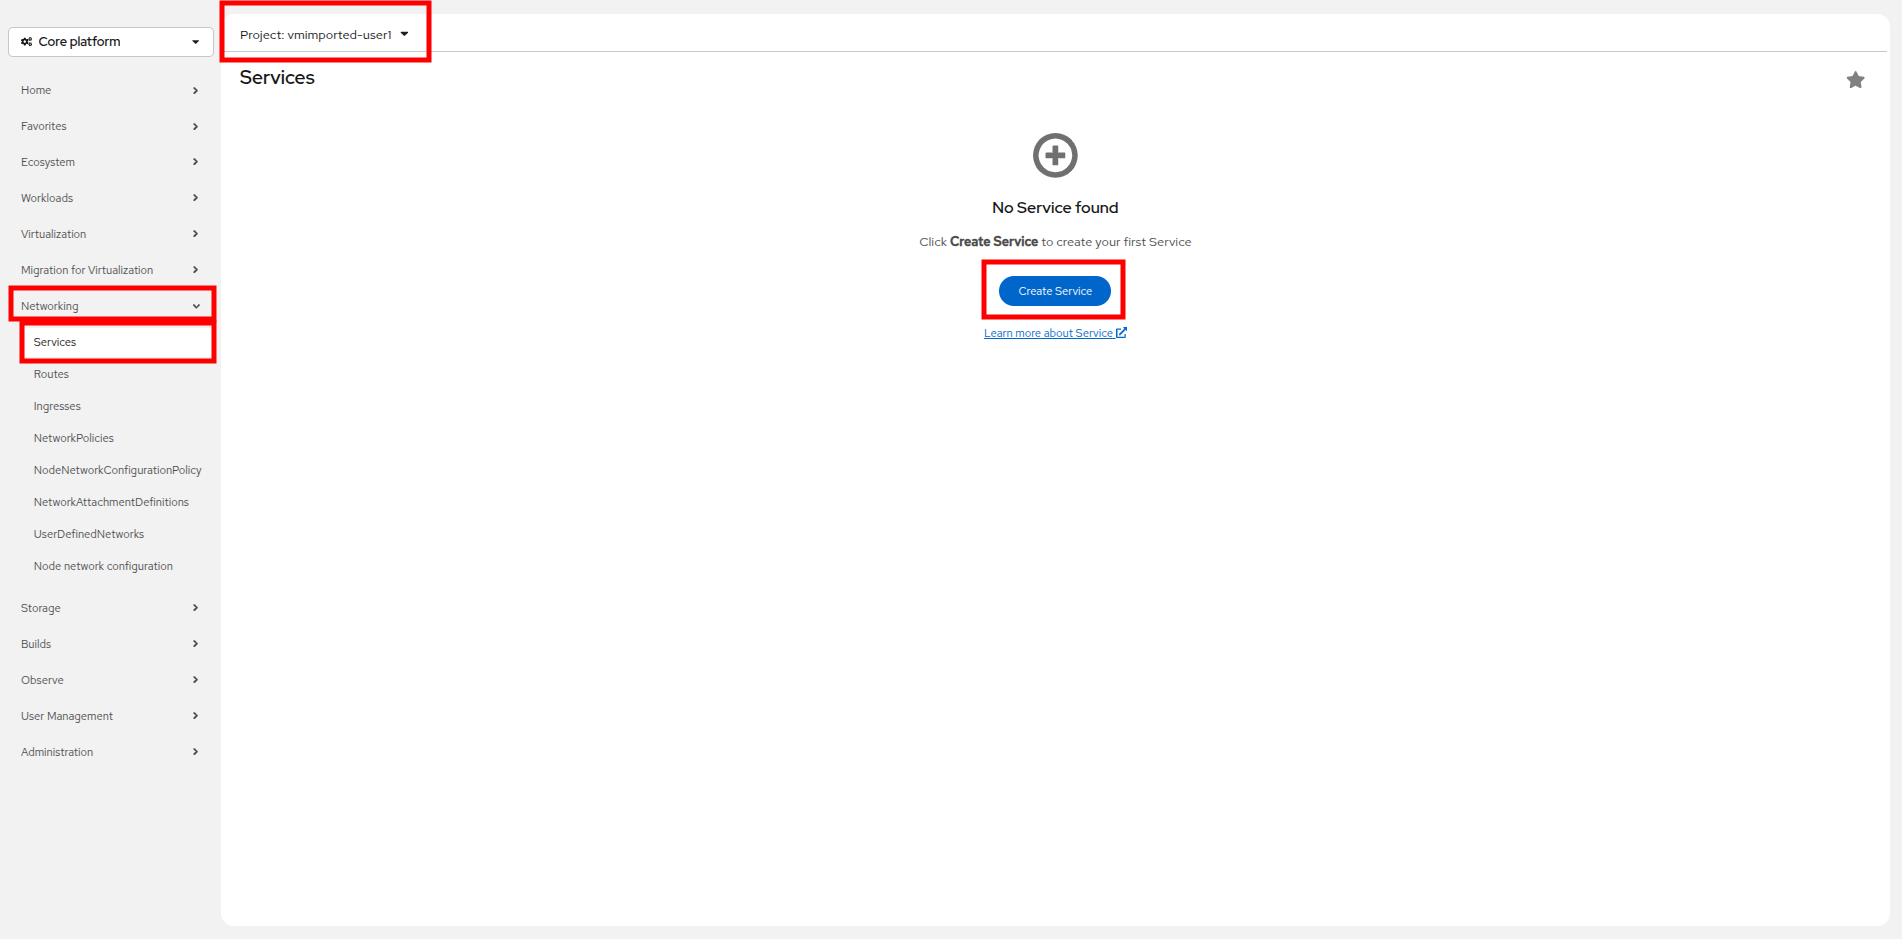
In the left-side menu expand Networking and click on Services. On the screen that loads, click the Create Service button in the center of the page.
-
Replace the YAML with the following definition
apiVersion: v1
kind: Service
metadata:
  name: webapp
  namespace: vmimported-{user}
spec:
  selector:
    env: webapp
  ports:
  - protocol: TCP
    port: 80
    targetPort: 80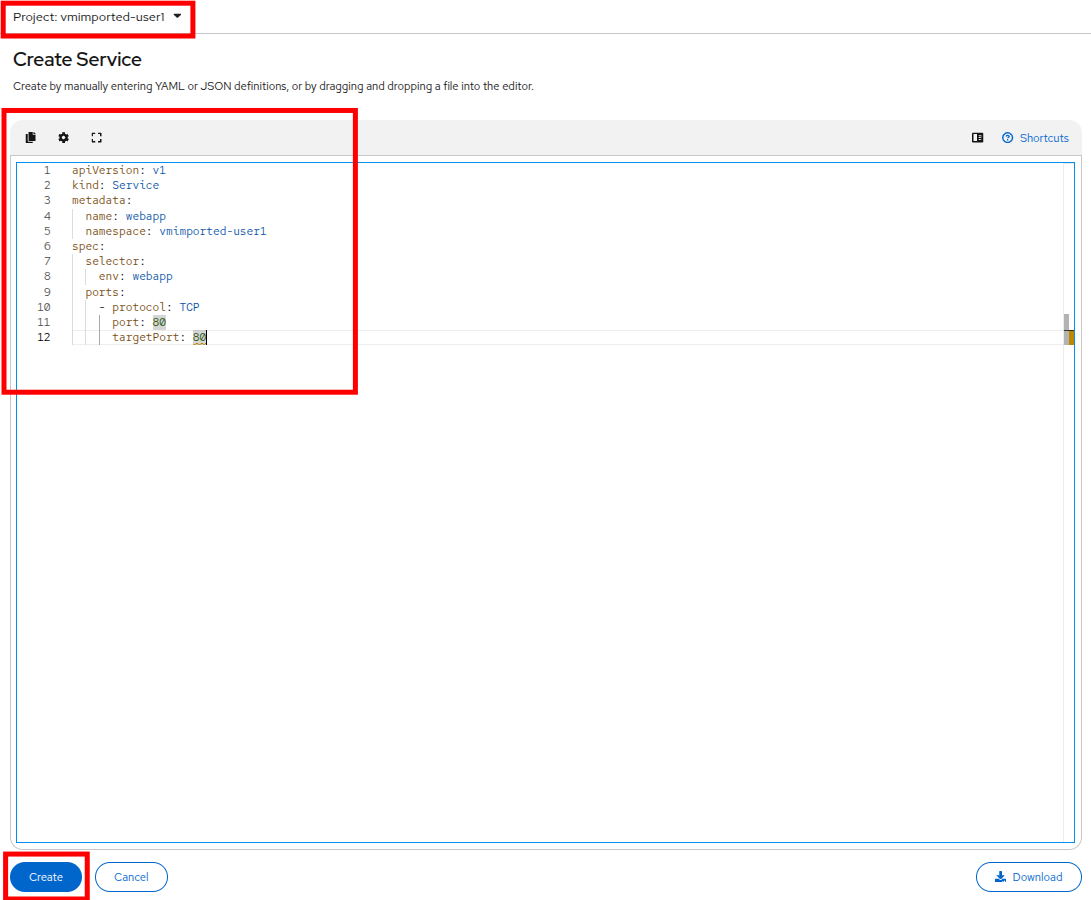
-
Click the Create button at the bottom. You will get a notification that the YAML has been saved.
-
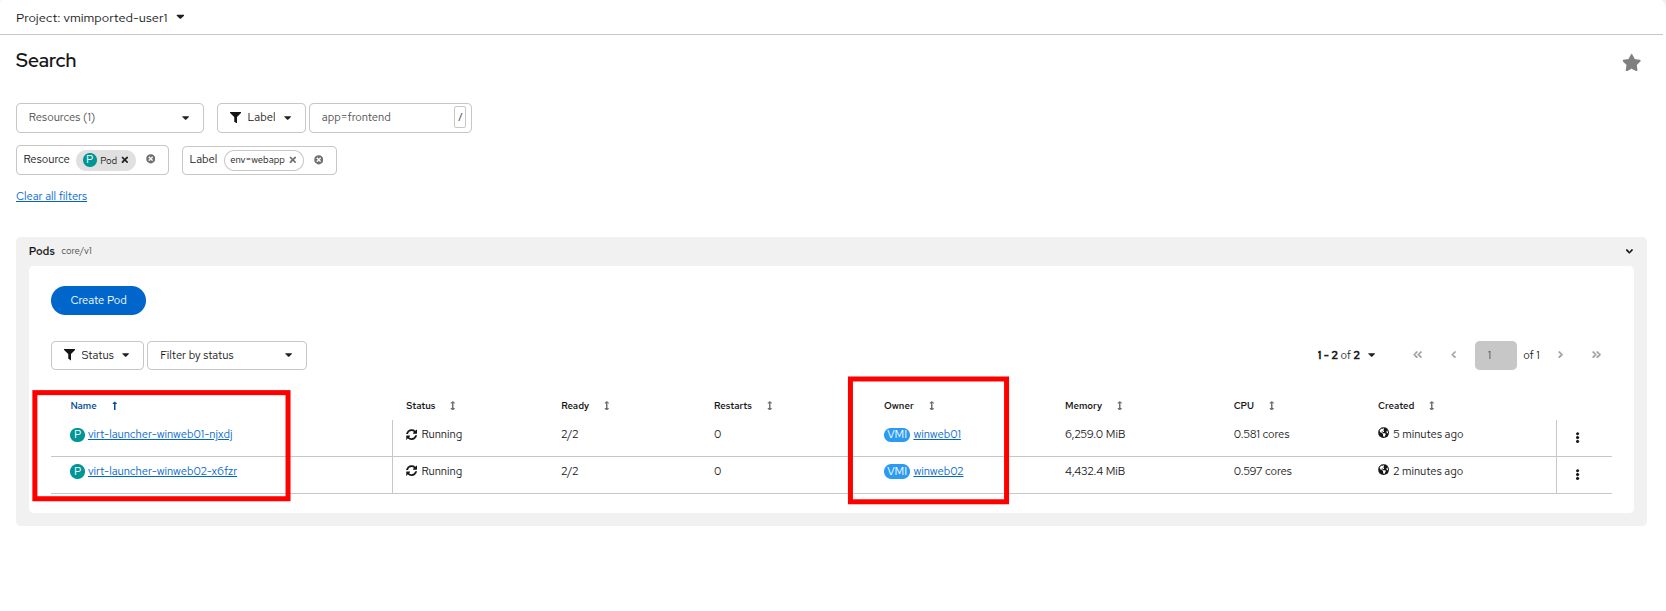
From the details page for the newly created webapp Service, locate Pod selector link and click it.
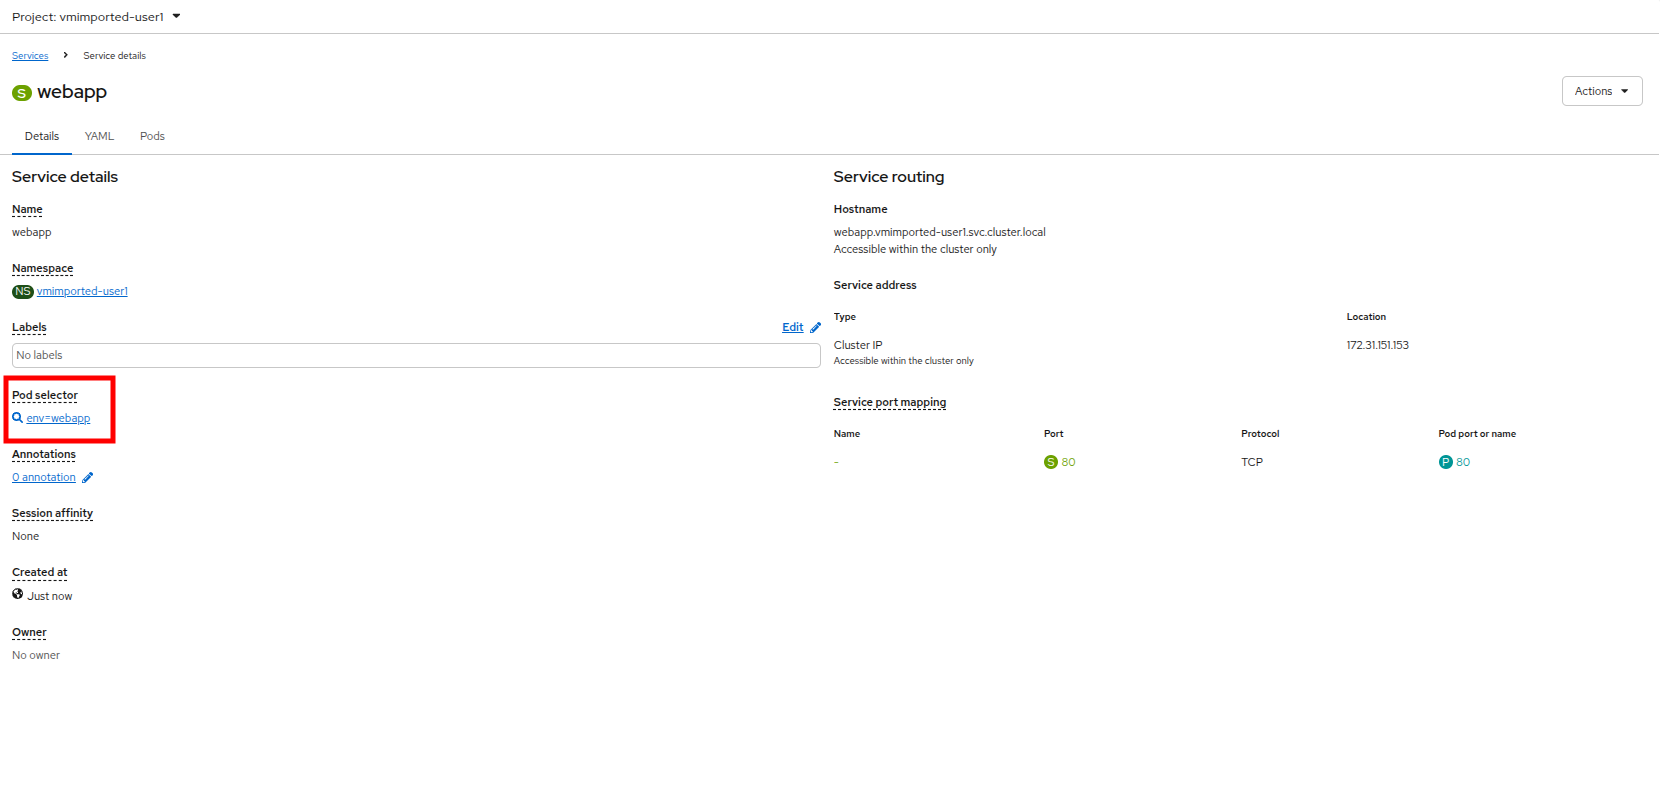
-
Verify the two Windows VMs are properly identified and targeted by the Service.
Create the Route
Now the Windows IIS servers are accessible from within the OpenShift cluster. Other virtual machines are able to access them using the DNS name webapp.vmimported-{user}, which is determined by the name of the service + the namespace. However, since these web servers are the front end to an application, we want it to be externally accessible. This will be done by exposing it publicly using a Route.
-
Under Networking now click on the Routes option in the left navigation menu. Click the Create Route button in the center of the screen.
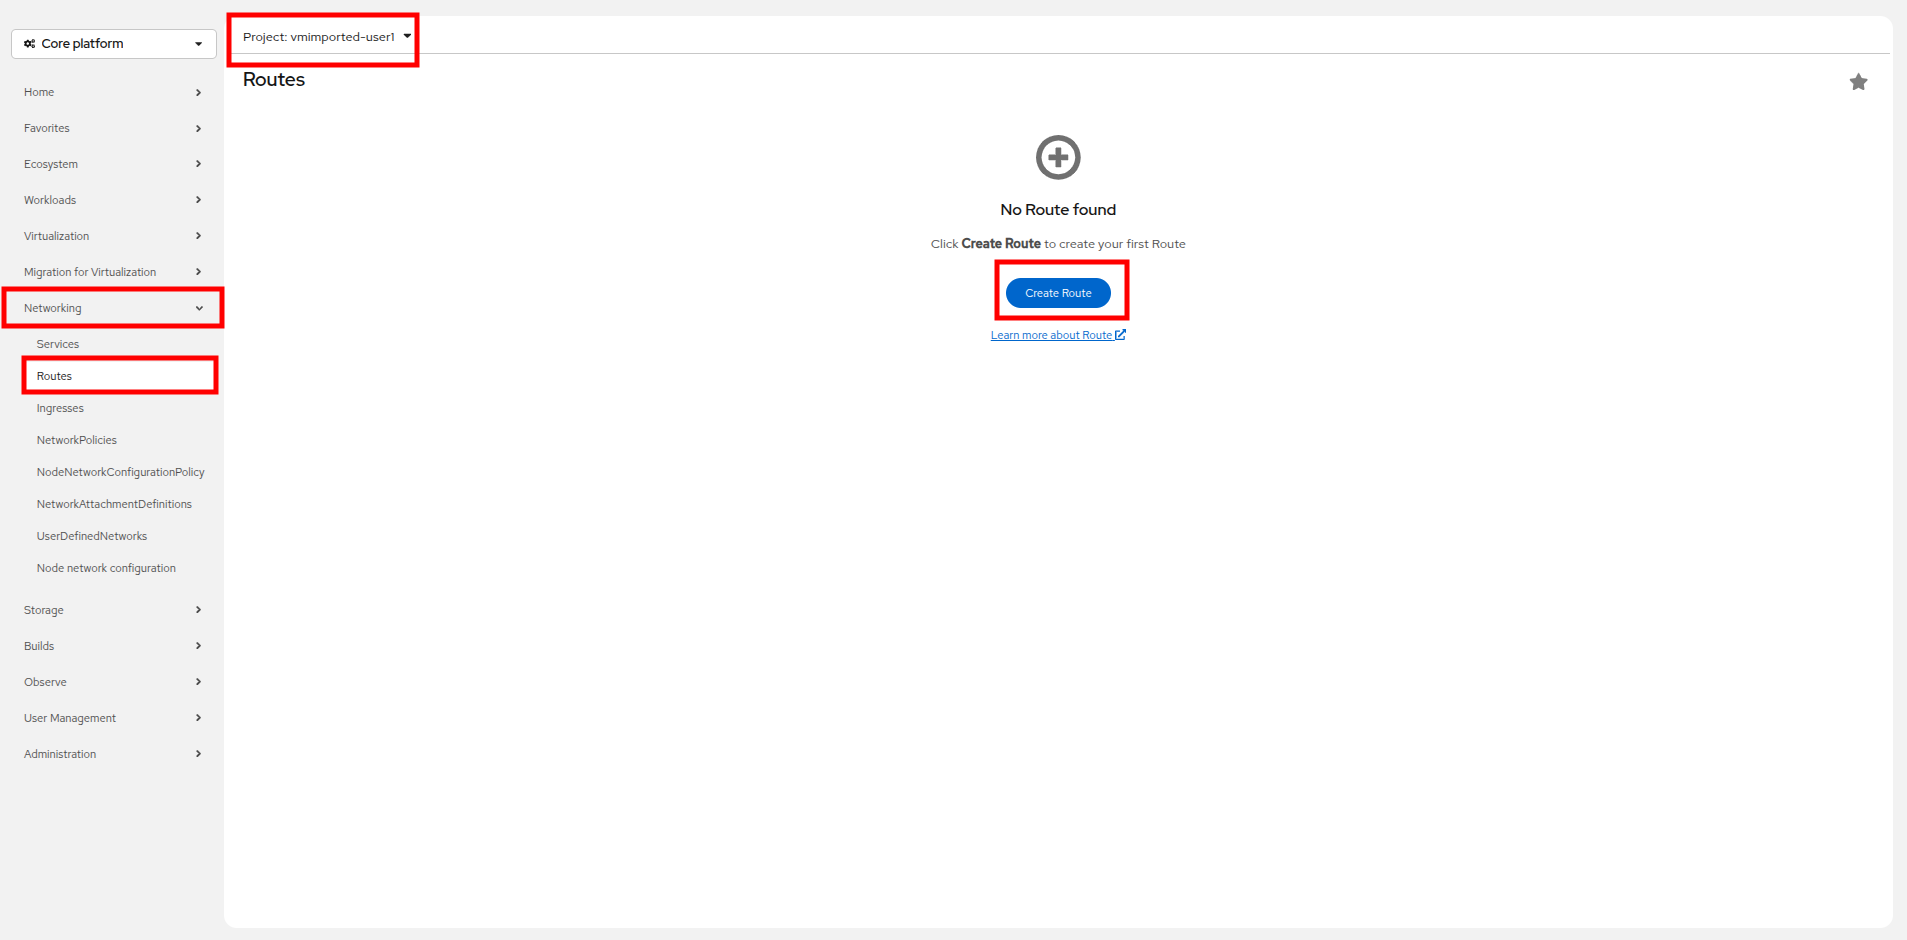
-
Fill the form using the information below, scroll to the bottom and click the Create button when done.
-
Name: route-webapp
-
Service: webapp
-
Target port: 80 → 80 (TCP)
-
Secure Route: Enabled
-
TLS termination: Edge
-
Insecure traffic: Redirect

-
-
Navigate to the address shown in Location field
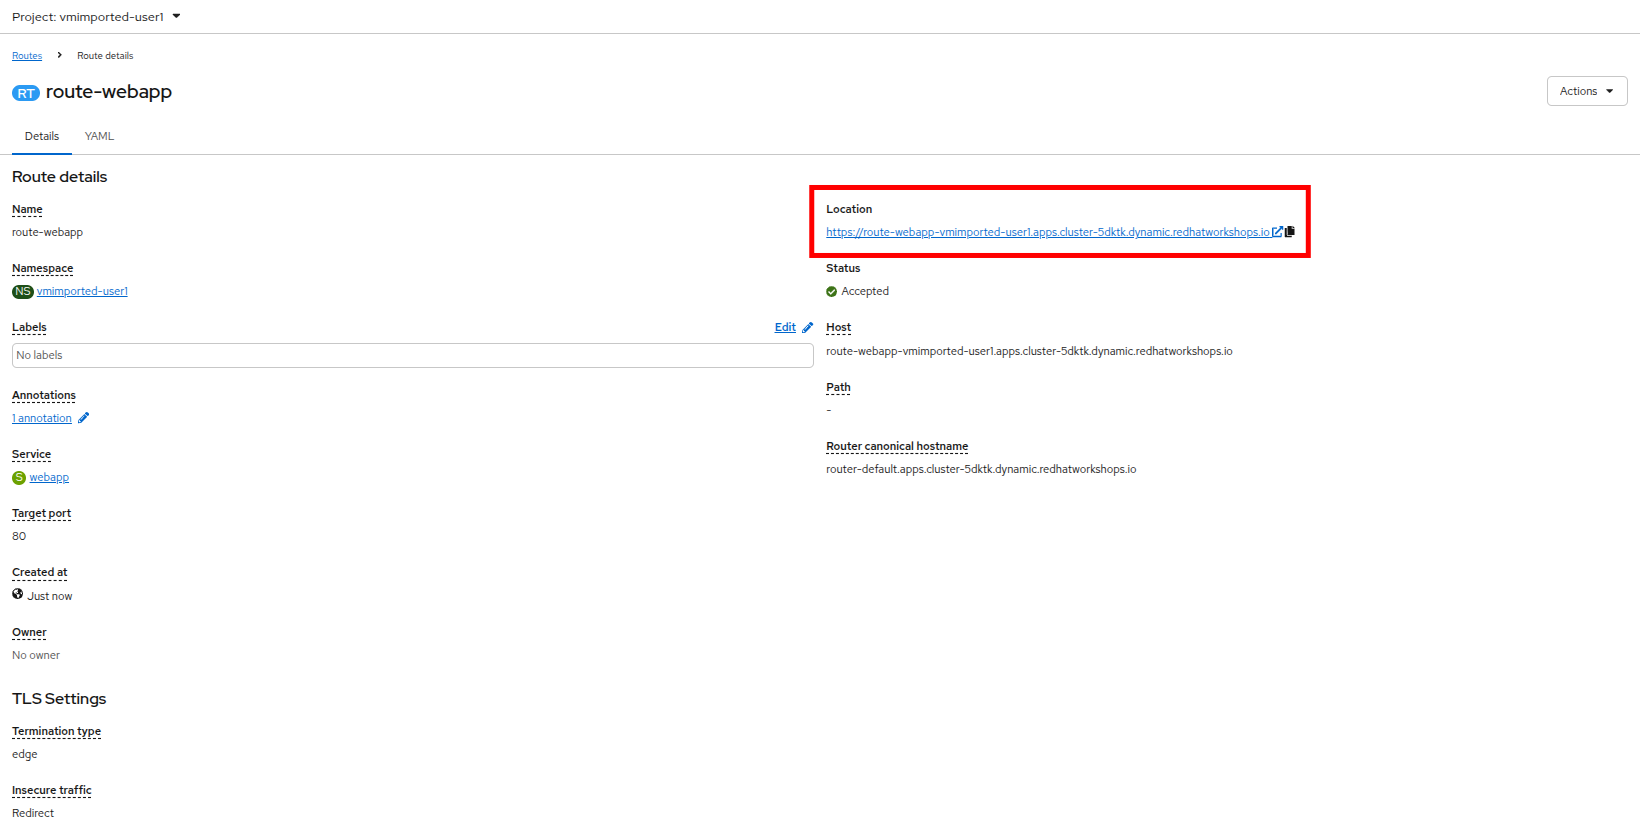
-
When the page loads, you will see an error, it’s not working as expected so something must be wrong.
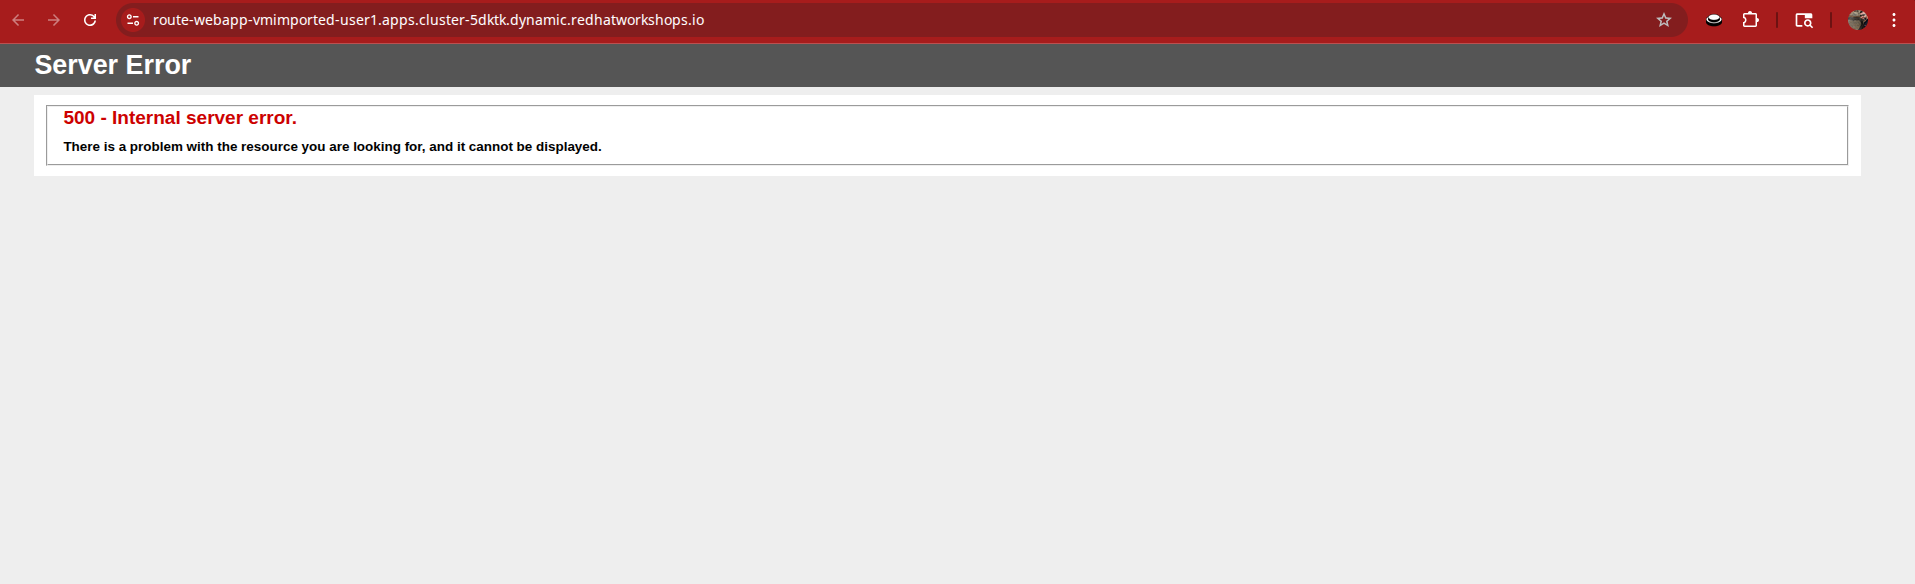
-
To address our connectivity issue, we will need to create a service for the database VM as well so that it can be accessed by the web servers.
-
Once again, navigate to Networking → Services and press the Create Service button. Replace the YAML with the following definition:
apiVersion: v1
kind: Service
metadata:
  name: database
  namespace: vmimported-{user}
spec:
  selector:
    vm.kubevirt.io/name: database
  ports:
  - protocol: TCP
    port: 3306
    targetPort: 3306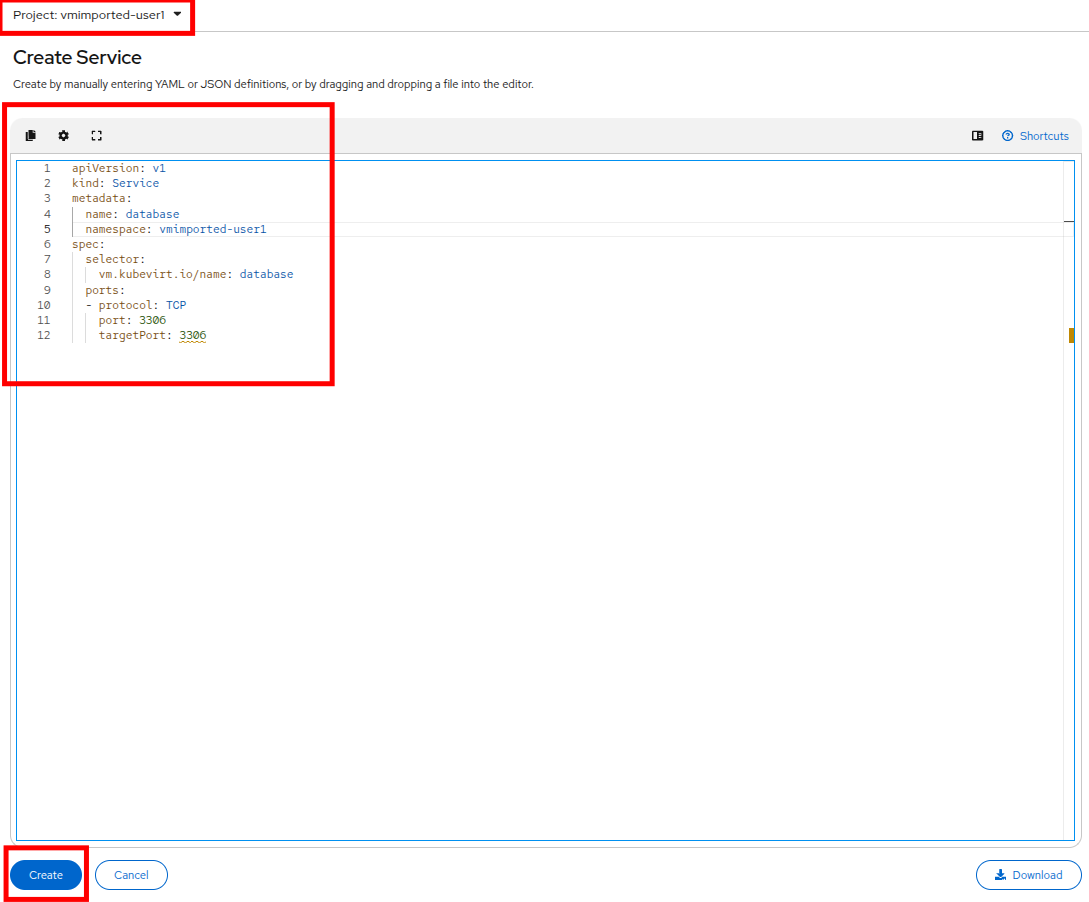
-
When the YAML is pasted, click the Create button.
-
Reload the WebApp URL in your browser and expect to get the proper result of a working migrated web application.
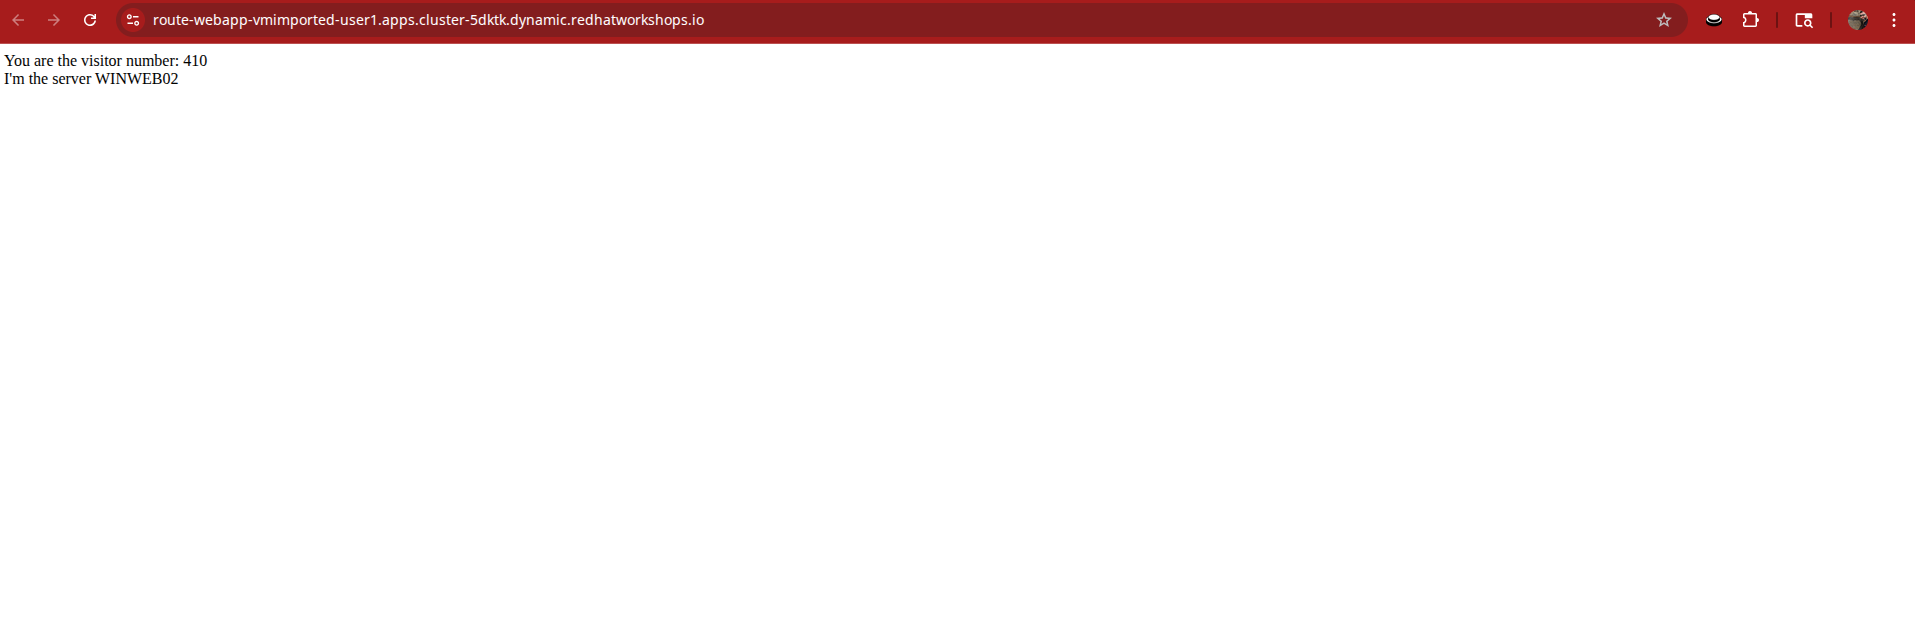
-
Refresh the screen a couple of times, you should see which webserver is responding, and that the count of user accesses rises with each refresh.
-
Return to your OpenShift console, and click on Virtualization → VirtualMachines and shut down the web server that is handling your requests.
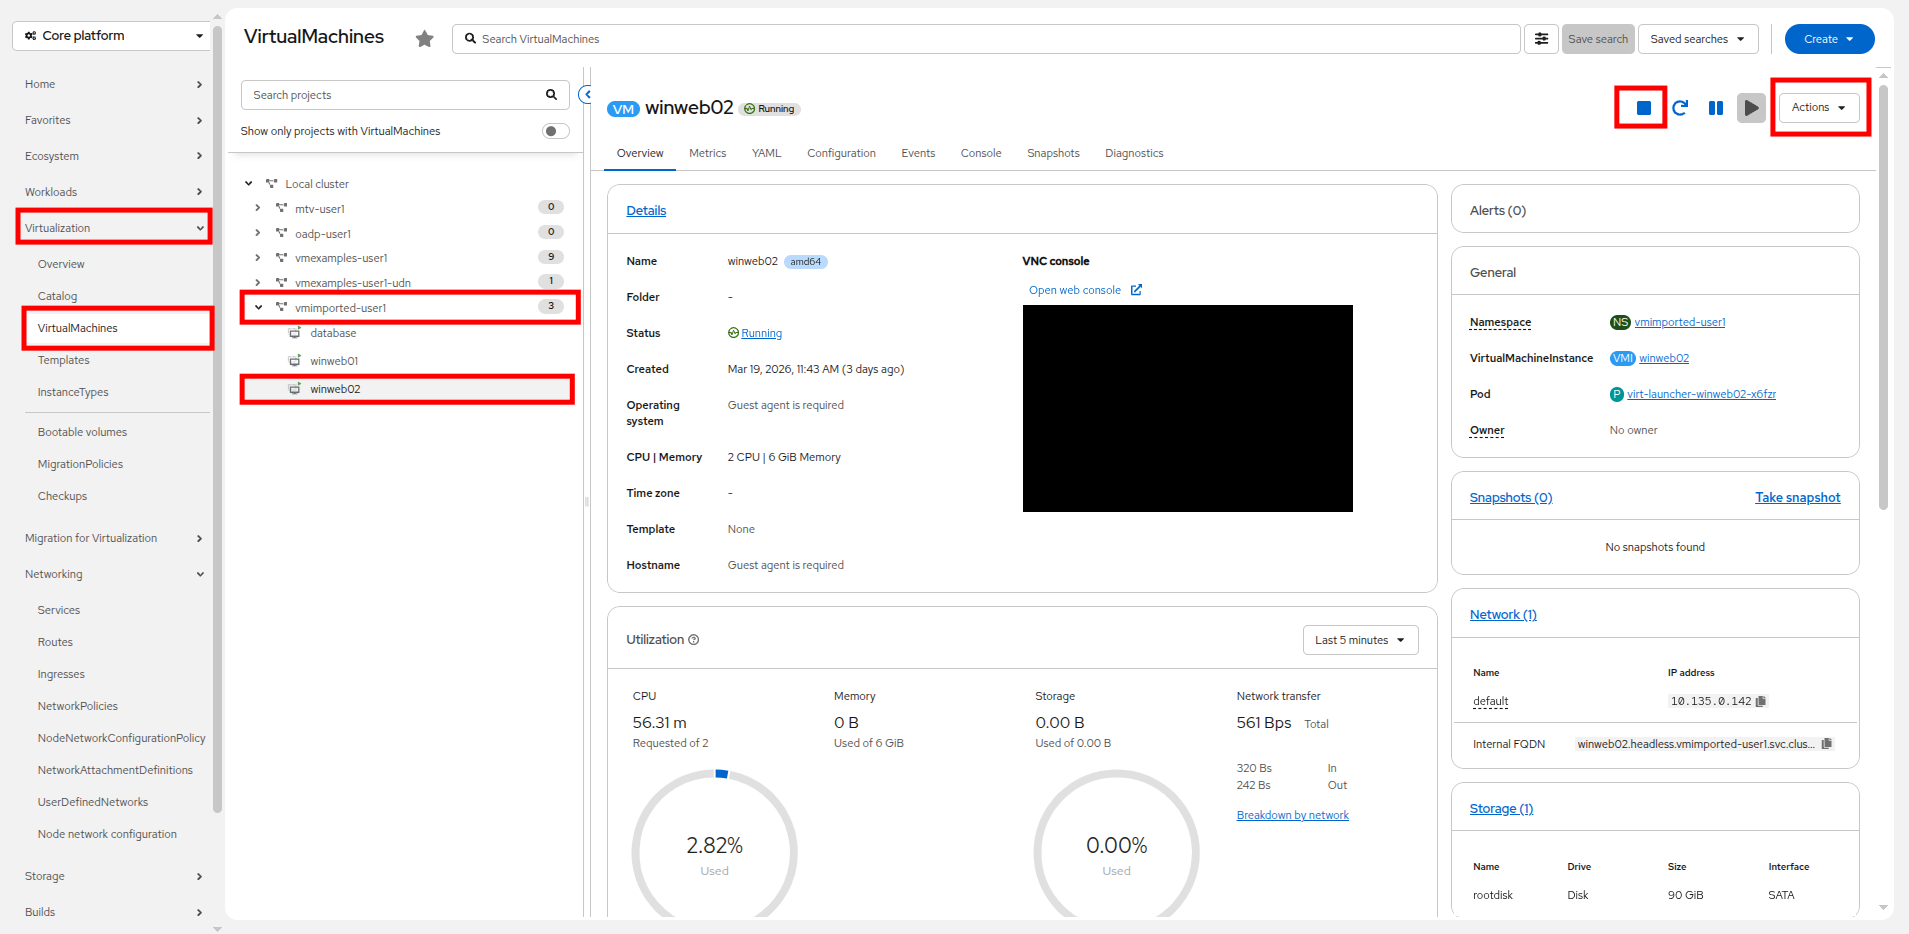
-
Return to your tab with the open WebApp URL and refresh the screen. You should see the remaining web server start returning requests, and the count continue to rise with each refresh. Configuring the service to load balance between two virtual web servers is shown to be successful.

While this is a simple example, keep in mind that there are a number of ways to configure load balancing services between virtual machines in OpenShift to meet the needs of your application.
Summary
In this module you were able to experience working with virtual machines that are running in OpenShift Virtualization — either those that you migrated into the OpenShift Virtualization environment from VMware vSphere, or those that already existed in your cluster — by making them accessible outside of the cluster in a more modernized approach using the native services and routes features in Red Hat OpenShift. This essentially allows you to treat your imported virtual machines and the applications they host like containerized applications, the first step of your modernization journey converting your legacy virtual machine hosted applications to containerized applications.