Mission National Parks: Deploy with the OpenShift 5 Console
Start here: Log in to OpenShift
Open the Showroom Terminal tab and authenticate using your assigned workshop credentials before running any other oc commands:
oc login --server=https://api.cluster-%GUID%.example.com:6443 --username=user-guid --password='password' --insecure-skip-tls-verify
oc whoami
Verify that oc whoami returns user-guid. This is a disposable lab environment: the `-p` option can expose your password in shell history and process listings. Do not reuse this password on a personal or production cluster.
Deploy the National Parks frontend, Python API and MongoDB 8 in your existing workshop project. The MongoDB Service contains a deliberately incorrect port. Use Lightspeed to diagnose the connection failure, repair the Service and load park data. Leave Argo CD, Gitea and other workshop workloads alone.
This is a 25–30-minute, console-first workshop using OpenShift Lightspeed 2.0. The guided walkthrough targets 28 minutes, with up to 2 minutes for transitions.
These timings assume your instructor has already verified image pulls, the Python build, student permissions, Lightspeed read tools and Argo CD/Gitea isolation. If any of those prerequisites fail, troubleshoot them separately rather than counting them against the lab. Lightspeed investigates; you apply the repair.
| 0–1 | 1–6 | 6–11 | 11–17 | 17–21 | 21–24 | 24–27 | 27–28 min |
|---|---|---|---|---|---|---|---|
Select project |
Frontend + discovery permissions |
Python API |
MongoDB 8 + wrong port |
Diagnose with Lightspeed |
Repair MongoDB Service |
Load data + map |
Sign-off |
|
Before you begin
|
Mission 0: Select your existing workshop project (1 minute)
-
In Showroom, select the OCP Console tab or open your OpenShift console. Sign in as
user-guid. -
Open Projects (from Home or your console’s project navigation). Locate and open
user-guid-demo. If you cannot see it, stop and ask the instructor to grant access; do not click Create Project. -
Confirm the selected project is
user-guid-demo. Explore the new OpenShift 5 Project Felt appearance. -
Open Showroom’s Terminal tab and verify that the login step at the top of this module has switched the terminal to your student identity:
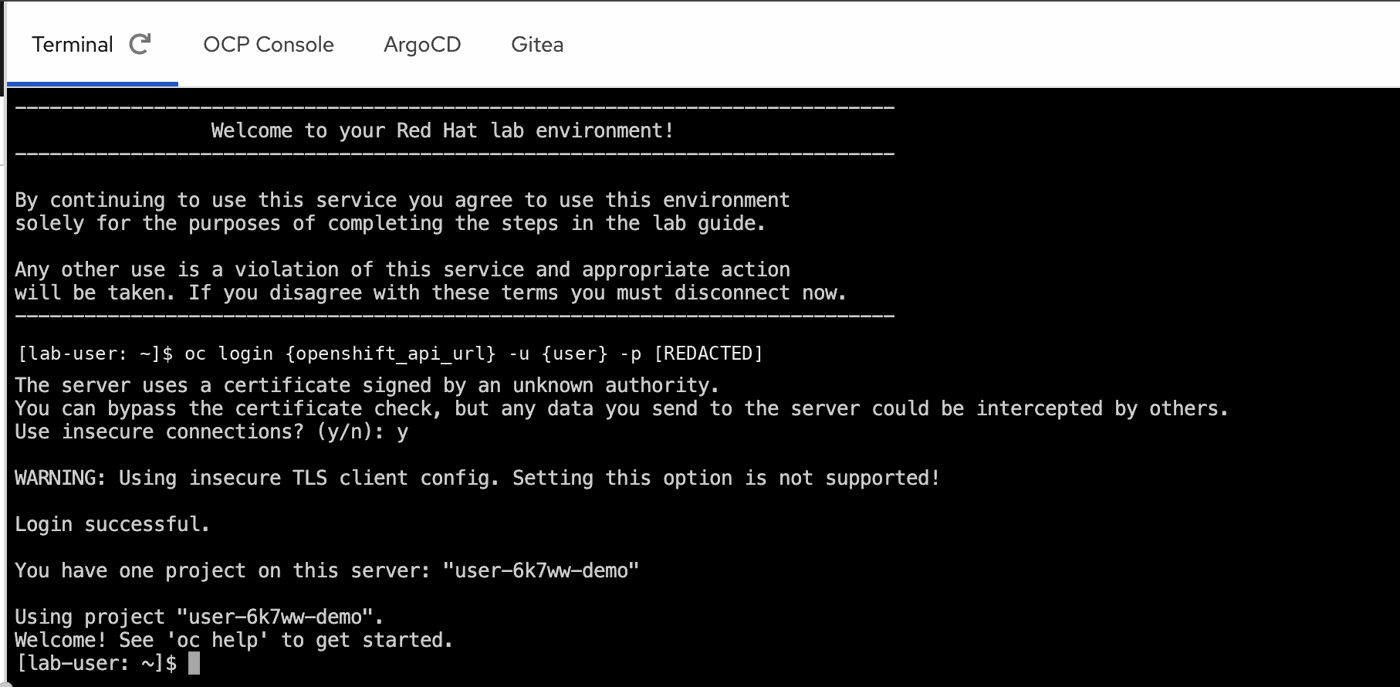
If {openshift_api_url} does not resolve, use the API URL from the OpenShift console’s Copy login command. If you see a certificate trust warning, ask your instructor for the approved login method.
-
Check your terminal identity and permissions:
oc whoami
oc project user-guid-demo
oc auth can-i patch deployments.apps -n user-guid-demo
Expected:
user-guid, youruser-guid-demoproject andyes. Ifoc whoamishowssystem:serviceaccount:…:showroom, stop and log in as the student. Do not try to grant the Showroom ServiceAccount additional permissions.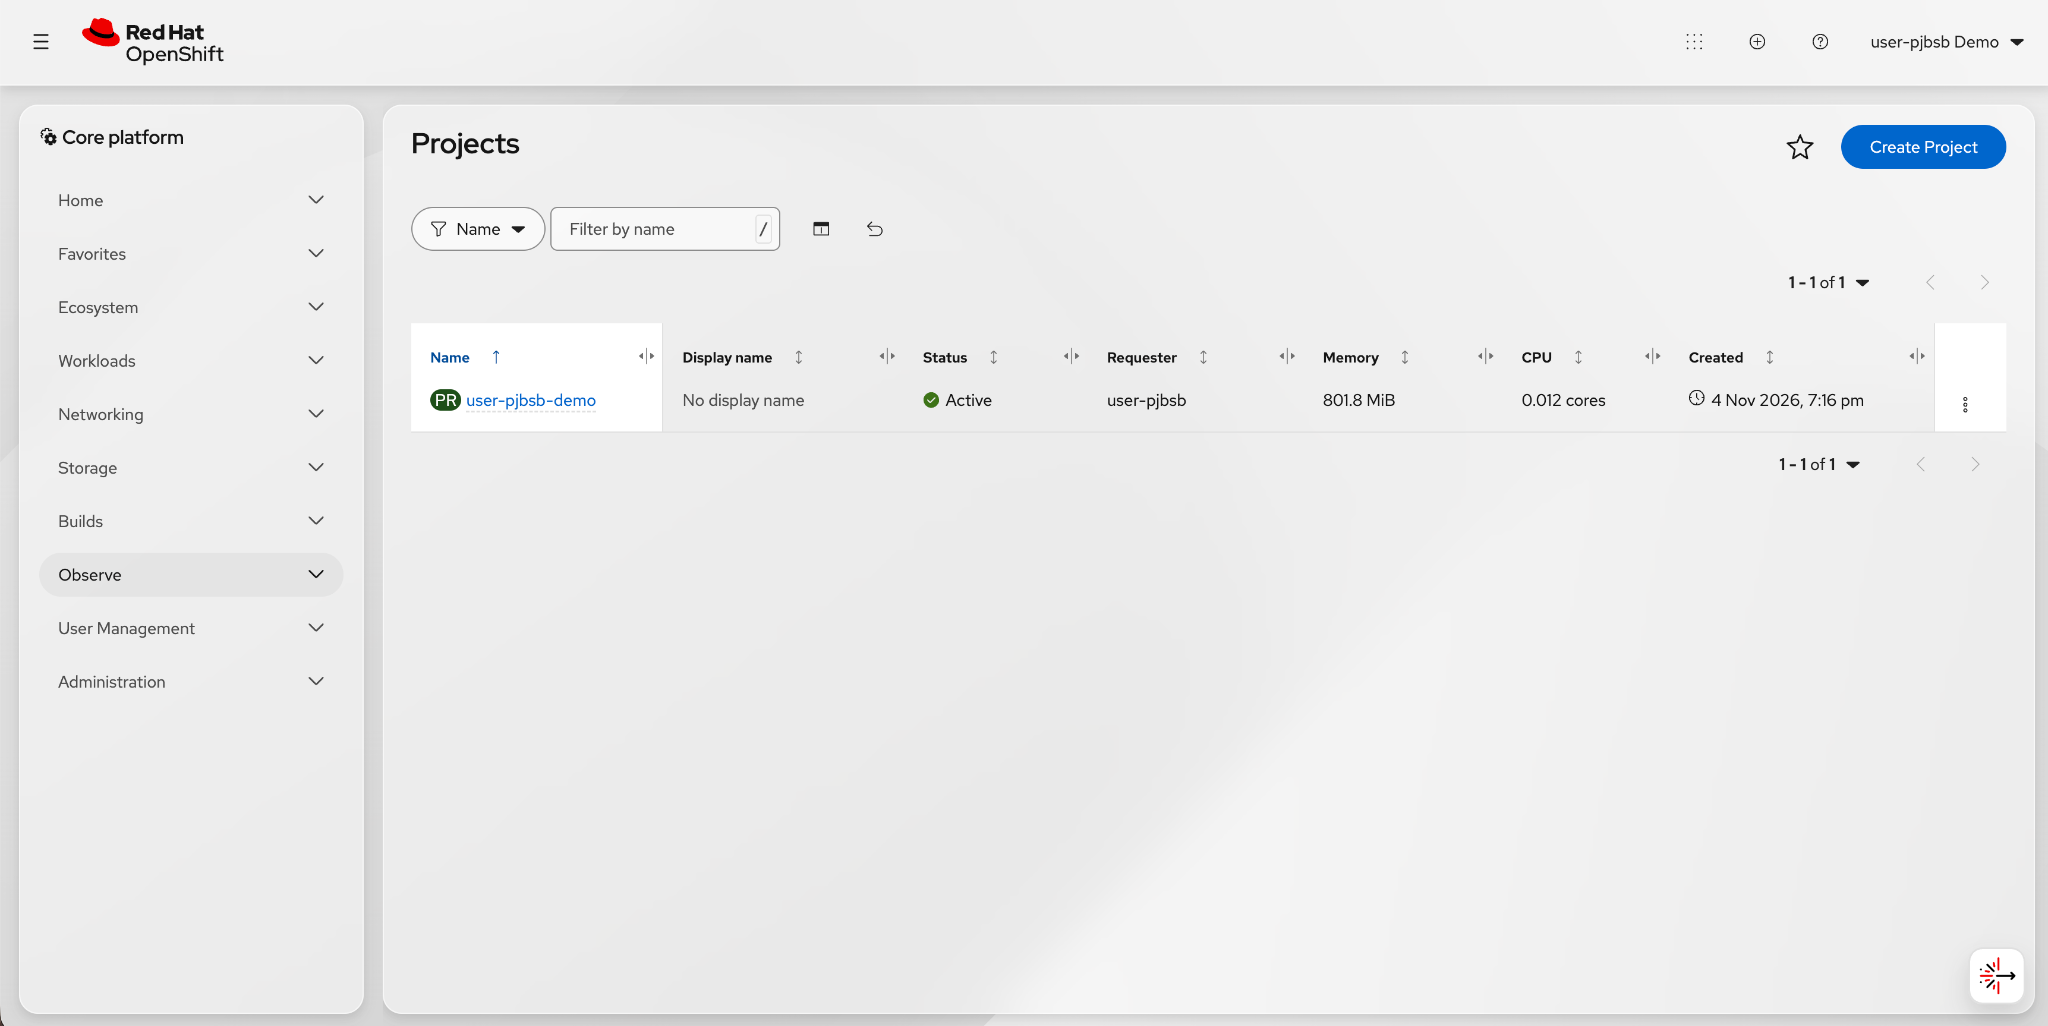
-
Open Topology from the workload navigation and confirm there is no
national-parks-appgrouping yet. Existing Argo CD, Gitea or other workshop workloads are expected and must be left alone.
Predict: How many Deployments and public Routes will our three-tier application eventually need?
Checkpoint 0: The console and terminal use your student account, oc whoami returns user-guid, and your project is user-guid-demo. National Parks is not yet deployed. Leave existing workshop services alone.
Application links
Use the links below in a new browser tab, or switch to the ParksMap or National Parks API tab in Showroom’s right-hand pane.
| App | Open in a new browser tab |
|---|---|
ParksMap |
|
Python backend |
|
Park data |
|
Backend discovery |
Only after MongoDB is ready, use Load park data once. Loading data changes the disposable database; it is not a health check.
Showroom’s built-in ParksMap and National Parks API tabs open these applications beside the instructions. If your browser blocks an embedded app, use the new-browser-tab links instead.
Mission 1: Put the frontend online with discovery access (5 minutes)
The fastest way to begin is with an existing container image. A running frontend does not mean the application has its data yet.
-
While
user-guid-demois selected, open the console’s Quick create (+) menu at the top of the page and choose Container images. If the menu layout differs, find the console’s create-application-from-image action.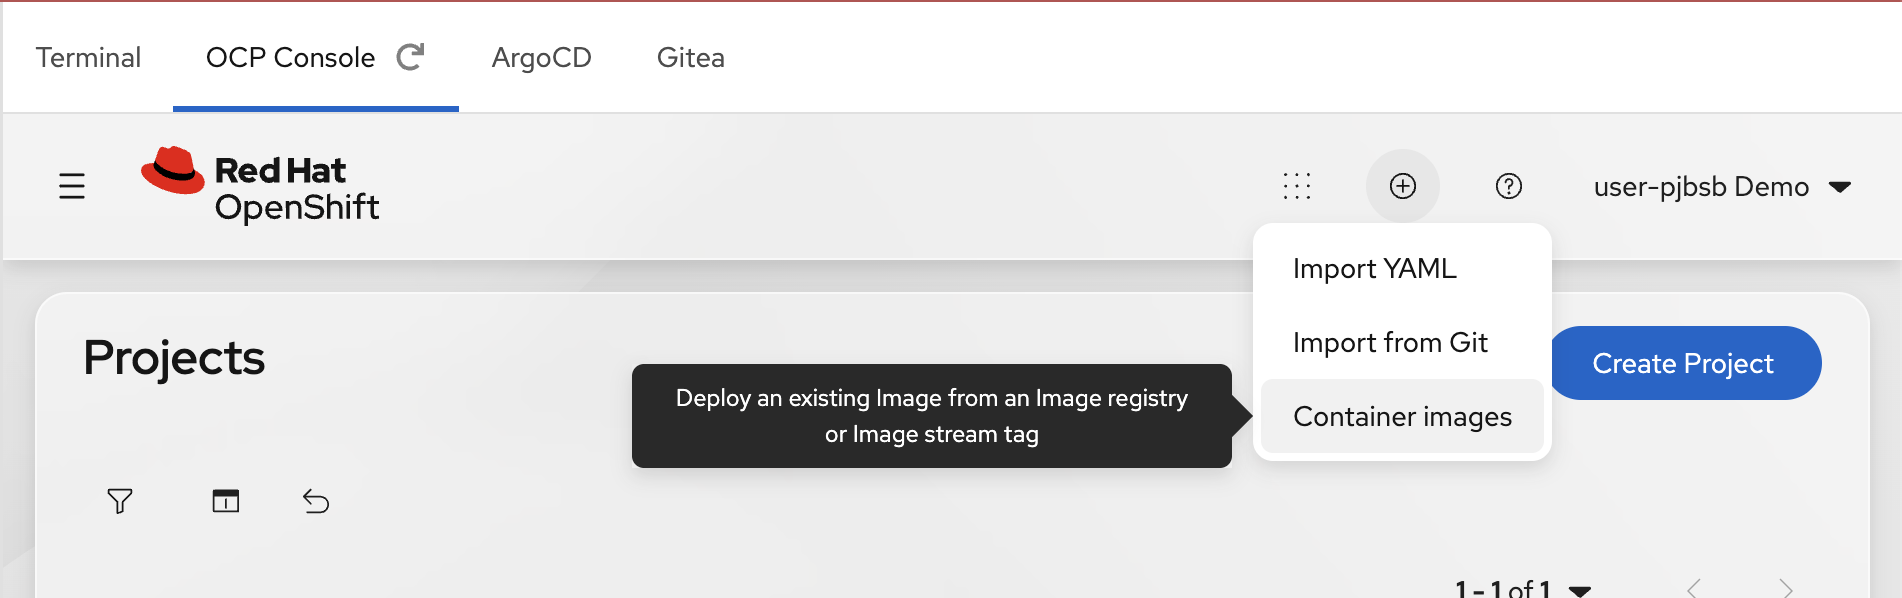
-
On the Deploy Image page, select Image name from external registry. Verify that Select project shows
user-guid-demoand enter:quay.io/openshiftroadshow/parksmap:latest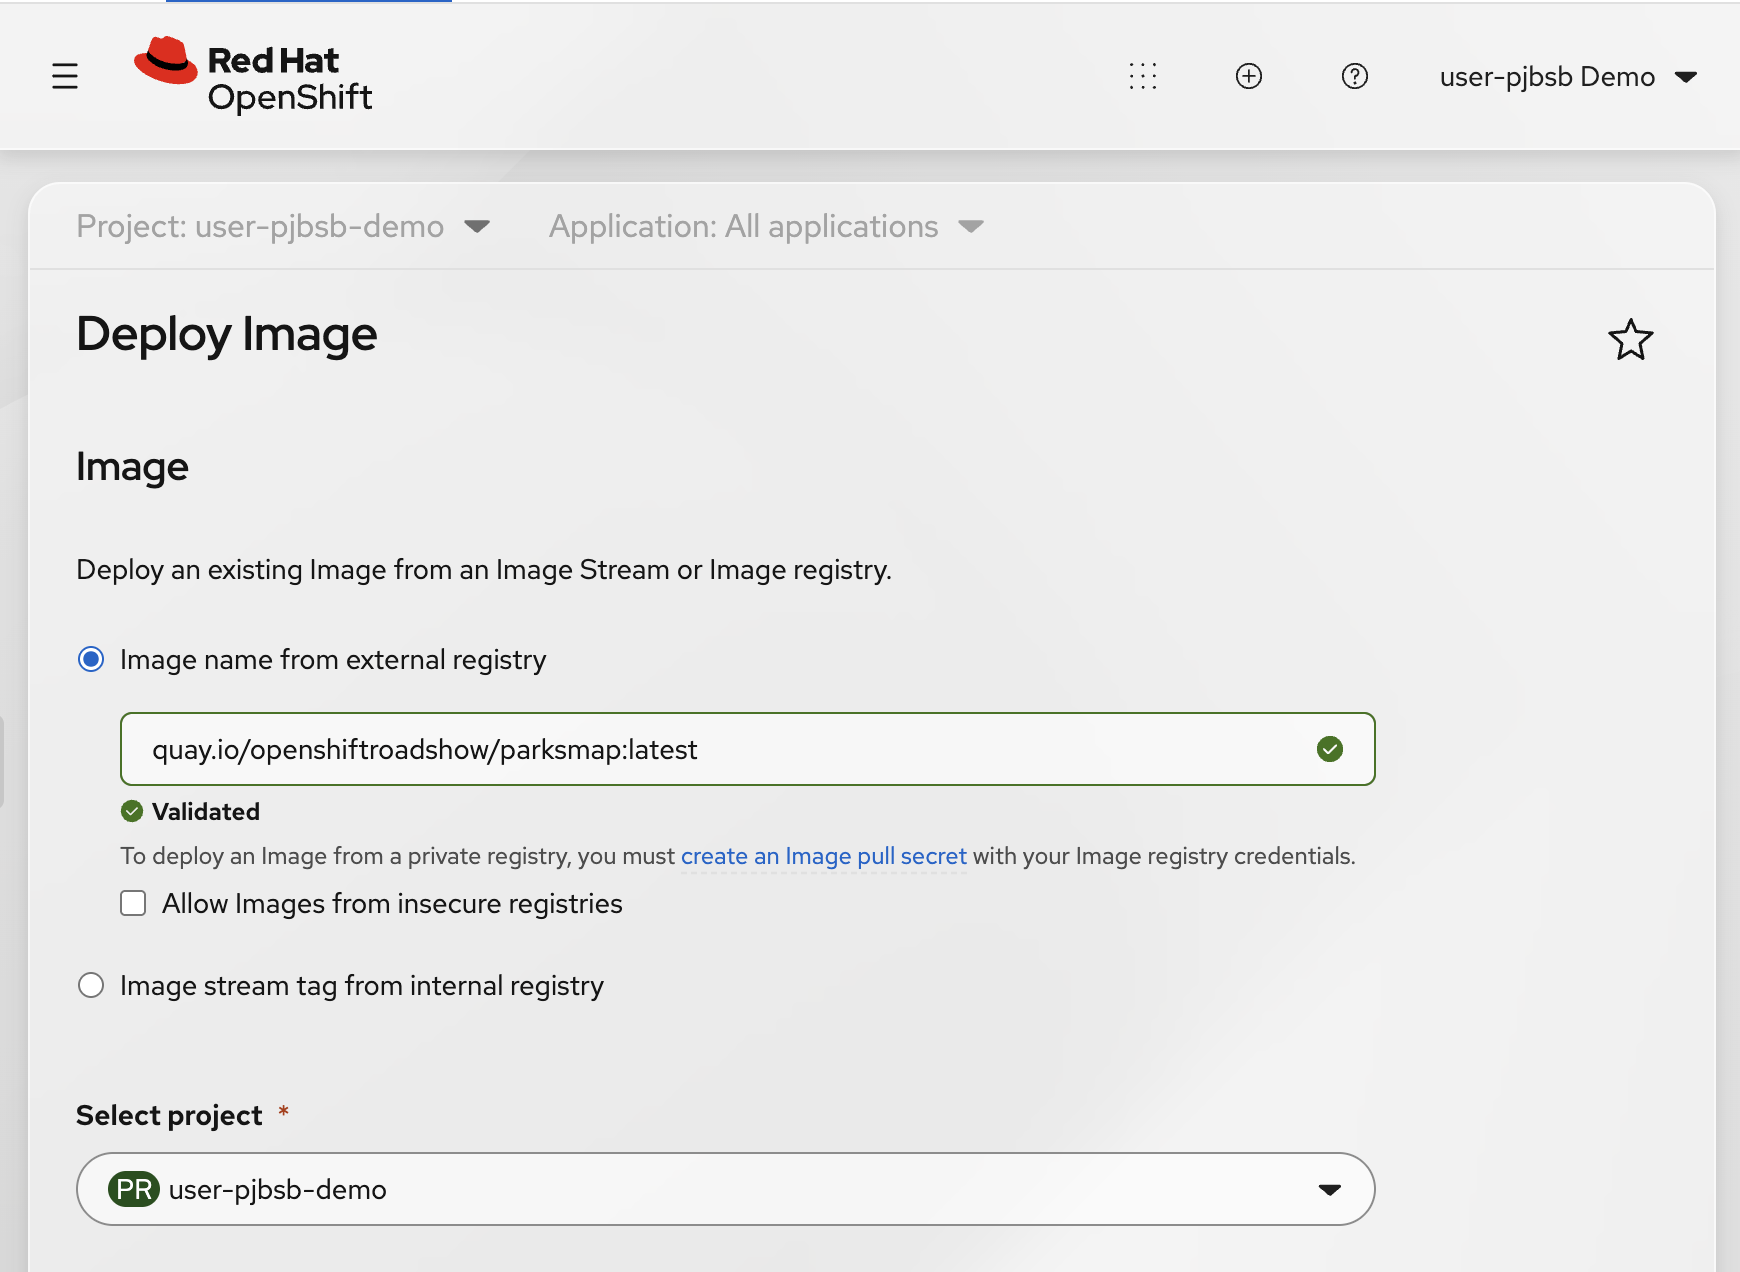
-
Leave Runtime icon set to openshift. Under Application, choose Create application. Enter Application name:
national-parks-app, and Name:parksmap.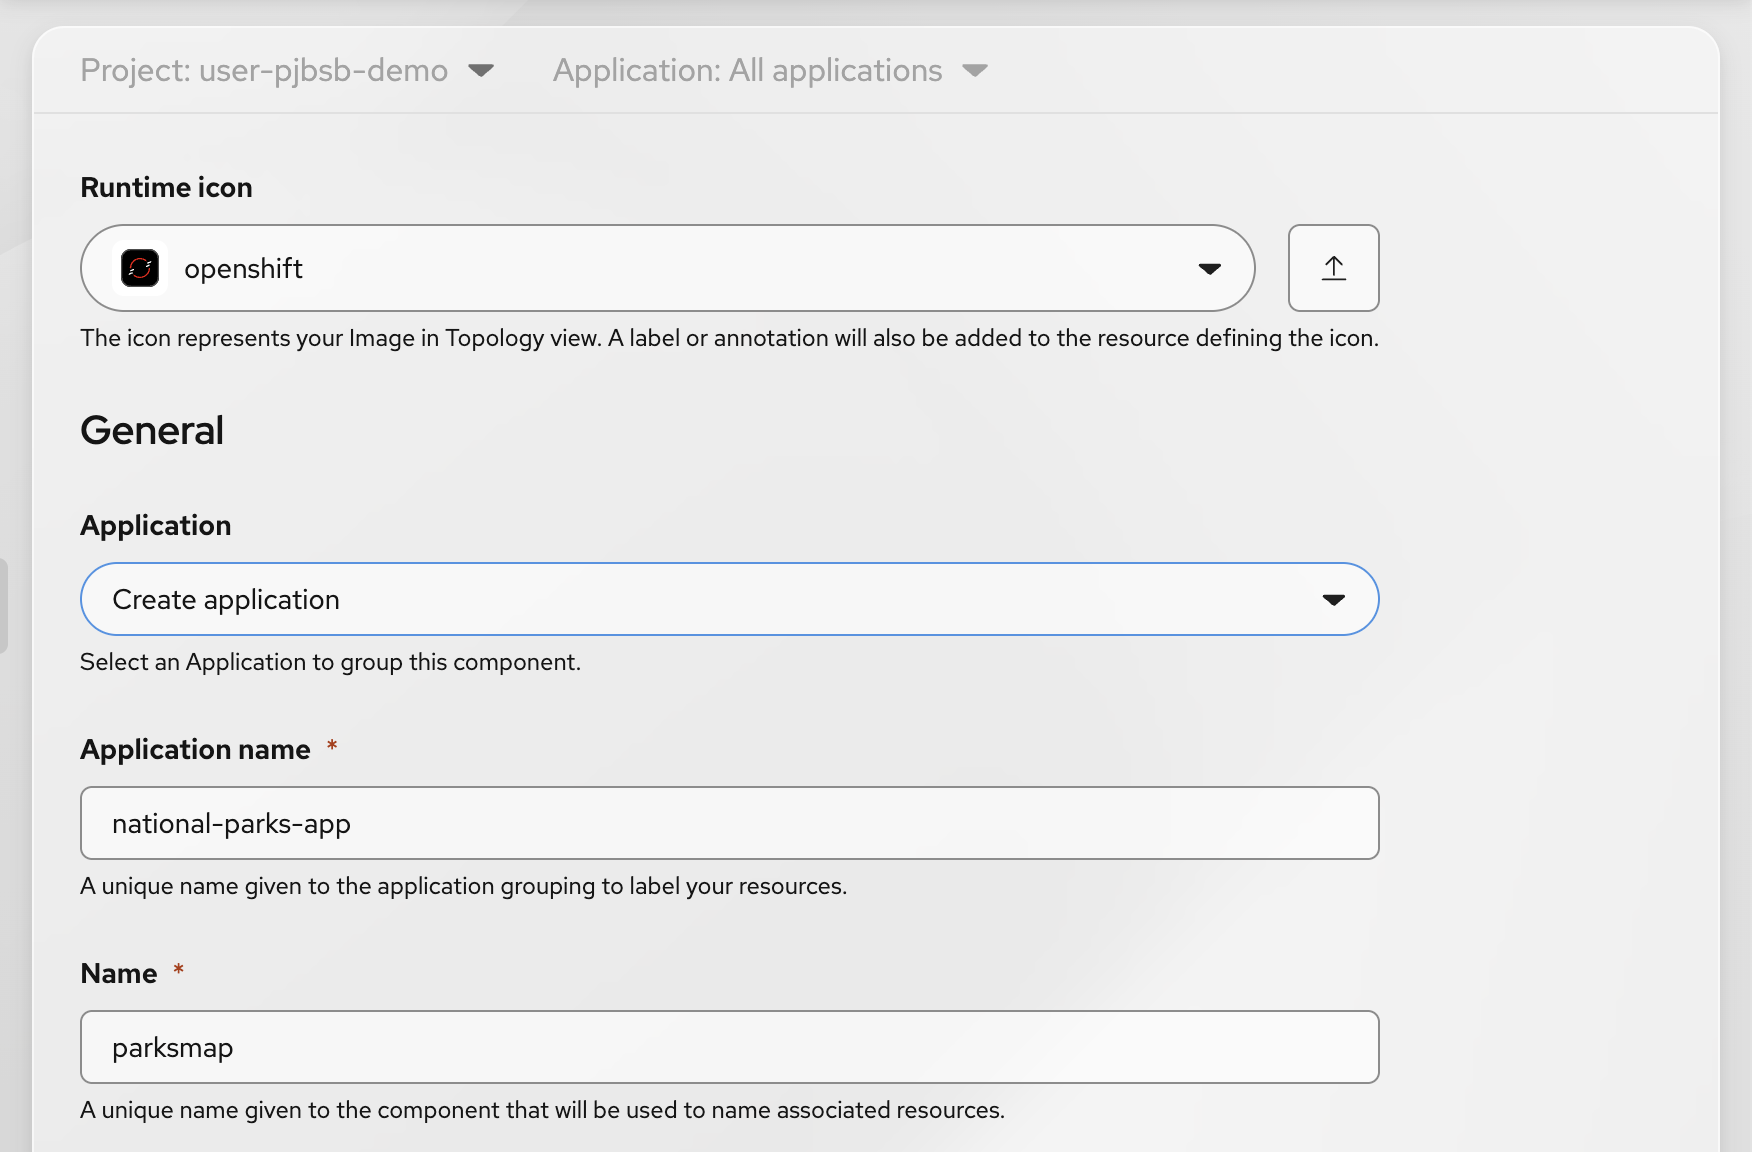
-
Under Deploy, choose Resource type: Deployment. Keep Target port:
8080, and ensure Create a route is checked.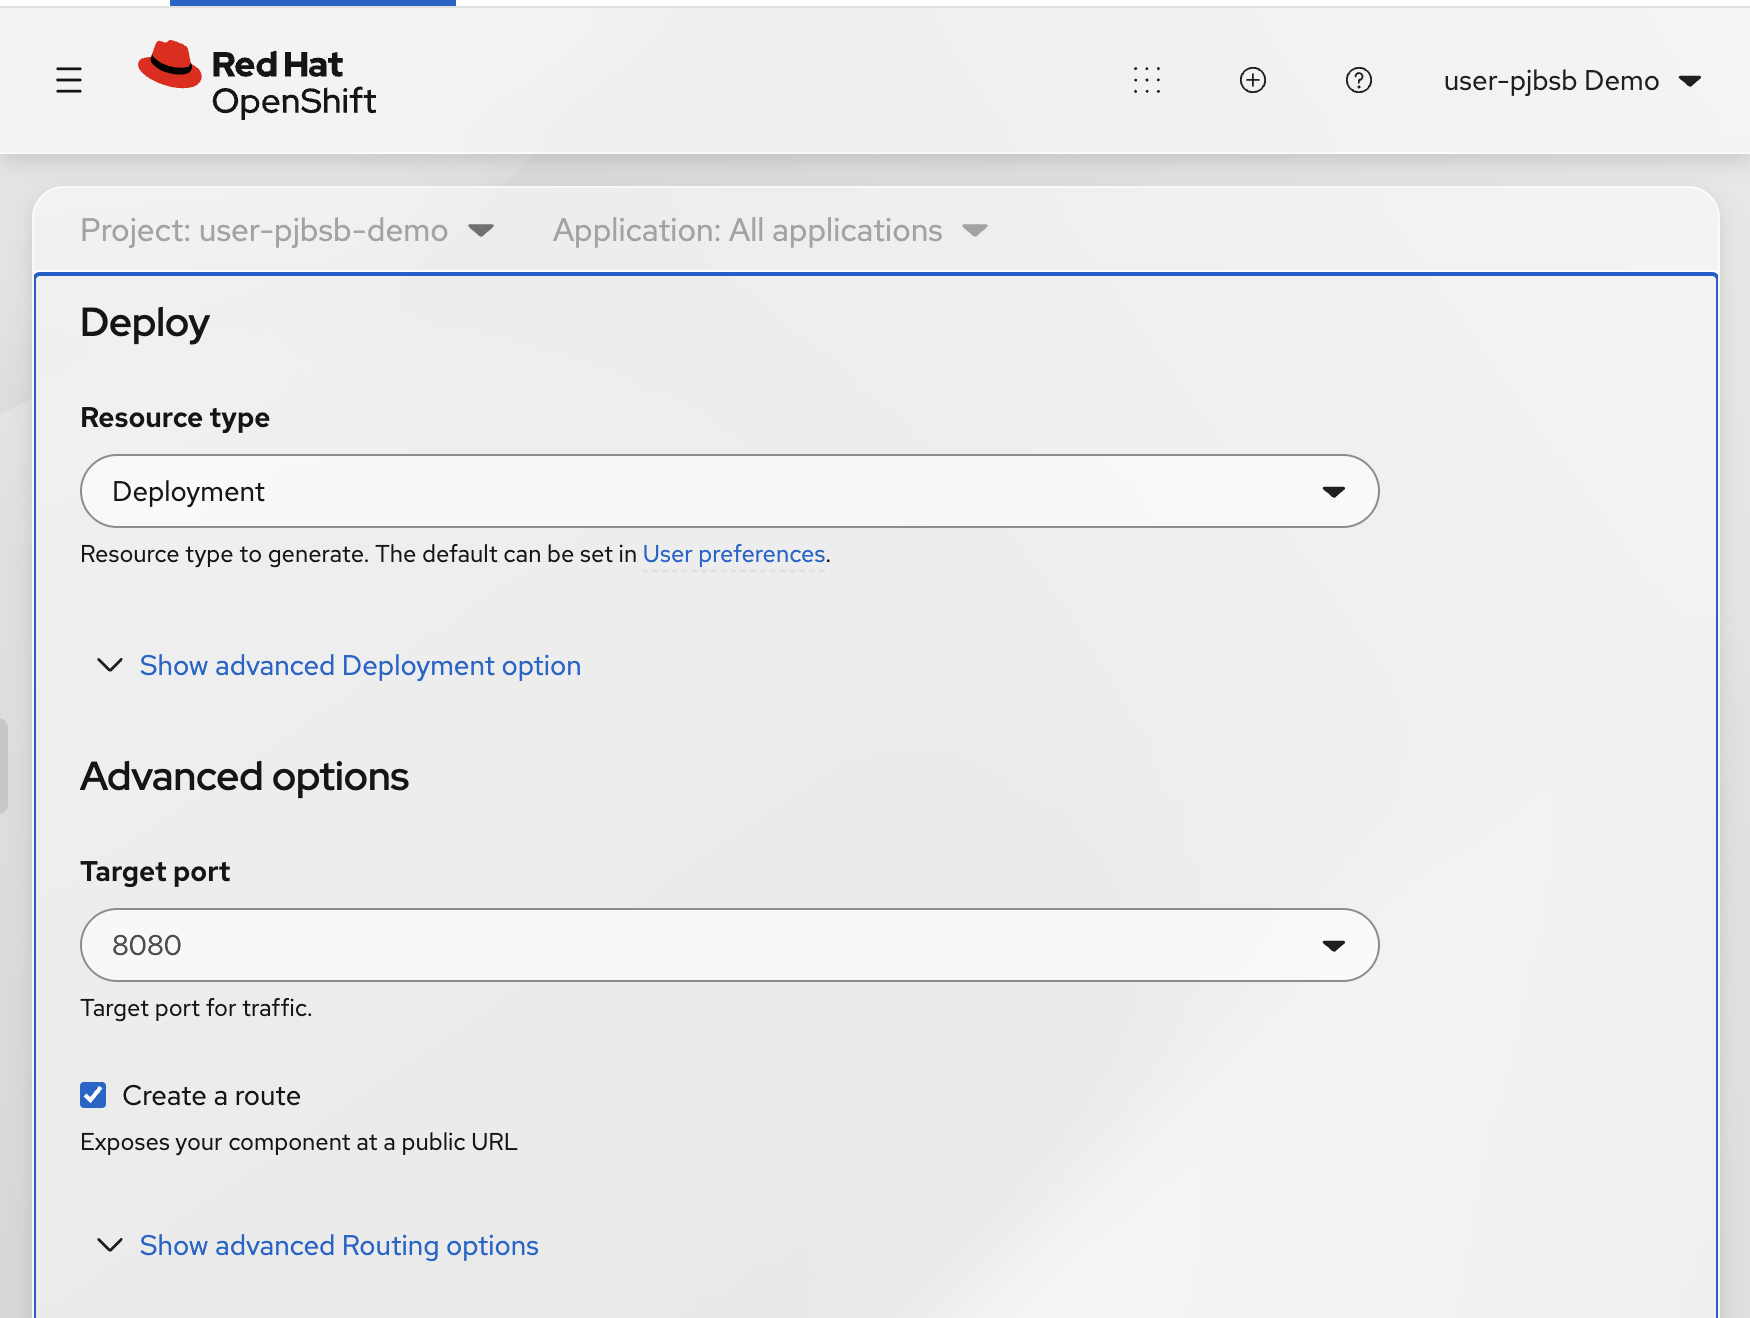
-
Under Labels, add these exact entries. Keep any console-generated labels that do not conflict:
app=national-parks-app
component=parksmap
role=frontend
app.kubernetes.io/part-of=national-parks-app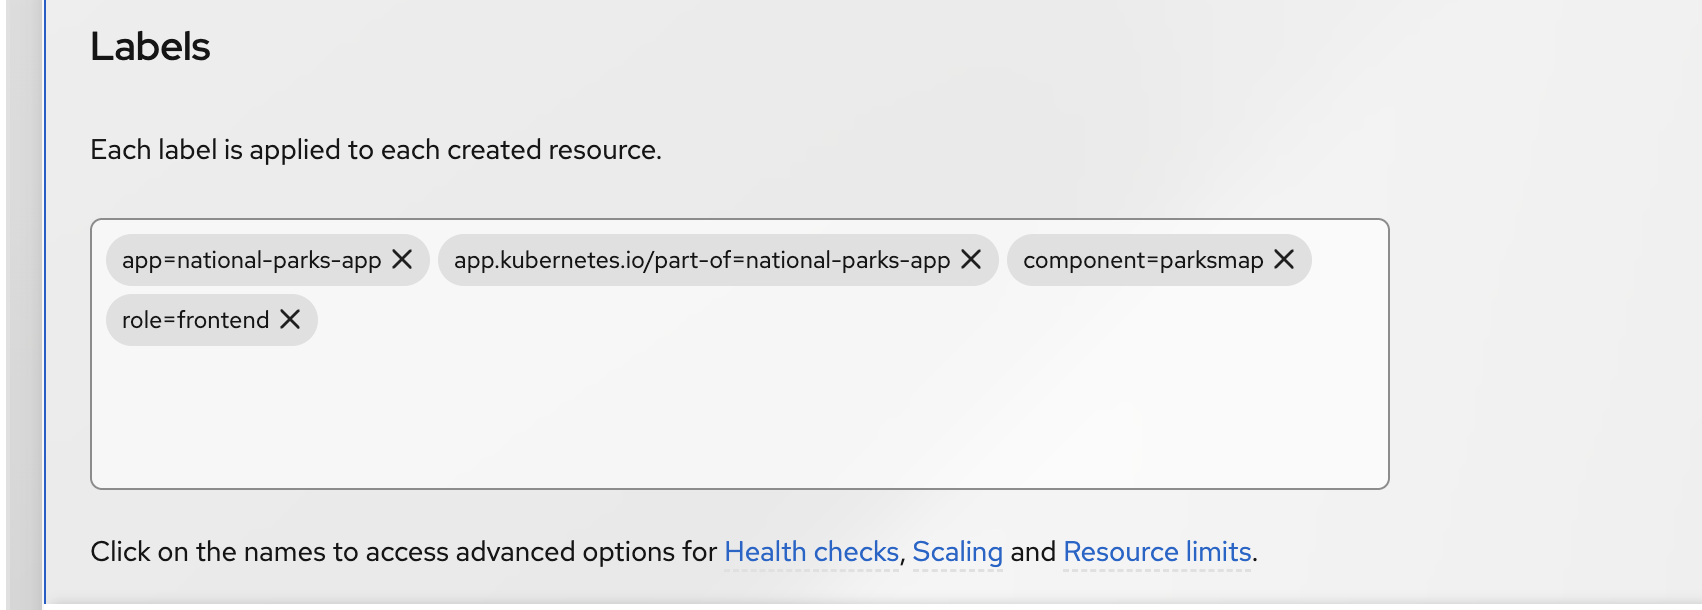
-
Select Create. The console normally opens Topology after creating the Deployment. If it does not, open the top-left navigation menu, expand Workloads, and select Topology. Confirm that the project is still
user-guid-demo.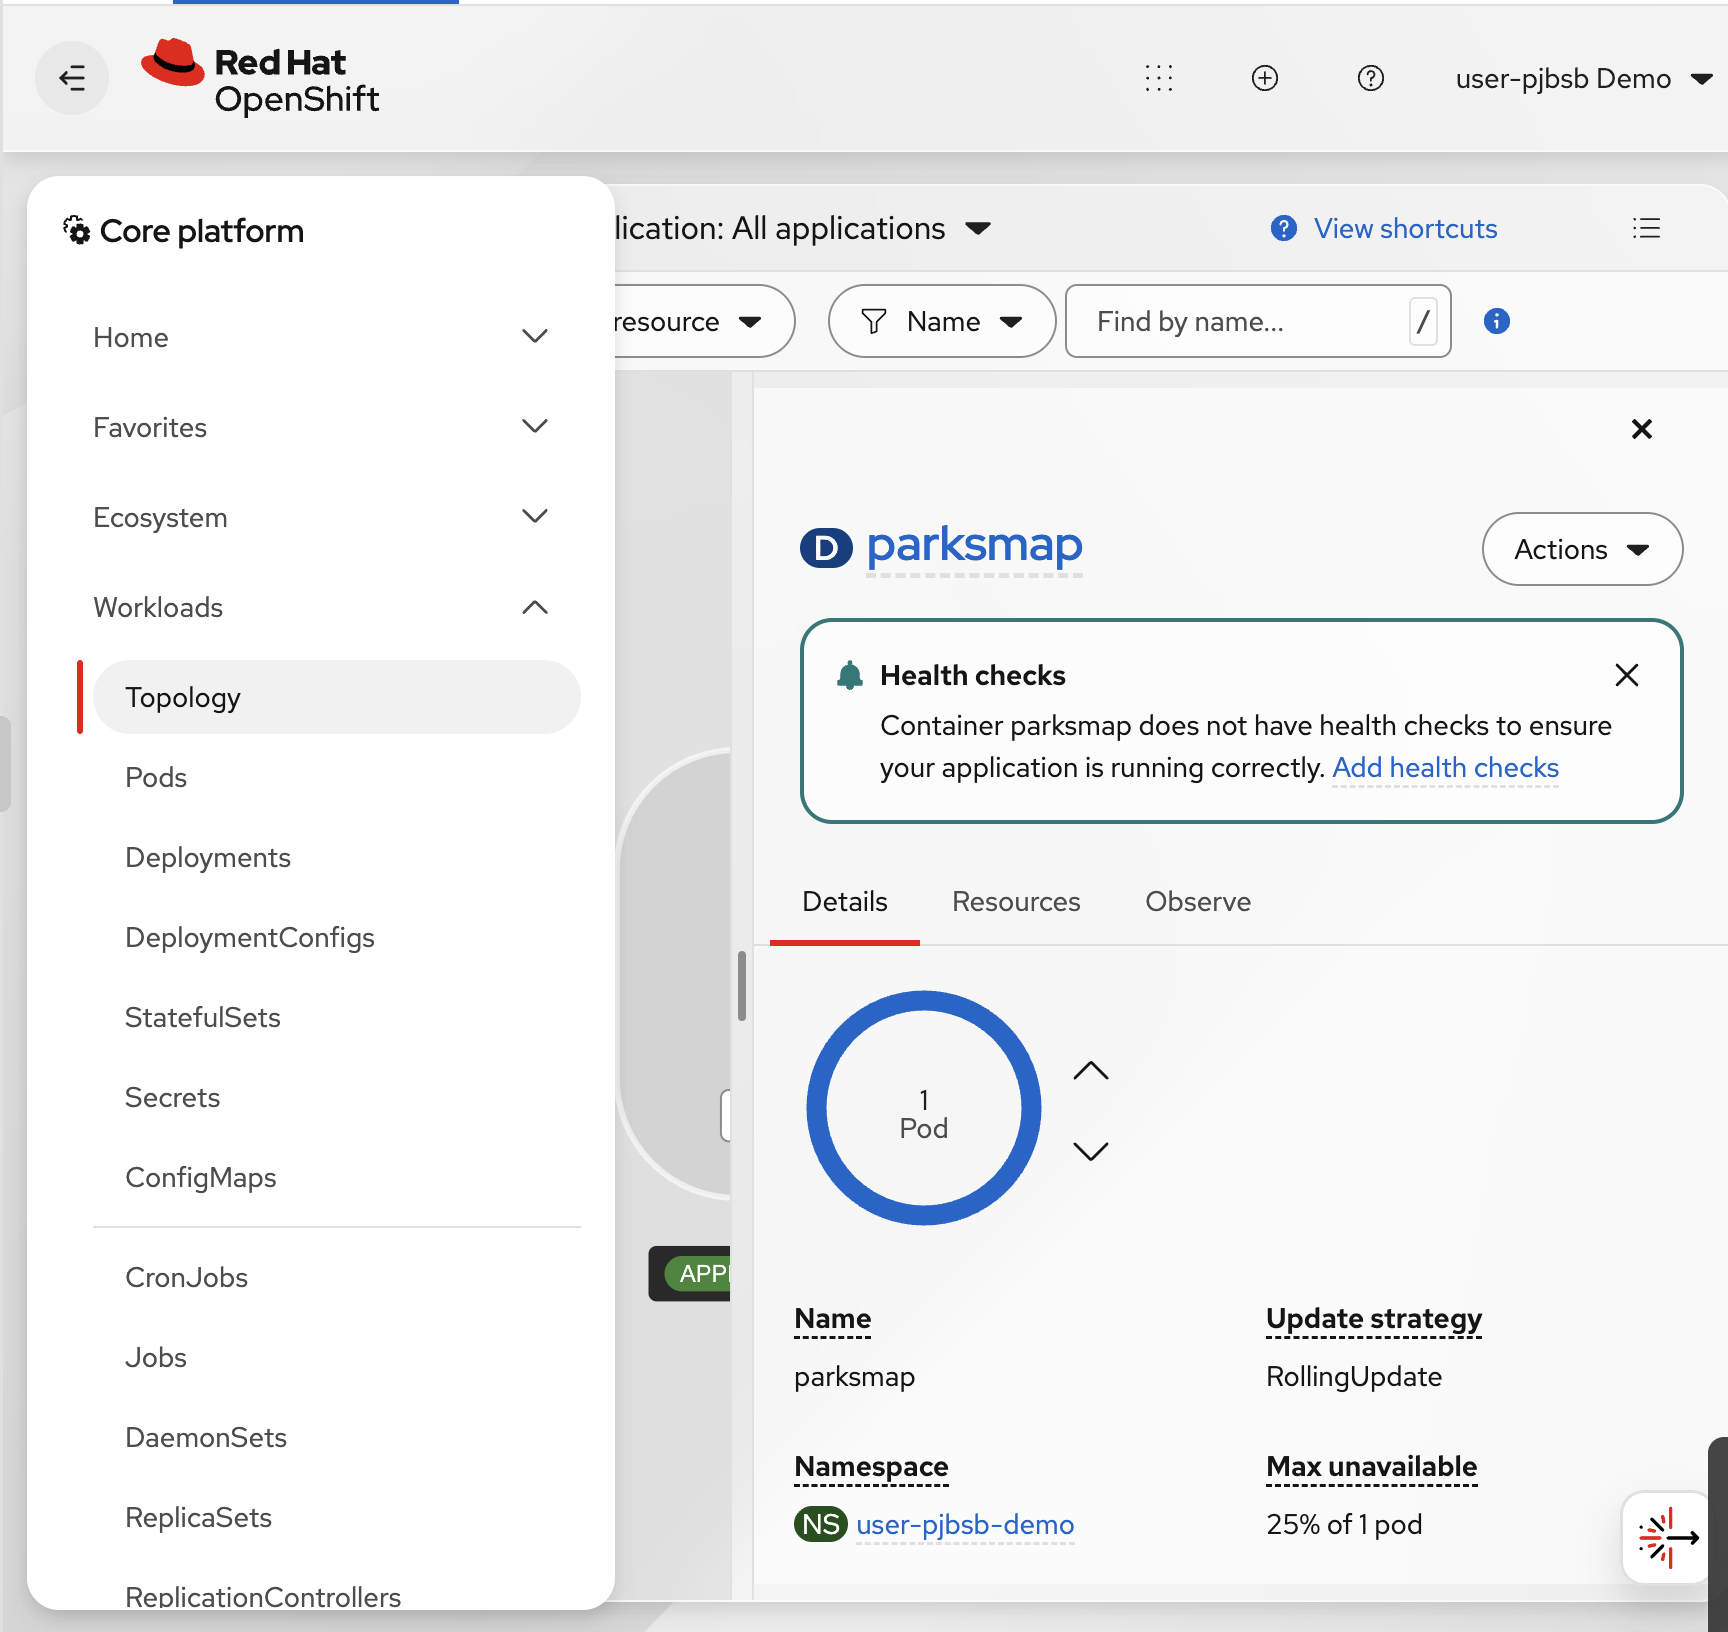
-
In the
national-parks-appgroup, selectparksmapand wait until its ring is healthy and the details panel shows 1 Pod. A suggestion to add health checks is not, by itself, a deployment failure.
Required: enable ParksMap backend discovery
ParksMap needs read-only access to Routes and Services. Do this before testing the map. The default ServiceAccount cannot discover the backend.
-
In project
user-guid-demo, choose Quick create (+) → Import YAML. Paste the prepared YAML:# Read-only discovery permissions for the legacy ParksMap frontend. # Import these objects into the student's existing user-guid-demo project. # Namespace deliberately omitted: the console import project selects it. apiVersion: v1 kind: ServiceAccount metadata: name: parksmap-discovery --- apiVersion: rbac.authorization.k8s.io/v1 kind: Role metadata: name: parksmap-discovery rules: - apiGroups: [""] resources: ["services"] verbs: ["get", "list", "watch"] - apiGroups: ["route.openshift.io"] resources: ["routes"] verbs: ["get", "list", "watch"] - apiGroups: [""] resources: ["endpoints"] resourceNames: ["nationalparks", "national-parks-app"] verbs: ["get", "watch"] --- apiVersion: rbac.authorization.k8s.io/v1 kind: RoleBinding metadata: name: parksmap-discovery subjects: - kind: ServiceAccount name: parksmap-discovery namespace: "user-guid-demo" roleRef: kind: Role name: parksmap-discovery apiGroup: rbac.authorization.k8s.io -
Verify the RoleBinding namespace is
user-guid-demo, then select Create. This creates a dedicated ServiceAccount, Role and RoleBinding. If creation is forbidden, ask your instructor to provision them. Do not giveviewto thedefaultServiceAccount. -
In the Showroom Terminal, check that
oc whoamireturnsuser-guid(not a Showroom ServiceAccount). Then run this single patch:oc patch deployment parksmap -n user-guid-demo --type=merge \ -p '{"spec":{"template":{"spec":{"serviceAccountName":"parksmap-discovery"}}}}' oc rollout status deployment/parksmap -n user-guid-demoExpected:
deployment.apps/parksmap patched, followed by a successful rollout. A successful rollout alone does not mean a failed patch succeeded. -
Required check: Verify the setting:
oc get deployment parksmap -n user-guid-demo \
  -o jsonpath='{.spec.template.spec.serviceAccountName}{"\n"}'
Expected:
parksmap-discoveryIf the output is blank or says
default, the Deployment is not fixed. Check thatoc whoamireturnsuser-guid, then repeat the patch. A RoleBinding alone does not make the Pod use this identity. Do not continue until this check passes.
|
The dedicated Role grants only backend discovery reads. Its Endpoint access is limited to |
-
In the Topology diagram, open the
parksmapRoute, or click ParksMap.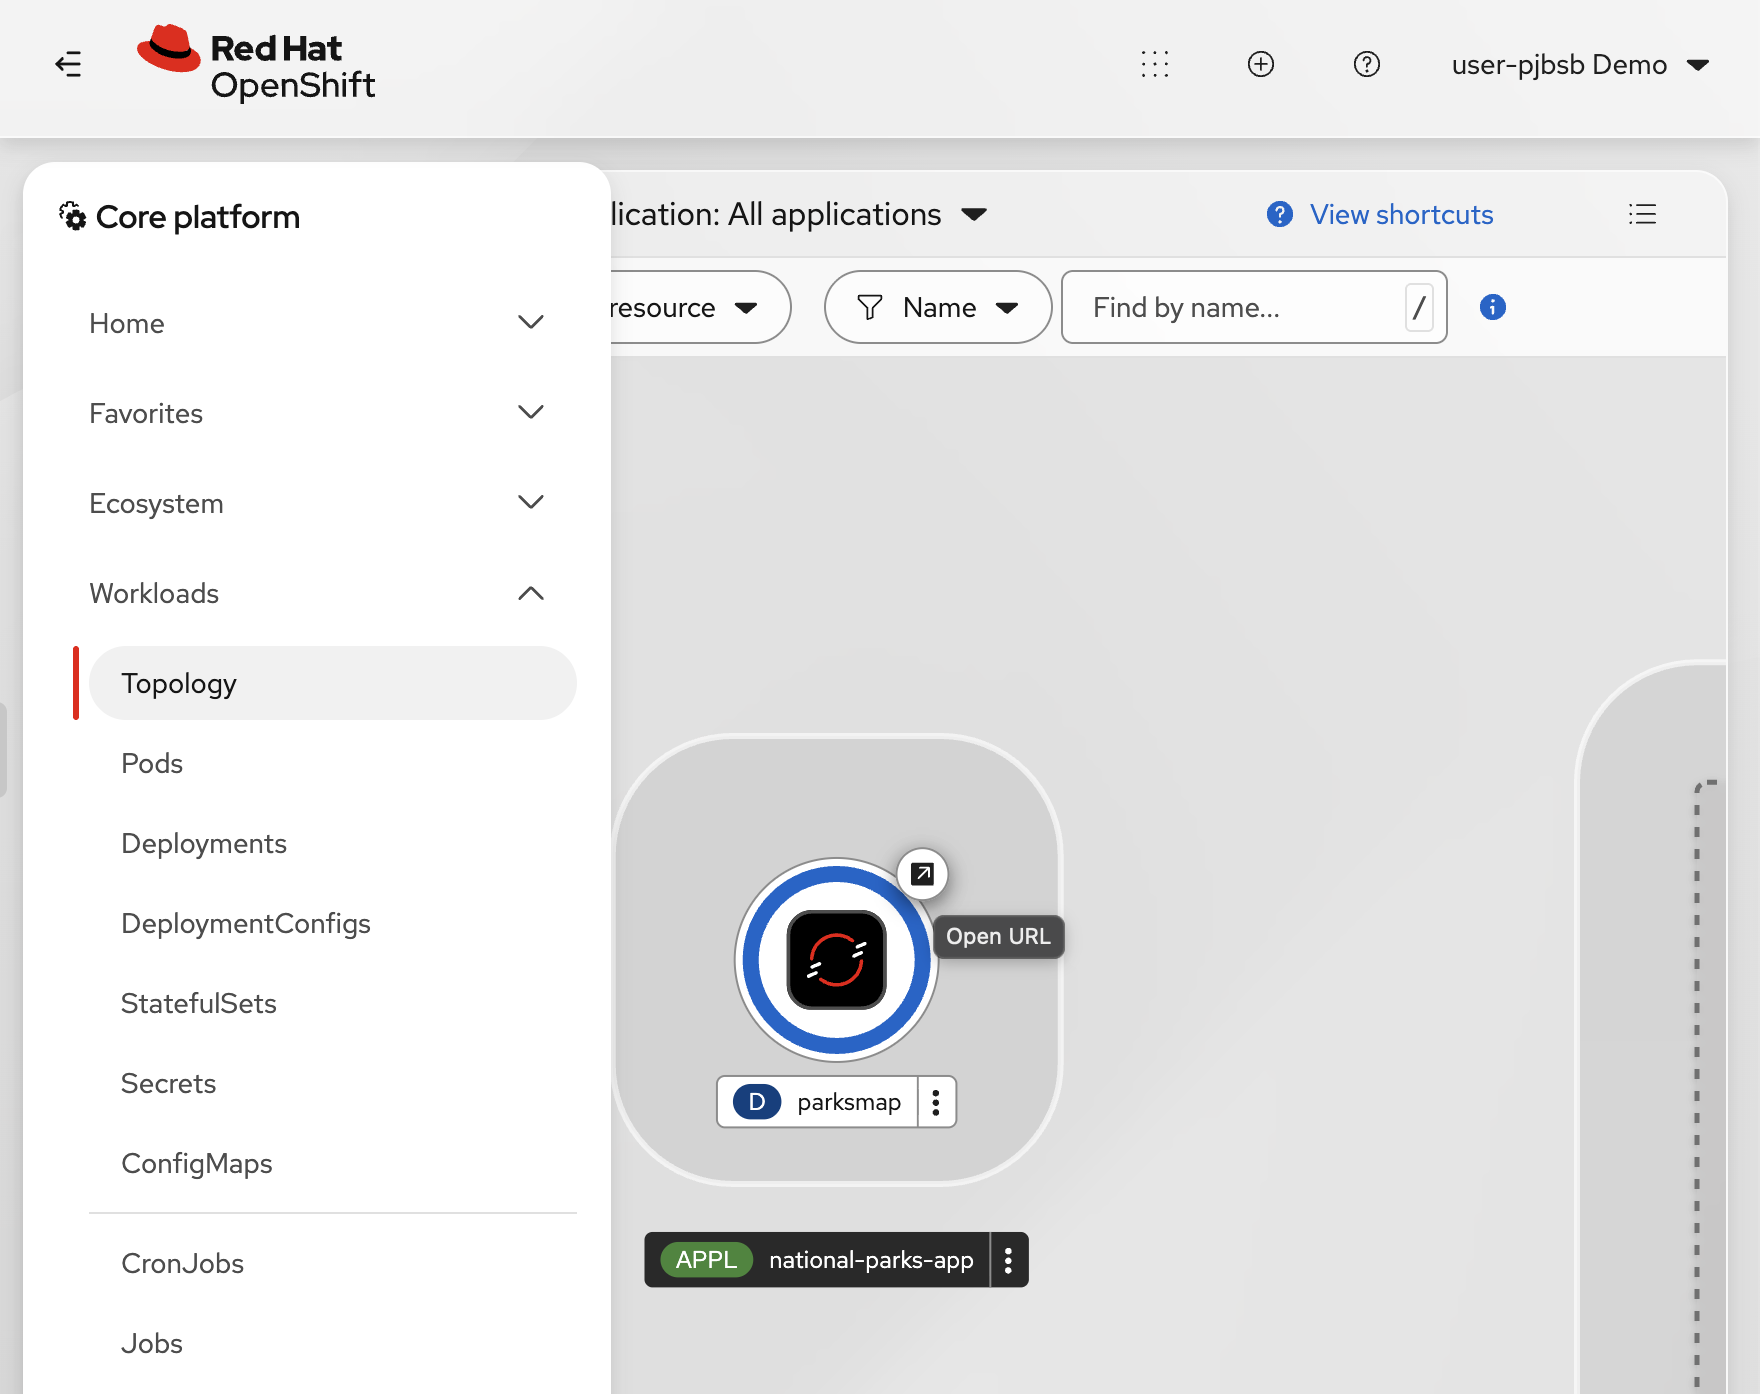
-
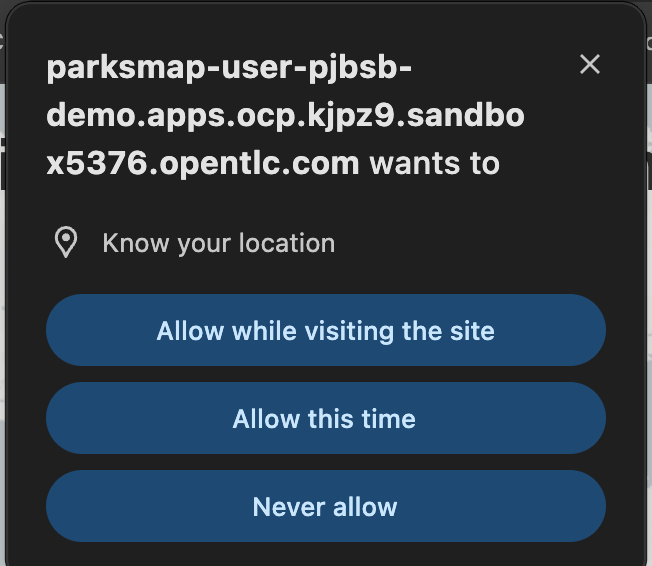
Your browser may ask whether the site can Know your location. You can select Allow this time if you are comfortable sharing your location with the page. If you decline, tell your instructor if the map or its backend layers fail to update; this older frontend does not handle a denied location request reliably. Browser location permission is not an OpenShift permission.
-
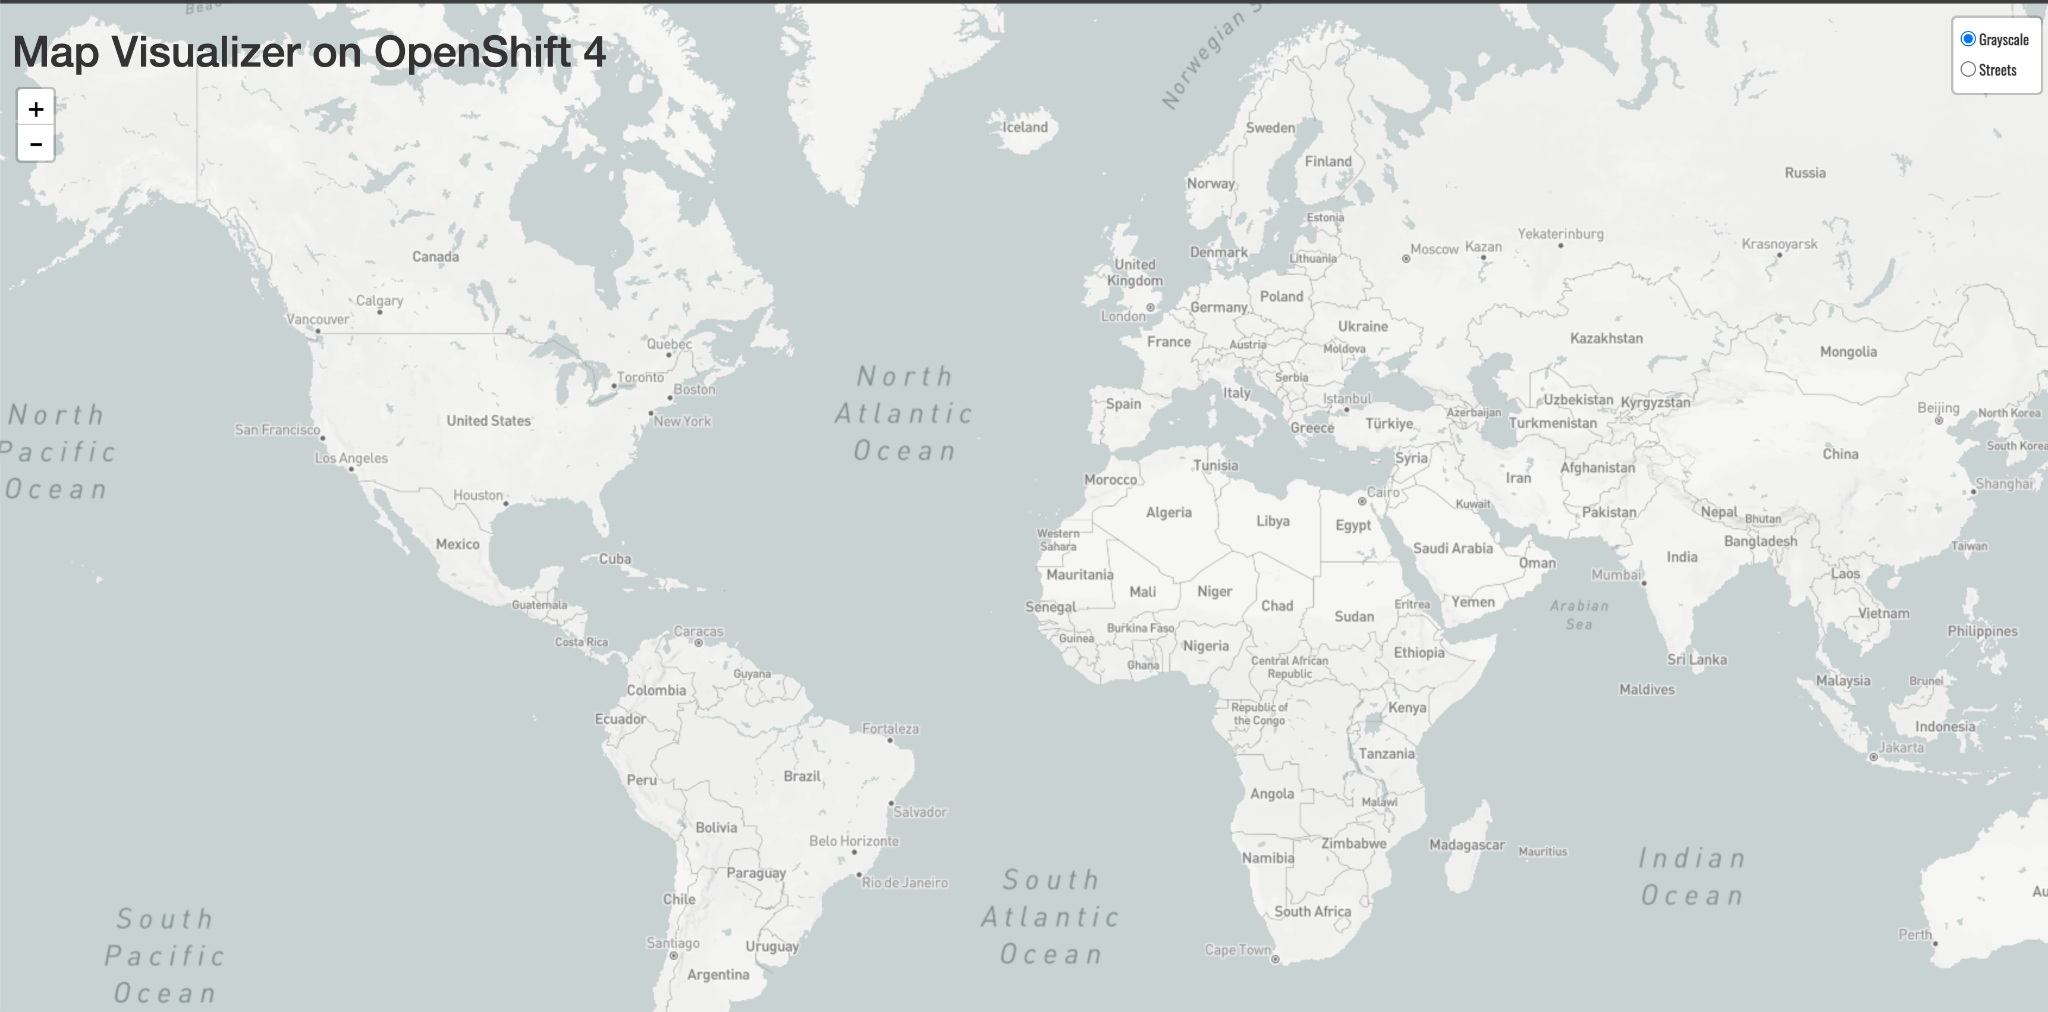
Confirm that the page opens with a world map. It is normal for the initial map to have no park markers: the API and database have not been deployed yet.
|
The page heading Map Visualizer on OpenShift 4 is literal text in the legacy ParksMap frontend source. It does not report your cluster’s version: you are deploying the image to OpenShift 5. There is no verified OpenShift 5-specific replacement image in this workshop, so keep the tested |
What do you notice? The map application can be reachable before any park data is displayed. It still needs the Python API and MongoDB. Do not troubleshoot the empty map yet.
Checkpoint 1 — mandatory: The ParksMap Route loads. The terminal verification returns parksmap-discovery. If it is blank, stop; otherwise Lightspeed will diagnose RBAC instead of the intended Service fault.
Mission 2: Build the Python backend from Git (5 minutes)
The map now has a frontend, but it still needs a Python API. In this mission you will import its source code, watch OpenShift build a container image, and check that the backend answers HTTP requests.
-
With user-guid-demo selected, choose Quick create (
+) → Import from Git. Enter the repository below. Confirm Select project shows your ownuser-guid-demoproject, not the example student’s project in the screenshot.https://github.com/openshift-roadshow/nationalparks-py.git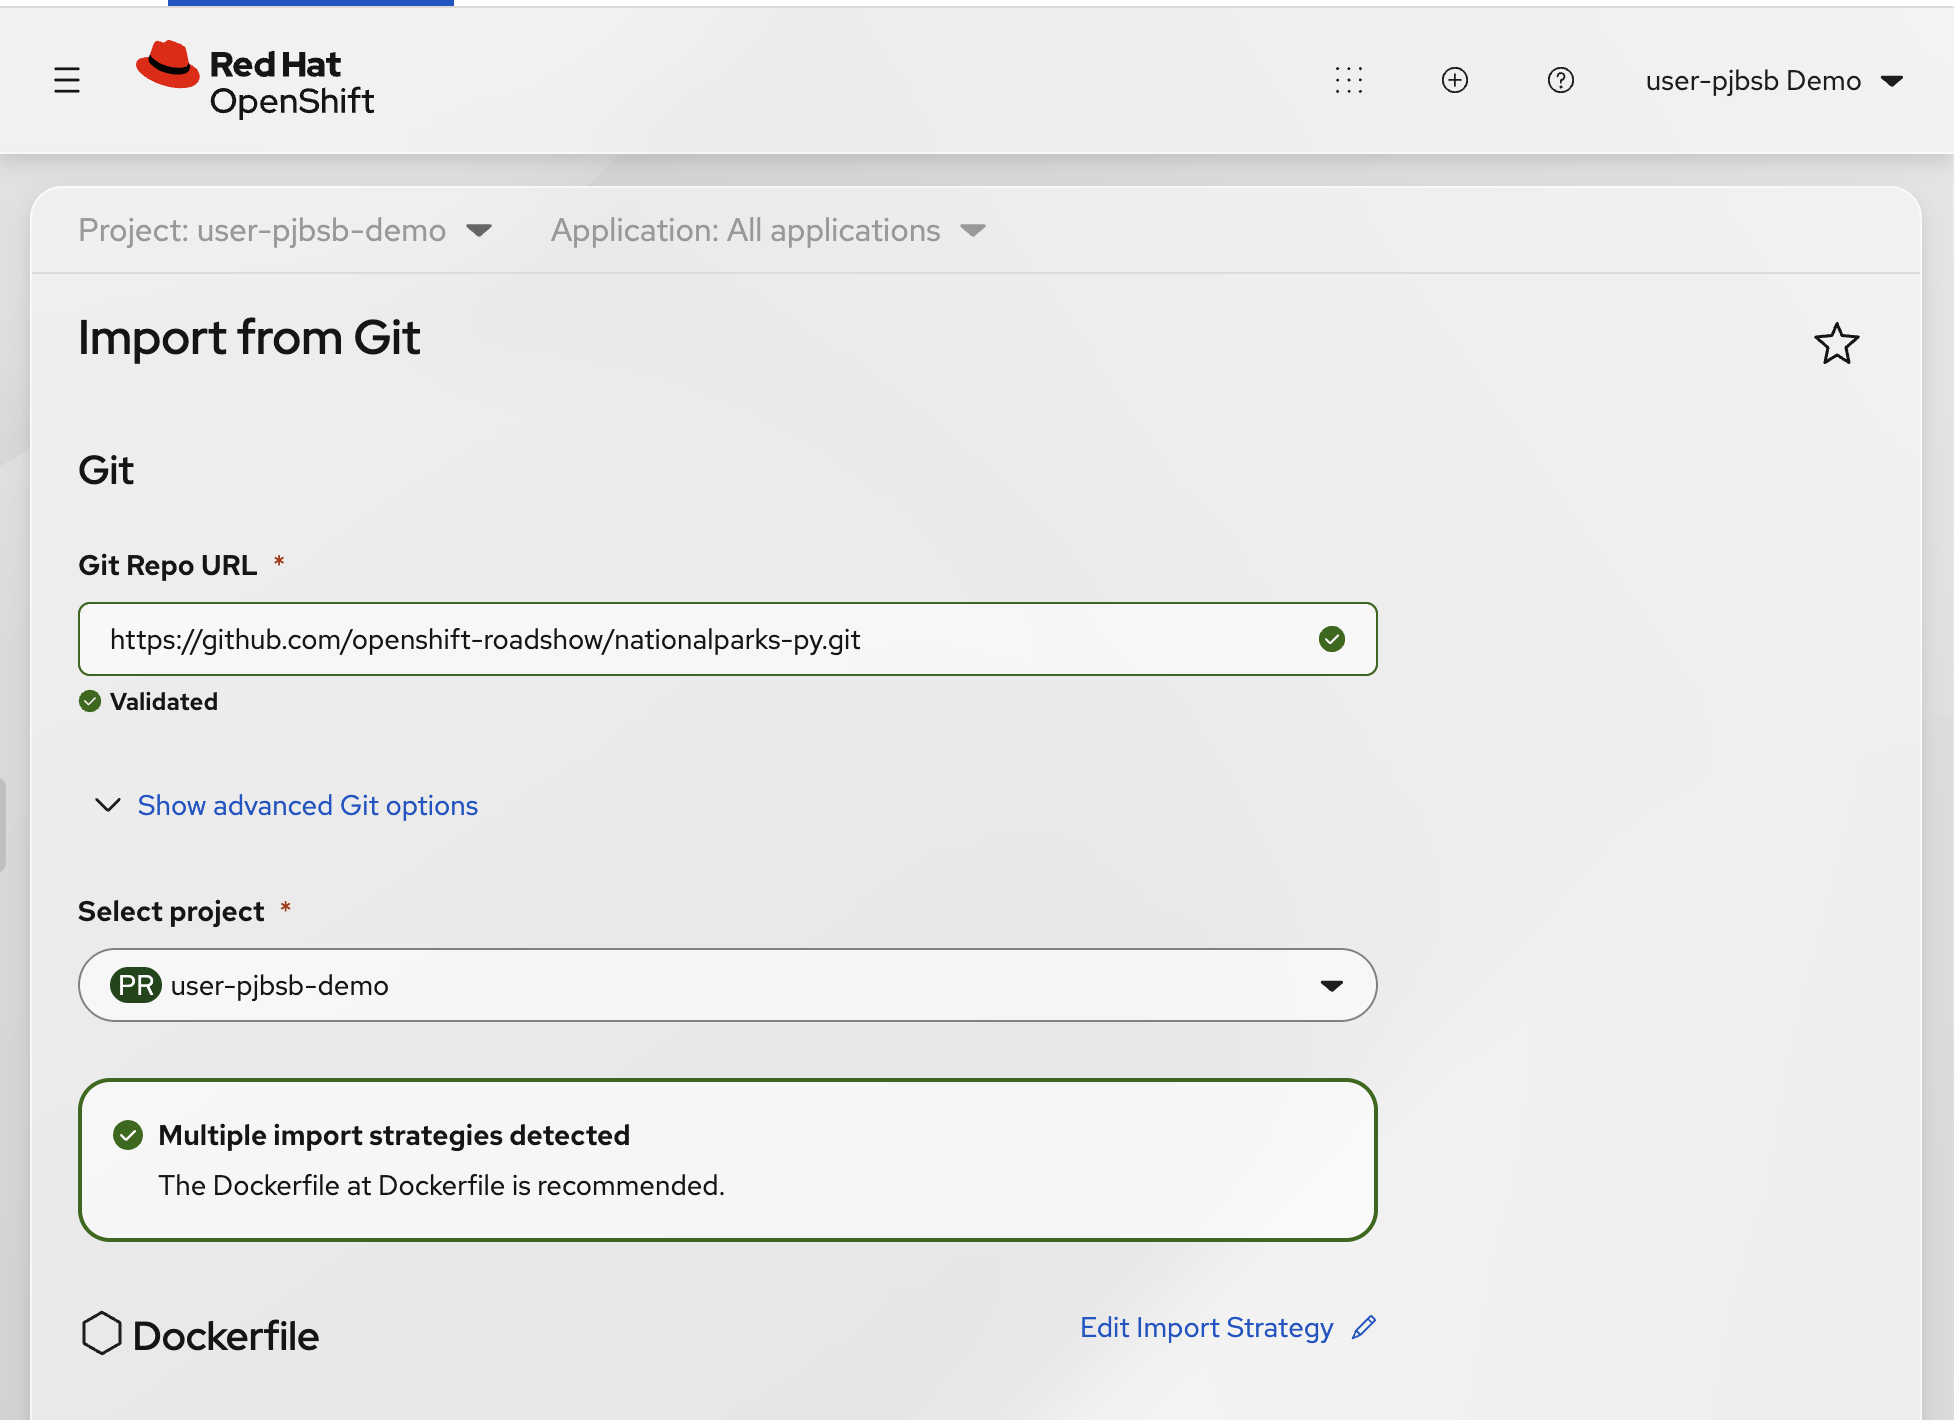
-
Wait for the import strategy detection. The console recommends Dockerfile because this repository contains one. Keep the recommended Dockerfile: it uses a UBI 9 Python 3.12 base image. You do not need to switch to a different Python builder.
-
In General, set Application to the existing
national-parks-appand Name tonationalparks. Under Build, choose Build option: BuildConfig. This creates a BuildConfig that tracks the source build; it is different from the Deployment that will run the resulting image.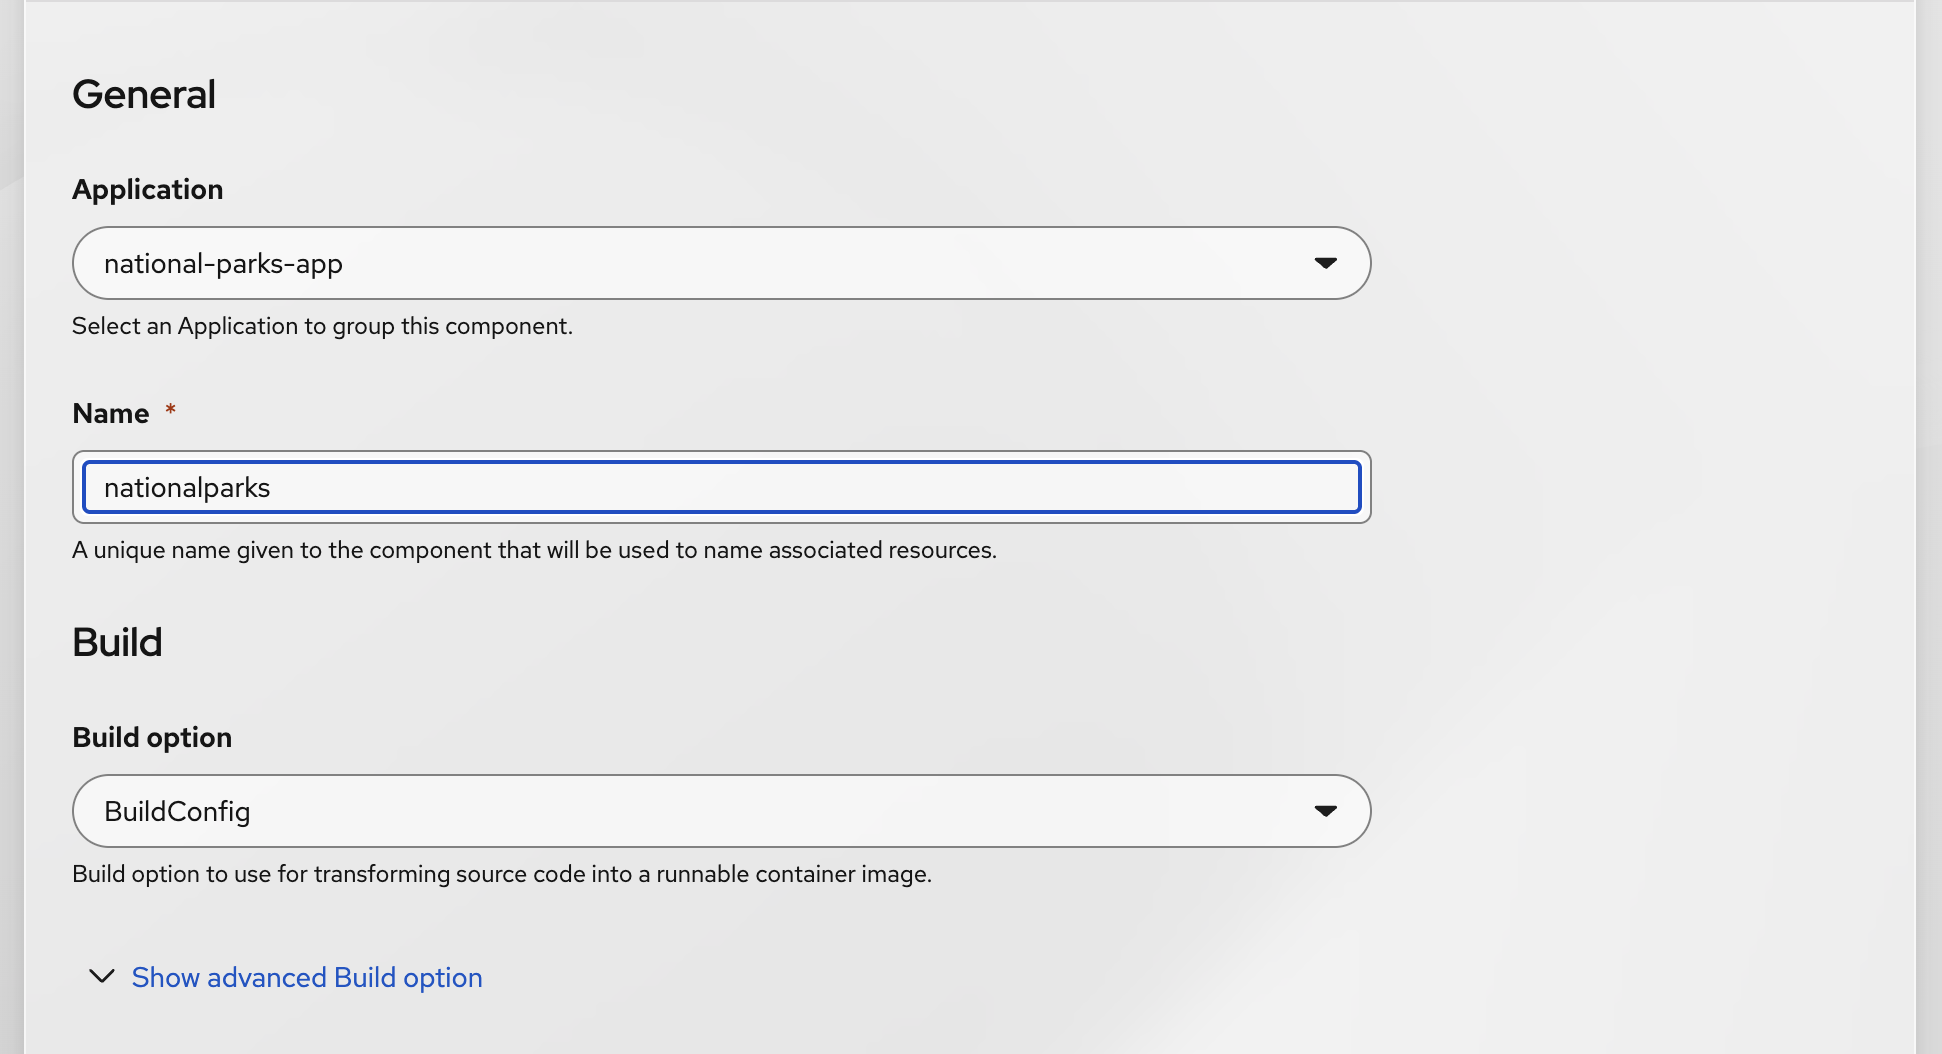
-
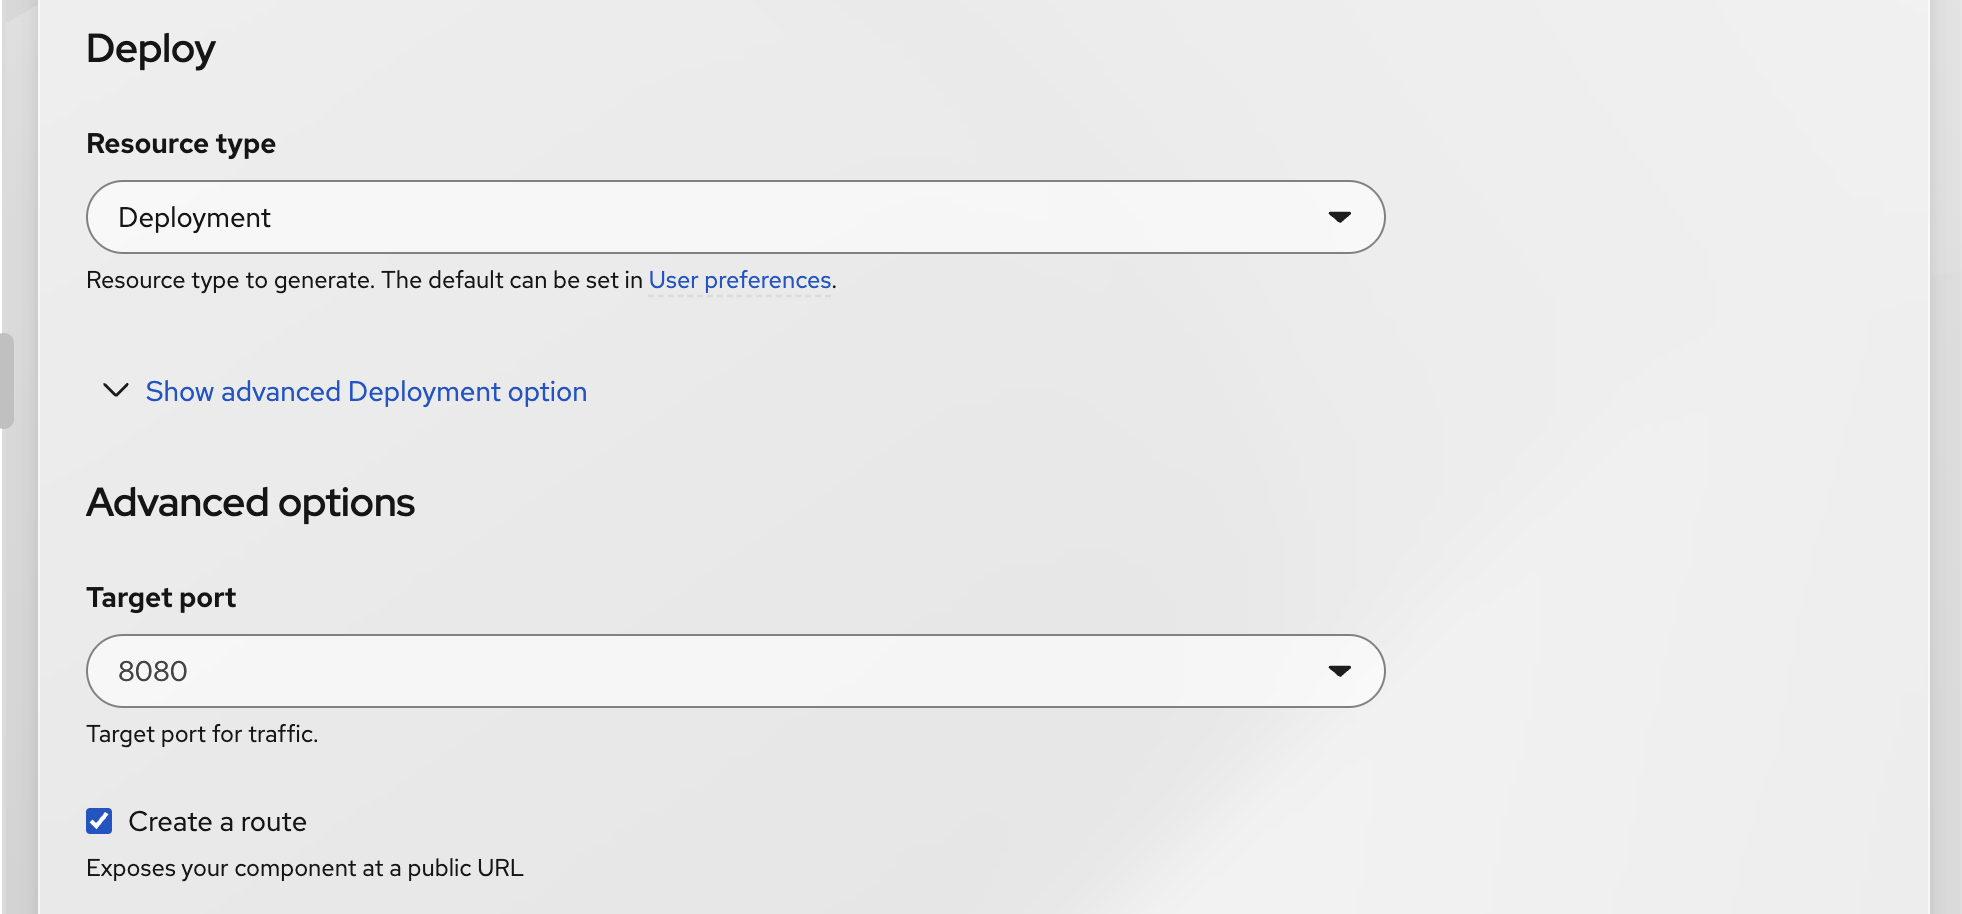
In Deploy, select Resource type: Deployment. Keep Target port: 8080 and Create a route checked. OpenShift will expose the backend through a Service and an external Route.
-
In Labels, add all five values below. Keep any other generated labels that do not conflict.
app=national-parks-app
app.kubernetes.io/part-of=national-parks-app
component=nationalparks
role=backend
type=parksmap-backend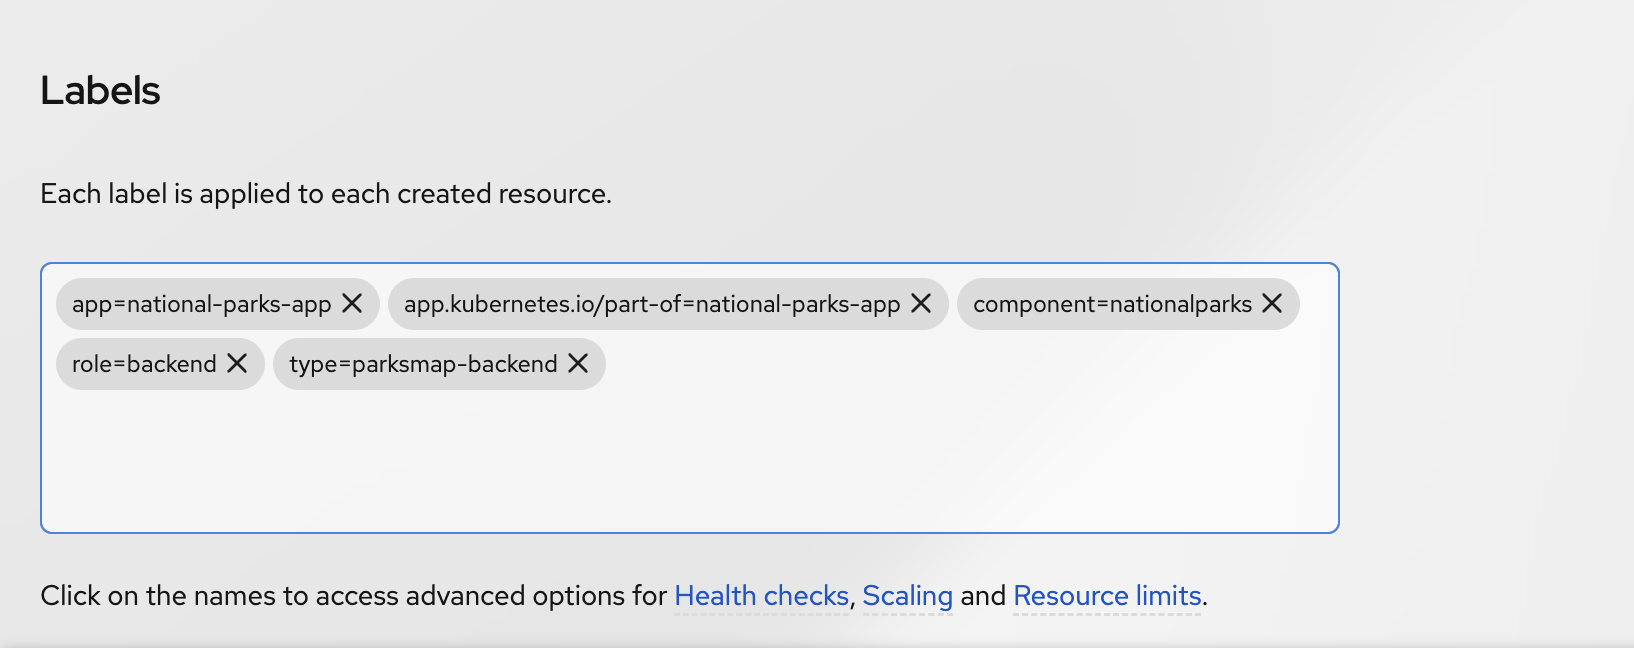
-
Select Create. Open the top-left console navigation, expand Builds, and choose Builds. Make sure the selected project is still
user-guid-demo.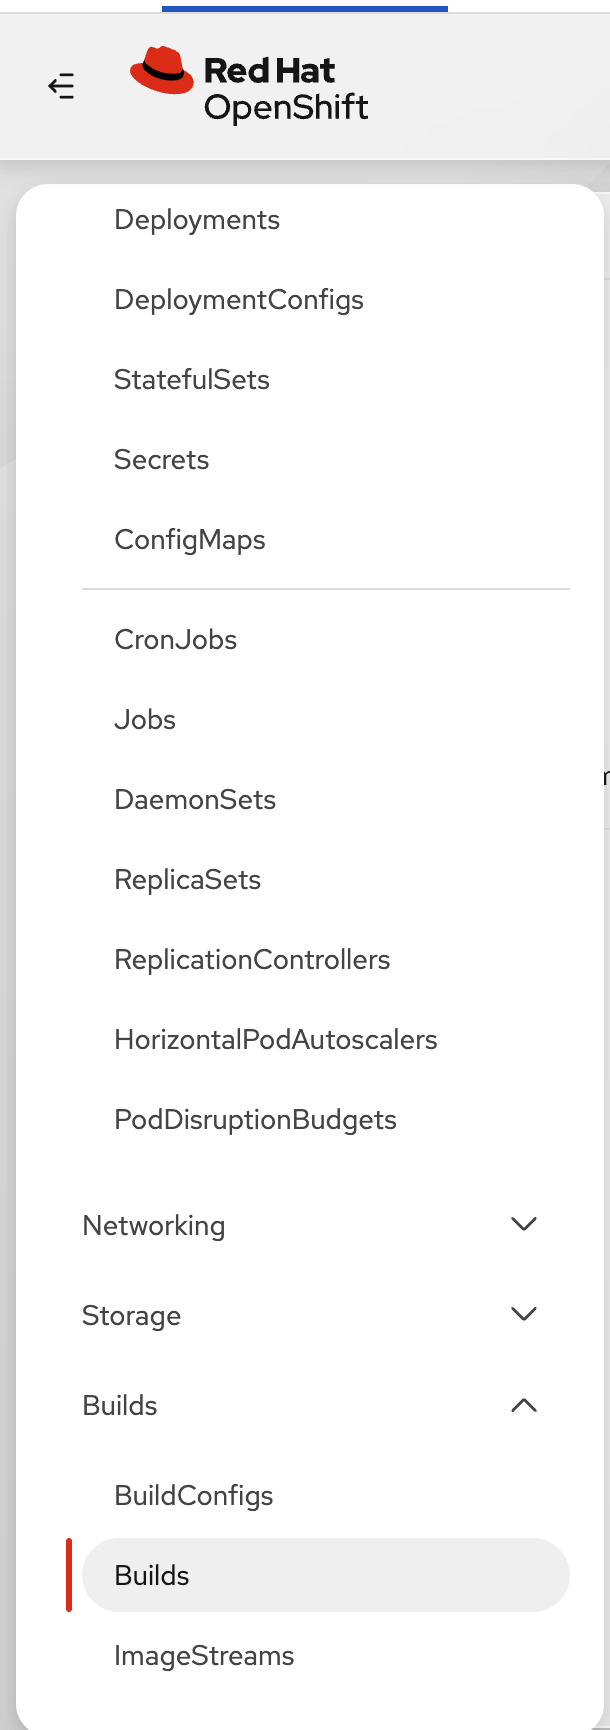
-
Find the build named
nationalparks-1(or your project’s latestnationalparksbuild), open it and select the Logs tab. Wait for its status to show Complete. At the end of the build log, look for Successfully pushed and Push successful. These lines confirm the container image was built and stored in the OpenShift image registry. If the build fails, inspect the error in this tab and ask your instructor; do not change the import strategy at random.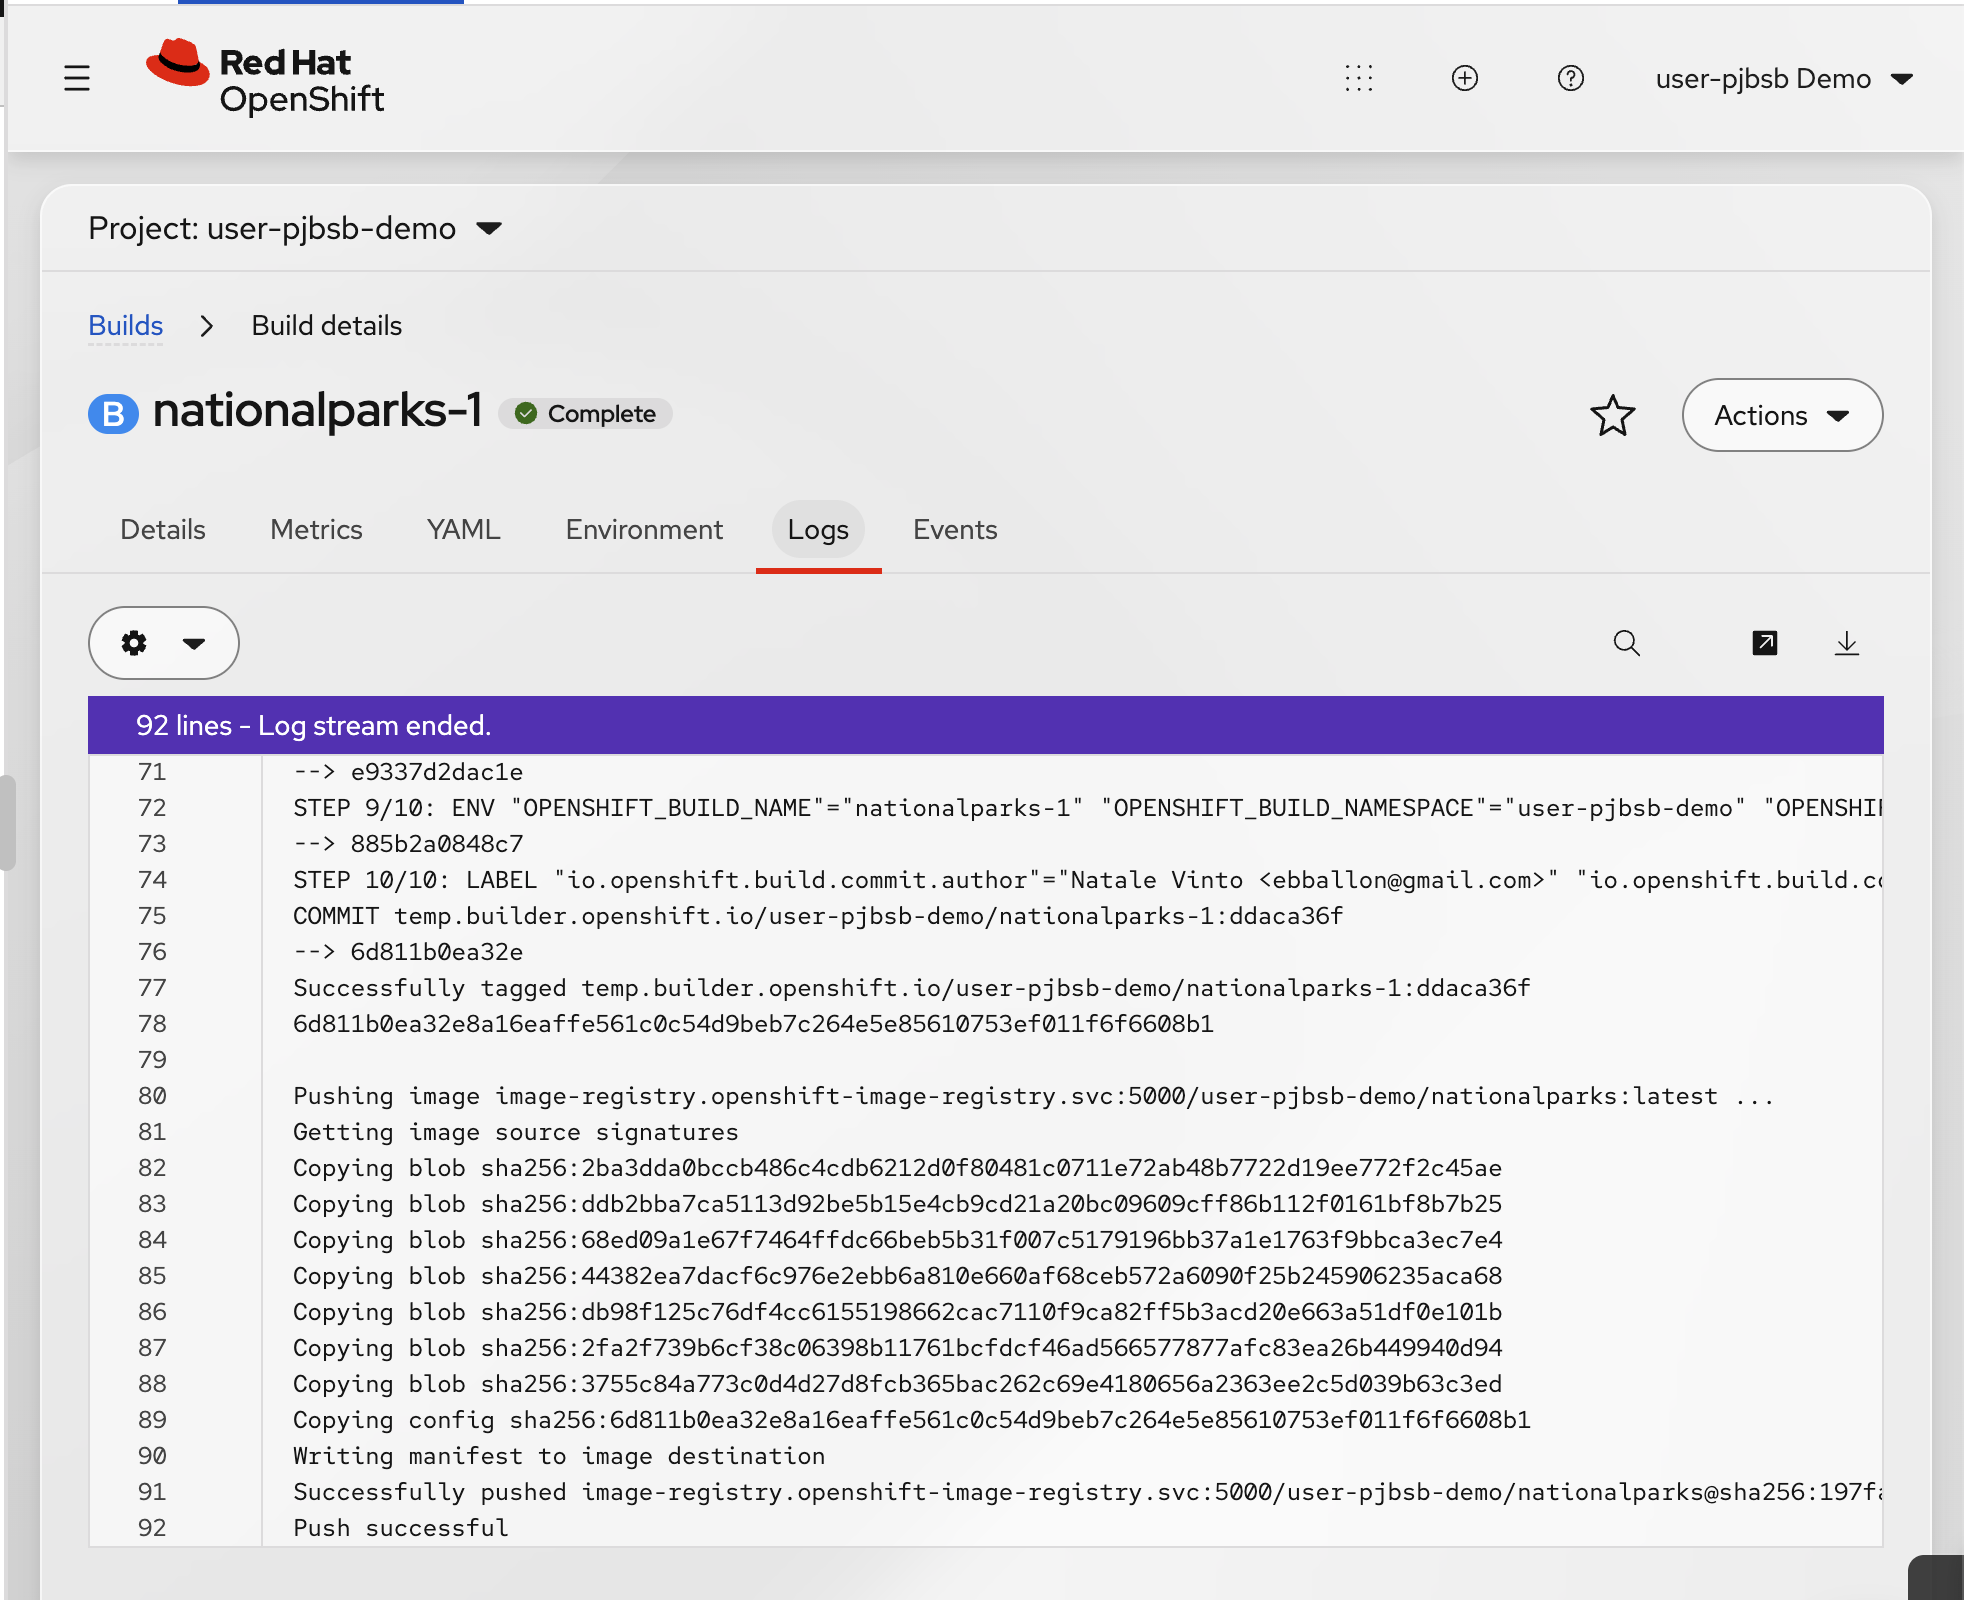
-
Return to Workloads → Topology. Select
nationalparksin thenational-parks-appgroup and open its Resources tab. Confirm that the build is marked Complete and its Pod is Running. The View logs link beside the Pod shows runtime logs, while the View logs link beside the Build shows image-build logs. These are different troubleshooting views.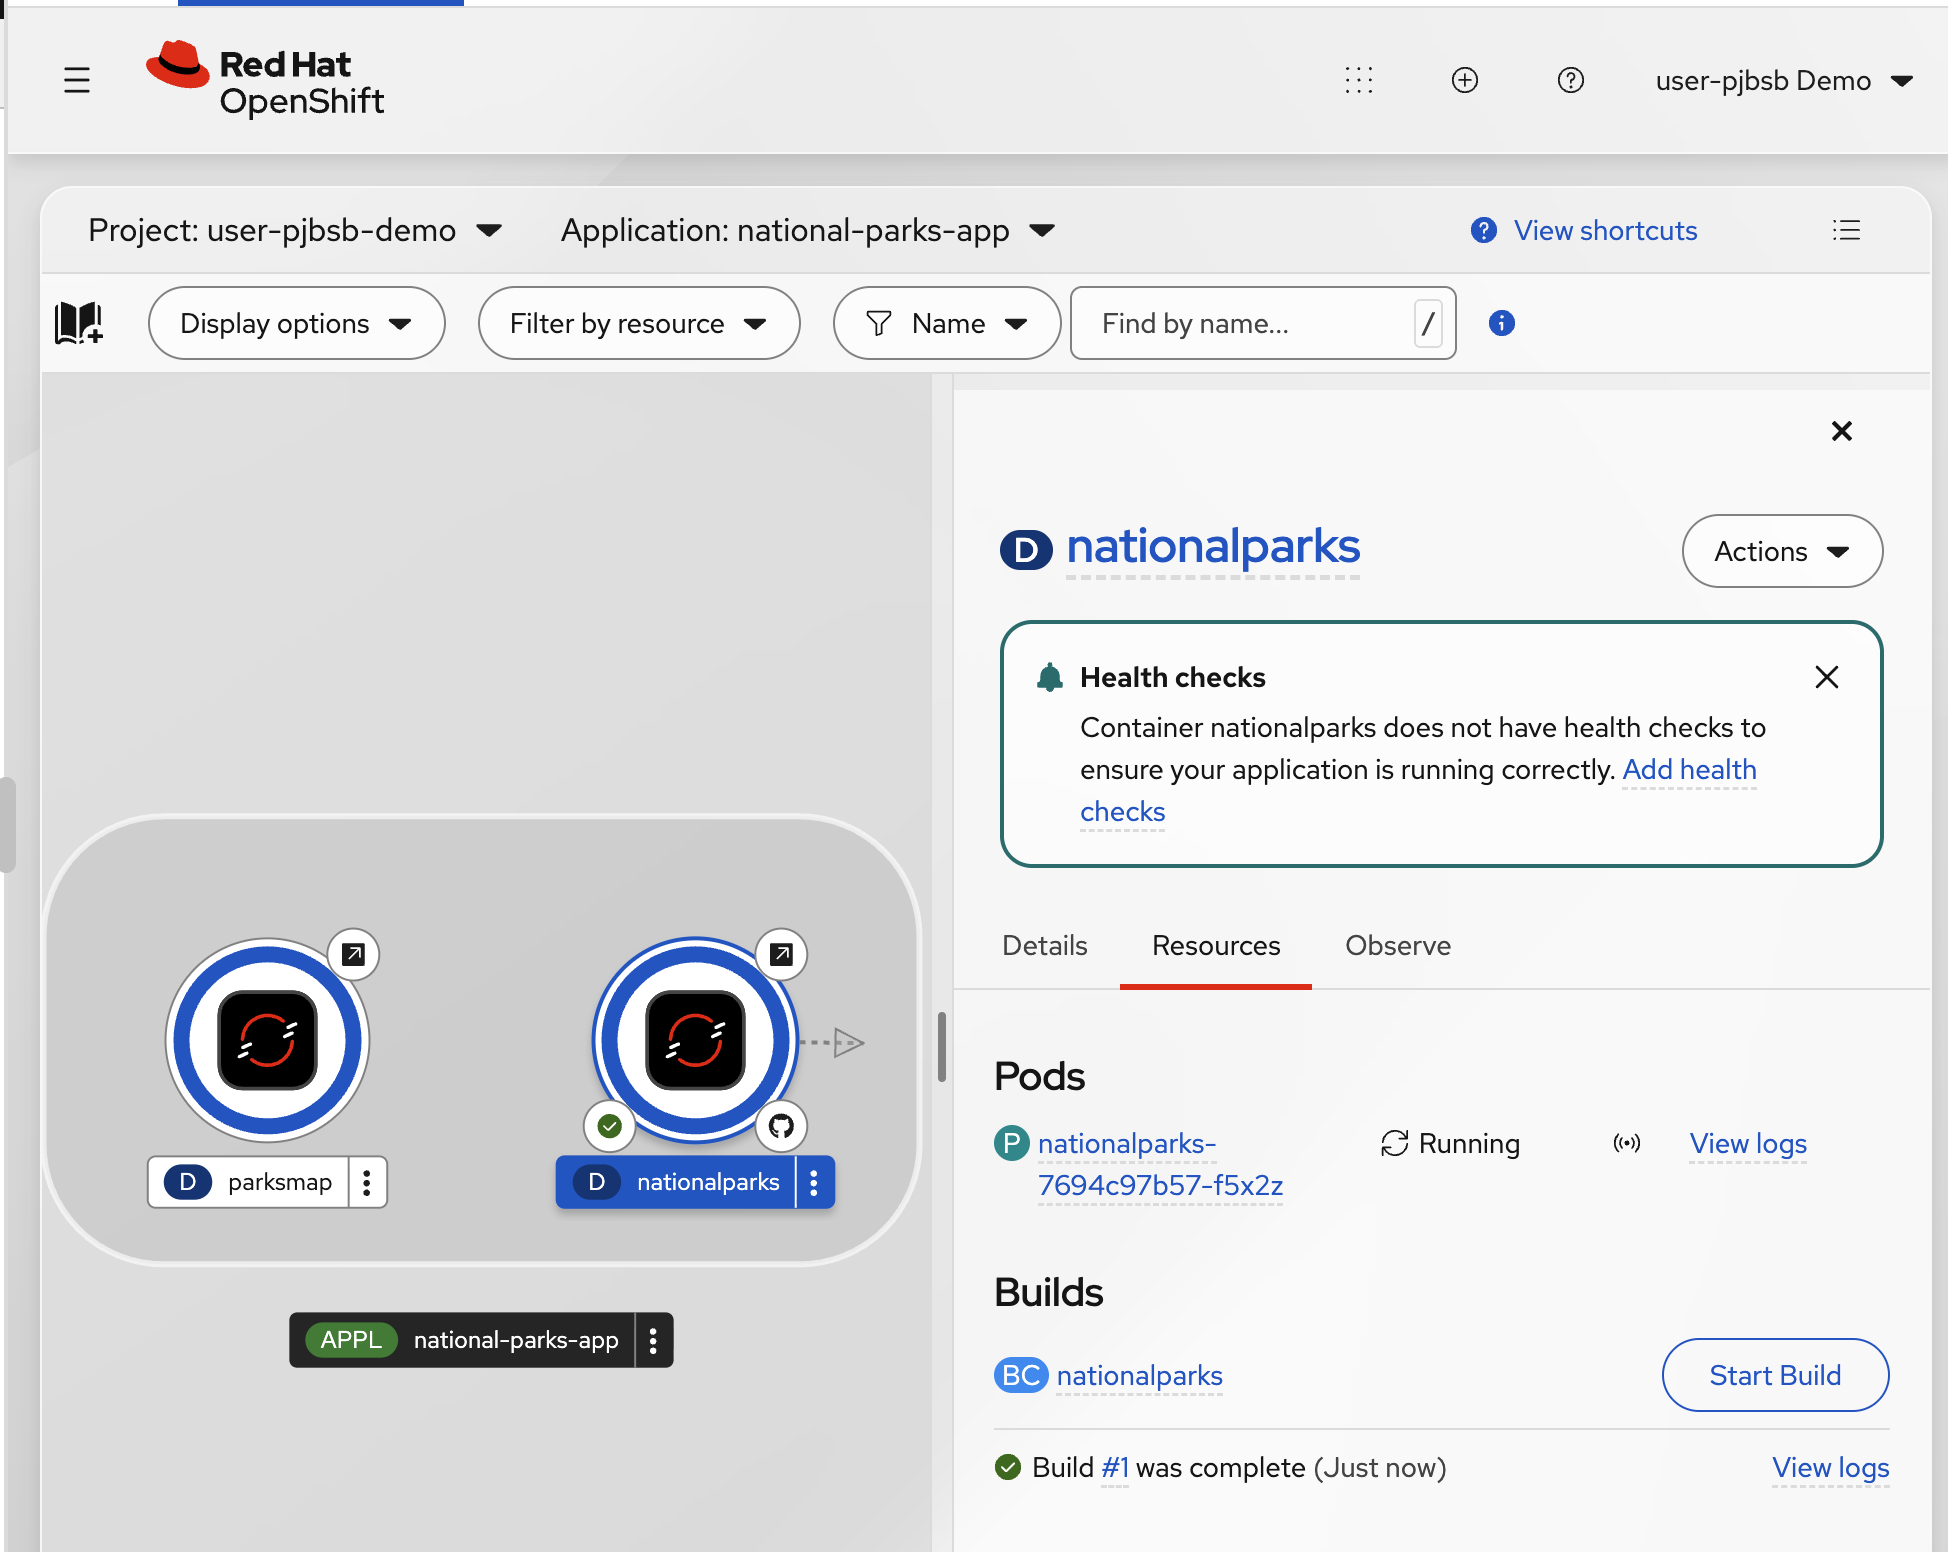
-
To test the backend Route, open the top-left navigation menu, expand Networking, and choose Routes. Find the Route pointing to the Python backend Service, typically
national-parks-appdepending on what the console generated. Do not chooseparksmap, which is the frontend Route. In the screenshot, the backend Route’s Backend health is1/1.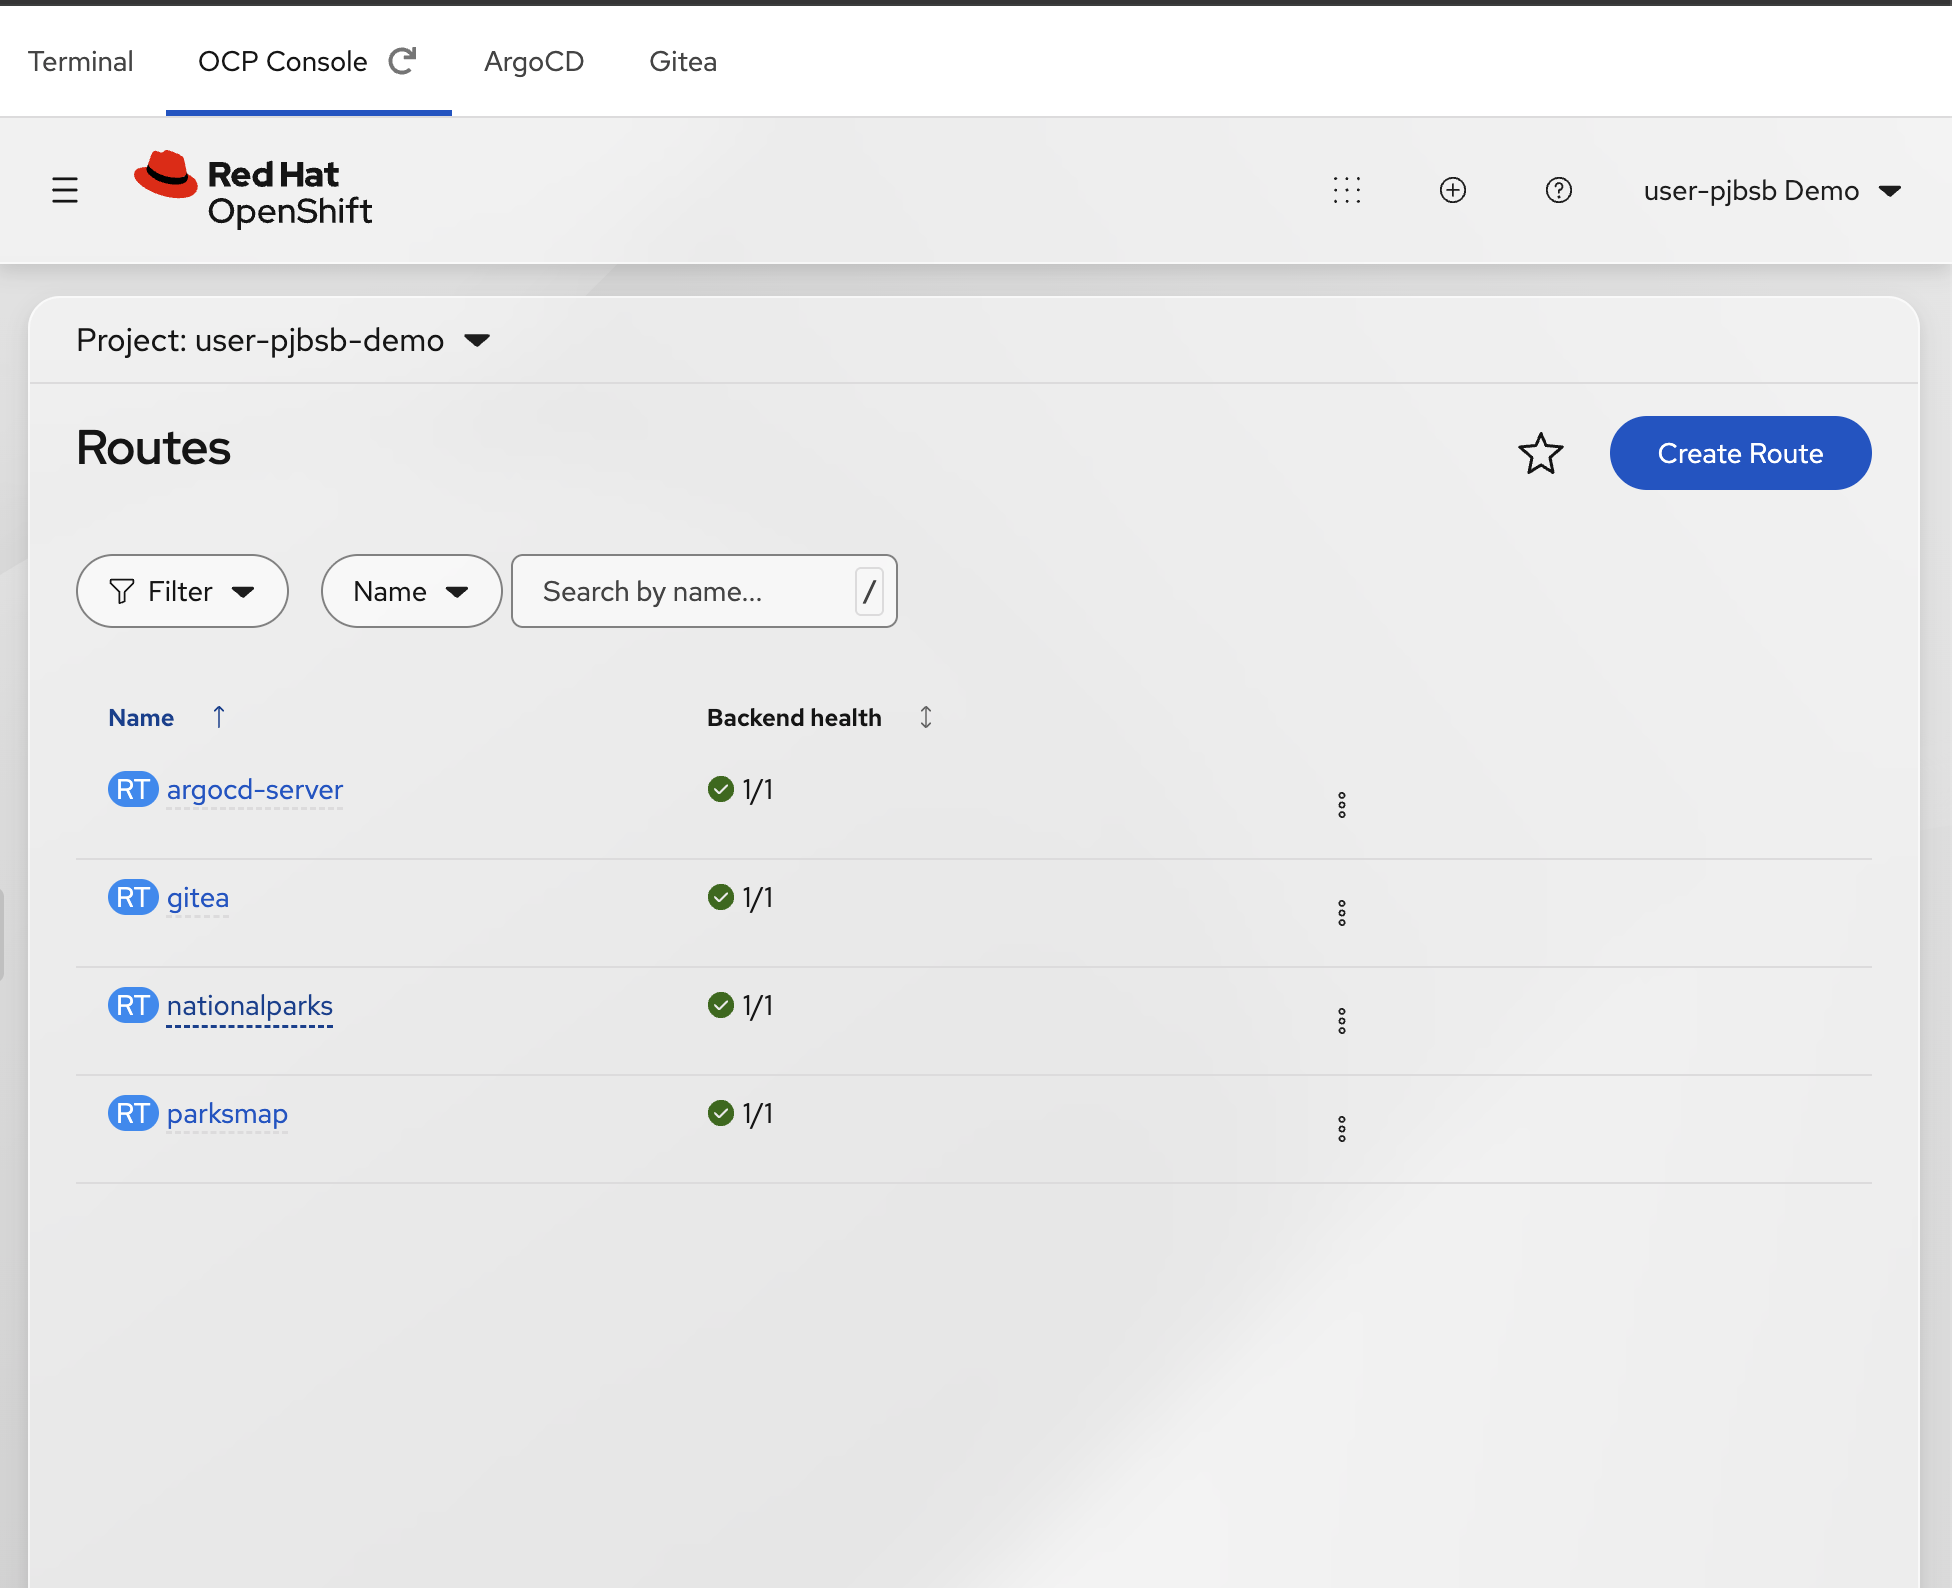
-
Open National Parks backend (or open the Location link on your actual backend Route). The page should display:
Welcome to the National Parks data service.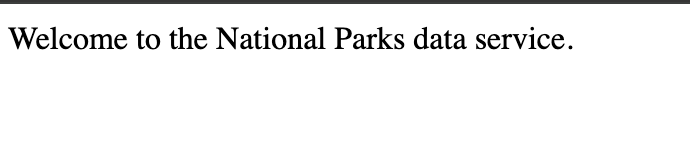
|
This welcome message confirms that the backend is reachable over HTTP. It does not prove that park records are available yet: you will connect MongoDB and load park data in Mission 3. Do not call |
|
The frontend discovers the API using Routes and Services labelled |
Checkpoint 2: The Python backend BuildConfig has produced a Complete build, the backend Pod is Running, the Service and Route exist, and the Route’s URL displays Welcome to the National Parks data service. Park data will be added later.
Mission 3: Deploy MongoDB and observe the failure (6 minutes)
Deploy MongoDB 8. The database Pod will start, but the Python backend cannot reach it because the MongoDB Service contains a deliberate fault.
-
In project
user-guid-demo, open Workloads → Secrets → Create → Key/value secret. Name itnationalparks-mongodb-parameters. Add these five keys:
| Key | Value |
|---|---|
|
|
|
|
|
|
|
Your own strong password (at least 16 characters) |
|
A different strong password (at least 16 characters) |
+ image::module01-s09a-secret-create-menu.png[Create a key/value Secret, width=800]
+
|
Never copy passwords from screenshots or paste them into Lightspeed. |
-
Select Create. Choose Quick create (
+) → Import YAML. Import these three resources: a bootstrap ConfigMap, MongoDB Deployment and MongoDB Service.# Working MongoDB 8 for the National Parks workshop. # Intentional lab fault: MongoDB Service targetPort is 27018 but mongod listens on 27017. # This is an emptyDir-backed disposable database; never store passwords in Git. apiVersion: v1 kind: ConfigMap metadata: name: mongodb-nationalparks-bootstrap labels: app: national-parks-app app.kubernetes.io/part-of: national-parks-app data: create-app-user.js: | // Executed only when the modern MongoDB image initializes an empty database. // Credentials come from the student's Secret via container environment. const database = process.env.MONGODB_DATABASE; const username = process.env.MONGODB_USER; const password = process.env.MONGODB_PASSWORD; if (!database || !username || !password) { throw new Error('Missing database name or application credentials'); } db.getSiblingDB(database).createUser({ user: username, pwd: password, roles: [{role: 'readWrite', db: database}] }); --- apiVersion: apps/v1 kind: Deployment metadata: name: mongodb-nationalparks labels: app: national-parks-app component: mongodb-nationalparks app.kubernetes.io/part-of: national-parks-app app.kubernetes.io/name: mongodb spec: replicas: 1 selector: matchLabels: app: mongodb-nationalparks template: metadata: labels: app: mongodb-nationalparks component: mongodb-nationalparks app.kubernetes.io/part-of: national-parks-app app.kubernetes.io/name: mongodb spec: containers: - name: mongodb image: quay.io/mongodb/mongodb-community-server:8.0.32-ubi9-slim imagePullPolicy: IfNotPresent ports: - name: mongodb containerPort: 27017 protocol: TCP envFrom: - secretRef: name: nationalparks-mongodb-parameters env: - name: MONGO_INITDB_ROOT_USERNAME value: nationalparks-admin - name: MONGO_INITDB_ROOT_PASSWORD valueFrom: secretKeyRef: name: nationalparks-mongodb-parameters key: MONGODB_ADMIN_PASSWORD - name: MONGO_INITDB_DATABASE valueFrom: secretKeyRef: name: nationalparks-mongodb-parameters key: MONGODB_DATABASE readinessProbe: tcpSocket: port: mongodb initialDelaySeconds: 10 periodSeconds: 5 resources: requests: cpu: 100m memory: 256Mi limits: memory: 1Gi volumeMounts: - name: modern-data mountPath: /data/db - name: app-user-bootstrap mountPath: /docker-entrypoint-initdb.d readOnly: true volumes: - name: modern-data emptyDir: {} - name: app-user-bootstrap configMap: name: mongodb-nationalparks-bootstrap --- apiVersion: v1 kind: Service metadata: name: mongodb-nationalparks labels: app: national-parks-app component: mongodb-nationalparks app.kubernetes.io/part-of: national-parks-app spec: type: ClusterIP selector: app: mongodb-nationalparks ports: - name: mongodb port: 27017 targetPort: 27018 protocol: TCP -
Open your Python backend Deployment (typically
nationalparks) under Workloads → Deployments → YAML → Edit. Add this to the application container, besideimageandports:envFrom: - secretRef: name: nationalparks-mongodb-parameters -
Save. Wait for the MongoDB and Python backend Pods to be Running and Ready.
-
Open View National Parks data. The backend should not return park records while its database connection is broken. It may show an error or timeout.
Checkpoint 3: Both workloads are Running, but the backend cannot retrieve data. Do not load park data or change any ports yet.
Mission 4: Investigate with Lightspeed (4 minutes)
-
Open OpenShift Lightspeed → Troubleshooting.
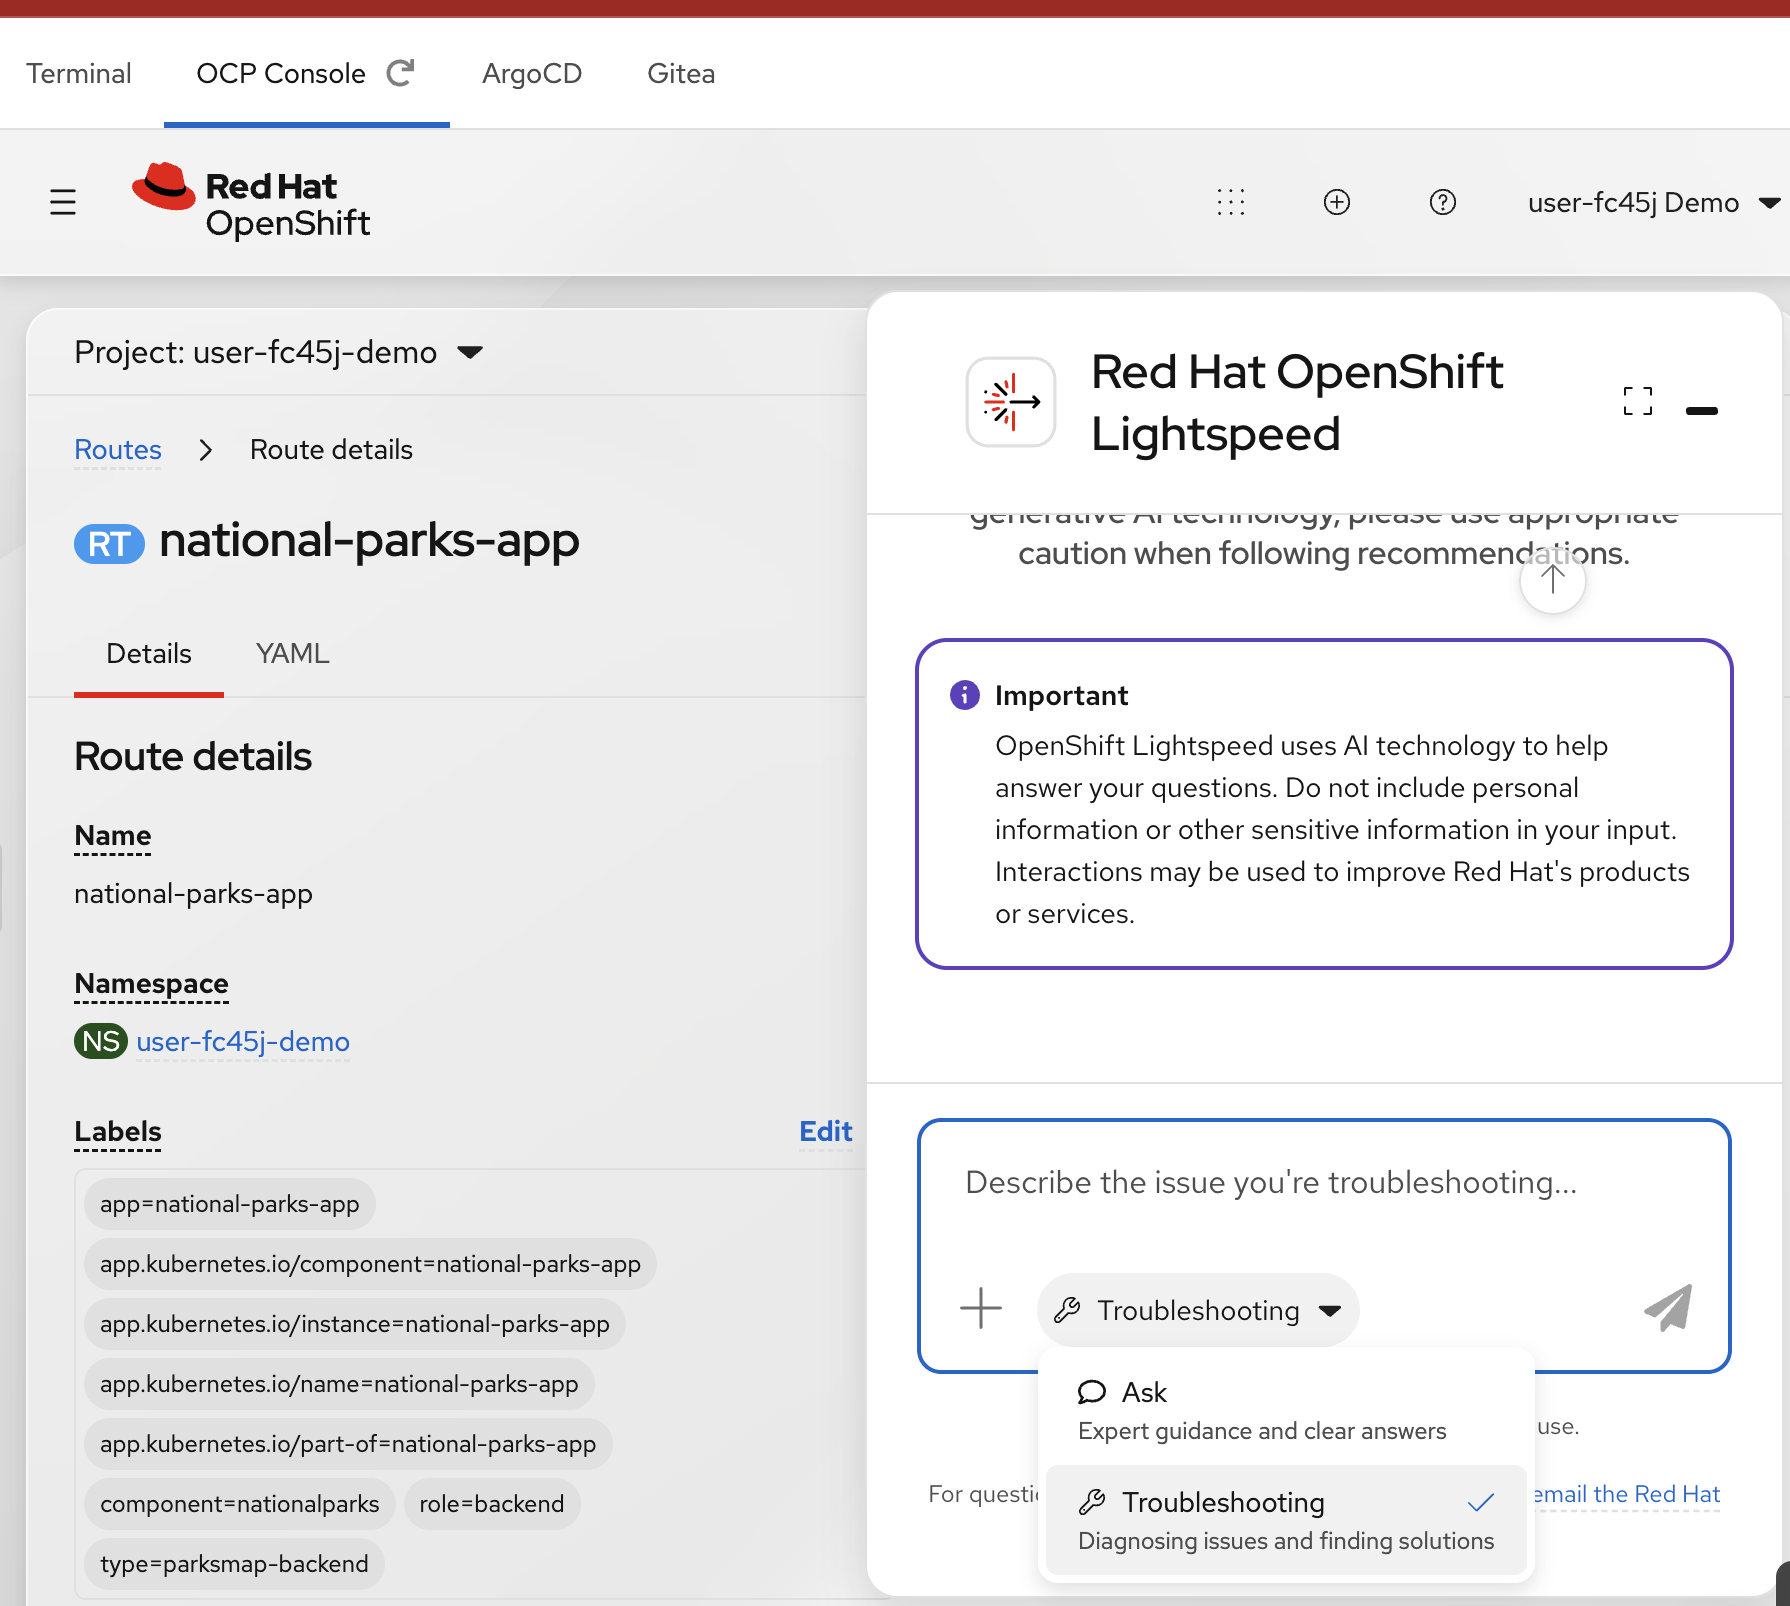
-
Paste this prompt:
My National Parks application cannot retrieve park data. Use live Kubernetes tools to inspect Pods, Services and logs in namespace user-guid-demo. Find the cause and suggest the simplest fix. Do not read Secrets or change anything. -
Review the response. If asked, approve only read operations in your namespace. Lightspeed should identify the MongoDB Service port mismatch.
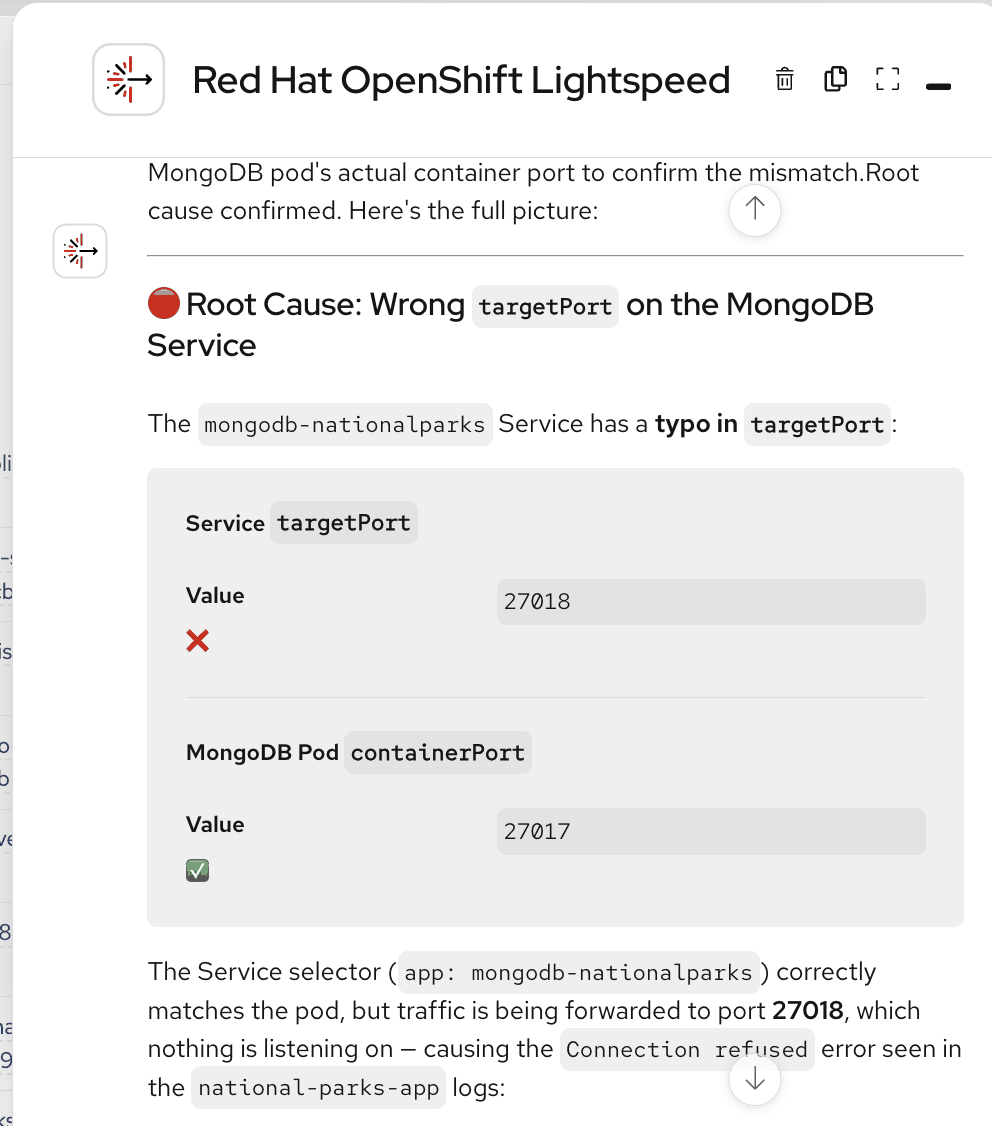
|
AI check: Compare the MongoDB Service with the MongoDB Pod. The Service exposes |
Checkpoint 4: Lightspeed identifies that mongodb-nationalparks sends traffic to 27018, but MongoDB listens on 27017.
Mission 5: Repair the MongoDB Service (3 minutes)
-
Go to Networking → Services →
mongodb-nationalparks→ YAML → Edit. -
Find
spec.portsand change onlytargetPortto27017:ports: - name: mongodb port: 27017 targetPort: 27017 protocol: TCPKeep the selector and every other field unchanged. Select Save.
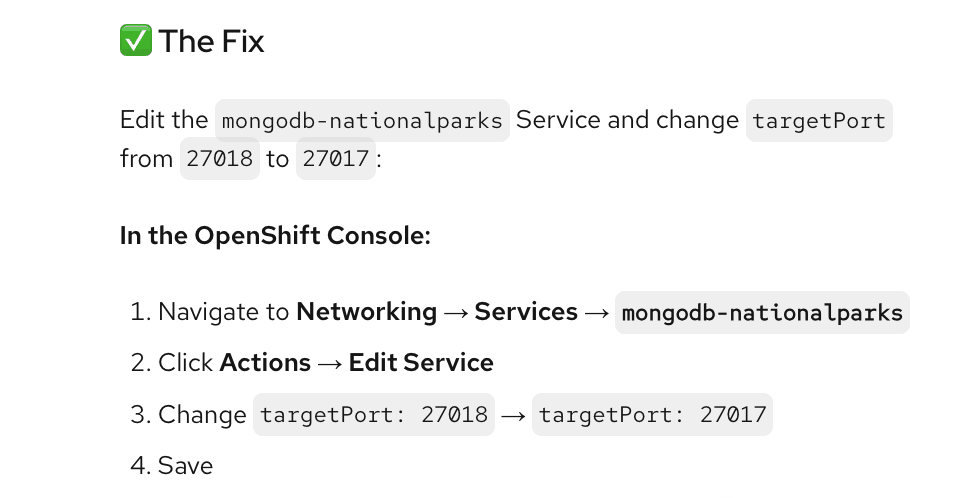
|
Terminal alternative (instead of using the console): Run this as your student user in the Showroom terminal: 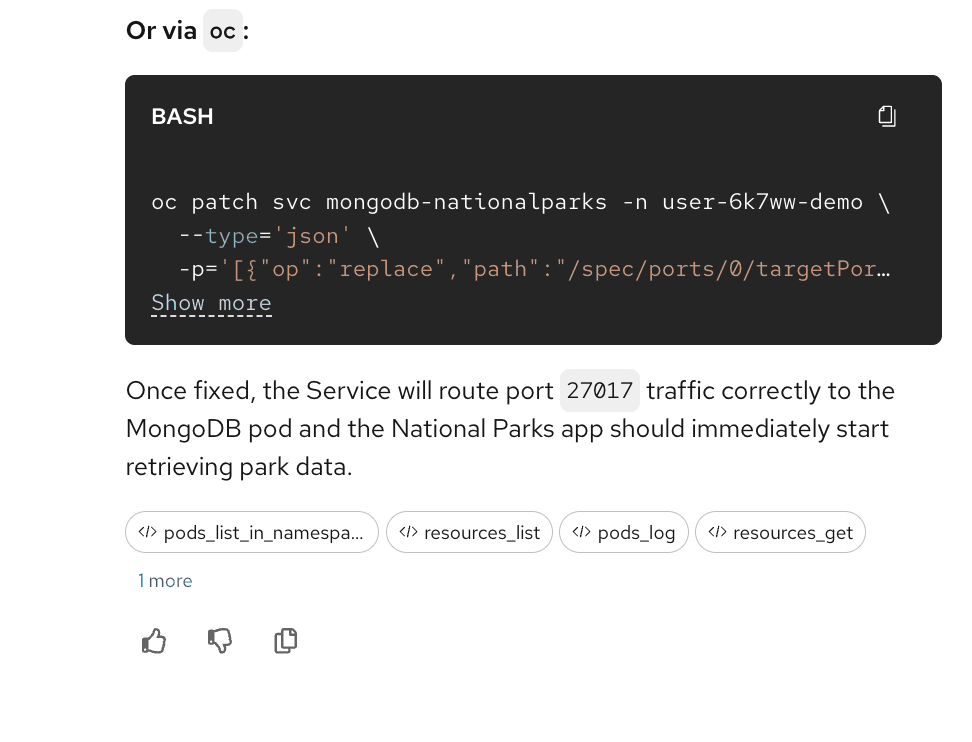
|
-
Verify the port in the Showroom terminal:
oc get svc mongodb-nationalparks -n user-guid-demo \
  -o jsonpath='{.spec.ports[0].port}{" -> "}{.spec.ports[0].targetPort}{"\n"}'
Expected:
27017 → 27017. No MongoDB Pod restart is required. -
Open Load National Parks data once to populate the disposable database. Then open View National Parks data and confirm park records appear.
Checkpoint 5: The API can now read MongoDB data. You repaired one Service field without changing the image, credentials or Pod labels.
Mission 6: Verify the National Parks map (3 minutes)
-
Open National Parks data. It should still return park records.
-
Open ParksMap backend list. It should include
nationalparks, not[]. -
Open ParksMap. Check that the National Parks (PY) layer displays park markers.
|
If the backend API works but the map stays empty, check that the |
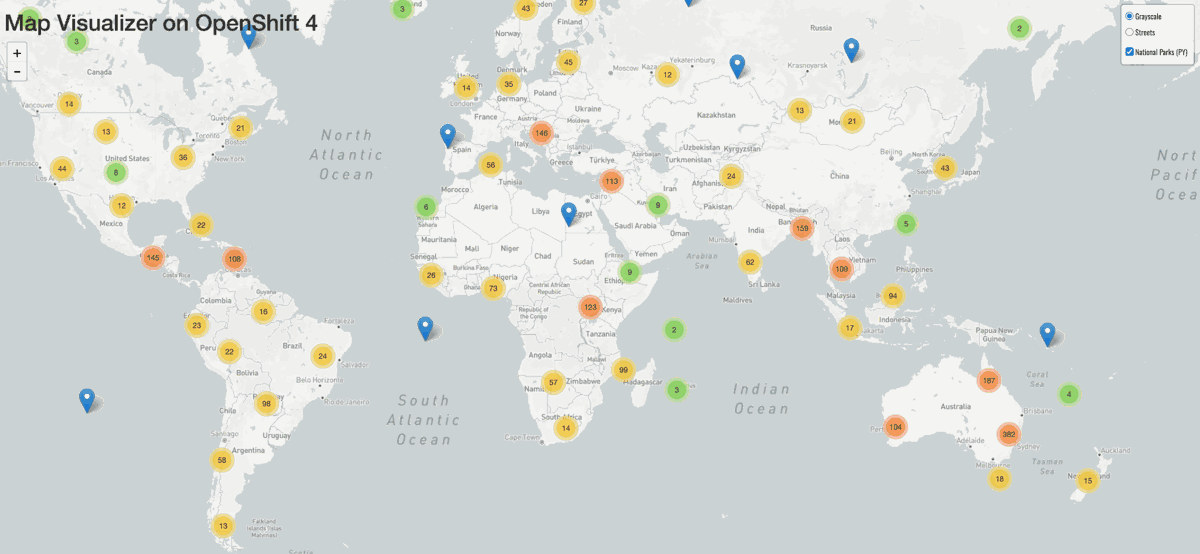
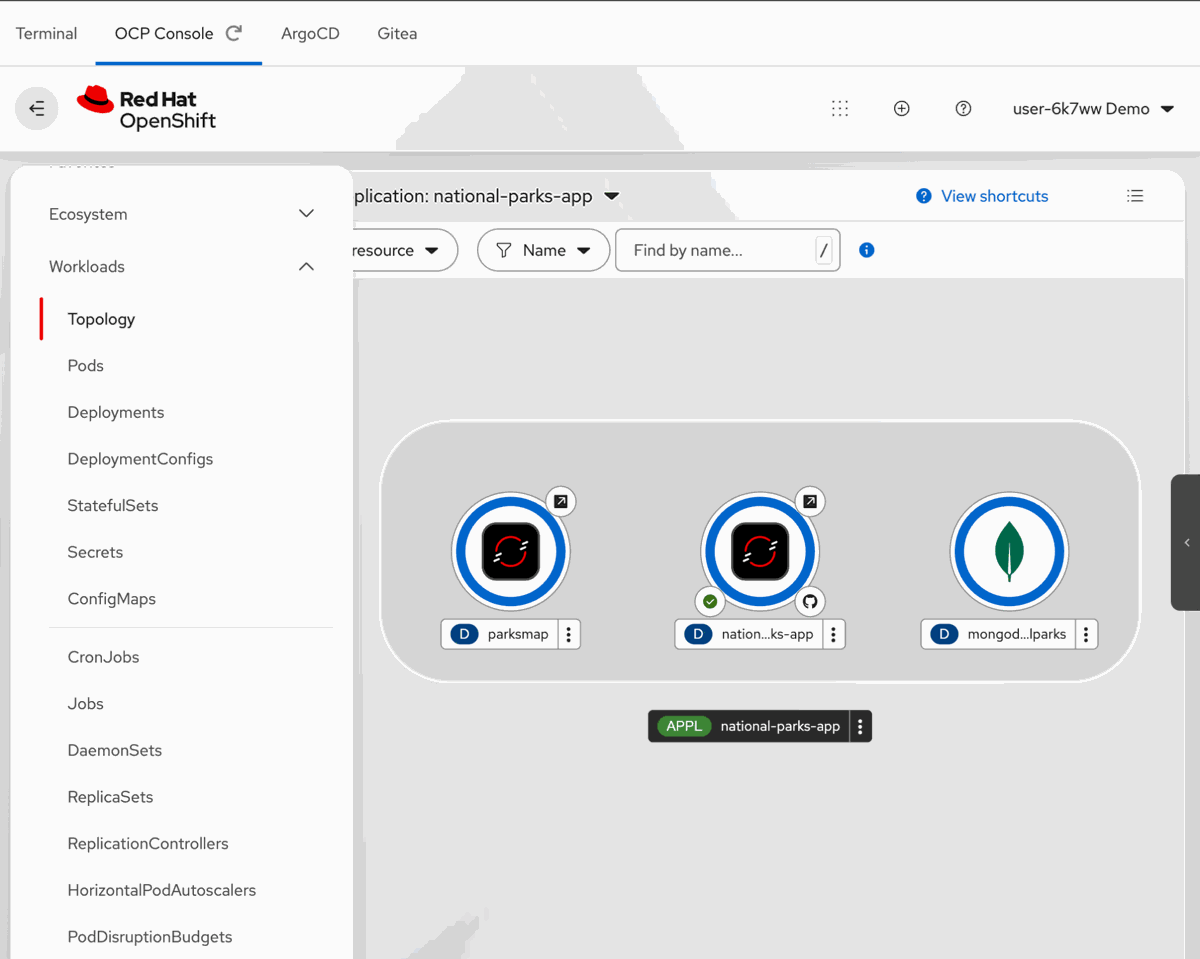
Checkpoint 6: The Route works, backend discovery works and the map shows markers. Mission complete!
Mission complete: You recovered National Parks (1 minute)
| Check | Expected |
|---|---|
Project |
|
Database |
MongoDB 8 Ready; Service points to port 27017 |
Python backend |
Connected to MongoDB; Route returns park records |
Park data |
|
Frontend |
|
Lightspeed |
Read-only diagnosis; student repaired MongoDB Service port |
You used Lightspeed to investigate a MongoDB Service port mismatch and repaired it with one change in the OpenShift console. In Module 2, you will explore onboarding the application into GitOps; Argo CD must not overwrite these student-created resources unexpectedly.
Troubleshooting quick reference
| Symptom | Check |
|---|---|
Cannot see |
Sign in as your own student account. |
Python build fails |
Open Builds → Logs and inspect the error. |
MongoDB Pod not Ready |
Check the Secret name, bootstrap ConfigMap and Pod events. |
Backend cannot retrieve data in Mission 3 |
Expected. Investigate with Lightspeed before fixing the MongoDB Service. |
Lightspeed cannot inspect resources |
Verify namespace and read permissions. |
Backend still cannot connect after Mission 5 |
Confirm the MongoDB Service |
API returns records but map is blank |
Check the |