1.3 - Run and Verify the Playbook
In this challenge, you will run the playbook generated in the previous module using ansible-navigator, verify that your web and database infrastructure is correctly configured across multiple hosts, and discover one of Ansible’s most important concepts: idempotency.
1. Hands-On Experience
☑️ Task 1 - Run system_setup.yml
|
Open a terminal in VS Code: click Terminal → New Terminal from the menu bar, or press Ctrl+`. |
-
Change into the ansible-files directory:
cd /home/rhel/ansible-files -
Run the playbook:
ansible-navigator run system_setup.yml
|
The first run may take a few minutes. ansible-navigator pulls the Execution Environment container image and then runs all tasks across the web and database groups. Subsequent runs are much faster. |
-
Watch the output carefully. You should see tasks execute in the order you specified in your prompt:
-
Gathering Facts (automatic)
-
Create sysadmin user (on all nodes)
-
Install Apache (only on node1 and node2)
-
Ensure Apache is running (only on node1 and node2)
-
Deploy status page (only on node1 and node2)
-
Install MariaDB (only on node3)
-
Ensure MariaDB is running (only on node3)
-
Deploy MOTD template (on all nodes)
-
-
The PLAY RECAP at the end summarizes changes made across all hosts:
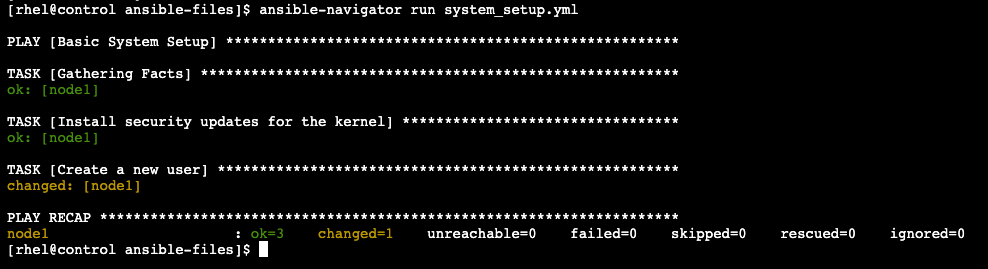 Figure 1. Playbook run output
|
The first task in every run is Gathering Facts. Ansible automatically collects system information from each managed node — hostname, OS version, IP addresses, network interfaces, installed packages — before running any tasks. This fact data is what makes templates dynamic (each host renders a different status page and MOTD based on its own facts). |
☑️ Task 2 - Verify user creation across all hosts
|
Stay in the VS Code terminal. |
The playbook created the user padawan on all hosts (node1, node2, and node3). Verify this worked on each node.
-
Check node1:
ssh node1 id padawanExpected outputuid=1002(padawan) gid=1002(padawan) groups=1002(padawan)
-
Check node2:
ssh node2 id padawan -
Check node3:
ssh node3 id padawan
All three should show the user exists. This demonstrates that tasks without a when: conditional ran on all hosts.
☑️ Task 3 - View the web server status page
The playbook deployed an HTML status page to the web servers using the index.html.j2 template. Each web server now has a live page showing its own system information.
-
Click the node1 Web tab at the top of the screen. You should see a status page showing node1’s hostname, IP address, OS version, and architecture — all rendered from Ansible facts by the Jinja2 template you deployed.
If the page shows "Application is not available" or a blank screen, click the reload arrow (circular arrow icon) next to the tab name to refresh the page. The status page should appear after reloading.
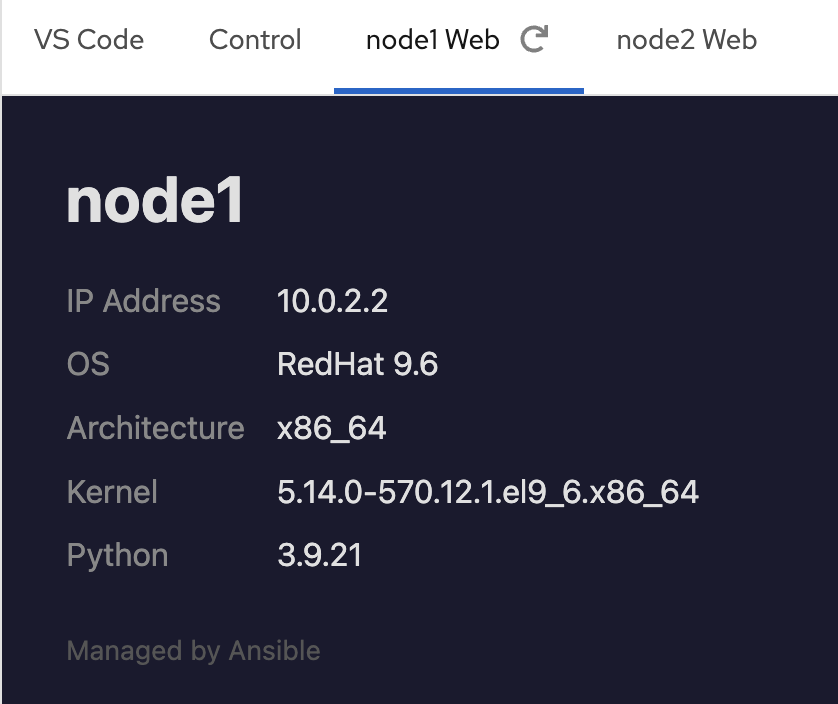 Figure 2. Web server status page
 -
Click the node2 Web tab. Notice the hostname changed to node2’s value, even though both servers used the same template file. This is the power of templates — one source file, customized output per host.
If needed, click the reload arrow next to the tab name to refresh this page as well.
Because both web servers run on the same OpenShift cluster network, node1 and node2 share the same IP address (10.0.2.2). The hostname is the key difference between the two pages.
-
Switch back to the VS Code terminal and verify from the command line as well:
curl -s node1 | grep -o '<title>.*</title>'Expected output<title>node1 - Status</title>
-
Verify httpd is running on both web servers:
ssh node1 systemctl is-active httpdExpected outputactive
-
Confirm httpd is NOT on node3 (the database server):
ssh node3 rpm -q httpd 2>&1 || echo "httpd not installed (expected)"Expected outputhttpd not installed (expected)
This proves the when: inventory_hostname in groups['web'] conditionals worked correctly — web tasks only ran on node1 and node2.
☑️ Task 4 - Verify the database server
|
Stay in the VS Code terminal. |
The playbook installed and started MariaDB on node3, which belongs to the database group.
-
Check that MariaDB is running:
ssh node3 systemctl is-active mariadbExpected outputactive
-
Verify MariaDB is installed:
ssh node3 rpm -q mariadb-serverYou should see the installed package version.
This demonstrates the when: inventory_hostname in groups['database'] conditional — MariaDB was installed only on the database server, not on the web servers.
☑️ Task 5 - Verify the dynamic MOTD
|
Stay in the VS Code terminal. |
The playbook deployed a Jinja2 template to /etc/motd on all hosts. Each host has a different MOTD because the template uses host-specific facts and inventory group membership.
-
View the MOTD on node1 (a web server):
ssh node1 cat /etc/motdExpected outputWelcome to node1. Role: Web Server OS: RedHat 9.6 Architecture: x86_64
-
View the MOTD on node3 (the database server):
ssh node3 cat /etc/motdExpected outputWelcome to node3. Role: Database Server OS: RedHat 9.6 Architecture: x86_64
Notice that node1 shows Web Server while node3 shows Database Server. The MOTD template uses a Jinja2 conditional ({% if inventory_hostname in groups['web'] %}) to display each host’s role, reinforcing the inventory groups concept from module 1.
☑️ Task 6 - Discover idempotency
Idempotency means that running an operation once produces the same result as running it many times. An idempotent Ansible task only makes a change when the desired state does not already exist. If the state is already correct, the task reports ok and does nothing.
This is what separates Ansible from shell scripts: you can safely run a playbook repeatedly and it will never break a system that is already configured correctly. Ansible checks the current state before every task and only acts when necessary.
|
Switch to the VS Code terminal if you aren’t already there. |
-
Run the playbook a second time:
ansible-navigator run system_setup.yml -
Compare the output to the first run. Notice:
-
Task status changed from changed (yellow) to ok (green)
-
The PLAY RECAP shows
changed=0for all hosts — Ansible confirmed everything was already in the desired state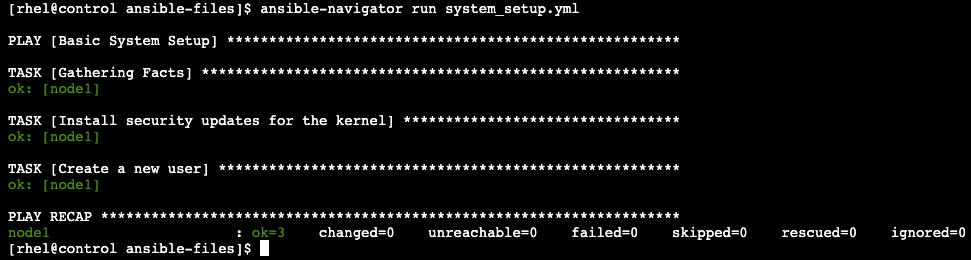 Figure 3. Idempotent second run
-
-
This demonstrates idempotency in action: running the same playbook twice produces the same result. Ansible checked the current state before every task and skipped changes because everything was already configured correctly.
|
Idempotency is why Ansible playbooks are safe to run repeatedly in production. Whether you run a playbook once or a hundred times, the end state is the same. This makes Ansible ideal for configuration management, drift correction, and disaster recovery — you can re-run the same playbook to fix issues without fear of breaking things. |
2. Learning Outcomes
By completing this module, you now understand:
-
How to run an Ansible playbook with
ansible-navigator run -
What Gathering Facts does and why Ansible runs it automatically
-
How to verify that tasks executed correctly on the right hosts
-
How conditionals control which tasks run on which inventory groups
-
How a single playbook manages both web and database infrastructure using group conditionals
-
How Jinja2 templates render differently on each host using facts
-
What idempotency means and why it makes Ansible safe for production use
-
How to read a PLAY RECAP to understand what changed (or didn’t change) on each run
3. Embracing the Next Challenge
✅ Next Challenge
Once you have completed the tasks, press the  button to proceed to the next challenge.
-
The
button will validate your steps. If anything is missing, an error will appear so you can correct it before proceeding. -
You can also click
 to auto-complete the challenge.
🐛 Encountered an issue?
If you have encountered an issue or noticed something not quite right, please open an issue on the Introduction to automation coding assistant repository.