Configure Ansible Automation Platform for Self-Service Portal
Learning objectives
By the end of this module, you’ll be able to:
-
Configure role-based access control (RBAC) in Ansible Automation Platform 2.6 for team-based permissions
-
Create teams and assign roles to job templates, inventories, and credentials
-
Set up RBAC in Self-Service Automation Portal using the permissions framework
-
Create permission policies for catalog and scaffolder plugins
-
Build conditional RBAC rules for advanced access control scenarios
-
Validate content synchronization between AAP and Self-Service Portal
Environment background
In your environment you will have access to the following:
-
Ansible Automation Platform.It is set up with users, inventories, credentials, a project, and a number of job templates, all of which will be used in this lab. -
Self-service automation portal.You will perform the setup in AAP, and in Self-Service Portal to enable different user personas to leverage automation. -
OpenShift Container Platform.You will have access but you will not need to use it.
| FOR BEST RESULTS… When logging in and out of Ansible Automation Platform AND Self-Service portal as different users, PLEASE CLOSE AND RE-OPEN YOUR BROWSER IN PRIVATE MODE (New Incognito Window) to ensure you are logged in / logged out as the correct user. |
Configuring RBAC in AAP 2.6 that will be used for Self-Service Portal
What is role-based access control (RBAC) in AAP
Ansible Automation Platform (AAP) uses Role-Based Access Control (RBAC) to manage user access to automation resources, ensuring governance, security, and compliance across an enterprise. RBAC is primarily configured within the Automation Controller, the platform’s control plane and web UI.
Key concepts of AAP RBAC
RBAC in AAP operates on the principle of least privilege, meaning users are granted only the permissions necessary to perform their specific job functions. This is managed through a hierarchy of users, teams, and organizations, which are assigned specific roles and permissions to various automation objects.
-
Users: Individuals who log into the platform. They can be normal users, auditors (read-only access to all objects), or administrators (full system privileges).
-
Teams: Logical groupings of users within an organization. Users inherit permissions from the teams they belong to.
-
Organizations: Collections of users, teams, projects, and credentials, serving as a primary container for managing and delegating automation resources.
-
Roles and Permissions: Define what a user or team can do with specific objects (e.g., read, write, or execute job templates, view inventories, manage credentials).
Create 3 teams in AAP:
Log in to the Ansible Automation Platform with the {aap_admin_username} user and password {aap_admin_password}.
Expand the Access Management menu on the left.
Access Management → Teams → +Create Team.
-
cloud-team -
network-team -
rhel-team
Create each team as follows and click Create team to save the team(s).
-
Be sure to select the
Defaultorganization.
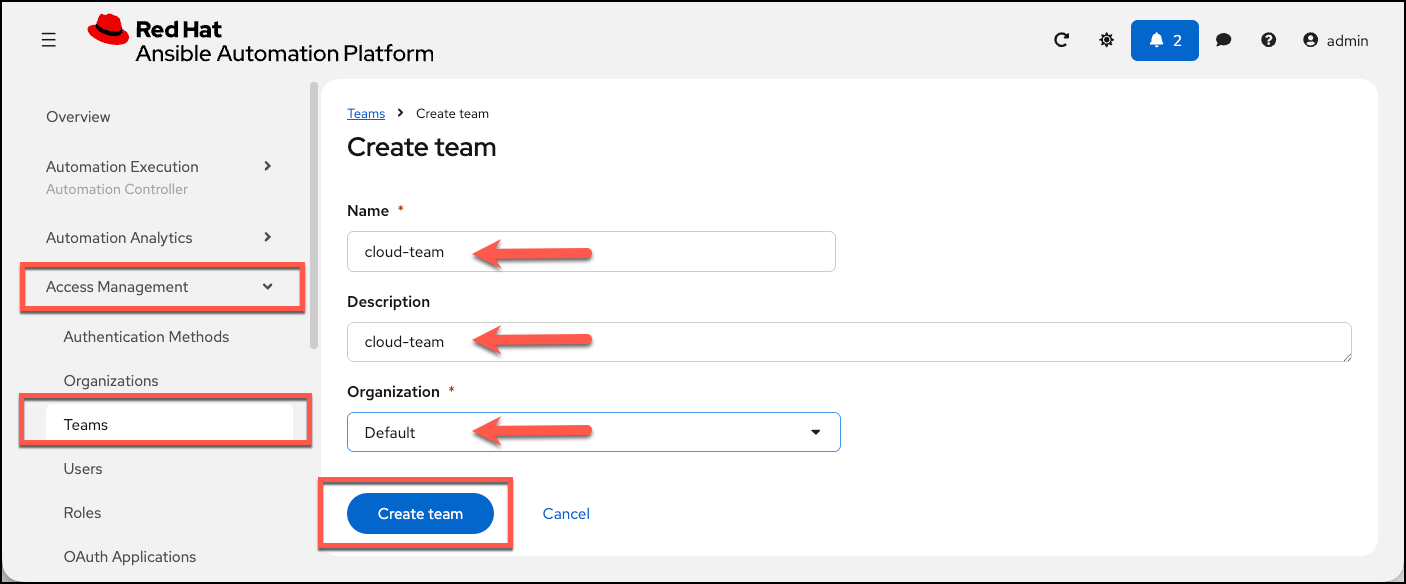
Now that you have created the teams, you will assign roles and users to the teams.
Starting with the cloud-team:
Access Management → Teams → cloud-team → Roles → +Assign roles
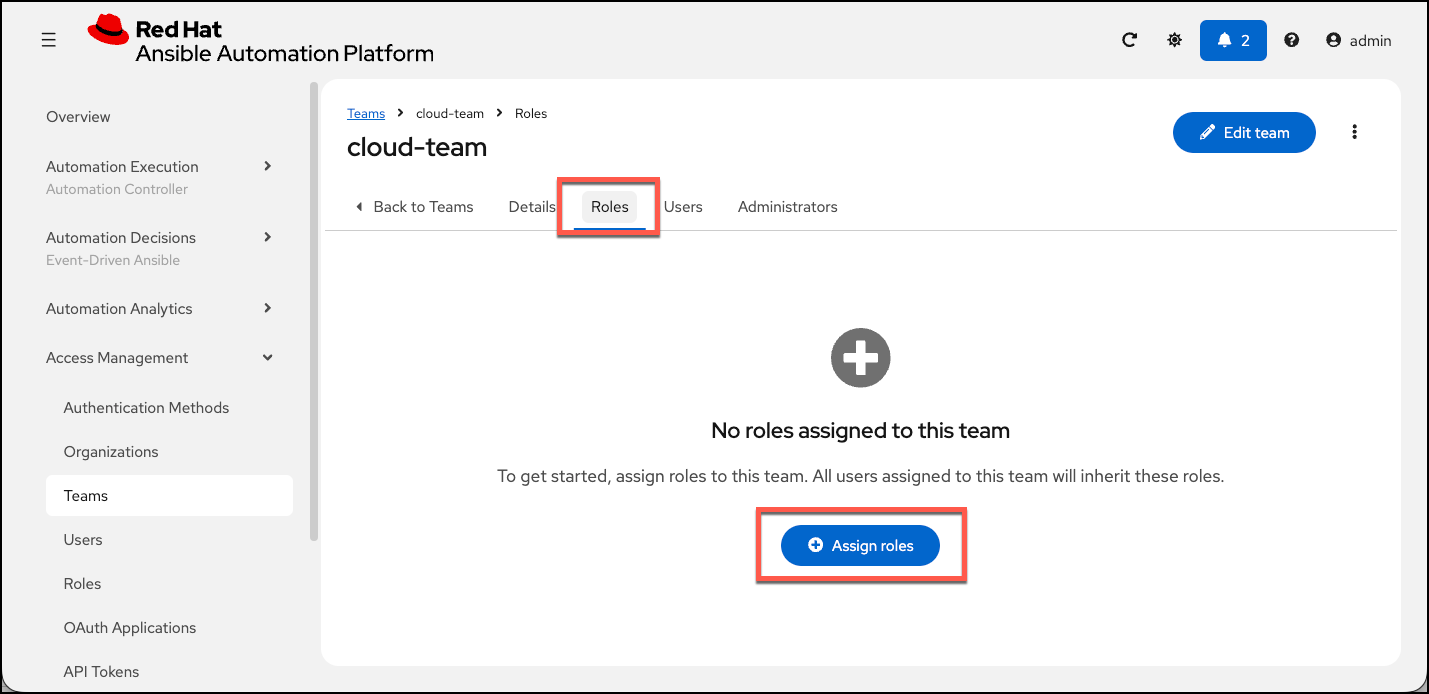
-
In the
Assign rolesstep one, selectJob Templateas the resource type, and clickNext. -
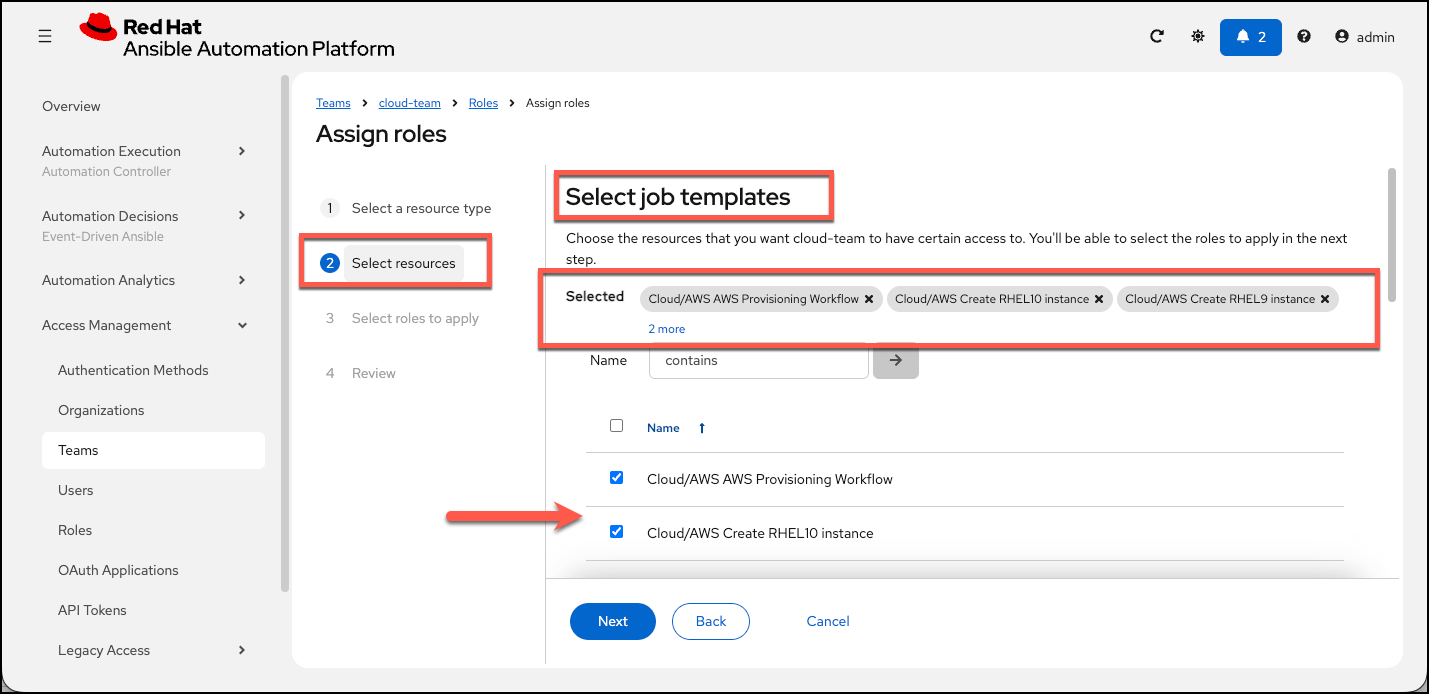
In step 2, select all the job templates that begin with
Cloud/AWS, and clickNext. -
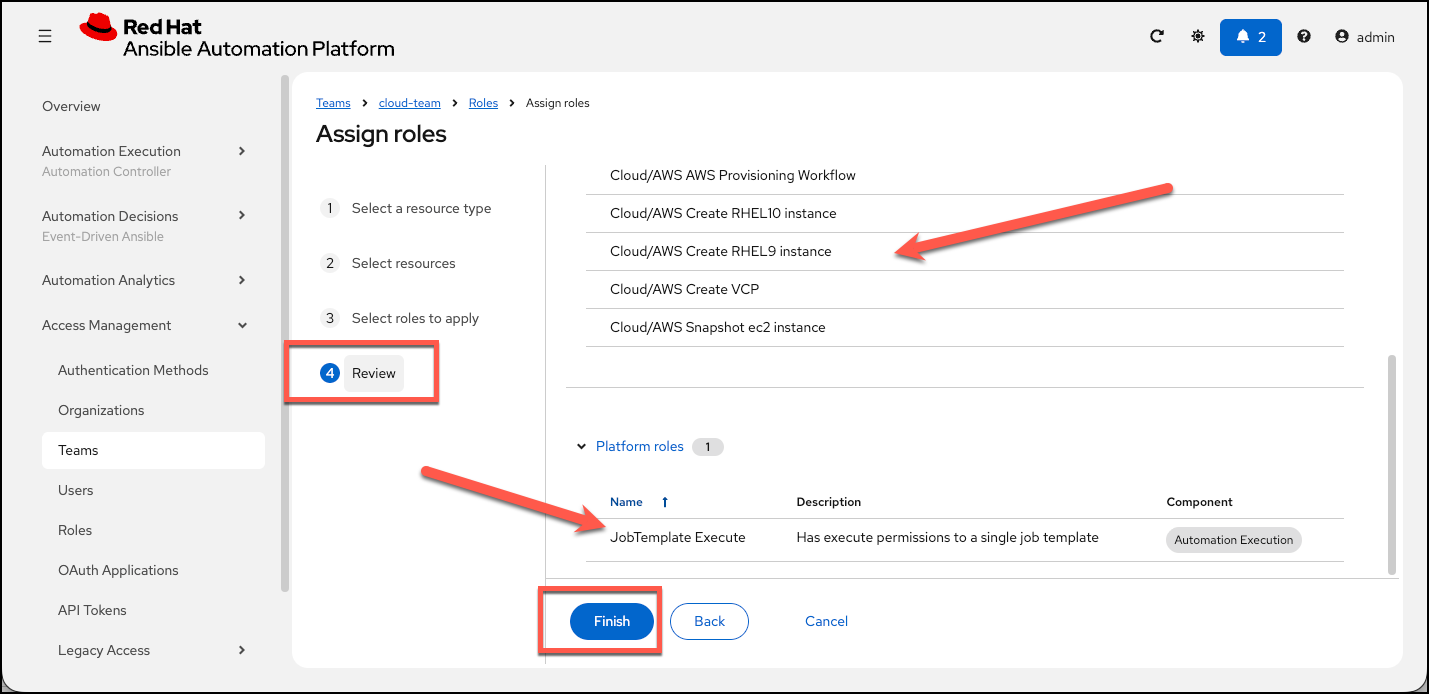
In step 3, select the role to apply, please select
Job Template Execute, and clickNext. -
In step 4, review your work, and click
Finish.
Repeat the same process for assiging roles by adding the following roles:
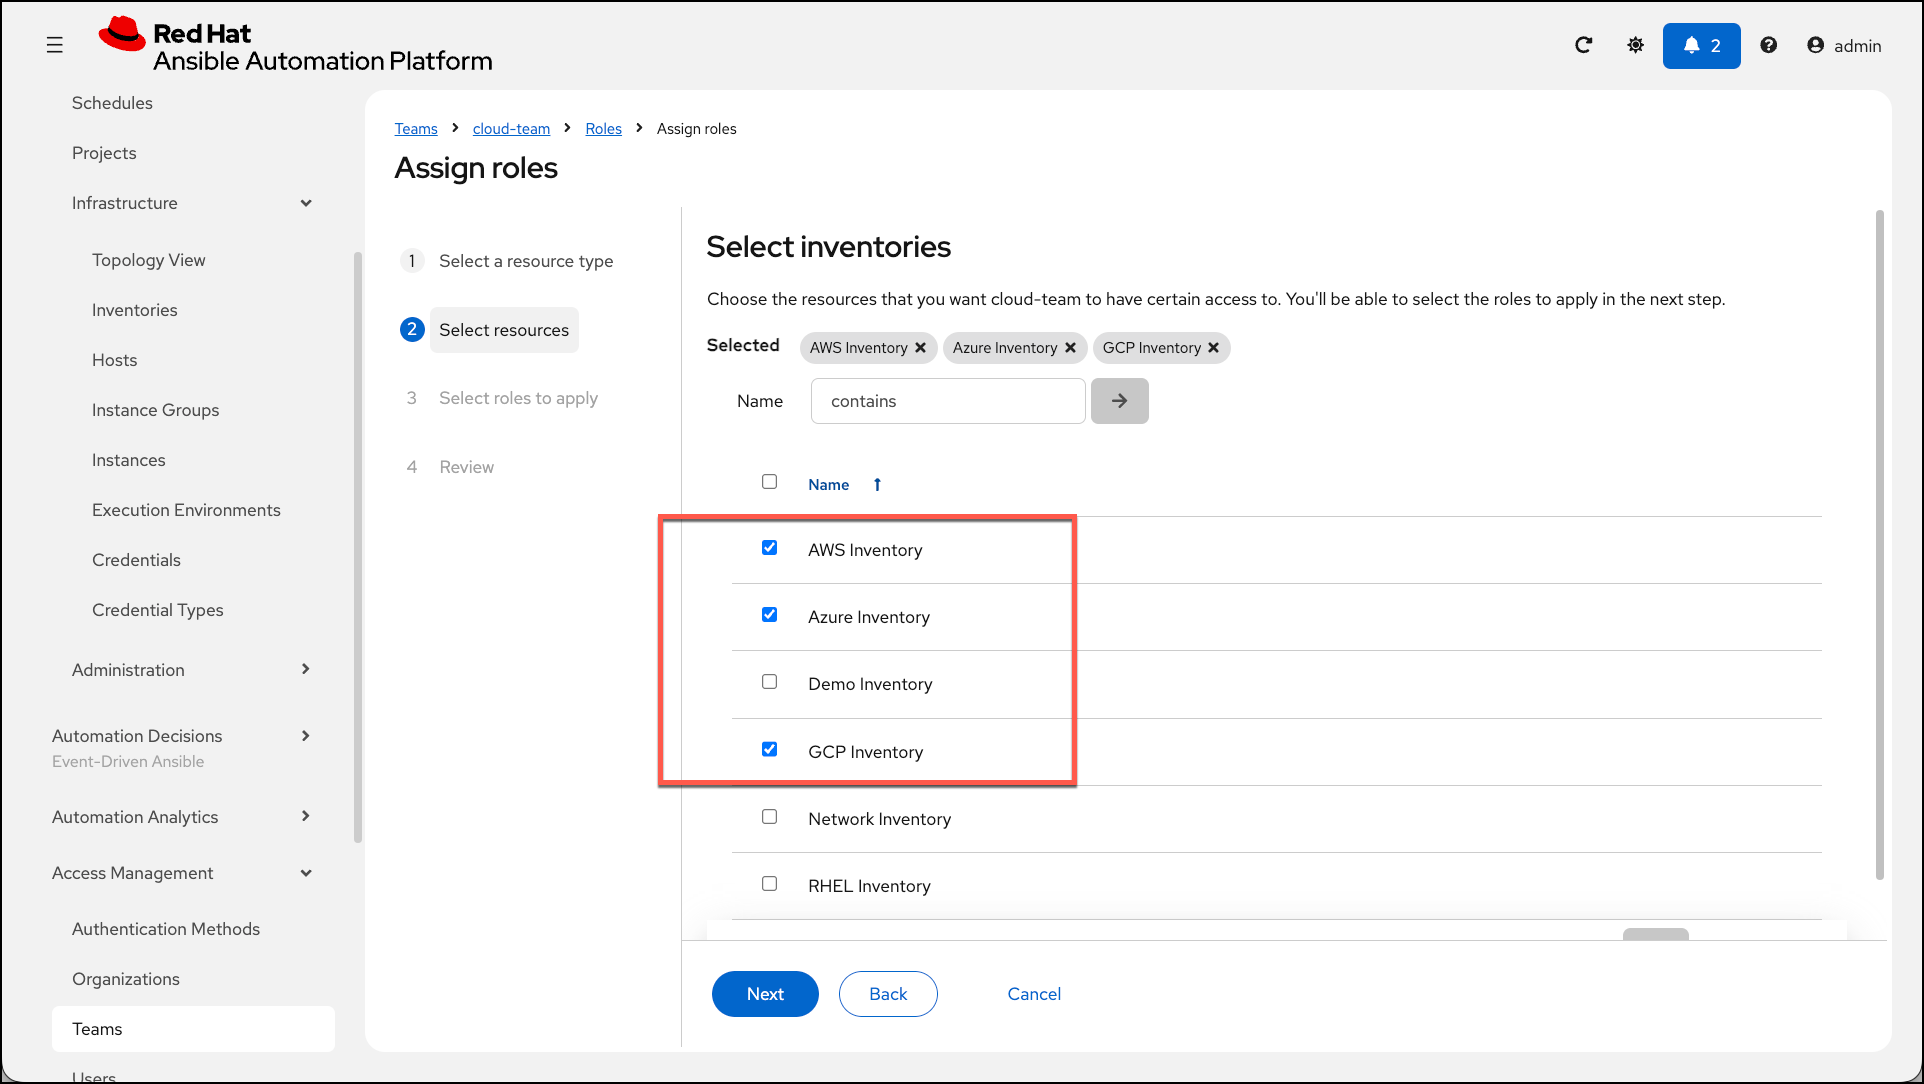
Access Management → Teams → cloud-team → Roles → +Assign roles → Resource Type: Inventory
For Inventory, select the following 3 inventories and click Next.
-
AWS Inventory -
Azure Inventory -
GCP Inventory -
Next→ selectInventory Useas the role to apply → Review your work and clickFinish
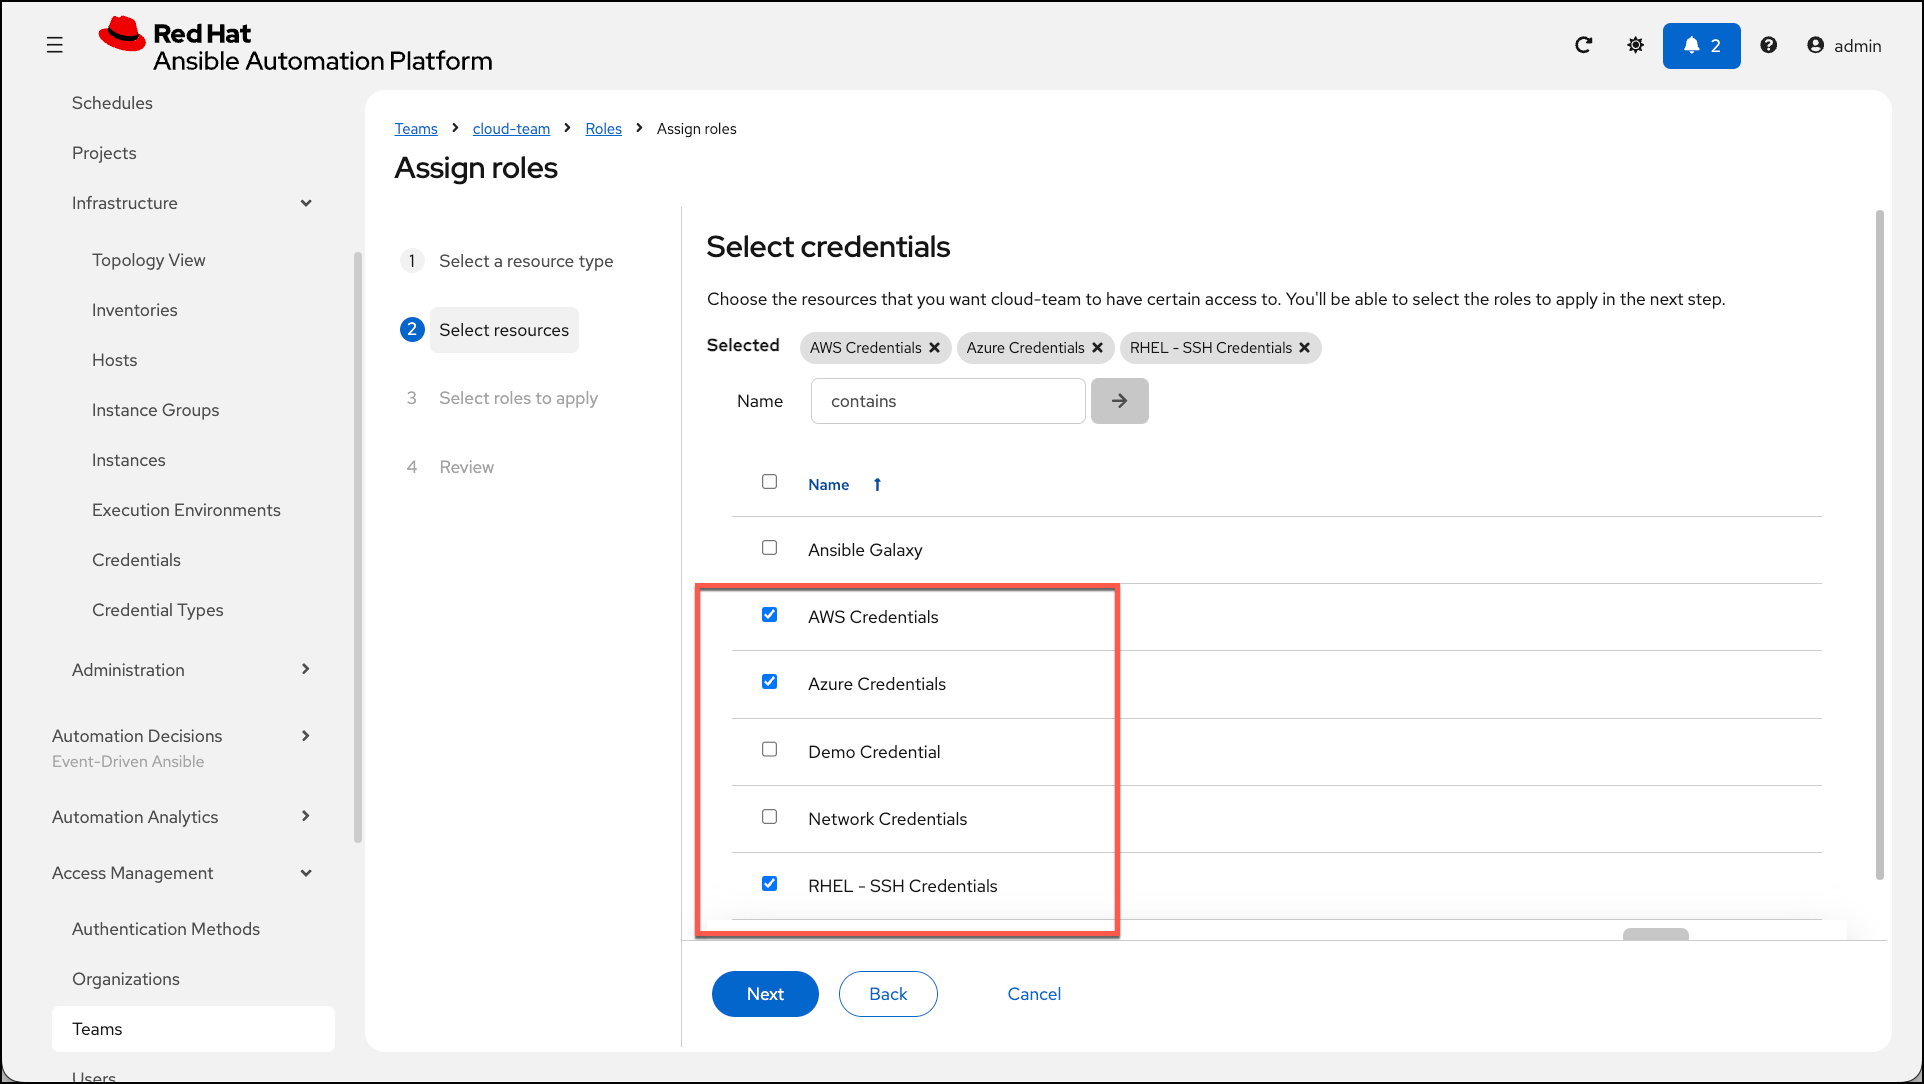
Access Management → Teams → cloud-team → Roles → +Assign roles → Resource Type: Credential
For Credential, select the following 3 credentials and click Next.
-
AWS Credential -
Azure Credential -
RHEL - SSH Credentials -
Next→ selectCredential Useas the role to apply → Review your work and clickFinish
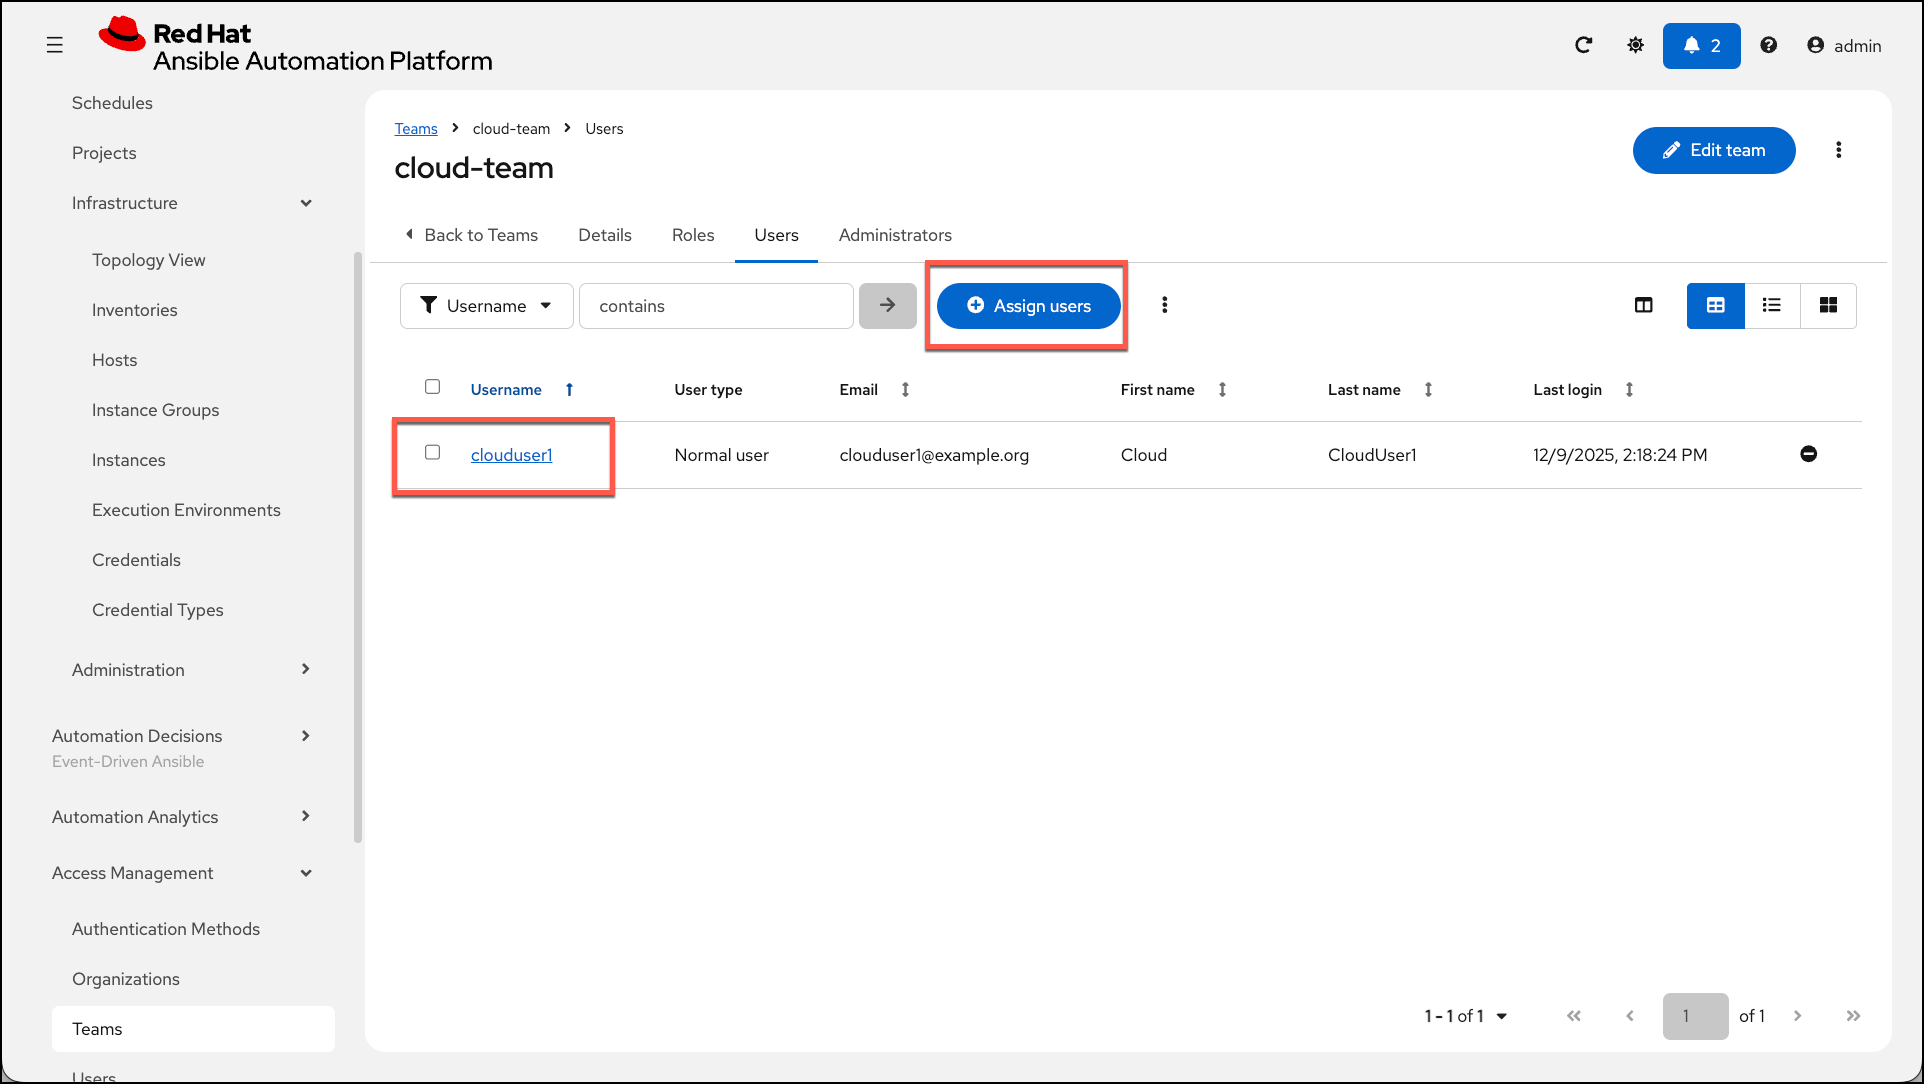
While still on the cloud-team page, assign the following Users to the cloud-team:
-
Click on the
Userstab, and select+Assign users→ select theclouduser1, and clickAssign users.
Repeat the same process for role and user assignmens to the network-team and rhel-team teams.
For network-team, assign the following:
-
For Resource Type:
Job Template, select all the job templates that begin withNetwork/, and clickNext. Please selectJob Template Executeas the role to apply → Review your work and clickFinish -
For Resource Type:
Inventory, select theNetwork Inventoryand clickNext. Please selectInventory Useas the role to apply → Review your work and clickFinish -
For Resource Type:
Credential, select theNetwork Credentialsand clickNext. Please selectCredential Useas the role to apply → Review your work and clickFinish
While still on the network-team page, assign the following Users to the network-team:
-
Click on the
Userstab, and select+Assign users→ select thenetworkuser1, and clickAssign users.
For rhel-team, assign the following:
-
For Resource Type:
Job Template, select all the job templates that begin withLinux/RHEL, AND add 2 other job templates namedCloud/AWS Create RHEL10 instanceANDCloud/AWS Create RHEL9 instanceANDRHEL / Update RHEL Time Serversand clickNext. Please selectJob Template Executeas the role to apply → Review your work and clickFinish -
For Resource Type:
Inventory, select theRHEL InventoryAND theAWS Inventoryand clickNext. Please selectInventory Useas the role to apply → Review your work and clickFinish -
For Resource Type:
Credential, select theAWS CredentialANDRHEL - SSH Credentialsand clickNext. Please selectCredential Useas the role to apply → Review your work and clickFinish
While still on the rhel-team page, assign the following Users to the rhel-team:
-
Click on the
Userstab, and select+Assign users→ select therheluser1, and clickAssign users.
Verify your RBAC configuration
Before proceeding to the Portal configuration, confirm your AAP RBAC is correctly set up:
Verification 1: Check team creation
Navigate to: Access Management → Teams
✅ Expected result: You should see 3 teams:
-
cloud-team -
network-team -
rhel-team
Verification 2: Confirm cloud-team roles
Click on cloud-team → Roles tab
✅ Expected result: You should see roles assigned for:
-
Job Templates: All
Cloud/AWS*templates with "Execute" permission -
Inventories: AWS, Azure, GCP with "Use" permission
-
Credentials: AWS, Azure, RHEL SSH with "Use" permission
Verification 3: Confirm user assignments
For each team, click the Users tab:
✅ Expected results:
-
cloud-team:clouduser1assigned -
network-team:networkuser1assigned -
rhel-team:rheluser1assigned
|
Troubleshooting: If any verification fails:
|
Awesome! You have now configured RBAC in Ansible Automation Platform.
Validate content synchronization to Self-Service Portal
Now that you have configured RBAC in Ansible Automation Platform, you will configure RBAC in Self-Service Portal. At this point if you log in to the Self-Service Portal as any of the users you created, you will NOT be able to see any job templates - yet. But as an administrator you will be able to see all the job templates.
What you need to do is configure RBAC in Self-Service portal to allow the Portal users to see the automation templates they are authorized to execute. Let’s get to this next
Configuring RBAC in the Self-Service Automation Portal
What is role-based access control (RBAC) in Self-Service Automation Portal
Self-Service Automation Portal uses Role-Based Access Control (RBAC) to manage user authorizations and permissions within the portal. It is built on top of the Red Hat Developer Hub Permissions framework and uses an administrator role to control who can perform actions and access specific resources.
Supported permissions
-
The RBAC system defines permissions across different functional areas:
-
Catalog Permissions: Control actions related to the software catalog, such as catalog.entity.read, catalog.entity.create, catalog.entity.delete, and more…
-
Scaffolder Permissions: Manage access to software templates and actions, such as scaffolder.action.execute and scaffolder.template.parameter.read and more…
-
RBAC Permissions: Delegate administrative tasks with policies like policy.entity.create, policy.entity.update, and policy.entity.delete. (The cloud / network / rhel team users will NOT need this permission.)
Log in to the Self-Service portal as {aap_admin_username}
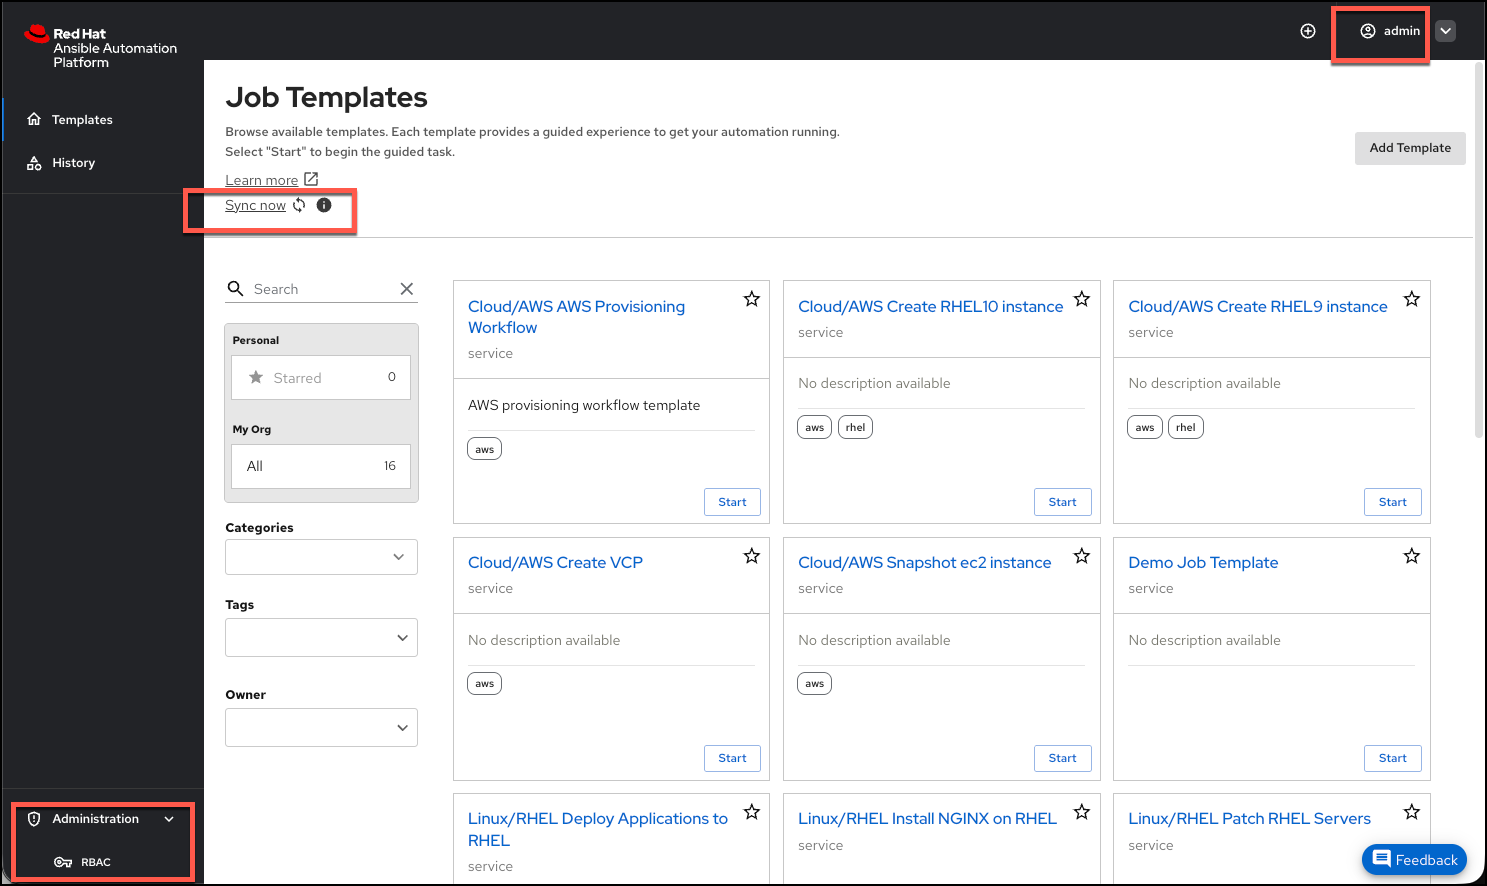
Log in to the Self-Service Portal with the {aap_admin_username} user and password {aap_admin_password}. When asked to Authorize Self-Service Portal? click Authorize. Again, notice that the administrator user can see ALL the job templates. This automatically synchronizes to the Self-Service Portal on a regular interval (configurable in the Self-Service Portal Helm chart).
| Self-service portal has a default synchronization schedule of 60 minutes. |
At any time as an administrator you can use the Sync now button to trigger an immediate synchronization of Organizations, Users, Teams, and Job Templates from Ansible Automation Platform to the Self-Service Portal.
Configure RBAC in the Self Service Automation Portal
Now let’s configure RBAC in the Self Service Automation Portal to allow the Portal users to see the automation templates they are authorized to execute.
Log in to the Self-Service Portal with the {aap_admin_username} user and password {aap_admin_password}. You need to create a new RBAC role to allow the Portal users to see the automation templates they are authorized to execute. We will create 2 RBAC roles, ssa-portal-users and ssa-portal-rhel-team
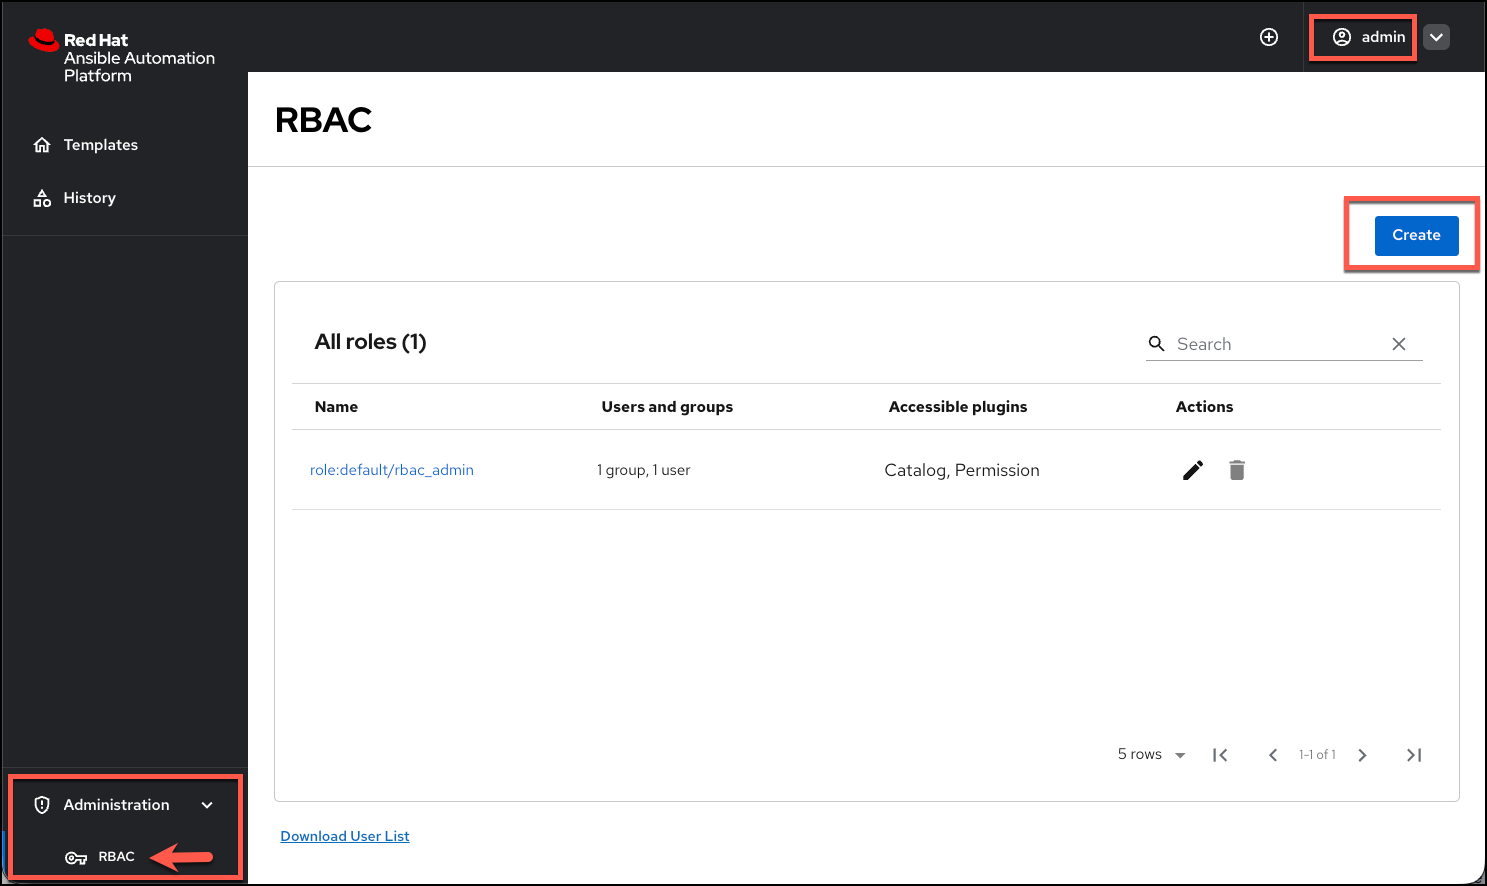
Create the ssa-portal-users role.
-
In the bottom left corner expand the
Administrationmenu and Click onRBAC, then click onCreate. -
For the
Namefield, enterssa-portal-users. -
For the
Descriptionfield, enterRole for Cloud and Network teams, and click onNext. -
For the
Add users and groupsfield, from the dropdown selectcloud-teamandnetwork-team, scroll down and click onNext. -
For the
Add permission policiesfield, from theSelect pluginsdropdown selectCatalogandScaffolder. -
Just below expand the
Catalogplugin and select thecatalog.entity.readpermission. -
Just below expand the
Scaffolderplugin and select ALL the permissions but NOTscaffolder.template.managementpermission. -
Scroll down and click on
Next. -
Review your work, and click on
Createto save the role.
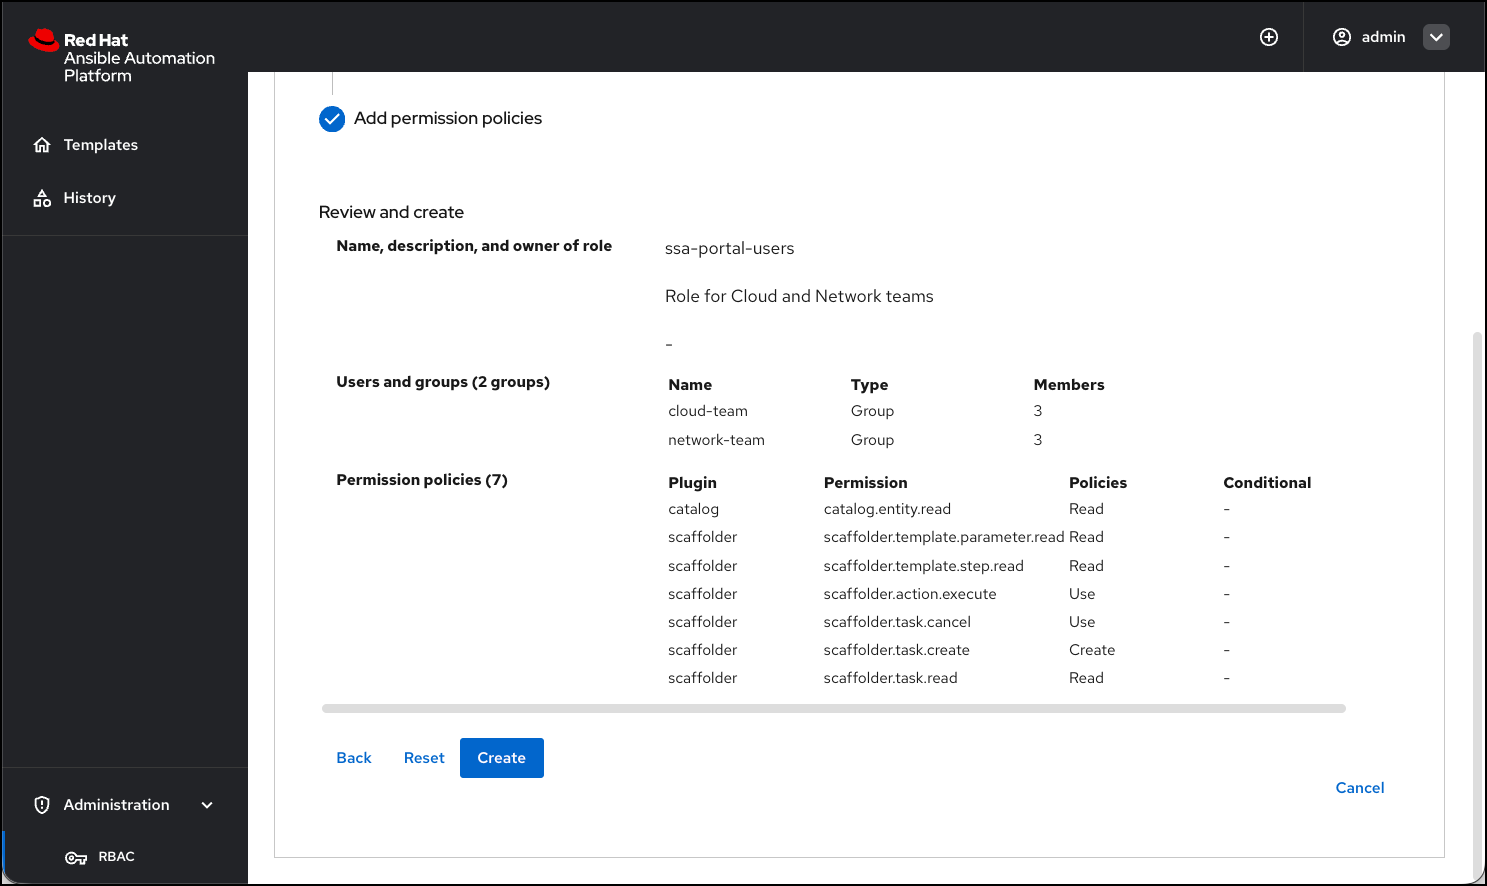
Create the ssa-portal-rhel-team role.
-
In the bottom left corner expand the
Administrationmenu and Click onRBAC, then click onCreate. -
For the
Namefield, enterssa-portal-rhel-team. -
For the
Descriptionfield, enterRole for RHEL team, and click onNext. -
For the
Add users and groupsfield, from the dropdown selectrhel-team, scroll down and click onNext. -
For the
Add permission policiesfield, from theSelect pluginsdropdown selectCatalogandScaffolder.-
Just below expand the
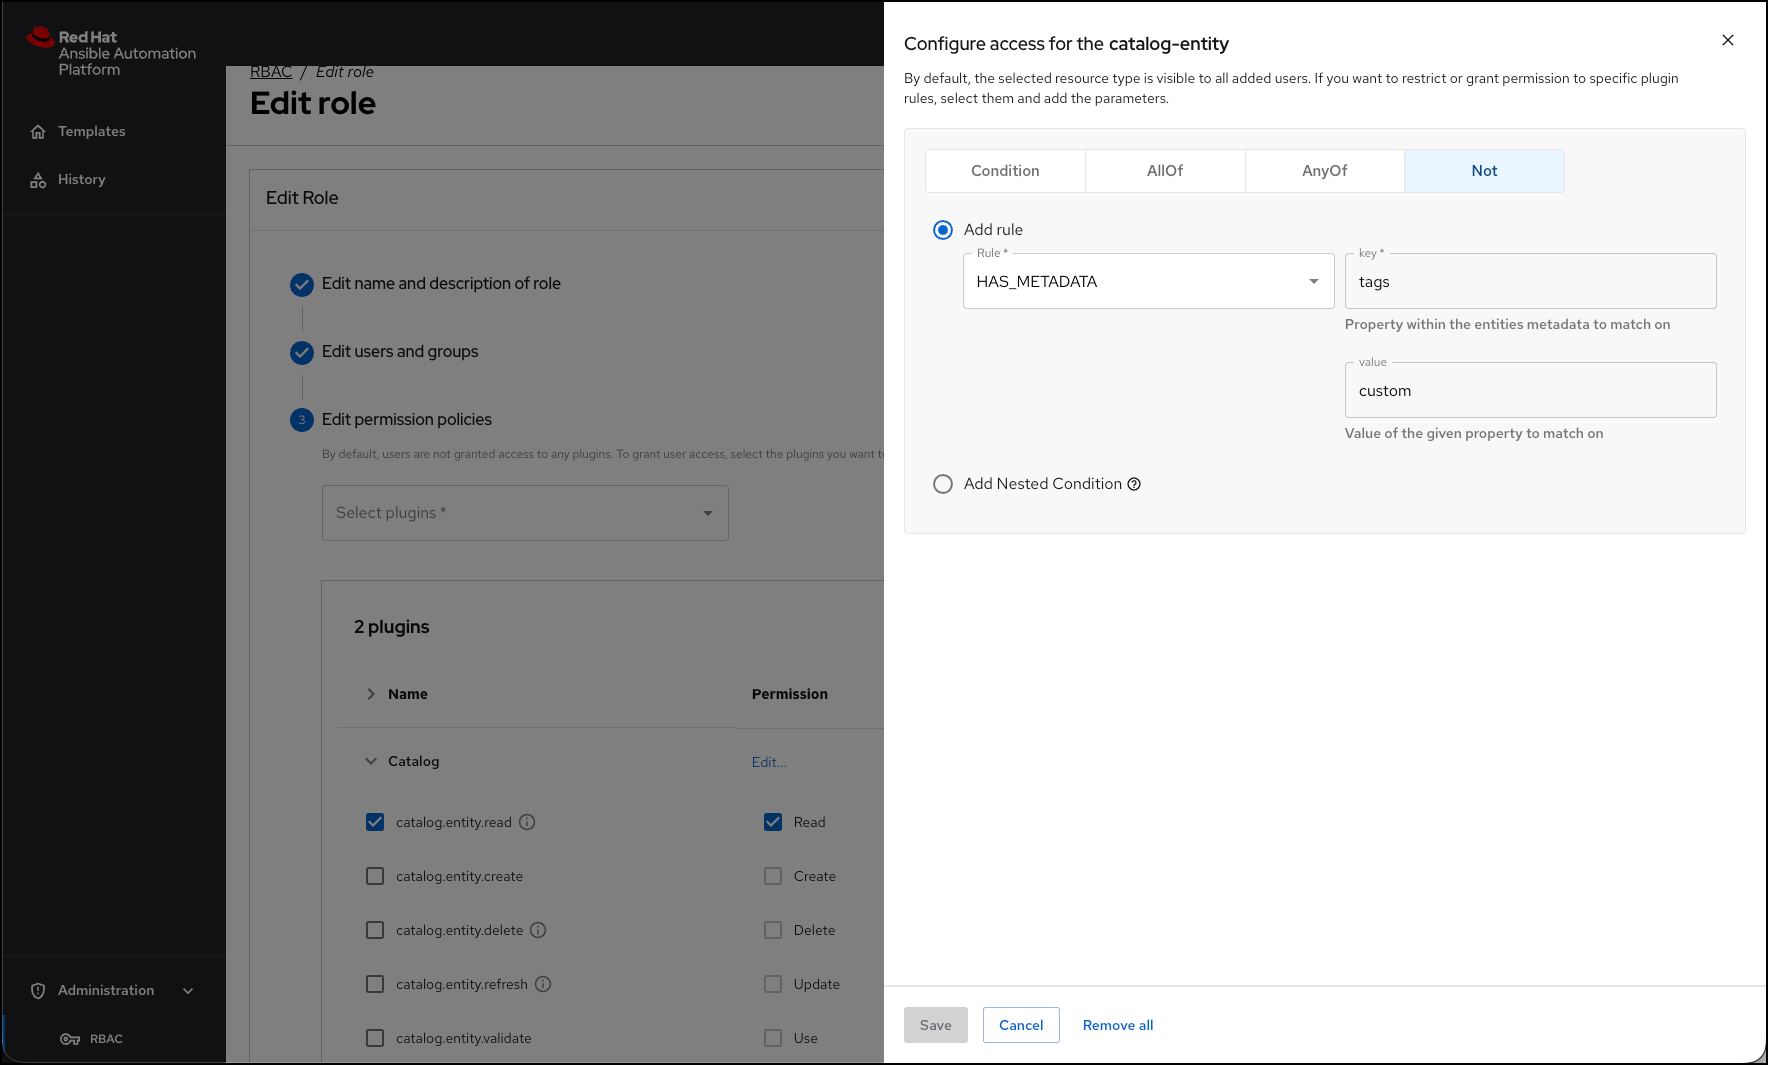
Catalogplugin and select thecatalog.entity.readpermission. At the very end of that row, click the 2 checkmarks in theActionscolumn to add a condition at the very end of the row. -
In the
Conditionfield, selectNot, TheAdd ruleoption will be selected automatically. -
In the
Ruledropdown, selectHAS_METADATA. -
In the
keyfield, entertags. -
In the
Valuefield, entercustom, and click onSave. -
You should see the condition added to the row with a green checkmark at the end.
-
-
Just below expand the
Scaffolderplugin and select ALL the permissions but NOTscaffolder.template.managementpermission. -
Scroll down and click on
Next. -
Review your work, and click on
Createto save the role.-
You added a condition to the RBAC role to allow the RHEL team to see the RHEL job templates but NOT the custom job template that will later be backed by a custom template imported directly from a Git repository. (more on this later)
-

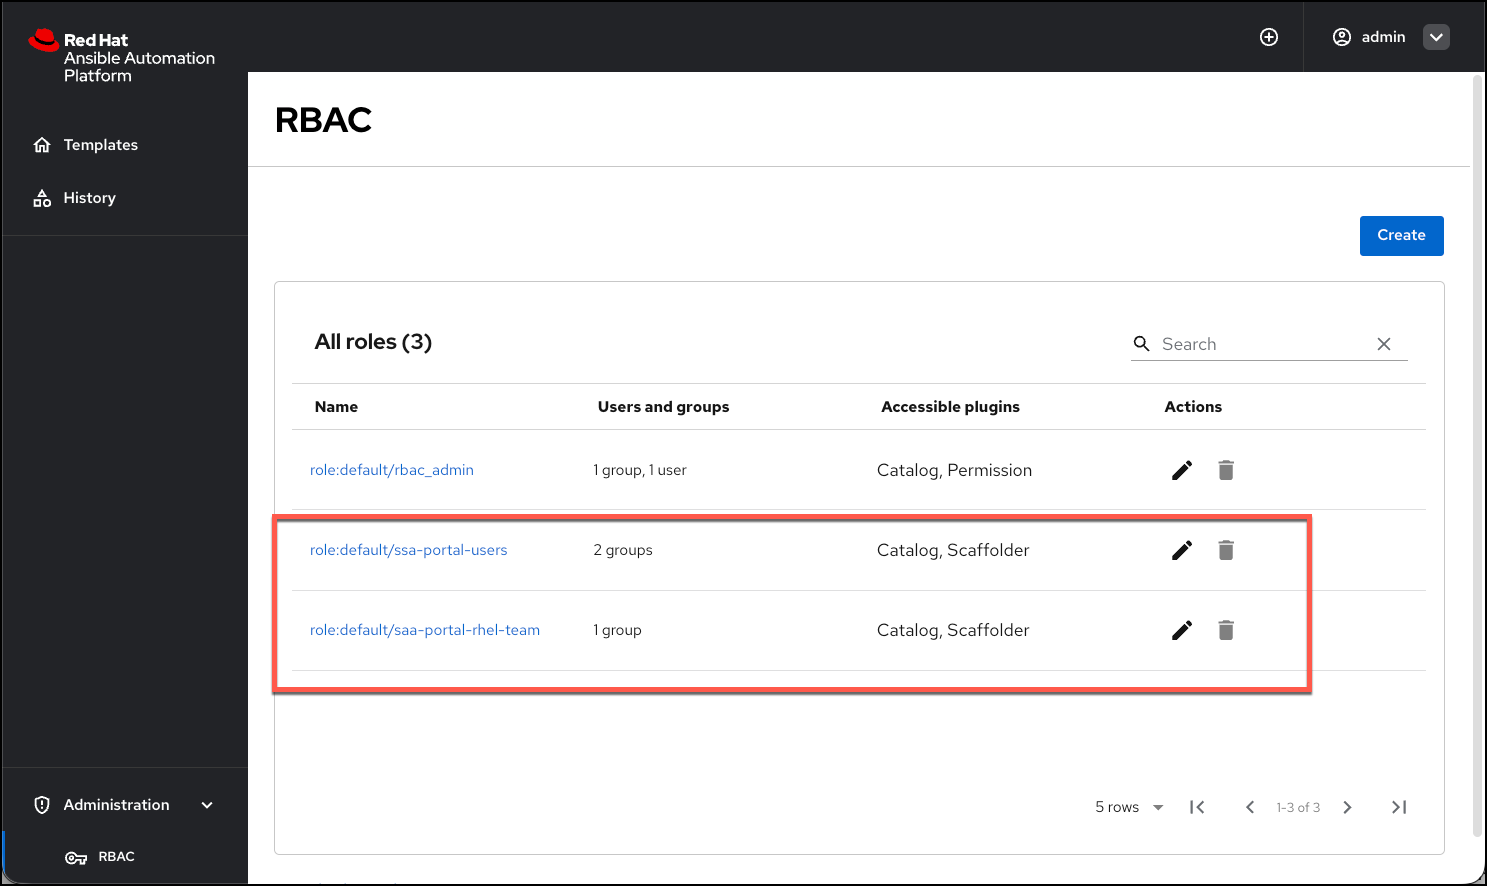
The final view of this section should look like this:
| Form more details on how to create RBAC roles and permissions, please refer to the Self-Service Portal - RBAC Setup Documentation. |
Verify your Portal RBAC configuration
Before testing with user personas, confirm your Portal RBAC policies are correctly configured:
Verification 1: Check policy creation
In Portal, navigate to: Administration → RBAC
✅ Expected result: You should see 2 policies:
-
ssa-portal-users(for cloud-team and network-team) -
ssa-portal-rhel-team(for rhel-team with conditional rule)
Verification 2: Validate ssa-portal-users configuration
Click on ssa-portal-users → Review configuration:
✅ Expected results:
-
Users and groups:
cloud-team,network-team -
Catalog permissions:
catalog.entity.read✓ -
Scaffolder permissions: All except
scaffolder.template.management✓
Verification 3: Validate ssa-portal-rhel-team conditional rule
Click on ssa-portal-rhel-team → Review configuration:
✅ Expected results:
-
Users and groups:
rhel-team -
Catalog permissions:
catalog.entity.readwith condition: -
Condition type:
Not -
Rule:
HAS_METADATA -
Key:
tags -
Value:
custom -
Scaffolder permissions: All except
scaffolder.template.management✓
|
Understanding the conditional rule: The |
|
Troubleshooting: If any verification fails:
|
You’re now ready to test the Portal with different user personas in Module 2!
Learning outcomes
By completing this module, you should now understand:
-
How RBAC works in Ansible Automation Platform 2.6 - The relationship between users, teams, organizations, and permissions, and how to implement least-privilege access control
-
How to configure team-based access control - Creating teams and assigning specific roles to job templates, inventories, and credentials for different IT domains
-
How RBAC works in Self-Service Automation Portal - The permissions framework built on Red Hat Developer Hub and how it controls catalog and scaffolder access
-
How to create permission policies in the portal - Building roles for different user groups and applying conditional rules for advanced access scenarios
-
The synchronization relationship between AAP and the portal - How organizations, users, teams, and job templates automatically sync from AAP to the Self-Service Portal
You’ve successfully configured role-based access control across both Ansible Automation Platform and Self-Service Automation Portal. Your teams now have the proper permissions to access their domain-specific automation. Let’s move on to the next module where you will test the Self-Service Automation Portal from different user perspectives.