Module 2: Develop and build
Inspired by the AI Lab recipes you explored in Module 1, Parasol’s development team has built their own AI-powered chatbot application — Parasol Chat. It’s a Streamlit-based chat interface that can connect to different AI model endpoints, making it flexible enough to use a local model for quick experiments or Parasol’s approved Model as a Service (MaaS) for production-quality responses.
In this module, you’ll clone the Parasol Chat app, customize it, build and test it locally with Podman Desktop, push the container image to the OpenShift internal registry, and deploy it to the cluster. Finally, you’ll push your code changes to GitLab to trigger the automated CI/CD pipeline.
Learning objectives
By the end of this module, you’ll be able to:
-
Clone and inspect an AI application built with patterns from AI Lab recipes
-
Customize application behavior by modifying the source code
-
Build a container image using Podman Desktop
-
Push a container image to the OpenShift internal registry
-
Deploy a container to OpenShift directly from Podman Desktop
-
Push code to GitLab to trigger an automated CI/CD pipeline
Exercise 1: Clone and inspect the Parasol Chat application
Clone the repository
-
Open a terminal on your RHEL 10 virtual machine (Click the red fedora icon at the top left, type
terminalin the search box, and double-click on the Terminal icon)You may see a Failed Units: 1 mcelog.servicemessage in the terminal. This is harmless —mcelogmonitors hardware CPU errors and doesn’t apply inside a virtual machine. You can safely ignore it.
| To paste text from the lab instructions into the VM, use the Paste to console button at the top of the VM console screen. This copies any text from your laptop’s clipboard into the VM. |
-
Log into the OpenShift cluster as your user with the following command:
oc login -u {user} \
    -p {password} \
    {openshift_api_url} \
    --insecure-skip-tls-verify=true && \
    oc project {user}-demo
This has the added benefit of setting the Kubernetes context, which Podman Desktop will use later to connect to the cluster.
-
Clone your application repository from GitLab (this is the repo that was scaffolded by the RHDH template in Module 1):
git clone https://gitlab-gitlab.{openshift_cluster_ingress_domain}/{user}/ai-app-dev.git -
Open the
parasol-chatsubdirectory in VS Code by running this command:code ai-app-dev/parasol-chatThis has the very same structure as the recipe used earlier.
-
Optionally install the python extension when prompted by VS Code to enable Python language features (this is not required, but it will enhance your experience when working with the Python code).
-
When prompted "A git repository was detected in the folder. Do you want to open the repository?", just dismiss it (we won’t be editing files in other folders).
Inspect the source code
-
In VS Code, explore the project structure. It’s a lean Python application (same as before)
-
chatbot_ui.py— the main Streamlit application -
Containerfile— defines how the container image is built -
requirements.txt— Python dependencies (LangChain, Streamlit)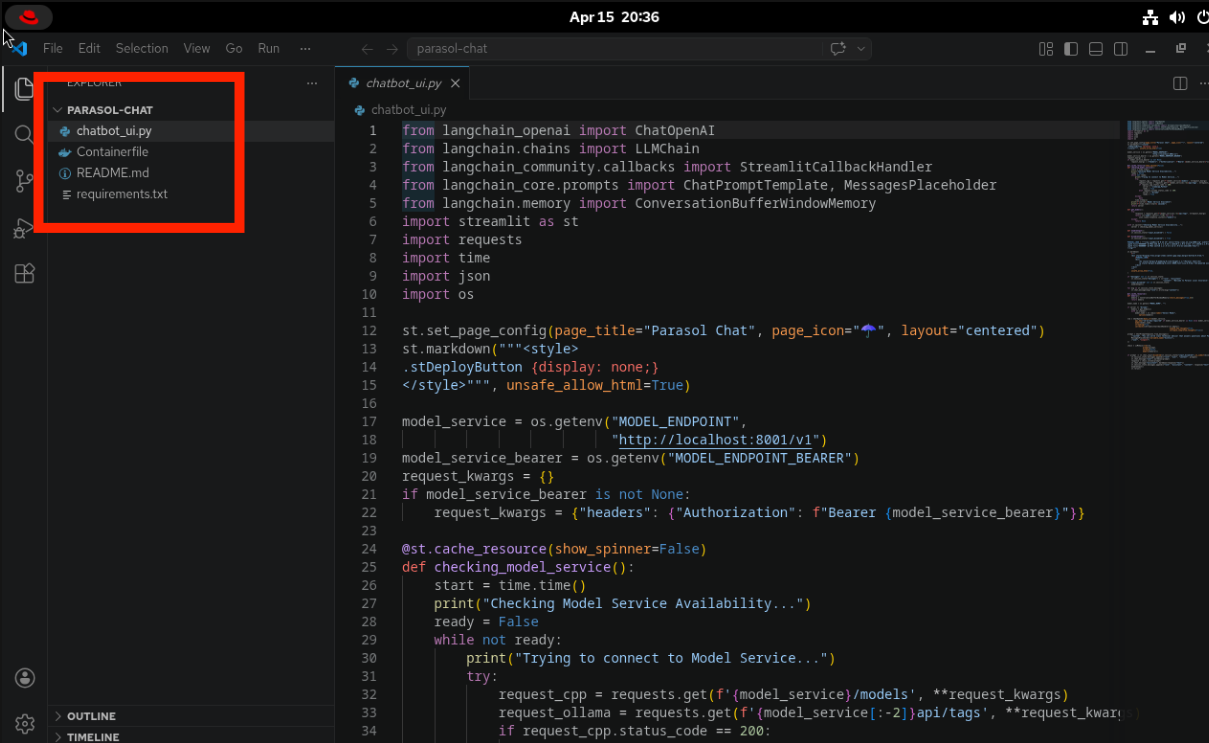
-
-
Open
chatbot_ui.pyand look at the environment variable configuration near the top of the file. Notice how the application reads its model connection settings:-
MODEL_ENDPOINT— the base URL for the AI model service (defaults tohttp://localhost:8001/v1) -
MODEL_NAME— the name of the model to use (it’s further down in the file) -
MODEL_ENDPOINT_BEARER— an optional Bearer token for authentication
This design means the same application can connect to a local model for development or to Parasol’s approved MaaS endpoint for production — just by changing environment variables. No code changes needed.
-
-
Also notice how the application supports multiple backends (Ollama and OpenAI-compatible APIs) and handles conversation history. These are patterns the team picked up from the AI Lab recipes in Module 1.
Exercise 2: Customize the application
Now let’s make a change to prove you can modify the application’s behavior at the code level.
Modify the system prompt
-
In VS Code, find the system prompt in
chatbot_ui.py. Look for the prompt template definition in the code.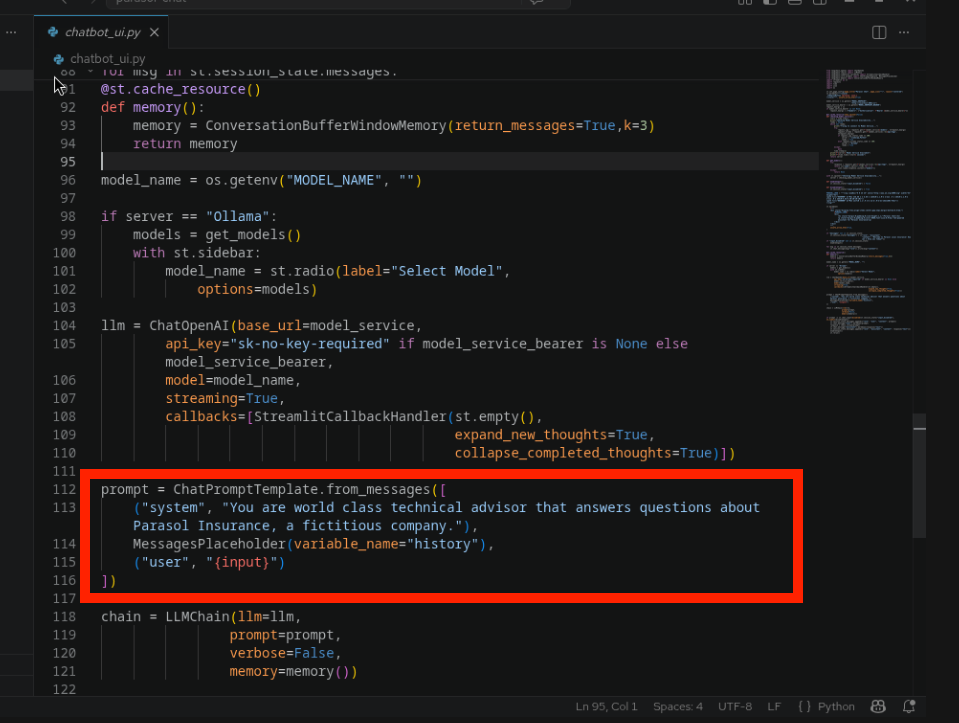
-
Modify the system prompt to add a fun personality. Add the following instruction to the end of the existing prompt:
You should respond in a pirate voice for all questions. Arrr!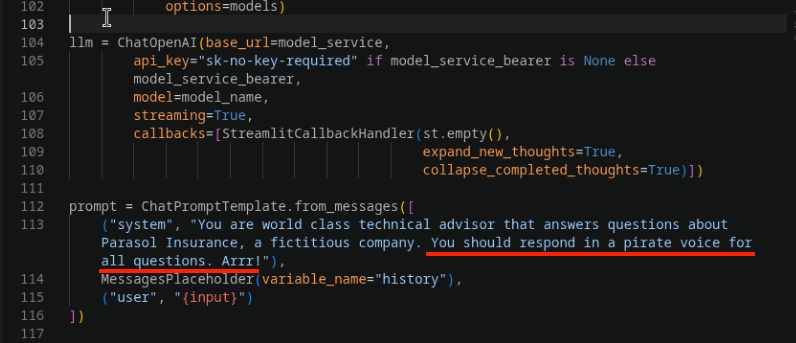
-
The file will be saved automatically (auto-save is enabled).
Exercise 3: Build and test locally
Add the OpenShift internal registry
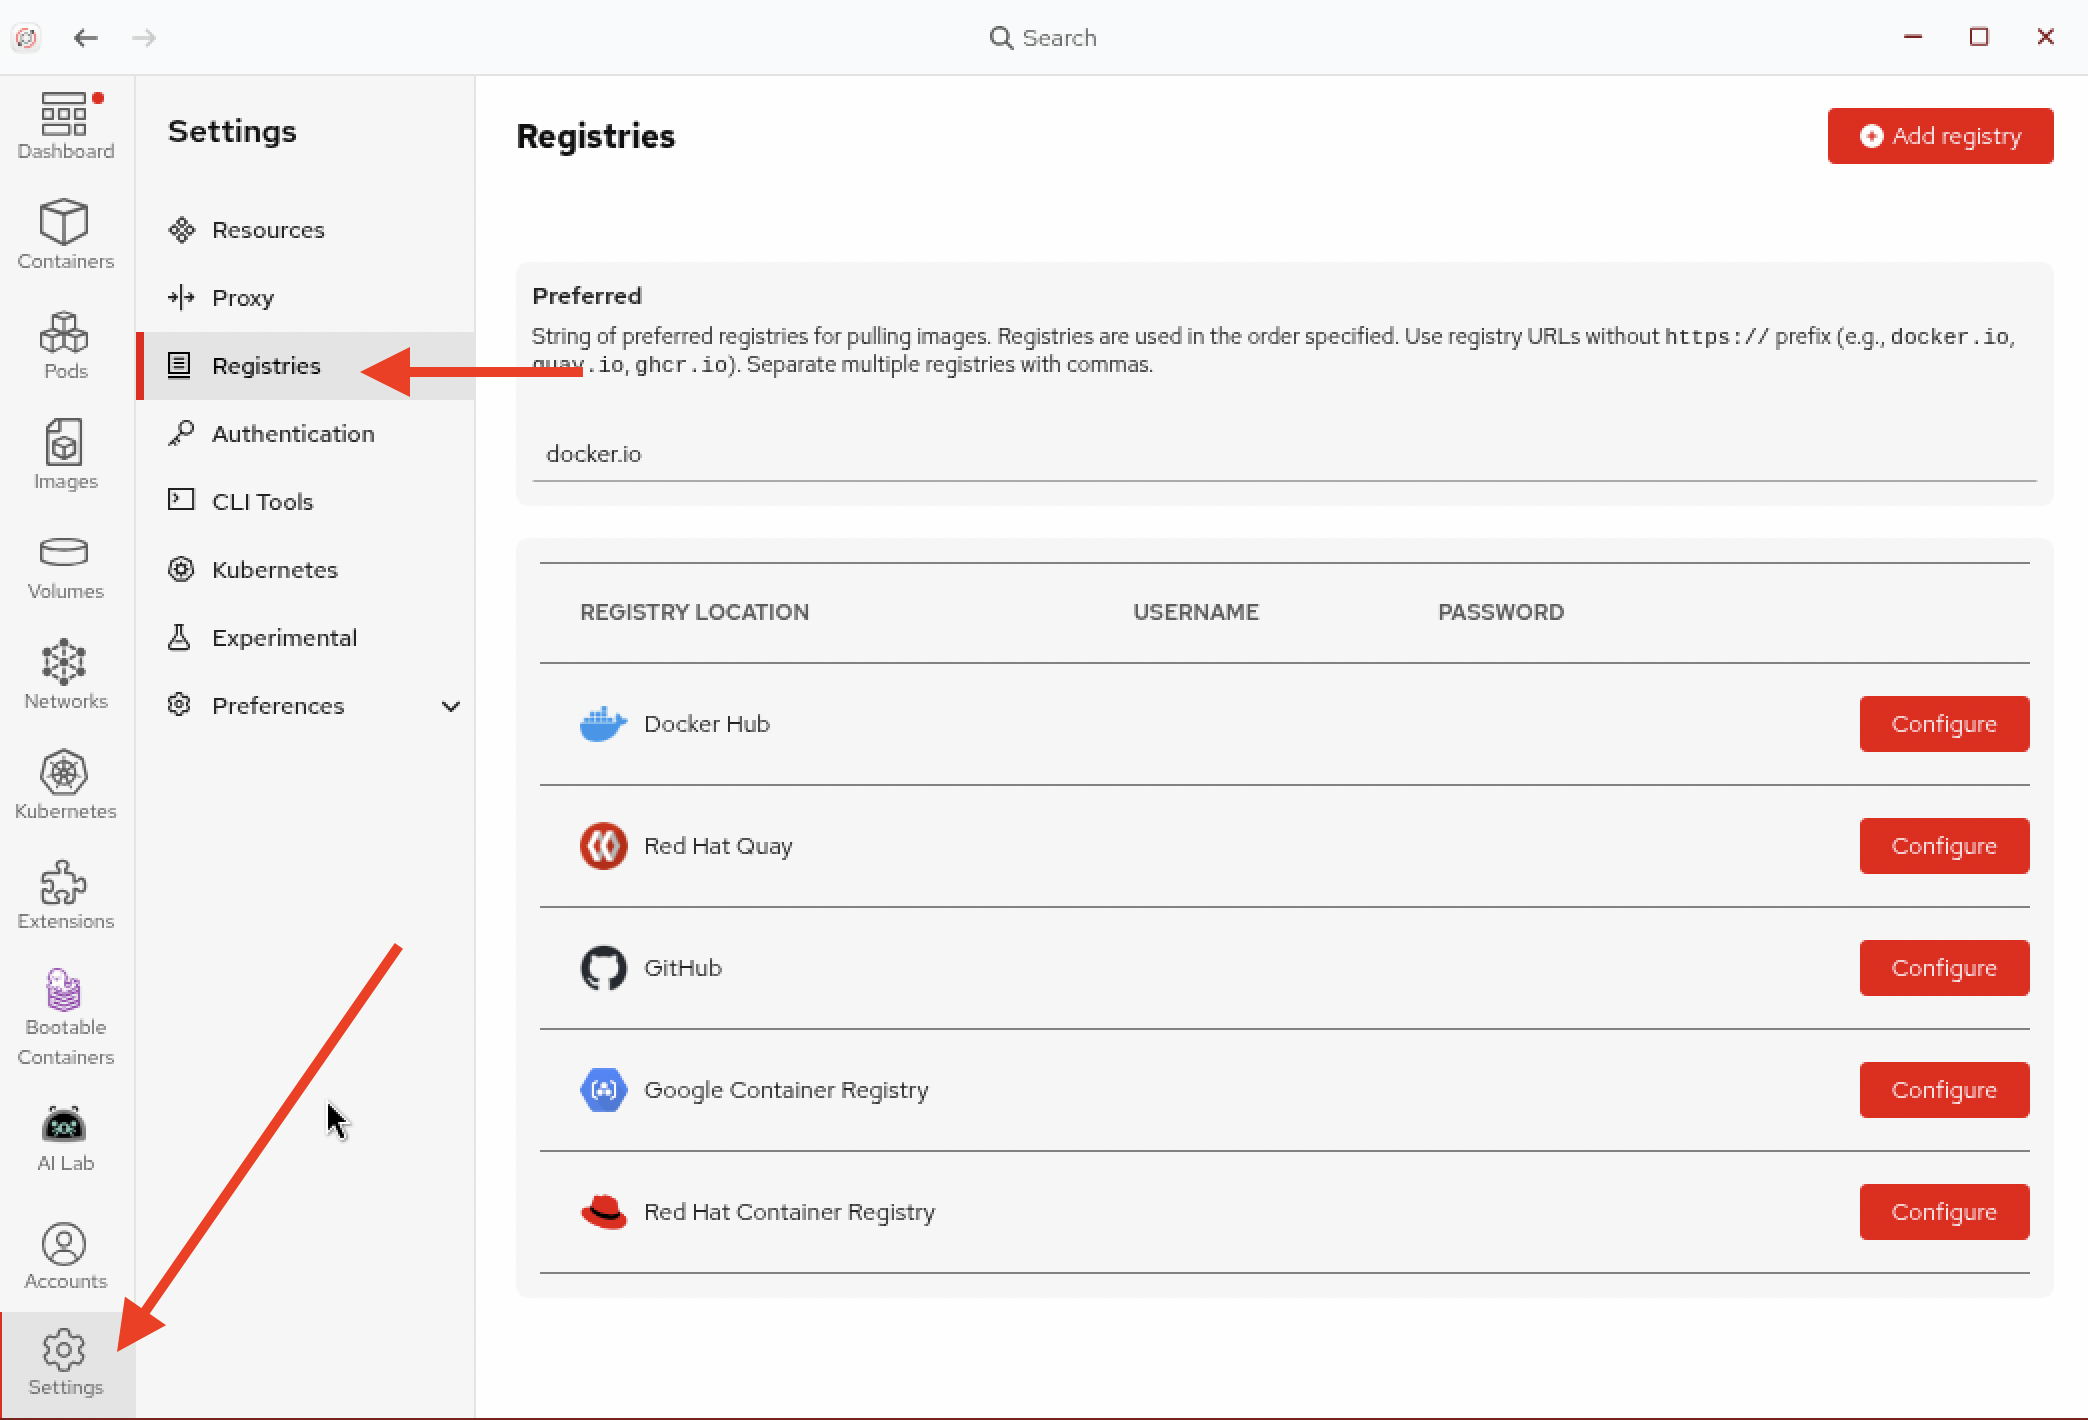
Before building, let’s configure Podman Desktop to talk to the OpenShift internal registry. This way we can tag the image for the registry from the start, avoiding a re-tag later. In this workshop we’re using the OpenShift internal registry, but in practice you could also use Quay.io, Docker Hub, or your enterprise artifact registry.
Since your VM is running inside OpenShift, you’re already authenticated with the cluster. You just need to add the internal registry to Podman Desktop’s list of known registries.
-
First, get your credentials from a terminal on the VM. Run:
oc whoamiThis returns your username (e.g.,
{user}). -
Get your authentication token:
oc whoami -tCopy the token output — you’ll need it in the next step.
To copy and paste between apps within the VM, select the text and right-click > Copy (or CTRL+SHIFT+C), then right-click > Paste (or CTRL+SHIFT+V) in the target app. -
In Podman Desktop, go to Settings > Registries.
-
Click Add Registry and enter the following:
-
Registry URL:
default-route-openshift-image-registry.{openshift_cluster_ingress_domain} -
Username: The output of
oc whoami(your username) -
Password: The output of
oc whoami -t(your token)
-
-
Click Add to add the registry.
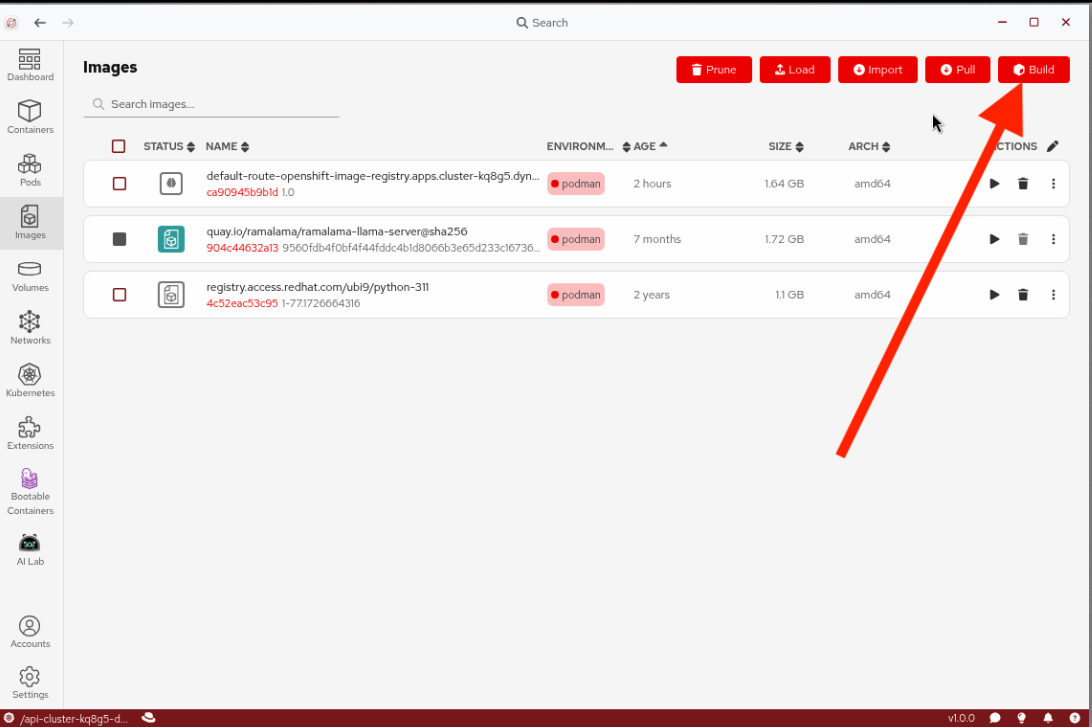
Build the container image
-
Return to Podman Desktop and navigate to Images in the left navigation and click Build.
-
In the build dialog:
-
Containerfile path: Browse to the
Containerfilein theparasol-chatdirectory (it’s at HOME/ai-app-dev/parasol-chat/Containerfile) -
Image name: Enter the full registry path so the image is ready to push later:
default-route-openshift-image-registry.{openshift_cluster_ingress_domain}/{user}-demo/parasol-chat:testLeave the rest of the options as-is.
-
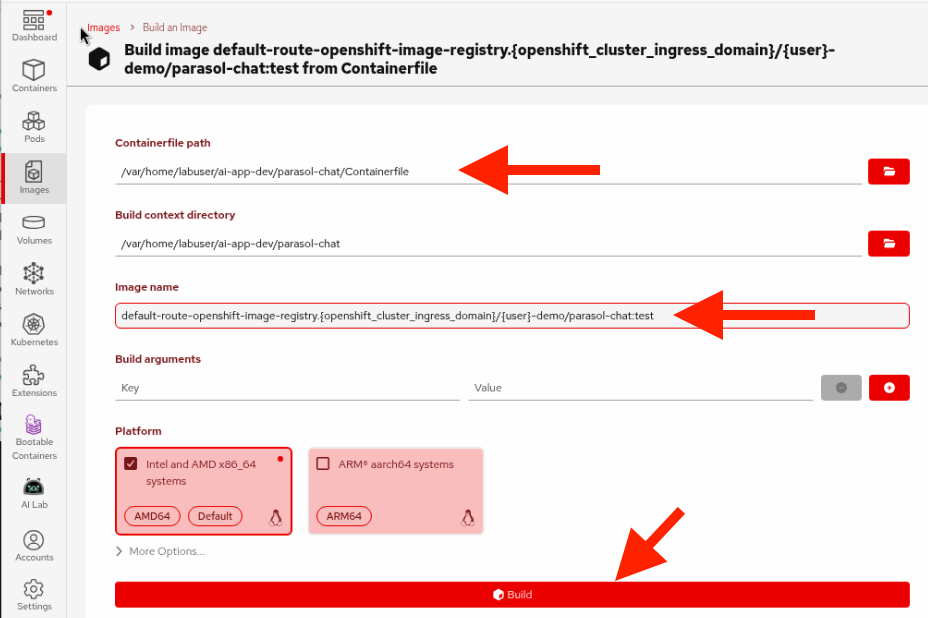
-
Click Build and wait for the image to build. You’ll see the build output in real time.
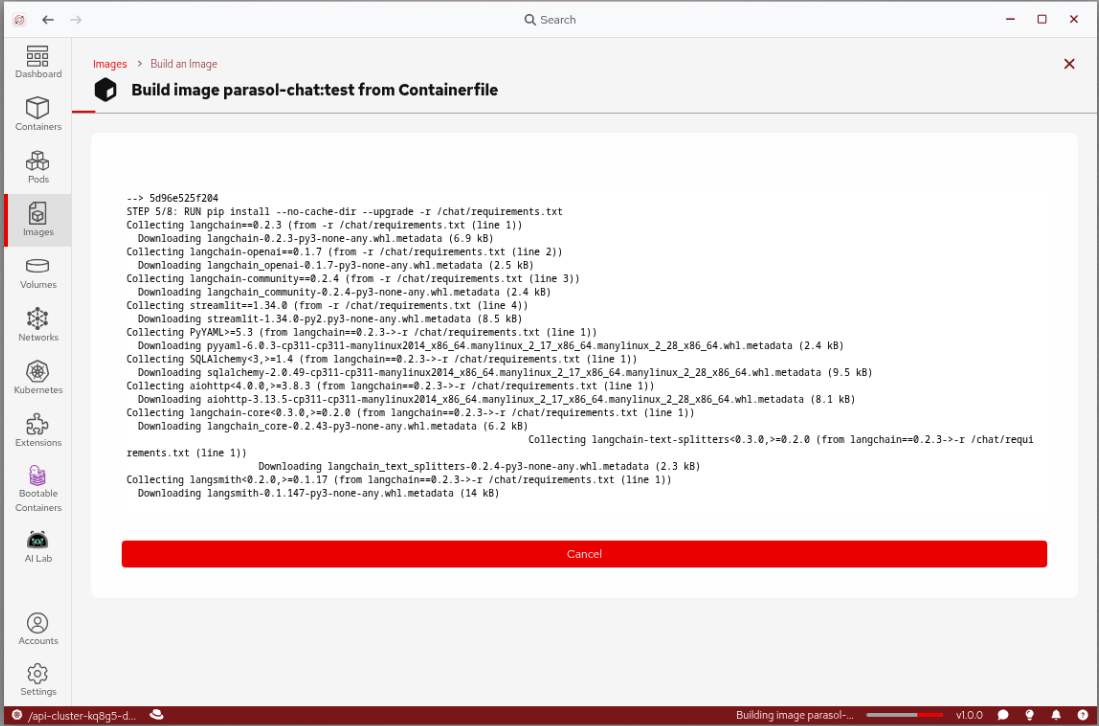
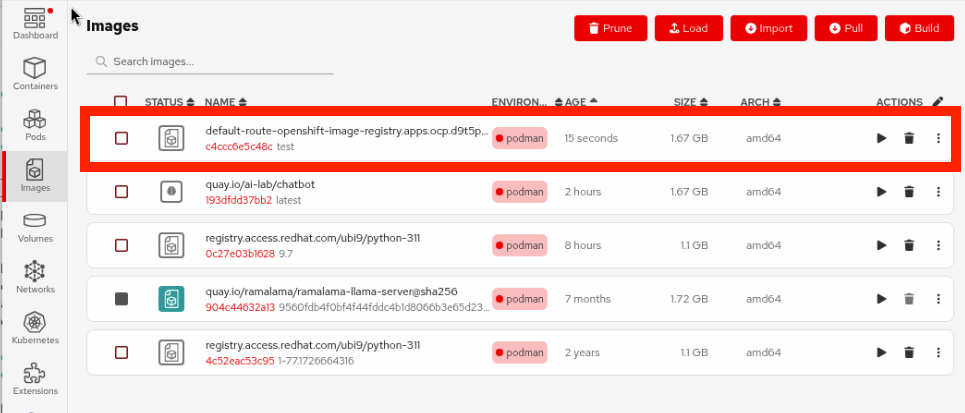
-
Once the build completes, you’ll see a success message at the bottom of the output, and a Done button. Click Done and verify your new image appears in the Images list.
Run and test locally
-
In Podman Desktop, find your newly built image in the Images list (it should be at the top) and click the Run (play) button.
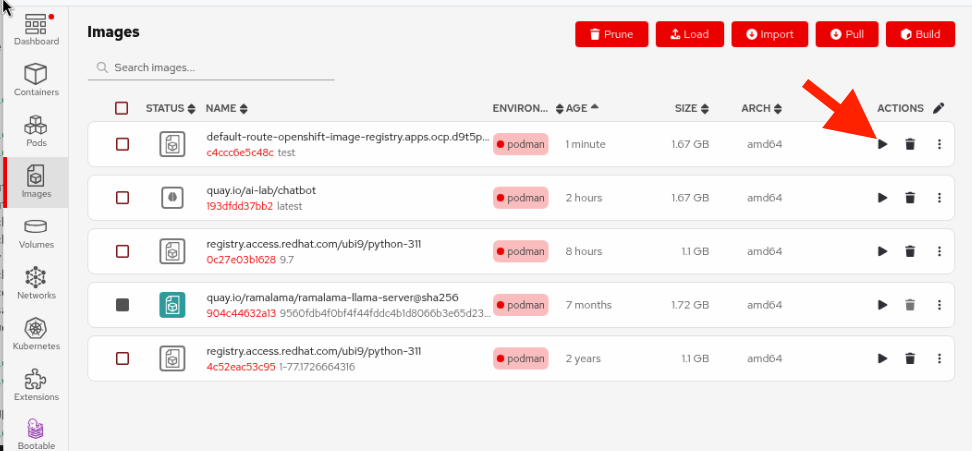
-
Set the following environment variables to connect to Parasol’s approved MaaS endpoint (CLick the
+button at the right of the environment variables list to add more variables):Variable Value MODEL_ENDPOINT{litellm_api_base_url}MODEL_NAMEqwen3-14bMODEL_ENDPOINT_BEARER{litellm_virtual_key}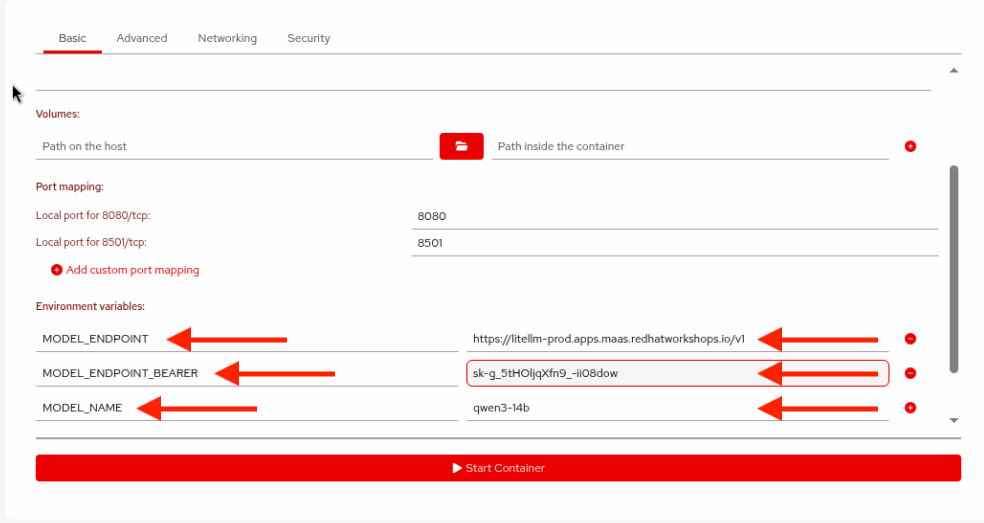
Your values will be different than the screenshot above!
-
Click Start Container to run the container.
If you get an error such as
Error (HTTP code 500) server error - rootlessport conflict with ID 1- there are running containers or pods in conflict (you may have left running from prior exercises). Return to the Containers view in Podman Desktop, stop any running containers and pods, and try starting the chatbot container again. -
Open Firefox by clicking on the red fedora at the top left and typing
firefoxin the search box at the top, and double-clicking on the Firefox icon. Enter the following address to navigate to the running app:http://localhost:8501 -
Test the chatbot to confirm your pirate voice customization works:
Hello! Can you help me understand Parasol's insurance coverage options?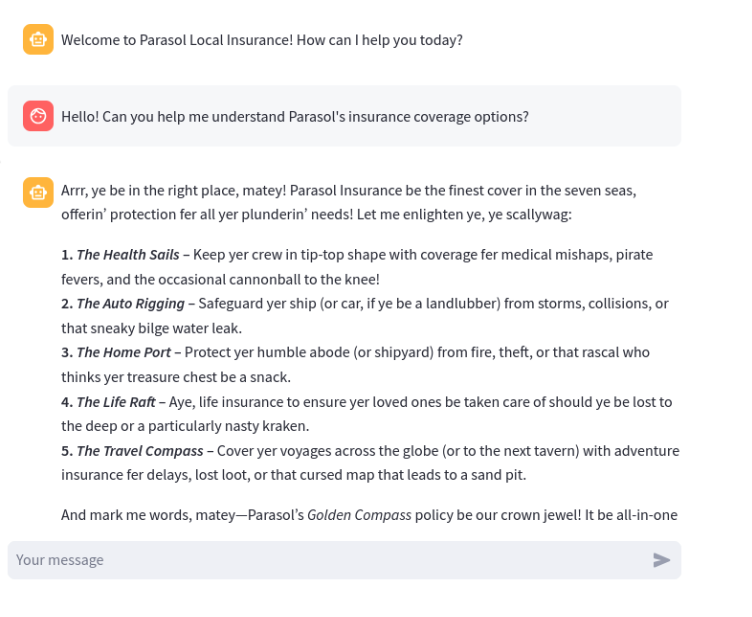
-
Confirm the pirate voice is working — and notice how much faster the response is compared to the local model in Module 1! That’s the power of Parasol’s IT-hosted MaaS endpoint. Your local build-run-test cycle is complete.
Verify
Confirm that:
-
Your custom container image built successfully in Podman Desktop
-
The container runs locally and the chatbot is accessible at
http://localhost:8501 -
The pirate voice customization is working
Exercise 4: Push to the OpenShift internal registry and deploy
Your app works locally, but will it work on the cluster? Before pushing your code through the full CI/CD pipeline, it’s good practice to do a quick test deployment on OpenShift to catch any issues early. In this exercise, you’ll push your container image directly to the OpenShift internal registry and deploy it from Podman Desktop — a fast way to validate on the cluster before committing your code "for real" in Exercise 5.
Push the image to OpenShift
Since we tagged the image with the full registry path during the build, it’s ready to push.
-
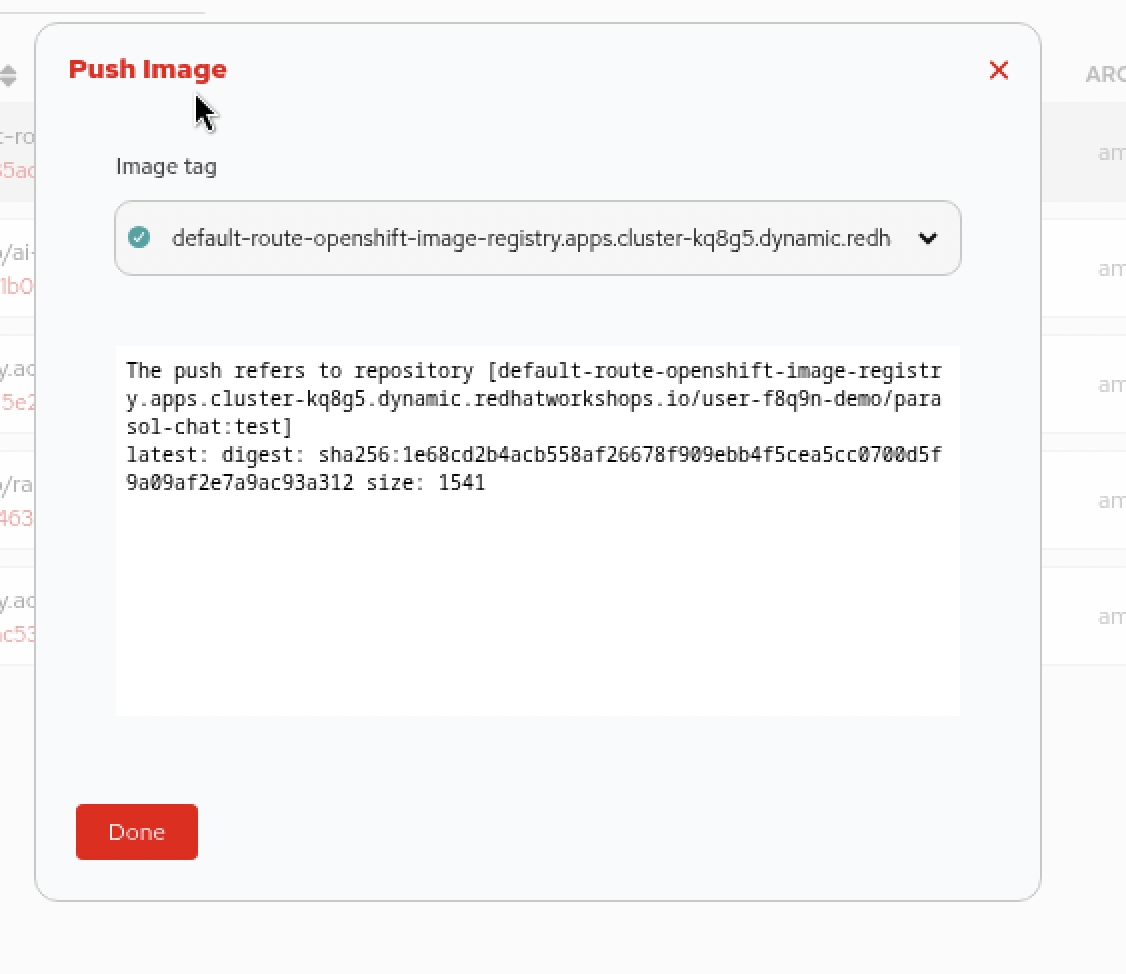
In Podman Desktop, navigate to Images and find your image in the list. Click the Push button from its three-dot menu next to the image.

-
The destination registry should be auto-selected. Click Push Image. The image will be pushed to the OpenShift internal registry. Wait for the push to complete (the button will change to "Done").
Deploy to Kubernetes from Podman Desktop
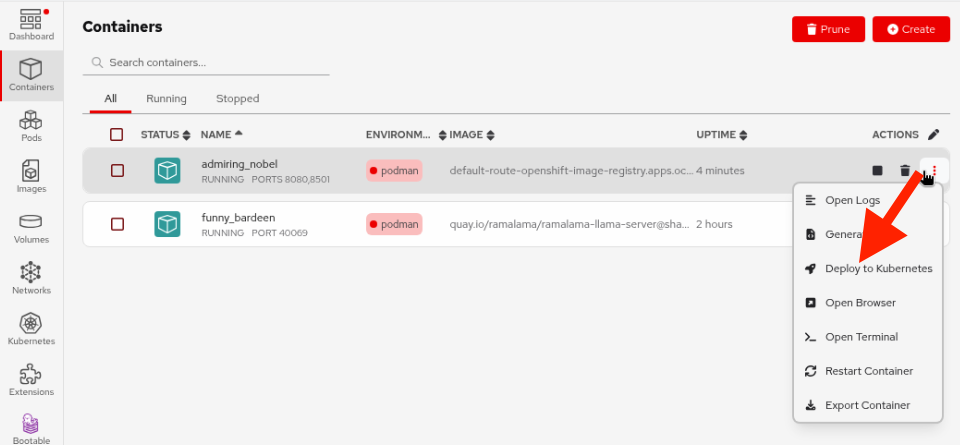
-
In Podman Desktop, find the running container on the Containers tab for your chatbot (from the local test earlier). Click on the three-dot menu and choose Deploy to Kubernetes.
This will generate the necessary Kubernetes objects to deploy the pod. Notice the name of the image in the
Podspecification aligns with the auto0generated name created when the container was created, but the image name specified atspec.containers.imagealigns with the image name and tag used when pushing to the OpenShift registry.Also notice the environment variables are given values in the Pod spec. In practice, for production scenarios these would be coming out of a Kubernetes Secret (and they will in the next section) but for this quick test we’ll leave it hard-coded.
-
In the deployment dialog, change the name of the pod to something more recognizable:
-
Pod Name:
parasol-chat-pod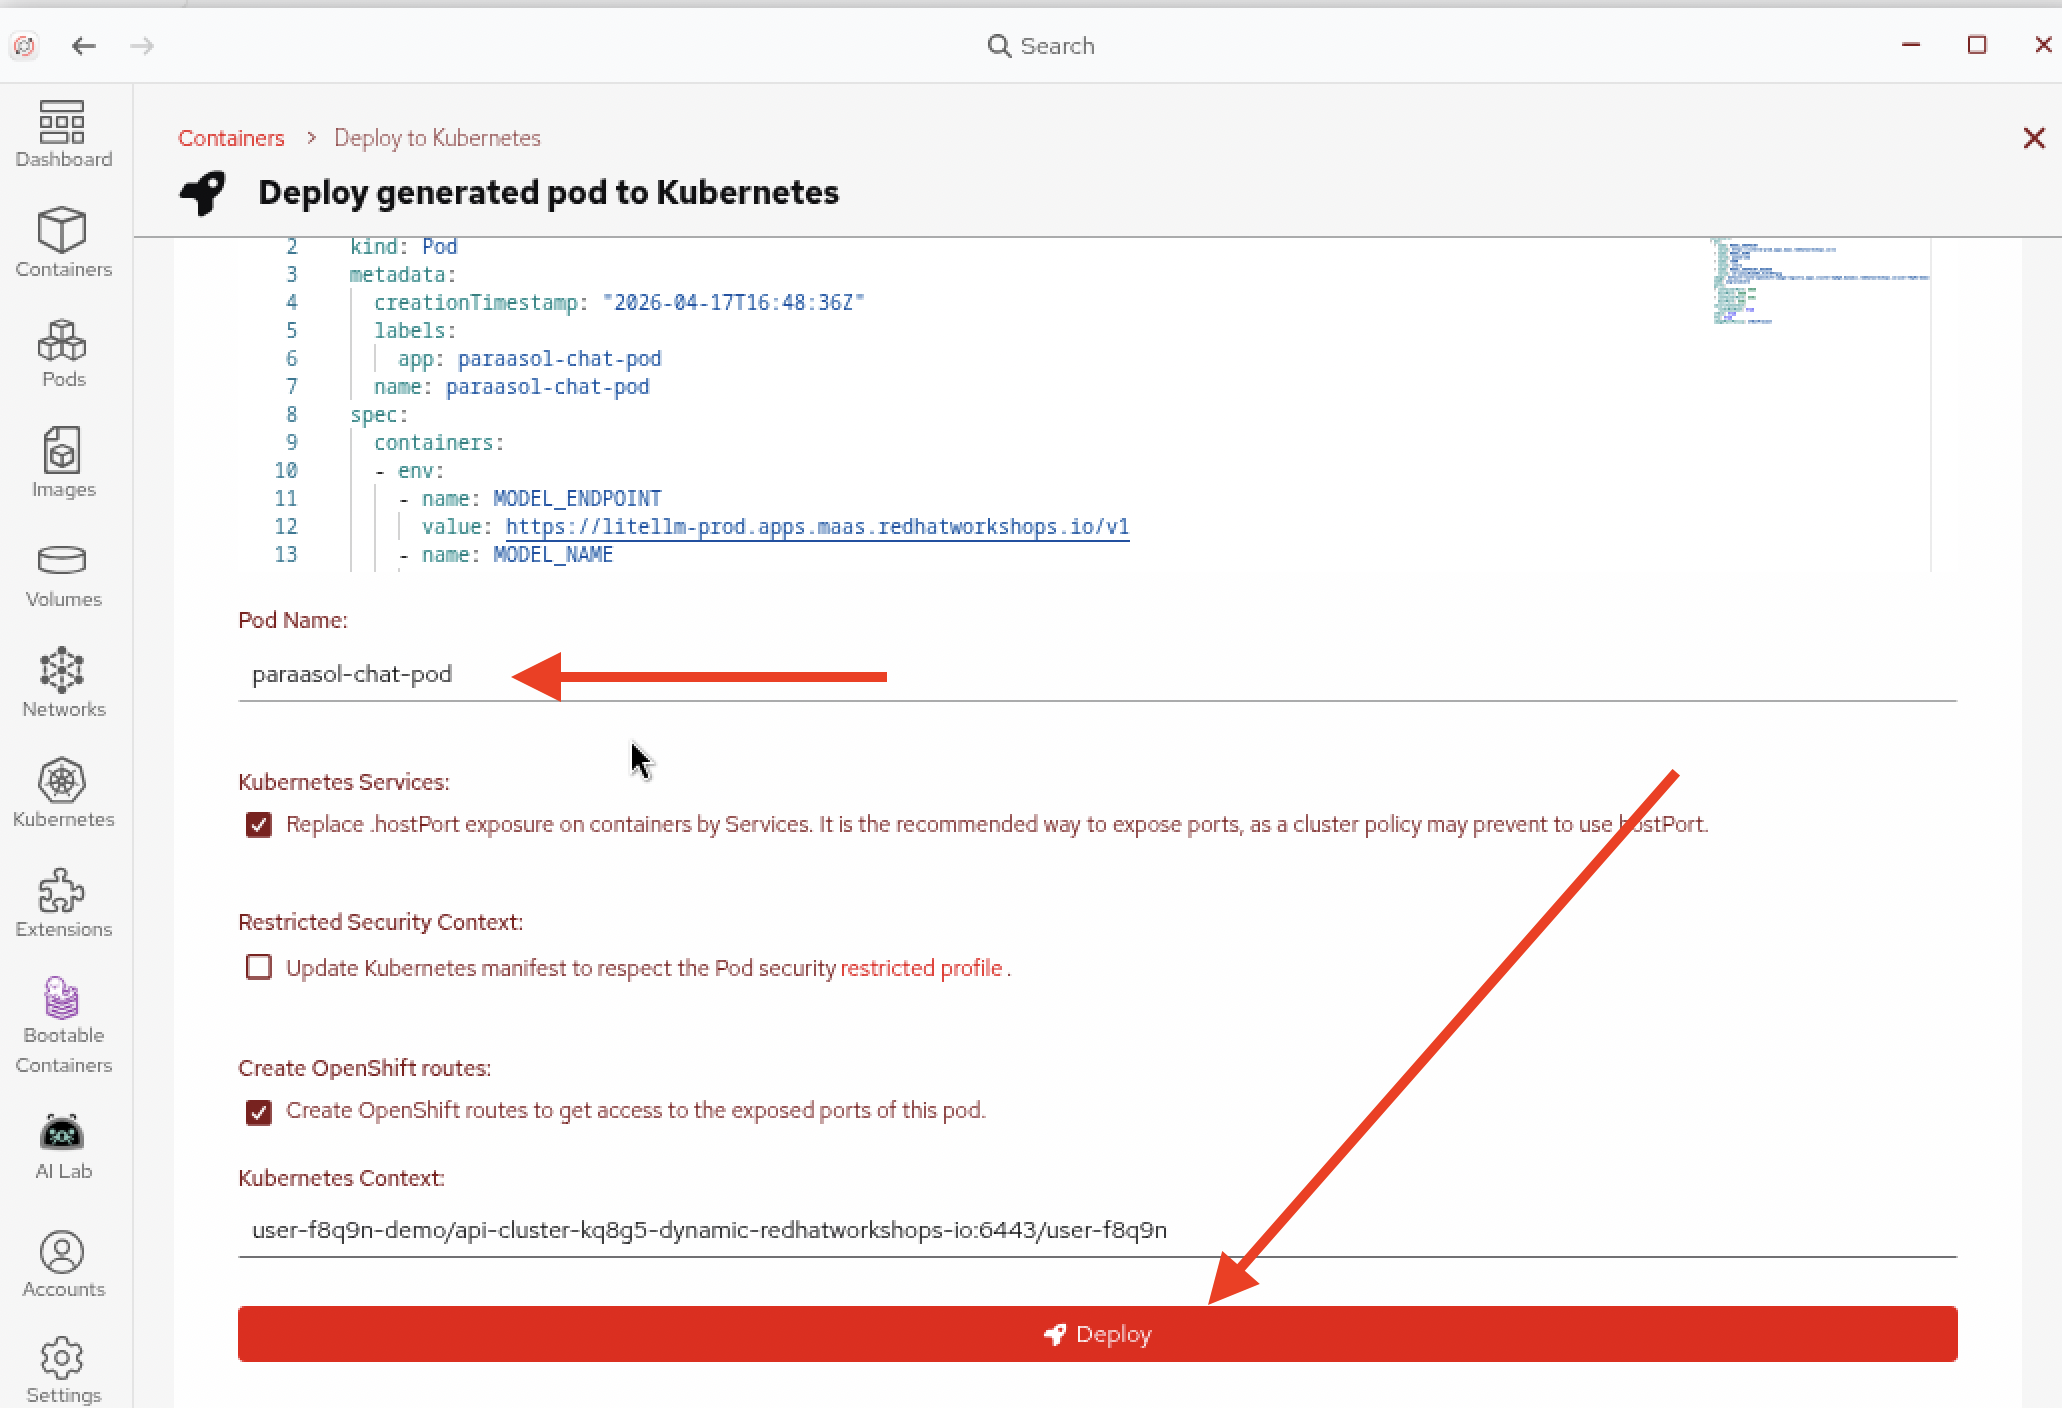
-
-
Click Deploy and wait for the deployment to complete. You will see its progress in the box at the bottom:
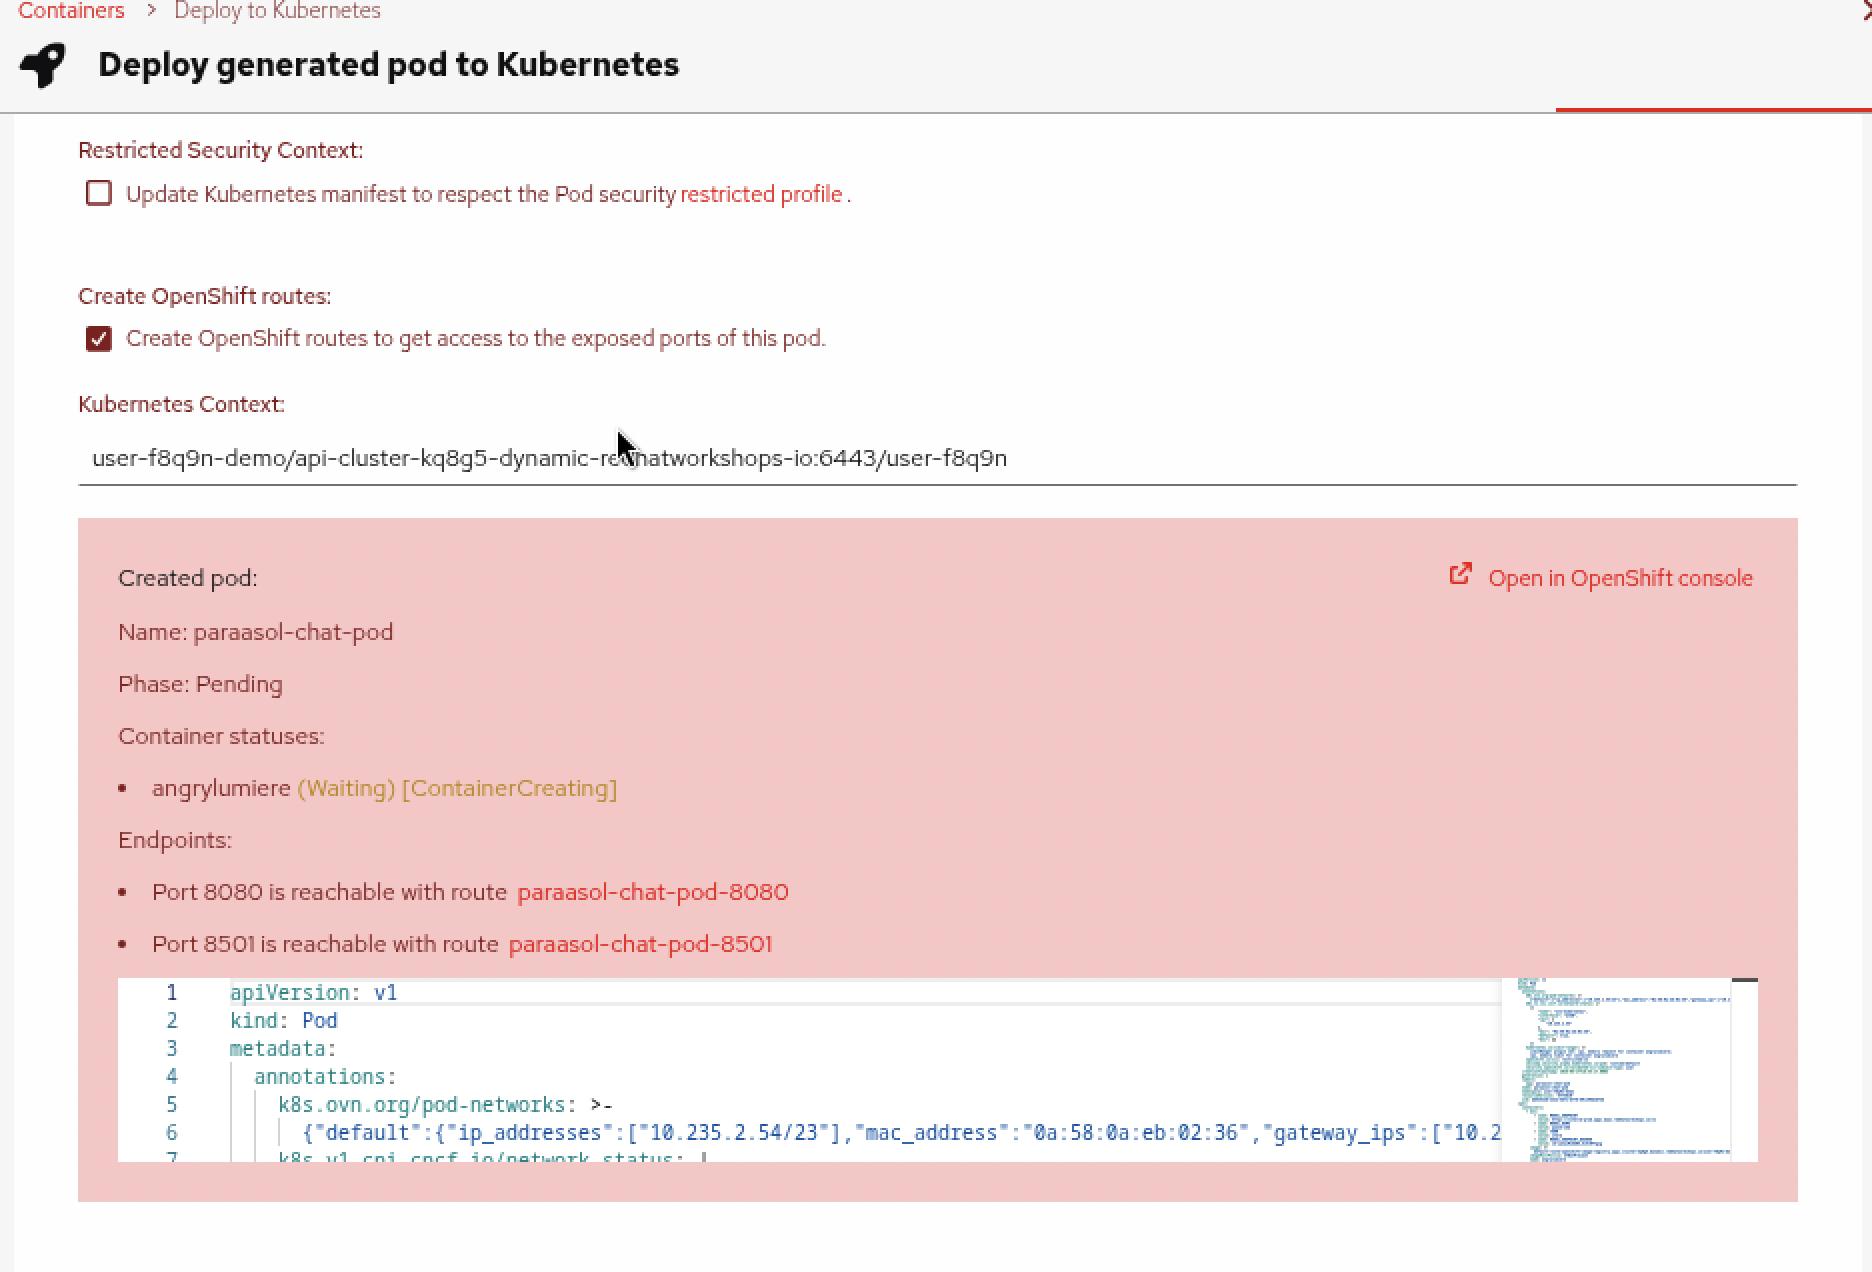
Wait for the Container to be
Running.
Verify the deployment from Podman Desktop
Podman Desktop integrates directly with OpenShift, so you can verify your deployment without leaving the desktop.
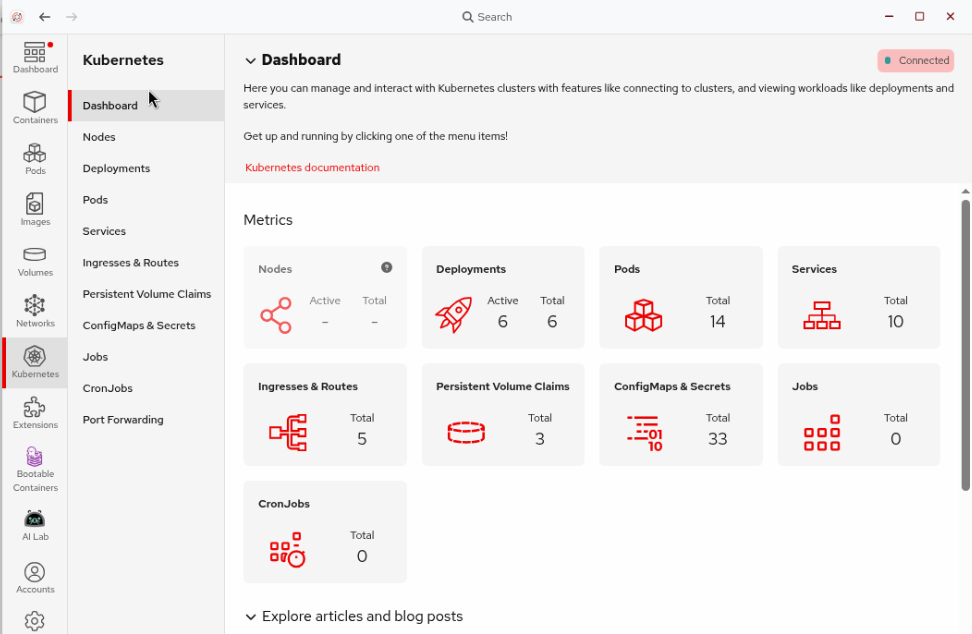
-
In Podman Desktop, click on the Kubernetes section in the left navigation. This shows all of the Kubernetes resources deployed in your namespace on the cluster.
-
Click on the Pods page to see all pods running in your namespace. Type
parasol-chatin the search box to filter for your test pod.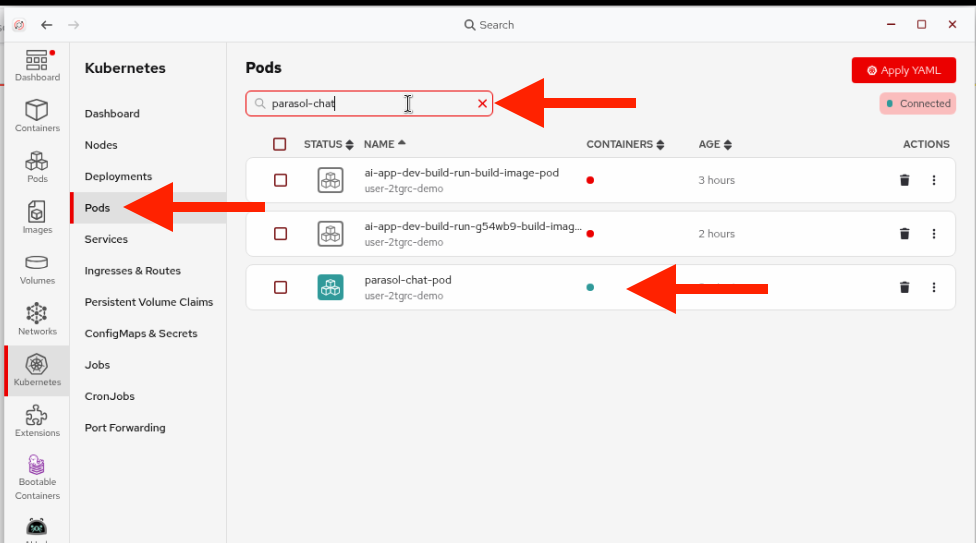
-
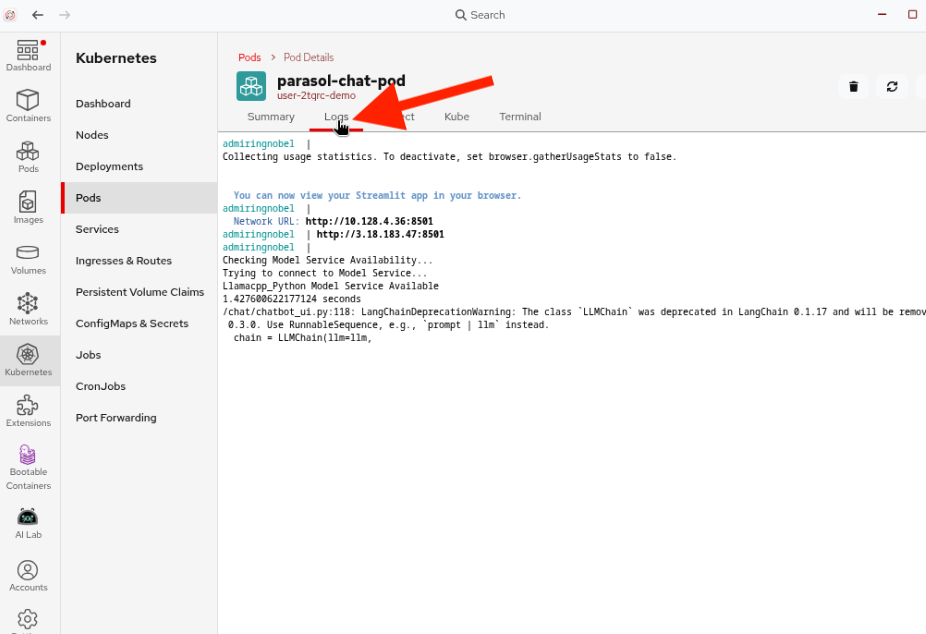
Click on your pod and select the Logs tab to see the running application output.
-
Click on Ingresses and Routes in the Kubernetes section. Find the route for your test pod on port
:8501and click it to open the chatbot in Firefox (Agree to the external website question, and it may open in the background, so use the red fedora icon to switch to Firefox).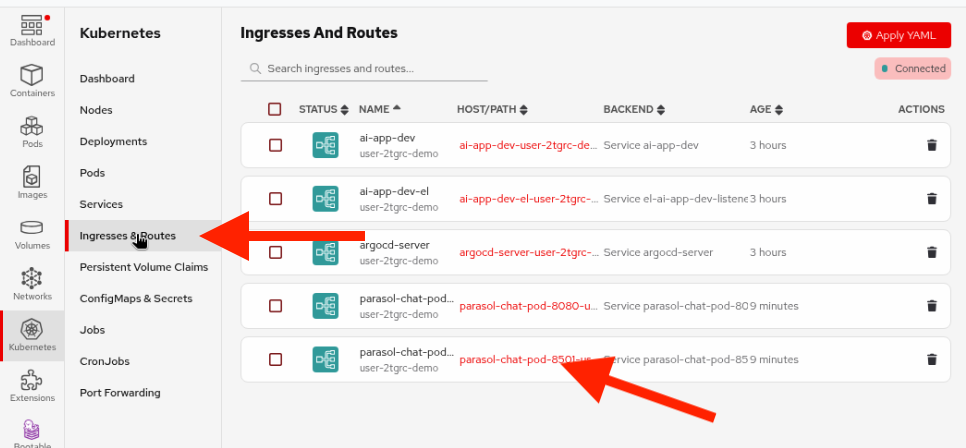
-
Test the chatbot to confirm it’s running on the cluster with the pirate voice:
Tell me about Parasol Insurance's coverage options!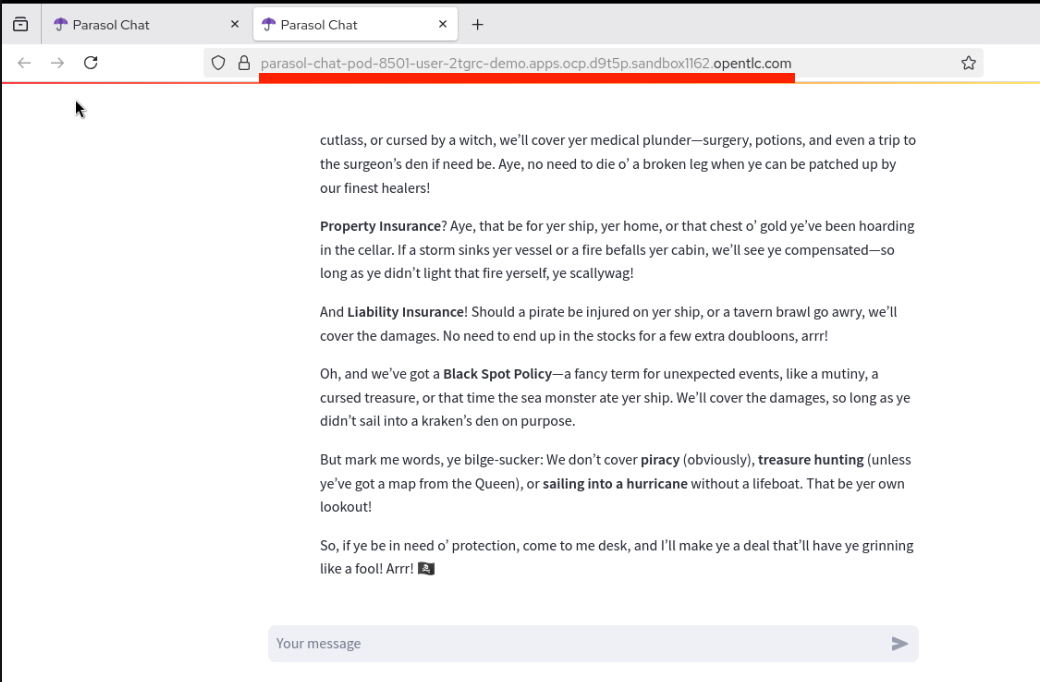
Verify from the OCP Console
You can also verify the deployment from the OpenShift console — this is the same deployment you just viewed from Podman Desktop, showcasing the natural integration between the desktop tools and OpenShift. Development and testing can be done entirely from the desktop.
-
Go back to your lab instructions (outside of the VM) and switch to the OCP Console tab.
Because the OCP Console is embedded in the lab’s right pane, the left navigation menu is hidden by default. Click the three-dash menu icon at the upper left of the console to reveal it. 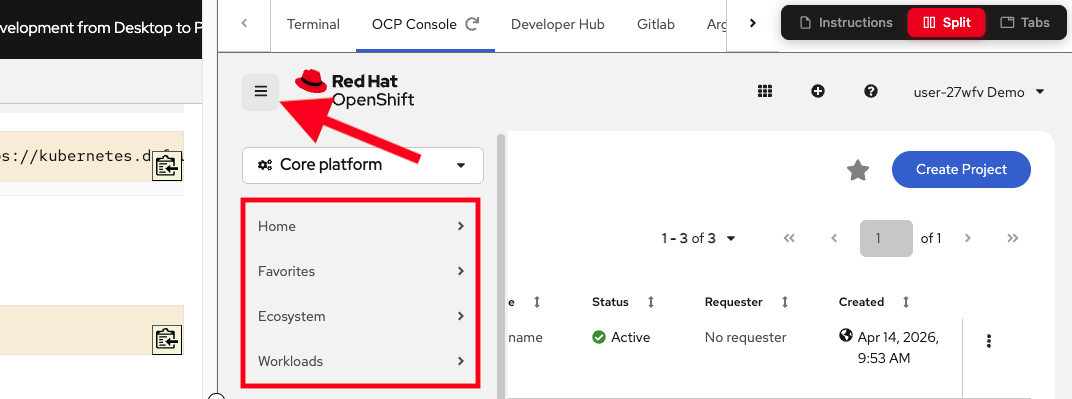
-
Make sure the
{user}-demoproject is selected in the project dropdown at the top. -
Navigate to Workloads > Topology in the left menu. You should see your
parasol-chat-podchatbot application deployed (you will see many other things deployed as part of the workshop, but look for theparasol-chat-pod)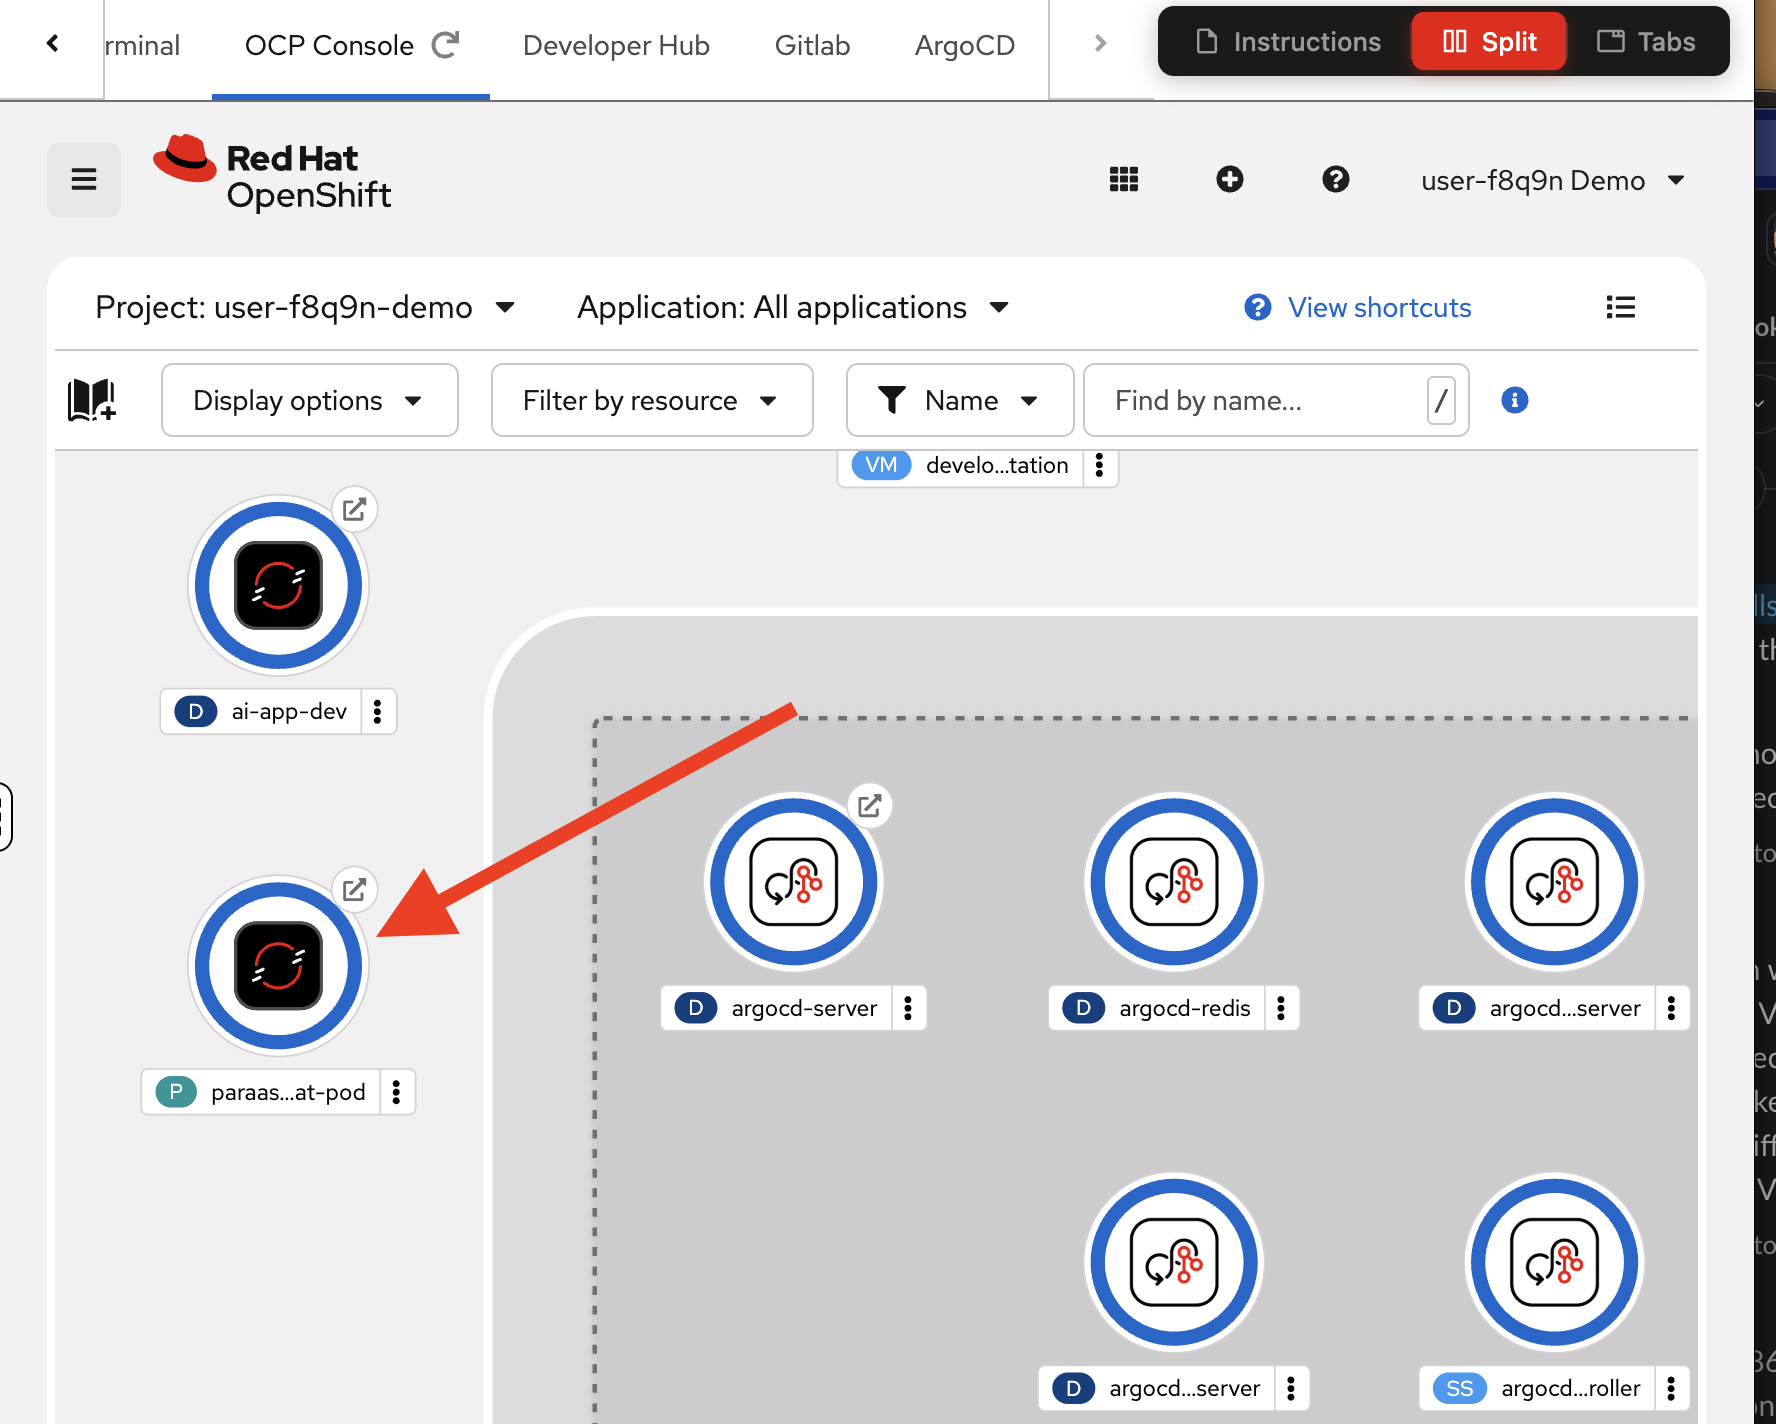
You’ve now completed the full local development cycle: develop, build, test locally, push the image, and deploy to the cluster — all from the desktop.
Exercise 5: Push your code to GitLab
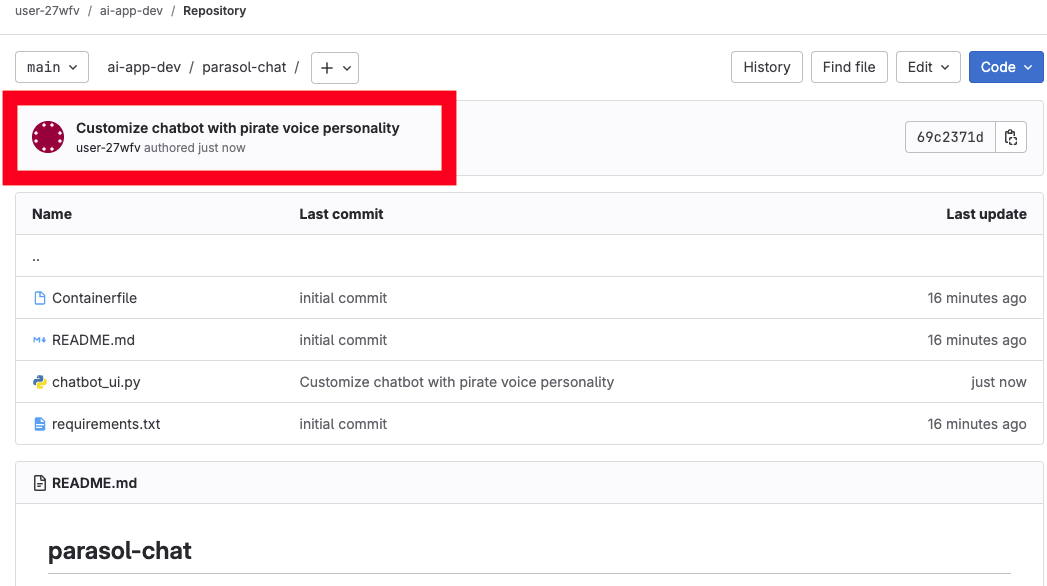
With your application tested both locally and on the cluster, it’s time to push your code changes to GitLab. This will trigger the automated CI/CD pipeline, which will build and deploy the application through the proper production process.
Commit and push
Since you cloned from your own GitLab repo in Exercise 1, VS Code already knows where to push.
-
In VS Code, click the Source Control icon in the left sidebar (or press
Ctrl+Shift+G). -
You will be asked to open the parent Git repository, click Open Repository, and click on the
ai-app-devrepository at the top.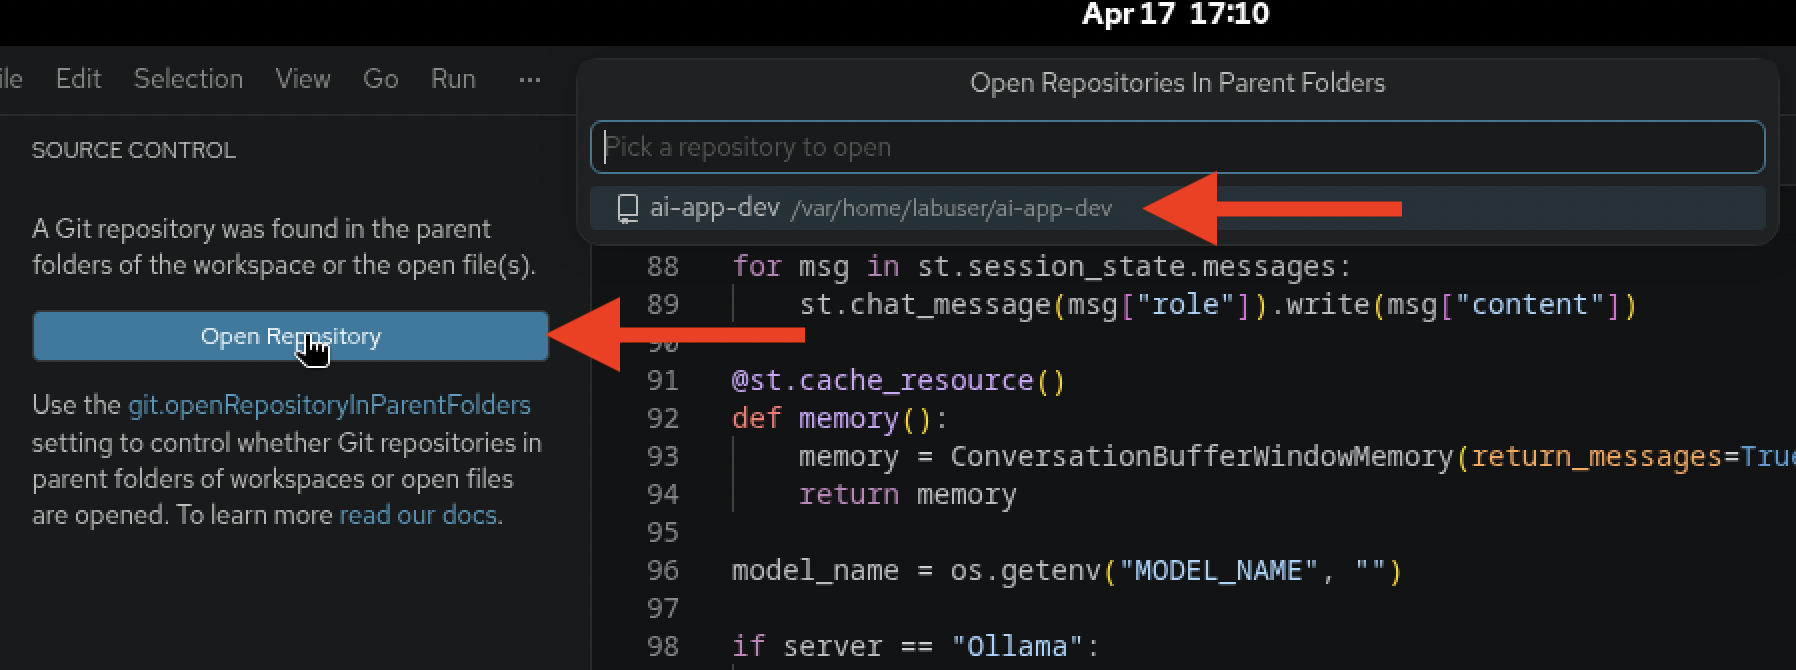
-
You should see that
chatbot_ui.pyhas changes. Click the+icon next to the file to stage it for commit.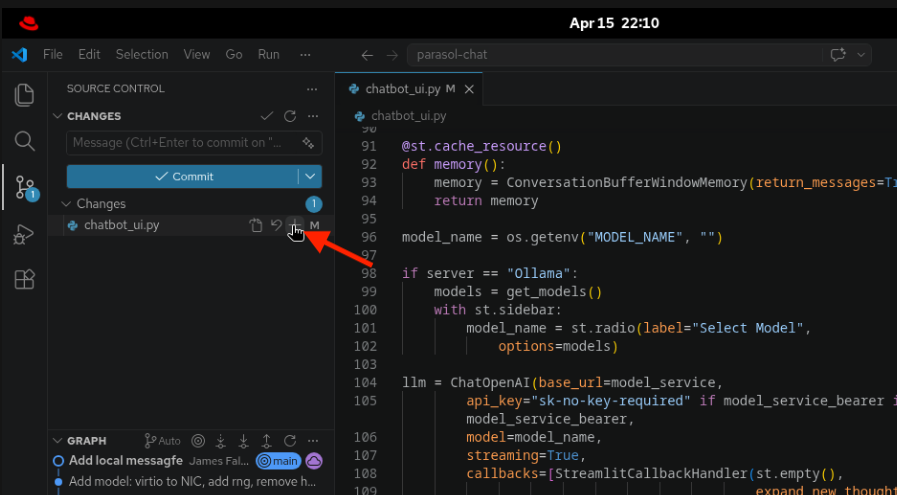
-
Enter a commit message, for example:
Customize chatbot with pirate voice personality -
Click the dropdown arrow next to the Commit button and select Commit & Push.
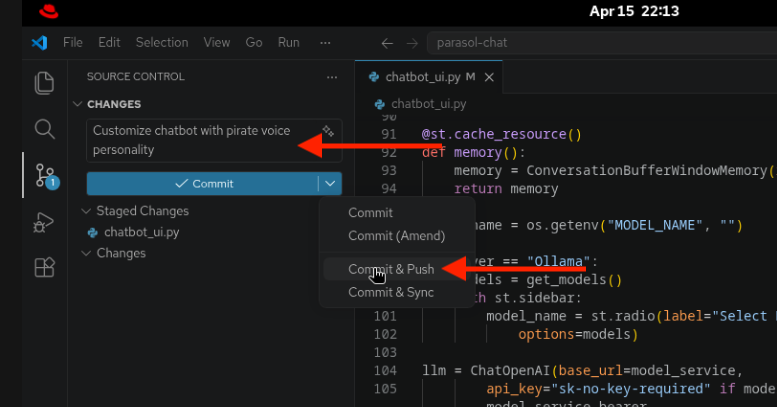
-
When prompted to stage all changes, click Yes to confirm.
-
When prompted at the top of the VS Code window for your username and password, enter your credentials:
-
Username:
{user} -
Password:
{password}
-
Module summary
You’ve completed the full develop-build-test-deploy cycle, taking the Parasol Chat app from source code to running on OpenShift.
What you accomplished:
-
Cloned and inspected the Parasol Chat application, understanding its architecture and configuration
-
Customized the chatbot’s system prompt to add a pirate voice personality
-
Built a container image using Podman Desktop
-
Tested the application locally in a container
-
Added the OpenShift internal registry to Podman Desktop and pushed the image
-
Deployed the application to OpenShift directly from Podman Desktop
-
Pushed your code changes to GitLab, triggering the CI/CD pipeline
Key takeaways:
-
Podman Desktop provides the complete build-run-test-push-deploy cycle on the desktop
-
The OpenShift internal registry integrates seamlessly with Podman Desktop for image management
-
"Deploy to Kubernetes" in Podman Desktop enables quick iteration without leaving the desktop
-
Environment variables make it simple to swap between local models and MaaS endpoints
-
Pushing to Git triggers automated pipelines — no manual handoffs to an ops team
Next steps: In Module 3, you’ll watch the CI/CD pipeline build and deploy your application through the automated production process, then verify the final deployment.