Module 1: Exploring the environment
Modernizing virtualization starts with understanding the platform. Before you can migrate workloads or build new VMs, you need to know what tools are available, how they fit together, and how storage integrates with compute.
In this module, you will explore the OpenShift Virtualization environment, understand the IBM Fusion storage integration, and create your first virtual machine.
Learning objectives
By the end of this module, you will be able to:
-
Navigate the OpenShift Virtualization console and identify key components
-
Understand how IBM Fusion provides persistent storage for VM workloads
-
Create a virtual machine from a pre-configured template
-
Verify VM status and access the VM console
Exercise 1: Navigating the OpenShift console
In this exercise, you will log in to the OpenShift web console and explore the Virtualization section to understand the management interface.
-
Open a web browser and navigate to the OpenShift console:
{openshift_cluster_console_url}
-
Log in with the following credentials:
-
Username: {openshift_cluster_admin_username}
-
Password: {openshift_cluster_admin_password}
-
-
After logging in, verify you are in the Administrator perspective by checking the dropdown in the upper-left corner of the console. If it shows Developer, switch it to Administrator.
-
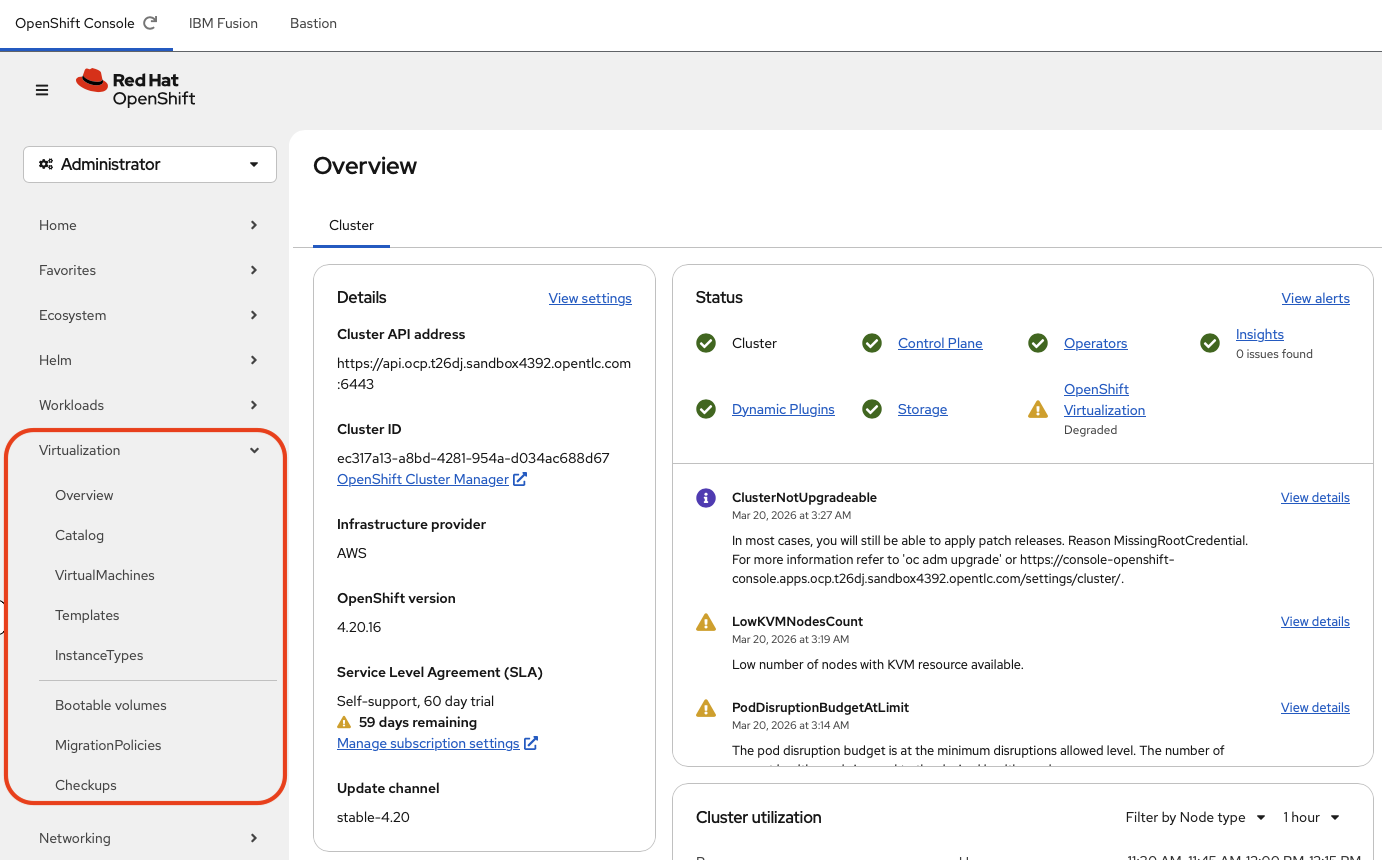
In the left navigation menu, click on Virtualization. This opens the OpenShift Virtualization dashboard.
-
Explore the Virtualization overview page. You should see:
-
Overview tab showing the virtualization cluster status
-
Catalog for creating new VMs from templates
-
VirtualMachines listing any existing VMs
-
Templates showing available VM templates
-
InstanceTypes showing available VM instance types available
-
Bootable volumes showing available boot images available
-
MigrationPolicies to manage VM migration policies
-
Checkups to manage and run network and storage checkup tools
-
Verify
Using the Bastion tab at the top of your browser window as illustrated below.

Confirm that the OpenShift Virtualization operator is installed and healthy:
| If the bastion tab is not responsive, click the refresh arrow for the tab to restart the corresponding container as illustrated below. |

oc get csv -n openshift-cnvExpected output:
NAME                                       DISPLAY                    VERSION   REPLACES                                   PHASE
kubevirt-hyperconverged-operator.v4.20.8   OpenShift Virtualization   4.20.8    kubevirt-hyperconverged-operator.v4.20.7   Succeeded
Check that the HyperConverged custom resource is available:
oc get hyperconverged -n openshift-cnvExpected output:
NAME                 AGE
kubevirt-hyperconverged   <age>
-
HyperConverged CR status shows as available
-
OpenShift Virtualization CSV phase is "Succeeded"
Exercise 2: Exploring IBM Fusion storage integration
IBM Fusion provides enterprise-grade storage for your OpenShift cluster. In this exercise, you will examine the storage classes available and understand how they support VM workloads.
-
In the OpenShift console, navigate to Storage > StorageClasses in the left navigation menu.
-
Identify the storage classes provided by IBM Fusion. Look for storage classes with
openshift-storagein the provisioner name.IBM Fusion storage classes provide features critical for VM workloads, including ReadWriteMany access modes, snapshots, and cloning. 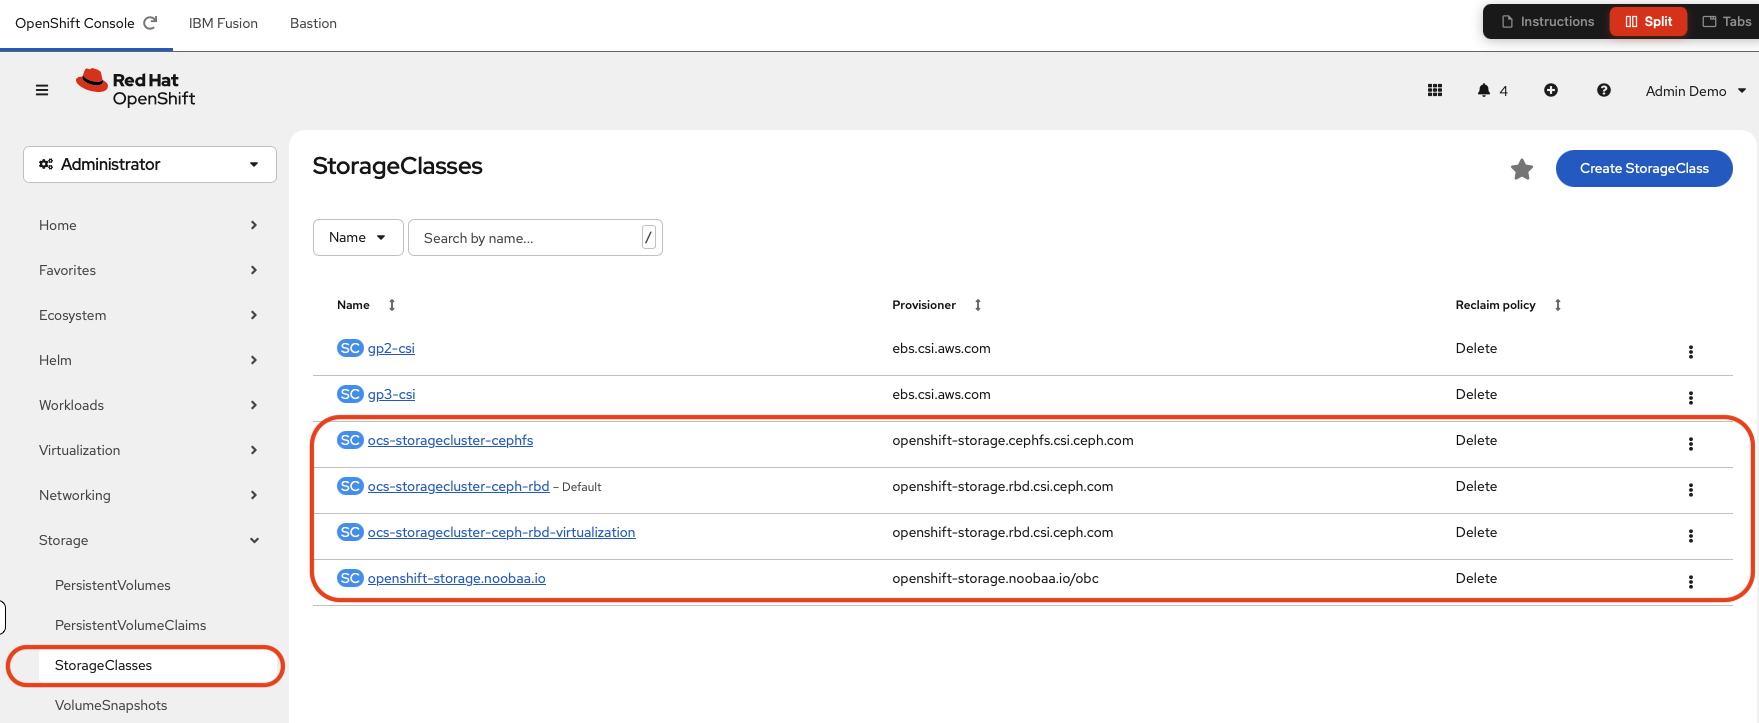 Figure 4. Overview of IBM Fusion Storage Classes
 -
In the OpenShift console, navigate to Storage > Data Foundation in the left navigation menu.
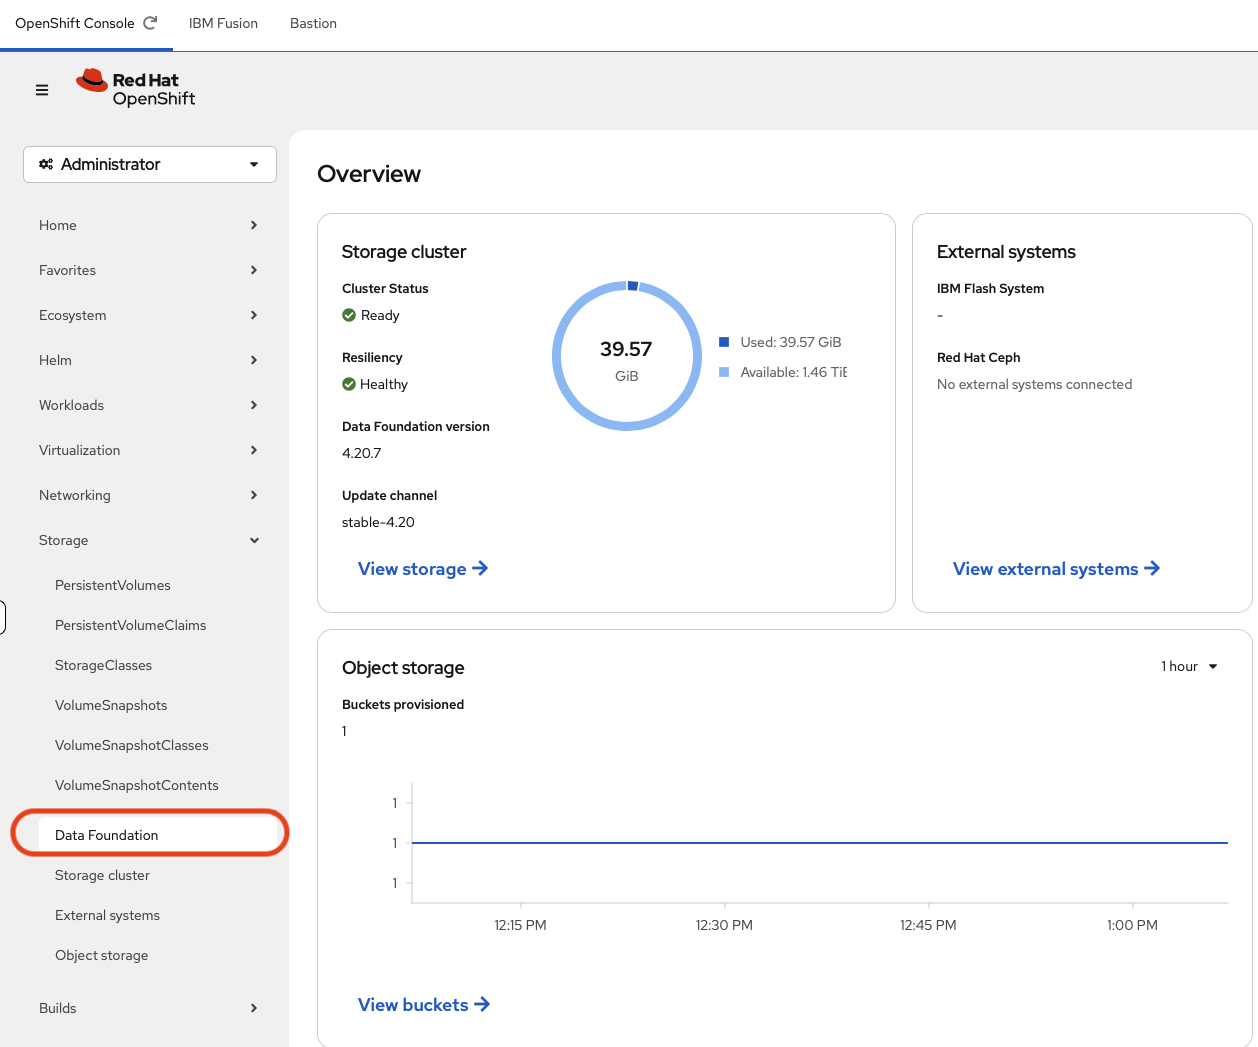 Figure 5. Overview of IBM Fusion Data Foundation
 -
In the OpenShift console, navigate to Storage > Storage Cluster in the left navigation menu.
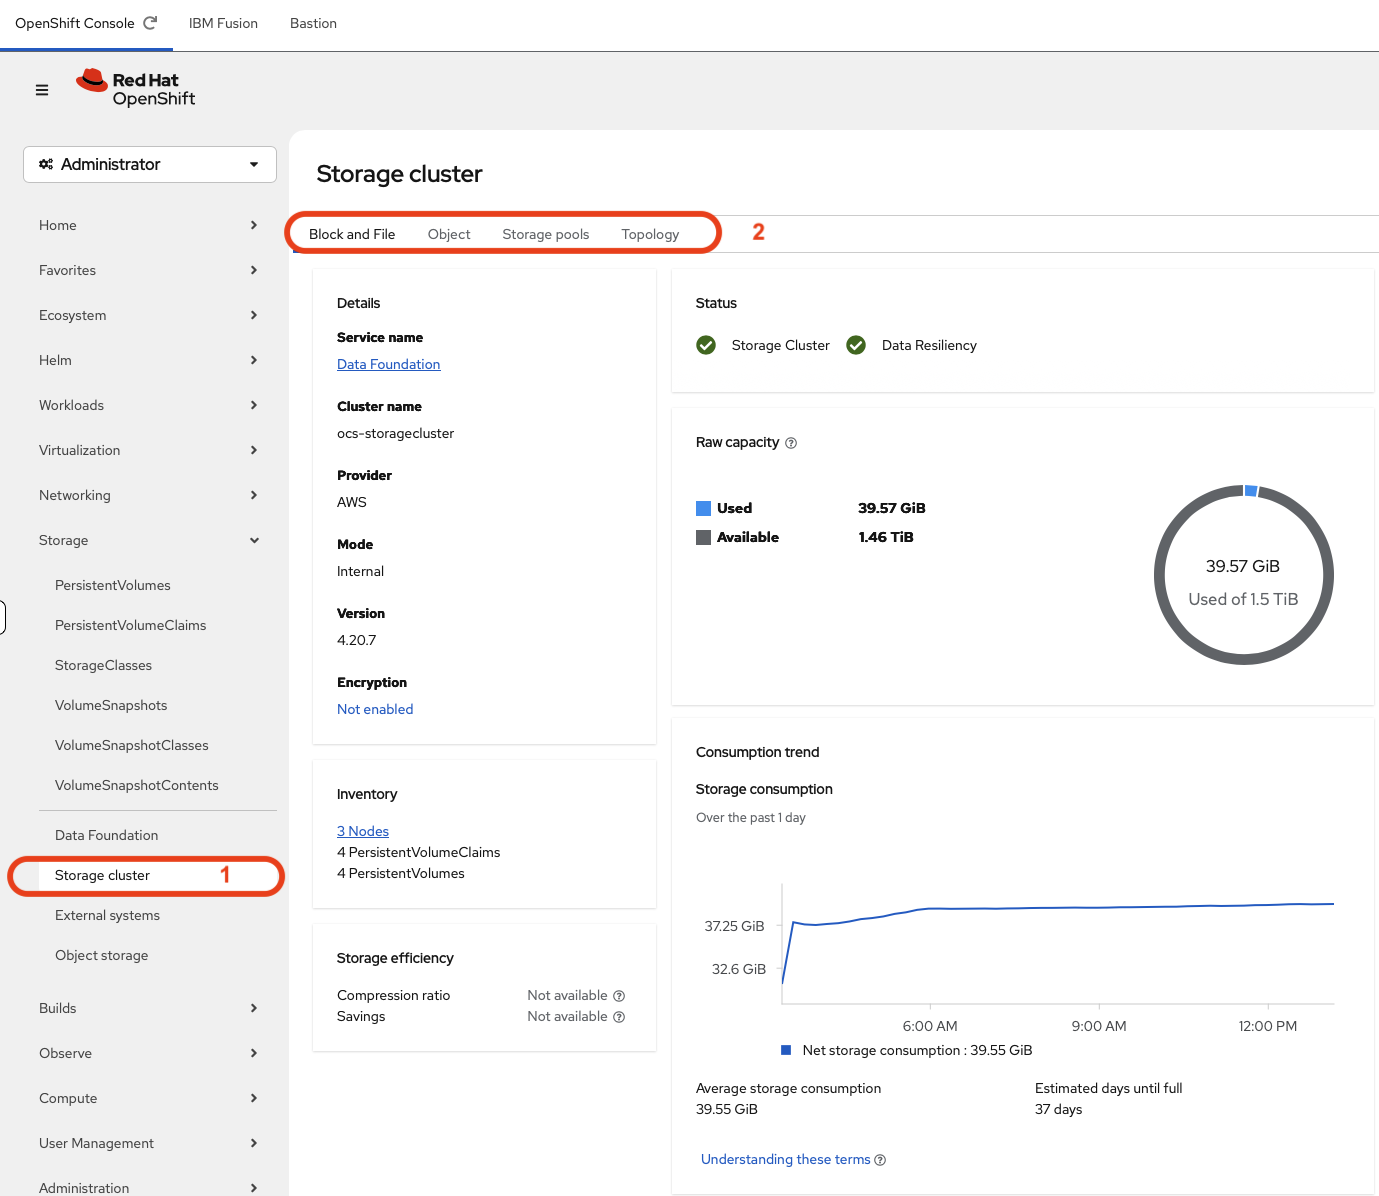 Figure 6. Overview of IBM Fusion Storage Cluster
Once in the Storage Cluster overview you can look at the specific storage type provided by clicking the specific types of storage as highlighted with a number 2. -
Block and File storage
-
Object storage
-
Storage pools
-
Topology of the storage cluster
-
-
From the command line, list all available storage classes:
oc get storageclassExpected output:
NAME                                         PROVISIONER                             RECLAIMPOLICY   VOLUMEBINDINGMODE      ALLOWVOLUMEEXPANSION   AGE
gp2-csi                                      ebs.csi.aws.com                         Delete          WaitForFirstConsumer   true                   <age>
gp3-csi                                      ebs.csi.aws.com                         Delete          WaitForFirstConsumer   true                   <age>
ocs-storagecluster-ceph-rbd (default)        openshift-storage.rbd.csi.ceph.com      Delete          Immediate              true                   <age>
ocs-storagecluster-ceph-rbd-virtualization   openshift-storage.rbd.csi.ceph.com      Delete          Immediate              true                   <age>
ocs-storagecluster-cephfs                    openshift-storage.cephfs.csi.ceph.com   Delete          Immediate              true                   <age>
openshift-storage.noobaa.io                  openshift-storage.noobaa.io/obc         Delete          Immediate              false                  <age>
-
Examine the details of an IBM Fusion storage class:
oc get storageclass ocs-storagecluster-ceph-rbd -o yamlExpected output:
allowVolumeExpansion: true apiVersion: storage.k8s.io/v1 kind: StorageClass metadata: annotations: description: Provides RWO Filesystem volumes, and RWO and RWX Block volumes reclaimspace.csiaddons.openshift.io/schedule: '@weekly' storageclass.kubernetes.io/is-default-class: "true" creationTimestamp: "2026-03-20T10:12:00Z" labels: ramendr.openshift.io/storageid: bb43b63b5fa8538c26acca2ba21d1c56 name: ocs-storagecluster-ceph-rbd ownerReferences: - apiVersion: ocs.openshift.io/v1alpha1 blockOwnerDeletion: true controller: true kind: StorageClient name: ocs-storagecluster uid: dd0c97e4-65dc-425d-8a82-9f329abd827d resourceVersion: "58670" uid: 913f7e1f-57d5-49ee-b672-e1ddcd2916f5 parameters: clusterID: openshift-storage csi.storage.k8s.io/controller-expand-secret-name: rook-csi-rbd-provisioner csi.storage.k8s.io/controller-expand-secret-namespace: openshift-storage csi.storage.k8s.io/fstype: ext4 csi.storage.k8s.io/node-stage-secret-name: rook-csi-rbd-node csi.storage.k8s.io/node-stage-secret-namespace: openshift-storage csi.storage.k8s.io/provisioner-secret-name: rook-csi-rbd-provisioner csi.storage.k8s.io/provisioner-secret-namespace: openshift-storage imageFeatures: layering,deep-flatten,exclusive-lock,object-map,fast-diff imageFormat: "2" pool: ocs-storagecluster-cephblockpool provisioner: openshift-storage.rbd.csi.ceph.com reclaimPolicy: Delete volumeBindingMode: Immediate -
Check what persistent volumes are currently provisioned:
oc get pv -o custom-columns="NAME:.metadata.name,SIZE:.spec.capacity.storage,ACCESS MODES:.spec.accessModes[0],STORAGE CLASS:.spec.storageClassName,CLAIM:.spec.claimRef.name"Expected output:
NAME                                       SIZE    ACCESS MODES       STORAGE CLASS                 CLAIM
pvc-011ff938-bc87-4de8-86fe-f874f644aaa1   512Gi   ReadWriteOnce      gp3-csi                       fusion-storage-0-data-0sj2bk
pvc-1340e310-163d-42ed-9629-b7a89e6c8477   5Gi     ReadWriteOnce      ocs-storagecluster-ceph-rbd   showroom-terminal-lab-user-home
pvc-1e9cdc8c-9fd3-4751-8c0e-a267fac1e1f4   50Gi    ReadWriteOnce      gp3-csi                       rook-ceph-mon-b
pvc-4a93e2b0-f504-425f-9dc9-7bedacf75c55   512Gi   ReadWriteOnce      gp3-csi                       fusion-storage-2-data-0wbmsk
pvc-5e3de127-e914-4b62-a79a-e2a64a33a845   50Gi    ReadWriteOncePod   ocs-storagecluster-ceph-rbd   noobaa-db-pg-cluster-2
pvc-77e5bcc2-fc07-462f-82fd-05c5eda806f6   50Gi    ReadWriteOnce      ocs-storagecluster-ceph-rbd   keycloak-pgsql-data
pvc-aa542b60-4433-4c4f-aa4d-b51e03681dcb   50Gi    ReadWriteOnce      gp3-csi                       rook-ceph-mon-a
pvc-b42c704e-6a58-4823-be5f-f67632e8aef1   50Gi    ReadWriteOncePod   ocs-storagecluster-ceph-rbd   noobaa-db-pg-cluster-1
pvc-d80f96ec-28e8-4beb-825c-0a34d2858ce5   50Gi    ReadWriteOnce      gp3-csi                       rook-ceph-mon-c
pvc-f6e7aa59-7ded-4125-9d60-4c2b6bb2fda9   512Gi   ReadWriteOnce      gp3-csi                       fusion-storage-1-data-0z29zj
Have a look specifically at the one for the IBM Fusion storage class named ocs-storagecluster-ceph-rbd
Verify
-
Verify that volume snapshot classes are available for VM snapshots:
oc get volumesnapshotclassExpected output:
NAME                                        DRIVER                                  DELETIONPOLICY   AGE
csi-aws-vsc                                 ebs.csi.aws.com                         Delete           <age>
ocs-storagecluster-cephfsplugin-snapclass   openshift-storage.cephfs.csi.ceph.com   Delete           <age>
ocs-storagecluster-rbdplugin-snapclass      openshift-storage.rbd.csi.ceph.com      Delete           <age>
-
Verify that IBM Fusion storage is operational:
oc get storagecluster -n openshift-storageExpected output:
NAME                 AGE   PHASE   EXTERNAL   CREATED AT             VERSION
ocs-storagecluster   <age> Ready              <  Date and Time >     4.20.7
Expected output from the two commands above show.
-
Two
volumesnapshotclassare available in your cluster foropenshift-storagedrivers -
The IBM Fusion Data Foundation cluster shows
PHASEasReady
Exercise 3: Explore IBM Fusion Backup and Restore Service
Along with IBM Fusion enterprise-grade storage for your OpenShift cluster, it also provides backup and restore services for your virtual machines and applications. In this exercise, you will examine the backup and restore service and its configuration.
-
Open the IBM Fusion UI using the application selector at the top of the Red Hat OpenShift Web Console as illustrated below.
 Figure 7. IBM Fusion Web Console Launch
| You can also use the Showroom Fusion tab to get access to the IBM Fusion UI as illustrated below. |

-
Once in the IBM Fusion Web Console click on the
Servicesmenu on the left hand side pane as illustrated below.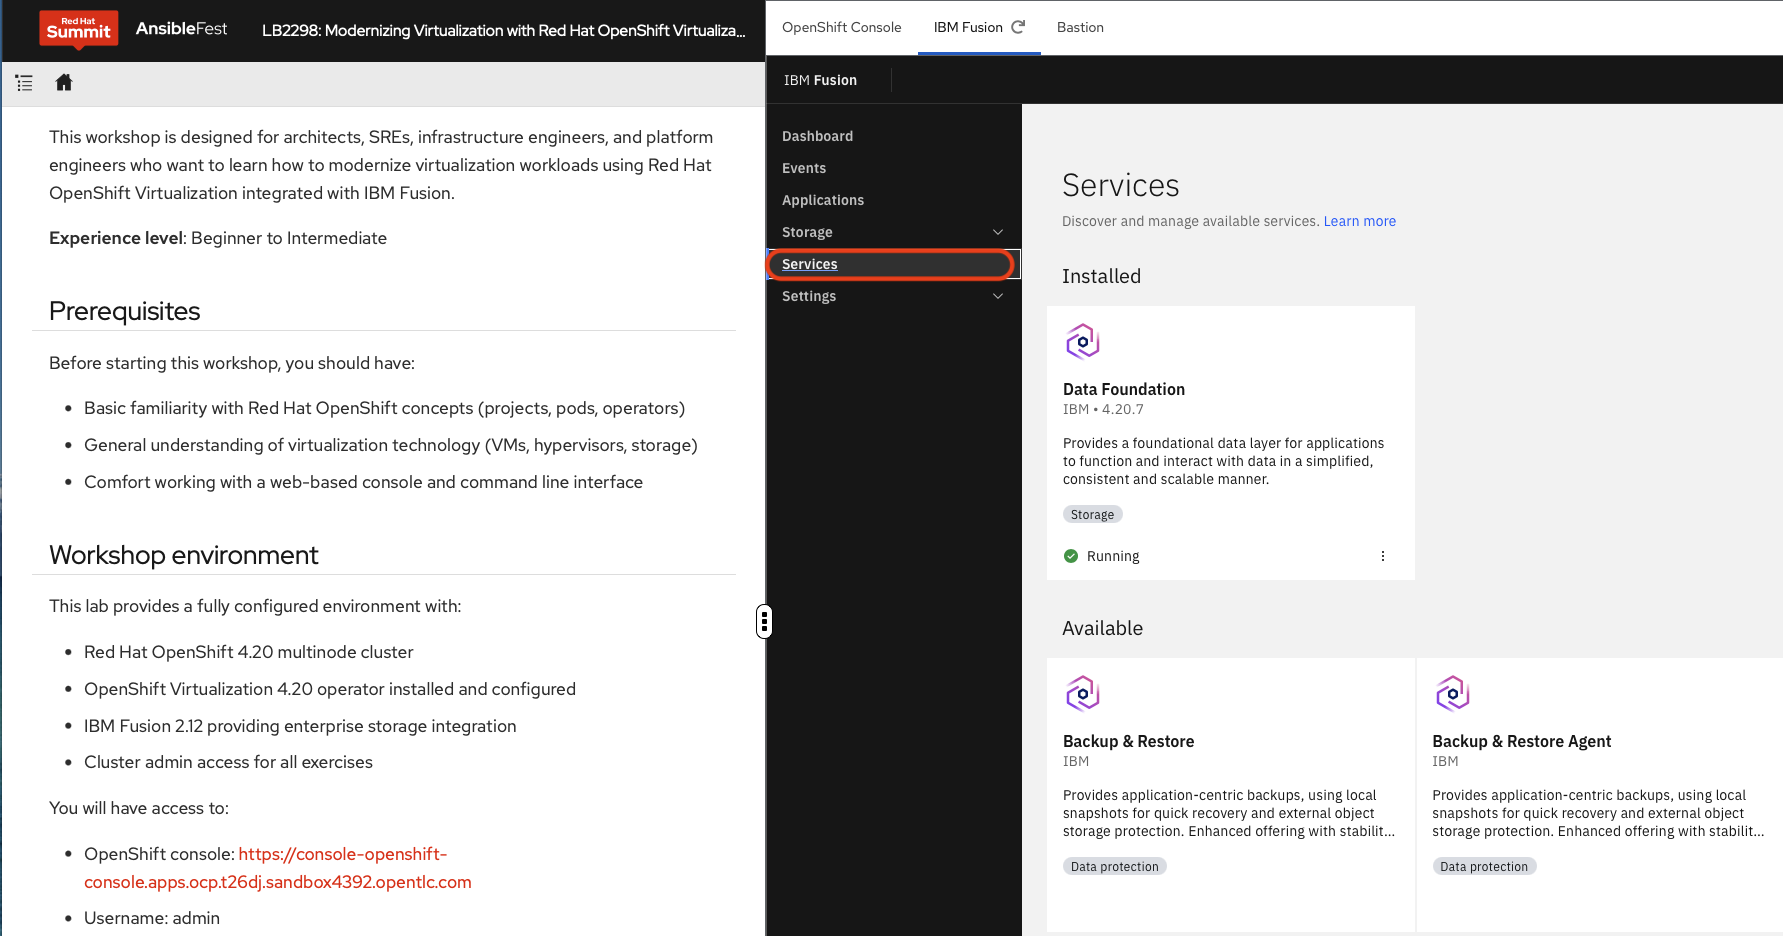 Figure 9. IBM Fusion Web Console Service Tab
 -
Click the
Backup & Restoretile to open the install window for the IBM Fusion Backup & Restore service as illustrated below.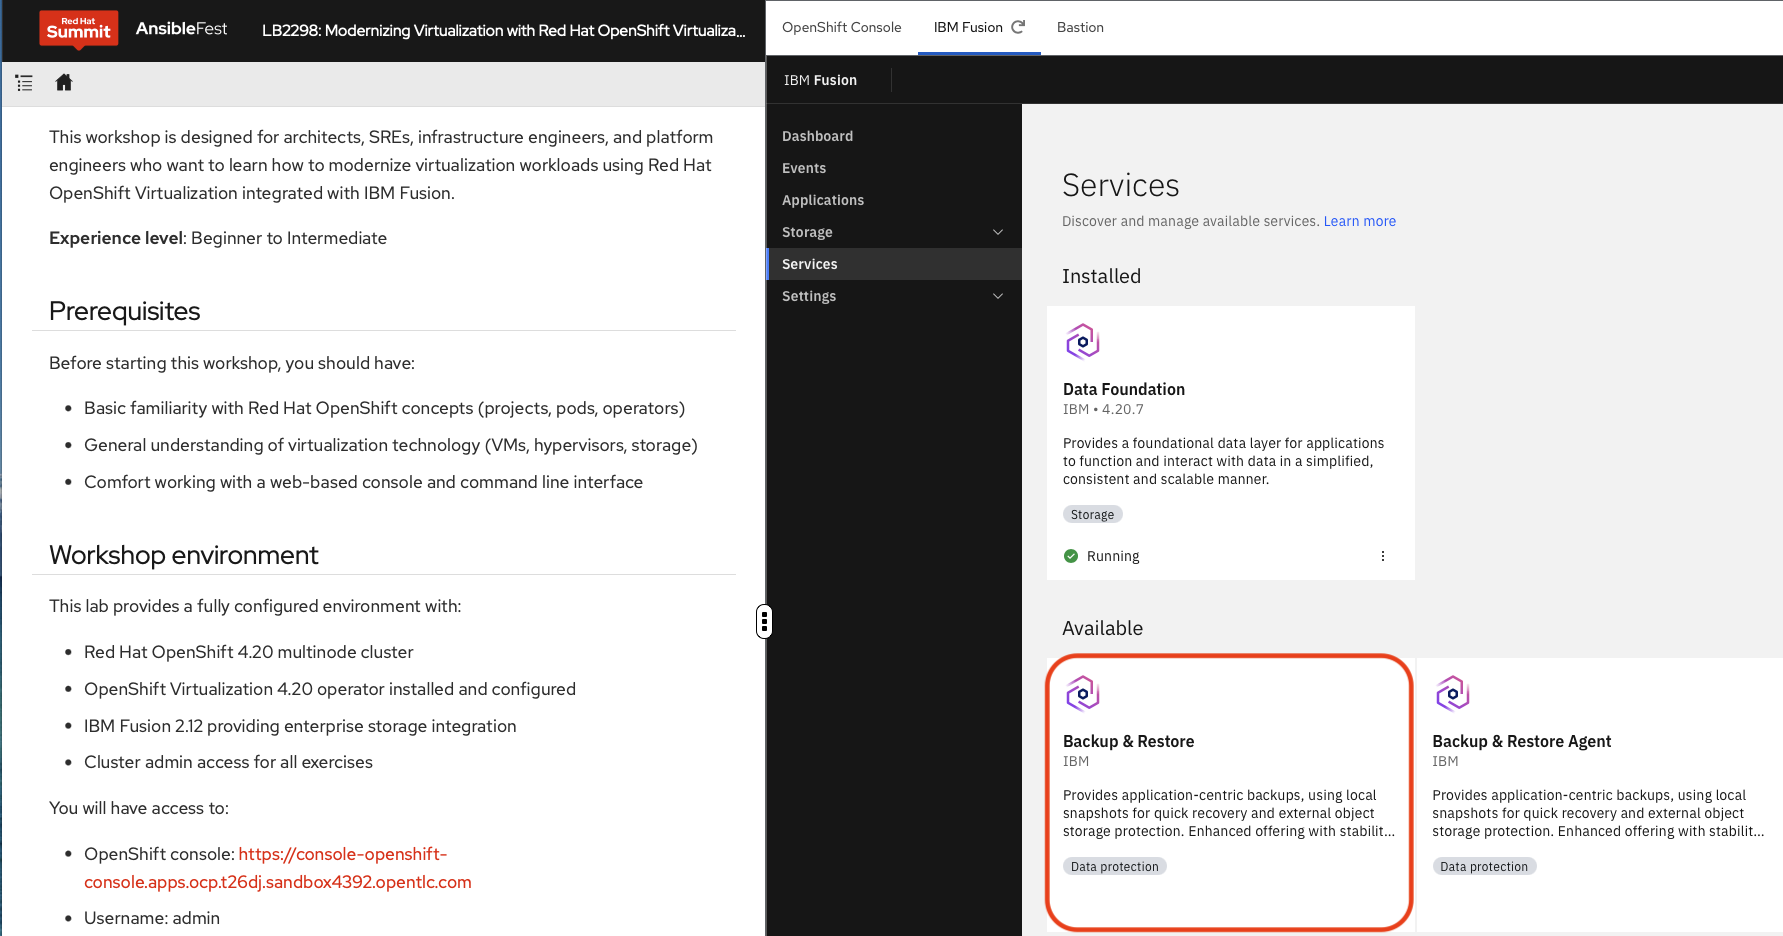 Figure 10. IBM Fusion Backup & Restore Service Tile
 -
Click the
Installbutton to start the installation process for the service as illustrated below.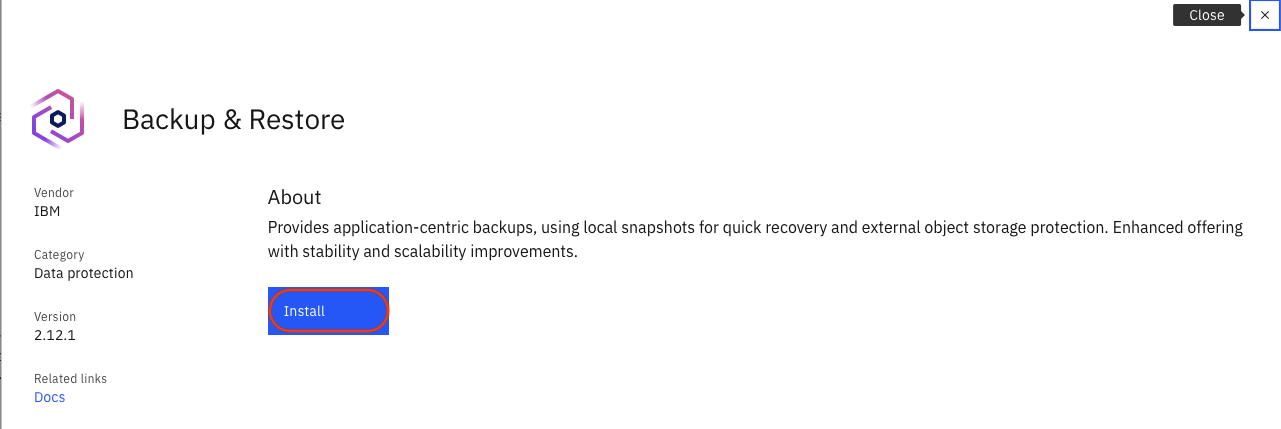 Figure 11. IBM Fusion Backup & Restore Installation
 -
In the drop-down list associated with the
Storage class to be used to deploy the servicefield select the valueocs-storagecluster-ceph-rbdas illustrated below.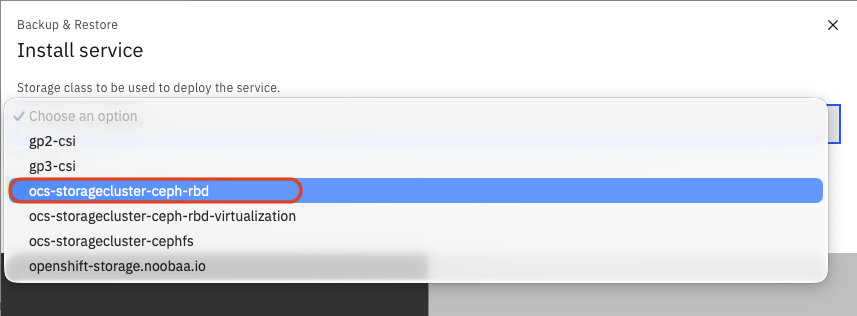 Figure 12. Select IBM Fusion Backup & Restore Service StorageClass
 -
Initiate the deployment of the service by clicking the
Installbutton as illustrated below.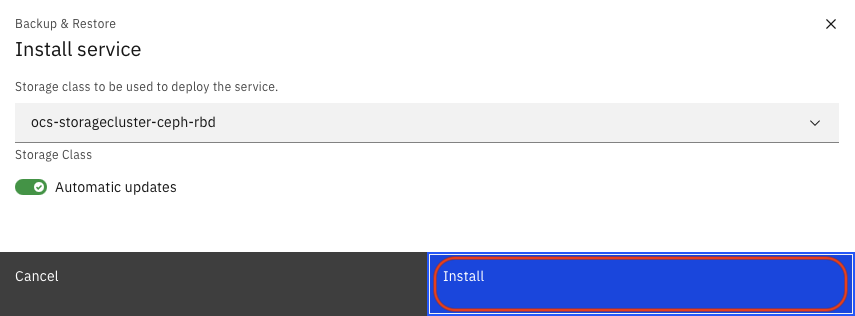 Figure 13. Initiate the Deployment of IBM Fusion Backup & Restore
 -
The IBM Fusion Backup & Restore Service is now being installed as illustrated below.
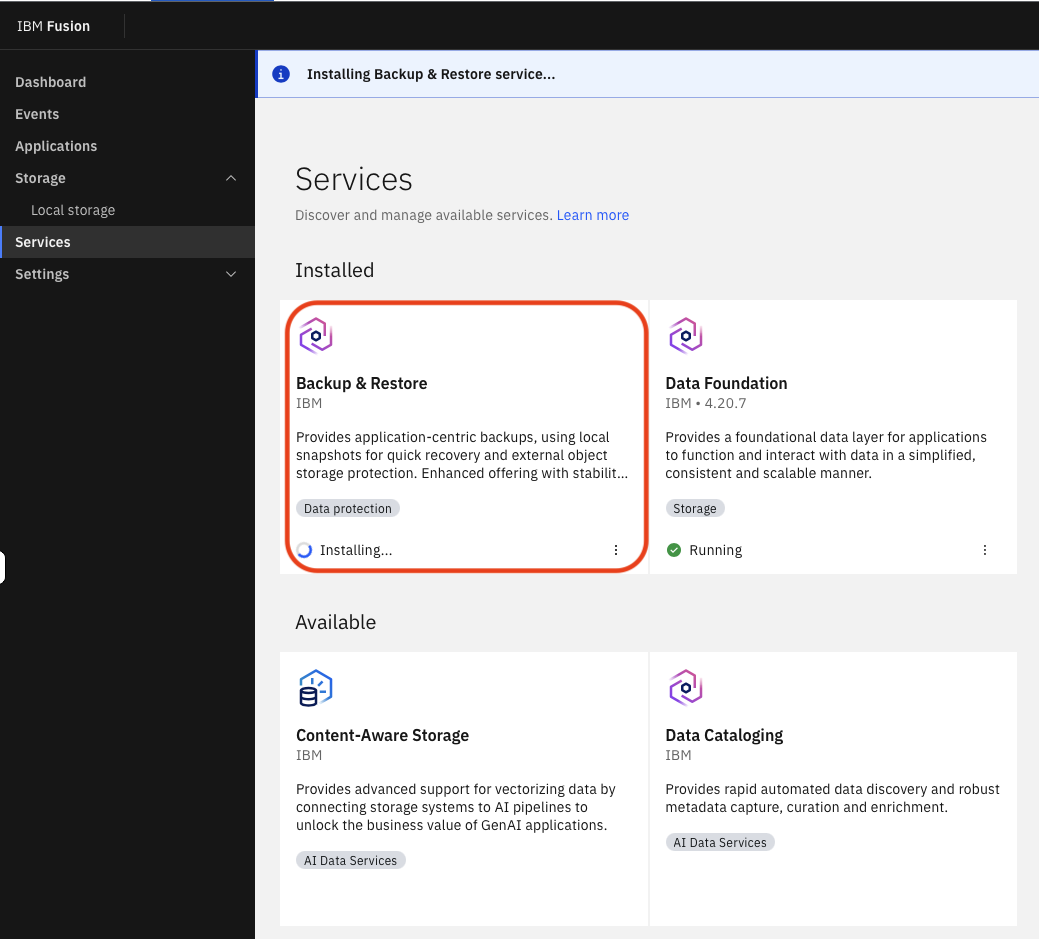 Figure 14. IBM Fusion Backup & Restore is being installed
Verify
Confirm that the IBM Fusion Backup & Restore service installation has started:
-
The service tile in the IBM Fusion Services tab shows the Backup & Restore service status as installing or installed
-
The installation progress is visible in the IBM Fusion UI
This completes this part of the lab. The IBM Fusion Backup & Restore functionality will be configured and used in the optional Module 4.
Exercise 4: Creating your first virtual machine
Now that you understand the environment, it is time to create your first virtual machine using the OpenShift Virtualization console.
-
In the OpenShift console, navigate to Virtualization > Catalog. Select Red Hat Enterprise Linux 9 VM as illustrated below.
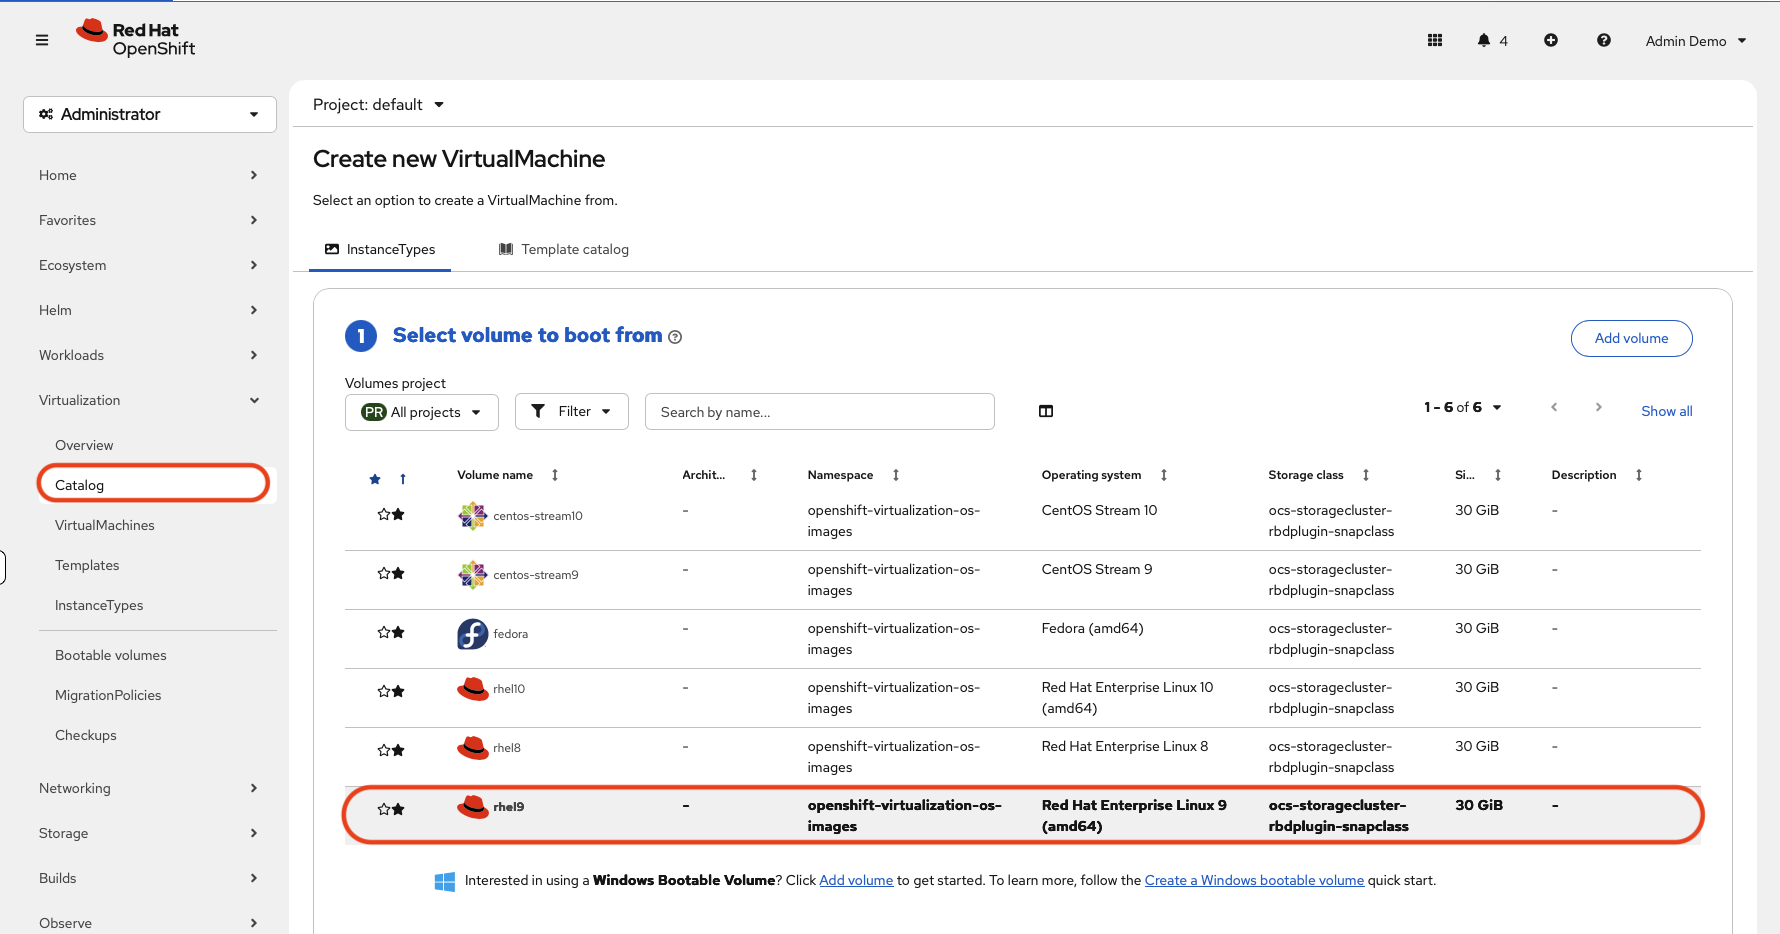 Figure 15. Red Hat OpenShift Virtualization Catalog
The catalog can be customized post Red Hat OpenShift Virtualization deployment. Visit the Templates tab for existing predefined templates. -
Scroll down and set the following numbered settings:
-
CPU and Memory: Review the default allocation (typically 1 CPU, 2 GiB memory) (item
1) -
Name: Enter a descriptive name (item
2), for examplerhel9-test-vmas illustrated -
Storage: Choose the storage class (item
3) for the boot disk (ocs-storagecluster-ceph-rbd-virtualization). This is an IBM Fusion storage class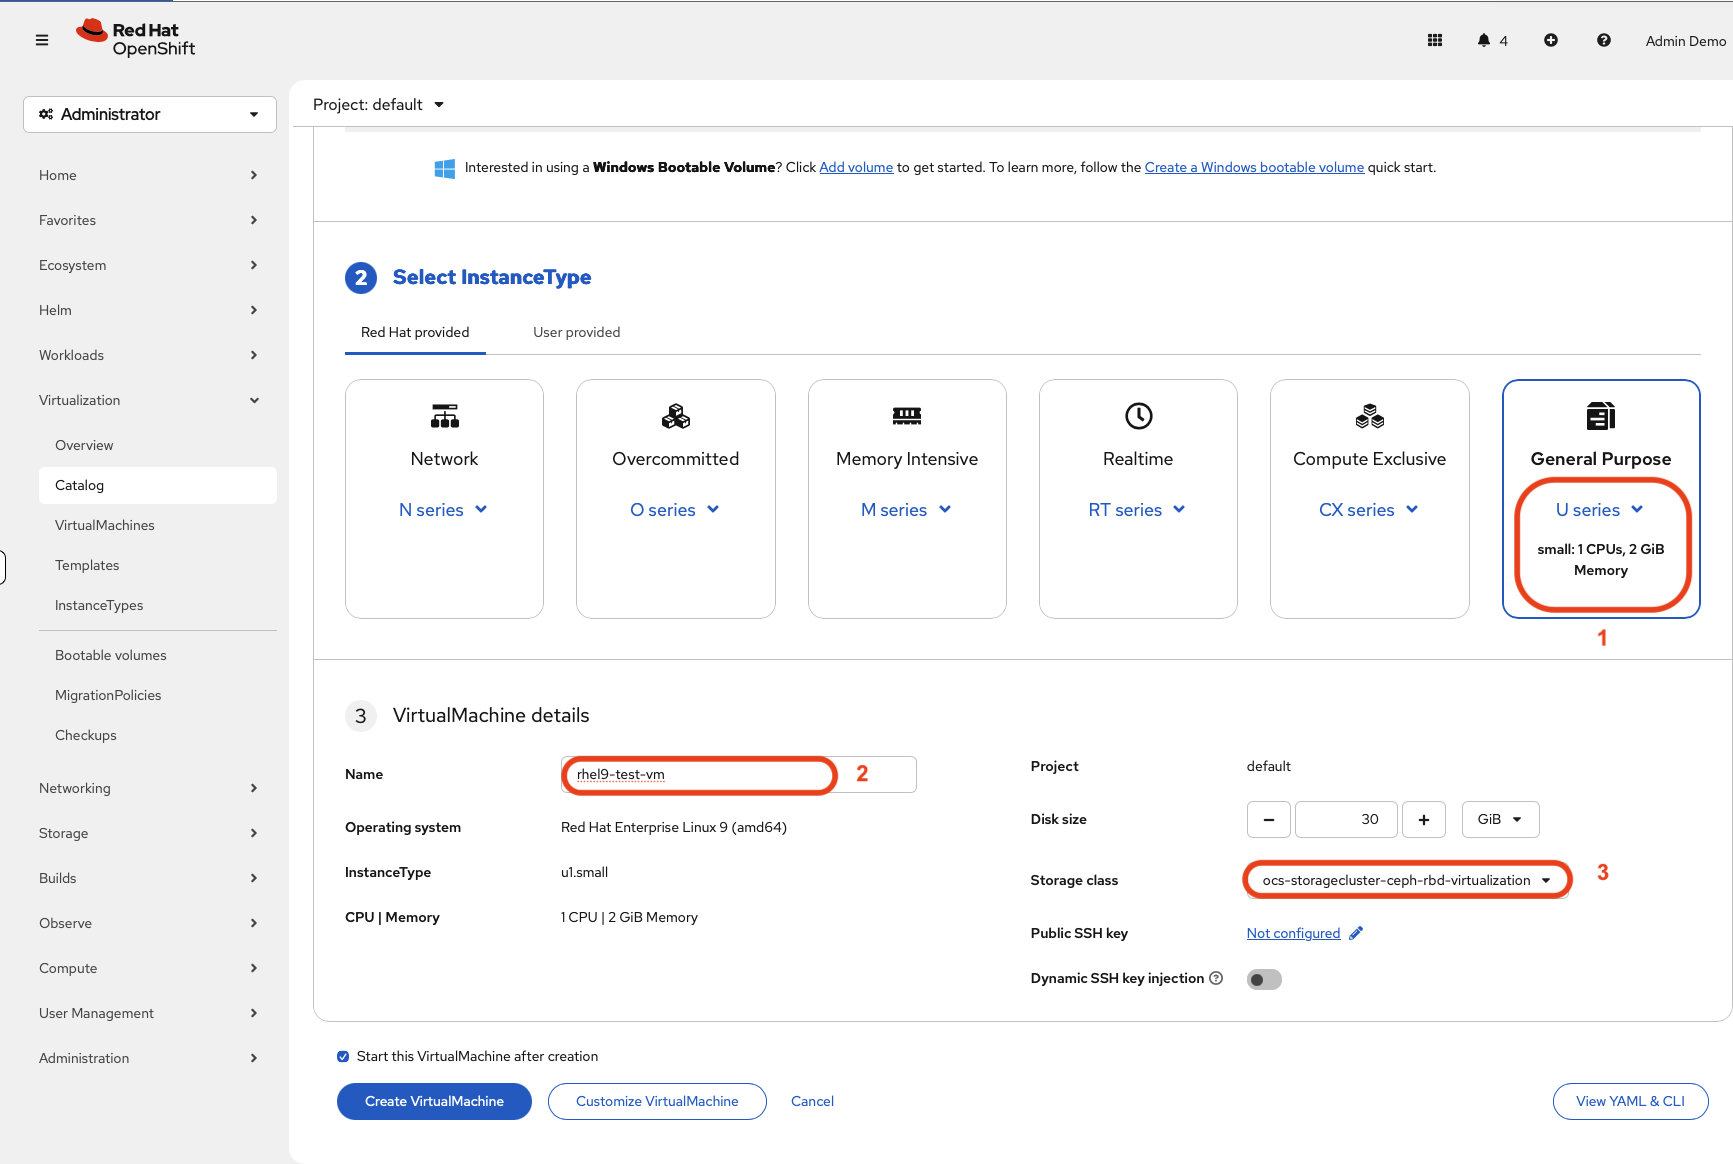 Figure 16. Customize VM
To create your VM in a different namespace simply select the correct one using the namespace selector in the Red Hat OpenShift console Use the checkbox just above the Create Virtual Machine button if you do not wish to start the VM automatically.
-
-
Click Create VirtualMachine to start the VM creation process.
-
Wait for the VM status to change from Starting to Running as illustrated below (Item
1). This may take a few minutes as the boot source is provisioned.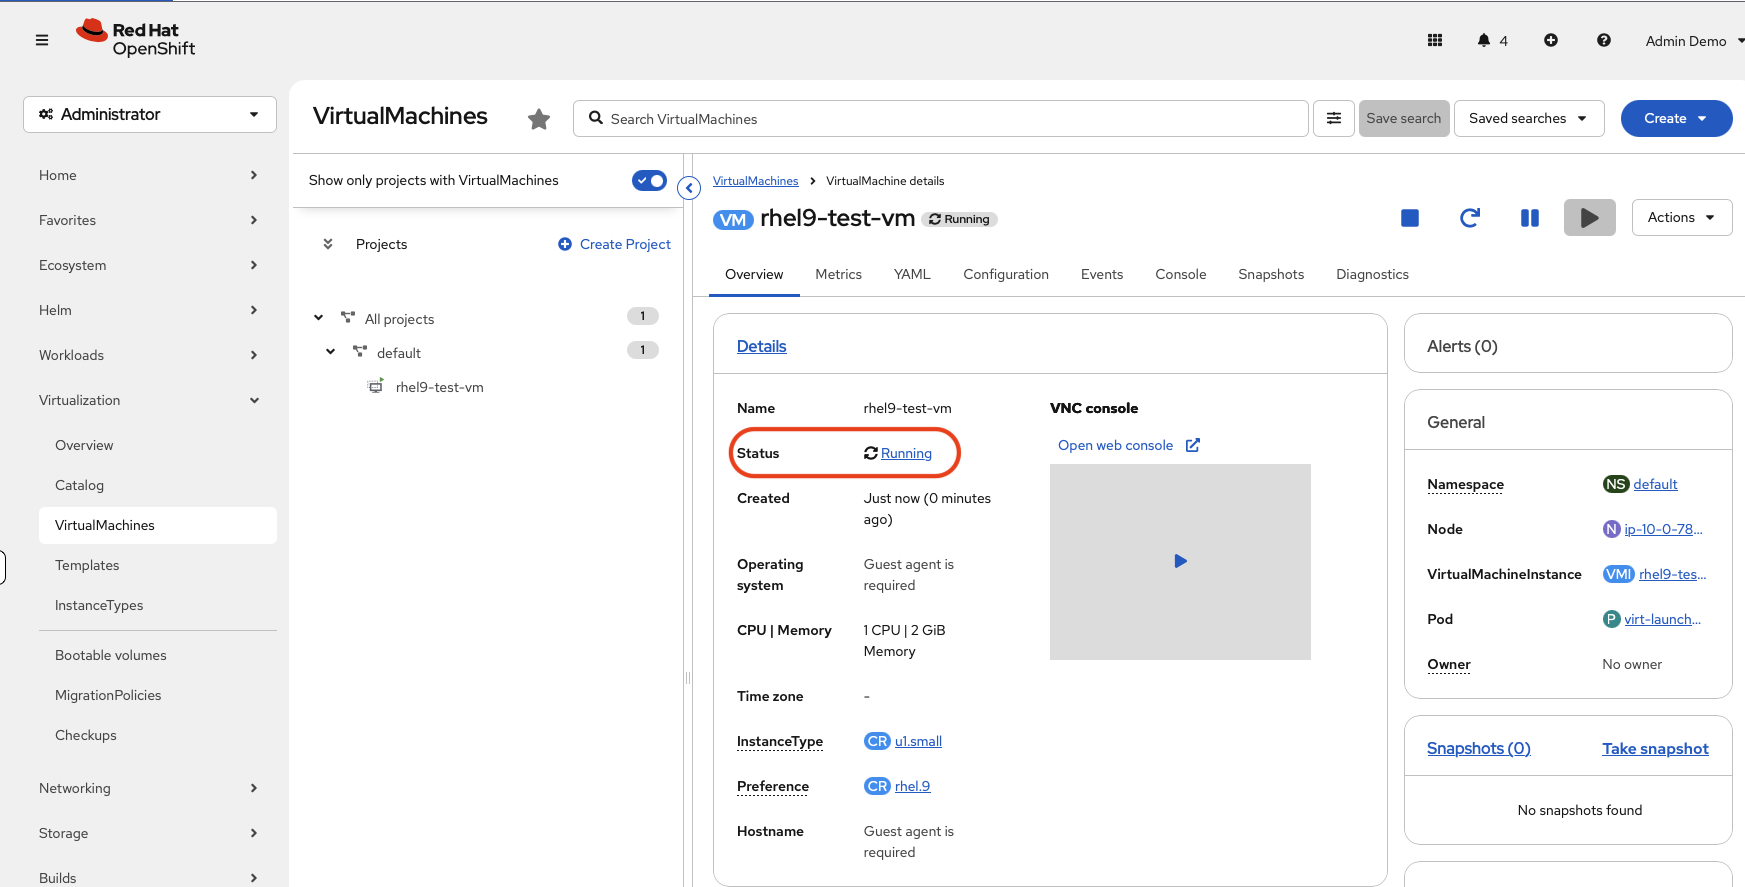 Figure 17. Running VM
 -
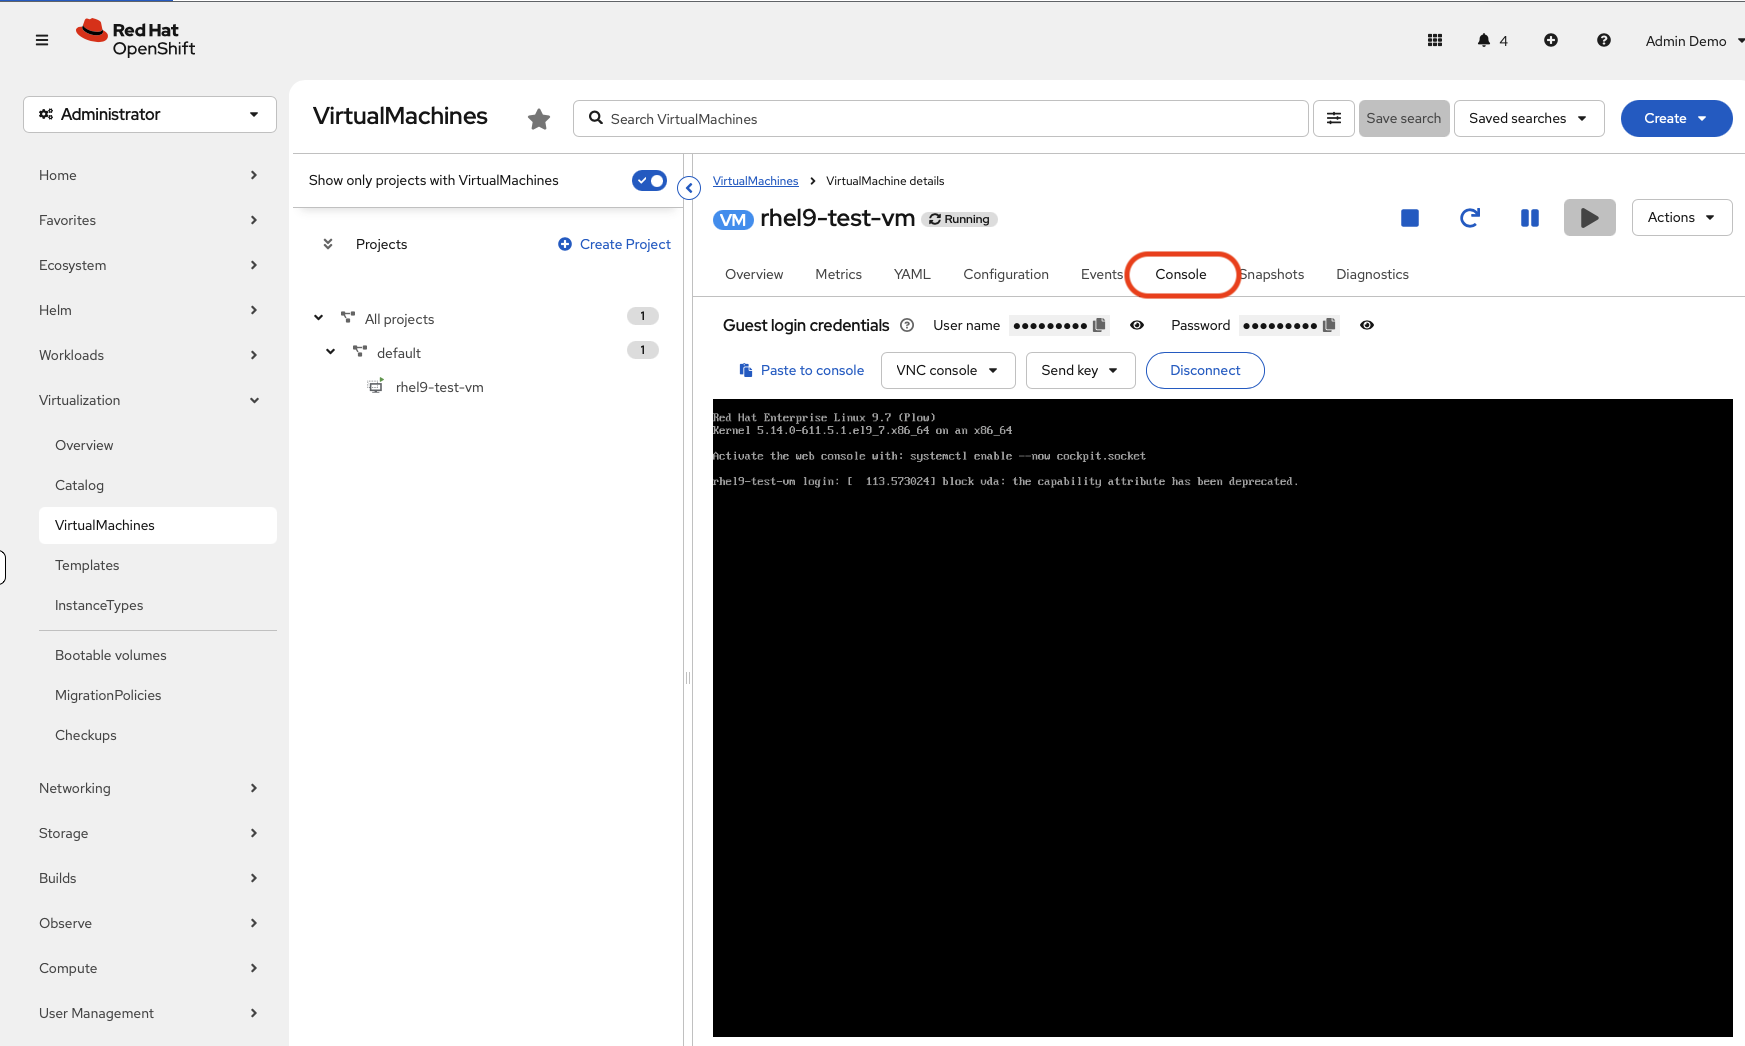
Once the VM is running, click the Console tab to access the VM console directly from the browser.
Verify
Switch to the Bastion tab in your Web browser. Confirm your VM is running from the command line:
oc get vmi -AExpected output:
NAMESPACE   NAME            AGE   PHASE     IP             NODENAME                                  READY
default     rhel9-test-vm   <age> Running   10.x.x.x       ip-<AWS_IP>.us-east-2.compute.internal    True
Check the VM details:
oc describe vm rhel9-test-vm -n defaultVerify the persistent volume claim was created with IBM Fusion storage class ocs-storagecluster-ceph-rbd-virtualization:
oc get pvc -n defaultExpected output:
NAME                   STATUS   VOLUME                                     CAPACITY   ACCESS MODES   STORAGECLASS                                 VOLUMEATTRIBUTESCLASS   AGE
rhel9-test-vm-volume   Bound    pvc-<UUID>                                 30Gi       RWX            ocs-storagecluster-ceph-rbd-virtualization   <unset>                 <age>
-
VM status shows
Running -
A persistent volume claim exists for the VM boot disk
-
The PVC uses an IBM Fusion storage class
Learning outcomes
By completing this module, you should now understand:
-
How to navigate the OpenShift Virtualization interface and identify operator status
-
How IBM Fusion storage classes integrate with OpenShift to provide persistent storage for VMs
-
How to create a virtual machine from a template using the OpenShift console
-
How to verify VM status using both the console and the command line
Module summary
You have successfully explored the OpenShift Virtualization environment and created your first VM.
What you accomplished:
-
Navigated the OpenShift Virtualization dashboard and identified key components
-
Examined IBM Fusion storage classes and verified storage integration
-
Created a RHEL 9 virtual machine from a template
-
Verified VM and storage status using both the console and CLI
Key takeaways:
-
OpenShift Virtualization runs VMs as native Kubernetes resources alongside containers
-
IBM Fusion provides enterprise storage features including snapshots and ReadWriteMany access
-
VM creation follows familiar patterns, whether using templates or custom specifications
-
Both the web console and CLI are available for VM management and troubleshooting
Next steps:
Module 2 will cover VM lifecycle management, including CPU and memory configuration, live migration, snapshots, and cloning using IBM Fusion storage.
Assets needed
-
content/modules/ROOT/assets/images/03-module-01-console-virtualization-overview.png- Screenshot of the OpenShift Virtualization overview dashboard -
content/modules/ROOT/assets/images/03-module-01-switch-to-bastion-tab.png- Switching to the Bastion tab -
content/modules/ROOT/assets/images/03-module-01-refresh-bastion-tab.png- Refreshing the Bastion tab -
content/modules/ROOT/assets/images/03-module-01-console-storageclasses.png- IBM Fusion Storage classes -
content/modules/ROOT/assets/images/03-module-01-console-datafoundation-overview.png- IBM Fusion Data Foundation Overview -
content/modules/ROOT/assets/images/03-module-01-console-datafoundation-storagecluster.png- IBM Fusion storage cluster details -
content/modules/ROOT/assets/images/03-module-01-FusionUI-Selector.png- Accessing IBM Fusion web console from OpenShift console -
content/modules/ROOT/assets/images/03-module-01-FusionUI-FromShowroomTab.png- Accessing IBM Fusion web console from showroom tab -
content/modules/ROOT/assets/images/03-module-01-FusionUI-ServiceTab.png- IBM Fusion Services tab -
content/modules/ROOT/assets/images/03-module-01-FusionUI-BnR-NewInstall-1.png- IBM Fusion Backup and Restore Install Step 1 -
content/modules/ROOT/assets/images/03-module-01-FusionUI-BnR-NewInstall-2.png- IBM Fusion Backup and Restore Install Step 2 -
content/modules/ROOT/assets/images/03-module-01-FusionUI-BnR-NewInstall-3.png- IBM Fusion Backup and Restore Install Step 3 -
content/modules/ROOT/assets/images/03-module-01-FusionUI-BnR-NewInstall-4.png- IBM Fusion Backup and Restore Install Step 4 -
content/modules/ROOT/assets/images/03-module-01-FusionUI-BnR-NewInstall-5.png- IBM Fusion Backup and Restore Install Step 5 -
content/modules/ROOT/assets/images/03-module-01-console-virtualization-createvm-1b.png- Create virtual machine from VM catalog -
content/modules/ROOT/assets/images/03-module-01-console-virtualization-createvm-2b.png- Customize virtual machine -
content/modules/ROOT/assets/images/03-module-01-console-virtualization-createvm-3b.png- Wait for vm to enter Running state -
content/modules/ROOT/assets/images/03-module-01-console-virtualization-createvm-4b.png- Access VM console