Module 4: IBM Fusion Backup and Restore
You can protect your container workloads and virtual machines by using the IBM Fusion Backup & Restore service.
In the event of data loss or corruption, such as accidental deletion or malicious ransomware attacks, a backup and restore system is needed to ensure data integrity and availability. By taking periodic backups of applications and storing them safely, you can restore your workloads during disasters, thereby minimizing downtime and data loss. Whenever disaster occurs, you can restore the workloads in place or to an alternate cluster.
Backup & Restore service protects both containerized and virtual machine (VM) workloads, going beyond data protection to include the application’s state and essential etcd resources. This capability is not only for stateful applications but also for stateless ones, ensuring complete restoration of functionality and configuration.
Backup and restore works by first choosing a secure backup location and then defining backup polices tailored to your application needs with frequency and retention parameters. You can then associate the workloads with defined backup policies to automate and simply the backup process. Finally, you can recover the backed up workloads either in their original location or to an alternate cluster based on the requirements.
For more complex scenarios or whenever you need to run tailored and repeatable workflows, you can make use of the advanced recipes provided by Backup & Restore service.
Backup & Restore supports both single-cluster mode and hub and spoke model. In a single cluster mode, all backup and restore operations are managed within a single cluster. In case of hub and spoke model, the hub acts as a central management point and spokes are individual clusters that run backup and restore tasks locally. You can choose this mode to manage backups across multiple clusters, and it is useful for large-scale environments where multiple clusters need to be managed with resilience in case of failures.
The IBM Fusion Backup & Restore service protection involves the backup of the Backup & Restore data management service itself to a S3 bucket.
In this module, you will explore how to protect virtual machines with the IBM Fusion Backup and Restore Service.
Learning objectives
By the end of this module, you will be able to:
-
Configure and use the backup and restore functions of IBM Fusion
-
Learn how to define and configure backup locations and policies.
-
Learn how to assign backup policies to applications.
-
Learn how to restore an application.
-
Learn how to monitor the status of backups and jobs.
-
Learn how to create a recipe and assign the recipe to applications for application-consistent backups.
-
Learn how to configure protection of the backup and restore service.
-
Pre-steps
To complete the activities included in this lab, the IBM Fusion operator and IBM Fusion backup & restore service need to be installed. You will have had to complete Module 1, exercise 3 to proceed with this section.
Exercise 1: Create Backup Locations and Policies
Applications have different requirements for backup frequency and retention. IBM Fusion uses Backup Policies to define and automate backup operations.
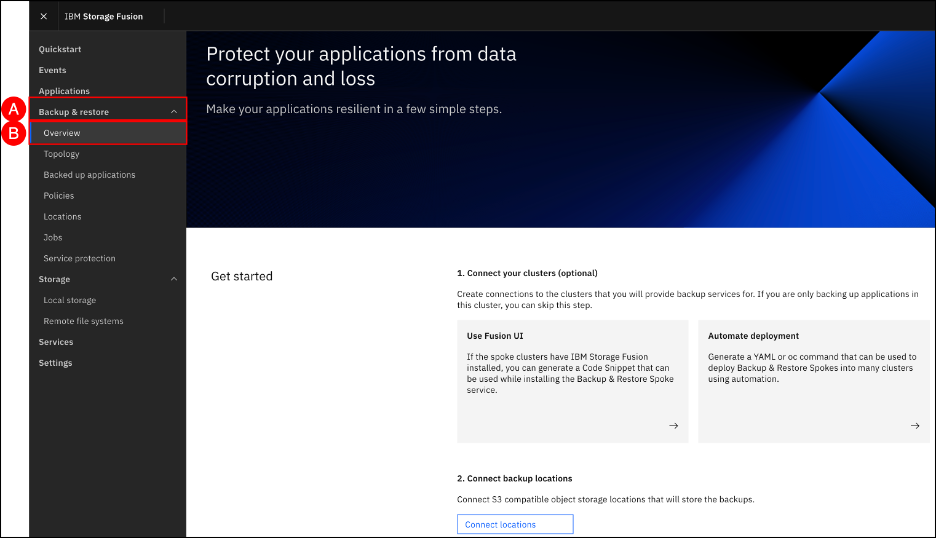
To configure backup and restore activities, go to the Backup & Restore section on the left-hand side navigation pane. To access the Overview page for Backup & Restore, click on the Backup & Restore (A) menu item shown in the left-hand side navigation pane and select the Overview (B) sub-item.
S3 Backup Bucket
Data Foundation must be installed and setup. In the OpenShift Console, navigate to “Data Foundation” → “object storage” and select the tab “Object Bucket Claims”
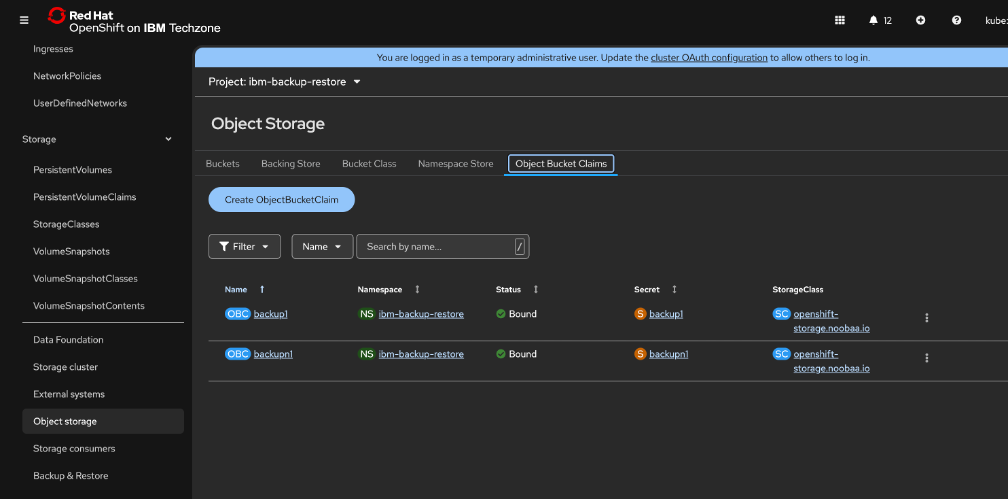
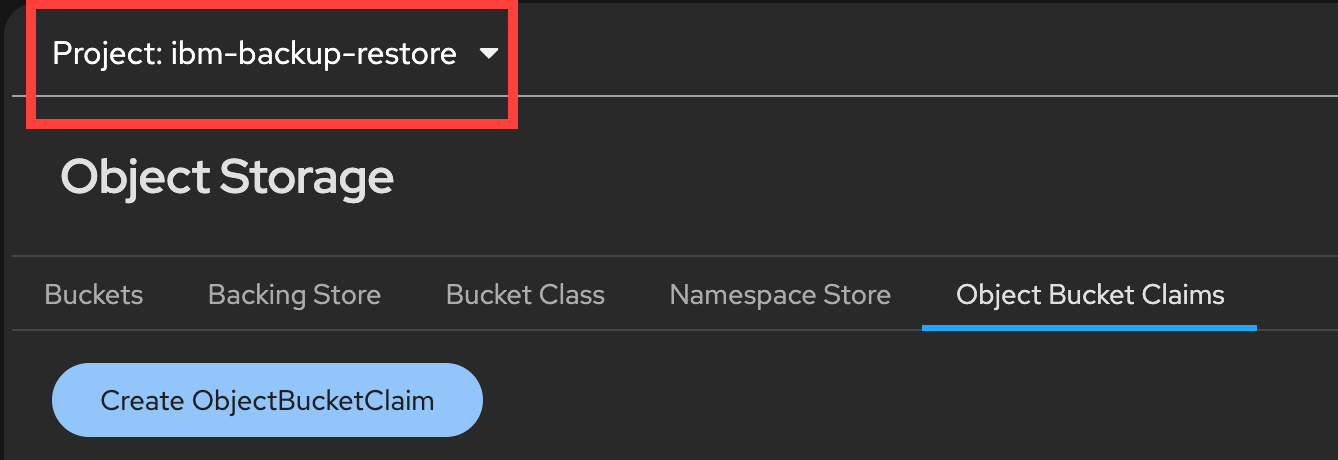
Change to the ibm-backup-restore Project.
Click create ObjectBucketClaim
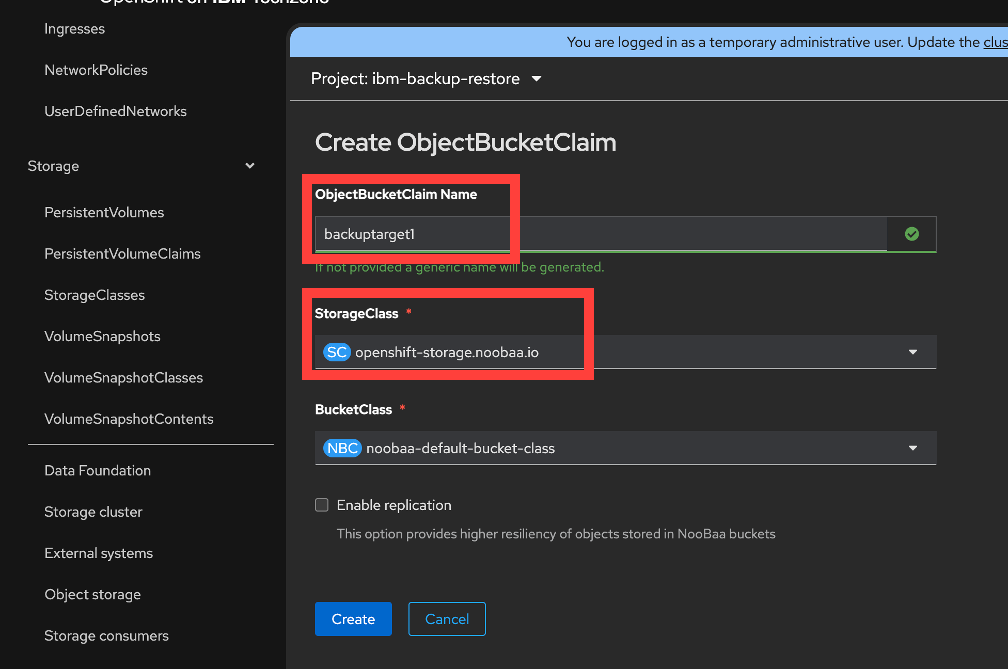
Once the bucket claim is created, scroll down and reveal values
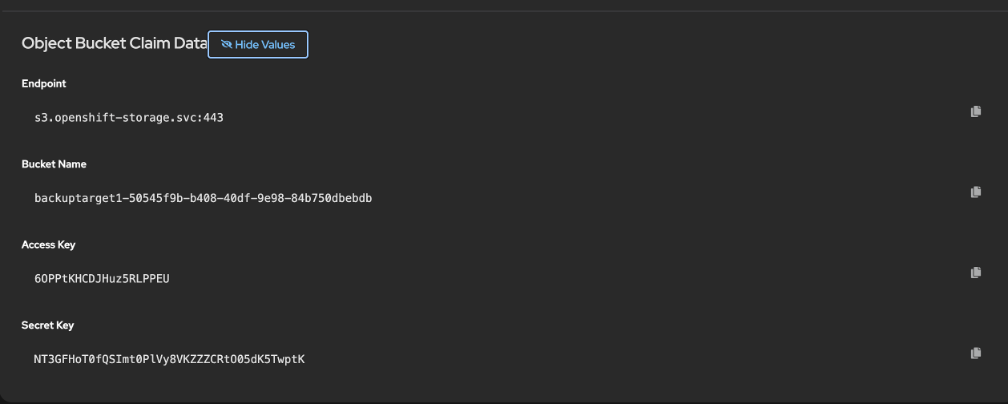
We will use the Bucket Name, Access Key and Secret Key.
Next we need to get the external endpoint
Navigate to networking → routes and choose all projects and search for S3
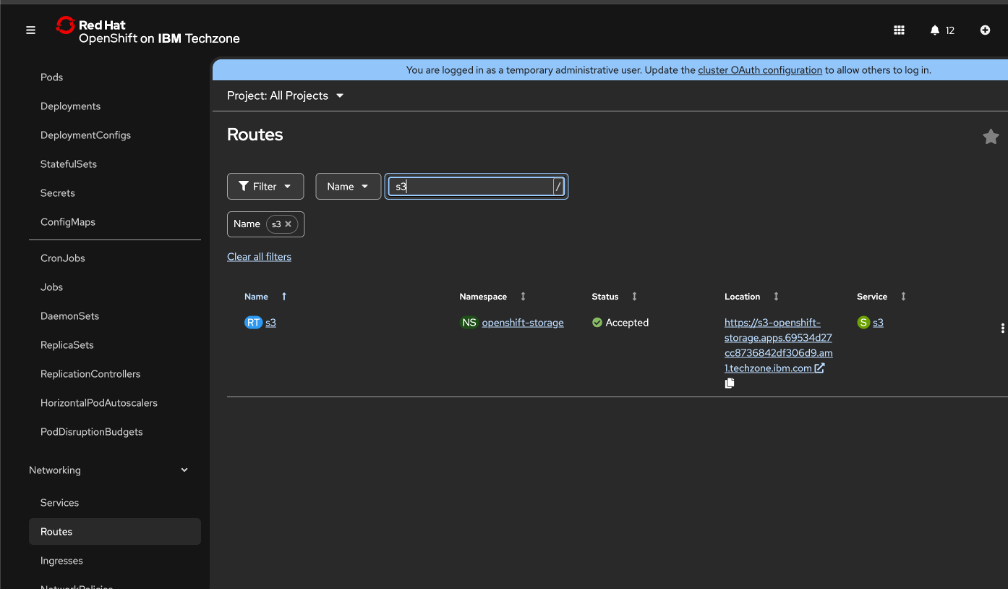
There you will find the correct route to use.
Backup Location
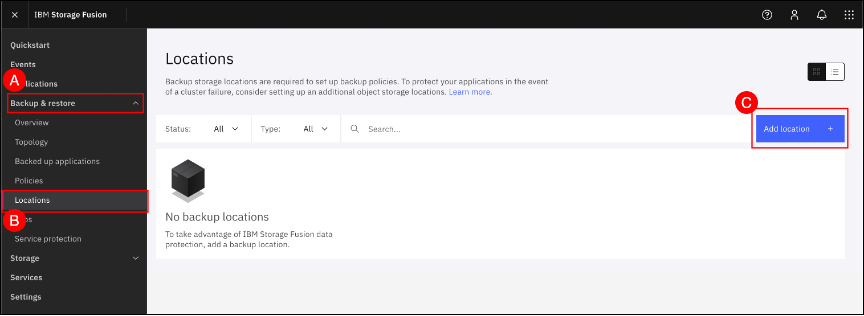
In the Fusion GUI, navigate to the Locations screen by clicking on the Backup & restore (A) menu item shown in the left-hand side navigation pane and selecting the Locations (B) sub-item. When the Locations screen is shown, click the Add location + © button and use the wizard to provide the appropriate S3 endpoint information and credentials.
Enter "Location1" (or any name of your choosing) in the Location name text entry field and click the MCG/NooBass (B) tile. Then, click "Next" to enter the connection details.
Enter the S3 endpoint and connection information collected in the previous steps

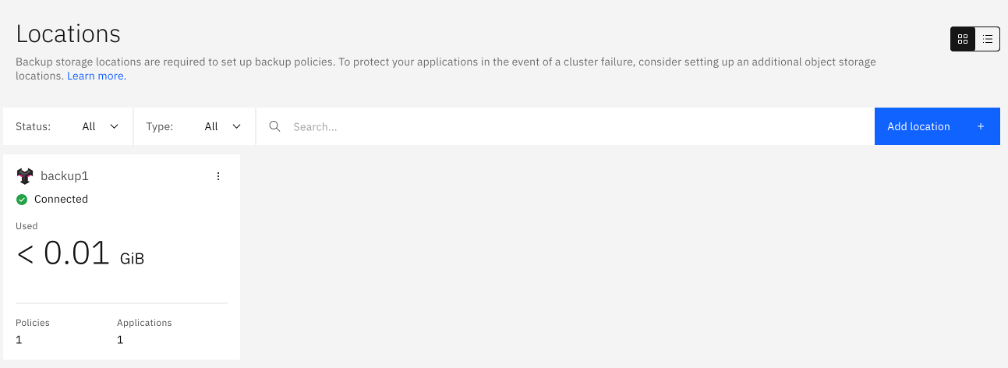
The newly added backup location should appear in a new tile and be connected after a few seconds.
Backup Policies
A backup policy is a set of rules and schedules that define how and when data is backed up. It outlines the frequency of backups, the type of data to be backed up, the retention period, and the storage location. The Backup & Restore service allows you to create and manage backup policies to ensure your data is protected according to your specific needs.
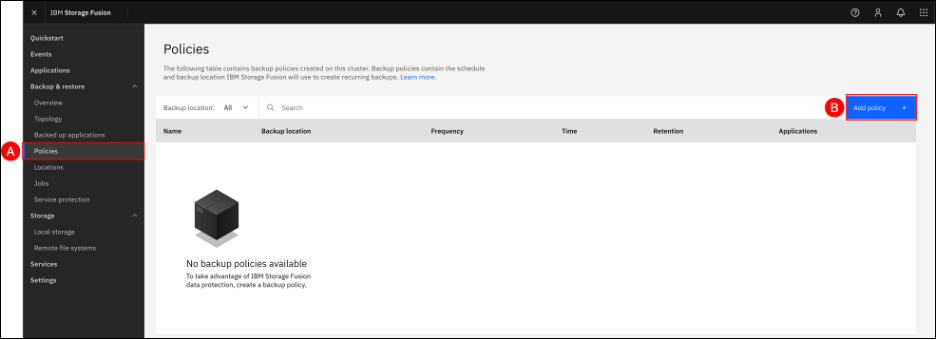
The Policies page lists all policies. You can search for policy records based on the backup location or other keywords, configure the table display, and perform actions like viewing, editing, or deleting policies from the ellipsis overflow menu.
In the Fusion GUI, navigate to the Policies screen by clicking on the Backup & restore (A) menu item shown in the left-hand side navigation pane and selecting the Policies (B) sub-item. When the Policies screen is shown, click the Add policy + © button to configure a backup policy.
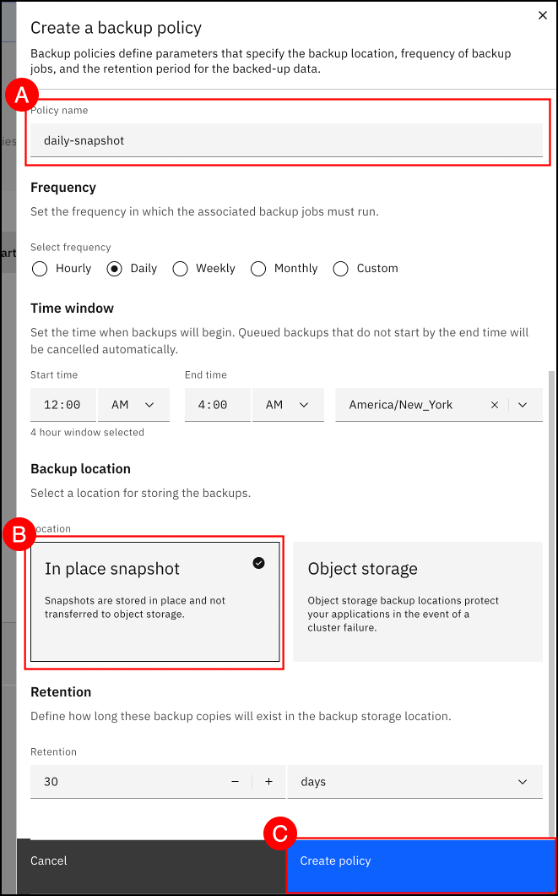
Enter daily-snapshot (A) in the Policy Name text entry field, set Frequency to Daily and specify a Time window for the backup to occur. Then, select the In place snapshot (B) Backup location tile. Finally, click the Next © button to create the new daily-snapshot backup policy.
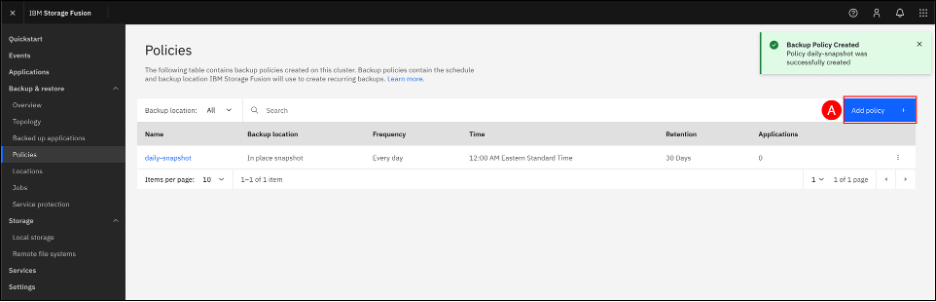
The daily-snapshot policy will now appear in the list of backup policies. Next, we will create a weekly-backup policy using object storage as the backup location. Click the Add policy + (A) button to begin.
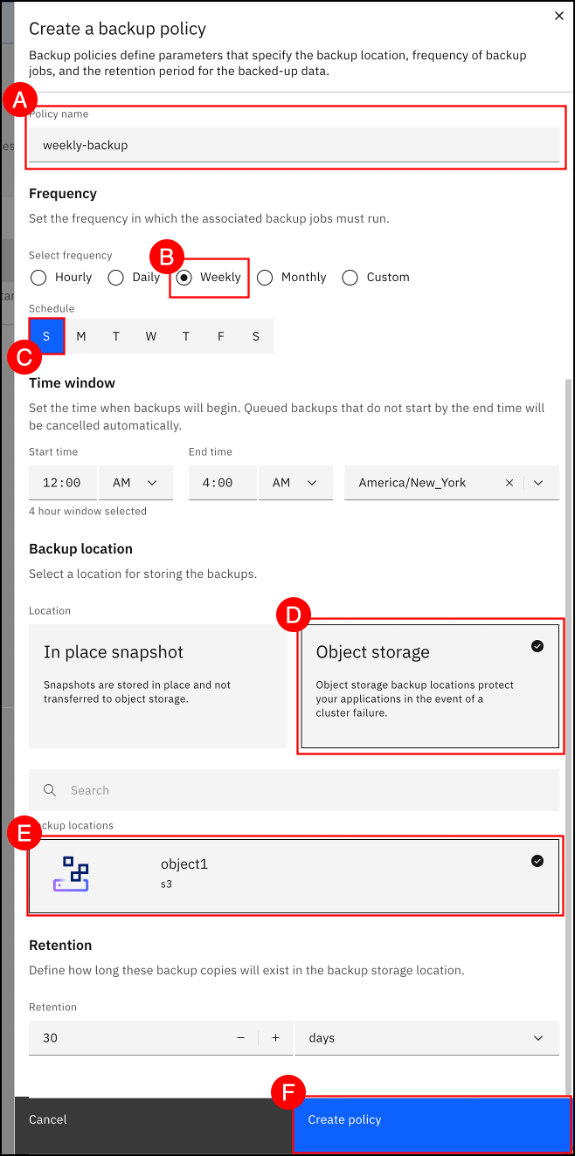
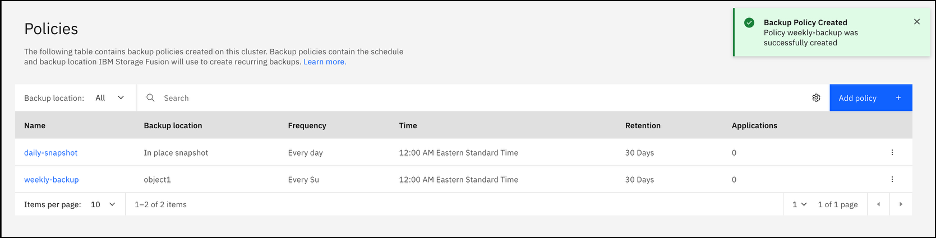
(A) Enter weekly-backup in the Policy name text entry field, set Frequency to weekly (B), select Sunday © for Schedule, and specify a Time window for the backup to occur. Select the Object Storage (D) Backup location tile to pick the backup location object1 (E). Click the Create policy (F) button to complete creation of the weekly-backup backup policy.
The Policies summary screen shows where backups are stored, the schedule for each policy, and the application that uses the policy.
Exercise 2: Backup and Restore an Application
In this section, you’ll learn how to create a basic application to demonstrate core functionality and prepare for backup and restore operations.
Create a simple application
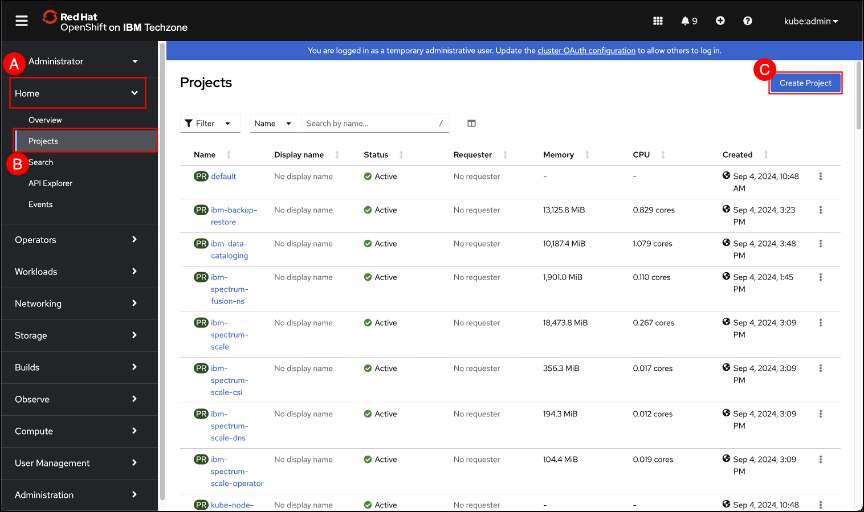
In the OpenShift GUI, navigate to the Projects screen by clicking on the Home (A) menu item in the left-hand side navigation pane and selecting the Projects (B) sub-item. When the Projects screen is shown, click the Create Project © button.
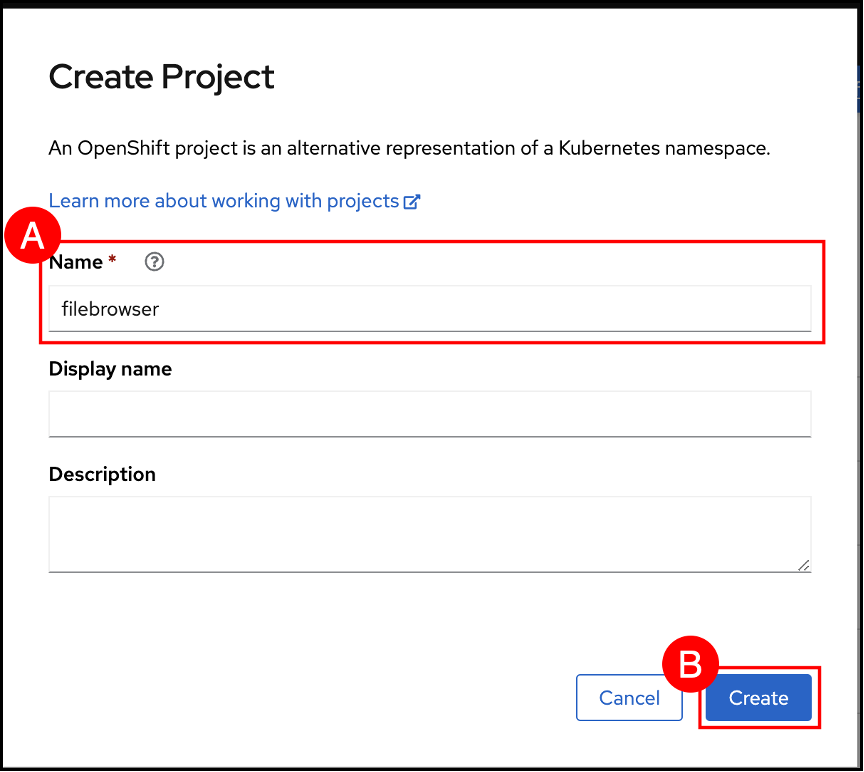
(A) Enter the value filebrowser in the Name text entry field and click the Create (B) button.
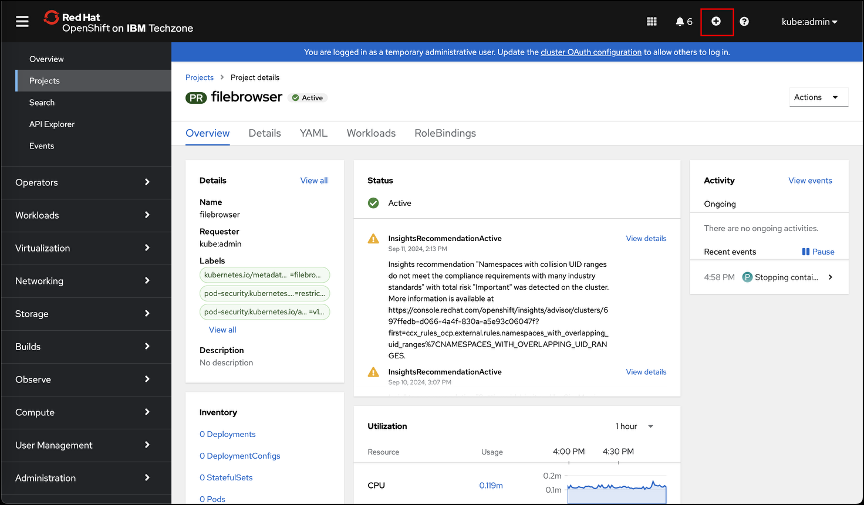
Verify that the project listed is set to the newly created filebrowser namespace. Click the Import YAML (A) (the icon that looks like a + sign) button on the OpenShift GUI masthead.
Use the following yaml file to create the filebrowser application:
kind: PersistentVolumeClaim
apiVersion: v1
metadata:
  labels:
    app: filebrowser
    app.kubernetes.io/component: filebrowser
    app.kubernetes.io/instance: filebrowser
    app.kubernetes.io/name: filebrowser
    app.kubernetes.io/part-of: filebrowser-app
  name: files
spec:
  storageClassName: ocs-storagecluster-ceph-rbd
  accessModes:
    - ReadWriteOnce
  resources:
    requests:
      storage: 10Gi

---
kind: PersistentVolumeClaim
apiVersion: v1
metadata:
  labels:
    app: filebrowser
    app.kubernetes.io/component: filebrowser
    app.kubernetes.io/instance: filebrowser
    app.kubernetes.io/name: filebrowser
    app.kubernetes.io/part-of: filebrowser-app
  name: filebrowser-config
spec:
  storageClassName: ocs-storagecluster-ceph-rbd
  accessModes:
    - ReadWriteOnce
  resources:
    requests:
      storage: 1Gi

---

kind: ConfigMap
apiVersion: v1
metadata:
  name: my-filebrowser-config
  labels:
    app: filebrowser
    app.kubernetes.io/component: filebrowser
    app.kubernetes.io/instance: filebrowser
    app.kubernetes.io/name: filebrowser
    app.kubernetes.io/part-of: filebrowser-app
data:
  .filebrowser.json: |
    {
      "port": 8080,
      "baseURL": "",
      "address": "",
      "log": "stdout",
      "database": "/config/database.db",
      "root": "/files"
    }

---
kind: Deployment
apiVersion: apps/v1
metadata:
  name: filebrowser
  labels:
        app: filebrowser
        deployment: filebrowser
spec:
  replicas: 1
  selector:
    matchLabels:
        app: filebrowser
  template:
    metadata:
      labels:
        app: filebrowser
        app.kubernetes.io/component: filebrowser
        app.kubernetes.io/instance: filebrowser
        app.kubernetes.io/name: filebrowser
        app.kubernetes.io/part-of: filebrowser-app
    spec:
      restartPolicy: Always
      serviceAccountName: default
      schedulerName: default-scheduler
      enableServiceLinks: true
      terminationGracePeriodSeconds: 30
      securityContext: {}
      containers:
        - resources:
            requests:
              cpu: "100m"
              memory: "128Mi"
            limits:
              cpu: "500m"
              memory: "512Mi"
          readinessProbe:
            httpGet:
              path: /health
              port: 8080
            initialDelaySeconds: 2
            timeoutSeconds: 2
            periodSeconds: 5
            successThreshold: 1
            failureThreshold: 3
          terminationMessagePath: /dev/termination-log
          name: filebrowser
          livenessProbe:
            httpGet:
              path: /health
              port: 8080
            initialDelaySeconds: 10
            timeoutSeconds: 2
            periodSeconds: 10
            successThreshold: 1
            failureThreshold: 3
          startupProbe:
            httpGet:
              path: /health
              port: 8080
            failureThreshold: 30
            periodSeconds: 10
          env:
            - name: TZ
              value: UTC
          ports:
            - name: http
              containerPort: 8080
              protocol: TCP
          imagePullPolicy: IfNotPresent
          securityContext:
            runAsNonRoot: true
            allowPrivilegeEscalation: false
            capabilities:
              drop:
                - ALL
          volumeMounts:
            - name: config
              mountPath: /config
            - name: filebrowser-config
              mountPath: /.filebrowser.json
              subPath: .filebrowser.json
            - name: data
              mountPath: /files
          image: 'filebrowser/filebrowser:v2.18.0'
      automountServiceAccountToken: true
      serviceAccount: default
      volumes:
        - name: config
          persistentVolumeClaim:
            claimName: filebrowser-config
        - name: filebrowser-config
          configMap:
            name: my-filebrowser-config
            defaultMode: 420
        - name: data
          persistentVolumeClaim:
            claimName: files
      dnsPolicy: ClusterFirst
  strategy:
    type: RollingUpdate
    rollingUpdate:
      maxUnavailable: 1
      maxSurge: 1
  revisionHistoryLimit: 3
  progressDeadlineSeconds: 600

---

kind: Service
apiVersion: v1
metadata:
  name: filebrowser
  labels:
    app: filebrowser
    app.kubernetes.io/component: filebrowser
    app.kubernetes.io/instance: filebrowser
    app.kubernetes.io/name: filebrowser
    app.kubernetes.io/part-of: filebrowser-app
spec:
  ports:
    - name: 8080-tcp
      protocol: TCP
      port: 8080
      targetPort: 8080
  type: ClusterIP
  selector:
    app: filebrowser

---
kind: Route
apiVersion: route.openshift.io/v1
metadata:
  name: filebrowser
  labels:
    app: filebrowser
    app.kubernetes.io/component: filebrowser
    app.kubernetes.io/instance: filebrowser
    app.kubernetes.io/name: filebrowser
    app.kubernetes.io/part-of: filebrowser-app
  annotations:
    openshift.io/host.generated: 'true'
spec:
  to:
    kind: Service
    name: filebrowser
    weight: 100
  port:
    targetPort: 8080-tcp
  tls:
    termination: edge
    insecureEdgeTerminationPolicy: Redirect
  wildcardPolicy: None
The OpenShift GUI and use Ctrl-V (windows), CMD-V (Mac) or browser Edit → Paste button to paste the contents of the clipboard into the editor (A) text entry field. Click the Create (B) button to create the filebrowser resources.
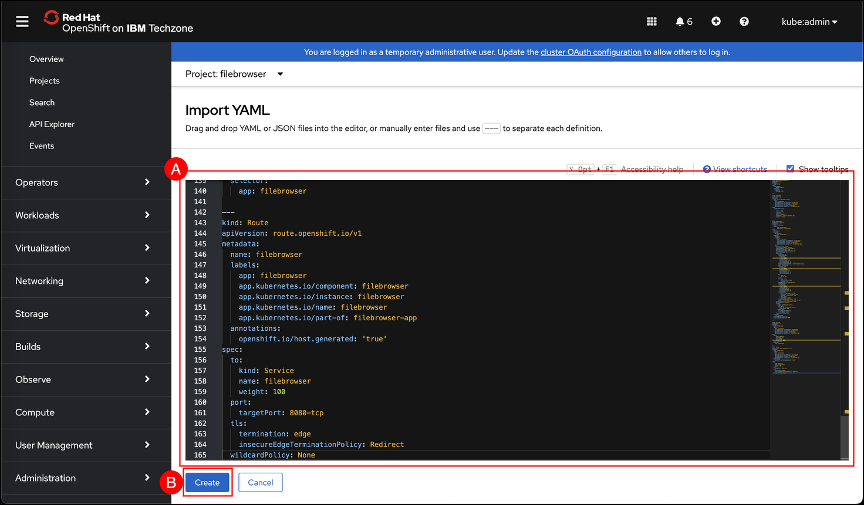
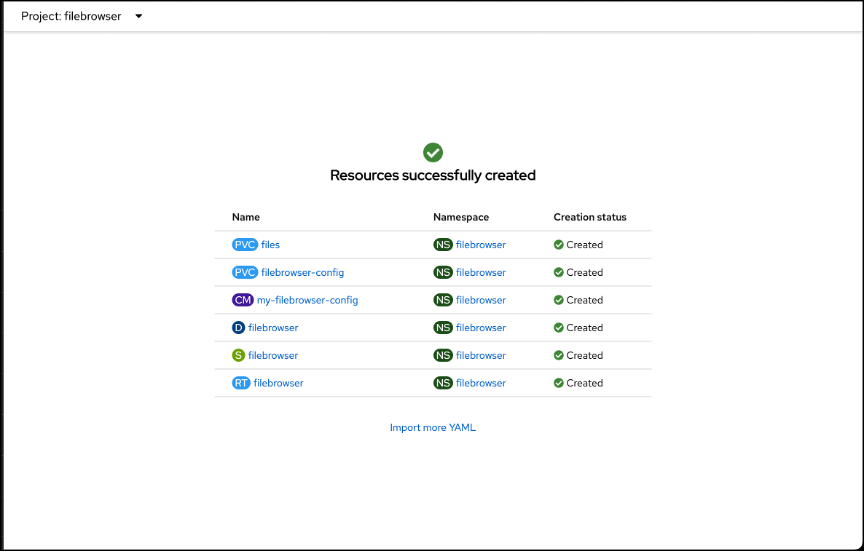
The following information will be displayed listing all resources that were created and Creation status.
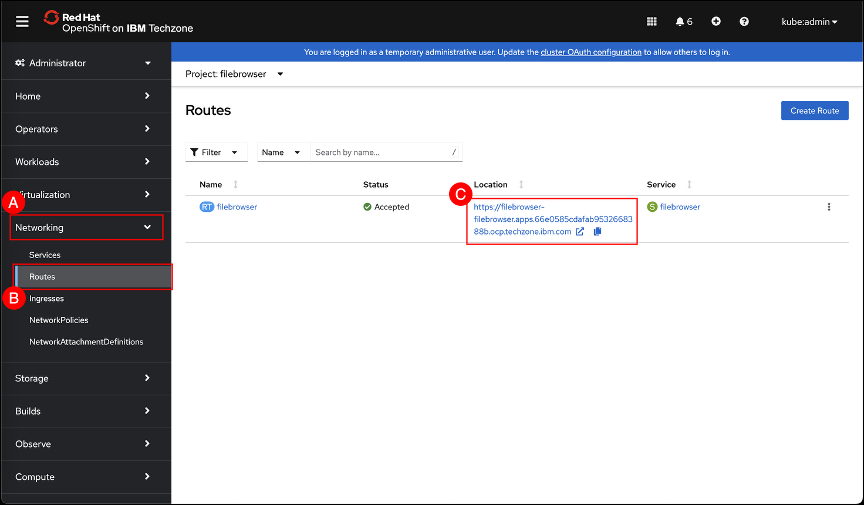
Navigate to the Route screen by clicking on the Network (A) menu item shown in the left-hand side navigation pane and selecting the Routes (B) sub-item. When the Routes screen is shown, click the URL Location © for the filebrowser route to open a new tab/window to the filebrowser application
| It may take a minute or two for the filebrowser application to become fully online and accessible from the route screen |
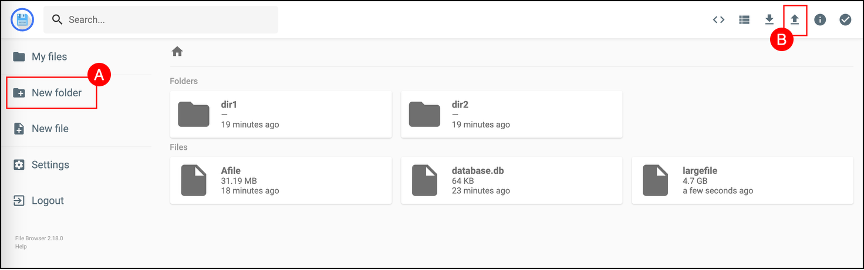
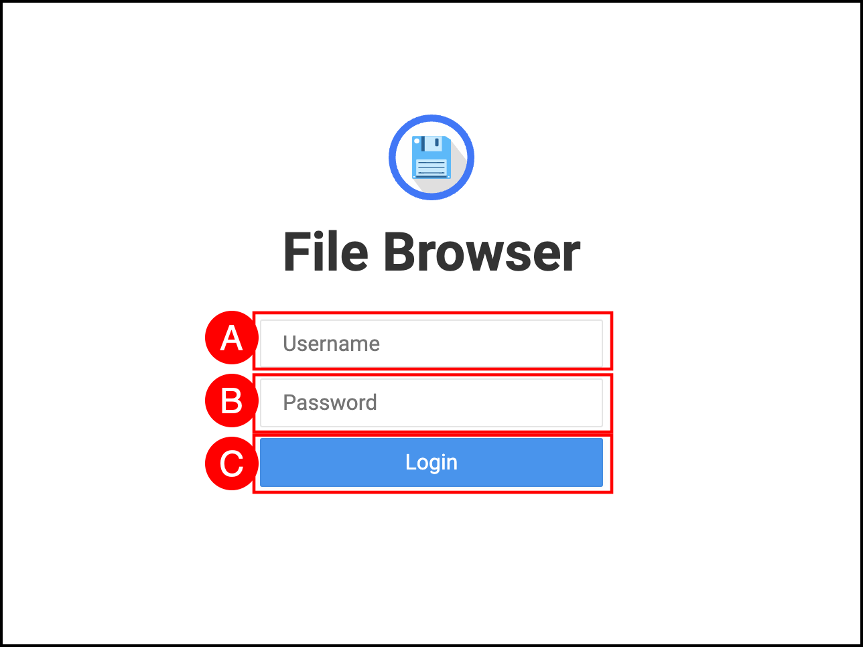
Login to the filebrowser application with Username (A): admin and Password (B): admin. Click the Login © button.

No files will be listed in the filebrowser application.
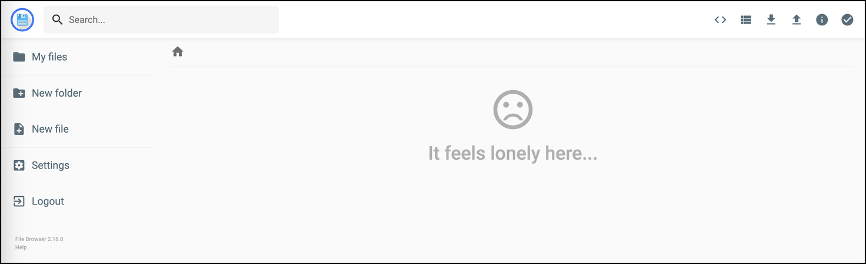
Use New folder (A) and Upload file (B) to create some directories and upload a couple files. In the example shown, 2 directories were created, and 3 files were uploaded.
Assign Policy to application
The OpenShift Cluster can host many application workloads; IBM Fusion provides a simple graphical user interface (GUI) to assign backup policies to applications and automate their protection.
| There are two (2) methods for interacting with applications in the Fusion GUI. The Applications menu item on the left-hand side navigation pane shows only the applications local to the cluster. The Backed up applications sub-item under the Backup & restore menu allows for assigning policies to local and remote clusters. For this lab either option can be used. |
Assign policy using applications menu item
This sub-section describes the process for managing backups of applications deployed in the local cluster using the Applications page.
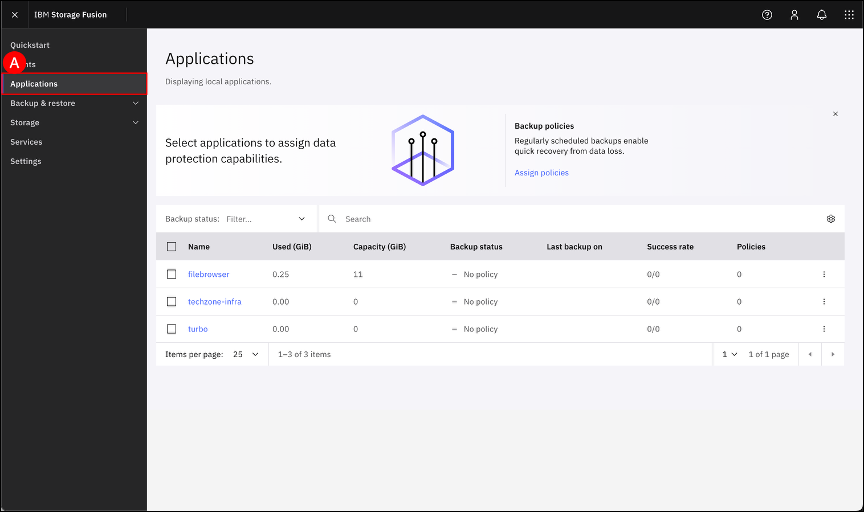
Navigate to the Application pane by clicking on the Applications (A) menu item on the left-hand side navigation pane.
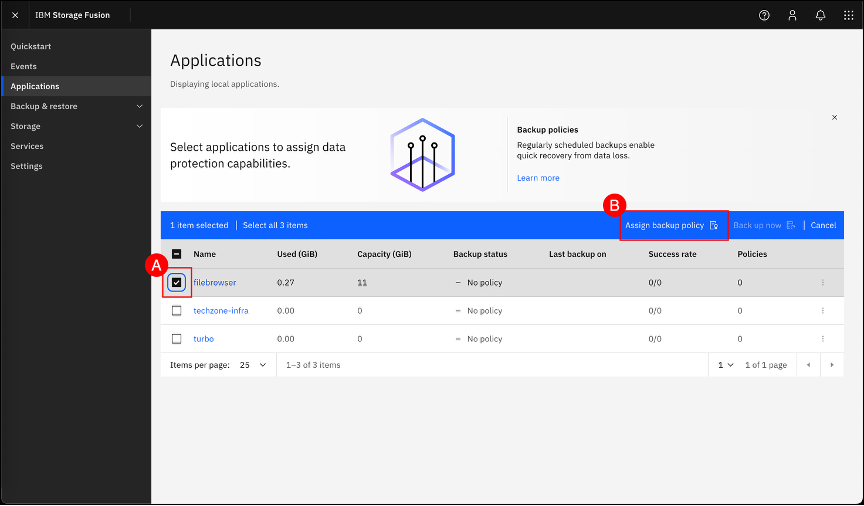
Select the filebrowser application checkbox (A) and click the Assign backup policy (B) button.
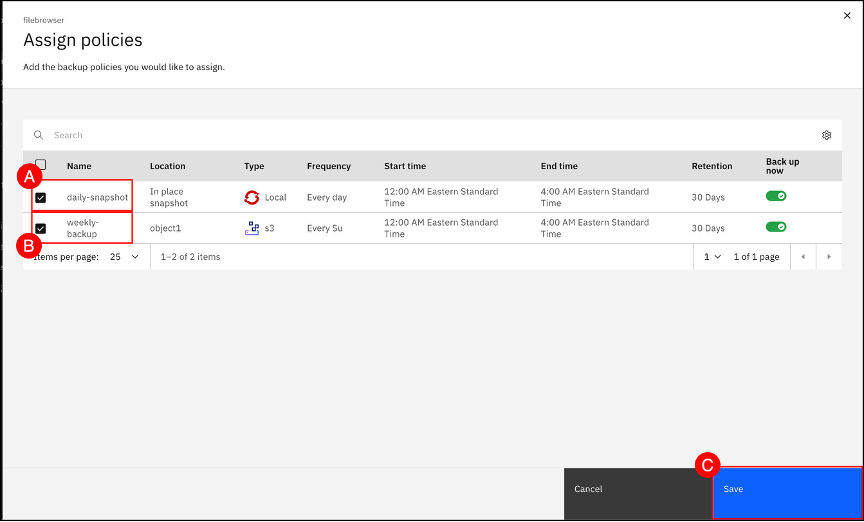
Select both the daily-snapshot checkbox (A) and weekly-backup checkbox (B). Leave the Back up now toggle set to enabled (displayed with a green checkmark). Click the Save © button.
A confirmation window will appear in the upper-right corner notifying that the policies have been assigned and the filebrowser application will appear in the list of Backed up applications.
Assign policy using Backed up applications menu item
This sub-section describes the process for managing backups of applications deployed across both hub and spoke clusters using the Backup up applications page.
Navigate to the Backed up applications pane in the IBM Fusion UI by clicking Backup & Restore (A) menu item shown in the left-hand side navigation pane and selecting the Backed up applications (B) sub-item. You should now see a page listing the applications that have been backed up, together with application details and assigned backup policies. Each line represents an OpenShift namespace which can contain a different application/workload.
If you want to find a specific namespace, you can use the search toolbar present on the page.
You can assign a backup policy to a namespace by clicking Protect apps + © on the right side. This will launch the Protect applications wizard.
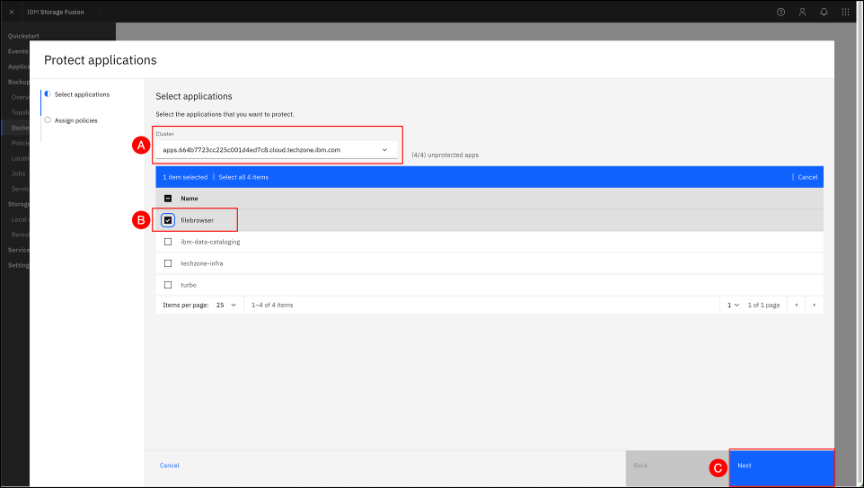
The Protect applications wizard can be used to backup applications locally and in hub and spoke configurations. Select the local cluster (A) from the drop-down list, and a list of unprotected applications will populate in the list below. Next select, filebrowser (B) from the unprotected applications list. Finally click on the Next © button.
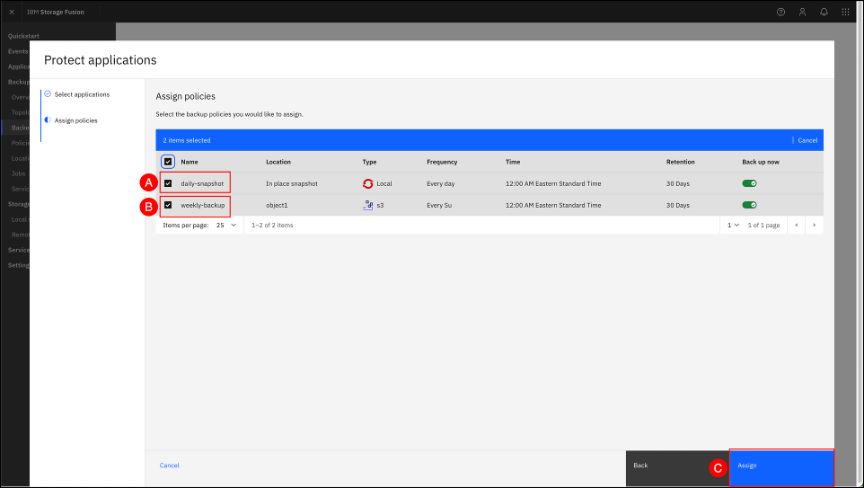
On the Assign policies, you can select one or more policies to attach to the application and if backup should start right after applying the policies. Select both the daily-snapshot (A) and weekly-backup (B) policies. Leave the Back up now toggle set to enabled (displayed with a green checkmark). Click the Assign © button.
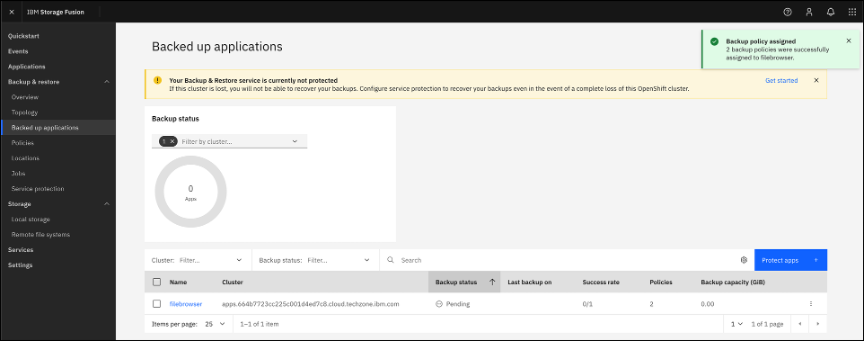
A confirmation window will appear in the right-hand upper corner notifying that the policies have been assigned and the filebrowser application will appear in the list of Backed up applications.
Monitor backup status
Depending on the method used to Assign a backup policy, the Pending and In progress screens will be slightly different. Selecting the application name will display a page with the same information.
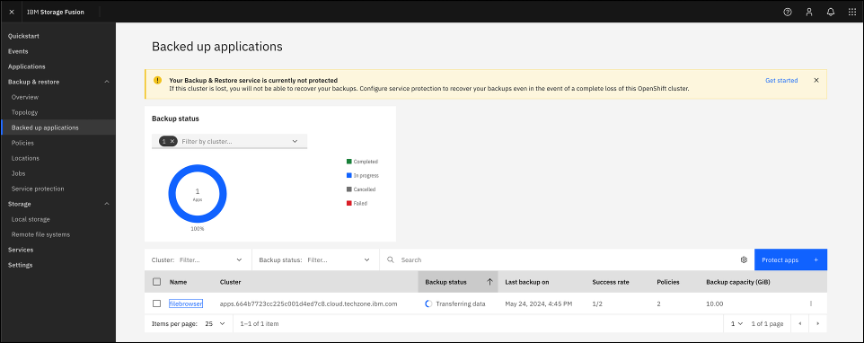
After a short period of time the Backup status will change from Pending to an In progress status, until it is Completed.
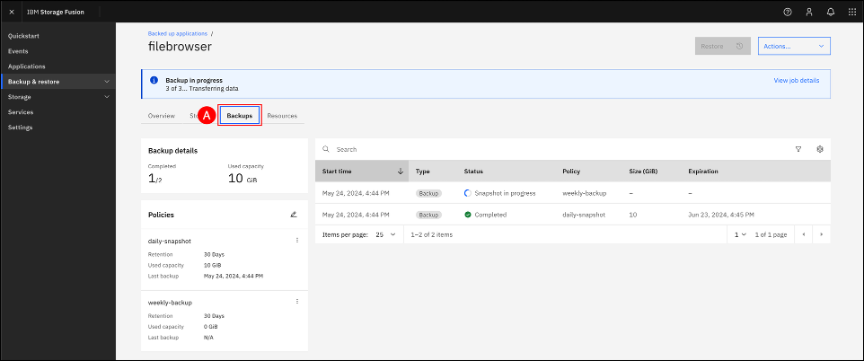
Status of each policy can be checked by going into the application pane and clicking the Backups (A) tab. In the example shown below, the daily-snapshot policy has Completed and the weekly-backup is Snapshot in progress.
Application restore
This section describes the steps required to restore an application from a previously created backup.
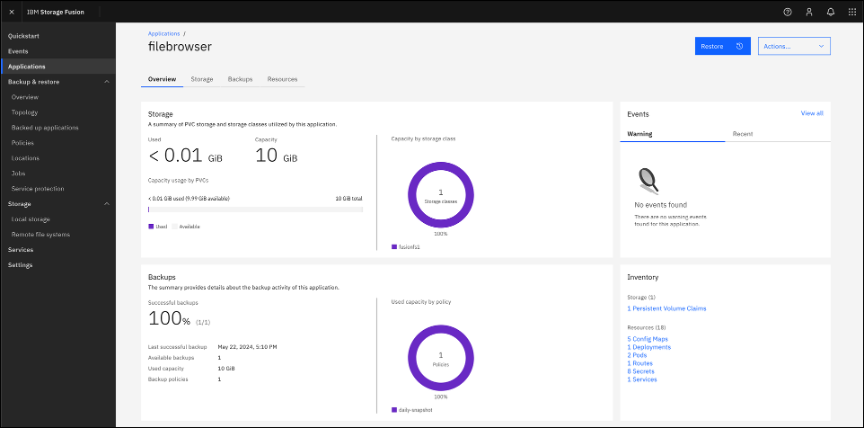
From the Applications or Backed up applications page, click the application name to open its Overview page
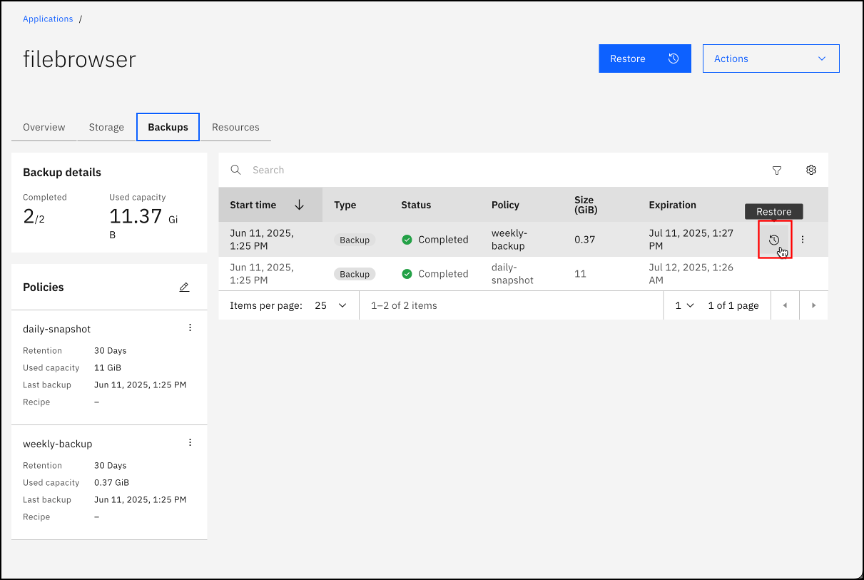
The Backups tab shows all the backups created for this application and lets you choose the backup you want to restore from.
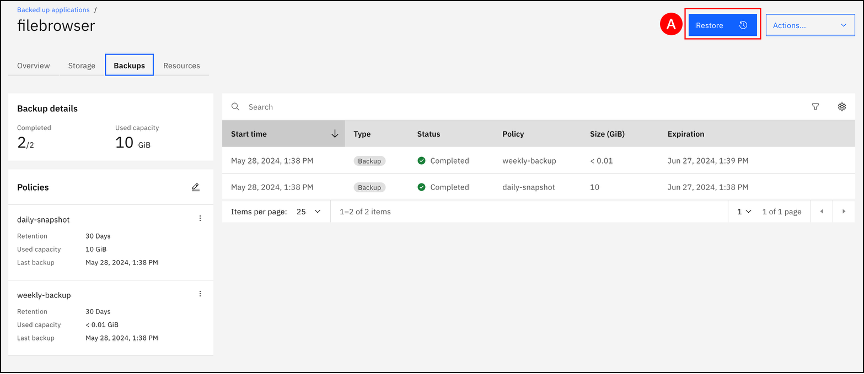
A restore action can also be started by using buttons at top of the page. Click on the Restore (A) button located at the top of the pane.
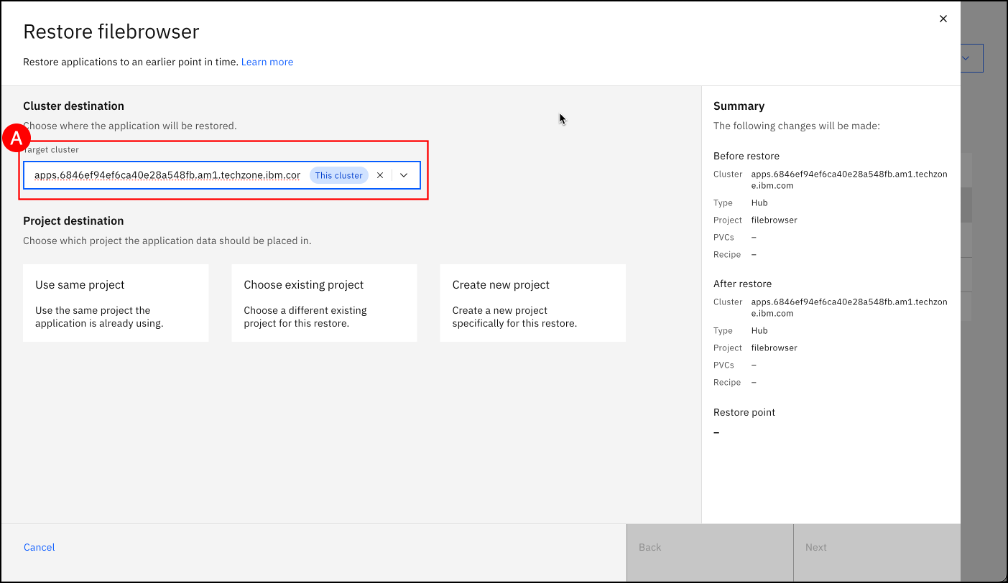
The wizard presents the choice to restore to the same cluster or to a different cluster, if you have a hub-spoke setup. Open the drop-down list associated with the “Target cluster” field and select the This cluster (A) item from the list.
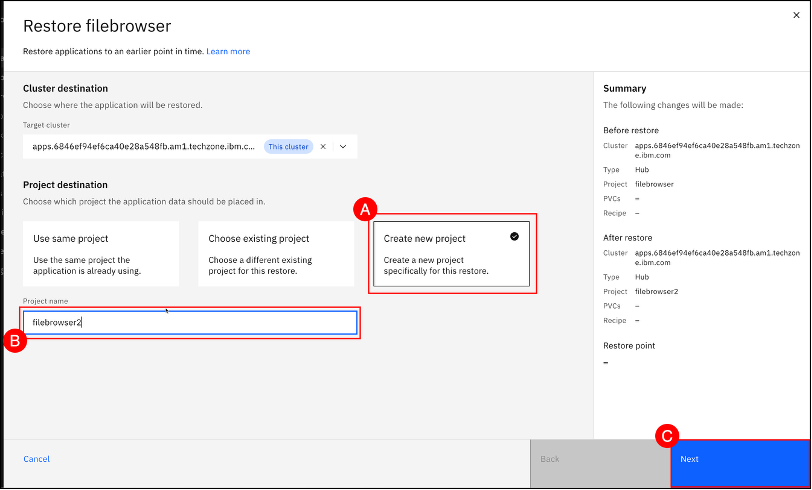
The restore wizard also provides a choice to restore over the same project, an existing project, or to a new project. Select Create a new project (A) and (B) enter filebrowser2 in the Project name text entry field. Then, click on the Next © button to select the backup to restore.
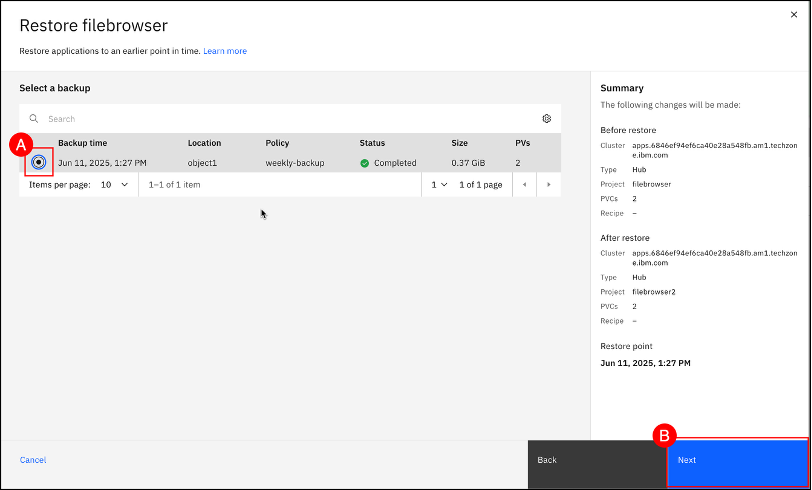
Choose the Backup time (A) you want to restore from, from the list of backups provided – note that if you want multiple backups to choose from, you must first create them. Then click on the Next (B) button.
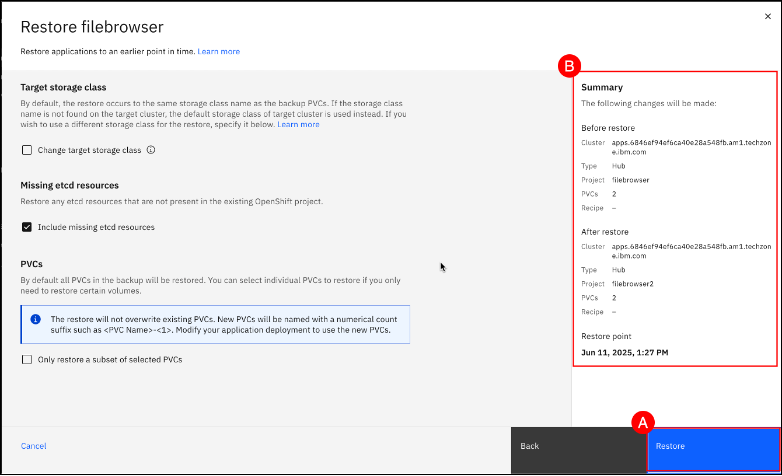
Keep all the default settings shown and click on the Restore (A) button. A Summary (B) is displayed on the right pane with details on what the Before restore and After restore states will be.
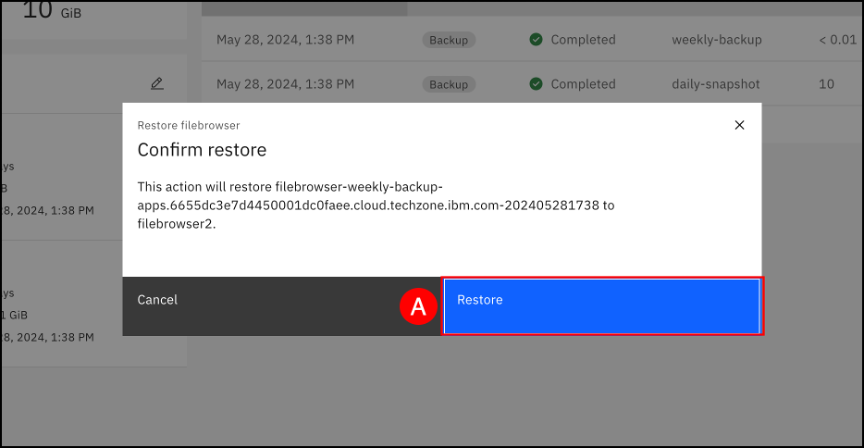
Confirm the restore by clicking on the Restore (A) button in the final dialog box.
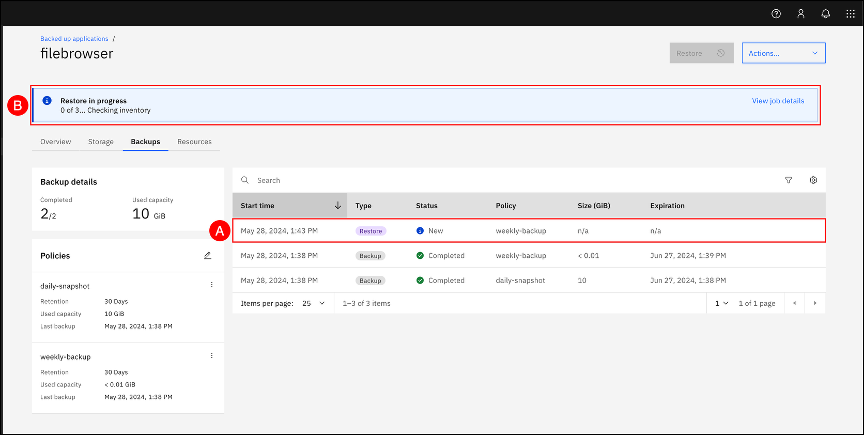
Watch the restore progress. Item (A) is the Restore job that has been scheduled; Item (B) will update as the restore operation progresses. The Restore process can also be tracked on the Jobs page. The Jobs page can be accessed by clicking on the Backup & restore menu item shown in the left-hand side navigation pane and selecting the Jobs sub-item. On the Jobs page, click the Restore tab to track progress.
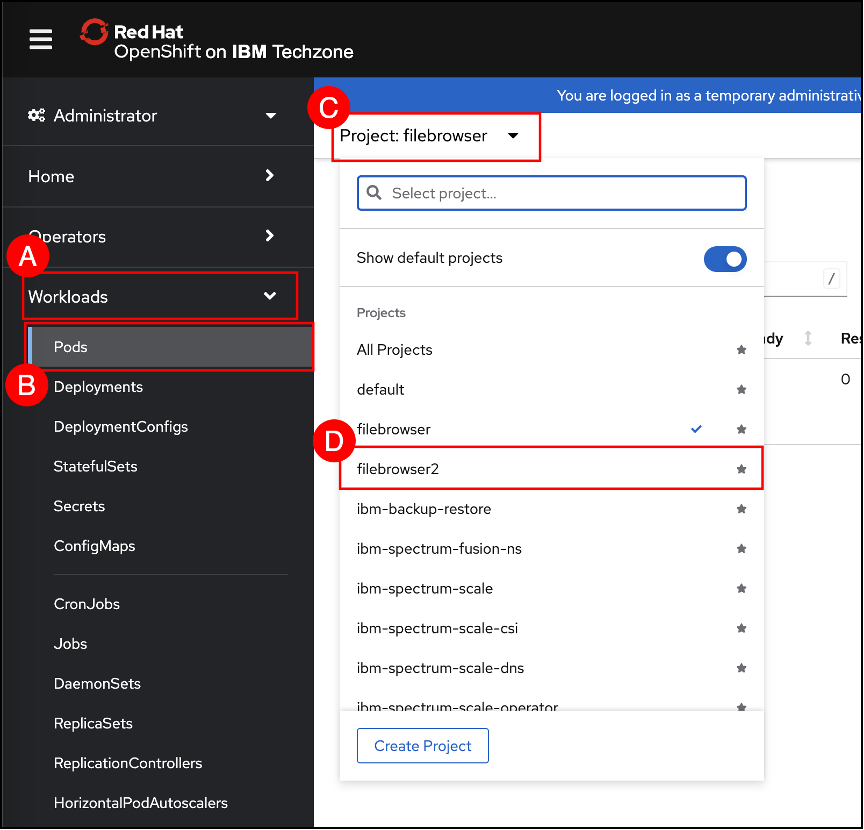
In the OpenShift Console, navigate to the Pods page by clicking on the Workloads (A) menu item shown in the left-hand side navigation pane and selecting the click Pods (B) sub-item. Then click the project selector © and choose filebrowser2 (D) from the projects drop down menu. Refer to section OpenShift project selector on how to use the project selector.
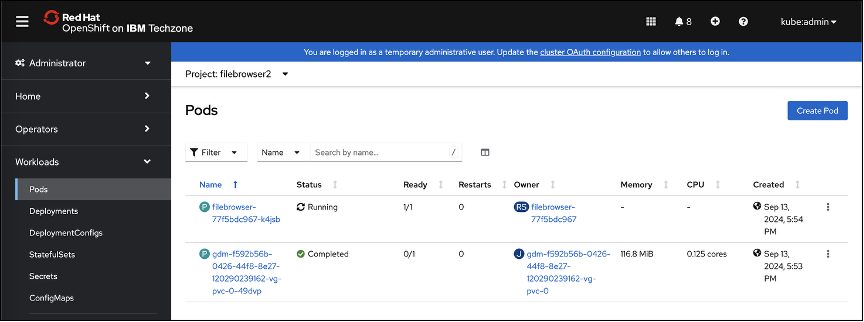
Watch the application being restored and the new pods created for the restored application.
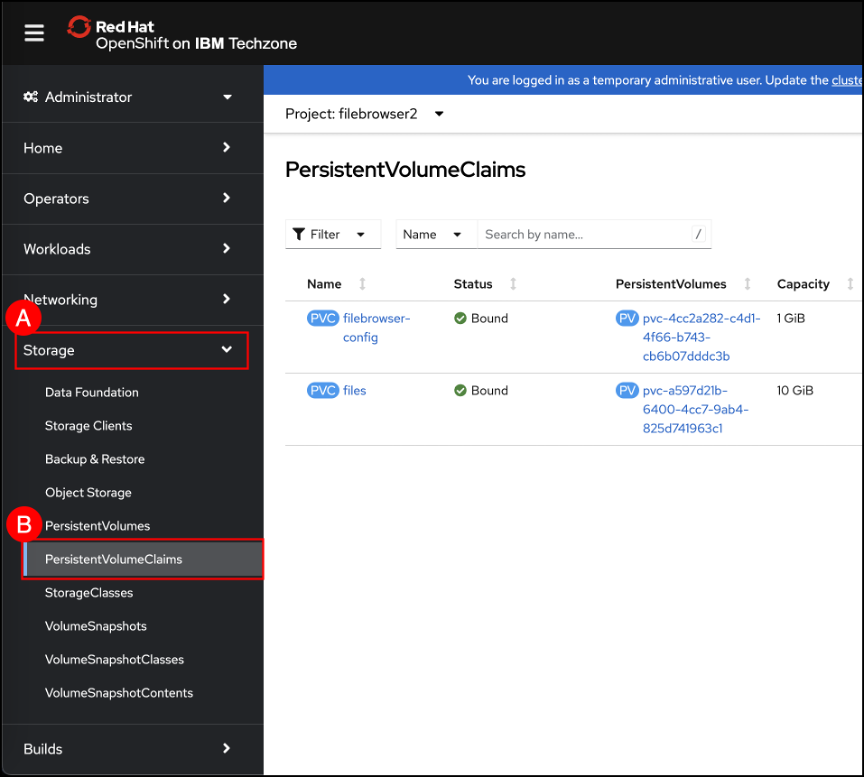
Navigate to the PersistenVolumesClaims screen by selecting the Storage (A) menu item shown in the left-hand side navigation pane and selecting the PersistentVolumeClaims (B) sub-item. The newly restored PVCs are shown.
Navigate to the Routes screen by clicking on the Networking (A) menu item shown in the left-hand side navigation pane and selecting the Routes (B) sub-item. When the Routes screen is shown
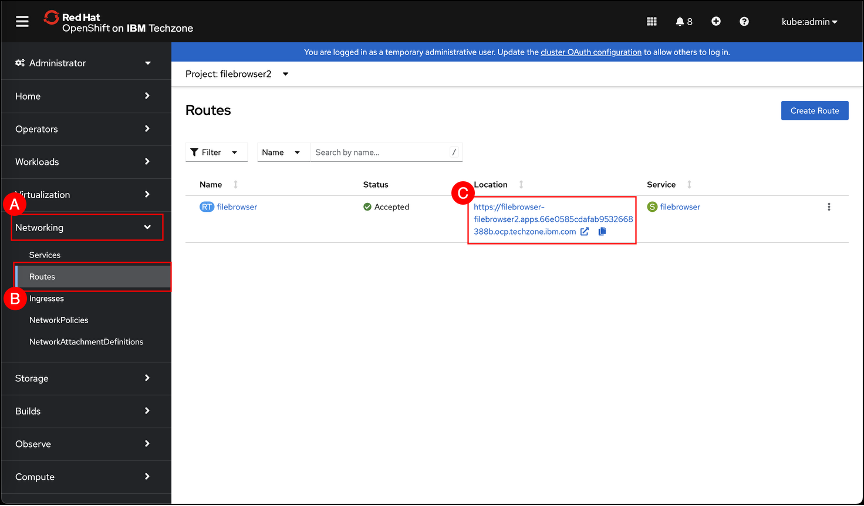
Login to the filebrowser application with the Username (A): admin and Password (B): admin. Click Login ©. Review that the files added earlier have been restored to a new application project
Exercise 3: Backup and Restore Virtual Machines
Backup a Virtual Machine
In the Administrative View, create a new project called "vmbackup"
Create a new Virtual Machine from the Catalog using the Red Hat Enterprise Linux 9 VM template. Use the name rhel9-backup.
Launch the Fusion User Interface by clicking the Application menu icon (looks like 9 squares) and then click IBM Storage Fusion. If prompted, enter kubeadmin and your kubeadmin password from the reservation.
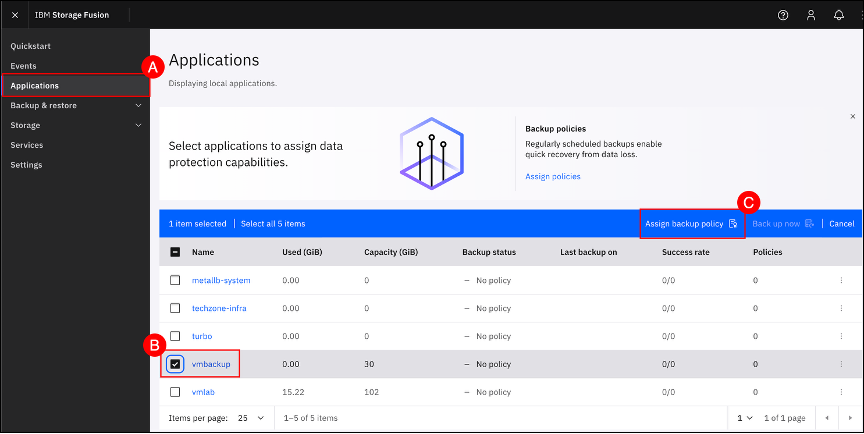
Navigate to the Applications screen by clicking on the Applications (A) menu item on the left-hand side navigation pane. Select the check box (B) next to vmbackup application and click on the Assign backup policy © button to open the Assign backup policy page.
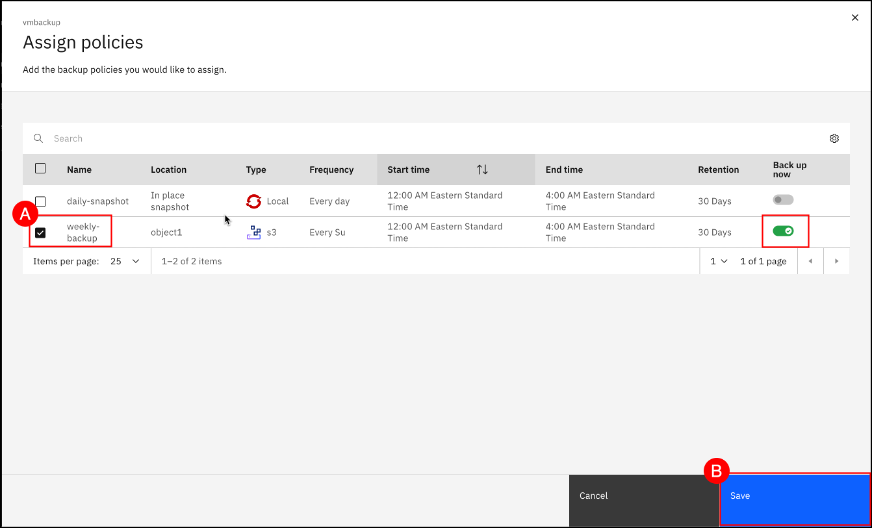
Select the check box (A) next to weekly-backup and leave the Back up now toggle set to enabled (green with a checkmark for enabled). Click on the Save (B) button to enable the weekly-backup policy for the vmbackup application and start a new backup job.
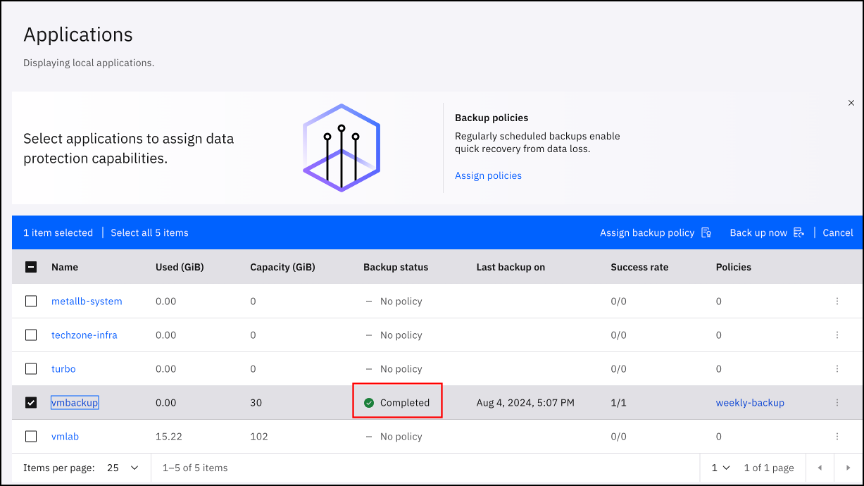
Wait for backup to show as Completed under Backup status.
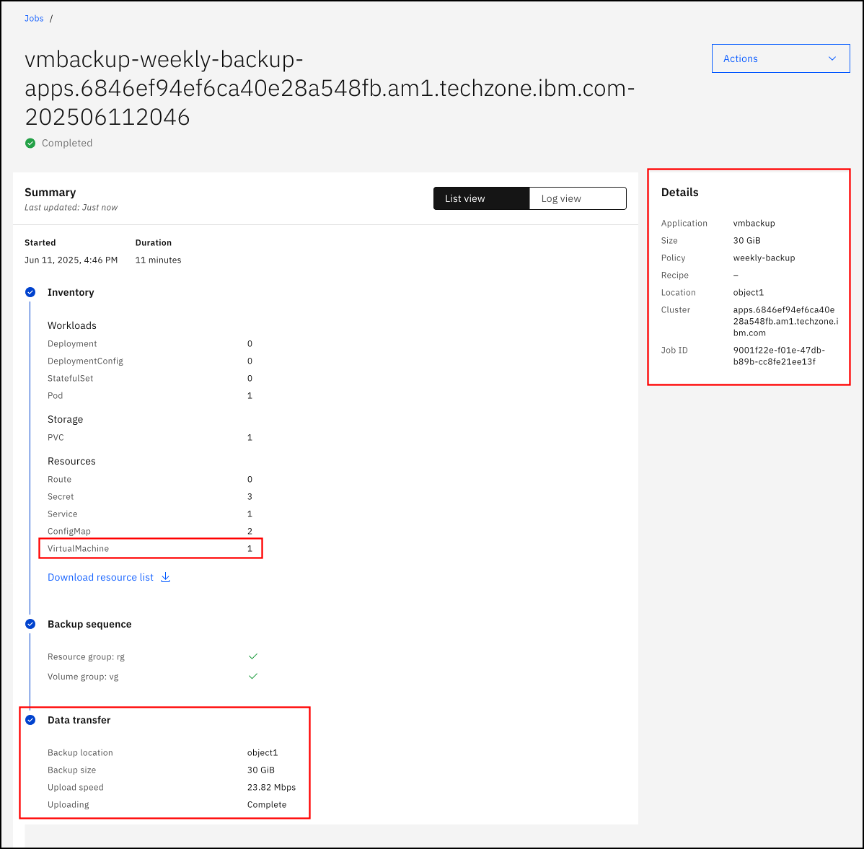
Navigate to the Jobs screen by clicking on the Backup & restore (A) menu item on the left-hand side navigation pane and selecting the Jobs (B) menu sub-item. Click on the vmbackup-weekly-backup-<OCP cluster name> © button to open the backup summary page.

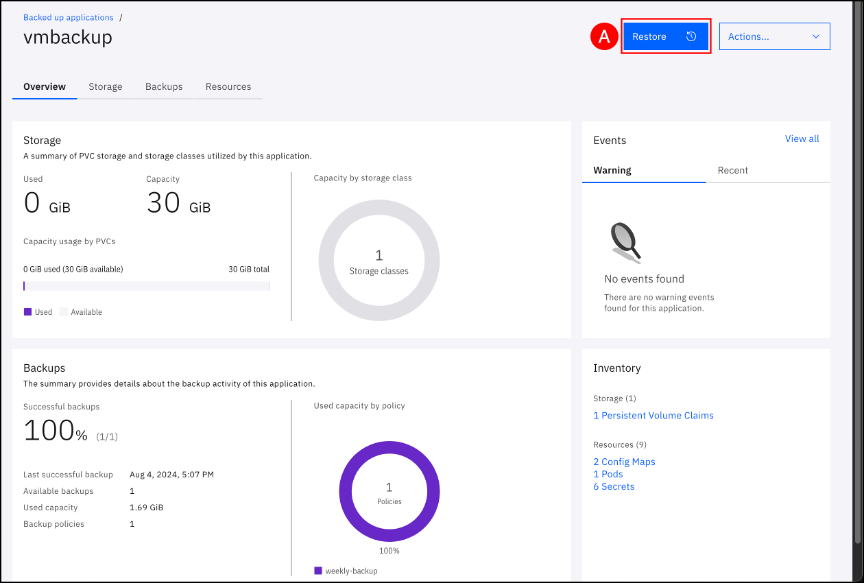
Review the information on this page. Some relevant information to the backup has been highlighted for informational purposes.
Restore Virtual Machine
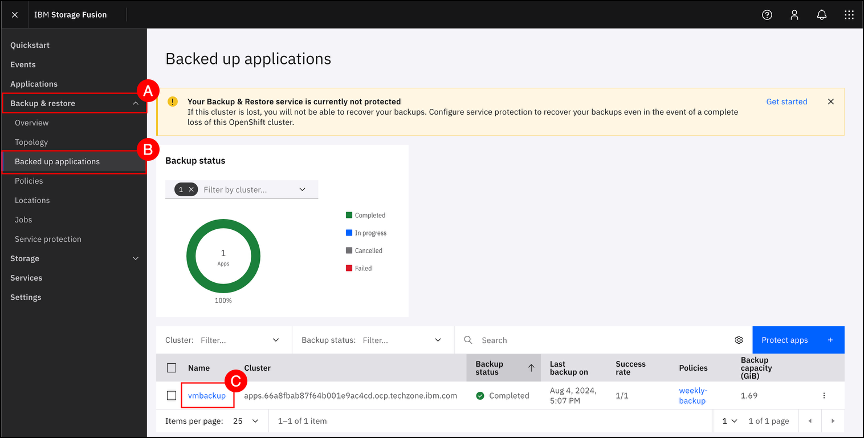
Navigate to the Backed up applications screen by clicking on the Backup & restore (A) menu item on the left-hand side navigation pane and selecting the Backed up applications (B) menu sub-item. Click on the vmbackup © application name to open the vmbackup backup details page.
Click on the Restore (A) button to begin the restore process.
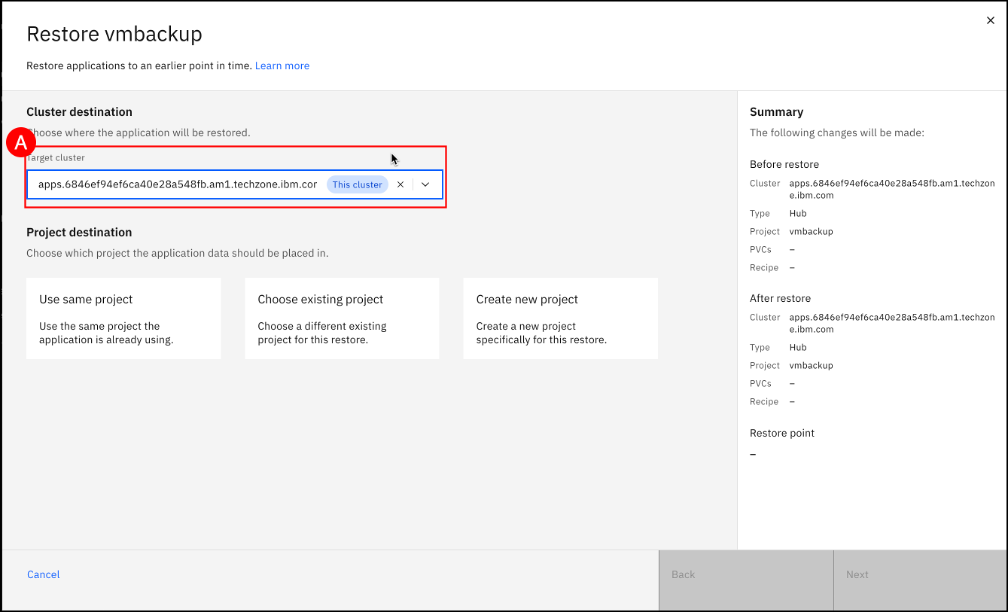
The wizard presents the choice to restore to the same cluster or to a different cluster, if you have a hub-spoke setup. Open the drop-down list associated with the “Target cluster” field and select the This cluster (A) item from the list.
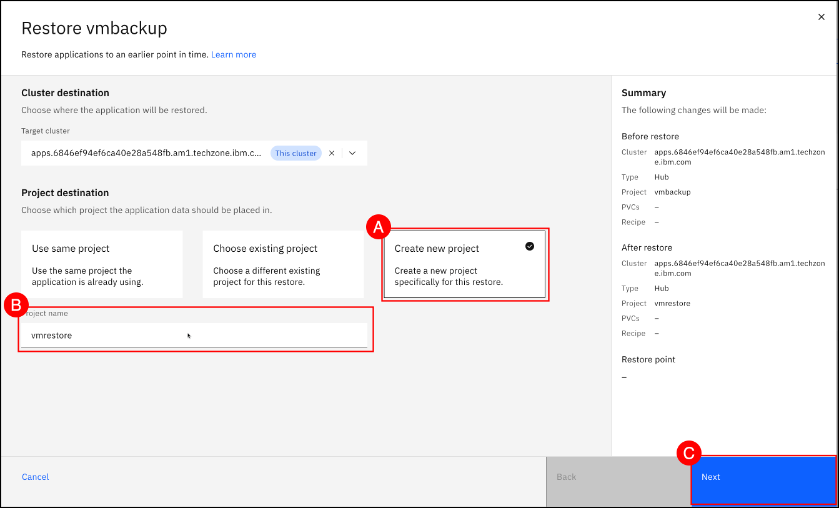
Click on the Create a new project (A) combo box to change the Project destination. Enter vmrestore in the Project name (B) text entry field and click the Next © button to continue the restore process.
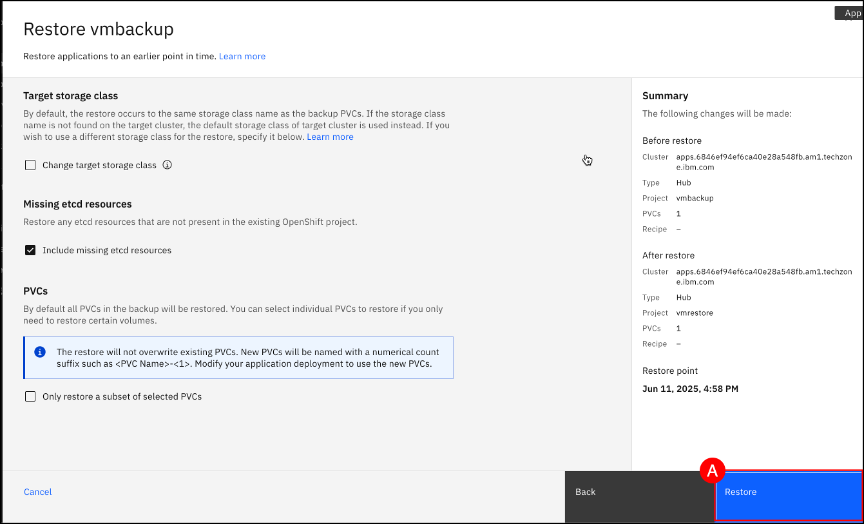
Click on the latest backup time (A) combo box (which should be the backup that was run in the previous section). Click the Next (B) button to continue to the final step of the restore process.

Review the Summary (A) details for OpenShift Project and Restore point for accuracy. Click the Restore (B) button.
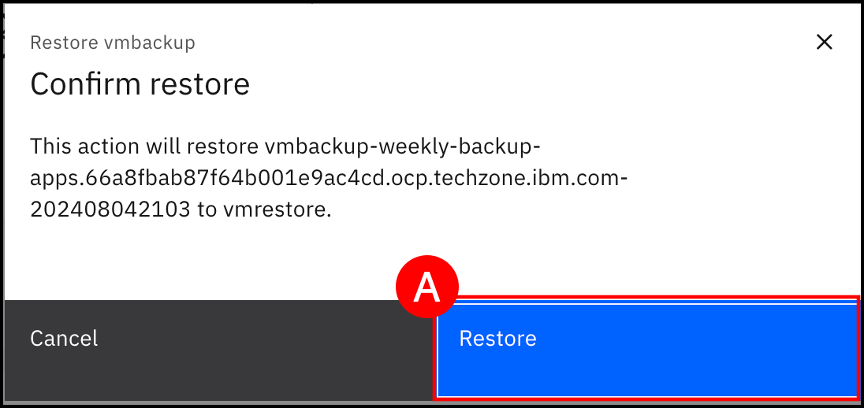
Click the Restore (A) button again to confirm the start of the restore process.
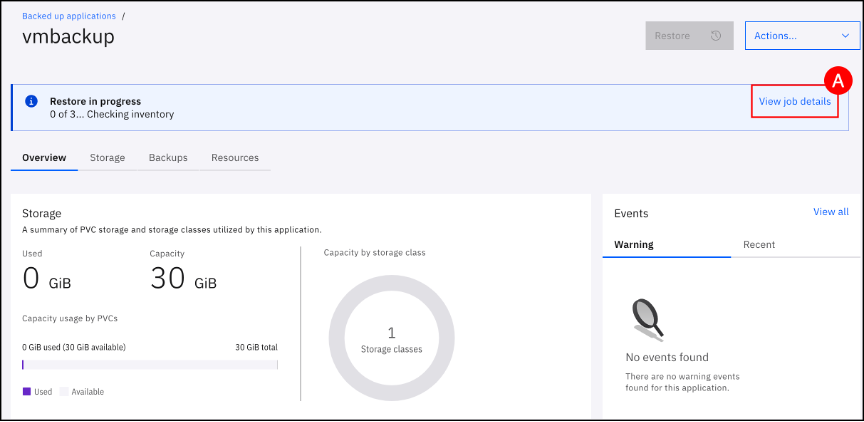
Click on the View job details (A) button to open the vmbackup restore details page.
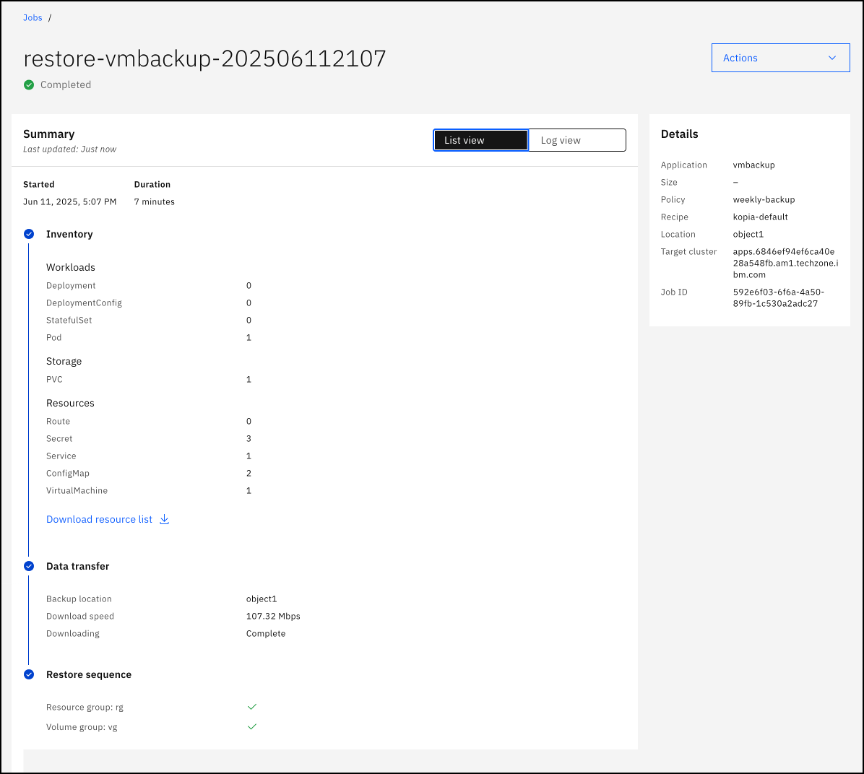
Wait for the restore backup job to show Completed.
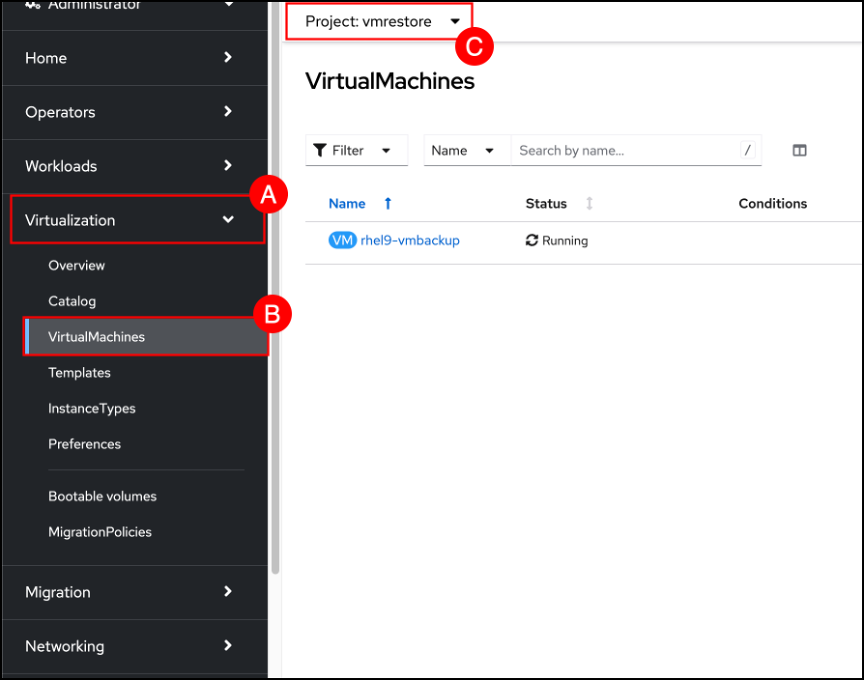
Return to the OpenShift GUI. Navigate to the VirtualMachines screen by clicking on the Virtualization (A) menu item on the left-hand side navigation pane and selecting the VirtualMachines (B) sub-item. Use the Project selector to change to the vmrestore © project. Notice that the VirtualMachine has been restored to a new namespace and is in a Running Status.
Exercise 4: Backup and Restore an Application with a recipe
Create an application with Fusion recipe
When you protect an application with Backup & Restore service, a default backup and restore workflow is used to protect an application. But while the backup and restore workflow is sufficient for some applications, there are some instances where you need to create a custom workflow for the backup and restore process to produce an application consistent backup. Recipes are used to create a custom workflow for the backup and restore process.
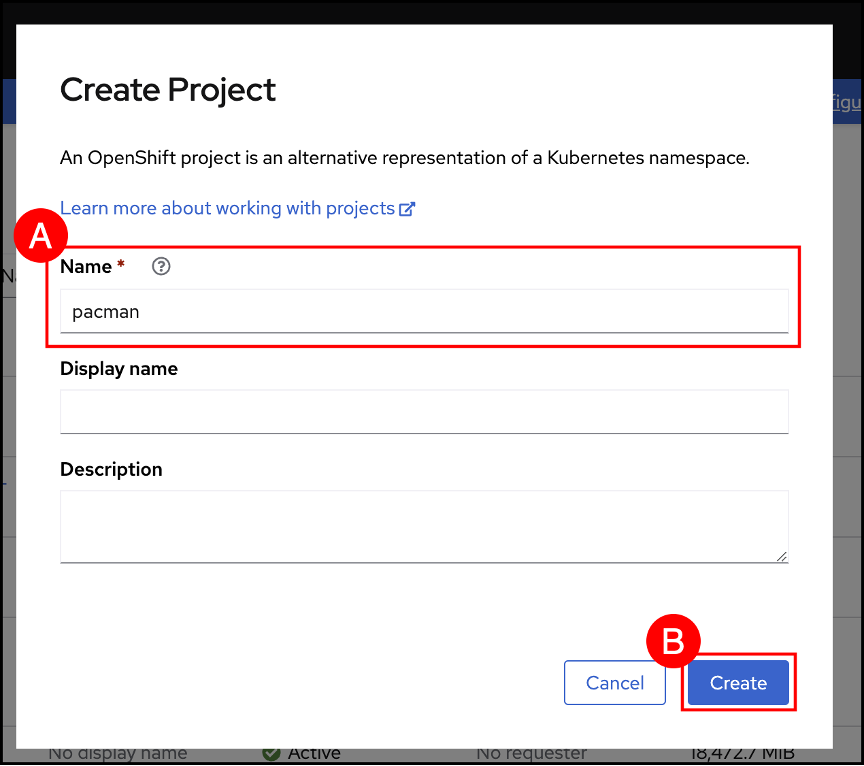
In the OpenShift GUI, navigate to the Projects screen by clicking on the Home (A) menu item in the left-hand side navigation pane and selecting the Projects (B) sub-item. When the Projects screen is shown, click on the Create Project © button.

In the popup dialog enter pacman as the name.
Use the following YAML file to create the PacMan Application in the pacman namespace.
kind: PersistentVolumeClaim
apiVersion: v1
metadata:
name: mongo-storage
spec:
storageClassName: ocs-storagecluster-ceph-rbd
accessModes:
- ReadWriteOnce
resources:
requests:
storage: 8Gi
---
apiVersion: apps/v1
kind: Deployment
metadata:
labels:
name: mongodb
app: mongodb
name: mongodb
spec:
replicas: 1
selector:
matchLabels:
name: mongodb
template:
metadata:
labels:
name: mongodb
app: mongodb
spec:
containers:
- image: bitnami/mongodb:5.0.24-debian-11-r20
name: mongodb
ports:
- name: mongodb
containerPort: 27017
volumeMounts:
- name: mongo-db
mountPath: /bitnami/mongodb/data/db
volumes:
- name: mongo-db
persistentVolumeClaim:
claimName: mongo-storage
---
apiVersion: v1
kind: Service
metadata:
labels:
name: mongodb
name: mongo
spec:
type: ClusterIP
ports:
- port: 27017
targetPort: 27017
selector:
name: mongodb
---
apiVersion: apps/v1
kind: Deployment
metadata:
labels:
name: pacman
name: pacman
spec:
replicas: 1
selector:
matchLabels:
name: pacman
template:
metadata:
labels:
name: pacman
spec:
containers:
- image: quay.io/jpacker/nodejs-pacman-app:latest
name: pacman
ports:
- containerPort: 8080
name: http-server
initContainers:
- name: db-check
image: busybox:latest
command: ['sh', '-c', 'echo -e "Checking for the availability of MongoDB Server deployment"; while ! nc -z mongo 27017; do sleep 1; printf "-"; done; echo -e " >> MongoDB Server has started";']
---
apiVersion: v1
kind: Service
metadata:
name: pacman
labels:
name: pacman
spec:
type: ClusterIP
ports:
- port: 80
targetPort: 8080
protocol: TCP
selector:
name: pacman
---
apiVersion: route.openshift.io/v1
kind: Route
metadata:
name: pacman
labels:
app.kubernetes.io/name: pacman
spec:
path: "/"
to:
kind: Service
name: pacman
tls:
termination: edge
insecureEdgeTerminationPolicy: Redirect
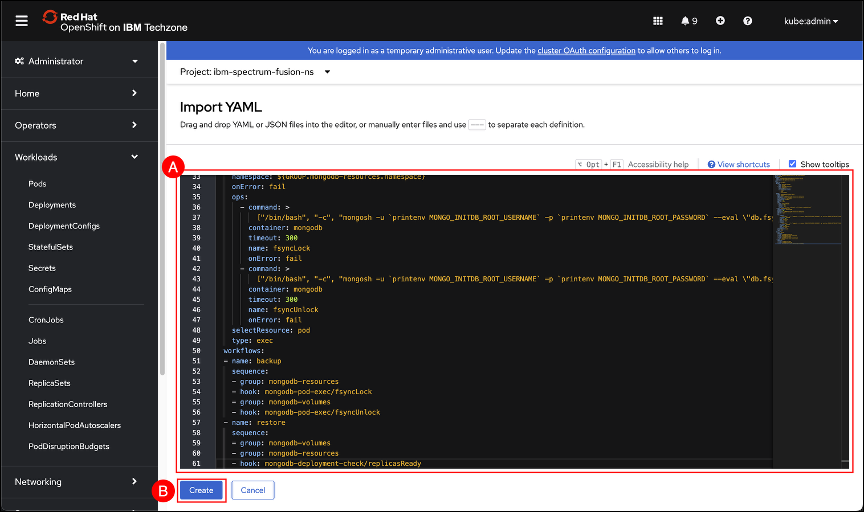
wildcardPolicy: NoneClick the Import YAML (A) (the icon that looks like a + sign) button on the OpenShift GUI masthead.

Navigate back to the OpenShift GUI and use Ctrl-V (windows), CMD-V (Mac) or the browser Edit → Paste function to paste the contents of the clipboard into the editor (A) text entry field. Click the Create (B) button to create the recipe.
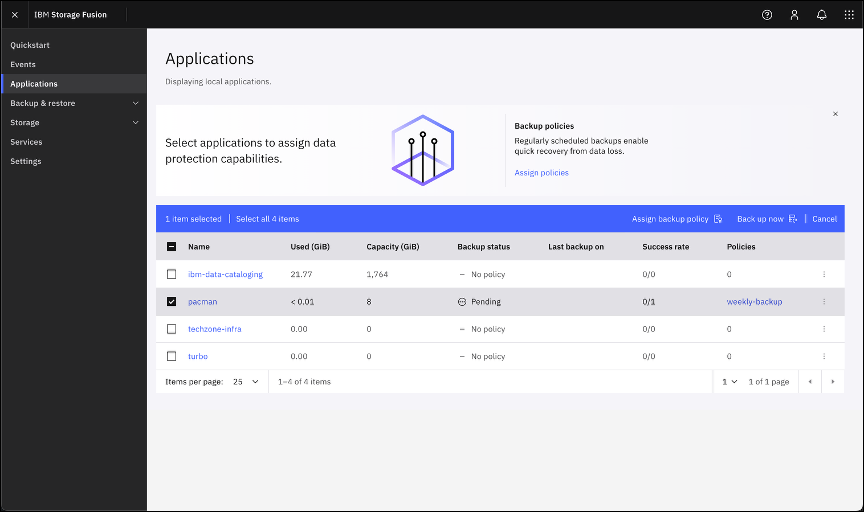
In the Fusion GUI, navigate to the Applications screen by clicking on the Applications (A) menu item shown in the left-hand side navigation pane. When the Applications screen is shown, select the pacman checkbox (B) and click on the Assign backup policy © button.
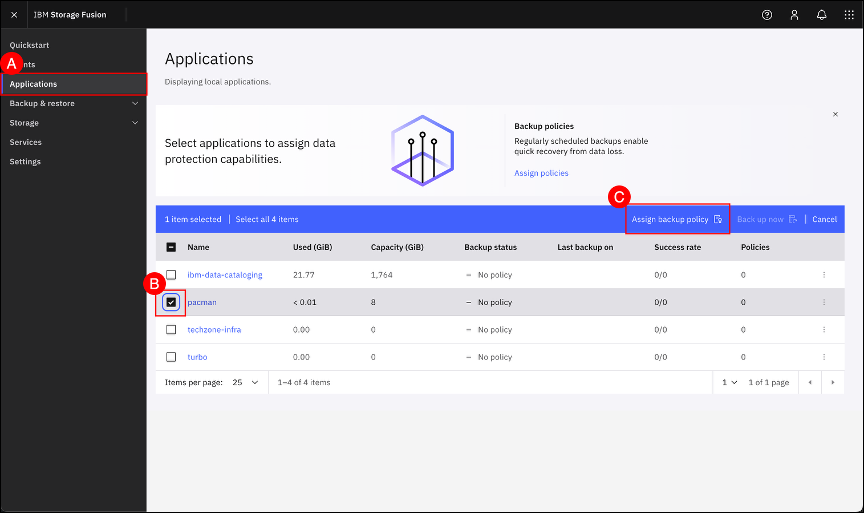
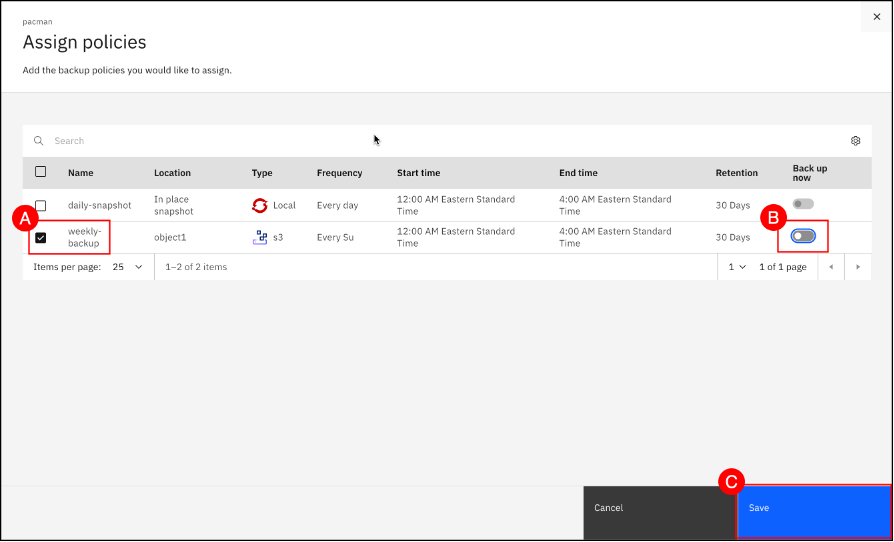
Select the weekly-backup policy (A) and use the Backup up now (B) toggle to disable the initial backup (shown as gray when disabled). Click the Save © button.
| IMPORTANT. Set the Backup up now option to disabled (indicated by the absence of a green checkmark) to prevent an initial backup. The Pacman application does not generate sufficient changes in the MongoDB database and performing an initial backup without the appropriate recipe may result in restore failures when using Change Block Tracking (CBT). |
The Pacman application is now associated with the weekly-backup policy.
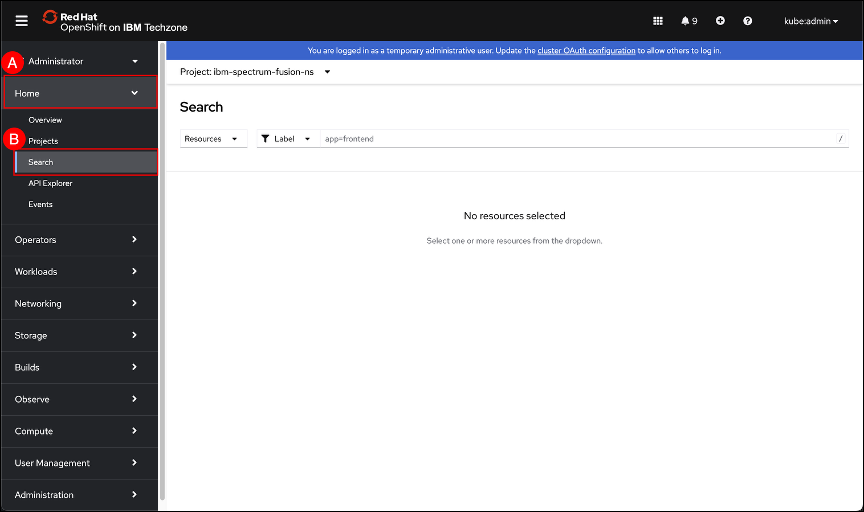
In the OpenShift GUI, navigate to the Search screen by clicking on the Home (A) menu item shown in the left-hand side navigation pane and selecting the Search (B) sub-item.
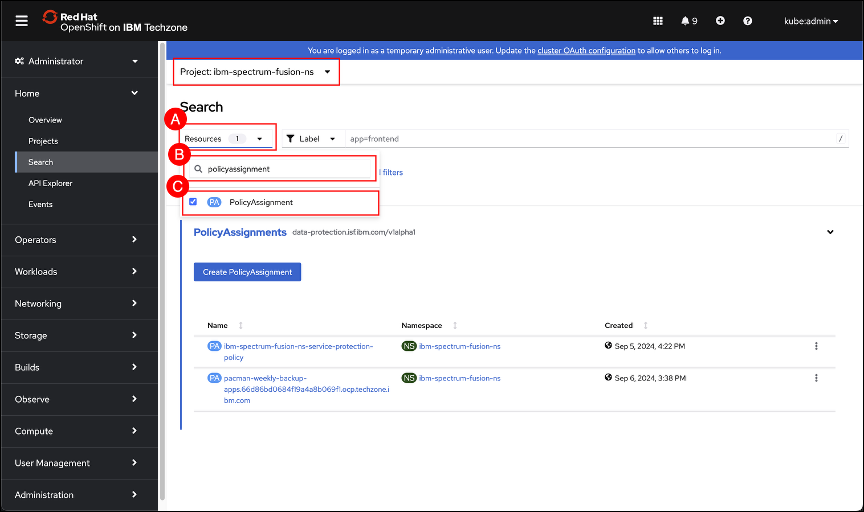
Change to the ibm-spectrum-fusion-ns project, if not already there. Refer to section OpenShift project selector on how to use the project selector. Open the drop-down list associated with the Resources (A) field and (B) enter policyassignment in the search box text entry field (displayed with a magnifying glass). Select the PolicyAssignment ©. Click anywhere outside the drop-down list to dismiss the window.
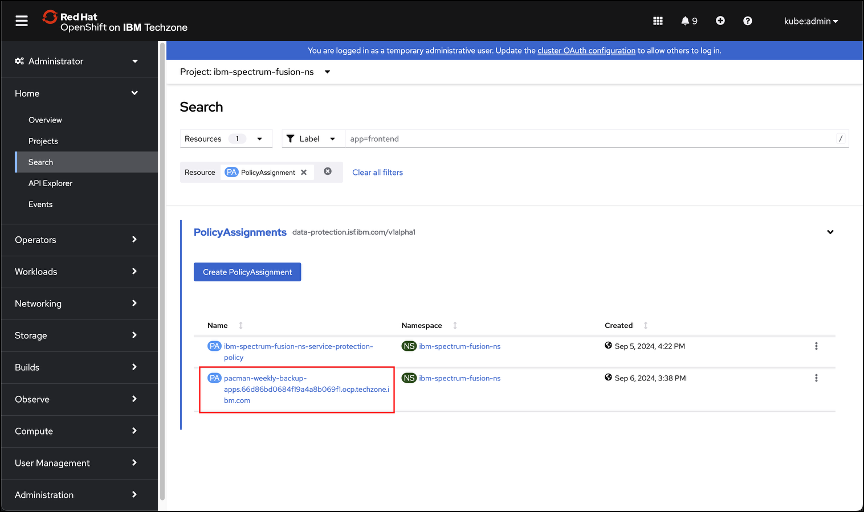
Click on the PolicyAssignment associated with the pacman application that was just created. The syntax for the policy is, <application>-<backup policy>-<backup cluster name>. In the example shown here, the PolicyAssignment name is pacman-weekly-backup-apps.66d86bd0694f19a4a8b069f1.ocp.techzone.ibm.com.
Click the YAML (A) tab.
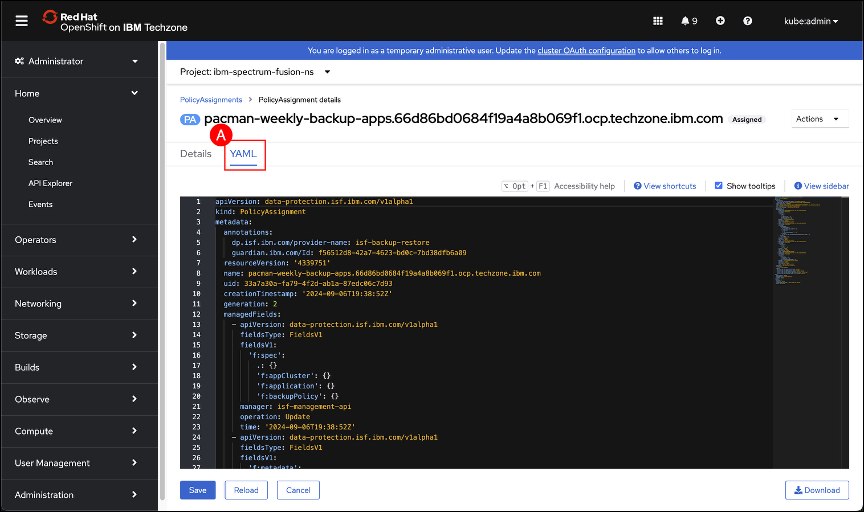
The recipe created in Step 13 will now be added to the Pacman weekly-backup PolicyAssignment.
The recipe syntax is as follows for use in a PolicyAssignment.
spec:
  recipe:
    apiVersion: spp-data-protection.isf.ibm.com/v1alpha1
    name: RECIPE_NAME
    namespace: RECIPE_NAMESPACE
RECIPE_NAME is the name of the recipe as specified in the Recipe CR.
RECIPE_NAMESPACE is the namespace where the Recipe CR is located.
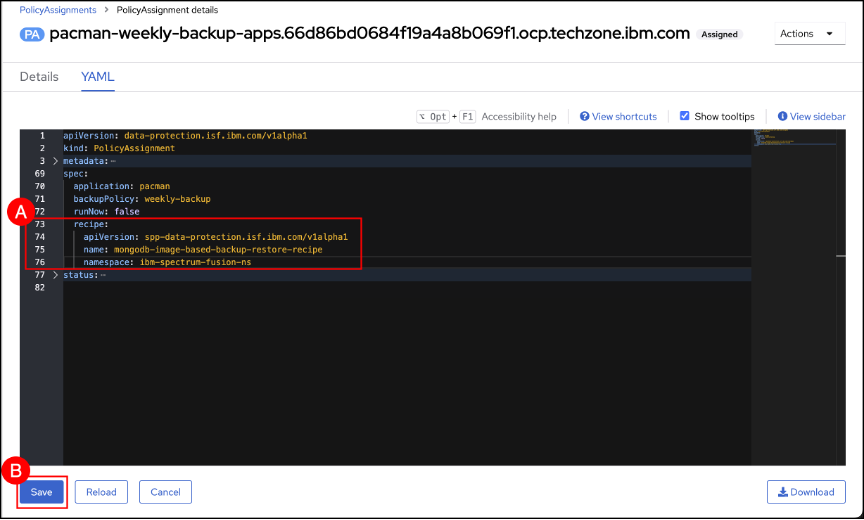
Enter the following 4 lines before status and after runNow as shown in the screenshot. The spacing included in the text entered is needed to conform to the YAML used by OpenShift.
| for readability the metadata and status information have been collapsed using the expand/collapse buttons on the left-hand side of the editor. |
  recipe:
    apiVersion: spp-data-protection.isf.ibm.com/v1alpha1
    name: mongodb-image-based-backup-restore-recipe
    namespace: ibm-spectrum-fusion-ns
Click the Save (A) button after the 4 new lines have been added.
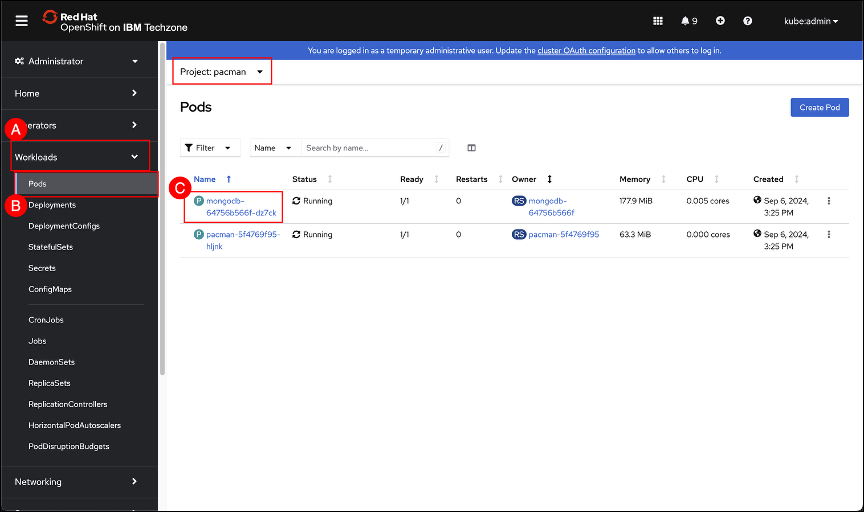
Change to the pacman project using the Project selector if necessary. Refer to section OpenShift project selector on how to use the project selector. Navigate to the Pods screen by clicking on the Workload (A) menu item shown in the left-hand side navigation pane and selecting the Pods (B) sub-item. Click on the mongodb-XXXXXXXXXX-YYYYY pod © to open the pod details page.
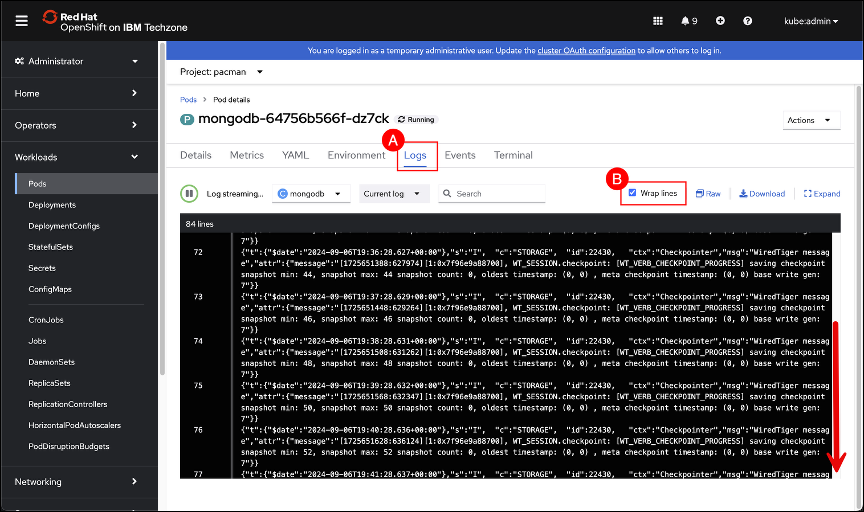
Click the Logs (A) tab and select Wrap lines (B) to improve readability. Scroll to the bottom of the logs if necessary. Leave this window open for now as we will return to it after a new backup has been run using the updated PolicyAssignment with the newly attached recipe.
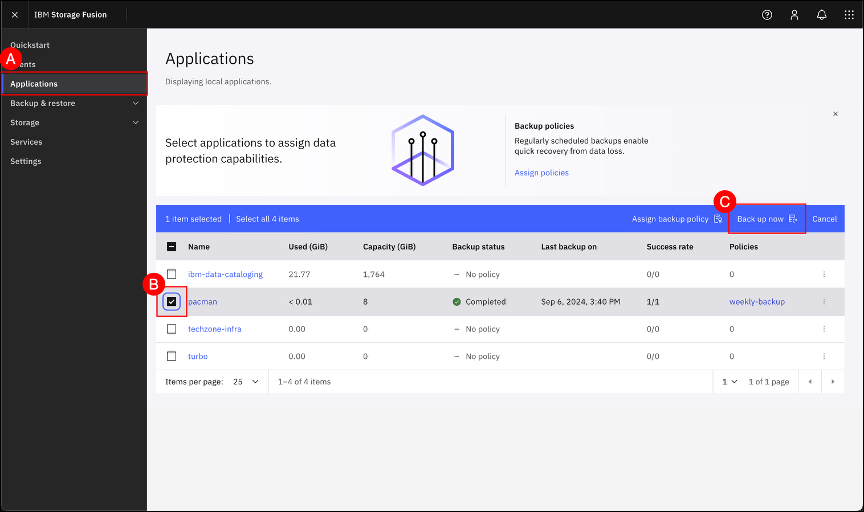
In the Fusion GUI, navigate to the Applications page by clicking on the Applications (A) menu item shown in the left-hand side navigation pane. When the Application screen is shown, select the pacman application (B) checkbox and click on the Back up now © button.
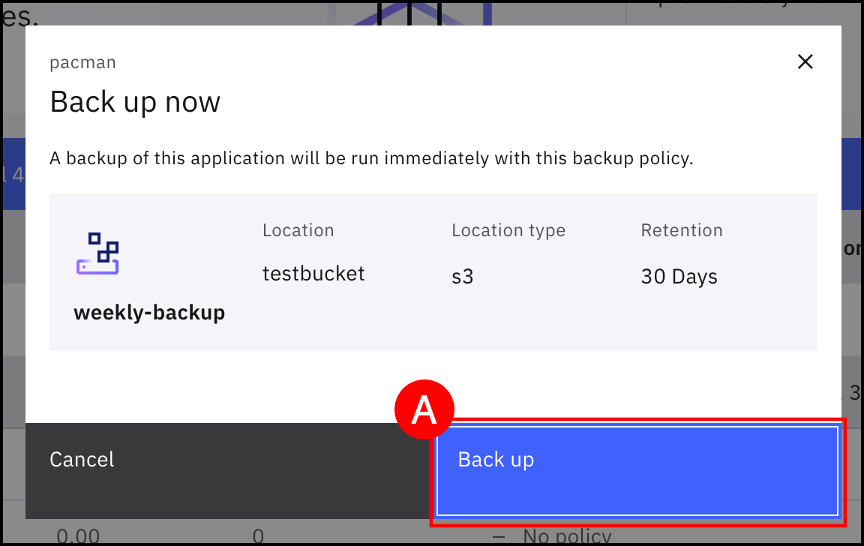
Click on the Back up (A) button.
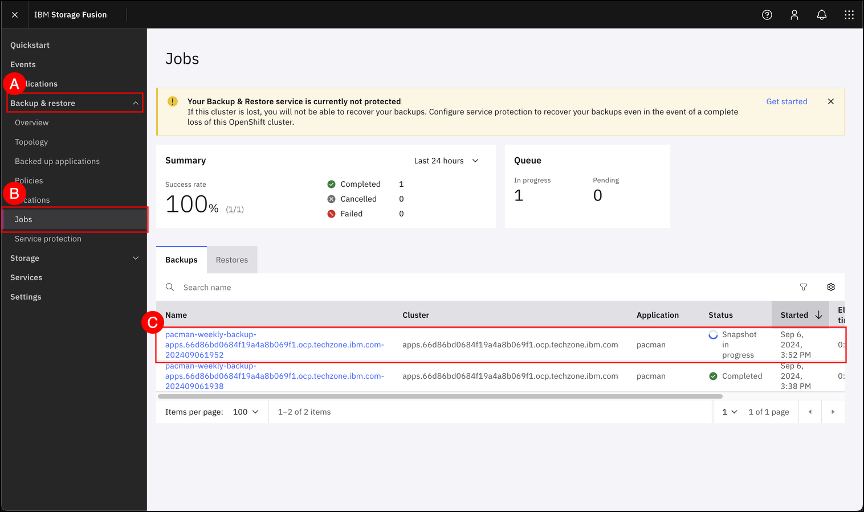
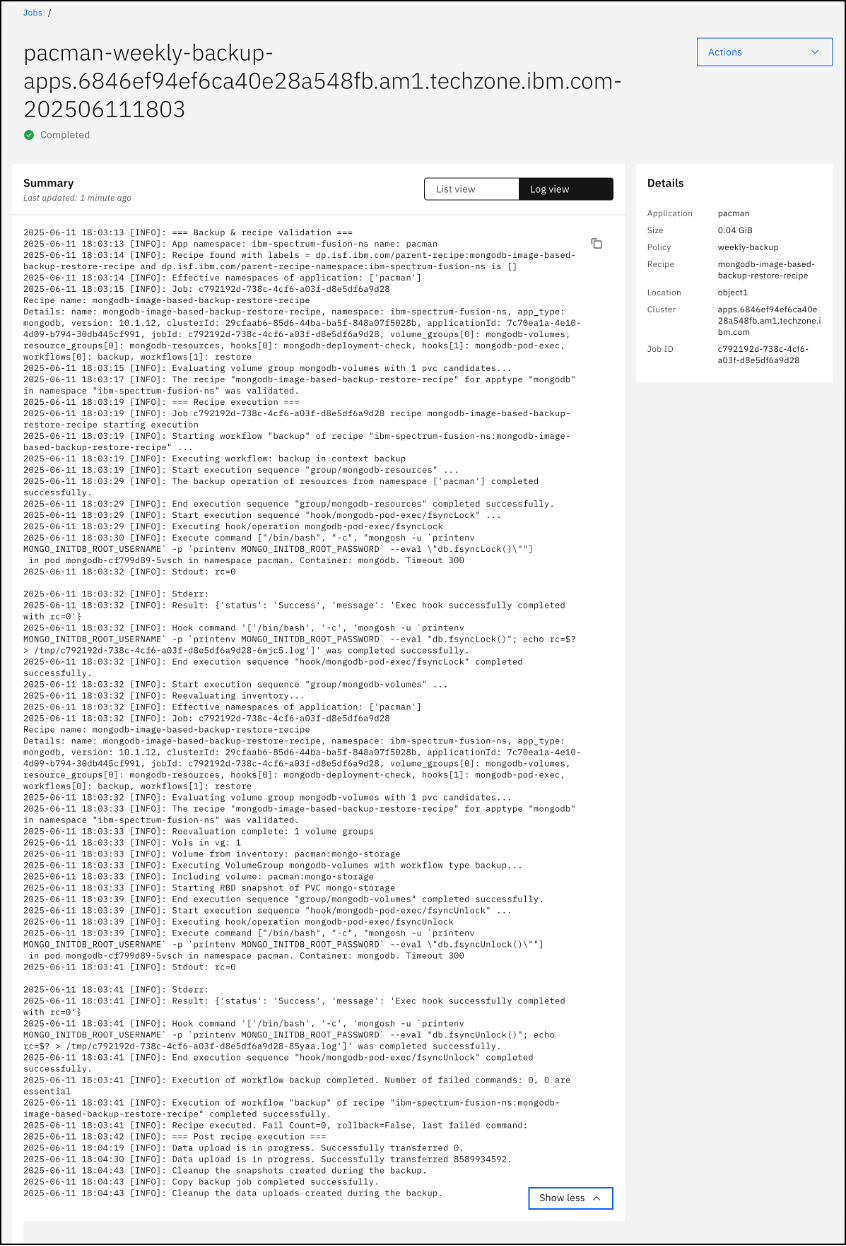
Navigate to the Jobs screen by clicking on the Backup & restore (A) menu item shown in the left-hand side navigation pane and selecting the Jobs (B) sub-item. When the Jobs screen is shown, click on the pacman-weekly-backup-<cluster name> job © to open the job details page.
Verify that the Backup sequence includes hooks provided in the backup recipe by expanding the Backup sequence section of the Jobs details.
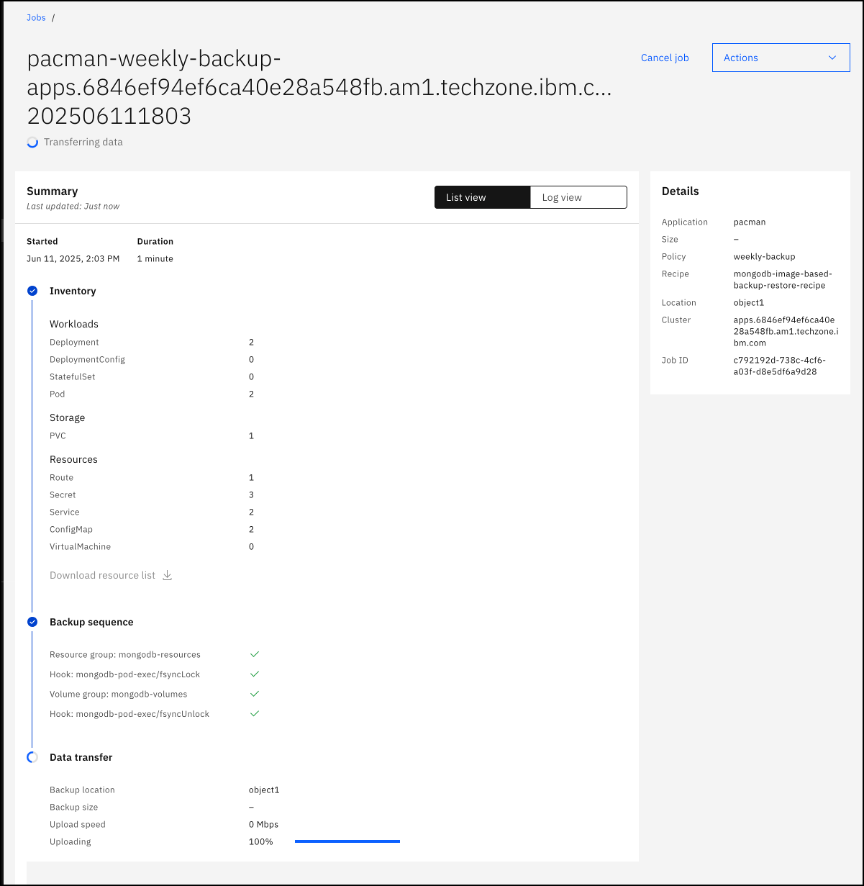
Additional details can be displayed by selecting the Log view on the Backup Jobs page.
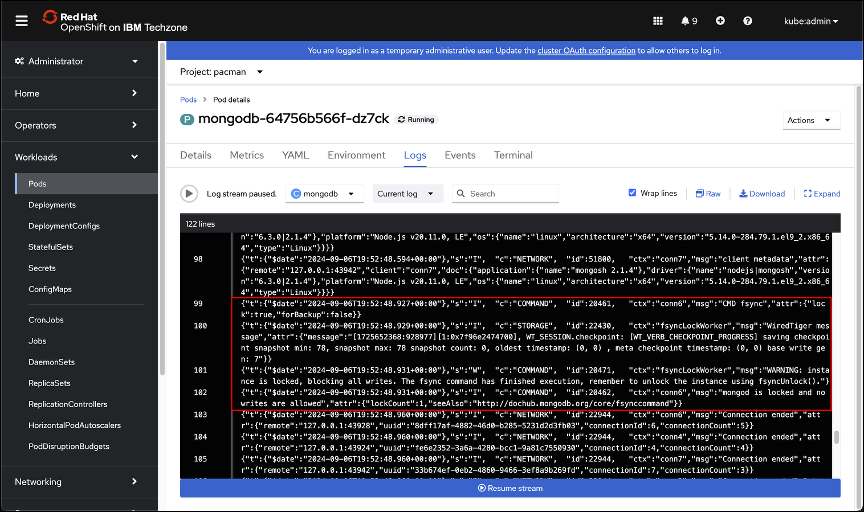
In the OpenShift GUI, navigate back to the mongodb Pod logs and look for the fsyncLock command to be executed. You may need to scroll back to find the COMMAND being run.
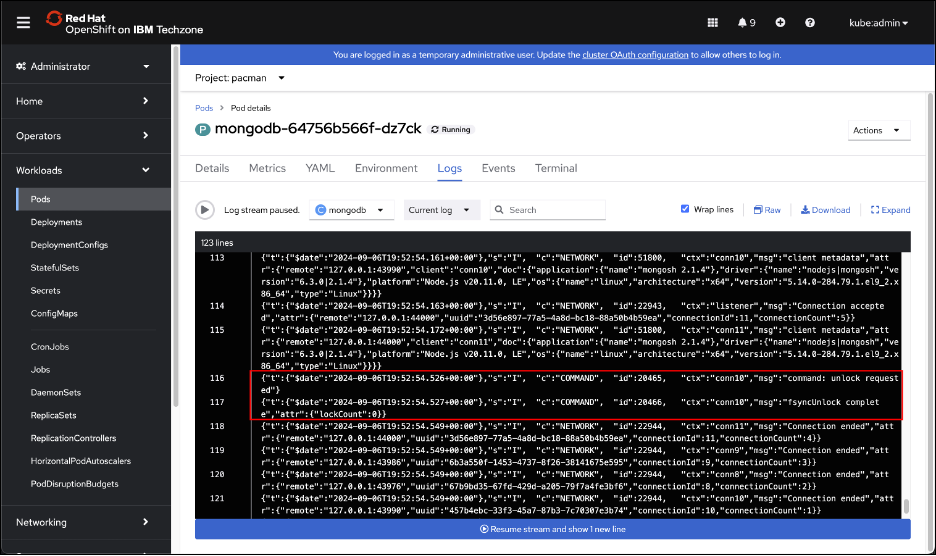
Continue investigating the mongodb logs and find the fsyncUnlock log entry.
Exercise 5: Backup Service Protection
The IBM Storage Fusion Backup & Restore service protection involves the backup of the control plane to a S3 object bucket. In the event of cluster failure, you can use this feature to restore the Backup & Restore service to another cluster. In this section you will configure service protection and run the initial service backup.
| To follow this section, create a new object bucket claim, as was done in the backup location section and use the new bucket claim info service protection. |
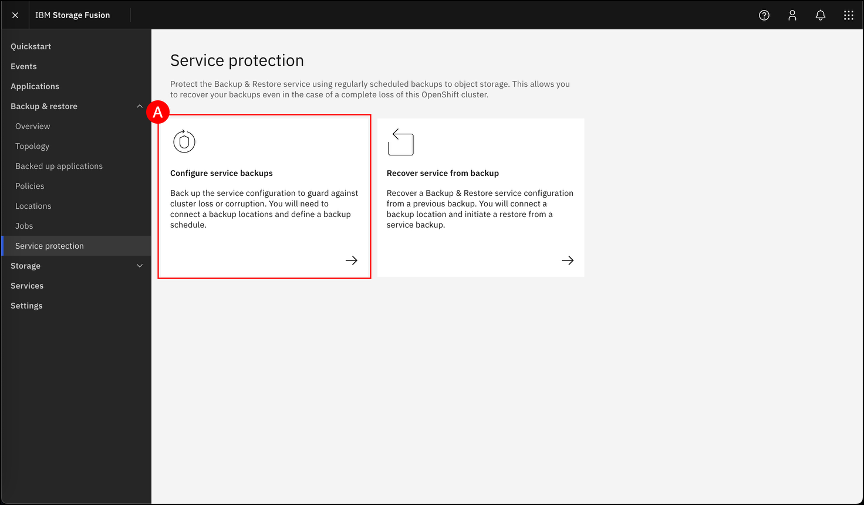
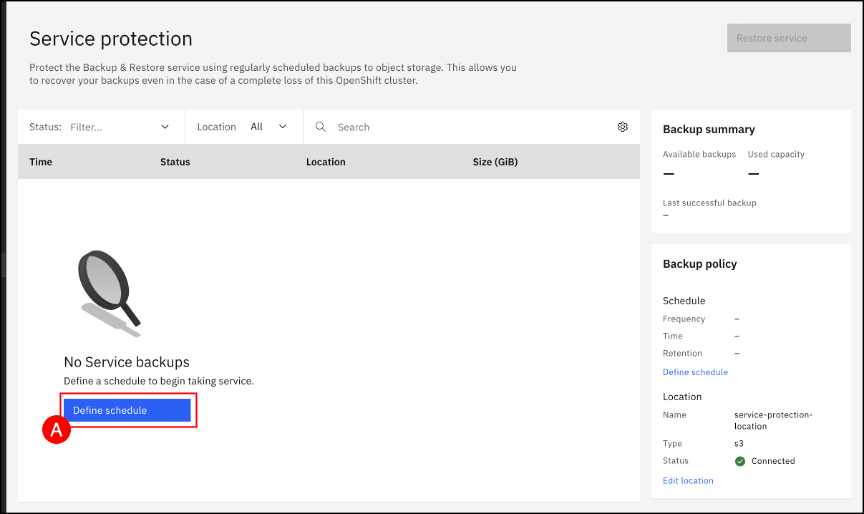
In the Fusion GUI, navigate to the Service protection page by clicking on the Backup & restore (A) menu item shown in the left-hand side navigation pane and selecting Service protection (B) sub-item.
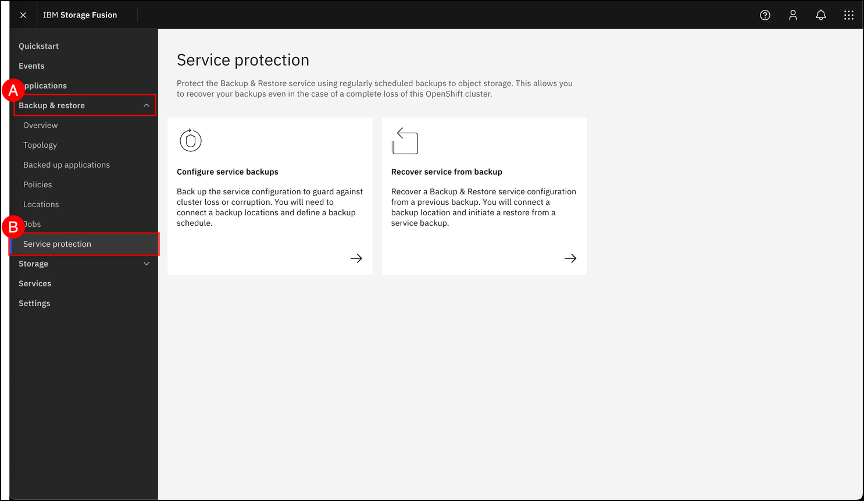
Click on the Configure service backups (A) tile.
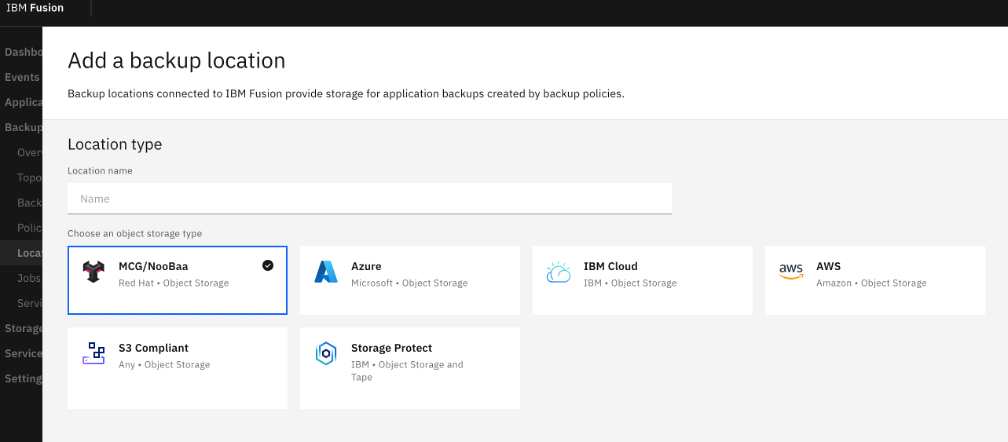
Click on the S3 Compliant tile in the Choose an object storage type wizard step and click the Next button.
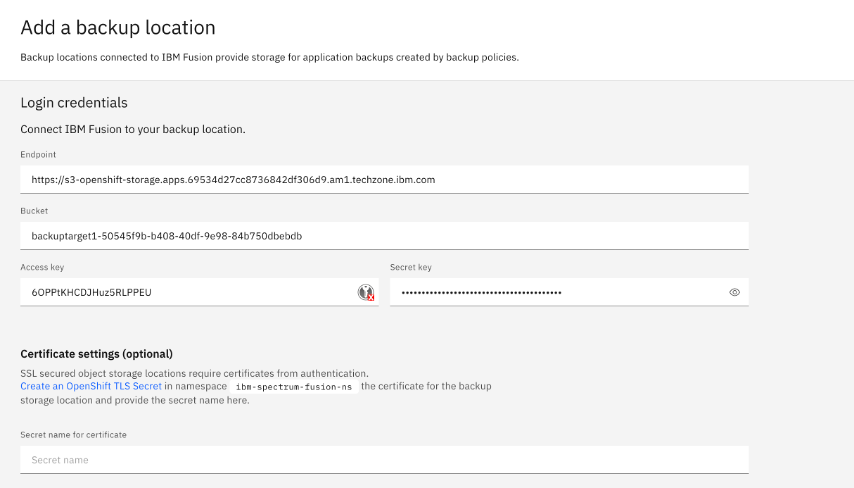
Enter the S3 endpoint and connection information, from the noobaa bucket claim you created.
An Adding backup location, Location service-protection-location is being added message will appear in the upper-right corner of the Fusion GUI.
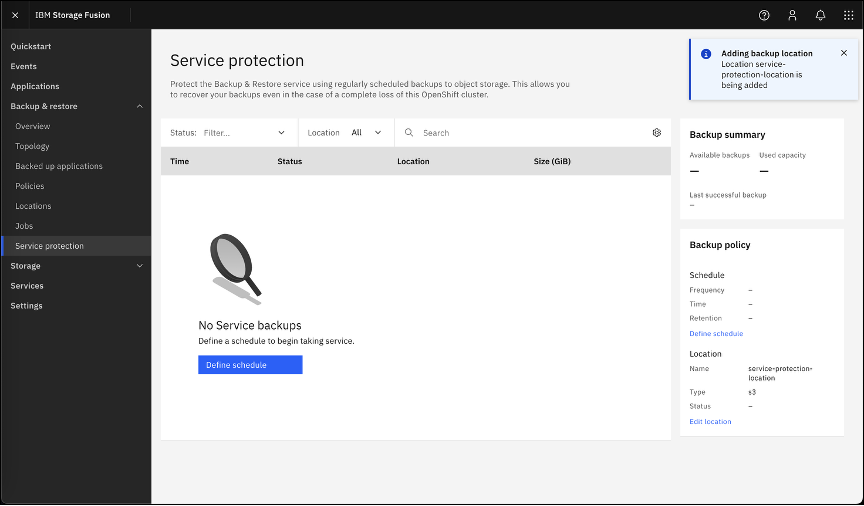
Click the Define schedule (A) button to configure a schedule for service protection.
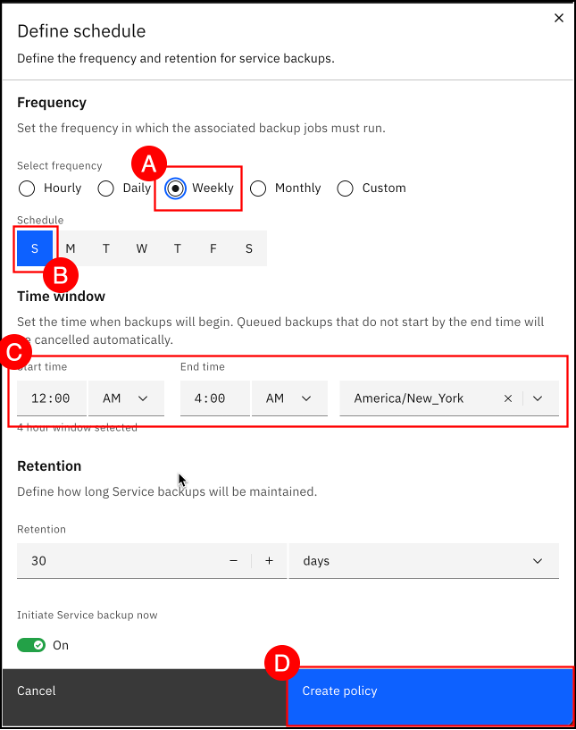
Select Weekly (A) under the Select frequency item, select Sunday (B) from the Schedule item, and select a Start time, End time, and Timezone © under the Time window item. Click the Create policy (D) button. Leave Initiate Service backup now selected.
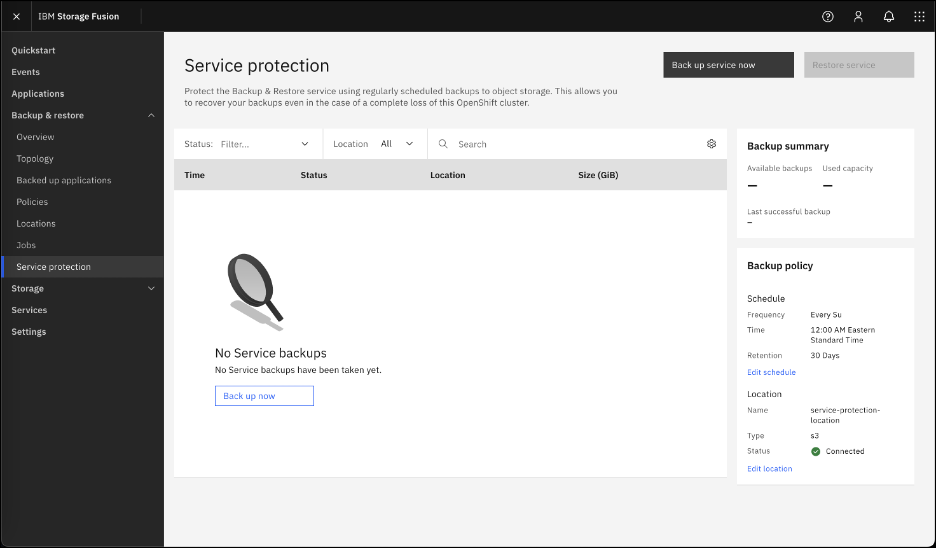
The backup service protection backup policy information should now be displayed.
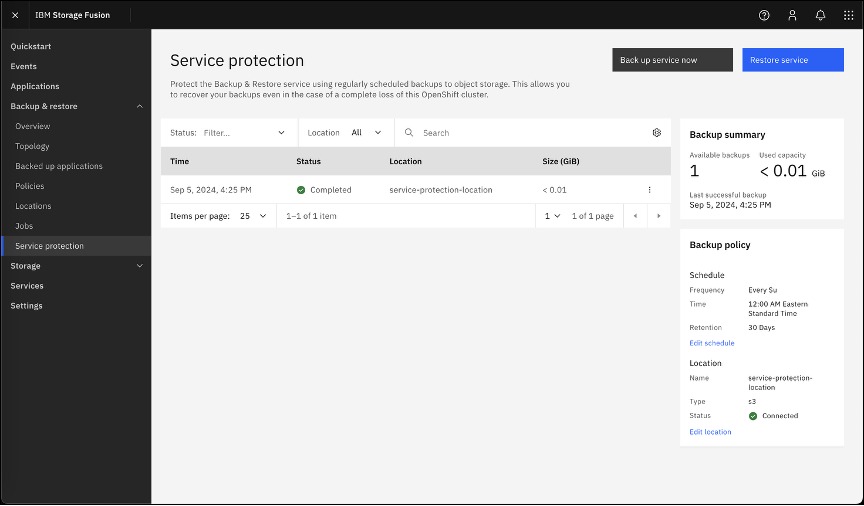
Confirm that backup service protection has been enabled for the IBM Fusion Backup & restore service.
Module summary
You have successfully explored the IBM Fusion Backup and Restore Service.
What you accomplished:
-
Defined backup and restore locations and policies.
-
Assigned backup polices to applications.
-
Restored an application to a new project.
-
Defined a backup service protection policy.
-
backup up and restored a virtual machine.
Key takeaways:
-
Fusion Backup and Restore is a key component of IBM Fusion and enhances Red Hat OpenShift.
-
IBM Fusion Backup and Restore has an easy to administer user interface.
-
Backup policies allow the customization of scheduled backup and create application consistent backups.