Working with Virtual Machines and Applications
Introduction
This section of our lab is dedicated to the Day-2 operations that many administrators would need to perform when working with virtual machines in their OpenShift Virtualization environment. We will make use of the understanding we have developed throughout this roadshow of how VMs operate in an OpenShift environment, and use those skills to complete the tasks in this section. In this particular case, we are going to work with the three virtual machines that we imported from VMware vSphere earlier in this roadshow, and we are going to make some minor configuration changes to enable the applications hosted on those servers to be accessed as they now run in OpenShift Virtualization. To accomplish this, we will install and configure a loadbalancer, and we will expose our applications using the service/route method that is the default when making use of the OpenShift SDN pod network so that the application is reachable from outside of the cluster.
MetalLB concepts
In this portion of the lab, we will review the MetalLB operator and understand how it exposes virtual machine hosted applications outside of the cluster.
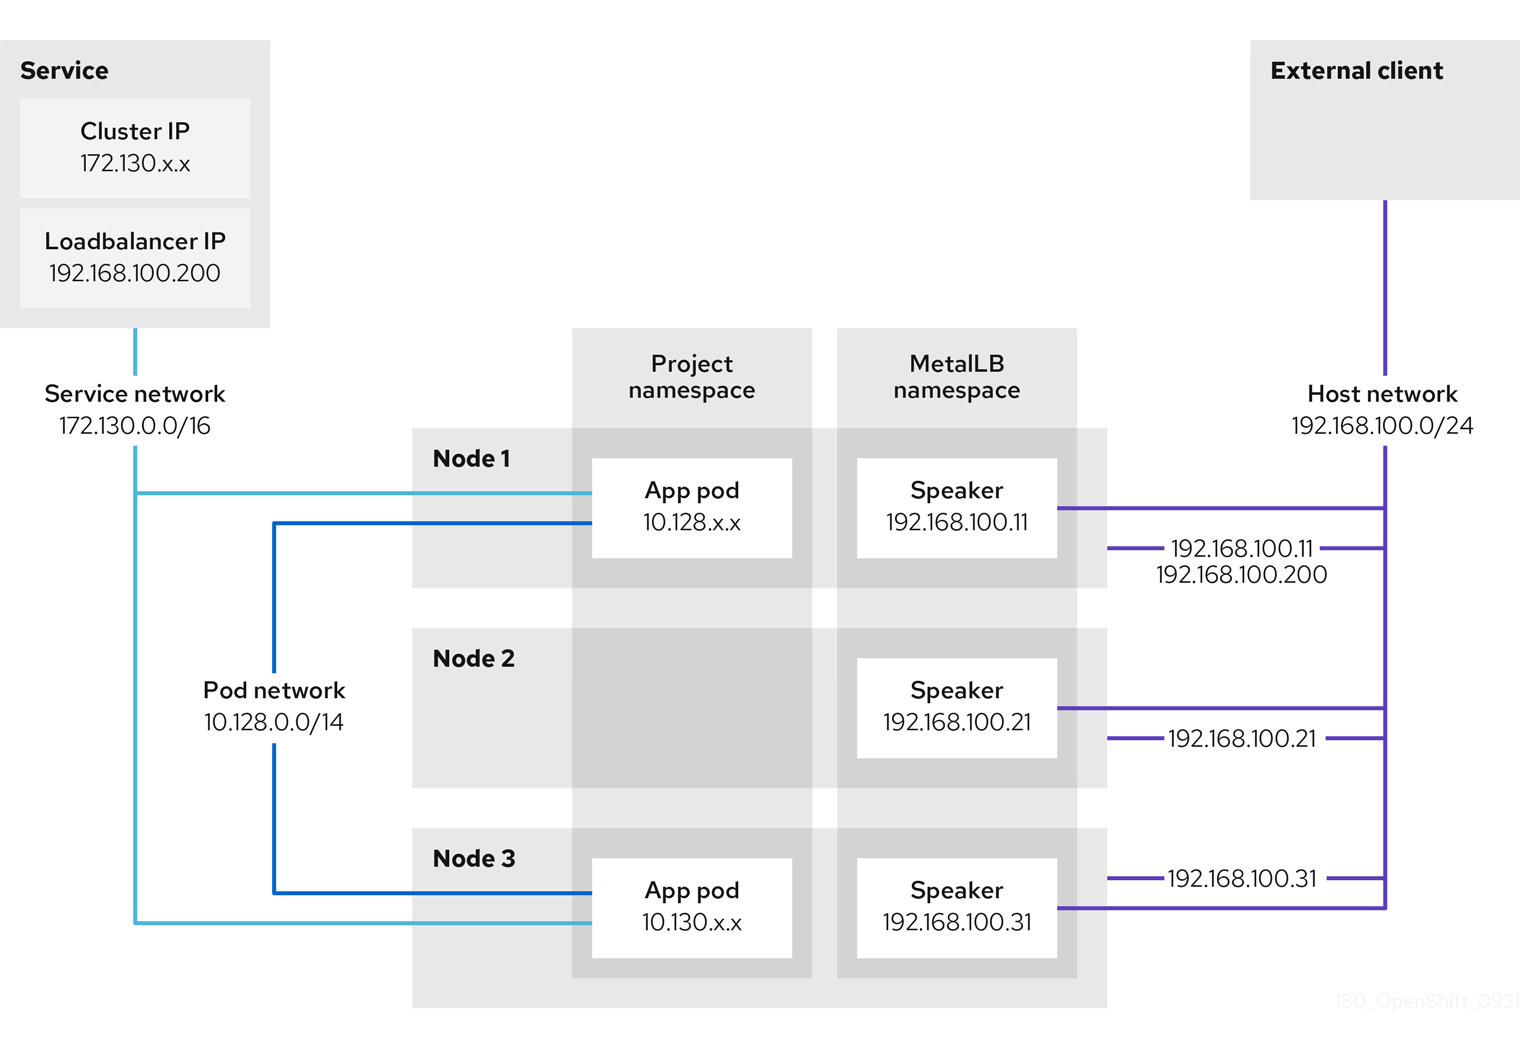
Using MetalLB is valuable when you have a bare-metal cluster or a virtual infrastructure that is treated like bare-metal, and you want to ensure that there is fault-tolerant access to an application through an external IP address.
For MetalLB to meet this need, you must configure your networking infrastructure to ensure that the network traffic for the external IP address is routed from clients to the host network for the cluster.
It can operate in two modes:
-
MetalLB operating in layer2 mode provides support for failover by utilizing a mechanism similar to IP failover. However, instead of relying on the virtual router redundancy protocol (VRRP) and keepalived, MetalLB leverages a gossip-based protocol to identify instances of node failure. When a failure is detected, another node assumes the role of the leader node, and a gratuitous ARP message is dispatched to broadcast this change.
-
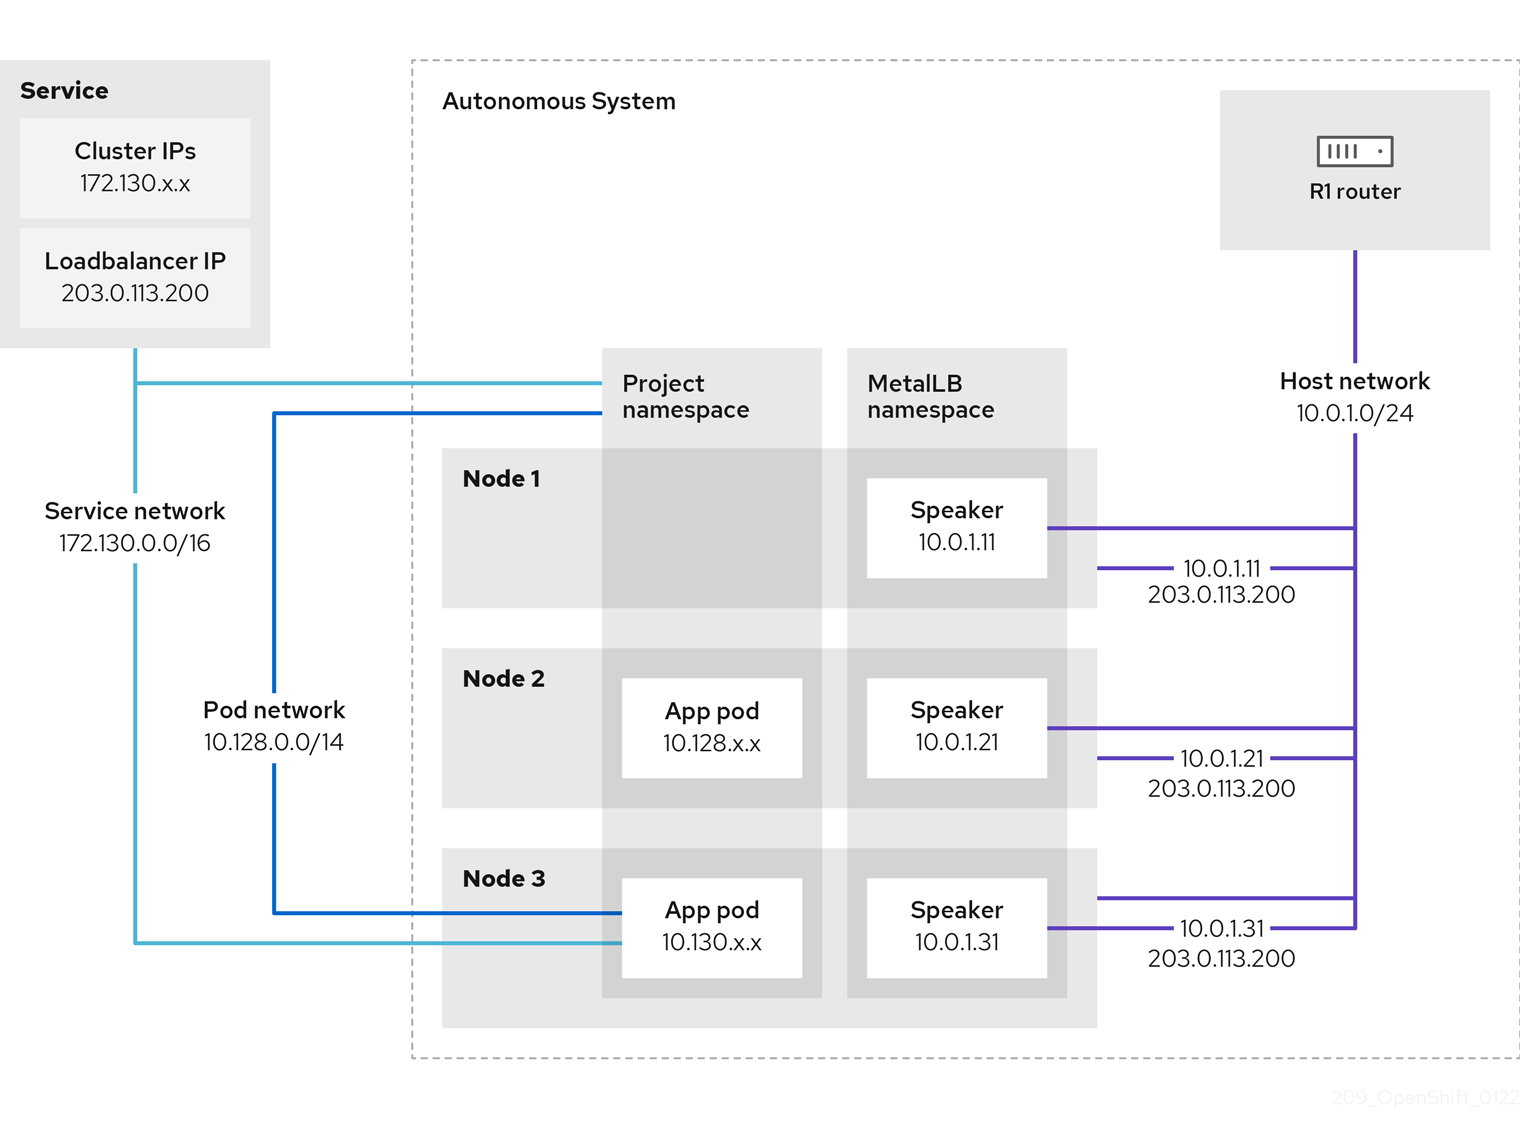
MetalLB operating in layer3 or border gateway protocol (BGP) mode delegates failure detection to the network. The BGP router or routers that the OpenShift nodes have established a connection with will identify any node failure and terminate the routes to that node.
Using MetalLB instead of IP failover is often preferable for ensuring high availability of pods and services.
Layer 2 mode
In layer 2 mode, the speaker pod on one node announces the external IP address for a service to the host network. From a network perspective, the node appears to have multiple IP addresses assigned to a network interface.
In layer 2 mode, all traffic for a service IP address is routed through one node. After traffic enters the node, the service proxy for the CNI network provider distributes the traffic to all the pods for the service.
When a node becomes unavailable, failover is automatic. The speaker pods on the other nodes detect that a node is unavailable, and a new speaker pod on a surviving node will take ownership of the service IP address from the failed node.
Layer 3 (BGP) mode
In BGP mode, by default, each speaker pod advertises the load balancer IP address for a service to each BGP peer. It is also possible to advertise the IPs coming from a given pool to a specific set of peers by adding an optional list of BGP peers. BGP peers are commonly network routers that are configured to use the BGP protocol. When a router receives traffic for the load balancer IP address, the router picks one of the nodes with a speaker pod that advertised the IP address. The router sends the traffic to that node. After traffic enters the node, the service proxy for the CNI network plugin distributes the traffic to all the pods for the service.
If a node becomes unavailable, the router then initiates a new connection with another node that has a speaker pod that is advertising the load balancer IP address.
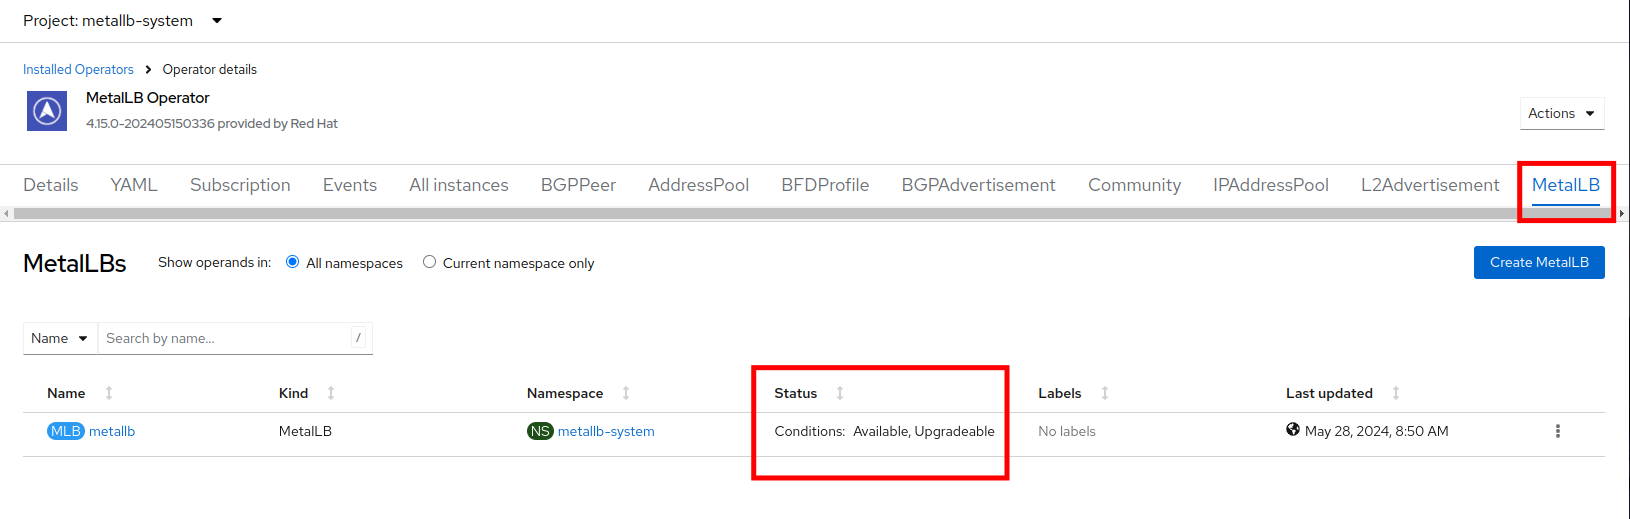
Review the MetalLB Operator
-
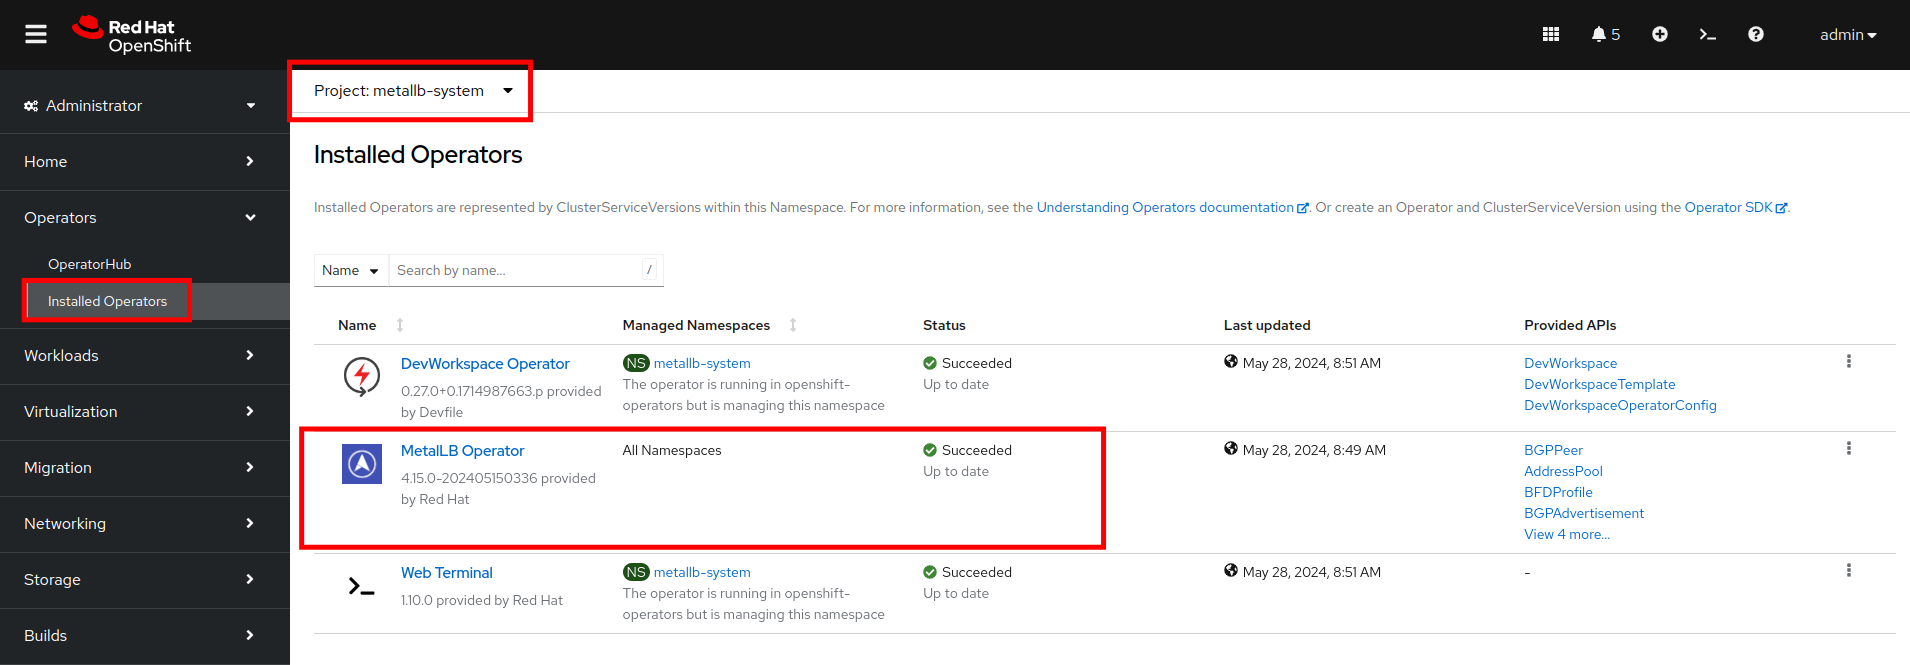
Navigate to Operators → Installed Operators. Click on the the Project: dropdown and select the metallb-system namespace.
-
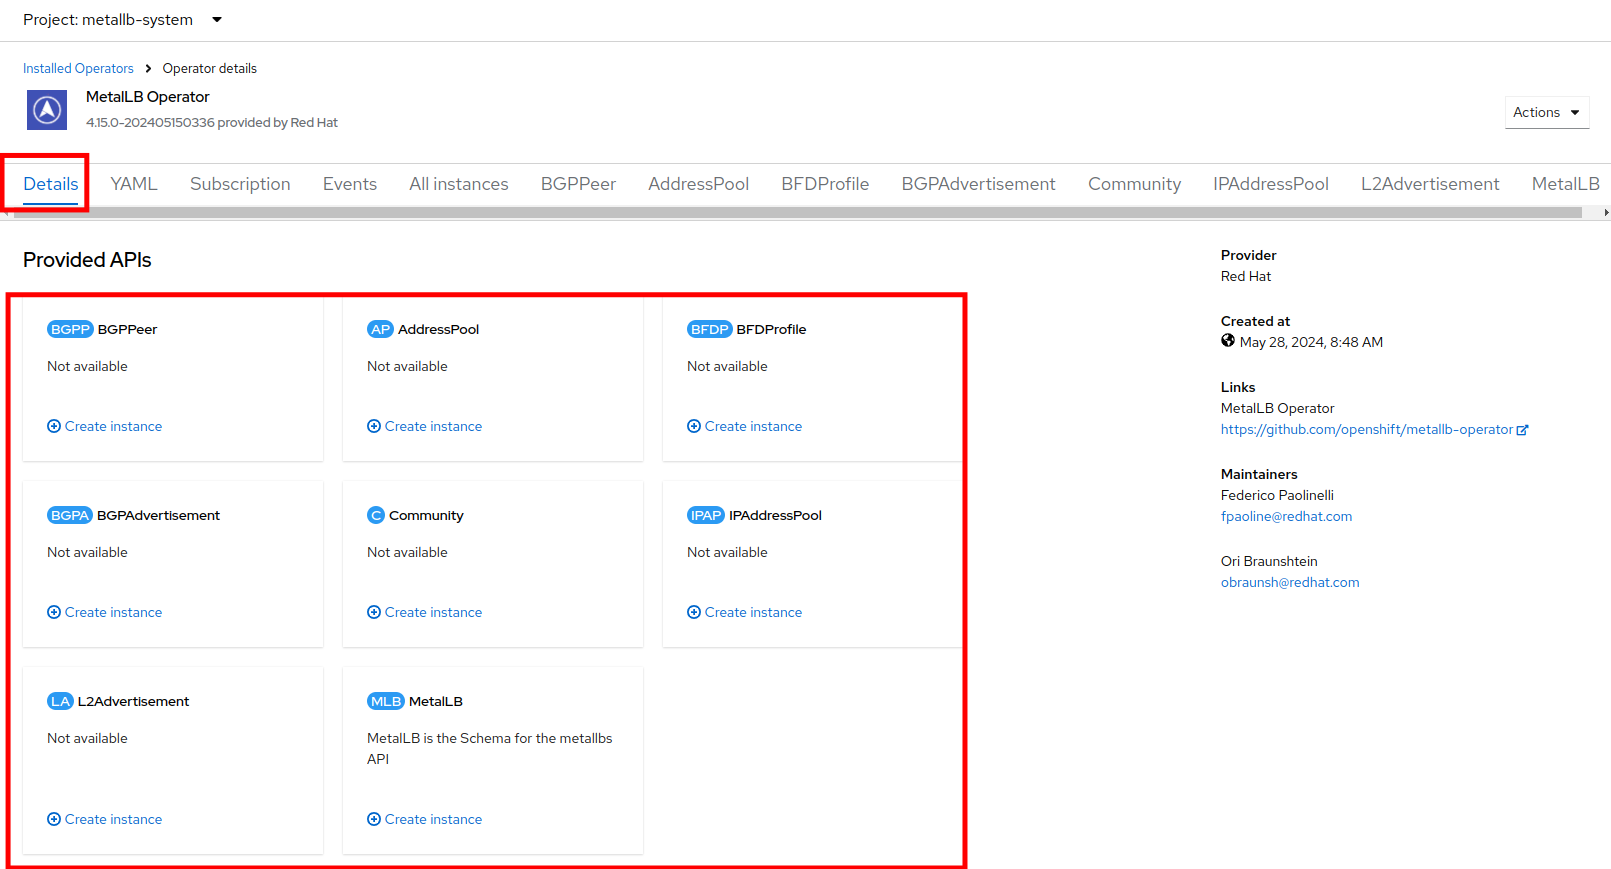
Click on the operator and review the Provided APIs on the Details tab.
-
Select the tab MetalLB to ensure the deployment is installed and configured correctly
Configure MetalLB
With our MetalLB application successfully installed it’s now time to configure it for our use.
For this portion of the lab, we will use the same network where the OpenShift Cluster nodes are located (192.168.123.0/24) and for this exercise we will reserve the IP range 192.168.123.200-192.168.123.250 to be used for load balanced services in the OpenShift cluster.
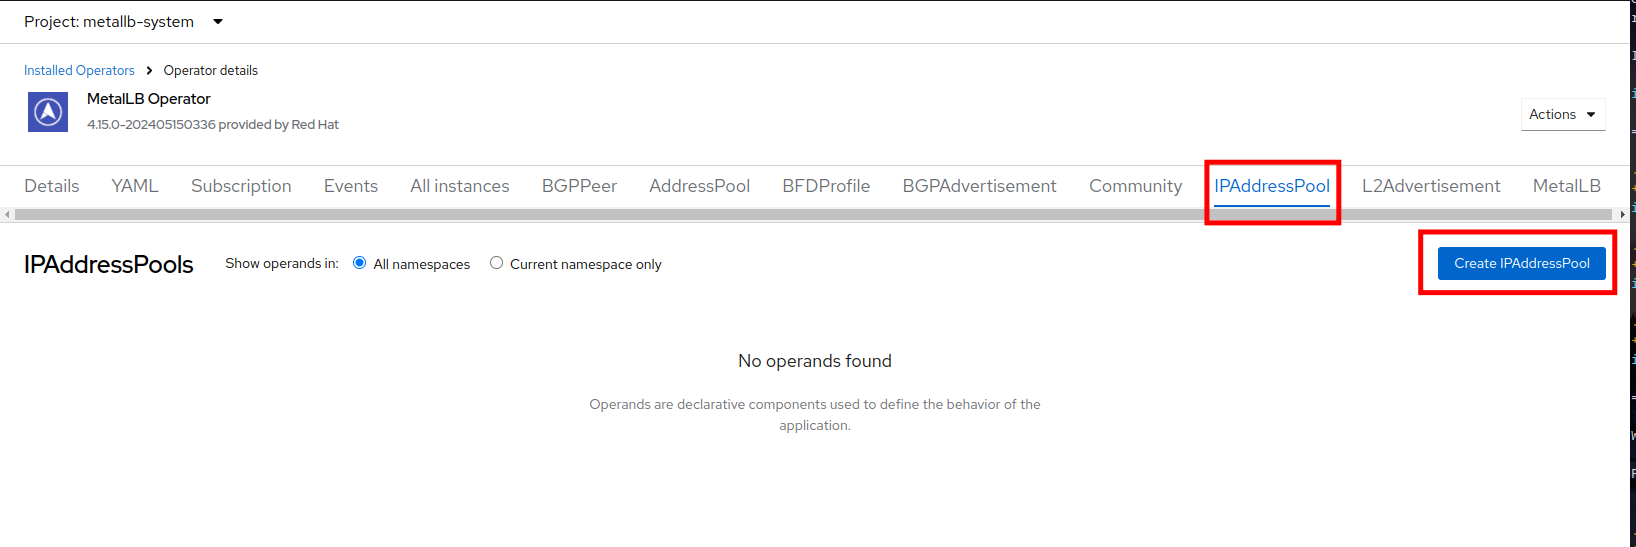
Create IPAddress Pool
The first step is to create an IP address pool to assign IPs to applications to be accessed from outside our cluster.
-
Click on the tab for IPAddressPool click on the button for Create IPAddressPool.
-
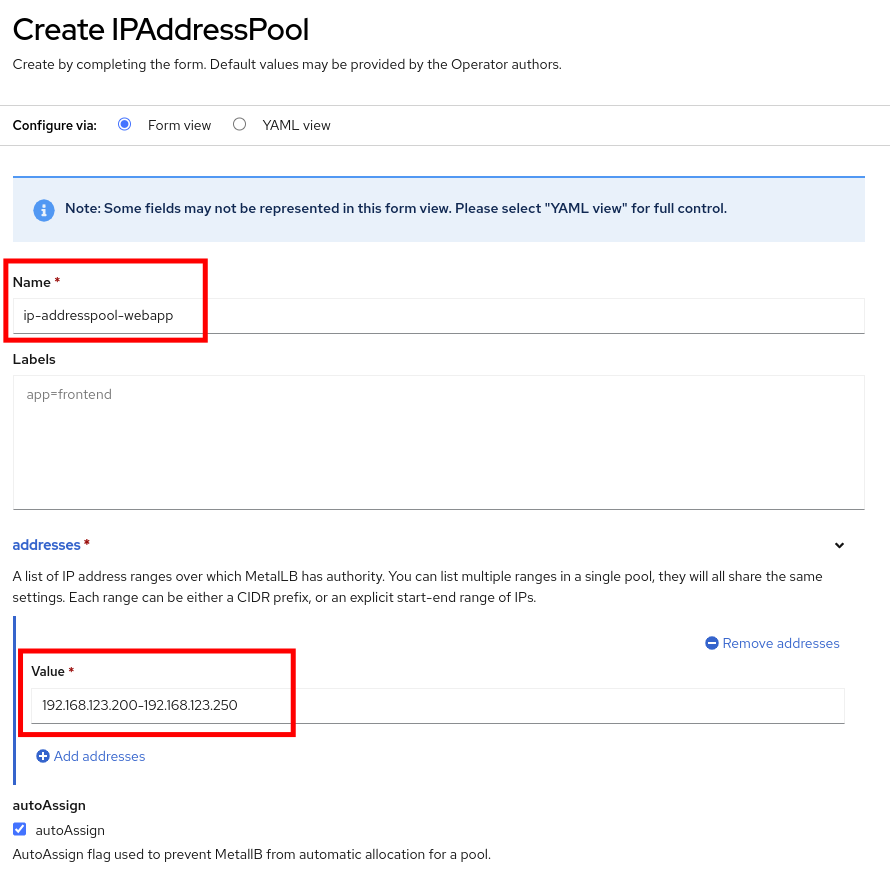
Use the name ip-addresspool-webapp and under section addresses, remove any existing addresses and enter 192.168.123.200-192.168.123.250 as the address pool. When complete it should look similar to this image:
-
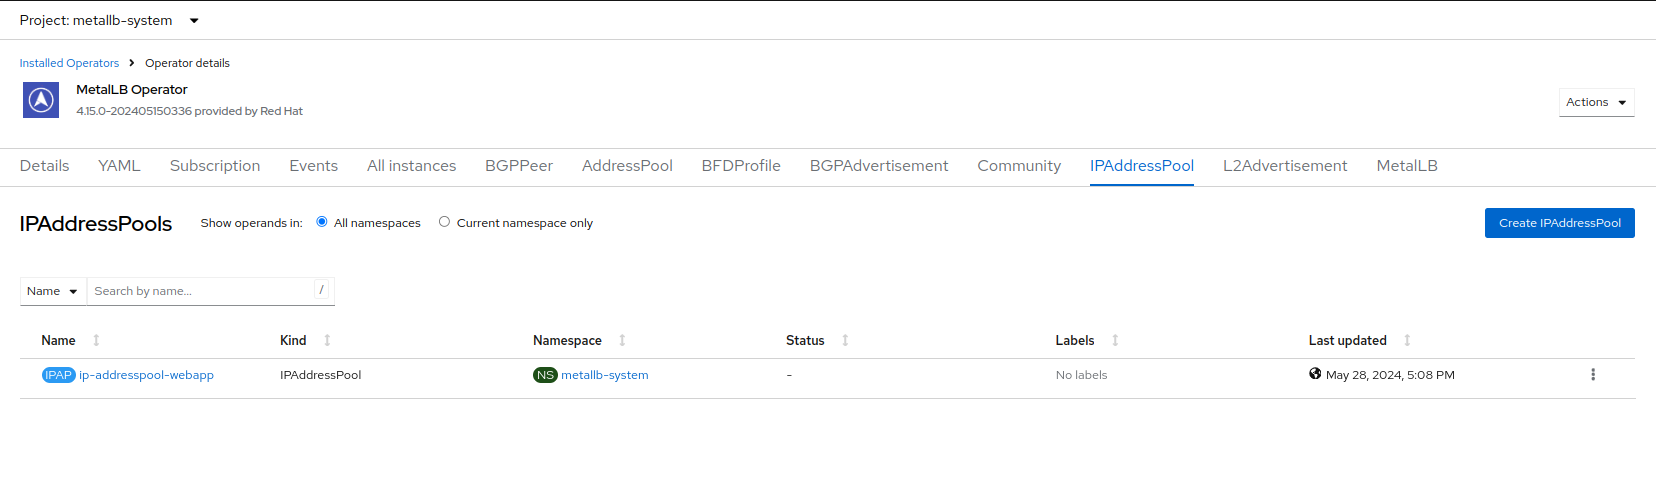
Scroll down and press Create. You will be returned to the main operator page where you will see that the IPAddressPool is now created.
Configure Layer2 mode
For this lab we will use MetalLB in layer2 mode, so we need to create the configuration.
-
Switch to the L2Advertisement tab (you may need to scroll the tab list to the right to see it) and press Create L2Advertisement.
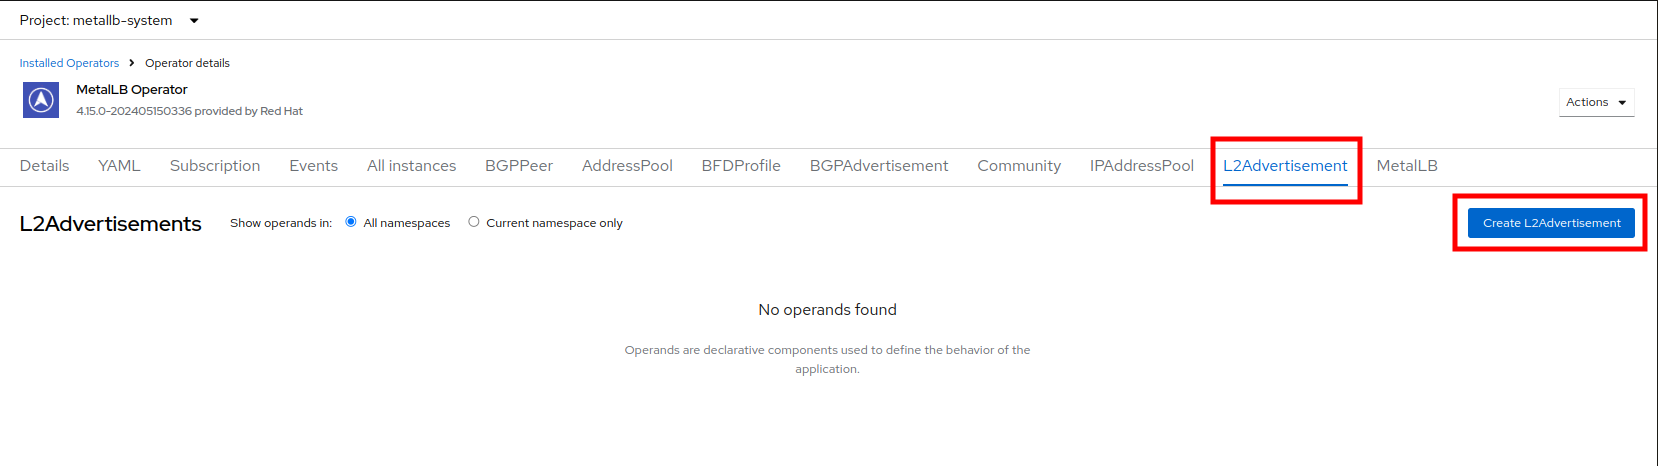
-
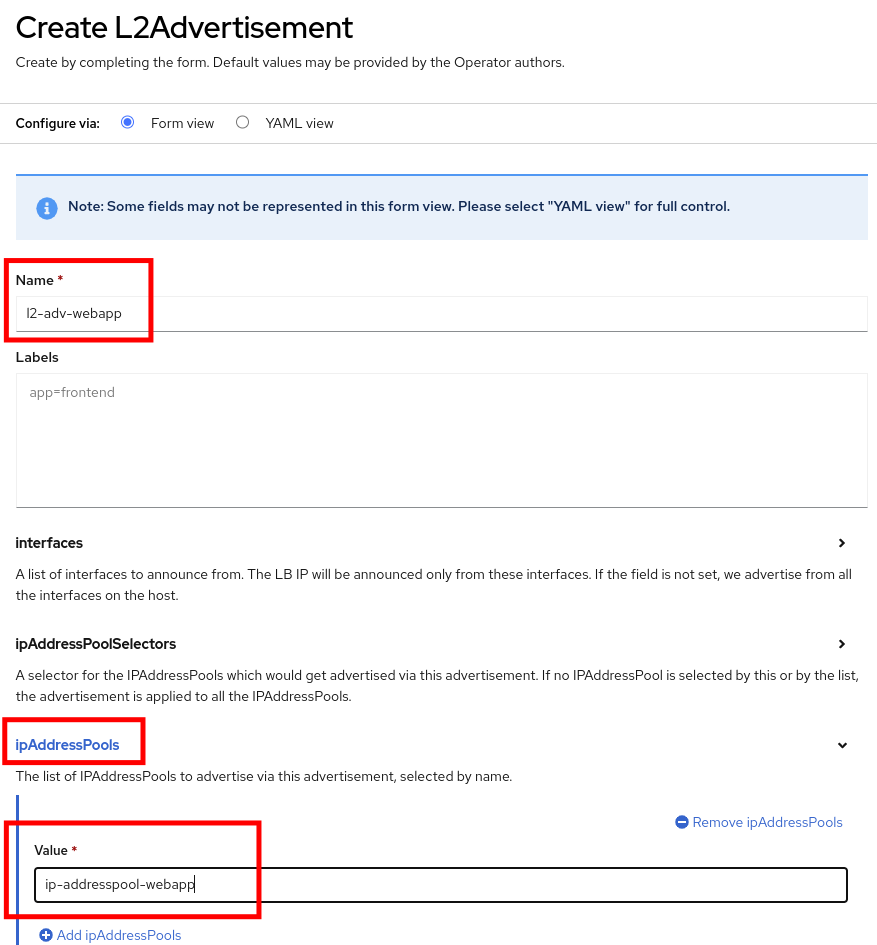
Indicate the name l2-adv-webapp and under section ipaddressPools specify the value ip-addresspool-webapp as is shown in the following image:
-
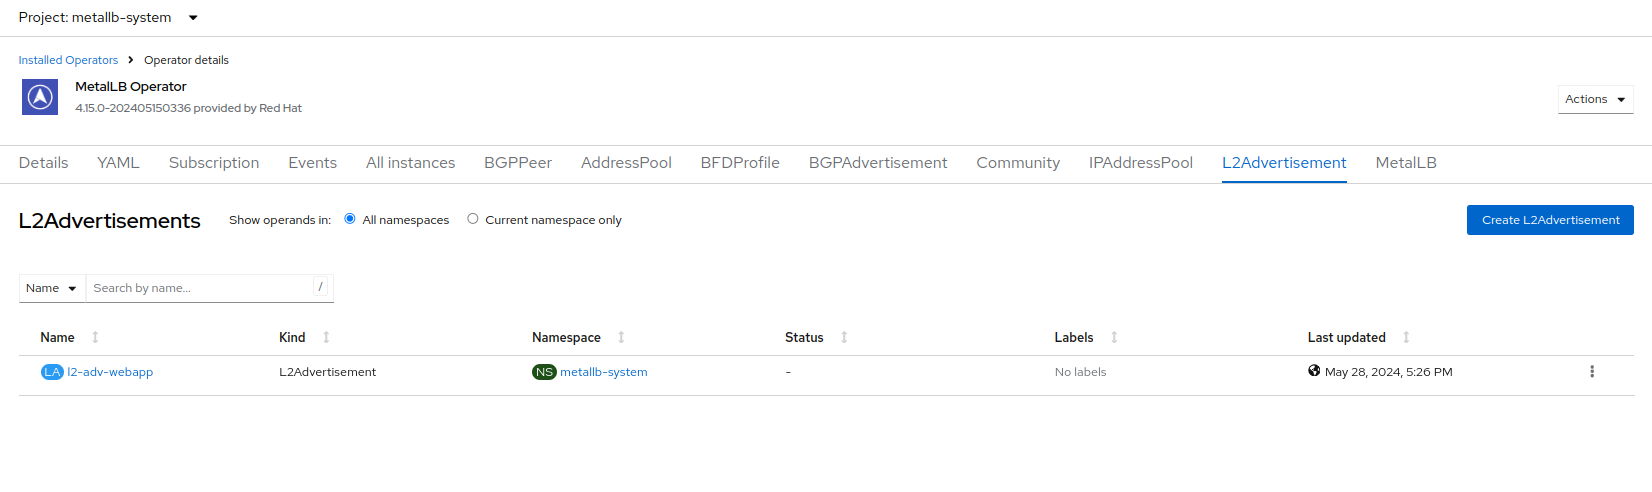
Scroll down and press Create. You will be returned to the main operator page where you will see that the L2Advertisement is now created.
With MetalLB installed and configured we can now prepare to make the applications on our imported VM’s available from outside of the cluster.
Exposing an Application with a Service/Route
By default, virtual machines are connected to the SDN, which is a convenient and easy way to give them access to the rest of the network, but can be challenging for the virtual machines, and other pods in the OpenShift cluster, to find and connect to the virtualized applications. To solve this, we will use a Service to balance connections across the two Windows-based web servers, and create a DNS entry for each service discovery, then create a Route to allow external clients to access the application hosted within the virtual machines.
| If you have not completed the module Migrating Existing Virtual Machines, it is recommended that you do that module first. If you have not completed it, or the migration process is still pending, you can use pre-existing virtual machines that have been prepared for you, which are available in the vmimported project. If you are using these pre-imported virtual machines, please replace all instances of the vmexamples namespace with vmimported in the examples below. |
Introduction to Services
The Service identifies the source/target for traffic, and directs clients to, the endpoints based on labels. Currently, the VMs do not have a label assigned yet.
In order to successfully associate the VMs with the Service, we need to do the following:
-
Add a label to the VMs. We will use the same label for both Windows IIS servers because they are both behind the same load balancer.
-
Create the service to make the two Windows IIS servers available for other workloads on the cluster. OpenShift will automatically make the load balancer internally accessible using the name of the Service as the DNS name.
-
Make the service available outside of OpenShift by creating a Route.
To begin, we’ll add labels to the virtual machines by modifying their definition in the OpenShift Virtualization GUI.
Label the virtual machines
-
From the OpenShift console, navigate to Virtualization → VirtualMachines and ensure the migrated VMs successfully imported and are running.
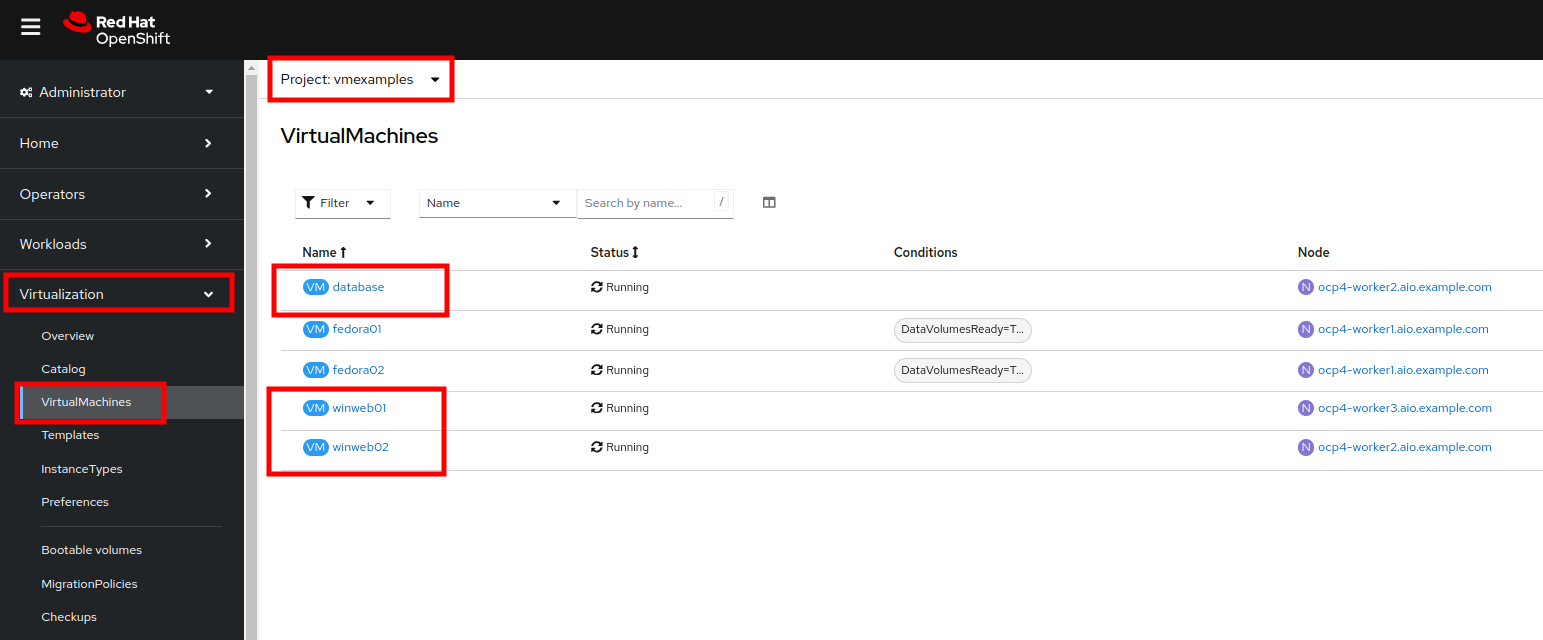
Ensure you select the correct project, vmexamples if you completed the Migrating Existing Virtual Machines module or vmimported if you did not. -
Select to the winweb01 VM and navigate to the YAML tab.
-
Find the spec: section and under the template.metadata add the following lines to labels section in the VM resources:
env: webappMake sure to get the indentation exactly right - just like in the screenshot below. 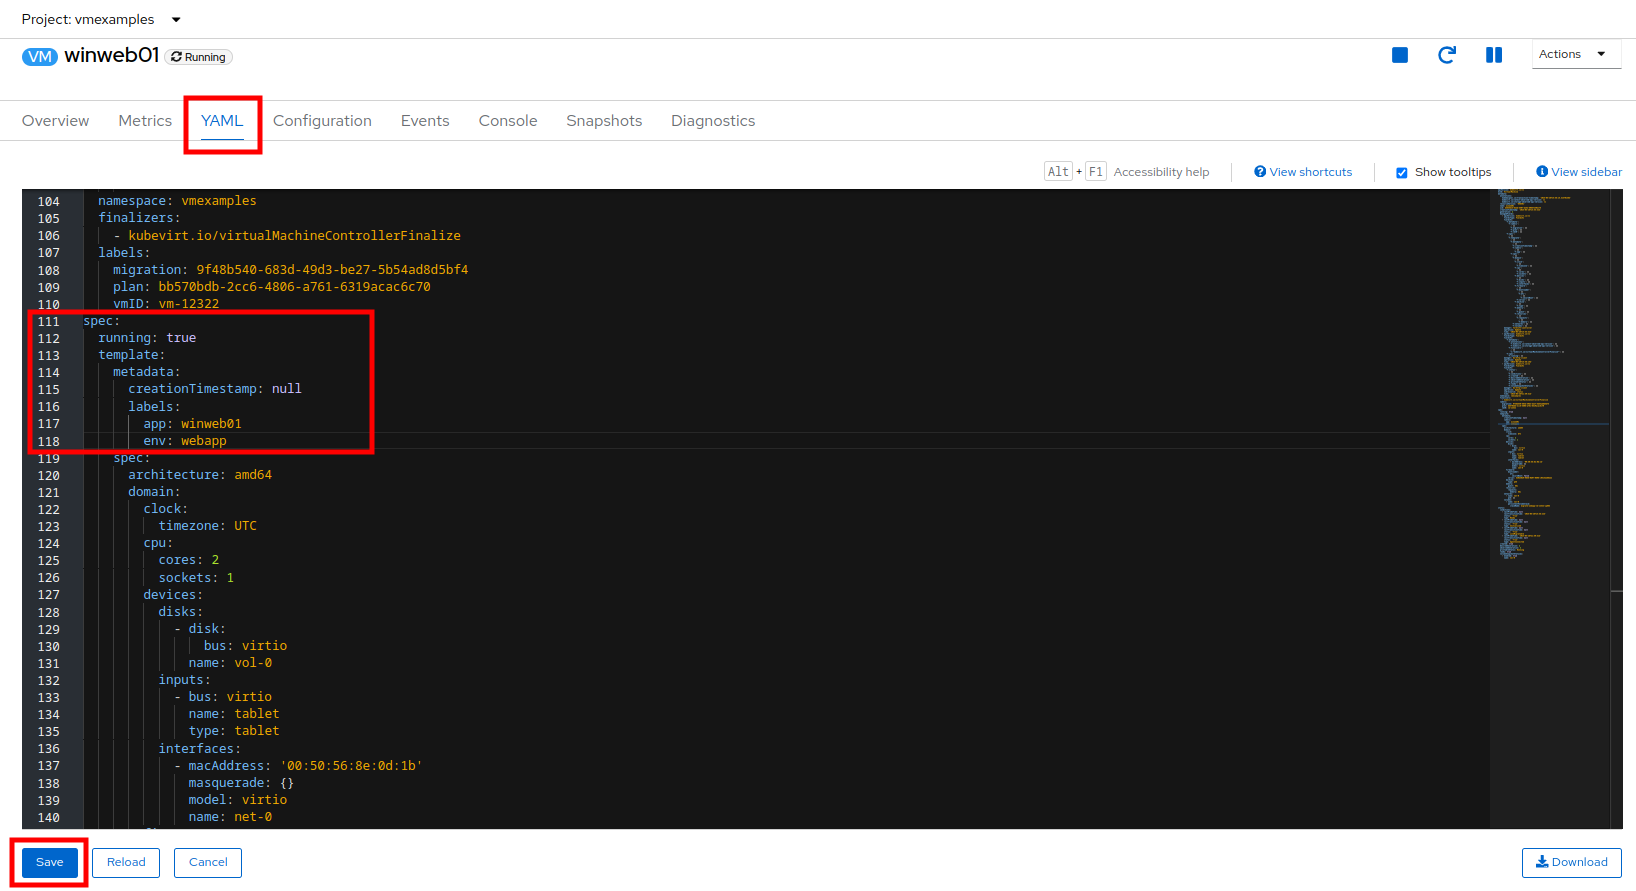
-
Click Save and Repeat the process for the VM winweb02.
-
Start, or restart if already running, the winweb01 and winweb02 virtual machines.
Ensure the VMs are properly working by accessing to the console tab of each VM.
Create the Service
-
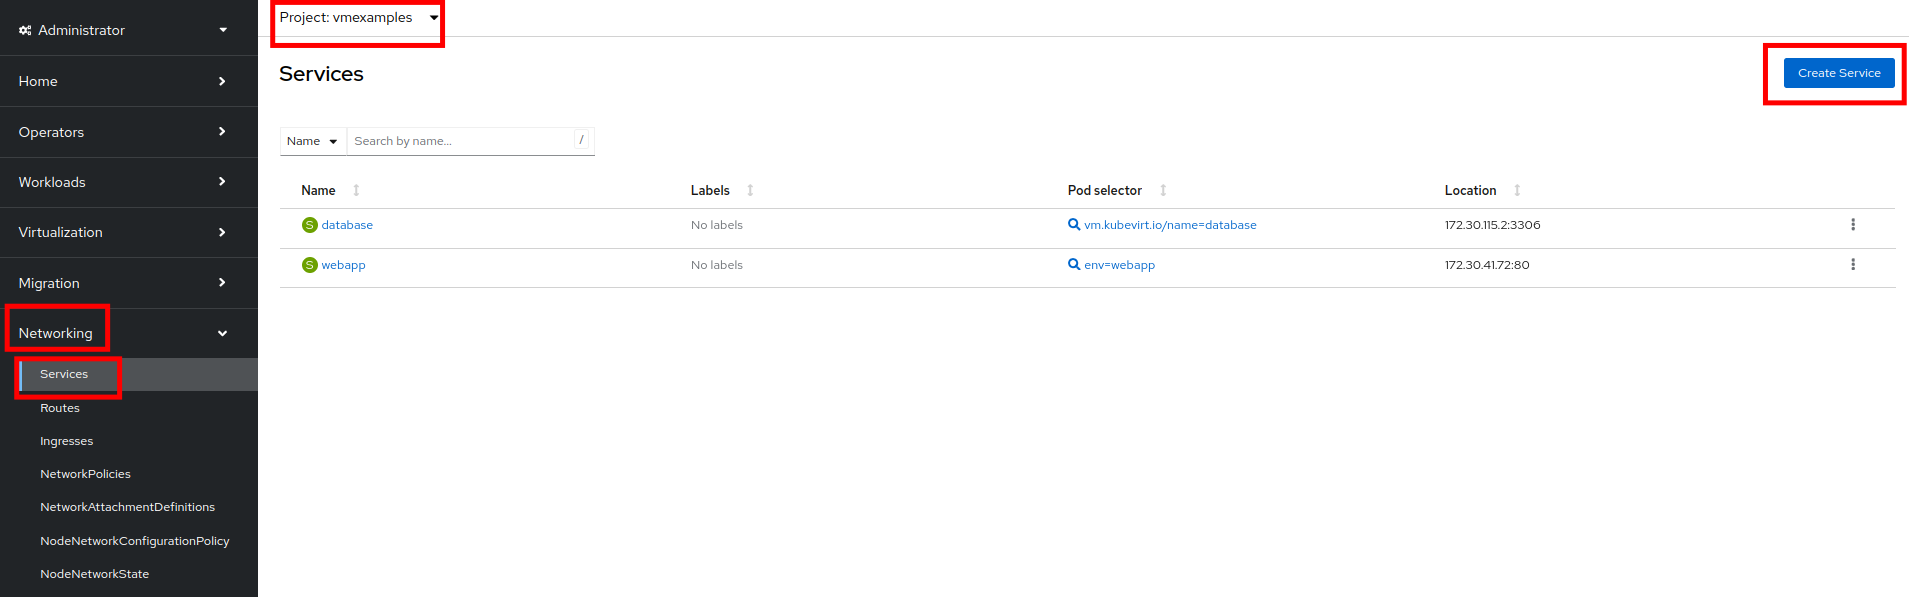
Navigate to Networking → Services and press Create Service.
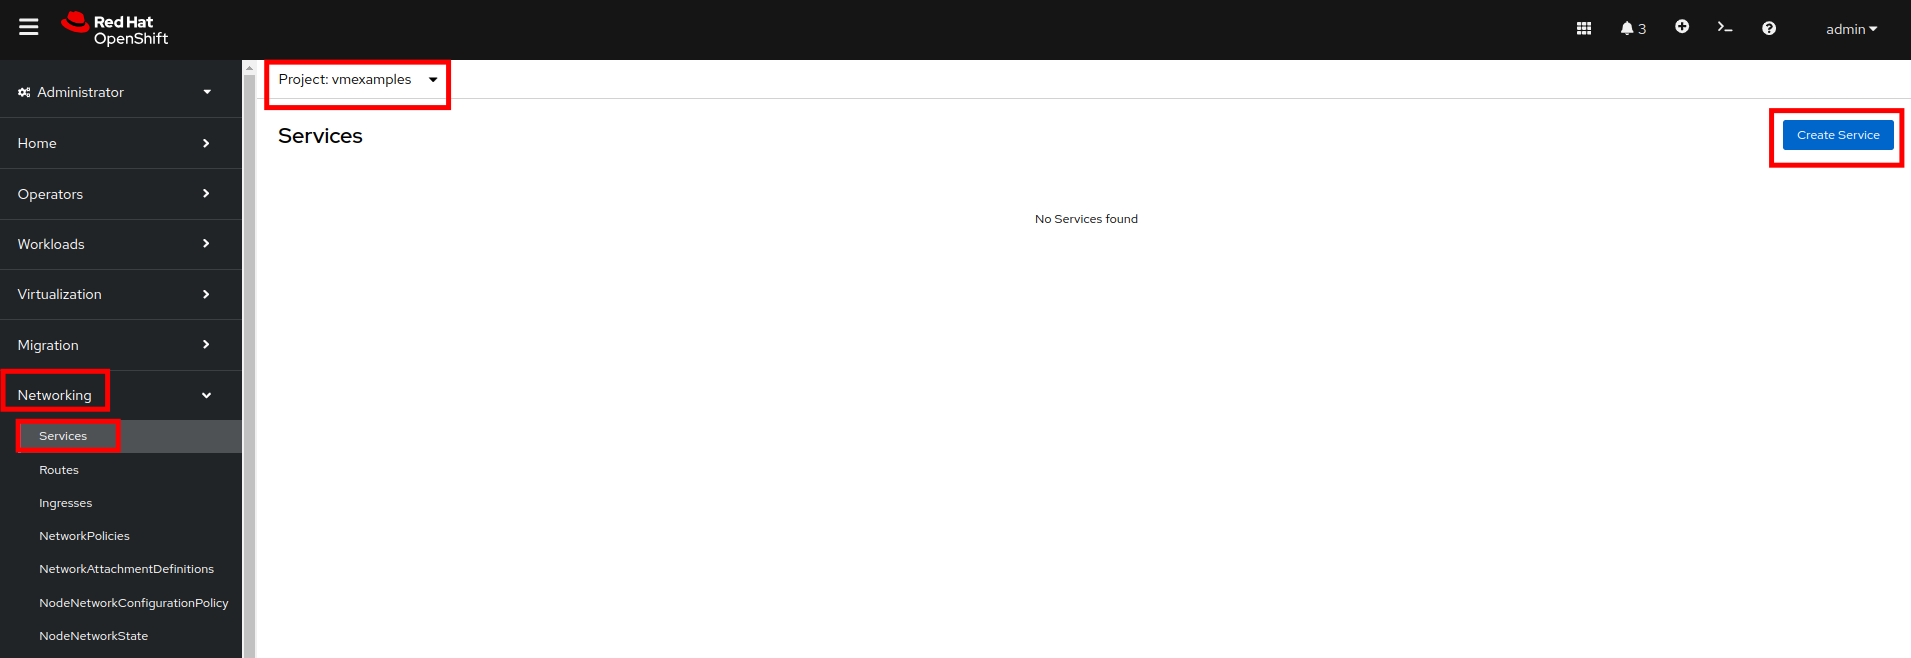
-
Replace the YAML with the following definition
apiVersion: v1
kind: Service
metadata:
  name: webapp
  namespace: vmexamples
spec:
  selector:
    env: webapp
  ports:
    - protocol: TCP
      port: 80
      targetPort: 80
Ensure the namespace with your virtual machines, vmexamples or vmimported, is the one used in the Service YAML. 
-
Press Create.
-
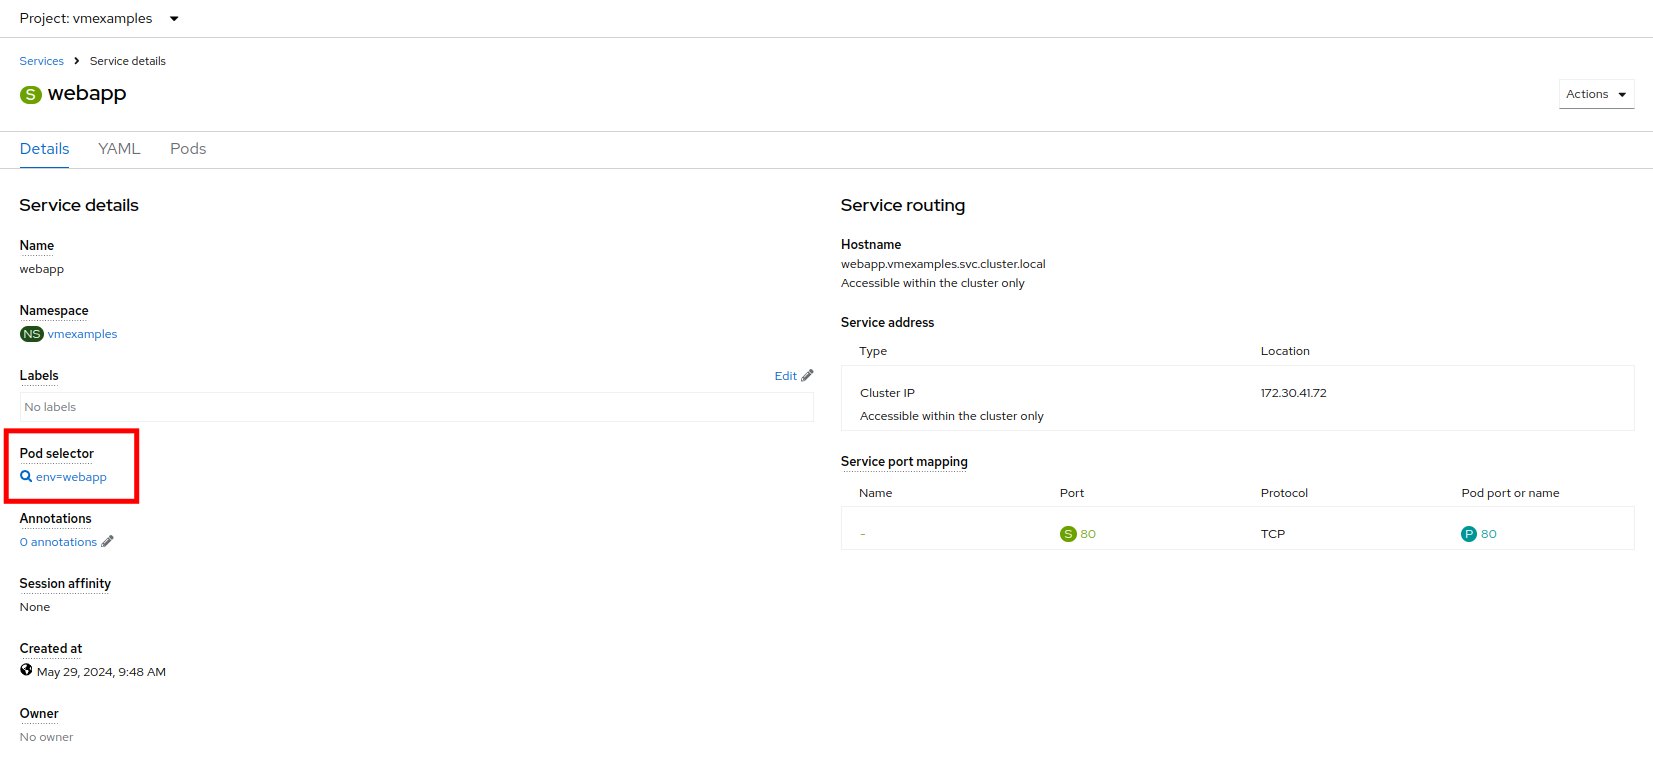
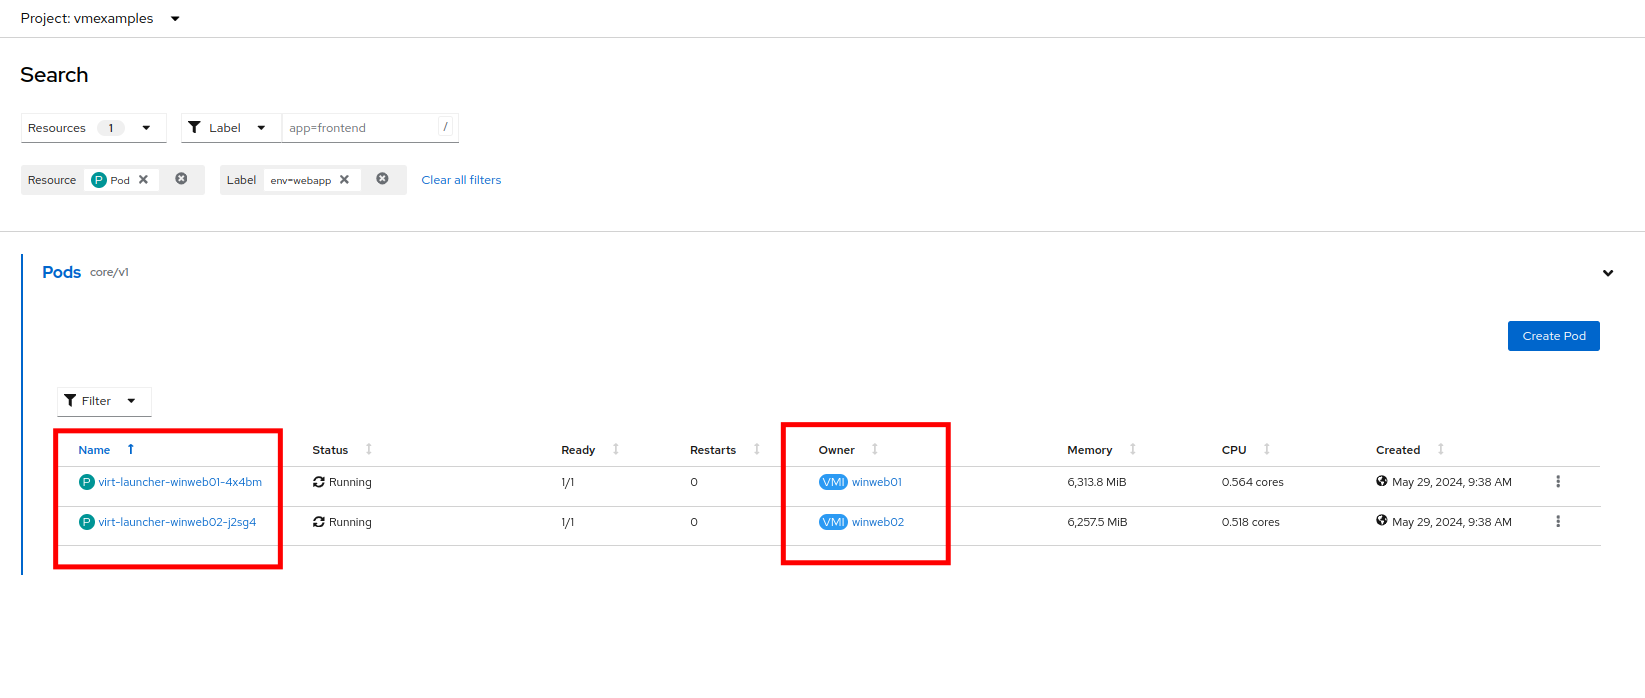
From the details page for the newly created webapp Service, locate Pod selector link and click it.
-
Verify the two Windows VMs are properly identified and targeted by the Service.
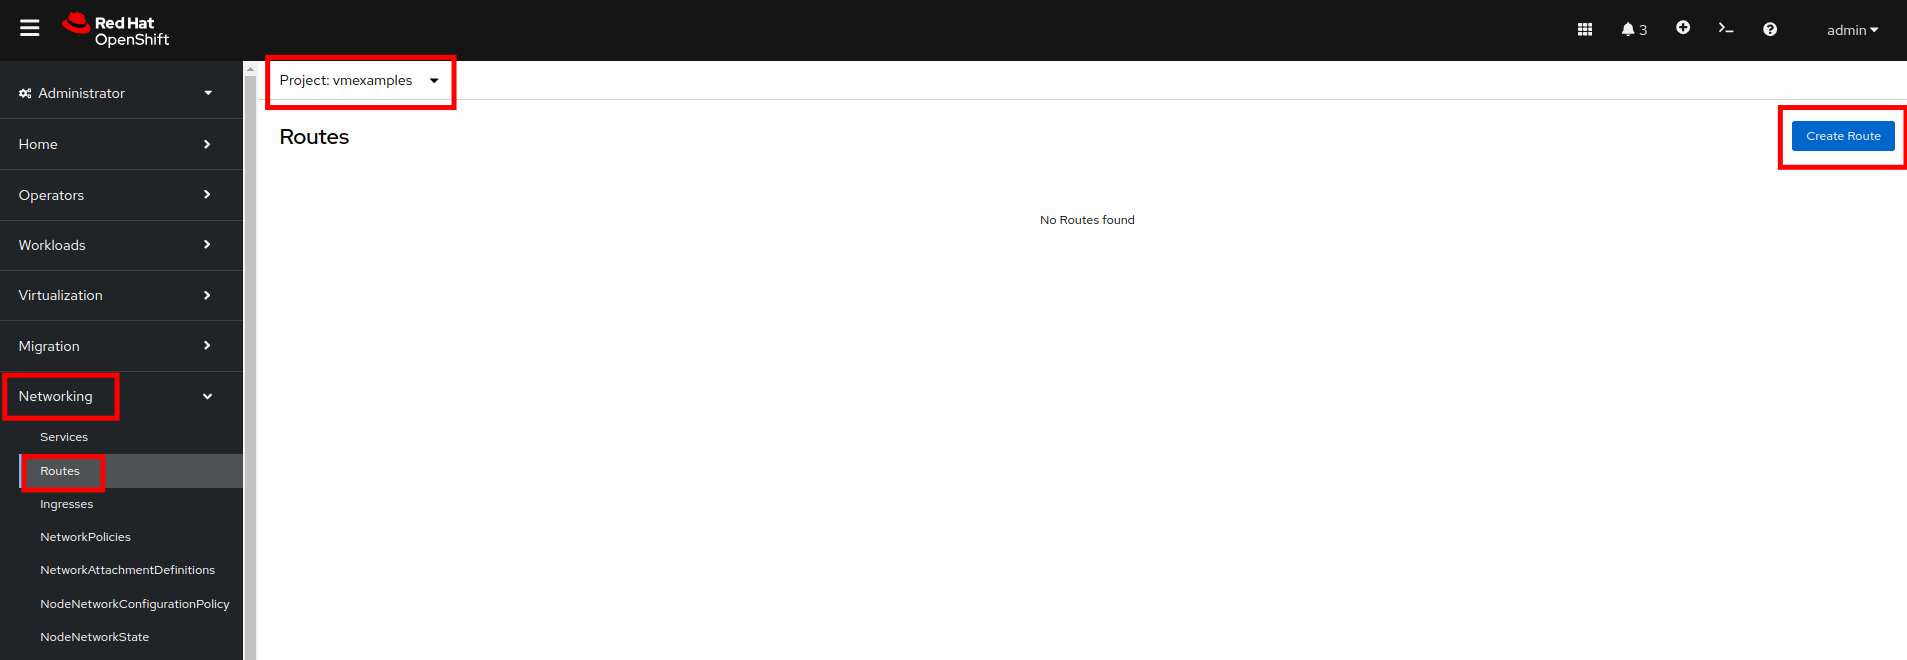
Create the Route
Now the Windows IIS servers are accessible from within the OpenShift cluster. Other virtual machines are able to access them using the DNS name webapp.vmexamples, which is determined by the name of the Service + the namespace. However, since these web servers are the front end to an application we want to be externally accessible, we will expose it using a Route.
-
Navigate to Networking → Routes in the left navigation menu, verify that you’re using the correct project name. Press Create Route.
-
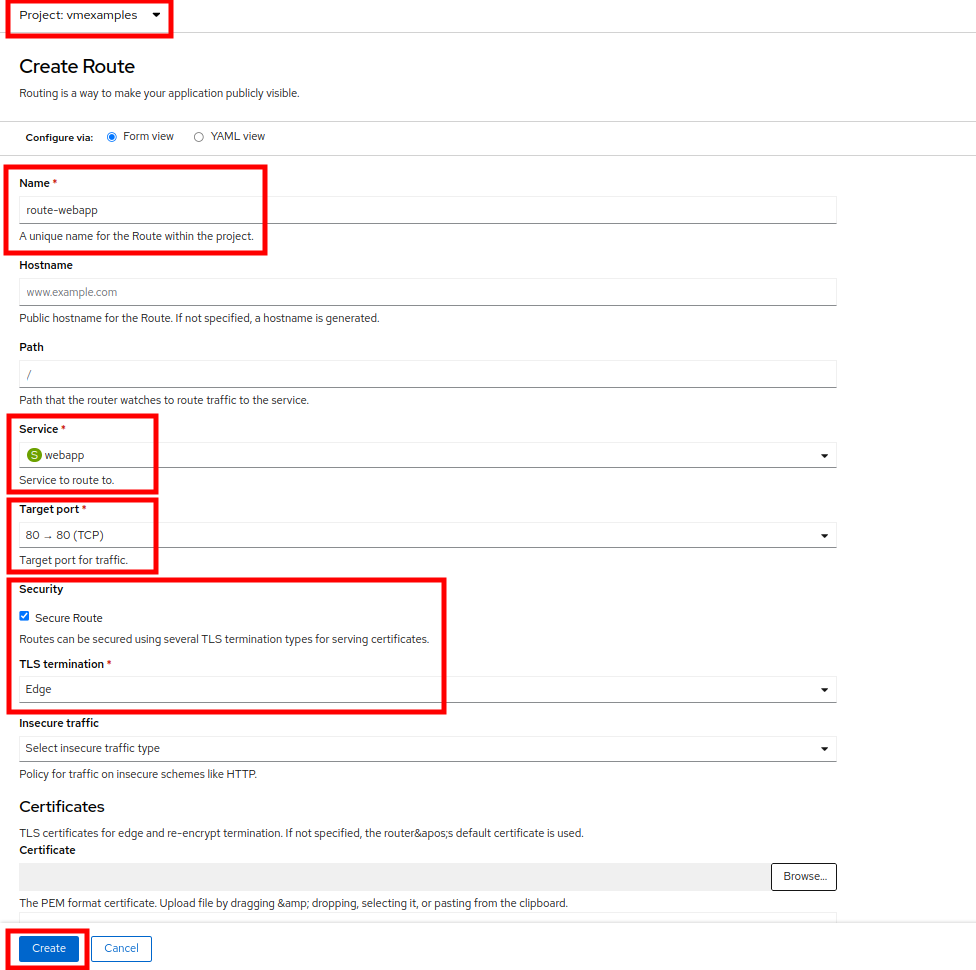
Fill the form using the information below, press Create when done.
-
Name: route-webapp
-
Service: webapp
-
Target port: 80 → 80 (TCP)
-
Secure Route: Enabled
-
TLS termination: Edge
-
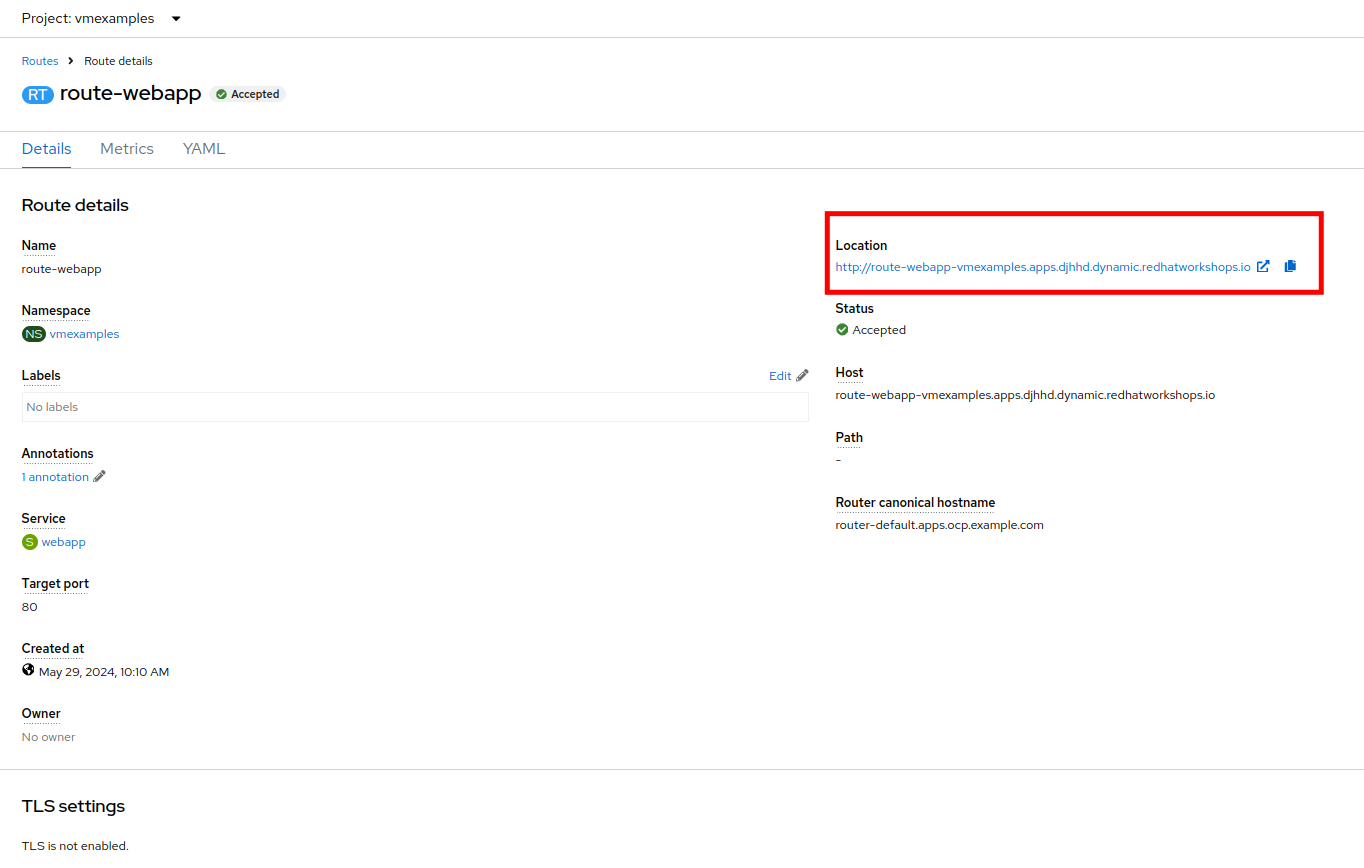
-
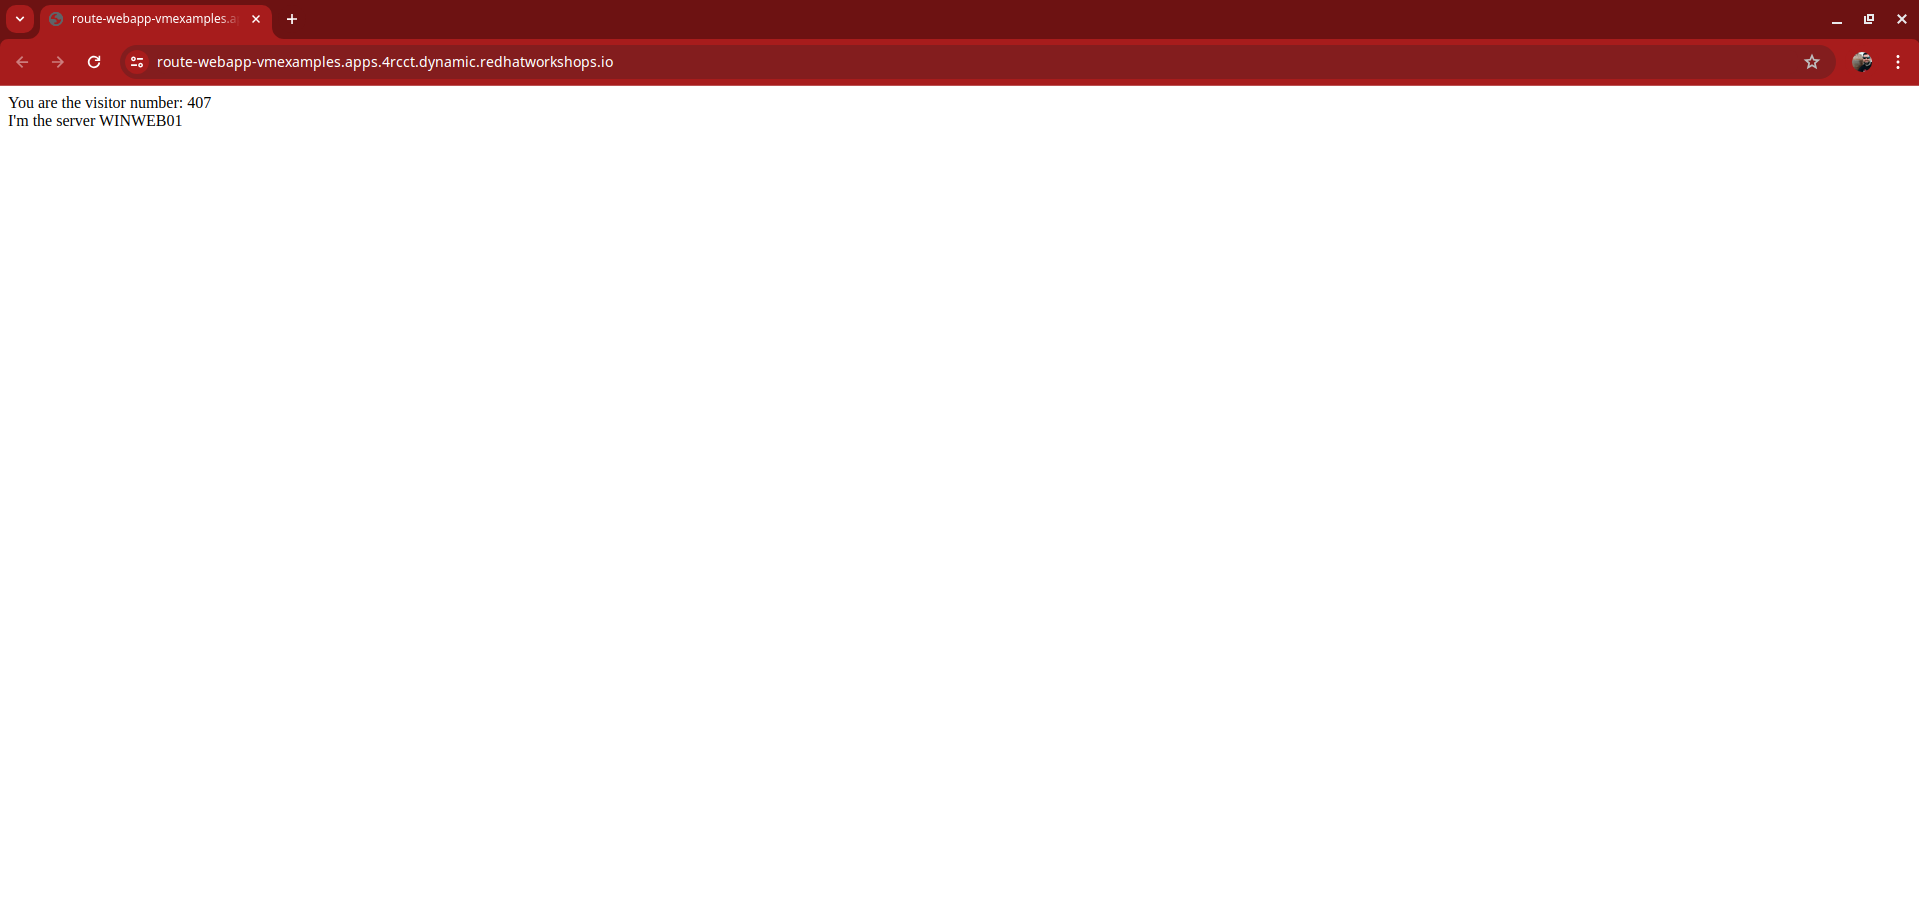
Navigate to the address shown in Location field
-
When the page loads, you will see an error. This is because the Windows web servers are not able to currently connect to the database VM after it’s migration.
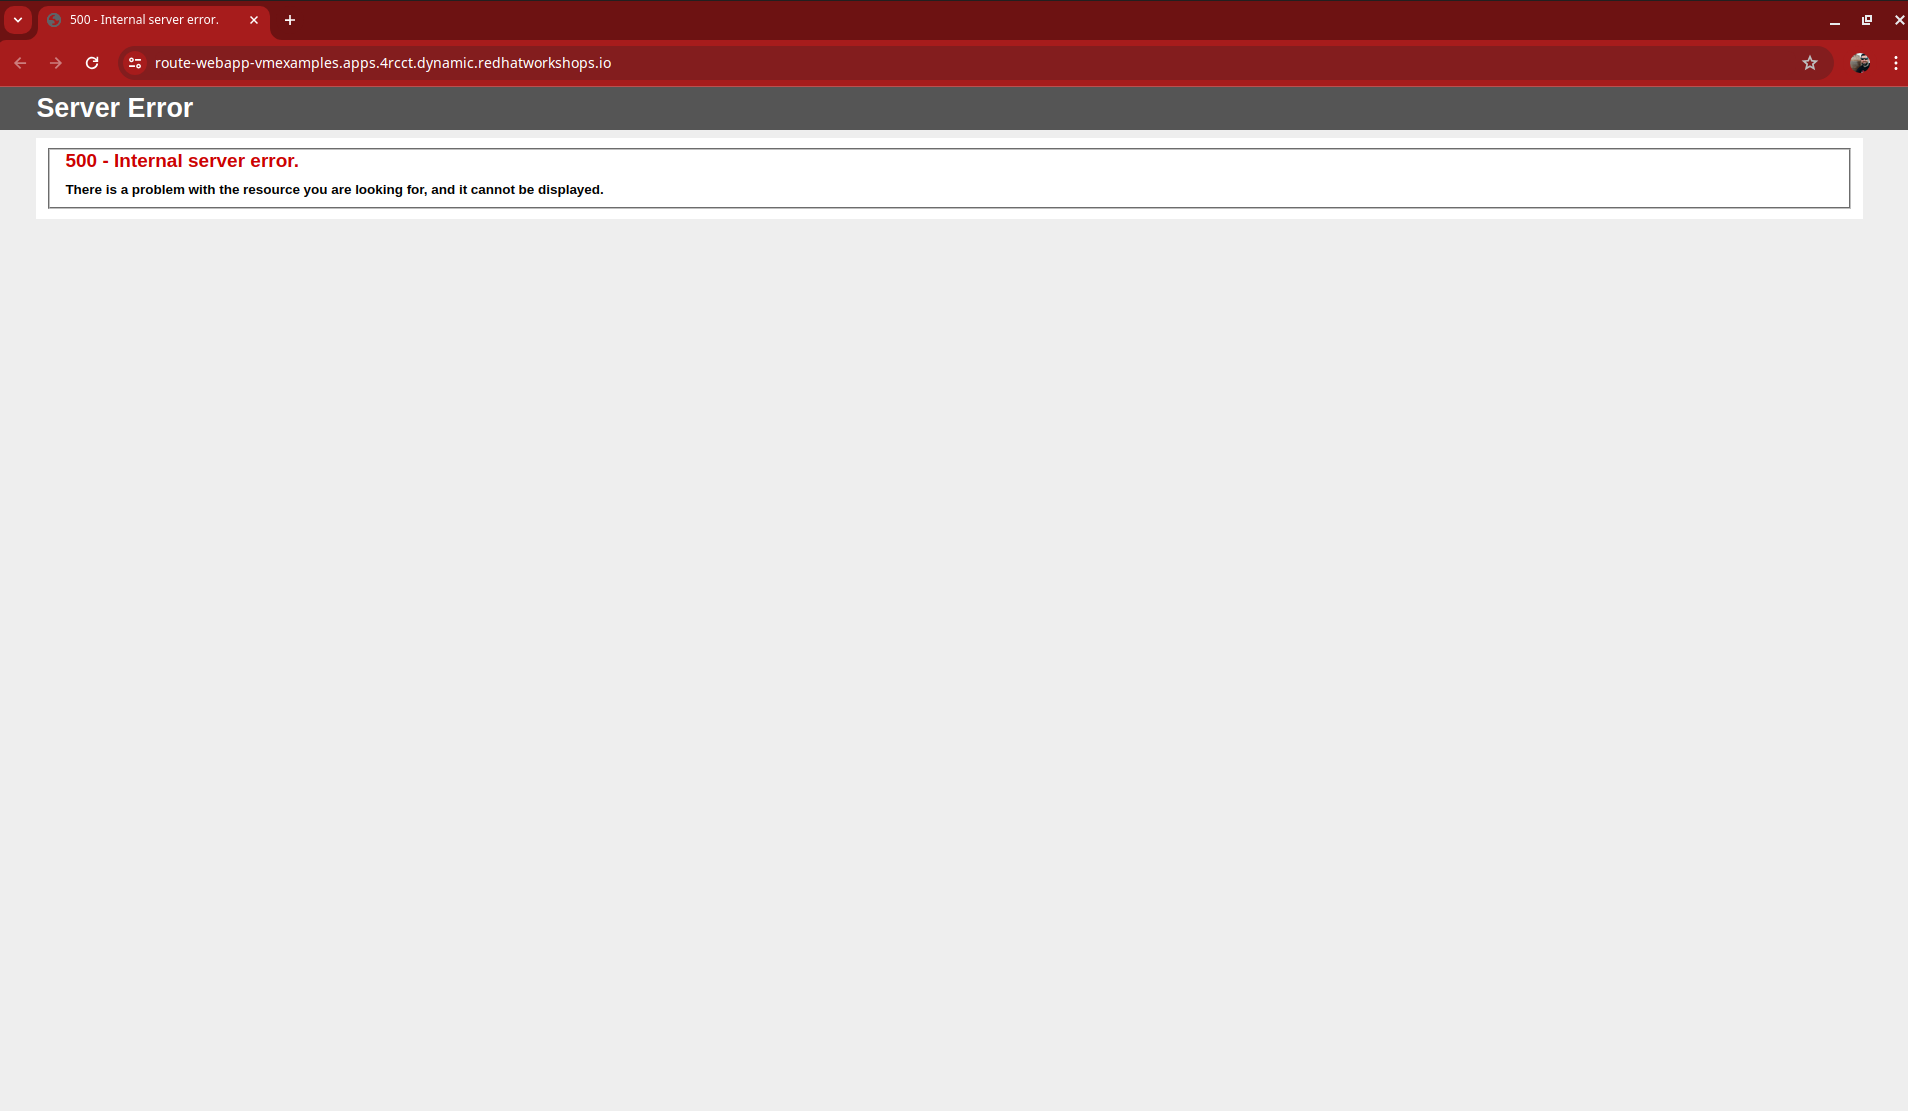
To fix the connectivity issue, we need to create a Service for the database VM so that it can be accessed by the web servers. -
Once again, navigate to Networking → Services and press Create Service. Replace the YAML with the following definition:
apiVersion: v1
kind: Service
metadata:
  name: database
  namespace: vmexamples
spec:
  selector:
    vm.kubevirt.io/name: database
  ports:
    - protocol: TCP
      port: 3306
      targetPort: 3306
This time we used the name of the virtual machine to attach it to the service we are creating, since there is only one VM named database in the namespace with this name it is safe to do so without having to customize the YAML of the VM or rebooting the guest. 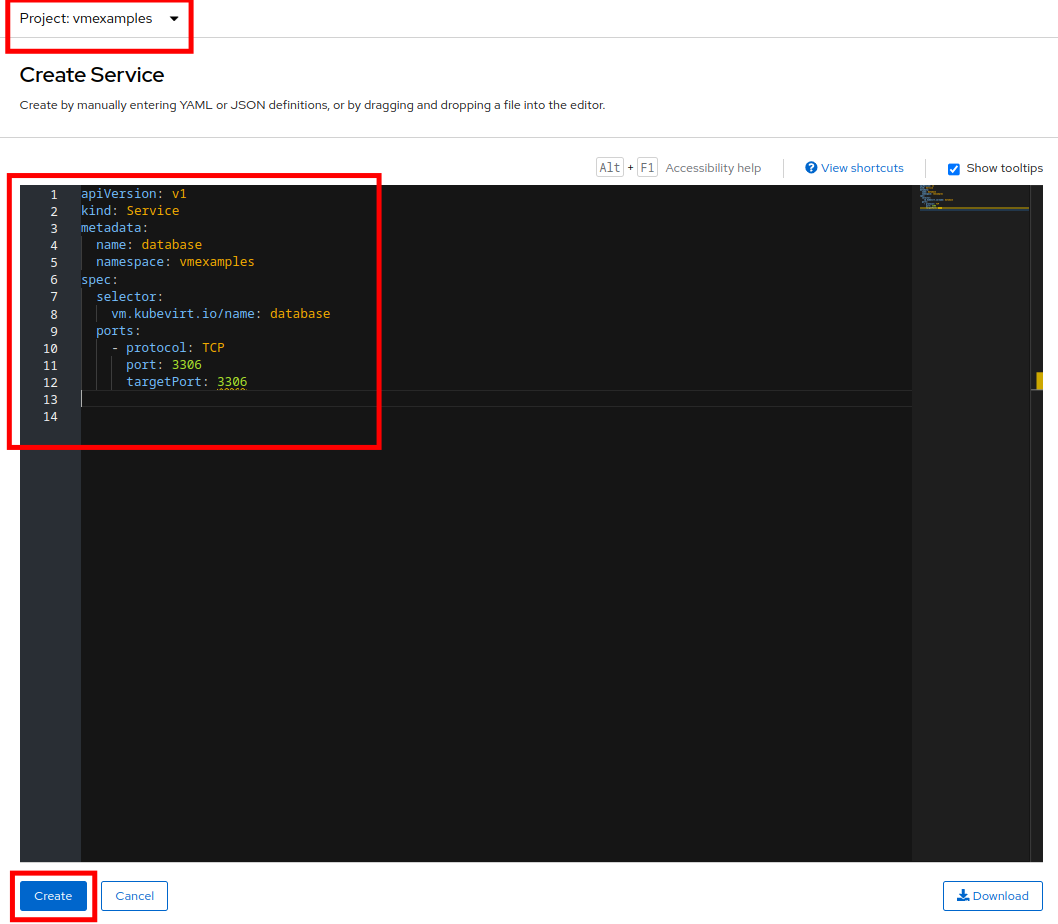
-
When the YAML is pasted, click the Create button.
Ensure the namespace with your virtual machines, vmexamples or vmimported is the one used in the Service YAML. -
Reload the webapp URL and expect to get the proper result
Expose the Database Externally
If you completed the Exposing an Application with a Service/Route module, the VM is currently accessible from inside the cluster using the Service previously created. In this task, we will expose port 3306 outside of the cluster, making the database available to other virtual machines and consumers not hosted in OpenShift.
-
Navigate to Networking → Services and select the project vmexamples
If you did not complete the module Migrating Existing Virtual Machines you can use pre-existing virtual machines in the vmimported project. If you are using the pre-imported virtual machines, please replace all instances of vmexamples namespace with vmimported. -
Press Create Service and fill the form with the following code snippet:
apiVersion: v1
kind: Service
metadata:
  name: database-metallb
  namespace: vmexamples
spec:
  type: LoadBalancer
  selector:
    vm.kubevirt.io/name: database
  ports:
    - protocol: TCP
      port: 3306
      targetPort: 3306
Notice the type indicated is LoadBalancer. Since this cluster has MetalLB installed, it will result in the specified port(s) exposed using that. There are other load balancer options available from partners such as F5, Nginx, and more. 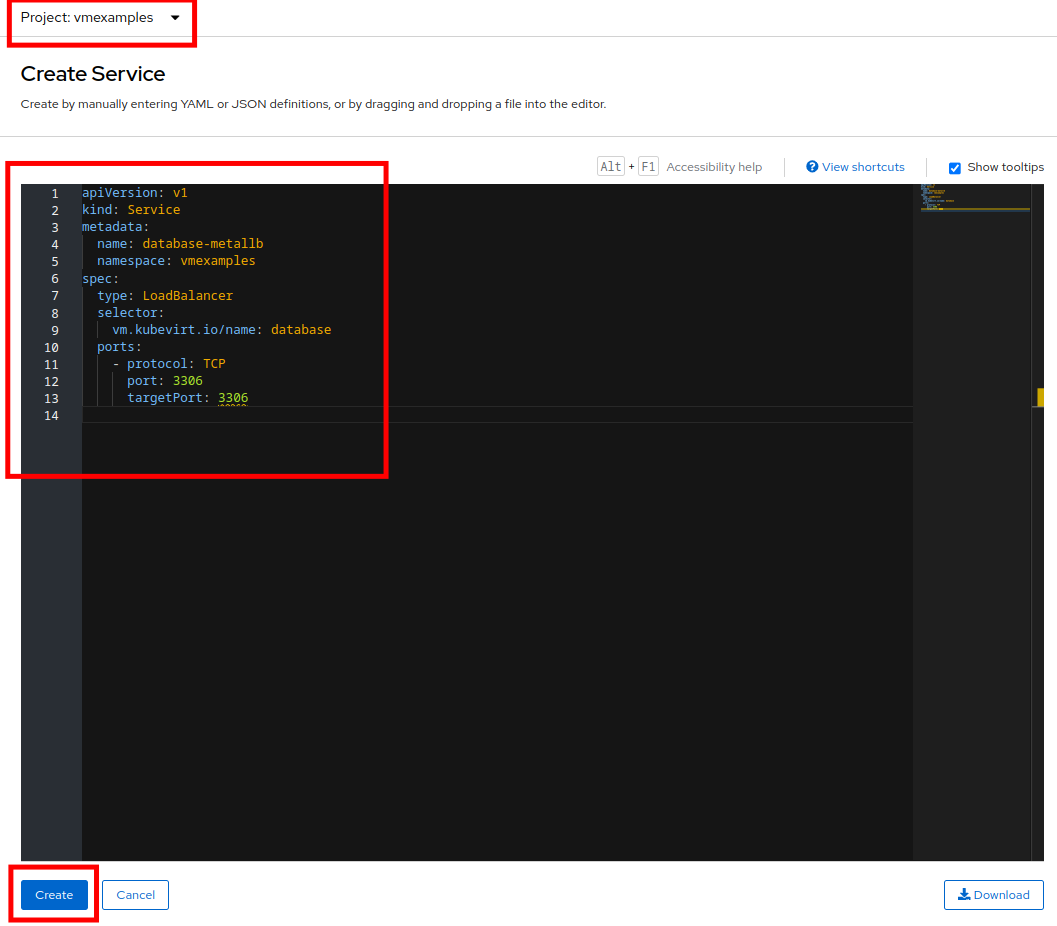
-
Press Create and review the Service created. Notice the IP address assigned to the load balancer is from the range specified earlier in the lab.
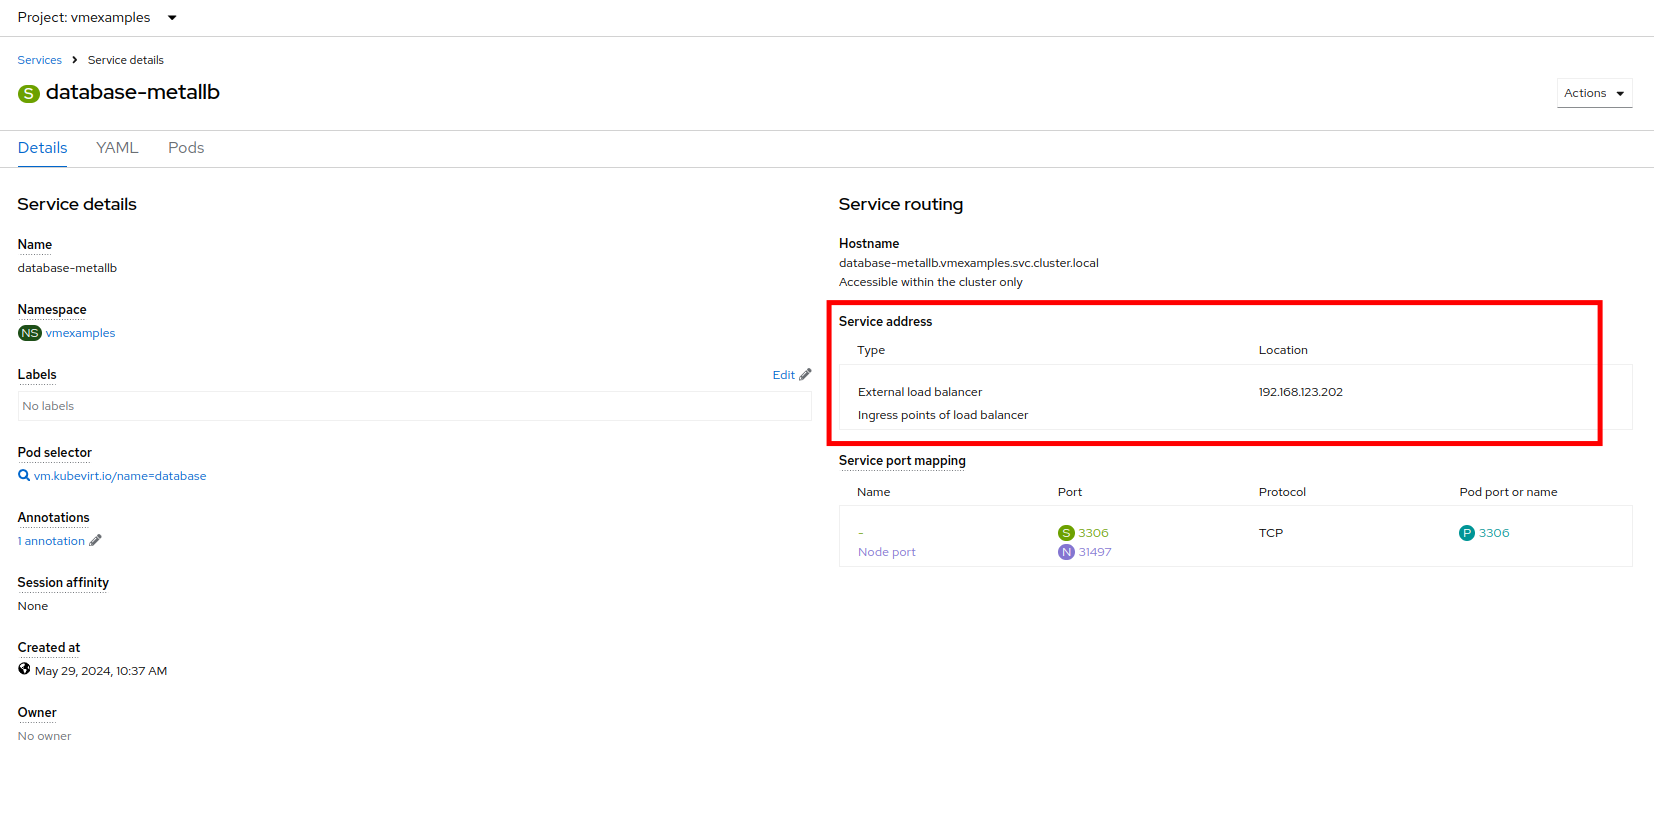
-
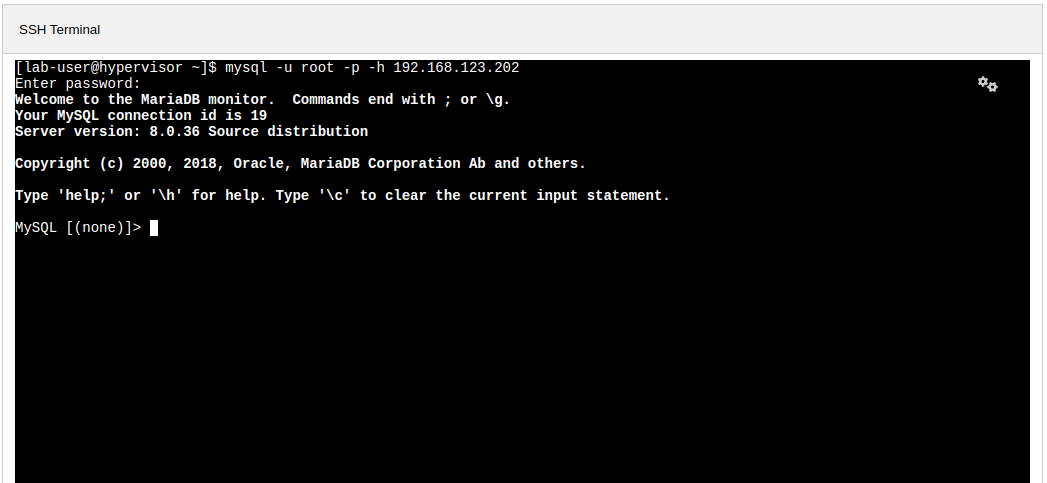
To verify connectivity to the database service via the external IP, use the terminal to the right to authenticate to the database at it’s exposed LB address with the credentials below.
-
Username: root
-
Password: R3dh4t1!
mysql -u root -p -h 192.168.123.202Be sure to replace the ip address in the sample above with the address being advertised by MetalLB. When successful, you should be able to login to the database and view the mysql prompt.
-
Summary
In this module you were able to experience working with the virtual machines that you migrated into the OpenShift Virtualization environment from VMware vSphere by making them accessible outside of the cluster in different manners.
I hope you have enjoyed the OpenShift Virtualization Roadshow and this lab that accompanied it. Please fill out the survey link that your proctor has made available to provide feedback on your experience.