Install PXE on Openshift
Getting familiar with Red Hat Openshift
Our first task is to get familiar with how to access openshift.
We will use both the oc CLI utility as well as the Red Hat OpenShift console.
Let’s start with the CLI
Task: Exploring the CLI
Red Hat OpenShift uses the oc cli utility.
This utility has a similar syntax to kubectl, but with some OpenShift specific extensions.
Let’s look at the nodes that make up our cluster:
oc get nodesNote that the oc utility has been configured with everything we need to connect.
Task: Exploring the OpenShift Console
To connect to the console, click on the tab above.
IMPORTANT: The
OpenShift Consoletab will open in a new browser window. Because we are using a self signed certificate, you will need to bypass your web browsers security features to connect.
We can then log in with the following credentials:
Username: kubeadmin Password: kubeadmin_password
Now that we have logged in to the console, we can explore some of the interface elements.
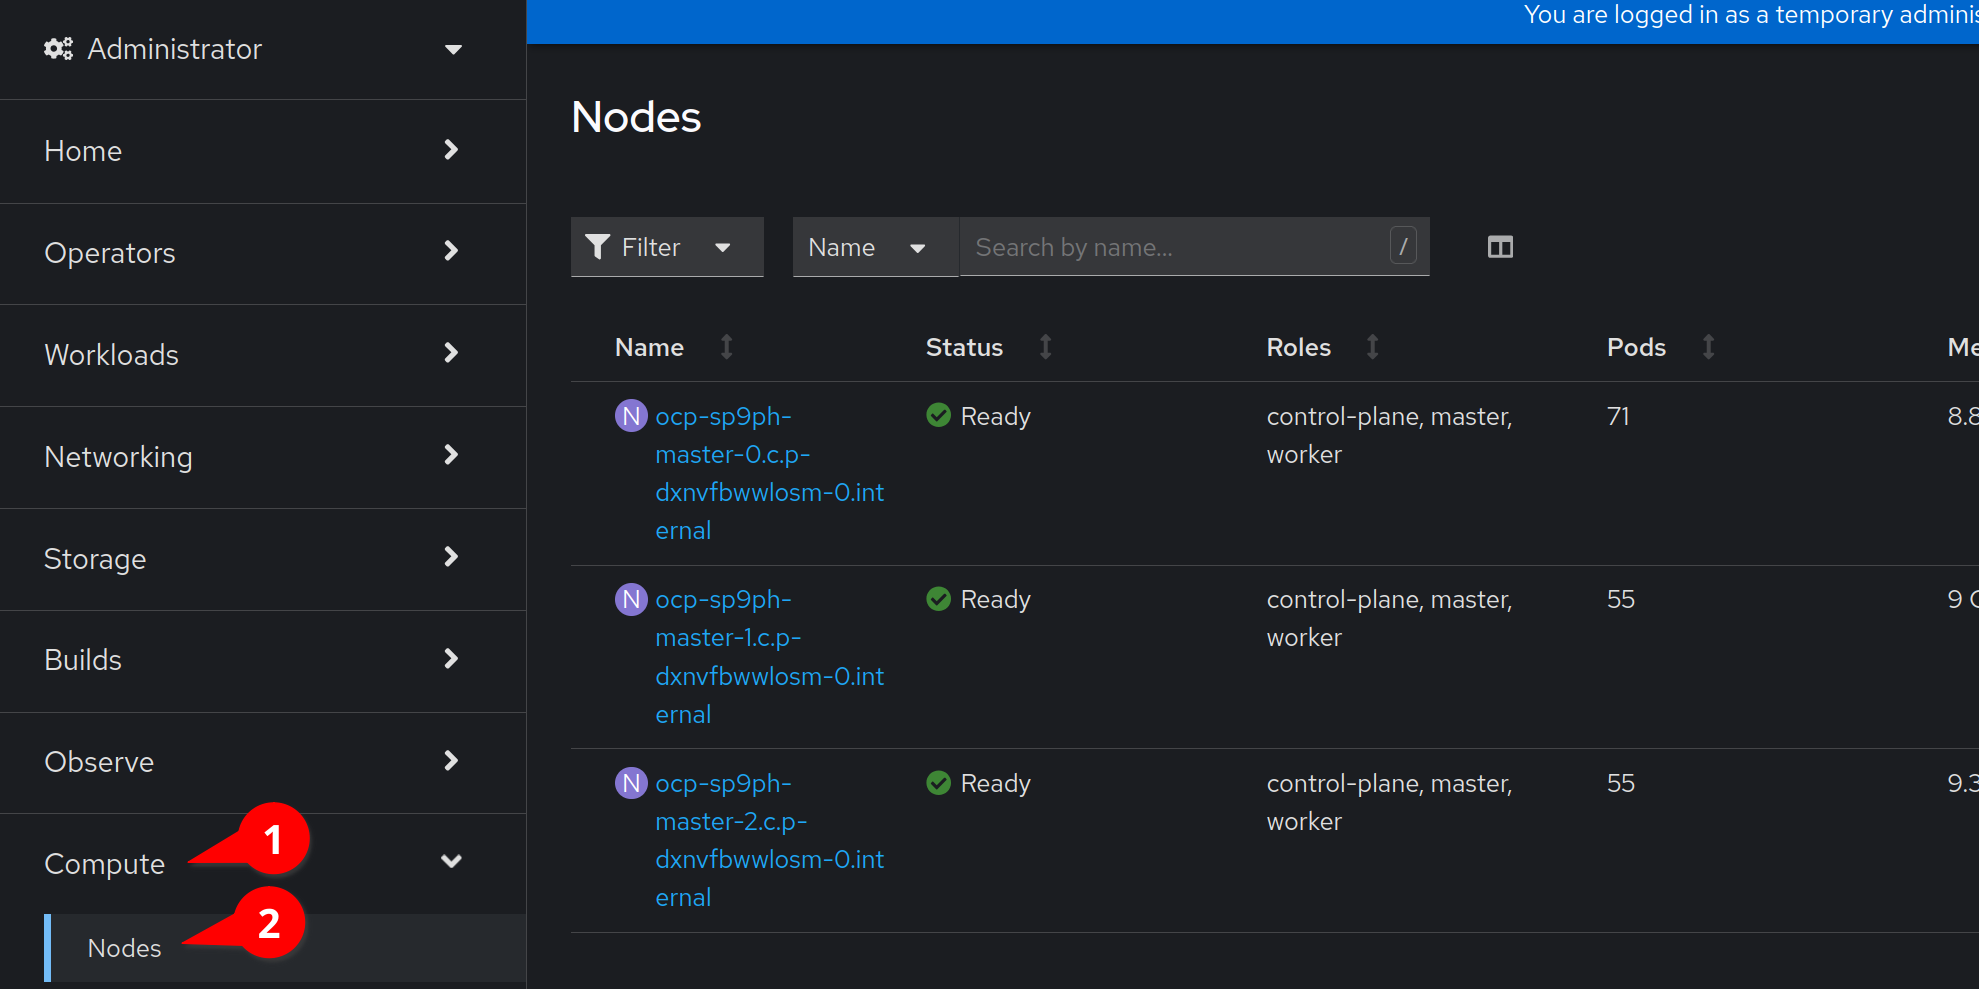
Navigate to Compute > Nodes as seen in the screenshot below.

Install Portworx
To install Portworx, we first need to install the Portworx Operator.
Task: Install the Portworx Operator
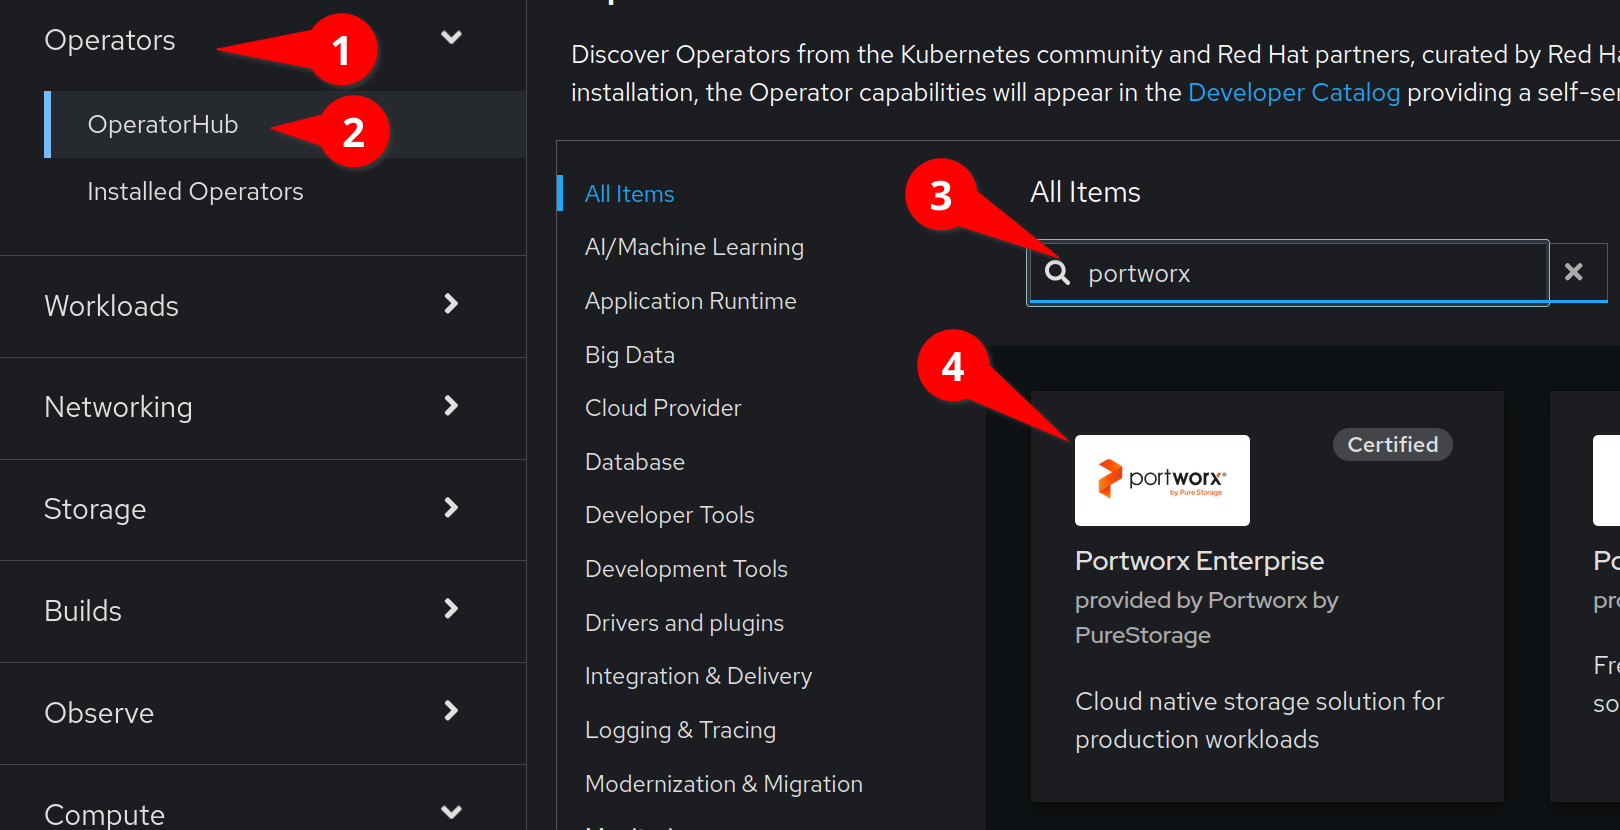
Navigate to Operators > Operator Hub and type Portworx in to the filter as seen in this screenshot:

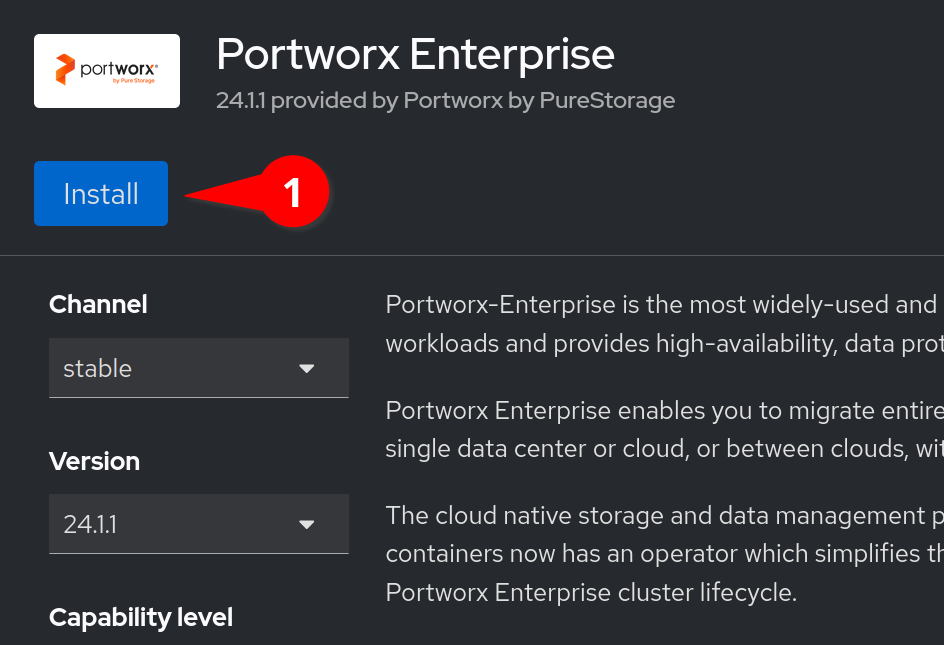
and then click on the Portworx Enterprise operator.
We will now see the installation screen on the right of our interface.
The defaults will suffice, and will grab the latest stable version of the operator.
Click Install

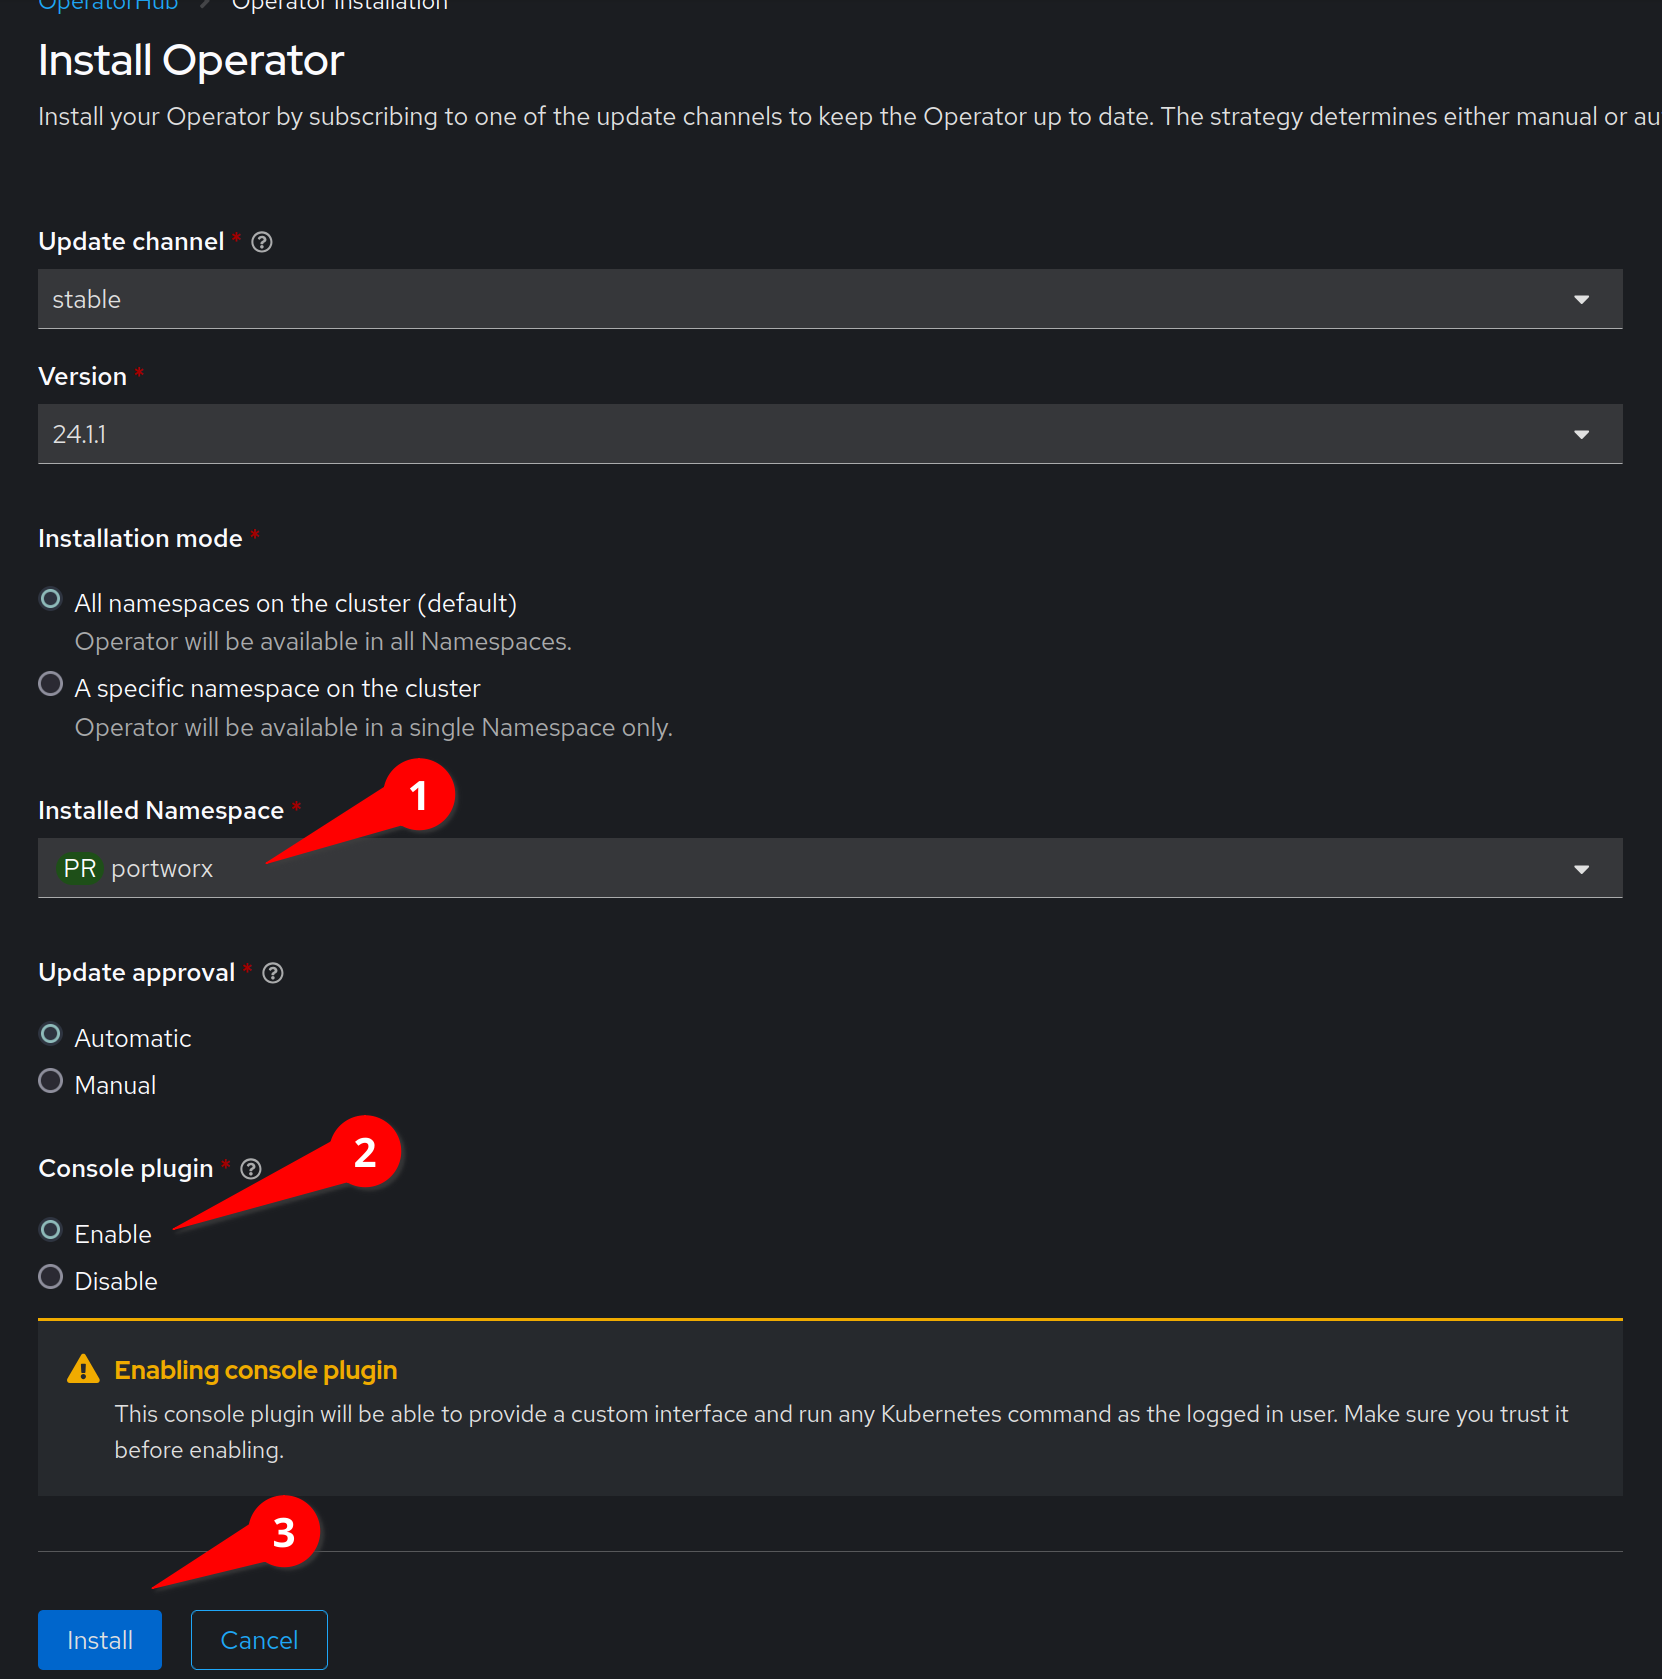
On the next screen, enable the Console plugin
Create the a new project named portworx and install the Portworx operator in to the new portworx project.

and click the Install button.
The installation will prompt you to create a StorageCluster object, instead, click View installed Operators in Namespace portworx
Task: Install Portworx StorageCluster
For this step, we need to switch back to our Terminal tab in the Instruqt interface.
Installing the the Portworx StorageCluster requires a few steps. We need to ensure that we have a service account secret for our gcloud environment to create and manage disks. Portworx will create and expand GCP disks based on our specifications.
Create this secret by running:
echo $INSTRUQT_GCP_PROJECT_GCPPROJECT_SERVICE_ACCOUNT_KEY | base64 -d > gcloud.json
oc -n portworx create secret generic px-gcloud --from-file=gcloud.json
We can now grab our StorageCluster specification:
curl -o px-spec.yaml "https://install.portworx.com/3.1?operator=true&mc=false&kbver=1.29.8&ns=portworx&b=true&iop=6&s=%22type%3Dpd-standard%2Csize%3D50%22&ce=gce&r=17001&c=px-cluster&osft=true&stork=true&csi=true&mon=true&tel=false&st=k8s&promop=true"We now need to insert a reference for our secret in to our StorageCluster specification.
This can be done with a little yq magic:
yq -iy '.spec.volumes += [{"name": "gcloud", "mountPath": "/etc/pwx/gce", "secret": {"secretName": "px-gcloud"}}] | .spec.env += [{"name": "GOOGLE_APPLICATION_CREDENTIALS", "value": "/etc/pwx/gce/gcloud.json"}]' px-spec.yamlTake a look at our current manifest by using the ccat utility:
ccat px-spec.yaml-
Lines 14-16 contain our disk configuration. These disks will be created and attached as part of the Portworx installation.
-
Lines 35-37 contain a reference to our OpenShift secret that we will use to provision the above disk specification.
Additional documentation can be found here
We can now apply the specification:
oc apply -f px-spec.yamlThe install can take about 5 minutes. We can watch the containers come up by running:
watch oc -n portworx get podsWhen all three of the px-cluster pods have a Ready status of 1/1 we can press ctrl-c to exit out of our watch command.
Task: Check the Portworx cluster status
Portworx ships with a pxctl CLI utility that you can use for managing Portworx.
We’ll cover this utility more in the labs here in a little bit!
For now, we’ll run sudo pxctl status via oc in one of the Portworx pods to check the StorageCluster status.
First, setup the PX_POD environment variable:
PX_POD=$(oc get pods -l name=portworx -n portworx -o jsonpath='{.items[0].metadata.name}')Next, use oc to execute sudo pxctl status within a pod defined by the PX_POD environment variable to check the Portworx StorageCluster status:
oc exec -it $PX_POD -n portworx -- /opt/pwx/bin/pxctl status --colorWe now have a 3-node Portworx cluster up and running!
Let’s dive into our cluster status:
-
All 3 nodes are online and use Kubernetes node names as the Portworx node IDs.
-
Portworx detected the block device media type as "STORAGE_MEDIUM_MAGNETIC", and created a storage pool for those disks. If you have different types of disk, for example SSD and magnetic/rotational disk, a dedicated storage pool would be created for each type of device.
To make things easier throughout the lab, let’s set a bash alias for pxctl:
echo "alias pxctl='PX_POD=\$(oc get pods -l name=portworx -n portworx --field-selector=status.phase==Running | grep \"1/1\" | awk \"NR==1{print \$1}\") && oc exec \$PX_POD -n portworx -- /opt/pwx/bin/pxctl'" >> /root/.profile
source /root/.profile
Now test out the alias:
pxctl status --colorLastly, some functions of OpenShift require a default StorageClass, let’s set one now:
And let’s set it as the default StorageClass:
kubectl patch storageclass px-csi-db -p '{"metadata": {"annotations":{"storageclass.kubernetes.io/is-default-class":"true"}}}'We can now move on to our next challenge by clicking the Check button.