Installing Veeam Kasten
1. Introduction
This add-on lab guide is intended to familiarize practitioners with the protection of OpenShift Virtualization workloads using Veeam Kasten for Kubernetes. It assumes the learner has completed other OpenShift Virtualization Roadshow lab exercises and are familiar with virtual machine provisioning and management in OpenShift.
What is Veeam Kasten?
Veeam Kasten for Kubernetes is a purpose-built data protection solution for Kubernetes that enables organizations to perform backup & restore, disaster recovery, and cross-cluster mobility of their applications.
How does Kasten work?

-
Kasten is deployed to the cluster that it protects. Within the cluster, Kasten communicates with the Kubernetes API server to discover applications and their resources.
-
Kasten orchestrates point-in-time snapshots of complete applications, including both application manifest data and storage volume data.
-
Kasten exports portable copies of the point-in-time snapshot to an external object, NFS, or Veeam repository.
| We have pre-staged the lab with an install of Veeam Kasten, so there’s no need to complete the steps in Section 2. Rather, this section just highlights how’d you go about installing Kasten if it were not already installed on the OpenShift cluster. |
Make sure you follow the instructions to access the Kasten K10 Dashboard in section 3 of this lab though!
2. Installing Kasten
While you do have access to the kasten-io namespace PLEASE DO NOT MODIFY ANYTHING IN THAT NAMESPACE. This namespace is shared by all lab participants and changing anything could break the lab for everyone!
|
-
In the OpenShift Console, search for
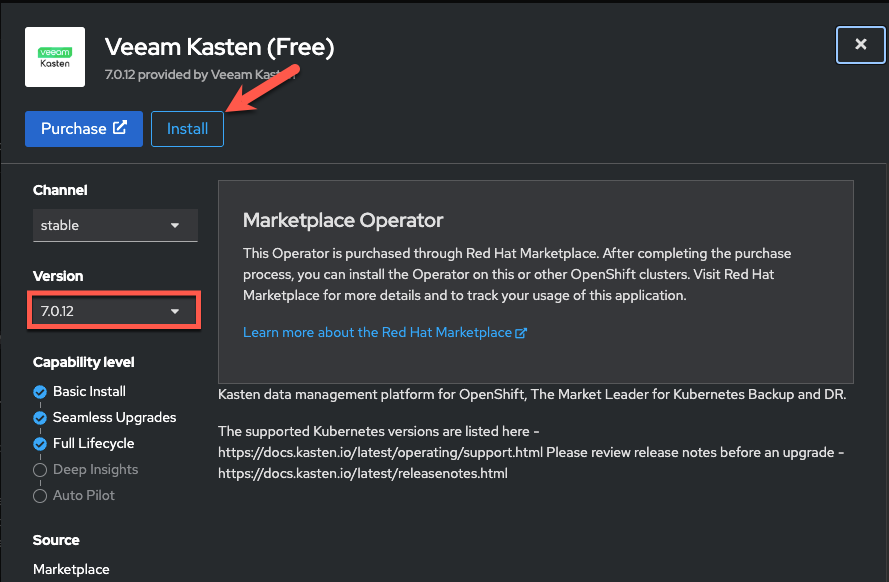
Kastenin the OperatorHub and select Kasten K10 (Free):
Alternate versions of the Kasten operator are available for use if transacting Kasten licensing through the Red Hat Marketplace. If desired, Kasten may also be installed on OpenShift via Helm chart.
-
Under Version, select
7.0.12from the dropdown menu, and click Install.
It’s recommended to always run the latest available version of Kasten. Explicitly selecting version 7.0.12is to ensure consistent instructions and corresponding screenshots in this lab guide. -
Under Update approval select Manual and then click Install to initiate operator installation.

-
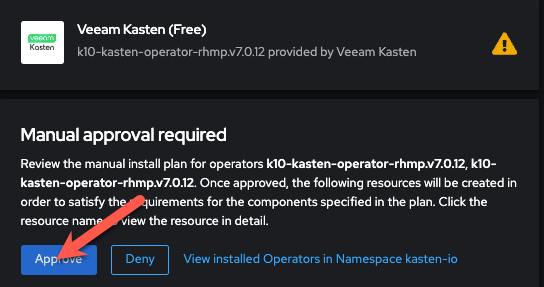
When prompted, click Approve to proceed with operator installation.

-
After operator installation completes, click View Operator (or select Operators → Installed Operators → Kasten K10 (Free) from the sidebar).
-
Under Provided APIs - K10, click + Create instance.

-
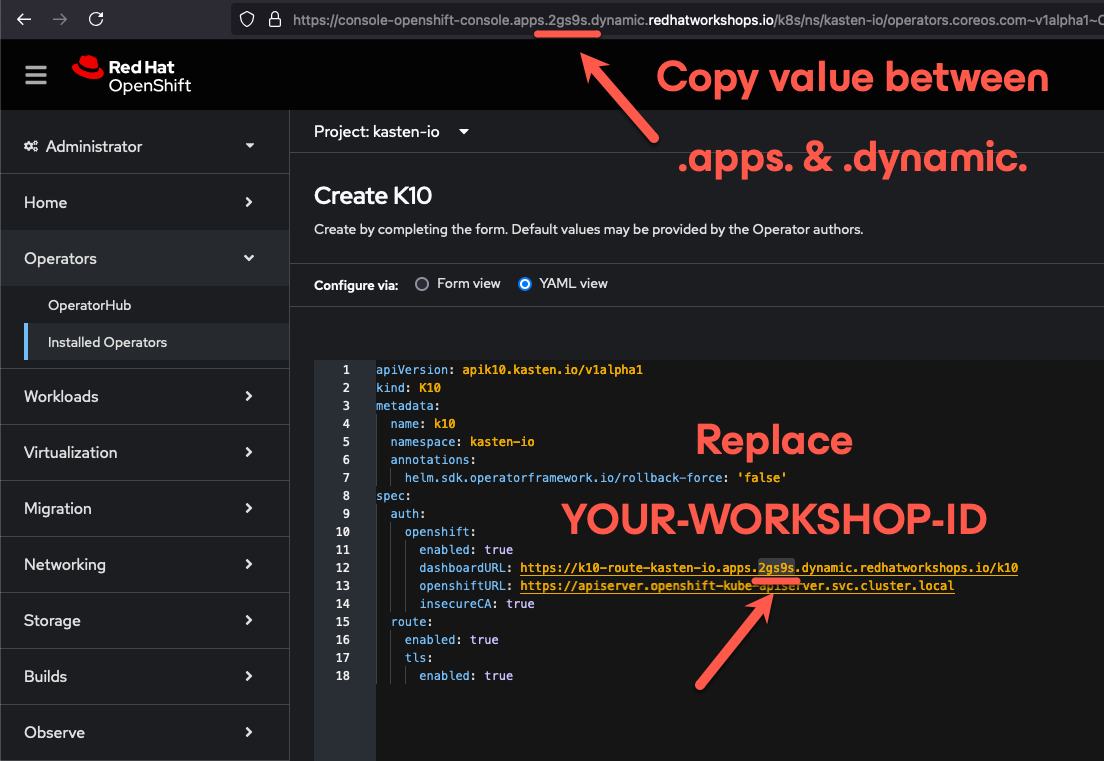
Select YAML view and overwrite the default options with the configuration below:
--- apiVersion: apik10.kasten.io/v1alpha1 kind: K10 metadata: name: k10 namespace: kasten-io annotations: helm.sdk.operatorframework.io/rollback-force: 'false' spec: auth: openshift: enabled: true dashboardURL: https://k10-route-kasten-io.apps.YOUR-WORKSHOP-ID.dynamic.redhatworkshops.io/k10 openshiftURL: https://apiserver.openshift-kube-apiserver.svc.cluster.local insecureCA: true route: enabled: true tls: enabled: true -
Replace
YOUR-WORKSHOP-IDwith the 5 character identifier for your lab environment DNS, as shown in the screenshot below:
This configuration will enable integration with the built-in OpenShift OAuth server and the creation of a
Routefor secure, multi-user access to the Kasten dashboard.A complete list of configuration parameters is available on docs.kasten.io. -
Click Create.
-
Open the Web Terminal and click Start to initialize the terminal (if prompted).

-
From the Web Terminal, run the following to monitor the installation:
watch oc get pods -n kasten-io -
Once all Deployments are
READY, pressCTRL+Cto end thewatch.
-
As a final deployment step, annotate the available VolumeSnapshotClasses for use with Kasten:
oc annotate volumesnapshotclass \
  ocs-external-storagecluster-rbdplugin-snapclass  \
  k10.kasten.io/is-snapshot-class=true

oc annotate volumesnapshotclass \
  ocs-external-storagecluster-cephfsplugin-snapclass \
  k10.kasten.io/is-snapshot-class=true
The k10.kasten.io/is-snapshot-classannotation is used by Kasten to determine which VolumeSnapshotClass should be used by Kasten to request CSI snapshots for PersistentVolumes provisioned by a given CSI provider. -
Close the Web Terminal.
3. Accessing the Kasten Dashboard
-
In a web browser navigate to the {kasten_dashboard}[Kasten Dashboard^]. You should be redirected to the OpenShift OAuth login prompt.
-
Use your OpenShift Console credentials provided as part of your lab environment and click Log-in.
-
User ID:
{user} -
Password:
{password}
-
-
When prompted, select Allow selected permissions to allow Kasten read-only access to username and group membership details from the OpenShift OAuth server.
-
Specify your Email Address and Company values and click Accept Terms.

-
Click on Skip Tour to skip the tour of the Kasten dashboard for the time being.
-
You should observe that the Kasten Dashboard is being accessed as your individual user.

Kasten ships with multiple built-in user roles, including k10-adminandk10-basic. As Kasten is built on Kubernetes-native resources, custom roles can be built and bound to users/groups to define fine-grained access on a per namespace level.This helps to allow secure self-service for end users who may need to manage their own policies or restores without dependence on a data protection administrator.
Your user has been granted the
k10-adminrole.