Configuring Location Profiles
1. Introduction
You have now configured everything required to perform a local snapshot of a Kubernetes application using Kasten - but snapshots are not backup! In order to restore in the event the local cluster or primary storage is compromised, a copy of that data should be exported to another location.
The configuration of these backup targets are called Location Profiles. Kasten supports several options, including:
-
AWS S3
-
Azure Blob
-
Google Cloud Storage
-
S3-Compatible
-
NFS
-
Veeam Backup & Recovery
Kasten supports the creation of immutable backups to ensure that, as a last line of defense against ransomware, backup data cannot be manipulated or deleted by any user. These backups are supported on the following platforms:
-
AWS S3
-
S3-Compatible with Object Lock support (ex. Ceph, MinIO, Wasabi, etc.)
-
Azure Blob
-
Google Cloud Storage
In this exercise, you will configure a bucket using the on-cluster Ceph Object Gateway deployment and add the bucket as a Location Profile in Kasten.
| In a real world environment you should never back up data to the same infrastructure you are intending to protect - using on-cluster storage as a backup target is performed in the lab solely to simplify lab staging and instructions. |
2. Configuring an Object Bucket Claim to Store Backups
| Kasten supports immutable object storage and it is recommended to protect backups against accidental deletion or ransomware attack. For this lab, we won’t configure immutability as it requires elevated permissions. |
-
If you haven’t yet logged into the {openshift_console_url}[OpenShift console^] log into the console now.
-
Your UserID is
{user}with password{password}.
-
-
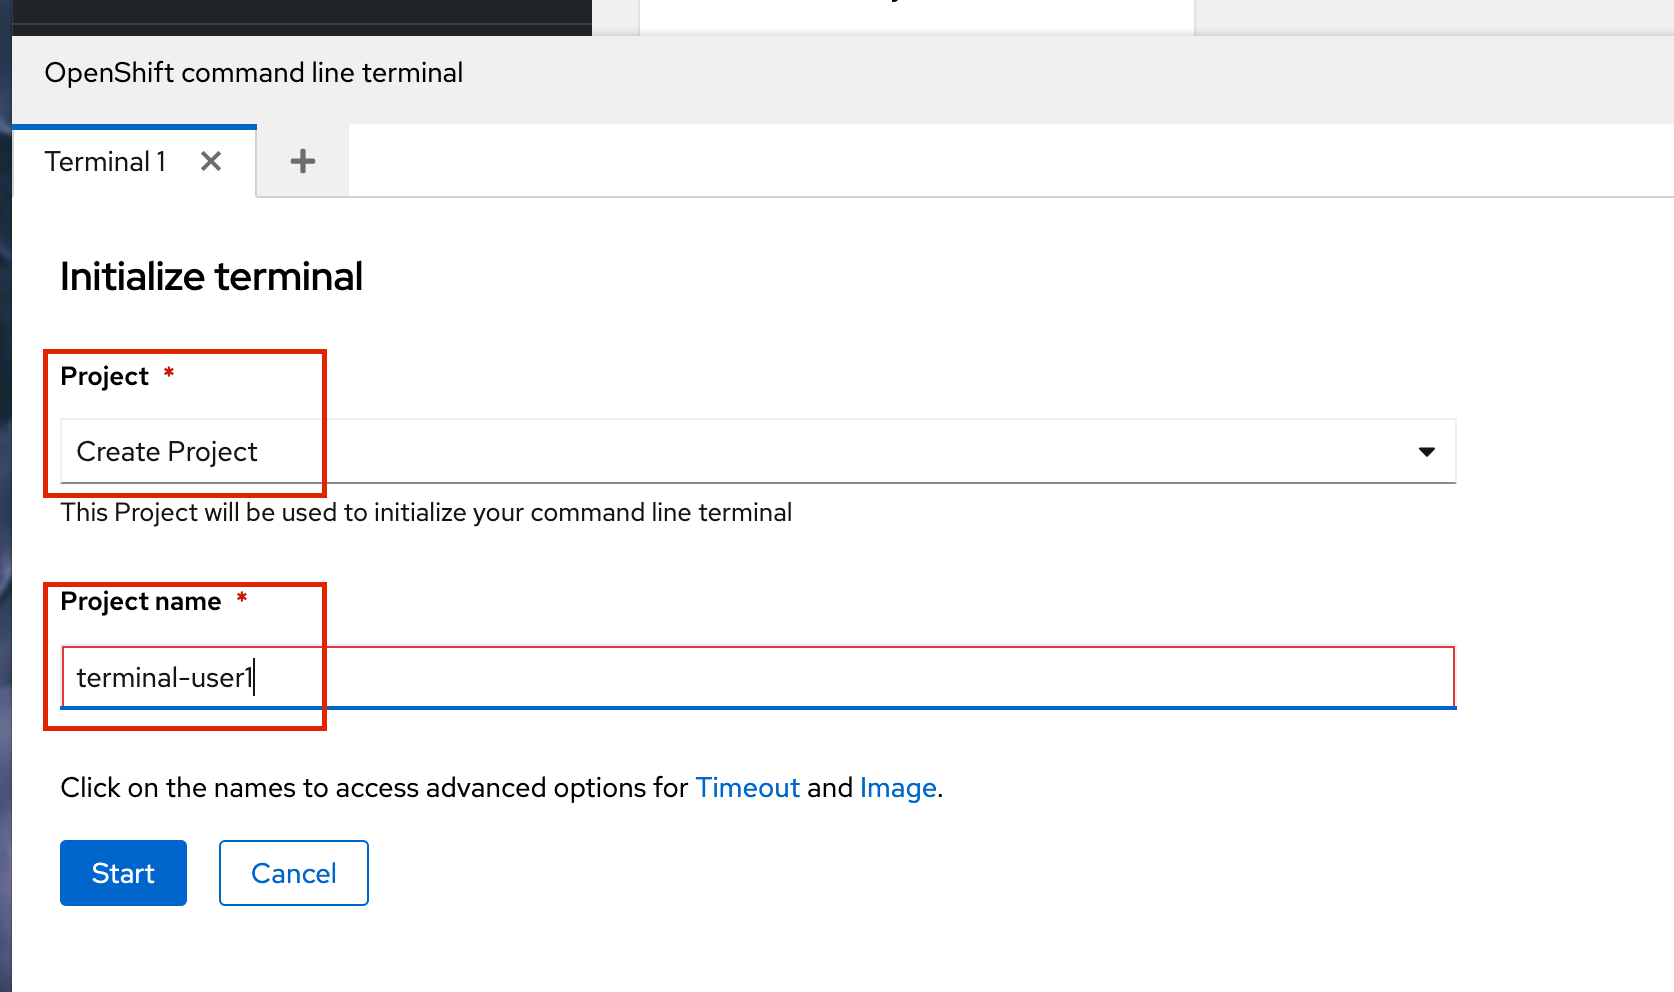
Open an OpenShift command line terminal

If this is the first time you are opening a terminal you may need to Create a Project first to run your terminal pod in. In that case make sure you use terminal-{user}as your project name to ensure that it is unique to you. Then click the blue Start button.
-
An
ObjectBucketClaimhas already been created for you. You can examine the claim using the following command:oc describe objectbucketclaim -n backuptarget-{user} kastenbackups-{user} -
Run the following command to retrieve the Access Key for the bucket:
oc get secret -n backuptarget-{user} kastenbackups-{user} \
  -o jsonpath='{.data.AWS_ACCESS_KEY_ID}' | base64 --decode && echo
Copy the Access Key to a text editor as it will be needed again shortly
-
Run the following command to retrieve the Secret Key for the bucket:
oc get secret -n backuptarget-{user} kastenbackups-{user} \
 -o jsonpath='{.data.AWS_SECRET_ACCESS_KEY}' | base64 --decode && echo
Copy the Secret Key to a text editor as it will be needed again shortly.
3. Creating an S3-Compatible Location Profile
-
In the Kasten Dashboard, select Profiles → Location from the sidebar and click + Add New.

-
Fill out the following fields and click Next:
Location Profile Name
kastenbackups-{user}Storage Provider
S3 Compatible

-
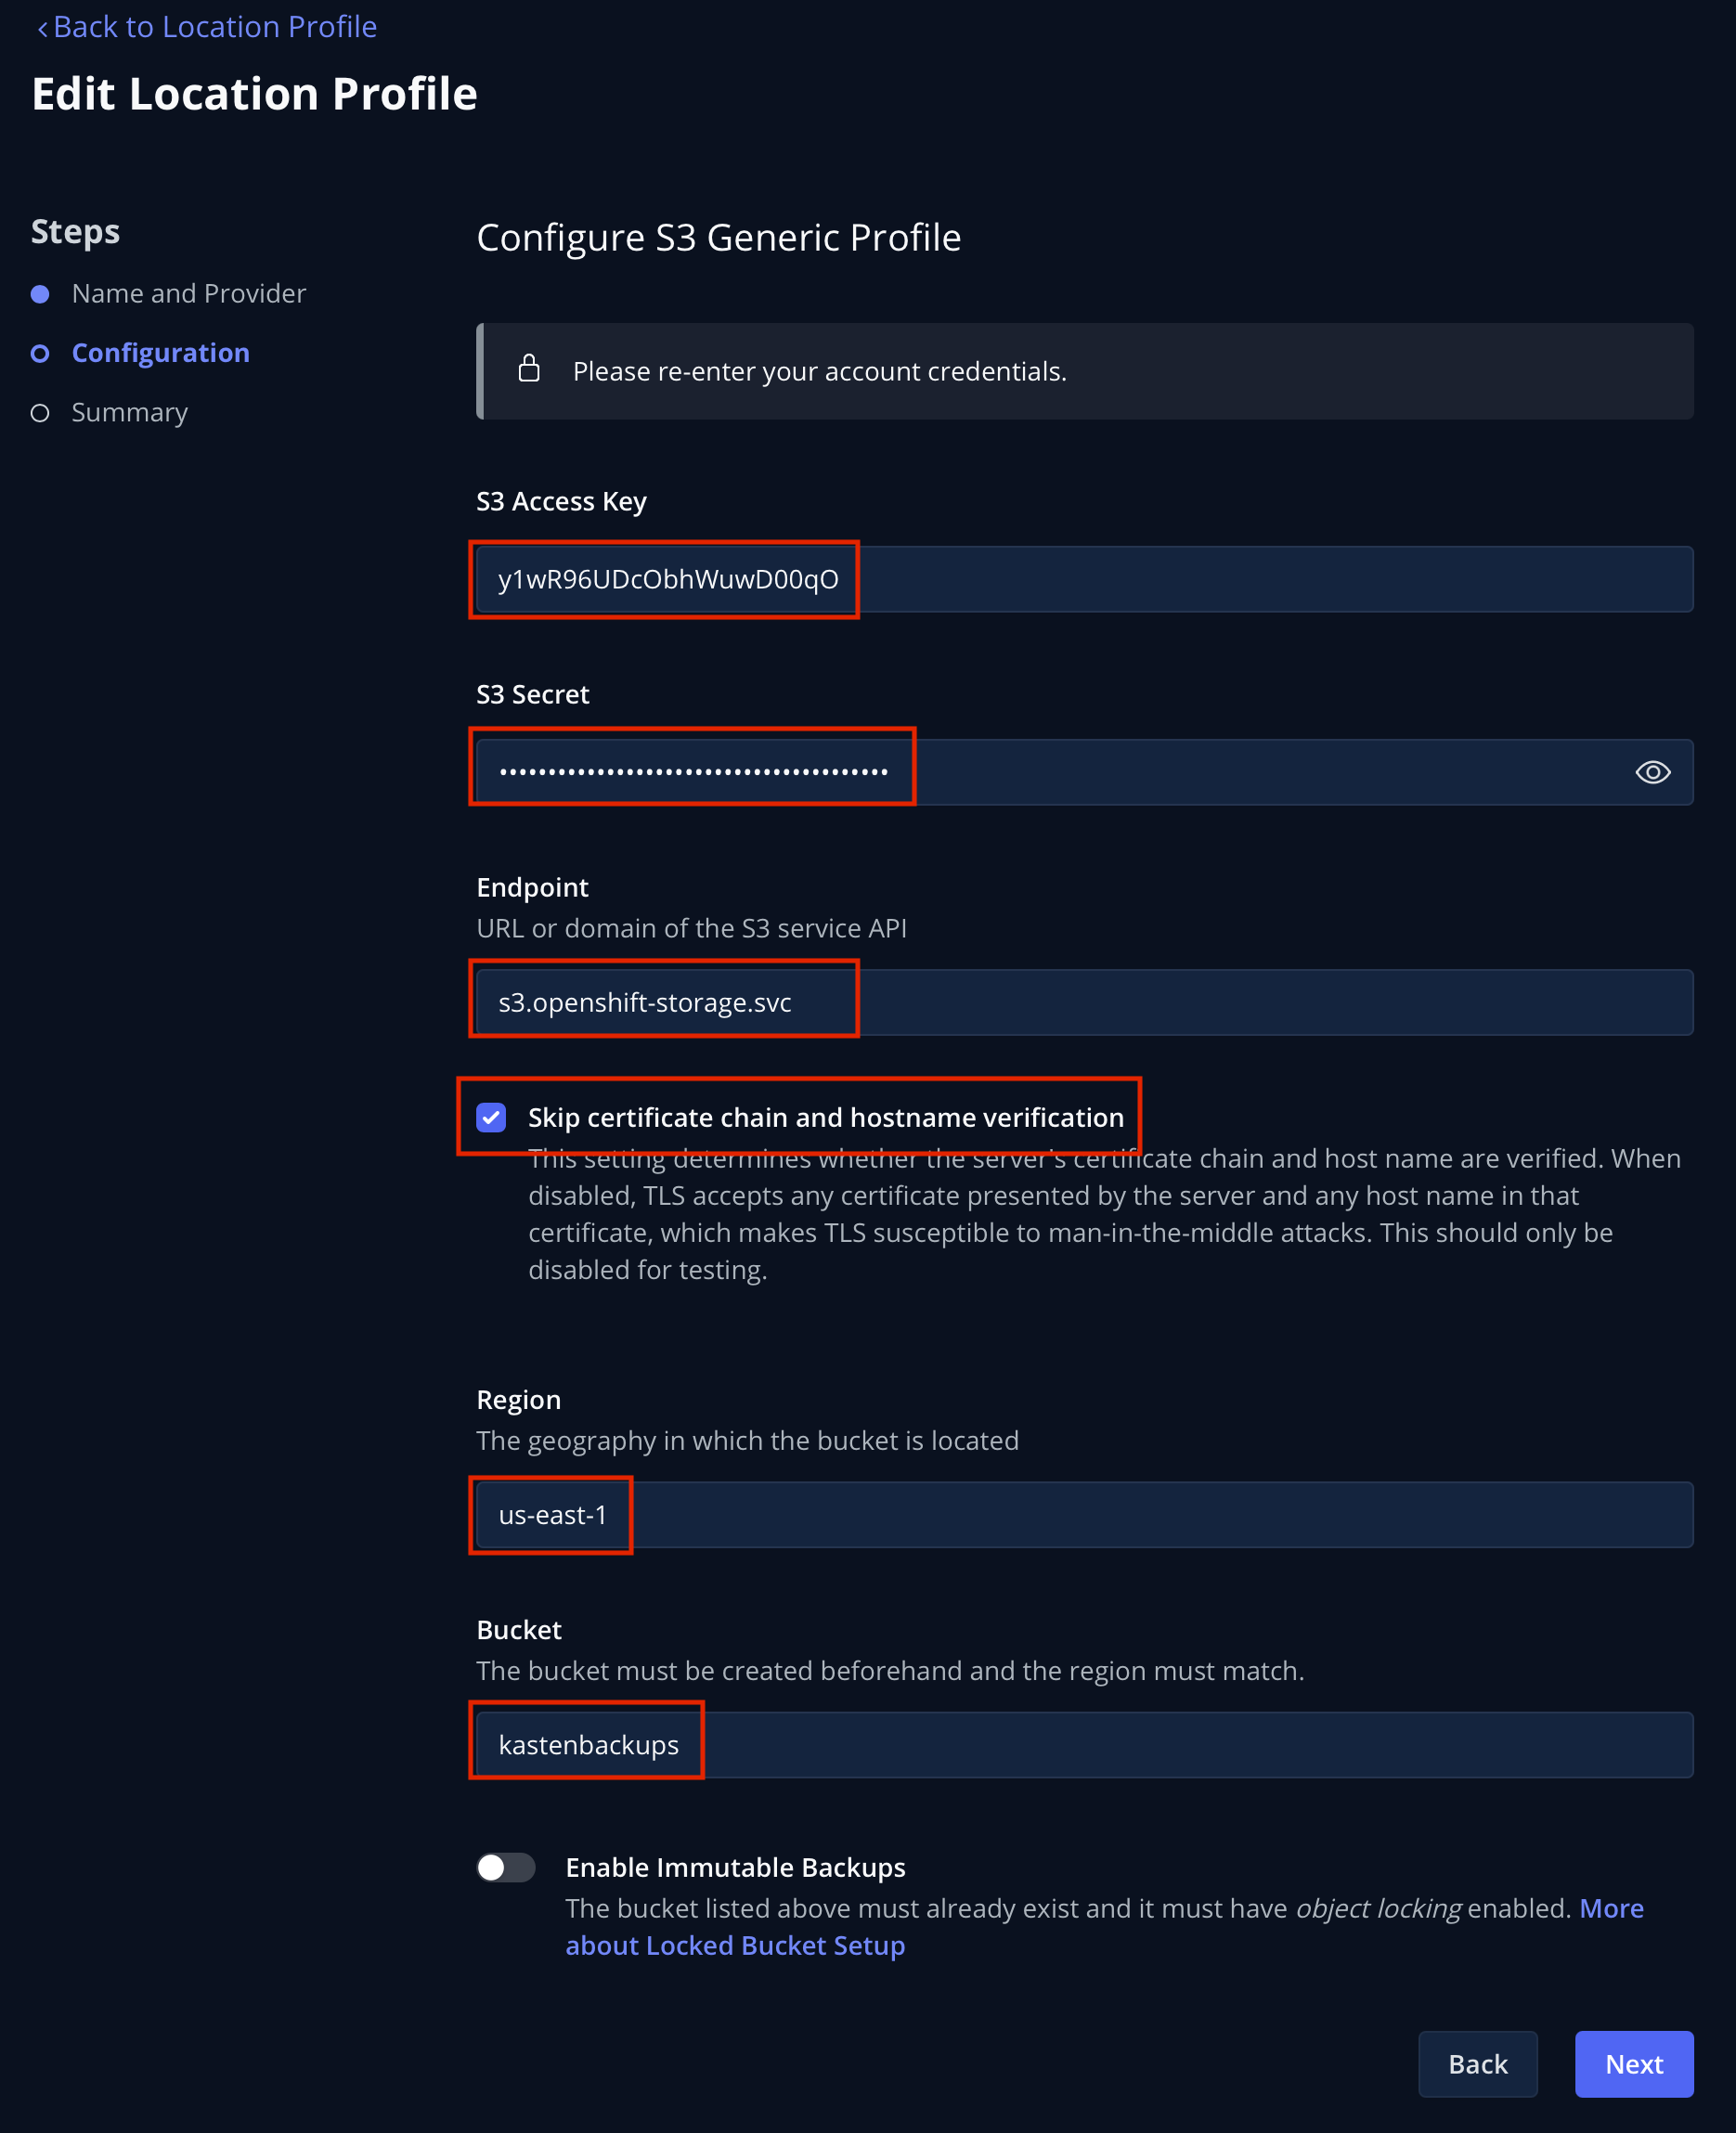
Fill out the following fields but DO NOT click Next yet!:
S3 Access Key
Paste
ACCESS KEYvalueS3 Secret
Paste
SECRET KEYvalueEndpoint
{kasten_backup_bucket_host}Skip certificate chain and hostname verification
CheckedRegion
us-east-1Bucket
kastenbackups-{user}
-
Click Next followed by Submit to create the Location Profile.
You should expect your
kastenbackups-{user}Location Profile to appear with a Success status.
Now you’re ready to start protecting apps!
-
Click the … menu and select View YAML to view the manifest generated by creating a Location Profile through the Dashboard.

As you can see from this example, Kasten Location Profiles can be created declaratively as a
profile.config.kio.kasten.ioobject referencing a Secret to store access and secret keys. This Kubernetes-native implementation makes it simple to configure backup targets using a GitOps approach.See docs.kasten.io for complete documentation on defining Profile API objects. -
Click Cancel or the X in the upper-right to close the YAML window.