Using the Collection with Workflows
One of the goals of the Automation Platform Collections and the infra.aap_configuration collection is to allow users to easily create objects in Ansible Automation Platform. In service of that, we will explore how to codify workflows and deploy them on the Platform.
Overview
First, let’s take a look at the following workflow:
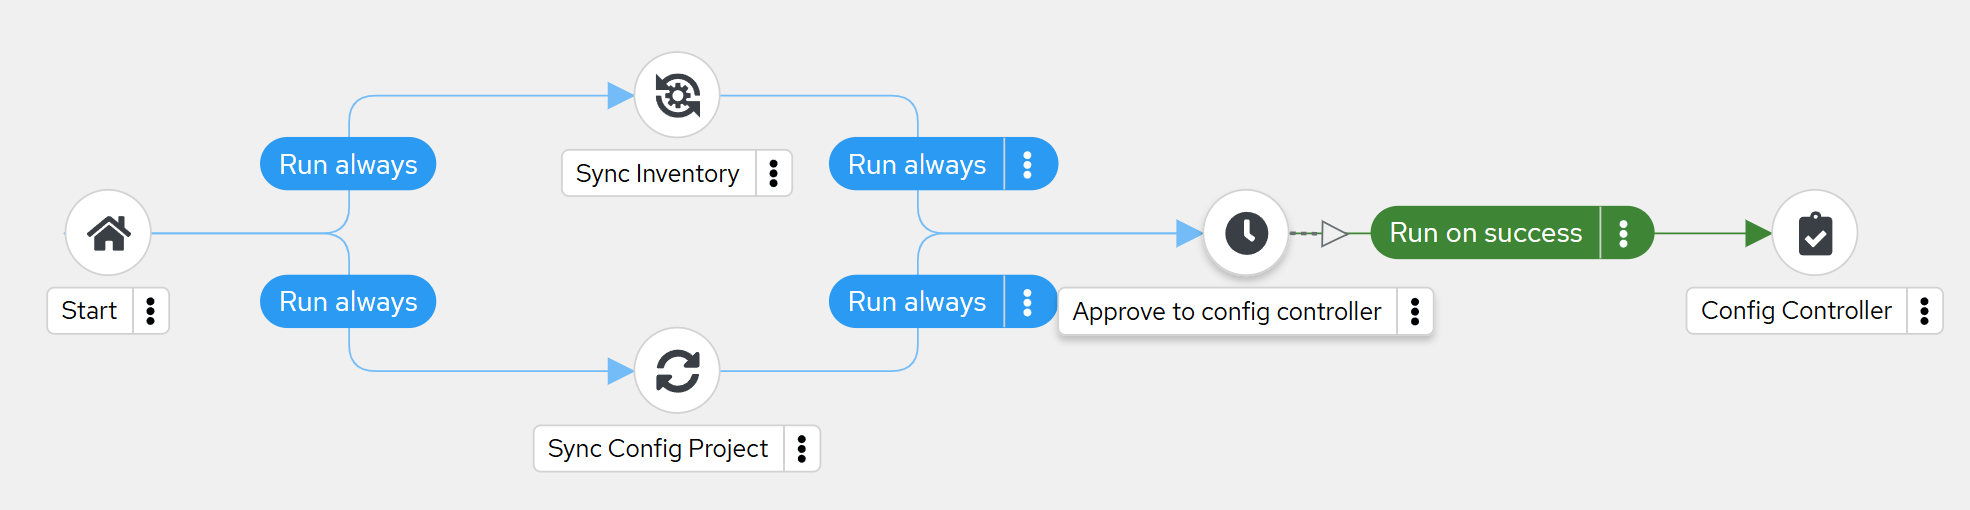
Each node represents an action, such as an inventory update, project update or the running of a job template. Other options can also be specified (see the docs for detail), and each node is linked to one or many other nodes. The common practice is to create the workflows inside of the automation controller GUI, but with the Collections, it is possible to manage these workflows through Ansible Playbooks.
Structure
To start lets explore how each node is structured in code. Each entity in the workflow_nodes list describes a single node. Here is a breakdown of what each of the fields in the node represent:
---
  - identifier: An identifier that is unique within its workflow.
    related:
      always_nodes: Dict List of nodes that always execute listed by identifiers
        - identifier: X
      failure_nodes: Dict List of nodes that execute on failure listed by identifiers
      success_nodes: Dict List of nodes that execute on success listed by identifiers
    unified_job_template:
      name: Name of Job Template that will be run
      organization:
        name: Name of Organization the Job template is in
      type: Type of node, this is required
...| The type can be one of job_template, project, inventory_source, workflow_approval. |
Inventory Sources
Unified Job template descriptions for inventory sources are slightly different to the others
---
unified_job_template:
  inventory:
    organization:
      name: config_as_code  # Organization that the inventory source is in
  name: controller_config_source  # Name of inventory source
  type: inventory_source  # Type
...| That the organization is a sub variable of the inventory and is the organization that the inventory belongs to, not the workflow. |
Approval Nodes
Approval nodes do not have organizations
---
unified_job_template:
  description: Approval node to continue job
  timeout: 900  # Timeout before the Approval fails
  type: workflow_approval  # Type
  name: Approve to config controller  # Name that shows on node
...
Project updates and Job templates
Project updates and Job templates share the same model
---
unified_job_template:
  name: Demo Project  # Name of the Project or Job Template
  organization:
    name: Default  # Organization the Project or Job Template is in
  type: project  # Type
...| That the type can be either project or job_template |
Changing the workflow
By modifying the variable that represents the workflow, we can add additional nodes, remove or remap existing nodes, or even change the job template a node runs, amongst other things.
An example of removing a node:
---
- identifier: Demo Job Template
  unified_job_template:
    name: Demo Job Template
    organization:
      name: Satellite
    type: job_template
  state: absent
...| It still requires a valid unified job template, but it will delete the node from the workflow. |
Task 1 - Putting it together
-
The above instructions are building blocks. Time to put them to use, below is the start of the workflow illustrated above. Using what you know, recreate it in the controller
---
workflow_job_templates:
  - name: Configuration Workflow
    workflow_nodes:
      - identifier: Sync Inventory
        unified_job_template:
          inventory:
            name: config_as_code
            organization:
              name: config_as_code
            type: inventory
          name: controller_config_source
          type: inventory_source
        related:
          always_nodes:
            - identifier: Configure Hub
...
Use the following
playbooks/workflow_config.ymlplaybook to just run workflows--- - name: Playbook to configure workflows hosts: all vars_files: - "../vault.yml" connection: local roles: - infra.aap_configuration.controller_workflow_job_templates ...
With this console command using tags:
ansible-playbook -i inventory.yml -l execution playbooks/workflow_config.yml-
Further documentation for creating workflows can be found here:
✅ Done
You’ve completed the lab, you should now have everything you need to start using configuration as code in your own environment!