2. Edge Manager Operations
Edge Manager Architecture
Edge Manager consists of the highlighted components as shown in the following high-level architecture diagram:
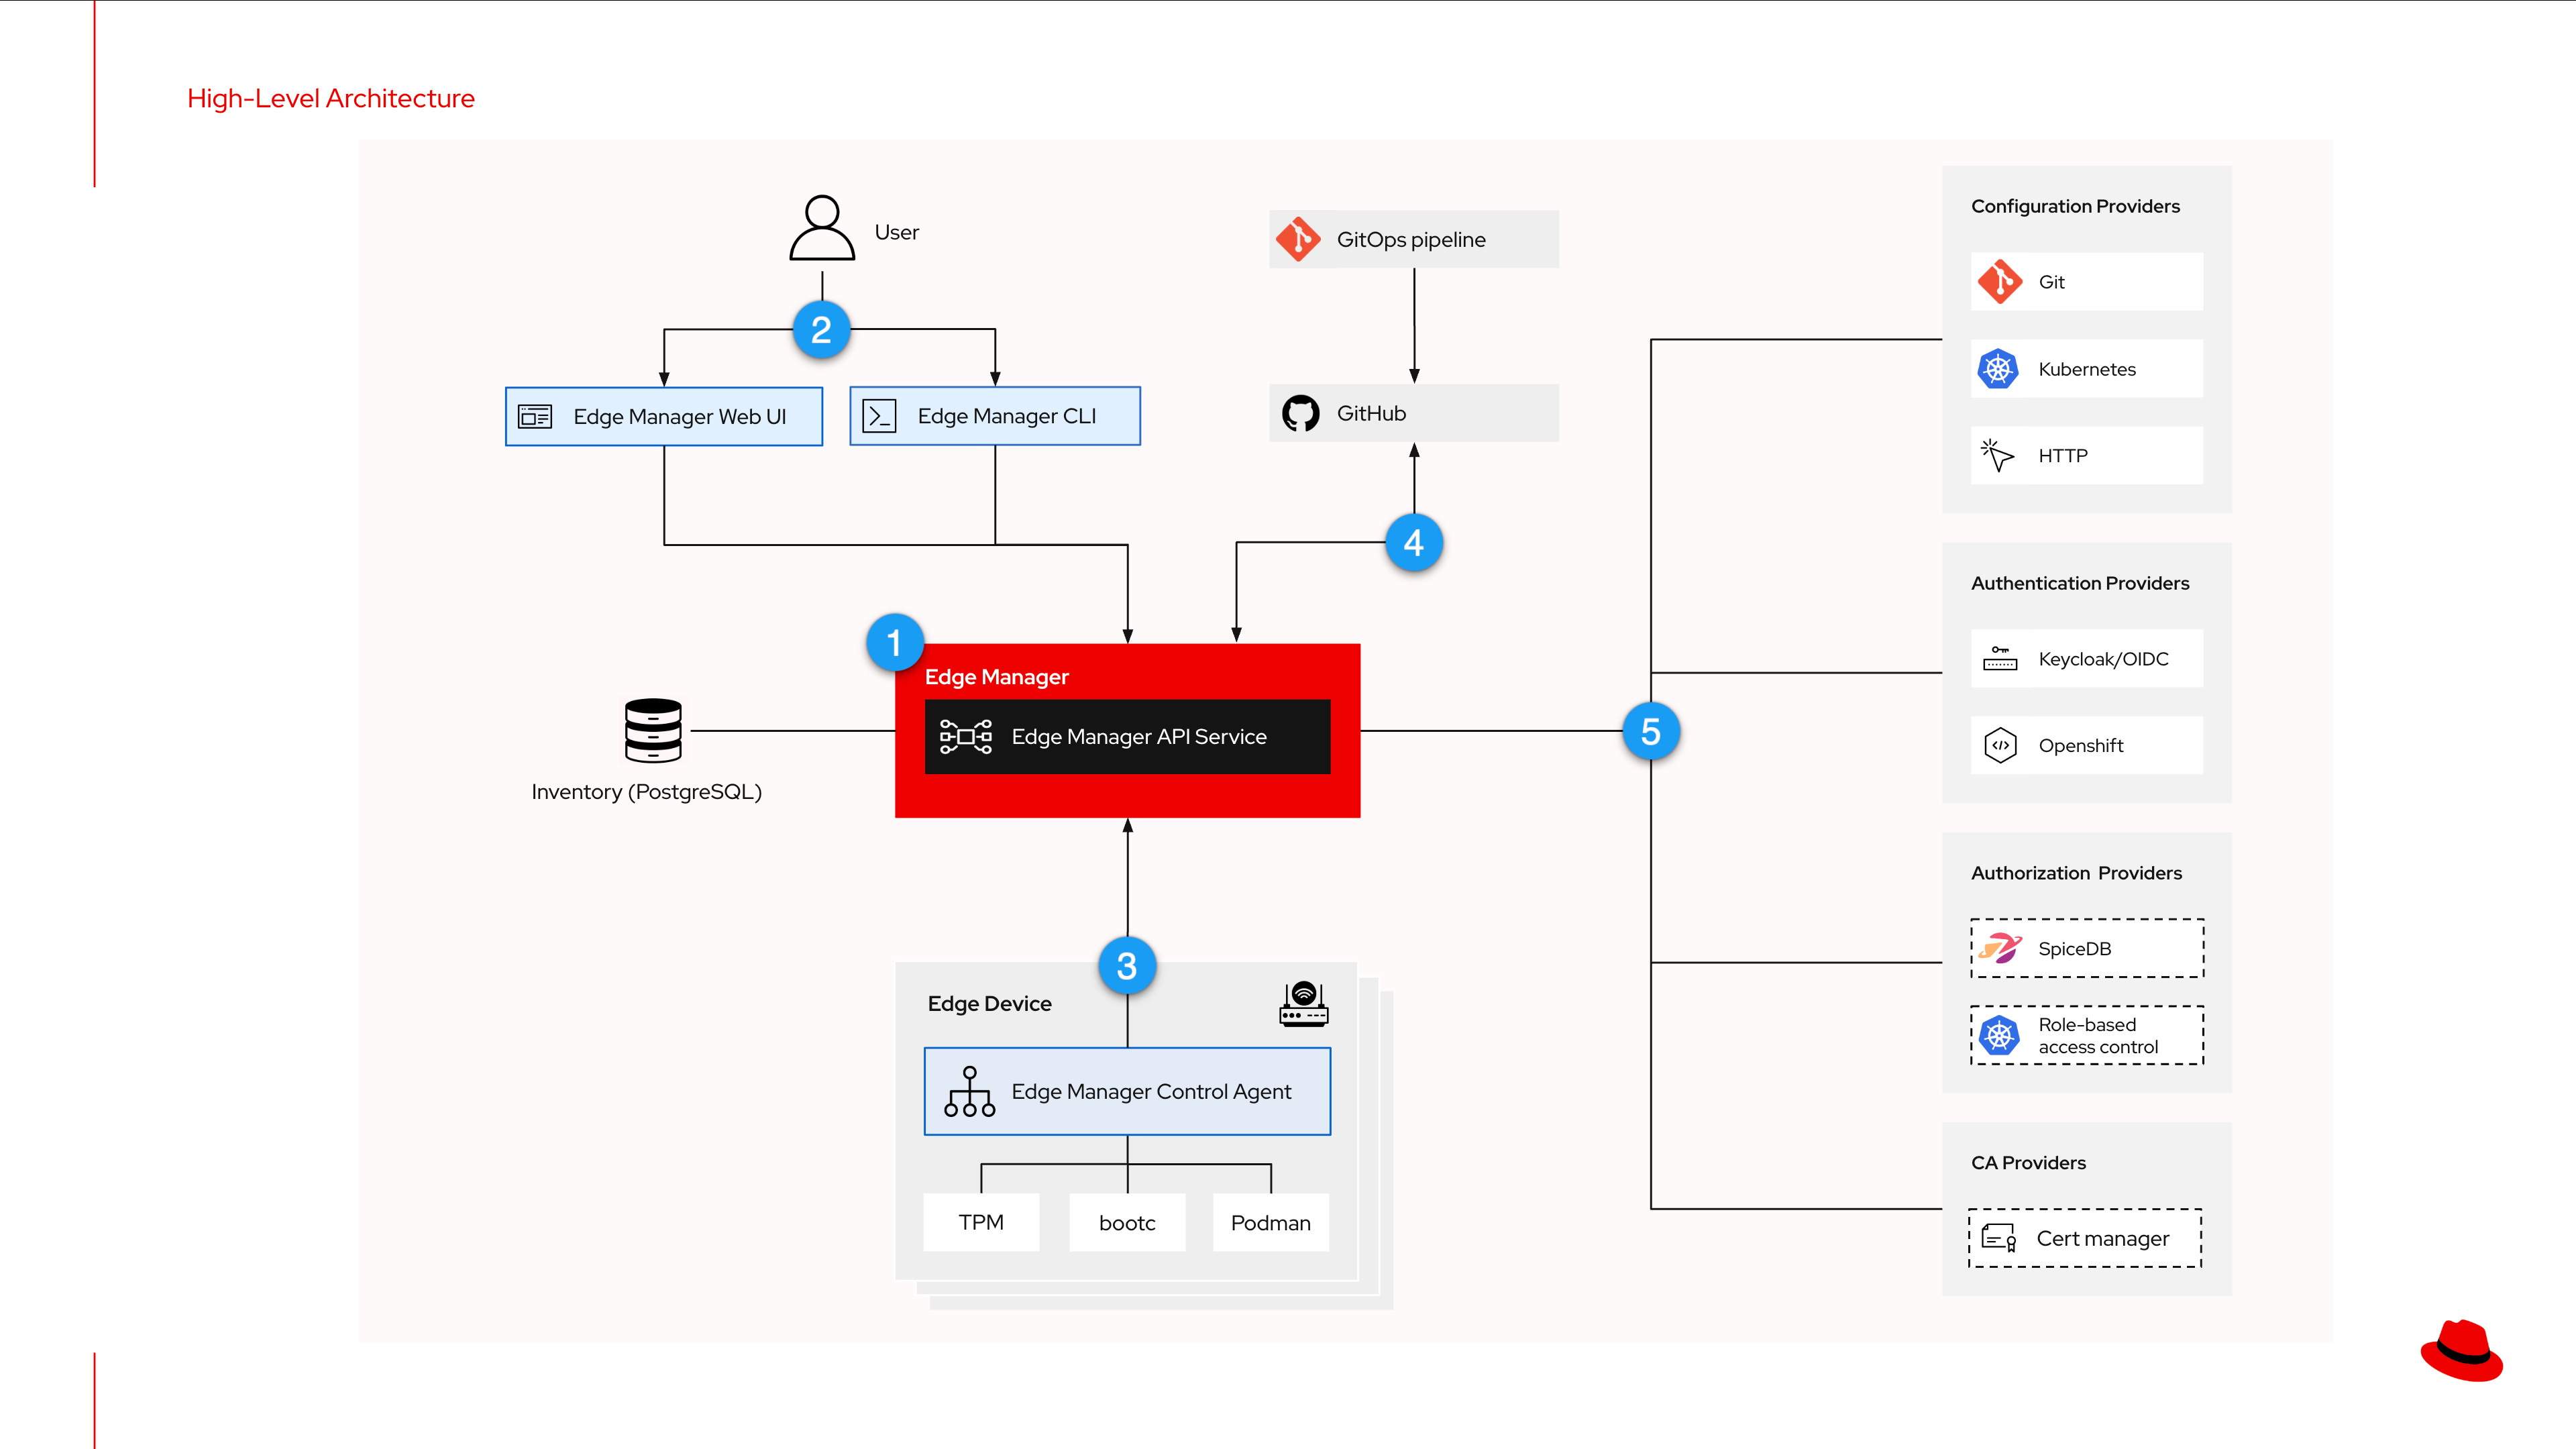
-
Edge Manager Service which consists of an API Server, worker processes (not shown), and a PostgreSQL database utilized for storing inventory and runtime information such as current device target configuration and the reported actual configuration
-
User access is achieved via two primary interfaces: Edge Manager Web UI (which we briefly examined earlier) and Edge Manager CLI (which we will explore in a later module)
-
Edge Device access utilizes an Agent that is running on each managed device. The agent always 'calls home' to the Edge Manager service, so the device can be on a private network or have a dynamic IP address (this includes devices that are behind Network Address Translation (NAT), firewalls and cellular / WLAN uplinks)
-
Git repository integration (optional) enables storing of device and device fleet configuration. When utilized, the Edge Manager service periodically polls Git for updates
-
External systems can be utilized by the Edge Manager service to authenticate and authorize users, get mTLS certificates signed, or query configuration for managed devices
New Store Edge Device Onboarding
Now that you have seen an overview of Edge Manager and examined its architecture, it’s time to bring our new store online
| In the following screenshots, the user ID is set to ‘user1’. Your user ID will most likely be different from this. Please refer to the lab guide text for your correct user ID |
Device Enrollment
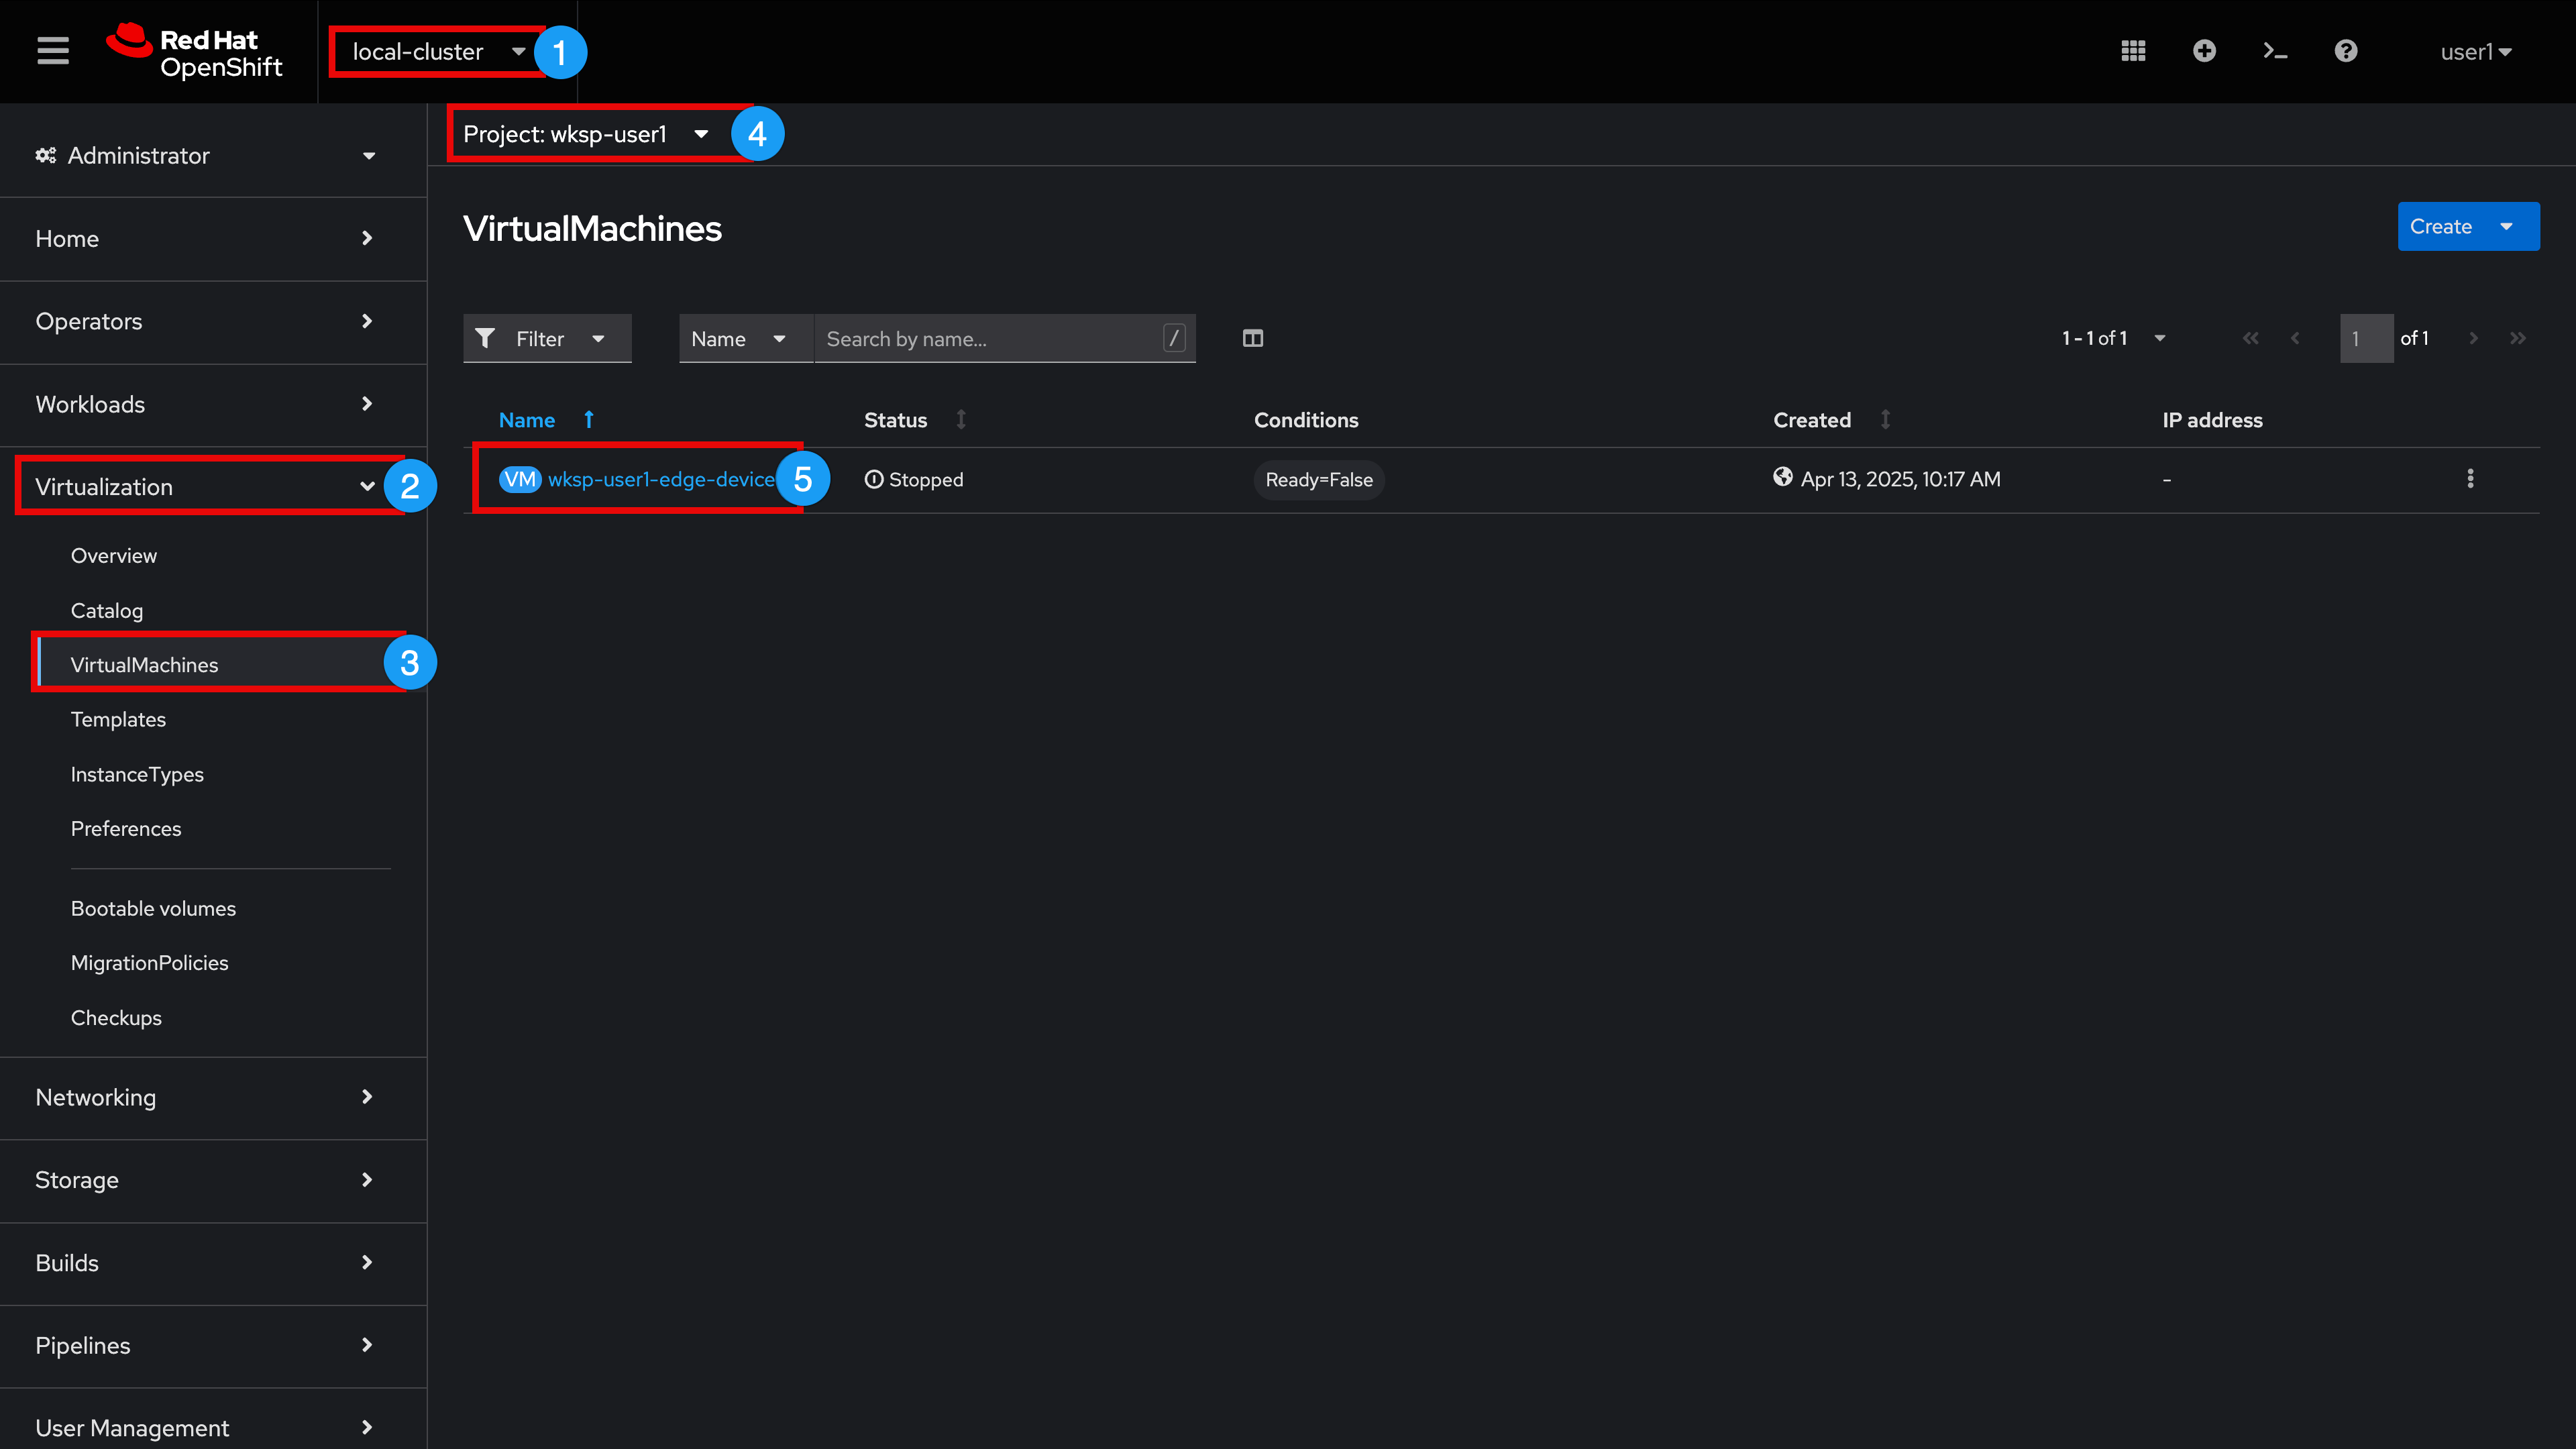
Return to your lab environment and perform the following steps
-
Expand and select local-cluster
-
Expand Virtualization menu
-
Select VirtualMachines
-
Set Project: wksp-{user}
-
Click wksp-{user}-edge-device
Your Edge Device virtual machine has been pre-configured with a RHEL 9.5 bootc image containing an Edge Manager agent, let’s power on the device
-
Click the VM start (play) icon
-
Click Open web console (to open the console in a new Browser tab)
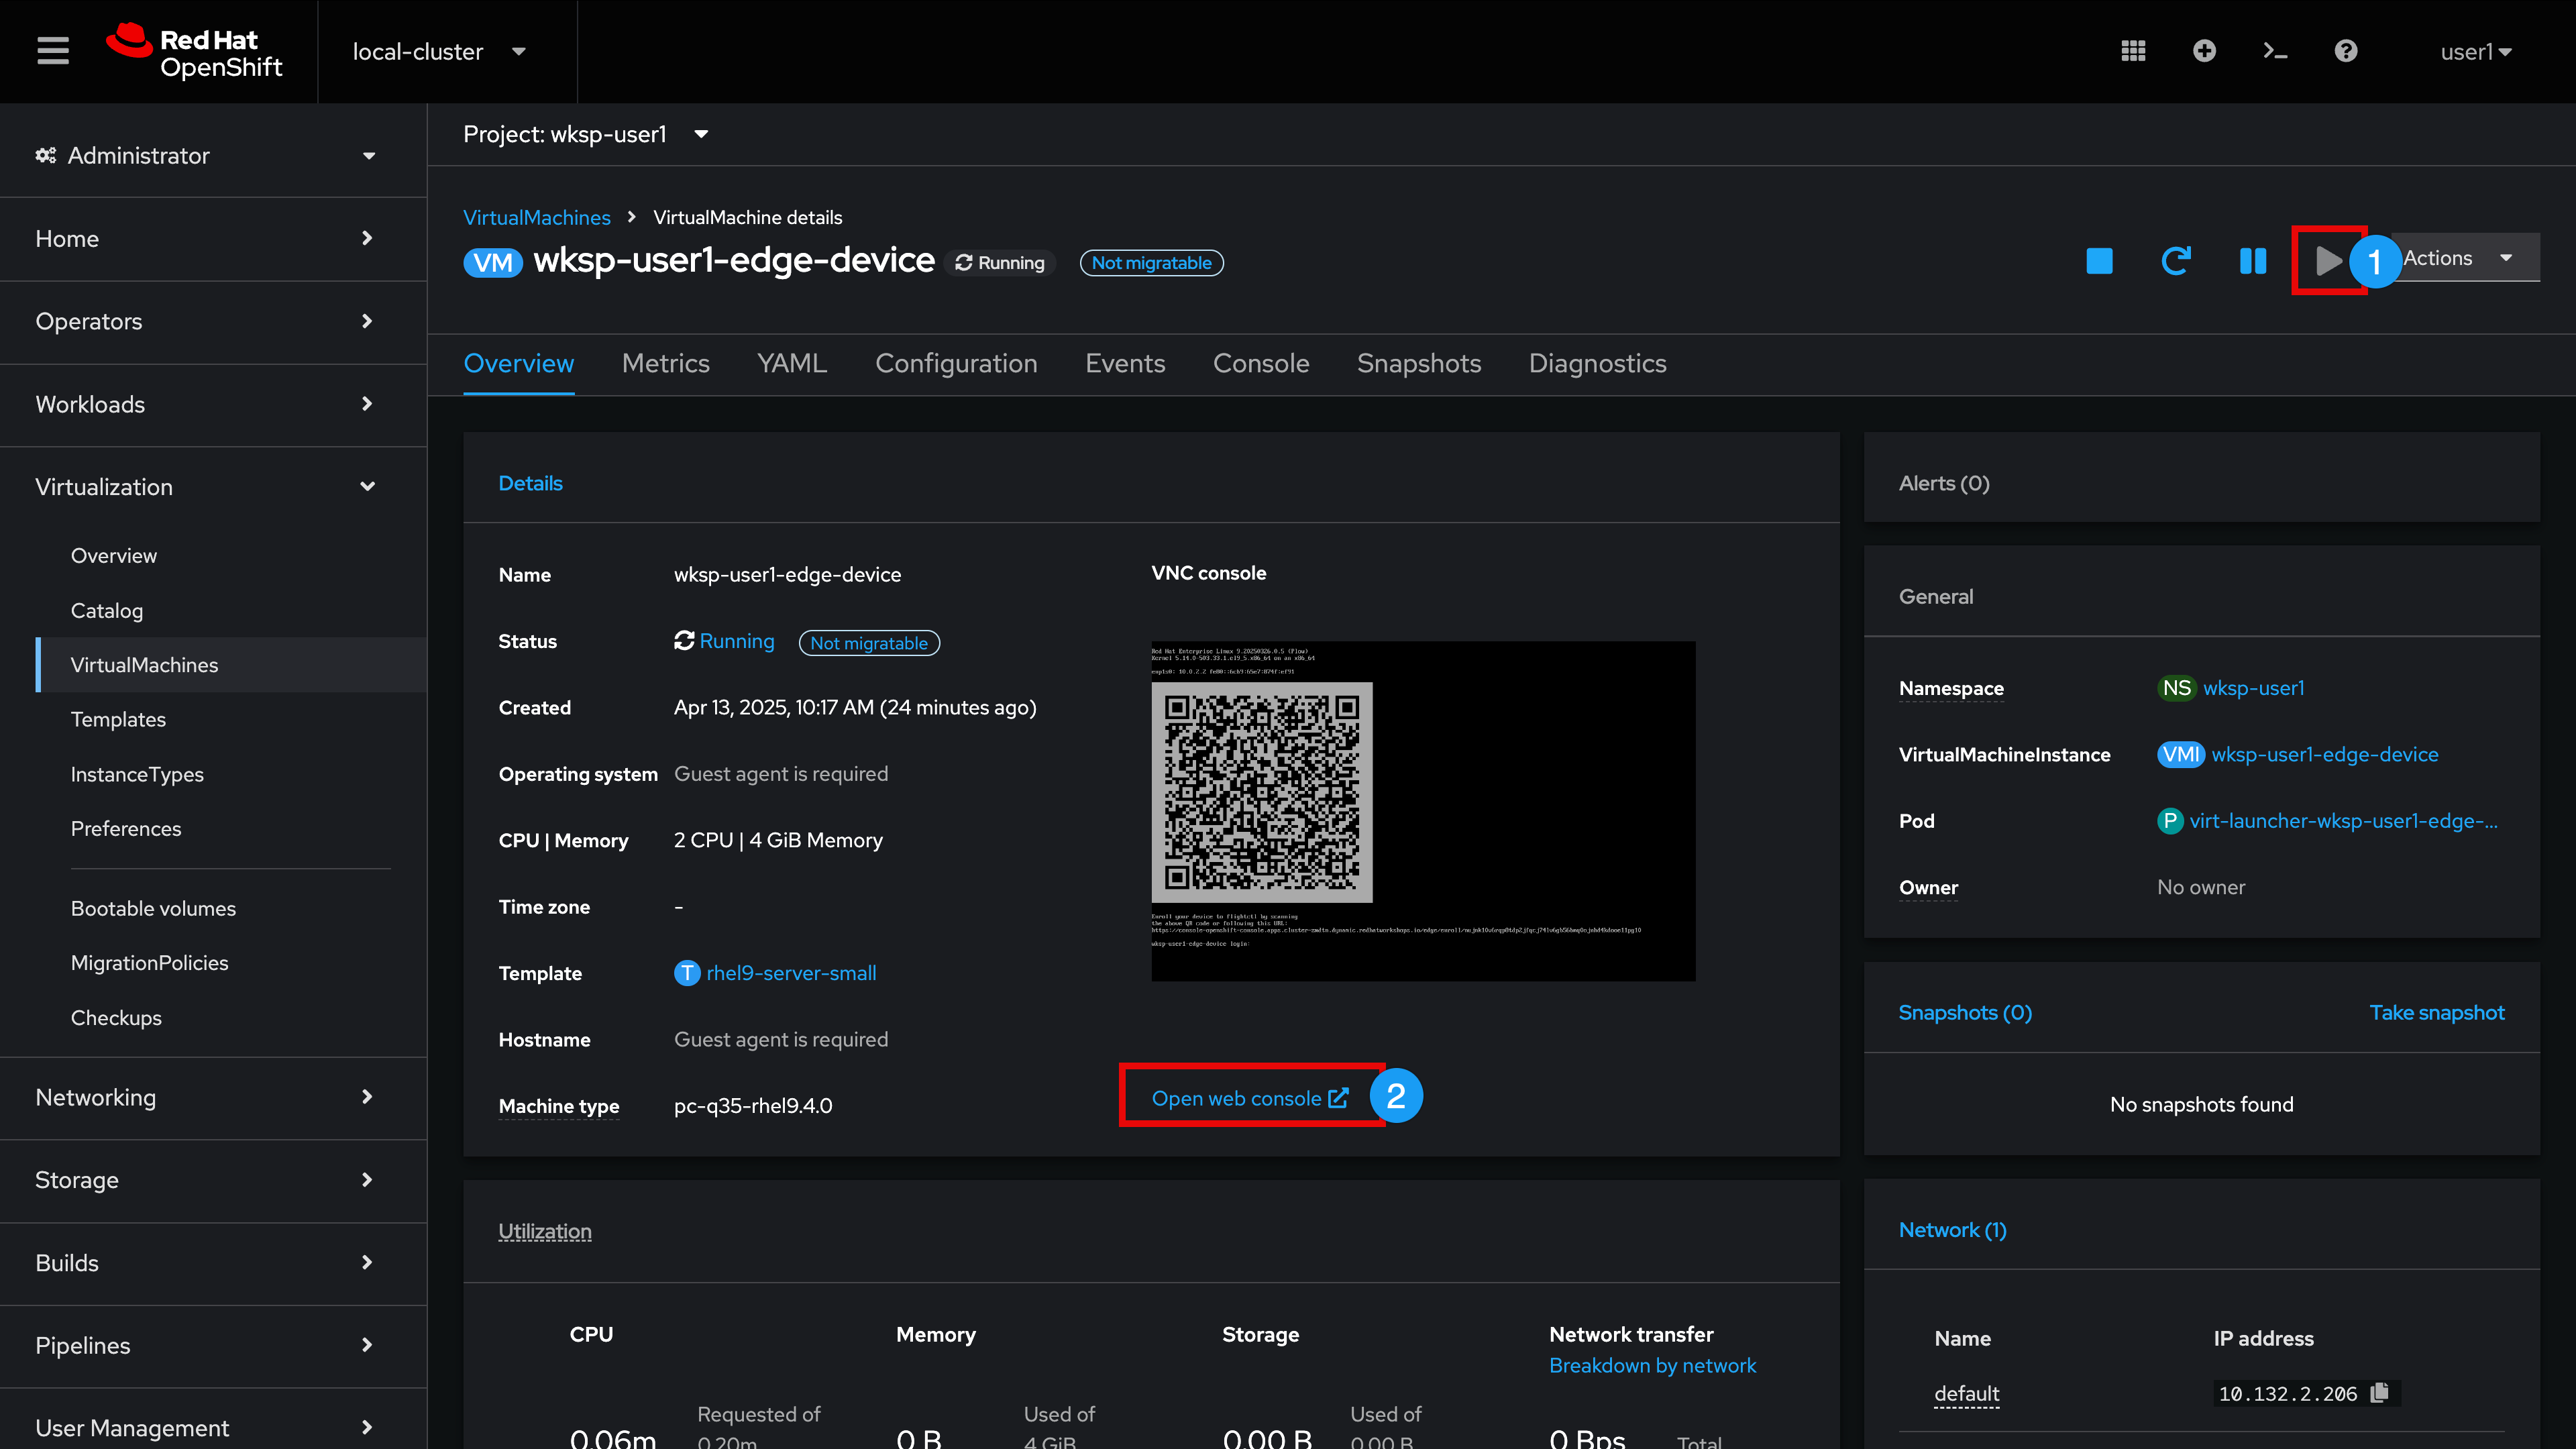
Your edge device has powered on and established a secure mTLS connection with the Edge Manager API Service. As part of the enrollment process, a QR code is conveniently made available to users
Option 1: QR Enrollment via Mobile Phone
| If you have a Mobile Device, continue with the steps indicated below. If you do not have a Mobile Device, skip this section by clicking here to go to the Option 2: QR Code Enrollment via Web Browser section (you can also select this section in the Contents right-hand navigation menu) |
-
Scan the QR code and open the site in your mobile device browser.
| Please make sure you utilize the username provided for you as shown in the following steps |
-
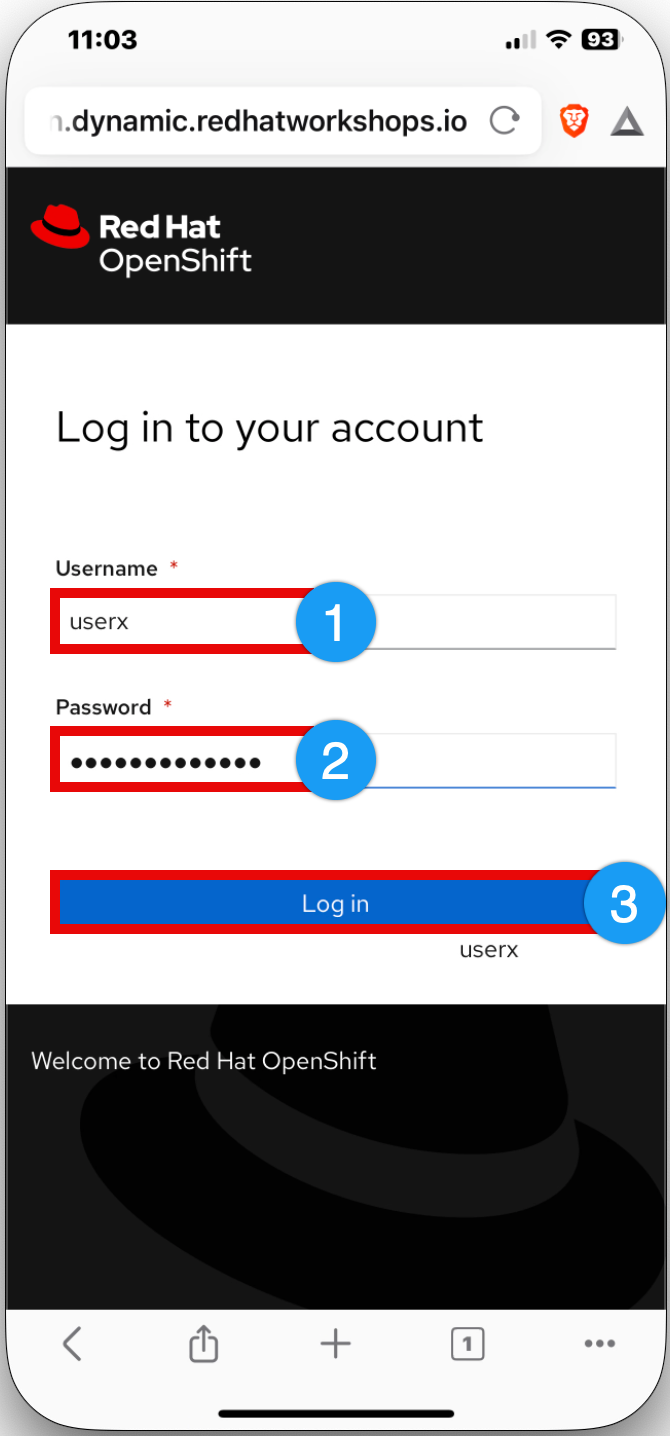
Enter Username: {user}
-
Enter Password: {password}
-
Select Login
-
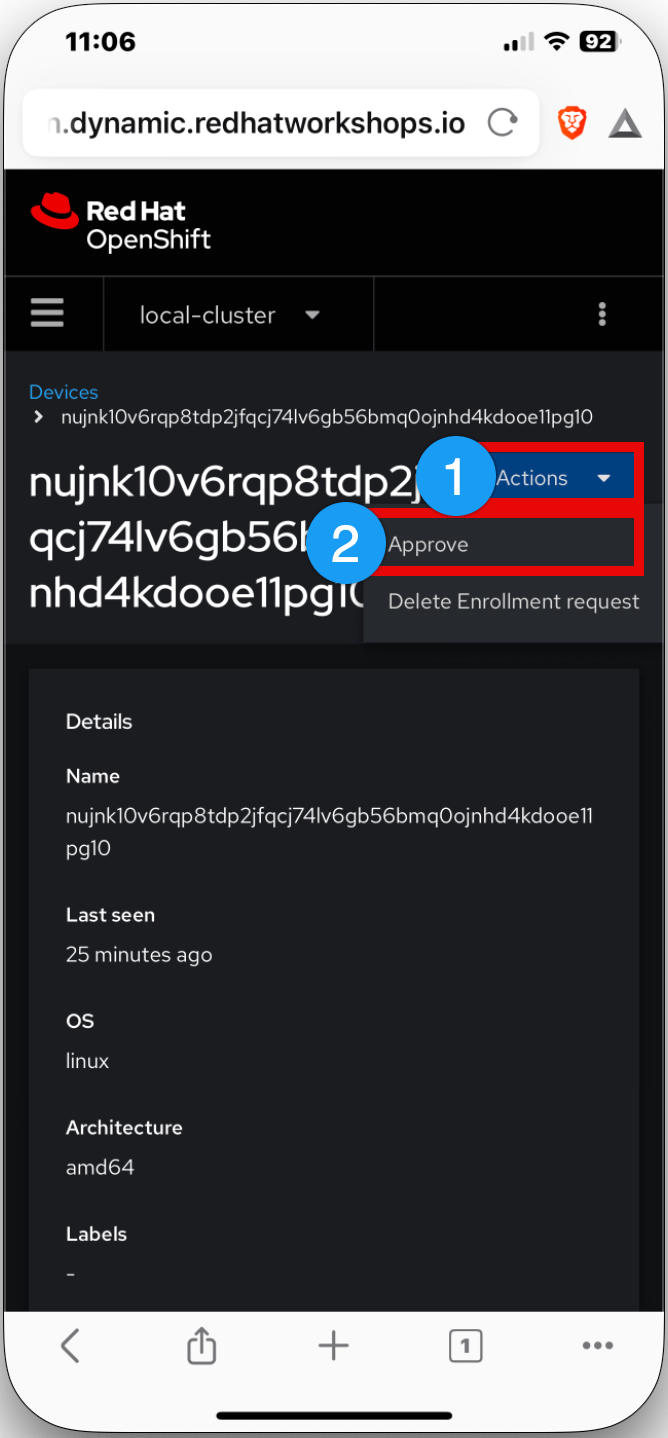
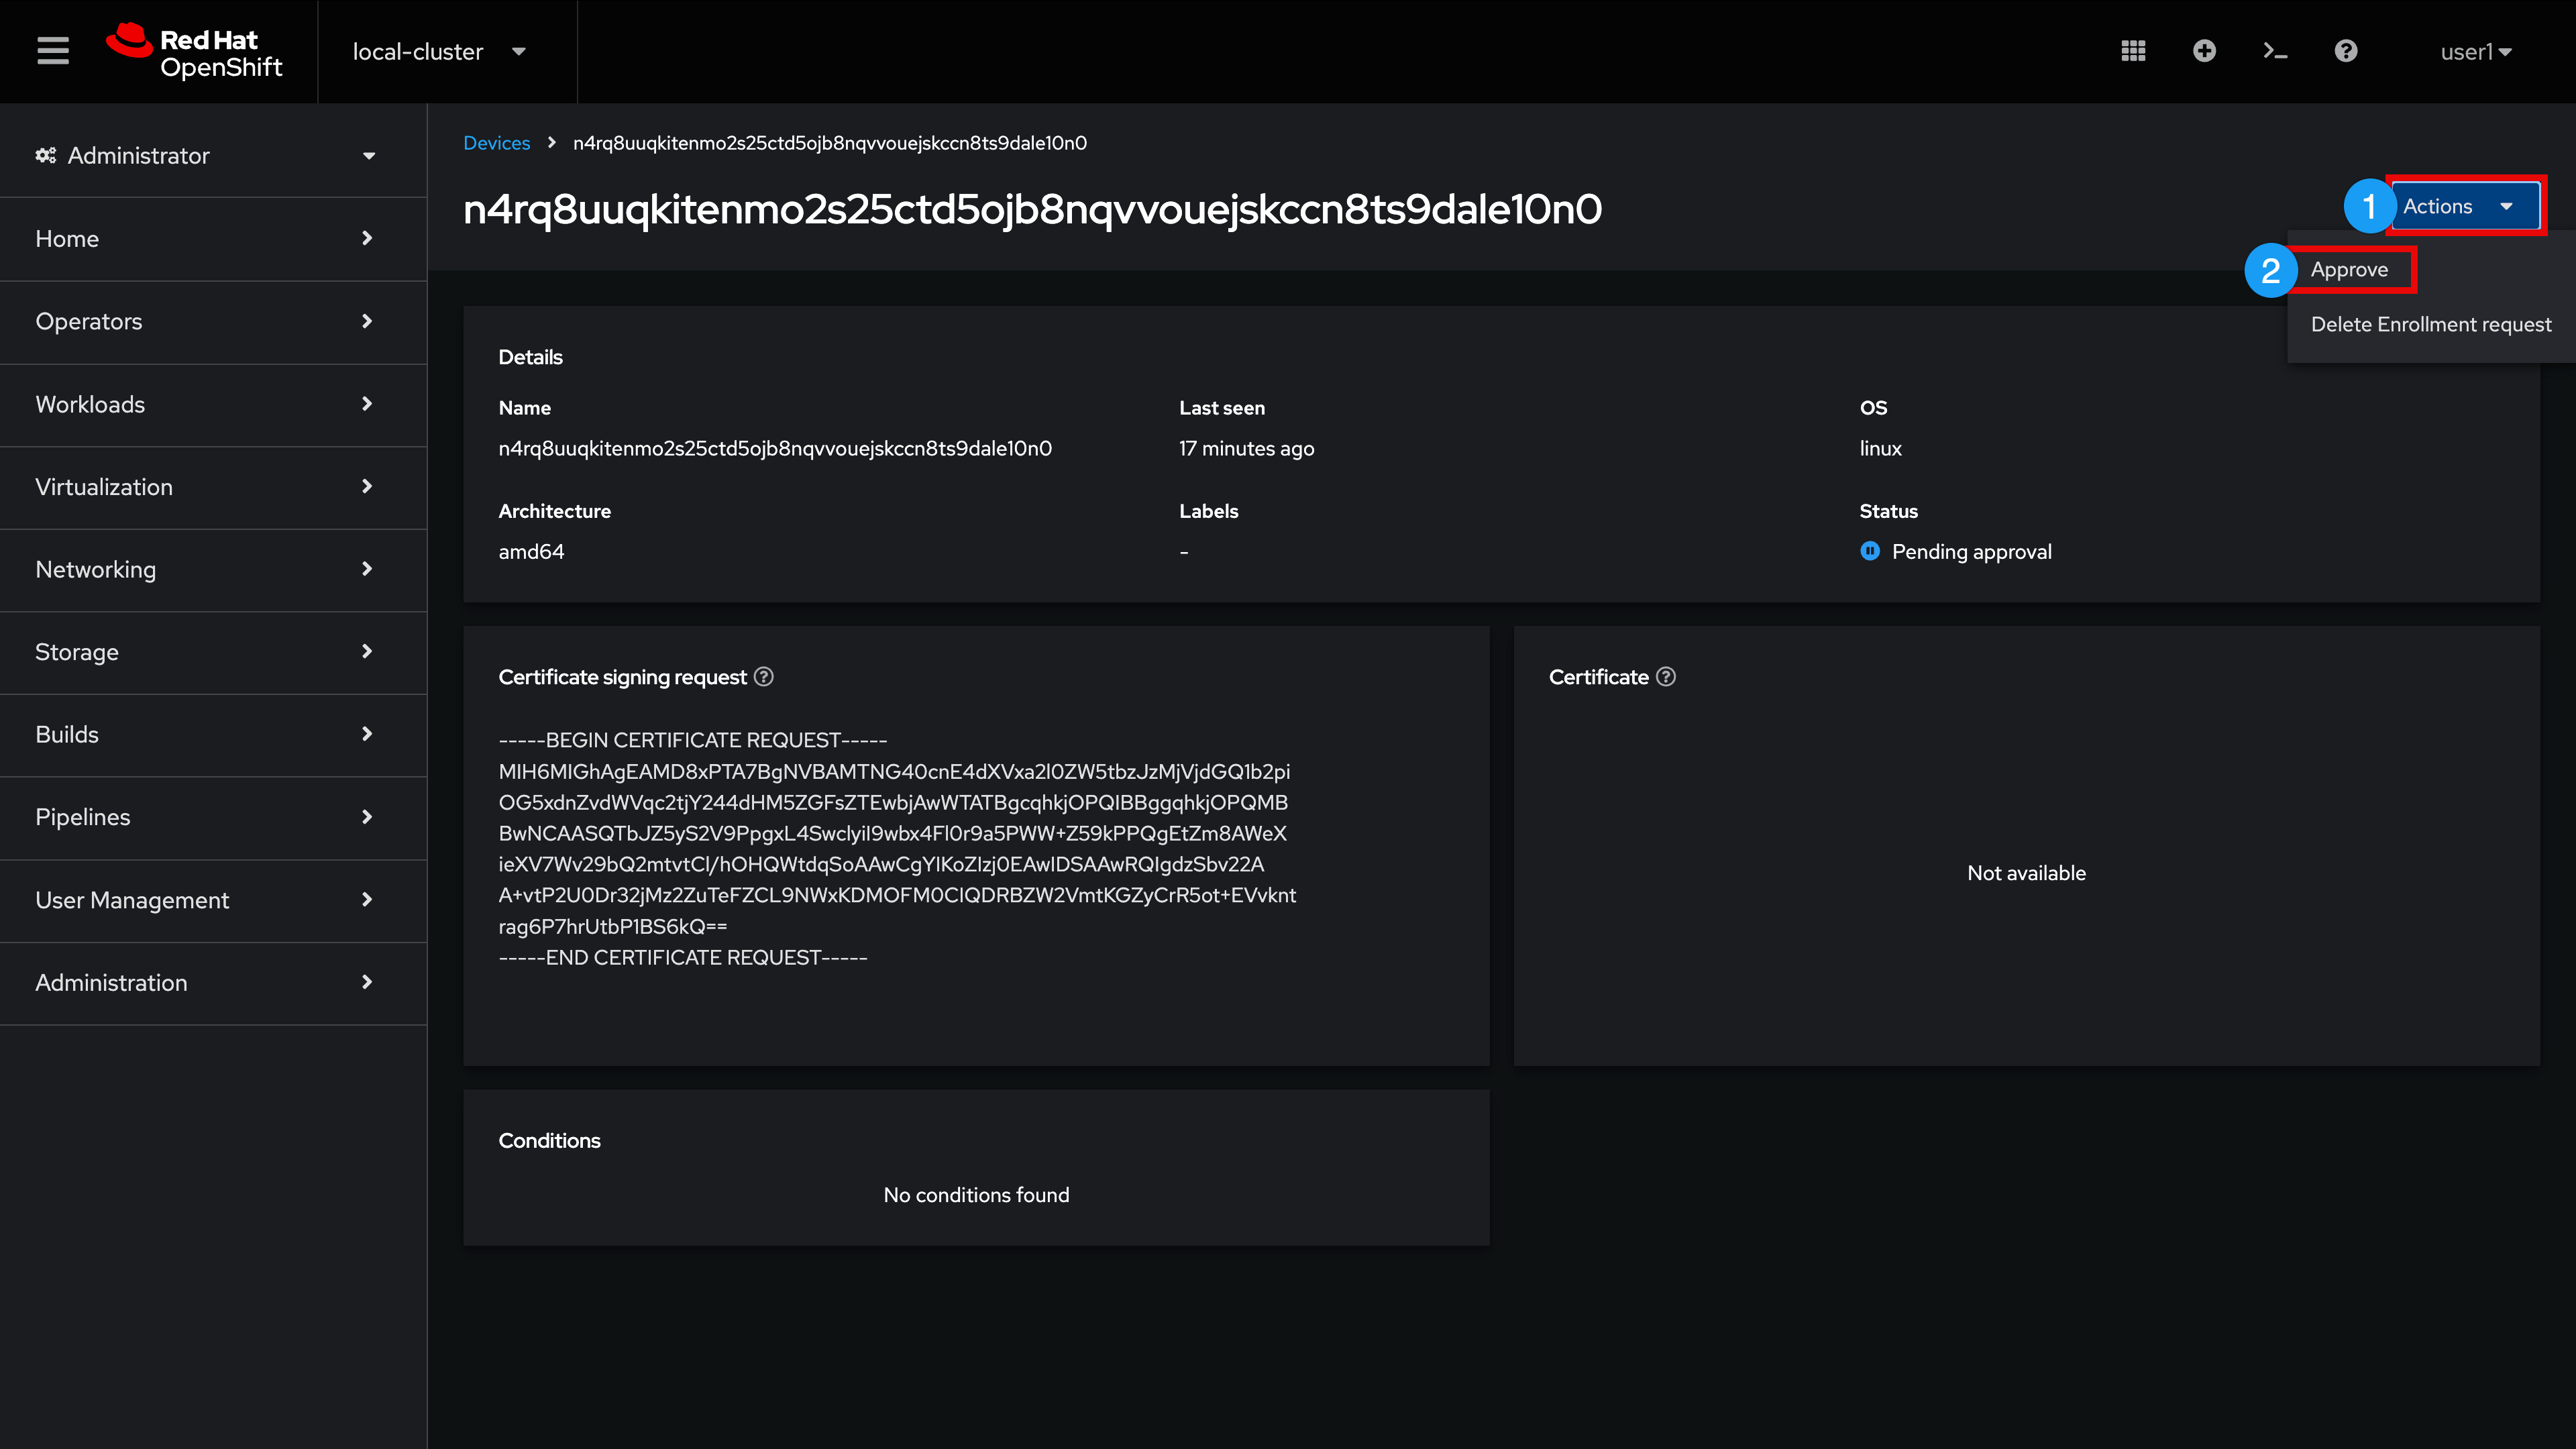
Expand Actions
-
Select Approve
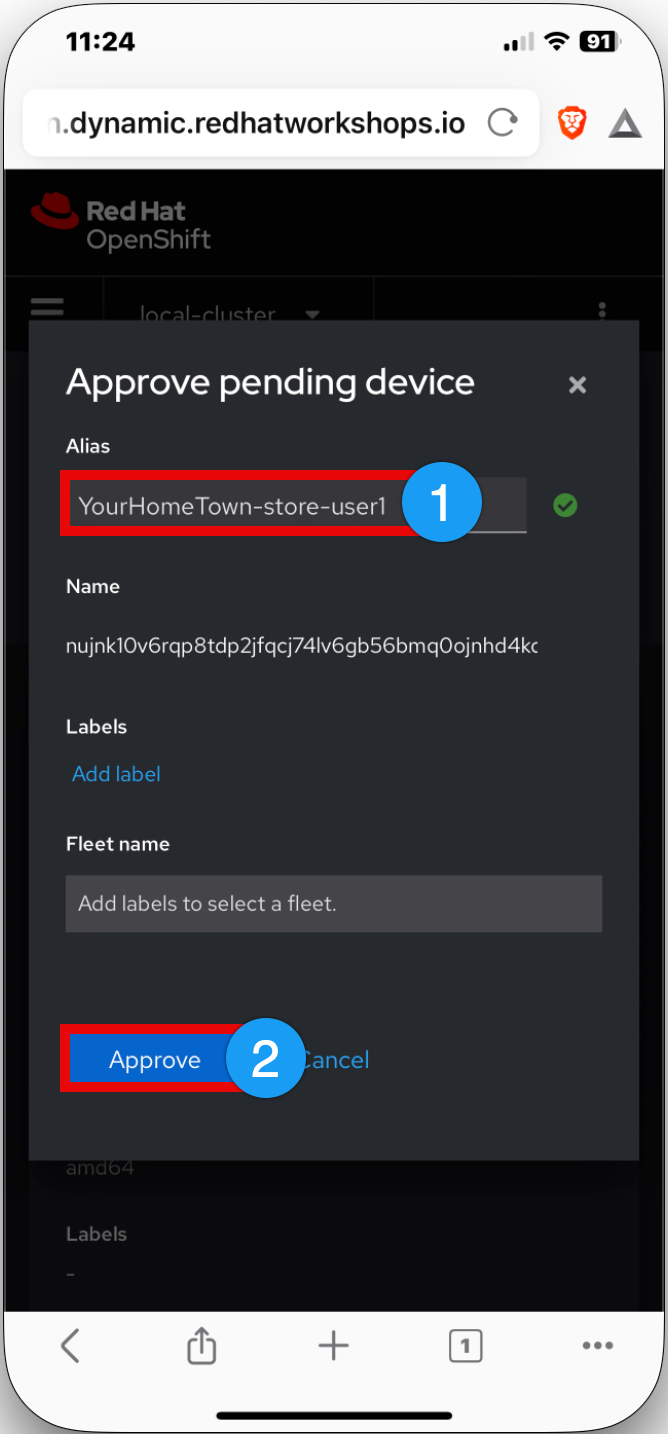
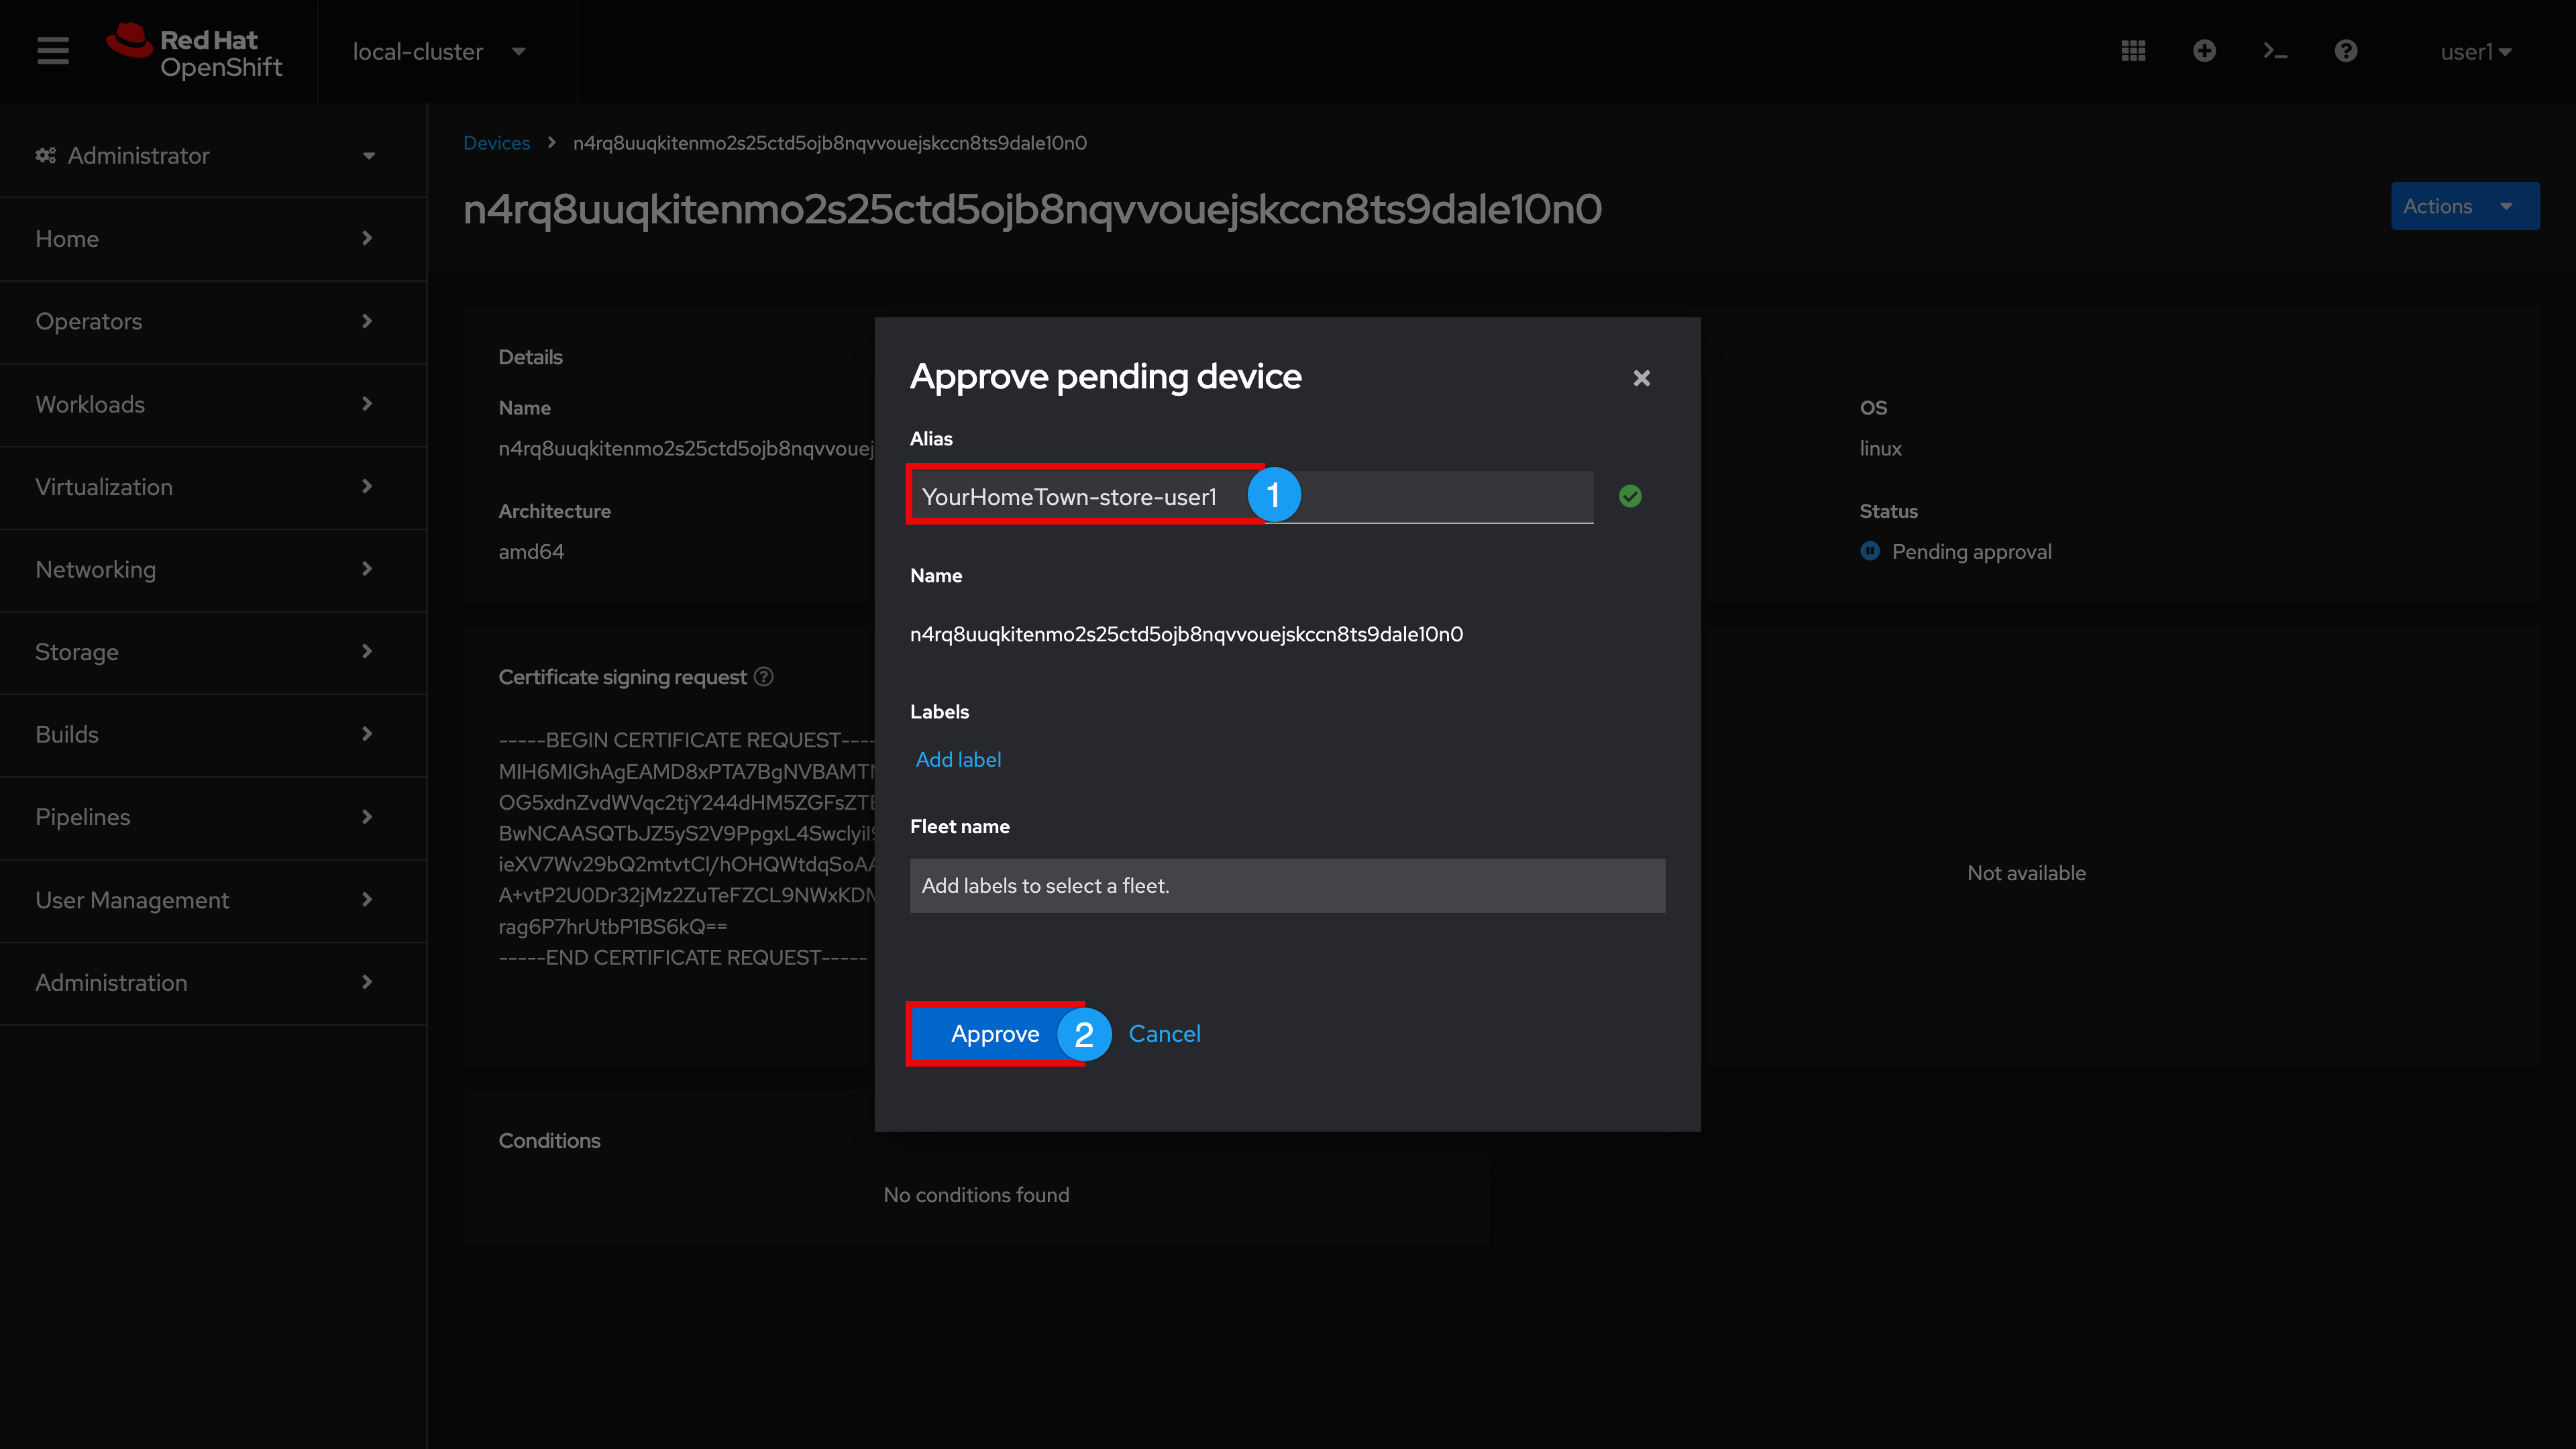
| For the device name (alias) please make sure that you replace 'YourHomeTown' with your own home town and append the alias with your user number: ({user}) |
-
Enter your device name (alias): [YourHomeTown]-store-{user}
-
Select Approve
-
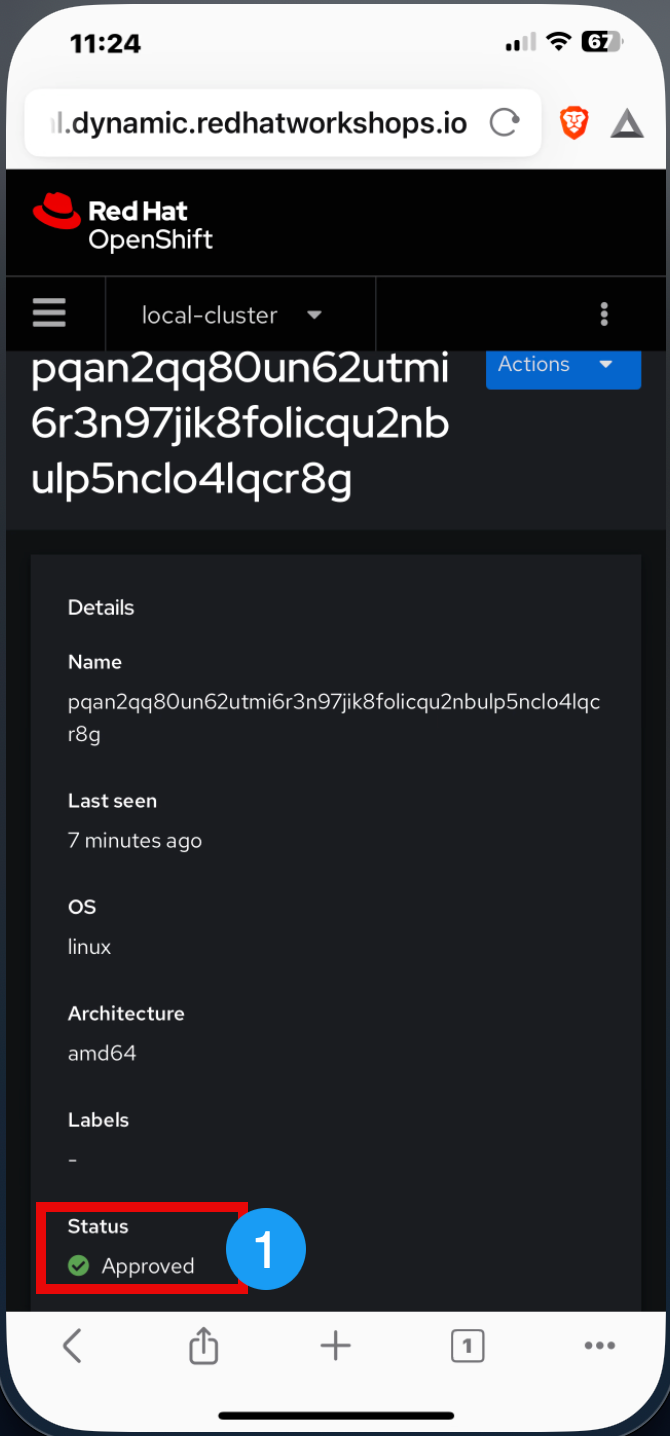
(Scroll down if needed) and observe that the device is now in an Approved state
| Since you just enrolled via a Mobile Device, you do not need to follow the instructions in the next section, "Option 2: QR Code Enrollment via Web Browser". Click here to skip this section and continue your lab |
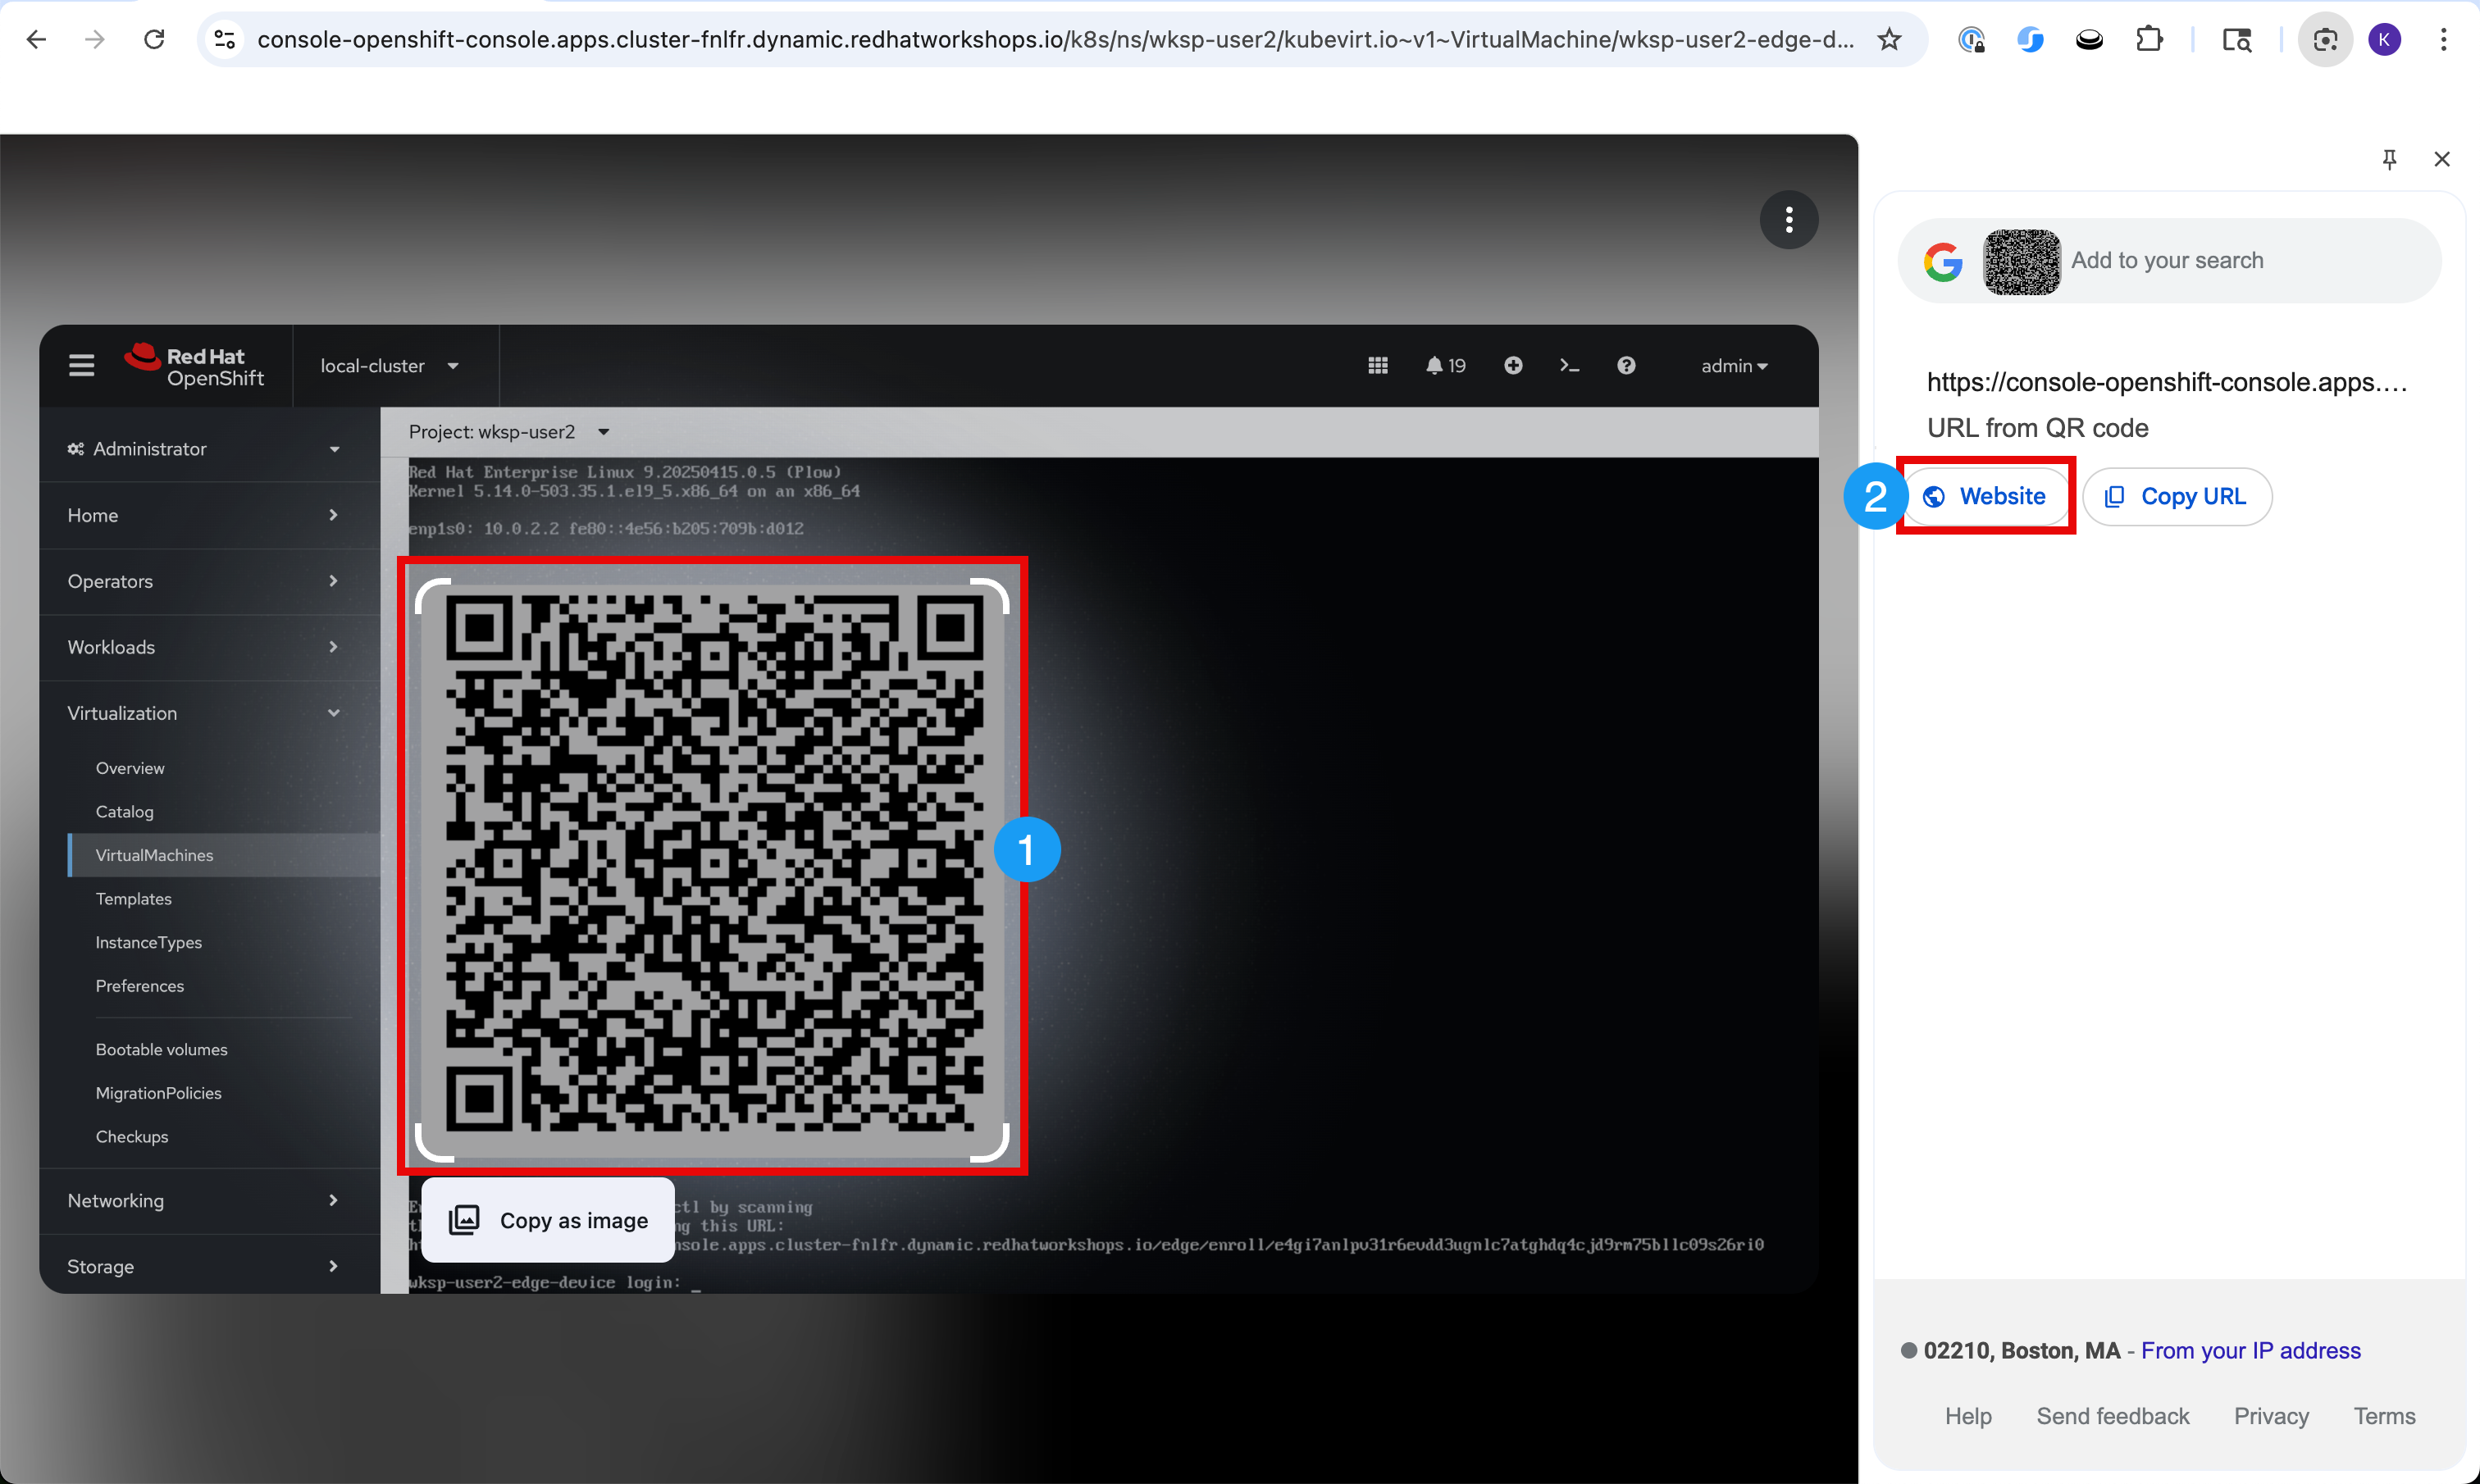
Option 2: QR Code Enrollment via Web Browser
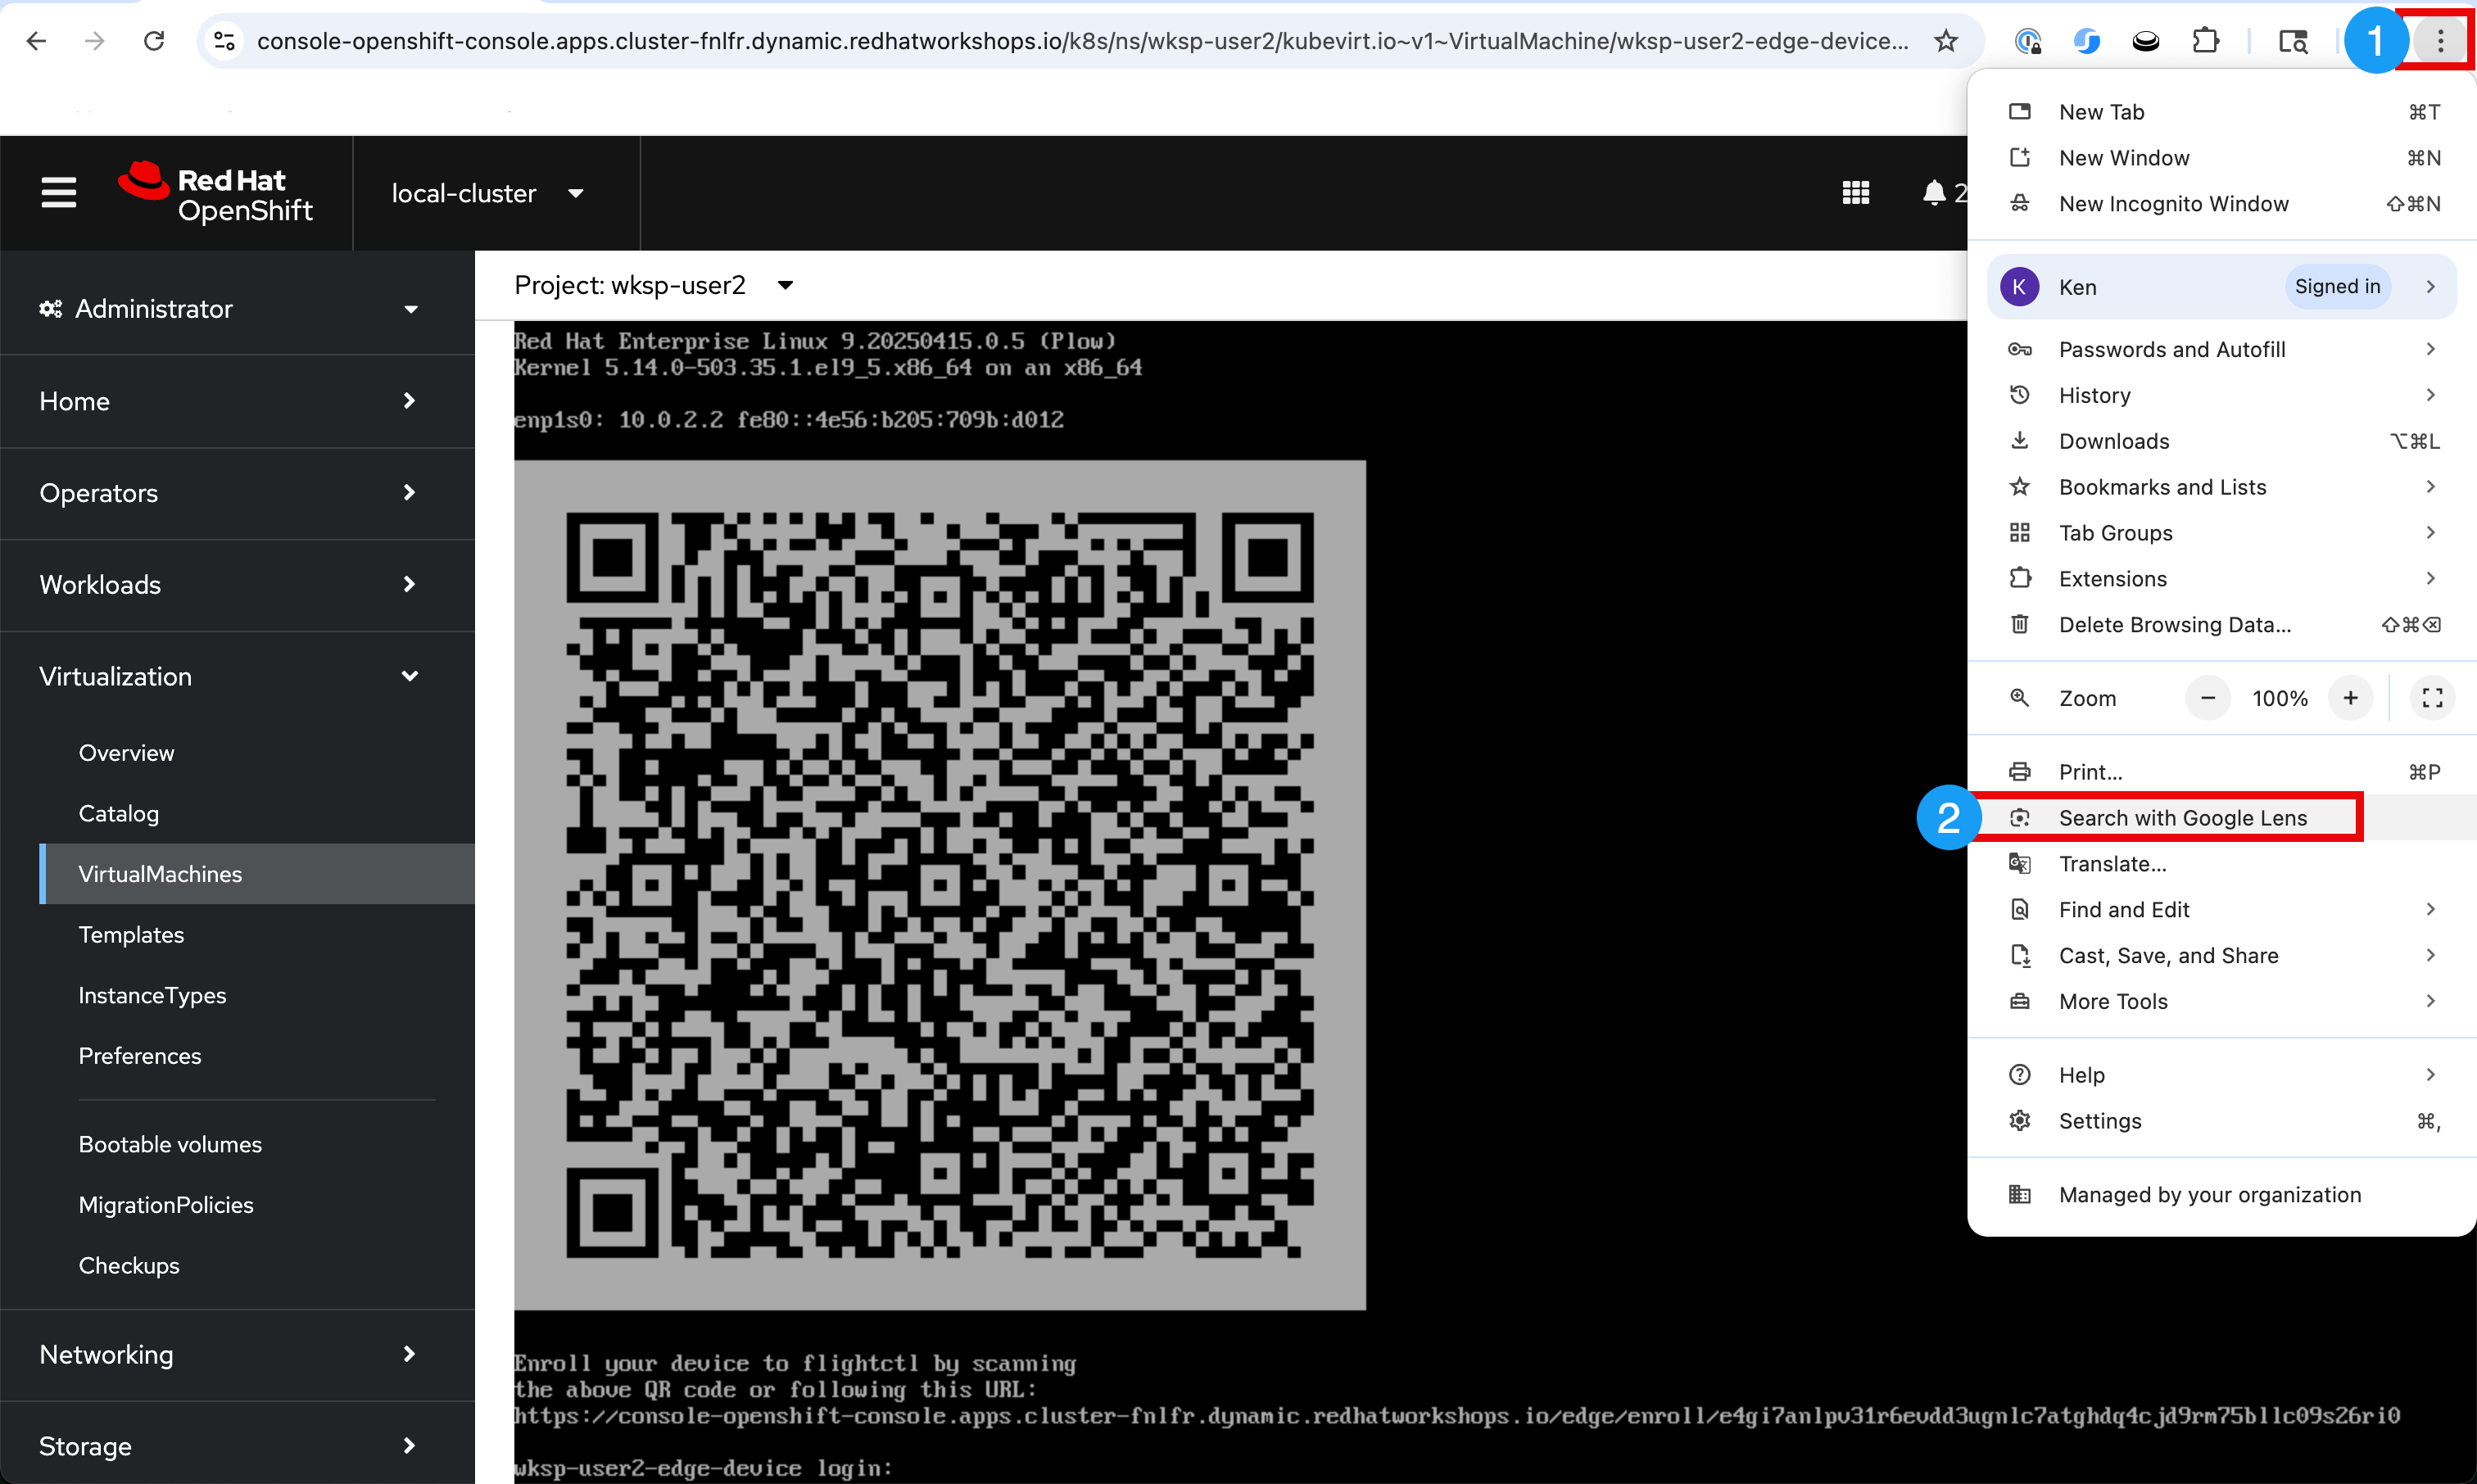
We are going to utilize the chrome browser Search with Google Lens feature to scan the device QR code
-
Select the chrome browser menu in the upper-right hand corner
-
Click Search with Google Lens
-
Drag and select the QR Code image
-
Click Website
-
Expand Actions
-
Select Approve
| For the device name (alias) please make sure that you replace 'YourHomeTown' with your own home town and append the alias with your user number: ({user}) |
-
Enter your device name (alias): [YourHomeTown]-store-{user}
-
Select Approve
Device Details
Now that the device approval is complete, let’s jump back into the Edge Manager Lab UI and further examine your new store device.
-
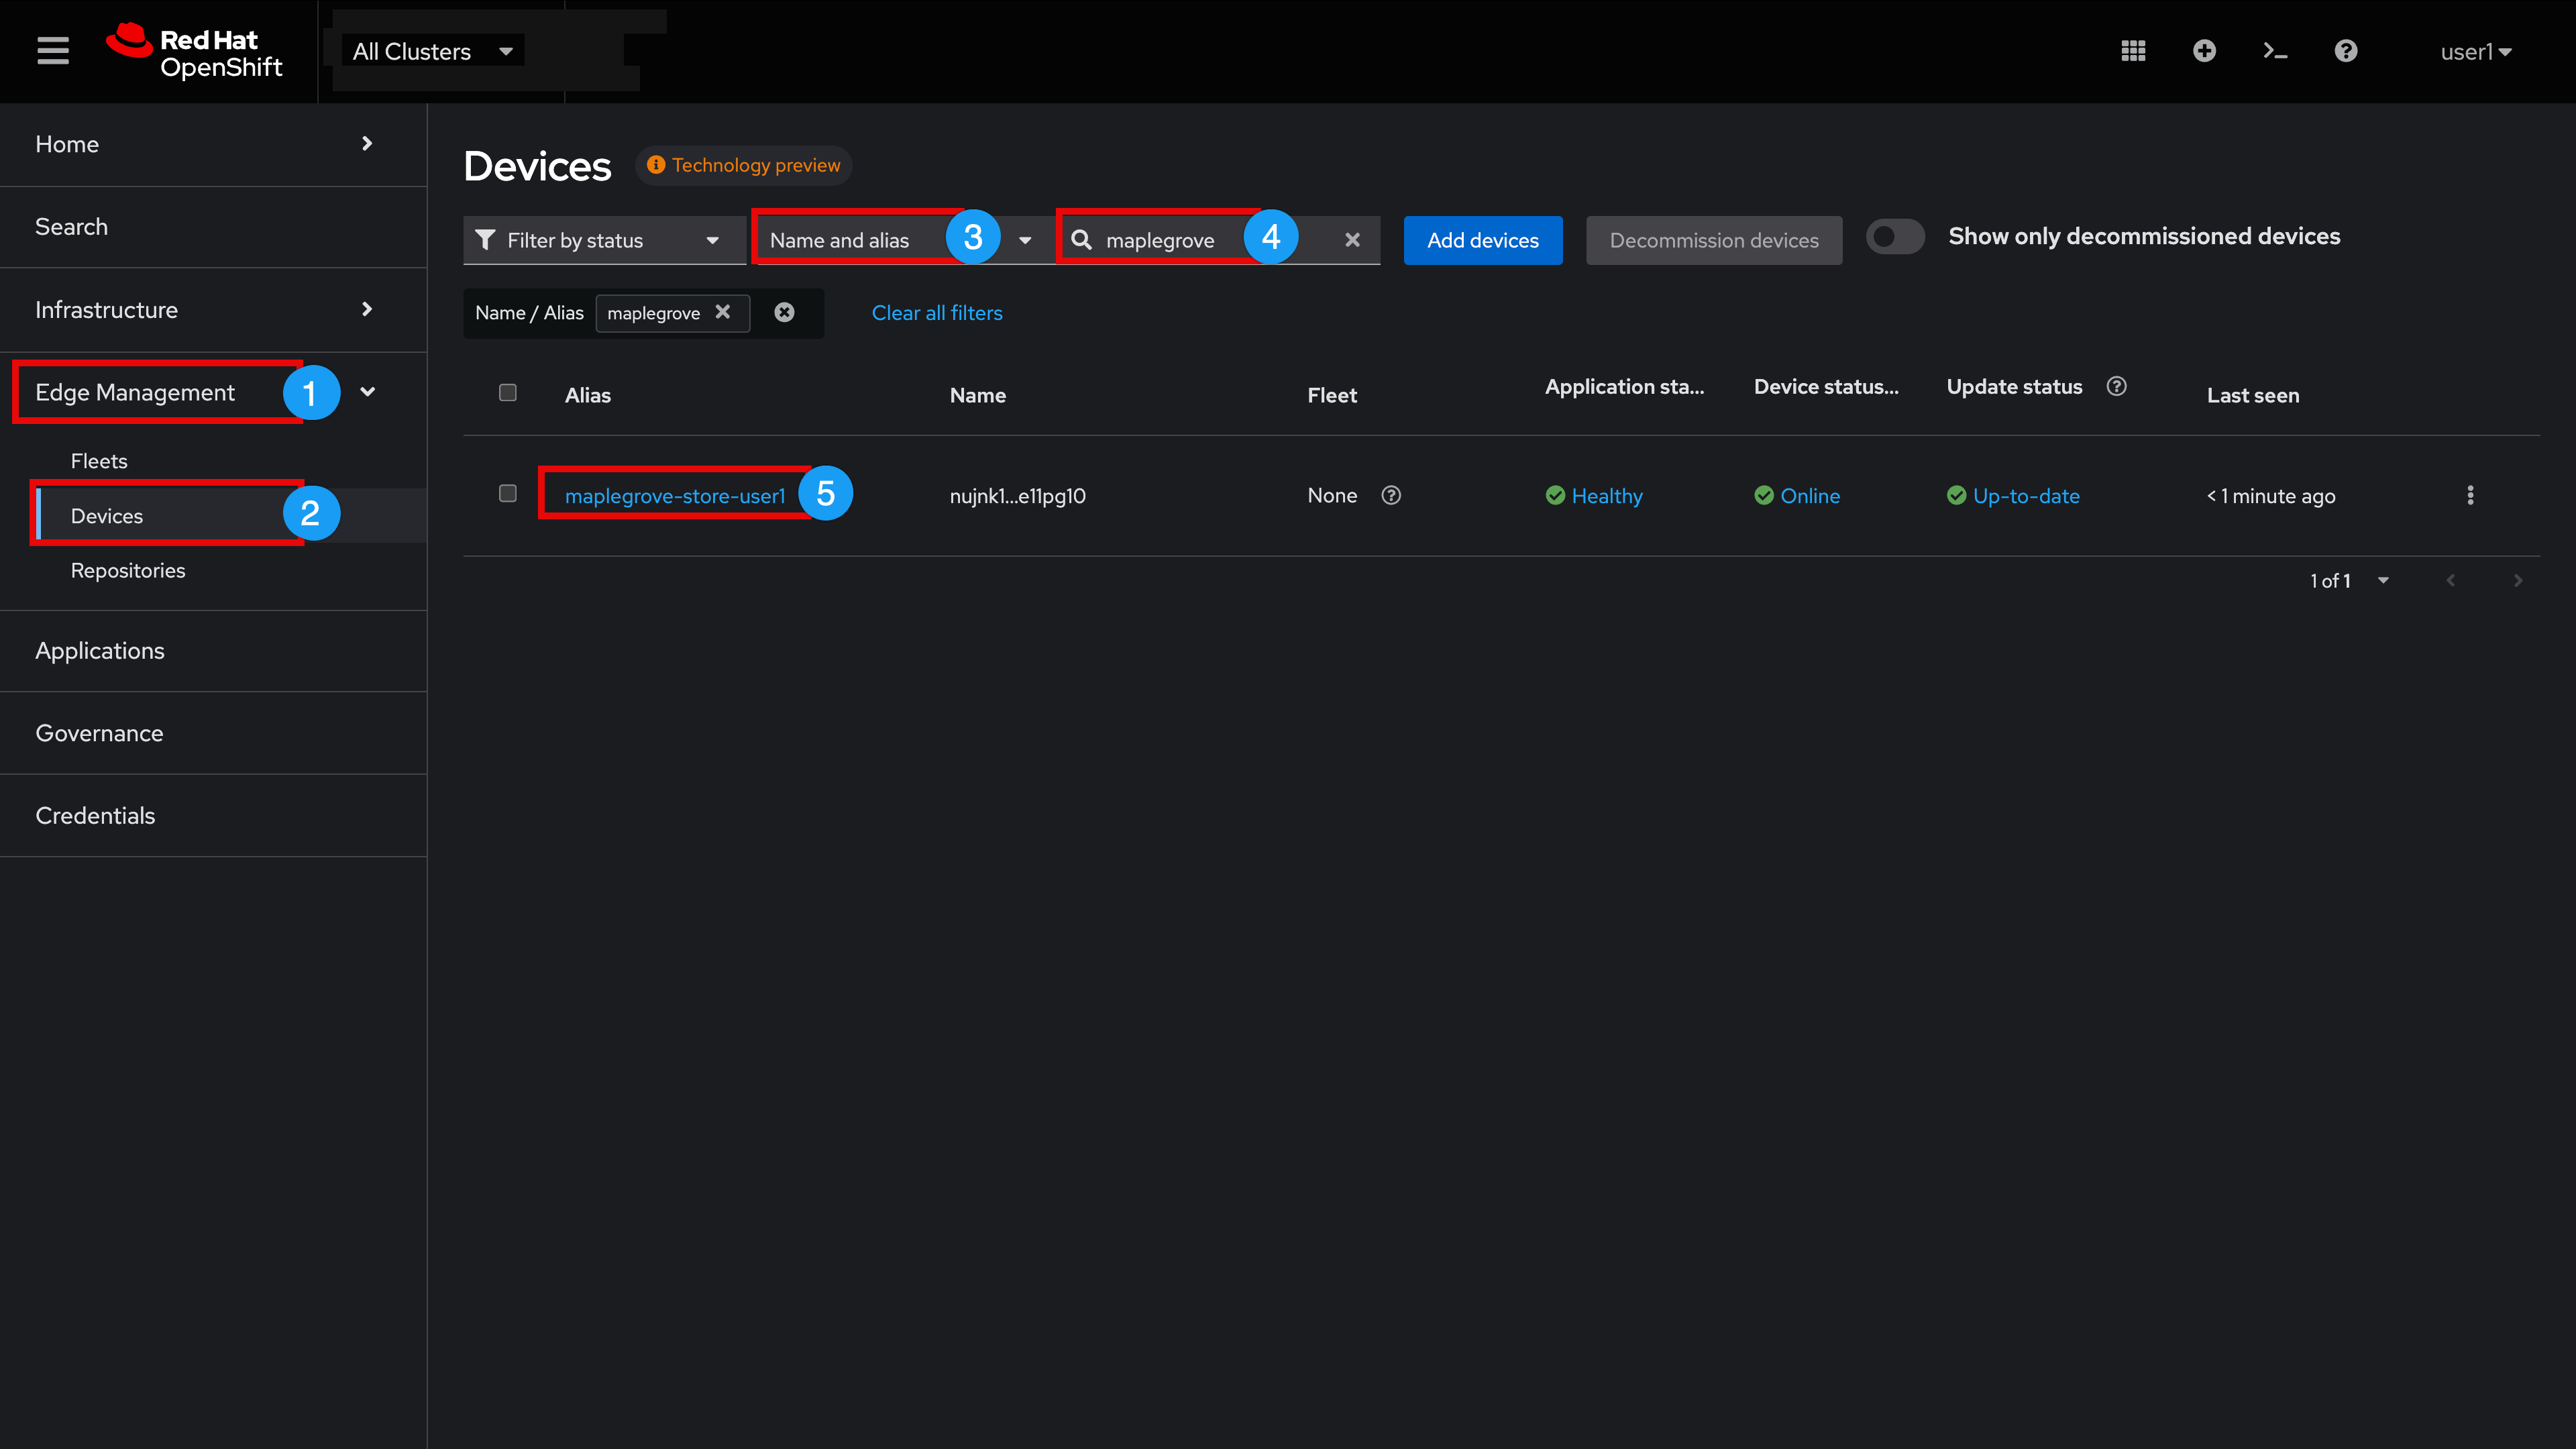
Expand and select All Clusters
-
Expand Edge Management
-
Select Devices
-
Change the Devices section search filter from Labels and fleets to Name and alias (You may need to scroll down to the Devices section if there is a list of Devices pending approval present at the top of this window)
-
Enter the hometown name you chose for your device in the search box to filter the device list (please note that this search filter is case sensitive)
-
Click YourHomeTown-store-{user} device
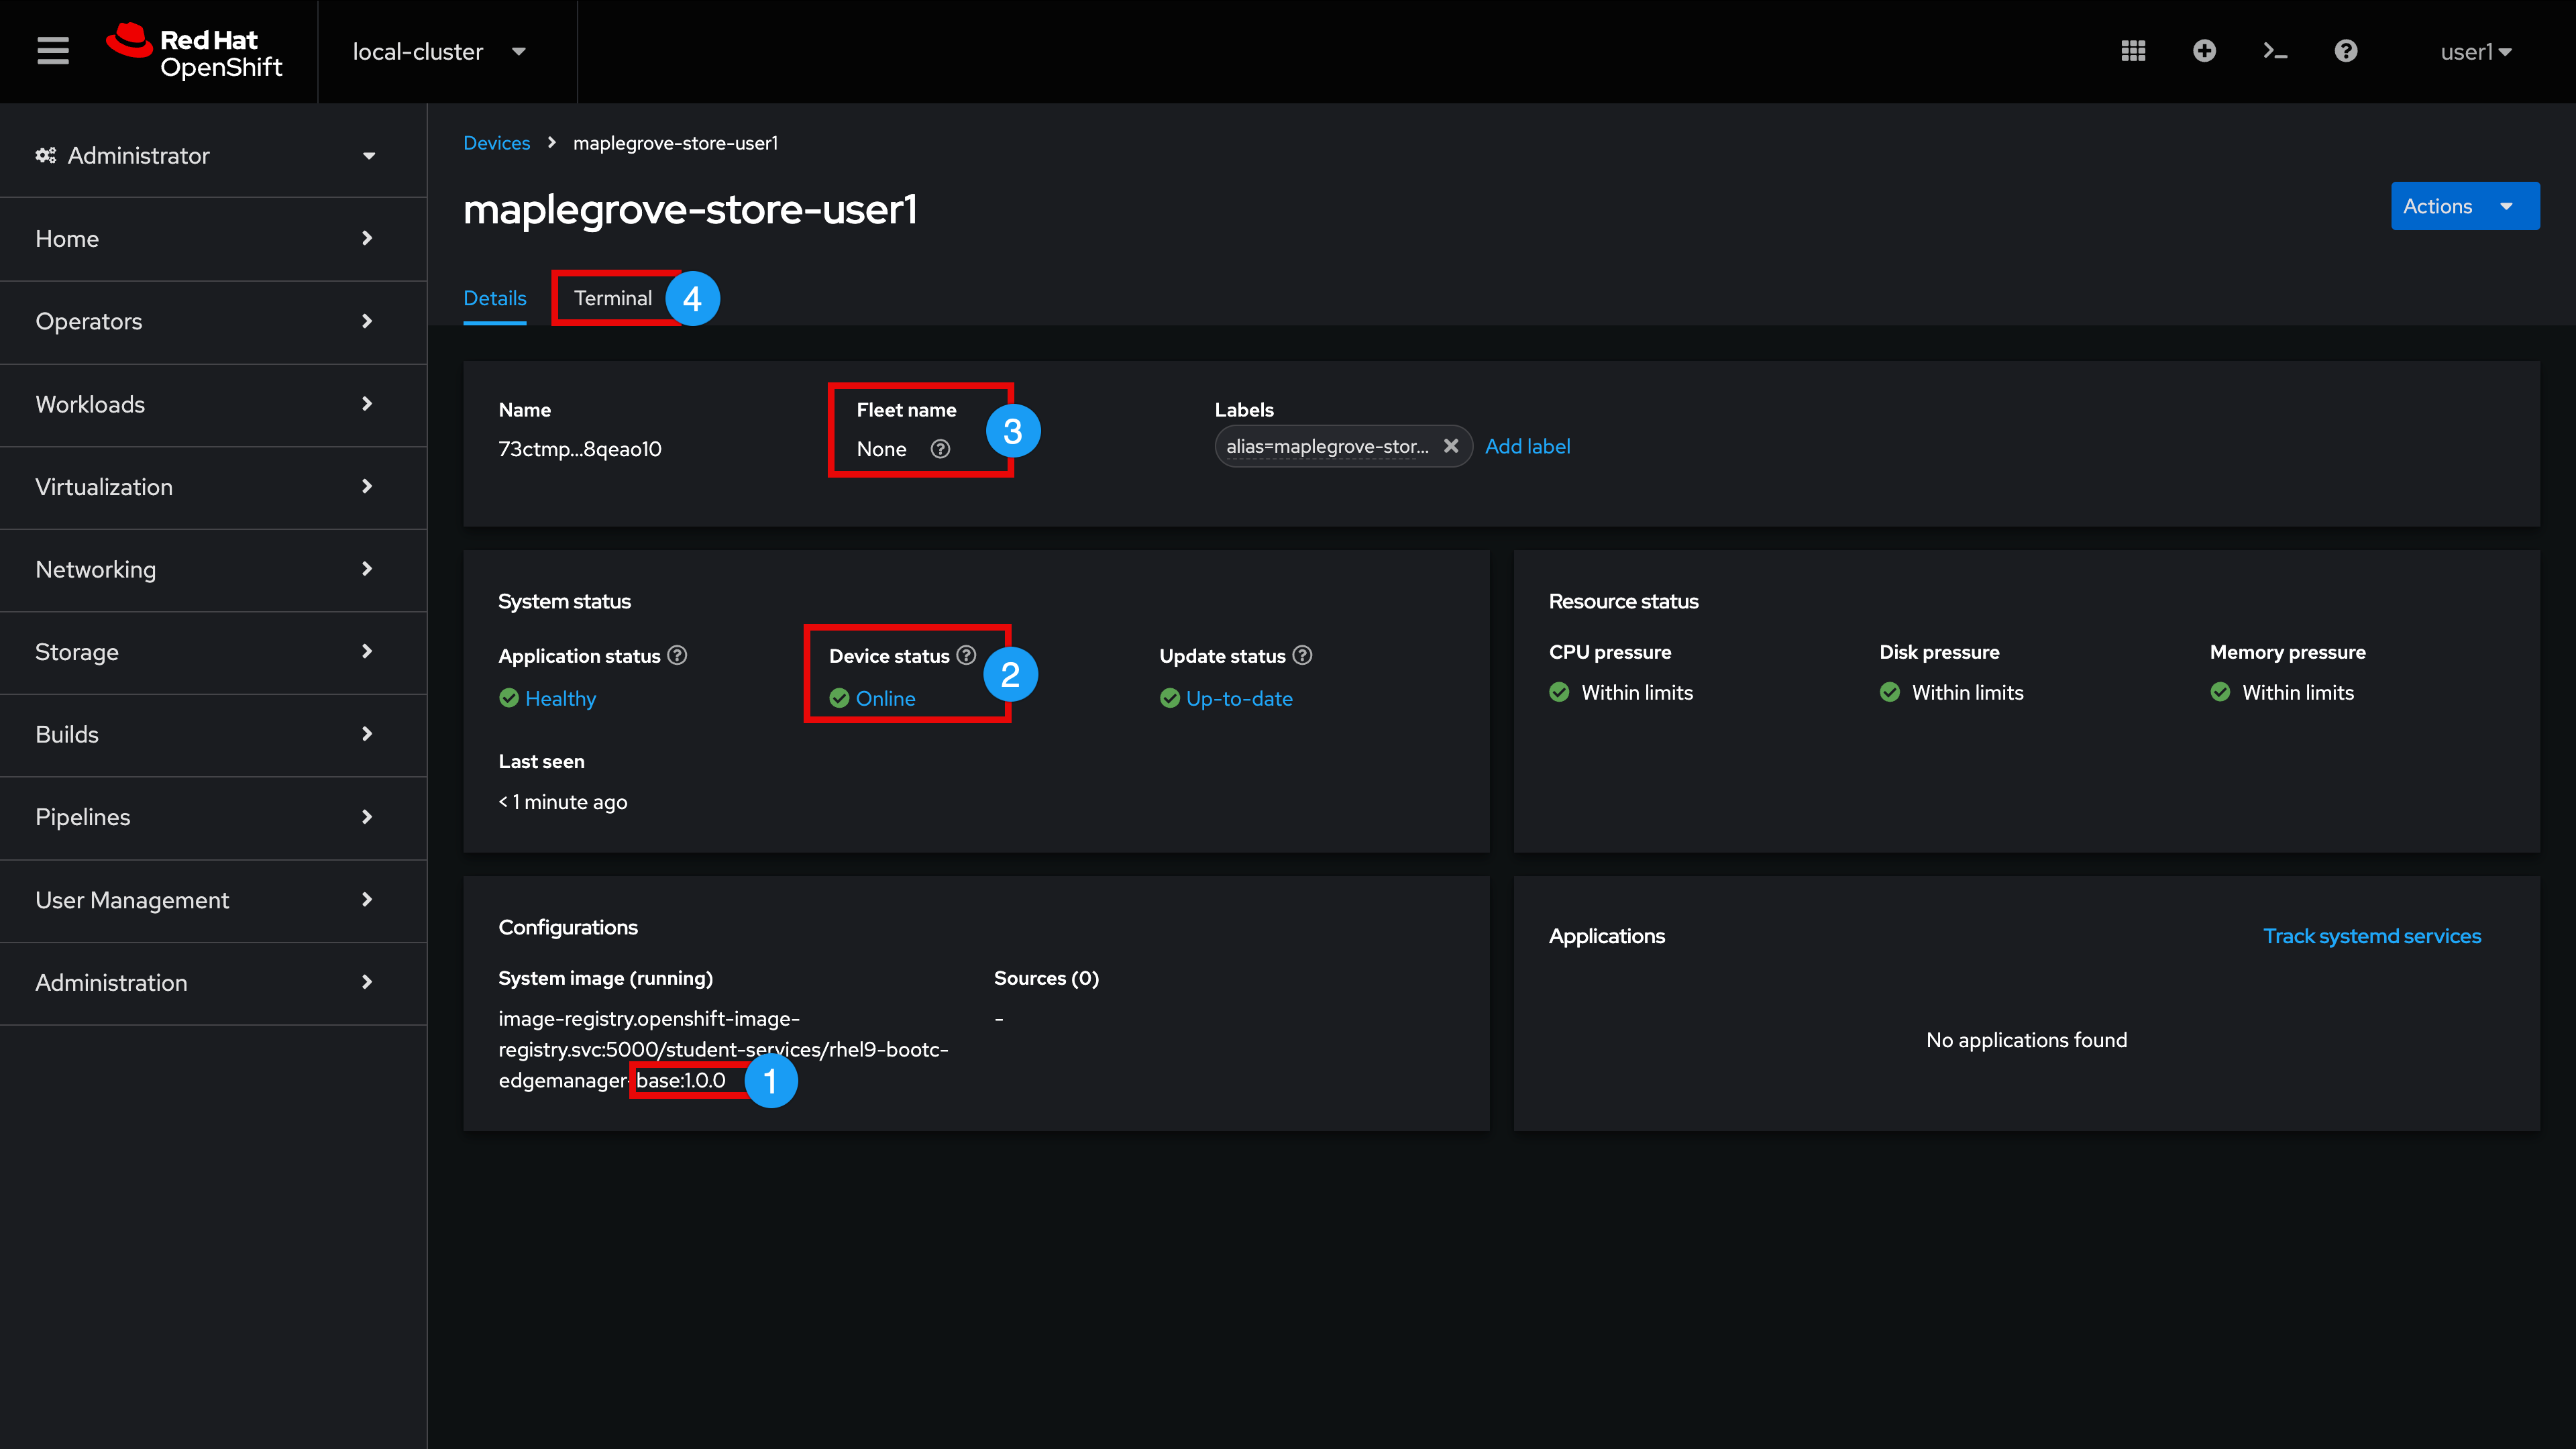
In the Device details tab we observe a few important details
-
System image (running): the device is running a bootc OS image that ends in '…base:1.0.0' (as its name implies, this is a 'base' image containing no custom applications)
-
Device status: Online - the device is in an Online status (by default, the Edge Manager agent reports in to the Edge Manager service every 60 seconds which populates information like this)
-
Fleet name: None - when we enrolled the device, we purposely did not join it to a Fleet (we will do so in a moment)
-
Click Terminal
| It can take a few moments for your Terminal session to establish (thank you for your patience) |
Let’s check a few items on our Edge Device via the Terminal
| You can copy the contents of these commands to your clipboard (if desired) by clicking the clipboard icon |
-
Examine the Red Hat Enterprise Linux version that is running on this device
cat /etc/redhat-releaseSample OutputRed Hat Enterprise Linux release 9.5 (Plow) -
Observe the current booted 'base' image (with no rollback image present) by issuing this command:
bootc statusSample OutputNo staged image present Current booted image: image-registry.openshift-image-registry.svc:5000/student-services/rhel9-bootc-edgemanager-base:1.0.0 Image version: 9.20250326.0 (2025-04-10 20:57:38.715070587 UTC) Image digest: sha256:e37967518e6f9679f761524ca74b02298b81baa6f82b40112e2c20b1aab2f1f8 No rollback image present -
Validate that there are currently no application Containers running:
podman ps -aSample OutputCONTAINER ID IMAGE COMMAND CREATED STATUS PORTS NAMES
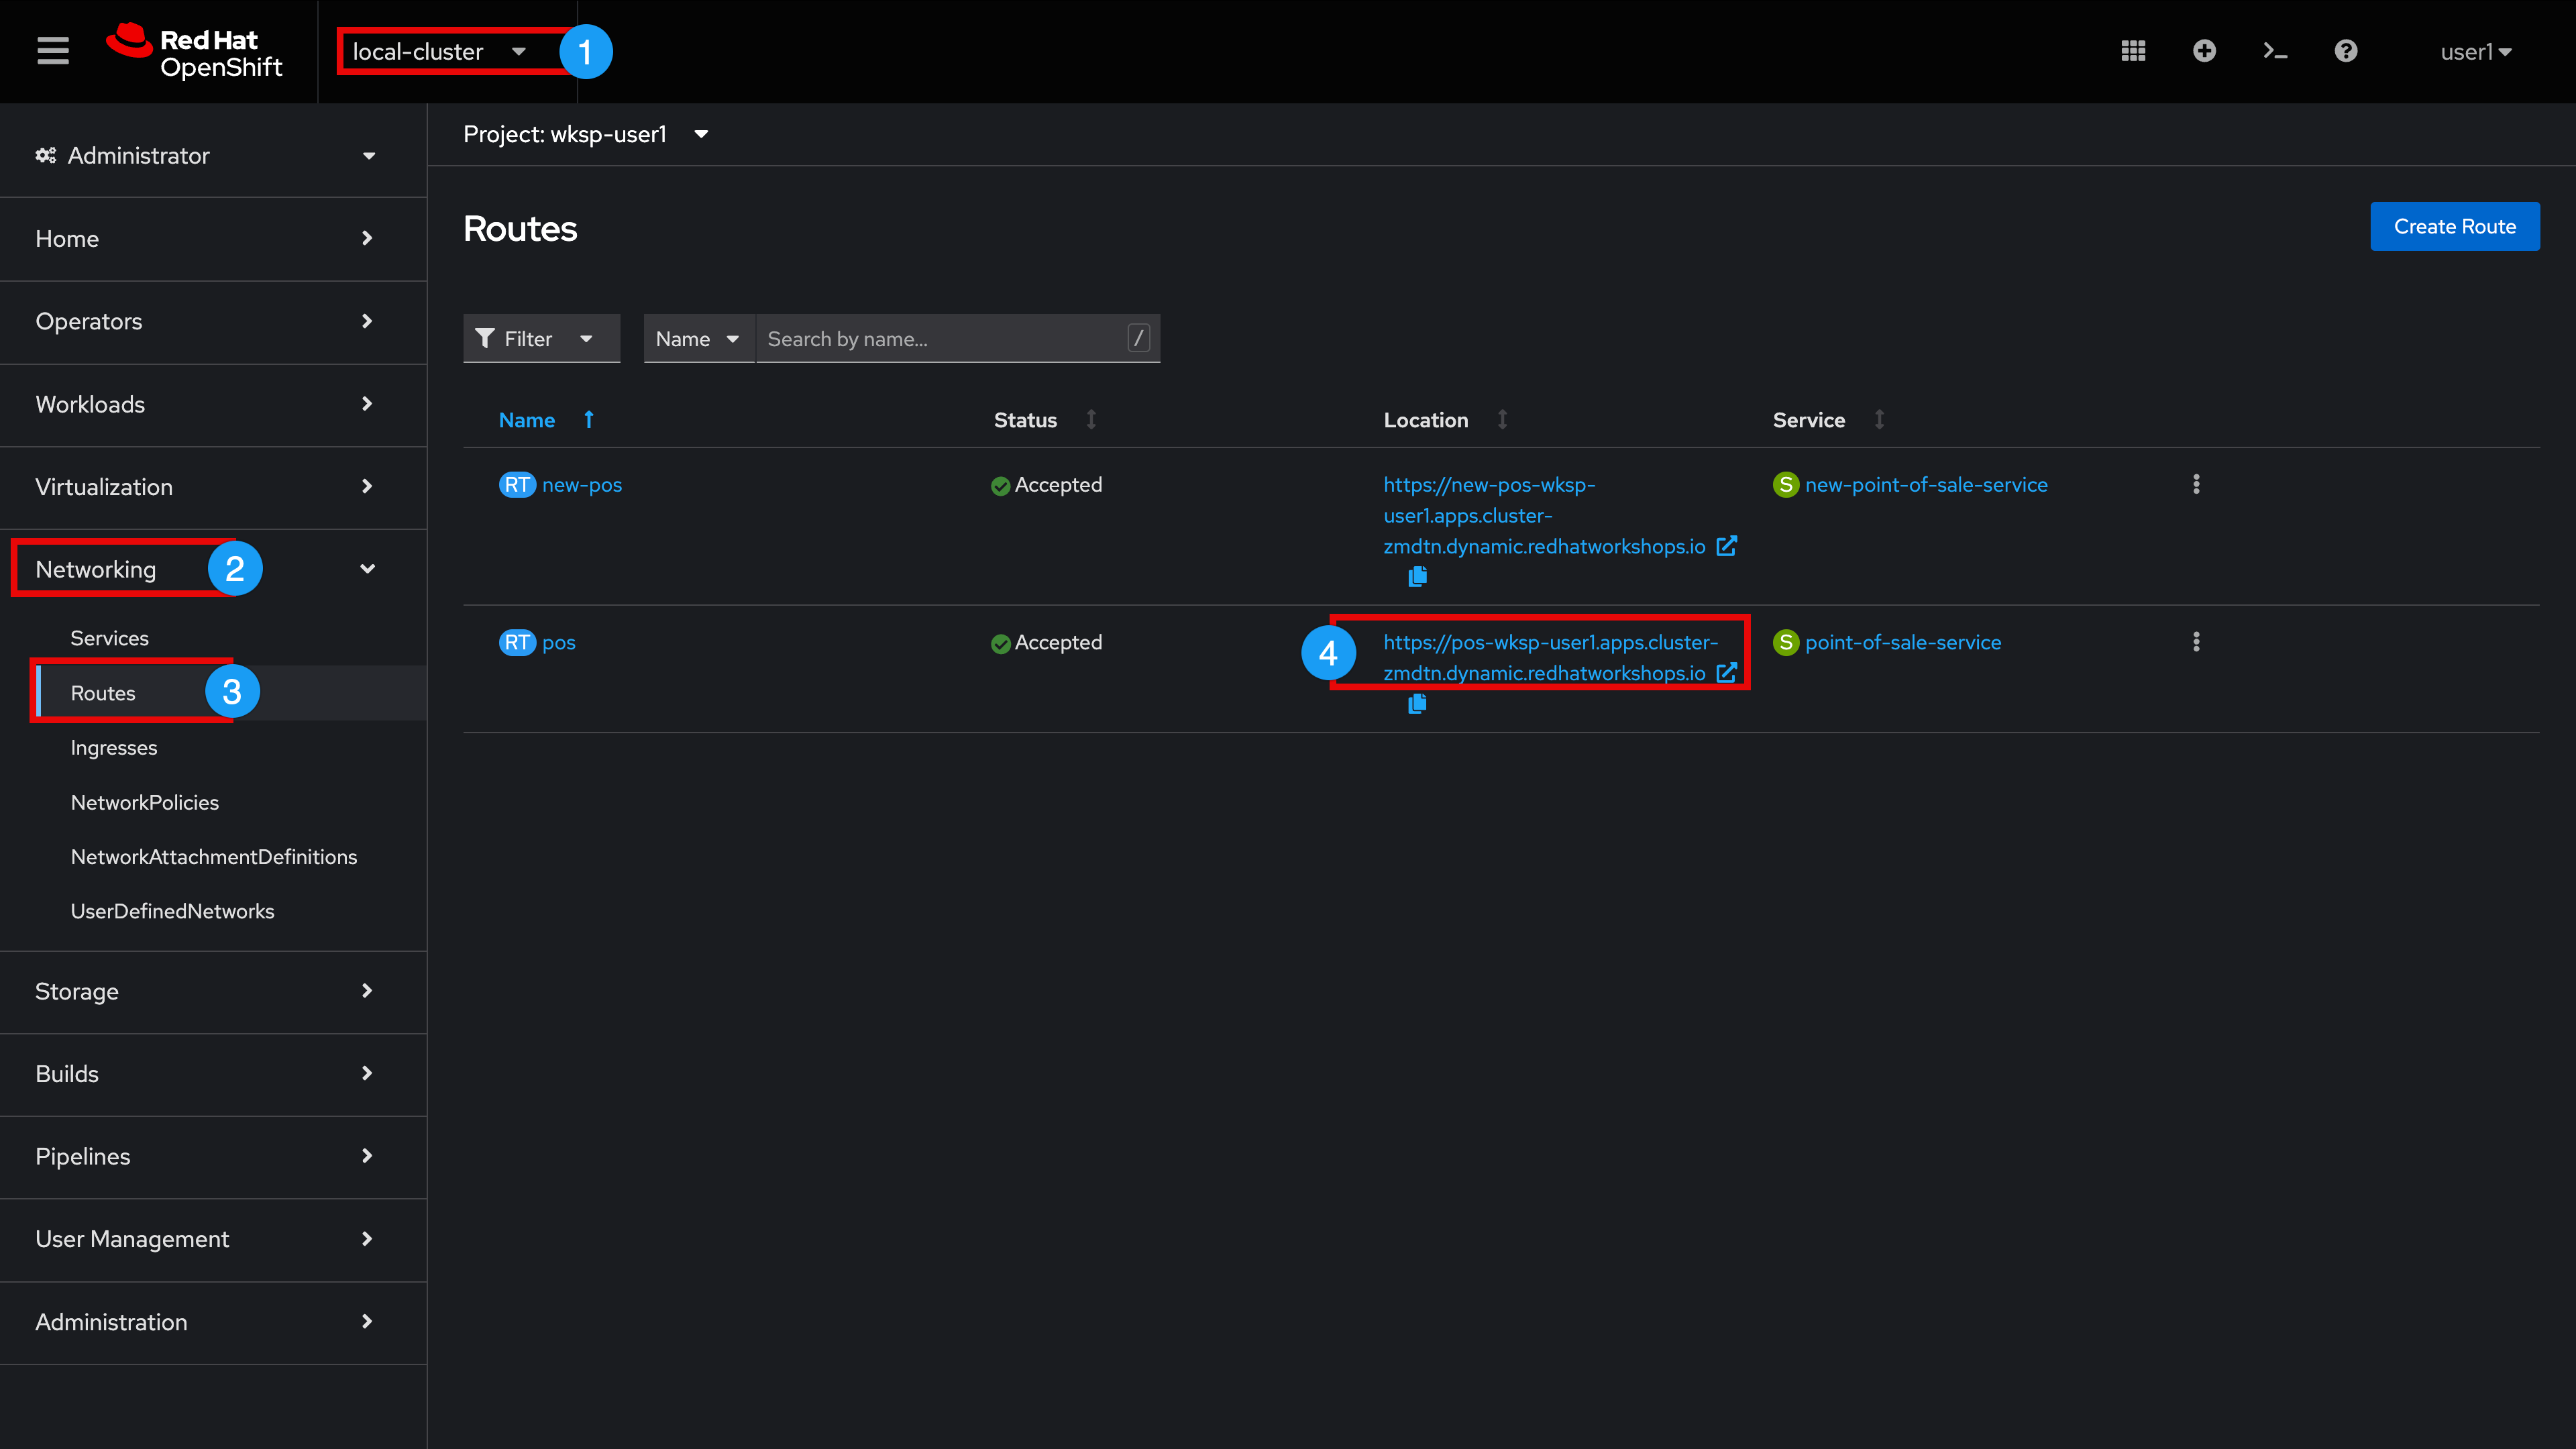
In order for this 'back of store' device to function properly, it needs to have a point-of-sale containerized application present. Our front of store point-of-sale Kiosk’s access this application via an OpenShift route. Let’s examine this route next.
-
Expand and select local-cluster
-
Expand Networking
-
Select Routes
-
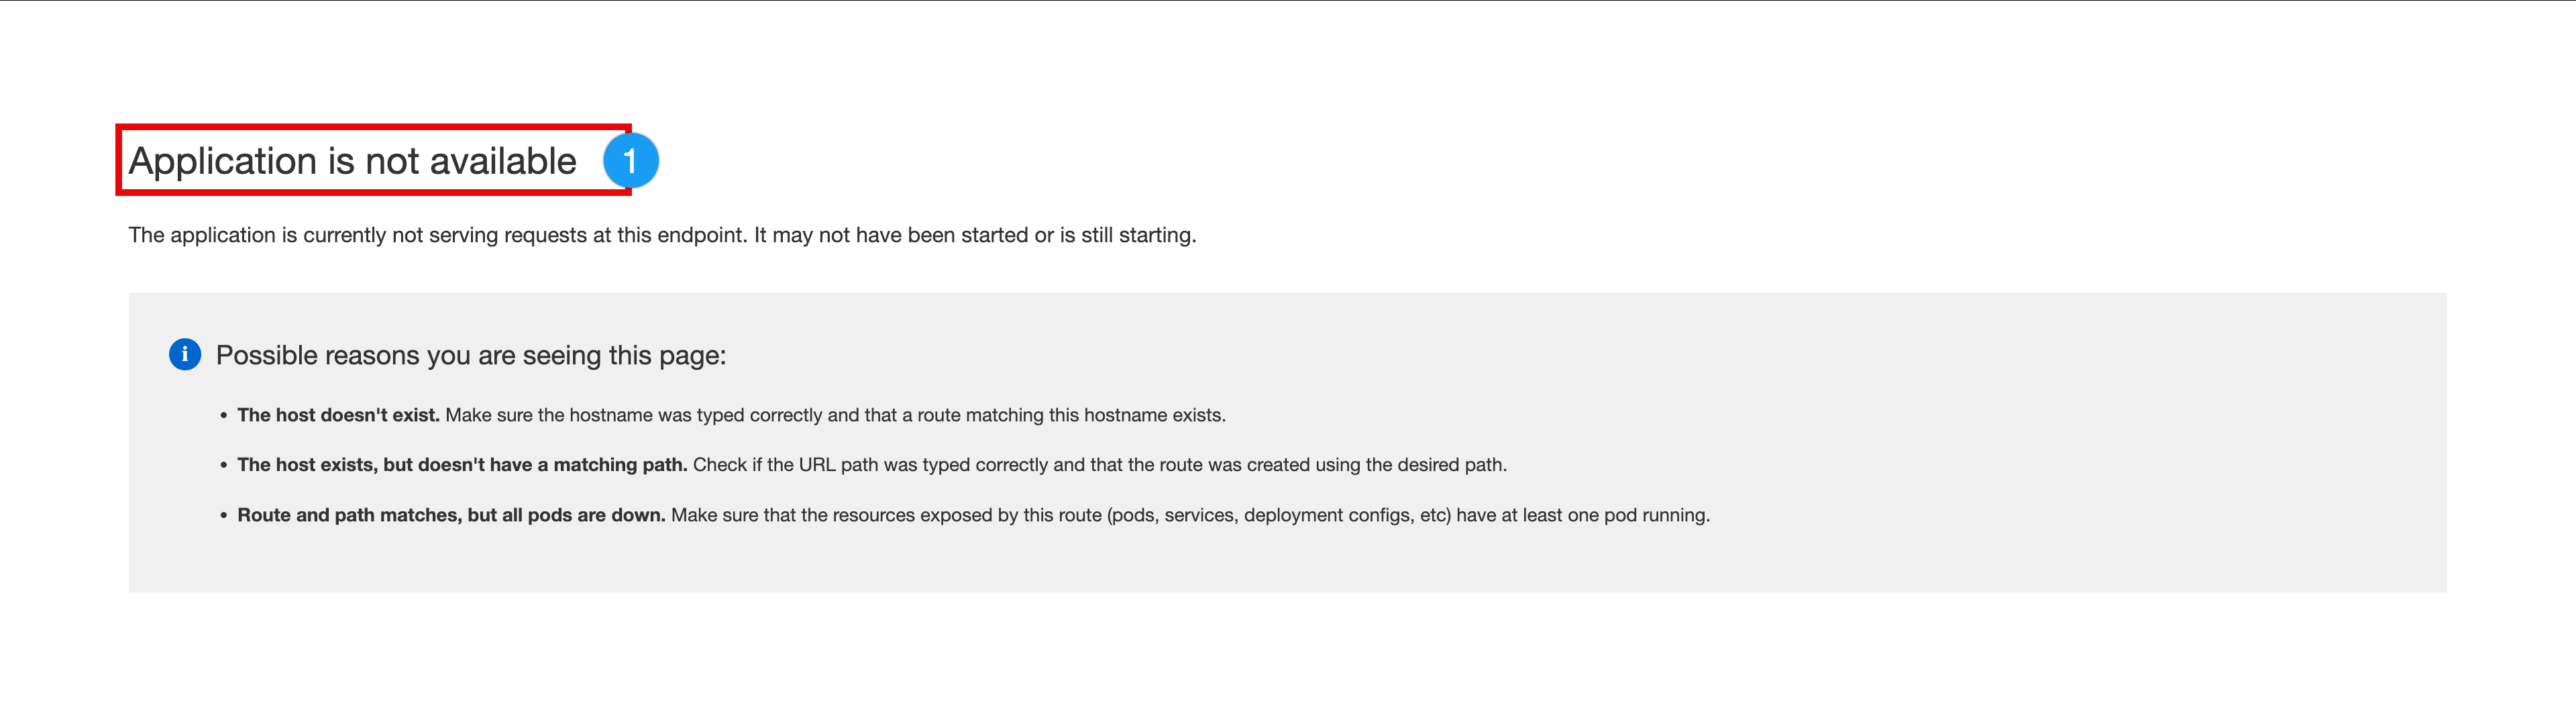
Click the 'pos' route Location hyperlink to open this route-to-app in a new browser tab
-
Note that we receive an, "Application is not available" error message (this is expected at this time because we are running a 'base' device image which does not contain any containerized applications).
Fleet Management
In this section we are going to join our new store device to the existing fleet that you examined earlier, "point-of-sale-prod". During this process, you will experience how Edge Manager maintains desired state configuration for any devices that are a member of this fleet.
Keep the Application Browser Tab open and return to the Routes Browser Tab
-
Expand and select All Clusters
-
Expand Edge Management
-
Select Devices
-
Change search filter from Labels and fleets to Name and alias
-
Enter the hometown name you chose for your device to filter the device list
-
Click YourHomeTown-store-{user}
Pop Quiz: Do you remember the mechanism that we utilize to set fleet membership?
If you answered, "Fleet Device selector label", congratulations! (This will be noted on your end of year, Edge Megastore, Inc., performance review)
The 'point-of-sale-prod' fleet is configured with a device selector label set to: pos=prod. Let’s add that label to our new store device now.
-
Click Add label and replace 'key=value' with pos=prod followed by pressing your enter key
-
Select the (!) icon at the end of the '…base:1.0.0' image
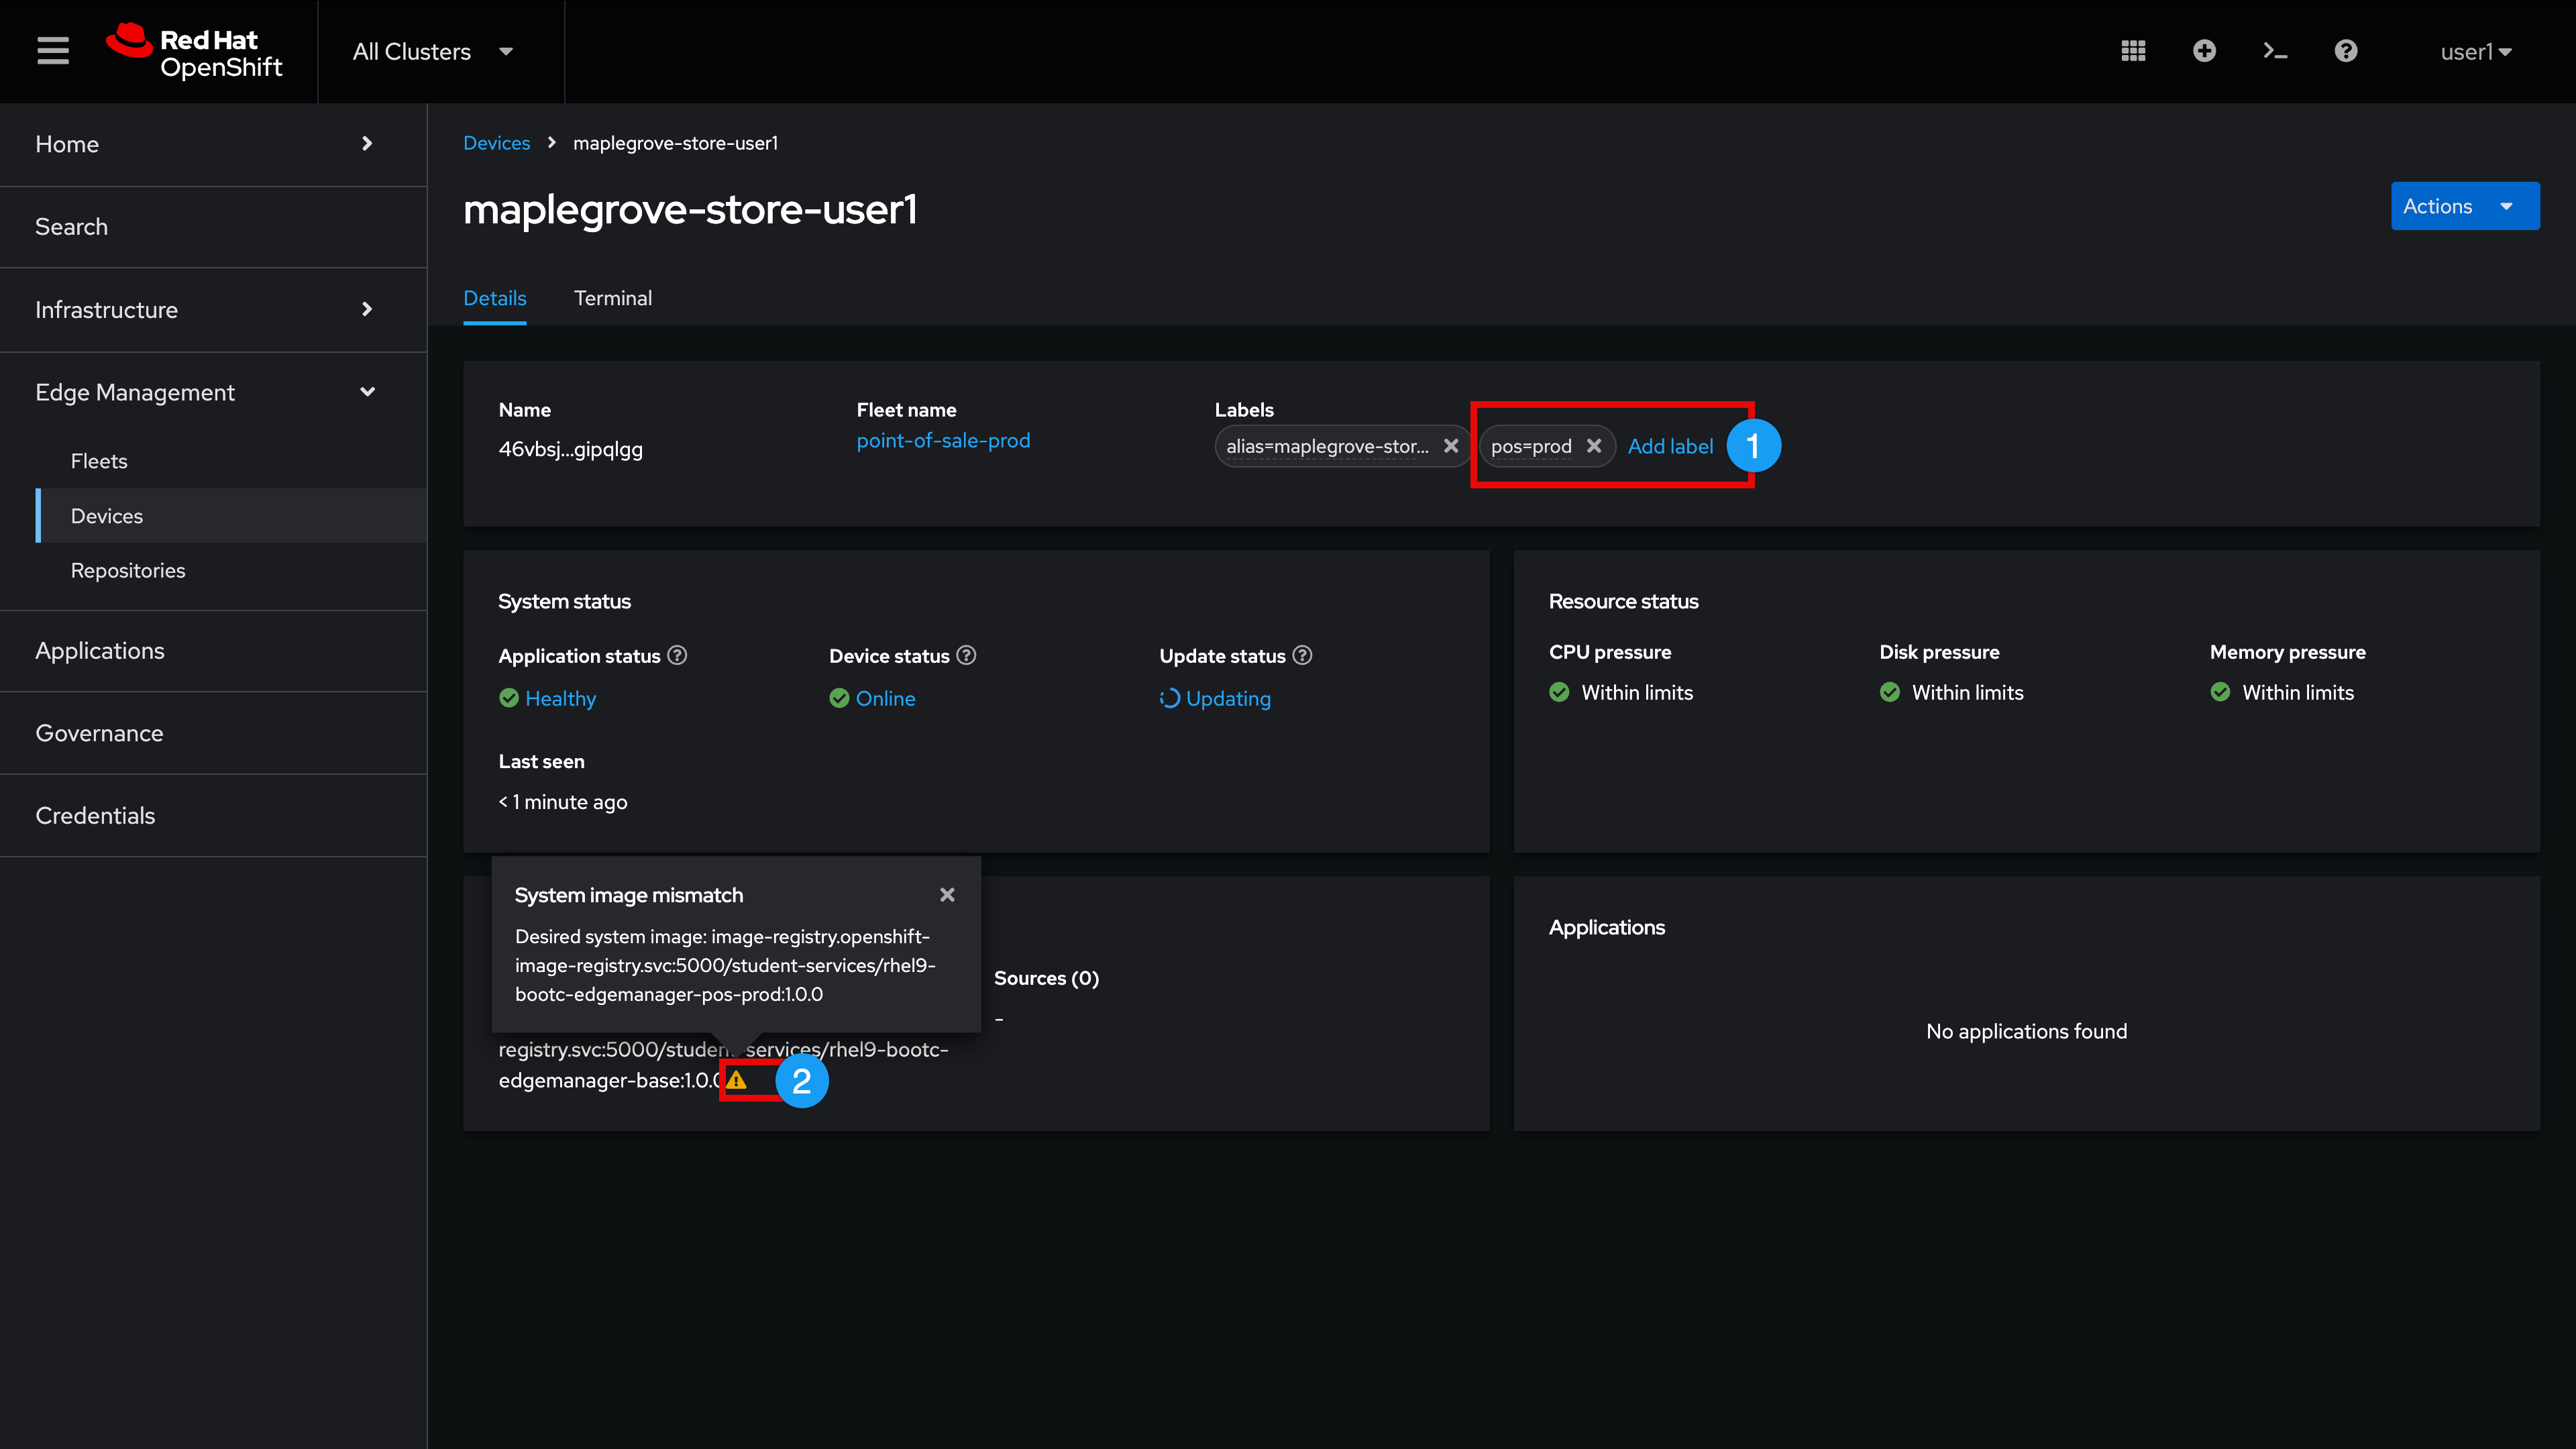
Note that we have a System image mismatch. Edge Manager is informing us that the desired state image for any device that is a member of this fleet must be a bootc image ending in '…pos-prod:1.0.0'. Since our new device is running a different (base) image, Edge Manager is automatically self-healing the device to desired state.
During this self-healing process, you will observe (via the System status pane):
-
'Update status' change to 'Updating', followed by
-
'Device status' change to 'Rebooting'
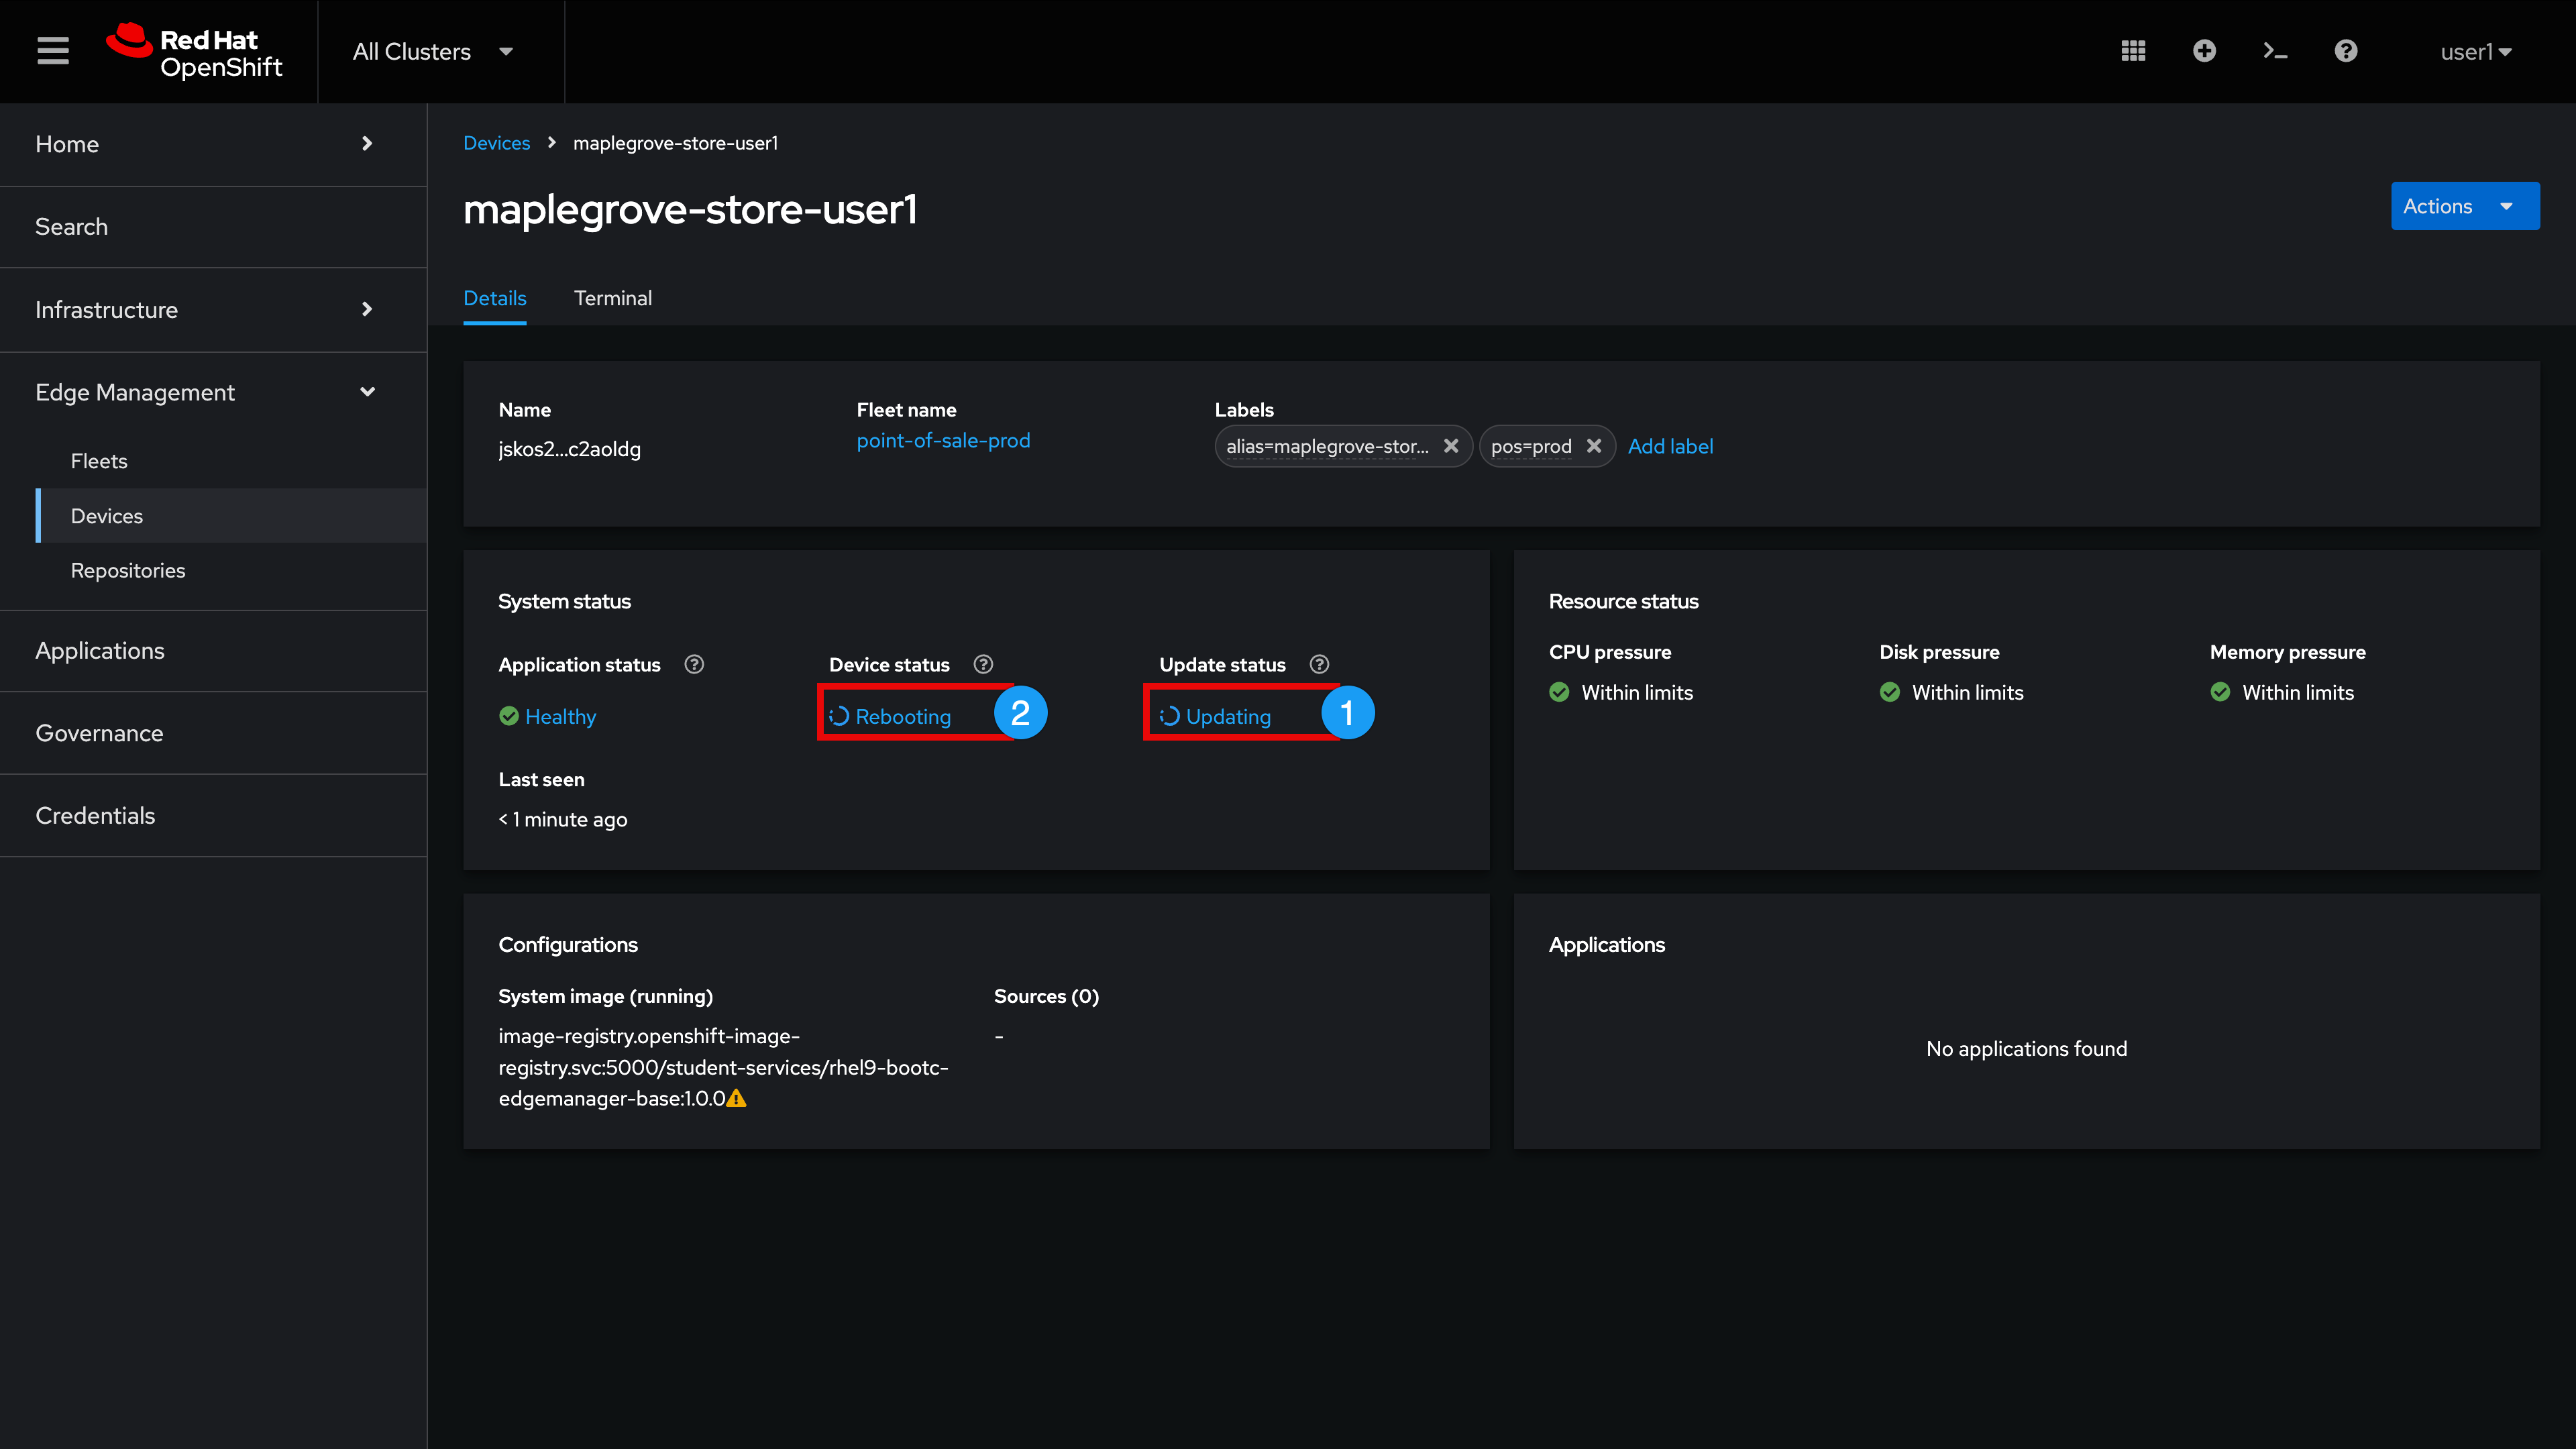
| It takes a few minutes for the device to apply the new '…pos-prod:1.0.0' image and reboot. Now would be a good time to relax a little while you wait. Thank you for your patience! |
-
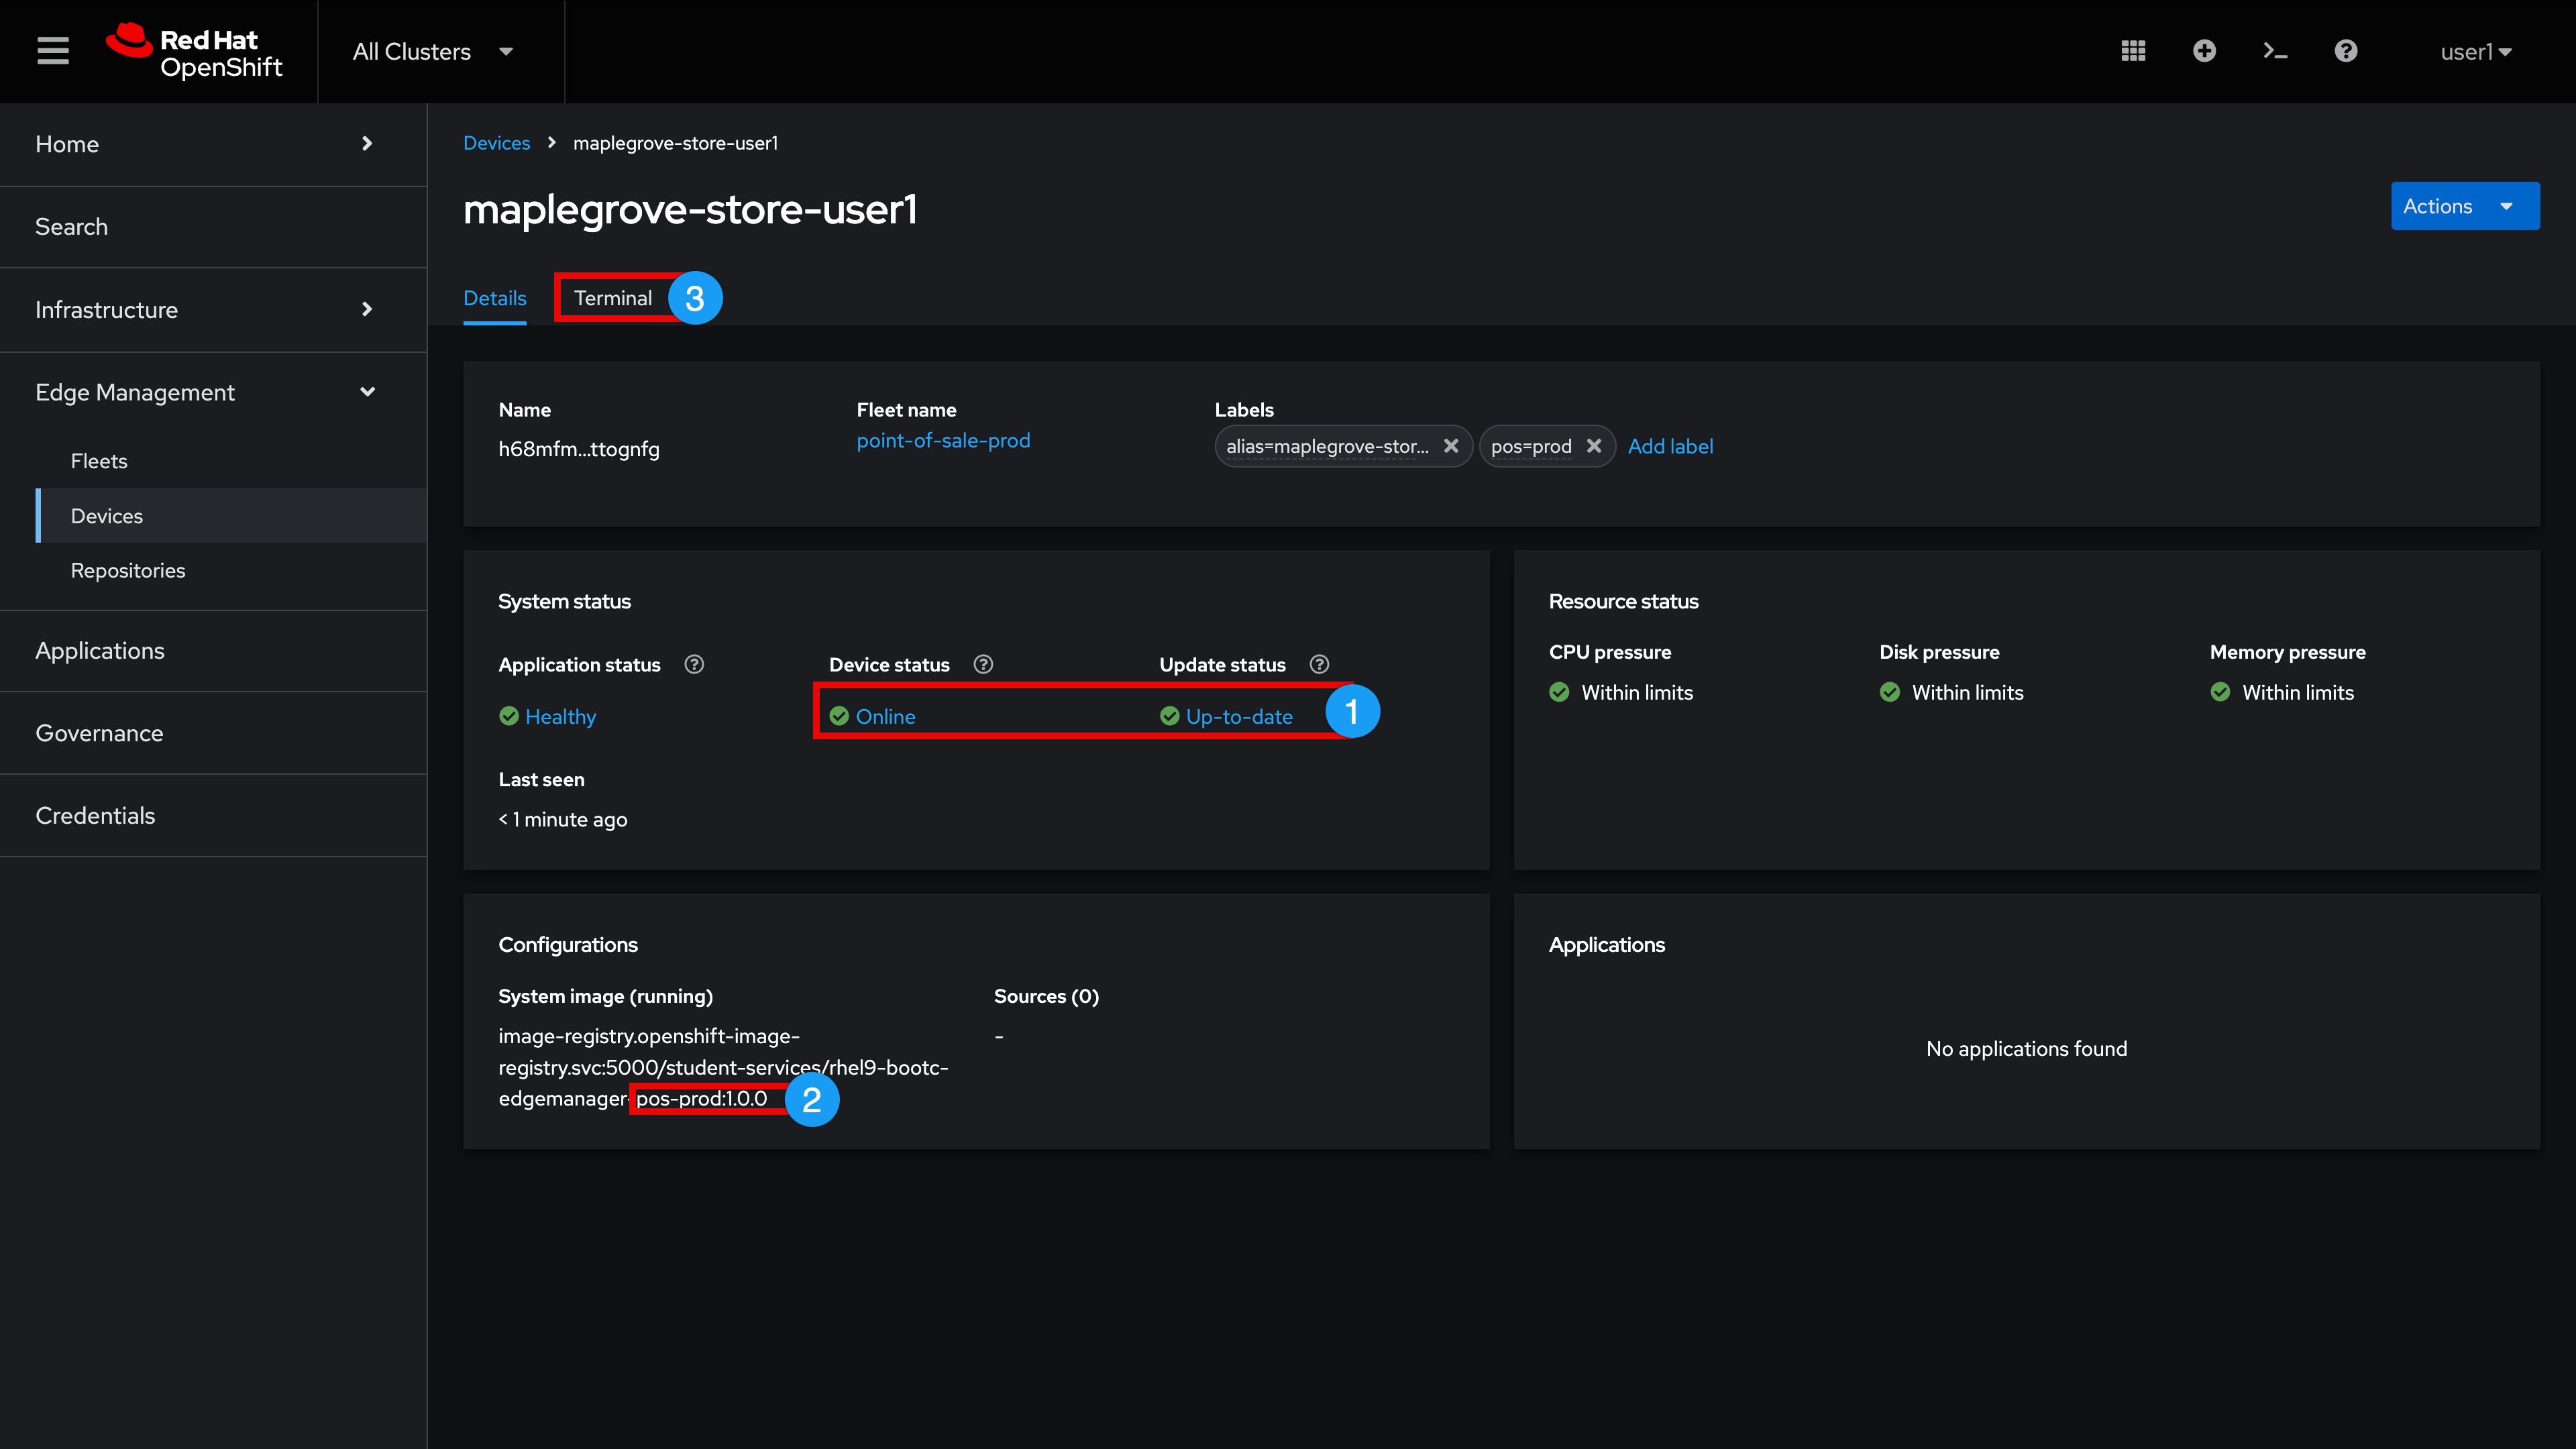
Wait for the device to report 'Online' and 'Up-to-date' in the System status panel
-
Once item 1 is complete, observe how Edge Manager is now reporting the new '…pos-prod:1.0.0' System image in the Configurations panel
-
Click Terminal
Now that the image has been brought to the fleet desired state OS configuration, let’s examine a few items within the Terminal
-
Observe that the current booted image has been set to '…pos-prod:1.0.0' and our previous '…base:1.0.0' image is indicated as a rollback option
bootc statusSample OutputNo staged image present Current booted image: containers-storage:image-registry.openshift-image-registry.svc:5000/student-services/rhel9-bootc-edgemanager-pos-prod:1.0.0 Image version: 9.20250326.0 (2025-04-10 21:00:03.968743927 UTC) Image digest: sha256:2c30b56e03862b92bbca2a50b3786642c8dd5af5309b8b2fa4f2de08d9a746ec Current rollback image: image-registry.openshift-image-registry.svc:5000/student-services/rhel9-bootc-edgemanager-base:1.0.0 Image version: 9.20250326.0 (2025-04-10 20:57:38.715070587 UTC) Image digest: sha256:e37967518e6f9679f761524ca74b02298b81baa6f82b40112e2c20b1aab2f1f8 -
Check the containers that are now running on the device:
podman ps -aSample OutputCONTAINER ID IMAGE COMMAND CREATED STATUS PORTS NAMES 53347f7ca8f7 localhost/podman-pause:5.2.2-1737721907 10 minutes ago Up 10 minutes 47a0b459f7c9-service 8df58eb27786 localhost/podman-pause:5.2.2-1737721907 10 minutes ago Up 10 minutes 0.0.0.0:30000->8080/tcp a5aa9d20b8d3-infra 268f5b977564 quay.io/jswanson/pos-v1-prod:1.0.0 /usr/bin/run-http... 10 minutes ago Up 10 minutes 0.0.0.0:30000->8080/tcp, 8080/tcp, 8443/tcp point-of-sale-pos-prod
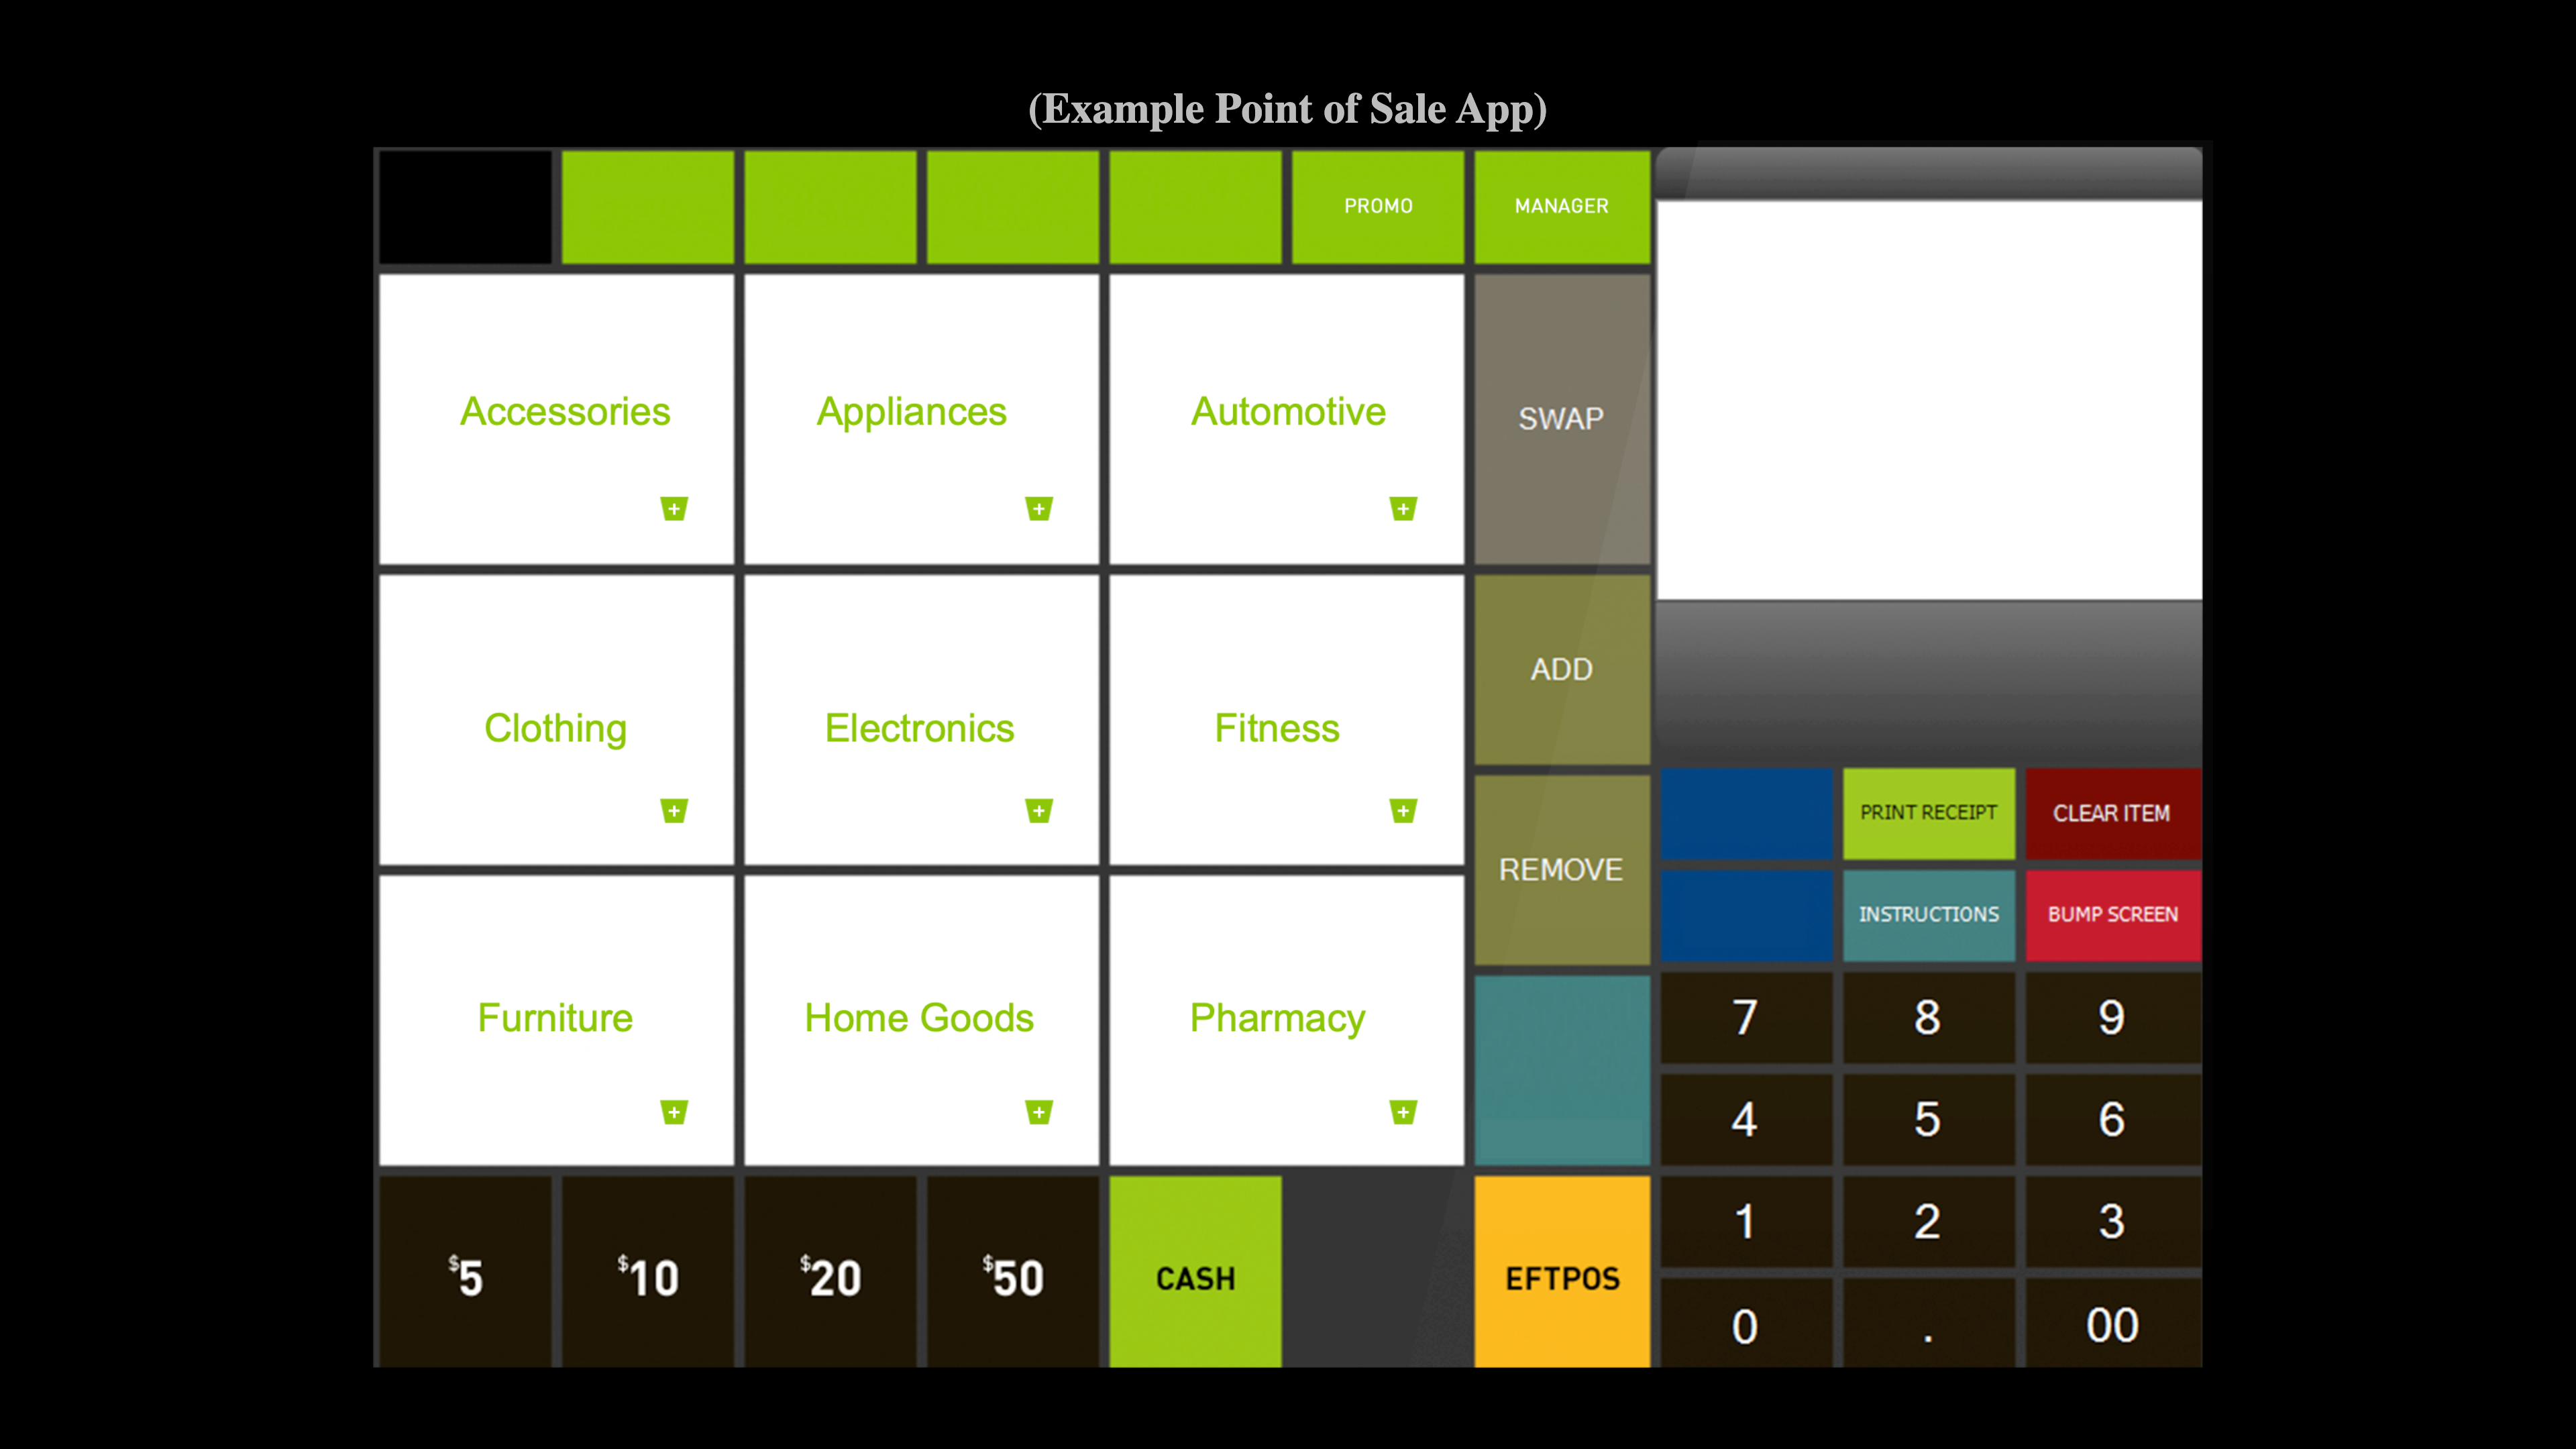
| The 'pos-v1-prod:1.0.0' container listed is our point of sale application (which is accessed via the front of store pos kiosk’s). |
Return to your Application browser tab (if you inadvertently closed this tab, you can get back to this view by selecting local-cluster in the top menu, followed by selecting Networking\Routes via the left-hand nav)
-
Refresh your browser and note that the point of sale application is now available!
Module 2 Summary
Thank you for completing our Module 2 Lesson.
In this Lesson, you learned how to onboard a new store edge device into Edge Manager. You started your device with a simple base image (containing no applications) and then witnessed how Edge Manager automatically swapped this image to one containing the POS App (after joining a Fleet that has this desired state configuration).
You may be wondering: "Why not just join the Fleet as part of onboarding?" and the answer is that you certainly could have done that but then you may not have learned as much about how Edge Manager operates. Additionally, you may have wondered, "Why not just bake the app(s) into the 'base' image?" and that is also certainly an option.
| Edge Manager gives users the optionality to configure things as they see fit, in alignment with any of their current build standards. |
Regardless of the approach taken, it should hopefully be more evident to you that Edge Manager can play a significant role in helping to maintain desired state configuration for devices.
Up Next
You are well on your way to opening your new store for business; however, there is one small challenge. You may have noticed that our POS app is not the most useful (it doesn’t actually do anything other than present a static user interface with no user interoperability).
In our final module, you will learn how to create a new fleet from scratch and specify a new point of sale application as part of the fleet device template. You will also explore the Edge Manager command line interface along with how to further monitor and decommission devices.