Lab Guide: Creating an Execution Environment with ansible-builder
A guide to automating the creation and customization of containerized execution environments using the ansible-builder utility and the integrated Visual Studio Code environment.
Lab Briefing
In previous challenges, you authored, tested, and validated your custom Ansible collection.
This final deployment step requires packaging all content (collections, Python dependencies, and system requirements) into a repeatable, version-controlled Execution Environment (EE) container image using ansible-builder.
This exercise focuses on using the Ansible VS Code extension and Ansible Builder 3 features to efficiently define and build a custom EE directly from the VS Code environment.
Enhanced Developer Experience
ansible-builder is part of the comprehensive Ansible Development Tools (ADT) suite.
The Ansible VS Code extension is actively providing an Enhanced VS Code integration that simplifies interaction with these tools.
Although new features in the roadmap are coming to simplify the EE building experience, specially for operators and deploying in production, this exercise covers the development and testing.
Lab Guide: Hands-On Tasks
We will define an Execution Environment configuration file by using the Ansible extension wizard in VS Code, then use ansible-galaxy to package our collection, ansible-builder create to inspect the generated Containerfile, and finally ansible-builder build for building the custom EE image, and finish by testing it using Podman (the default container runtime).
Task 1: Define the Execution Environment Definition File
The EE configuration is defined in execution-environment.yml. To access the features of modern Ansible tooling, we must explicitly declare version: 3 in the definition file.
-
Open the project folder in VS Code. In the top menu, select File → Open Folder…, enter the following path and click OK:
/home/rhel/myansibleproject/ -
Create the Execution environment project in VS Code:
Open the Ansible extension in the VS Code sidebar and click the Execution environment project option under the "INITIALIZE" menu.
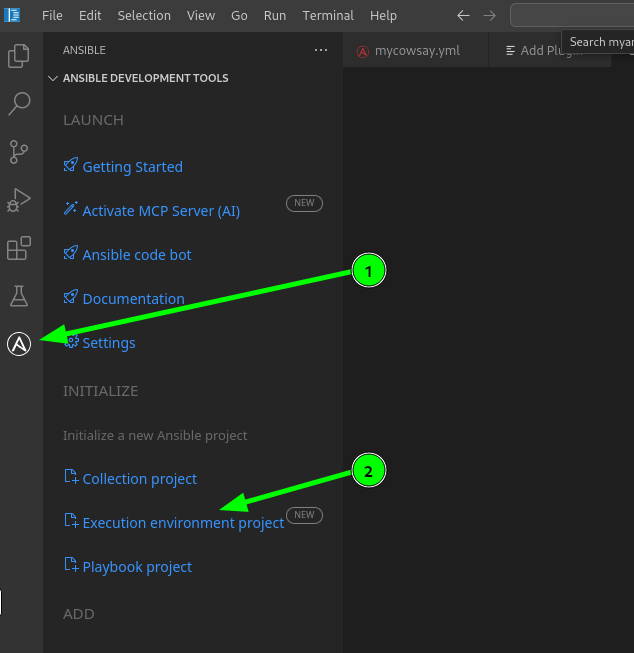
-
Fill out the Execution environment project details. Use the following information:
-
Destination path:
/home/rhel/myansibleproject -
Base image: In the base image field, enter
quay.io/centos/centos:stream10to use a public CentOS Stream 10 image that does not require registry authentication. -
Additional collections:
mynamespace.mycollection -
Additional python packages:
cowsay -
Tag:
mycollection-ee -
Leave all the other fields as they are
-
Click the blue Build button. You might need to scroll down to find it.
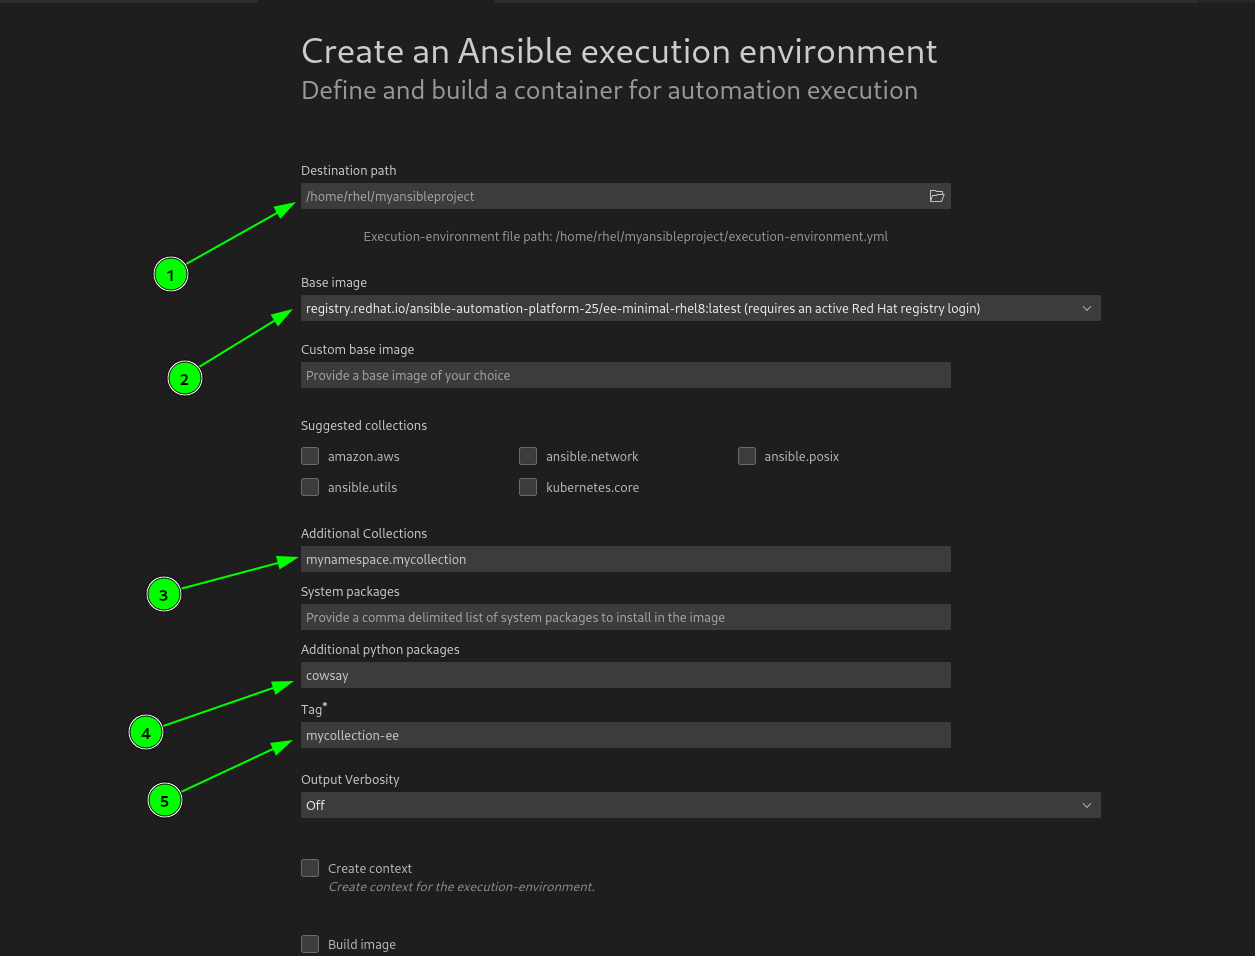
-
-
Open the
execution-environment.ymlfile:In the VS Code file explorer view, look for and open the newly created file named
execution-environment.yml. It should be in the root of themyansibleproject. -
Check the EE blueprint content:
This configuration defines the base image, includes the collection dependencies (as an alternative to pull requirements from
requirements.txtandrequirements.yml), and explicitly adds the system dependency (cowsay) needed for your custom module. The file should look like the one below:--- version: 3 images: base_image: name: quay.io/centos/centos:stream10 dependencies: ansible_core: package_pip: ansible-core ansible_runner: package_pip: ansible-runner galaxy: collections: - name: mynamespace.mycollection python: - cowsay options: tags: - mycollection-eeWhen using Red Hat supported EE base images from
registry.redhat.io(e.g.ee-minimal-rhel8), you must addpackage_manager_path: /usr/bin/microdnfto theoptions:section, as those images are built on UBI-minimal which usesmicrodnfinstead ofdnf. -
Let’s customize the EE blueprint content:
We will be making two modifications to the created file, as we are building an EE to test our local developed collection, we need to specify to
ansible-builderwe will be working with a local tarball, as our collection is not yet available in Ansible Galaxy or AAP’s Automation Hub.First we will add a section called
additional_build_files, where we will input the source (src) file of the collection and the destination (dest) for the build contextSecond we will modify the
collection:section to point to the tarball path, instead of just the collection name, and indicate this by usingtype: filesoansible-galaxyuses the local file and avoids we copied to the build context in the previous step.--- version: 3 images: base_image: name: quay.io/centos/centos:stream10 dependencies: ansible_core: package_pip: ansible-core ansible_runner: package_pip: ansible-runner galaxy: collections: # 2. Tell Galaxy to look inside the local folder we created below - name: collection_tarballs/mynamespace-mycollection-1.0.0.tar.gz type: file python: - cowsay # 1. Copy the file into a dedicated folder named 'collection_tarballs' additional_build_files: - src: mynamespace-mycollection-1.0.0.tar.gz dest: collection_tarballs options: tags: - mycollection-ee -
Save the file:
Save the
execution-environment.ymlfile. -
Make sure you are in
mycollectiondirectory:Ensure your VS Code terminal is operating in the directory containing your newly created execution-environment.yml
cd /home/rhel/myansibleproject/collections/ansible_collections/mynamespace/mycollection -
Run the
ansible-galaxycommand in the VS Code Terminal:Before we move on to build our Execution Environment, we need to package our collection and clean it of unneeded development files. We will be using
ansible-galaxyfor this. Run the following command in the active terminal to generate the collection tarball.ansible-galaxy collection build --output-path /home/rhel/myansibleproject/
Task 2: Review the Generated Containerfile (Dry Run)
Before executing the full build, we can use the ansible-builder create command to generate the Containerfile and build context directory (context/). This is helpful for debugging the build steps without spending time on the full image assembly.
-
Make sure you are in the myansibleproject directory:
Ensure your VS Code terminal is operating in the directory containing your newly created execution-environment.yml
cd /home/rhel/myansibleproject -
Run the
ansible-builder createcommand in the VS Code Terminal:Execute the following command in the active terminal to generate the build context.
ansible-builder createExpected Output: This creates the
context/directory containing theContainerfileand all necessary build artifacts. -
Inspect the generated Containerfile:
In the VS Code file explorer, locate
context/Containerfileand open it. Review the sequential stages (Base, Galaxy, Builder, Final) generated byansible-builder.
Task 3: Build and Tag the Custom Execution Environment
Now we will execute the full build process and assign a specific tag to the final container image.
-
Run the
ansible-builder buildcommand:Use the
-tflag to tag your new EE image and the-vvvflag for detailed output.ansible-builder build -t mynamespace/mycollection-ee:latest -vvvVerbosity FlagThe
-vvvflag specifies the verbosity level of the output and is not related to theversionschema defined in your YAML file. -
Verify the image creation:
The build command executes the container build across four internal stages: Base, Galaxy, Builder, and Final. After the build completes successfully, you should see a message similar to this one:
[4/4] STEP 22/22: CMD ["bash"] [4/4] COMMIT mynamespace/mycollection-ee:latest --> 6492fc97cd31 Successfully tagged localhost/mynamespace/mycollection-ee:latest 6492fc97cd316aba11934f050e9ff5b8edf52972c80934ca70e122f1965bf62c Complete! The build context can be found at: /home/rhel/myansibleproject/context -
Verify the container image exists:
Use your podman container runtime tool to verify the local image exists.
podman images | grep mynamespaceYou should see
mynamespace/mycollection-eelisted. -
Test the custom Execution environment contains mycollection:
With podman we can run an ansible-galaxy command to list all collections in the execution environment:
podman run mynamespace/mycollection-ee:latest ansible-galaxy collection listThis command should display
mycollectionand it’s dependencies.# /usr/share/ansible/collections/ansible_collections Collection Version ------------------------ ------- ansible.netcommon 8.2.0 ansible.posix 2.1.0 ansible.utils 6.0.0 mynamespace.mycollection 1.0.0 -
Run the mycowsay.yml playbook with your new EE:
Use
ansible-navigatorto run yourmycowsay.ymlplaybook with your newly created custom execution environment:ansible-navigator run mycowsay.yml --execution-environment-image mycollection-ee --pull-policy never -
Test the cowsay module documentation:
Run a quick test inside the container to verify the custom collection and module dependency were successfully packaged.
podman run mynamespace/mycollection-ee:latest ansible-doc -t module mynamespace.mycollection.cowsayThis command should display the documentation for your custom module, but we didn’t add the corresponding metadata blocks! We will leave it to you as an optional task to research and fix this issue if you have time after finishing the lab!