Trigger Infrastructure Provisioning and automation from Terraform Enterprise - Part 1
In this challenge you will learn how to trigger infrastructure provisioning and automation from Terraform Enterprise.
The following diagram shows the overall scenario that we will be covering in this, and the following lab sections. Let’s work through to completion of this scenario.
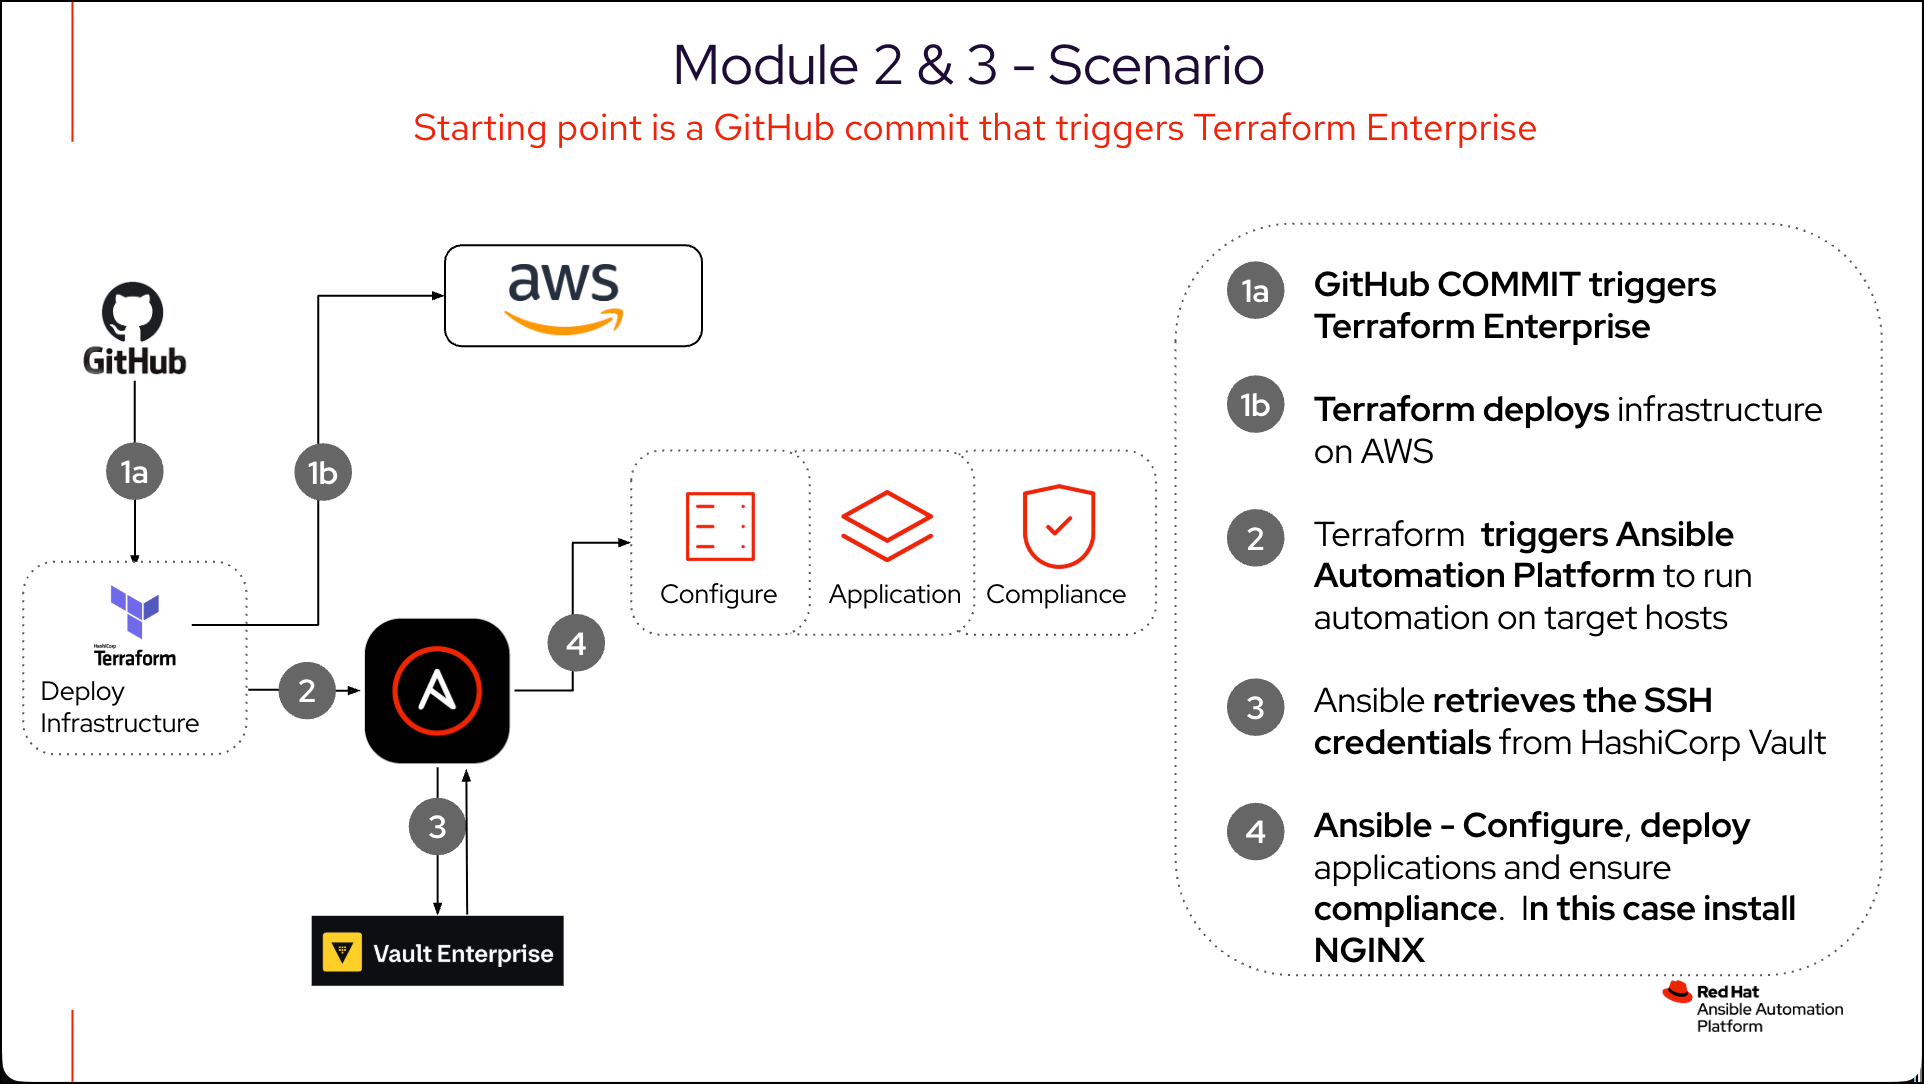
There are a number of prerequisites that you will need to complete before you can start this lab.
-
Vault Enterprise
-
Terraform Enterprise
-
Cloning a GitHub repository to your account
-
Create a Terraform Enterprise Workspace that used Version Control System (VCS) to store the Terraform code
-
Part 1 of this lab module will focus on configuring the Vault Enterprise Secret Engine.
Configure the Vault Enterprise Secret Engine
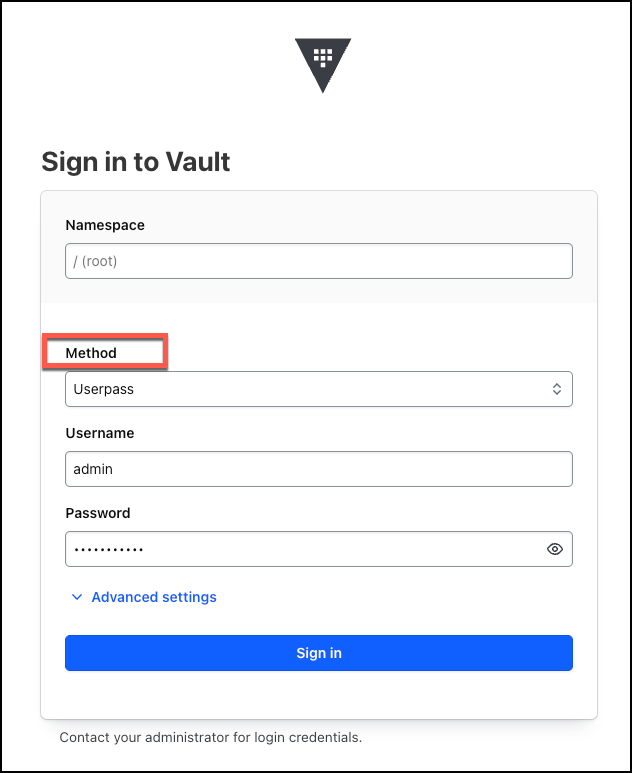
Open the Vault Enterprise UI in your browser, the tab name is HashiCorp Vault.
In the Method dropdown, select Userpass.
Enter the following details to login to the Vault Enterprise UI.
-
User: admin -
Password: ansible123! -
Click on the
Sign Inbutton.
-
Click on the
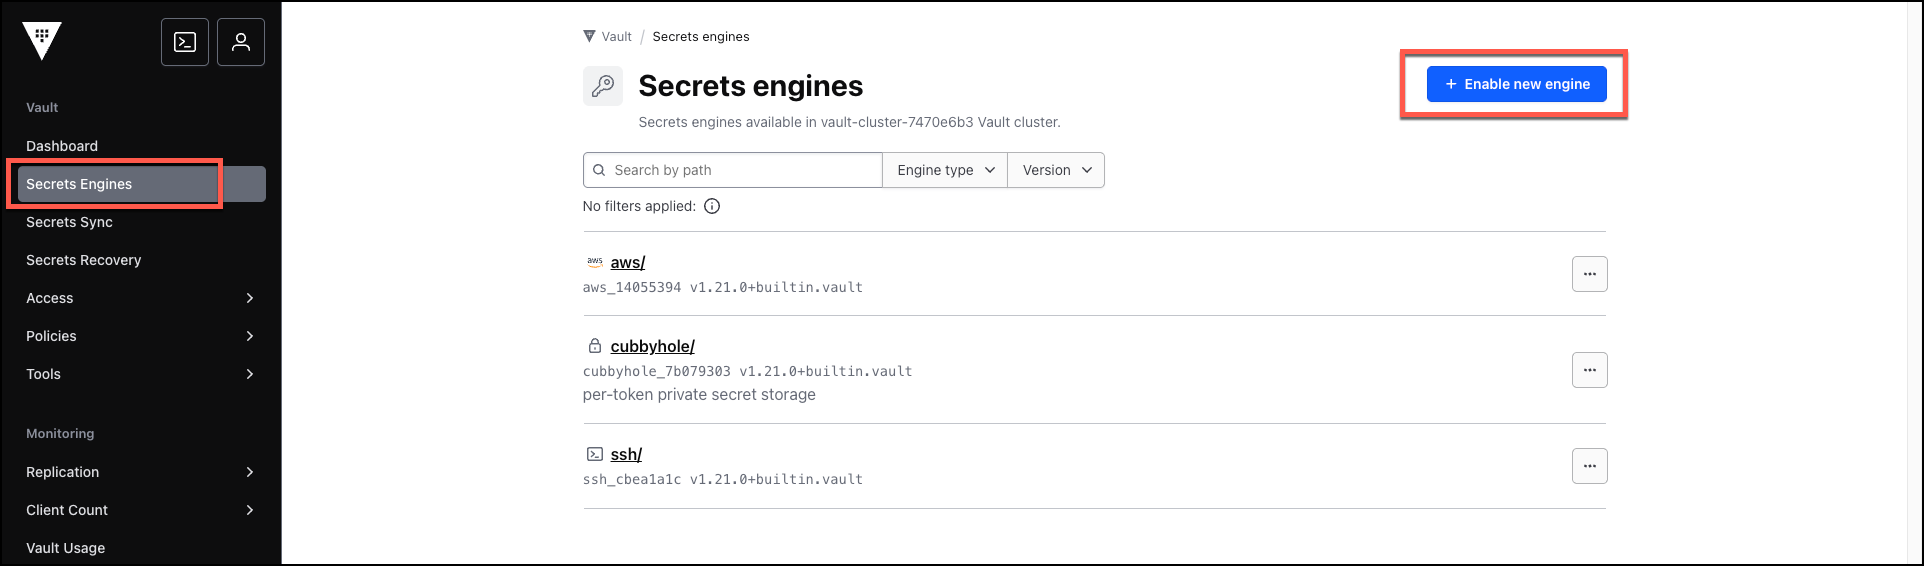
Vaultmenu option in the left menu. -
Click on the
Secrets Enginesmenu option. -
Click on the
+ Enable new enginebutton.
-
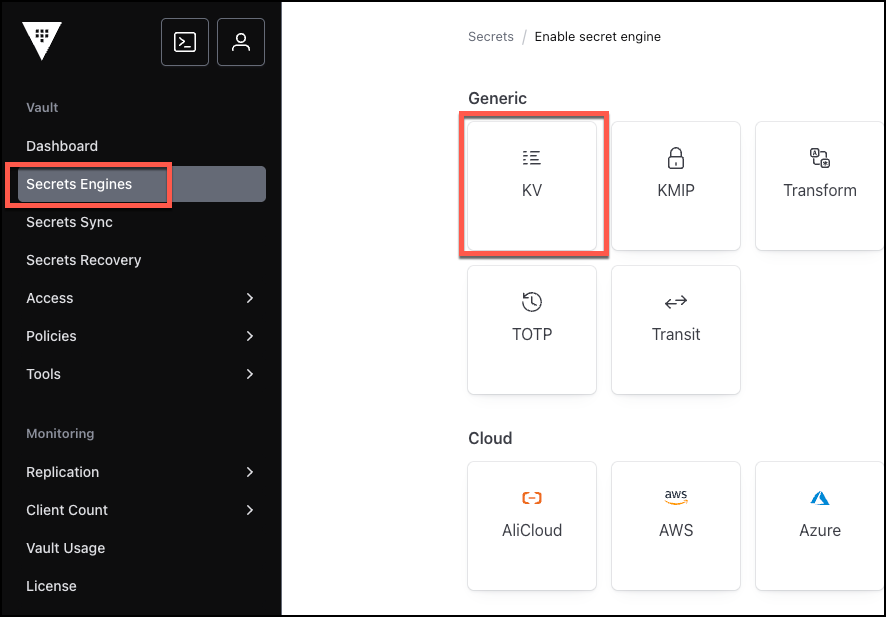
Select the
KVsecrets engine from theGenericsection.
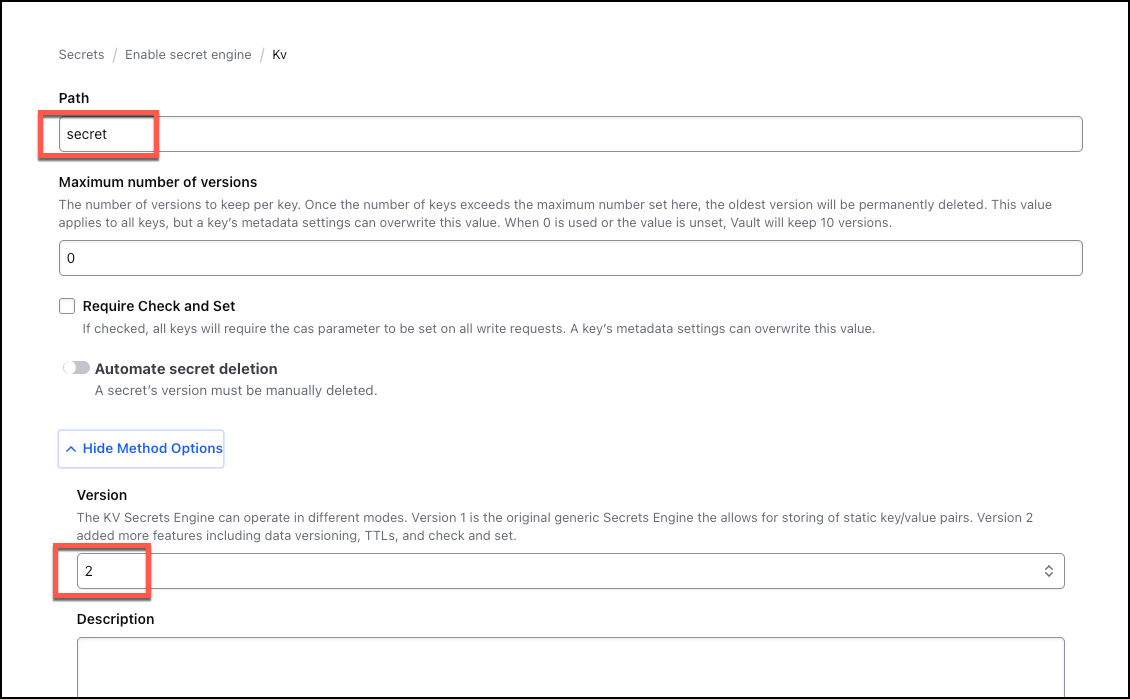
Enter the following details:
| Field | Value |
|---|---|
Path |
secret |
Version |
2 |
-
Expand the
Method Optionssection to see the available options. -
Scroll down and in the
Versiondropdown, select2. (This is the latest version of the KV secrets engine.) Must be 2. -
Scroll down and click on the
Enable Enginebutton.
Create a new secret for your AWS keys in this secret engine
-
Select the
Create secret +option on the right -
In the
Path for this secretfield, enteraws_creds -
In the
Secret datasection, enter the following details: -
Get the AWS Access Key ID and AWS Secret Access Key from the
Cloud(AWS)tab in your lab.
| Field | Value |
|---|---|
access_key |
<Your AWS Access Key ID> |
secret_key |
<Your AWS Secret Access Key> |
-
Click on the
Savebutton.
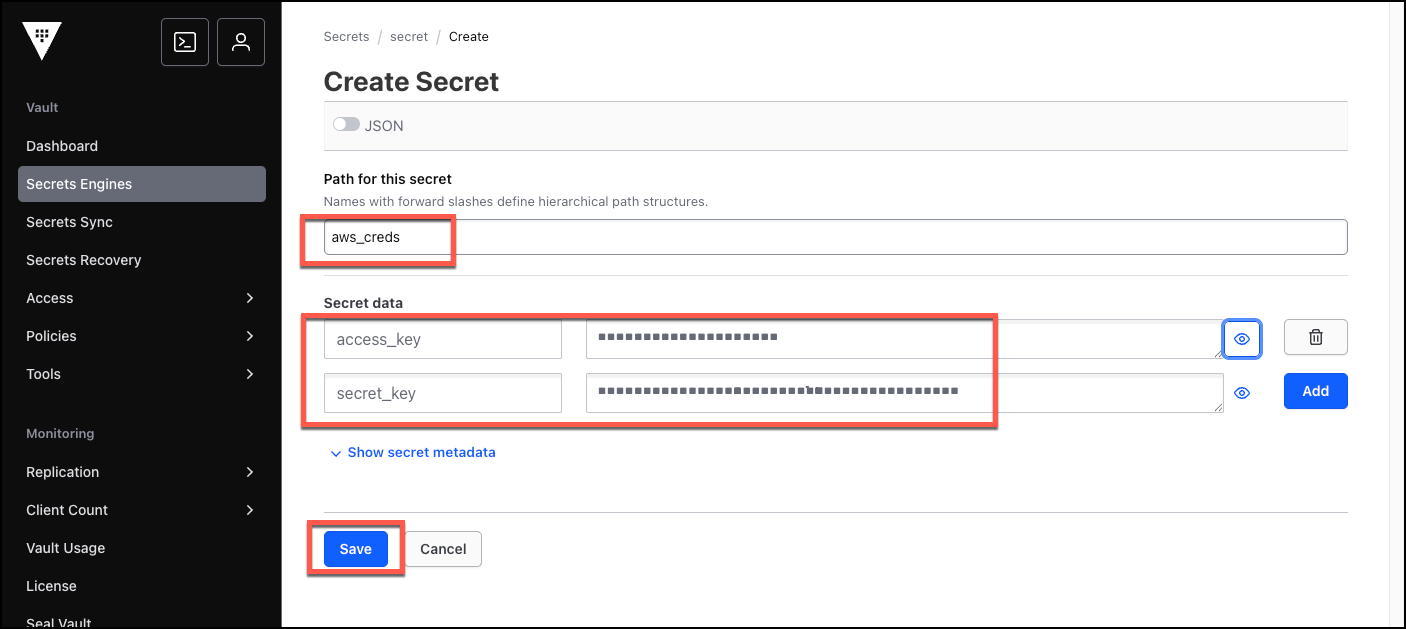
You have now created a new secret for your AWS keys in the Vault secret engine. You can now use these keys to authenticate against the AWS cloud account.
Validate that you can read the secret from the Vault secret engine
Let’s validate that you can read the secret from the Vault secret engine by using the Vault CLI.
-
Open the
TERMINALtab from your lab -
You will be at the
vscodeterminal prompt -
SSH to the
vaultserver by typingssh rhel@vault, typeyeswhen prompted
ssh rhel@vault-
Type
yeswhen prompted to continue -
Enter the password
ansible123!when prompted -
Run the following commands to login to the Vault CLI:
export VAULT_ADDR=http://127.0.0.1:8200vault login -address=http://127.0.0.1:8200 -method=userpass username=admin password=ansible123!-
You are now logged in to the Vault CLI.
-
Run either of the following commands to read the secret from the Vault secret engine:
vault kv get secret/aws_credsOR (alternate way to read the secret)
vault kv get -mount=secret aws_creds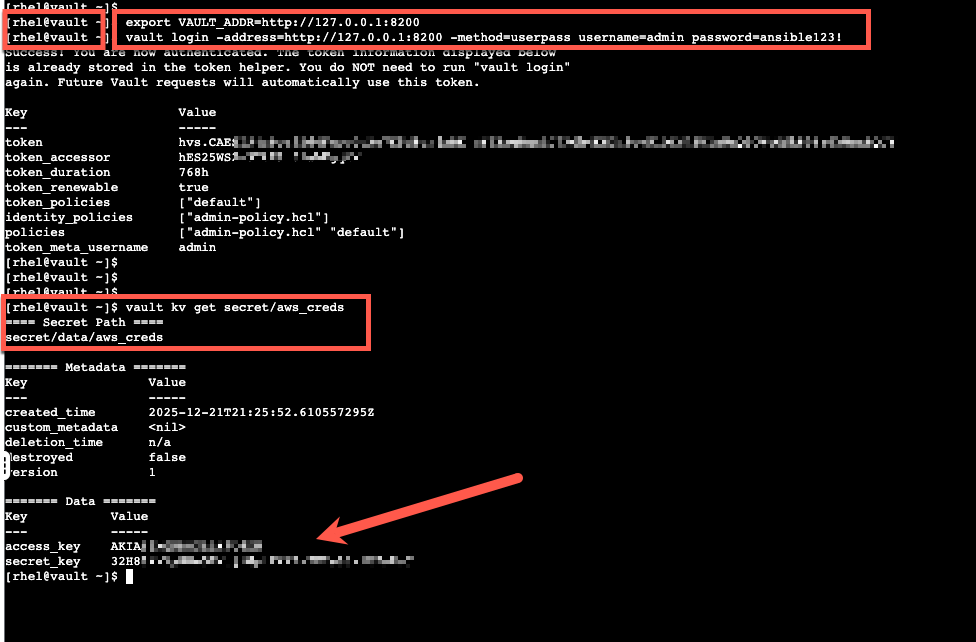
You should see the AWS Access Key ID and AWS Secret Access Key in the output.
Create an Application Role in Vault Enterprise (AppRole)
In this task we will create an Application Role in Vault Enterprise (AppRole) for both Terraform Enterprise and Ansible Automation Platform so that they can authenticate against the Vault secret engine to read and write secrets.
Before creating the Application Role, we need to create a Policy in Vault Enterprise.
| For simplicity, In this lab we will create a single policy for both Terraform Enterprise and Ansible Automation Platform. In a production environment, you would create a separate policy for each system. |
-
Back in the Vault Enterprise UI, click on the
Policiesmenu option in the left menu. -
Click on the
ACL Policiesmenu option in the left menu. -
Click on the
Create ACL policy +button on the right. -
For the
Namefield, enteraap-terraform-policy -
Enter the following into the
Policybody:
### Read AWS credentials
path "secret/data/aws_creds" {
  capabilities = ["read"]
}
### Write SSH keys - TFE to write, and AAP to read SSH keys
path "secret/data/*/ssh-keys/*" {
  capabilities = ["create", "read", "update", "delete"]
}
path "secret/data/rhel-server/ssh-keys/*" {
  capabilities = ["create", "read", "update", "delete"]
}
# Allow creating child tokens
path "auth/token/create" {
  capabilities = ["create", "update"]
}
path "auth/token/renew-self" {
  capabilities = ["update"]
}
path "auth/token/lookup-self" {
  capabilities = ["read"]
}
#
### TFE and AAP can see, list, and read metadata
path "secret/metadata/*" {
  capabilities = ["list", "read"]
}
# Allow TFE and AAP to write instance metadata
path "secret/data/*/metadata" {
  capabilities = ["create", "read", "update", "delete"]
}-
Click on the
Create policybutton.
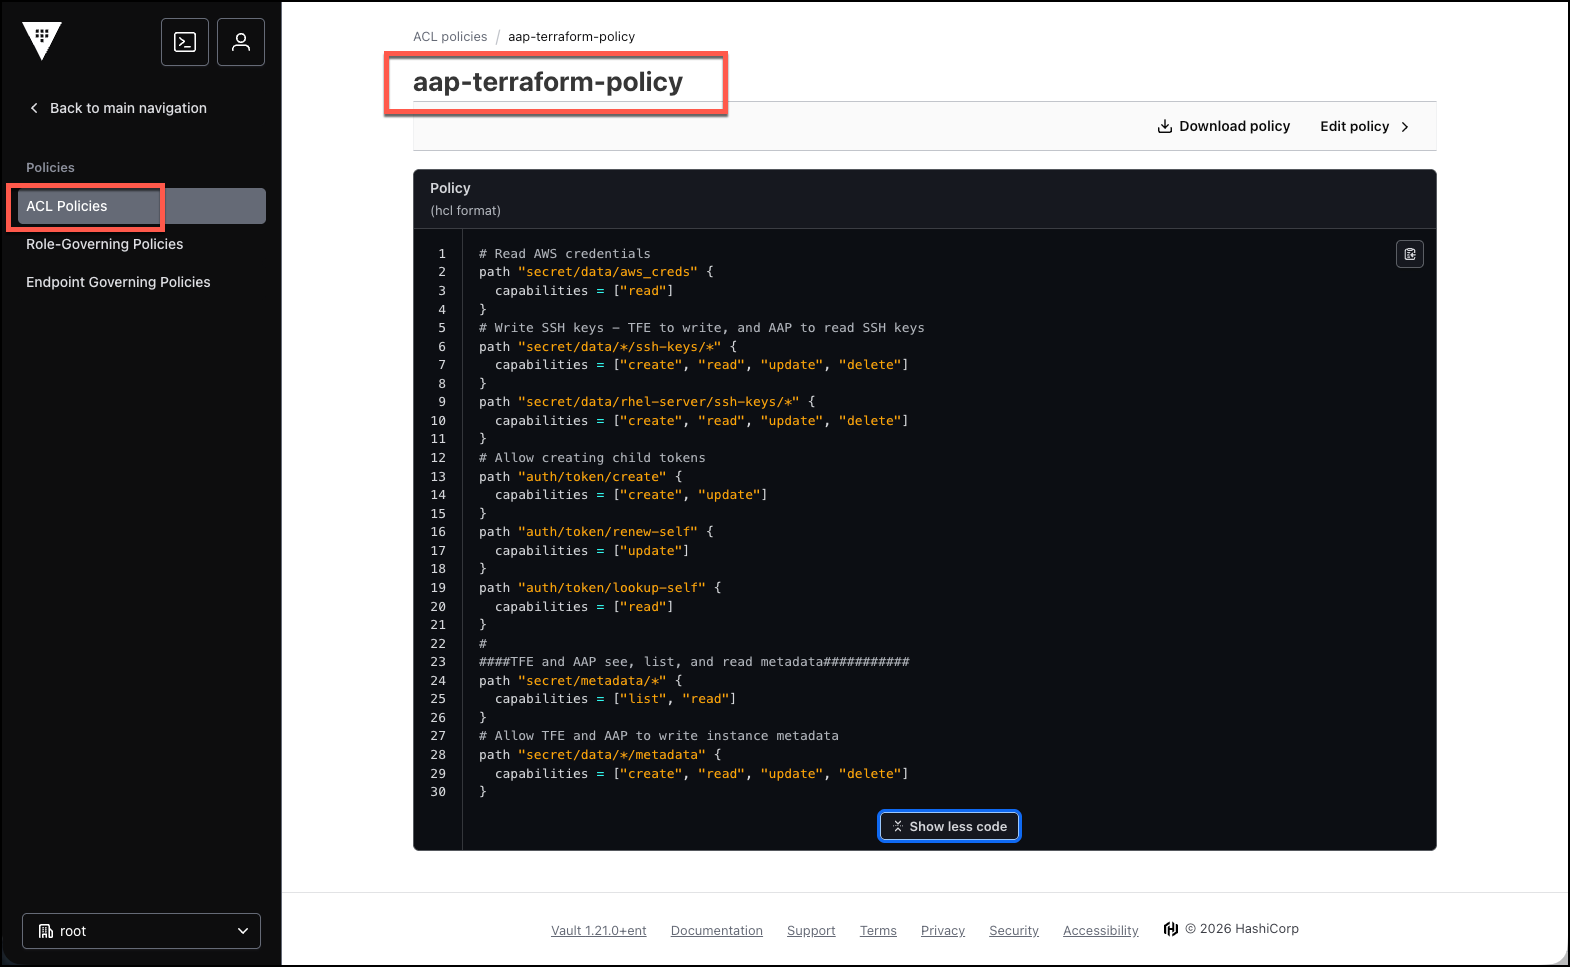
You have now created a new policy in Vault Enterprise.
Now let’s enable the AppRole authentication method in Vault Enterprise UI. The AppRole authentication method in HashiCorp Vault is for machines, services, and automated applications to securely authenticate with Vault
-
Return to the main menu by clicking on the
Back to main navigationmenu option in the top left. -
Select the
Accessmenu option in the left menu. -
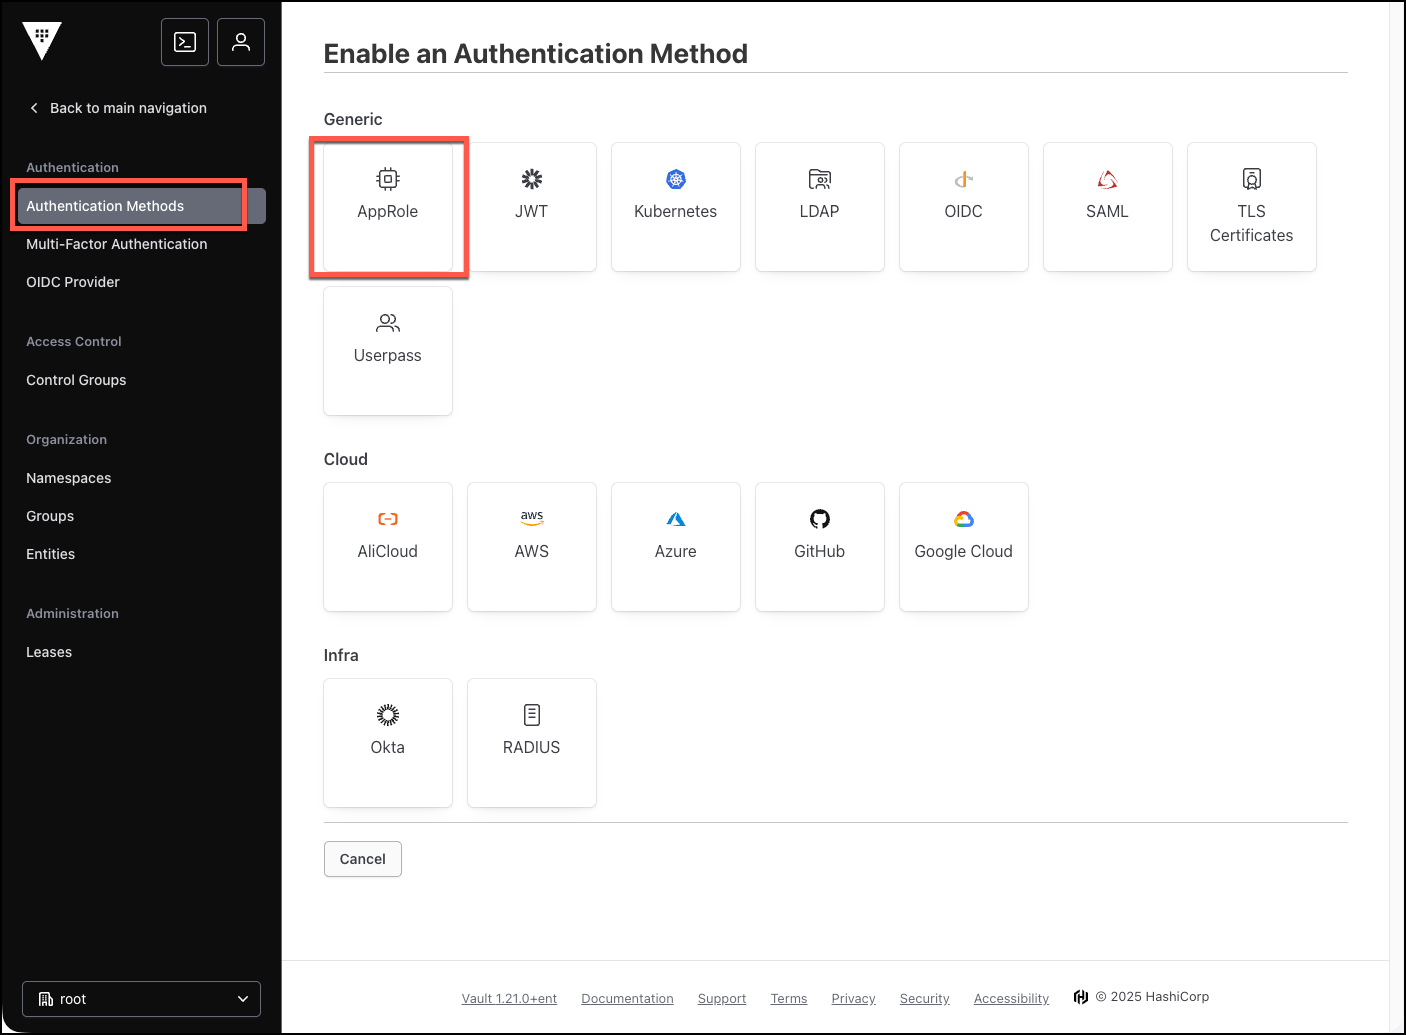
Click on the
Authentication Methodsmenu option in the left menu. -
Click on the
+ Enable new method +button on the right. -
Click on the
AppRoletile.
-
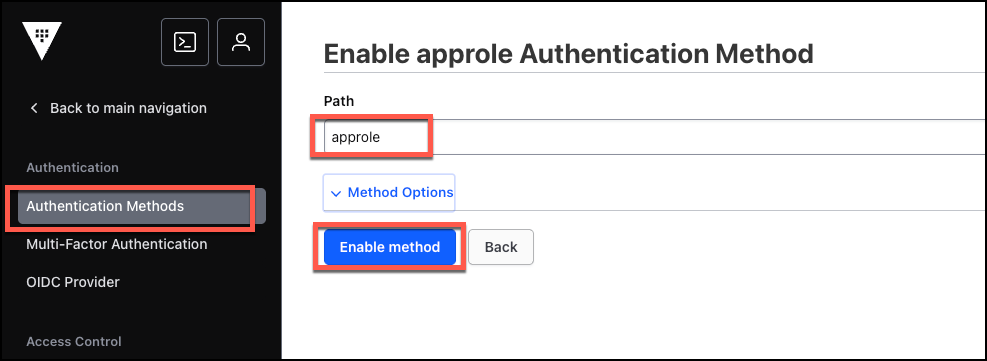
In the
Pathfield, keep it at the default ofapprole -
Click on
Enable methodto enable the AppRole authentication method
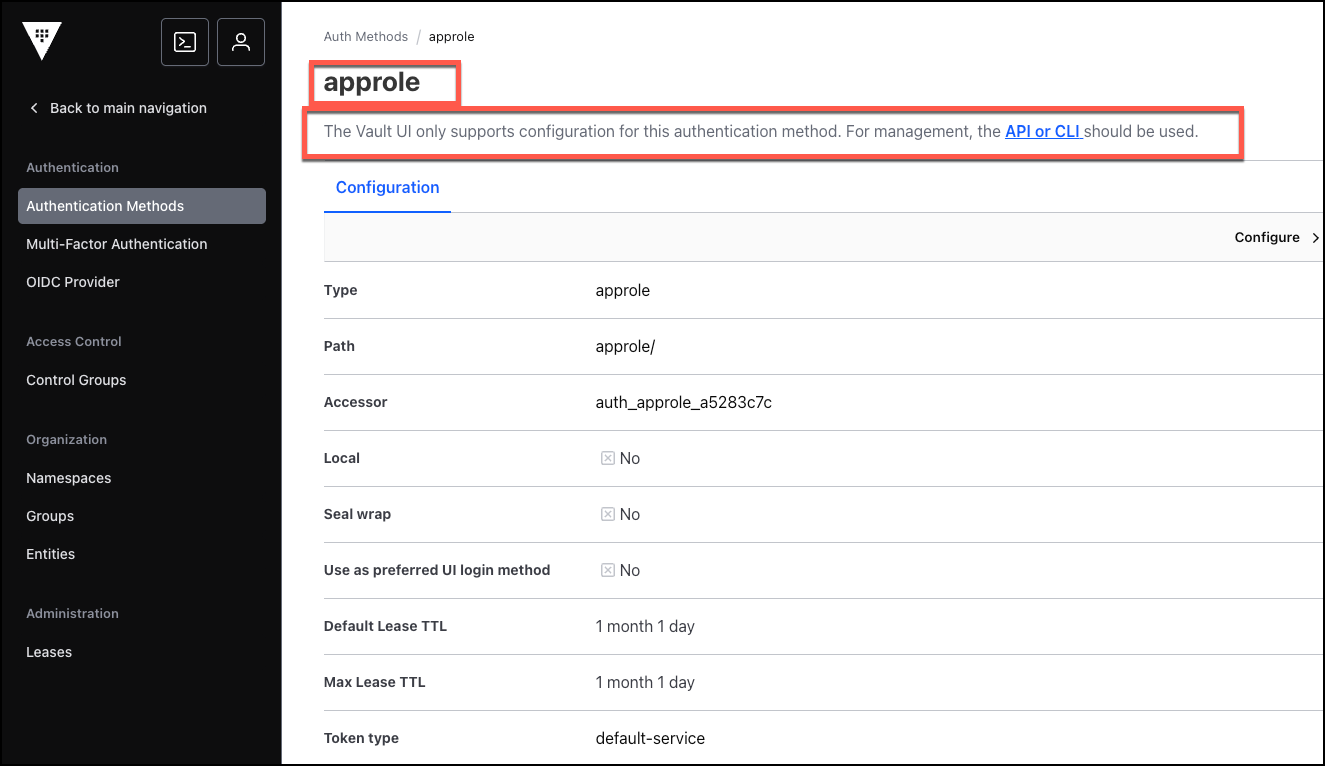
| The Vault UI only supports the configuration of the AppRole authentication method. You will need to use the Vault CLI to create the Application Role, and perform additional configuration steps. |
-
Open the
TERMINALtab from your lab -
You will be at the
vscodeterminal prompt -
SSH to the
vaultserver by typingssh rhel@vault, typeyeswhen prompted
ssh rhel@vault-
Type
yeswhen prompted to continue -
Enter the password
ansible123!when prompted -
Run the following command to login to the Vault CLI (if you are not already logged in):
export VAULT_ADDR=http://127.0.0.1:8200vault login -address=http://127.0.0.1:8200 -method=userpass username=admin password=ansible123!-
Run the following command to create a role named
aapterraformwithin the AppRole authentication method in Vault Enterprise. It explicitly assigns theaap-terraform-policyto any tokens generated by this role. This is a standard step for any AppRole in Vault Enterprise.
vault write auth/approle/role/aapterraform token_policies=aap-terraform-policy-
You should see the following output:
Success! Data written to: auth/approle/role/aapterraform -
Now get the
Role IDandSecret IDfor the AppRole:
Run the following command to get the Role ID:
vault read auth/approle/role/aapterraform/role-idThen run the following command to get the Secret ID:
vault write -f auth/approle/role/aapterraform/secret-id-
Copy the Role ID and Secret ID to your clipboard. You will need these momentarily
Test the AppRole authentication method
Let’s test the AppRole authentication method by using the Vault CLI. (using the role_id and secret_id you copied a moment ago)
vault write auth/approle/login \
    role_id=<aapterraform-role-id> \
    secret_id=<aapterraform-secret-id>
If you see key / value pairs in the output, you have successfully authenticated against the Vault secret engine using the AppRole authentication method! Great Job!
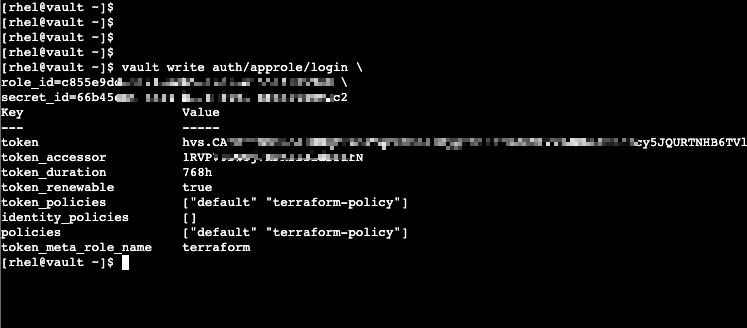
You have now created an Application Role (AppRole) in Vault Enterprise. Ansible Automation Platform and Terraform Enterprise can now authenticate securely against the Vault secret engine.
Configure Ansible Automation Platform to use the AppRole authentication method
In this task we will configure Ansible Automation Platform to use the AppRole authentication method to securely authenticate against the Vault secret engine.
Create a new credential in Ansible Automation Platform to use the AppRole authentication method
Create a new credential in Ansible Automation Platform to use the AppRole authentication method. This will be named Vault lookup credential
-
Open the
Ansible Automation Platformtab in your lab -
Click on the
Automation Executionmenu option in the left menu. -
Click on the
Infrastructuremenu option in the left menu. -
Click on the
Credentialsmenu option in the left menu. -
Click on the
+ Create credentialbutton on the right. -
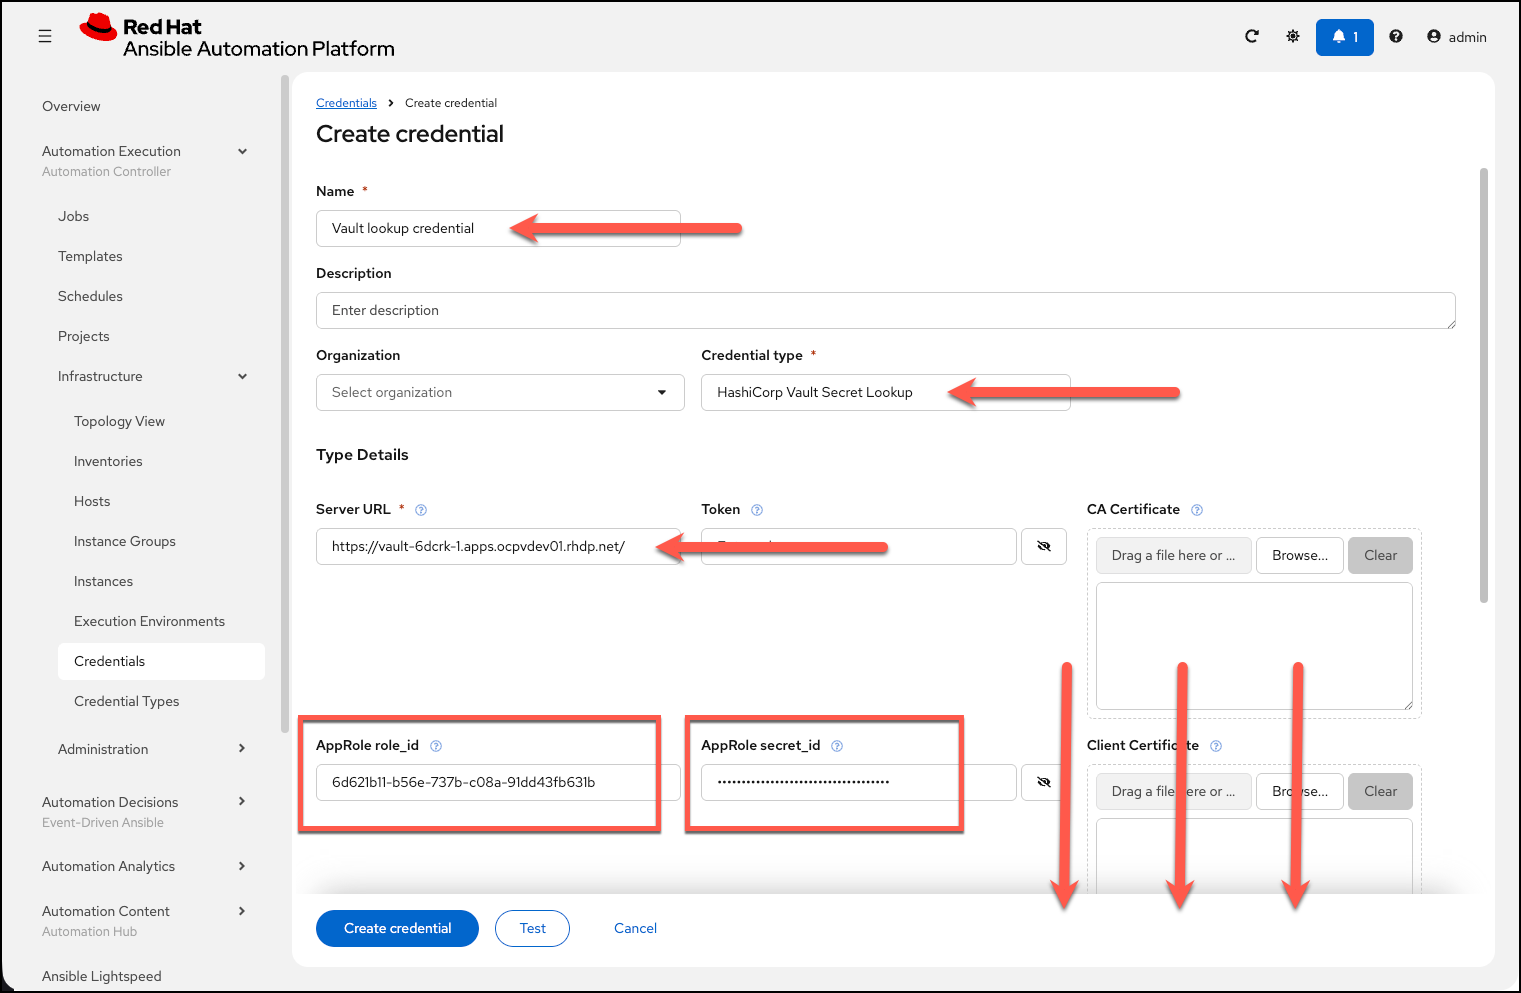
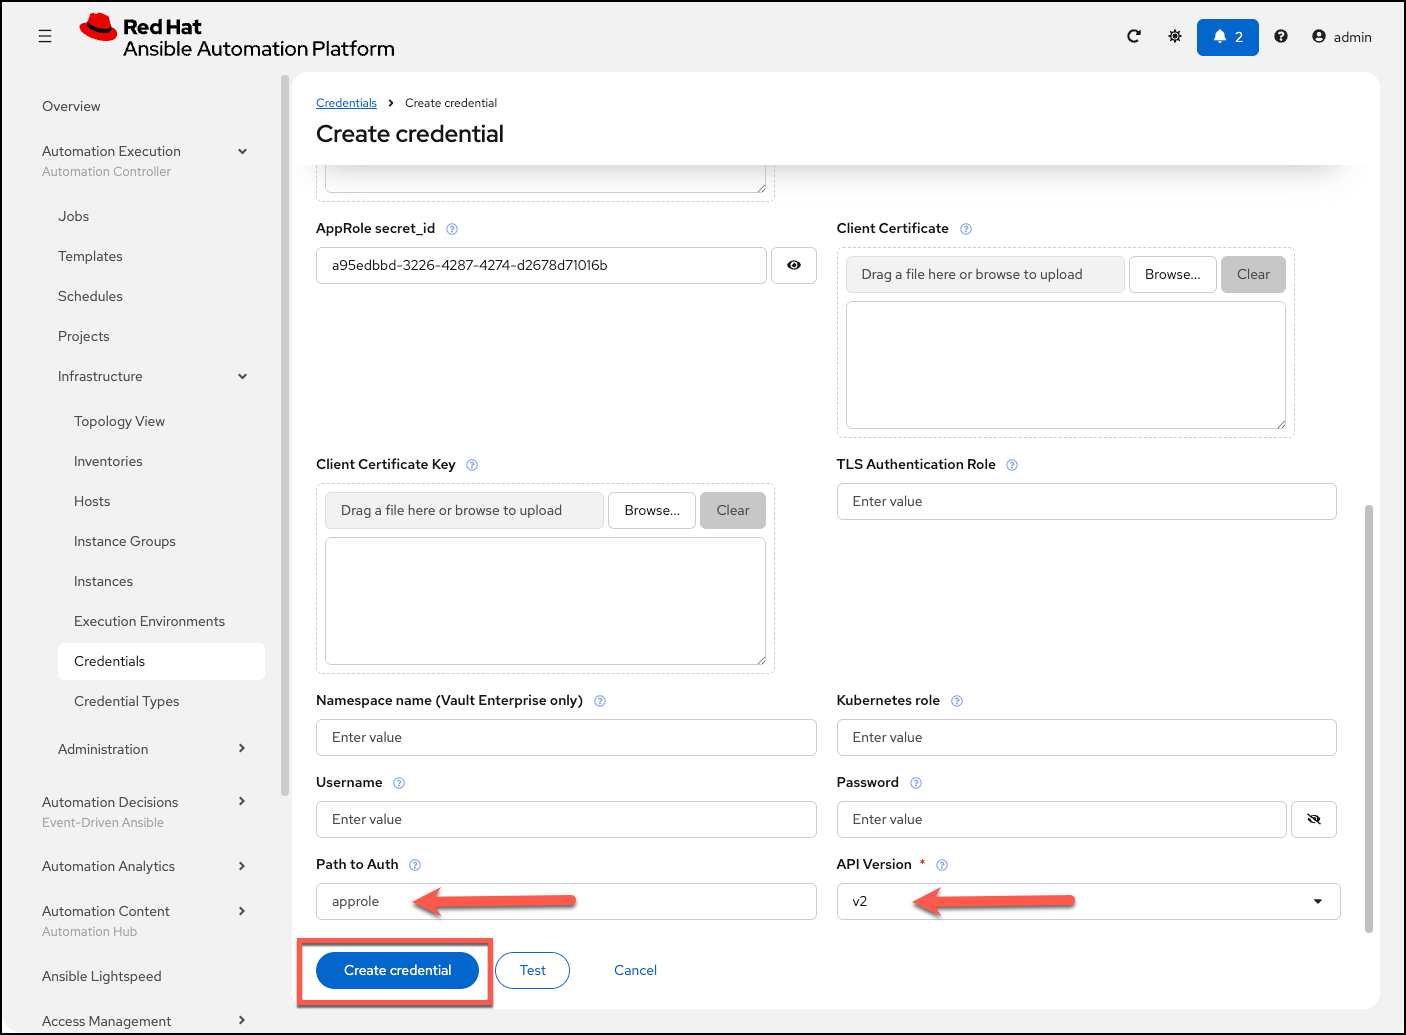
Fill in the following details from the table below:
| Field | Value |
|---|---|
Name |
Vault lookup credential |
Credential Type |
HashiCorp Vault Secret Lookup |
Server URL |
https://vault-my-guid.{domain} |
AppRole role_id |
<generated role id> |
AppRole secret_id |
<generated secret id> |
Path to Auth |
approle |
API Version |
v2 |
-
Click on the
Create credentialbutton.
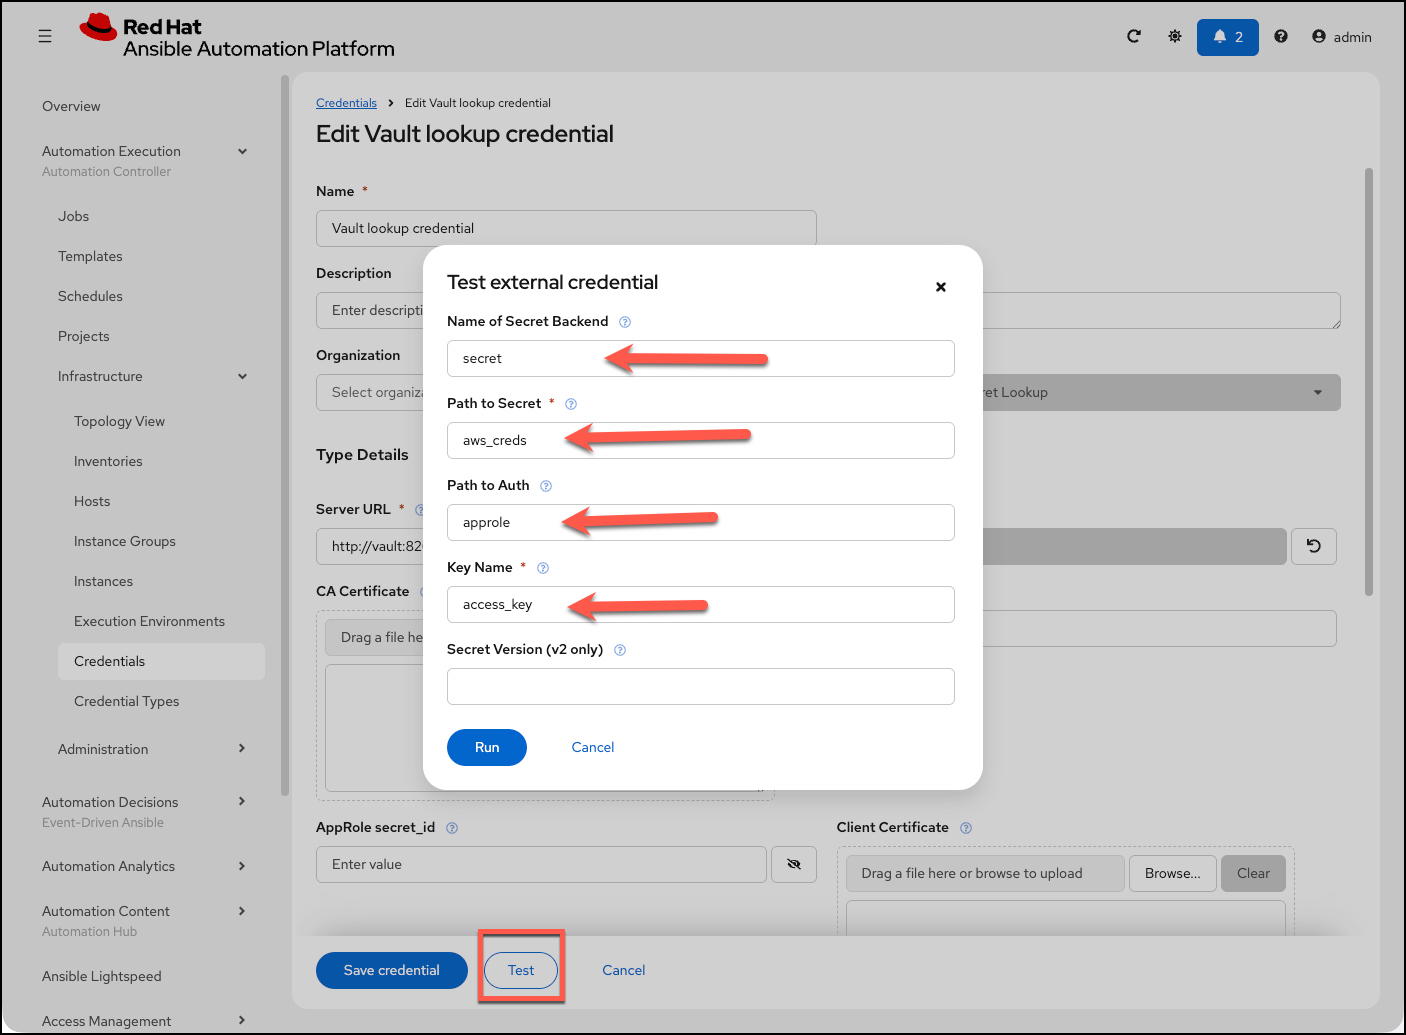
Once you have saved the credential, go back into it to change to EDIT the credential, and select Test to validate this. We know we created the AWS credentials in the Vault secret engine earlier, so this test should pass.
-
Enter the following details into the
Test external credentialdialog box:
| Field | Value |
|---|---|
Name of Secret Backend |
secret |
Path to Secret |
aws_creds |
Path to Auth |
approle |
Key Name |
access_key |
-
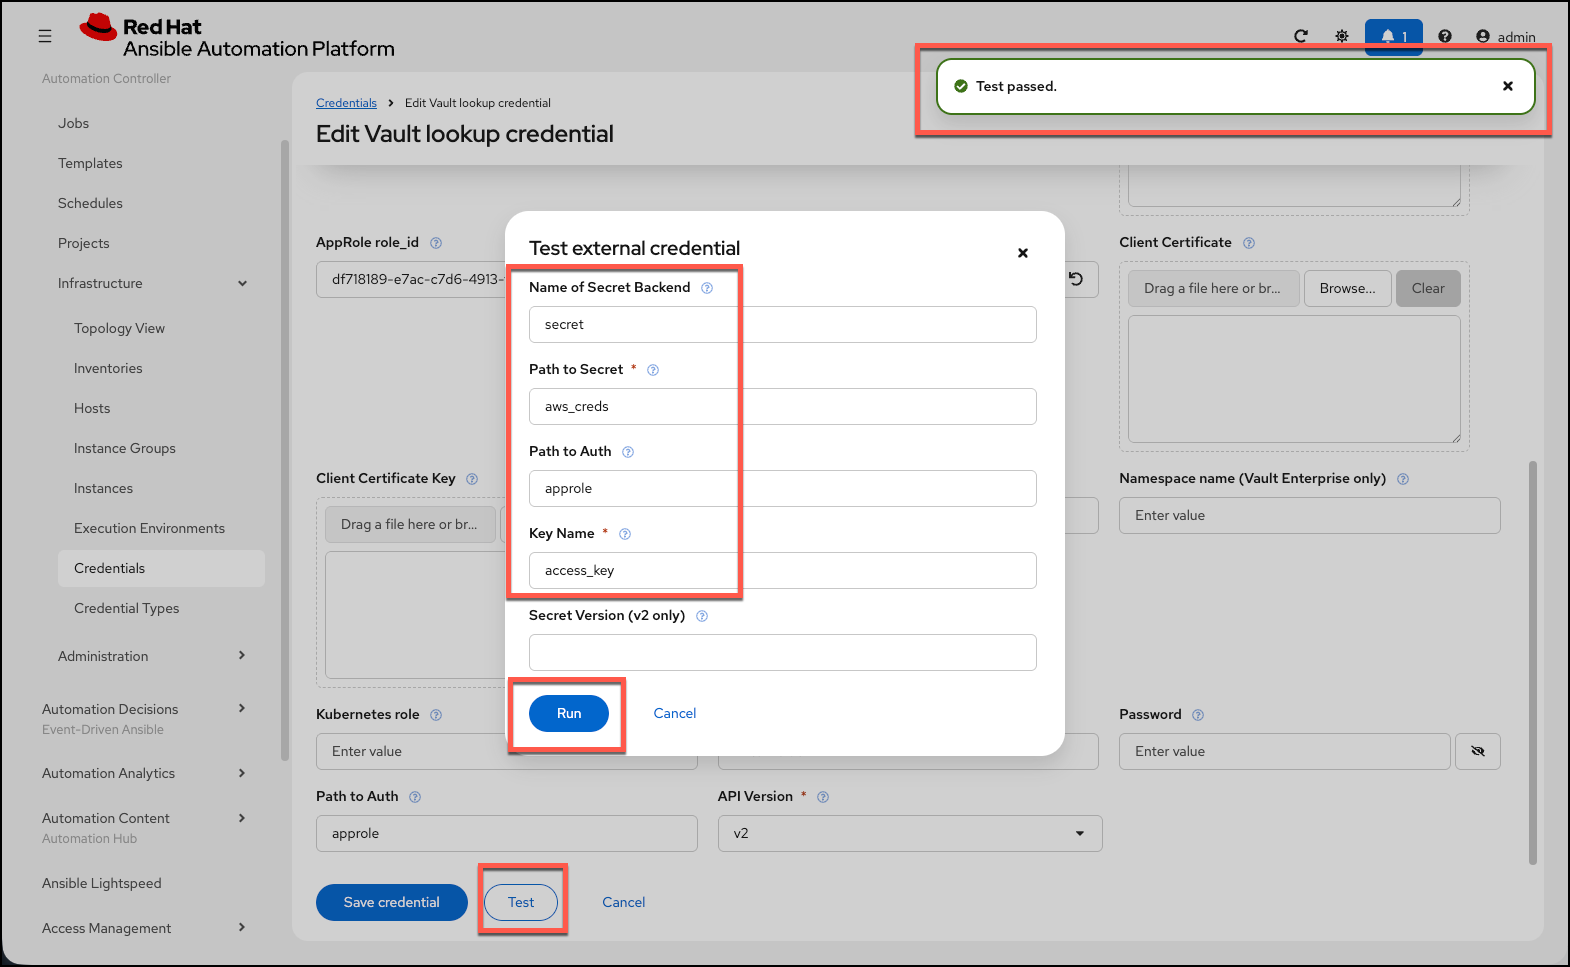
Click on the
Runbutton to test credential lookup. You should see a success message in the output.
You have now configured Ansible Automation Platform to use the AppRole authentication method to authenticate against the Vault secret engine.
Create ANOTHER credential in Ansible Automation Platform
This will be a machine credential to SSH to the inventory RHEL hosts, and it will use the Vault lookup credential we created earlier to read the SSH private key.
-
Click on the
Automation Executionmenu option in the left menu. -
Click on the
Infrastructuremenu option in the left menu. -
Click on the
Credentialsmenu option in the left menu. -
Click on the
+ Create credentialbutton on the right. -
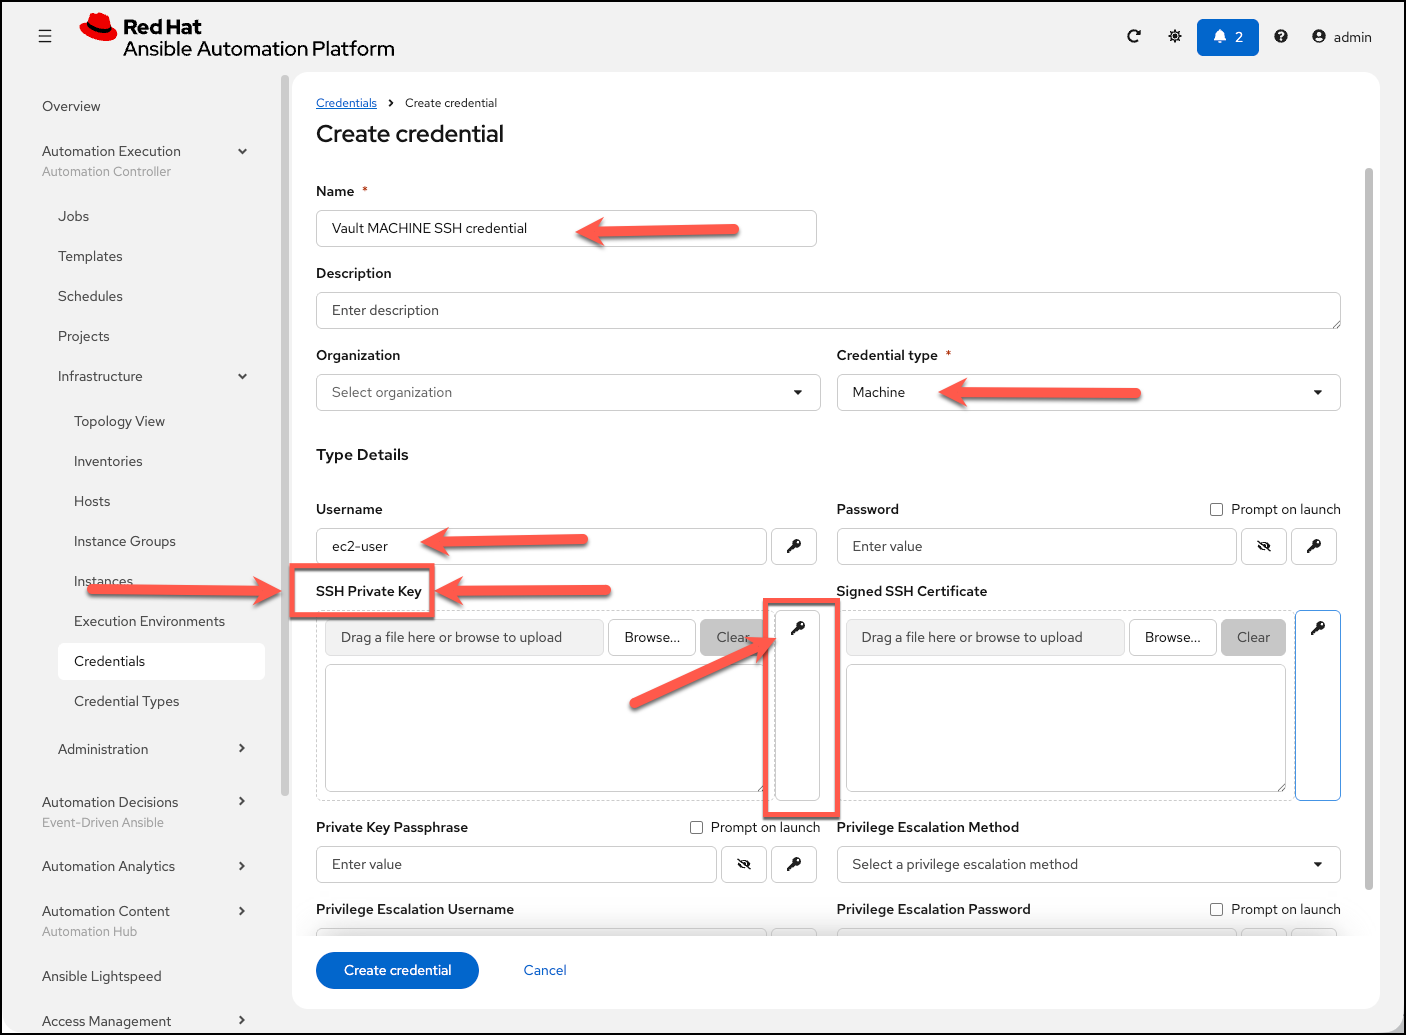
For the
Namefield, enterVault MACHINE SSH credential -
For the
Credential Typefield, selectMachine -
For the
Usernamefield, enterec2-user -
Click on the
KEYicon to the right of theSSH Private Keyfield
| Field | Value |
|---|---|
Name |
Vault MACHINE SSH credential |
Credential Type |
Machine |
Username |
ec2-user |
SSH Private Key |
Click on the |
-
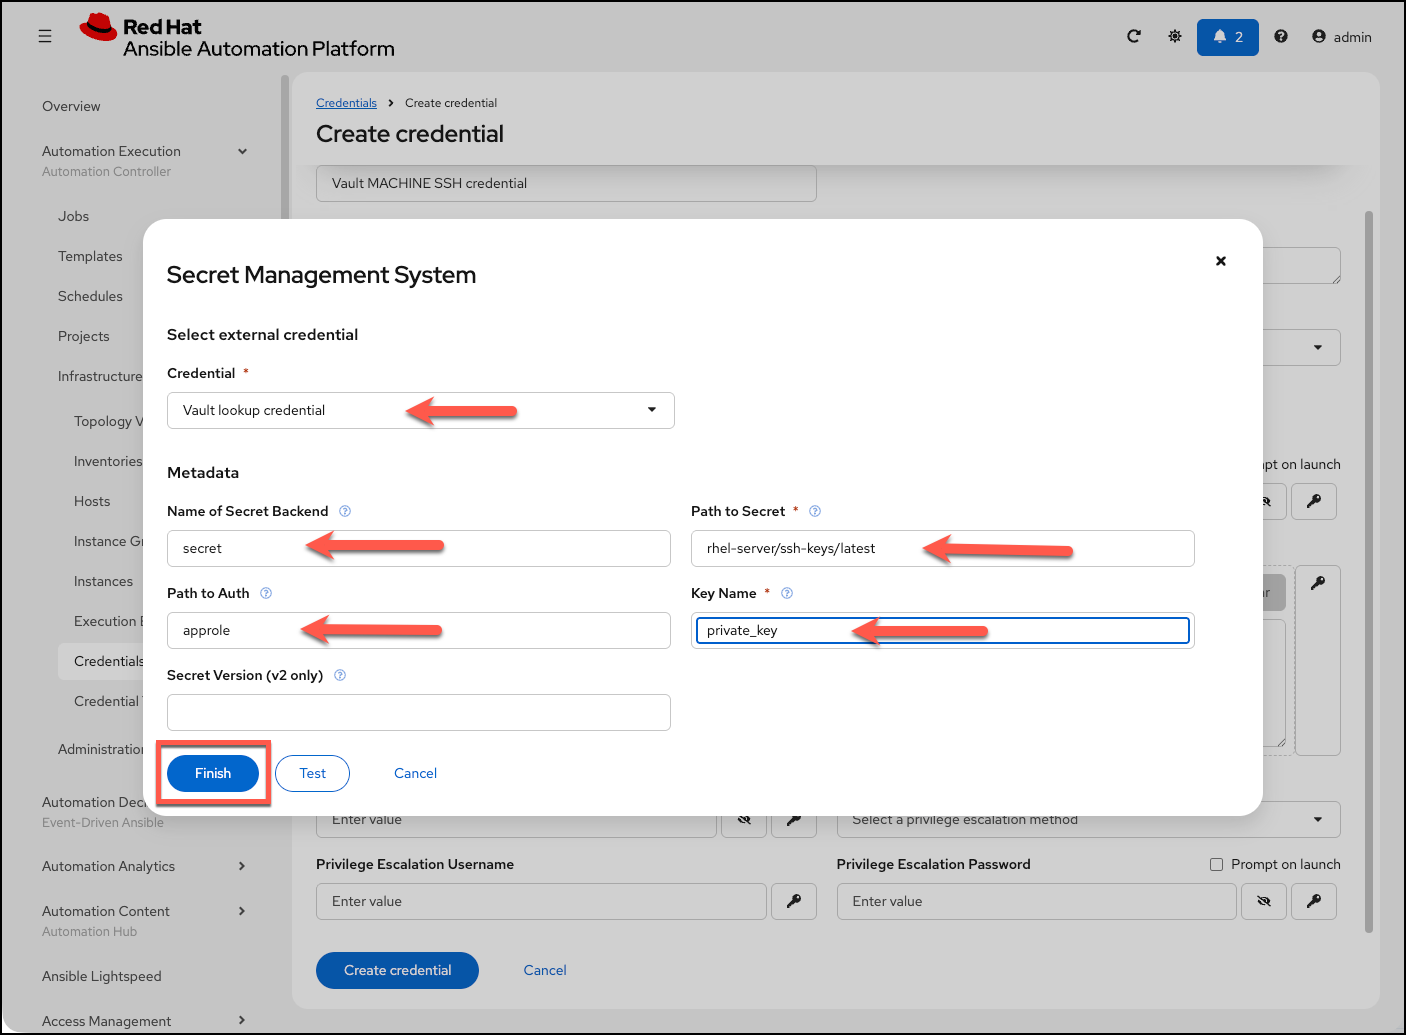
On the
Secret Management Systemdialog box, fill in the following details:-
For the
Credentialfield, selectVault lookup credentialfrom the dropdown -
For the
Name of Secret Backendfield, enter thesecret -
For the
Path to Secretfield, enterrhel-server/ssh-keys/latest -
For the
Path to Authfield, enterapprole -
For the
Key Namefield, enterprivate_key -
Click on the
Finishto save this dialog box
-
| Field | Value |
|---|---|
Credential |
Vault lookup credential |
Name of Secret Backend |
secret |
Path to Secret |
rhel-server/ssh-keys/latest |
Path to Auth |
approle |
Key Name |
private_key |
-
Click on the
Create credentialbutton. You will see a summary of the credential you just created
| Don’t worry about testing this credential yet, as it will error out until there are some SSH private_keys in the Vault secret engine. |
Create the Job Template and Workflow template that will be triggered by Terraform Enterprise
In this task we will create a Job Template and Workflow template that will be triggered by Terraform Enterprise.
Duplicate the "Install Nginx on RHEL" job template
Click on the Ansible Automation Platform tab at the top of lab. (if not already) Expand the Automation Execution menu on the left. Automation Execution → Templates.
-
Now click on
Elipsisat the end of theInstall Nginx on RHELjob template and selectDuplicate template. -
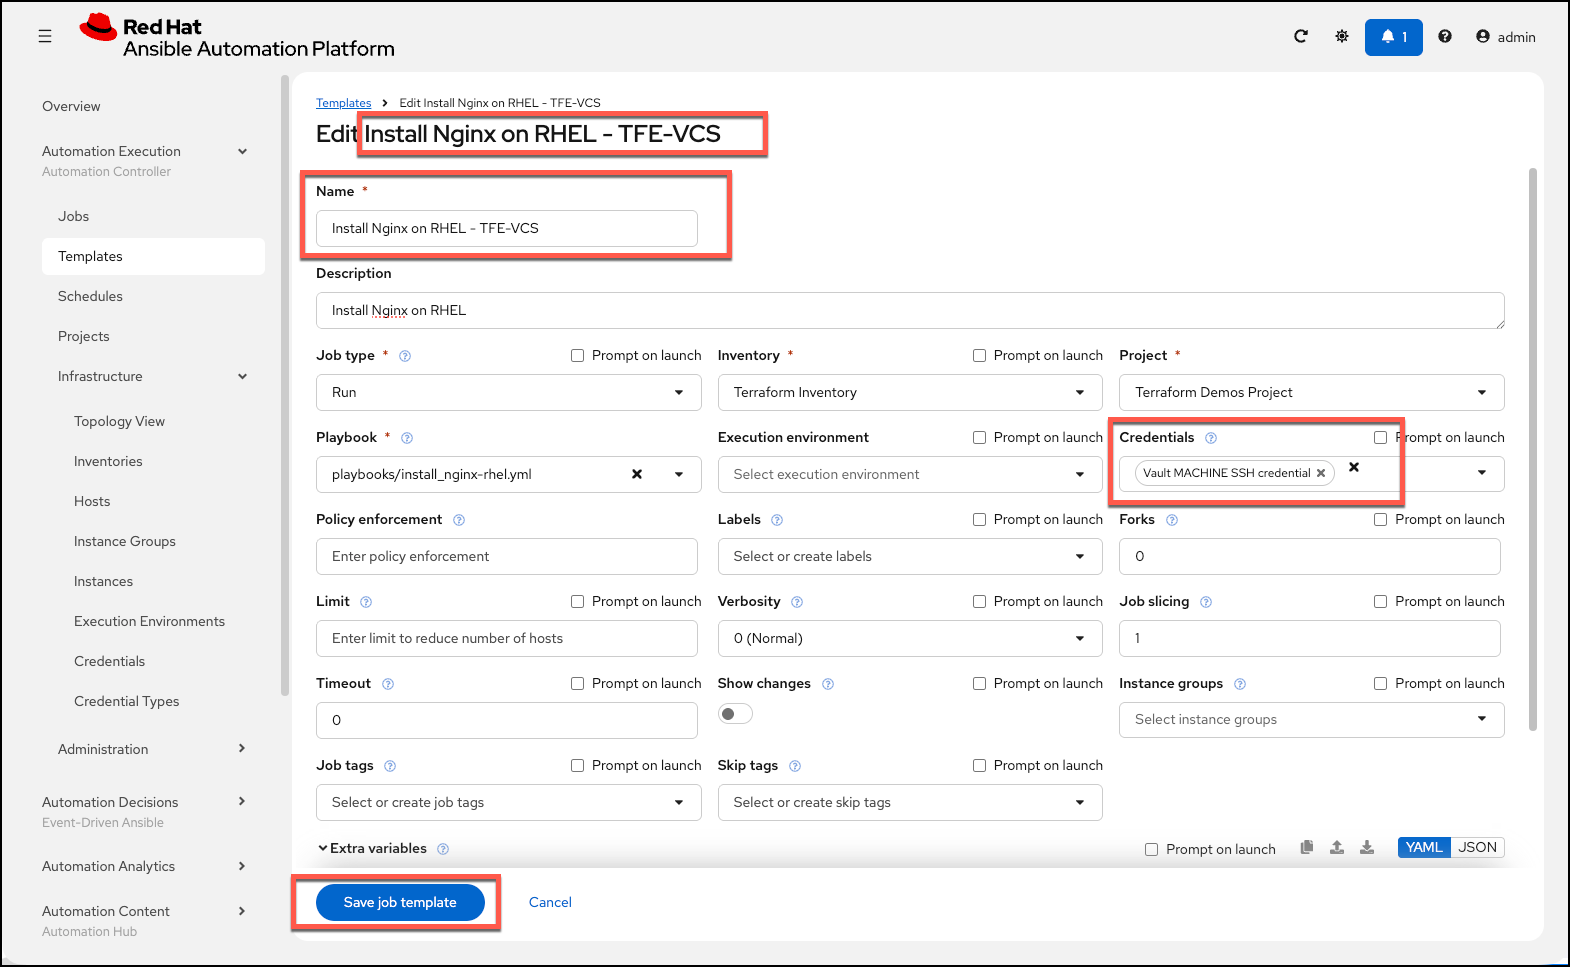
Edit this duplicated Job Template and make 2 small changes
-
Change the
Namefield toInstall Nginx on RHEL - TFE-VCS -
Change the
Credentialsfield:-
REMOVE the existing SSH Credential
-
ADD the
Vault MACHINE SSH credentialwe created earlier
-
-
| Field | Value |
|---|---|
Name |
Install Nginx on RHEL - TFE-VCS |
Credential |
Vault MACHINE SSH credential |
-
Click on the
Save job templatebutton to save the job template
Create a new Worflow Job Template
-
Click on the
+ Create workflow job templatebutton -
Fill out the following fields:
| Field | Value |
|---|---|
Name |
WF-Launched by TFE (Please use that name exactly) |
Organization |
Default |
Inventory |
Ckeck the Prompt on launch checkbox |
-
Click on the
Create workflow job templatebutton to save the workflow job template
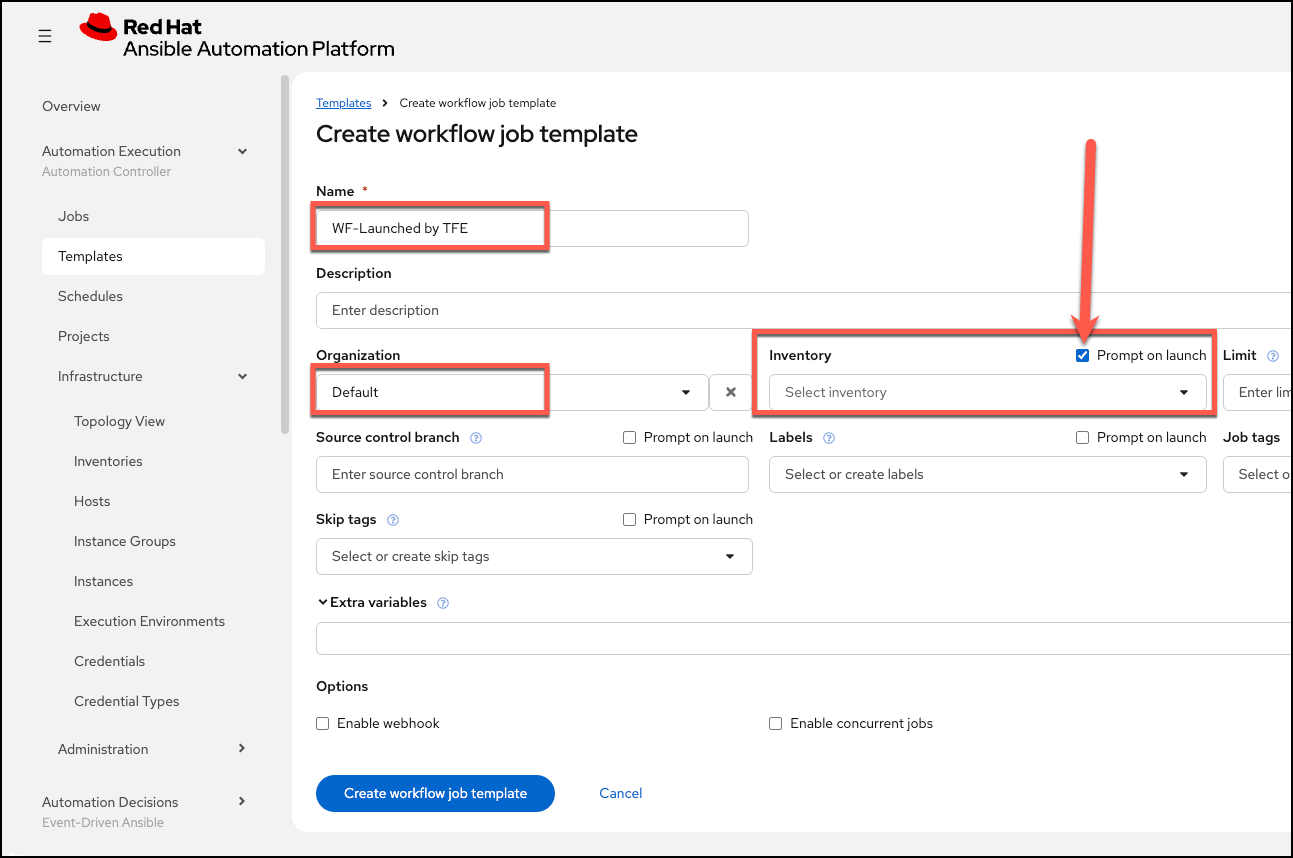
Prompt on launch is needed because Terraform Enterprise cannot supply or override Ansible job template variables unless Ansible Automation Platform explicitly allows it. Without Prompt on launch, Ansible Automation Platform treats the job template as fully static, and external systems (like Terraform Enterprise) are blocked from injecting runtime values.
|
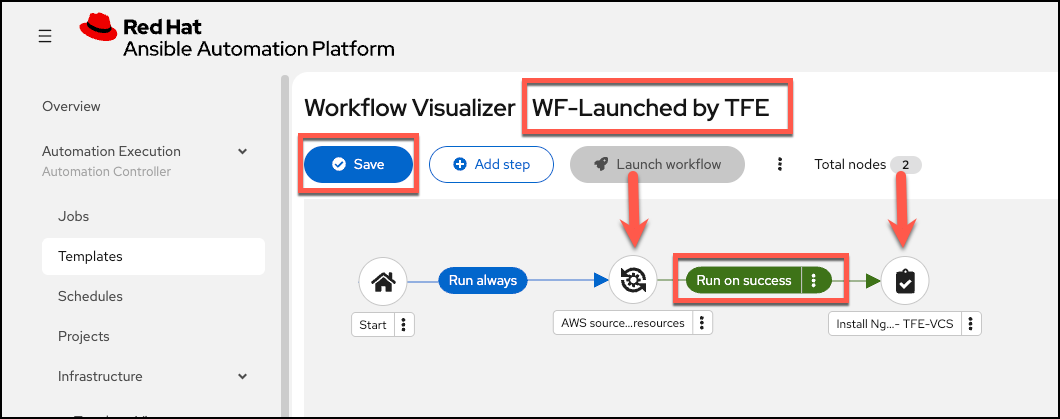
Create the nodes for the "WF-Launched by TFE" workflow template
-
Select
+ Add stepand then -
For this next step Change the
Node TypetoInventory Source Syncand select theAWS source for TFE resources. -
Select
NextthenFinishto save this node. This will synchronize the inventory source you created earlier. -
Click on the vertical ellipsis
…at the end of the node you just created, and then select+ Add step and link. -
For this next step
-
Keep the
Node TypetoJob Templateand select theInstall Nginx on RHEL - TFE-VCSjob template. -
Change the
StatustoRun on Success.
-
-
Select
NextthenFinishto save this step. This will install Nginx on the RHEL hosts. -
Click on the
Savebutton to save the workflow template.
In the next lab section we perform the GitHub requirements so that we can trigger the infrastructure provisioning and automation from Terraform Enterprise.