Trigger Infrastructure Provisioning and automation from Terraform Enterprise - Part 2
In this part we will continue the prerequisites and put the final touches on the Terraform Enterprise Workspace.
The following diagram shows the overall scenario that we started in the previous lab section.
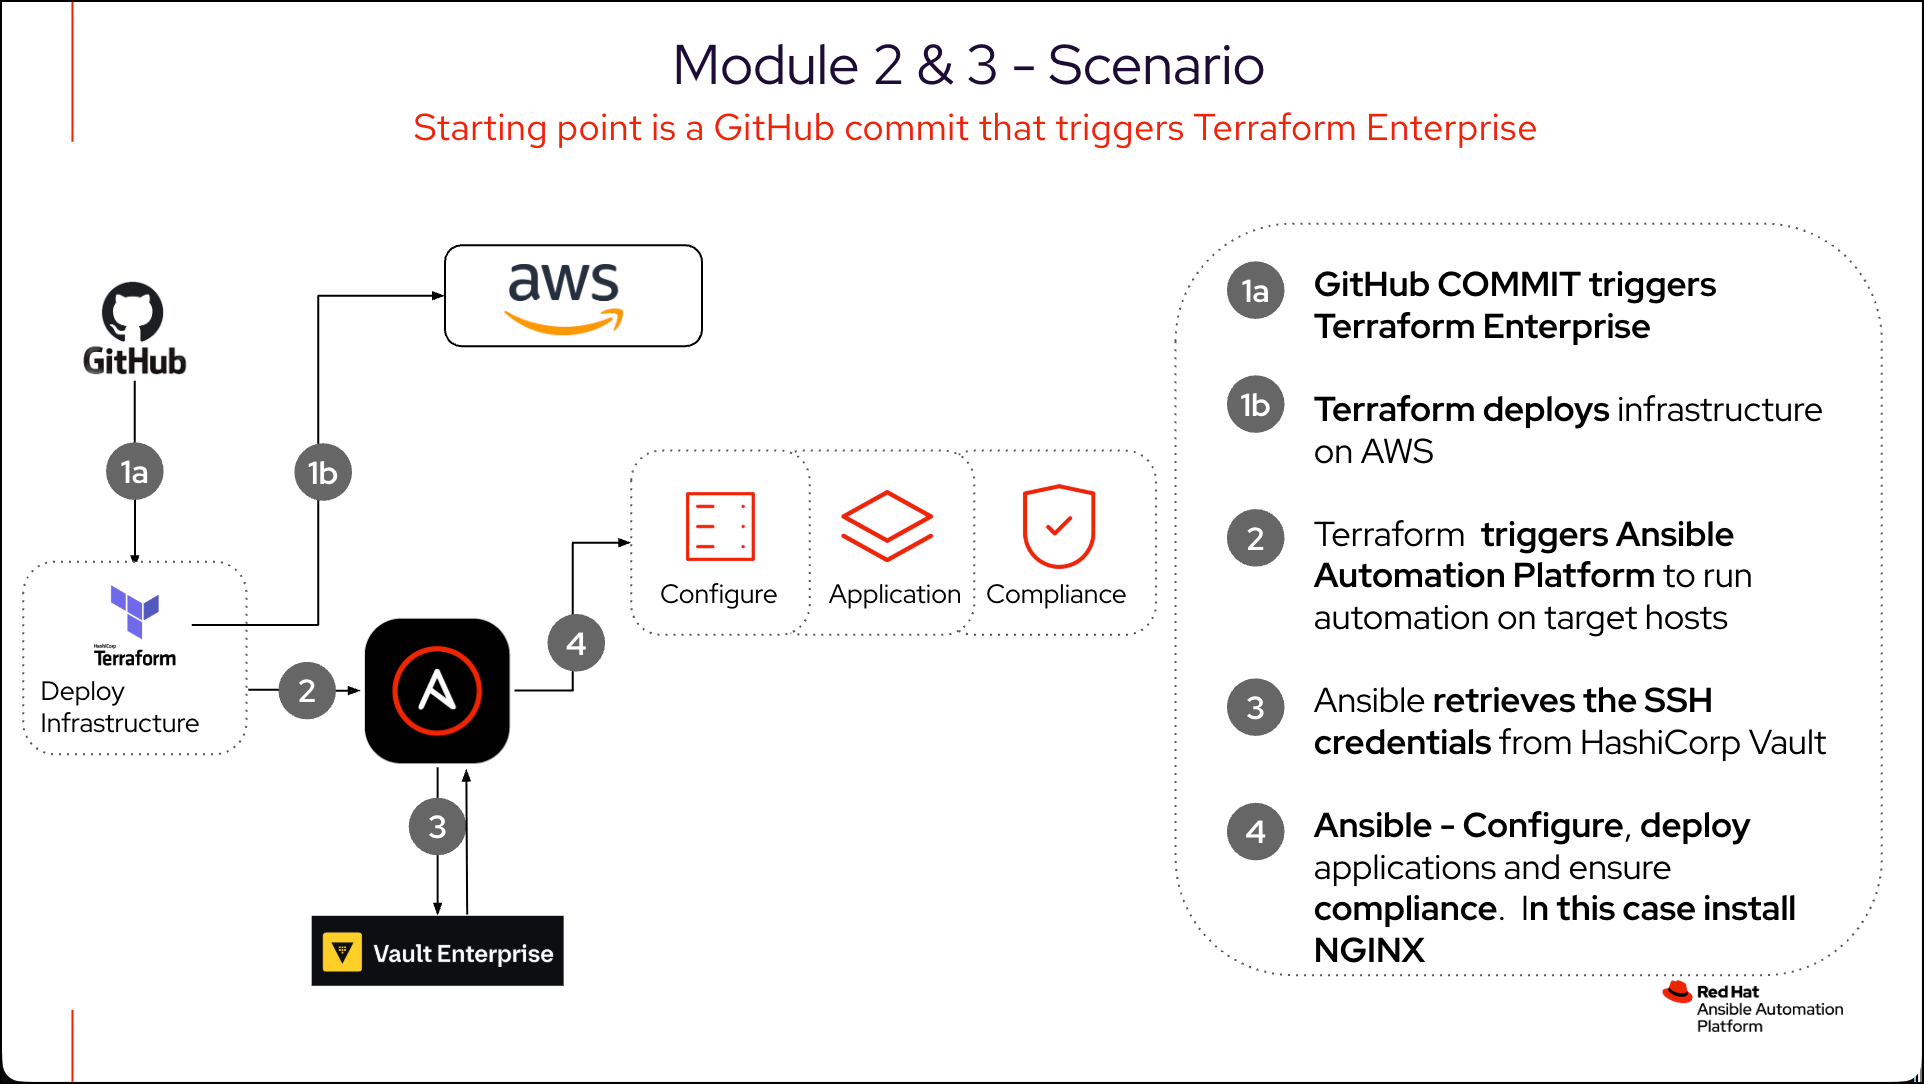
Let’s work through to completion of this scenario.
| You MUST have a github account to complete this lab. Having said that if you want to use a GitLAB account, you can do so by creating a new GitLAB account and using that instead of a GitHub account. The instructions will be nearly identical. The only difference are the values from TFE did not auto fill in gitlab when creating the OAuth application, so you have to copy and paste those values manually. |
|
The GitHub OAuth connection to Terraform Enterprise has been pre-configured for you in this lab. If you do not have a GitHub account, you can skip Tasks 1 and 2 and proceed directly to Task 3. |
-
Terraform Enterprise
-
Import a GitHub repository to your account
-
Create a Terraform Enterprise Workspace that uses Version Control System (VCS, in this case GitHub) to store the Terraform code
-
Trigger Terraform infrastructure provisioning and automation by committing changes to the Terraform code in the GitHub repository.
-
In this challenge you will learn how to bring in HashiCorp Vault Enterprise to your automation pipeline.
Import the GitHub repository to your account
To create your own UNLINKED GitHub repository, Use the GitHub.com UI to IMPORT REPOSITORY from an existing repository.
|
The following repository contains the Terraform code for the infrastructure you will be provisioning.
-
https://github.com/ansible-tmm/aap-hashi-lab-2.git # This is the repository you will be importing to your account
-
While logged in to Github.com with your acccount, the top right corner click on the
+icon, and selectImport repository
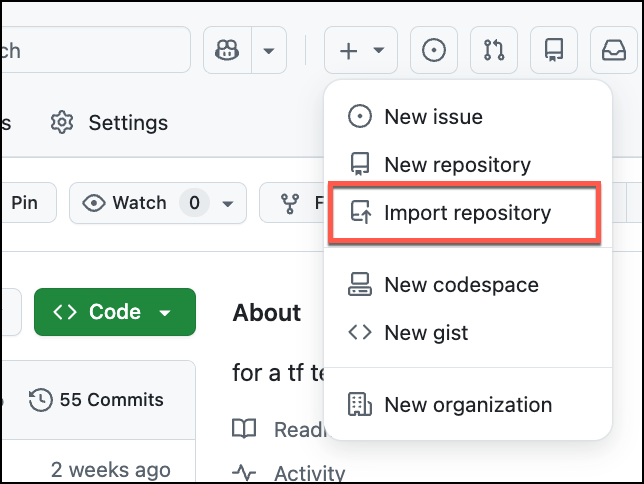
-
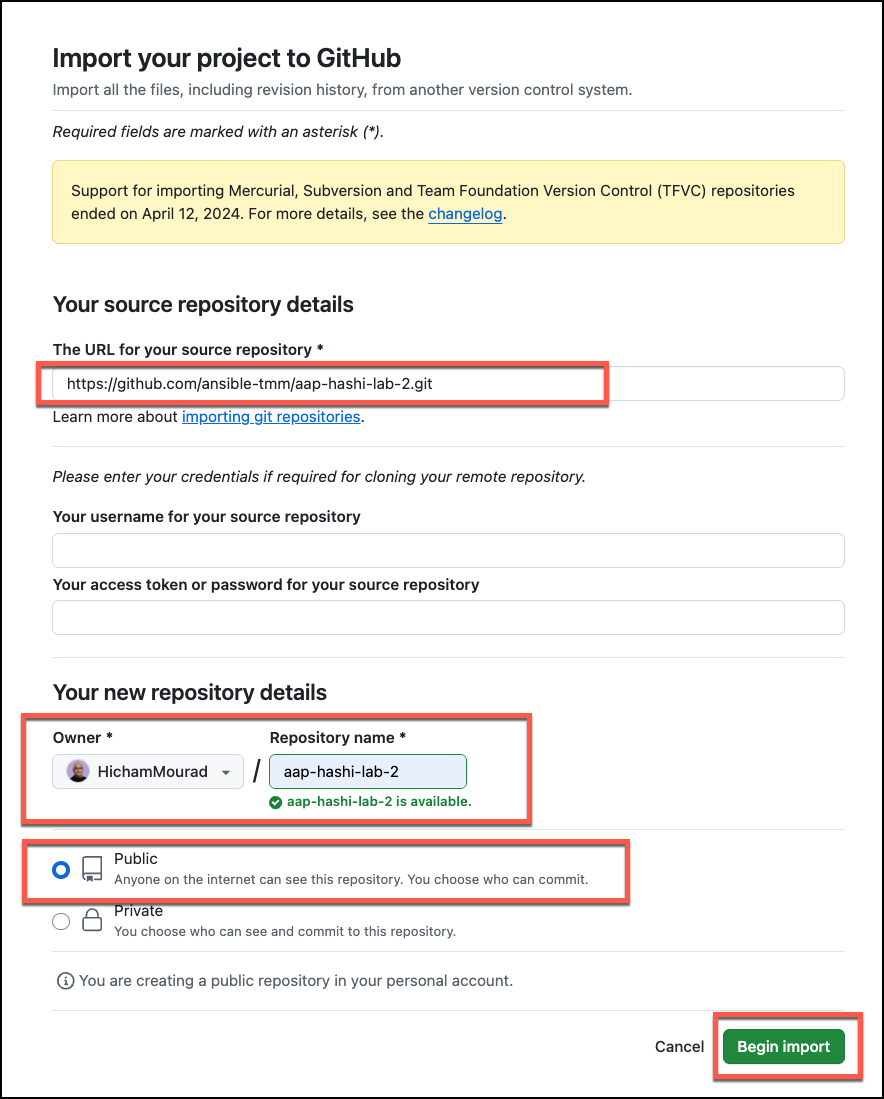
In the
Repository URLfield, enter the URL of the repository you want to import, in this case: https://github.com/ansible-tmm/aap-hashi-lab-2.git -
Scroll down and enter an
OwnerandRepository namefor your new repository, in this case:YOUR GITHUB USERNAMEandaap-hashi-lab-2(or another name if you prefer) -
Keep it at
Publicrepository type. -
Click on the
Begin importbutton to import the repository to your account. -
The repository will be ready in a minute or two.
Later in this lab, you will be committing changes to the Terraform code in the GitHub repository, which in turn will trigger the Terraform infrastructure provisioning and automation, and will retrieve secrets from Vault Enterprise.
Set up the Terraform Enterprise Workspace
We now want to create a new Terraform Enterprise Workspace that uses Version Control System (VCS) to store the Terraform code. By doing this, you will be able to trigger the Terraform infrastructure provisioning and Ansible automation by committing changes to the Terraform code in the GitHub repository that you imported earlier.
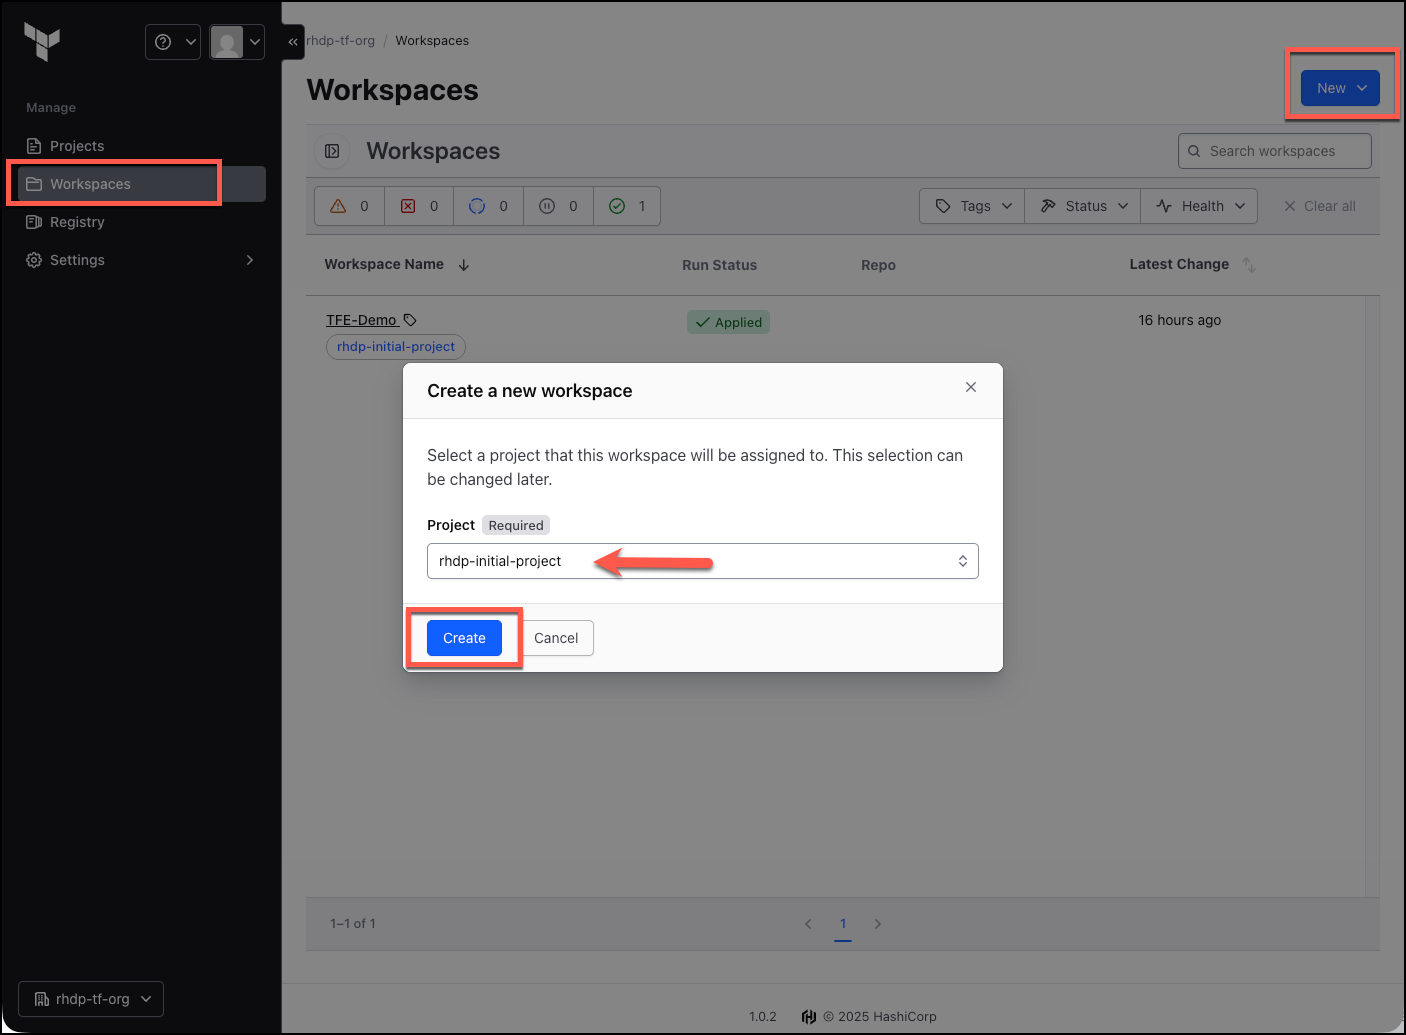
Back in the Terraform Enterprise UI, click on the Workspaces menu option in the left menu.
-
Click on the
Newbutton on the right, and selectWorkspacefrom the dropdown. -
Enter the following details:
-
For the
Projectfield, selectrhdp-initial-projectfrom the dropdown, and selectCreate
-
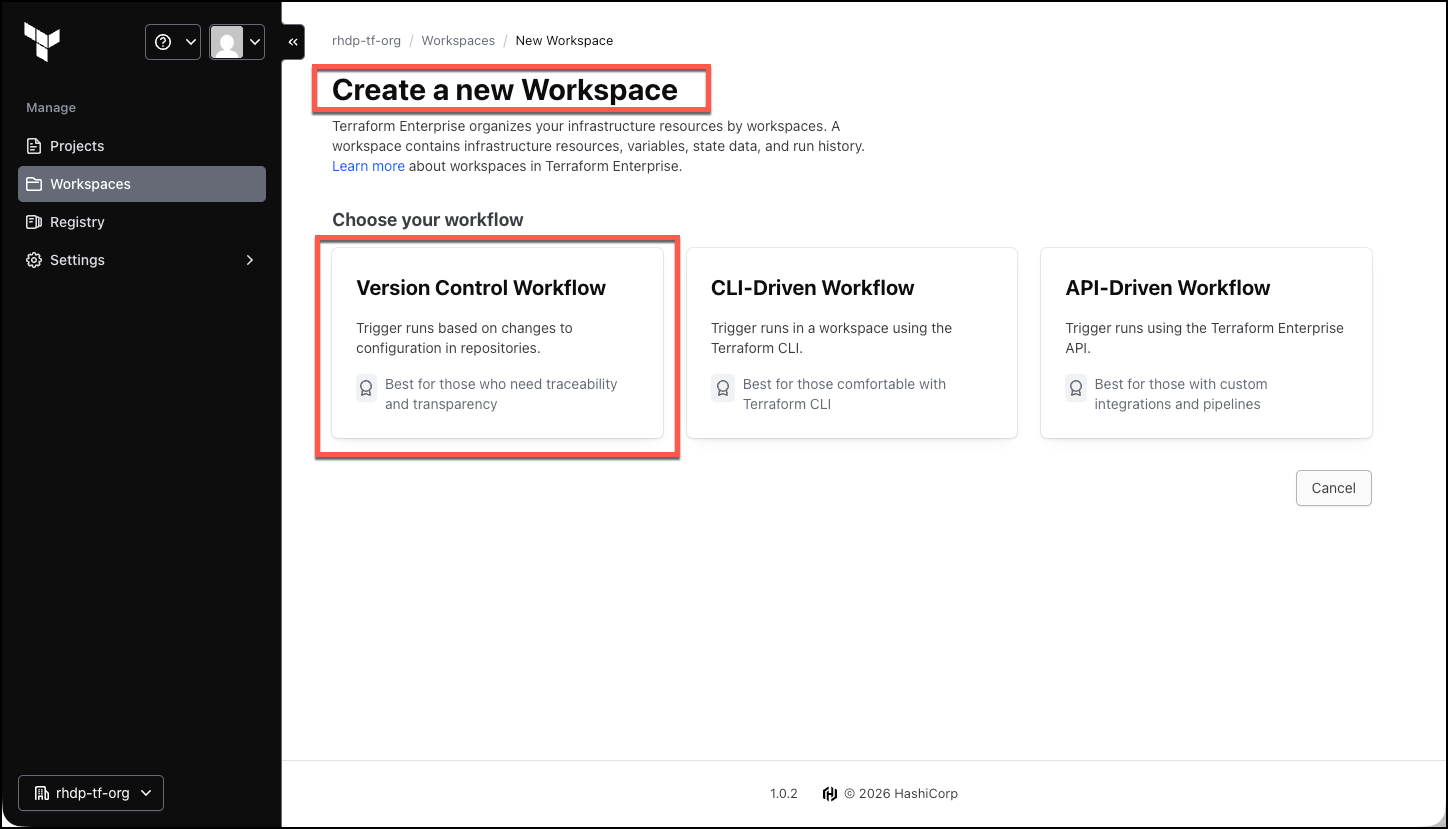
On the next screen choose
Version Control Workflowfor the Workspace type
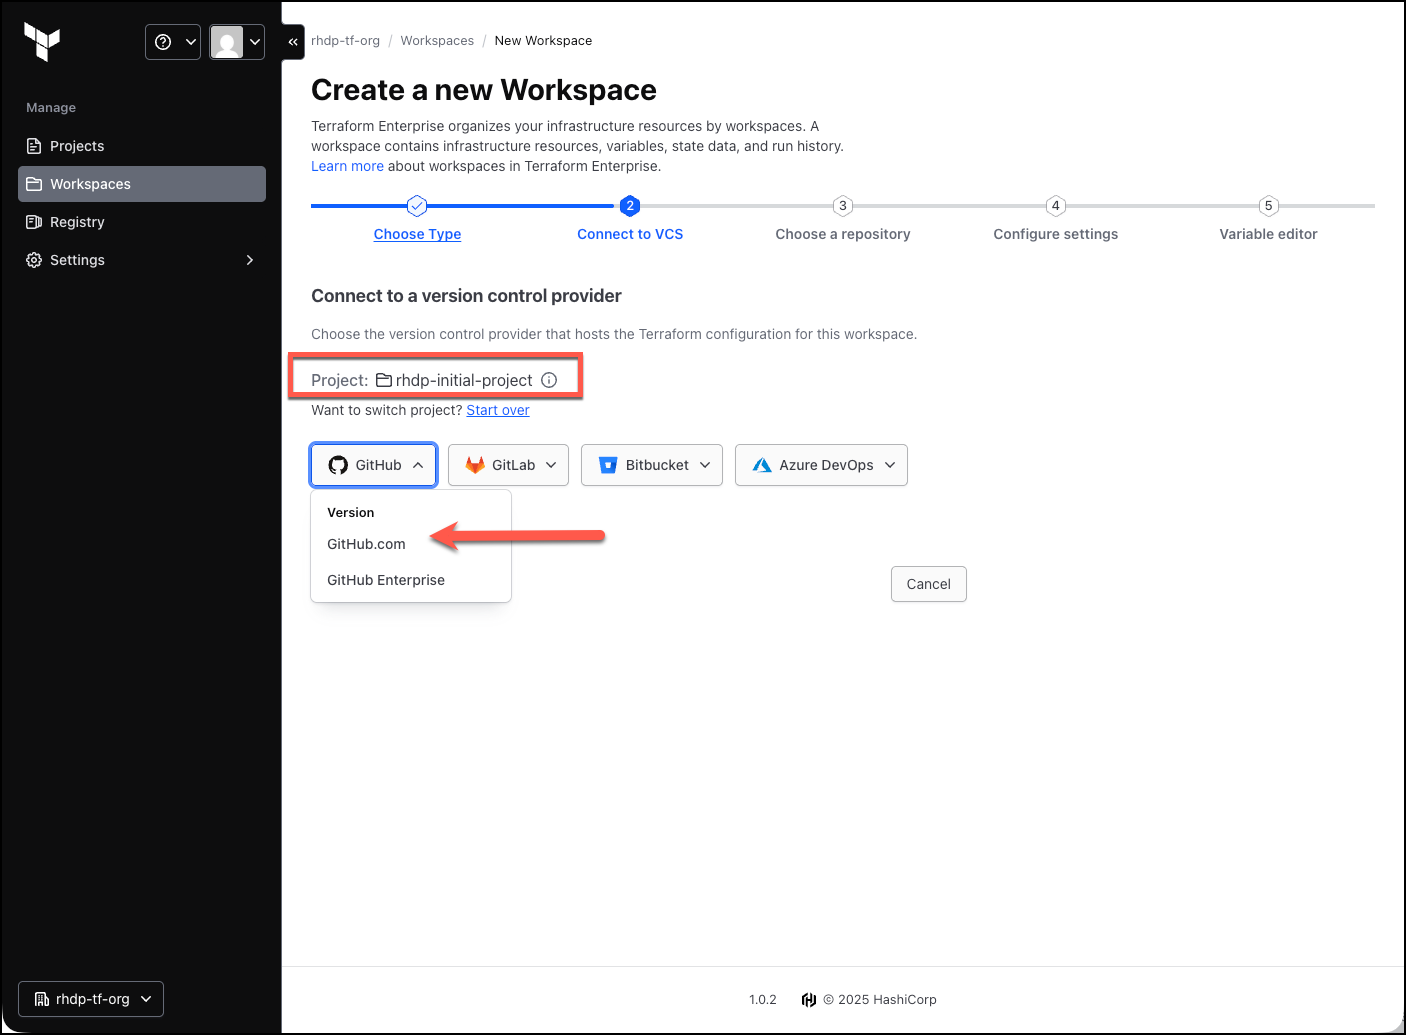
Now you will need to configure the Workspace to use the GitHub repository you cloned earlier into your GitHub account.
-
Select the
GitHuboption from the dropdown, and then click on theGitHub.combutton. -
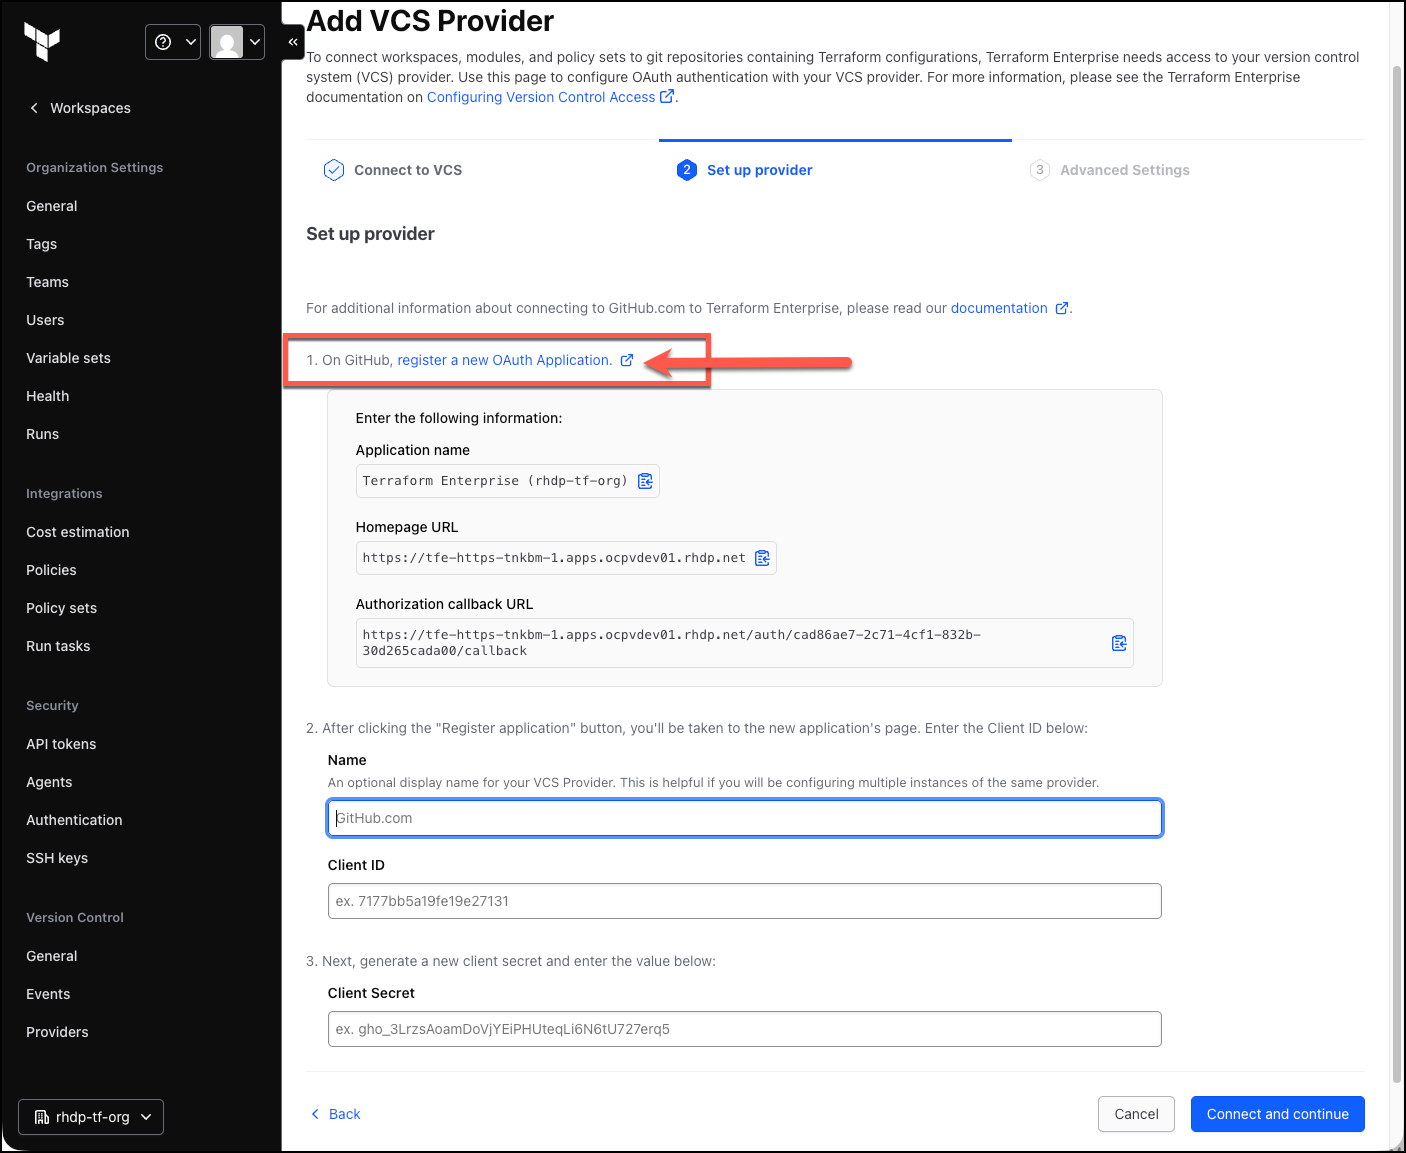
You will now be launced to step 2 (
Set up provider), which is to setup the GitHub repository connection -
Click the
Register a new OAuth Applicationlink to register a new OAuth application with GitHub.
-
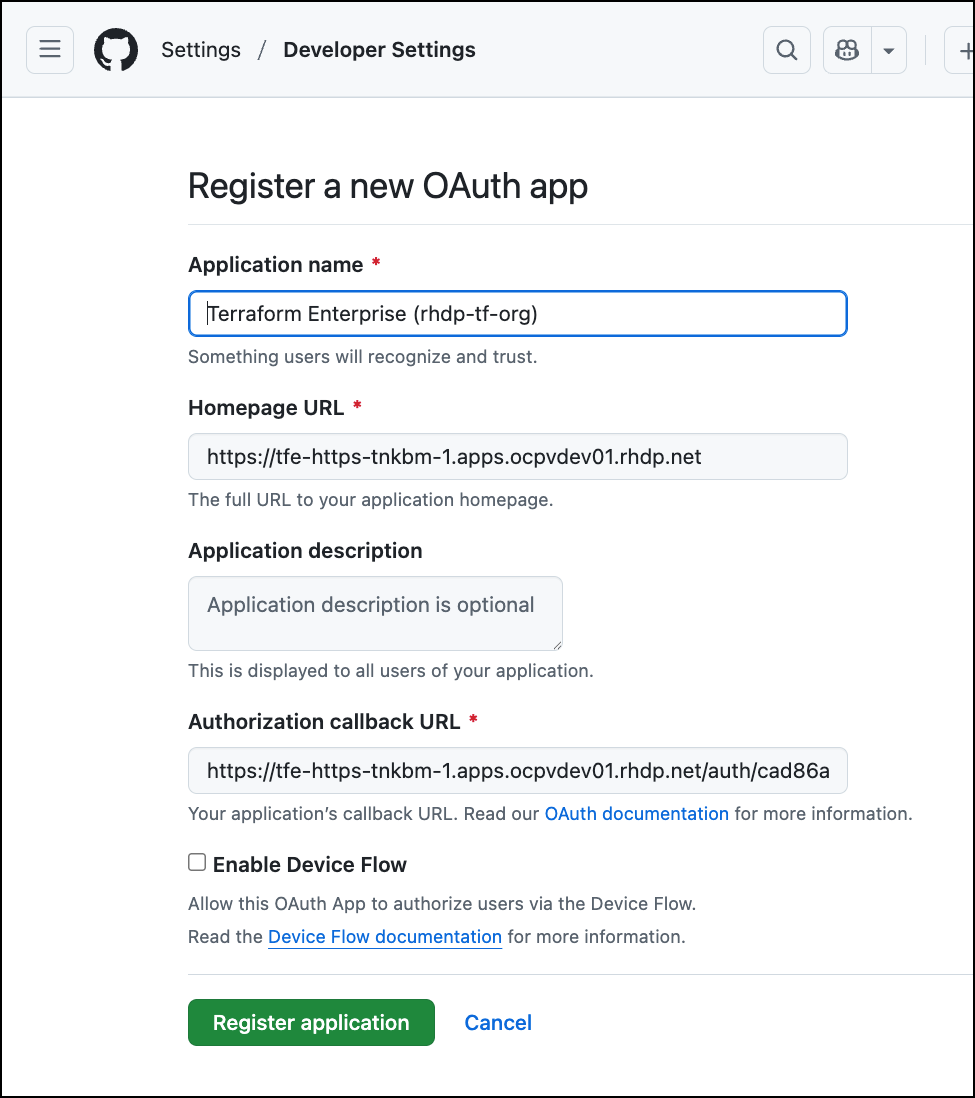
Authenticate to
your GitHub account, and authorize the Terraform Enterprise OAuth application to access your GitHub account. -
It will have automatically populated some of the fields for you as they relate to Terraform Enterprise
-
Scroll down and click on the
Register applicationbutton
-
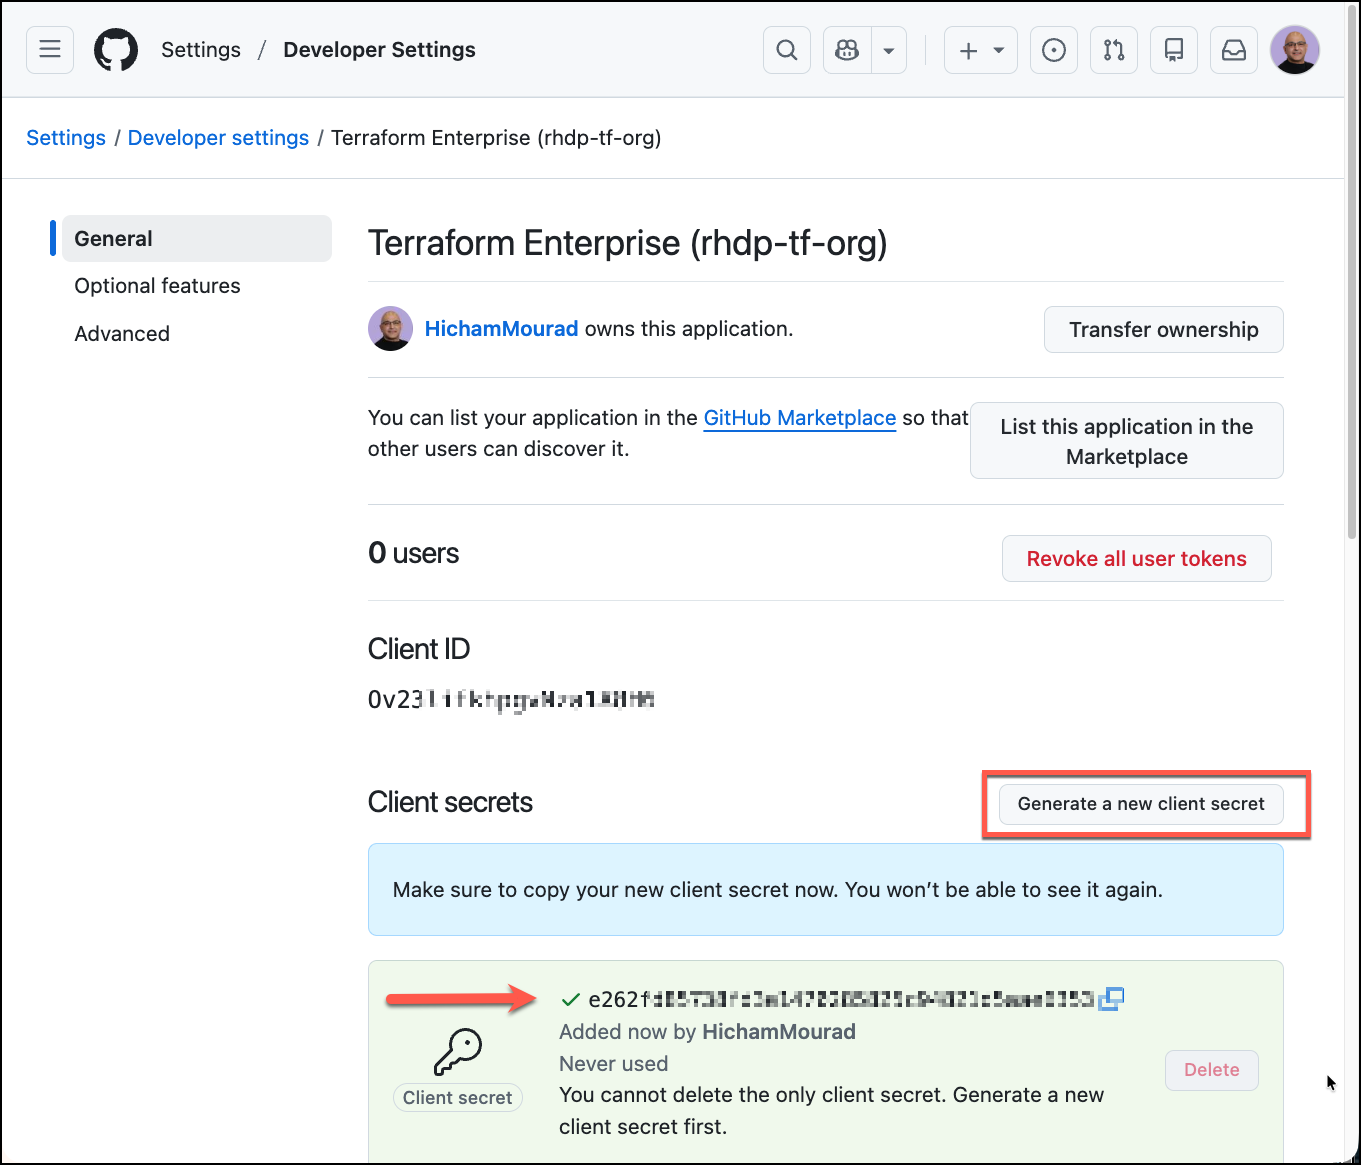
The application will now be registered, and you will need to click the
Generate a new client secretbutton to generate a new client secret. -
You will be prompted to login to your GitHub account, please do so.
-
Copy both the
Client IDandClient Secret, you will need these momentarily. -
Scroll down and click on
Update applicationbutton to save the application configuration
BACK in the Terraform Enterprise UI, please do the following:
-
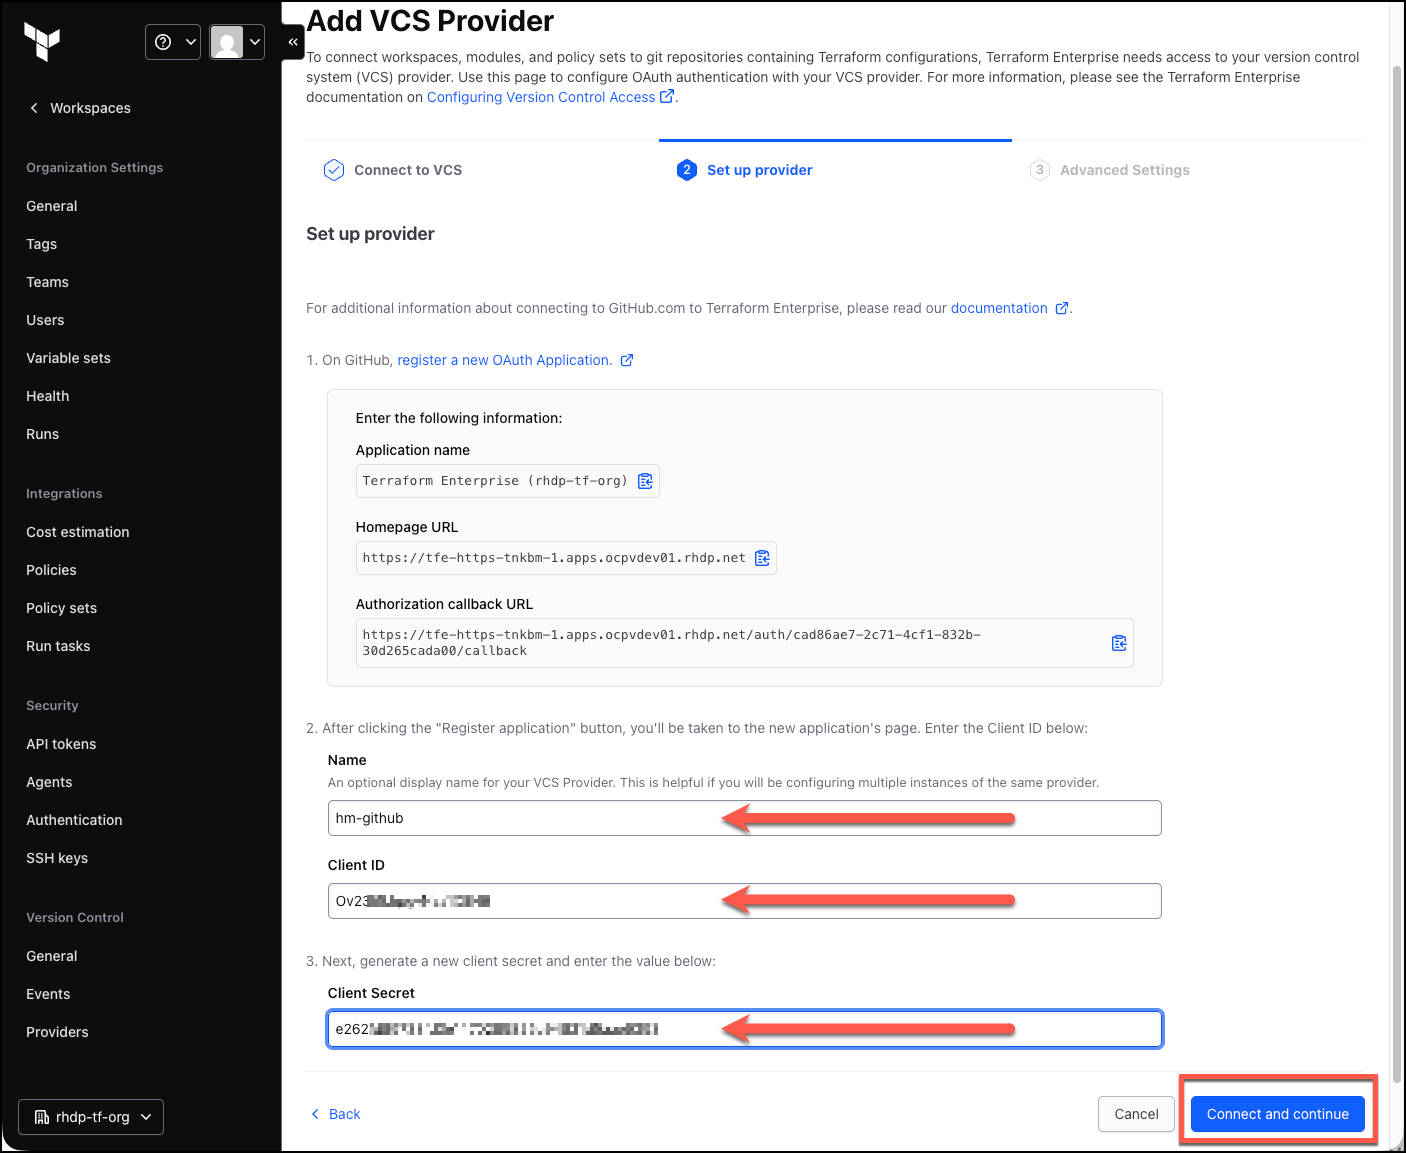
For the
Namefield, enter your initials, followed by dash and github, example:jdoe-github -
Paste the
Client IDto the Client ID field. -
Paset the
Client Secretto the Client Secret field. -
Click on the
Connect and Continuebutton to save the VCS provider configuration
-
You will be redirected to GitHub.com to authorize the Terraform Enterprise application to access your GitHub account, please
authenticate and authorize. -
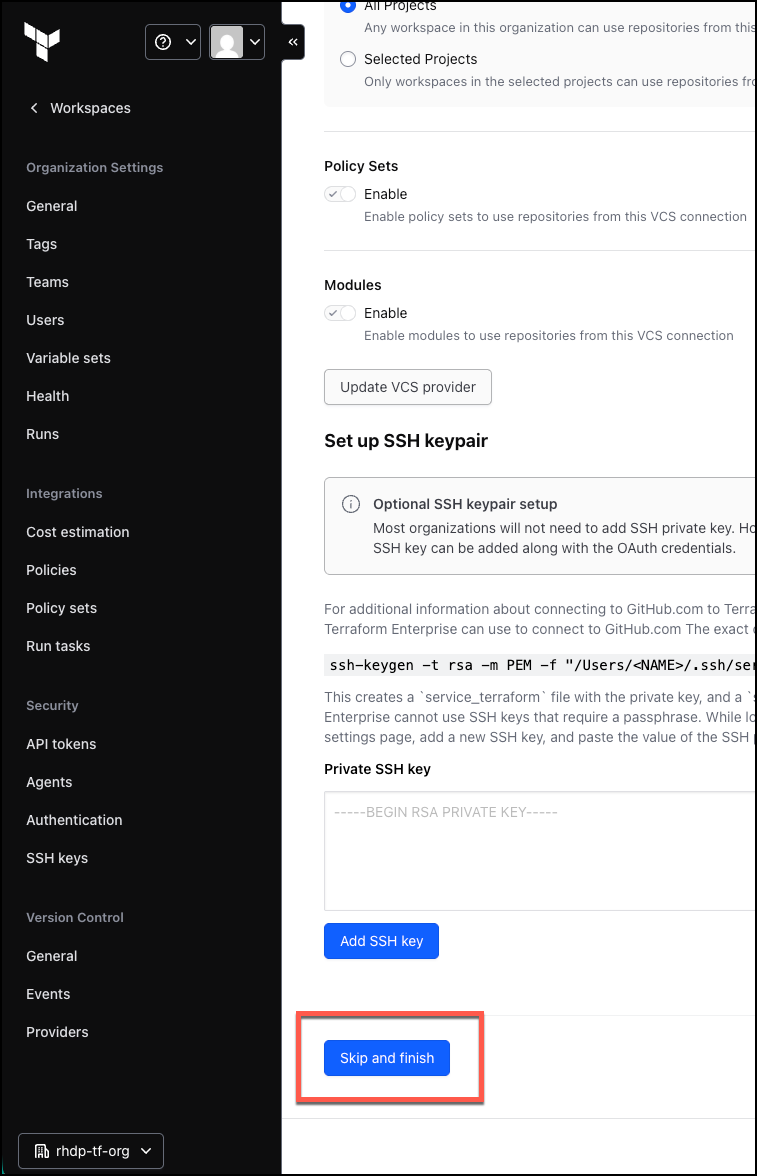
Scroll to the bottom of the screen and click on the
Skip and Finishbutton
-
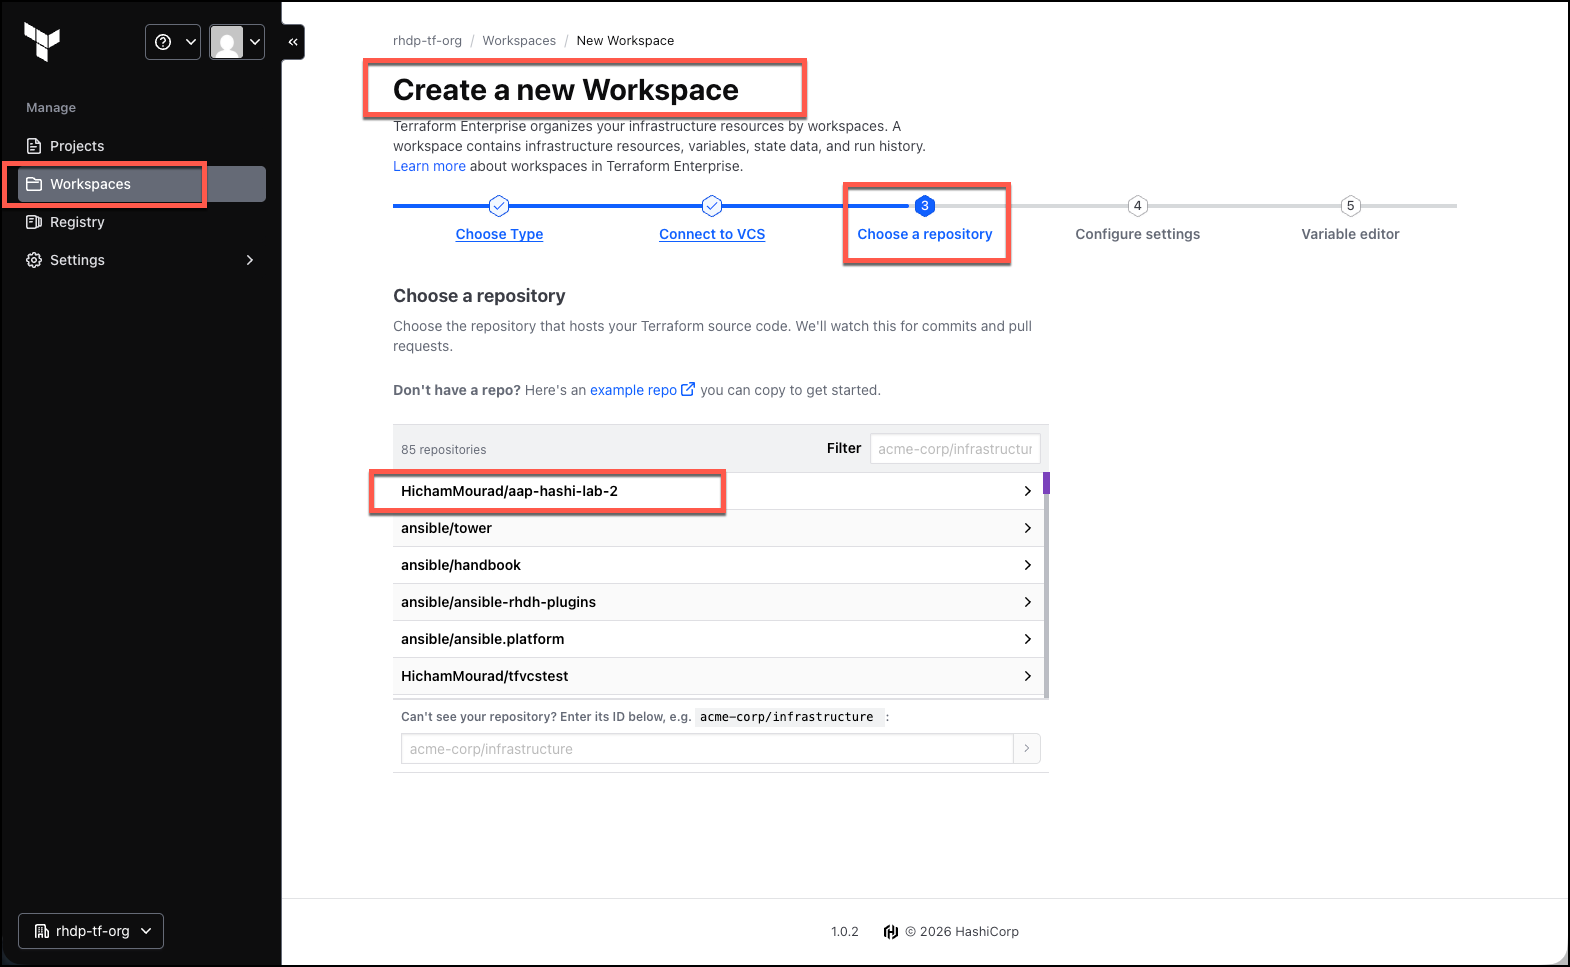
On the next screen, you will need to choose the repository you want to use for this workspace. For this lab, we will *use the repository you imported earlier into your GitHub account We had named it
aap-hashi-lab-2earlier (Unless you chose to name it something else).
-
The Workspace Name will default to the repository name. Change the
Workspace NametoTFE-Demo-VCS -
For the
Descriptionfield, enterUsing GitHub commits to trigger Plan/Apply Runs -
Expand the
Advanced Optionssection, and check both of theAuto-applyoption checkboxes. This will automatically apply the changes to the workspace when you commit changes to the repository. -
For the
Terraform Working Directoryfield, enterTF_templates/AWS/
| Field | Value |
|---|---|
Workspace Name |
TFE-Demo-VCS |
Description |
Using GitHub commits to trigger Plan/Apply Runs |
Terraform Working Directory |
TF_templates/AWS/ |
Auto-apply |
Check both of the |
-
Scroll down
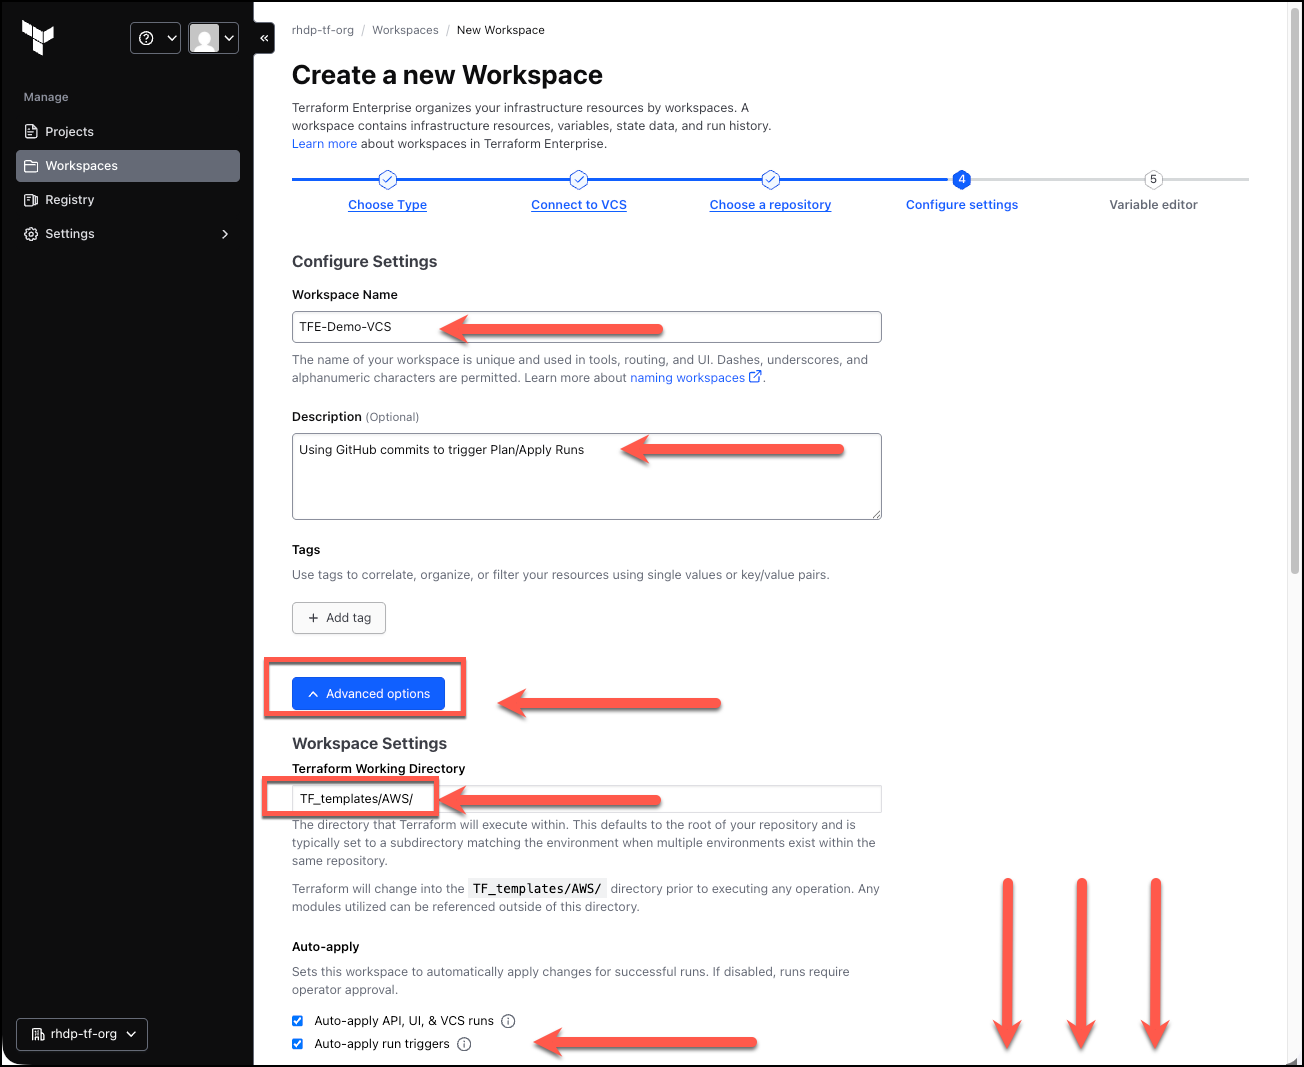
-
Scroll down the bottom of the screen and click on the
Createbutton to save the workspace configuration
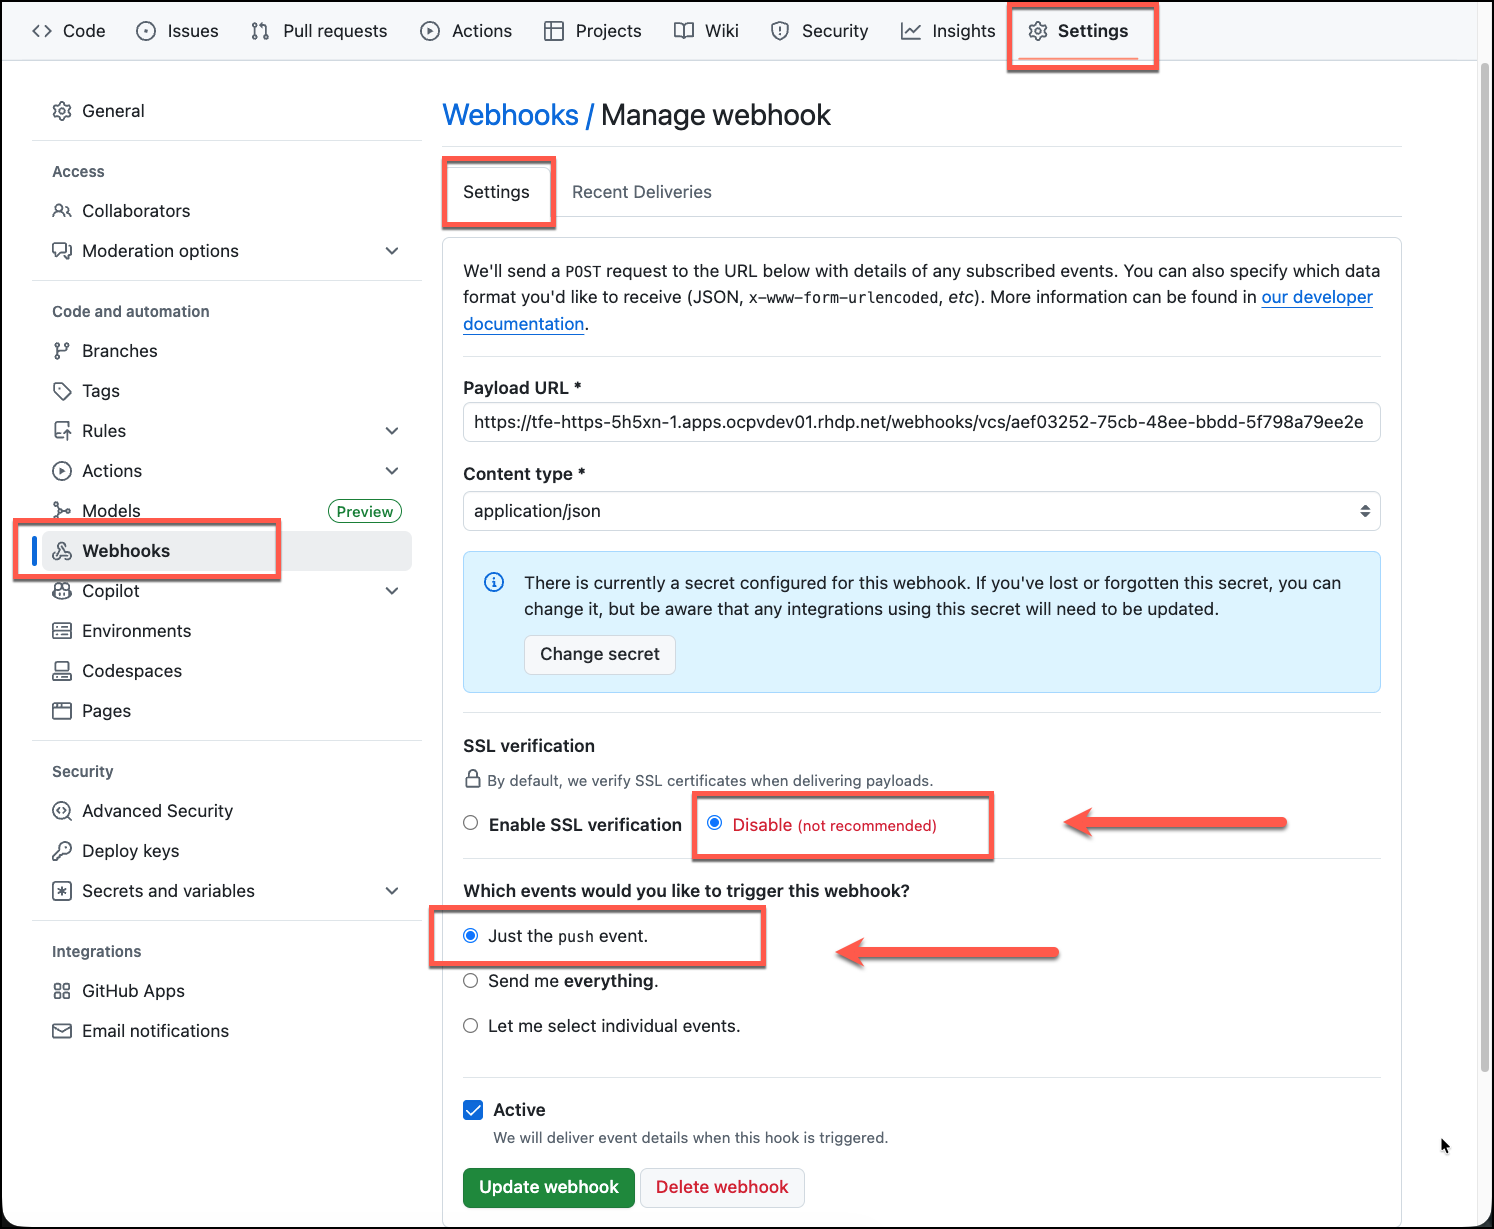
While you still have the GitHub UI open, navigate to the repository you cloned earlier into your GitHub account please perform the following:
-
Navigate to the repository
SETTINGS→WEBHOOKS -
You will see the Terraform Enterprise webhook configuration, click on the
Editbutton -
Scroll down to the
SSL verificationsection, and check theDisablecheckbox. When prompted, click on theI understand -
For the
Which events would you like to trigger this webhook?section:-
select
Just the push event.
-
-
Scroll down and click on the
Update Webhookbutton to save the webhook configuration -
Authenticate to your GitHub account if prompted
-
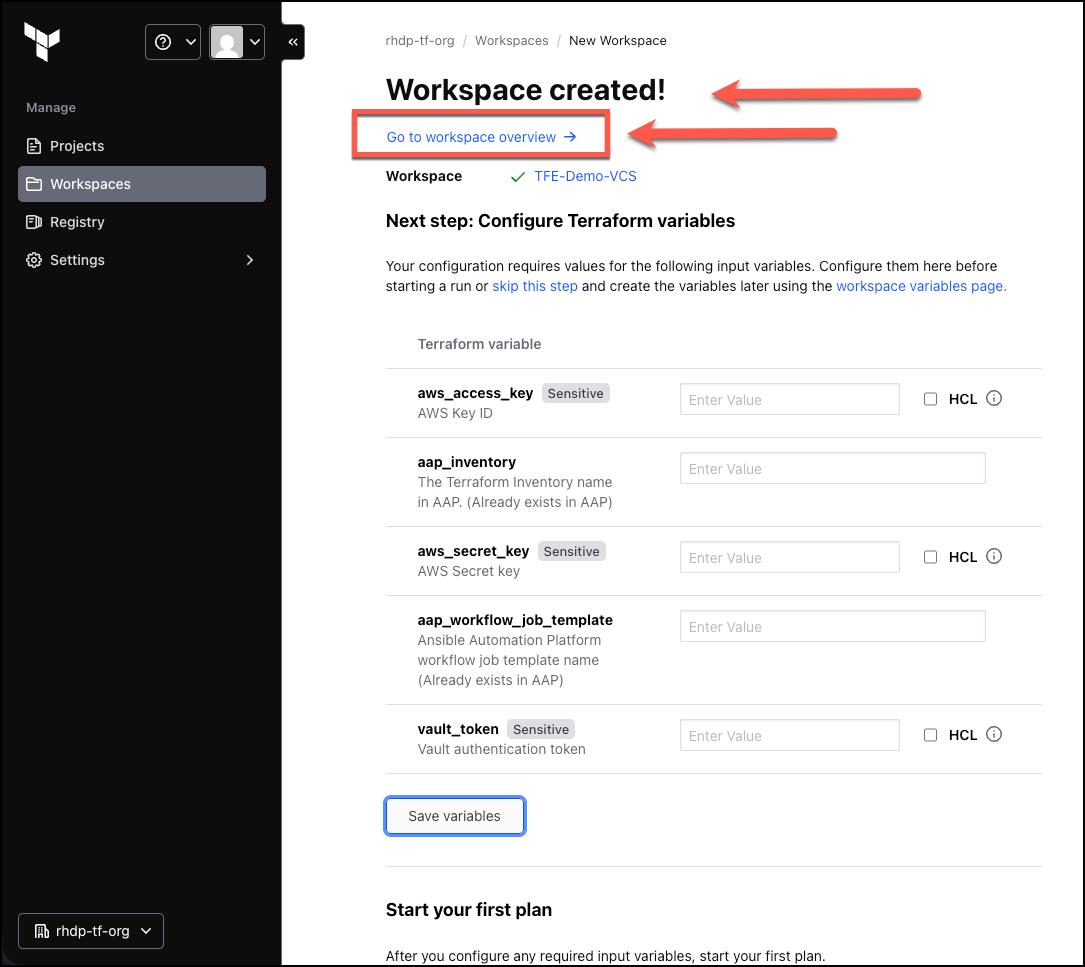
In Terraform Enterprise UI, You will now see that the Terraform Enterprise Workspace is now created successfully.
-
DO NOT accept the auto detected variables
-
Click on the
Go to Workspace Overviewlink to navigate to the workspace dashboard
-
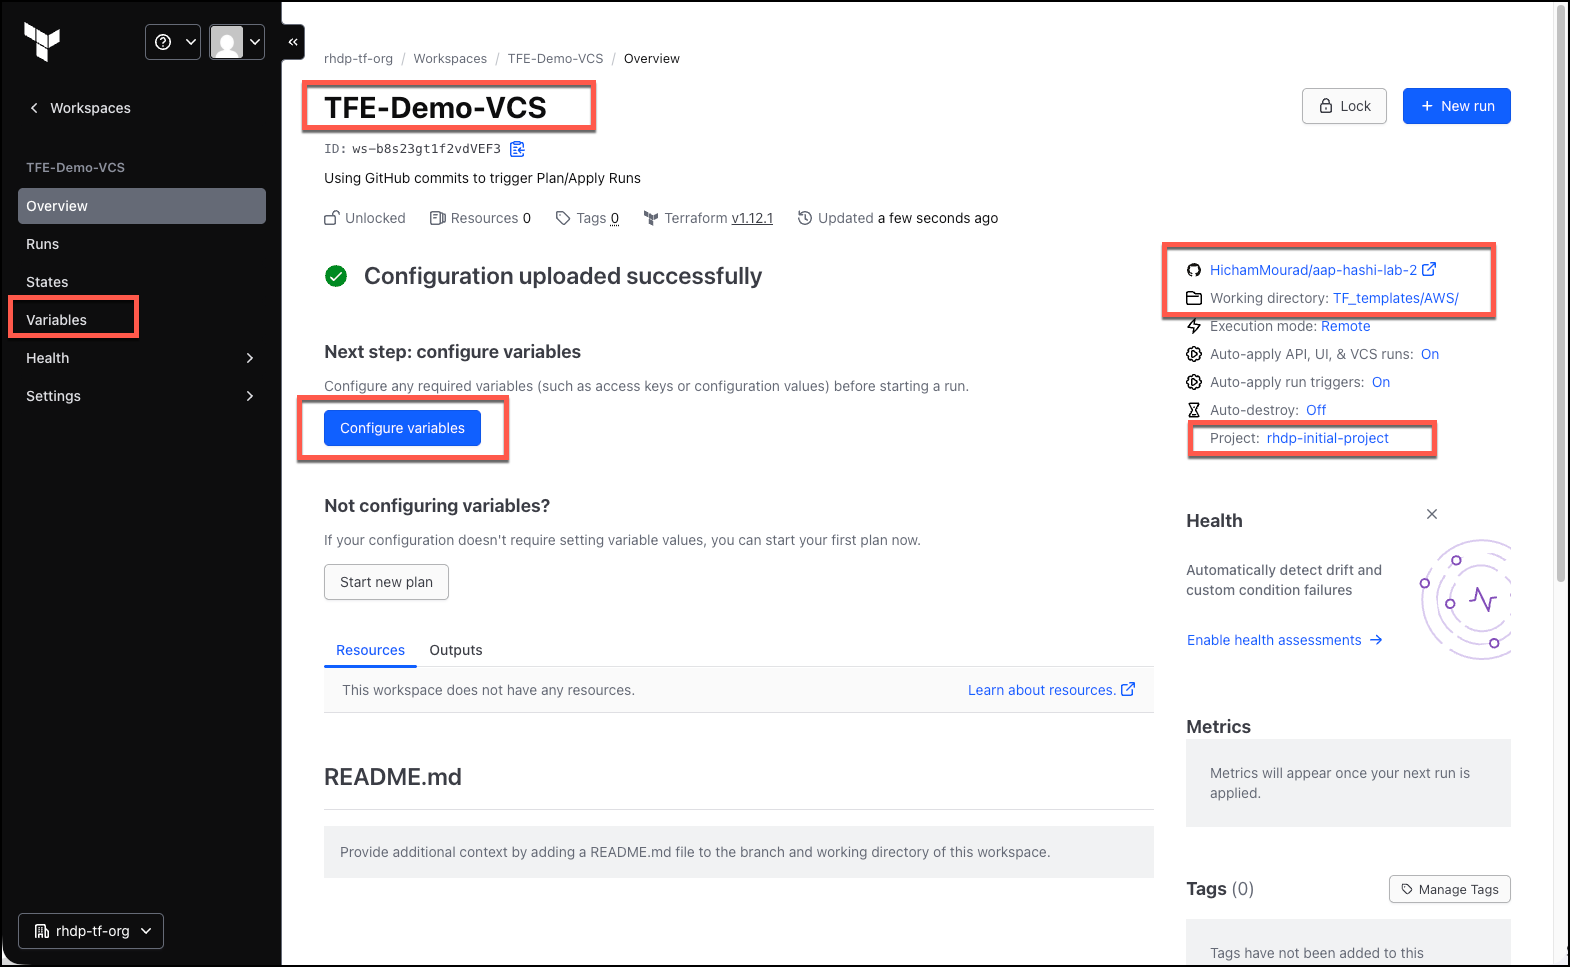
On this page, click on the
Configure Variablesbutton
-
On the next screen, add the following
Terraform variables:
|
Where to find your values:
|
| Key | Value | Sensitive |
|---|---|---|
aap_host |
https://control-my-guid.{domain} |
No |
aap_username |
admin |
No |
aap_password |
ansible123! |
Yes |
aws_access_key |
From the |
No |
aws_secret_key |
From the |
Yes |
aws_region |
us-east-2 |
No |
vault_addr |
https://vault-my-guid.{domain} |
No |
vault_role_id |
From the Terminal — see note above |
No |
vault_secret_id |
From the Terminal — see note above |
Yes |
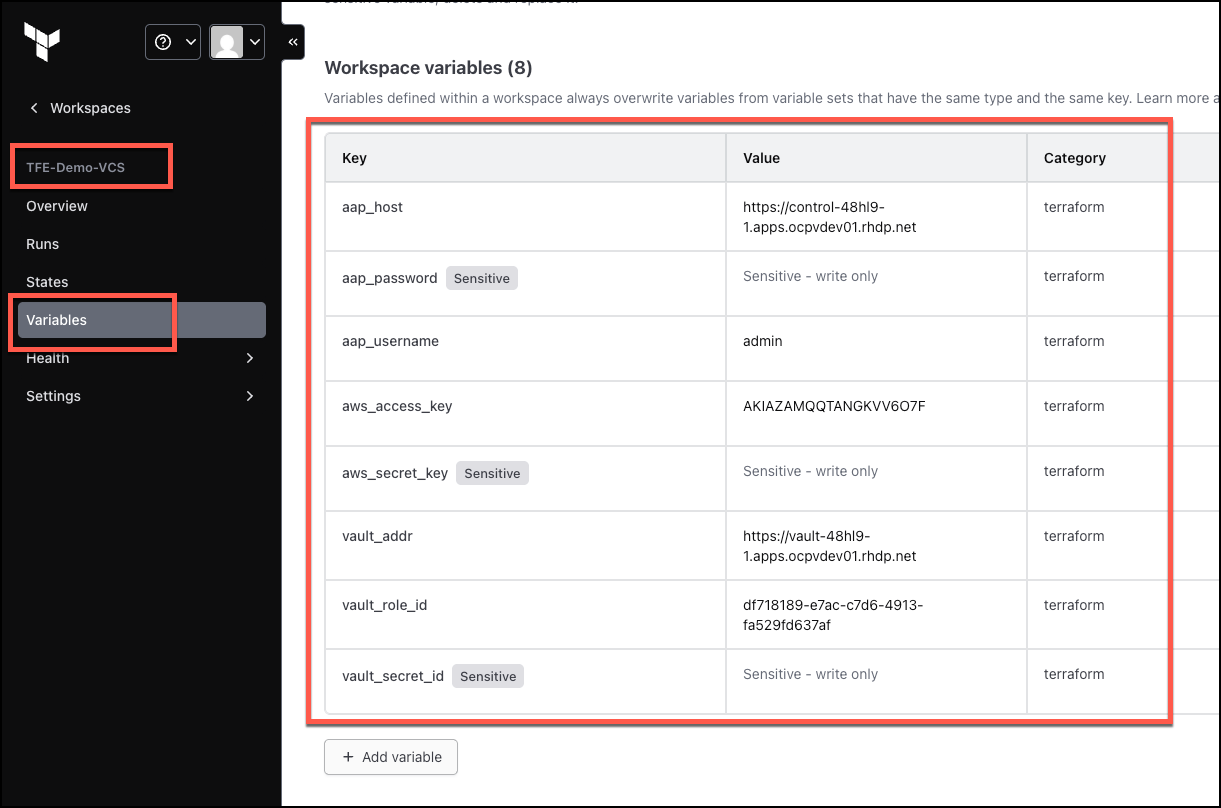
Trigger infrastructure provisioning and automation
Now we’re all set to trigger the infrastructure provisioning and automation from Terraform Enterprise by committing changes to the Terraform code in the GitHub repository.
Perform a quick test run in the Terraform Enterprise Workspace
Let’s perform a quick test to make sure we set up the Terraform Enterprise Workspace correctly. This will be a Plan only run, so we will not actually create any resources.
-
Click on the
Runsmenu option on the left. -
Click on the
+ New Runbutton in the top right of the Workspace overview screen. -
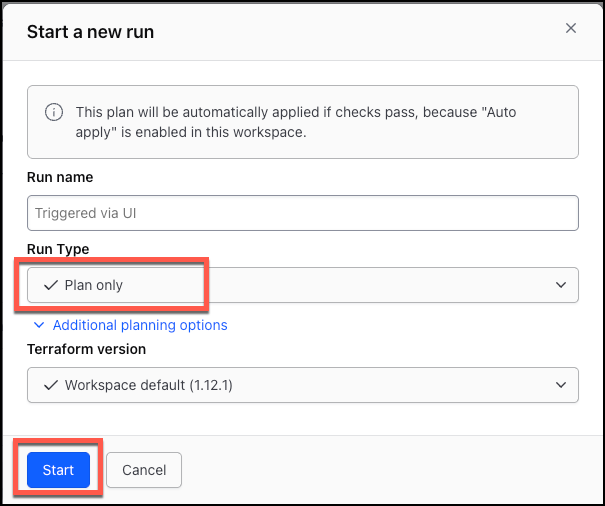
For the
Run TypeselectPlan only -
Click on the
Startbutton to perform a quick test run of the Terraform code in the Terraform Enterprise Workspace.
-
In a few moments You will see the
TEST PLAN RUNcompleted successfully. This is a test run to make sure the Terraform Enterprise Workspace is configured correctly.
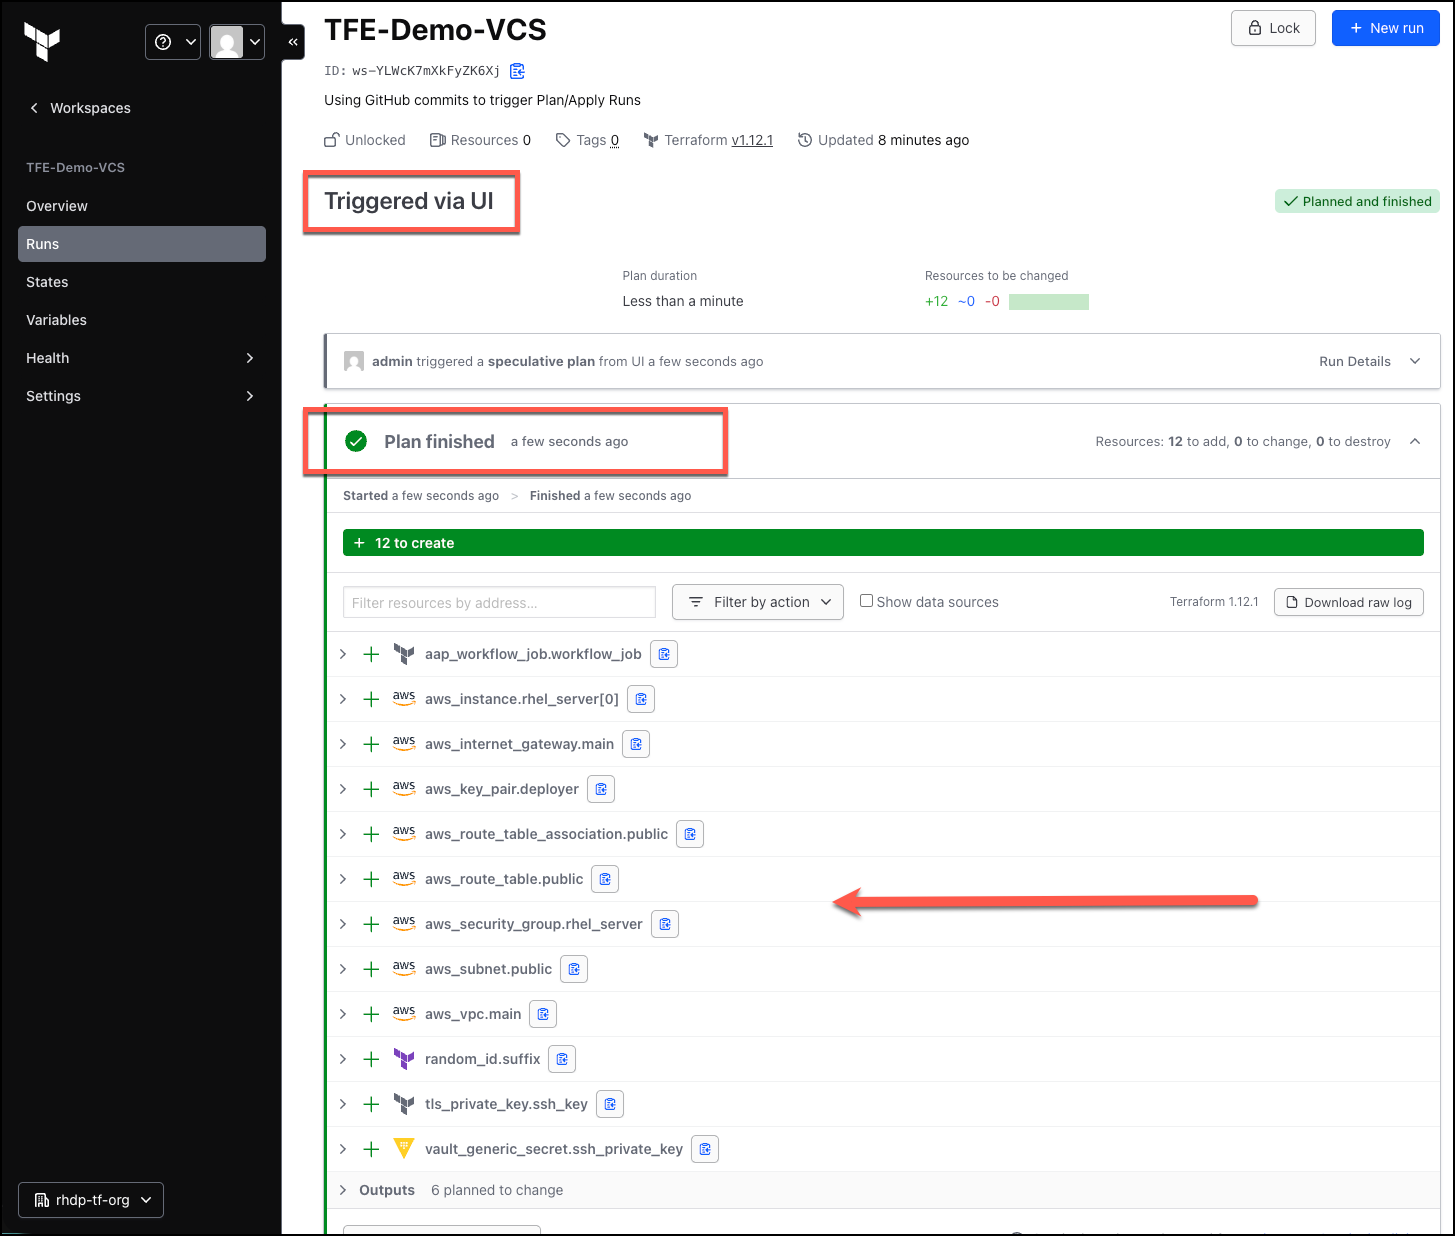
GREAT! We are all set to commit changes to the Terraform code in the GitHub repository to trigger the infrastructure provisioning and automation.
Commit changes to the Terraform code in the GitHub repository
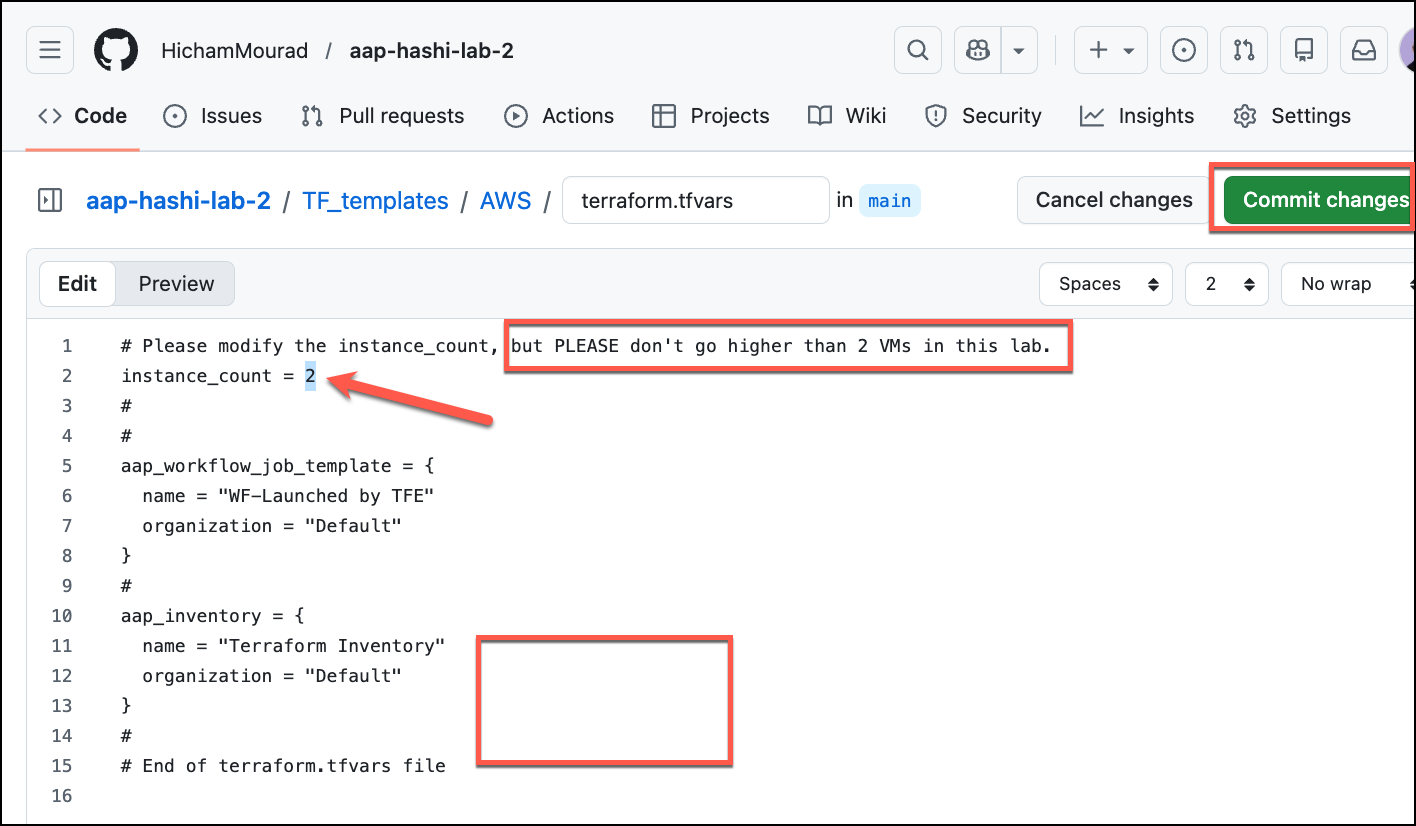
In a real-world scenario, you would commit changes to the Terraform code in the GitHub repository to a separate branch. Then you would create a pull request to merge the changes into the main branch. Then Terraform Enterprise will trigger the infrastructure provisioning and automation. For this lab, we will simply change the instance_count variable to 2, to create 2 RHEL ec2 instances.
|
-
Navigate to the repository you cloned earlier into your GitHub account
-
Click on the
Codetab, and go to theTF_templates/AWS/folder -
Select the
terraform.tfvarsfile, and on the right click on thePenciland selectIn place -
Chance the
instance_count = 0toinstance_count = 2 -
Click on the
Commit changesbutton to commit the changes to the repository, then clickCommitdirectly to the main branch
What will happen now in Terraform Enterprise and Vault Enterprise
-
Navigate to the Terraform Enterprise UI, and click on the
Runsmenu option on the left. (if you’re not already there). -
It may take a few moments to see the new run appear in the list.
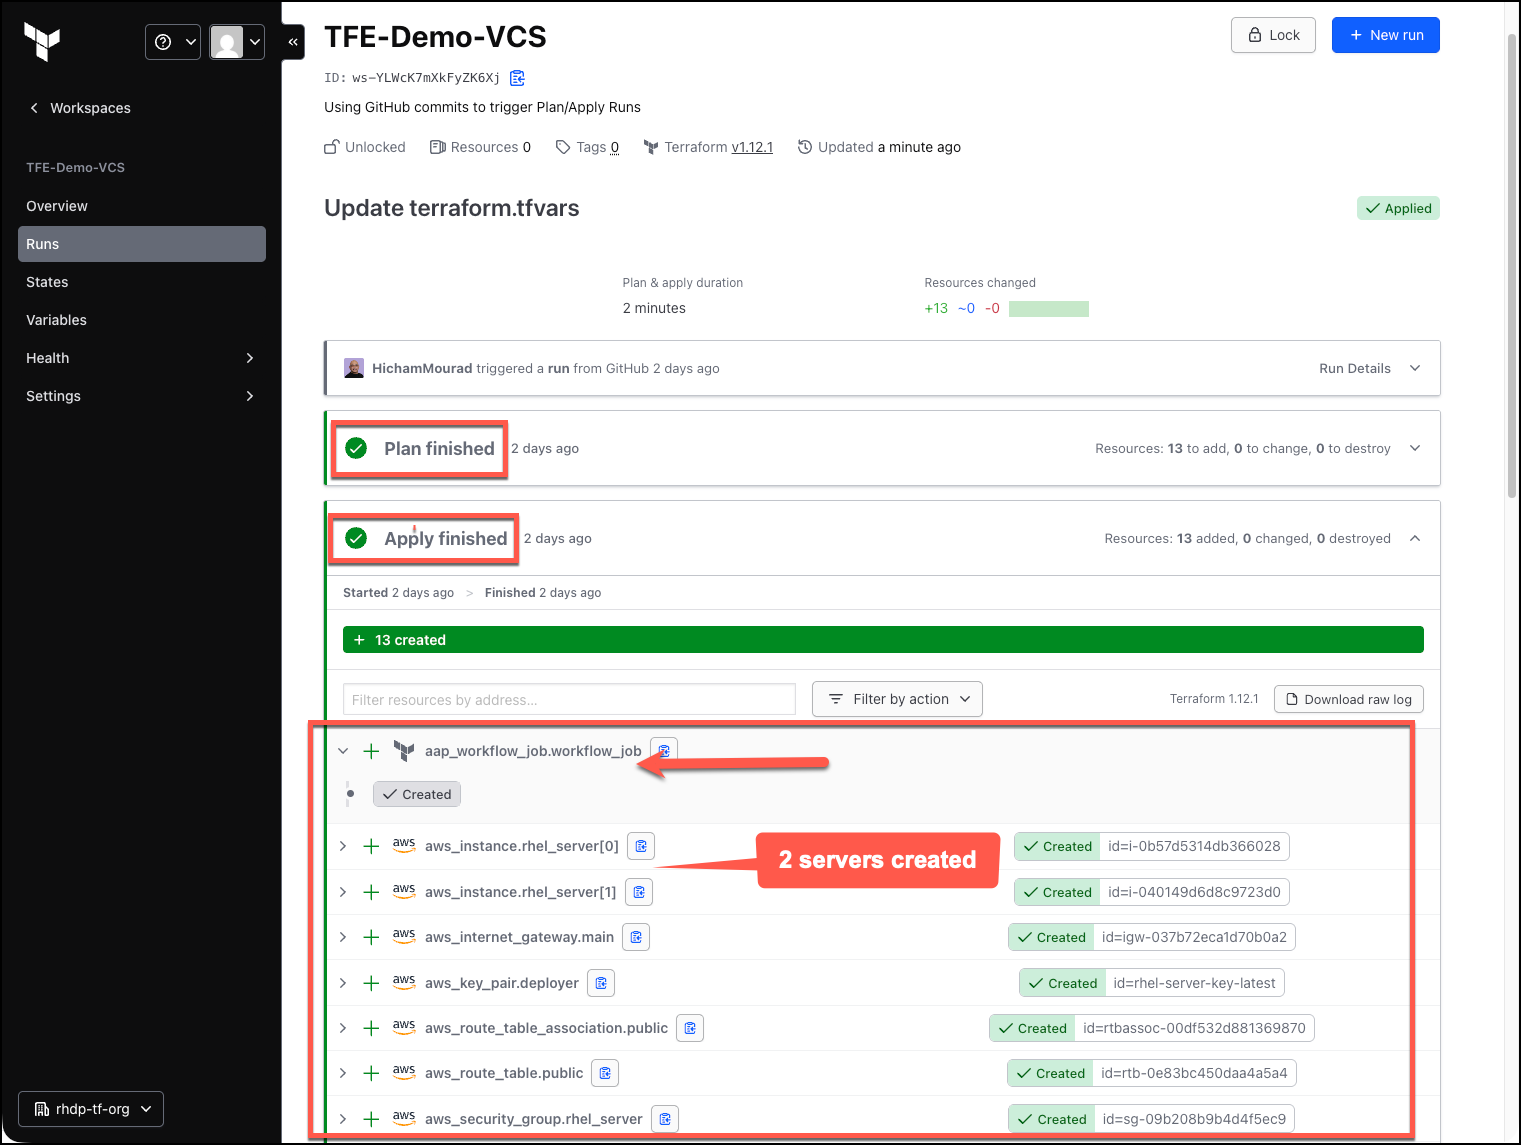
-
Below you will see the plan and apply in Terraform Enterprise, and the resources that will be created.
-
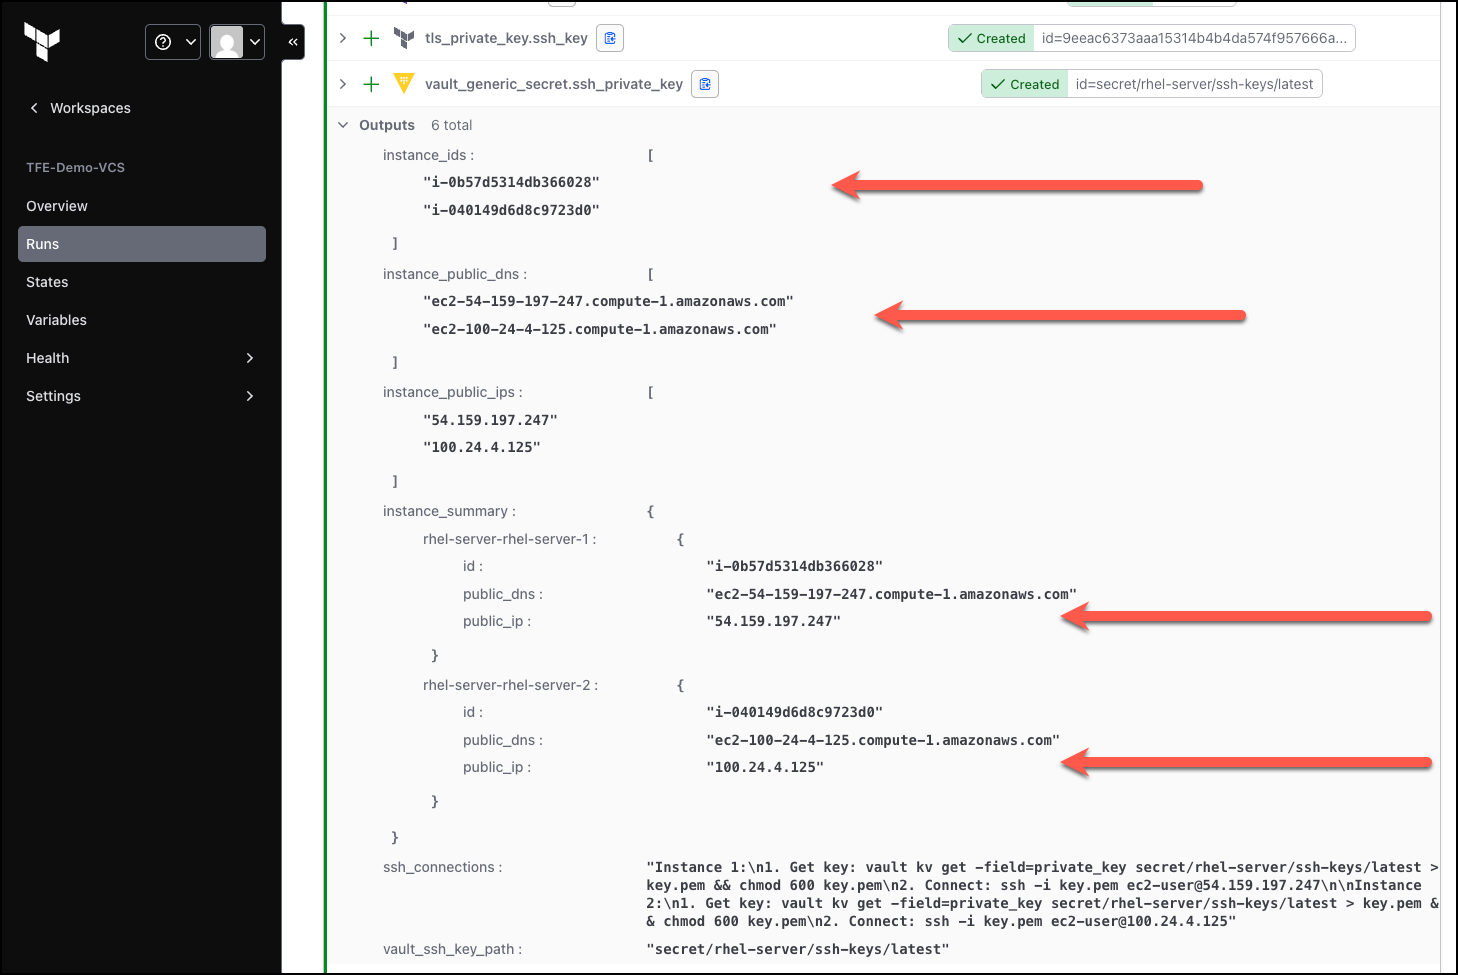
Please observe the output of the plan and apply.
-
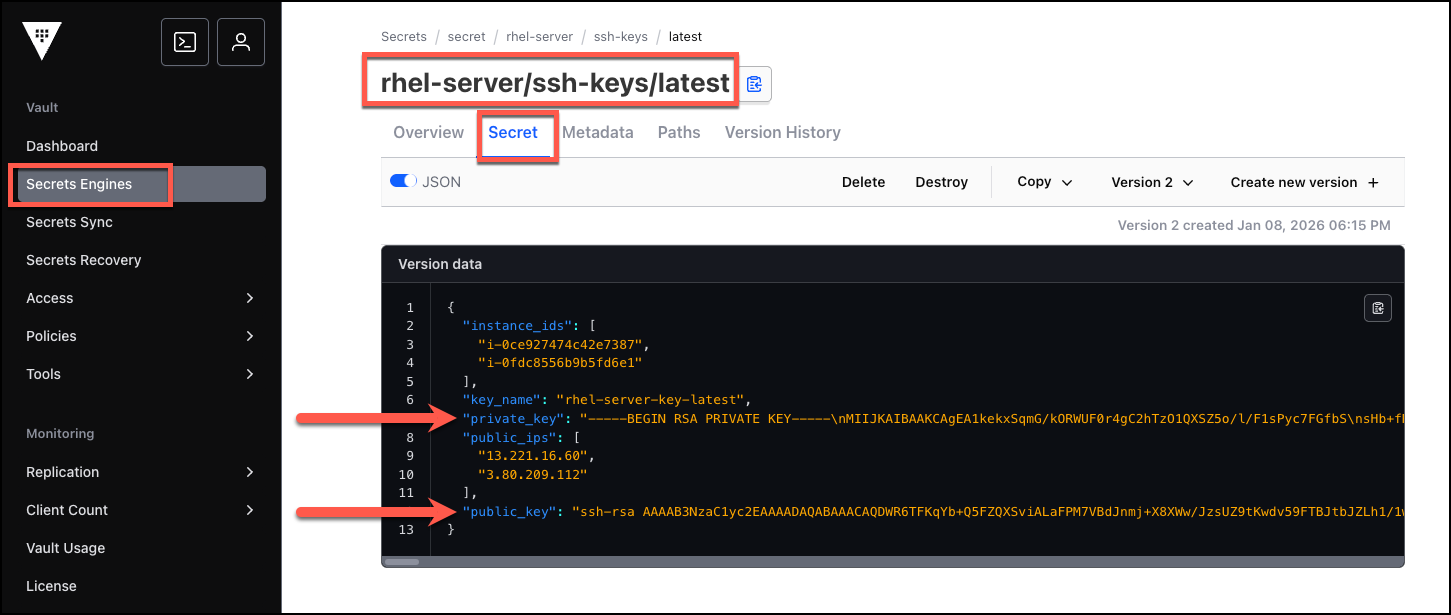
Terraform Enterprise created the SSH Keys for the RHEL ec2 instances in the Vault Enterprise secret engine.
If you’d like to see the SSH private key that was created, you can navigate to the Vault Enterprise UI
-
Click on the
Secrets Enginemenu on the left. -
Select the
secretsecret engine -
Navigate to the
rhel-server/ssh-keys/latestpath. -
Click on the
Secretmenu item. -
You will see the SSH key details.
What will happen now in Ansible Automation Platform
-
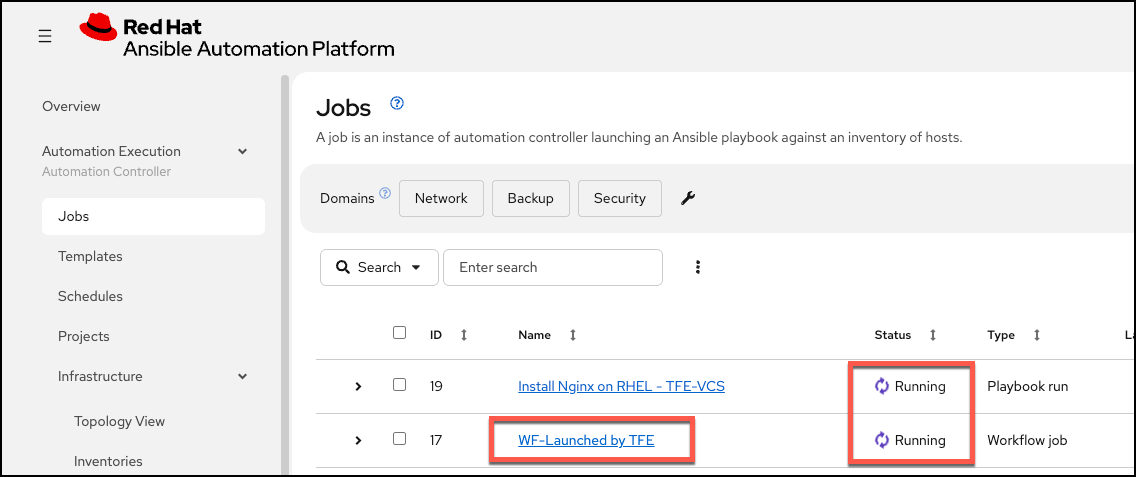
Terraform Enterprise will then trigger the
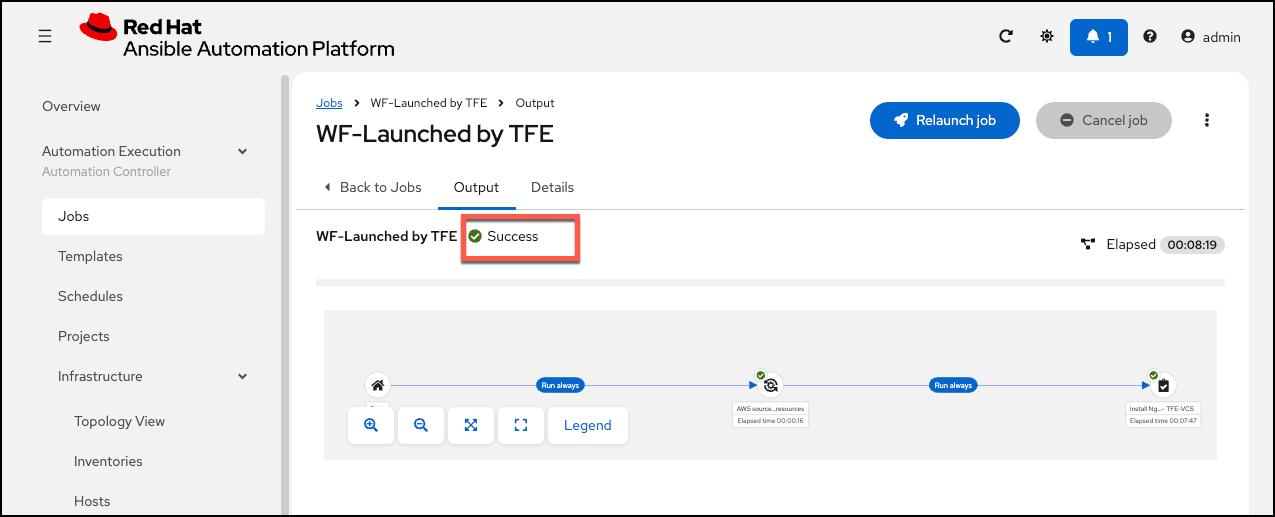
WF-Launched by TFEworkflow template in Ansible Automation Platform. You will see the workflow in aRunningstate.
-
After a few minutes, you will see the workflow template successfully completed.
-
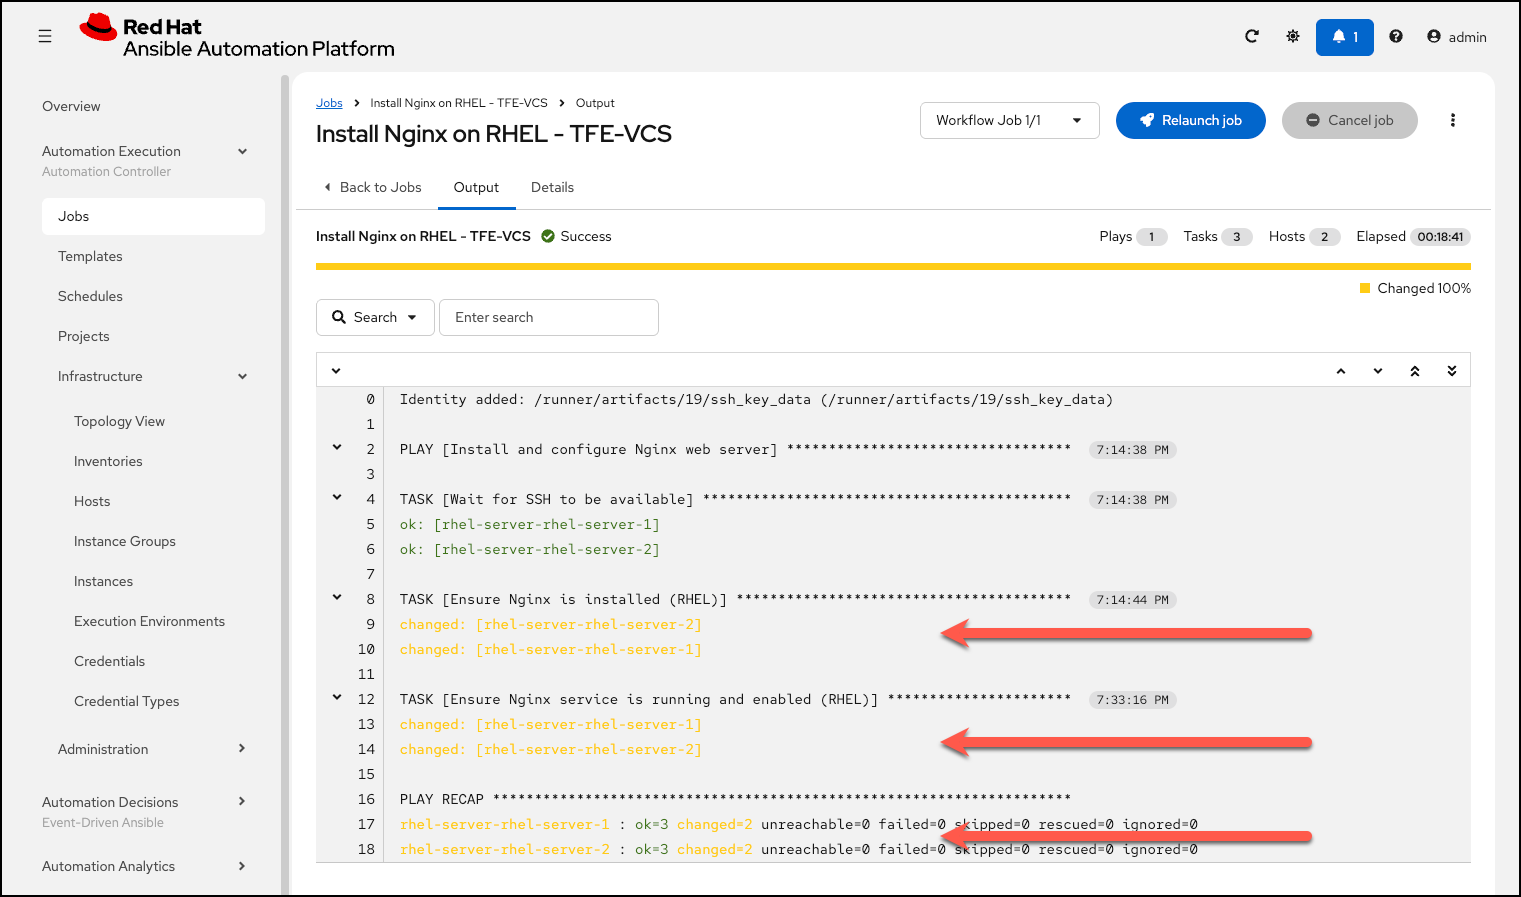
If you look at the job template output, you will see the Nginx installation completed successfully on all the new EC2 instances.
-
Ansible Automation Platform retrieved the SSH private key for the RHEL ec2 instances, from Vault Enterprise, to allow Ansible to connect to the instances and install Nginx and setup the Insurance company’s website.
-
The Terraform Inventory in Ansible Automation Platform will be synchronized with the new resources.
-
The RHEL ec2 instances will have Nginx installed and running on them.
-
Feel free to navigate to the
public IP addressorDNS nameof the EC2 instances and verify the Nginx installation. You can get the public IP address or DNS names from the Terraform Enterprise UI, or from the Ansible Automation Platform UI.
-
-
Please use the
httpprotocol to access the website. -
If prompted that the site doesn’t support a secure connection, please click on the
Continue to sitebutton.
You will see the following page:

Destroy the infrastructure - Please
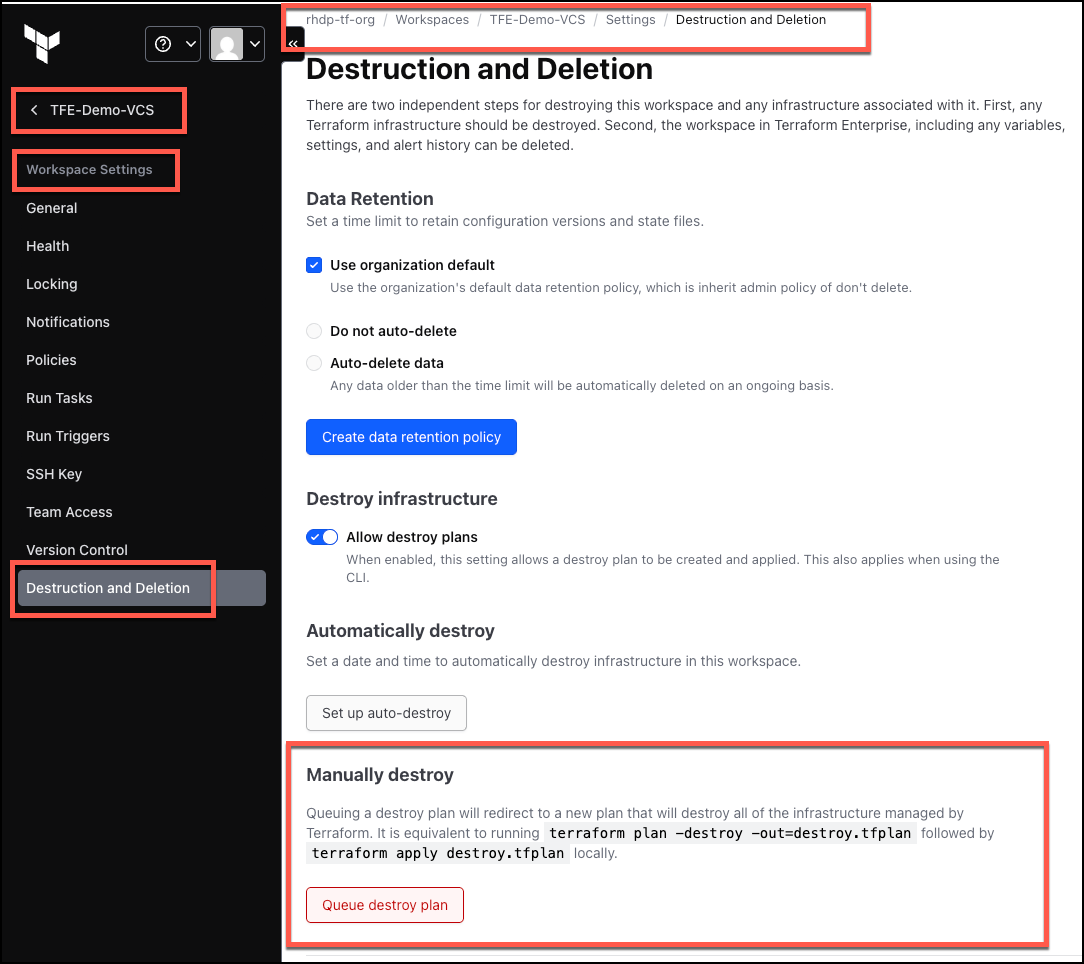
In this section we will destroy the infrastructure that was created by Terraform Enterprise in the TFE-Demo-VCS workspace.
-
Navigate to the Terraform Enterprise UI, and click on the
Workspacesmenu option on the left. -
Select the
TFE-Demo-VCSworkspace. -
Click on the
Settingsmenu option on the left. -
Click on the
Destruction and Deletionmenu option on the left. -
Scoll down to the
Manually Destroysection. -
Click on the
Queue Destroy Planbutton. -
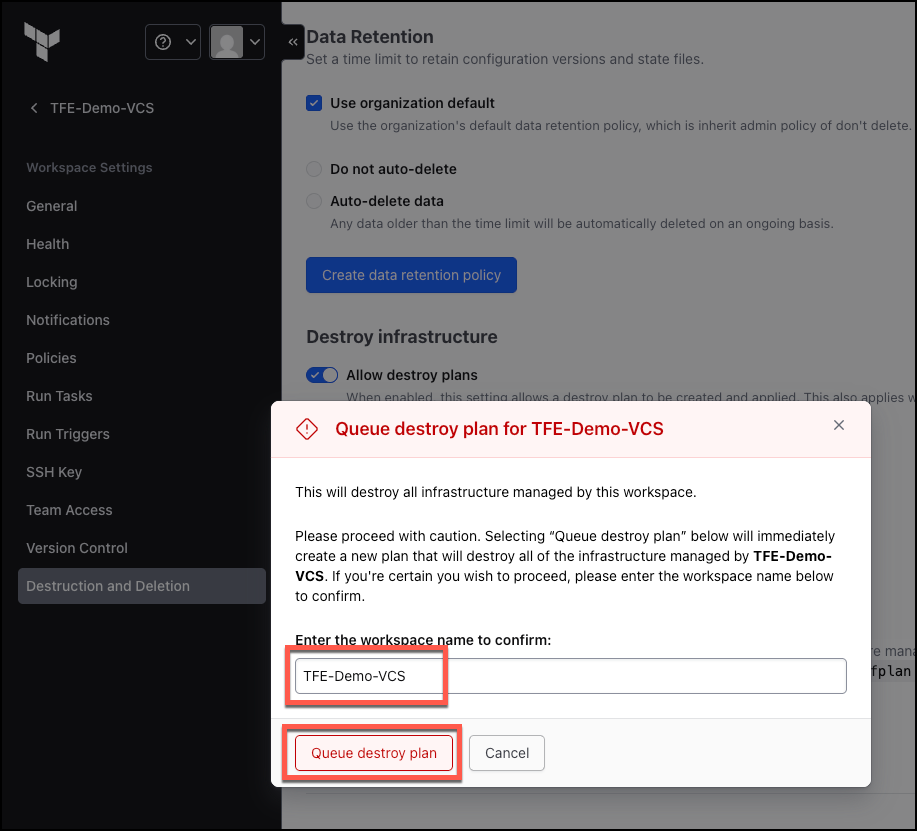
Another dialog box will appear
-
Enter/paste the name of the Workspace to confirm the destruction:
TFE-Demo-VCS. -
Click on the
Queue Destroy Planbutton. This will trigger a destroy plan run of the Terraform code in the Terraform Enterprise Workspace, and will take a few minutes to complete.
-
THANK YOU FOR CLEANING UP THE INFRASTRUCTURE! APPRECIATED!
Summary
The following scenario is what you competed in module 2 and module 3 of this lab.
-
You learned how to trigger infrastructure provisioning and automation from Terraform Enterprise using GitHub commits.
-
You also learned how to configure Ansible Automation Platform to retrieve secrets from HashiCorp Vault Enterprise. AAP retrieved the SSH private key for the RHEL ec2 instances, from Vault Enterprise, to allow Ansible to connect to the instances and install Nginx.
THANK YOU FOR COMPLETING THE LAB! GREAT JOB!