Module 1: Establish Software Composition Trust with SBOMs
Before you begin
Showroom
This workshop uses Showroom to present the workshop guide and provide quick access to the tools used throughout the labs. On the left-hand side, you will find the workshop guide, including all modules and steps you will complete. On the right-hand side, you will find the tools required to complete the labs, such as a terminal, the OpenShift Console, and additional services. Not all tools are available from the start, some services are deployed and configured as you progress through the workshop, and the corresponding tabs will become active in later modules.
Optional Sections
Along the way, you will encounter collapsible sections marked with the following callout in the header: Optional Deep Dive: <section name>. These sections provide additional technical detail, including YAML and configuration walkthroughs. They are completely optional, but you are encouraged to expand and explore them if you would like a deeper understanding of how the components used in this workshop are configured.
Module 1 - Introduction
In this module, you help customers answer a foundational software supply chain question: “Do we actually trust the software components inside our applications?” Modern applications are assembled rather than written. Container images typically bundle hundreds of upstream packages, along with direct and transitive dependencies, each carrying its own CVEs and security advisories. Without clear visibility into that composition, trust becomes an assumption rather than evidence.
Enter Red Hat Trusted Profile Analyzer (RHTPA)
-
This is where RHTPA comes into play.
-
RHTPA is Red Hat’s supported distribution of the upstream trustify project, which is part of the GUAC Community (Graph for Understanding Artifact Composition).
-
RHTPA ingests SBOM documents, indexes every component inside them, and continuously correlates that inventory against known CVEs and security advisories, producing an auditable view of software composition.
Step 1: Configure identity and access management
-
RHTPA requires an external OpenID Connect (OIDC) provider for authentication and authorization, as it does not maintain its own internal user store.
-
In this module, you will integrate RHTPA with Red Hat Build of Keycloak (RHBK), which is responsible for issuing identity tokens and embedding the claims and permissions that RHTPA evaluates when processing API and UI requests.
|
Key Concepts: Realm, Client and Client Scope
|
-
Access control is enforced through RBAC configured in Red Hat Build of Keycloak (RHBK).
-
RHTPA authorises requests based on client scopes embedded in the OIDC access token, roles in RHBK map to scopes, and those scopes inside the token are what RHTPA evaluates to allow or deny access.
-
In this step, you will import a pre-configured realm that defines the 2 clients:
-
Frontend: Used by human users accessing the RHTPA web interface.
-
CLI: Used by CI/CD systems, such as Tekton or Jenkins, to upload SBOMs programmatically. This client uses a service account for machine-to-machine authentication.
-
1.1 Import the TPA Realm
-
Before importing the tpa realm, switch to the OpenShift Console to monitor the realm import job.
-
Click the OpenShift Console tab in the Showroom
-
Log in to the OpenShift console using the following details:
-
Username:
{openshift_gitops_admin_user} -
Password:
{openshift_gitops_admin_password} -
After entering your credentials, click the Sign In button.
-
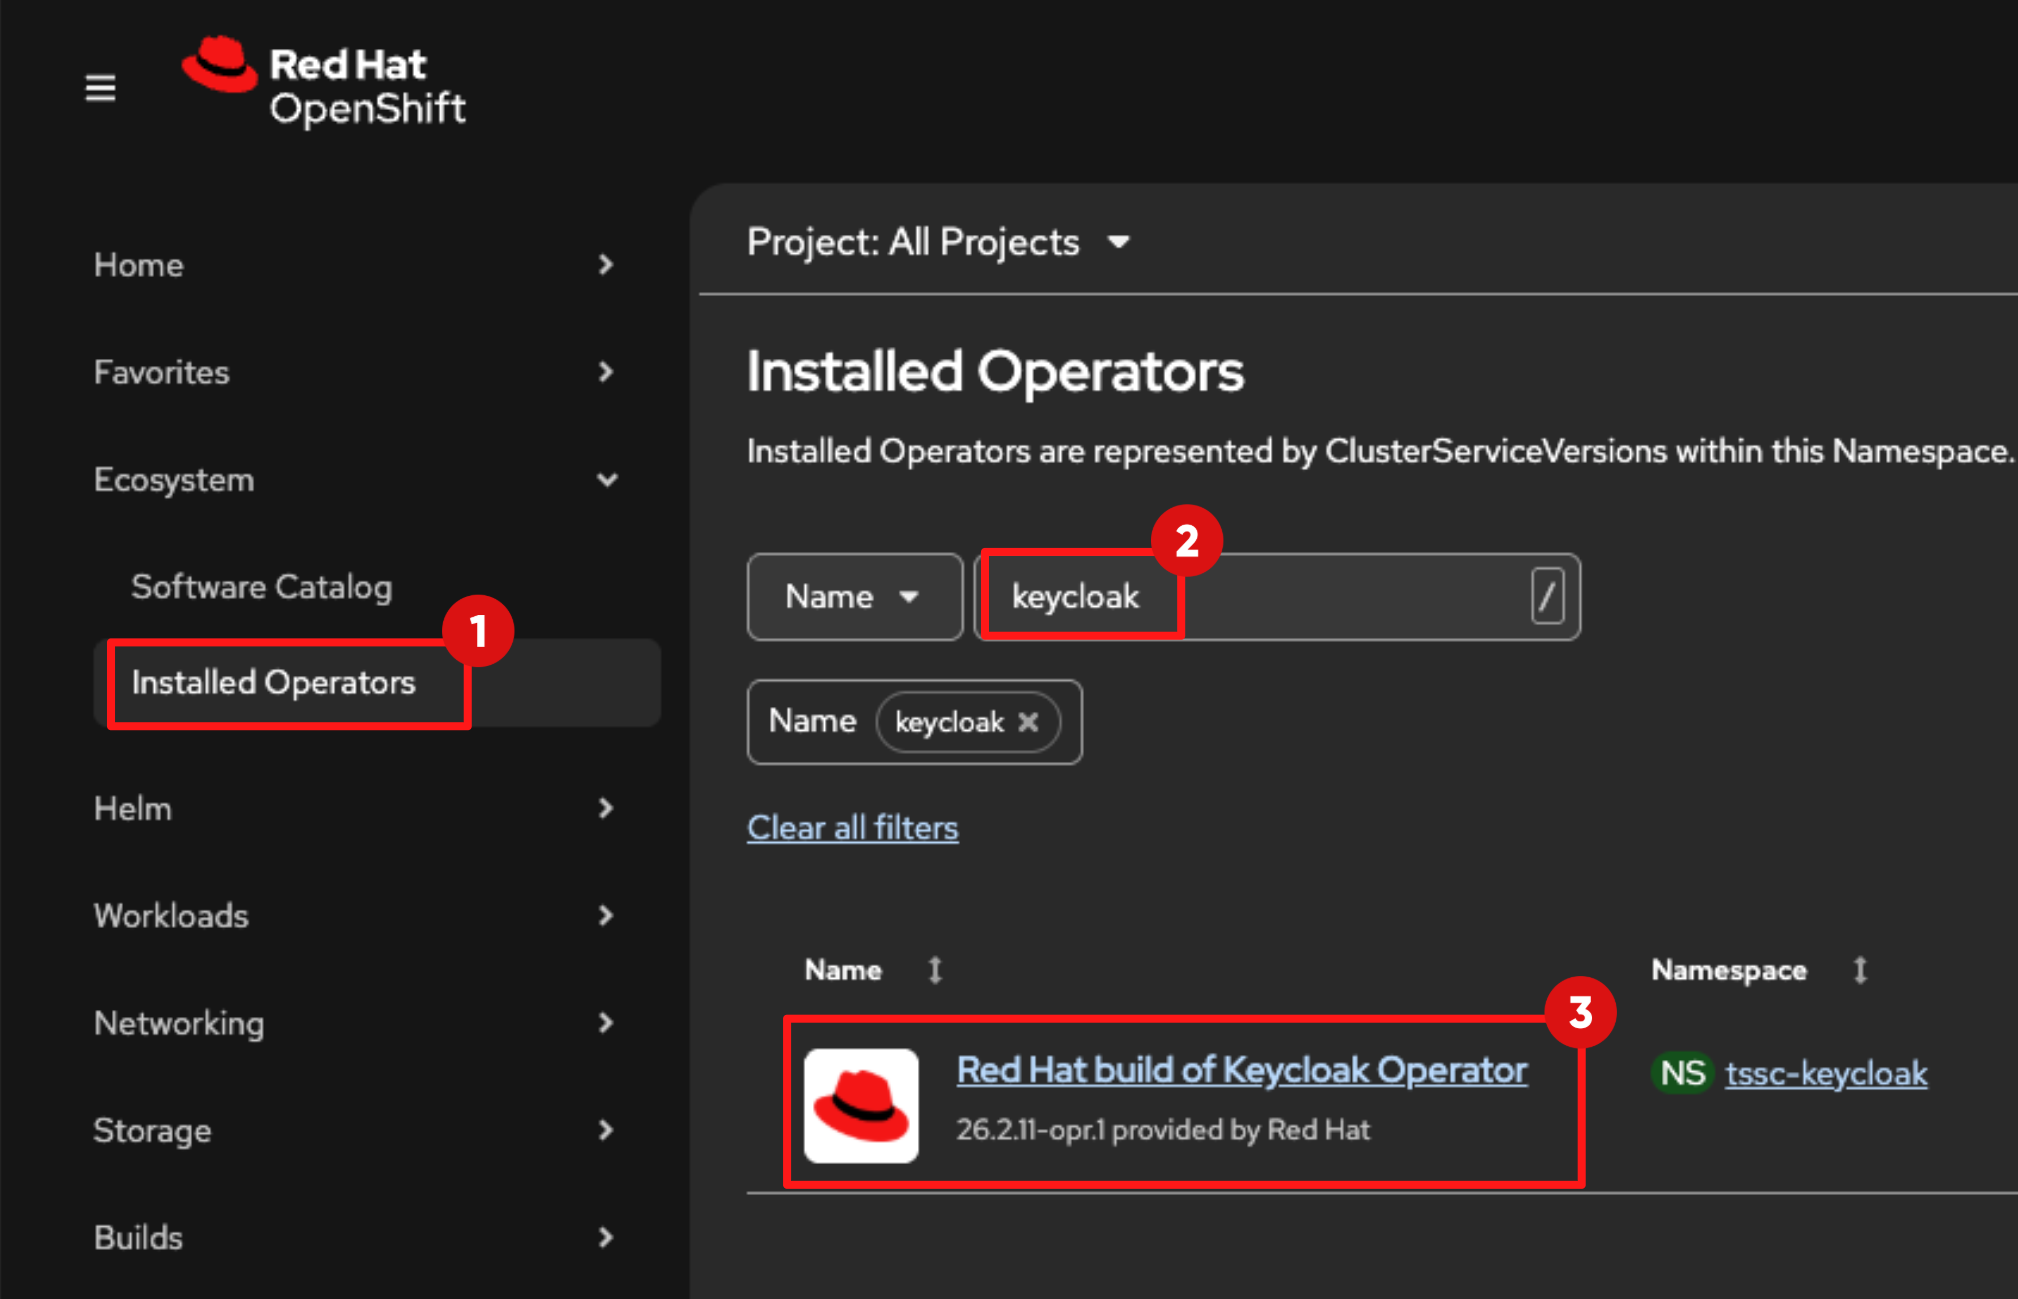
Expand the Ecosystem list in the left Navigation menu and select Installed Operators
-
Switch to the tssc-keycloak project.
-
In the name filter input:
keycloak-
After a few seconds, the Red Hat build of Keycloak Operator will appear in the list of installed operators.
-
Click its link to view the details.
-
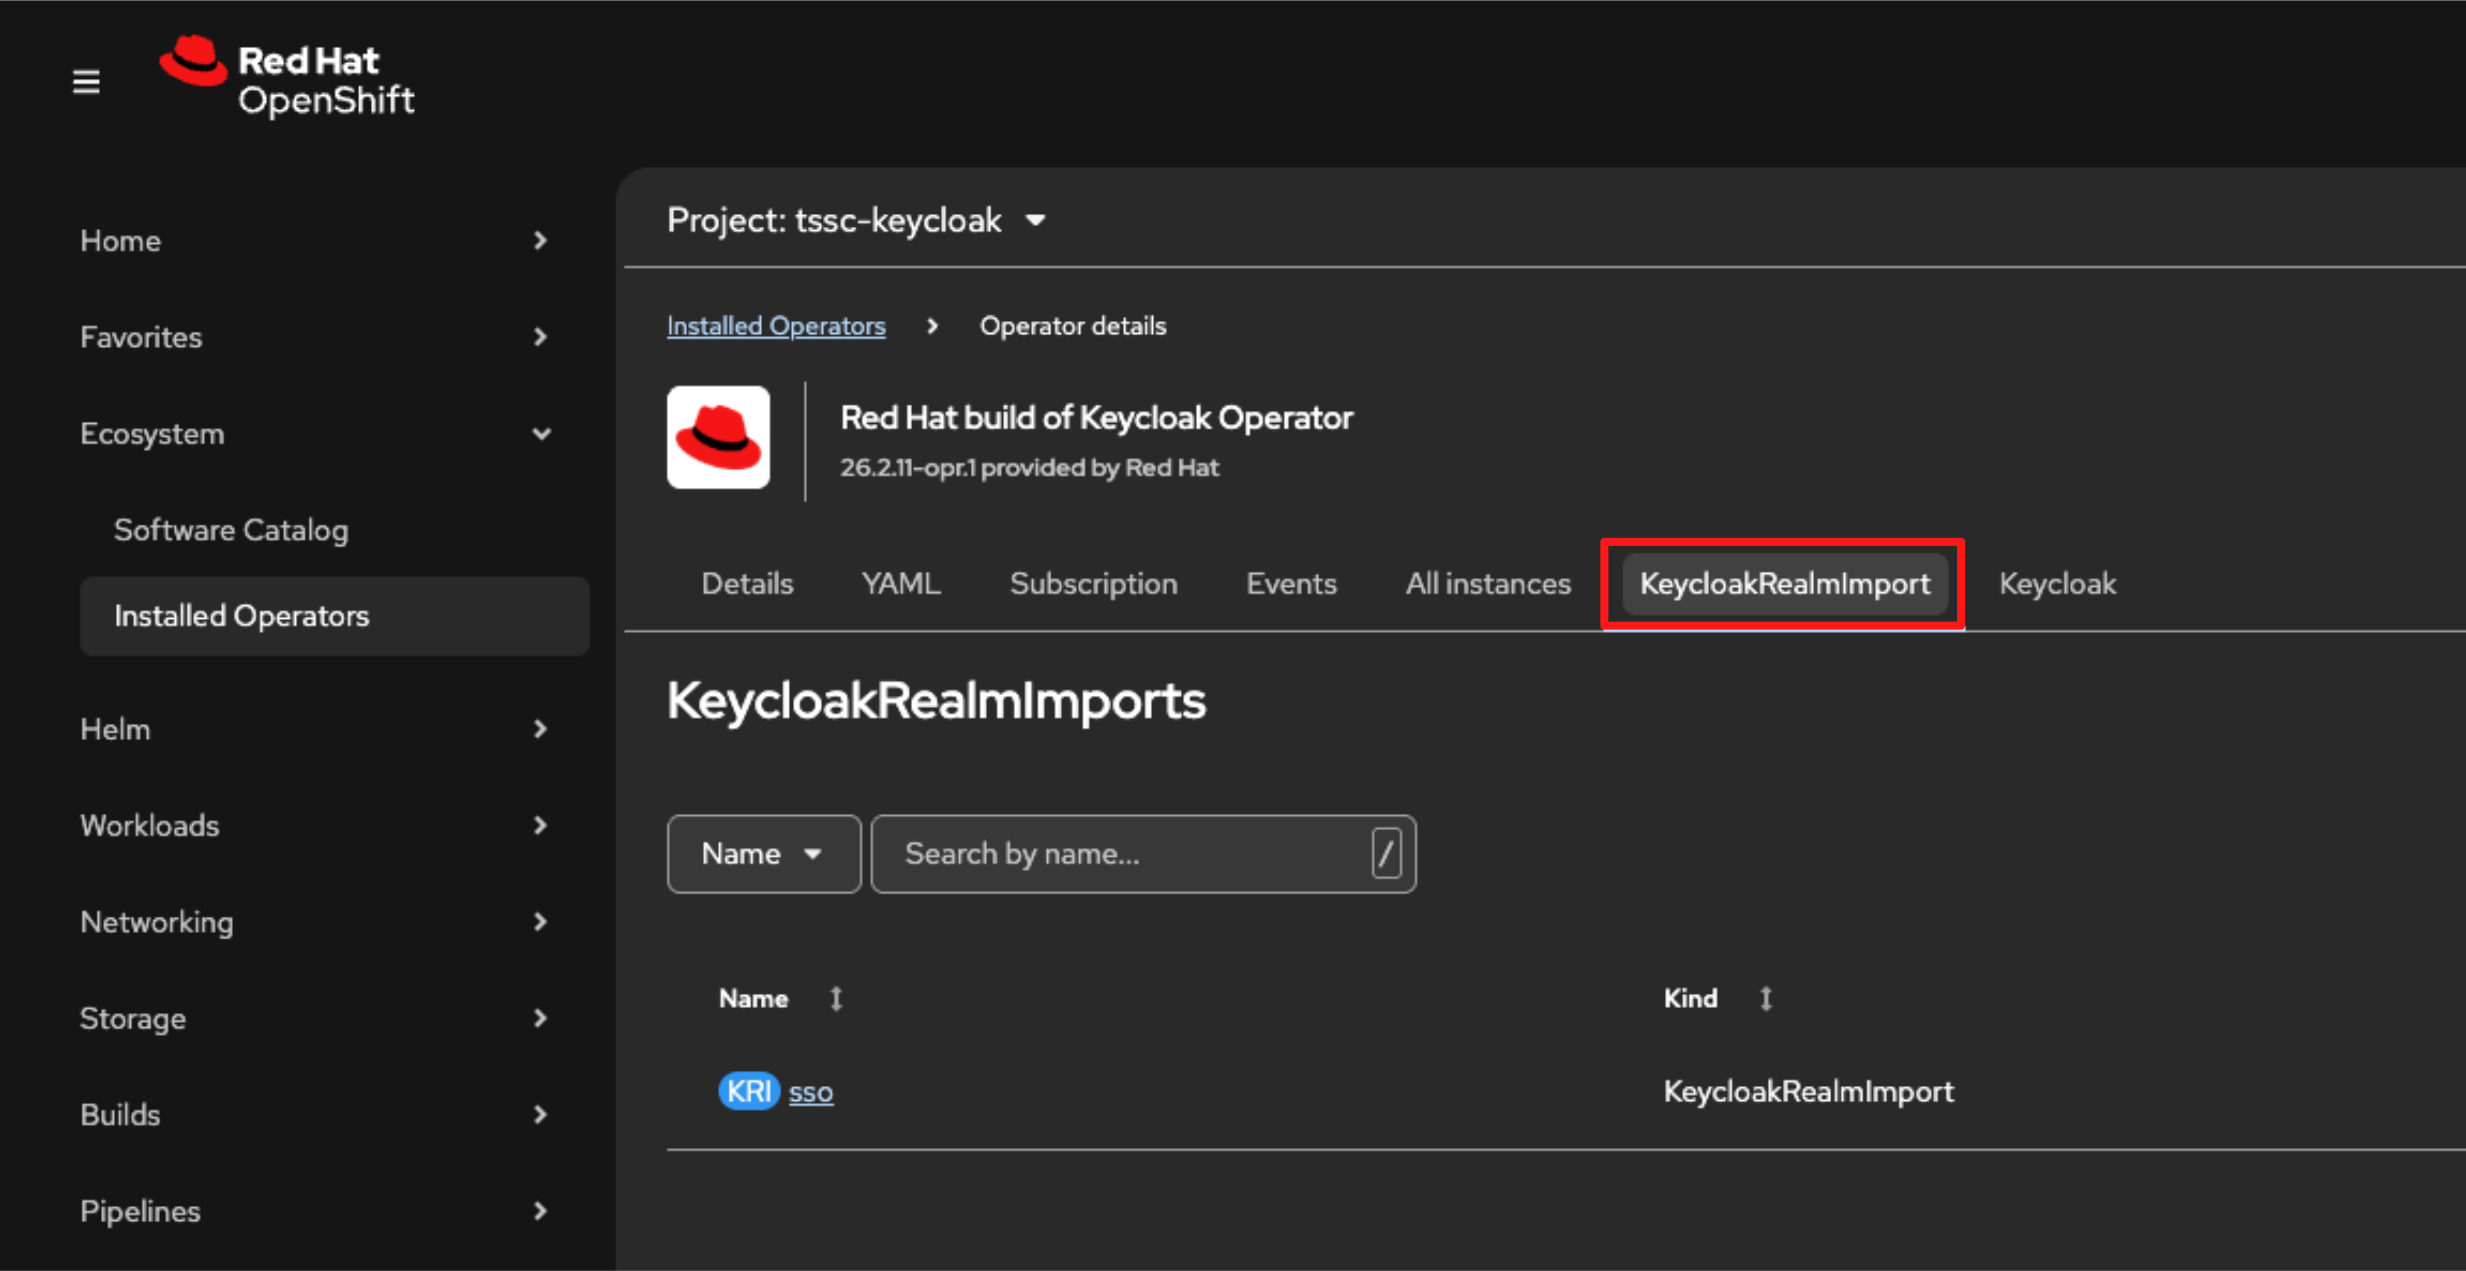
Then select the KeycloakRealmImport tab.
-
At this stage, no import jobs are running. You will trigger the import in the next step.
-
Execute the following command in the Showroom terminal to set the required variables for this module.
cat << 'EOF' >> ~/.bashrc
export TPA_REALM={tpa_realm}
export TPA_CLI_CLIENT_SECRET={tpa_cli_client_secret}
export TPA_ADMIN_USERNAME={tpa_admin_username}
export TPA_ADMIN_PASSWORD={tpa_admin_password}
export KEYCLOAK_URL={keycloak_admin_console}
EOF
source ~/.bashrc-
Execute the following command to apply the configuration in the keycloak-tpa-realm.yml and import the new tpa realm configuration to the tssc-keycloak namespace.
envsubst '${TPA_REALM} ${TPA_CLI_CLIENT_SECRET} ${TPA_ADMIN_USERNAME} ${TPA_ADMIN_PASSWORD}' < ~/lab-assets/keycloak-tpa-realm.yml | oc apply -n tssc-keycloak -f --
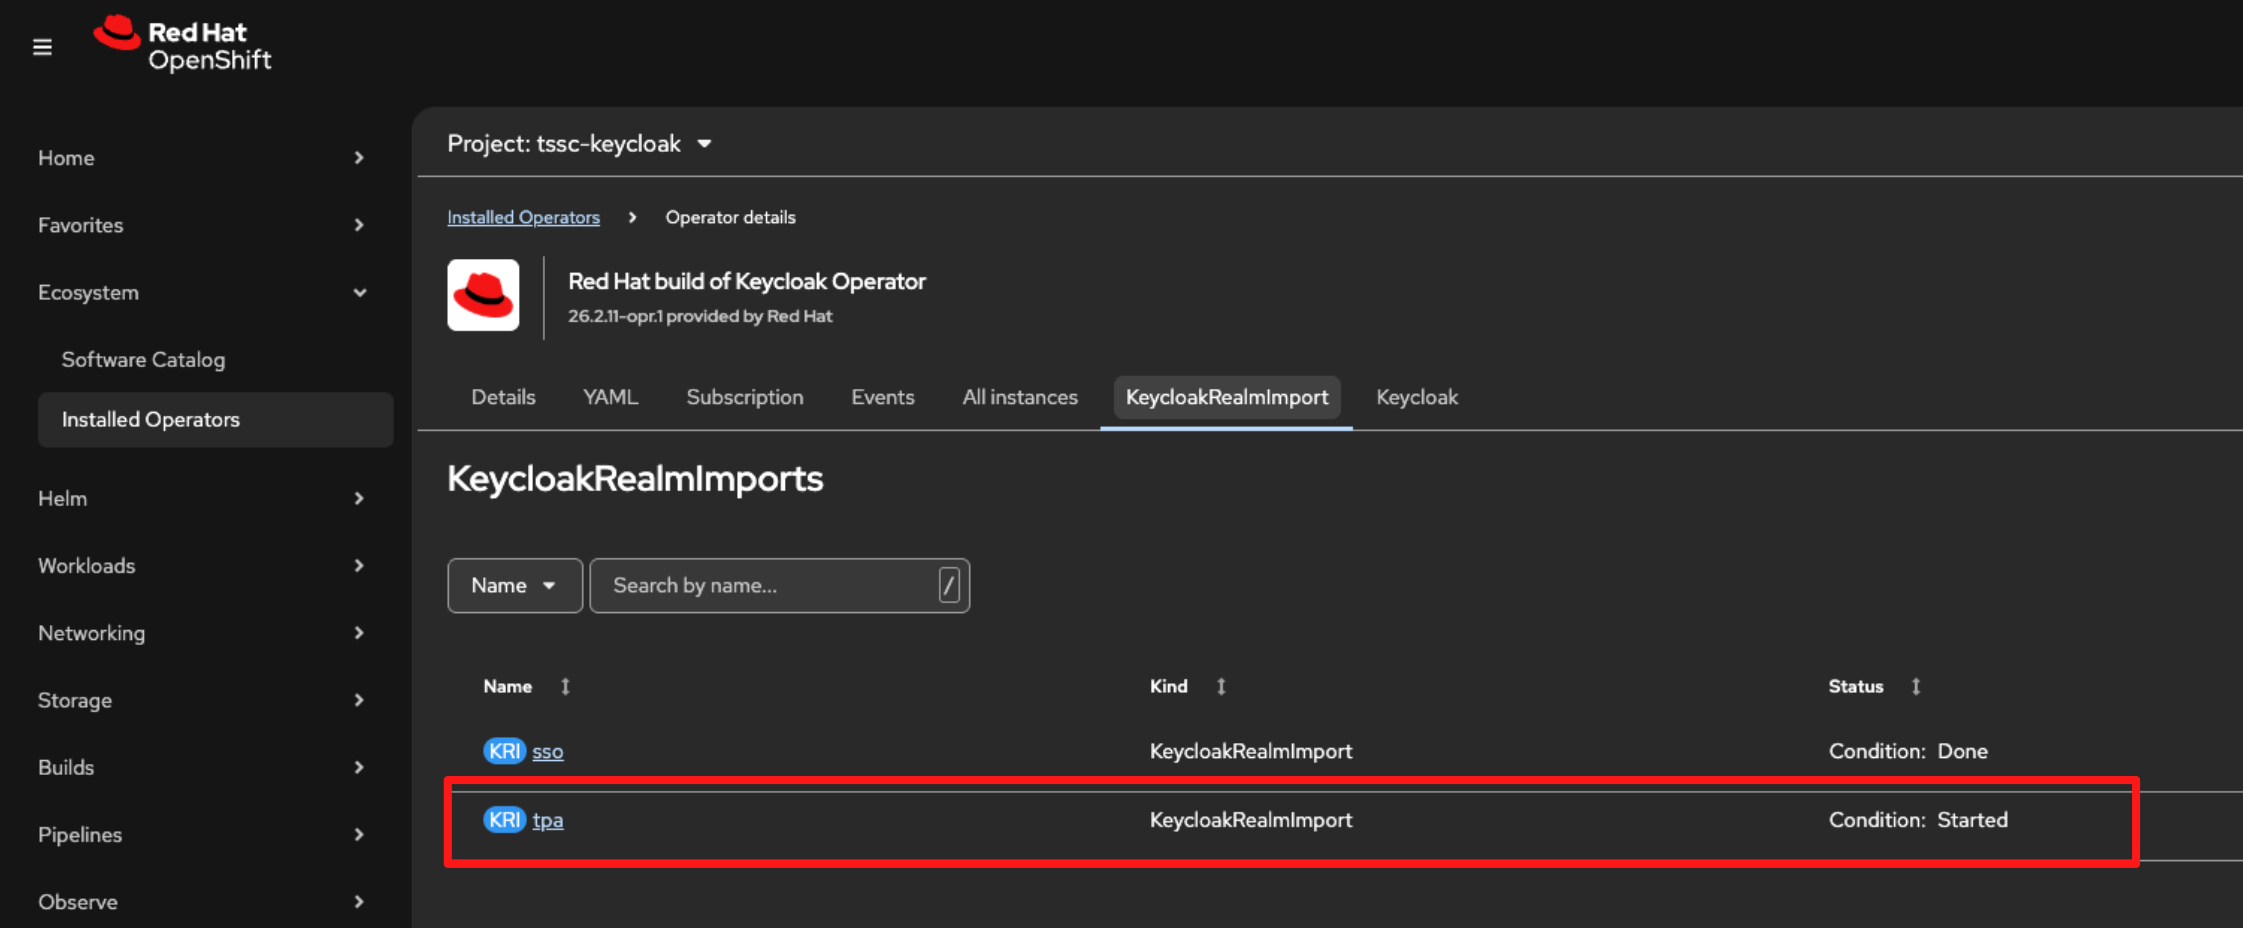
Switch back to the KeyCloakRealmImport tab in the OpenShift console. You will see that the import job has started:
-
After a short time, the status will change to Done.
Optional Deep Dive: What just happened?
-
The YAML you applied creates the identity and authorization model that Red Hat Trusted Profile Analyzer (RHTPA) uses to control SBOM upload, search, and deletion.
-
It created:
-
A dedicated realm for RHTPA
-
Client scopes that represent specific API access permissions
-
Two clients frontend and cli
-
Realm roles used to assign high-level identity
-
Scope mappings that attach permissions to roles
-
==== 1. Dedicated tpa realm for RHTPA
-
The file creates a dedicated realm tpa for Red Hat Trusted Profile Analyzer (RHTPA):
apiVersion: k8s.keycloak.org/v2alpha1
kind: KeycloakRealmImport
spec:
  keycloakCRName: keycloak
  realm:
    realm: ${TPA_REALM}
    displayName: Trusted Content
    enabled: true
...-
This isolates RHTPA’s identities and settings from the shared sso realm used by other components.
==== 2. Client scopes created
-
RHTPA authorizes API calls using OIDC scopes, those scopes are defined here:
clientScopes:
  ...
  - attributes: {}
    name: create:document
    protocol: openid-connect
  ...
  - attributes: {}
    name: read:document
    protocol: openid-connect
  ...
  - attributes: {}
    name: delete:document
protocol: openid-connect-
These scope names are not arbitrary, the RHTPA backend expects them and enforces API permissions based on their presence in the access token:
-
read:document: required to query and view SBOM inventory.
-
create:document: required to POST SBOMs into RHTPA via API.
-
delete:document: required to remove SBOMs.
-
-
If a user or pipeline identity calls the API without the required scope, RHTPA denies the request.
==== 3. Frontend and cli clients
-
The YAML defines 2 clients: frontend and cli
===== frontend client
-
When a user signs in through the UI, the token issued for the frontend client is able to carry the client scopes (read:document, create:document, delete:document), subject to role and scope mapping.
- clientId: frontend
  publicClient: true
  defaultClientScopes:
    - web-origins
    - delete:document
    - profile
    - roles
    - read:document
    - email
    - create:document
===== cli client
-
The cli client is the machine identity used later by Tekton Chains:
clients:
  - clientId: cli
    clientAuthenticatorType: client-secret
    secret: ${TPA_CLI_CLIENT_SECRET}
    serviceAccountsEnabled: true
    defaultClientScopes:
      - web-origins
      - profile
      - roles
      - read:document
      - email
      - create:document
      - update:document
- delete:document-
Because serviceAccountsEnabled is set to true, RHBK automatically creates a backing user called service-account-cli
-
This service account is the identity is what Tekton Chains and other CI tools authenticate as when uploading SBOMs.
-
clientAuthenticatorType is set to client-secret, this configures the client to authenticate using a shared secret when requesting tokens. Combined with serviceAccountsEnabled: true, this allows the client to use the OAuth 2.0 Client Credentials flow for machine-to-machine authentication.
-
Client scopes again include the document permissions, so a service account based on the client cli can upload and manage SBOMs.
==== 4. Roles created:
-
In the YAML, the roles block defines three realm roles:
roles:
  realm:
    - name: tpa-user
    - name: tpa-manager
- name: tpa-admin-
These roles do not grant permission by themselves — they are labels that a human user or a Tekton machine identity can be assigned.
==== 5. Scope-to-role mapping
-
The next YAML block maps those scopes to specific roles so that when a user logs in, the access token carries the correct permissions:
scopeMappings:
  - clientScope: delete:document
    roles:
      - tpa-manager
  - clientScope: create:document
    roles:
- tpa-manager-
This mapping ensures only identities assigned the tpa-manager role receive create:document and delete:document scopes embedded in their access tokens.
-
The mapping between the service-account-cli and this role is configured here:
realmRoles:
  - default-roles-tpa
  - tpa-manager
serviceAccountClientId: cli
username: service-account-cli-
So the service-account-cli user:
-
Authenticates as the cli client
-
Has the tpa-manager realm role
-
-
This service account is entitled to receive create:document and delete:document scopes in its token, when it requests a token for the cli client.
==== Putting it all together
-
RHBK is responsible for issuing client scopes in the token.
-
RHTPA is responsible for interpreting them and enforcing which operations are allowed.
-
When Tekton authenticates using the cli client and secret, RHBK issues a token for service-account-cli.
-
Because that identity has tpa-manager role, the resulting OIDC token automatically contains the create:document and delete:document client scopes:
"scope": "openid email profile create:document delete:document"-
That token is sent to RHTPA with the SBOM upload API call.
-
If create:document is present — upload succeeds.
-
If it is missing — RHTPA rejects the request with a 403 error.
-
1.2 Log in to Red Hat Build of Keycloak (RHBK)
-
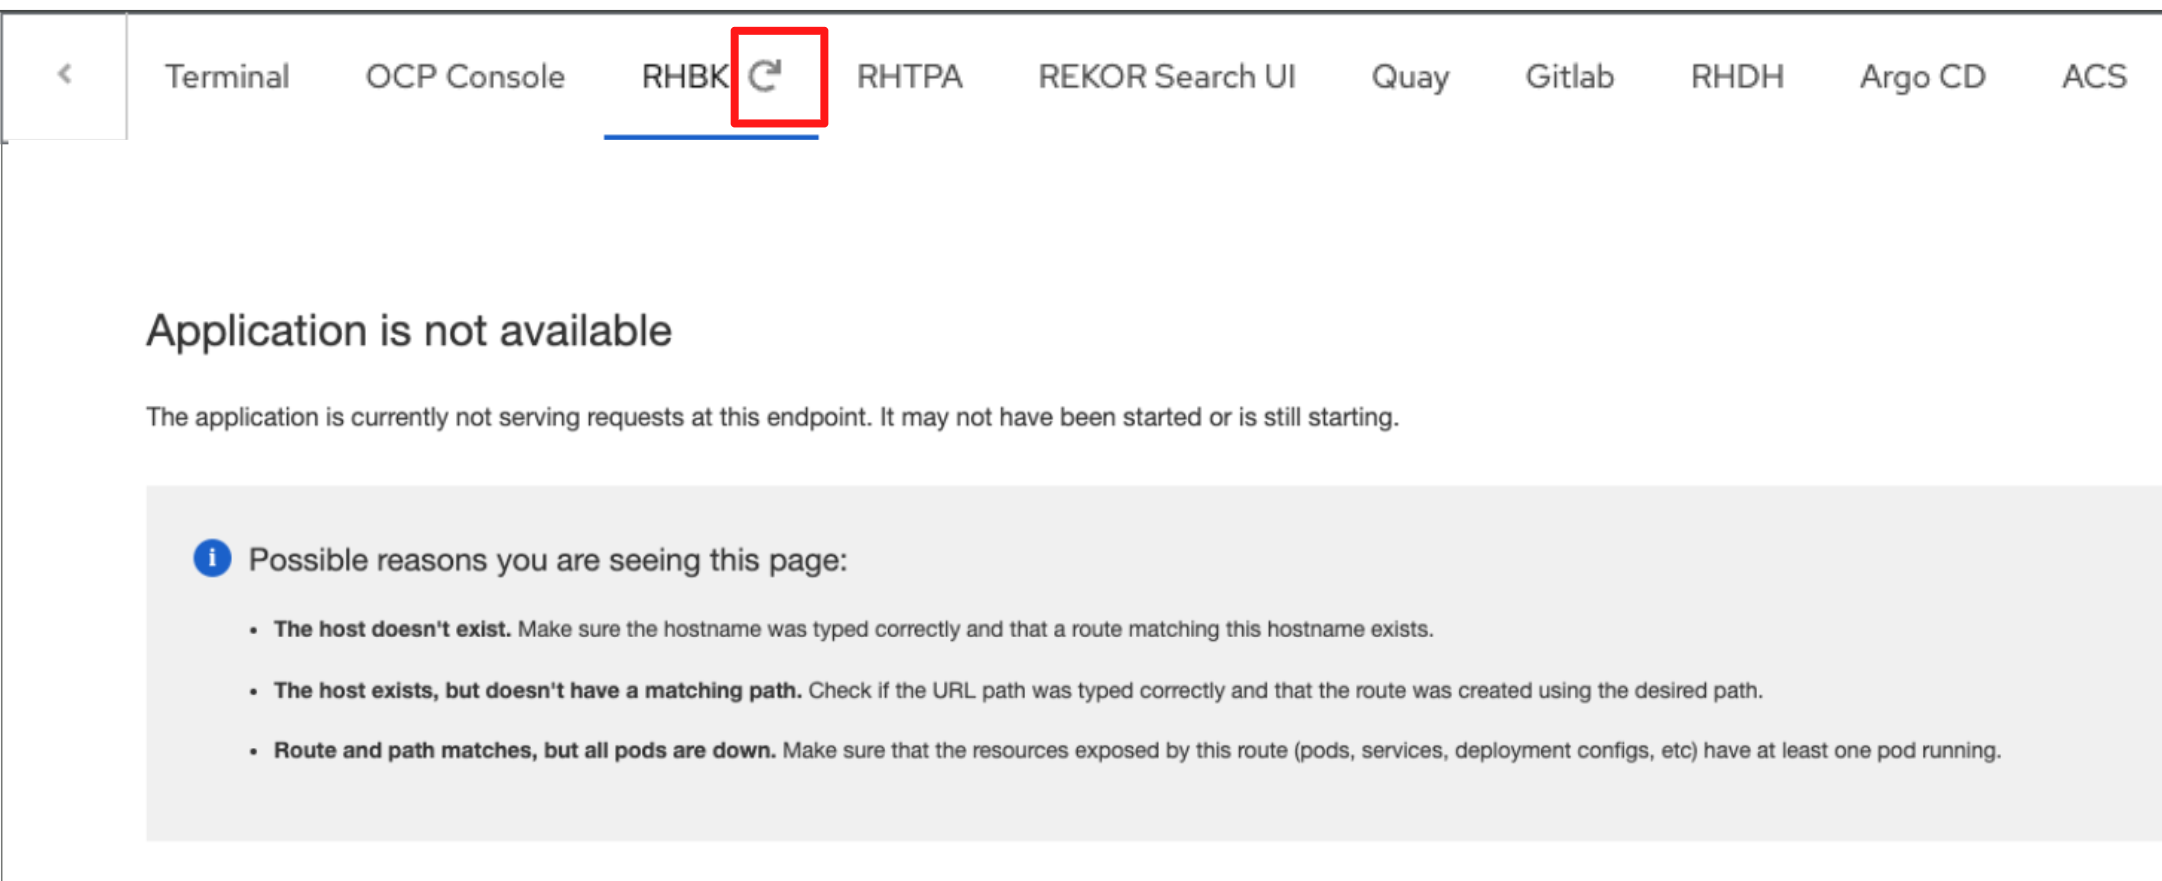
Click the RHBK Console tab in the Showroom, you may need to refresh the tab (Do not refresh the browser page itself).
-
Log in to the RHBK console using the following details:
-
Username:
{keycloak_admin_user}-
Password:
{keycloak_admin_password}-
After entering your credentials, click the Sign In button.
-
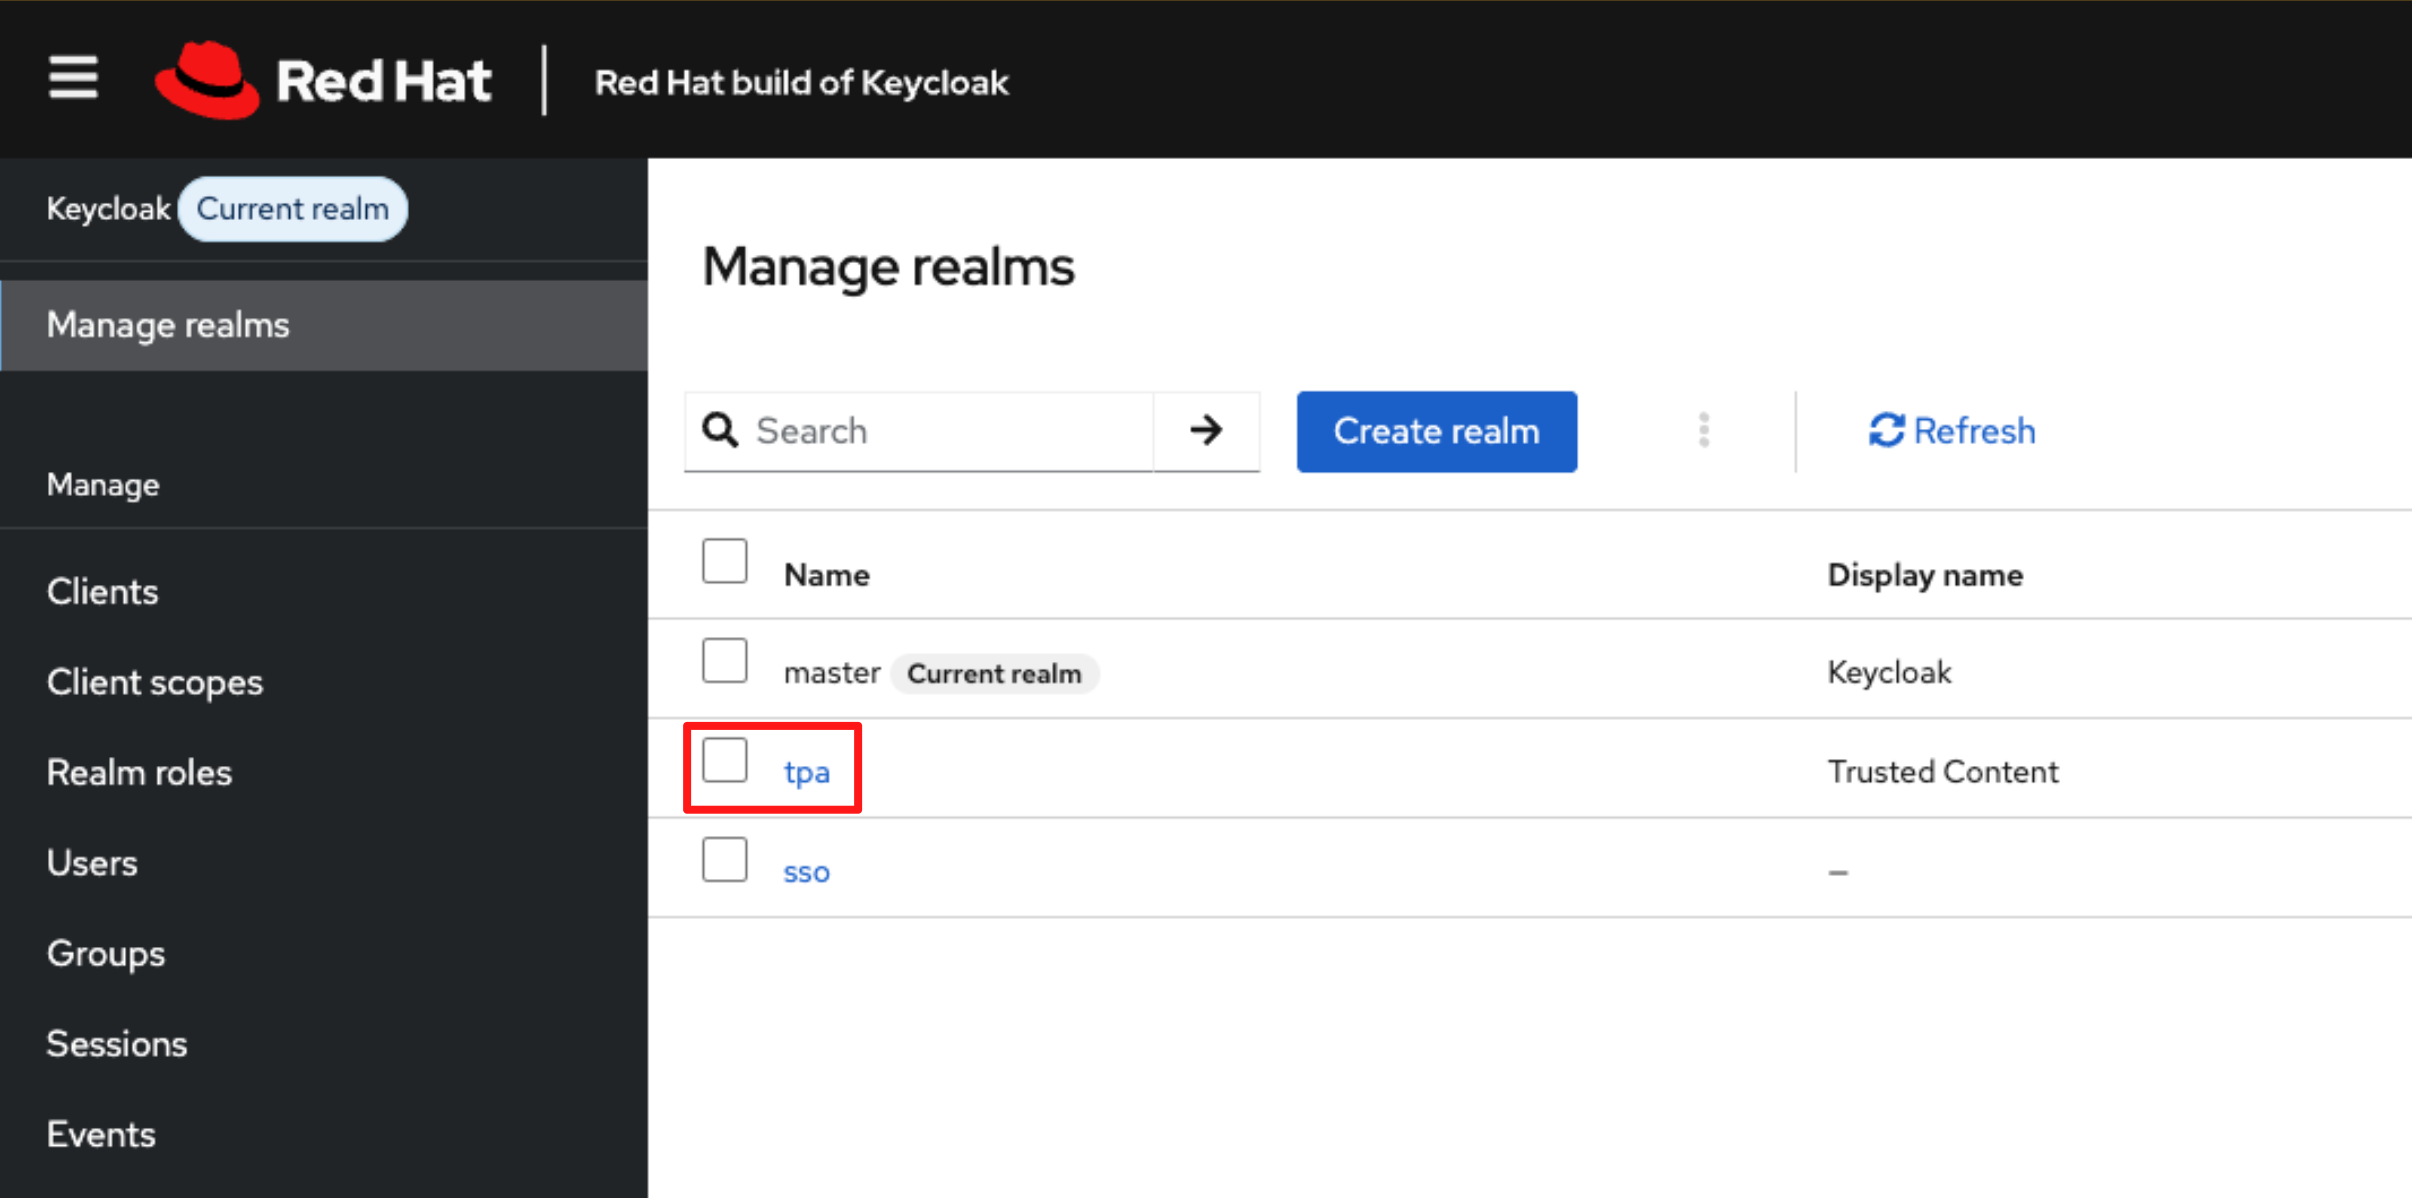
In the RHBK Console, click Manage Realm in the left-hand navigation menu. You will see the newly created tpa realm, as shown in the screenshot below.
Optional Deep Dive: Verify the new tpa realm in RHBK
-
In the Manage Realm view in the RHBK console, select the newly created tpa realm.
-
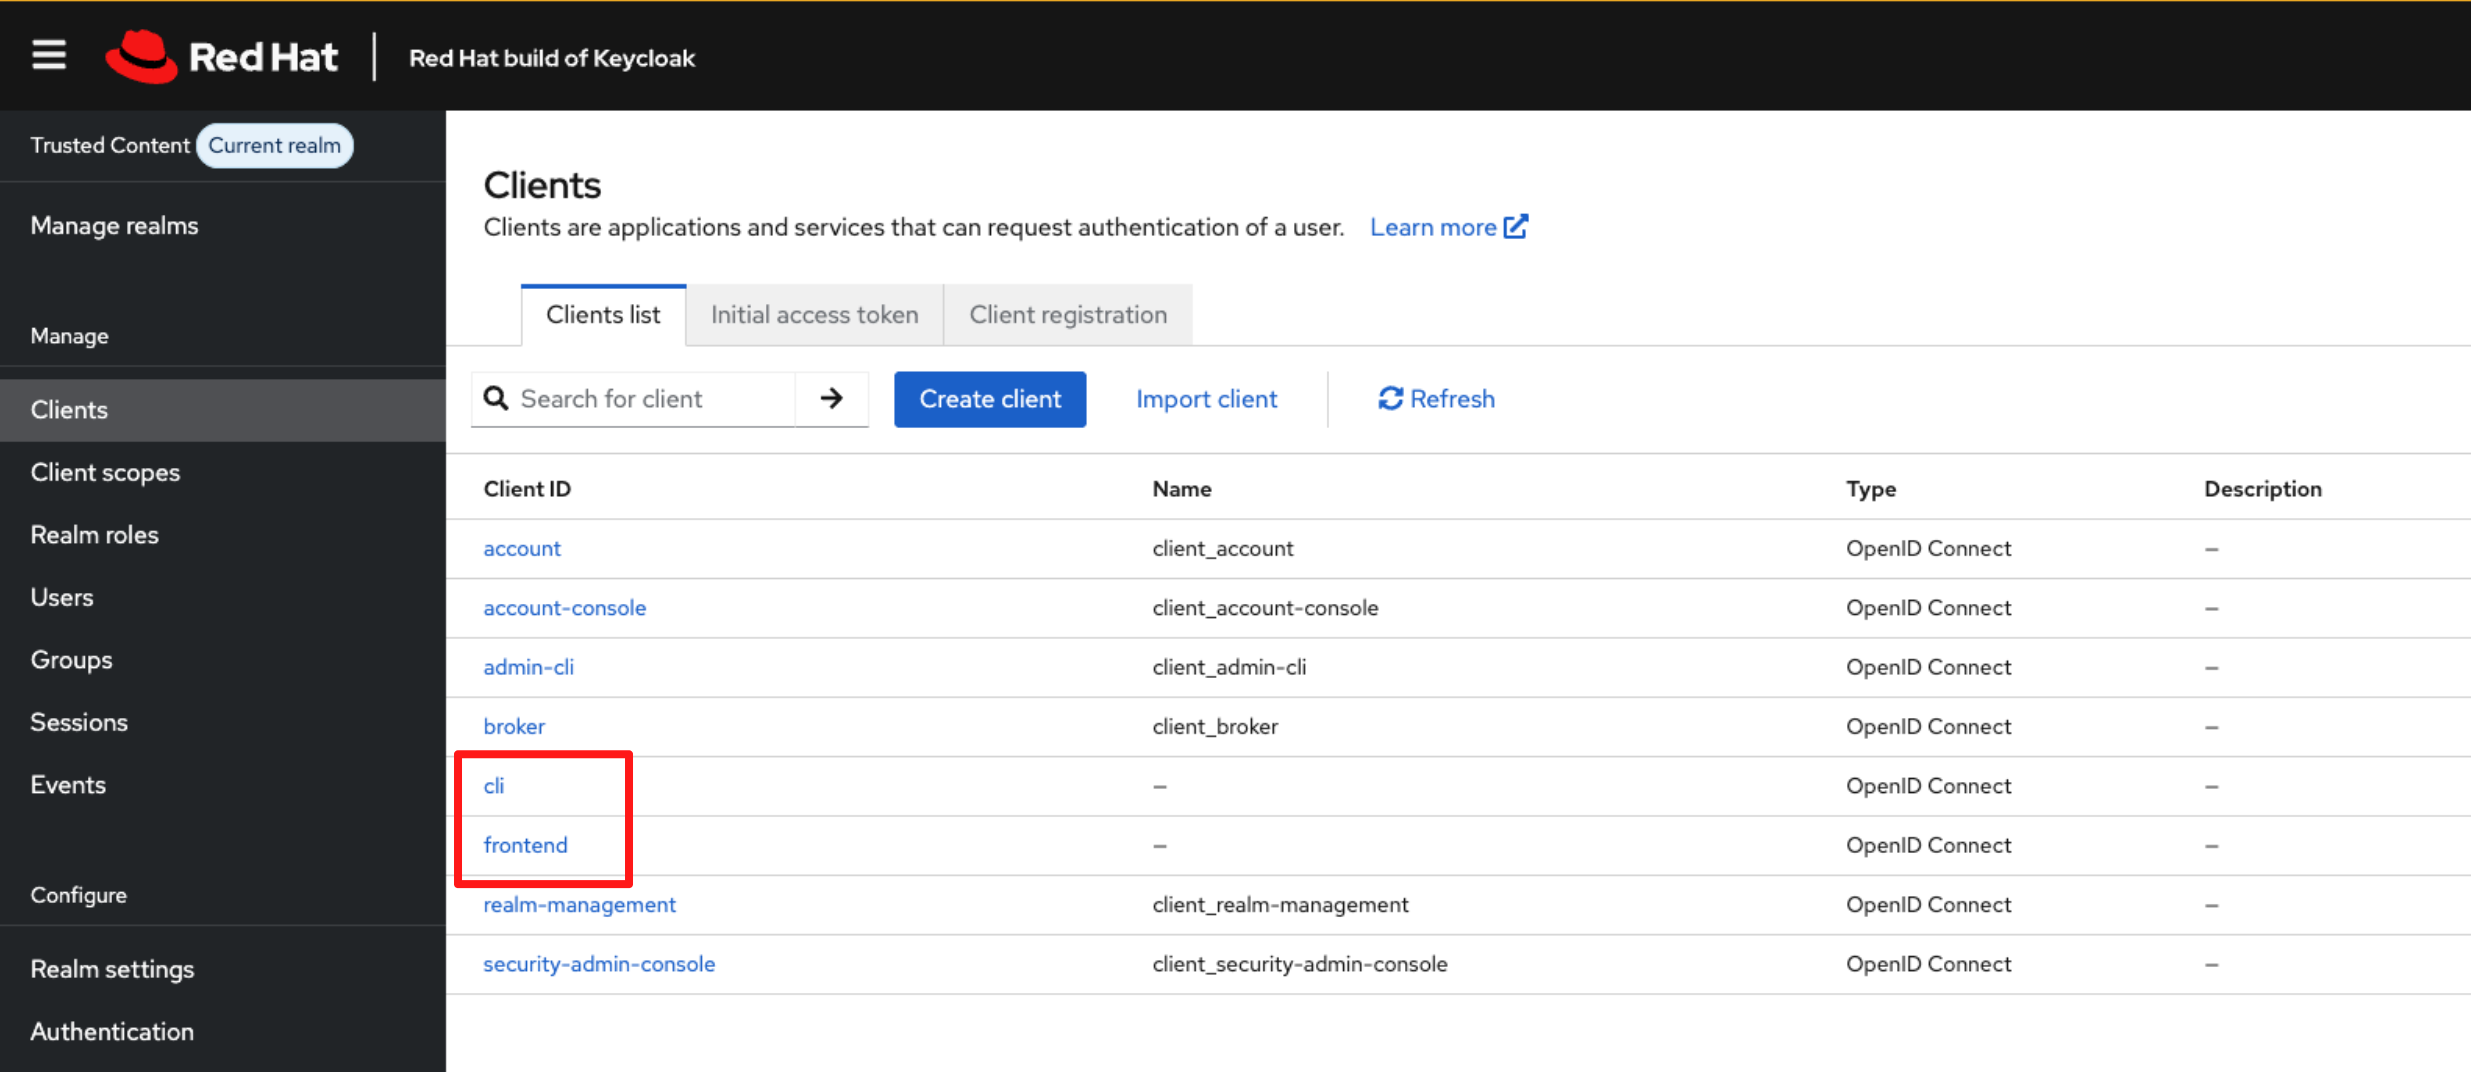
Navigate to Clients in the left menu.
-
You will see the 2 clients created by the import job: cli and frontend.
-
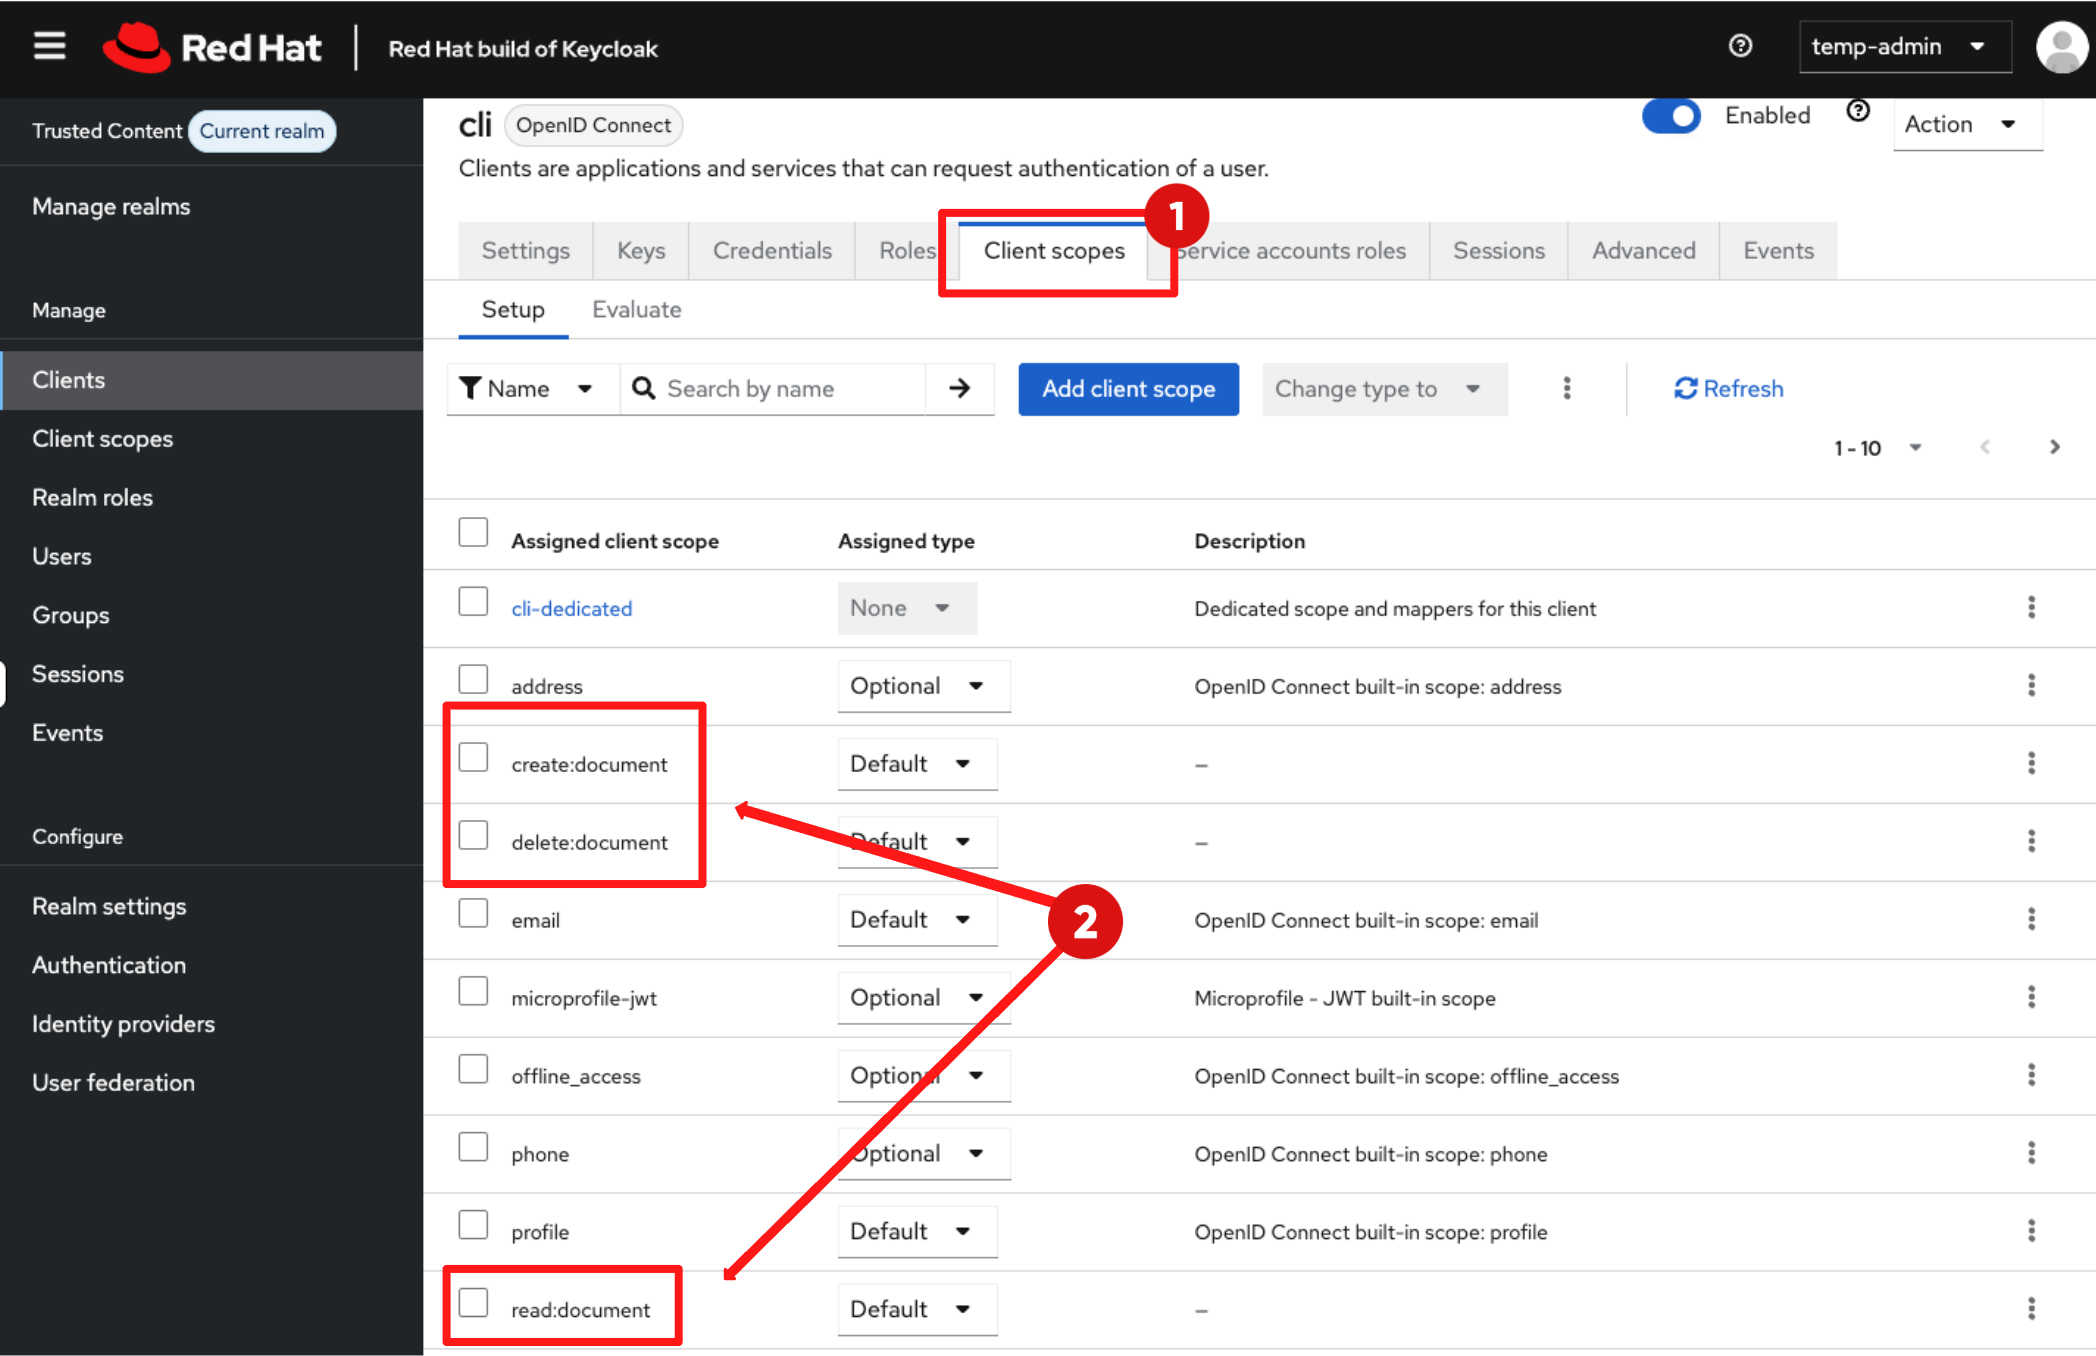
Select the cli client then navigate to Client scopes.
-
You will see the three client scopes (create, delete, read) assigned to this client as per our configuration.
-
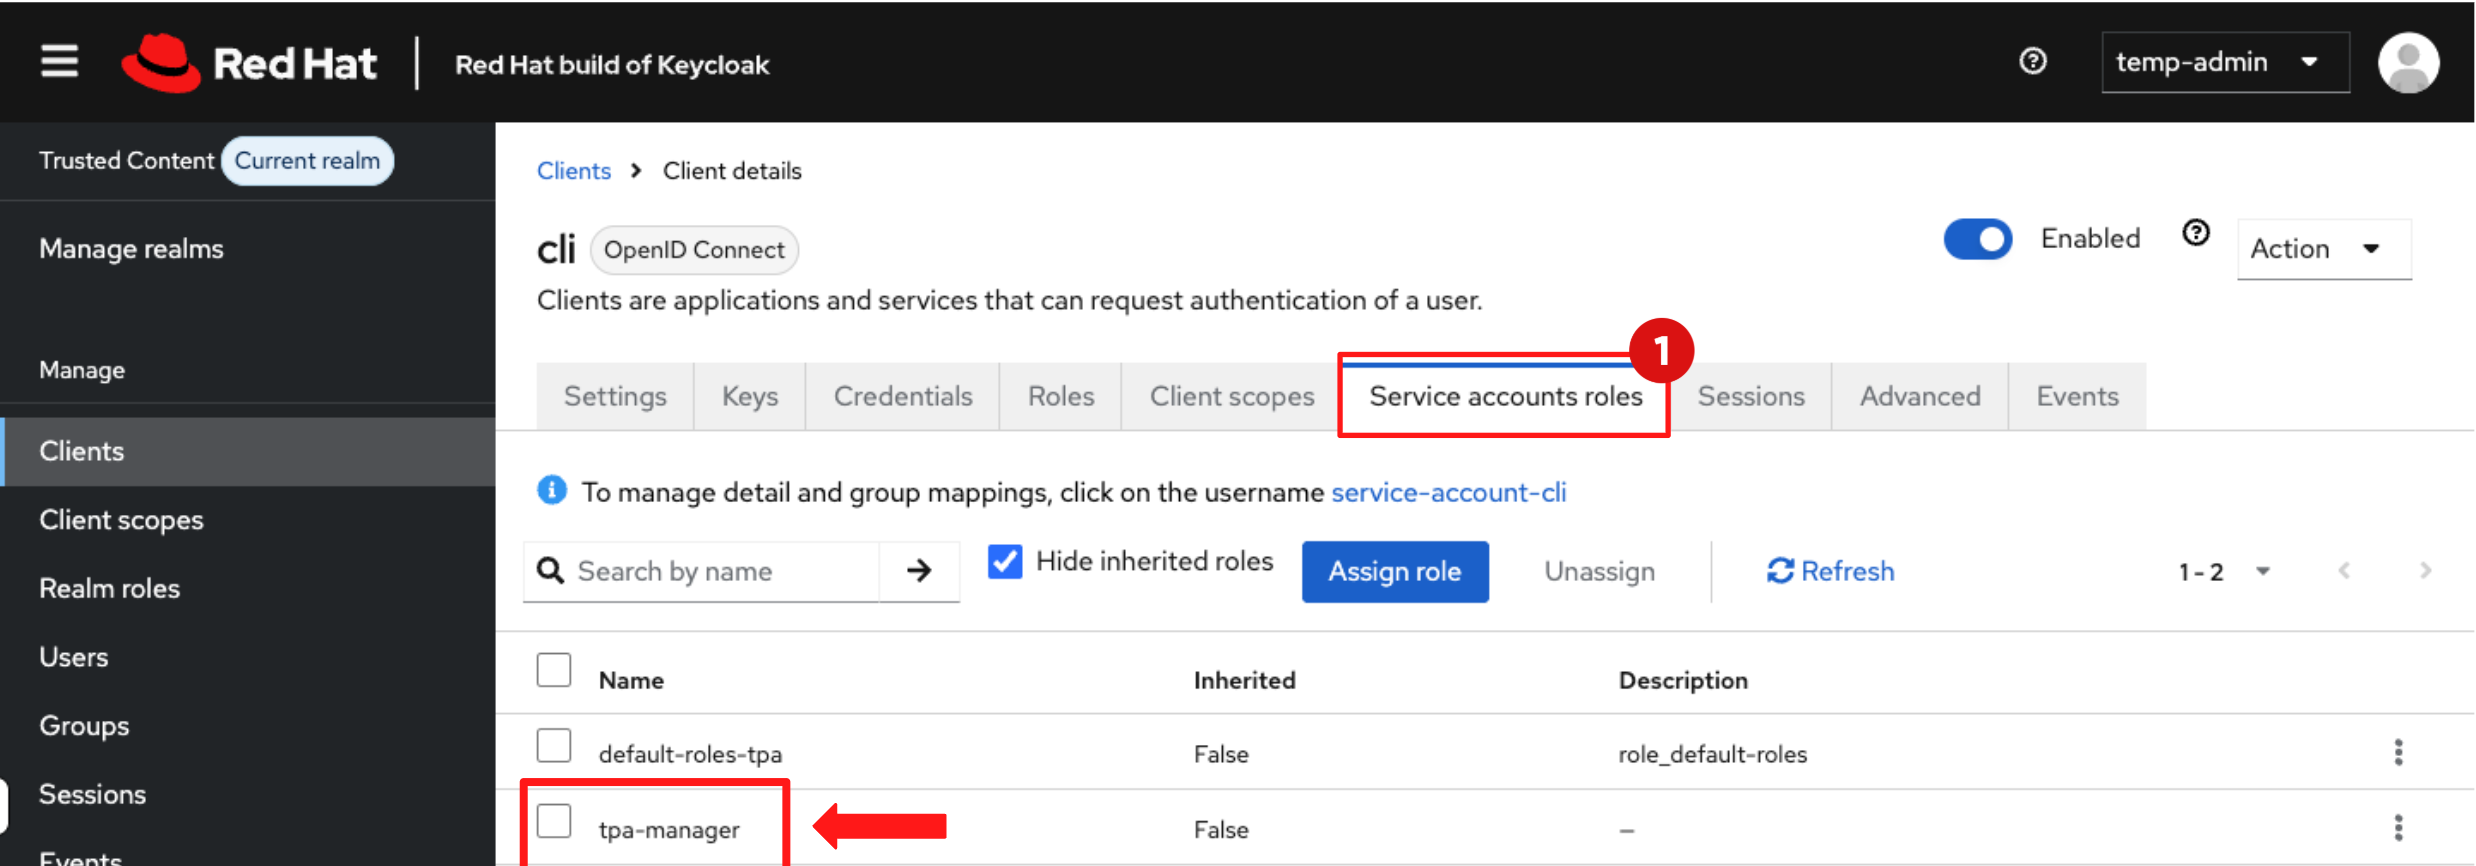
Select Service Account Roles, here you will find that the cli client is assigned the tpa-manager role as expected.
Step 2: Create the RHTPA instance
-
Now that identity is configured, you can deploy a Red Hat Trusted Profile Analyzer (RHTPA) instance.
-
You can deploy RHTPA using Helm or an Operator. In enterprise clusters, the Operator model is preferred because it manages CR lifecycle, upgrades, and dependent components.
-
In this lab, you will apply a Custom Resource (CR) that instructs the Operator to deploy all RHTPA components.
2.1 Configure the Client Secret
-
The RHTPA components authenticate to the Identity Provider using an OIDC Client ID and Client Secret stored in a Kubernetes Secret.
-
Run the following command in the showroom terminal to create the tpa-realm-cli-clients secret:
envsubst < ~/lab-assets/tpa-cli-credentials.yml | oc apply -n tssc-tpa -f -2.2 Deploy RHTPA Instance
-
With the credentials in place, you can now deploy the RHTPA instance using its Custom Resource (CR).
-
The Custom Resource defines the desired state of the RHTPA deployment and instructs the RHTPA Operator to provision it’s components.
-
Run the following command to apply the RHTPA Instance CR:
envsubst < ~/lab-assets/tpa-instance.yml | oc apply -n tssc-tpa -f -Optional Deep Dive: Understanding the RHTPA Custom Resource
-
This CR is your application blueprint. It defines:
-
Authentication to PostgreSQL to store SBOM metadata
-
OIDC configuration to authenticate users and pipelines
-
Persistent storage to store importer data and indexed graphs
-
Importers where vulnerability data comes from
-
==== 1. PostgreSQL authentication configuration
-
This is how RHTPA authenticates to Postgres
database:
  host:
    valueFrom:
      secretKeyRef:
        key: host
        name: tpa-pgsql-user
  name:
    valueFrom:
      secretKeyRef:
        key: dbname
        name: tpa-pgsql-user
==== 2. OIDC configuration
-
This tells RHTPA how to validate OIDC tokens and which clients are allowed to act on it.
oidc:
  issuerUrl: '${KEYCLOAK_URL}/realms/${TPA_REALM}'
  clients:
    cli:
      clientId: cli
      clientSecret:
        valueFrom:
          secretKeyRef:
            key: cli
            name: tpa-realm-cli-clients
    frontend:
      clientId: frontend
==== 3 Storage provisioning (PVC definition)
-
This PVC backs importer datasets and RHTPA’s indexed internal graph store. Without persistent storage, importer snapshots would be lost between pod restarts.
storage:
  size: 32Gi
  type: filesystem
==== 4 Importers (where vulnerability data comes from)
-
RHTPA isn’t useful without ingestion. The CR enables daily importers:
modules:
  createImporters:
    enabled: true
    importers:
      cve:
        cve:
          period: 1d
          source: 'https://github.com/CVEProject/cvelistV5'
      osv-github:
        osv:
          period: 1d
source: 'https://github.com/github/advisory-database'-
This section configures the vulnerability importers used by RHTPA to populate its vulnerability database.
-
The importers.cve importer pulls official CVE data from the CVE Project, providing a broad, standardised vulnerability feed.
-
The importers.osv-github importer consumes the GitHub Security Advisory database, which often includes ecosystem-specific and early disclosures.
-
The period setting controls how frequently each feed is refreshed. With period: 1d, vulnerability data is updated daily, ensuring SBOM analysis is performed against current and relevant security information.
-
-
These importers pull upstream vulnerability intelligence daily, enabling RHTPA to match component identifiers from SBOM documents against known advisories (NVD and GitHub Security). Without importer data, correlation would return empty results.
2.3 Validate the RHTPA deployment
-
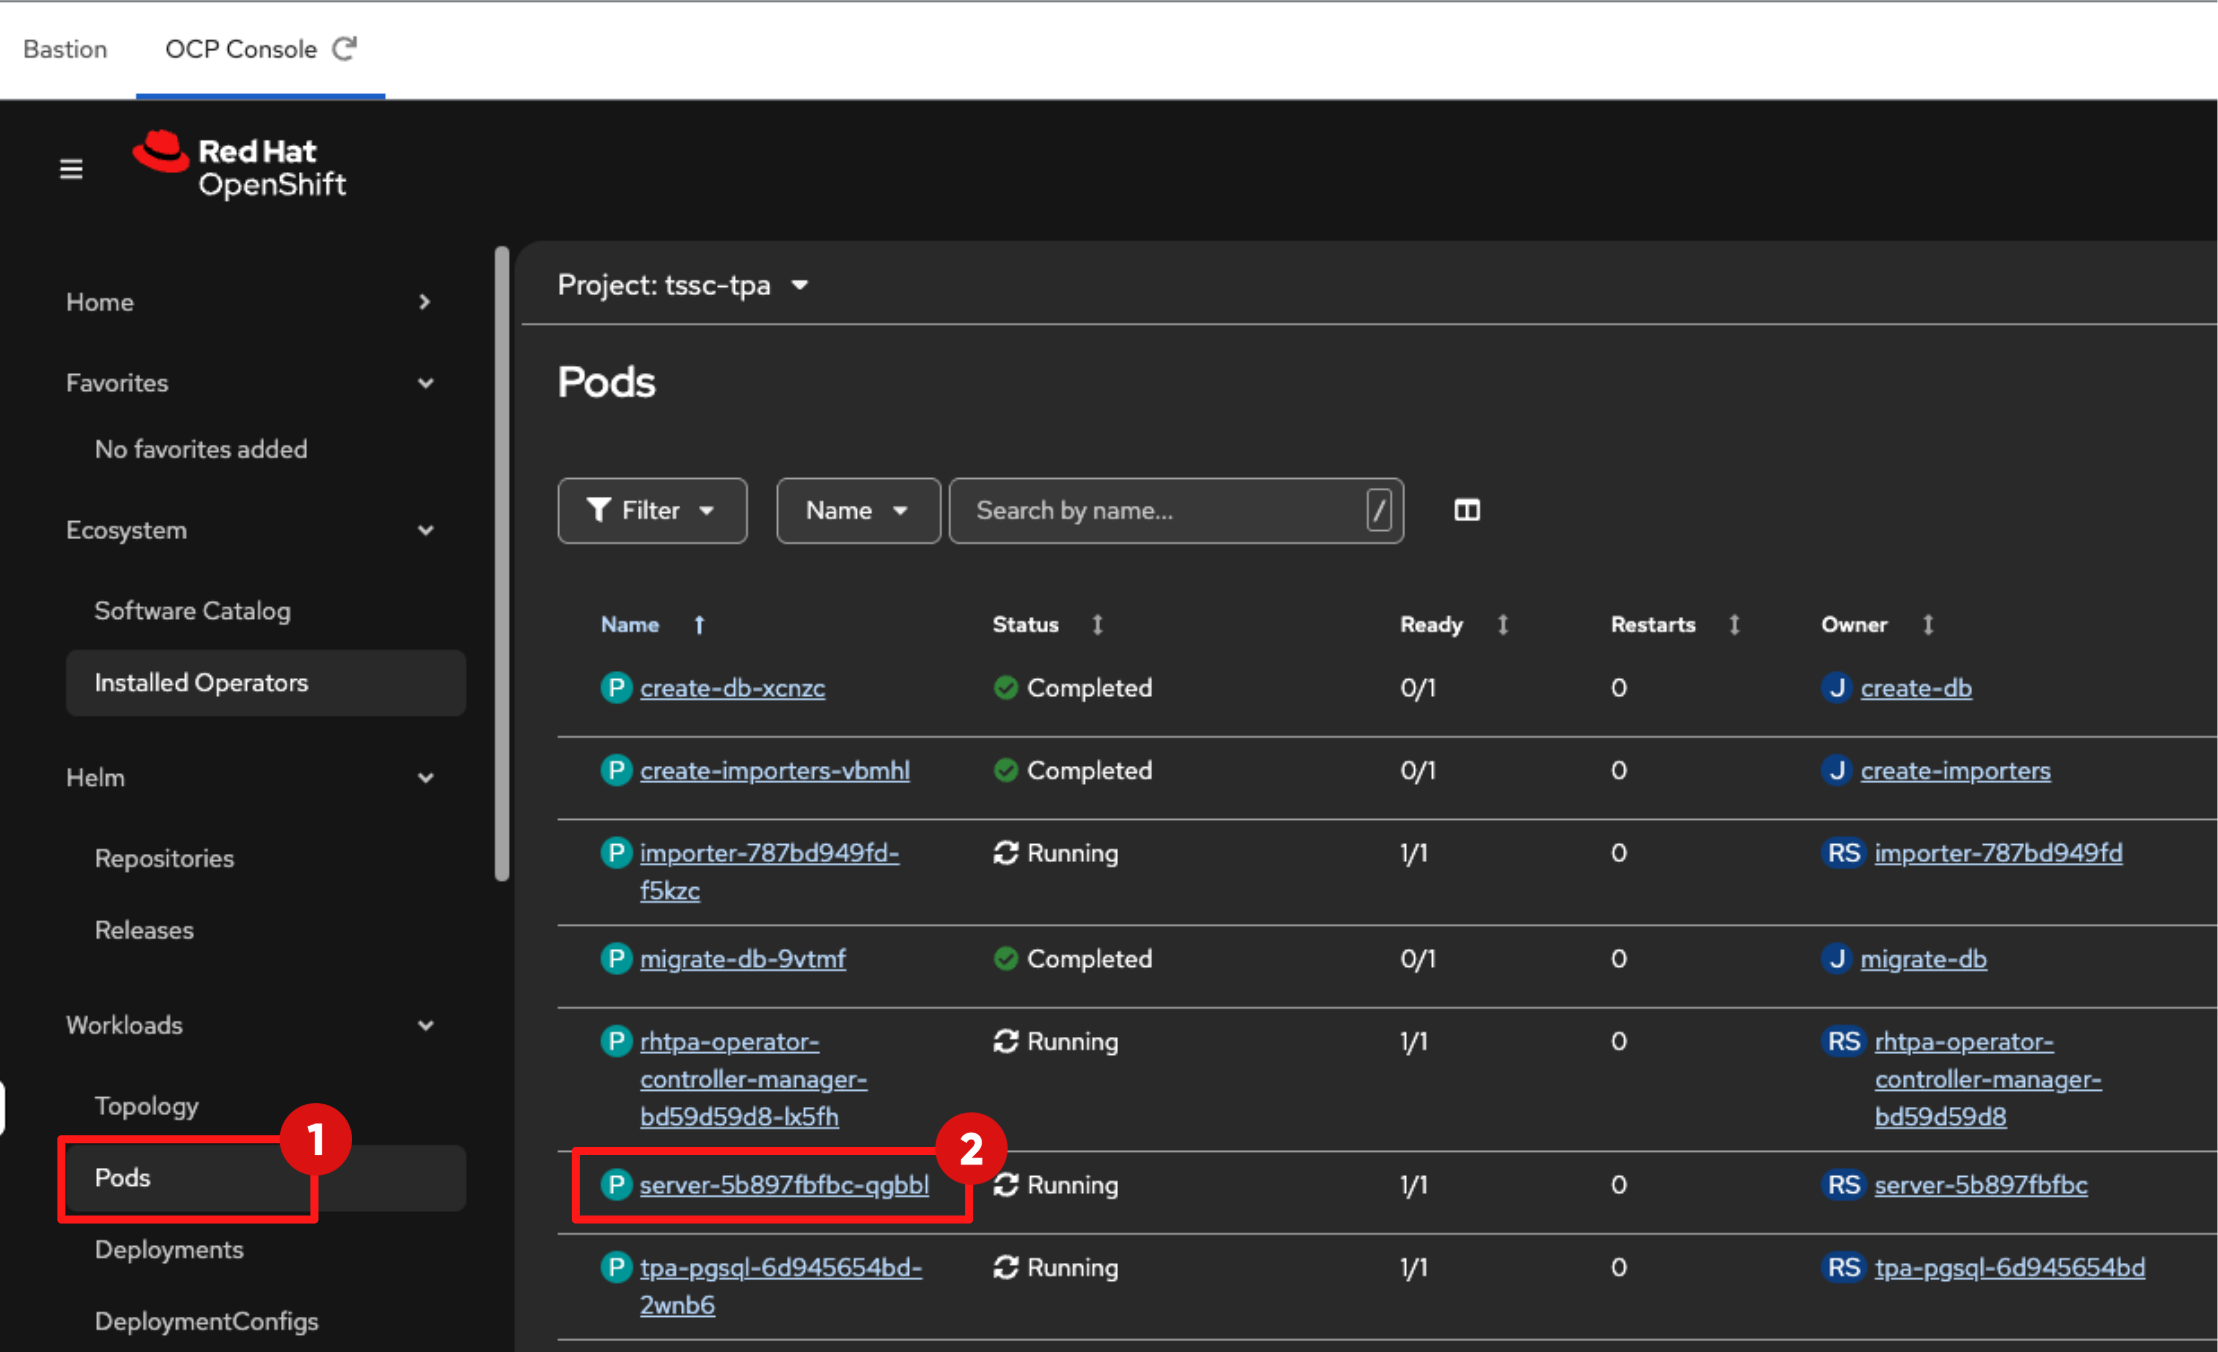
Switch to the OpenShift Console tab in your Showroom.
-
Select the project:
tssc-tpa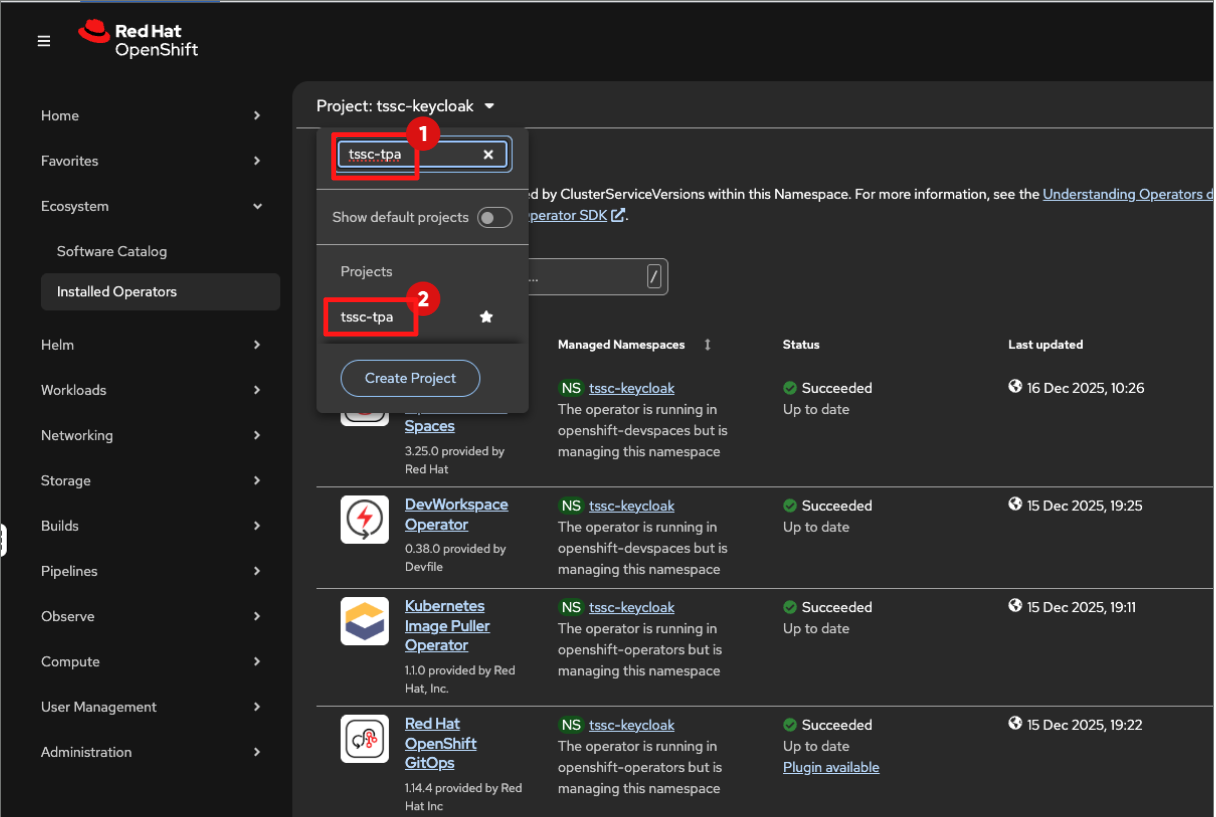
-
Navigate to: Workloads → Pods and confirm that the RHTPA server pod is in the Running state and Ready is 1/1, this may take 2-5 minutes. The pod name will follow the format server-<hash>.
Step 3: Ingest an SBOM
What is an SBOM, anyway?
-
A Software Bill of Materials (SBOM) is a machine-readable inventory that lists all components, libraries, and dependencies included in a software artifact, along with their metadata (such as version, licence, and source). Common formats include SPDX and CycloneDX.
-
In this step, you simulate a CI/CD pipeline by uploading an SBOM to RHTPA using its API.
3.1 Ingest the SBOM into RHTPA
-
In the Showroom terminal, run the following command to extract the external route for the RHTPA server:
export TPA_SERVER_URL="https://$(oc get route -l app.kubernetes.io/component=server -n tssc-tpa -o json \
| jq -r '.items[0].spec.host')"-
To upload an SBOM to RHTPA you must authenticate every API request.
-
The CLI client does this by obtaining an access token from Red Hat Build of Keycloak (RHBK), which is then included in each API call.
-
Run the following commands to discover the token endpoint and obtain an access token:
TOKEN_EP=$(curl "$KEYCLOAK_URL/realms/$TPA_REALM/.well-known/openid-configuration" | jq -r .token_endpoint)
TOKEN=$(curl -s -X POST "$TOKEN_EP" \
  -d grant_type=client_credentials \
  -d client_id="cli" \
-d client_secret="$TPA_CLI_CLIENT_SECRET" | jq -r .access_token)-
Use the token to POST an SBOM file to the ingestion API:
curl -X POST ${TPA_SERVER_URL}/api/v2/sbom?id=test-sbom -H "Authorization: Bearer ${TOKEN}" -H "Content-Type: application/json" --data-binary @/home/lab-user/lab-assets/example-sbom.json-
A successful upload returns a JSON payload containing a UUID, for example: {"id":"urn:uuid:…"}.
-
This confirms three things:
-
Authentication via OIDC is functioning.
-
Scope-based authorization is correctly enforced.
-
The RHTPA ingestion service is accepting SBOM uploads..
-
| You are manually exercising the cli client credentials here. In Module 4, Tekton Chains will use this same client configuration to automatically push SBOMs during the build pipeline. |
Step 4: View the SBOM from RHTPA UI
-
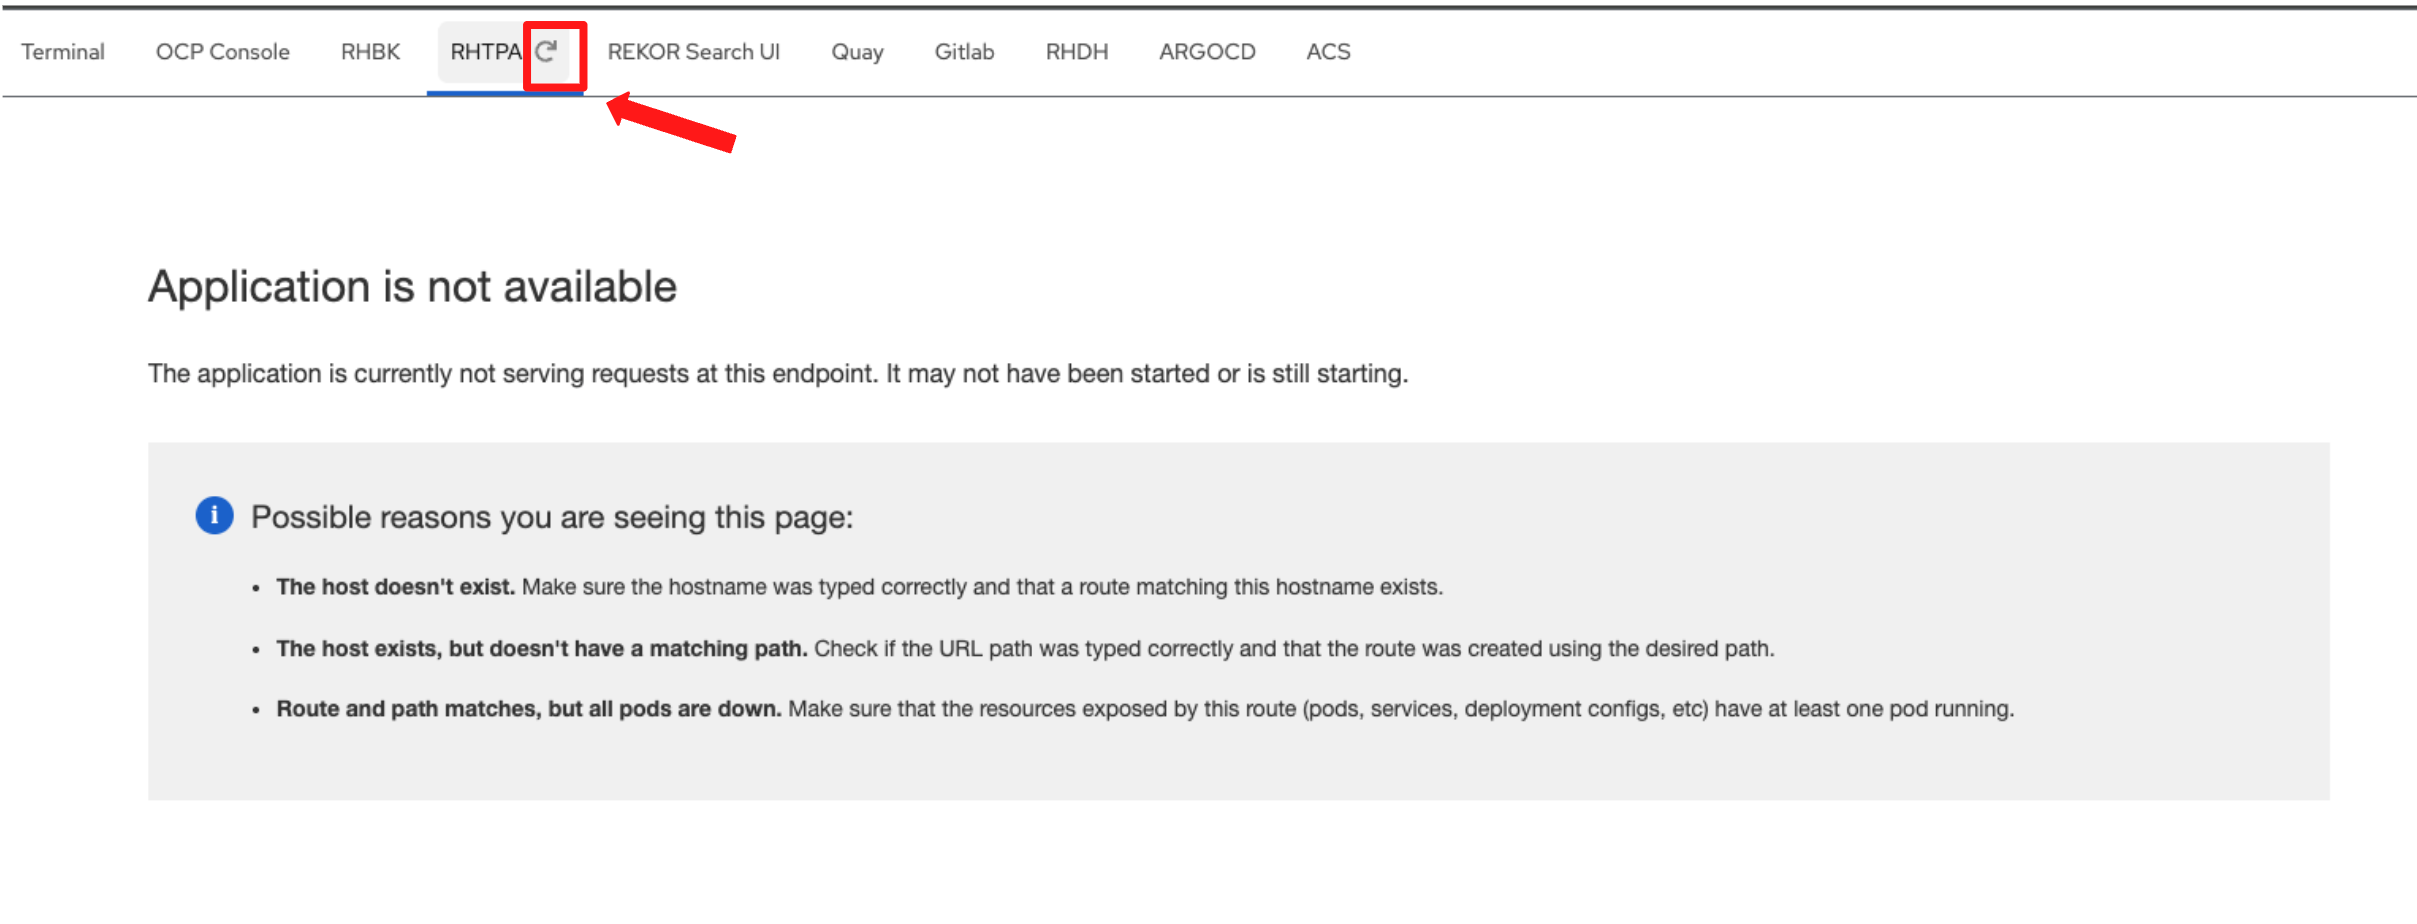
Click the RHTPA Console tab in the Showroom, you may need to refresh the tab (Do not refresh the browser page itself).
-
Log in to the RHTPA console using the following credentials:
-
Username:
{tpa_admin_username}-
Password:
{tpa_admin_password}-
After entering your credentials, click Sign In.
-
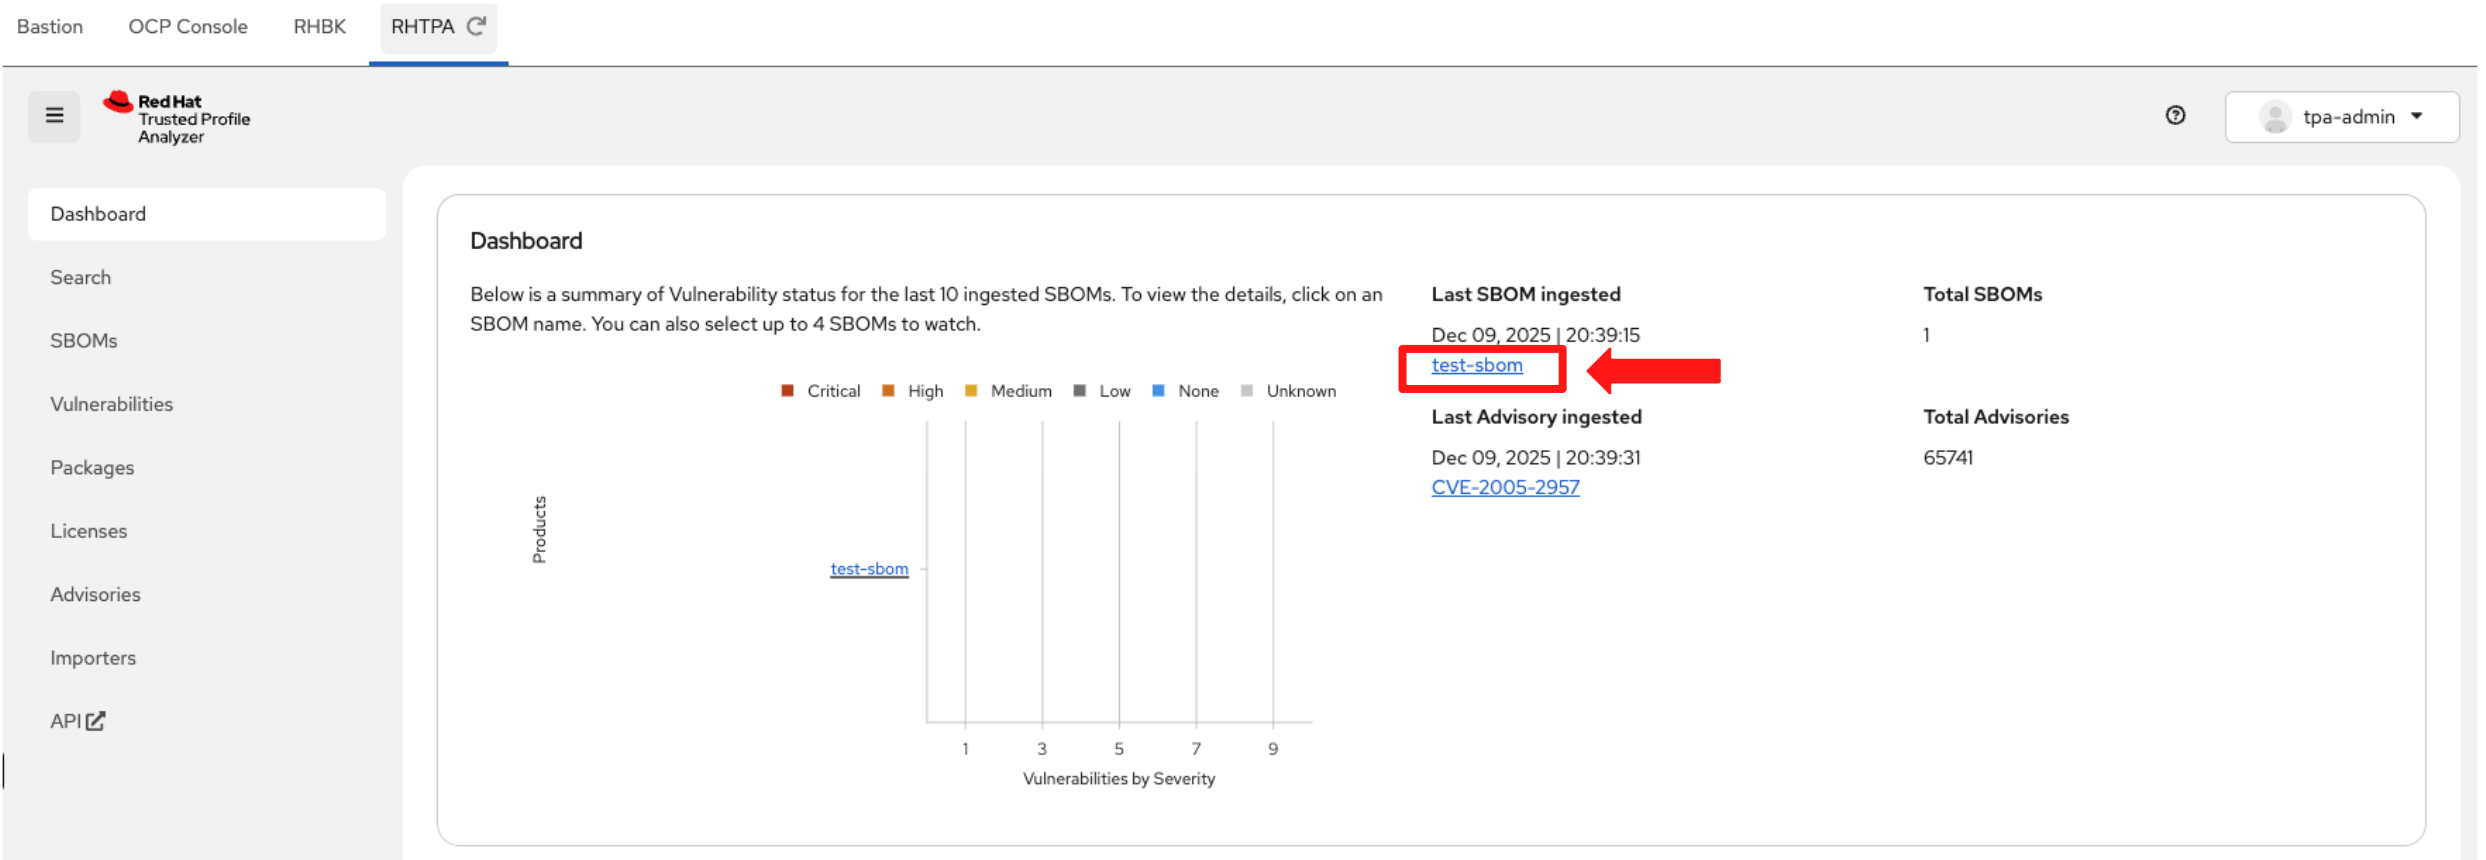
Once logged in, check the dashboard. You should see test-sbom listed in the inventory.
-
Click test-sbom link to view its details.
-
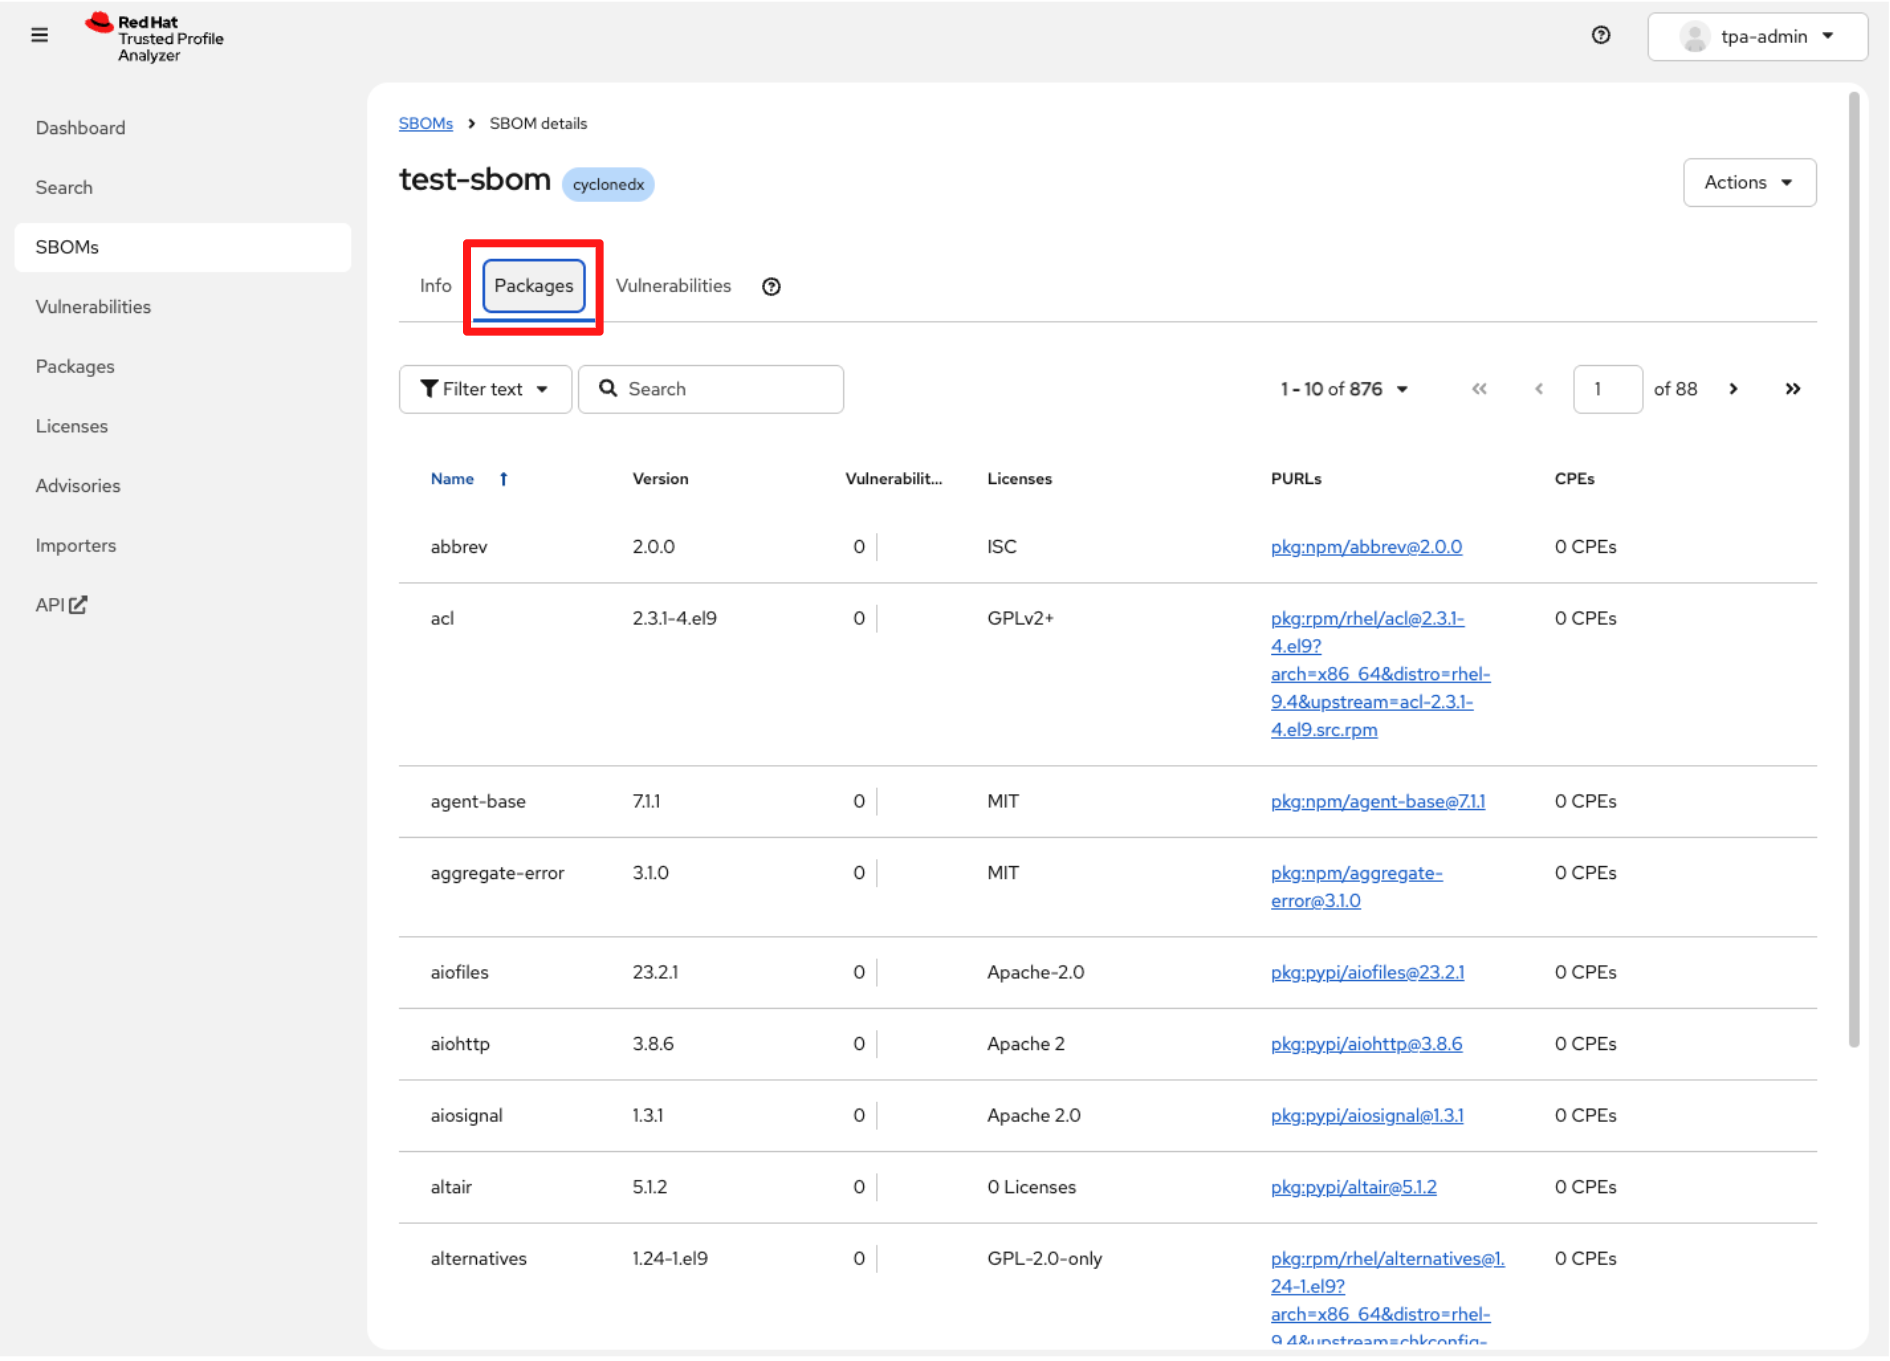
Switch to the Packages tab. RHTPA shows an inventory of all packages contained in the SBOM you uploaded.
-
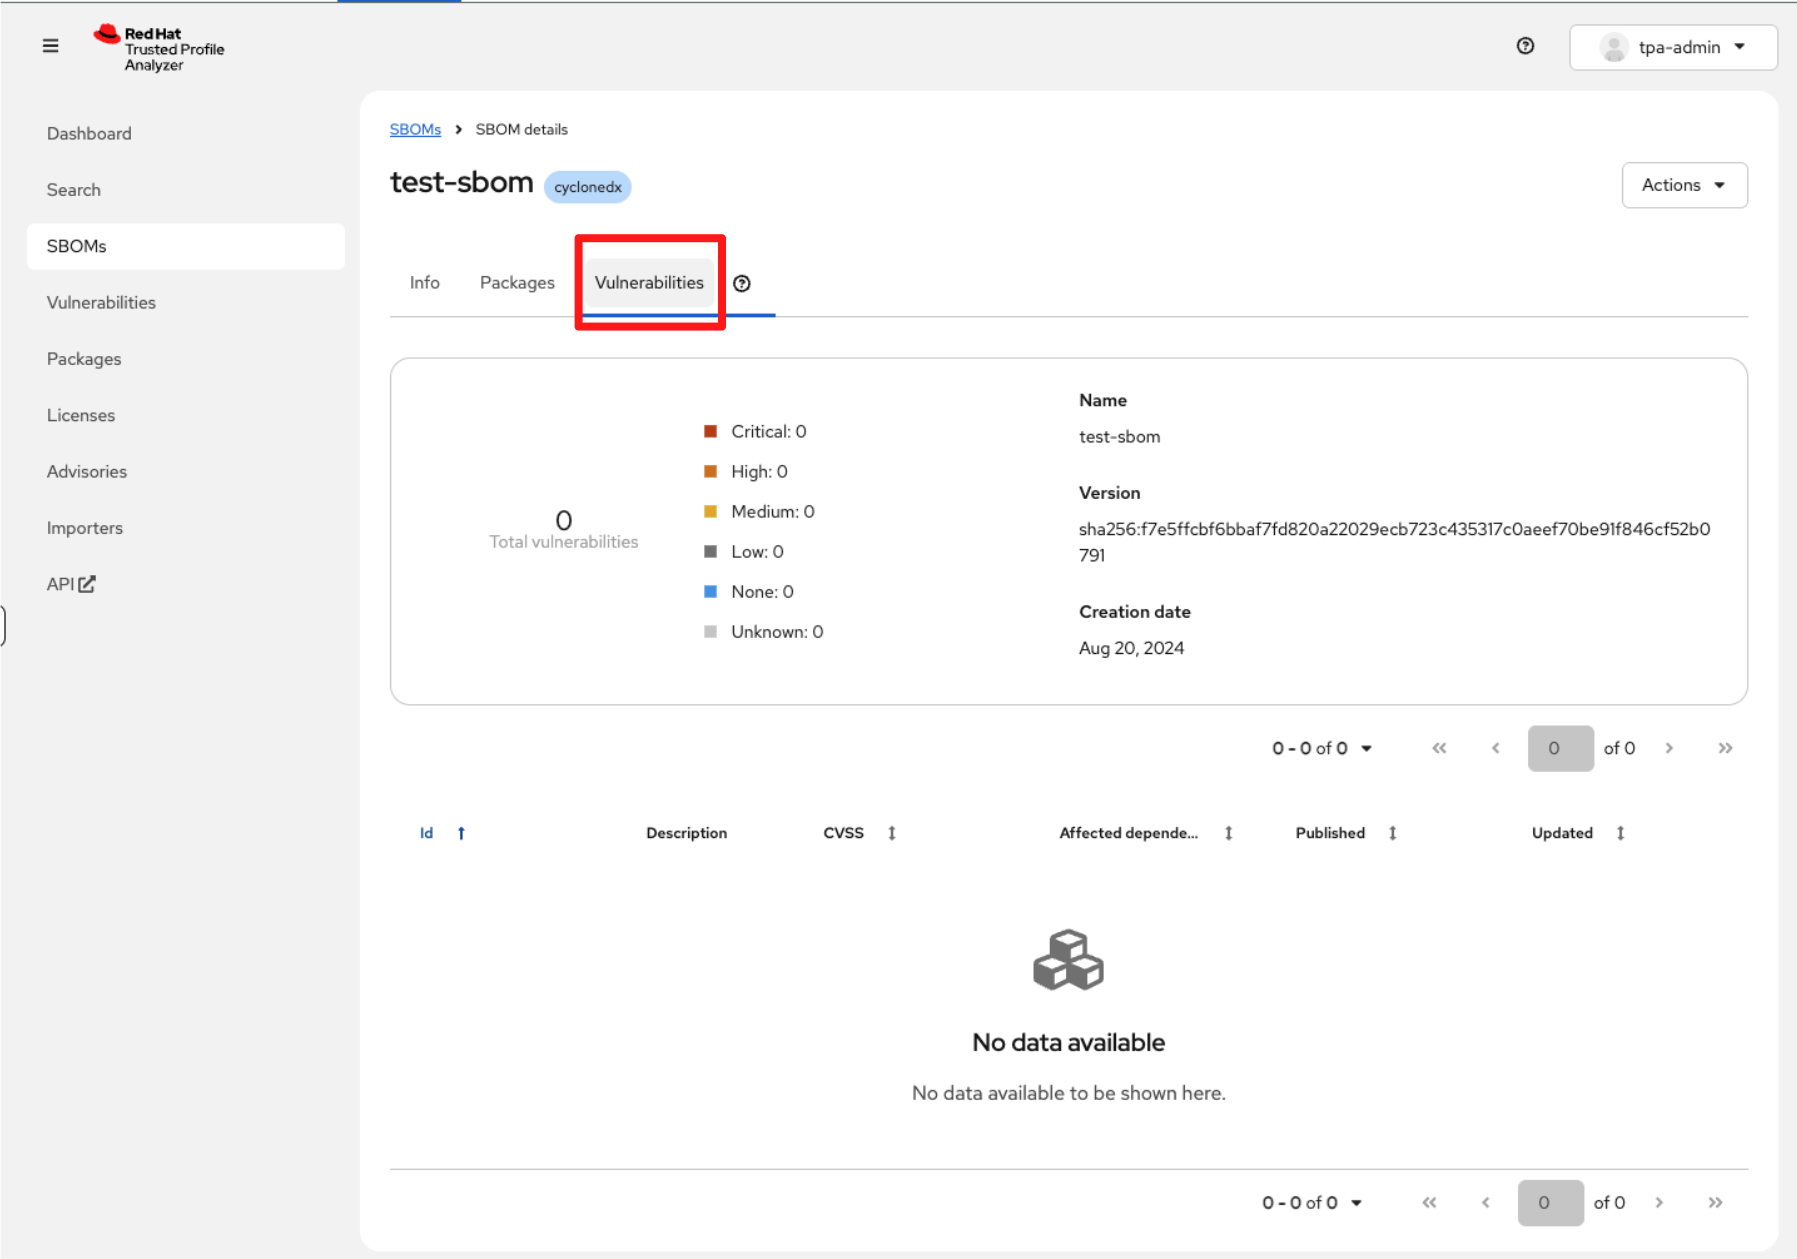
Switch to the Vulnerabilities tab. You will notice that the view is currently empty.
|
Why is the vulnerability report empty? If the test-sbom entry shows zero vulnerabilities, this is expected in a fresh installation. Reason: RHTPA relies on background importer jobs to download large vulnerability advisory datasets, including the National Vulnerability Database (NVD), the U.S. government’s authoritative CVE repository, and GitHub Security Advisories. These datasets must be fully synced before RHTPA can correlate vulnerabilities with SBOM components. The initial sync can take significant time, especially in new environments. |
-
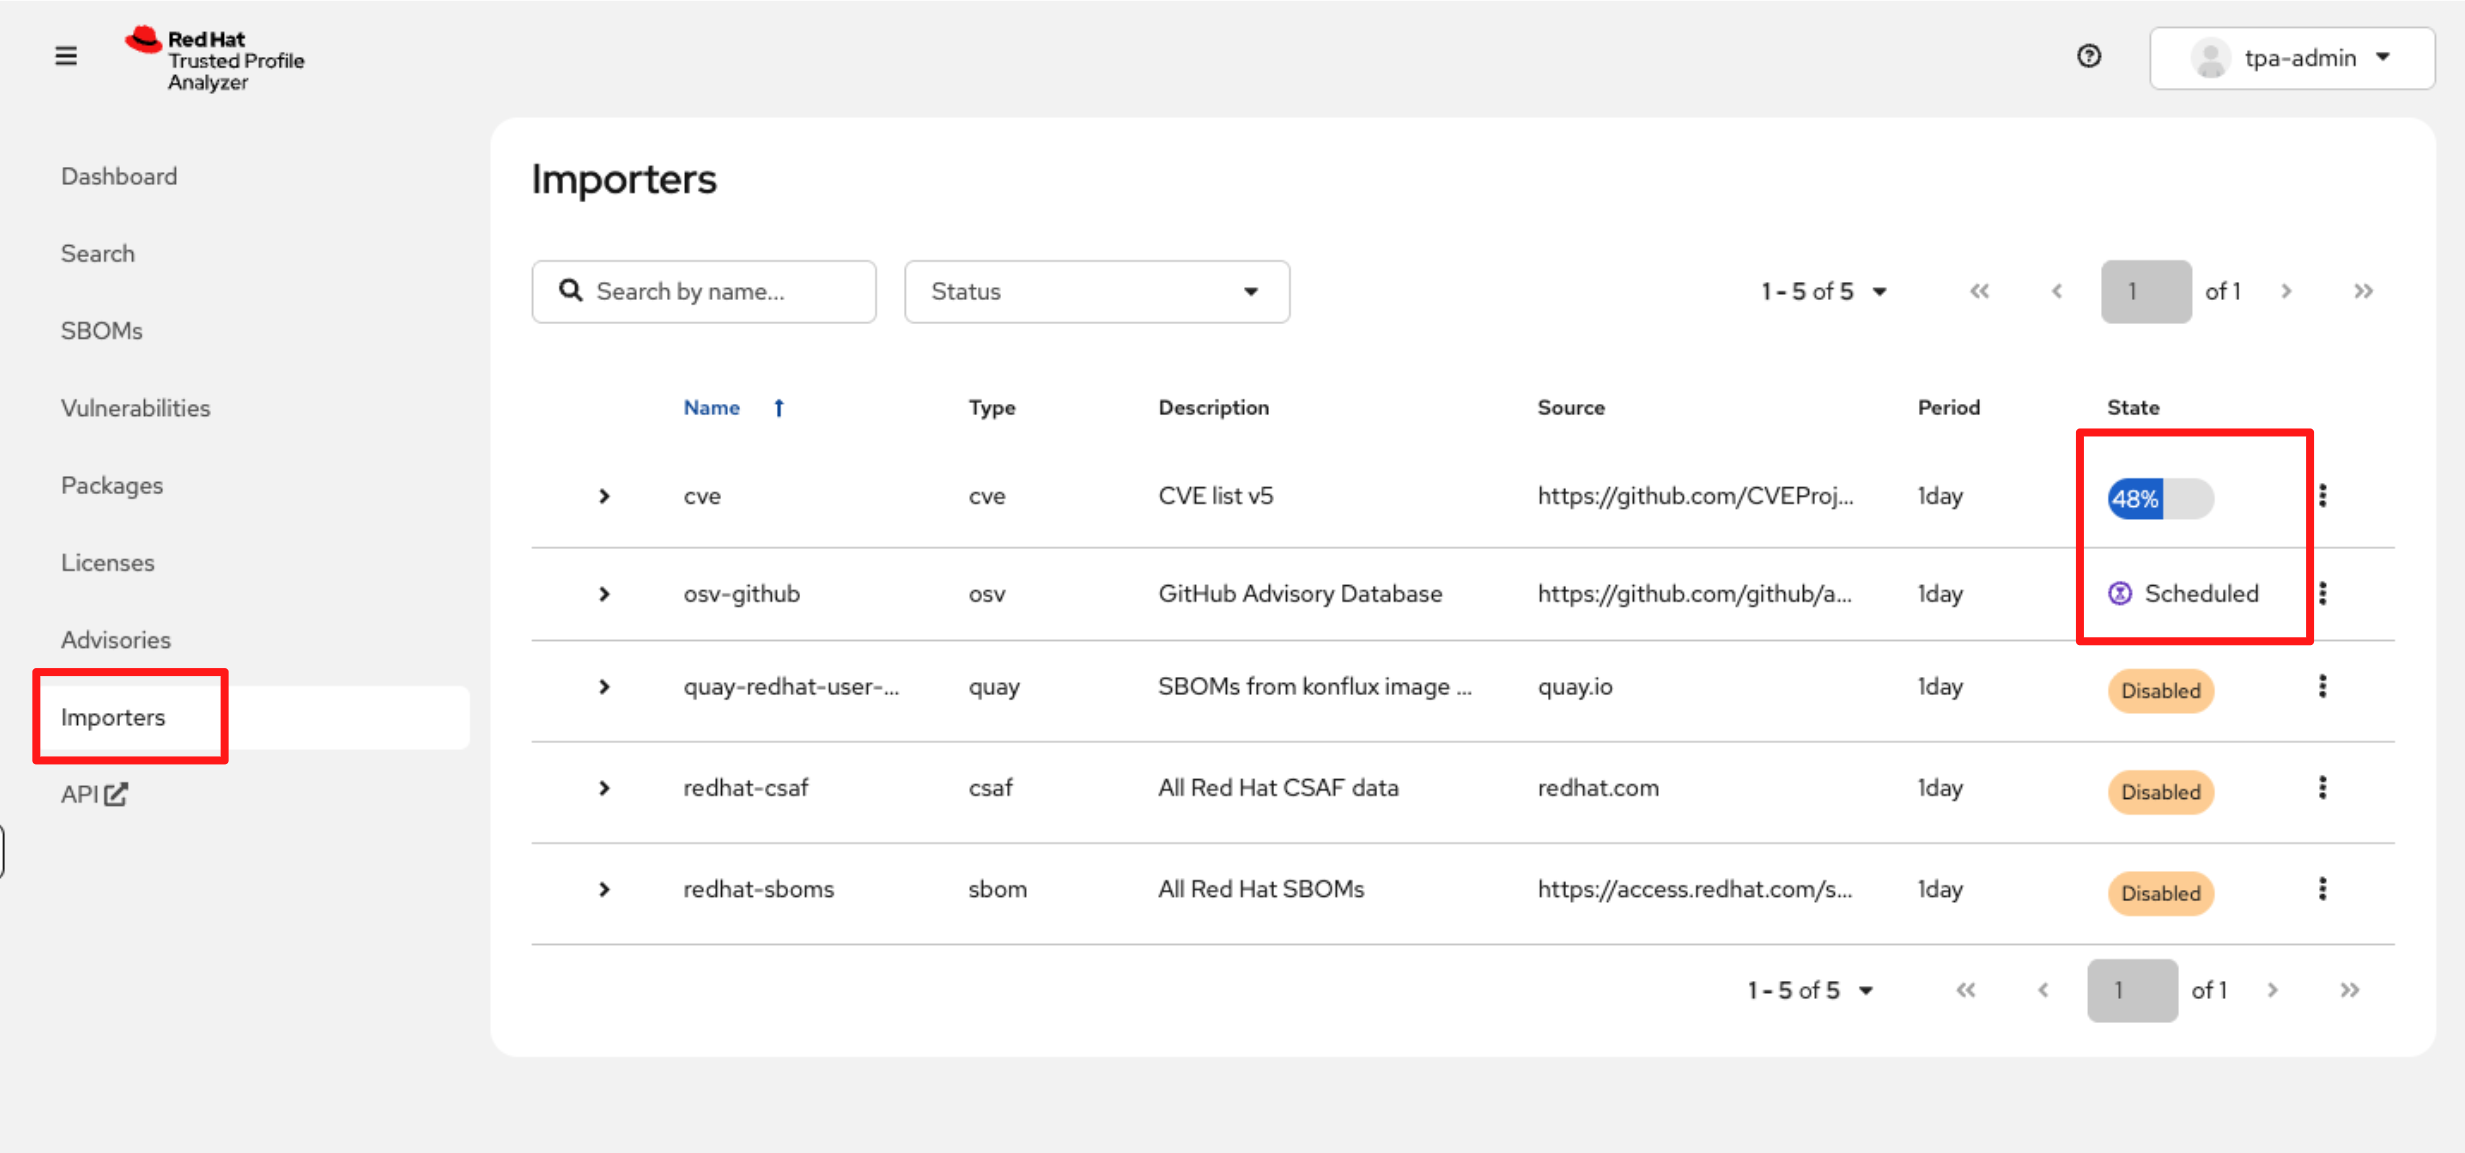
In the left navigation, select Importers.
-
You will see the advisory import jobs running for the sources configured in the tssc-tpa YAML you applied.
-
These import jobs can take quite a while to complete, so you may not see full results during today’s lab.
-
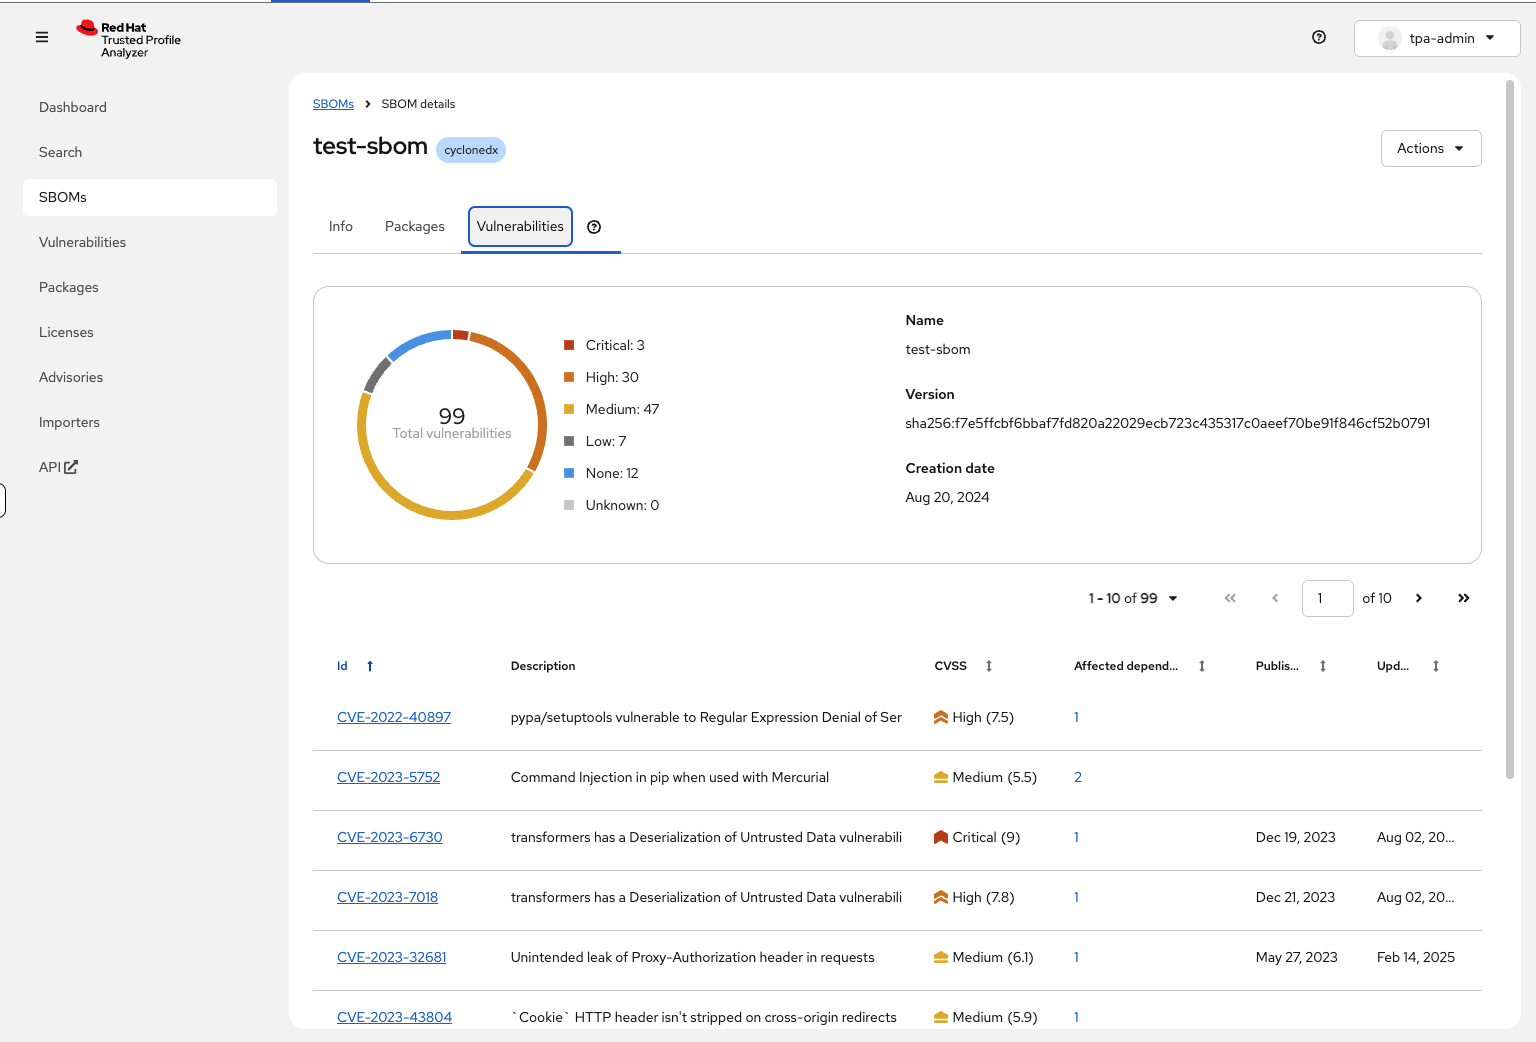
Once imports are finished, you would see identified vulnerabilities, similar to the example below:
Module 1: Summary
-
By completing this module, you configured identity in RHBK, deployed RHTPA and validated your first SBOM, establishing a reliable source of truth for software composition. This is a good starting point for consultants implementing early-stage supply-chain controls for customers.
-
For technical sellers, when a customer says, “We cannot verify or attest to the components that make up our software,” you now know exactly where to start. RHTPA gives customers an auditable view of their software composition, enabling risk assessment from the very first stage of the software delivery process.
-
And now that we know what is in our software, the next question naturally follows: “How do we know these artifacts haven’t been tampered with?” That is the next trust boundary we will solve.
-
Head to Module 2 to learn how to cryptographically sign and verify artifacts using Red Hat Trusted Artifact Signer (RHTAS), ensuring every image you build can be traced, trusted and validated.