Module 3: Developer workflow without developer friction
Introduction
Modern software delivery is shaped by two opposing forces. On one side, security expectations have never been higher. Organisations are under pressure to prove where their software comes from, how it was built, and whether it can be trusted across every stage of the supply chain. On the other side, developers face increasing cognitive load. Tool sprawl, fragmented workflows, and manual security steps slow delivery and create frustration when security is bolted on after the fact. Most organisations struggle to balance both. They invest heavily in security tooling or developer productivity, but rarely achieve both without friction. This is where platform engineering comes in.
Platform Engineering and Internal Developer Portals
Platform engineering is the discipline of designing and operating a curated internal platform that abstracts complexity and delivers secure capabilities to development teams. Platform engineering teams build and maintain Internal Developer Platforms (IDPs) that bring together the tools and capabilities developers need to deliver software effectively. These capabilities are exposed through consistent, opinionated, self-service Golden Path templates.
Golden Paths are standardised, reusable, and secure workflows that guide developers through building, testing, and deploying software in the approved way. They reduce decision fatigue for developers while ensuring security and compliance are enforced by design. The outcome is twofold: developers focus on writing code rather than managing infrastructure or security plumbing, and security and compliance are applied consistently as part of the platform. In this workshop, the IDP you will use is Red Hat Developer Hub (RHDH).
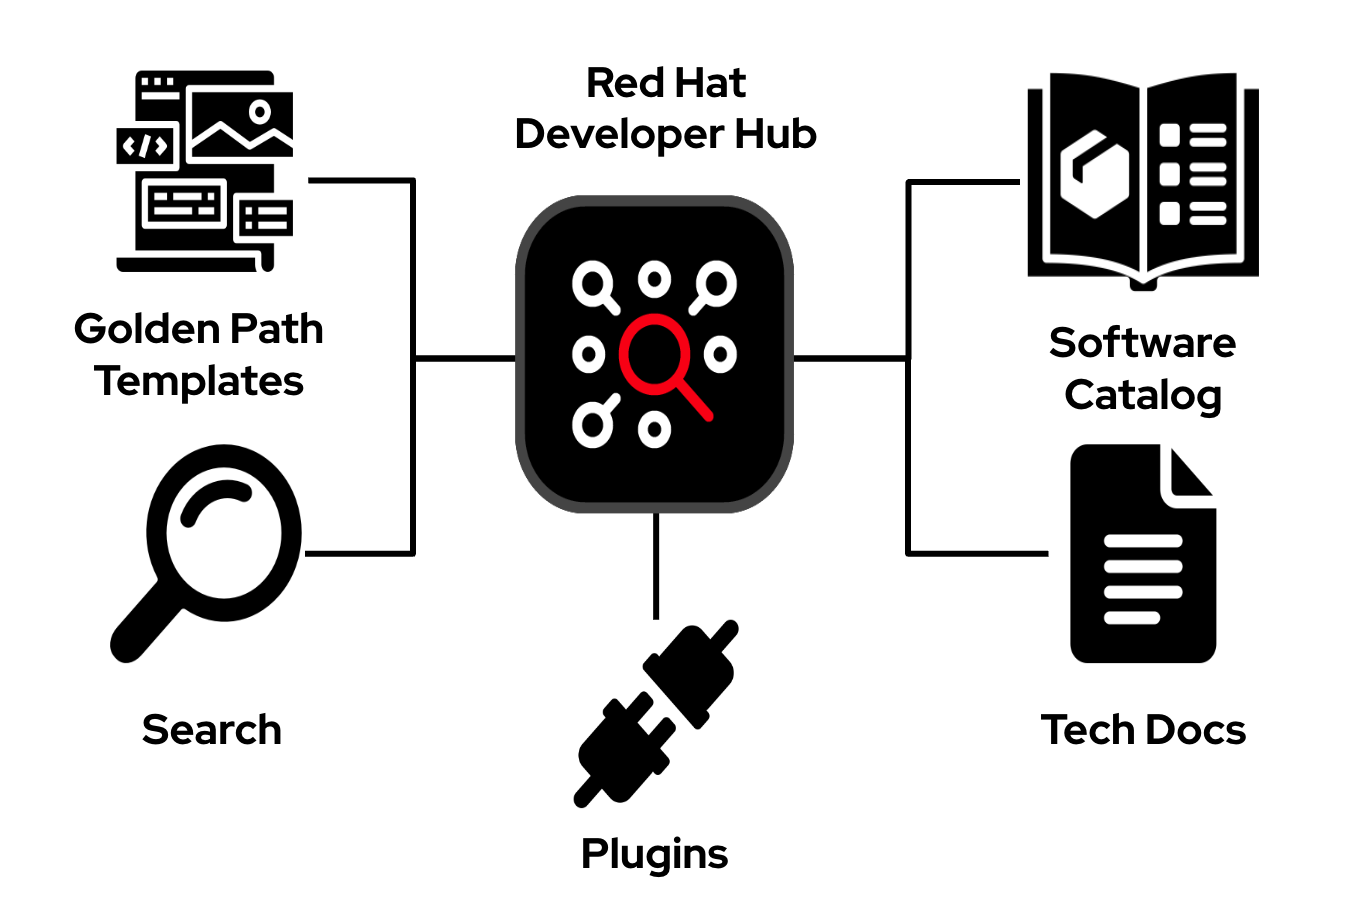
What is Red Hat Developer Hub (RHDH)?
Red Hat Developer Hub (RHDH) is Red Hat’s enterprise-grade developer platform for building Internal Developer Portals (IDPs). RHDH is based on the upstream Backstage project created by Spotify. In modern development environments, IDPs play a pivotal role by providing developers with a centralised interface to access the organisation’s technology stack, eliminating the need to search for information or navigate a maze of disconnected tools and systems.
Red Hat Developer Hub (RHDH) is equipped with a curated set of capabilities and tools, based on Red Hat’s platform engineering vision and industry best practices. Together, these provide customers with an opinionated, fully supported Internal Developer Portal designed to meet the evolving needs of modern development environments.
-
The Software Catalog: A centralized directory that lists all services, libraries, and documentation, simplifying the process for developers to find the components they need.
-
TechDocs: Facilitates easy access to up-to-date documentation for all software components. It supports the documentation-as-code philosophy, allowing documentation to live alongside the code, making it very easy to maintain documentation.
-
Search: Enables developers to efficiently locate information across the entire RHDH ecosystem. This feature is essential for quickly finding services, documentation, and other resources.
-
Software templates: Streamlines the setup process for new projects, services, or libraries. This ensures consistency and adherence to best practices in all new development efforts.
-
Plugins: Modular extensions that enhance RHDH with new features or integrate it with external tools and services.
What You Will Learn in This Module
In this module, you will see how platform engineering principles turn the supply-chain security foundations from Modules 1 and 2 into frictionless developer workflows. You will use Configuration as Code and GitOps practices to:
-
Enable SSO-based authentication
-
Configure developer-facing plugins
-
Setup catalog auto-discovery
Step 1: User and Identity Configuration
Before enabling Red Hat Developer Hub (RHDH) features, you need to create a developer identity. In this step, you will create a developer user (user1) in the sso realm. Typically a developer identity will already exist, for example from LDAP or the organisation’s existing SSO system.
| In this lab, RHDH, OpenShift, and OpenShift Dev Spaces all share the sso realm. This is intentionally different from the tpa realm used in Module 1. Using a shared realm enables seamless Single Sign-On (SSO) across the OpenShift Console, OpenShift Dev Spaces, and Red Hat Developer Hub. |
1.1 Log in RHBK
If you are not already logged in to RHBK, click the RHBK Console tab in the Showroom and log in using:
Username:
{keycloak_admin_user}Password:
{keycloak_admin_password}After entering your credentials, click Sign In.
1.2 Create the Developer User
-
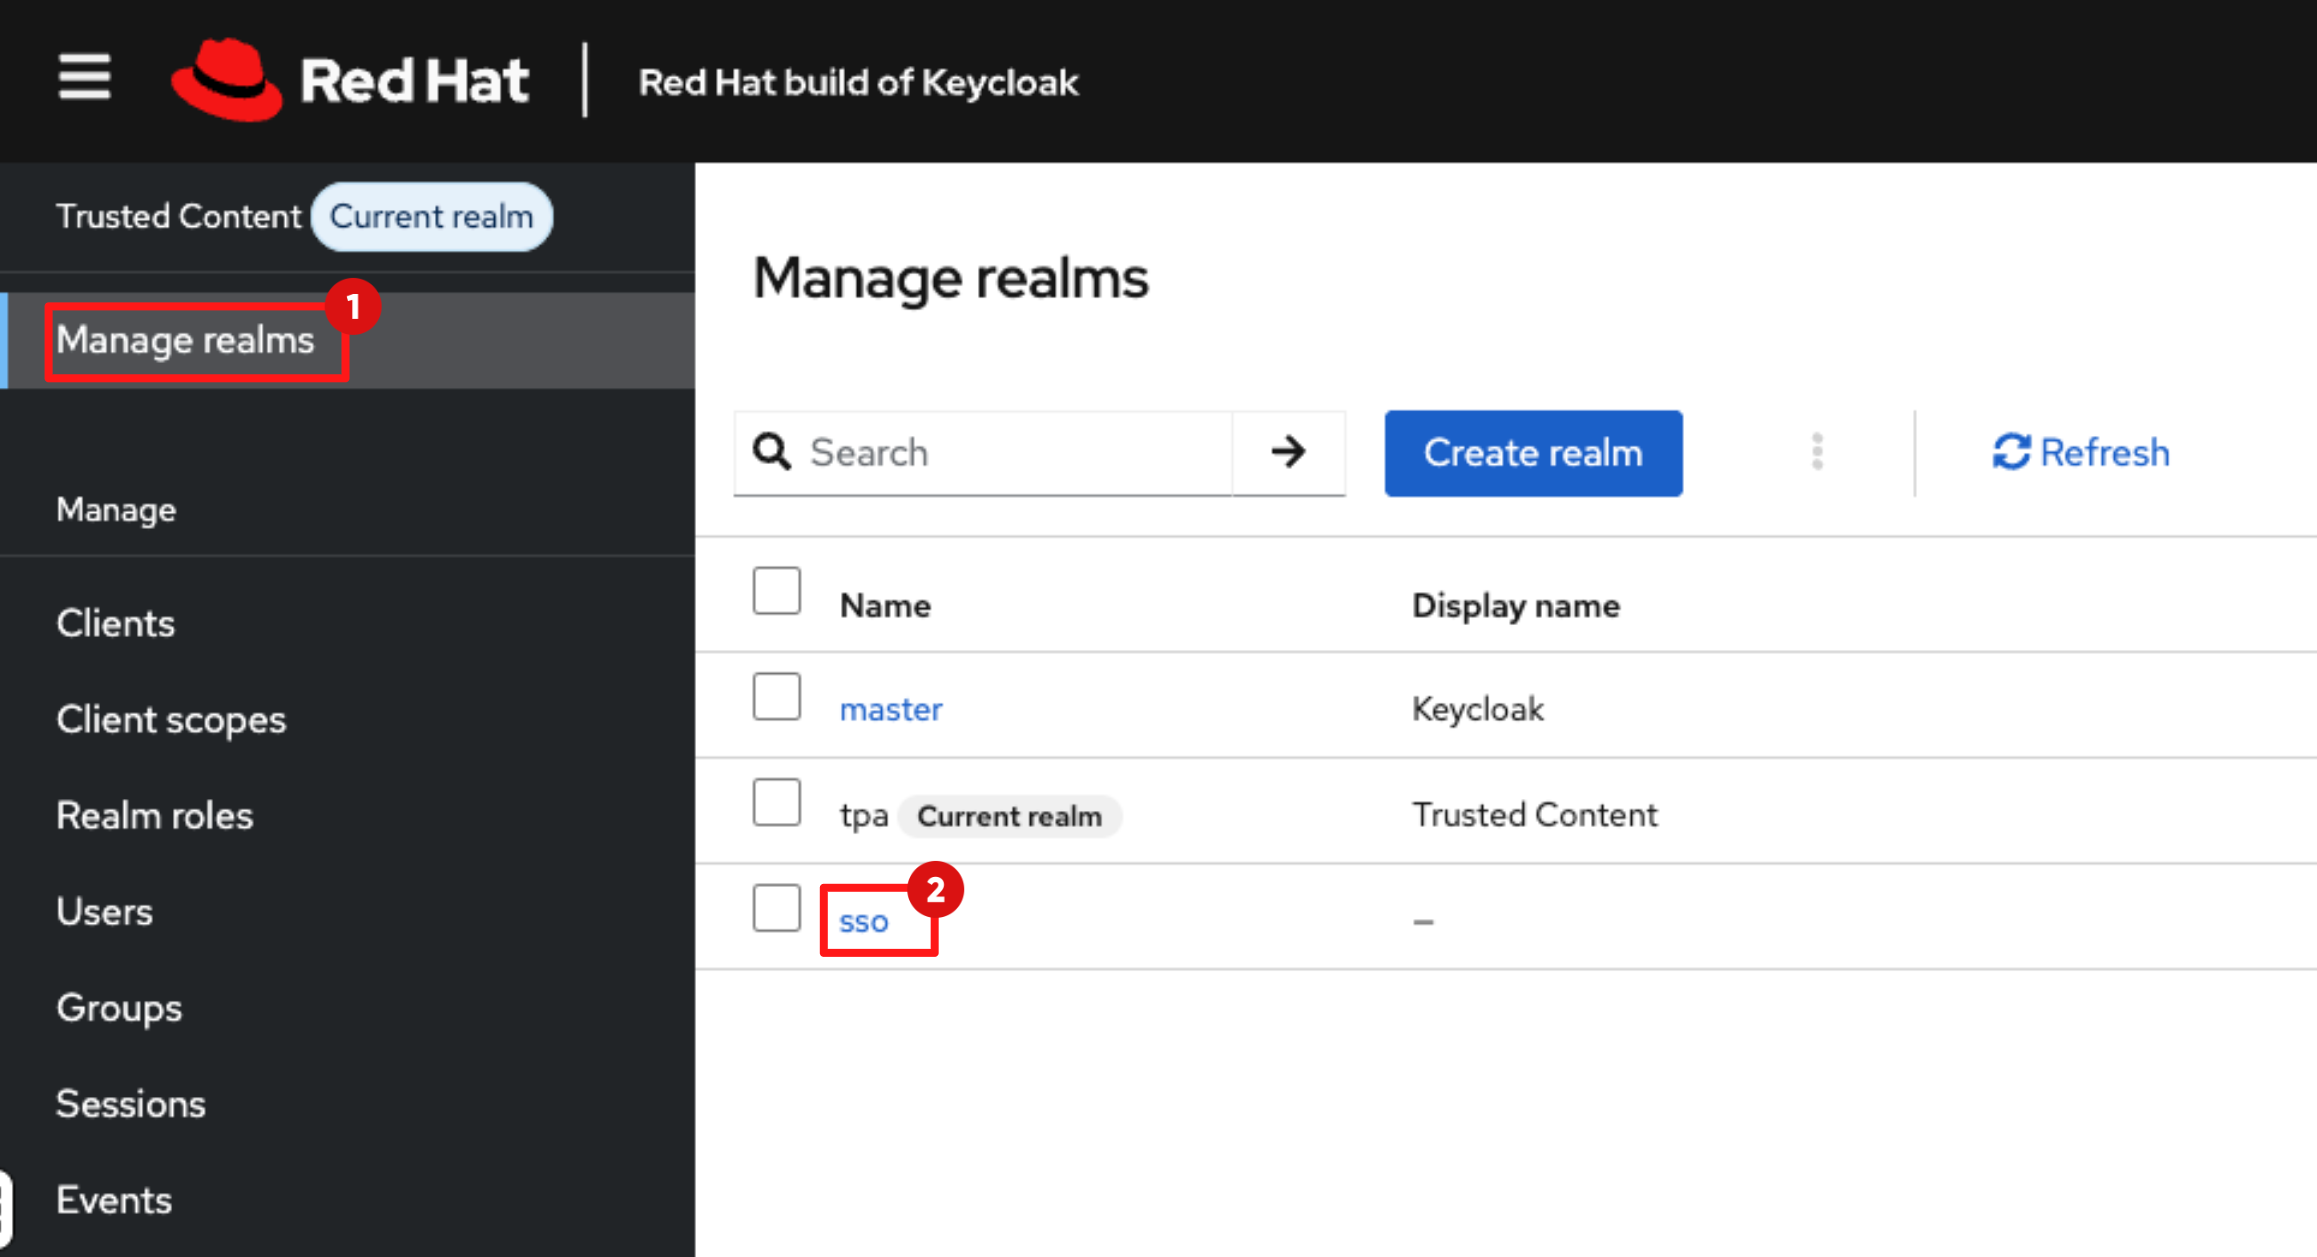
Switch to the sso realm:
-
In the RHBK Console click Manage Realm.
-
Select the sso realm.
-
-
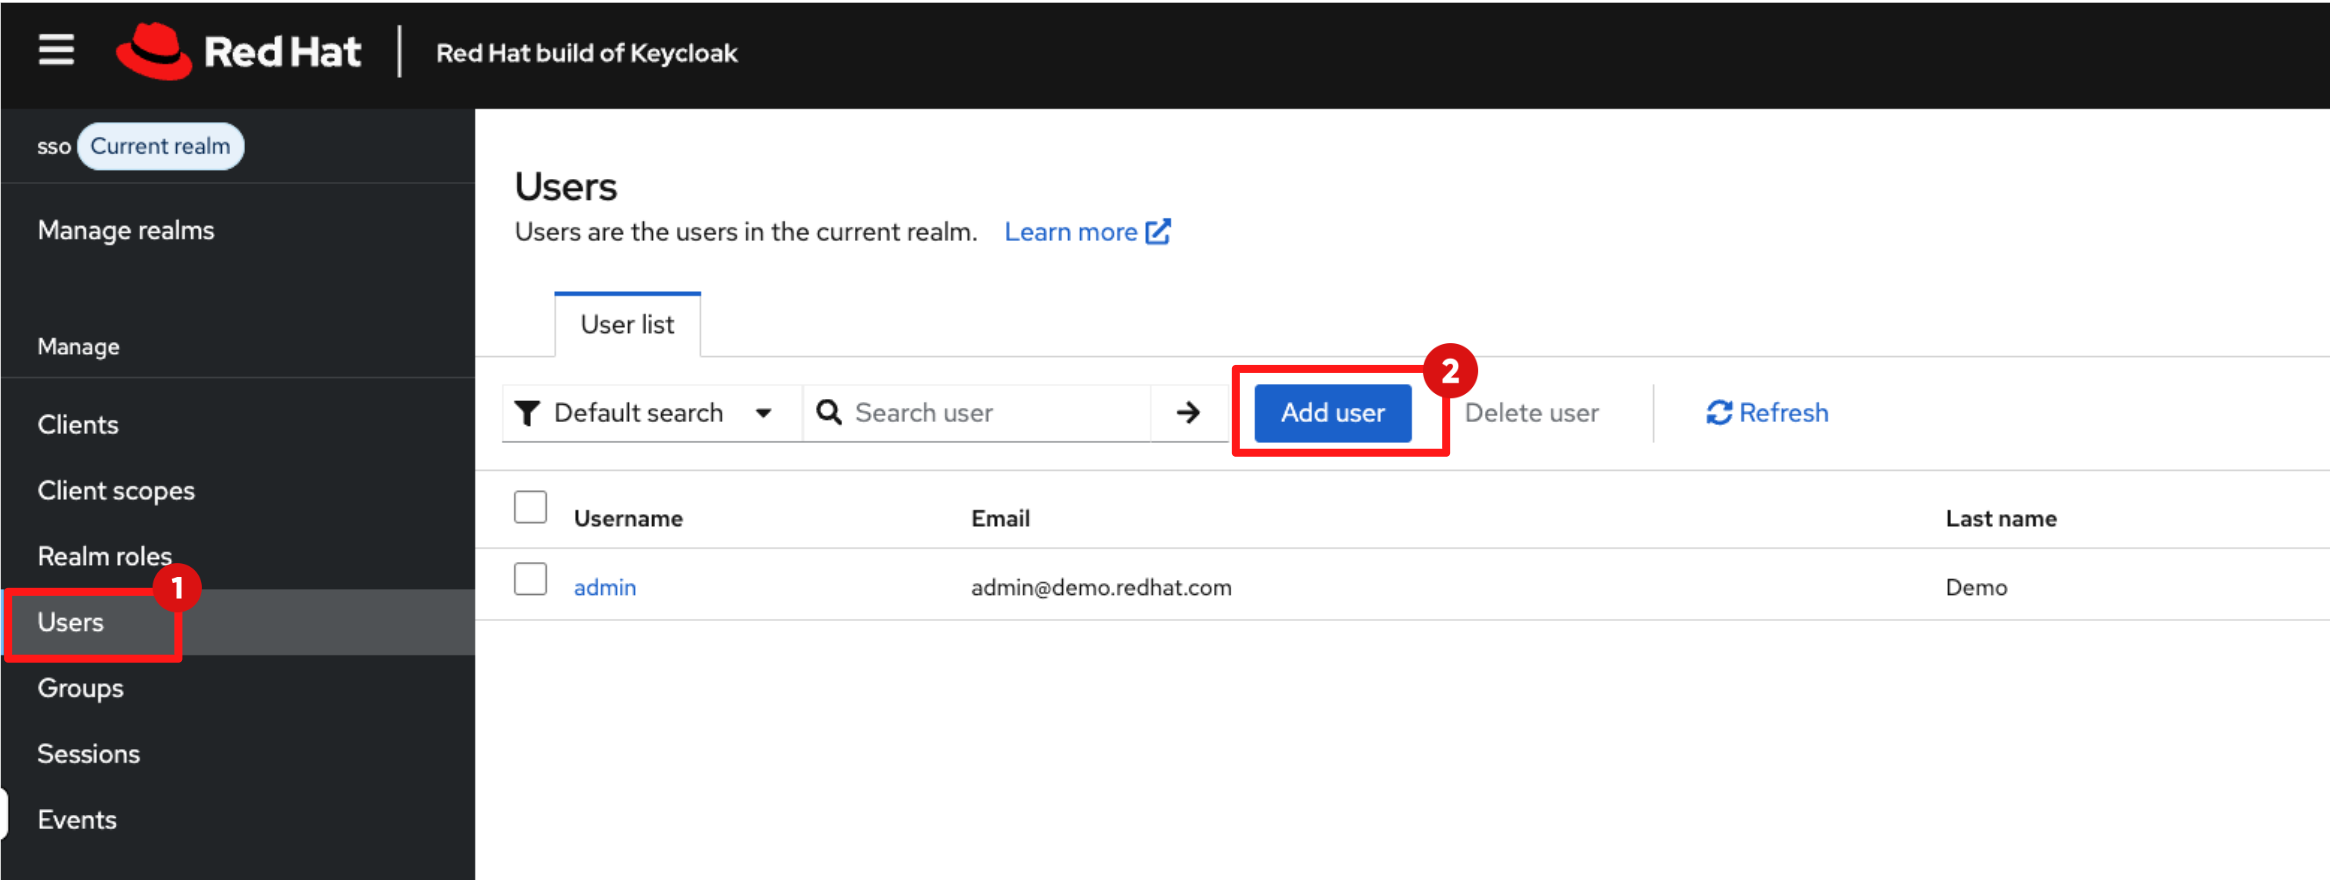
To create a new user:
-
Navigate to Users.
-
Click Add user.
-
-
Set the following values:
-
Email Verified: Toggle on (required for TAS signing)
-
Username:
user1 -
Email:
user1@demo.redhat.com -
First Name:
User1 -
Last Name:
Demo -
Click Create.
-
-
You’ll see a pop-up message saying "The user has been created."
Make sure Email Verified is toggled on. If it is disabled, authentication will fail when you attempt to sign your code in Module 4. 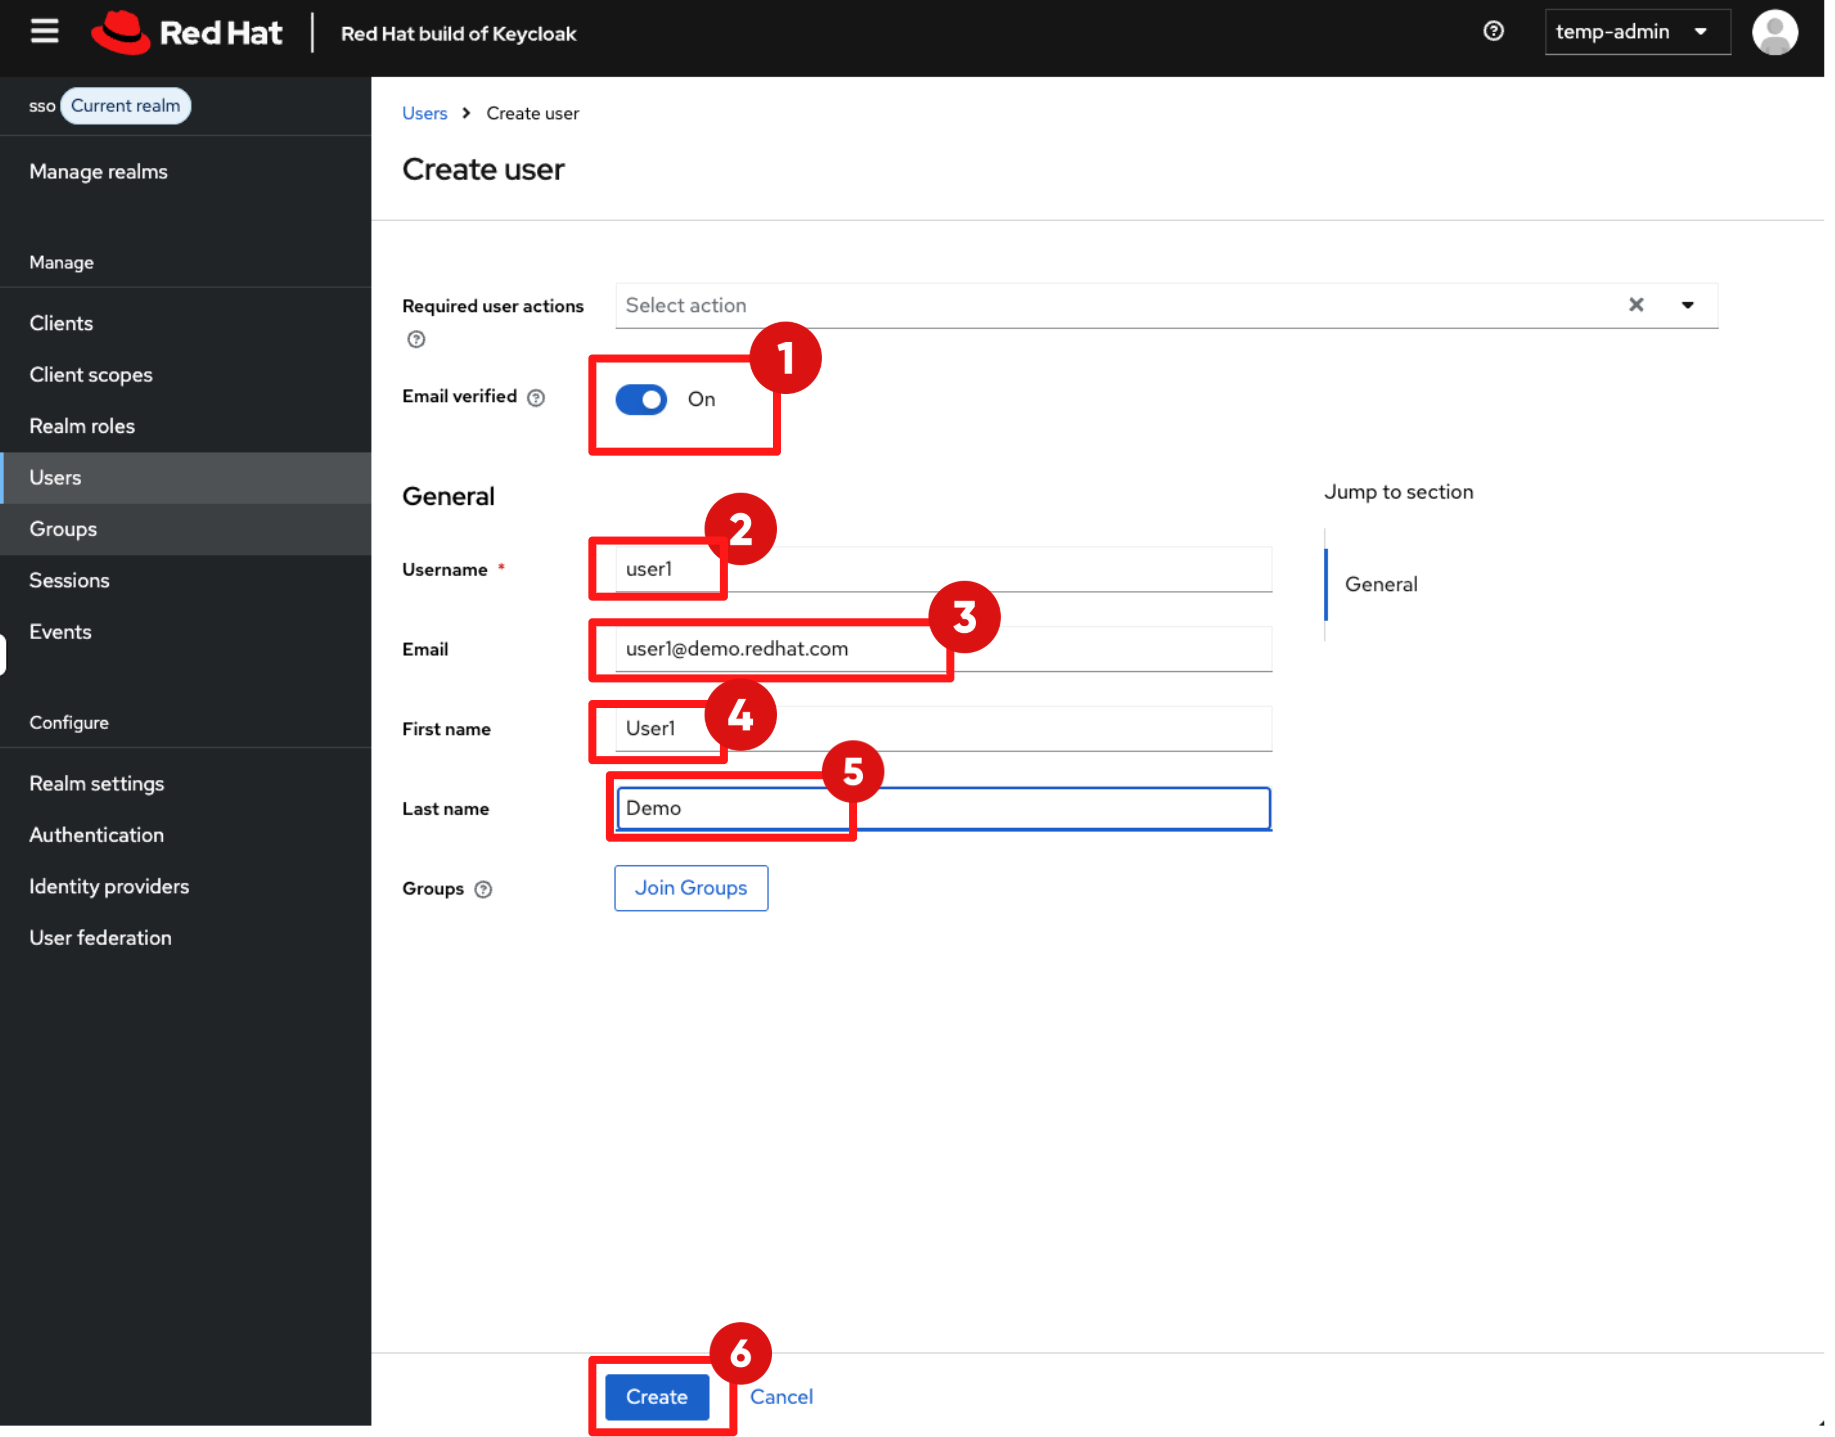
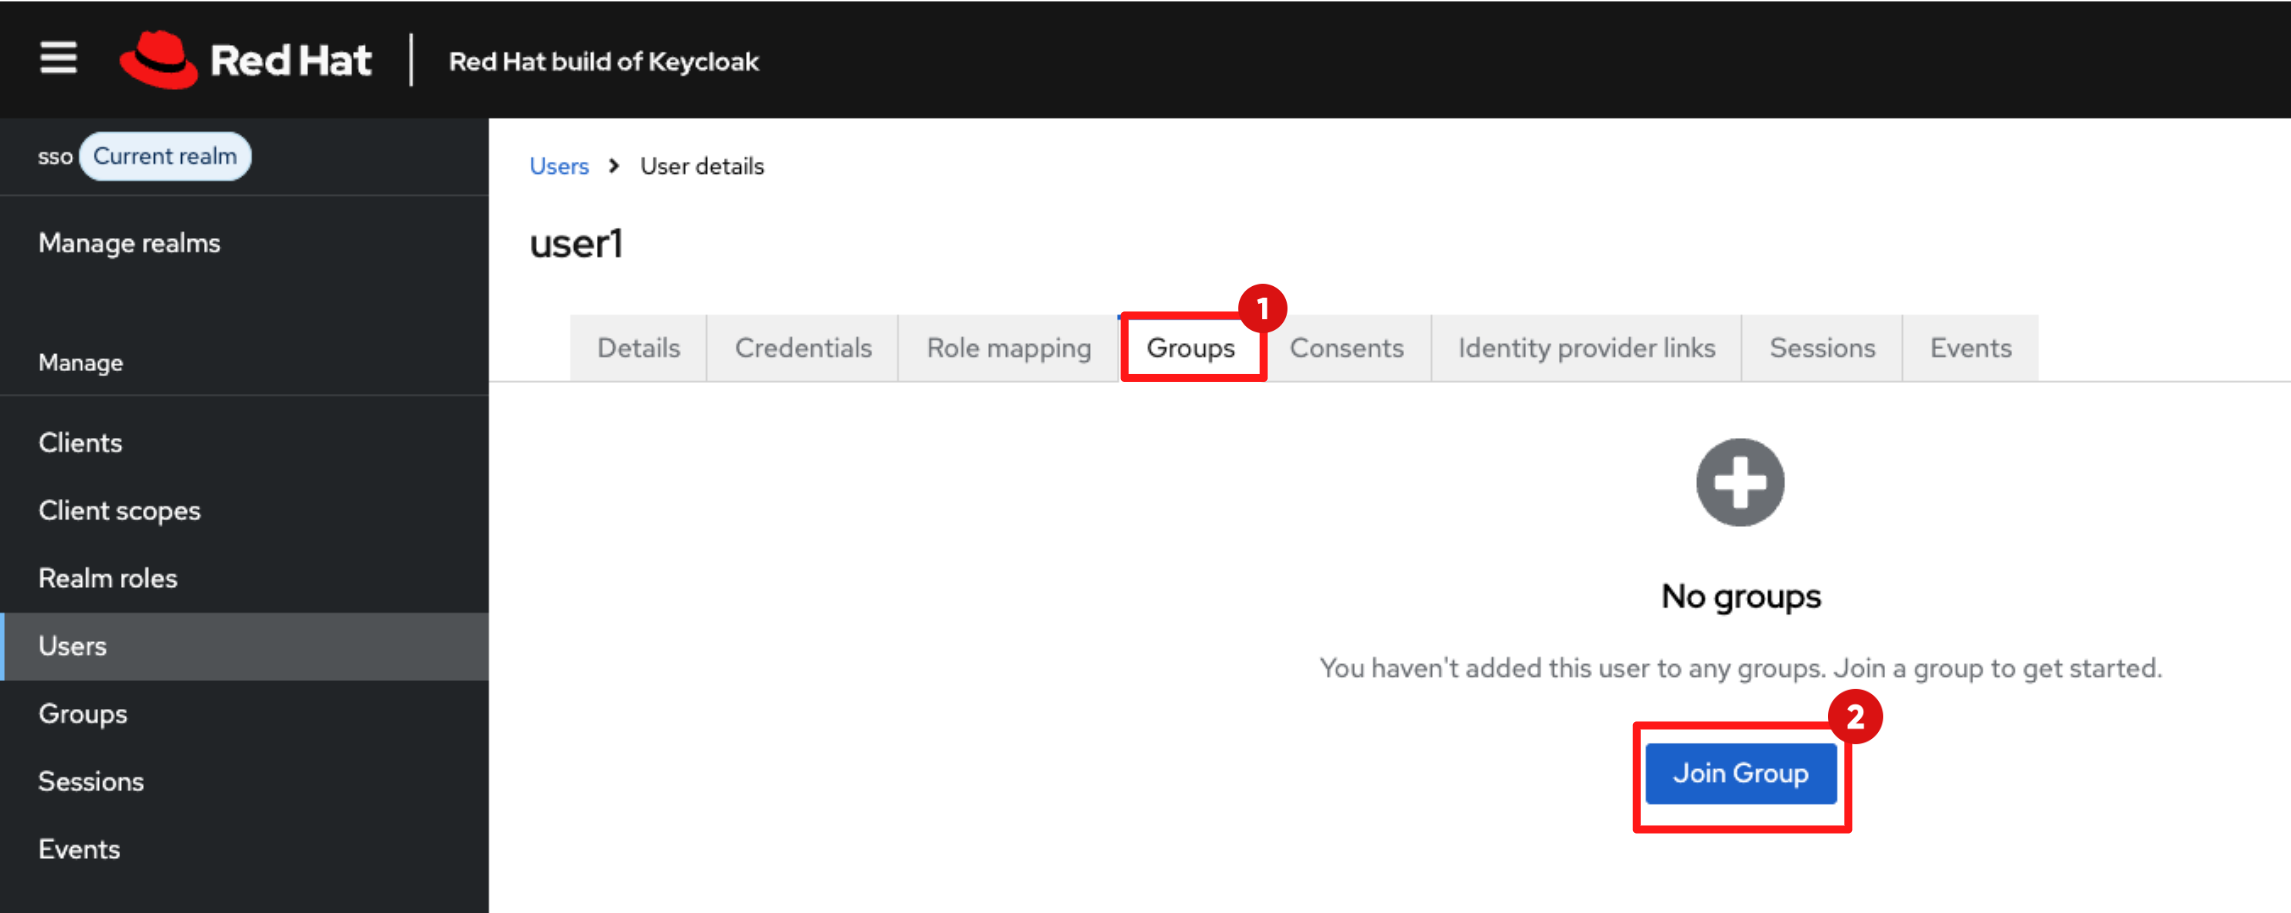
1.3 Assign Group Membership
-
In the user details view, click the Groups tab.
-
Click Join Group.
-
Select the following groups:
-
tssc
-
users
-
-
Click Join. You’ll see a pop-up message saying "Added group membership."
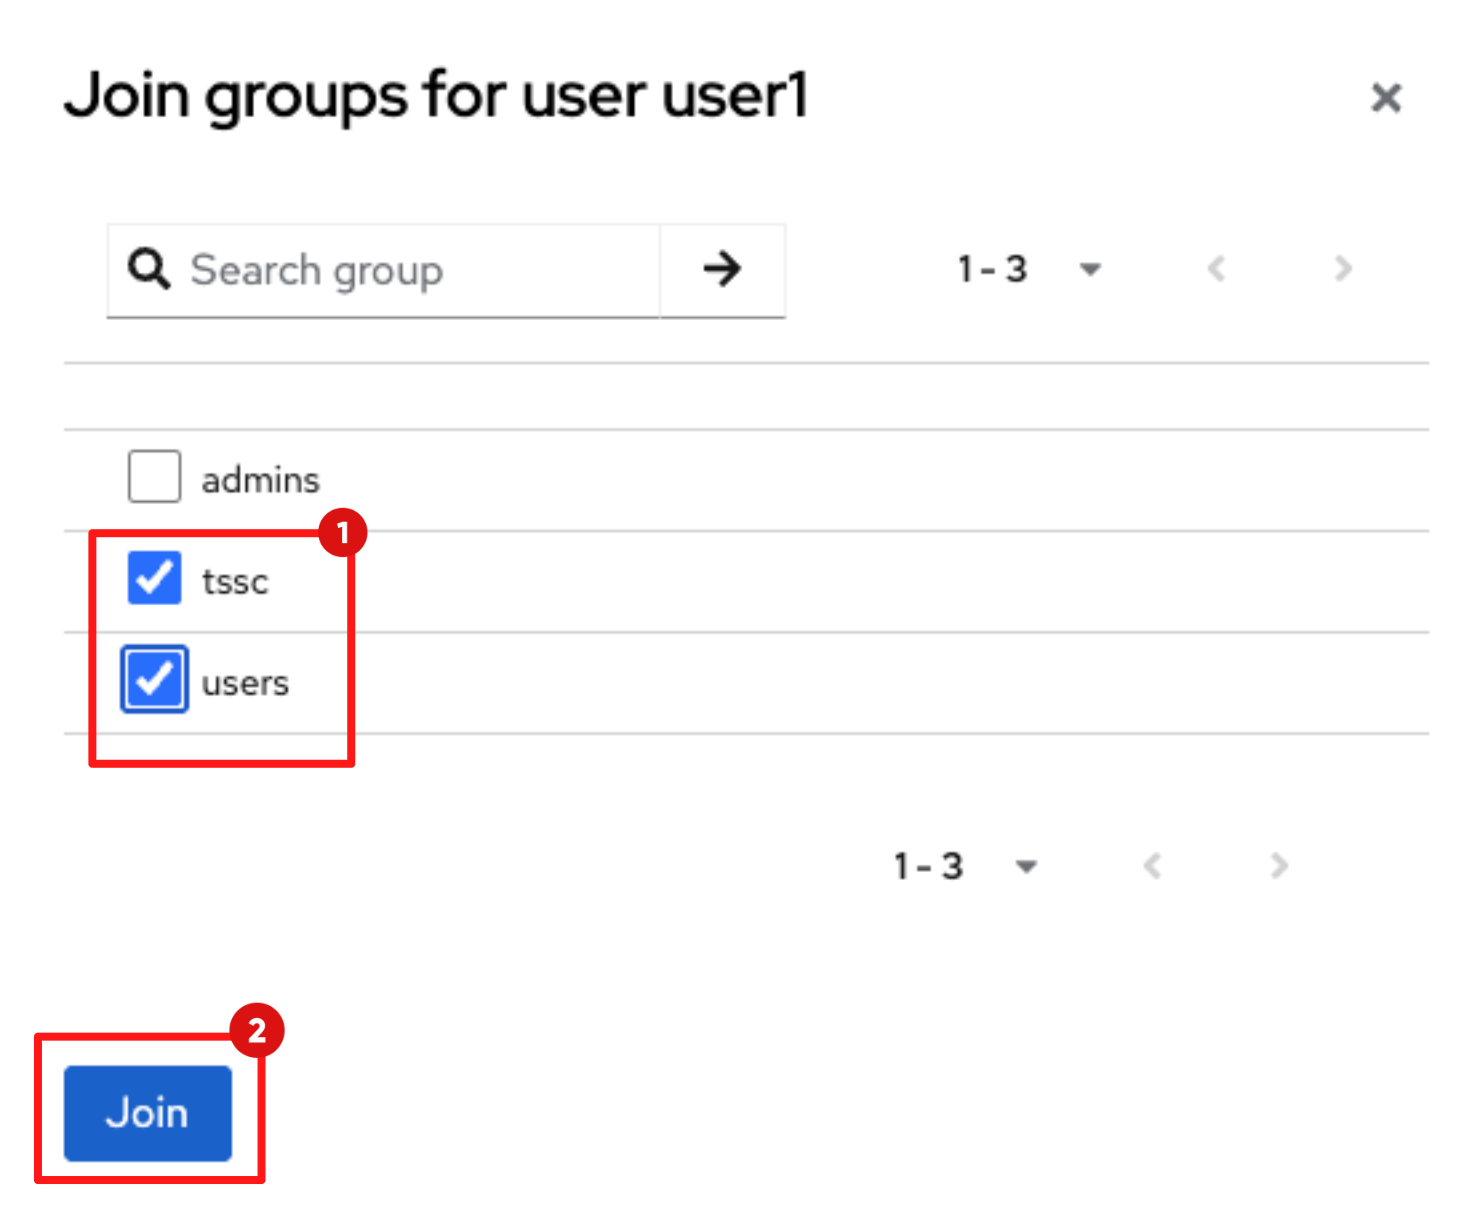
| The tssc group mapping in RHDH ensures this user has ownership and management rights over the components you will scaffold later in this module. |
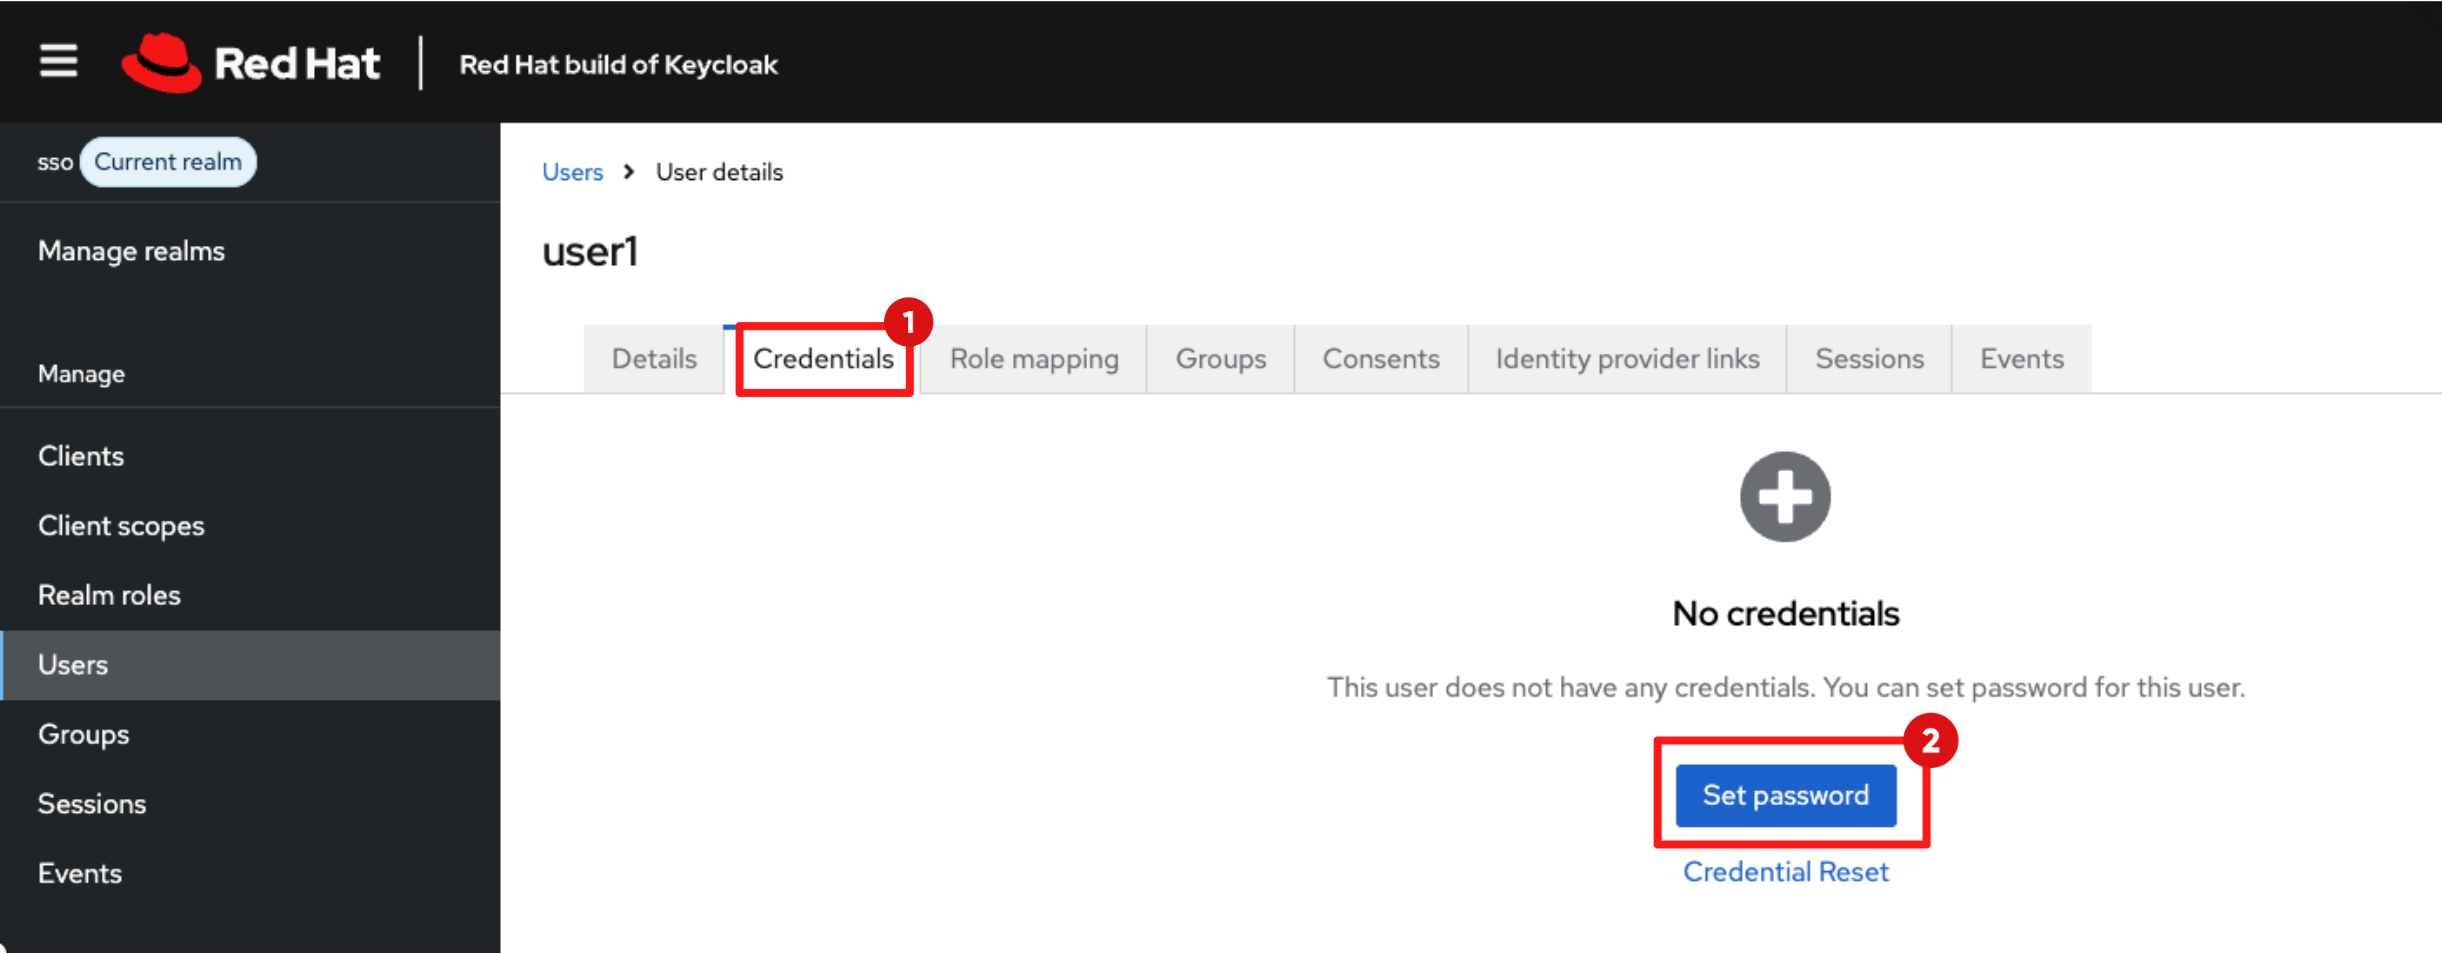
1.4 Set User Credentials
-
Click the Credentials tab.
-
Click Set Password.
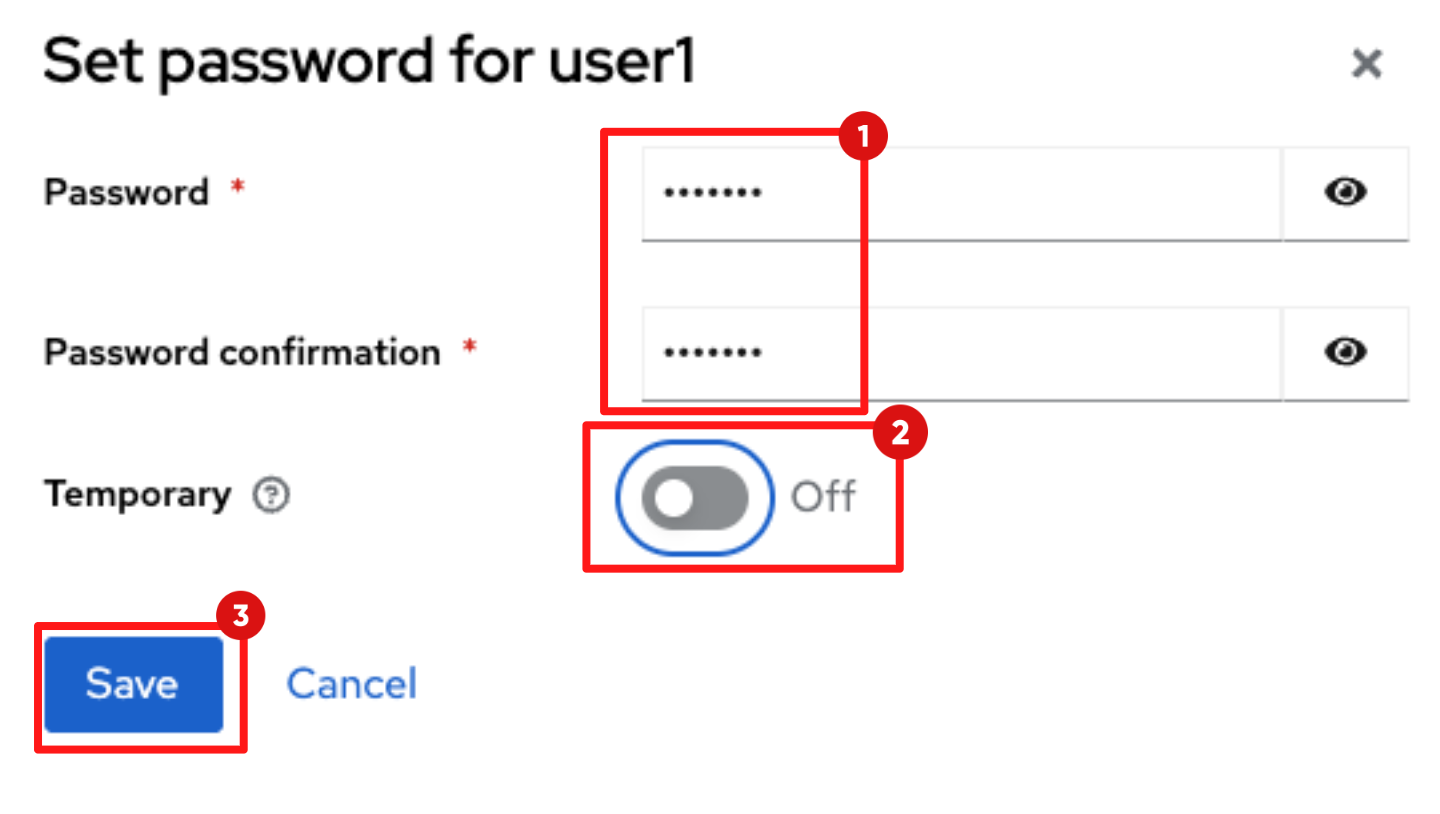
-
Enter the Password and Password confirmation to:
{password} -
Ensure Temporary is toggled off.
-
Click Save.
-
You’ll see a pop-up message saying "The password has been set successfully."
-
When prompted to confirm the password for user1, click Save password to confirm.
-
At this point, the developer identity is fully configured and ready to authenticate across OpenShift, Dev Spaces, and Red Hat Developer Hub.
Step 2: Hydrating the Developer Hub
When Red Hat Developer Hub (RHDH) first starts in this lab, it runs in a vanilla state with guest access enabled and an empty catalog. Rather than enabling features manually, you will configure Red Hat Developer Hub using GitOps and Infrastructure as Code practices, ensuring configuration is version-controlled, reviewable, and aligned with enterprise platform standards.
2.1 Verify the "Before" State
-
In Showroom, switch to RHDH tab.
-
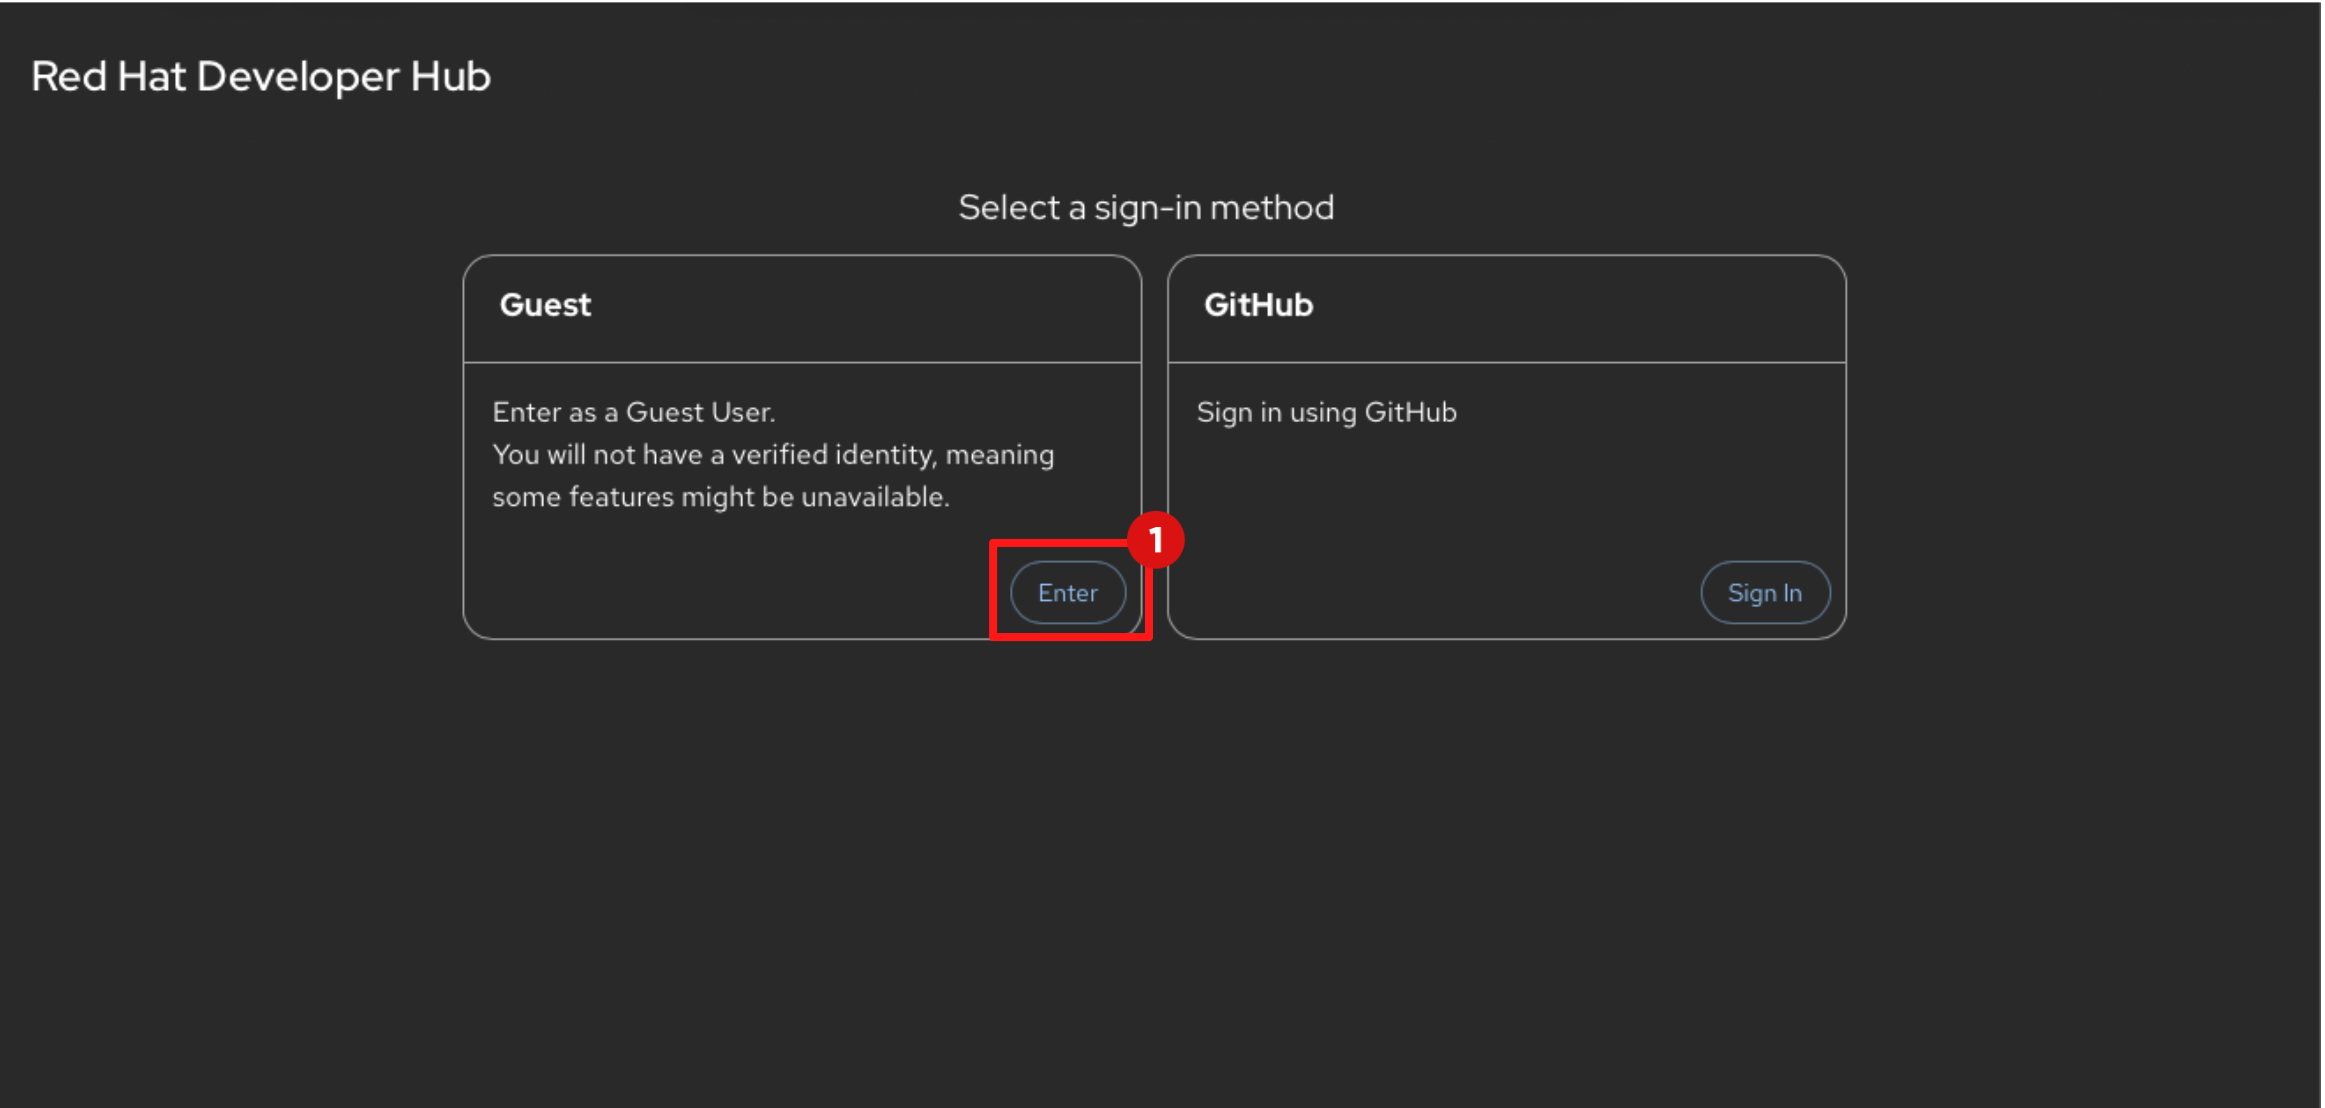
You’ll notice that Guest access is currently enabled. This is not recommended for production environments and will be disabled in the following steps.
-
Click Enter to log in as Guest.
-
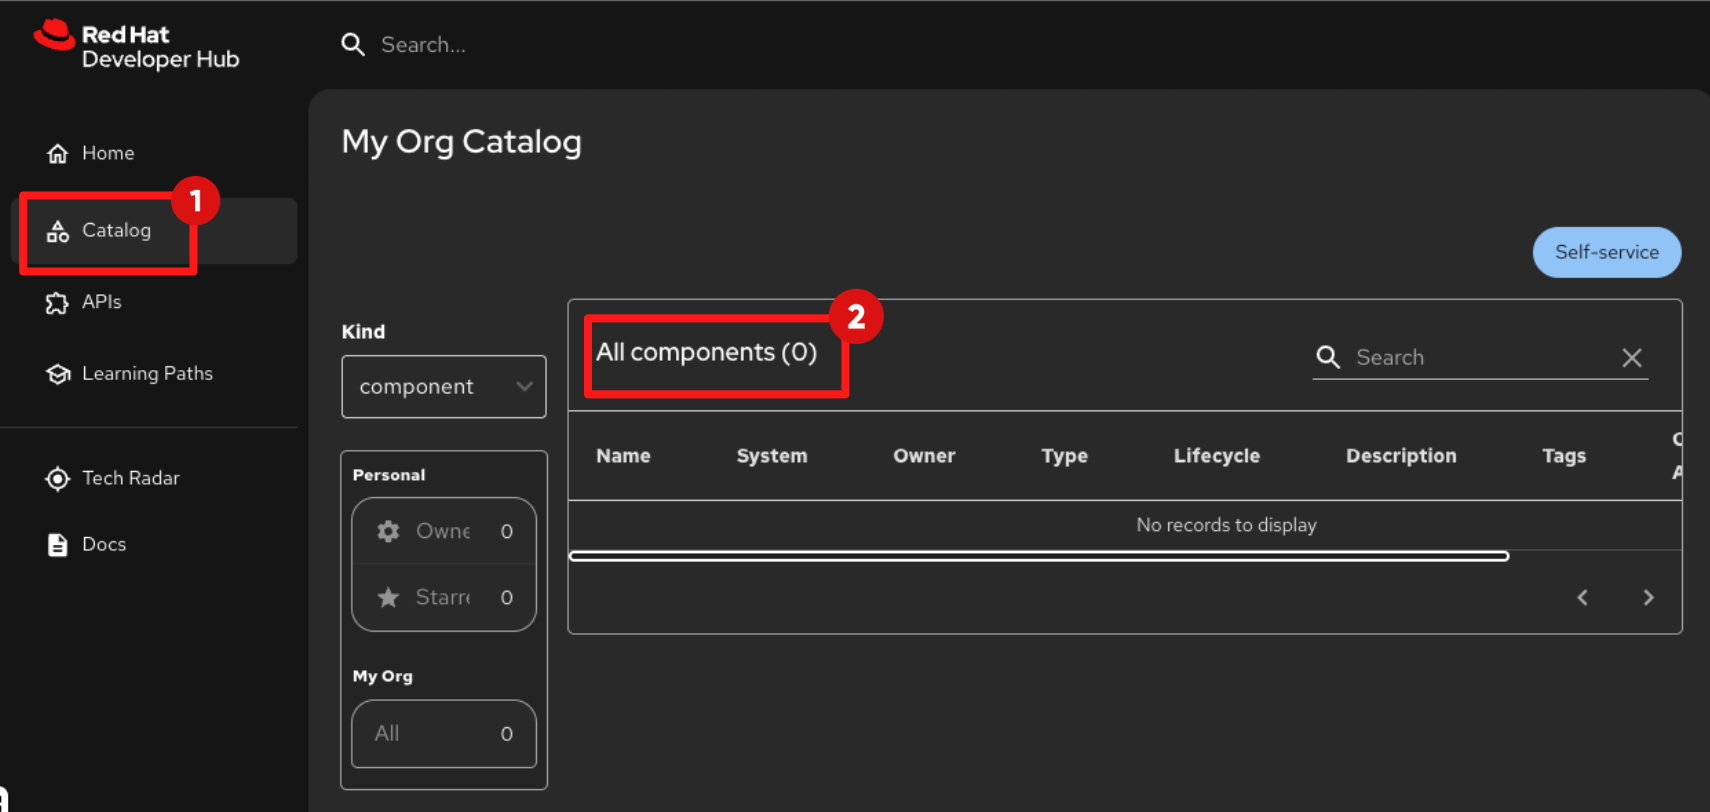
Select Catalog from the left navigation.
-
The catalog is empty, confirming that no sources or providers are configured yet.
2.2 Log in to Gitlab
In Showroom, switch to the GitLab tab and login using the following credentials:
Username:
{gitlab_root_user}Password:
{gitlab_root_password}Understanding RHDH Configuration and Plugins
Red Hat Developer Hub configuration is managed through a single declarative file, app-config.yaml, inherited from upstream Backstage. This file defines the platform capabilities where authentication, integrations, plugins, catalog sources, and proxy behaviour are all configured. In the next steps, you will modify four key sections that shape the platform experience:
-
dynamic.plugins : controls which plugins are enabled.
-
These plugins surface platform capabilities to developers, CI/CD views, Argo CD visualisations, IDEs, Image Registries, OpenShift topology view, documentation and more.
-
-
authentication: defines authentication providers and login behaviour.
-
You will disable Guest access and enable OIDC login backed by Keycloak — enforcing secure authentication.
-
-
catalog: controls where RHDH discovers software components.
-
Later in this module, you will point the catalog at a GitOps-backed location so that platform templates and developer components appear automatically.
-
-
integrations: configure API access to external tools.
-
This allows RHDH to securely call external systems like GitLab and Quay without exposing user credentials, and supports plugin functions that require backend access.
-
Below is a trimmed example of the configuration you will work with. The commented sections represent platform capabilities that you will enable as the module progresses:
global:
  dynamic:
    plugins:
      # - disabled: false
      #   package: ./dynamic-plugins/dist/backstage-plugin-kubernetes
      # - disabled: false
      #   package: ./dynamic-plugins/dist/backstage-community-plugin-quay
      # - disabled: false
      #   package: ./dynamic-plugins/dist/roadiehq-backstage-plugin-argo-cd-backend-dynamic

upstream:
  backstage:
    extraEnvVars:
      - name: AUTH_OIDC_METADATA_URL
        value: https://sso.apps.cluster.example.com/realms/sso/.well-known/openid-configuration
      - name: QUAY_URL
        value: https://quay.apps.cluster.example.com

    appConfig:

      auth:
        providers:
          guest:
            dangerouslyAllowOutsideDevelopment: true
        # signInPage: "oidc"
        # providers:
        #   oidc:
        #     production:
        #       clientId: ${AUTH_OIDC_CLIENT_ID}
        #       clientSecret: ${AUTH_OIDC_CLIENT_SECRET}
        #       metadataUrl: ${AUTH_OIDC_METADATA_URL}

      catalog:
        # providers:
        #   keycloakOrg:
        #     default:
        #       baseUrl: ${KEYCLOAK_BASE_URL}
        #       realm: ${KEYCLOAK_REALM}

      integrations:
        gitlab:
          - host: ${GITLAB_HOST}

      proxy:
        endpoints:
          # '/quay/api':
          #   headers:
          #     Authorization: Bearer ${QUAY_API_TOKEN}
          #   target: ${QUAY_URL}
2.3 Enable Plugins
Backstage, and by extension Red Hat Developer Hub (RHDH), is designed to be modular. Plugins are the primary mechanism used to integrate developer tools and extend the capabilities of the Internal Developer Portal.
2.3.1 Plugin management in upstream Backstage
In upstream Backstage, plugins are added using a build-time model. Platform engineers must:
-
Clone the Backstage source code
-
Install plugins via npm
-
Import and wire them into the React frontend and Node.js backend
-
Build a new Backstage container image
-
Redeploy the updated image
Each update — including plugin upgrades or security fixes — requires repeating this entire process. While functional, this approach does not scale well across multiple environments or teams and introduces operational friction.
2.3.2 Dynamic plugins in Red Hat Developer Hub
Red Hat Developer Hub introduces dynamic plugins, shifting plugin management from build time to runtime configuration. Instead of rebuilding images, platform engineers enable and configure plugins declaratively using YAML and GitOps workflows. The container image remains unchanged, while plugins are mounted and activated at runtime.
This approach:
-
Reduces operational overhead
-
Aligns with infrastructure-as-code practices
-
Enables versioned configuration and environment promotion
-
Treats the developer portal as a managed platform product
In the following steps, you will begin enabling plugins through configuration, activating core RHDH functionality exactly as a platform engineering team would when shaping a developer experience.
2.3.3 Enabling RHDH plugins
To enable plug-ins in this lab:
-
In Gitlab, open the repository
gitops / build-secured-dev-workflows-idp-gitops.
-
Navigate to the
charts/Backstagefolder.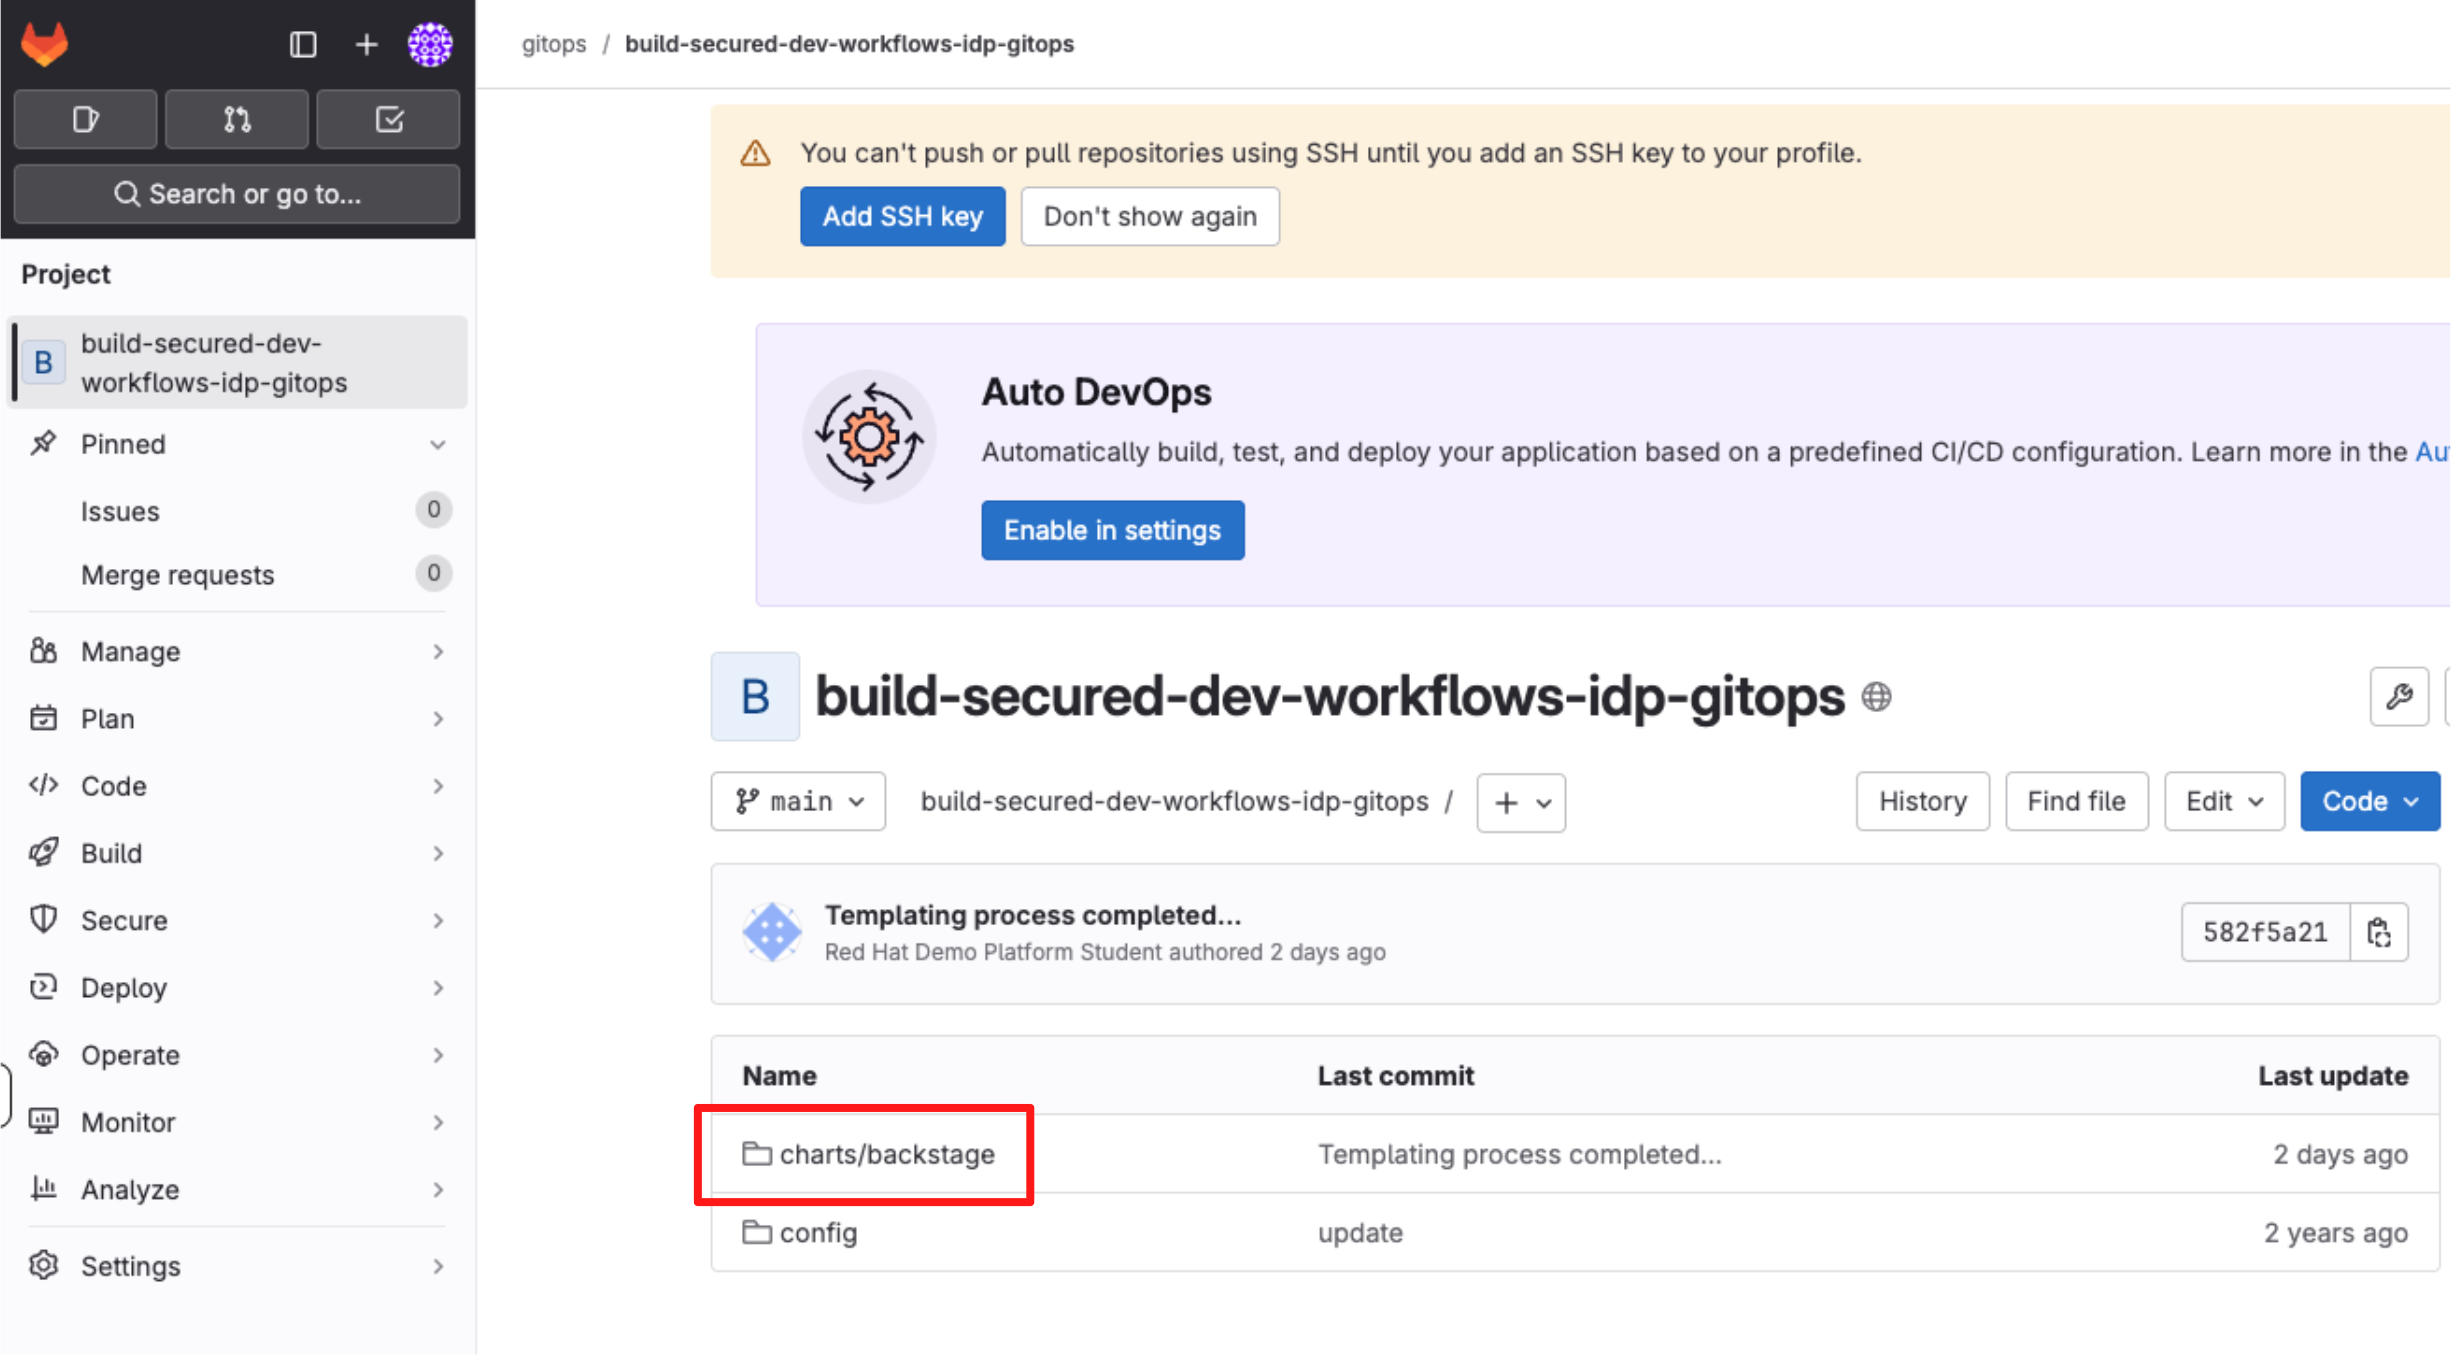
-
Click the file
backstage-values.yaml.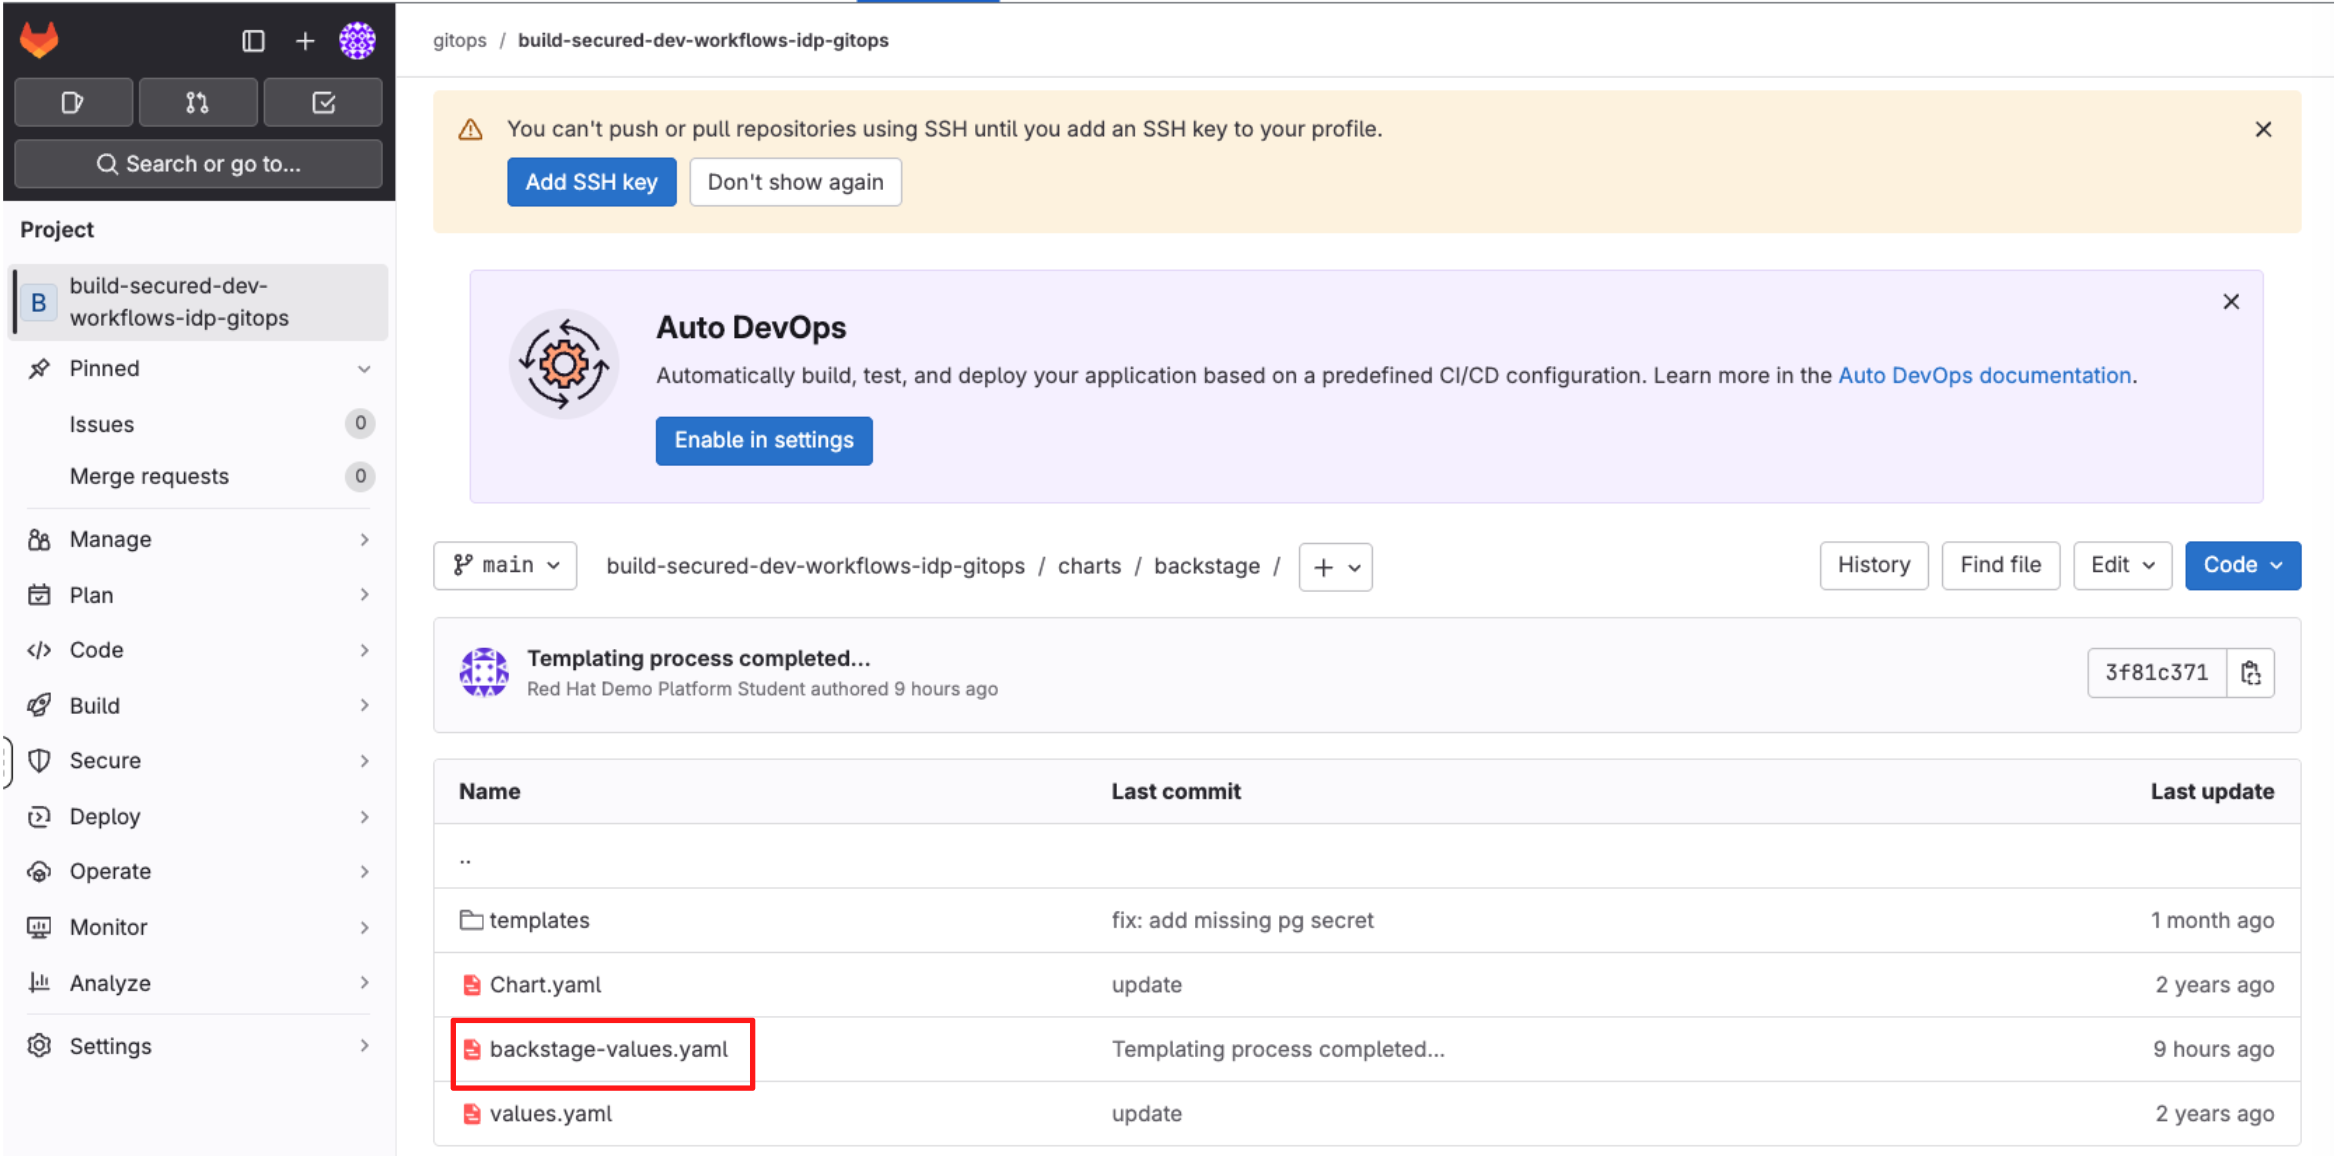
-
Select Edit > Edit single file.
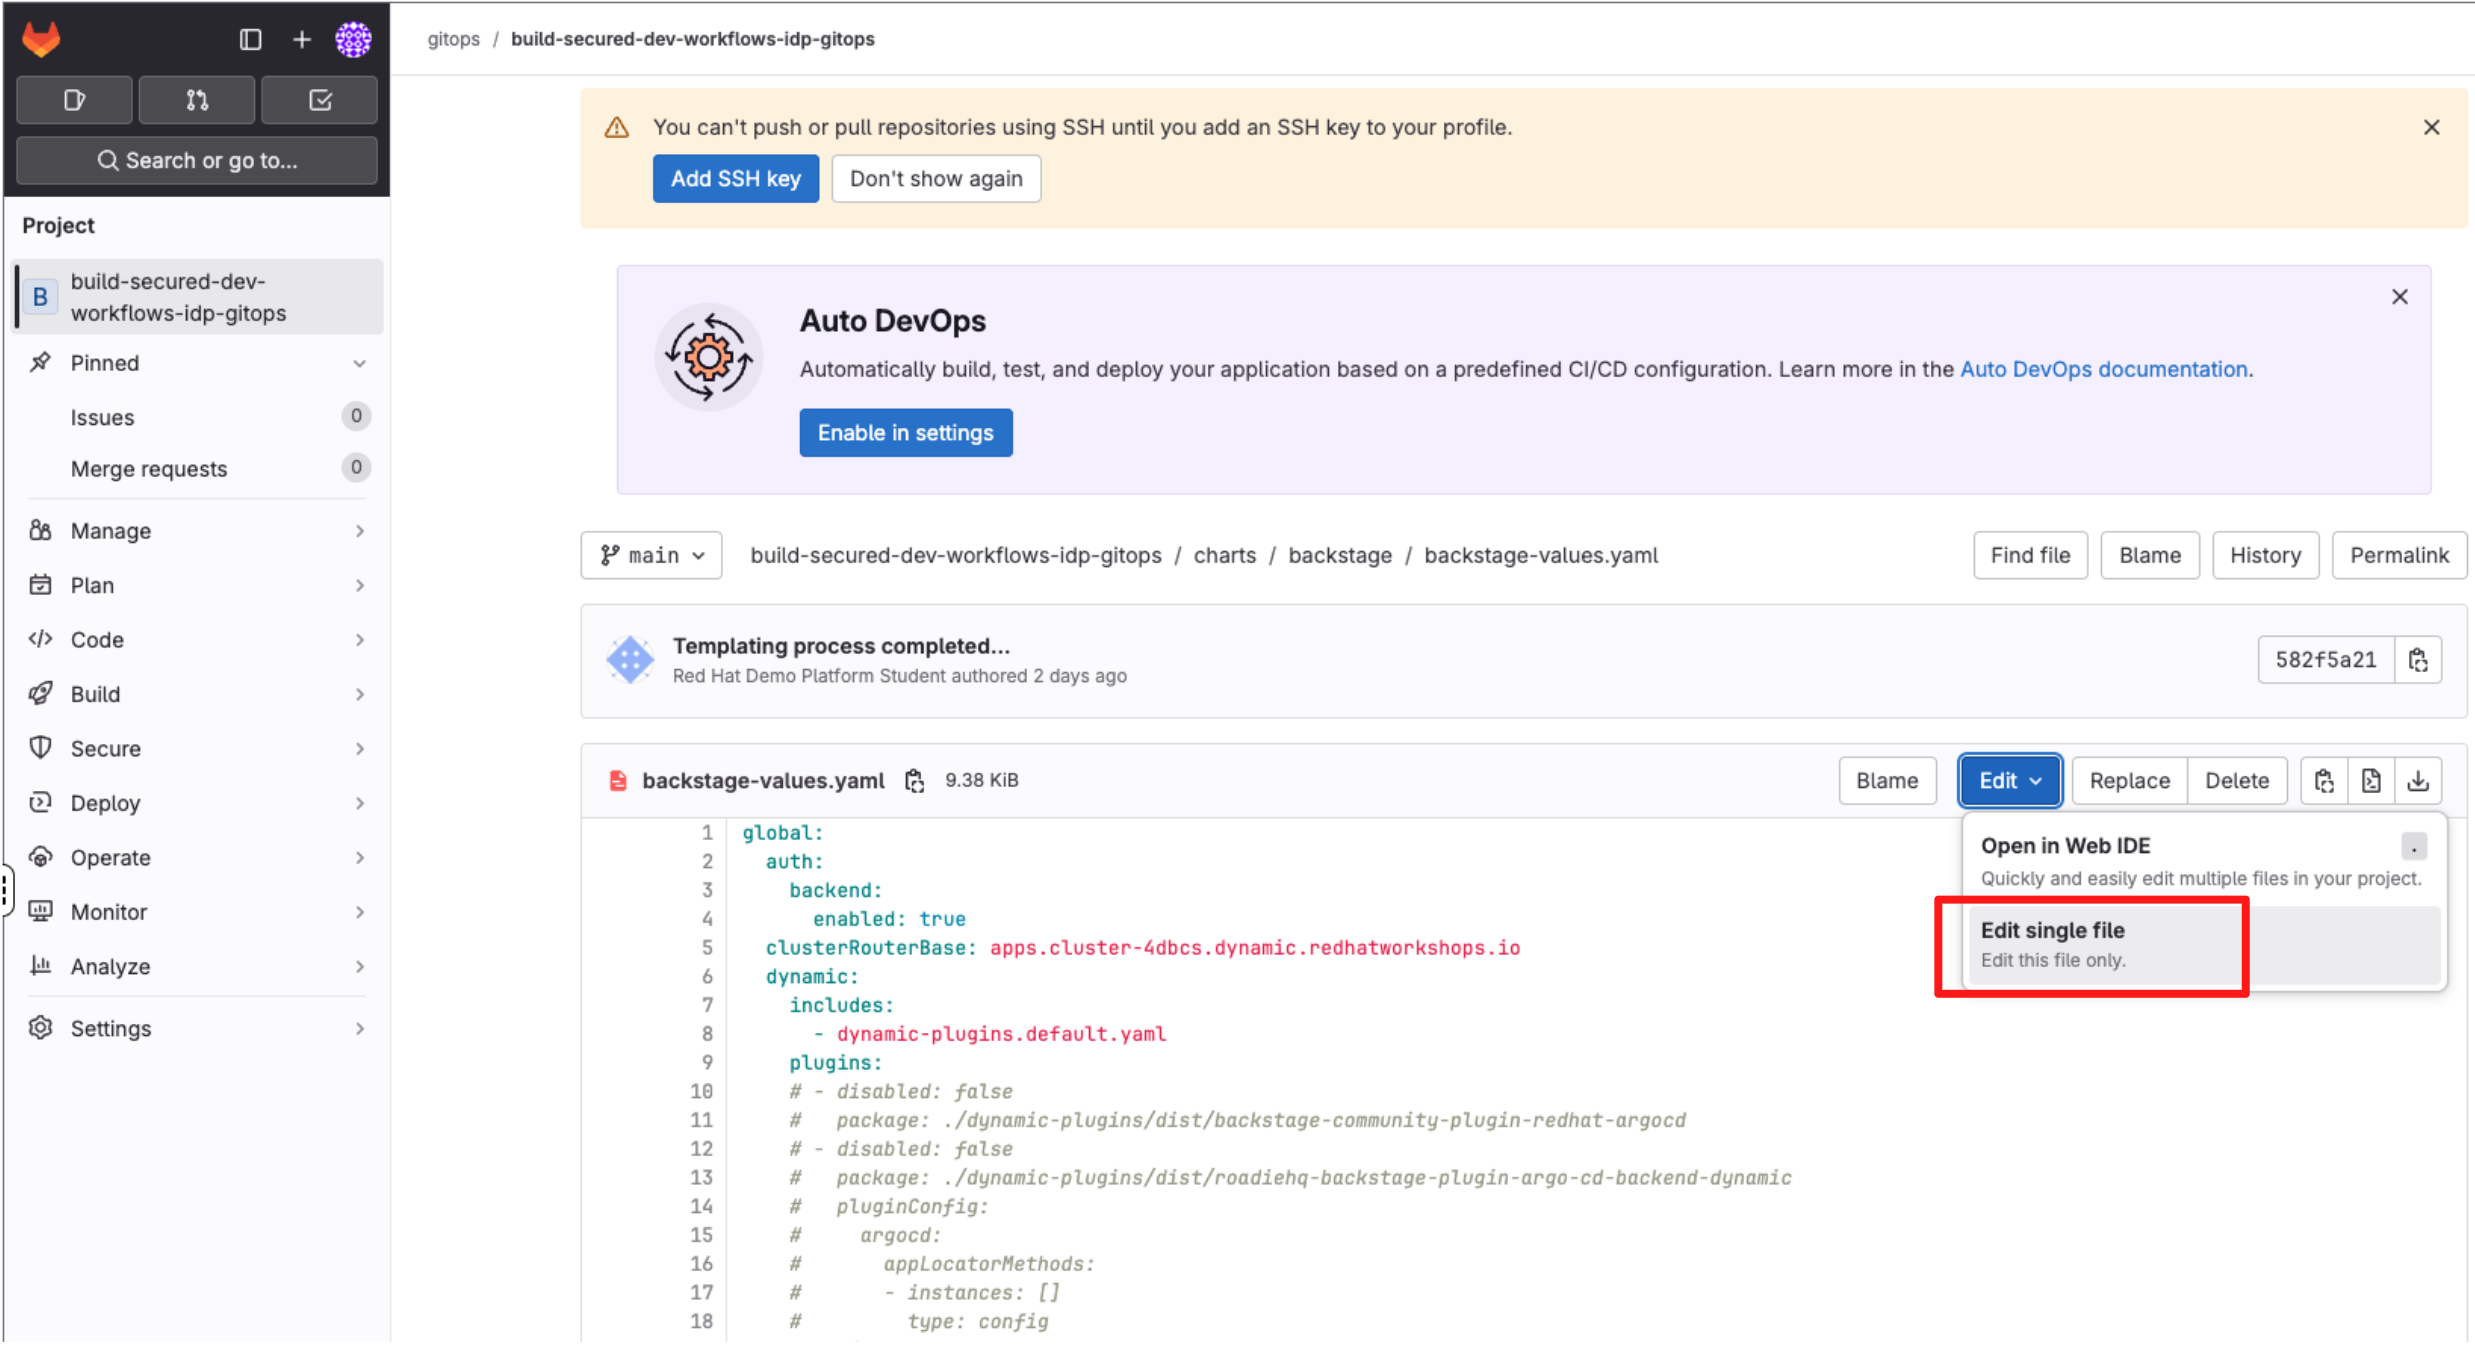
-
Locate the commented block under the dynamic.plugins section and uncomment it using
CMD + /(Mac) orCTRL + /(Windows/Linux).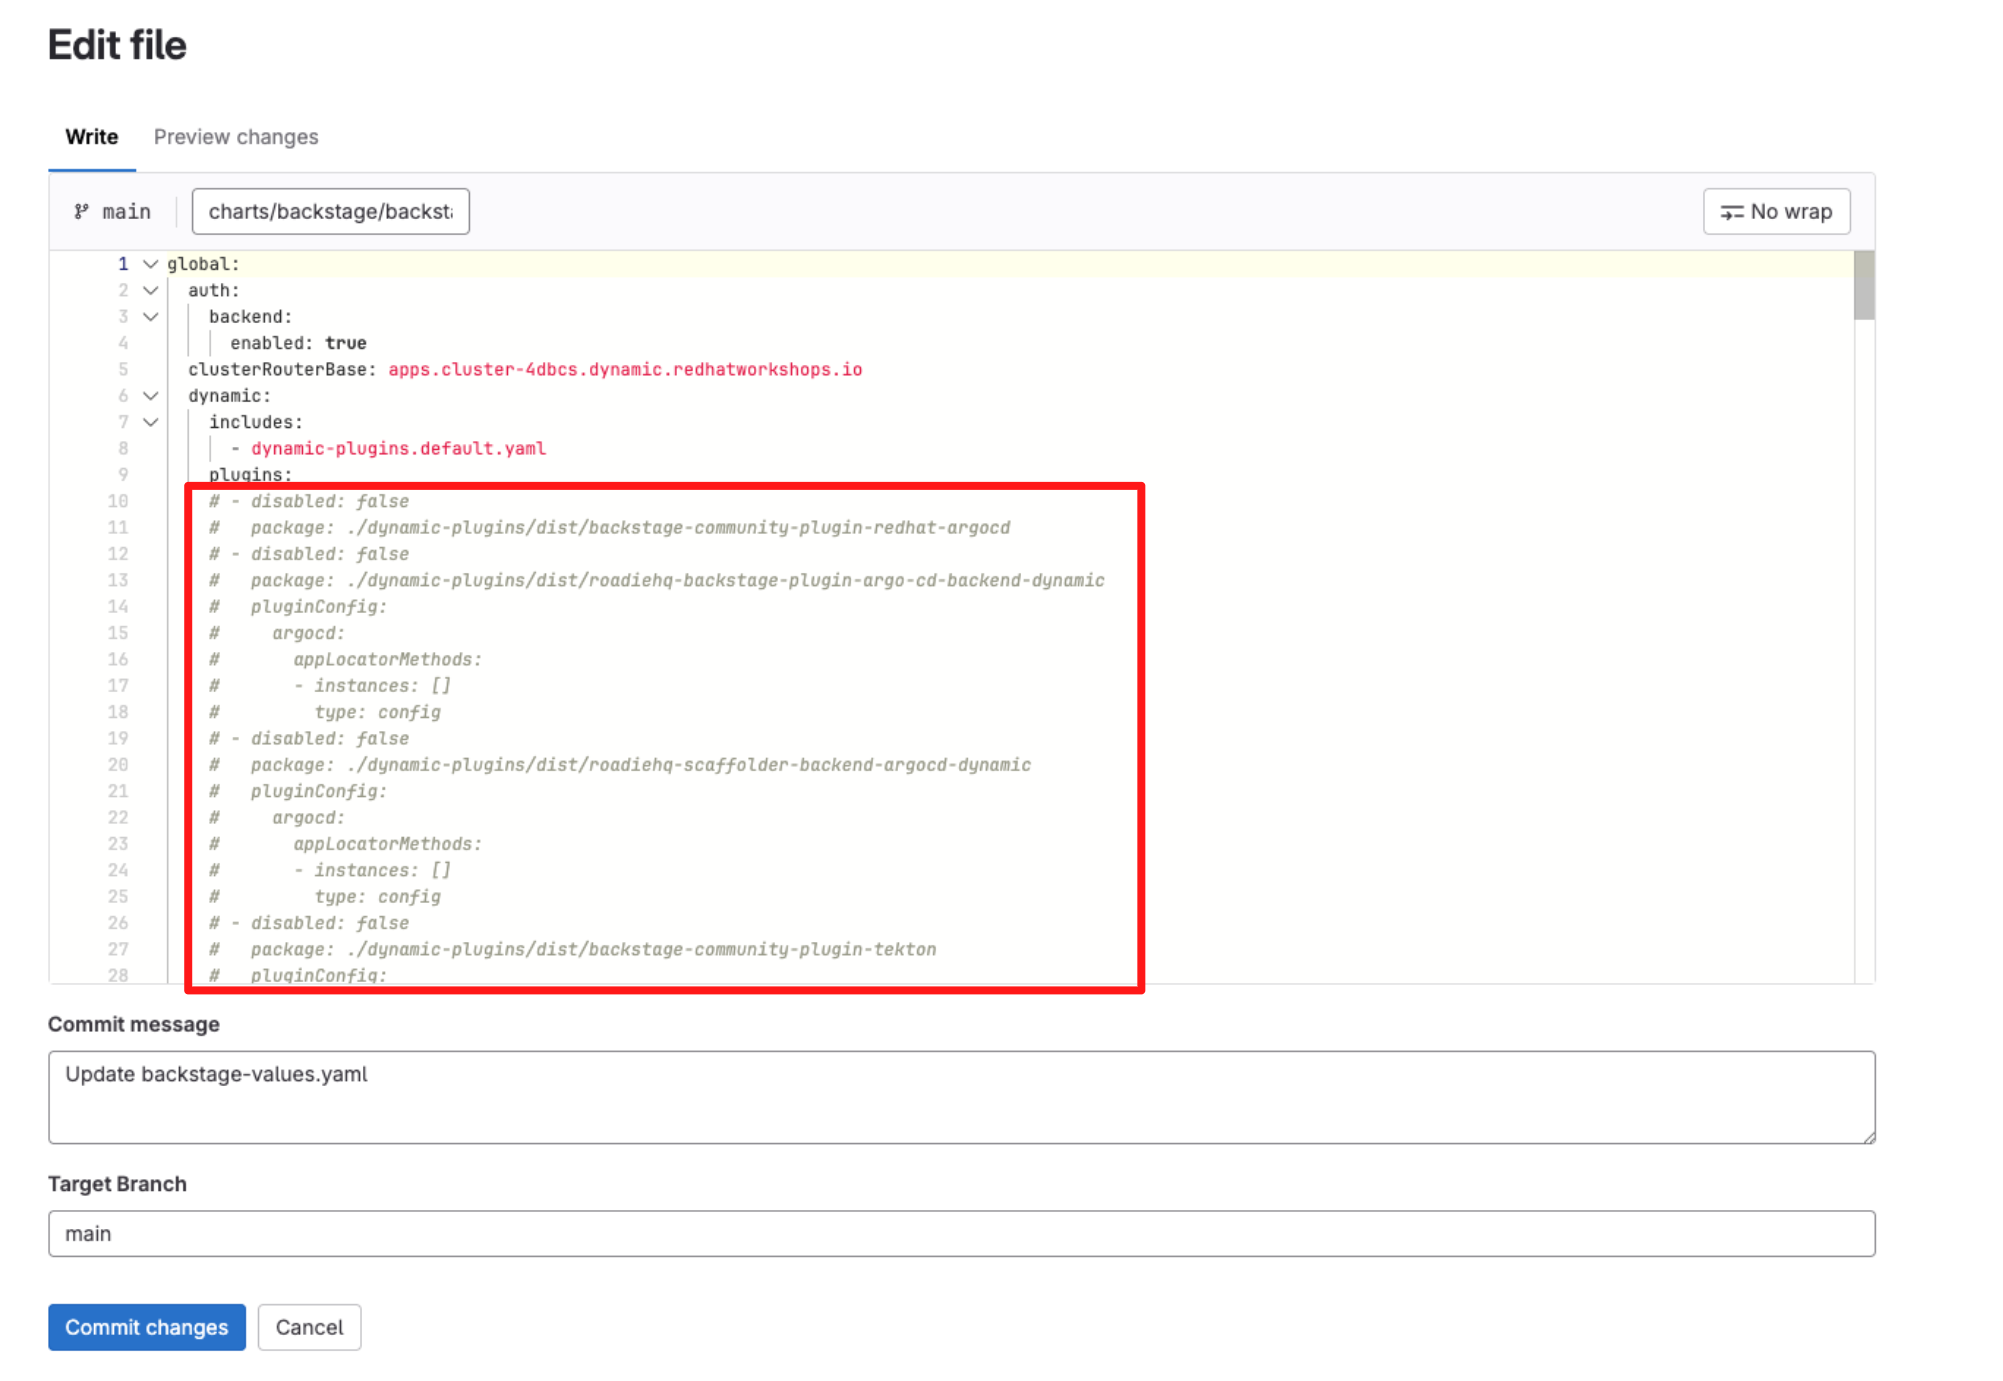
2.3.4 Understanding the dynamic.plugins configuration
Let’s take a look at the dynamic.plugins YAML block that you’ve just uncommented:
-
Top-level structure
-
includes: allows you to reference a base set of plugin definitions that ship with Red Hat Developer Hub.
-
plugins is the explicit list of dynamic plugins enabled for this environment. Each entry represents one plugin, its source, and any plugin-specific configuration.
dynamic:
  includes:
    - dynamic-plugins.default.yaml
  plugins:
-
-
Plugin entries:
-
Each plugin entry follows a common pattern:
- disabled: false package: <plugin-location> pluginConfig: <optional> -
disabled: false: Enables the plugin. This flag allows plugins to be toggled on or off declaratively without removing configuration.
-
package: Defines where the plugin is loaded from. This can be:
-
A local path baked into the RHDH image (./dynamic-plugins/dist/…)
-
An OCI image hosted in a registry (as seen with the multi-source security viewer plugin)
-
-
pluginConfig (optional): Provides plugin-specific configuration, such as UI placement, backend settings, or integration endpoints (as seen with the tekton plugin).
-
One particularly important plugin in this block is the Keycloak catalog backend plugin:
- disabled: false
  package: ./dynamic-plugins/dist/backstage-community-plugin-catalog-backend-module-keycloak-dynamic
This plugin enables Red Hat Developer Hub to integrate with Red Hat Build of Keycloak (RHBK) and automatically synchronise Users and Groups into the Software Catalog. You will activate and configure this capability in the next steps.
2.4 Configure authentication
In this step, you will replace temporary Guest access with Single Sign-On (SSO) using Red Hat Build of Keycloak (RHBK) via OpenID Connect (OIDC). This allows developers to log in to Red Hat Developer Hub using their existing organisational identity, rather than anonymous Guest access.
2.4.1 Configuration steps
-
Comment the developer environment block under authusing
CMD + /(Mac) orCTRL + /(Windows/Linux). -
Then, uncomment the production environment configuration using
CMD + /(Mac) orCTRL + /(Windows/Linux). -
Finally uncomment the signInPage setting using
CMD + /(Mac) orCTRL + /(Windows/Linux) as shown below:
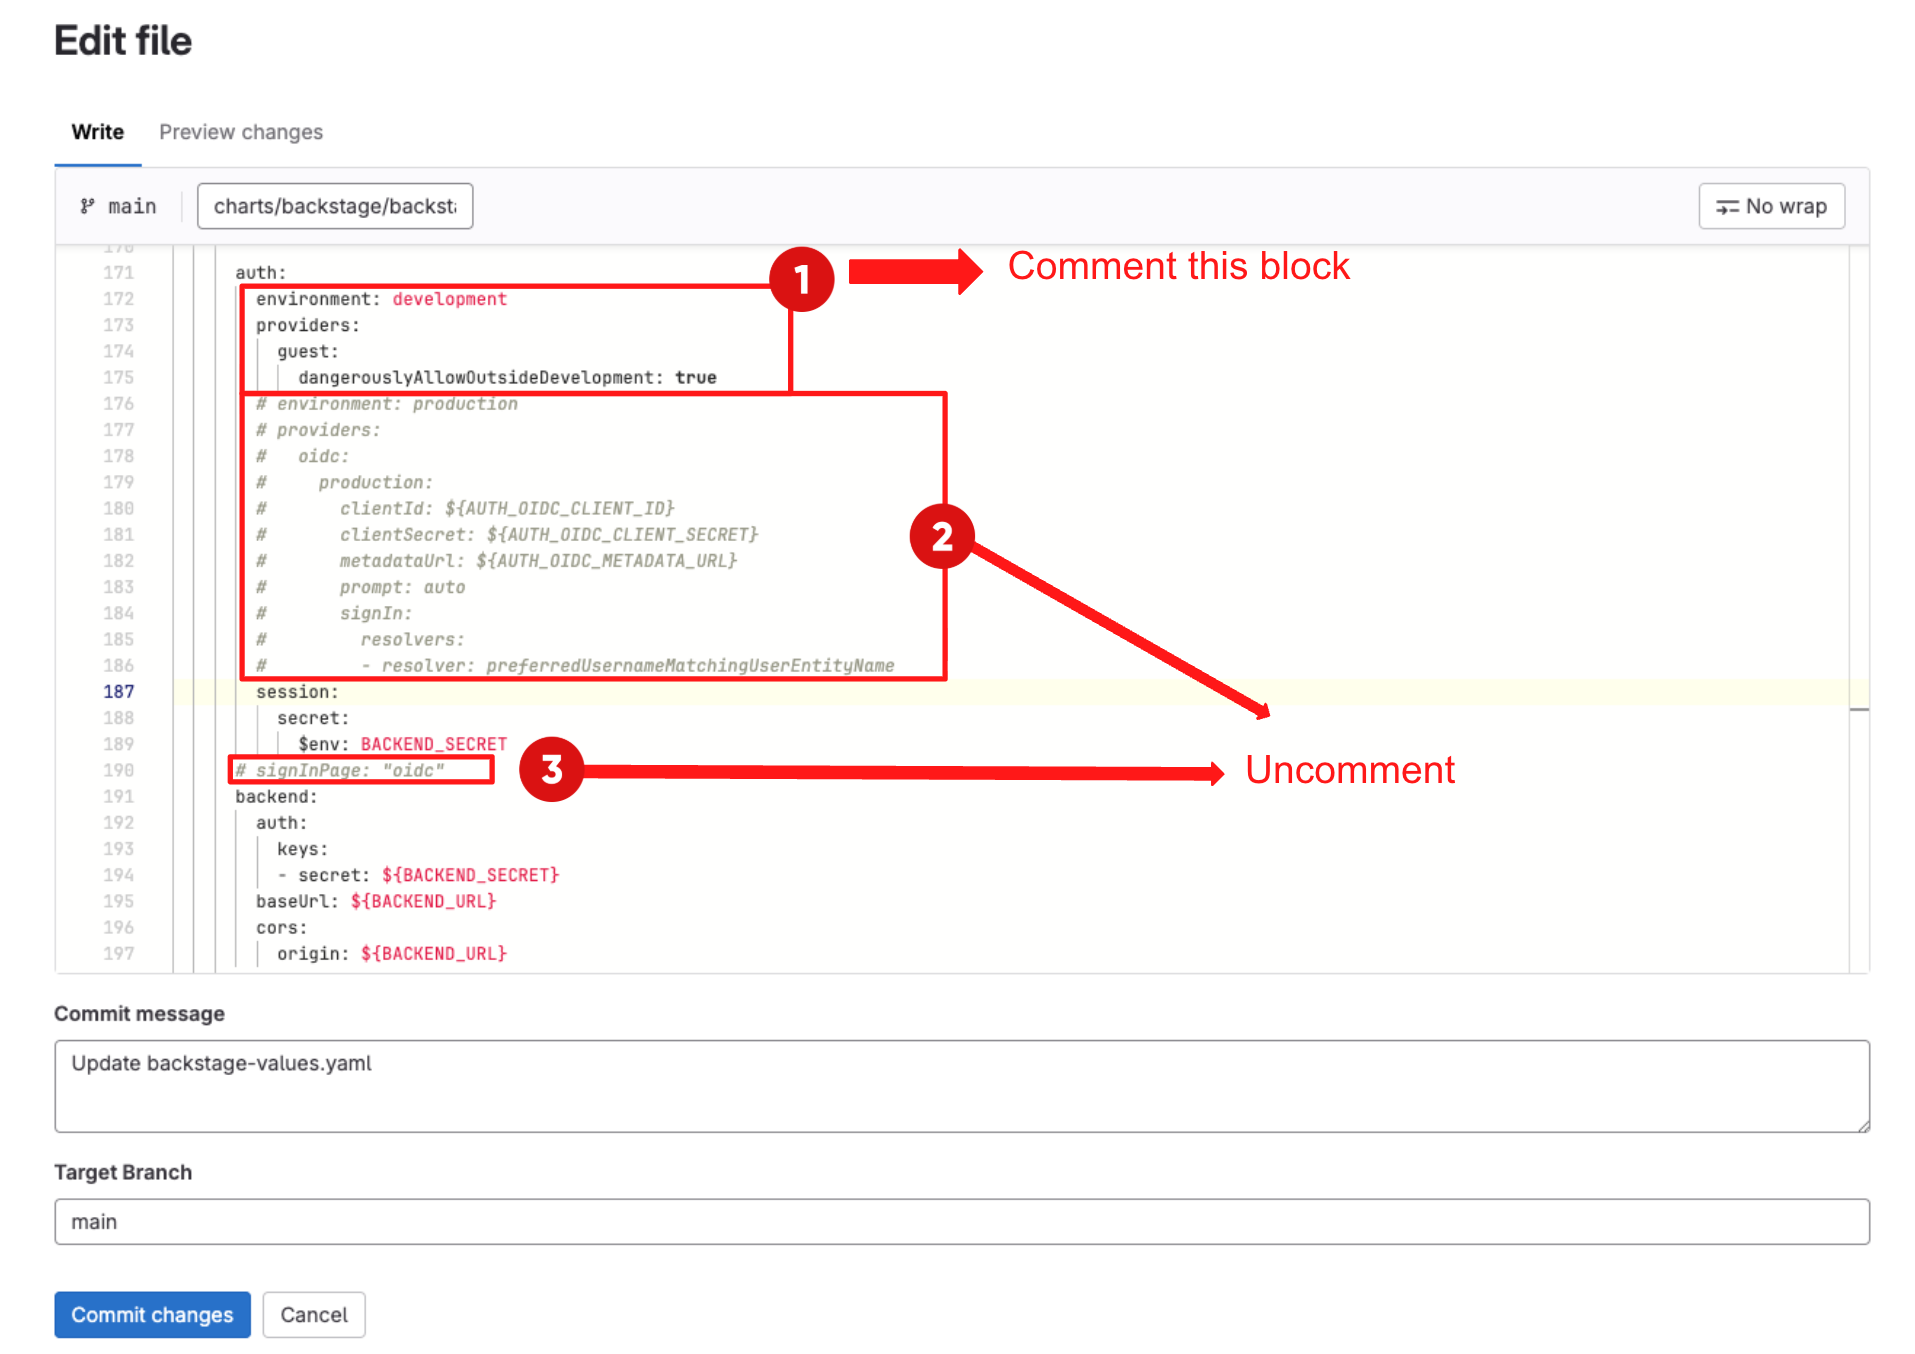
2.4.1 Understanding the authentication configuration
The YAML you just uncommented configures authentication as follows:
auth:
  environment: production
  providers:
    oidc:
      production:
        clientId: ${AUTH_OIDC_CLIENT_ID}
        clientSecret: ${AUTH_OIDC_CLIENT_SECRET}
        metadataUrl: ${AUTH_OIDC_METADATA_URL}
        prompt: auto
        signIn:
          resolvers:
          - resolver: preferredUsernameMatchingUserEntityName
signInPage: "oidc"-
providers.oidc.production: defines an OIDC provider that RHDH will use in "production" mode.
-
clientId and clientSecret: are the OIDC client credentials configured in RHBK for Developer Hub. They allow RHDH to redirect users to Keycloak and exchange authorisation codes for tokens.
-
metadataUrl: points to the OIDC discovery endpoint in RHBK (for example: https://sso.<APPS_DOMAIN>/realms/sso/.well-known/openid-configuration). RHDH uses this to discover the correct authorisation, token and JWKS endpoints.
-
prompt: auto lets the identity provider decide whether to prompt the user again, enabling smoother SSO experiences when the user already has an active session.
-
signIn.resolvers: the resolver preferredUsernameMatchingUserEntityName tells RHDH how to map an incoming Keycloak identity to a Backstage User entity.
-
signInPage: oidc tells RHDH to use the OIDC login flow as the default sign-in experience. Once applied, the "Guest" button should no longer be the primary entry point and users will be directed to "Sign in with OIDC" backed by RHBK.
2.5 Populating Software Catalog
The Software Catalog is your central inventory for everything that matters in your technology landscape. It tracks entities such as:
-
Components: services, websites, libraries
-
Resources: databases, message brokers, object storage
-
APIs: REST, gRPC, GraphQL interfaces
-
Users and Groups: people and teams in your organisation
In your YAML, providers are configured under catalog.providers and are usually delivered by plugins. In this step, you will enable the Keycloak catalog provider to synchronise Users and Groups from Red Hat Build of Keycloak (RHBK) into the Software Catalog.
-
In backstage-values.yaml, locate and uncomment the catalog block using
CMD + /(Mac) orCTRL + /(Windows/Linux) as shown below: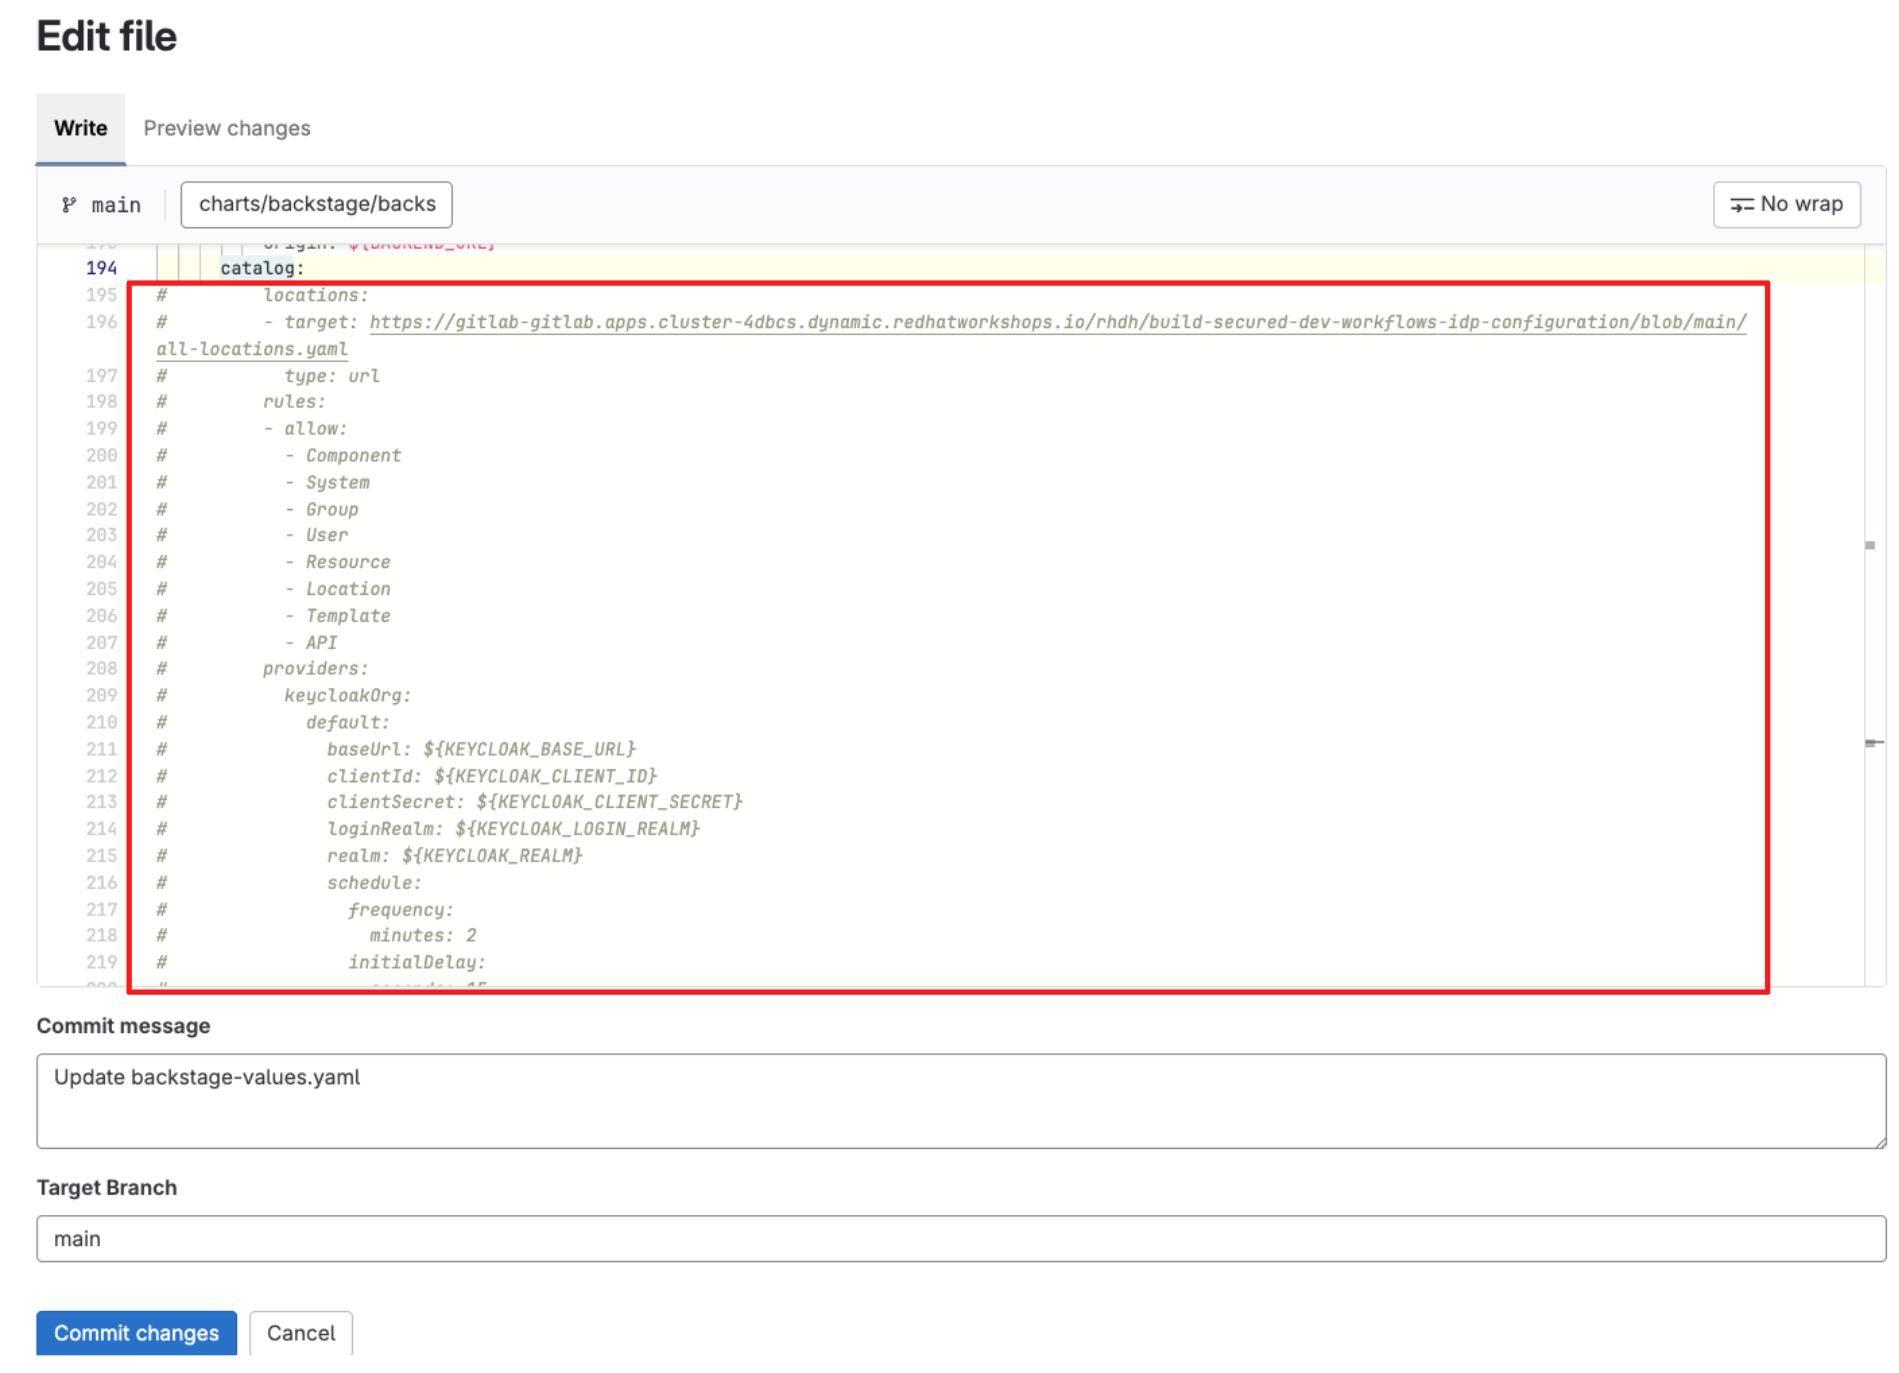
The YAML block you just uncommented configures catalog providers as follows:
catalog:
  locations:
  - target: https://gitlab-gitlab.apps.cluster-4dbcs.dynamic.redhatworkshops.io/rhdh/build-secured-dev-workflows-idp-configuration/blob/main/all-locations.yaml
    type: url
  rules:
  - allow:
    - Component
    - System
    - Group
    - User
    - Resource
    - Location
    - Template
    - API
  providers:
    keycloakOrg:
      default:
        baseUrl: ${KEYCLOAK_BASE_URL}
        clientId: ${KEYCLOAK_CLIENT_ID}
        clientSecret: ${KEYCLOAK_CLIENT_SECRET}
        loginRealm: ${KEYCLOAK_LOGIN_REALM}
        realm: ${KEYCLOAK_REALM}
        schedule:
          frequency:
            minutes: 2
          initialDelay:
            seconds: 15
          timeout:
minutes: 2-
Catalog locations: The locations section is used to register catalog files from Git (for example all-locations.yaml in GitLab).
-
Allowed entity types: The rules.allow block defines which entity kinds the catalog will accept from those locations.
-
Providers: The providers.keycloakOrg.default block configures the Keycloak organisation provider plugin.
-
baseUrl: ${KEYCLOAK_BASE_URL} points RHDH at your RHBK instance.
-
clientId and clientSecret are the OIDC client credentials that allow RHDH to call the Keycloak Admin APIs securely.
-
loginRealm is the realm used for authentication (for example sso).
-
realm is the realm from which Users and Groups will be synchronised. In this lab they are the same, but in larger environments they may differ.
-
-
Sync schedule: The schedule block controls how often RHDH refreshes Users and Groups from RHBK:
-
frequency.minutes: sync every 2 minutes
-
initialDelay.seconds: wait 15 seconds after startup before the first sync
-
timeout.minutes: fail the run if the sync takes longer than 2 minutes
-
Once this configuration is applied and RHDH restarts, the Catalog will automatically populate with User and Group entities pulled from RHBK, forming the identity backbone for ownership and permissions in later steps.
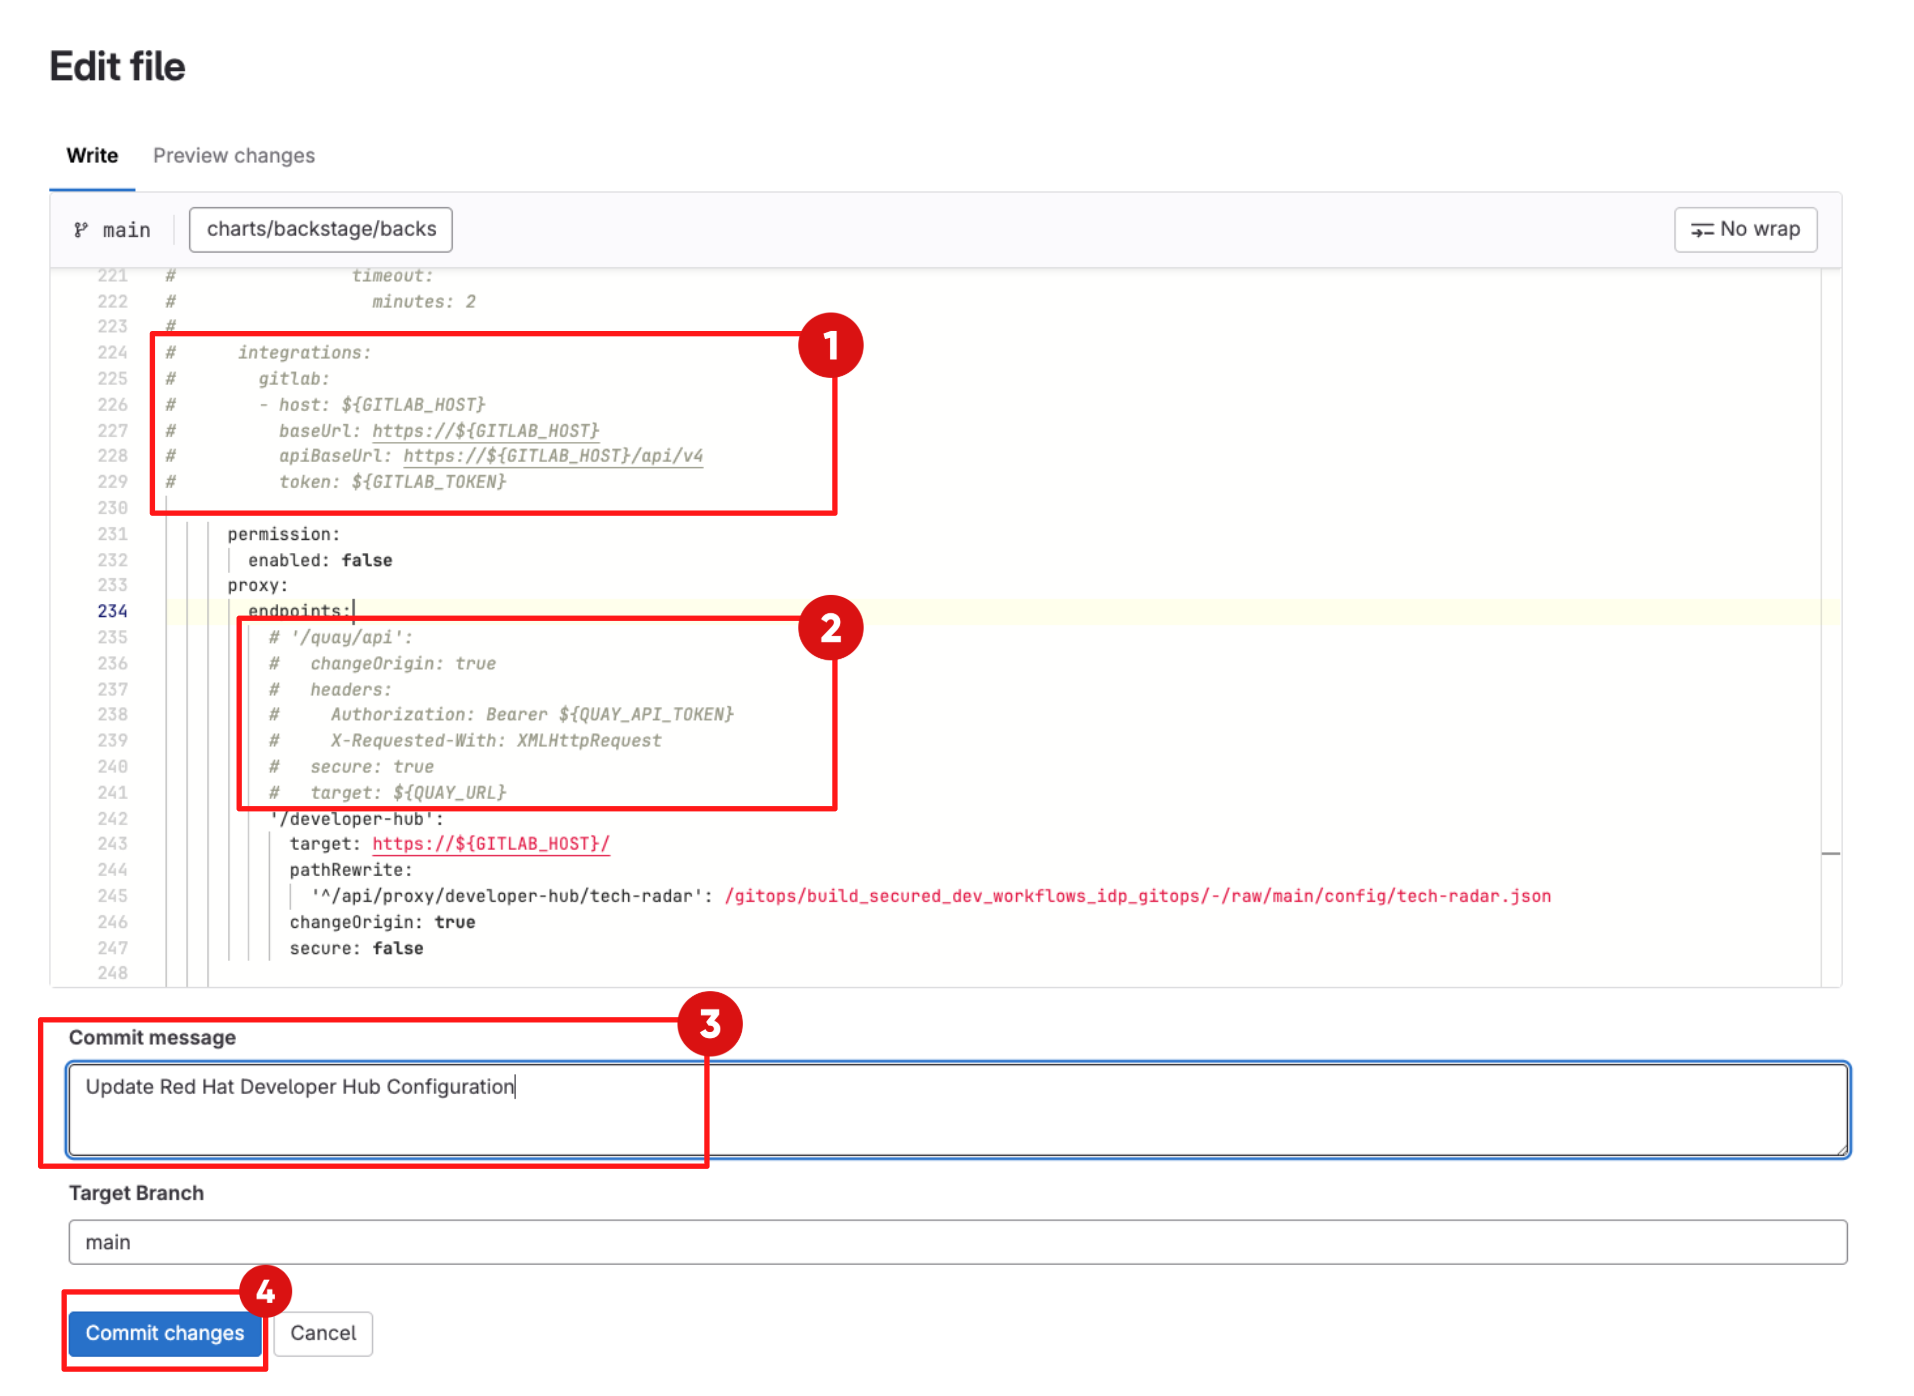
2.6 Integration and Proxy Configuration
In this step you enable integration between Red Hat Developer Hub and your GitLab instance. You will also enable the proxy configuration, allowing Red Hat Developer Hub to act as a secure intermediary between developers and external services such as Quay — routing requests server-side so developers never handle tokens directly or run into browser CORS issues.
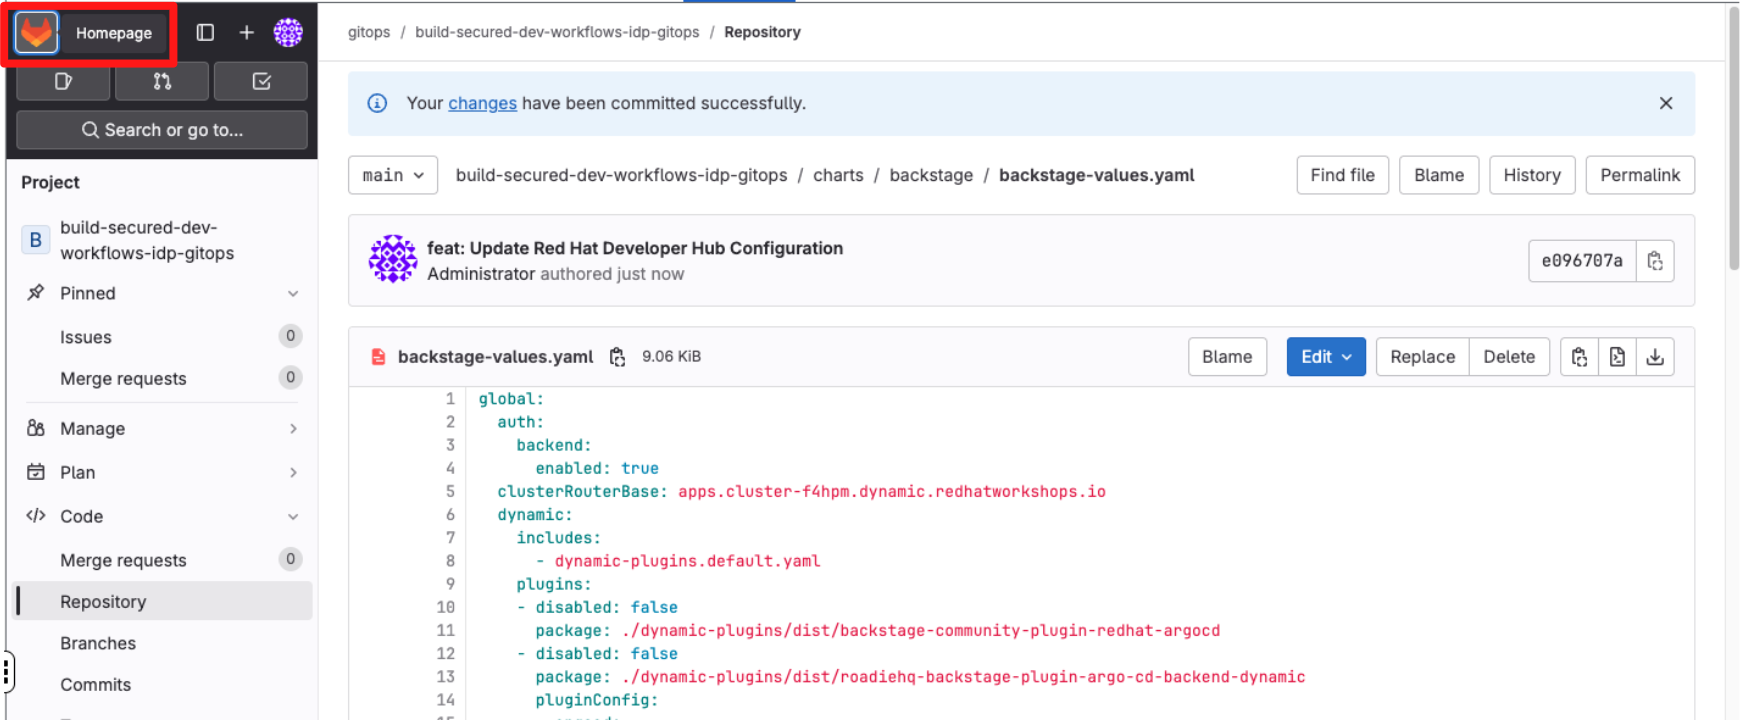
-
In backstage-values.yaml, locate and uncomment the integrations and proxy blocks using
CMD + /(Mac) orCTRL + /(Windows/Linux) as shown below. -
Scroll down and enter a commit message:
feat: Update Red Hat Developer Hub Configuration -
Click Commit Changes.
2.7 Sync via Argo CD
-
In Showroom, switch to the Argo CD tab and log in using the following credentials:
Username:
{openshift_gitops_admin_user}Password:
{openshift_gitops_admin_password} -
Switch to the Backstage Application.
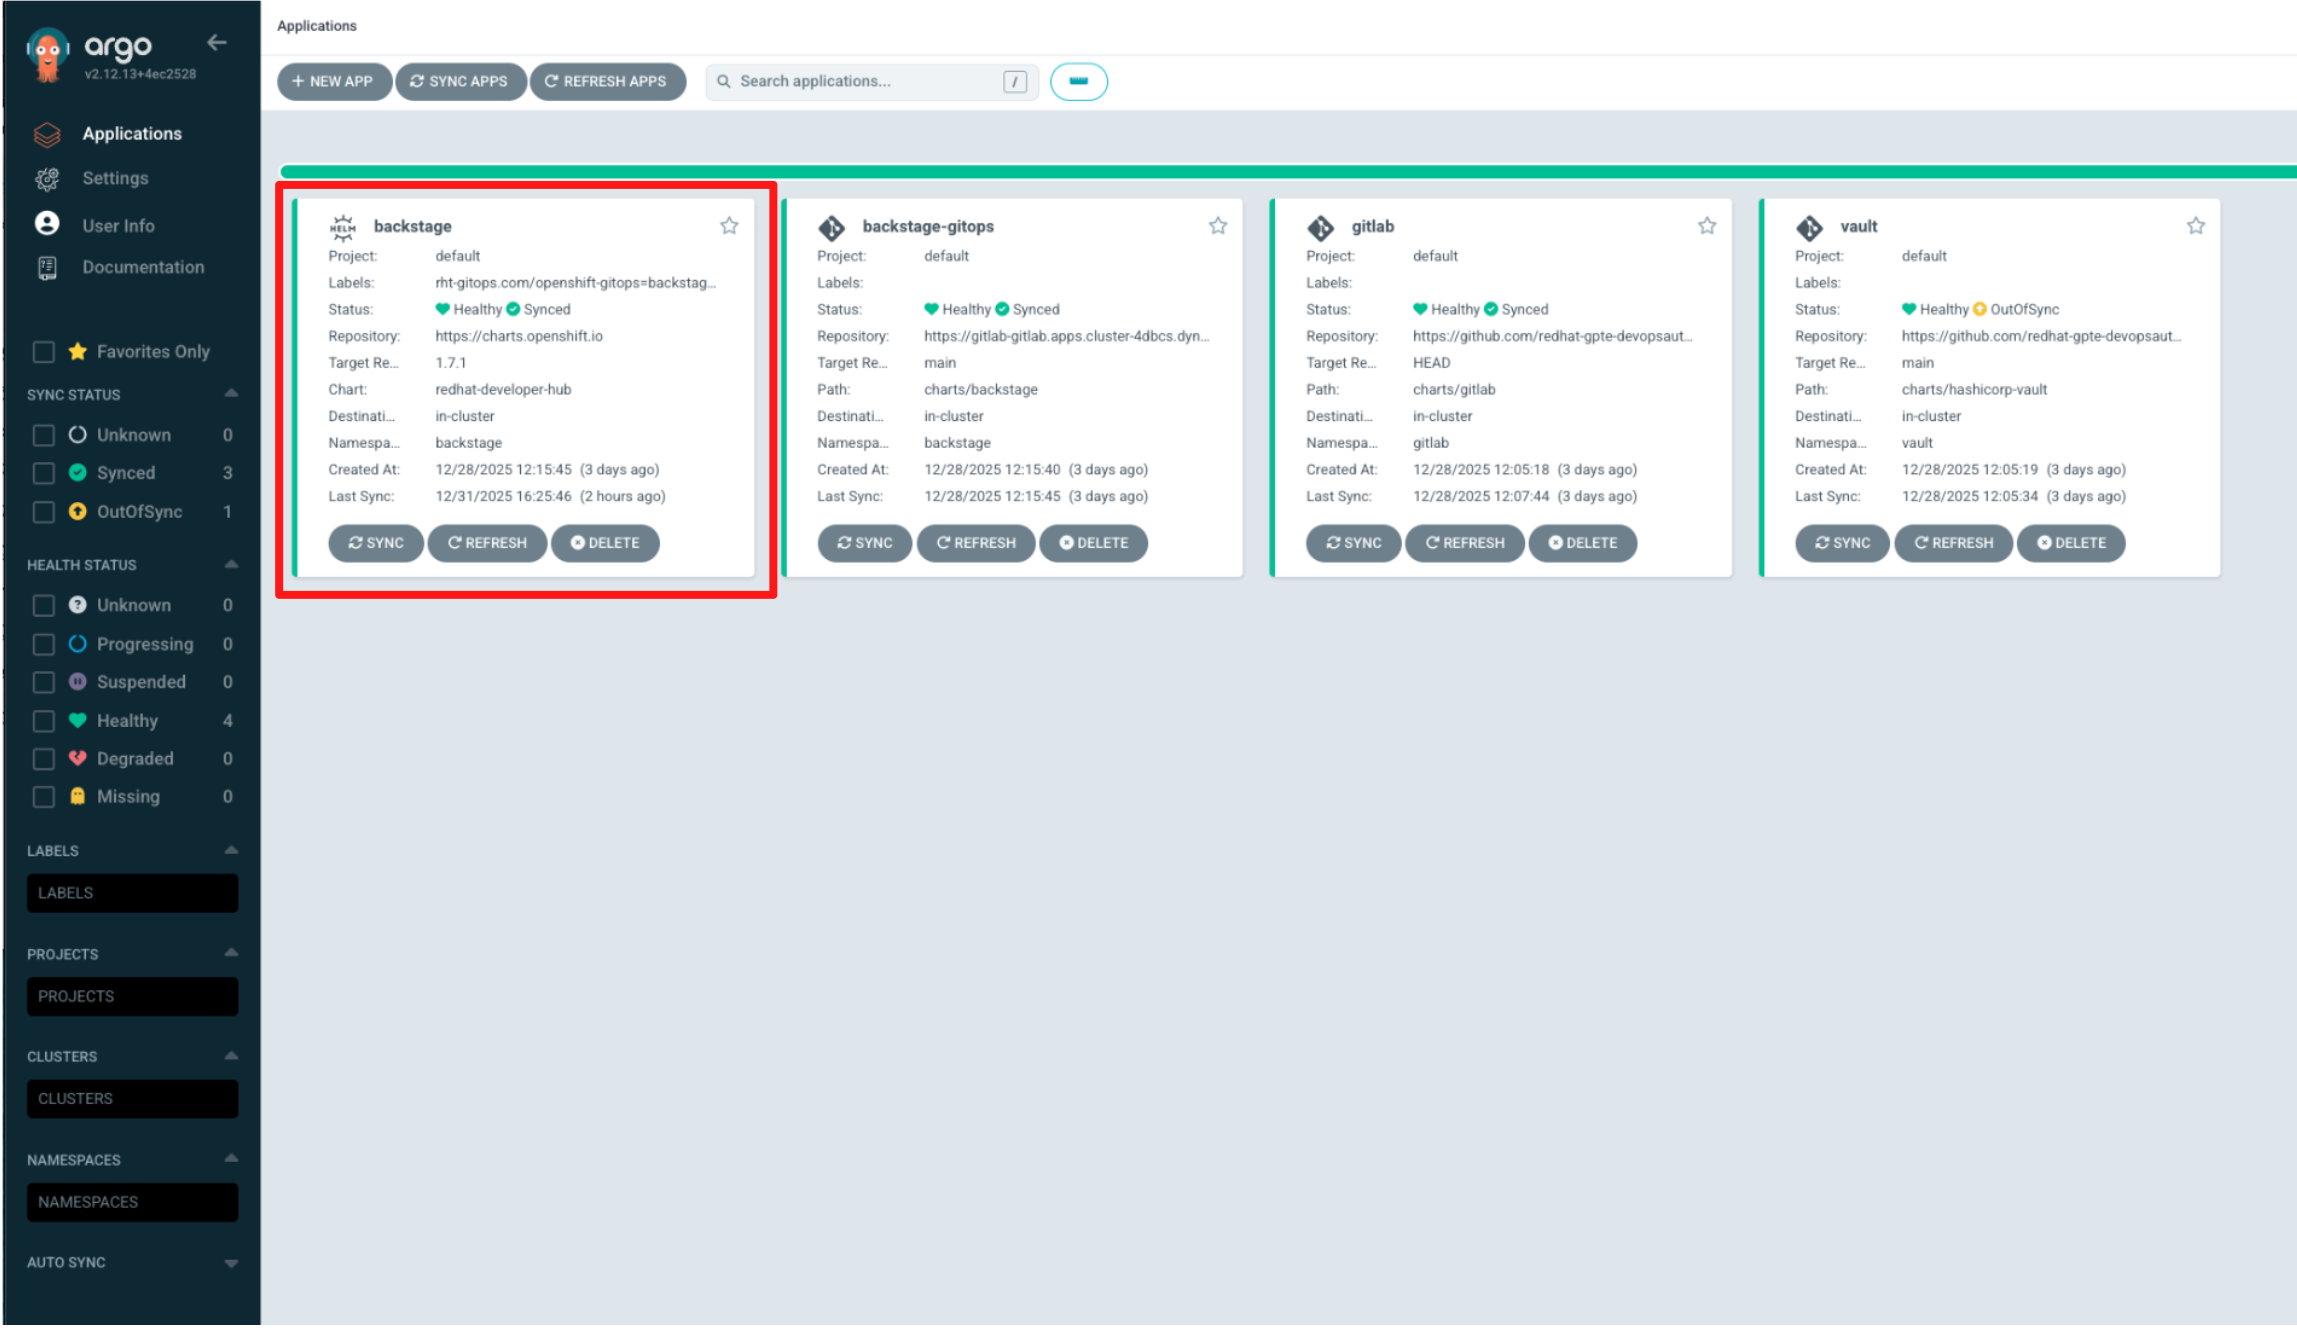
-
Argo CD is configured to automatically synchronise every two minutes. To avoid waiting for the next sync cycle, trigger Hard Refresh to trigger an immediate reconciliation.
-
Locate the Refresh button in the UI, click the down arrow next to it, and select Hard Refresh.
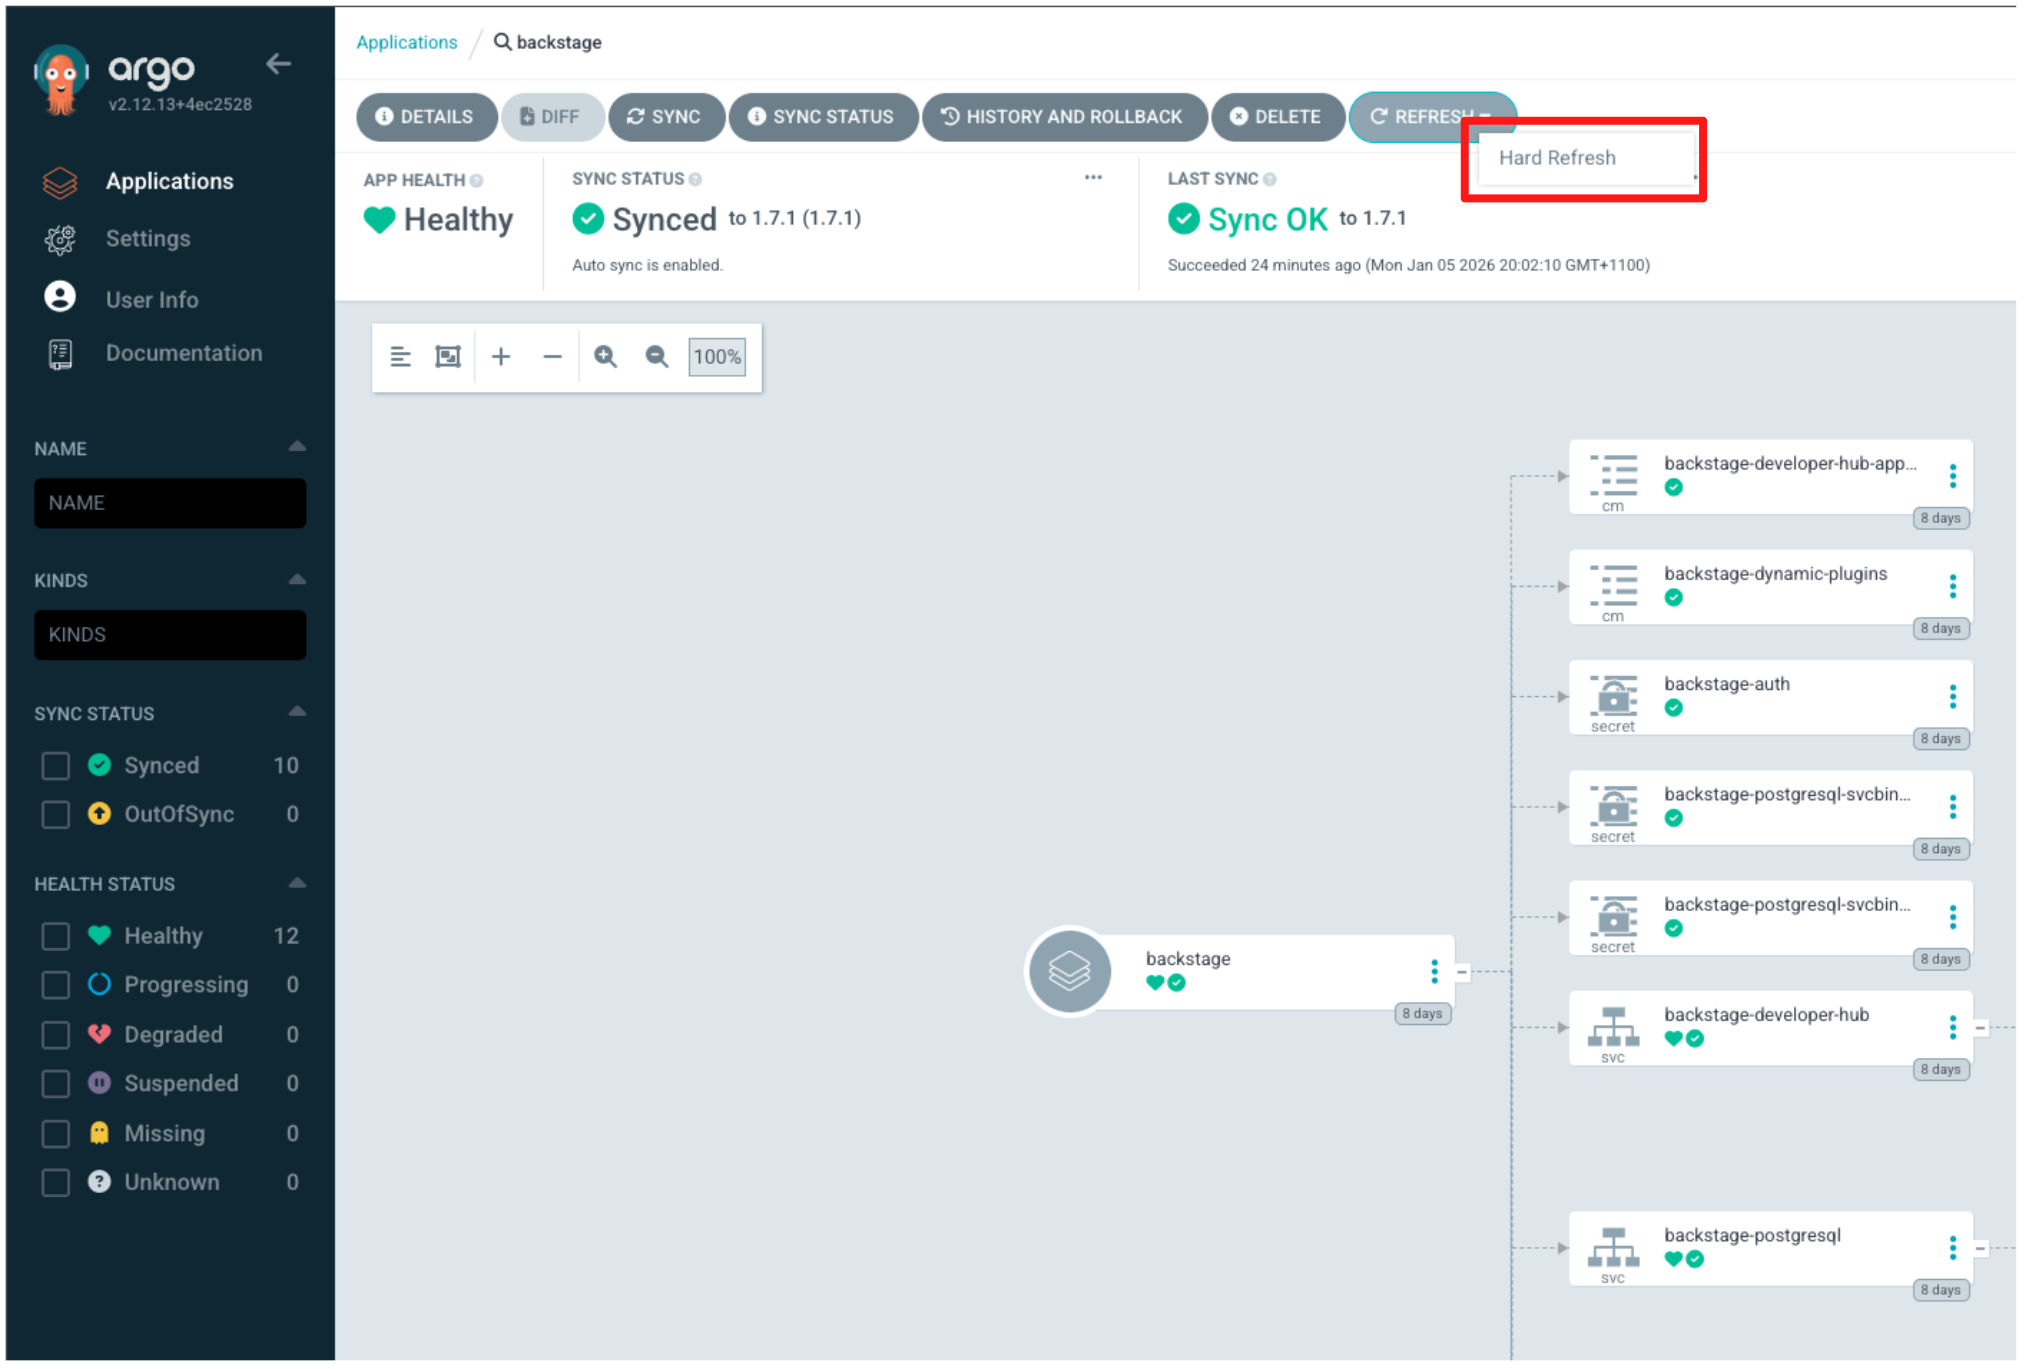
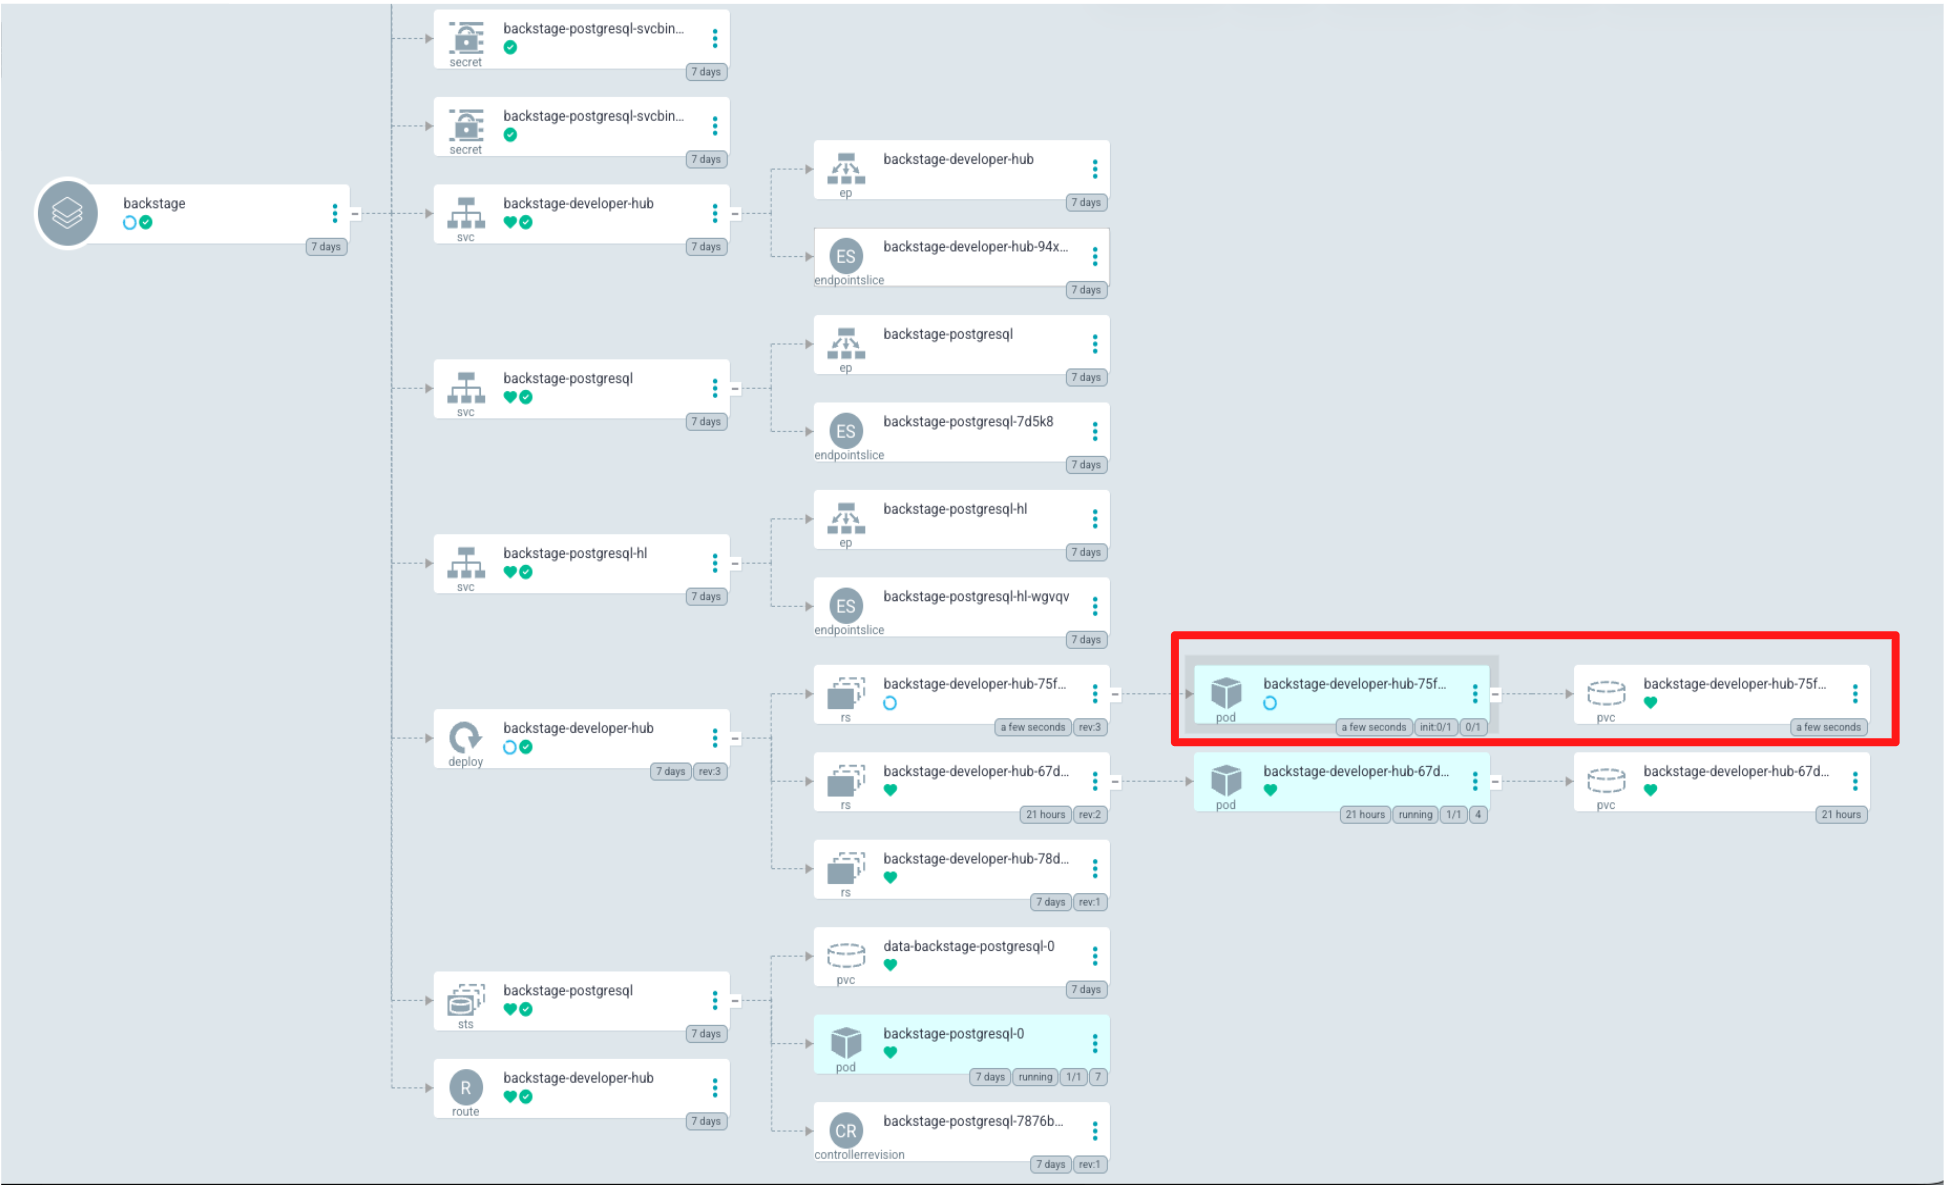
Argo CD immediately begins rolling out the updated configuration. This typically takes 2–3 minutes as the Red Hat Developer Hub deployment is reconciled and new plugins are installed for the first time.
-
Wait for Argo CD to complete synchronisation of the Backstage application. Confirm that APP HEALTH shows Healthy and SYNC STATUS shows Synced.
-
You’ve just seen GitOps and configuration-as-code in action. Configuration changes committed to Git were automatically reconciled into Red Hat Developer Hub by Argo CD, without manual UI changes.
In the next step, you’ll return to Red Hat Developer Hub to verify that these changes are now active in the portal.
Step 3: Validate the changes in RHDH
-
Click the RHDH tab in the Showroom. You may need to refresh the tab.
-
If you are logged in as Guest, click the user icon in the top-right corner, select the drop-down arrow, then choose Sign out from the menu.

-
You should immediately notice that Guest access is no longer available and the only login option is Sign in with OIDC, backed by Red Hat Build of Keycloak.
-
Click Sign in with OIDC.

-
Log in using the following credentials:
Username:
user1Password:
{password} -
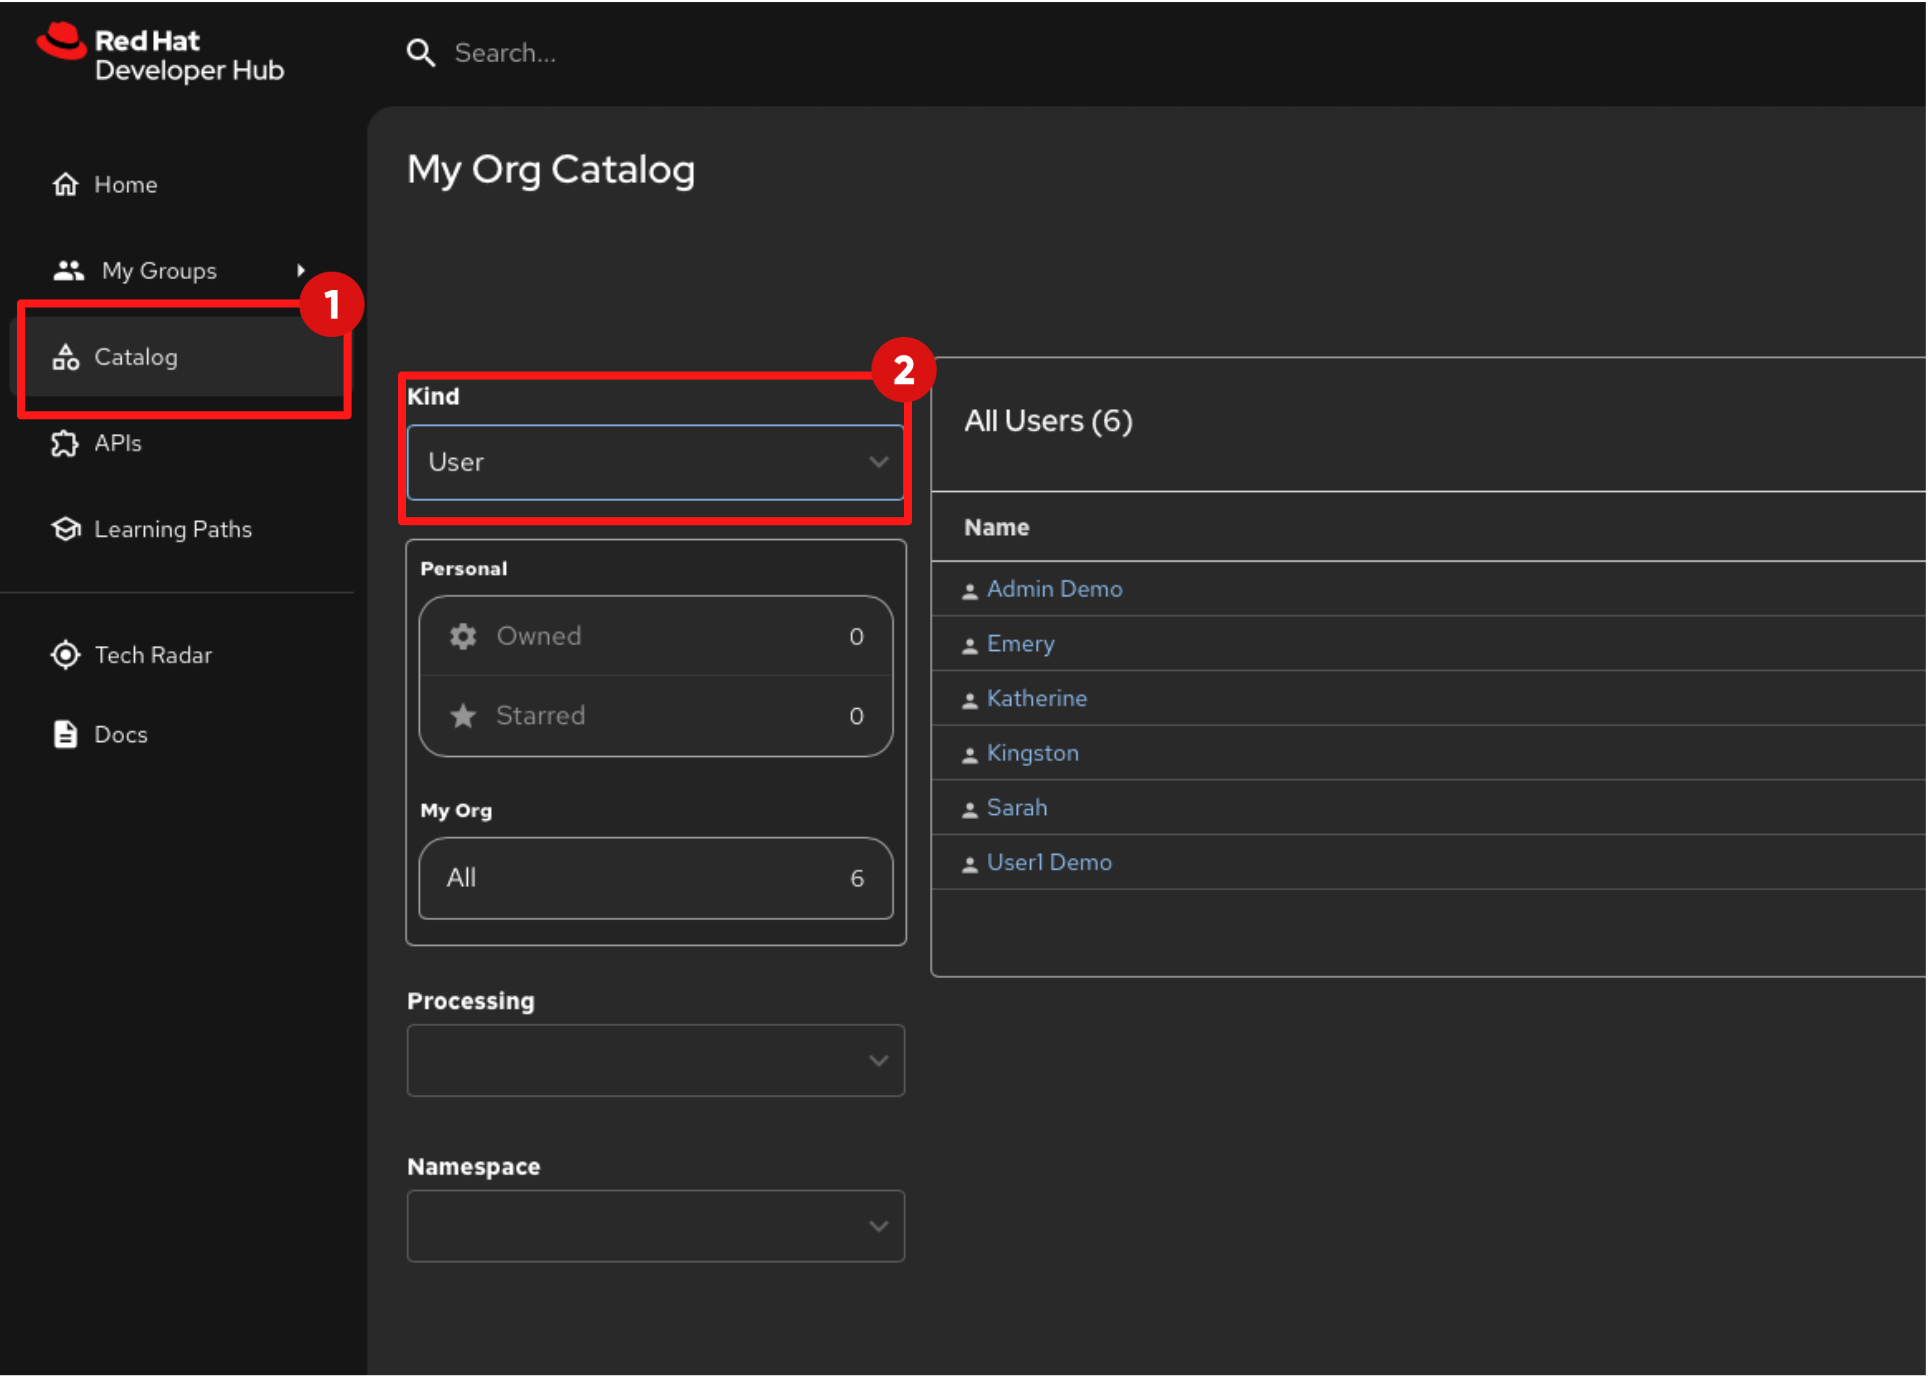
Once logged in, select Catalog from the left navigation menu. You should now see that the catalog is populated.
-
Change the Kind filter to User and the catalog will display users that have been synchronised from Red Hat Build of Keycloak. Additional users are also listed. These are sample users imported from the catalog locations you provided in the Red Hat Developer Hub configuration in GitLab.
-
Step 4: Development Environment as Code with Devfiles
The concept of Development Environment as Code represents a significant shift in the way we set up and manage development environments. By treating these configurations as code, developers can leverage automation, apply version control, and ensure consistency across various setups.
This approach simplifies the complex process of configuring individual environments and aligns it with modern DevOps practices. At the heart of this paradigm is the Devfile, a YAML configuration file used by OpenShift Dev Spaces, and in this step you will update a Devfile that our developer will use in his development workspace.
In this section you’ll act as a Platform Engineer and update the Devfile in a Template (Golden Path) that developers will use to create new applications. The update you make ensures that commit signing is enforced in new projects created using the template.
Optional Deep Dive: Development Environment as Code with Devfiles
=== Development Environment as Code with Devfiles
-
Devfiles act as blueprints for setting up development environments, defining everything from runtime environments to the necessary tools and commands needed for a project.
=== Anatomy of a Devfile
==== Projects (Optional)
-
The Projects section is used to specify source code repositories that are essential for the development environment.
-
It includes details like the repository URL and the specific branch, tag, or commit to be used, ensuring that the workspace is pre-populated with the correct code version upon initialization.
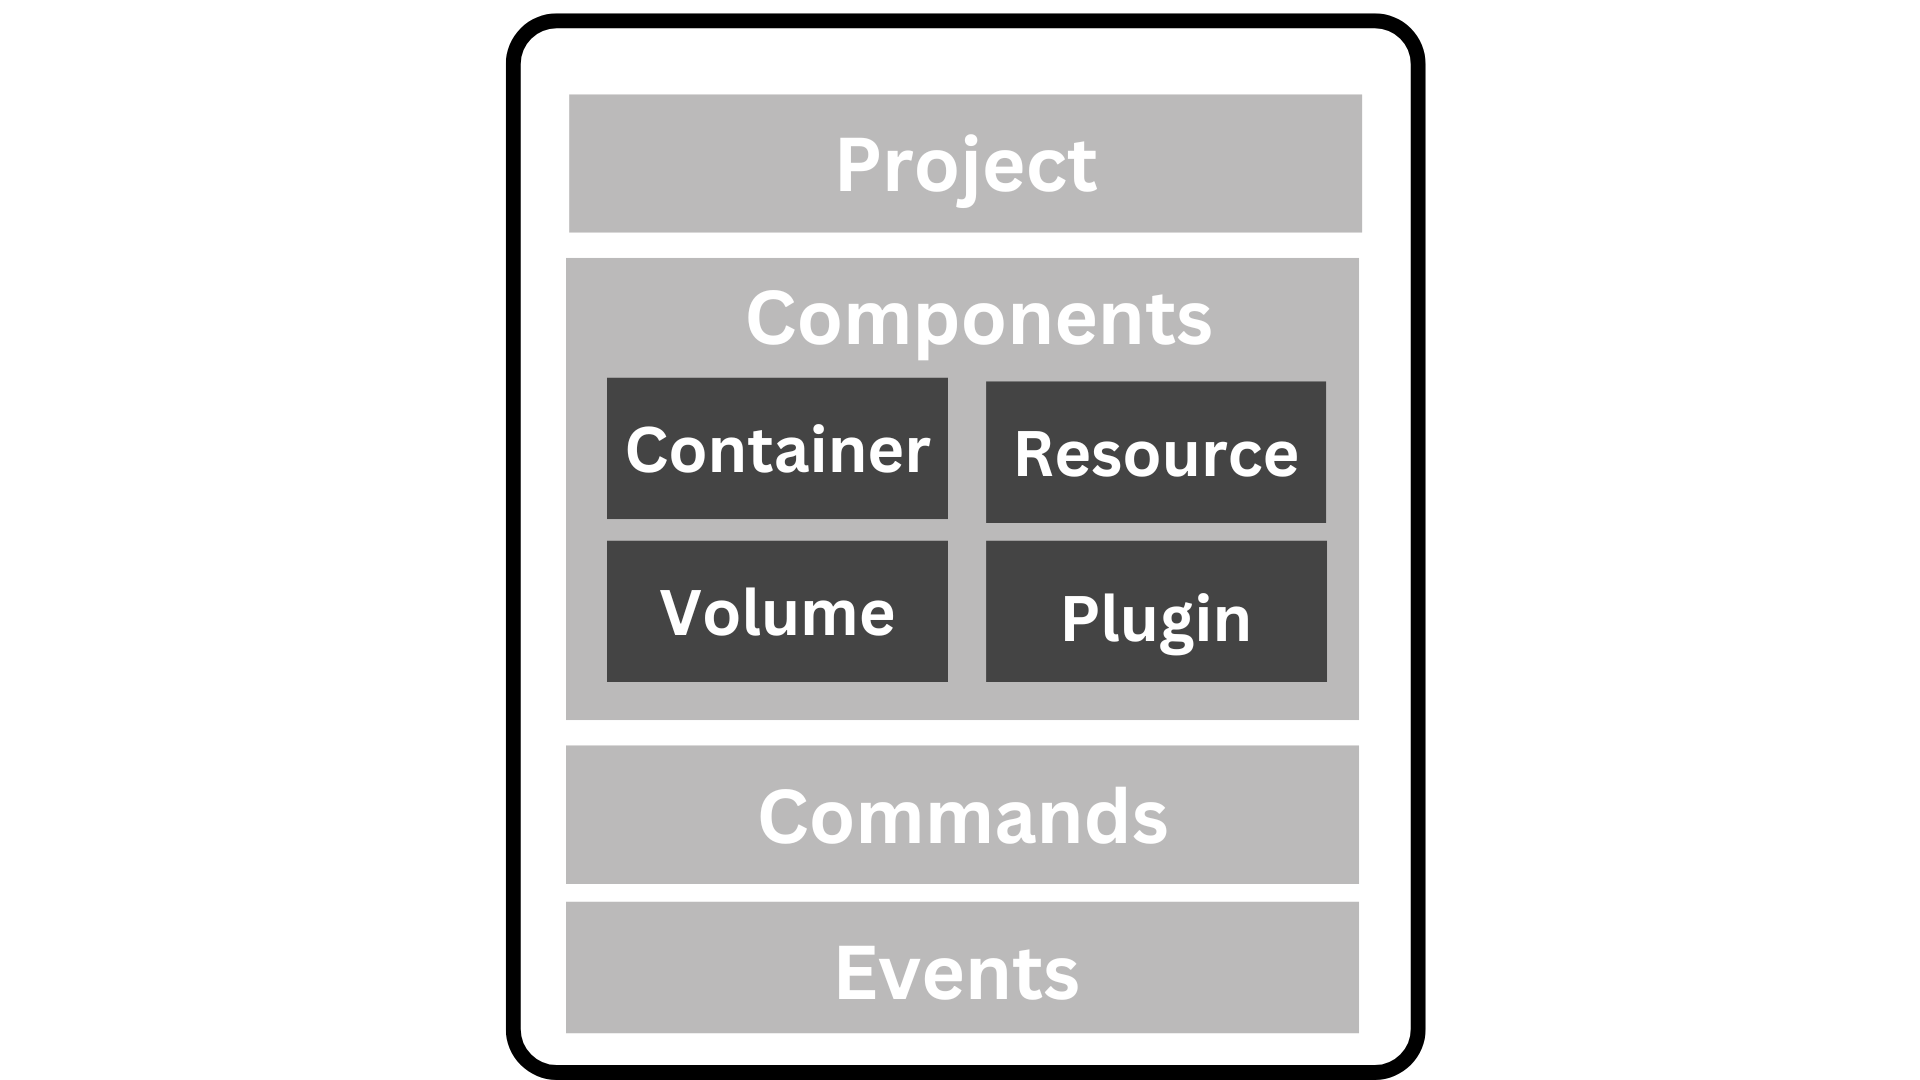
==== Components:
-
Components are the building blocks of the development environment. The can be of type:
-
Container: Defines the container image containing the runtime environment, development tools, and dependencies.
-
Kubernetes/OpenShift Resources: Incorporates Kubernetes or OpenShift-specific resources such as Routes and BuildConfigs into the workspace.
-
Volume: Provides persistent storage necessary for certain data within the development environment.
-
Plugin: Extends the capabilities of the development environment by adding IDE features or integrating additional tools and services.
-
==== Commands (Optional):
-
The Commands section outlines specific actions that can be executed within the development environment, such as build, run, and test commands.
-
These commands are defined to automate tasks and facilitate a consistent development workflow across different environments.
-
Each command can specify a working directory, an associated container, and the actual command line to execute.
==== Events (Optional):
-
The Events section in a devfile handles the lifecycle events of the workspace, such as pre-start, post-start, pre-stop, and post-stop events.
-
These events trigger specific commands at different stages of the workspace lifecycle, enabling the setup or teardown of services and tools necessary for the development process.
-
This mechanism ensures that certain tasks are automatically handled at the appropriate times, enhancing both the efficiency and reliability of the development environment.
-
Now it’s time to try this out hands-on. In this module, you’ll experience firsthand how OpenShift Dev Spaces streamlines the process of joining a new project.
4.1 Log Back in to GitLab Update the Devfile
-
If you are not already logged in to Gitlab, click the Gitlab tab in the Showroom and log in using:
Username:
{gitlab_root_user}Password:
{gitlab_root_password}
4.2 Update the Devfile
-
At the top left click on Gitlab Home.
-
Select the repository "build-secured-dev-workflows-idp-configuration".

-
Navigate to the paths "scaffolder-templates/quarkus-stssc-template".

-
Open the folder skeleton.
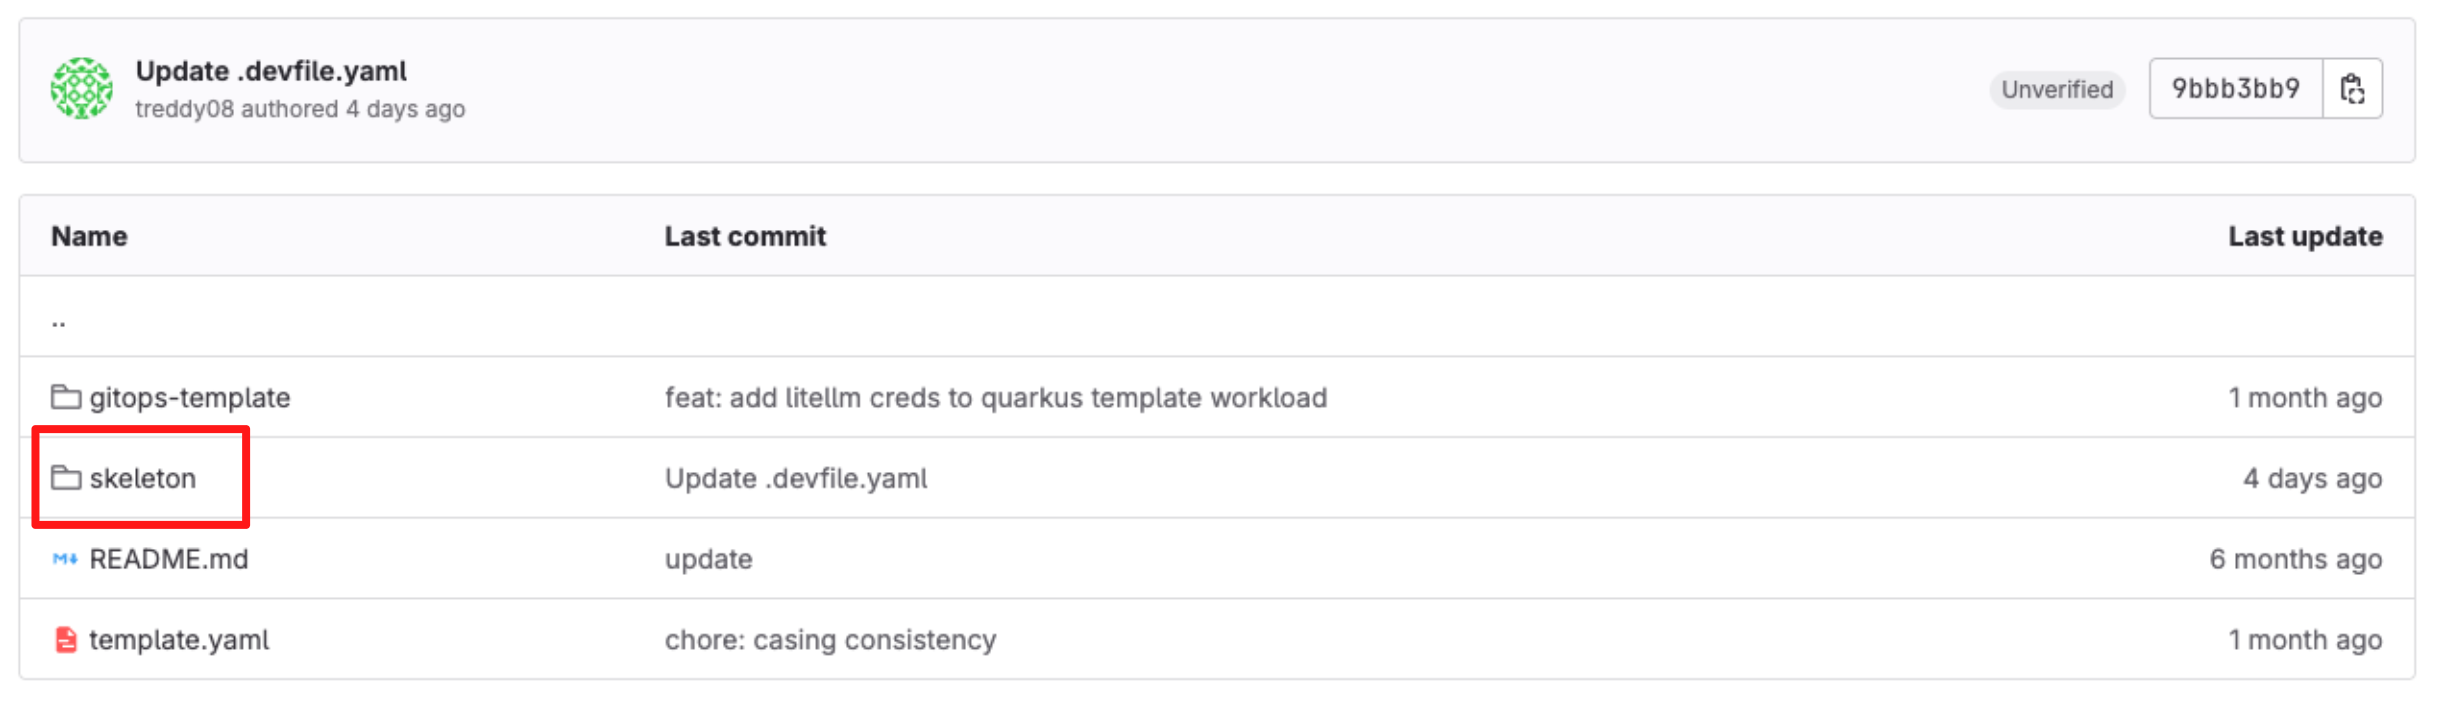
-
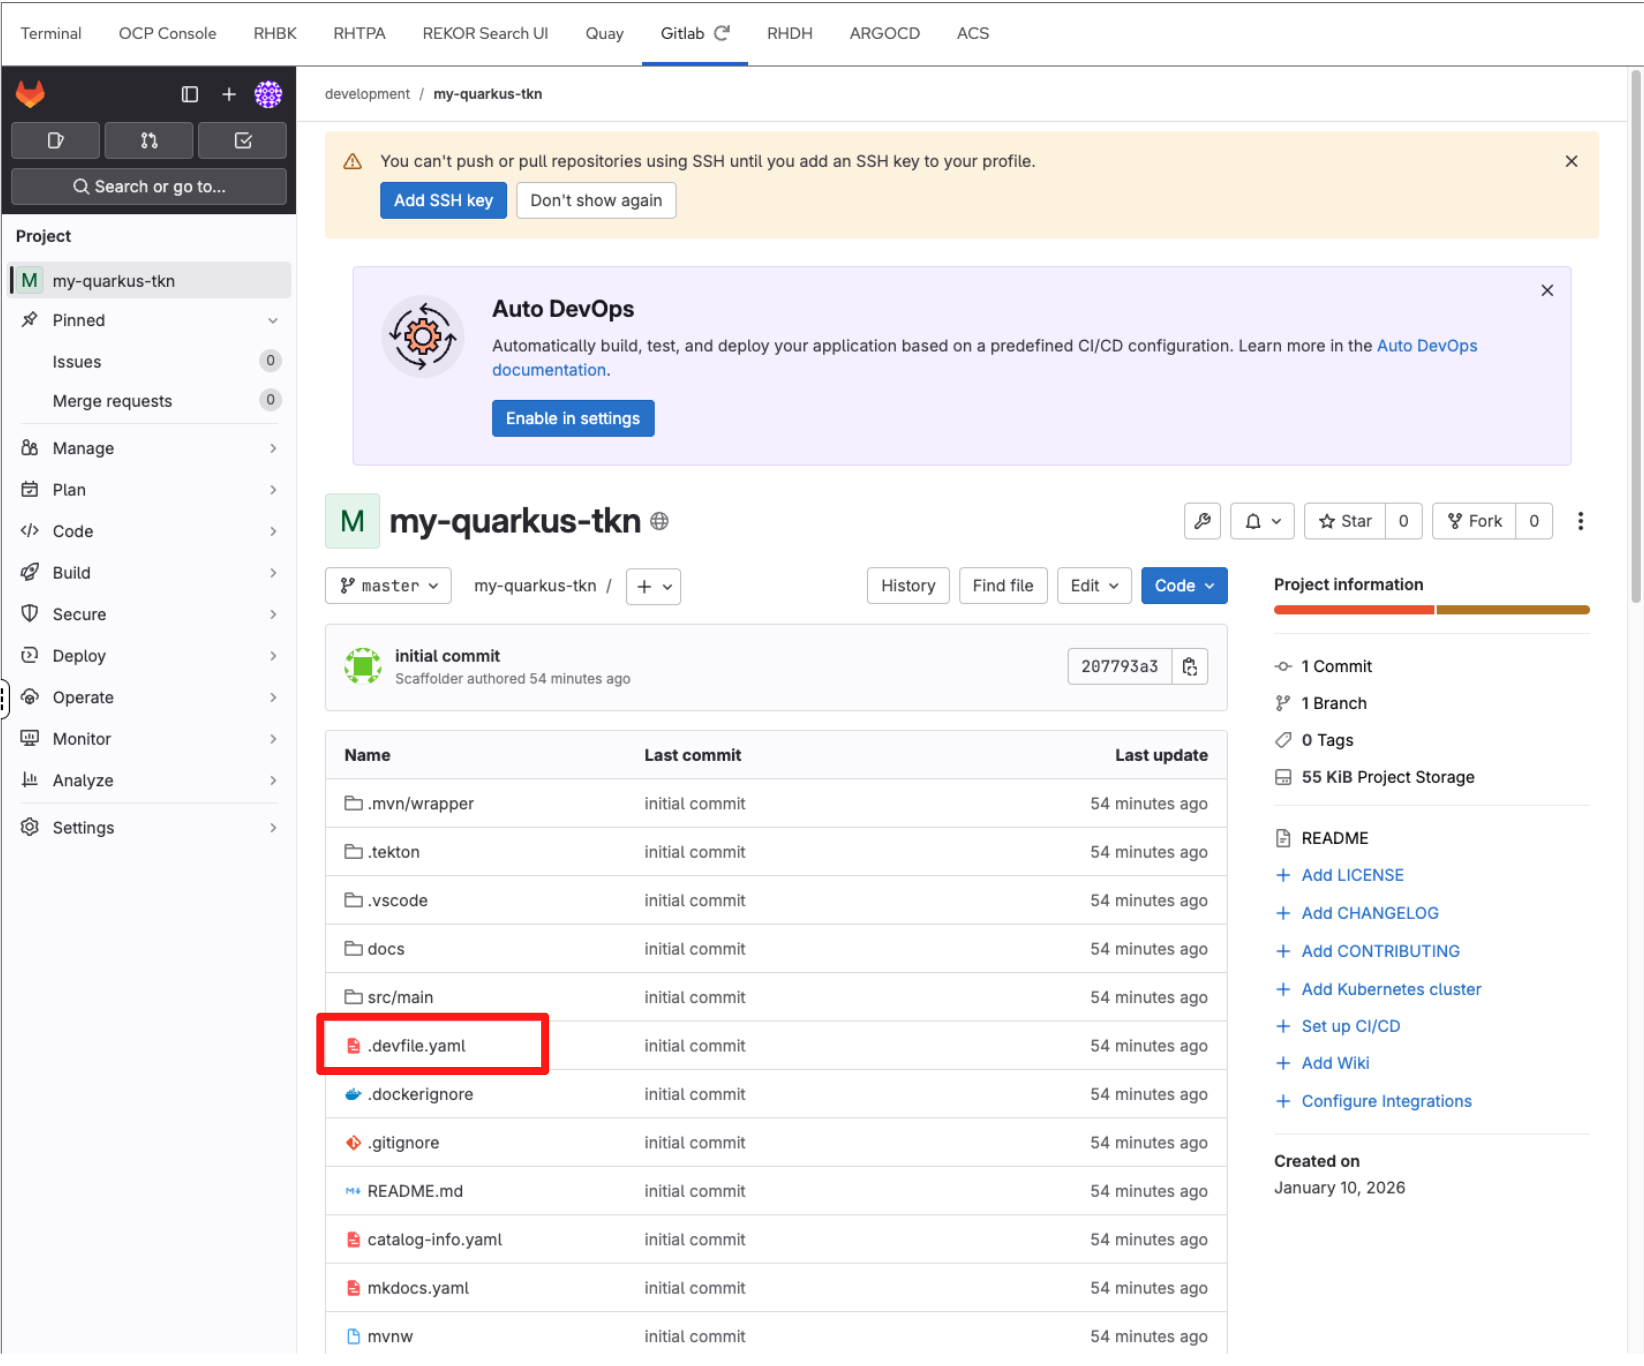
Select the the file devfile.yaml.
-
Select Edit > Edit single file.
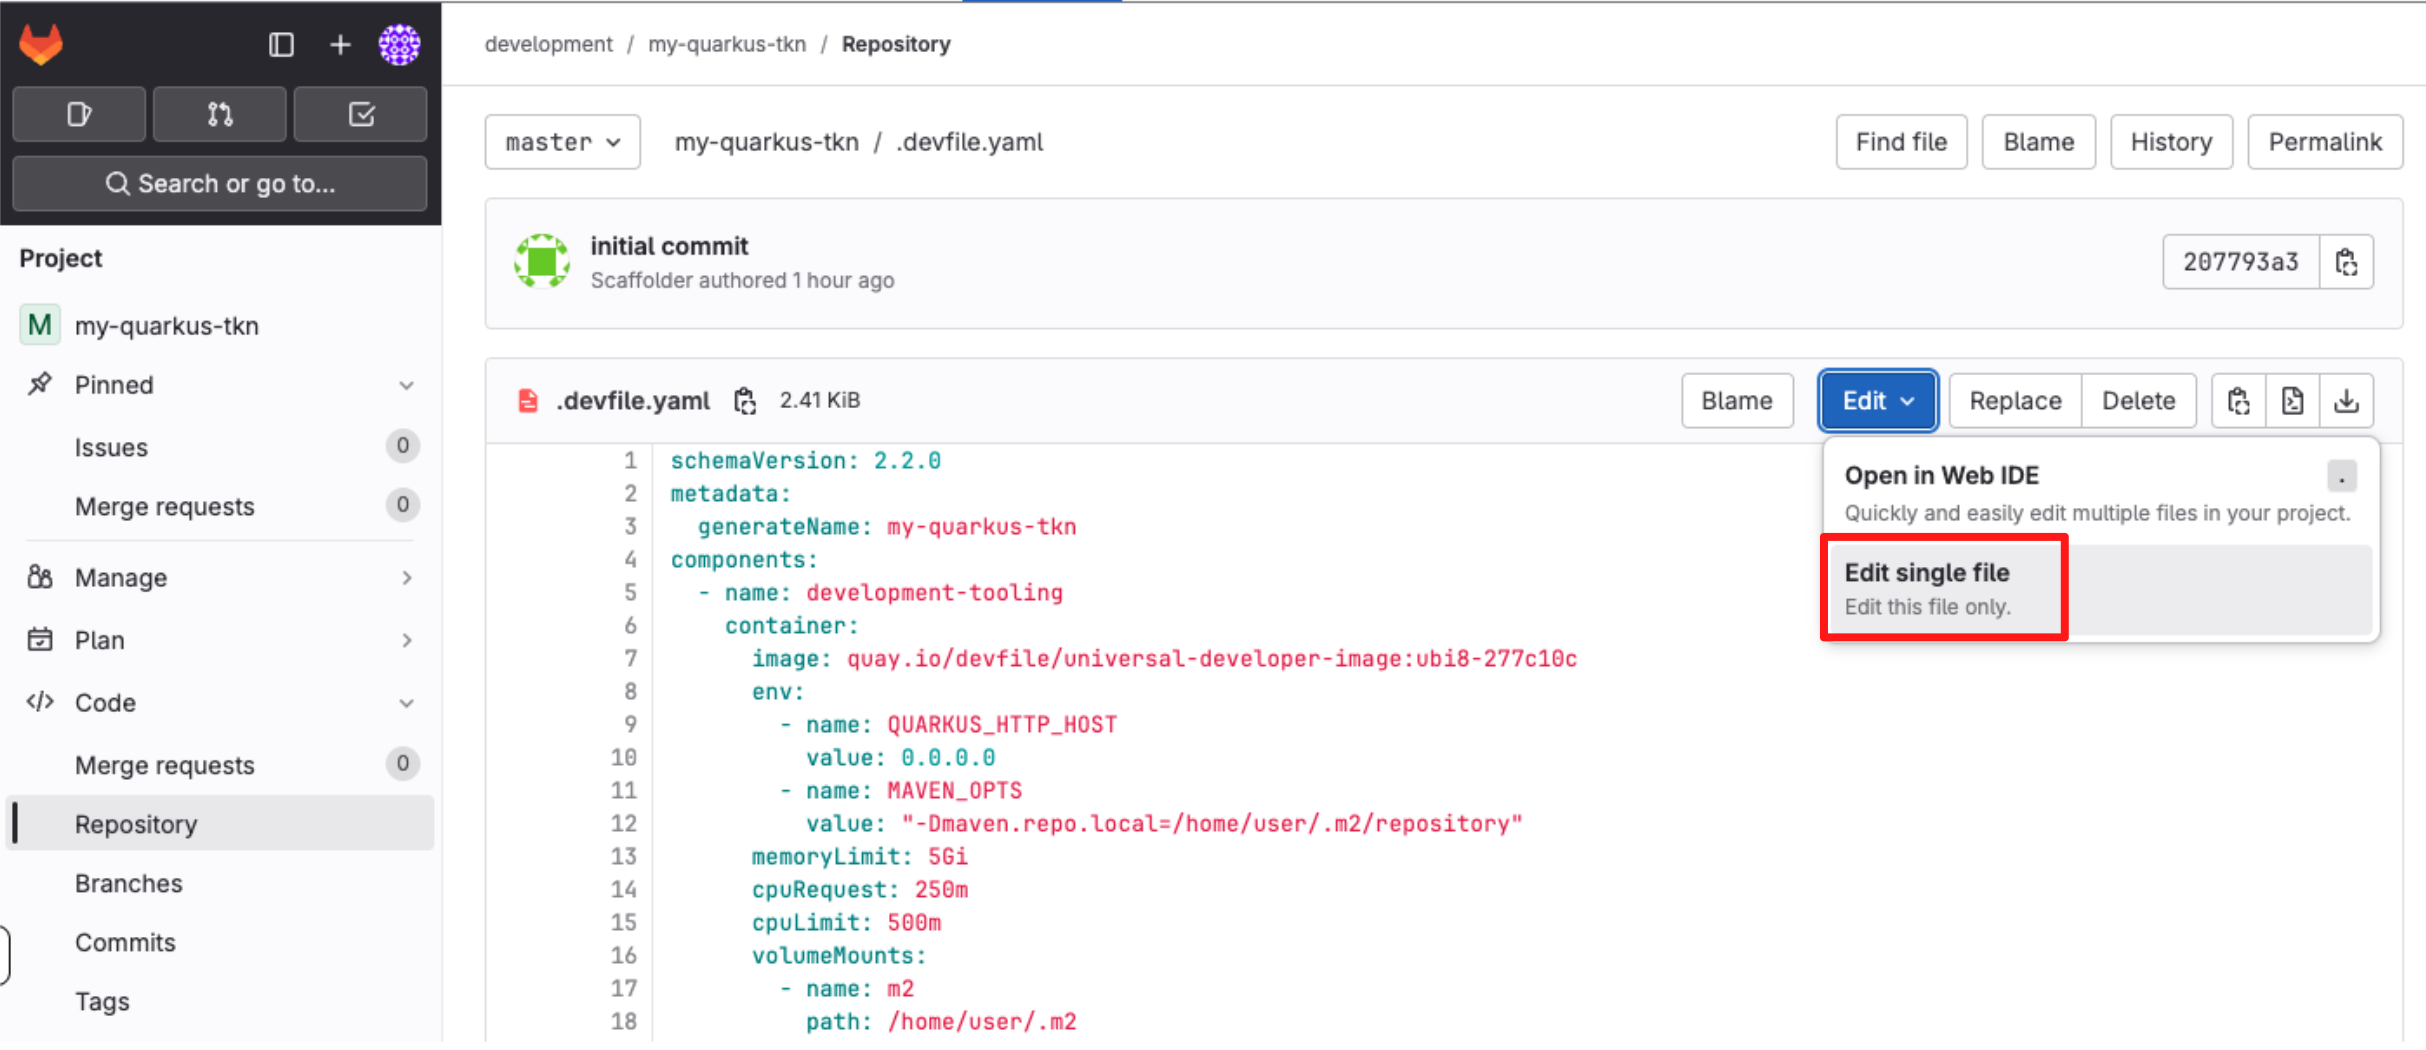
-
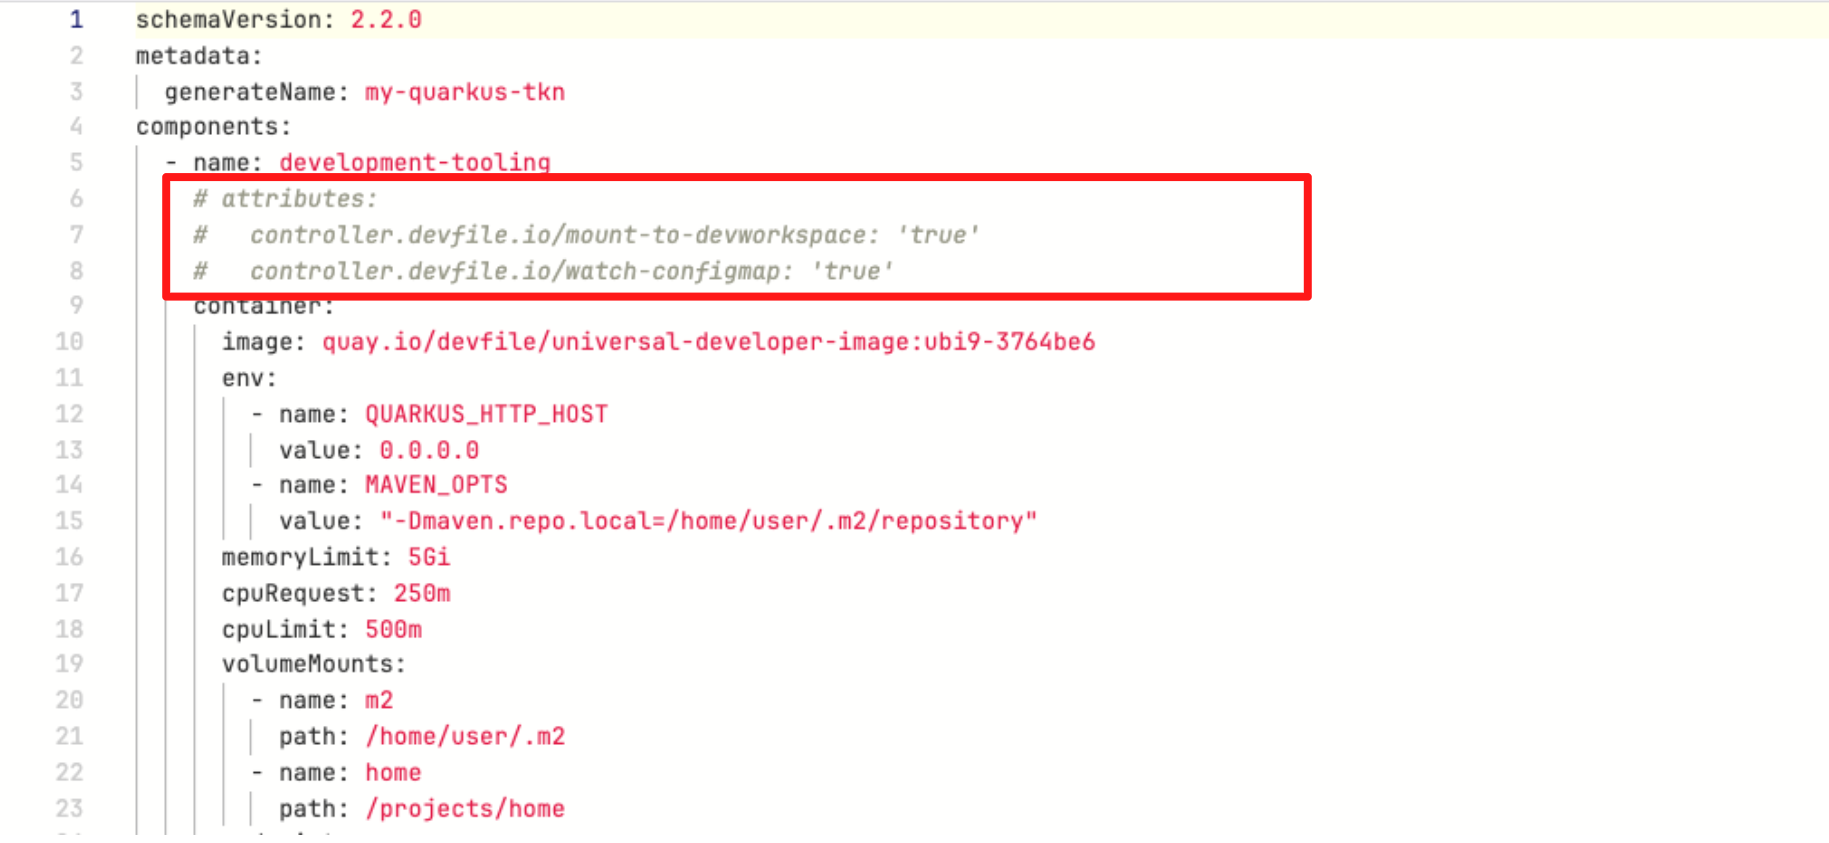
In devfile.yaml, locate and uncomment the attributes section using
CMD + /(Mac) orCTRL + /(Windows/Linux) as shown below:-
These attributes allow configuration from a ConfigMap you’ll create in the next module to be injected into workspaces managed by OpenShift Dev Spaces.
-
-
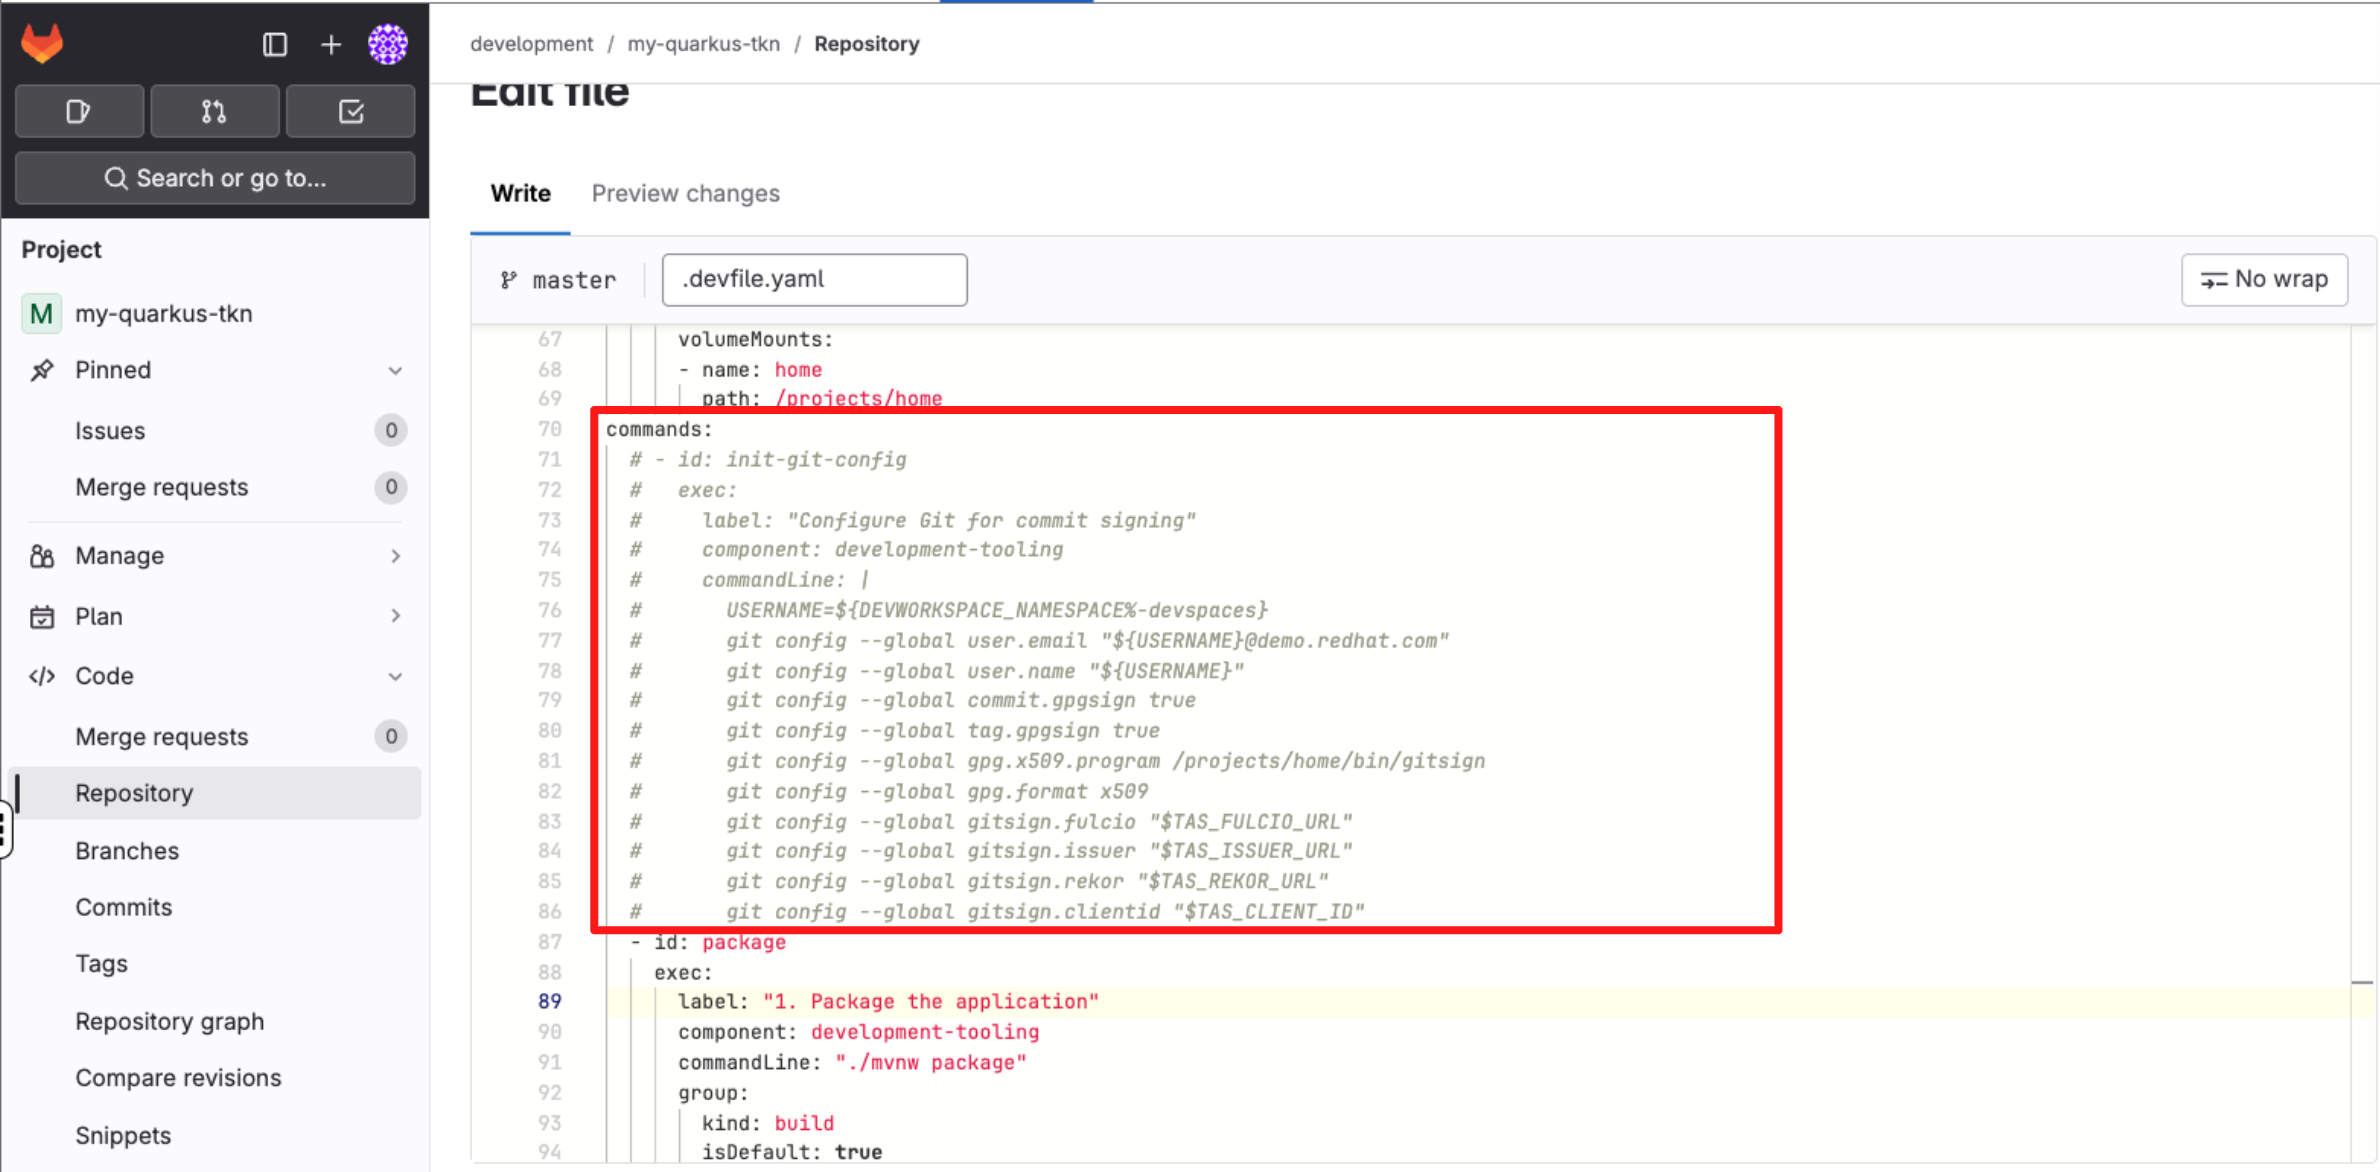
Next, under the commands section, uncomment the init-git-config command using using
CMD + /(Mac) orCTRL + /(Windows/Linux) as shown below:-
This command updates the Git configuration for the current workspace session using the injected environment variables, enabling commit signing.
-
-
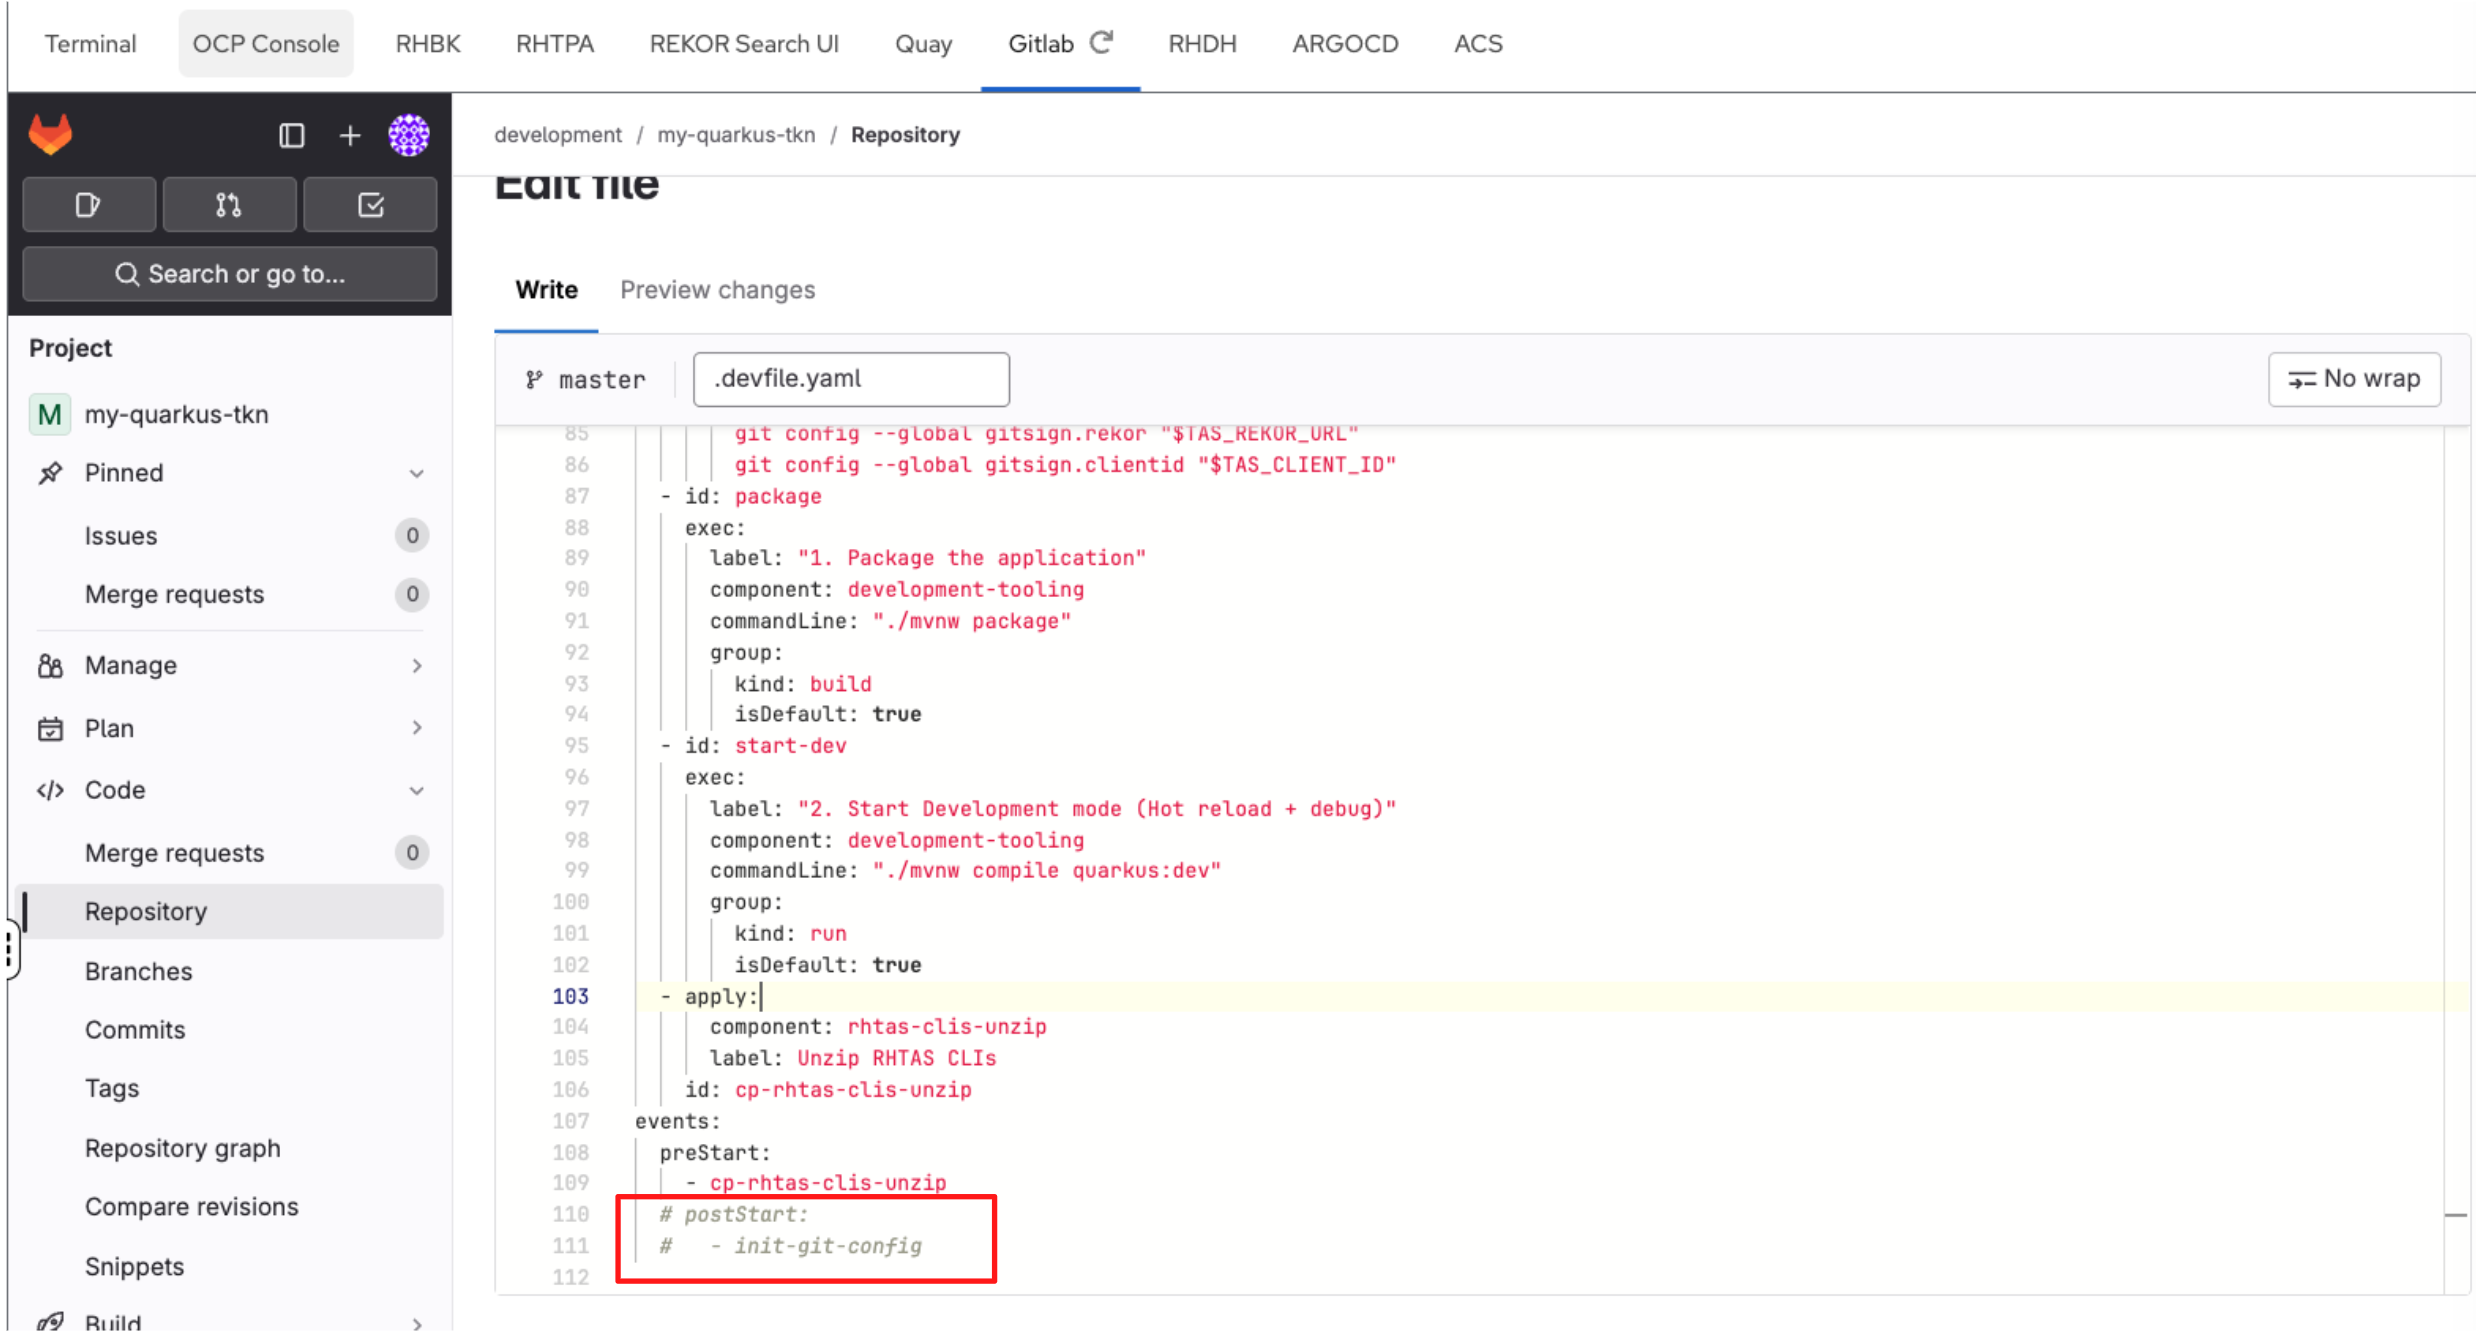
Finally, under the events section, uncomment the postStart event using CMD + / (Mac) or CTRL + / (Windows/Linux).
-
This post-start event automatically triggers the init-git-config command as soon as the workspace starts.
-
-
Scroll down and enter a commit message:
feat: Update Devfile Configuration. -
Click Commit Changes.
4.3 Create the tas-git-config ConfigMap for Dev Spaces
In this step, you will create a ConfigMap for Dev Spaces so that every developer workspace automatically inherits the information required for OIDC-based Git commit signing, without manual setup.
Create a new ConfigMap in the openshift-devspaces namespace using this command in the Terminal:
cat << 'EOF' | oc apply -n openshift-devspaces -f -
apiVersion: v1
kind: ConfigMap
metadata:
  name: tas-git-config
  annotations:
    controller.devfile.io/mount-as: env
  labels:
    app.kubernetes.io/part-of: che.eclipse.org
    app.kubernetes.io/component: workspaces-config
data:
  TAS_FULCIO_URL: "{tas_fulcio_url}"
  TAS_REKOR_URL: "{tas_rekor_url}"
  TAS_ISSUER_URL: "https://sso.{openshift_cluster_ingress_domain}/realms/sso"
  TAS_CLIENT_ID: "trusted-artifact-signer"
EOF
This ConfigMap defines the endpoints and identity configuration required by gitsign, the tool used to perform keyless Git commit signing via RHTAS.
| The label app.kubernetes.io/component=workspaces-config instructs Dev Spaces to inject these values into every developer workspace as environment variables. |
4.4 Configure pipeline authentication secrets
Before moving on to executing the software template as a developer, the CI pipeline must be able to authenticate to the systems it interacts with. All application pipelines in this workshop run in the tssc-app-ci namespace. Any credentials required by the pipeline must be available there as Kubernetes Secrets.
In this step, you will create two secrets required by the pipeline:
-
tpa-secret: Credentials for uploading SBOMs to Red Hat Trusted Profile Analyzer (RHTPA)
-
gitlab-auth-secret: Credentials for authenticating to GitLab when creating repositories and interacting with source code
Let’s get started.
-
Run the following command to set the TPA_SERVER_URL
export TPA_SERVER_URL="https://$(oc get route -l app.kubernetes.io/component=server -n tssc-tpa -o json \ | jq -r '.items[0].spec.host')" -
Then run this command to create the secret tpa-secret:
envsubst < ~/lab-assets/tpa-secret.yml | oc apply -n tssc-app-ci -f - -
Next, create the GitLab authentication secret. First, retrieve the GitLab personal access token:
export GITLAB_TOKEN=$(oc get secret root-user-personal-token -n gitlab -o jsonpath='{.data.token}' | base64 -d) -
Next, create the gitlab-auth-secret secret:
envsubst < ~/lab-assets/gitlab-auth-secret.yml | oc apply -n tssc-app-ci -f -
In the next module, you will edit code using OpenShift Dev Spaces and commit it to Git. This commit will be automatically signed using your OIDC identity.
Module 3 Summary
In this module, you acted as a platform engineer, configuring Red Hat Developer Hub using GitOps and configuration as code.
For consultants, this module demonstrates how to design and implement an Internal Developer Platform in practice: translating customer requirements into repeatable, version-controlled platform configuration that scales across teams and environments.
For technical sellers, this provides a concrete way to address common customer challenges — tool sprawl, inconsistent onboarding, and security friction — by positioning Red Hat Developer Hub as the foundation for platform engineering, not just another developer tool. It shows how security, compliance, and productivity are delivered together, which is often the deciding factor in winning the deal.
In the next module, you will switch personas and act as a developer, consuming the platform through a Software Template (Golden Path) to build and deploy an application.