Module 2: Sign and Verify All Artifacts With RHTAS
Introduction
In Module 1, you established trust in what is inside your software. The next challenge customers face is this: “How do we know these artifacts were really built by us and haven’t been tampered with?” Organisations need assurance that both code commits and build artifacts originate from verified identities, not rogue machines or compromised pipelines.
Enter Red Hat Trusted Artifact Signer (RHTAS)
In this module, you will deploy Red Hat Trusted Artifact Signer (RHTAS) to establish a root of trust for the entire build system. RHTAS is an enterprise deployment of the Sigstore project and provides cryptographic signing, verification, provenance attestation, and transparency. This ensures that software artifacts can be proven authentic at every stage of the delivery process. RHTAS supports keyless signing using OIDC identities, while also enabling traditional key-based workflows for tightly controlled or regulated environments where required.
RHTAS component overview
Architecturally, RHTAS combines Sigstore components to deliver identity-based, auditable signing:
-
Fulcio: a certificate authority (CA) that issues short-lived X.509 signing certificates bound to an authenticated OpenID Connect (OIDC) identity, such as a Keycloak user or service account.
-
Rekor: a transparency log that records signatures, certificates and attestations in an append-only, tamper-evident log. It allows anyone to independently verify that a signing event occurred.
-
Trillian: the cryptographic storage engine behind Rekor. It organizes log entries in a Merkle tree so that every entry is provably recorded and cannot be removed or altered without detection.
-
TUF (The Update Framework): Manages the root keys and trust metadata that the signing system relies on. TUF ensures clients know which public keys and certificates are legitimate, providing a cryptographic “root of trust” when verifying signatures from Rekor or certificates from Fulcio.
-
Cosign: A CLI used to sign and verify signed artifacts. Pipelines (Tekton Chains) invoke cosign to generate signatures and publish them to the image registry and Rekor.
| A Merkle tree is a data structure where each entry is represented by a hash, and those hashes are combined up a tree — meaning a single “root hash” represents the entire log. If anyone tries to change or delete an entry, the hashes won’t match anymore, so the tampering is immediately visible. |
Together, these components establish an auditable chain of trust across container images, code commits and other artifacts. Every signature is tied to a real identity, recorded in a transparency log and verifiable against a well-defined trust root.
Optional Deep Dive: How does keyless signing work?
Traditional signing models rely on long-lived private keys that developers or CI systems must generate, store, rotate and protect. In contrast, RHTAS uses keyless signing and short lived certificates.
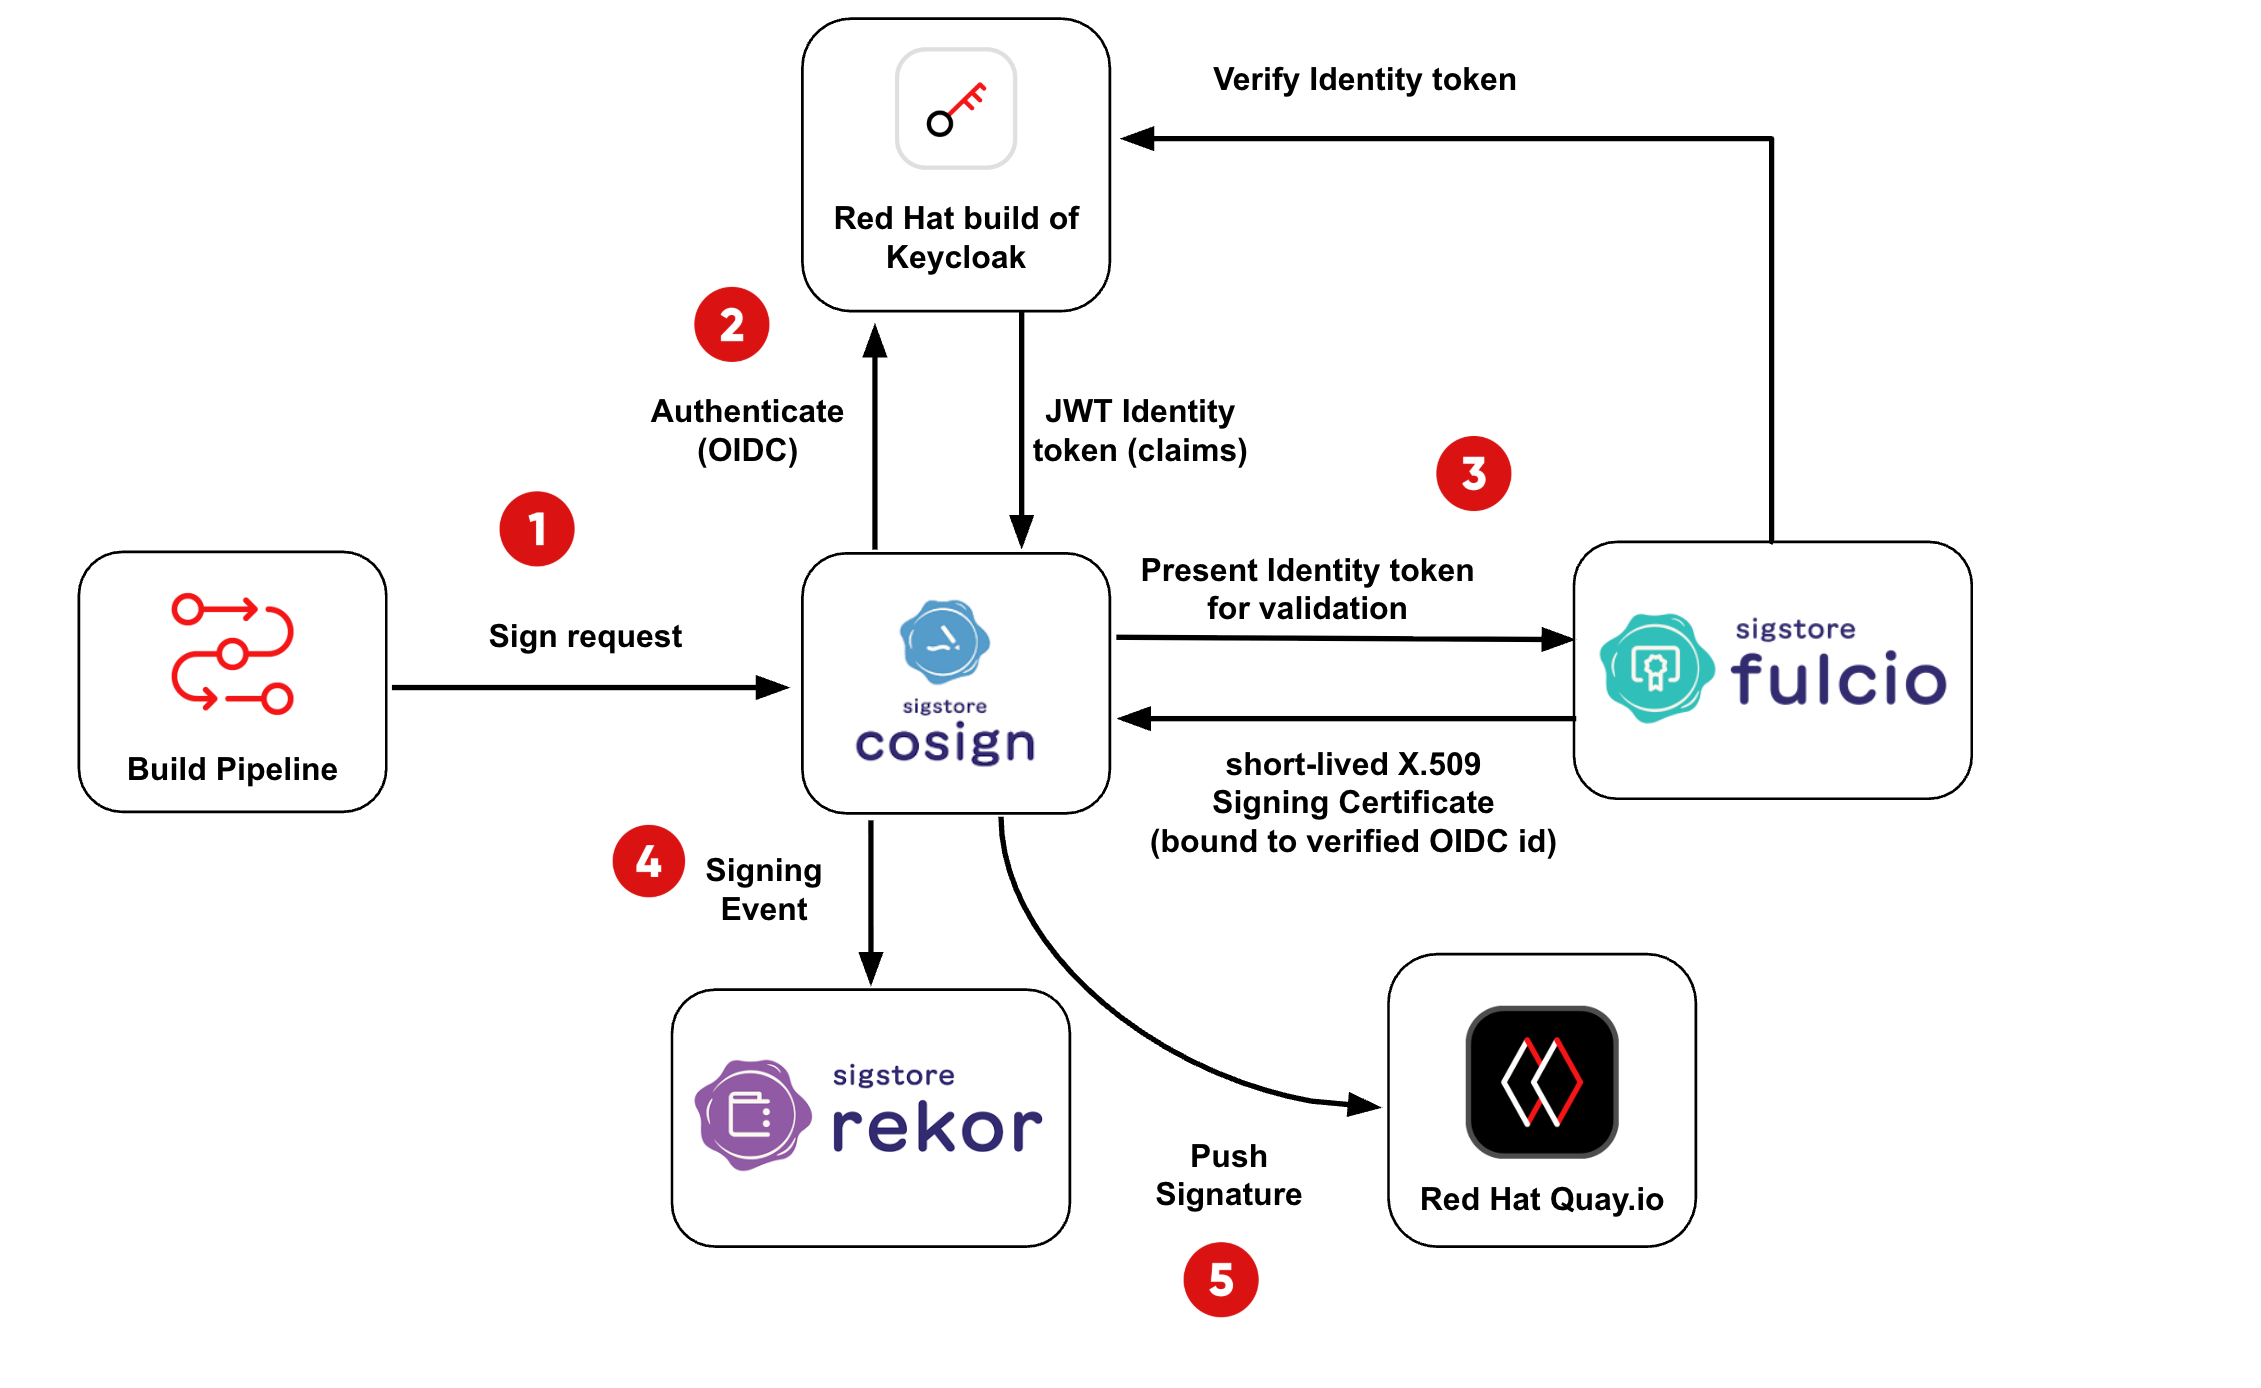
The flow below shows how image signing is carried out in this workshop:
-
Tekton finishes building and pushing a container image
-
A pipeline task builds and pushes an image to a registry such as Quay.io.
-
At this point, the image exists, but has no provenance or cryptographic signature.
-
Tekton Chains watches the cluster for completed TaskRuns.
-
When it detects a success event, it issues a signing request to Cosign.
-
-
Cosign initiates an OIDC-based identity request
-
To perform keyless signing, Cosign must obtain an OIDC identity token from the configured identity provider (RHBK in this workshop).
-
Cosign authenticates using the Kubernetes service account identity that Tekton Chains is running under.
-
Cosign performs a standard OIDC authentication flow and receives a JWT identity token that includes claims such as email (the identity), issuer (RHBK), expiry timestamp, and audience (Fulcio).
-
-
Cosign requests a signing certificate from Fulcio
-
Cosign sends the OIDC identity token to Fulcio and asks for a certificate.
-
Fulcio validates that:
-
the token came from a trusted issuer.
-
an email claim (identity) is present and verified.
-
the signature on the token is valid and has not expired.
-
-
If validation succeeds, Fulcio issues a short-lived X.509 certificate bound to that identity.
-
-
Cosign prepares to create a singing event for the Trust Authority (Rekor + Trillian)
-
Cosign signs the image digest.
-
Cosign creates a one-time signing key in memory only and pairs it with the Fulcio certificate.
-
Cosign signs the image digest and produces a cryptographic signature.
-
Cosign submits the signed artifact and certificate bundle to Rekor.
-
Rekor records the event in its transparency log, backed by Trillian’s tamper-evident Merkle tree, and returns an inclusion proof.
-
This makes the signing event tamper-evident — any attempt to alter or remove it becomes detectable.
-
-
Cosign pushes the signature to the OCI registry
-
Cosign pushes a separate OCI artefact containing the signature and certificate alongside the original image tag (for example :latest).
-
| In an interactive keyless signing flow (for example, when signing code from your IDE), Cosign will prompt you to authenticate with the OIDC provider, such as RHBK. It prints a login URL (and sometimes a short verification code), you complete the login in your browser, and provide the OIDC access token to Cosign, which behind the scenes requests a signing certificate from Fulcio. |
Step 1: Configure the Machine Identity
-
Tekton Chains requires its own realm and client to sign images on behalf of the pipeline.
-
This isolates automated signing from human user identities and is considered best practice in customer deployments.
1.1 Log in to RHBK
If you are not already logged in to RHBK, click the RHBK Console tab in the Showroom and log in using:
Username:
{keycloak_admin_user}Password:
{keycloak_admin_password}After entering your credentials, click Sign In.
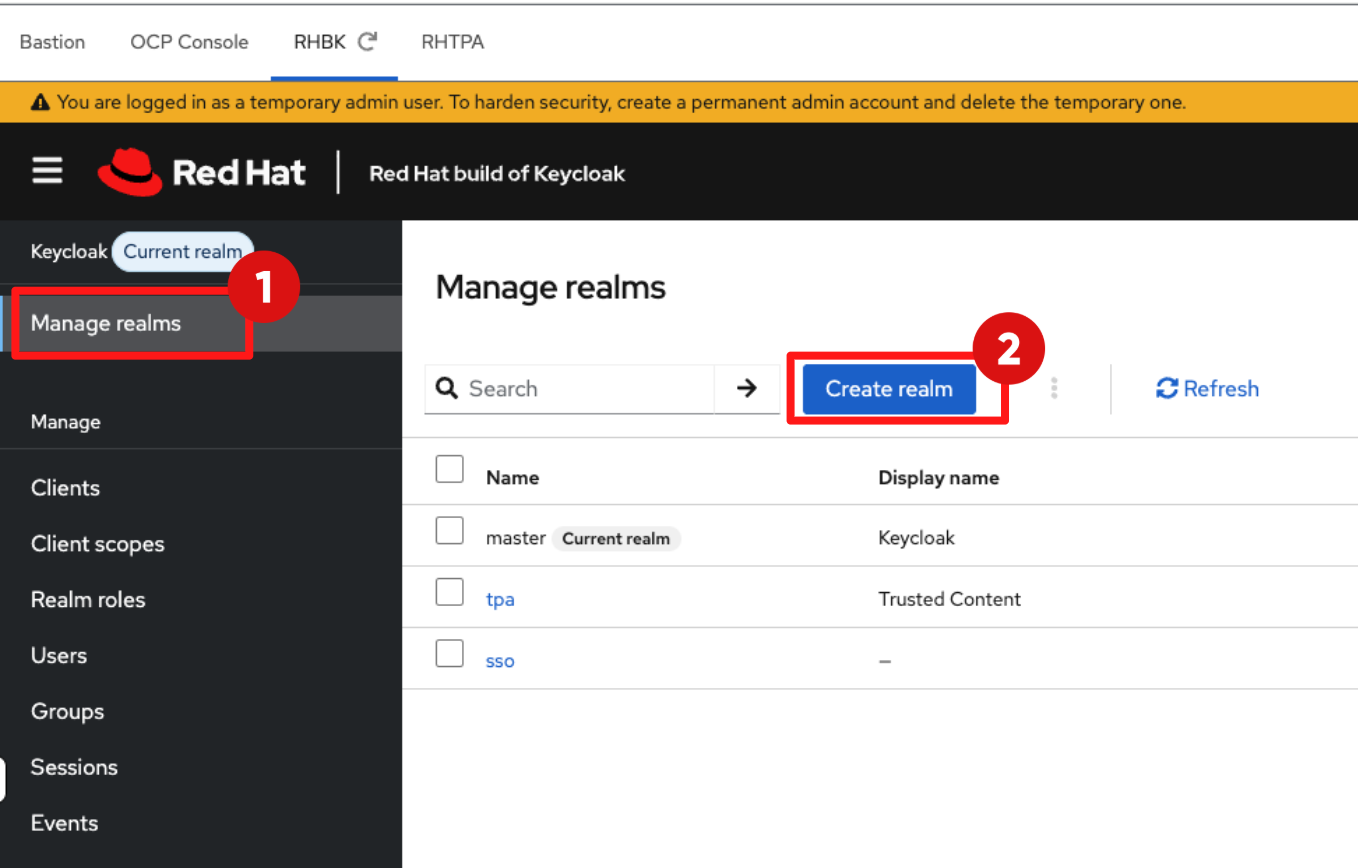
1.2 Create tas-chains Realm
-
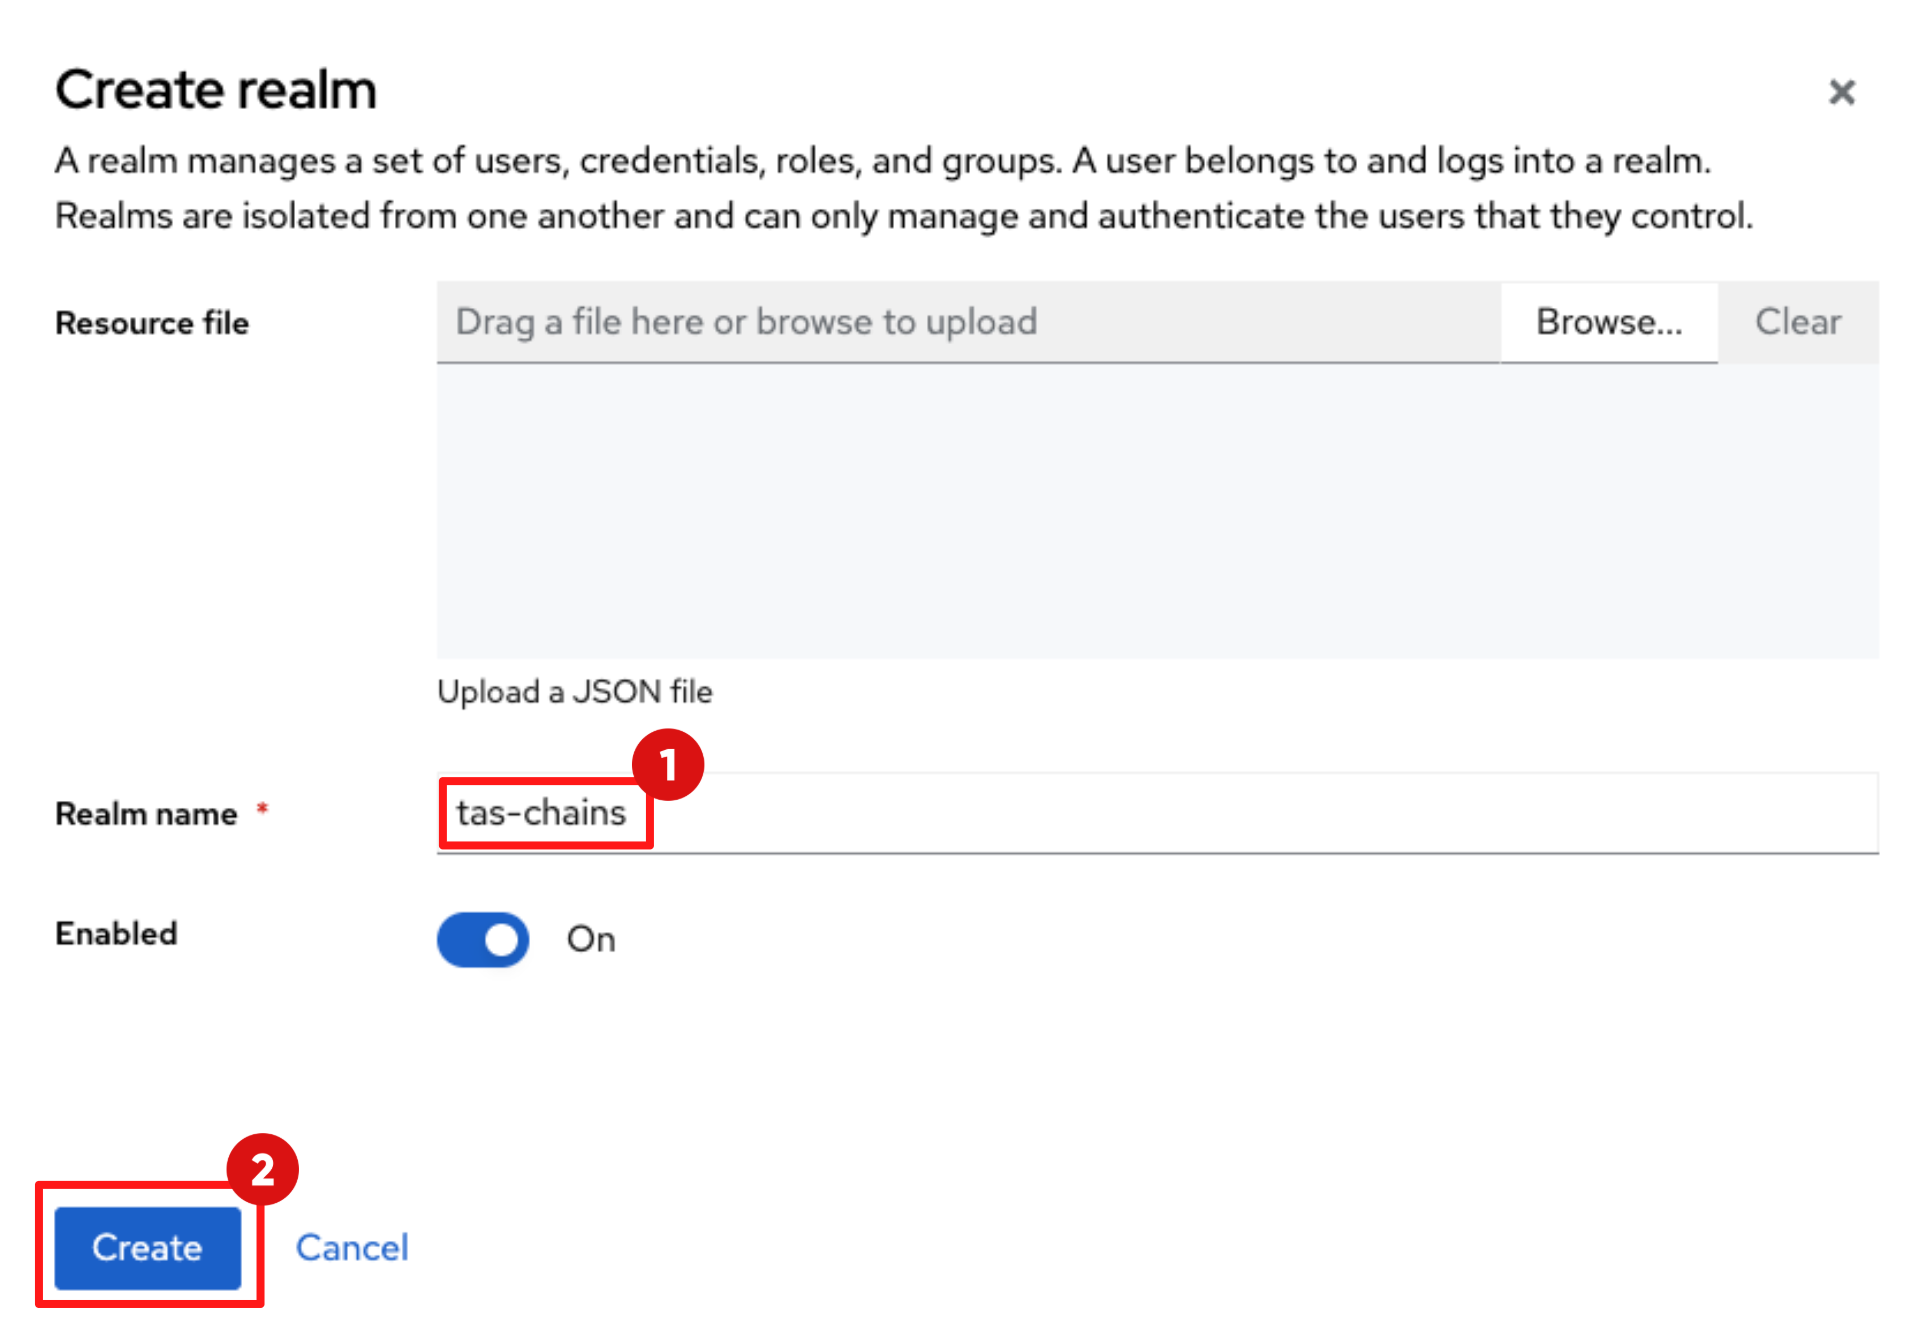
Click the Create realm button.
-
In the Create realm pop up, enter the Realm name:
tas-chains -
Click Create.
1.3 Create trusted-artifact-signer client in tas-chains Realm
-
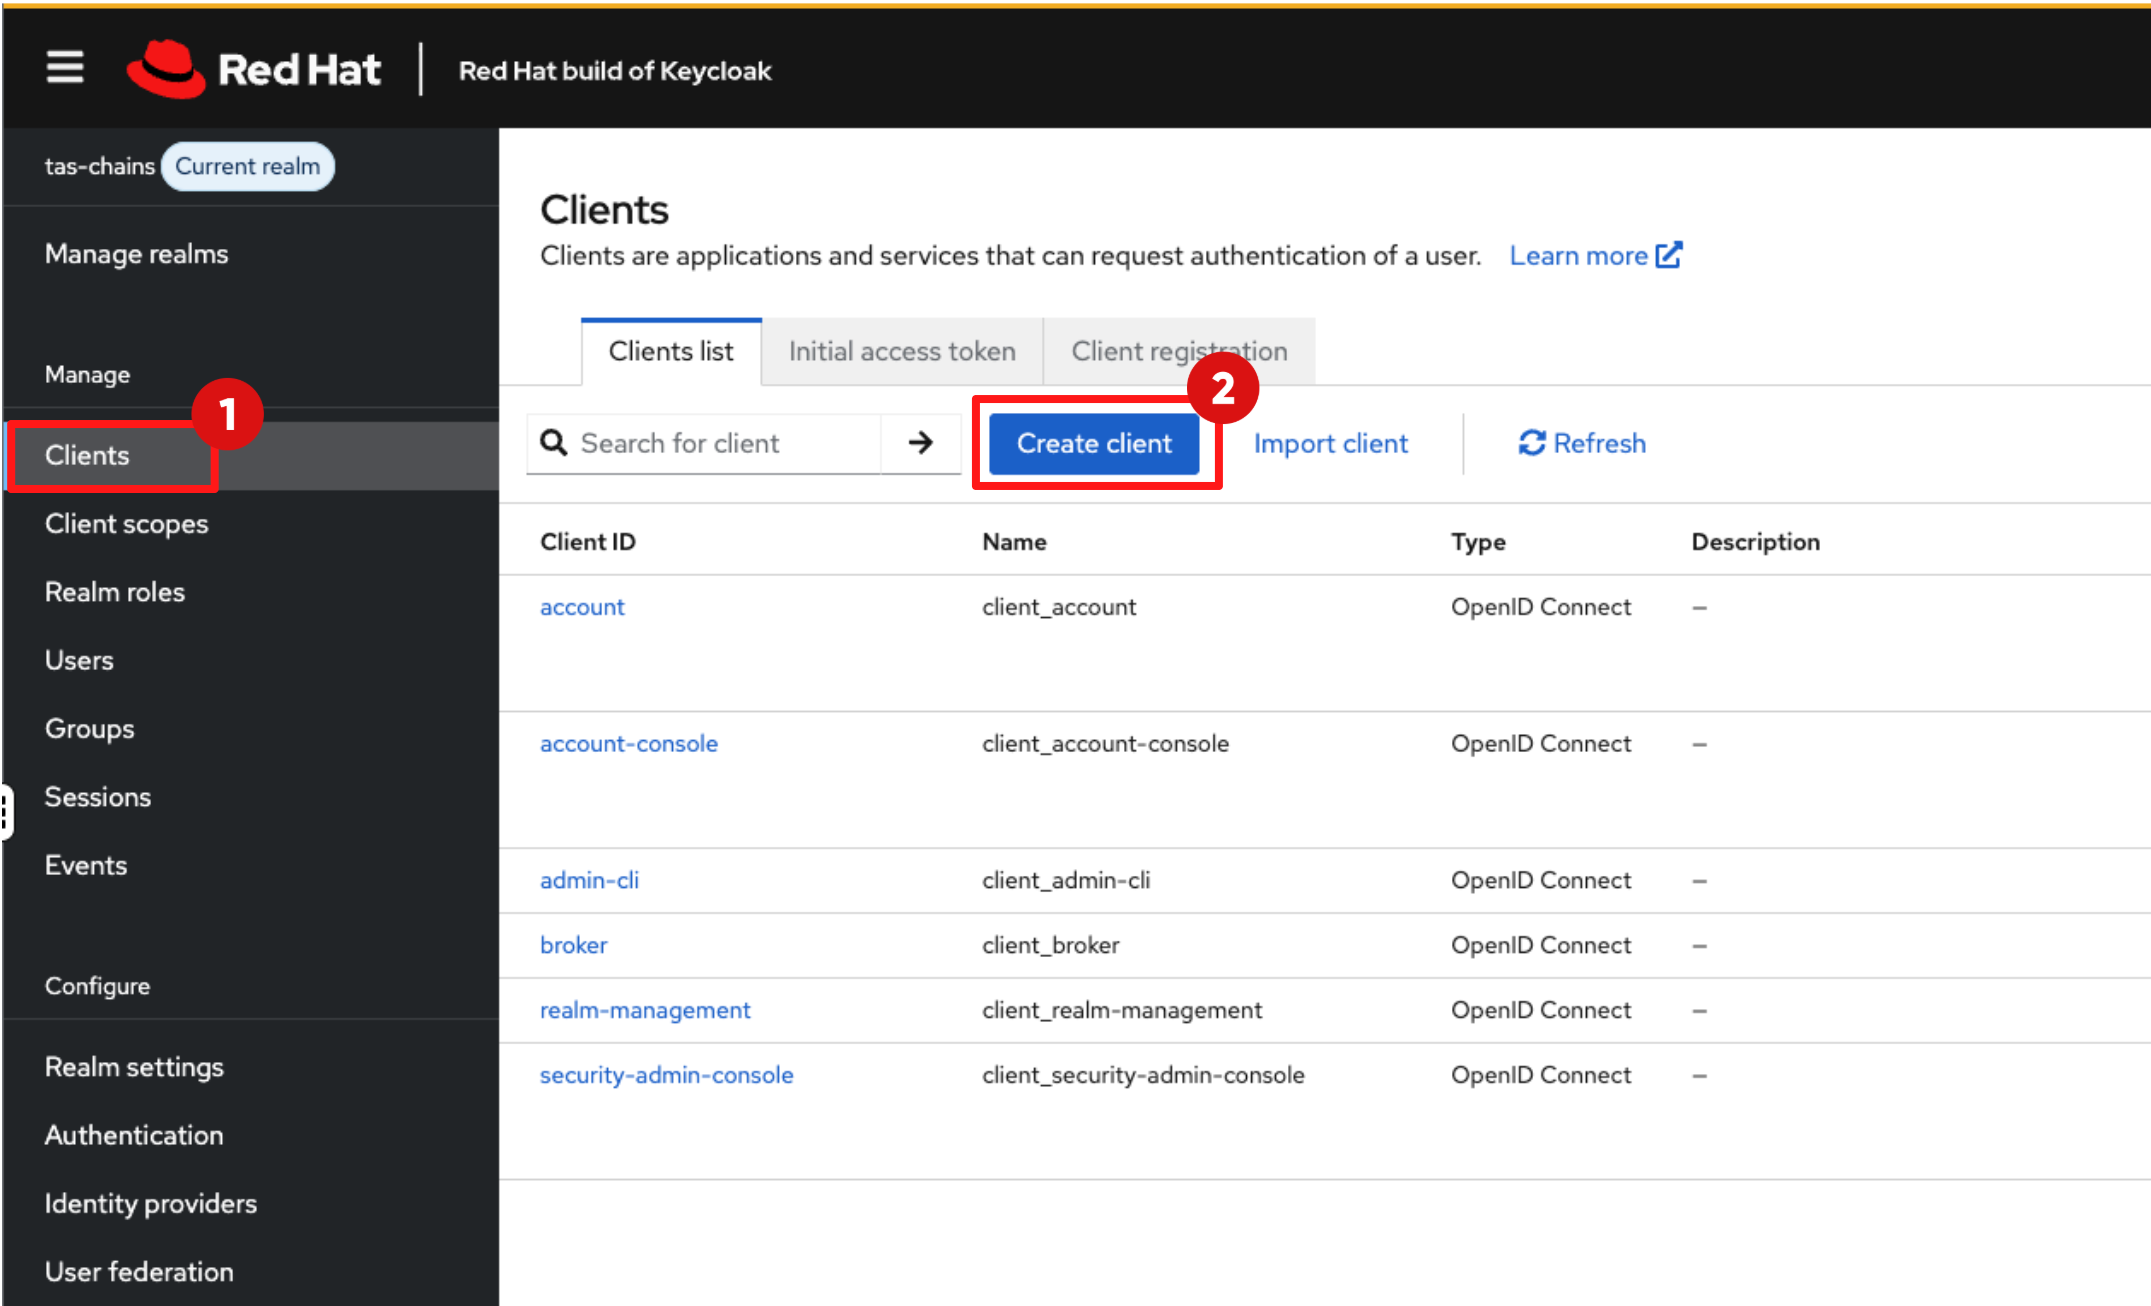
Next you will create a new client:
-
In the left navigation menu, click Clients.
-
Then click Create client.
-
-
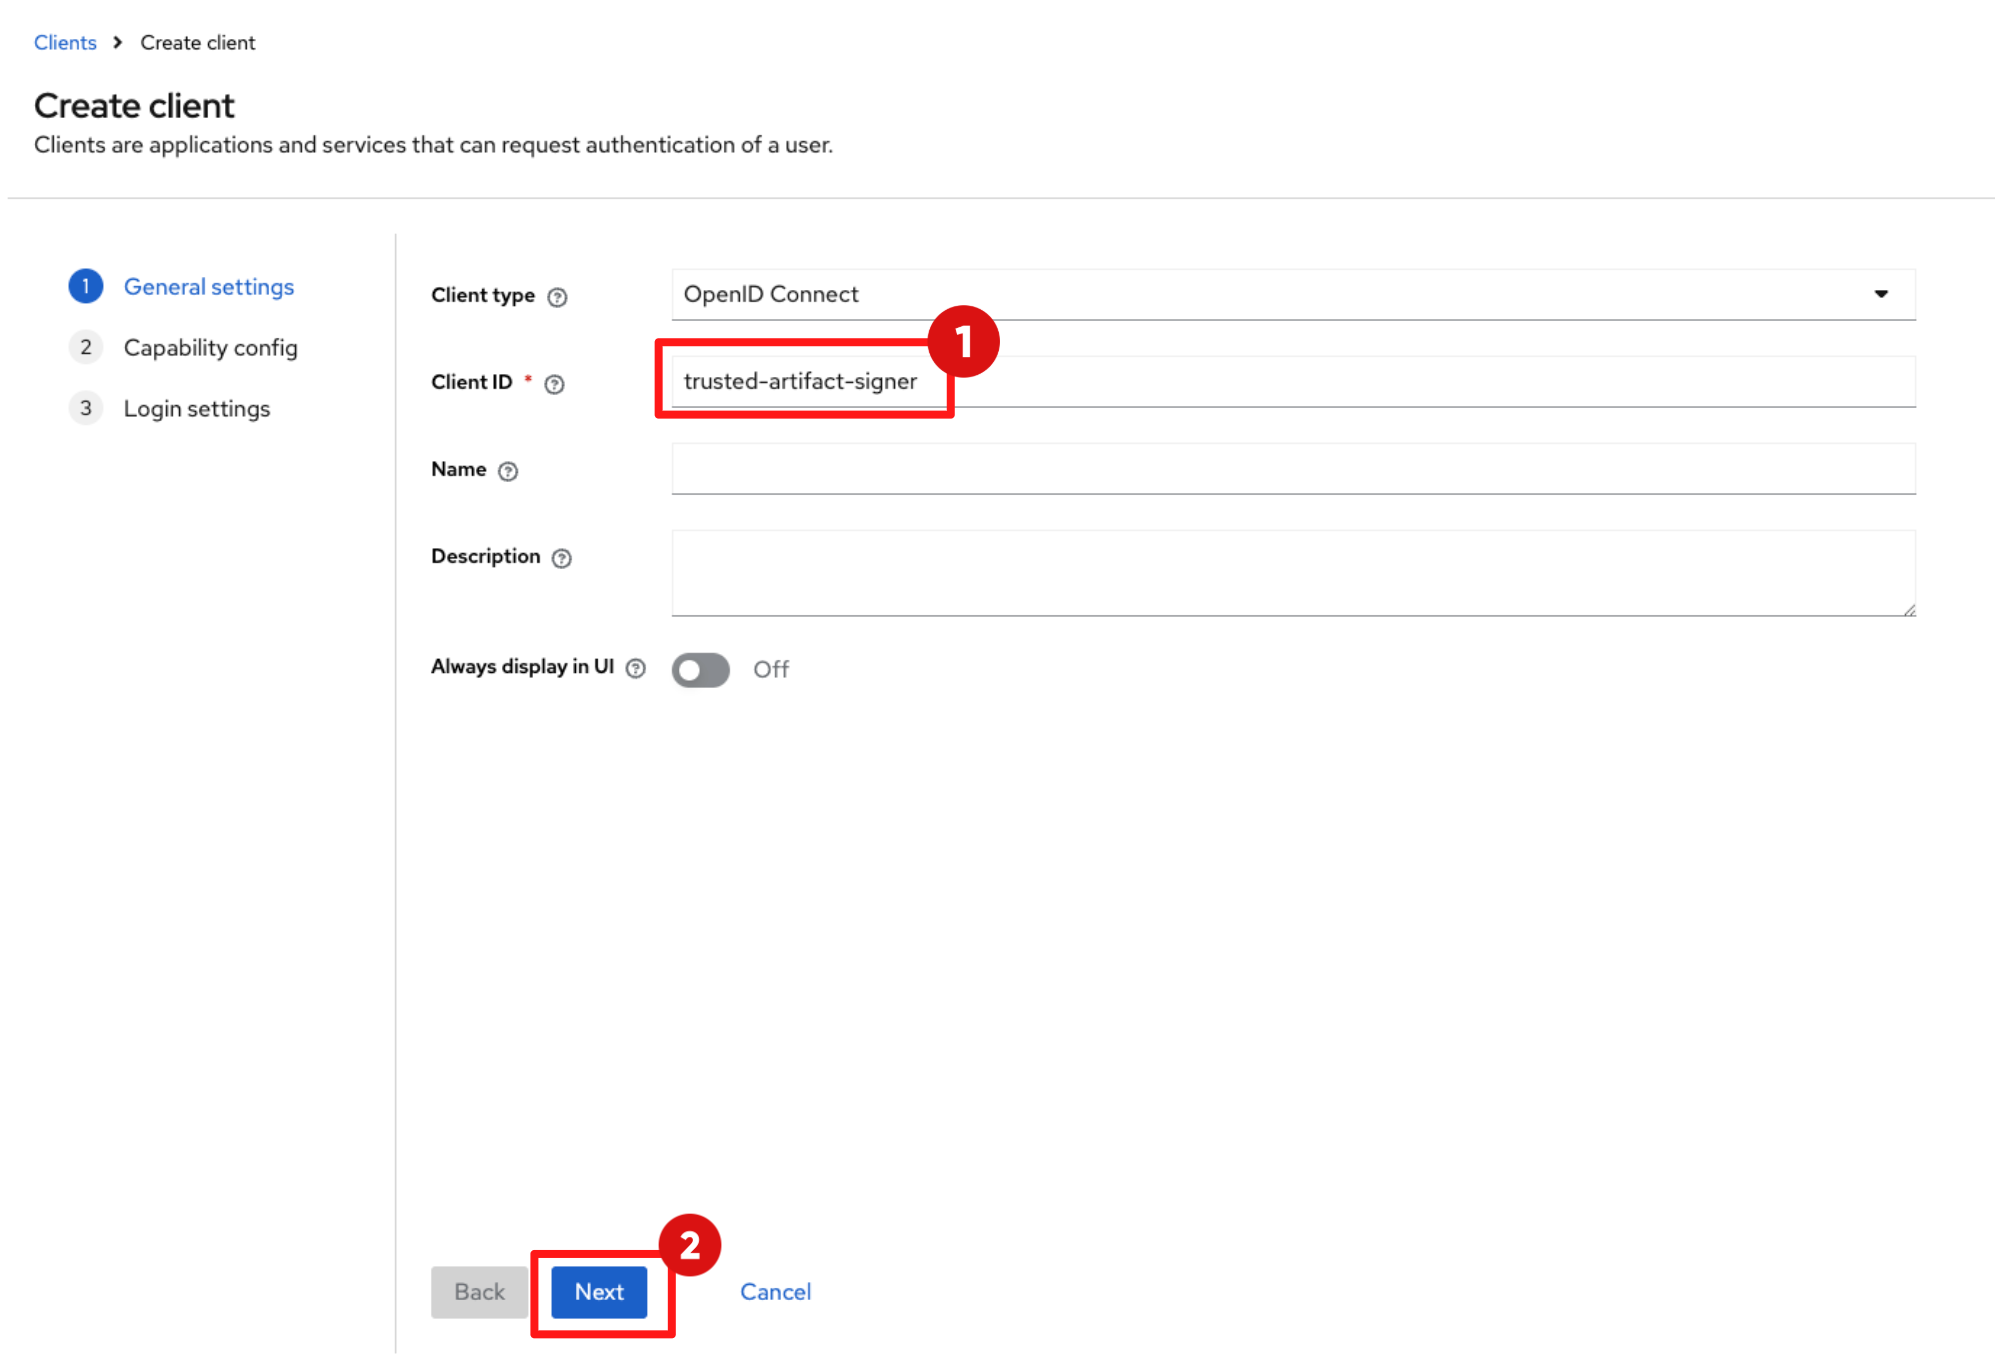
In the General setting page:
-
Set the Client ID to:
trusted-artifact-signer -
Click Next.
-
-
Under Capability Config, set:
-
Client authentication: toggle on
-
Standard flow: make sure this checkbox is ticked
-
Service accounts roles: Tick this checkbox
-
Then click Next.
-

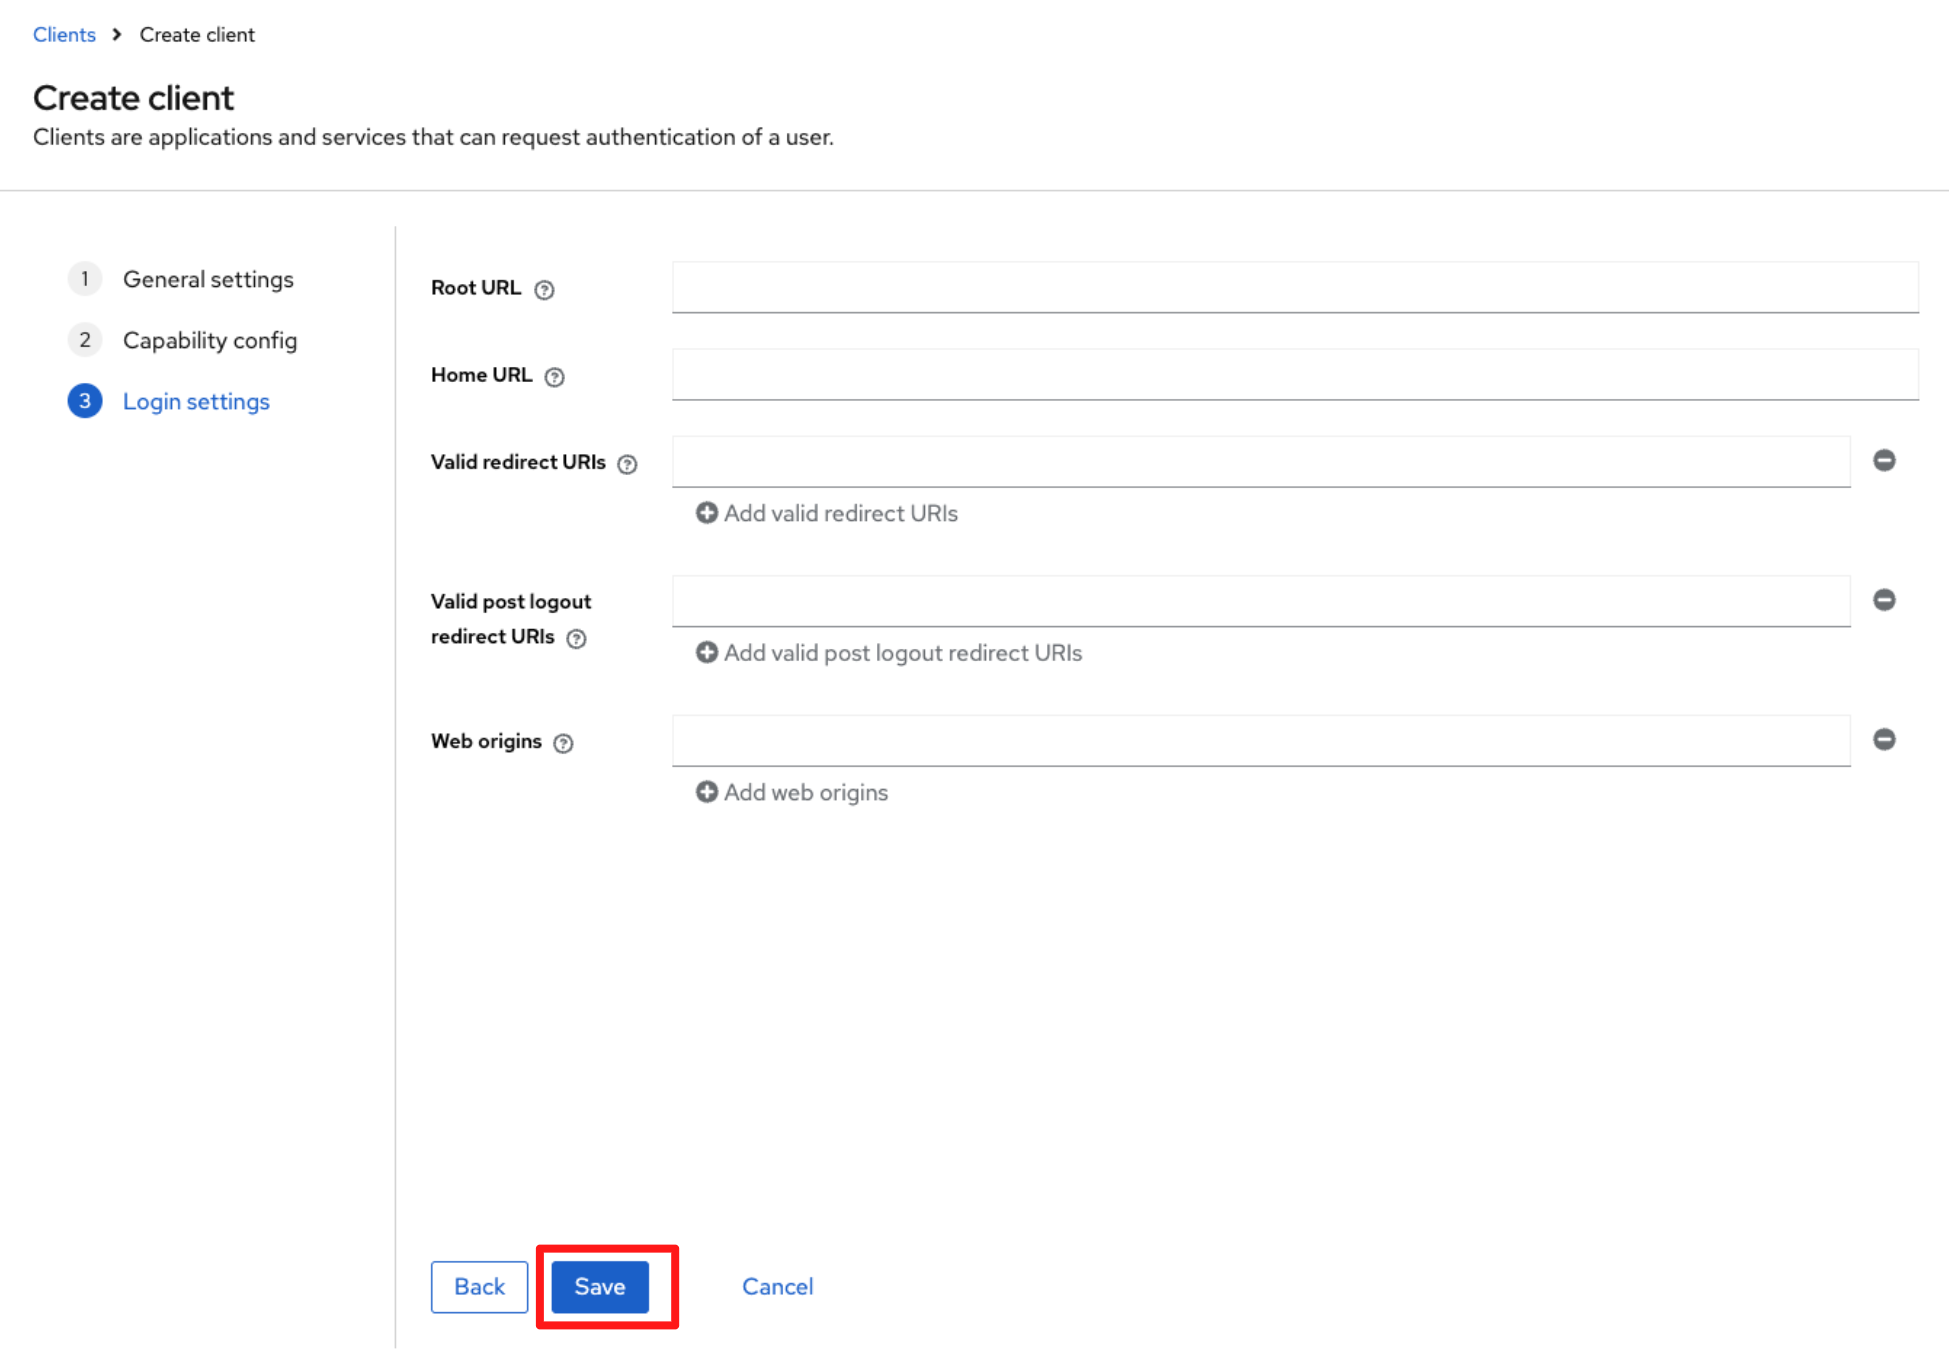
-
Under Login Settings, leave the default values as they are.
-
Click Save.
-
You’ll see a pop-up message saying “Client created successfully".
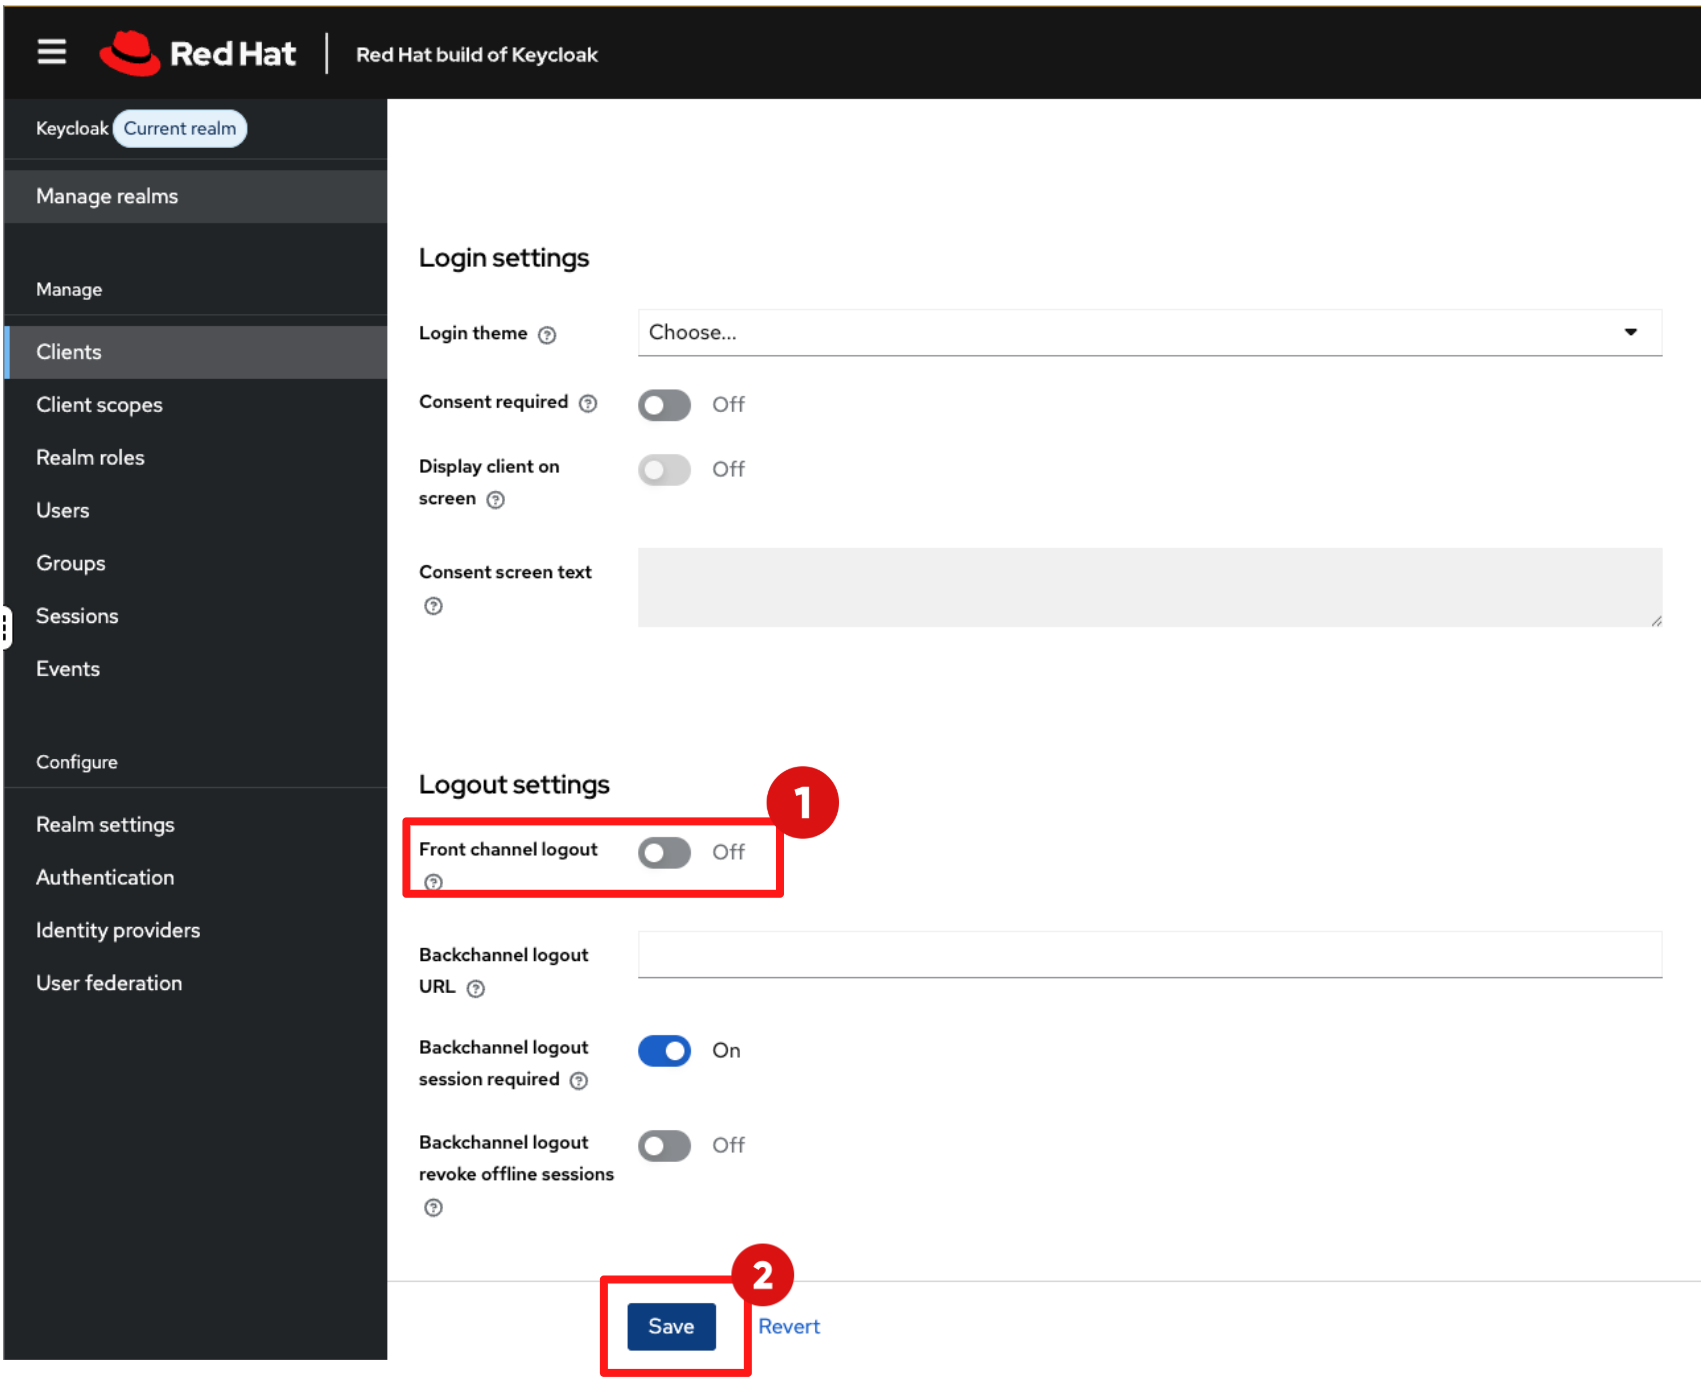
-
Scroll down to Logout Settings:
-
Set the Front channel logout toggle to Off.
-
Click Save.
-
-
You’ll see a pop-up message saying “Client successfully updated".
-
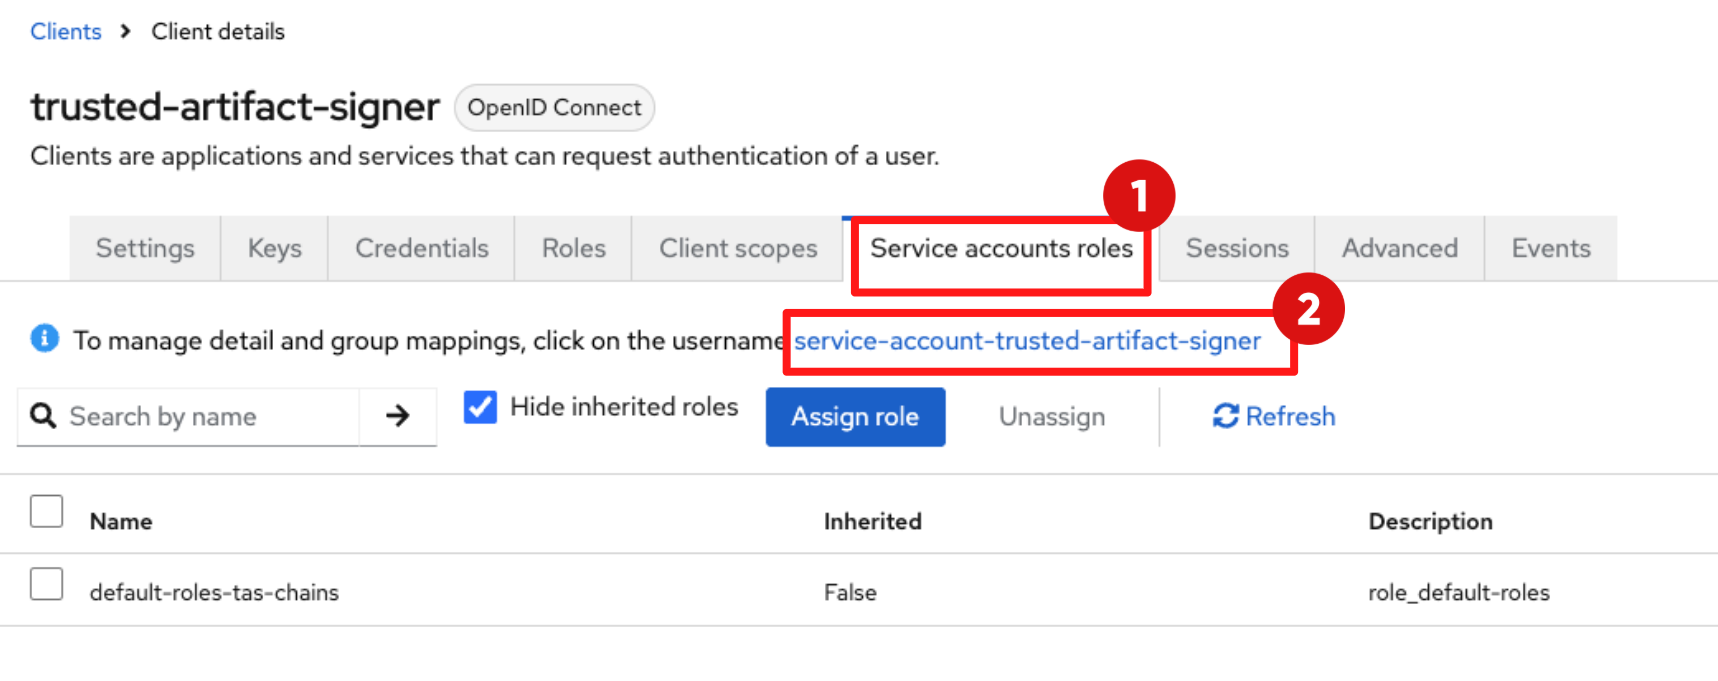
Scroll back up to top of the screen:
-
Click the Service account roles tab
-
Then, click the service-account-trusted-artifact-signer link
-
-
Set the following attributes:
-
Email Verified: toggle on
-
Email:
trusted-artifact-signer@demo.redhat.com -
First name:
Trusted -
Last name:
Content -
Click Save
-
-
You’ll see a pop-up message saying “The user has been saved".
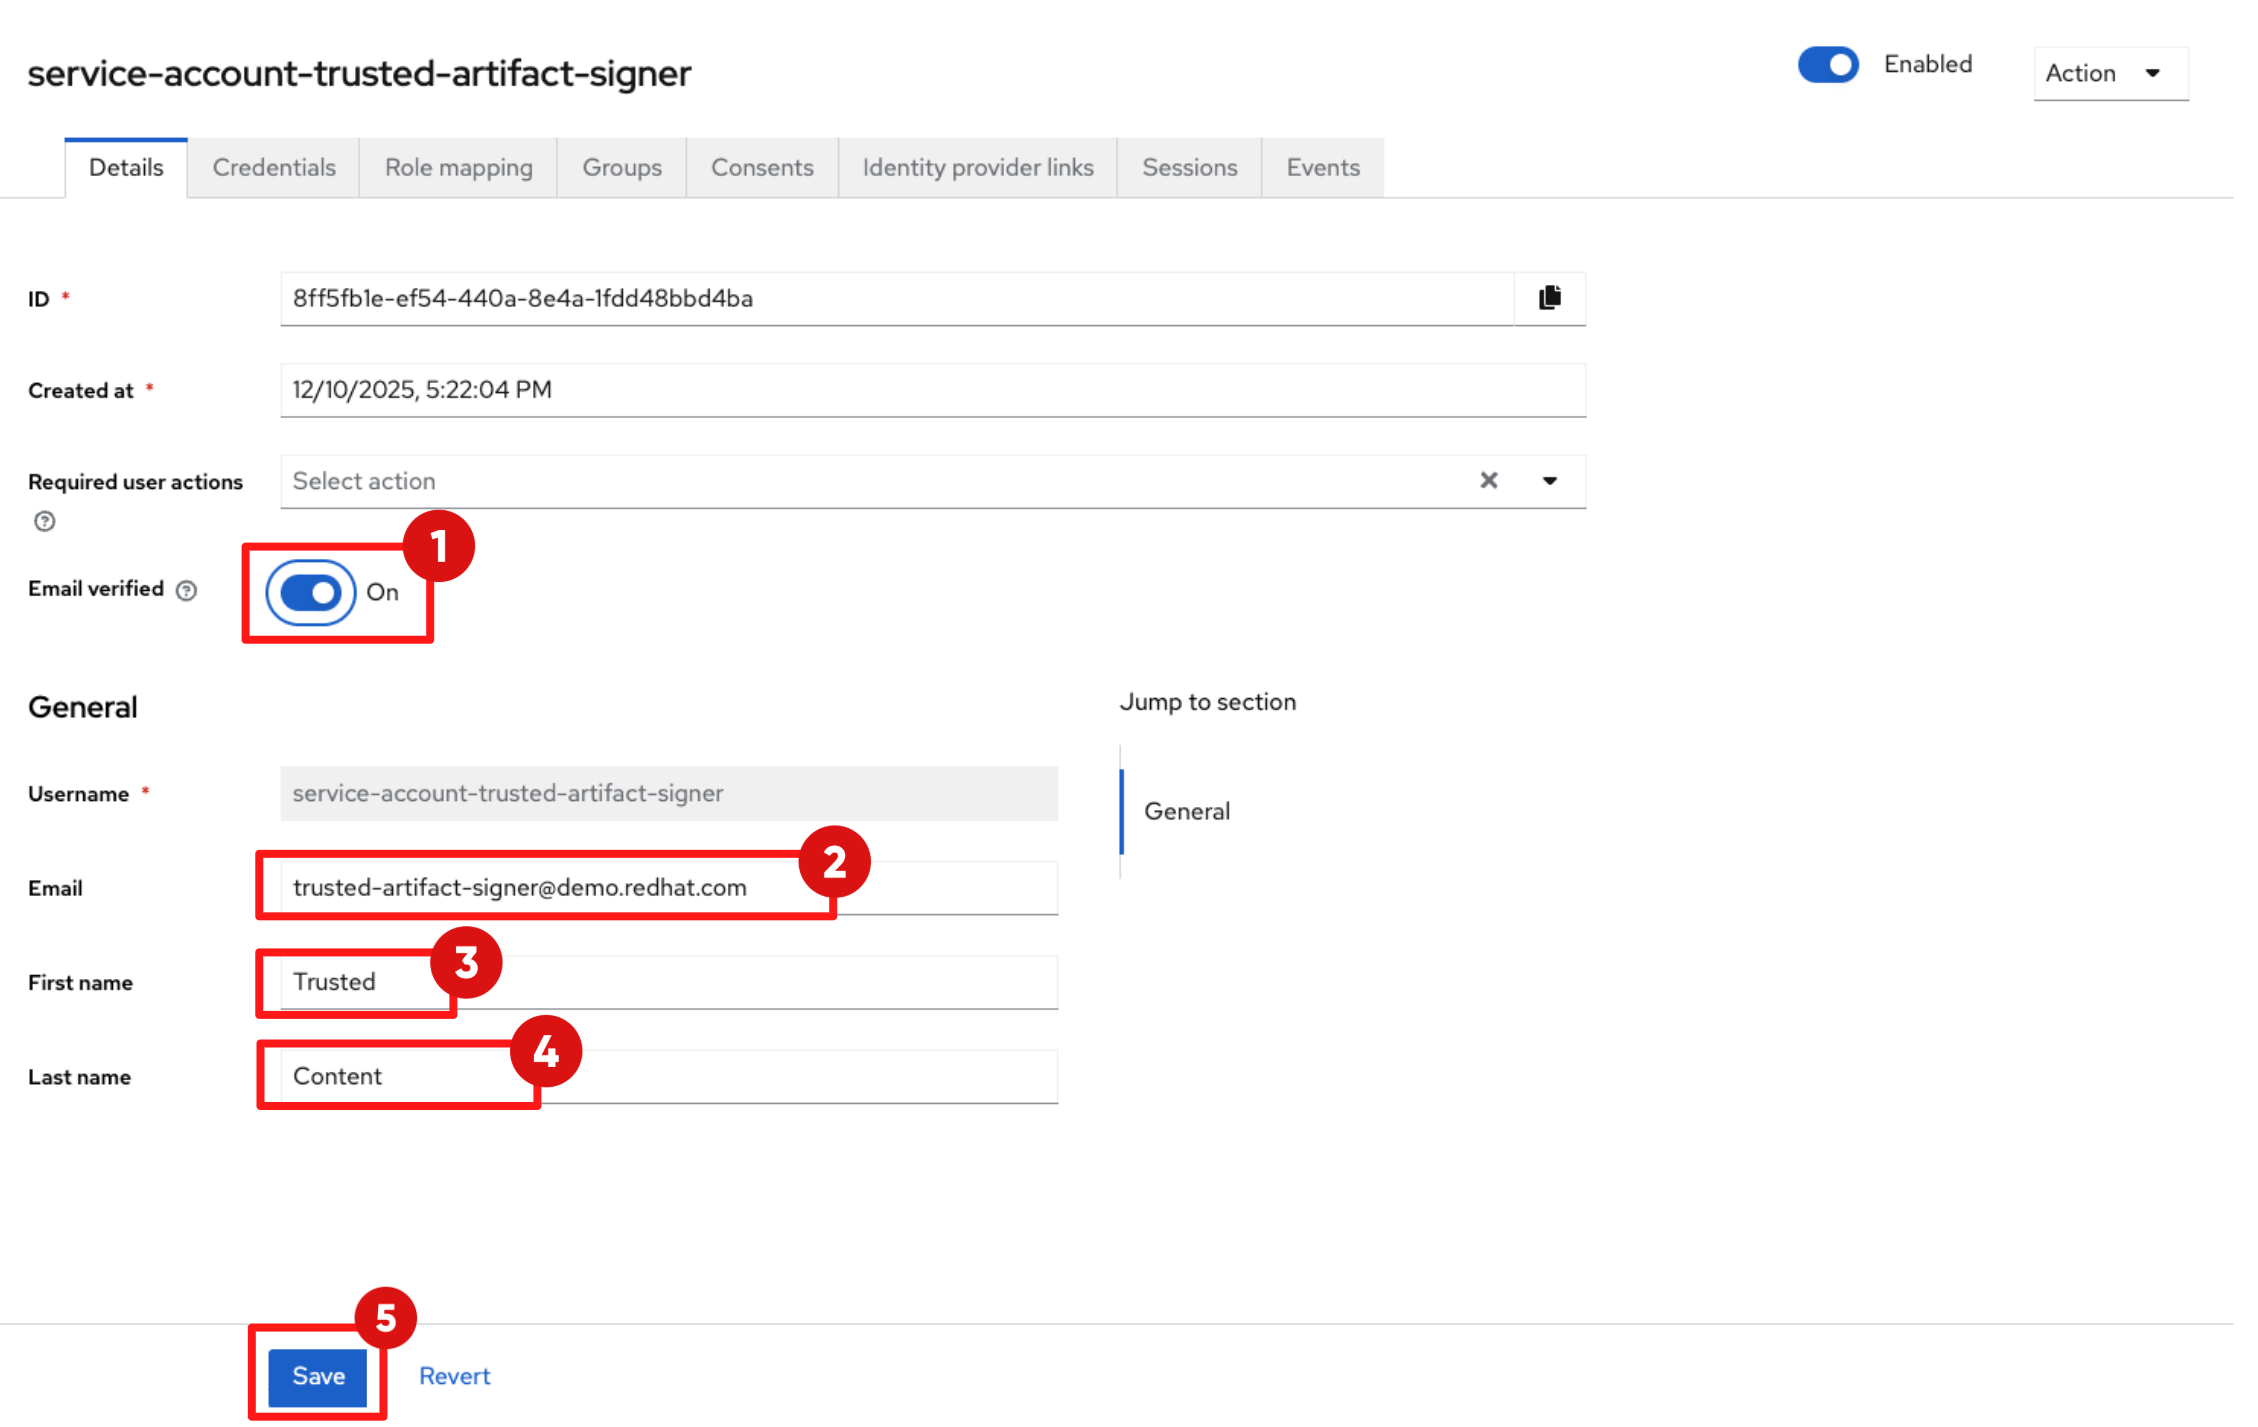
| Make sure Email Verified is set to On. This is the most common failure point in RHTAS deployments. Fulcio requires the OIDC token to contain a verified email claim. If this is missing, certificate issuance fails. |
Step 2: Configure Developer Identity for Commit Signing
-
Developers need a trusted identity to sign Git commits using RHTAS.
-
This identity is separate from Tekton’s machine identity you configured in the last step and is configured in the existing sso realm.
-
The client you create here enables OAuth-based authentication for developers performing commit signing.
2.1 Create trusted-artifact-signer client in sso Realm
-
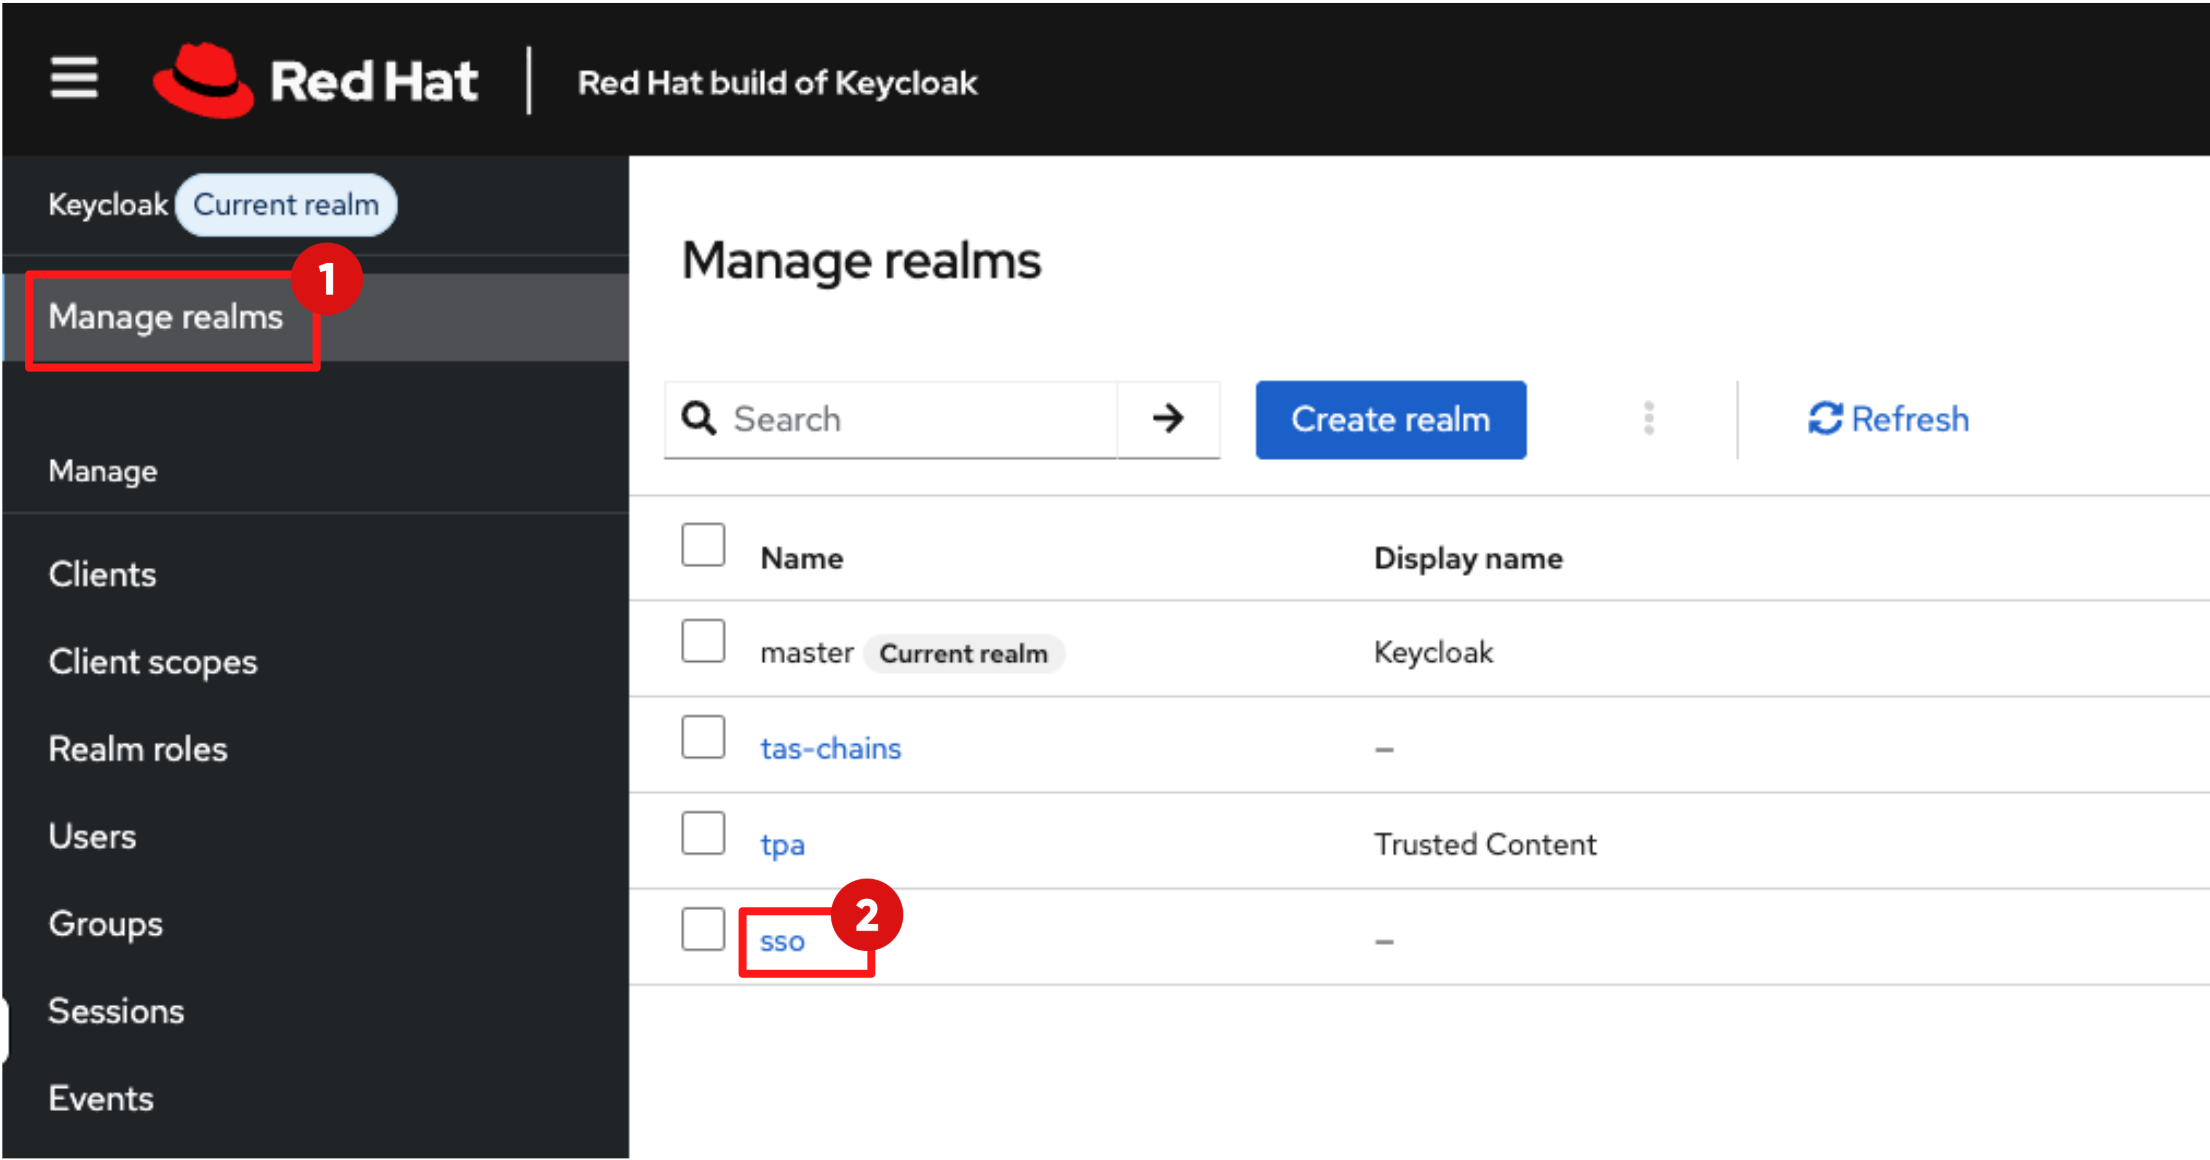
In the RHBK Console:
-
Click Manage realms in the left navigation menu.
-
Select the sso realm.
-
-
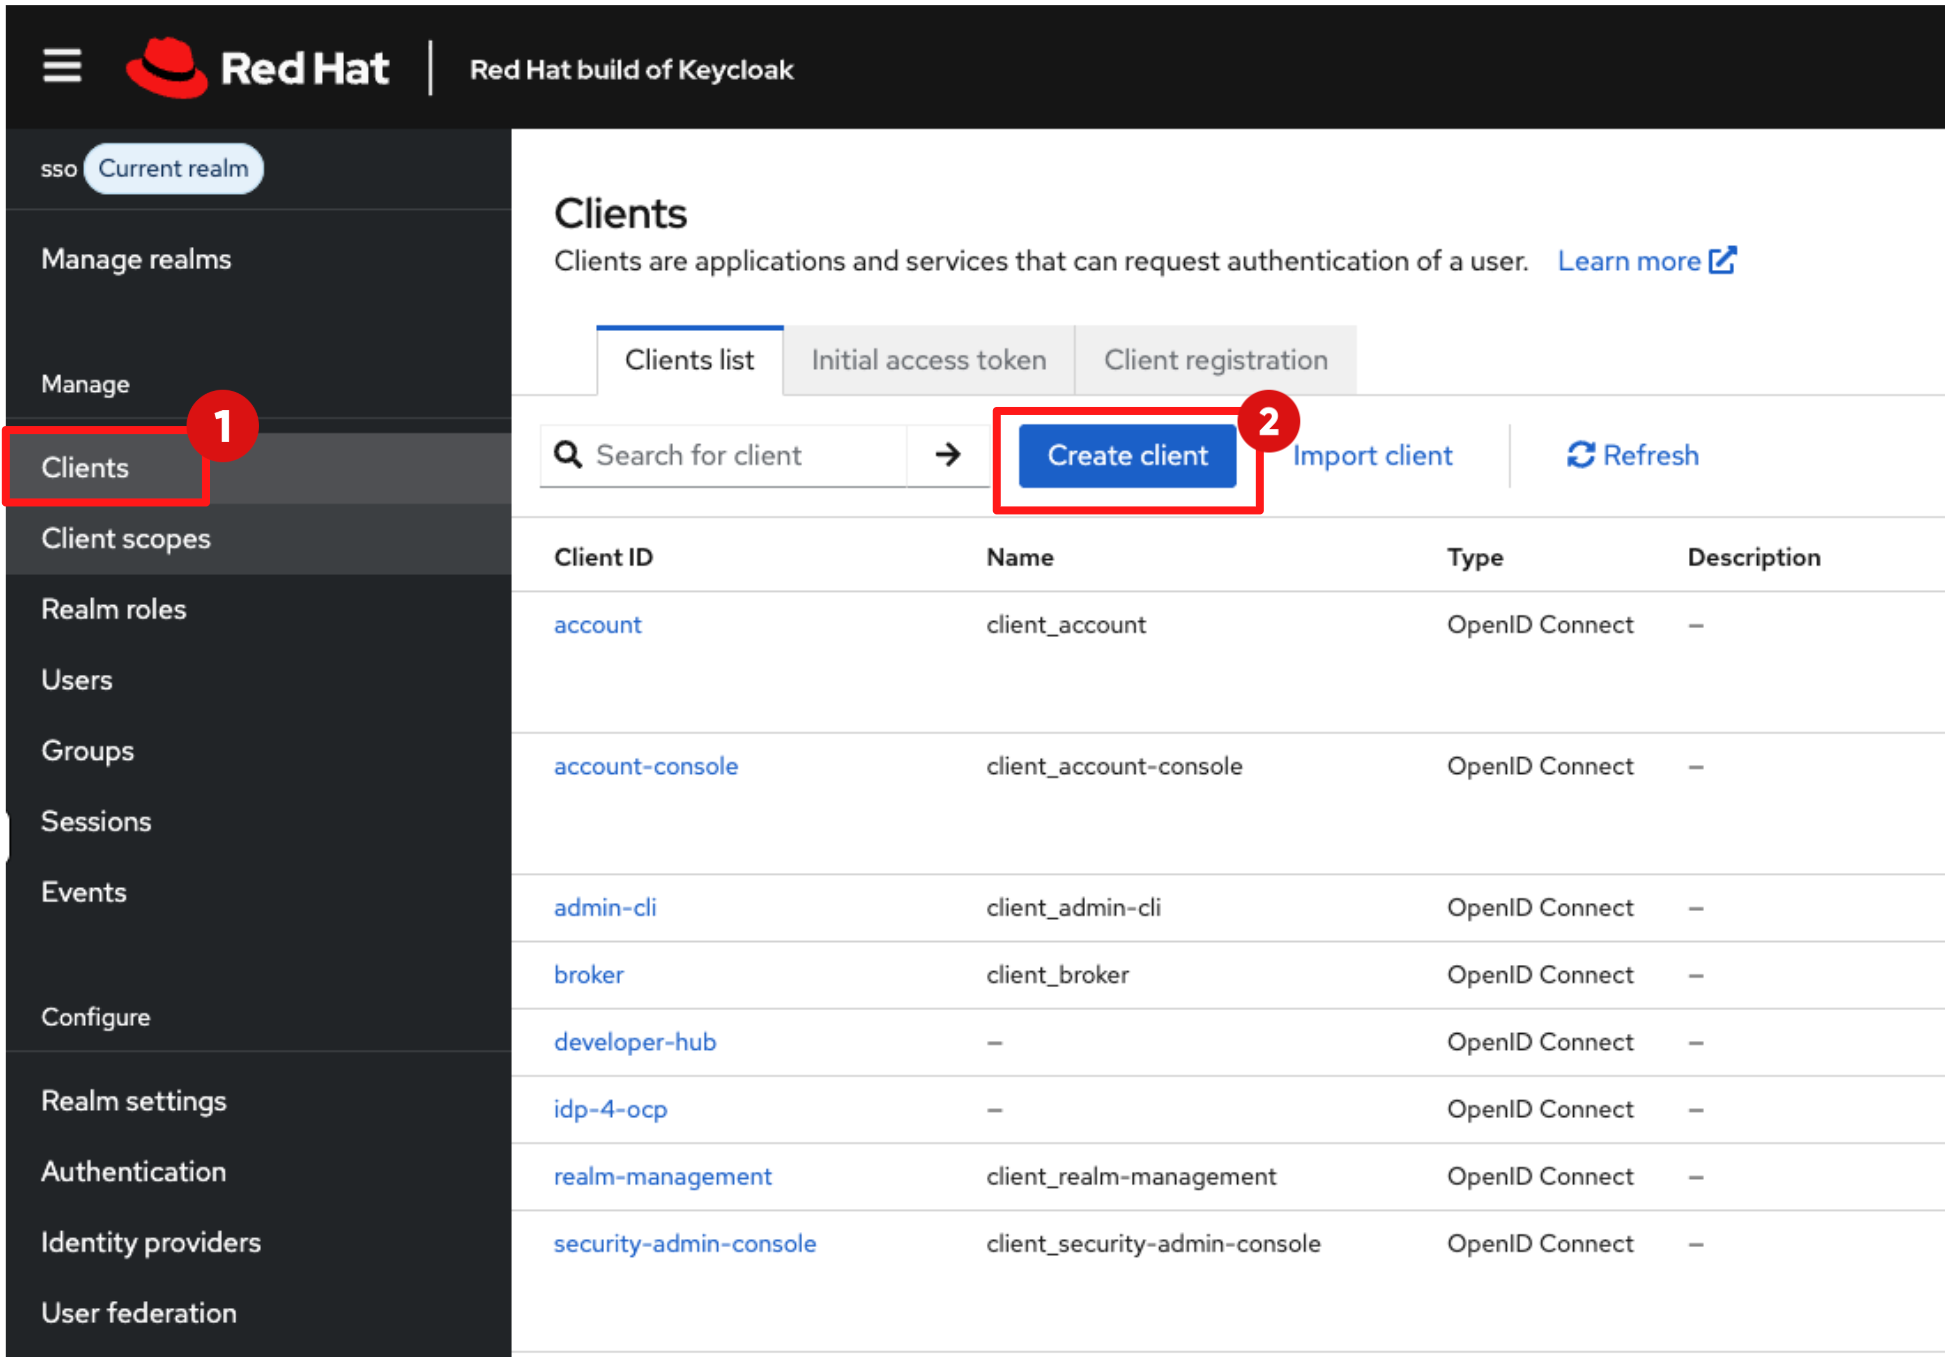
To create a new client:
-
Navigate to Clients in the left menu
-
Then click Create client.
-
-
In the General setting page:
-
Set the Client ID to:
trusted-artifact-signer -
Click Next.
-
-
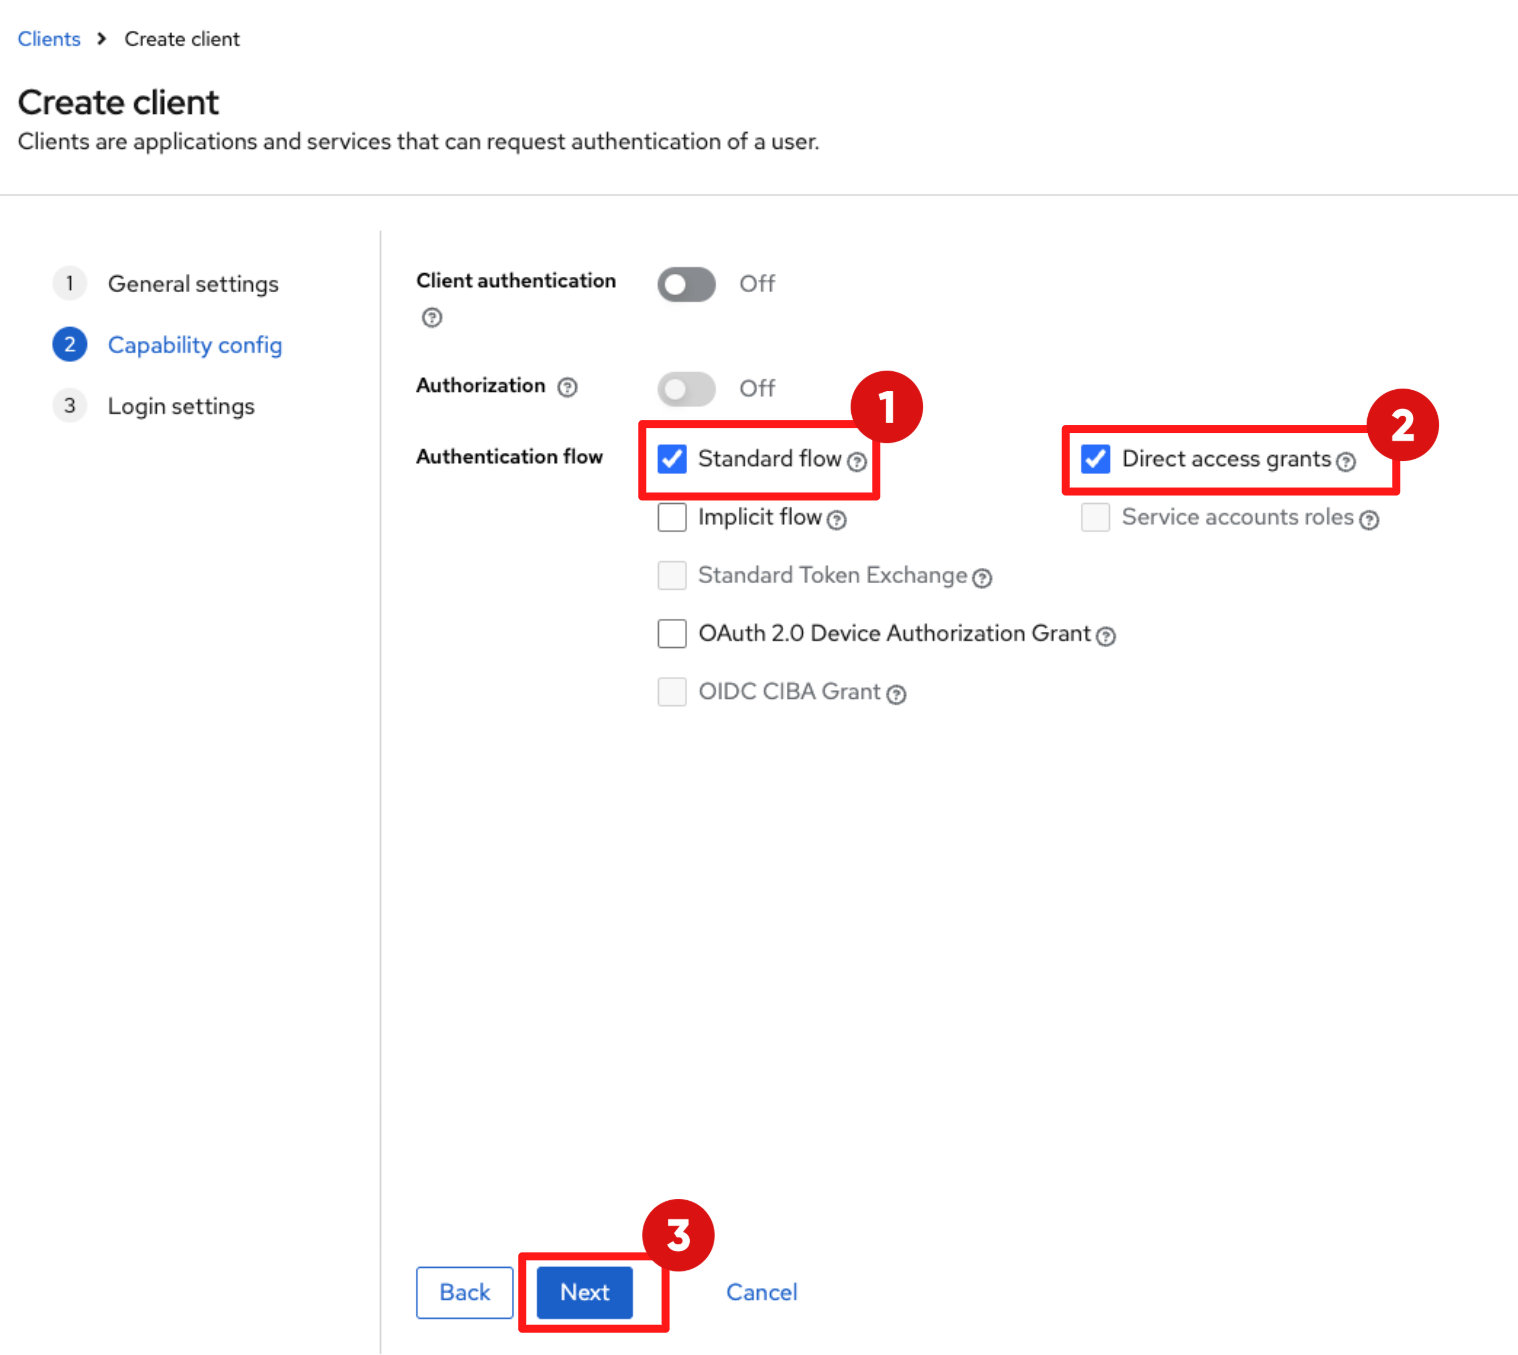
Under Capability Config set:
-
Standard flow: Make sure this checkbox is ticked.
-
Direct access grants: Tick this checkbox.
-
Then click Next.
-
-
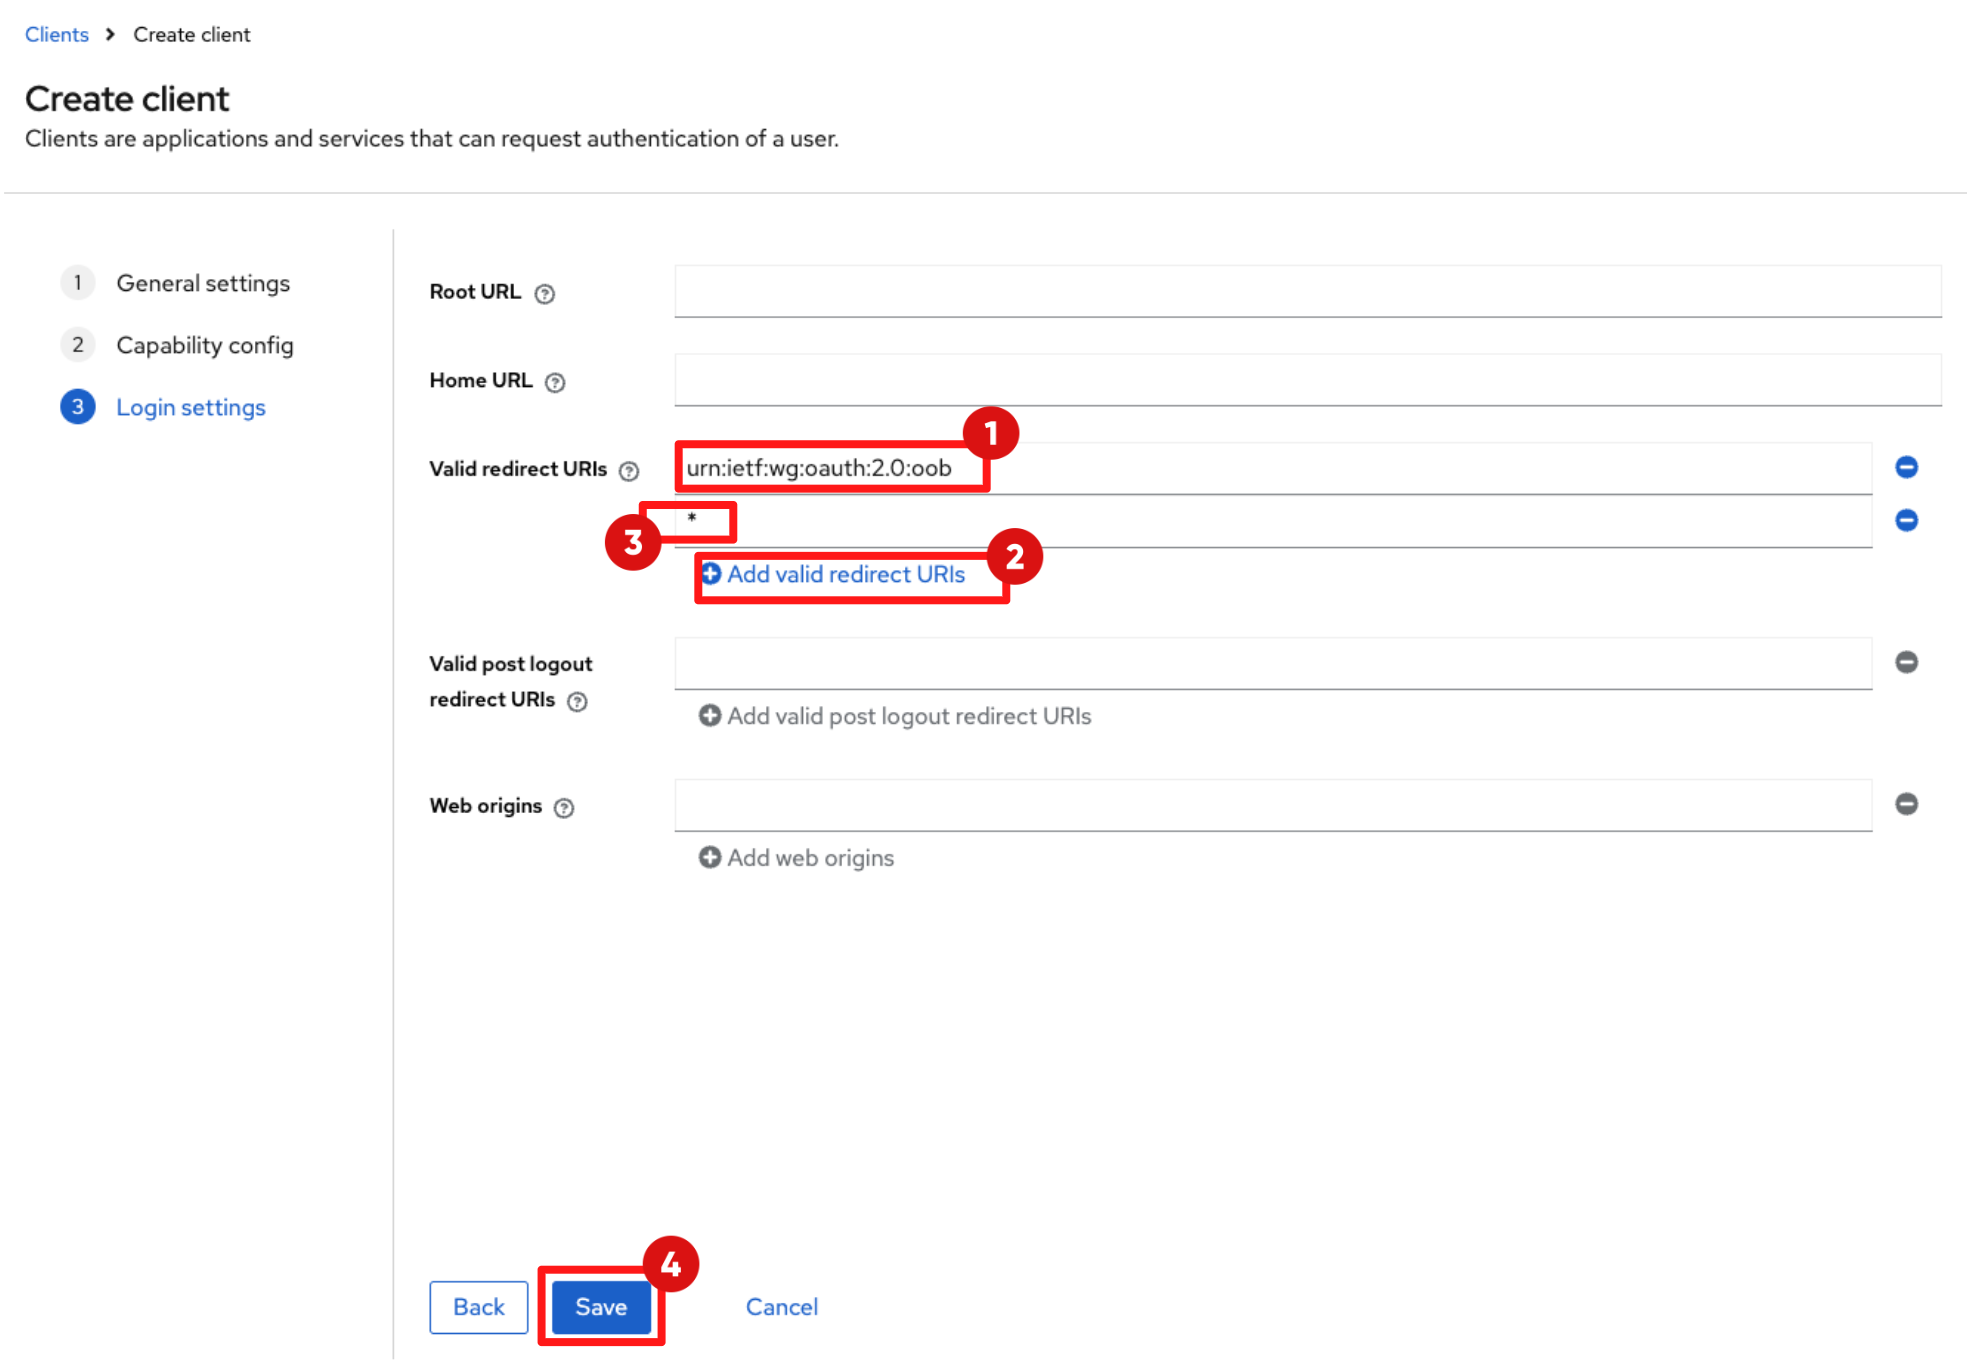
In the Login Settings page, add the following Valid redirect URIs:
-
Add the first URI:
urn:ietf:wg:oauth:2.0:oob -
Click Add valid redirect URIs, then input:
* -
Click Save
-
-
You’ll see a pop-up message saying “Client created successfully".
-
This allows tools like RHTAS to complete the OAuth authentication flow.
-
Now scroll down to the Logout settings section
-
Set the Front channel logout toggle to Off.
-
Then click Save
-
-
You’ll see a pop-up message saying “Client successfully updated".
Step 3: Deploy the RHTAS Instance
-
Now that both machine and developer identities are configured, you can deploy the RHTAS components (Fulcio, Rekor, Trillian, and TUF) using the Custom Resource.
3.1 Apply the RHTAS Instance CR
-
In Showroom terminal, run the following command to apply the RHTAS Instance CR:
cat << 'EOF' >> ~/.bashrc
export TAS_CHAINS_CLIENT_ID={tas_chains_client_id}
export TAS_CHAINS_REALM={tas_chains_realm}
export TAS_SSO_REALM={tas_sso_realm}
EOF
source ~/.bashrc
envsubst < ~/lab-assets/tas-instance.yml | oc apply -n tssc-tas -f -
Optional Deep Dive: What did the RHTAS Instance CR configure?
-
The custom resource you just applied tells the RHTAS Operator how to stand up Fulcio, Rekor, Trillian, and TUF, and how to trust your Keycloak realms. Here are the key parts worth calling out.
=== Fulcio certificate identity
spec:
  fulcio:
    certificate:
      commonName: fulcio.hostname
      organizationEmail: trusted-artifact-signer@company.dev
organizationName: TSSC-
These fields describe how Fulcio identifies itself as a Certificate Authority.
-
They do not control the signer identity on images, that still comes from the OIDC token, but they appear in the CA certificate chain that verifiers will trust.
-
In a customer environment, these values would normally align with the organization’s naming standards (e.g. security team email, business unit name).
=== Binding Fulcio to our OIDC issuers
spec:
  fulcio:
    config:
      OIDCIssuers:
        - ClientID: ${TAS_CHAINS_CLIENT_ID}
          Issuer: 'https://sso.{openshift_cluster_ingress_domain}/realms/${TAS_CHAINS_REALM}'
          IssuerURL: '${KEYCLOAK_URL}/realms/${TAS_CHAINS_REALM}'
          Type: email
        - ClientID: ${TAS_CHAINS_CLIENT_ID}
          Issuer: 'https://sso.{openshift_cluster_ingress_domain}/realms/${TAS_SSO_REALM}'
          IssuerURL: '${KEYCLOAK_URL}/realms/${TAS_SSO_REALM}'
Type: email-
This section wires Fulcio to the RHBK realms you created earlier.
-
ClientID: ${TAS_CHAINS_CLIENT_ID} tells Fulcio which OIDC client (trusted-artifact-signer) it should expect tokens from.
-
Issuer / IssuerURL point to the tas-chains realm (for pipelines) and the sso realm (for developers), so Fulcio will only accept tokens issued by those realms.
-
Type: email means Fulcio will derive the certificate identity from the verified email claim in the token. If the email is missing or not verified, certificate issuance fails.
-
This configuration is how RHTAS knows which identities are allowed to sign.
=== Rekor and Trillian: durable, tamper-evident log
spec:
  rekor:
    externalAccess:
      enabled: true
    pvc:
      accessModes:
        - ReadWriteOnce
      retain: true
      size: 5Gi
    rekorSearchUI:
      enabled: true
    trillian:
      port: 8091
  trillian:
    database:
      create: true
      pvc:
        accessModes:
          - ReadWriteOnce
        retain: true
size: 5Gi-
This section configures Rekor, the transparency log where signing events are recorded, plus a small UI (rekorSearchUI: enabled: true) so you can browse entries.
-
The pvc sections allocate persistent volumes for Rekor and Trillian so that log data survives pod restarts and upgrades.
-
The nested trillian block connects Rekor to the trillian (Merkle-tree) database that makes the log tamper-evident.
-
Together, Rekor and Trillian give you an audit trail of all signing events, not just signatures attached to images.
=== TUF: root of trust for Fulcio and Rekor
spec:
  tuf:
    externalAccess:
      enabled: true
    keys:
      - name: rekor.pub
      - name: ctfe.pub
      - name: fulcio_v1.crt.pem
    port: 80
    pvc:
      accessModes:
        - ReadWriteOnce
      retain: true
      size: 100Mi
    rootKeySecretRef:
name: tuf-root-keys-
tuf configures The Update Framework repository that distributes the trusted public keys for Fulcio and Rekor.
-
The keys list names the key files that will be published as TUF targets (Rekor public key, Fulcio CA cert, etc.).
-
rootKeySecretRef points to the Kubernetes Secret that holds the TUF root keys – effectively the “keys to the kingdom” for this trust store.
-
As with Rekor/Trillian, a PVC is used so the TUF metadata is persisted.
-
From a customer perspective, TUF is what makes the signing infrastructure itself updatable and recoverable without re-installing everything from scratch.
=== ctlog: Certificate-Transparency Log Service
ctlog:
    trillian:
port: 8091-
CT log is a cryptographically verifiable ledger, entries cannot be deleted or modified without detection.
-
When Fulcio issues a certificate, it performs a Certificate Transparency (CT) log submission.
-
ctlog then records the submission in Trillian, ensuring no certificate can be issued secretly.
-
That guarantee is what allows auditors or verification tools to prove that a certificate existed at a specific moment in time.
Step 4: Deploy The OIDC Refresher App
-
In this step you will deploy a small helper application that continuously refreshes the OIDC token required for signing in pipelines.
Why is the OIDC Refresher App needed?
-
Fulcio issues short-lived certificates based on OIDC tokens.
-
For security reasons, these tokens typically expire within 5 minutes.
-
However, a CI/CD pipeline (such as a Tekton build) may run for 20 minutes or more before reaching the Sign Image step.
-
If Tekton Chains attempts to sign an image using the token obtained at pipeline start, that token will almost certainly have expired.
-
To solve this, you will deploy the OIDC Refresher App which does the following:
-
Authenticates with Keycloak using the trusted-artifact-signer client credentials you created in Step 1.
-
Fetches a fresh access token.
-
Writes the token into a Kubernetes Secret named oidc-token in the openshift-pipelines namespace.
-
Refreshes the token every 2 minutes, ensuring Tekton always signs using a valid identity.
-
Deploy OIDC Refresher App
-
Run the following commands in the Showroom terminal:
-
First, retrieve the Keycloak admin credentials from the keycloak-initial-admin secret in the tssc-keycloak namespace:
export keycloak_admin_user=$(oc get secret keycloak-initial-admin -n tssc-keycloak -o jsonpath='{.data.username}' | base64 -d) export keycloak_admin_password=$(oc get secret keycloak-initial-admin -n tssc-keycloak -o jsonpath='{.data.password}' | base64 -d) -
Next, use the credentials to request an access token:
KEYCLOAK_ACCESS_TOKEN=$(curl -s -X POST "${KEYCLOAK_URL}/realms/master/protocol/openid-connect/token" \ -H "Content-Type: application/x-www-form-urlencoded" \ -d "client_id=admin-cli" \ -d "username=$keycloak_admin_user" \ -d "password=$keycloak_admin_password" \ -d "grant_type=password" | jq -r '.access_token') -
Next, retrieve the client secret for the trusted-artifact-signer client from the tas-chains realm:
export TAS_CHAINS_CLIENT_SECRET=$(curl -s -X GET "${KEYCLOAK_URL}/admin/realms/$TAS_CHAINS_REALM/clients?clientId=$TAS_CHAINS_CLIENT_ID" \ -H "Authorization: Bearer $KEYCLOAK_ACCESS_TOKEN" | jq -r '.[0].secret') -
Finally, create the Kubernetes Secret containing the OIDC configuration, then deploy the refresher application:
envsubst < ~/lab-assets/oidc-info-secret.yml | oc apply -n openshift-pipelines -f - oc apply -f ~/lab-assets/oidc-refresher-app.yml -n openshift-pipelines -
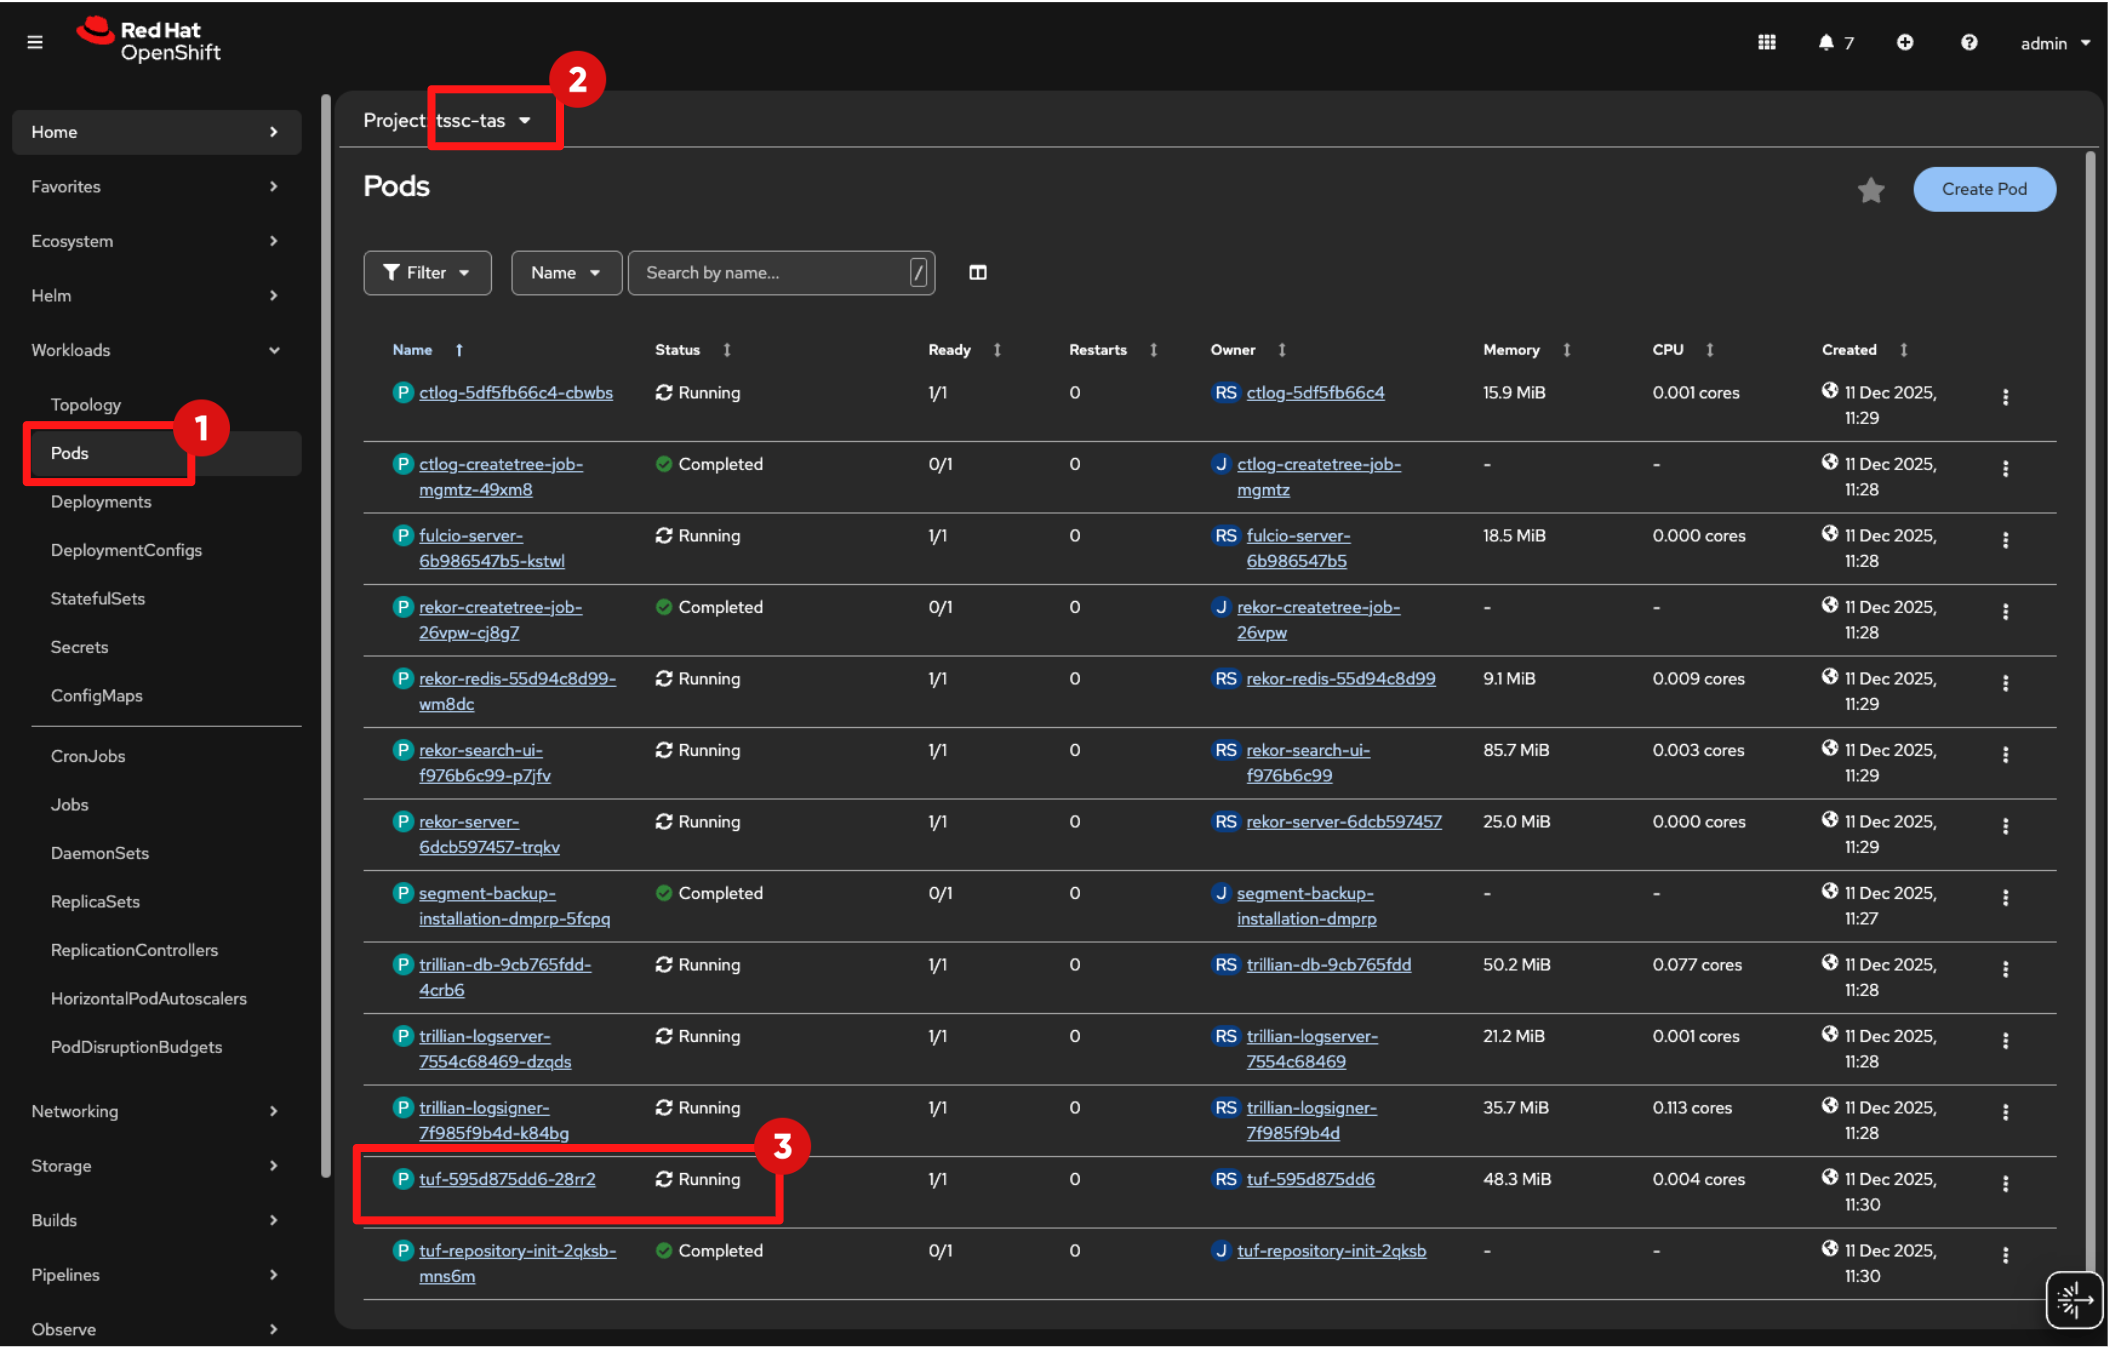
Use the following command to continuously monitor the refresher pod until it reaches the Running state:
watch -n 2 "oc get pods -n openshift-pipelines | awk '/^oidc-token-refresher/ { print; exit }'"
-
-
Once the pod is running, the OIDC refresher is actively maintaining valid tokens for Tekton Chains.
-
Exit using
CTRL+Z.
Step 5: Configure Tekton Chains
-
Tekton Chains is the supply-chain security controller inside Tekton Pipelines.
-
It observes pipeline executions, captures build materials (provenance, SBOMs, image digests), and—when configured, it automatically signs container images using Cosign.
-
By default, Tekton Chains expects static signing secrets.
-
In this step, you will reconfigure Chains to use the RHTAS infrastructure and the continuously refreshed OIDC token instead.
-
This allows Chains to perform keyless signing using short-lived identities, rather than long-lived keys.
5.1 Apply the Tekton Chains Configuration Patch
-
Patch the Tekton configuration to point Tekton Chains at the RHTAS services and token source:
oc patch tektonconfig config -n openshift-pipelines --type=merge --patch "$(cat ~/lab-assets/tekton-chains-patch.yml)"-
The patch updates Tekton Chains to integrate with RHTAS and use keyless signing. Key parts from the patch (simplified):
artifacts:
  oci:
    signer: x509
artifact:
  signers:
    x509:
      fulcio:
        address: "http://fulcio.tssc-tas.svc"
      identity:
        token:
          file: "/var/run/sigstore/cosign/oidc-token"
transparency:
  x509:
    rekor:
address: "http://rekor.tssc-tas.svc"-
signer: x509: Use the x509 signer implementation, which is Cosign’s keyless flow.
-
fulcio.address : Request a signing certifiacte from this Fulcio endpoint.
-
identity.token.file : Read the OIDC token from this file.
-
transparency.x509.rekor.address : After signing, send log entries to this Rekor URL.
Step 6: Verify Signing (Smoke Test)
-
In this step, you will run a simple end-to-end smoke test to confirm that artifact signing is working as expected.
-
You will manually trigger a Tekton Task that builds and pushes a container image. Because Tekton Chains was configured in Step 5, it should automatically:
-
Detect the successful task completion.
-
Sign the resulting image using Cosign.
-
Upload the signature to Quay.
-
-
This validates that keyless signing is correctly integrated into the pipeline.
6.1 Set Up Permissions for the Test Task
-
Create a temporary service account with the permissions required to run buildah, which requires elevated SCCs.
oc create sa chains-signing-image-tester -n tssc-app-ci
oc adm policy add-scc-to-user anyuid -z chains-signing-image-tester -n tssc-app-ci
oc adm policy add-scc-to-user privileged -z chains-signing-image-tester -n tssc-app-ci
oc secret link  chains-signing-image-tester tssc-image-registry-auth -n tssc-app-ci --for=mount
6.2 Run the Tekton Task
-
The build-and-push task you are about to create and run builds an OCI image, pushes it to the registry, and exposes the image URL and image digest, which triggers Tekton Chains to start the signing process.
params:
  - name: IMAGE
    default: quay.io/tssc/tssc-demo:latest
results:
  - name: IMAGE_URL
- name: IMAGE_DIGEST-
The buildah bud and buildah push steps build and push the container image to the configured Quay.io registery.
steps:
  - name: build
    image: quay.io/buildah/stable
    script: |
      buildah bud --tls-verify=false -f /workspace/Dockerfile -t $(params.IMAGE)

  - name: push
    image: quay.io/buildah/stable
    script: |
buildah push --tls-verify=false $(params.IMAGE) docker://$(params.IMAGE)-
Run the Tekton Task that builds and pushes an image:
oc create -f ~/lab-assets/example-image-sign.yml -n tssc-app-ci-
Tekton will execute the task, and upon successful completion, Tekton Chains will automatically call Cosign to sign the resulting image.
-
Wait until the PipelineTask status shows Succeeded = true.
watch -n 2 "oc get taskrun -n tssc-app-ci"-
Exit using
CTRL+Z.
Optional Deep Dive: Verify Certificate and Attestation in Rekor search UI
-
Click the Rekor Search UI tab in the Showroom, you may need to refresh the tab.
-
After Cosign completes the signing operation, Rekor stores 2 complementary entries:
-
The first is a hashedrekord — Rekor's standard record type for a signature over a hash — which contains the Cosign signature over the image digest. This acts as proof that a trusted identity signed this image and that its contents have not been changed since.
-
The second is an in-toto provenance attestation, generated by Tekton, which captures how the image was built — which pipeline ran, when it completed, and the exact digest produced.
-
| An attestation is structured metadata that describes how an artifact was created, providing verifiable build context. in-toto is the open standard used to express these attestations — defining what was built, how, and by whom — so consumers can verify both integrity (nothing changed) and provenance (it came from the expected build process). |
-
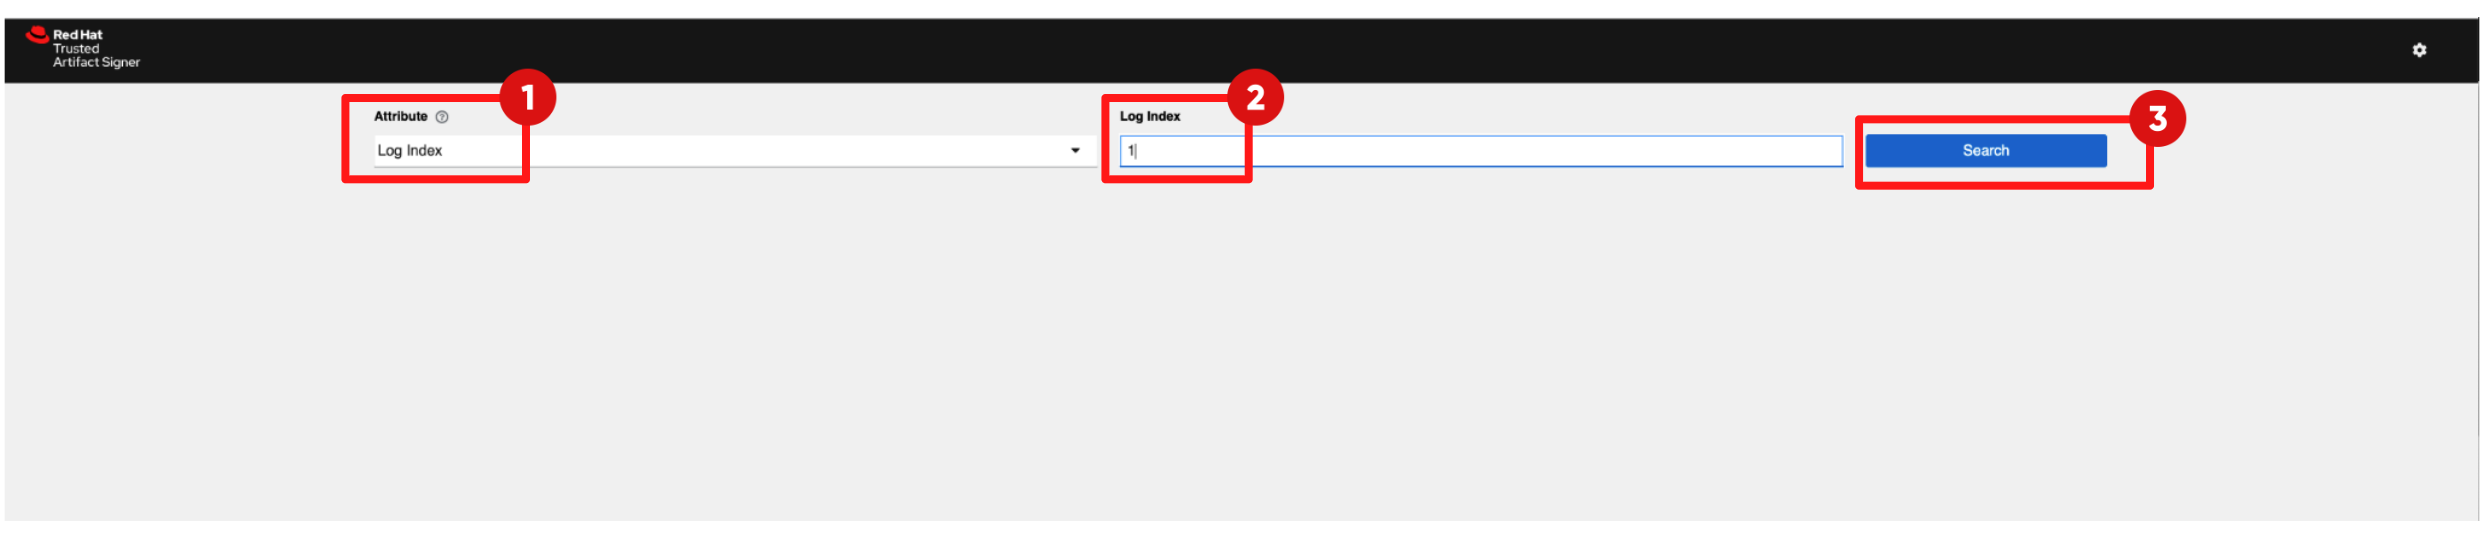
Choose Log Index from the Attribute drop down list
-
Provide Log Index value as 1
-
Click Search
-
This first Rekor record represents the signature event.
-
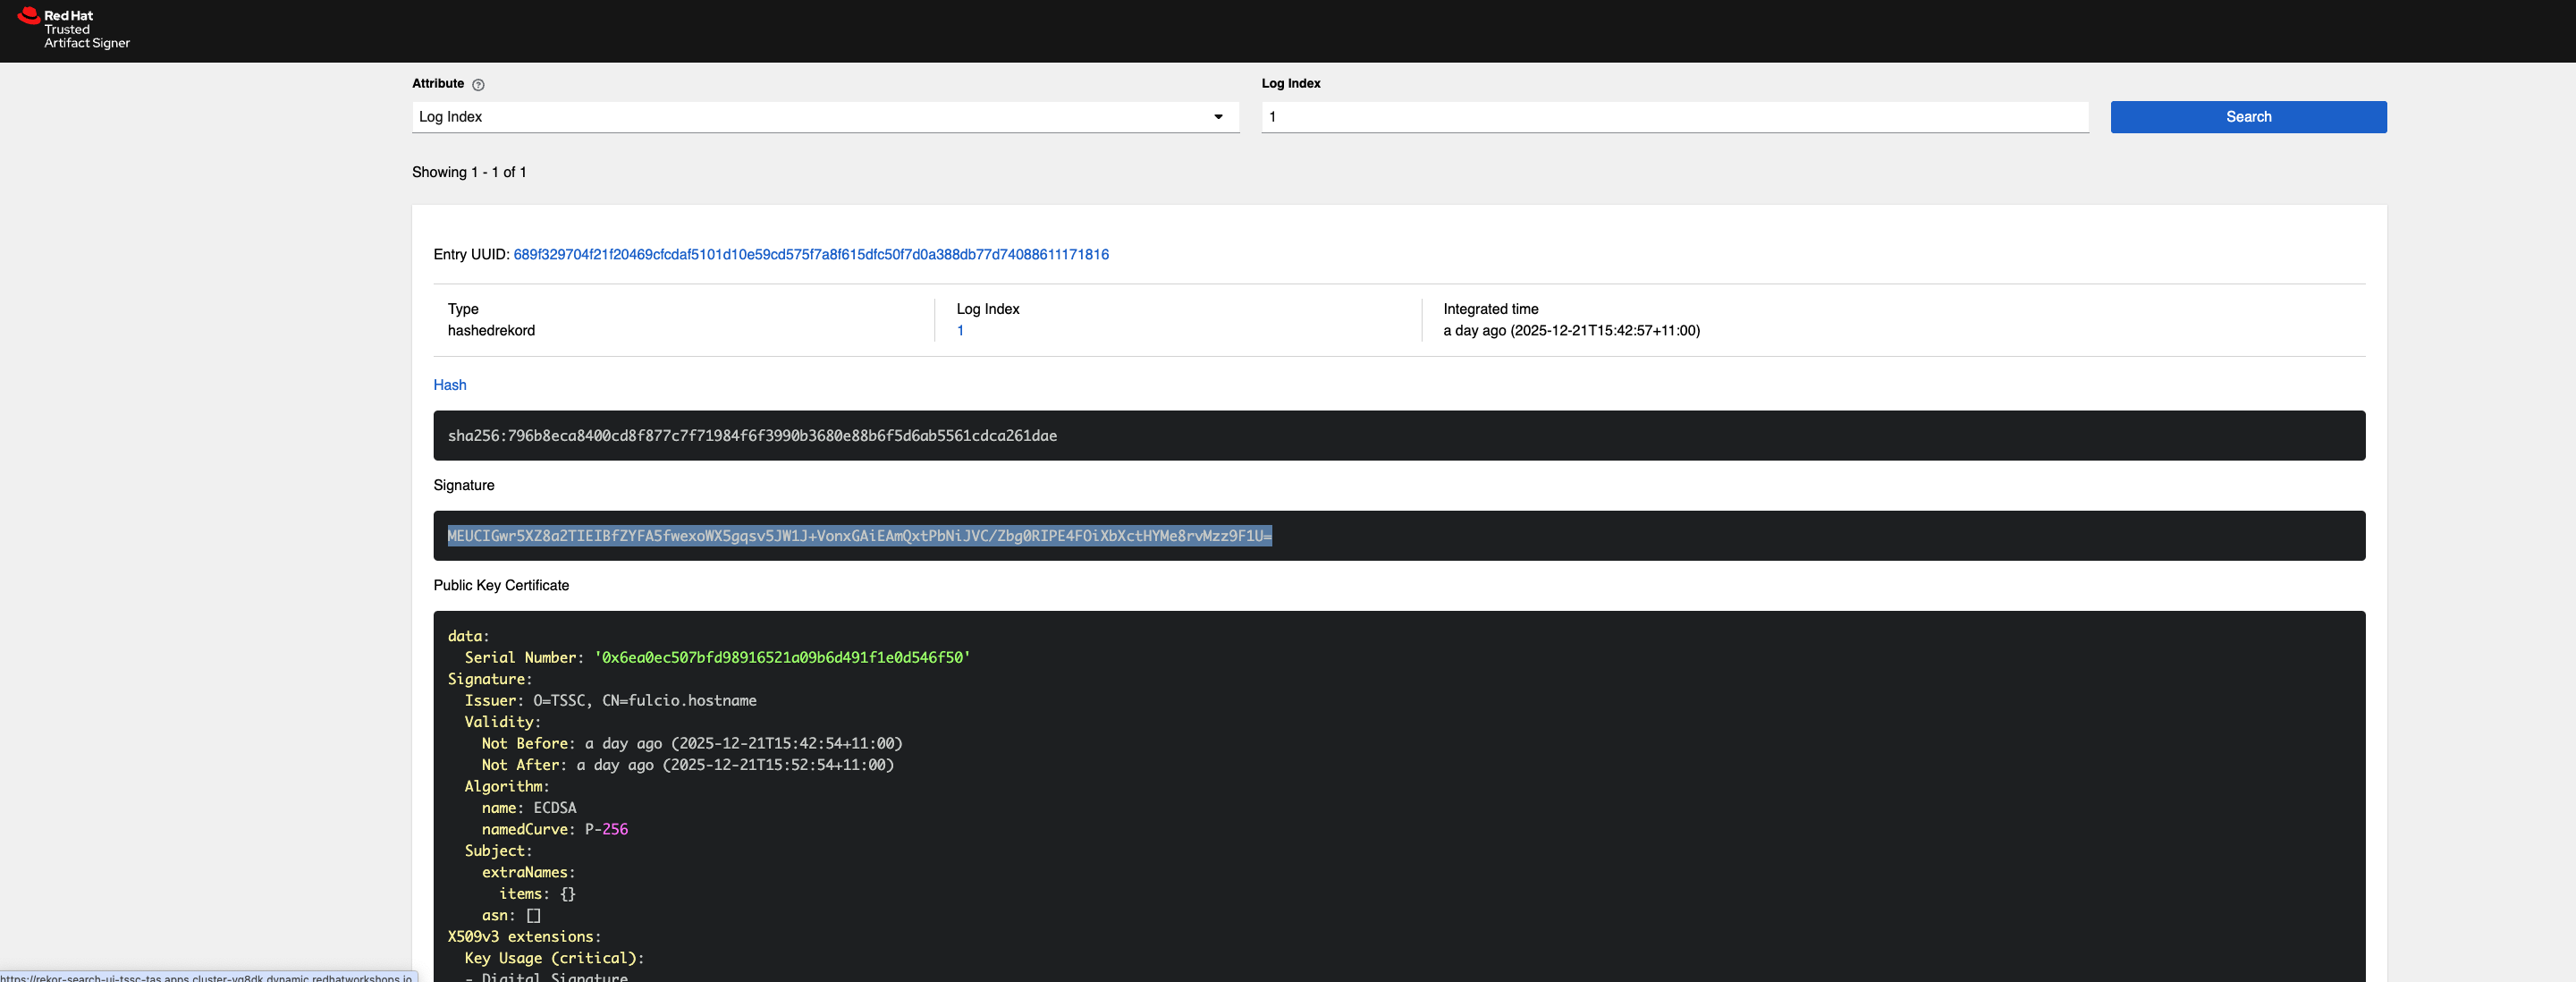
It contains four important parts:
=== 1 The Signature
-
You can see a long base64 signature under the Signature section.
-
The signature is Cosign’s cryptographic seal over the image digest, proving who signed the build and that the content hasn’t changed since.
=== 2 The Public Key Certificate
-
There is a lot of important information here, including:
-
Who issued the certificate: Fulcio acting as a Certificate Authority.
Issuer: O=TSSC, CN=fulcio_hostname -
How long is the certificate valid: nearly zero lifetime for this short lived certificate
Not Before: 2025-12-21T15:42:54 Not After: 2025-12-21T15:42:54 -
The signing algorithm:
ECDSA P-256 -
The OIDC identity bound into the cert
email = trusted-artifact-signer@demo.redhat.com
OIDC Issuer = https://sso.apps.../realms/tas-chains
-
=== 3 Inclusion Proof
-
Scroll to the bottom of the Rekor entry and expand the Verification section, this reveals the proof of inclusion:
inclusionProof: checkpoint: rekor-server-... wm6b • 7538799925445926688 hashes: - 1c7e8... - b6f7... - ... -
That is Rekor + Trillian cryptographically proving that:
-
the signature was truly written to the transparency log
-
it cannot be deleted without detection
-
future verifiers can audit that history
-
-
Now switch to the 2nd Log Index, provide the value as 2
-
Click Search
-
An in-toto attestation captures:
-
which pipeline ran
-
which steps were executed
-
what artifact digest was produced
-
when the build started and finished
-
-
Expand the Attestation section to examine it’s details. This is a simplified version:
attestation:
  type: https://in-toto.io/Statement/v0.1
  predicateType: https://slsa.dev/provenance/v0.2
  predicate:
    buildConfig:
      tasks:
        - finishedOn: <timestamp>
          serviceAccountName: chains-signing-image-tester
          startedOn: <timestamp>
          environment:
            annotations:
              pipeline.tekton.dev/release: 3a584b5
            labels:
              app.kubernetes.io/managed-by: tekton-pipelines
              tekton.dev/memberOf: tasks
              tekton.dev/pipeline: chains-signing-image-test-2c55c
              tekton.dev/pipelineRun: chains-signing-image-test-2c55c
              tekton.dev/pipelineRunUID: b2bc3a19-8bc2-4345-a12d-2db3e3952a99
              tekton.dev/pipelineTask: build-and-push
    buildType: tekton.dev/v1beta1/PipelineRun
    builder:
      id: https://tekton.dev/chains/v2
    materials:
    - digest:
        sha256: e9c0b62a83c3b7ede51fbec9df53872f1aab643bb597de6570df2c27a1bbbe35
      uri: oci://quay.io/containers/aio
6.3 Verify the Signed image in Quay
-
Log in to the Quay registry UI.
-
Click the Quay Console tab in the Showroom and log in using:
-
Username:
{quay_admin_user}-
Password:
{quay_admin_password}-
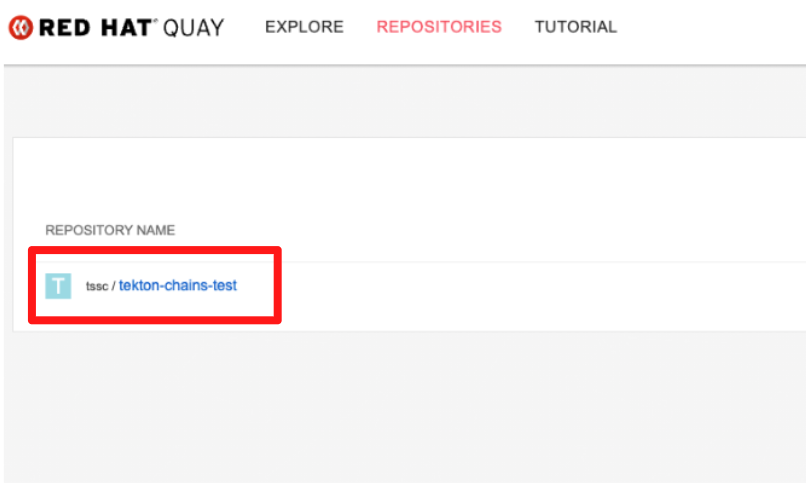
Navigate to the tssc/tekton-chains-test repository.
-
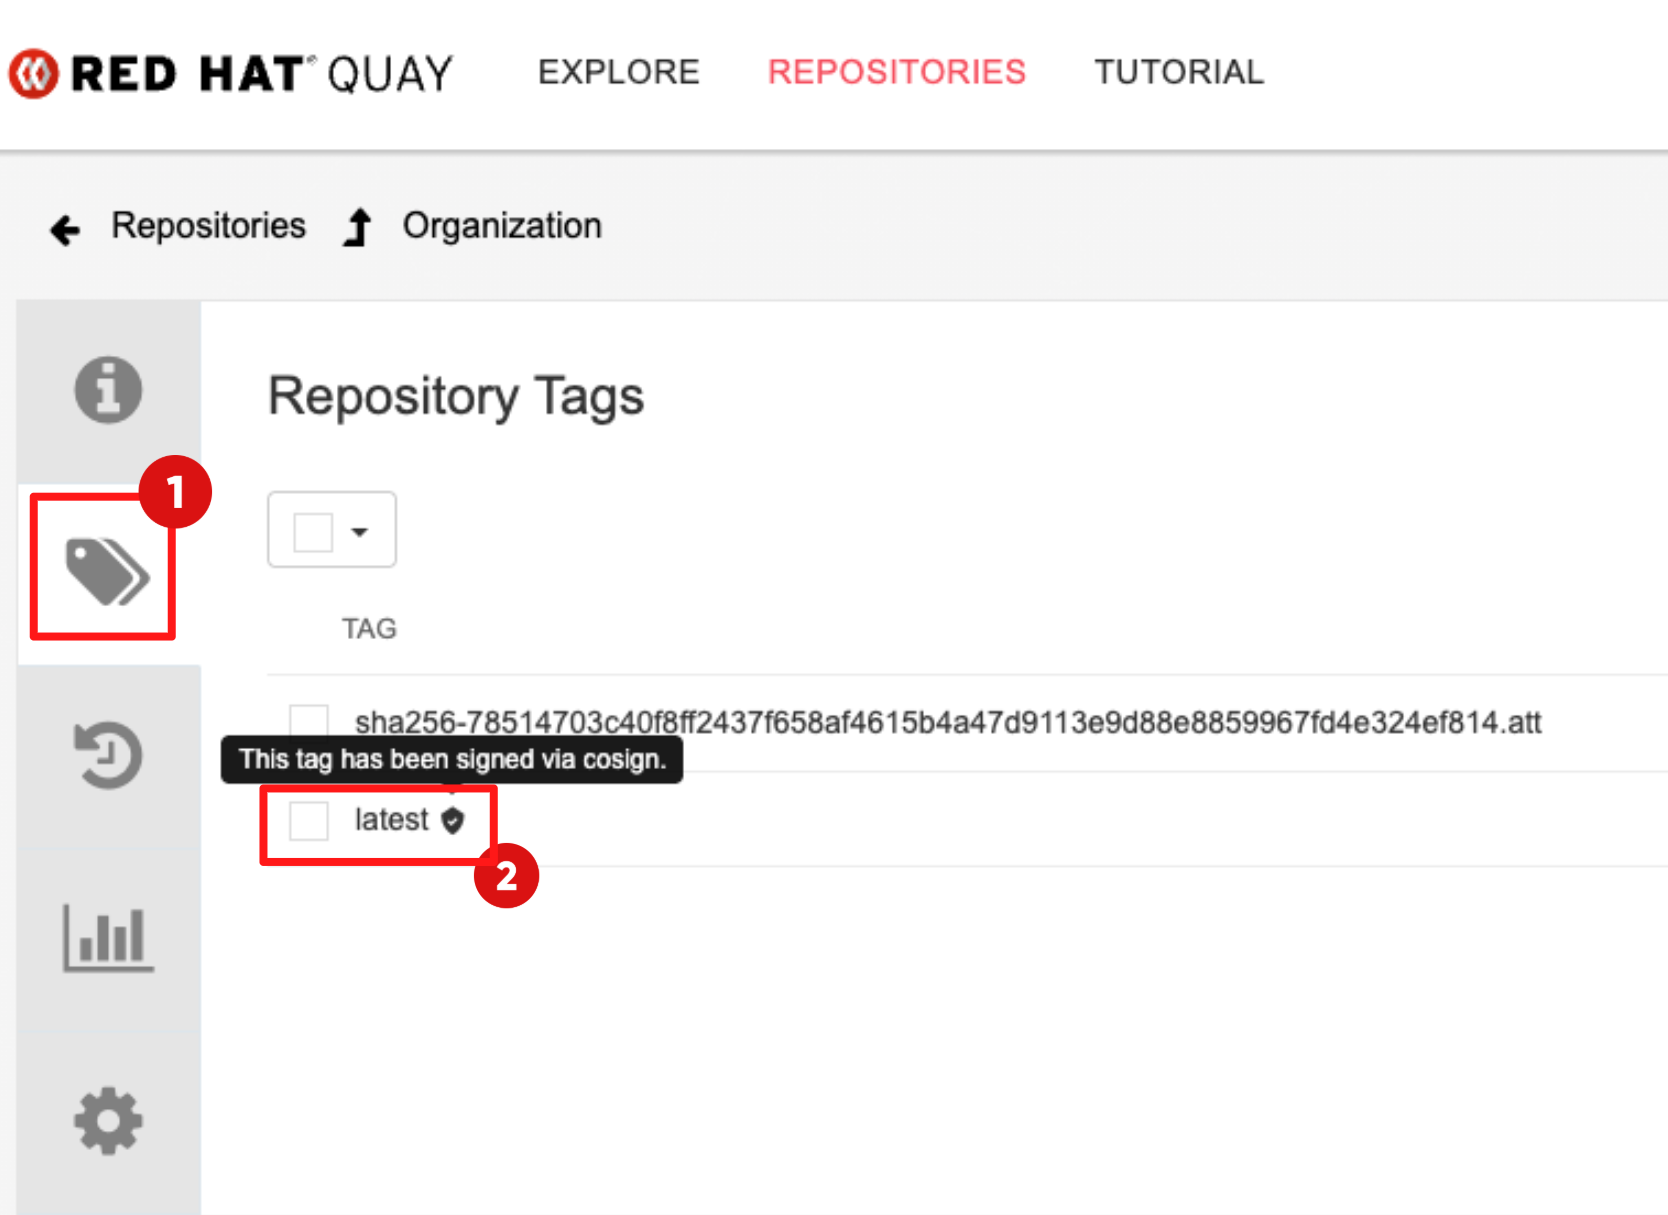
Locate the image tag created by the task.
-
You should see a shield icon next to the image tag as seen in the following screenshot.
-
This indicates that a valid Cosign signature is attached to the image.
6.5 Clean Up Temporary Permissions
Once verification is complete, remove the elevated permissions and delete the service account:
oc adm policy remove-scc-from-user anyuid -z chains-signing-image-tester -n tssc-app-ci
oc adm policy remove-scc-from-user privileged -z chains-signing-image-tester -n tssc-app-ci
oc delete sa chains-signing-image-tester -n tssc-app-ci
Module 2: Summary
-
In this module, you addressed the second customer challenge: “We cannot trust that our code and images were really produced by us, or that they haven’t been modified along the way.”
-
As a consultant, you learned how to deploy Red Hat Trusted Artifact Signer (RHTAS) and implement keyless signing for both code commits and container images, ensuring artifacts are cryptographically verifiable and protected from tampering.
-
For customers, this means build integrity is no longer assumed — it is provable. They can verify who authored the code, which system built the image and whether the artifact has been altered since it was produced.
-
For technical sellers, this is the moment where the story resonates with customers: “This is how we prove your software really came from you and was not tampered with.”
-
With identity and integrity established, the next challenge becomes: “How do we keep developers fast without compromising security?”
-
In Module 3, you will focus on developer workflows and show how Red Hat Advanced Developer Suite (RHADS) security guardrails are built into developer flows without slowing developers down.