Ansible for OpenShift Virtualization Migration Installation
The Ansible for OpenShift Virtualization Migration is a set of Ansible based tooling, powered by Ansible Automation Platform (AAP), that simplifies the use of OpenShift Virtualization and focuses on three (3) primary areas:
-
Analyzing existing environments
-
Migration of Virtual Machines into OpenShift Virtualization
-
Day 2 Operations
This section describes the process for setting up the Ansible for OpenShift Virtualization Migration within the OpenShift environment.
To get started, you will need the following:
-
Container runtime, such as Podman
-
Red Hat Customer Portal / Red Hat Developers account
In addition, the following will be provided for you:
-
Image Registry Credentials to retrieve the Ansible for OpenShift Virtualization Migration Ansible Execution Environment
-
Git Credentials to retrieve the Ansible for OpenShift Virtualization Migration Ansible Content Collection
The process of deploying the Ansible for OpenShift Virtualization Migration makes use of Ansible on the local machine to prepare an instance of Ansible Automation Platform on OpenShift for use managing the lifecycle of Virtual Machines and OpenShift Virtualization. While several architectural patterns are available for deploying the Ansible for OpenShift Virtualization Migration, including configuring an existing instance of Ansible Automation Platform, you will use the tooling provided with the Ansible for OpenShift Virtualization Migration to deploy a new instance of Ansible Automation Platform to your single OpenShift environment.
Utilize the following sections to deploy the Ansible for OpenShift Virtualization Migration by first installing any prerequisite software necessary on your machine and then configure the Ansible for OpenShift Virtualization Migration for use in your OpenShift environment.
Local Machine Configuration
Since Ansible is used to facilitate the deployment of the Ansible for OpenShift Virtualization Migration, you will need to have the required tooling installed and configured on your Machine.
Ansible Navigator
Ansible Navigator is to used execute the Ansible automation as it simplifies how Ansible content is managed and used by leveraging Execution Environments which are container images which include all of the necessary dependencies and tools needed.
Install Ansible Navigator by first creating a new Python Virtual Environment called etx within the ~/.virtualenvs directory
mkdir -p ~/.virtualenvs/
python -m venv ~/.virtualenvs/etx|
You may choose an alternate location to store your Python Virtual Environment, if desired. |
Source the newly created Virtual Environment
source ~/.virtualenvs/etx/bin/activateOnce a Virtual Environment has been activated, the shell prompt will show the name of the active Virtual Environment; in this case (etx). Install Ansible Navigator into the virtual environment:
pip install ansible-navigatorThe Ansible for OpenShift Virtualization Migration includes an Execution Environment to support executing Ansible Automation both locally and within Ansible Automation Platform. Since an Execution Environment runs as a container image, you will need to have a container runtime, such as Podman installed and configured on your machine. Consult the Podman website for any additional questions.
The Execution Environment supporting the Ansible for OpenShift Virtualization Migration is located within a private Container registry. As as a result, you will need to provide credentials in order to obtain the image. Using the credentials provided, login to the remote registry:
podman login quay.io/redhat-copPull the Execution Environment to your local machine
podman pull quay.io/redhat-cop/openshift-virtualization-migration-ee:2.5Source Code
Source code, including Automation tooling (playbooks, collections, etc) for the Ansible for OpenShift Virtualization Migration are located within a protected Git repository within the Red Hat Consulting GitLab instance and the openshift-virtualization-migration group.
Clone the Ansible for OpenShift Virtualization Migration Ansible Collection (infra.openshift_virtualization_migration) source code to your local machine and change into the cloned directory. When prompted, enter the Git username and password that were provided previously:
git clone https://gitlab.consulting.redhat.com/redhat-cop/openshift-virtualization-migration/openshift_virtualization_migration.git
cd openshift_virtualization_migration
Setting Environment Variables
Since multiple repositories (ETX workshop and Ansible for OpenShift Virtualization Migration) are being used within this exercise, it is recommended that several environment variables be set which will simplify the process of referencing files and directories for the remainder of this exercise.
First set a new environment variable called OPENSHIFT_VIRTUALIZATION_MIGRATION_REPO to be the current working directory which should be the root of the cloned Ansible for OpenShift Virtualization Migration Git repository.
export OPENSHIFT_VIRTUALIZATION_MIGRATION_REPO=$(pwd)Next, set a new environment variable called ETX_REPO to be the location of the ETX workshop Git repository. This should be the location where you cloned the ETX workshop Git repository.
|
The ETX Workshop Git Repository is the repository located at https://github.com/juliovp01/etx-virt_delivery which was cloned in the prior exercise relating to GitOps and Virtual Machines. |
export ETX_REPO=/path/to/etx-workshop-repo|
Be sure to replace |
Confirm that both the OPENSHIFT_VIRTUALIZATION_MIGRATION_REPO and ETX_REPO environment variables are set correctly by running the following command:
env | grep -E "^ETX_REPO|^OPENSHIFT_VIRTUALIZATION_MIGRATION_REPO"Building your Ansible Inventory
The core component for setting up the Ansible for OpenShift Virtualization Migration is the Ansible Inventory as it defines both the composition of the OpenShift environment, but also properties to enable Ansible Automation Platform to manage all of the resources effectively.
At a high level, the inventory is organized similar to the following:
# Ansible for OpenShift Virtualization Migration Inventory
all:
  vars:
    # Common variables applied to all inventory groups
    my_var: 'my_var_value'

# Ansible for OpenShift Virtualization Migration Hub Clusters
migration_hub:
  hosts:
    hub-cluster:
      # Variables to apply to specific Ansible for OpenShift Virtualization Migration Hub Cluster
      my_var: 'my_var_value'

  # Variables to apply to all Ansible for OpenShift Virtualization Migration Hub Clusters
  vars:
    my_var: 'my_var_value'

# Ansible for OpenShift Virtualization Migration Spoke Clusters
migration_spoke:
  hosts:
    spoke-cluster:
      # Variables to apply to specific Ansible for OpenShift Virtualization Migration Spoke Cluster
      my_var: 'my_var_value'

  # Variables to apply to all Ansible for OpenShift Virtualization Migration Spoke Clusters
  vars:
    my_var: 'my_var_value'

    # Defines a set of source and destination environments which are turned into MTV providers
    migration_targets:
      - name: my-vmware-cluster
        type: vmware
        host: vcenter.example.com
        # ...

# Standalone Ansible Automation Platform Environments
migration_aap:
  hosts:
    aap_host:
      # Ansible Automation Platform Variables
      aap_host: aap.example.com
      aap_token: changeme
      aap_validate_certs: true
The Ansible for OpenShift Virtualization Migration supports multiple deployment patterns and these can be modeled (as seen above) within the inventory. Three Inventory groups are available and described in the following table:
| Group Name | Description |
|---|---|
|
Hub OpenShift clusters |
|
Spoke OpenShift clusters |
|
Standalone Ansible Automation Platform environments |
In addition to the Inventory Groups, Migration Targets which are located within vars section of the migration_spoke Inventory group represent source and destination environments containing Virtual Machines. In most cases, a VMware vSphere environment will be a source and an OpenShift cluster will be a destination.
For this workshop, since there is only 1 OpenShift cluster, we will leverage a combined hub and spoke architecture within the same cluster. The Ansible for OpenShift Virtualization Migration will also be responsible for deploying and configuring Ansible Automation Platform on the hub instance.
Given that the Ansible for OpenShift Virtualization Migration relies heavily on the Inventory, there are a number of variables that can be configured. An inventory starter (in YAML format) is located in the content/ansible/openshift-virtualization-migration/inventory-etx-base.yml file within the ETX workshop Git repository. This file contains the base set of variables used to drive the deployment and should not need to be modified.
Copy the file from the ETX repository to the root of the cloned Ansible for OpenShift Virtualization Migration Git repository.
cp $ETX_REPO/content/ansible/openshift-virtualization-migration/inventory-etx-base.yml $OPENSHIFT_VIRTUALIZATION_MIGRATION_REPO/inventory-etx-base.ymlOpen the inventory-etx-base.yml file that has been copied to the root of the Ansible for OpenShift Virtualization Migration Git repository to review these base configuration. The inventory starter includes a lot of comments in order to illustrate the significance of each value and to ensure the proper configurations are set. No changes need to be made to this file. However, it is good to review the variables that are being configured.
Also included in the ETX Git repository in the content/ansible/openshift-virtualization-migration/inventory-etx.yml file is the Ansible Inventory that you will modify and drive the deployment of the Ansible for OpenShift Virtualization Migration. Copy the content/ansible/openshift-virtualization-migration/inventory-etx.yml file to the root of the Ansible for OpenShift Virtualization Migration Git repository. Open the inventory-etx.yml file as you will begin editing the content with the specific properties to support your own individual ETX workshop environment.
cp $ETX_REPO/content/ansible/openshift-virtualization-migration/inventory-etx.yml $OPENSHIFT_VIRTUALIZATION_MIGRATION_REPO/inventory-etx.ymlThere are several methods for which Ansible Automation Platform can be subscribed, including using a Service Account from the Red Hat Hybrid Cloud Console or a Subscription manifest. For this workshop, you will make use of a Subscription manifest that provides the necessary entitlements for the target Ansible Automation Platform. Download the manifest file to your local machine from the location provided by the instructors.
If you’re using the bastion machine provided by the RHDP deployment as your instance, download the manifest file provided to the root of your OpenShift Virtualization Migration Git repository.
curl -L -o $OPENSHIFT_VIRTUALIZATION_MIGRATION_REPO/aap-manifest.zip <URL_TO_MANIFEST>The next section will describe the changes that you will need to make in order to properly deploy the Ansible for OpenShift Virtualization Migration within your OpenShift environment.
General Variables
There are a set of variables within the Inventory file located at $OPENSHIFT_VIRTUALIZATION_MIGRATION_REPO/inventory-etx.yml that are used throughout the automation and are found within the all Inventory Group. Update this file using the steps described below.
The all Inventory Group applies variables to every Inventory Group that is defined.
To obtain the Ansible for OpenShift Virtualization Migration Ansible Execution Environment, set the container_username and container_password properties using the provided credentials.
container_username: <username>
container_password: <password>
If you would like to encrypt the password instead of saving it in clear text, you could use ansible-vault to encrypt it. This step is optional, but highlights how to encrypt sensitive information.
In the following example, we will be using RedHat123 as your Red Hat password.
A prompt will ask you for a new vault password. This will be the secret that must be provided in order for ansible to decrypt the vault content.
|
ansible-vault encrypt_string "RedHat123"
New Vault password:
Confirm New Vault password:
Once completed, ansible will output the following:
Encryption successful
!vault |
          $ANSIBLE_VAULT;1.1;AES256
          32363961356135633636396339363465623130393635323766633131343432633764666334623737
          3862376532656134613635346530653436316535616262310a353965326536363831323666396561
          37613131353337326231666662303165396636376262636165663534623364343165623037613066
          6533643336656630350a356162656136333438313362373734363564393361366633303734663733
          6437
You will need to copy the entire block and paste it within the var section, in place of the value. Here is an example:
container_password: !vault |
          $ANSIBLE_VAULT;1.1;AES256
          32363961356135633636396339363465623130393635323766633131343432633764666334623737
          3862376532656134613635346530653436316535616262310a353965326536363831323666396561
          37613131353337326231666662303165396636376262636165663534623364343165623037613066
          6533643336656630350a356162656136333438313362373734363564393361366633303734663733
          6437
An Ansible Controller Project will be configured to source the baseline set of Ansible automation so that it can be managed by the platform. Set the git_username and git_password properties using the provided credentials for accessing Git content.
git_username: <username>
git_password: <password>
Specify the location and credentials of the VMware environment so that the Ansible for OpenShift Virtualization Migration will be able not only make use of the credentials, but also configure the Migration Toolkit for Virtualization to connect and manage how Virtual Machines and other services are handled.
vmware_host: <host>
vmware_username: <username>
vmware_password: <password>
Now that all of the required variables in the all Inventory Group have been configured, turn your attention to the only other Inventory Group defined in the Inventory file, migration_spoke. In this Inventory Group, we will define a key concept of the Ansible for OpenShift Virtualization Migration: Migration Targets
Migration Targets
Within the vars section of the migration_spoke Inventory group, we will configure how the Ansible for OpenShift Virtualization Migration interacts with the VMware environment within the migration_targets variable. We will leverage the connectivity details that we defined previously as well as to set the VMware Virtual Disk Development Kit (VDDK) image which is used to transfer virtual disks from VMware vSphere. In addition, we also specify that we would like the Ansible for OpenShift Virtualization Migration to create a set of default MTV StorageMap’s and NetworkMap’s by setting create: true within the mapping field of the Migration Target.
The following depicts the configuration that is found within the Inventory file.
migration_targets:
  - name: vmware-etx
    type: vmware
    host: "{{ vmware_host }}"
    username: "{{ vmware_username }}"
    password: "{{ vmware_password }}"
    vddk:
      image: "{{ mtv_vmware_vddk_init_image }}"
      username: "{{ container_username }}"
      password: "{{ container_password }}"
    mapping:
create: true|
The VDDK image that has been referenced previously is available exclusively for use within this workshop and CANNOT be used outside of this workshop or copied to other environments or container repositories as it contains licensed VMWare components. Tooling is available to help produce a VDDK image of your own using the licensed VMWare components that are provided by the customer which can be found in the following repository: |
OpenShift Connectivity
Throughout all of the configurations that have been defined thus far in the prior sections, one area that you might be wondering about is how Ansible connects to the OpenShift environment. Since the Ansible for OpenShift Virtualization Migration supports multiple deployment architectures, support is available for specifying the locations of the OpenShift environments as well as how to authenticate within the Host Group for either the migration_hub or migration_spoke Inventory Group. Whether looking at the inventory-etx-base.yml or inventory-etx.yml Inventory file, you will notice the variable openshift_verify_ssl which allows for SSL verification errors to be ignored.
At this location, you can specify the address of the OpenShift API server using the openshift_host variable. Credentials can either be provided via Username/Password combination with the openshift_username and openshift_password variables or using an API Token. Either a long-lived token associated with a Service Account or a temporary API key, such as a token associated with a User, can be provided.
Since there is only 1 OpenShift cluster, we can provide the location of the OpenShift API server and the token of the currently authenticated user as Extra Variables.
Provision the Ansible for OpenShift Virtualization Migration
The installation of the Ansible for OpenShift Virtualization Migration within the OpenShift ETX workshop environment involves the deployment and configuration of Ansible Automation Platform.
Navigate to the root of the cloned Ansible for OpenShift Virtualization Migration Collection repository and deploy the Ansible for OpenShift Virtualization Migration to the OpenShift environment by executing the following command.
|
Ensure that your OpenShift CLI has a valid and active token for the OpenShift cluster. Otherwise, failures will occur. You can confirm by running the following commands: A token for the session and the list of OpenShift Ingress pods should be returned. Otherwise, authenticate to OpenShift by running the following command: If you used |
ansible-navigator run \
  --eei=quay.io/redhat-cop/openshift-virtualization-migration-ee:2.5 \
  -m stdout \
  --pp=missing \
  --eev=$(pwd):/runner/project:Z \
  --eev=$(pwd):/usr/share/ansible/collections/ansible_collections/infra/openshift_virtualization_migration:Z \
  playbooks/migration_factory_aap.yml \
  -i inventory-etx-base.yml \
  -i inventory-etx.yml \
  --pae false \
  -e openshift_host=$(oc whoami --show-server) \
  -e openshift_temporary_api_key=$(oc whoami -t) \
  -e bootstrap_aap_license_manifest=$(pwd)/aap-manifest.zip
The provisioning will take a few minutes to complete as OpenShift is populated with Ansible for OpenShift Virtualization Migration resources. Re-run the the above ansible-navigator run command if you run into a HTTP Error 503: Service Unavailable during the Apply license to AAP Task.
Verify the Provisioning
Once the playbook associated with the provisioning of the Ansible for OpenShift Virtualization Migration has completed successfully, perform the following steps to confirm Ansible Automation Platform is available within the OpenShift cluster and it has been configured properly.
Launch a web browser and navigate to the OpenShift Web Console.
Verify a new project called virtualization-migration has been created by expanding the Home section on the left hand navigation bar and selecting Projects.
Confirm virtualization-migration is present.
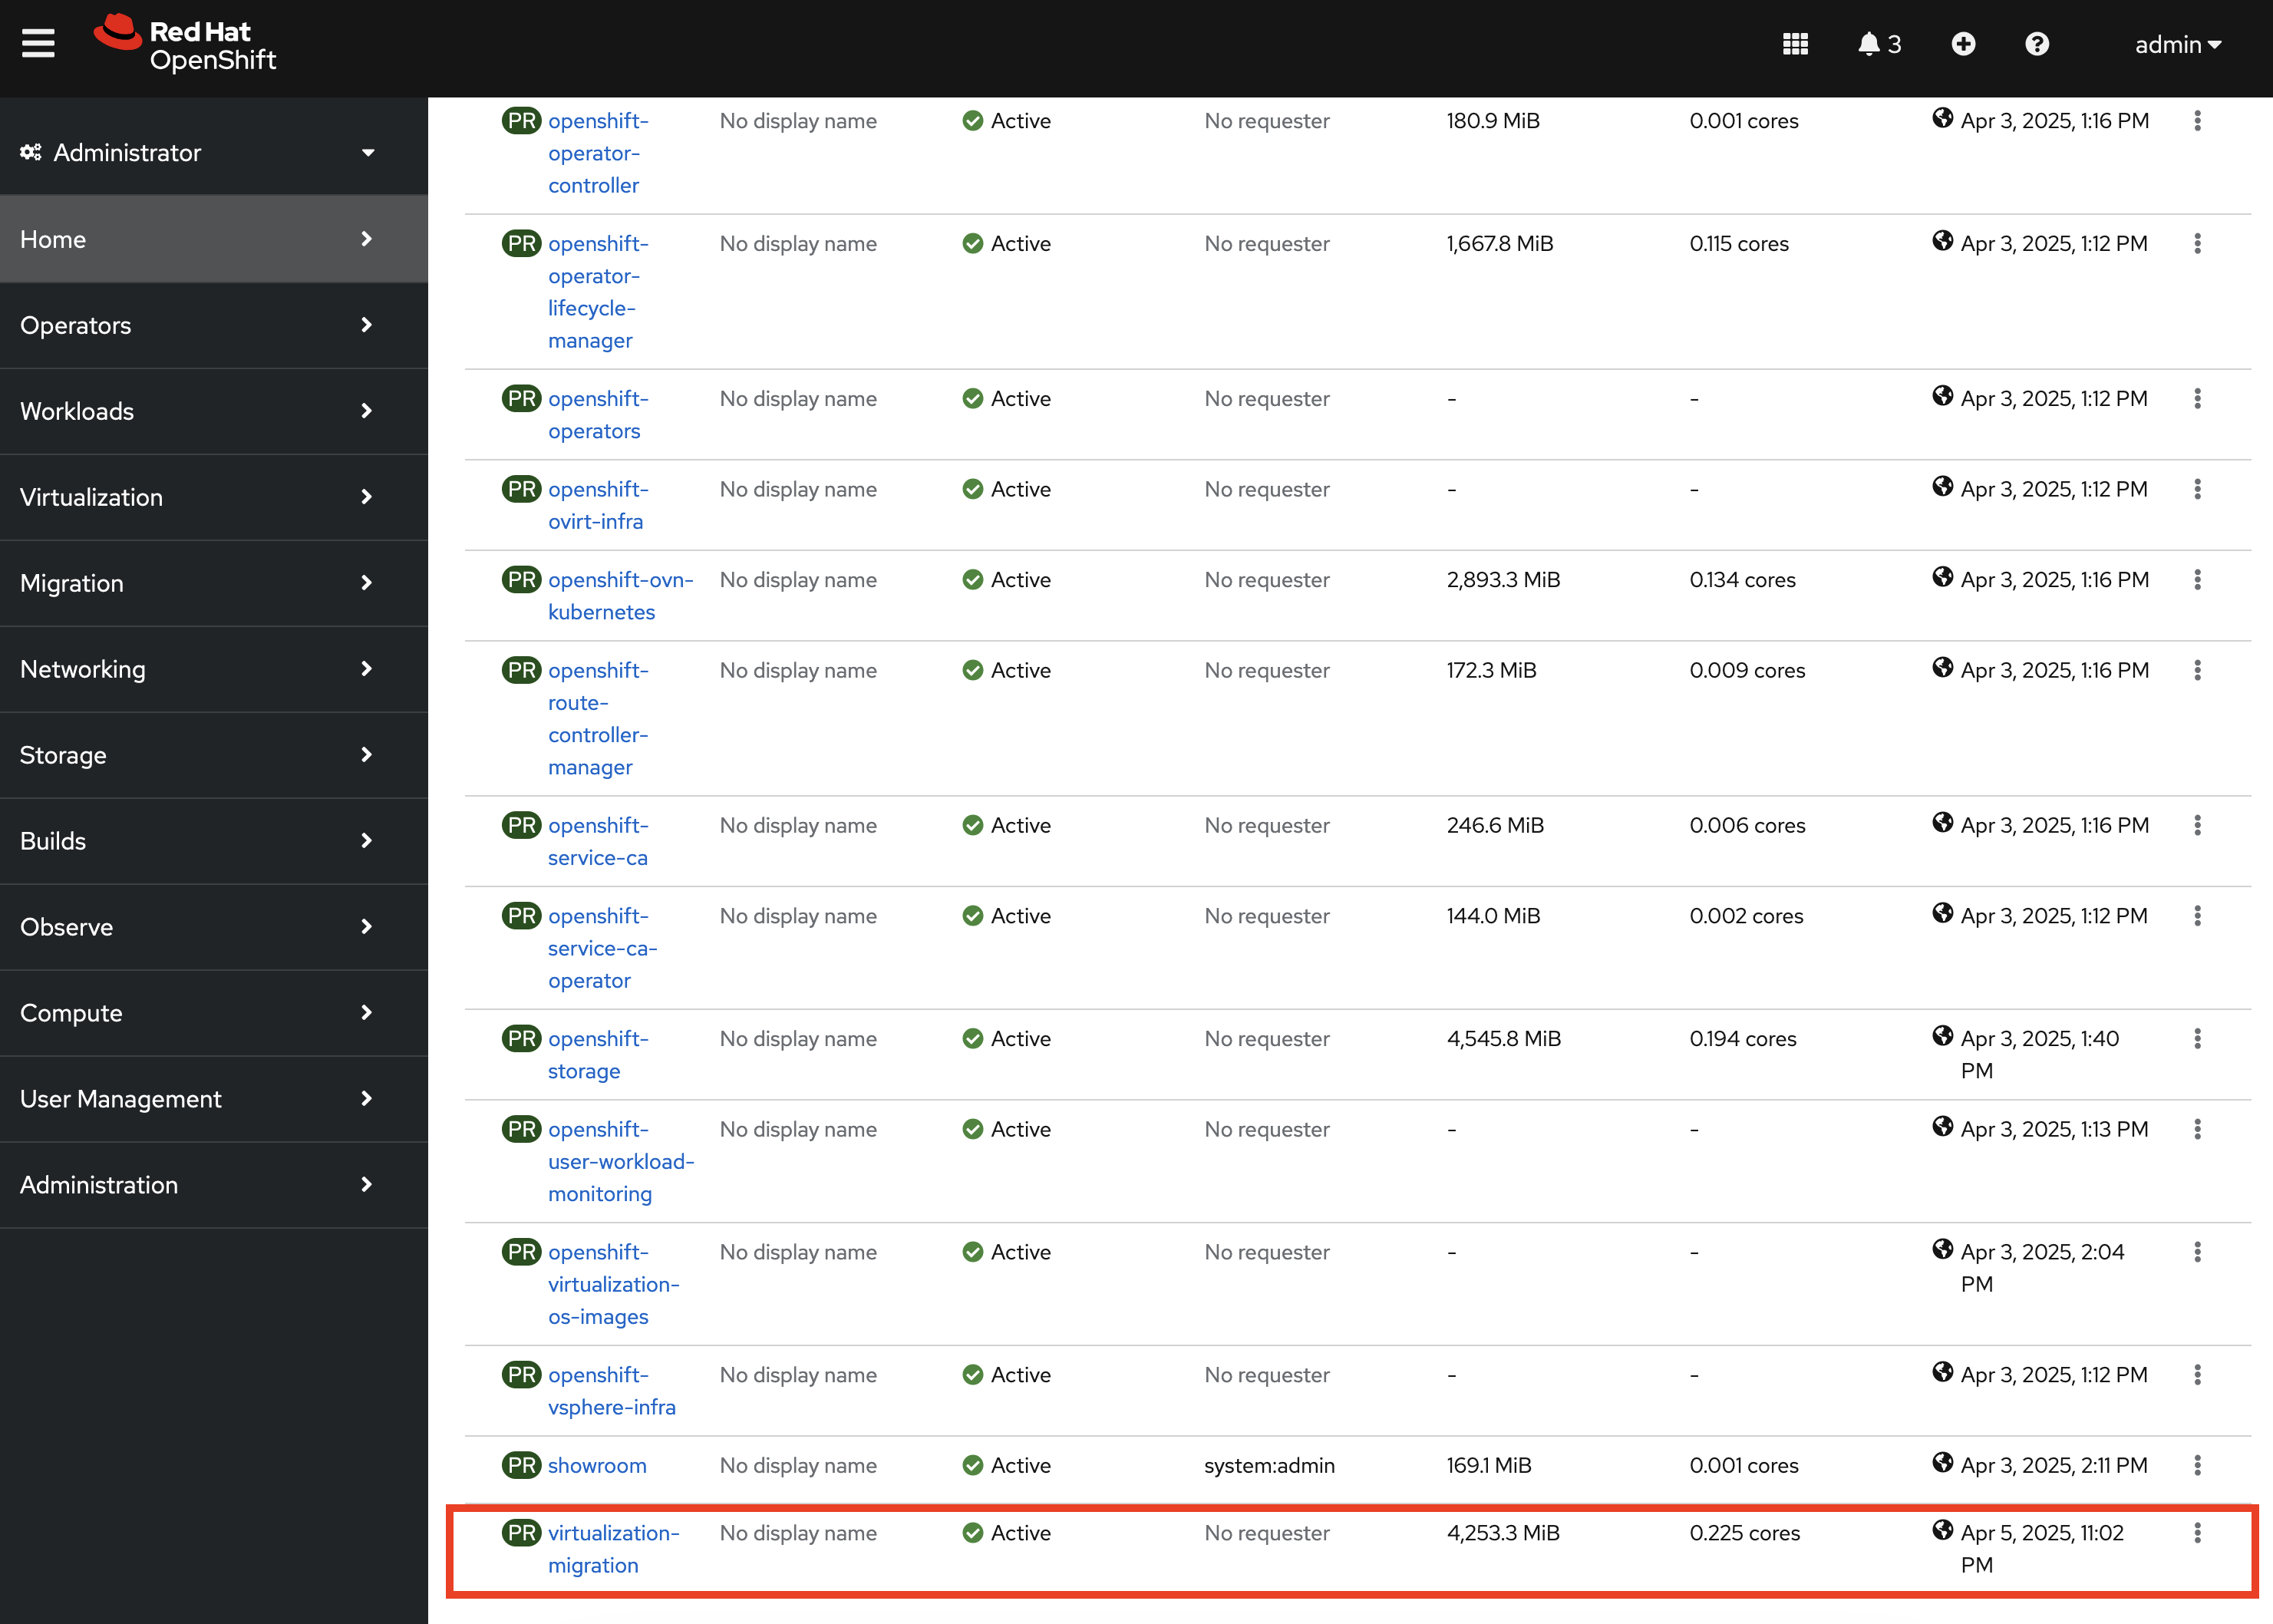
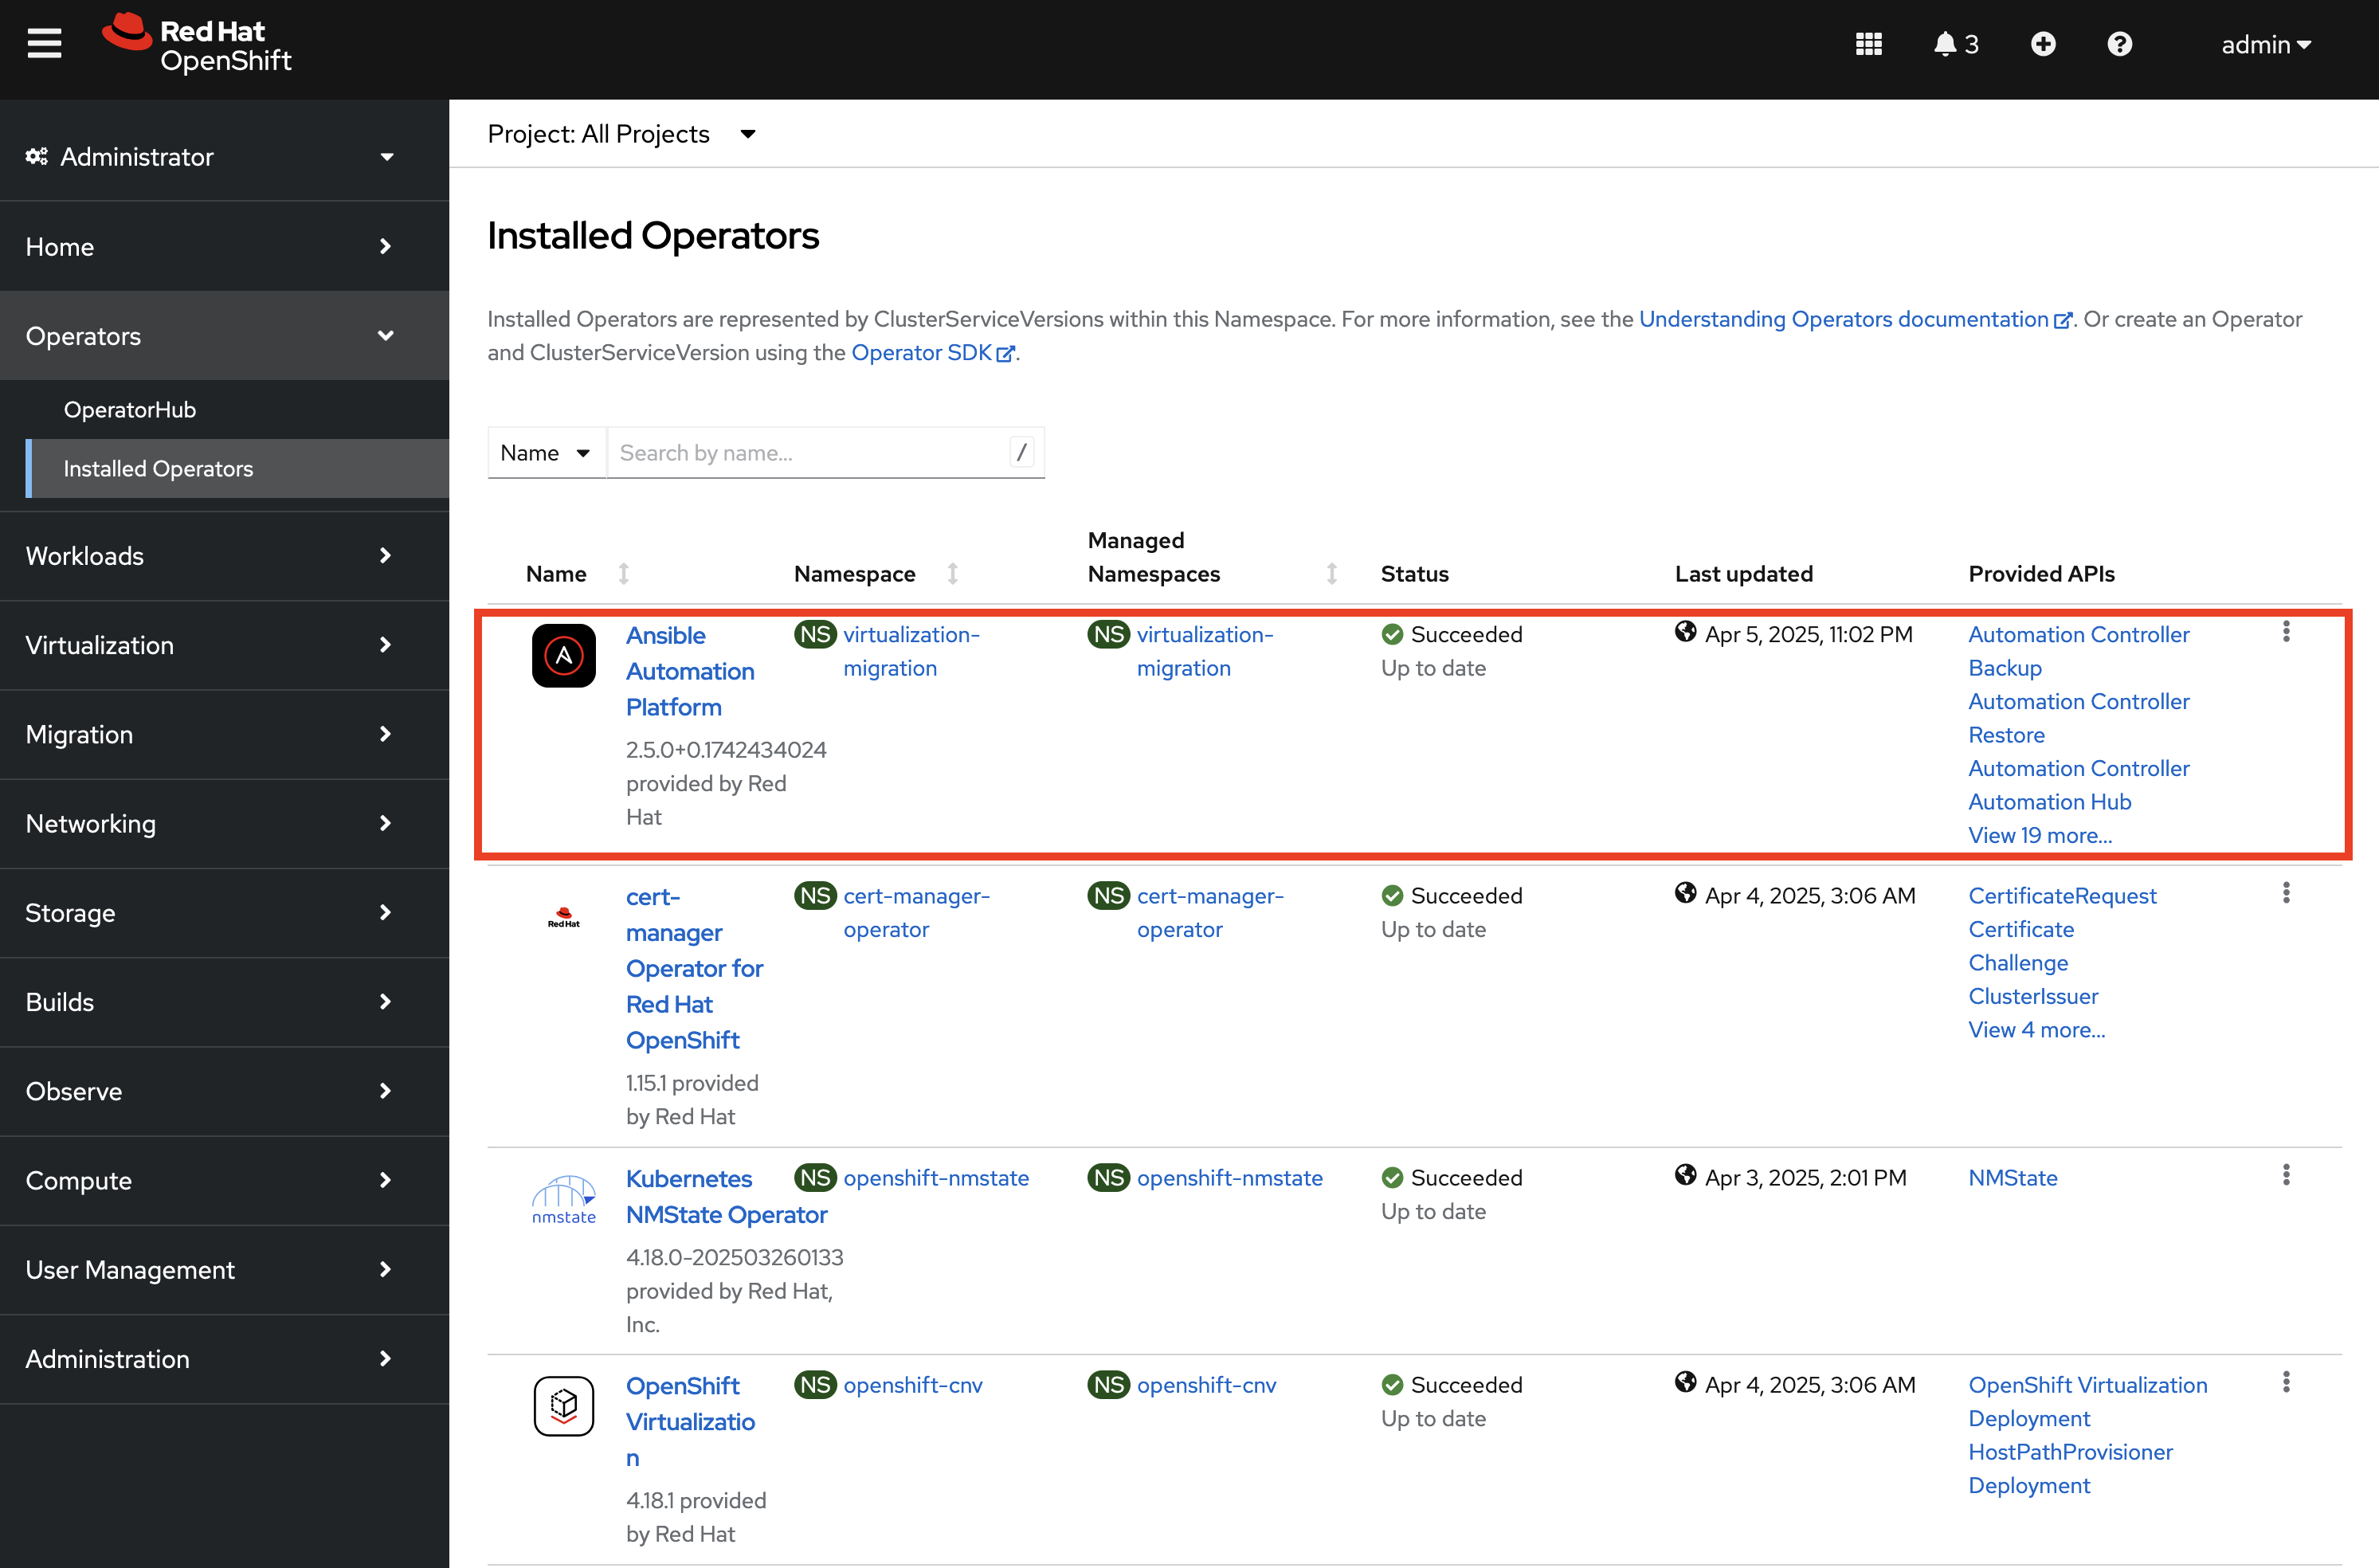
Next, select Operators from the left hand navigation bar and select Installed Operators.
Select the Ansible Automation Platform to view details related to the Operator.
Scroll over to the Ansible Automation Platform tab to list all of the Ansible Automation Platform instances in the virtualization-migration Project.
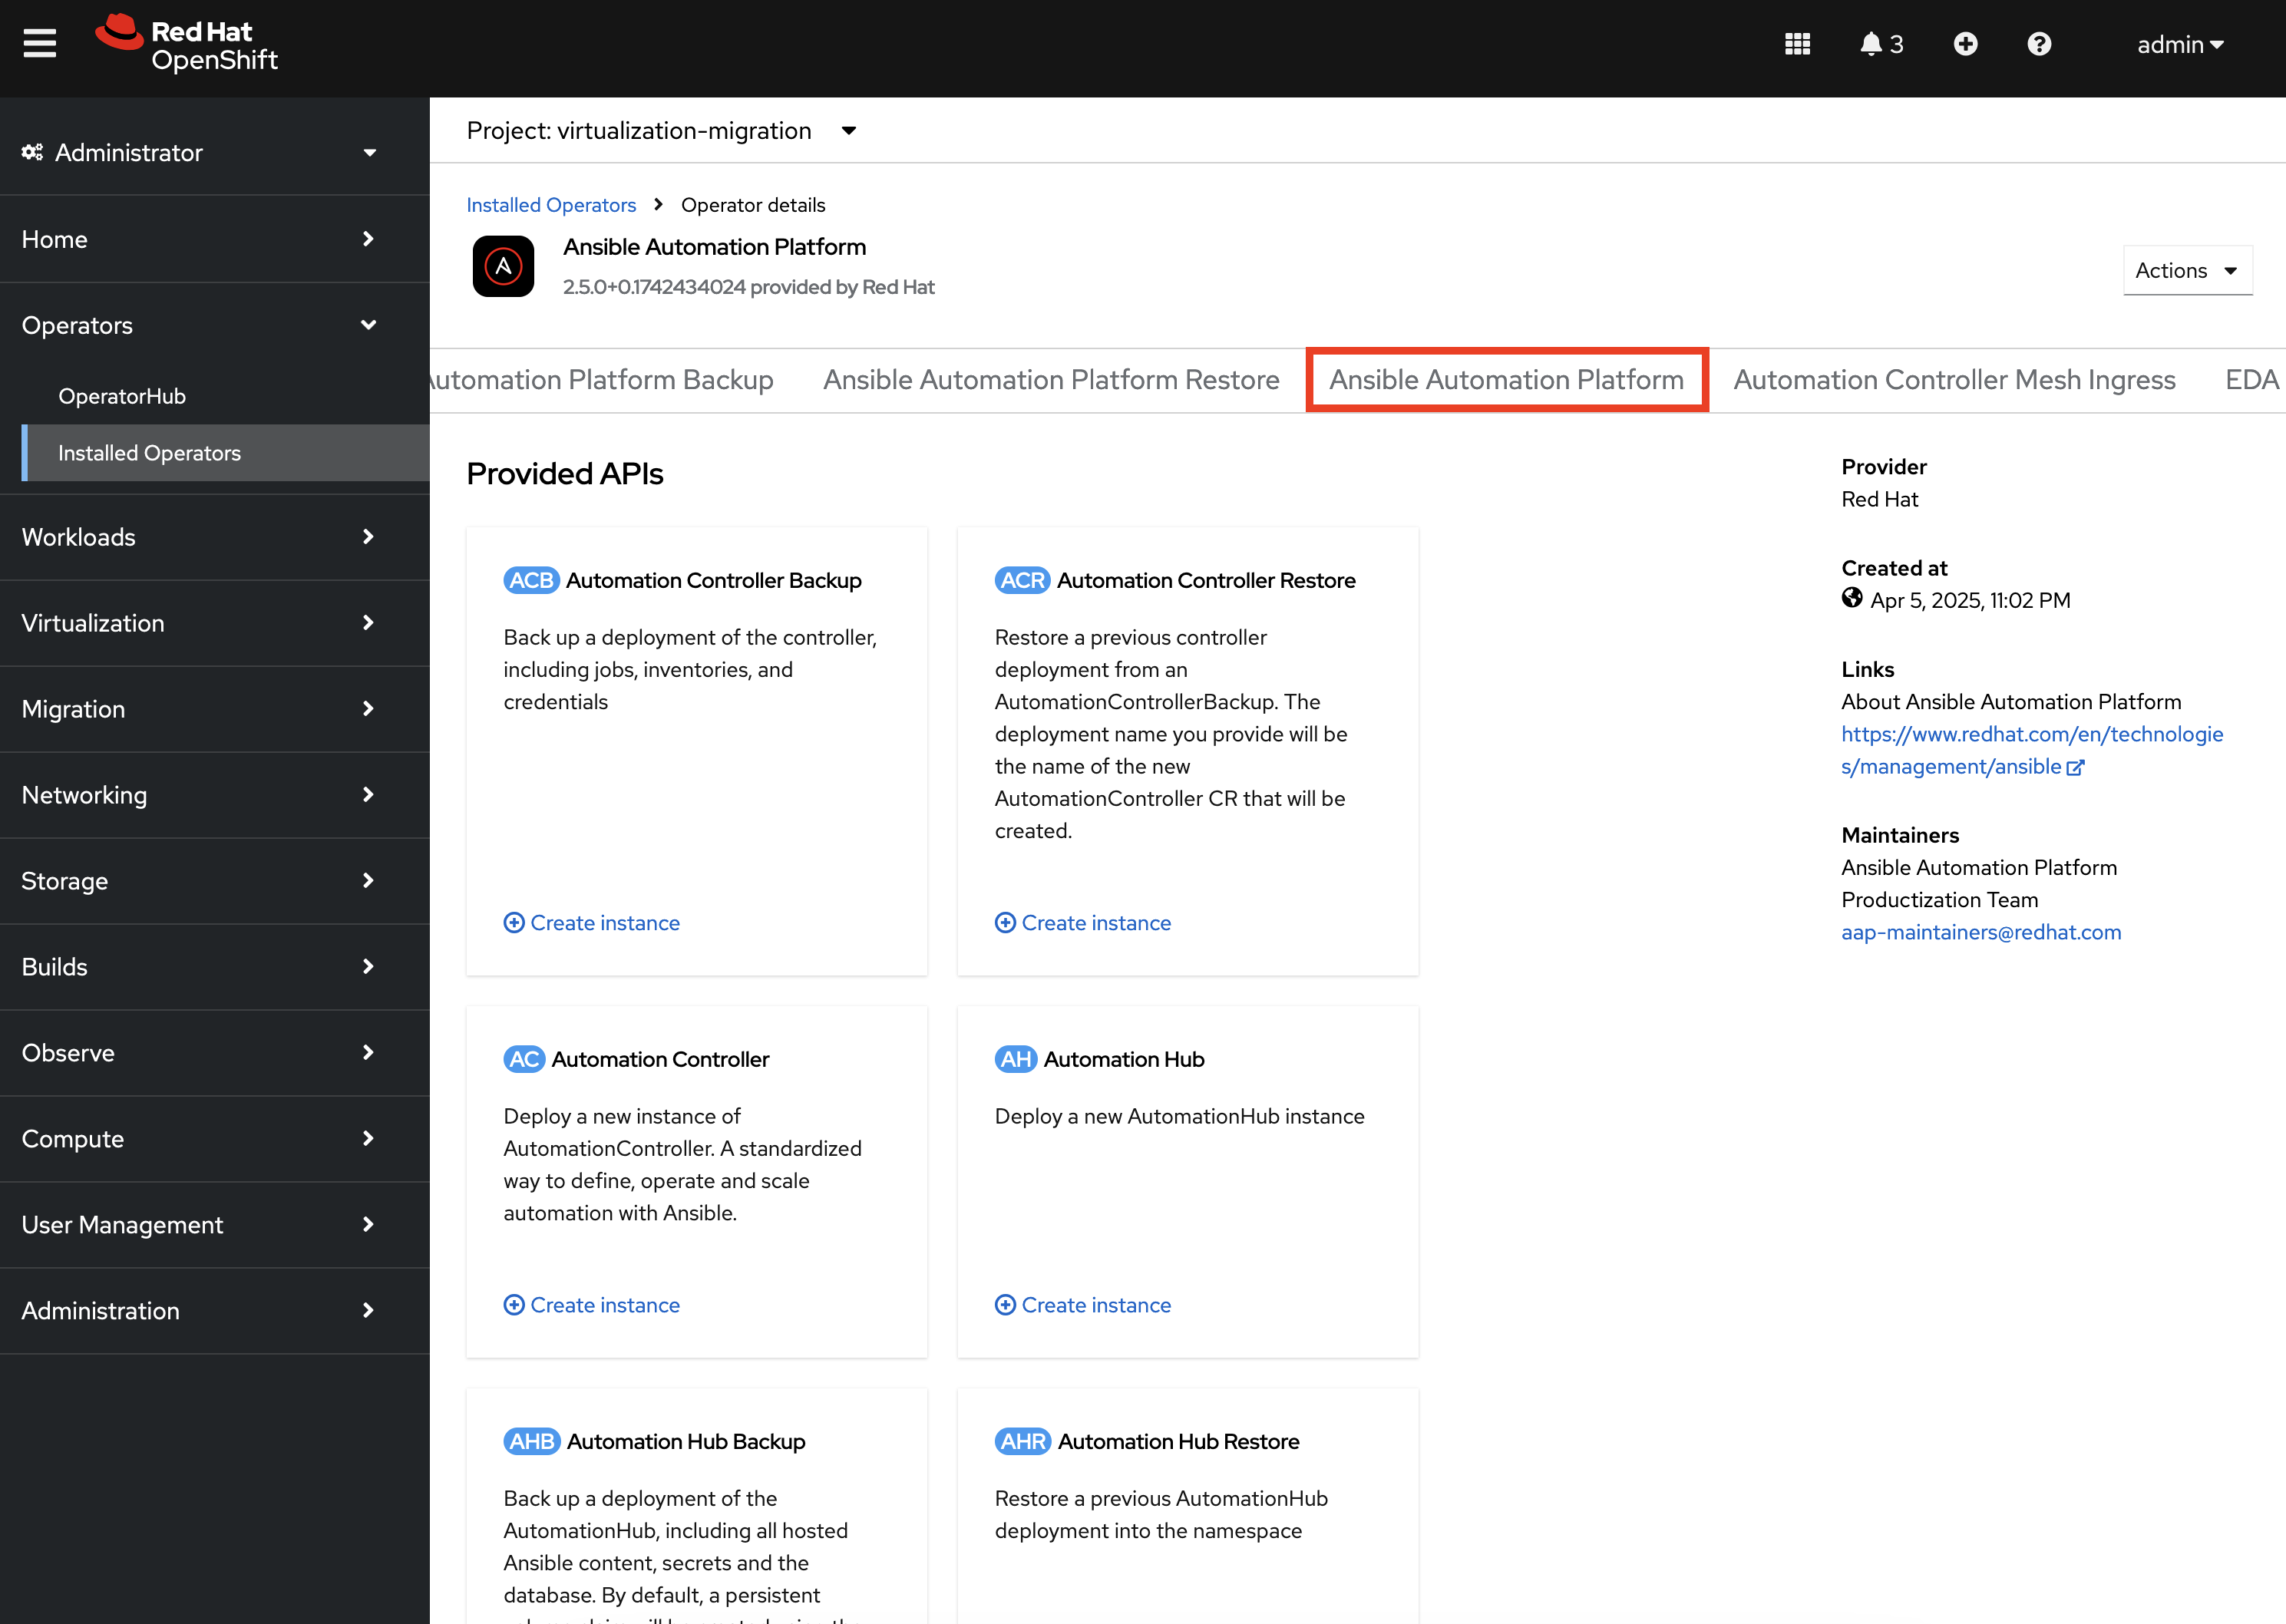
Select the aap-etx instance to view details related to the instance that was provisioned.

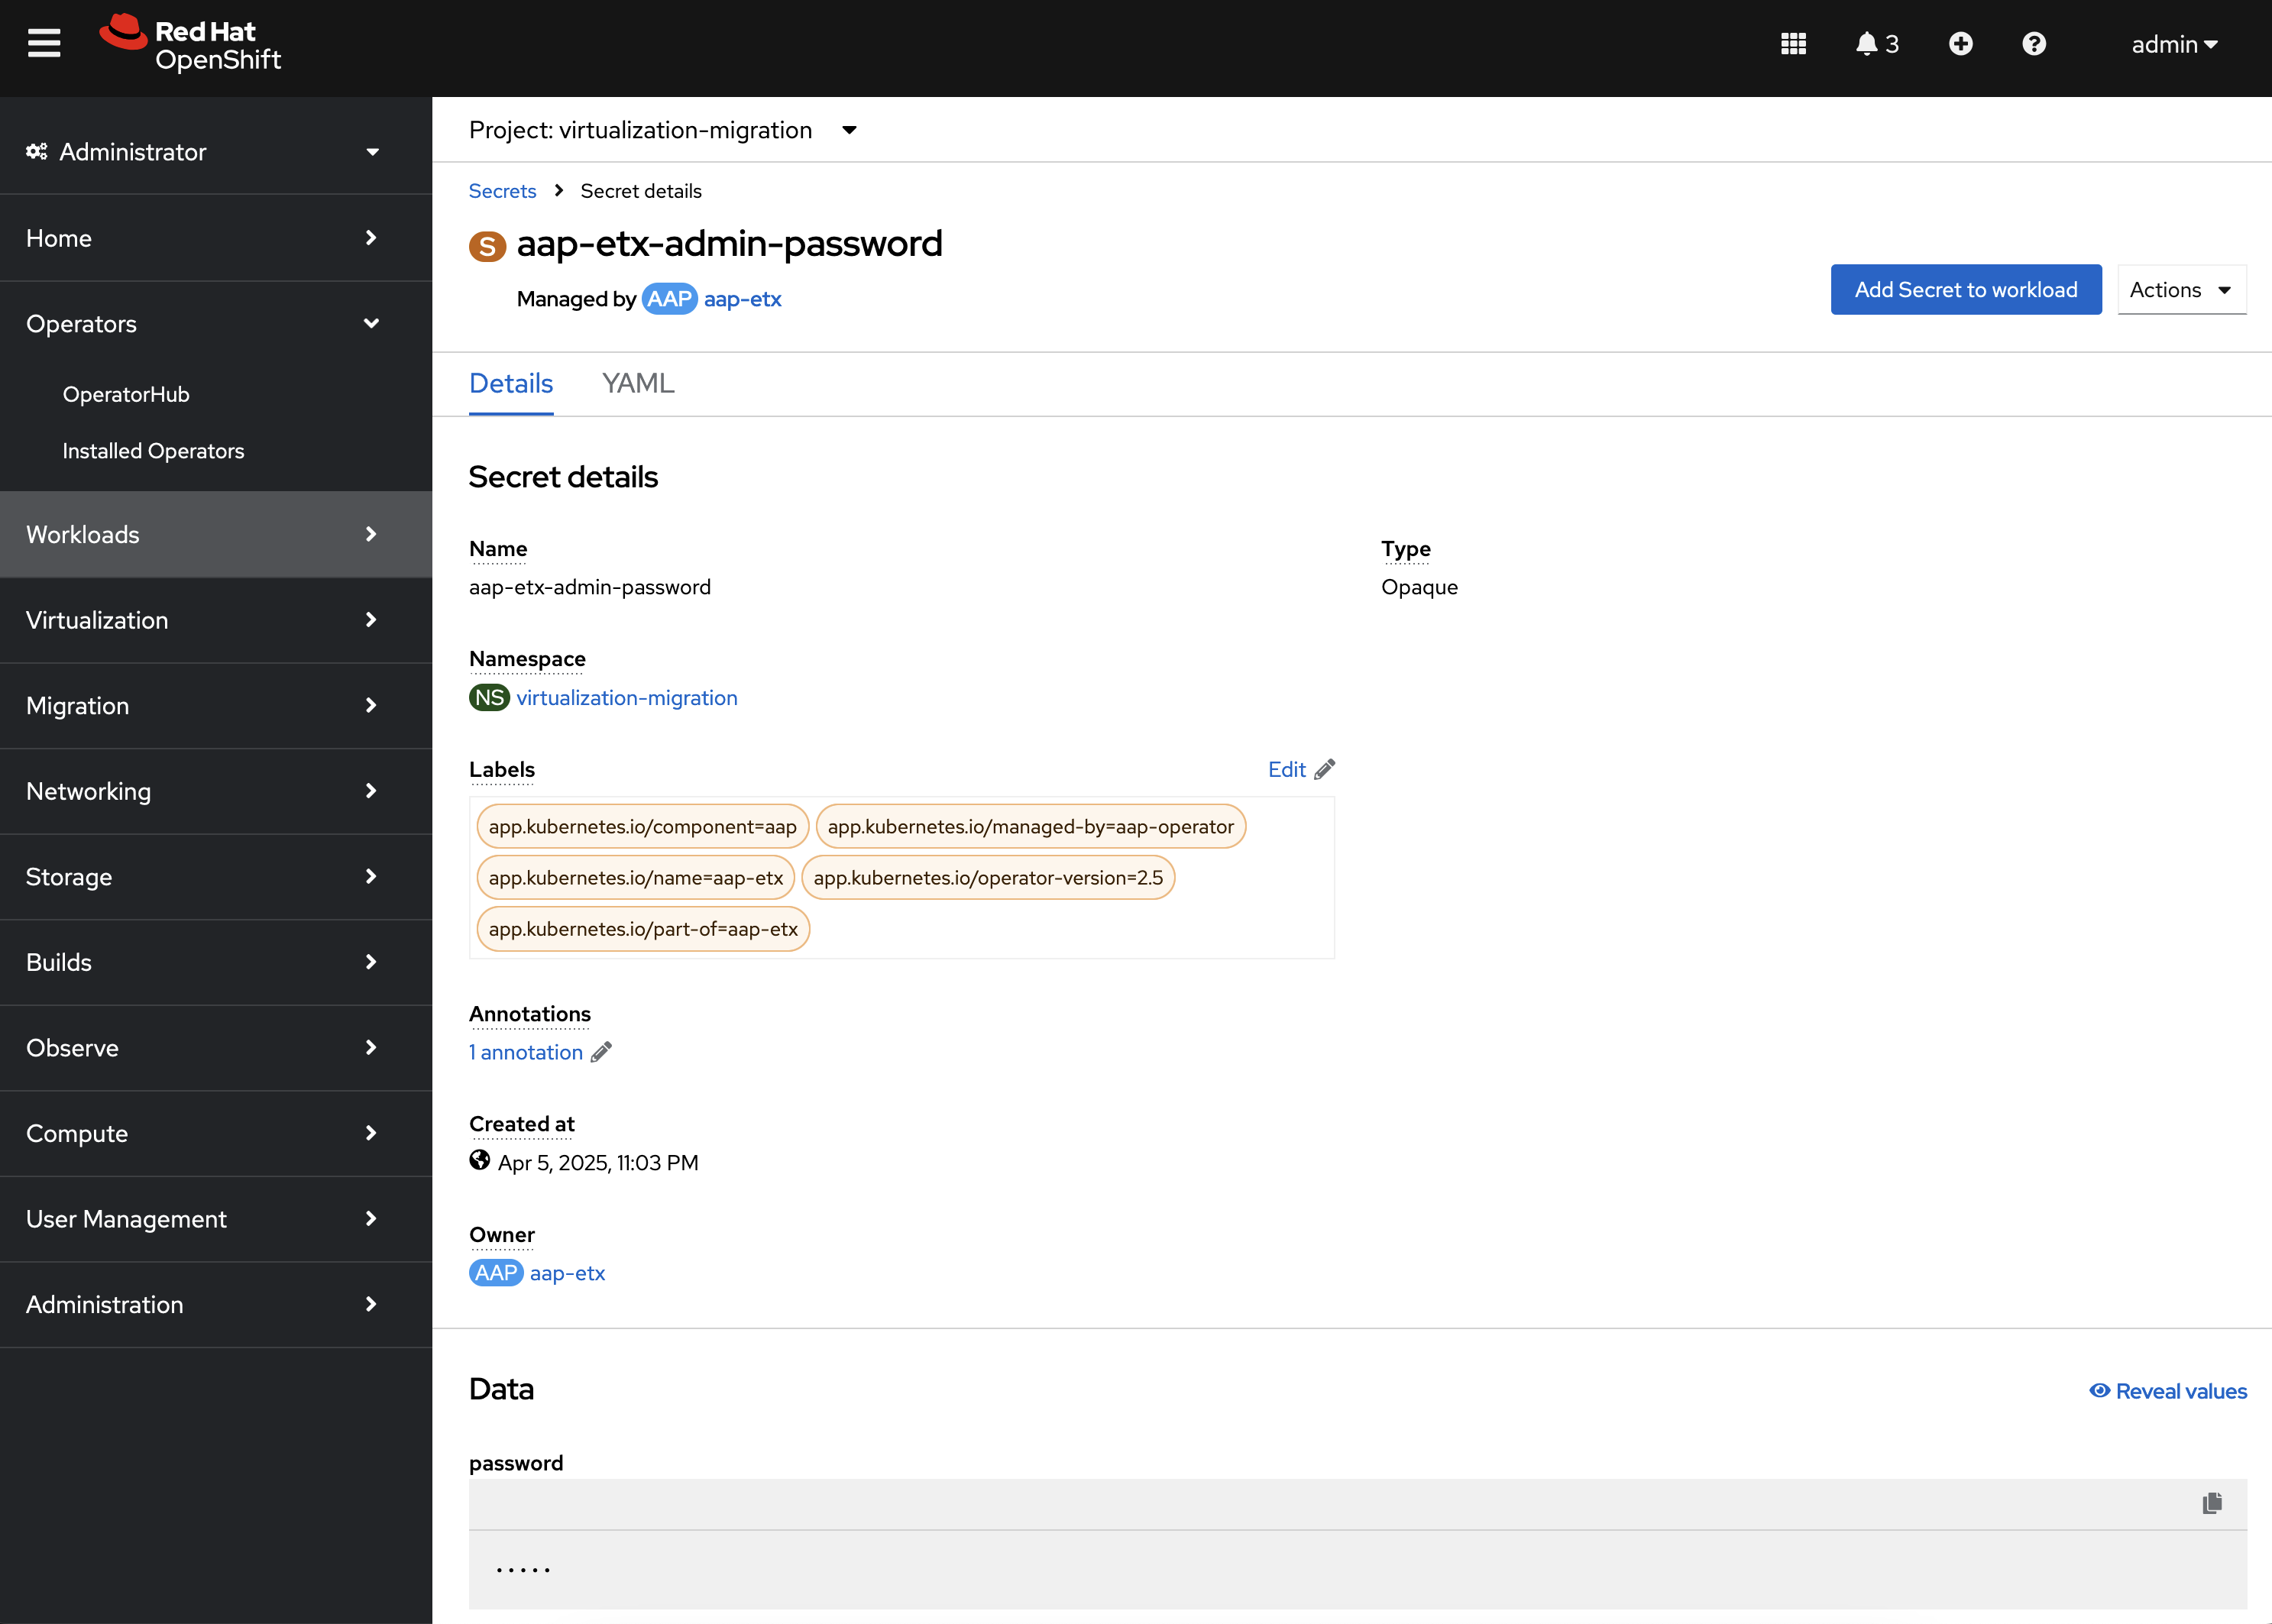
Under Gateway Admin Password, select the aap-etx-admin-password Secret which contains the credentials to authenticate to Ansible Automation Platform.
On the aap-etx-admin-password Secret page, click the Reveal values link associated with the password property and copy the value so that it can be used to authenticate to Ansible automation Platform.
Go back to the aap-etx AnsibleAutomationPlatform instance and navigate to Ansible Automation Platform by selecting the link underneath URL.
Login using admin as the username and paste the password copied using the value obtained from the aap-etx-admin-password Secret.
Exploring Ansible Automation Platform
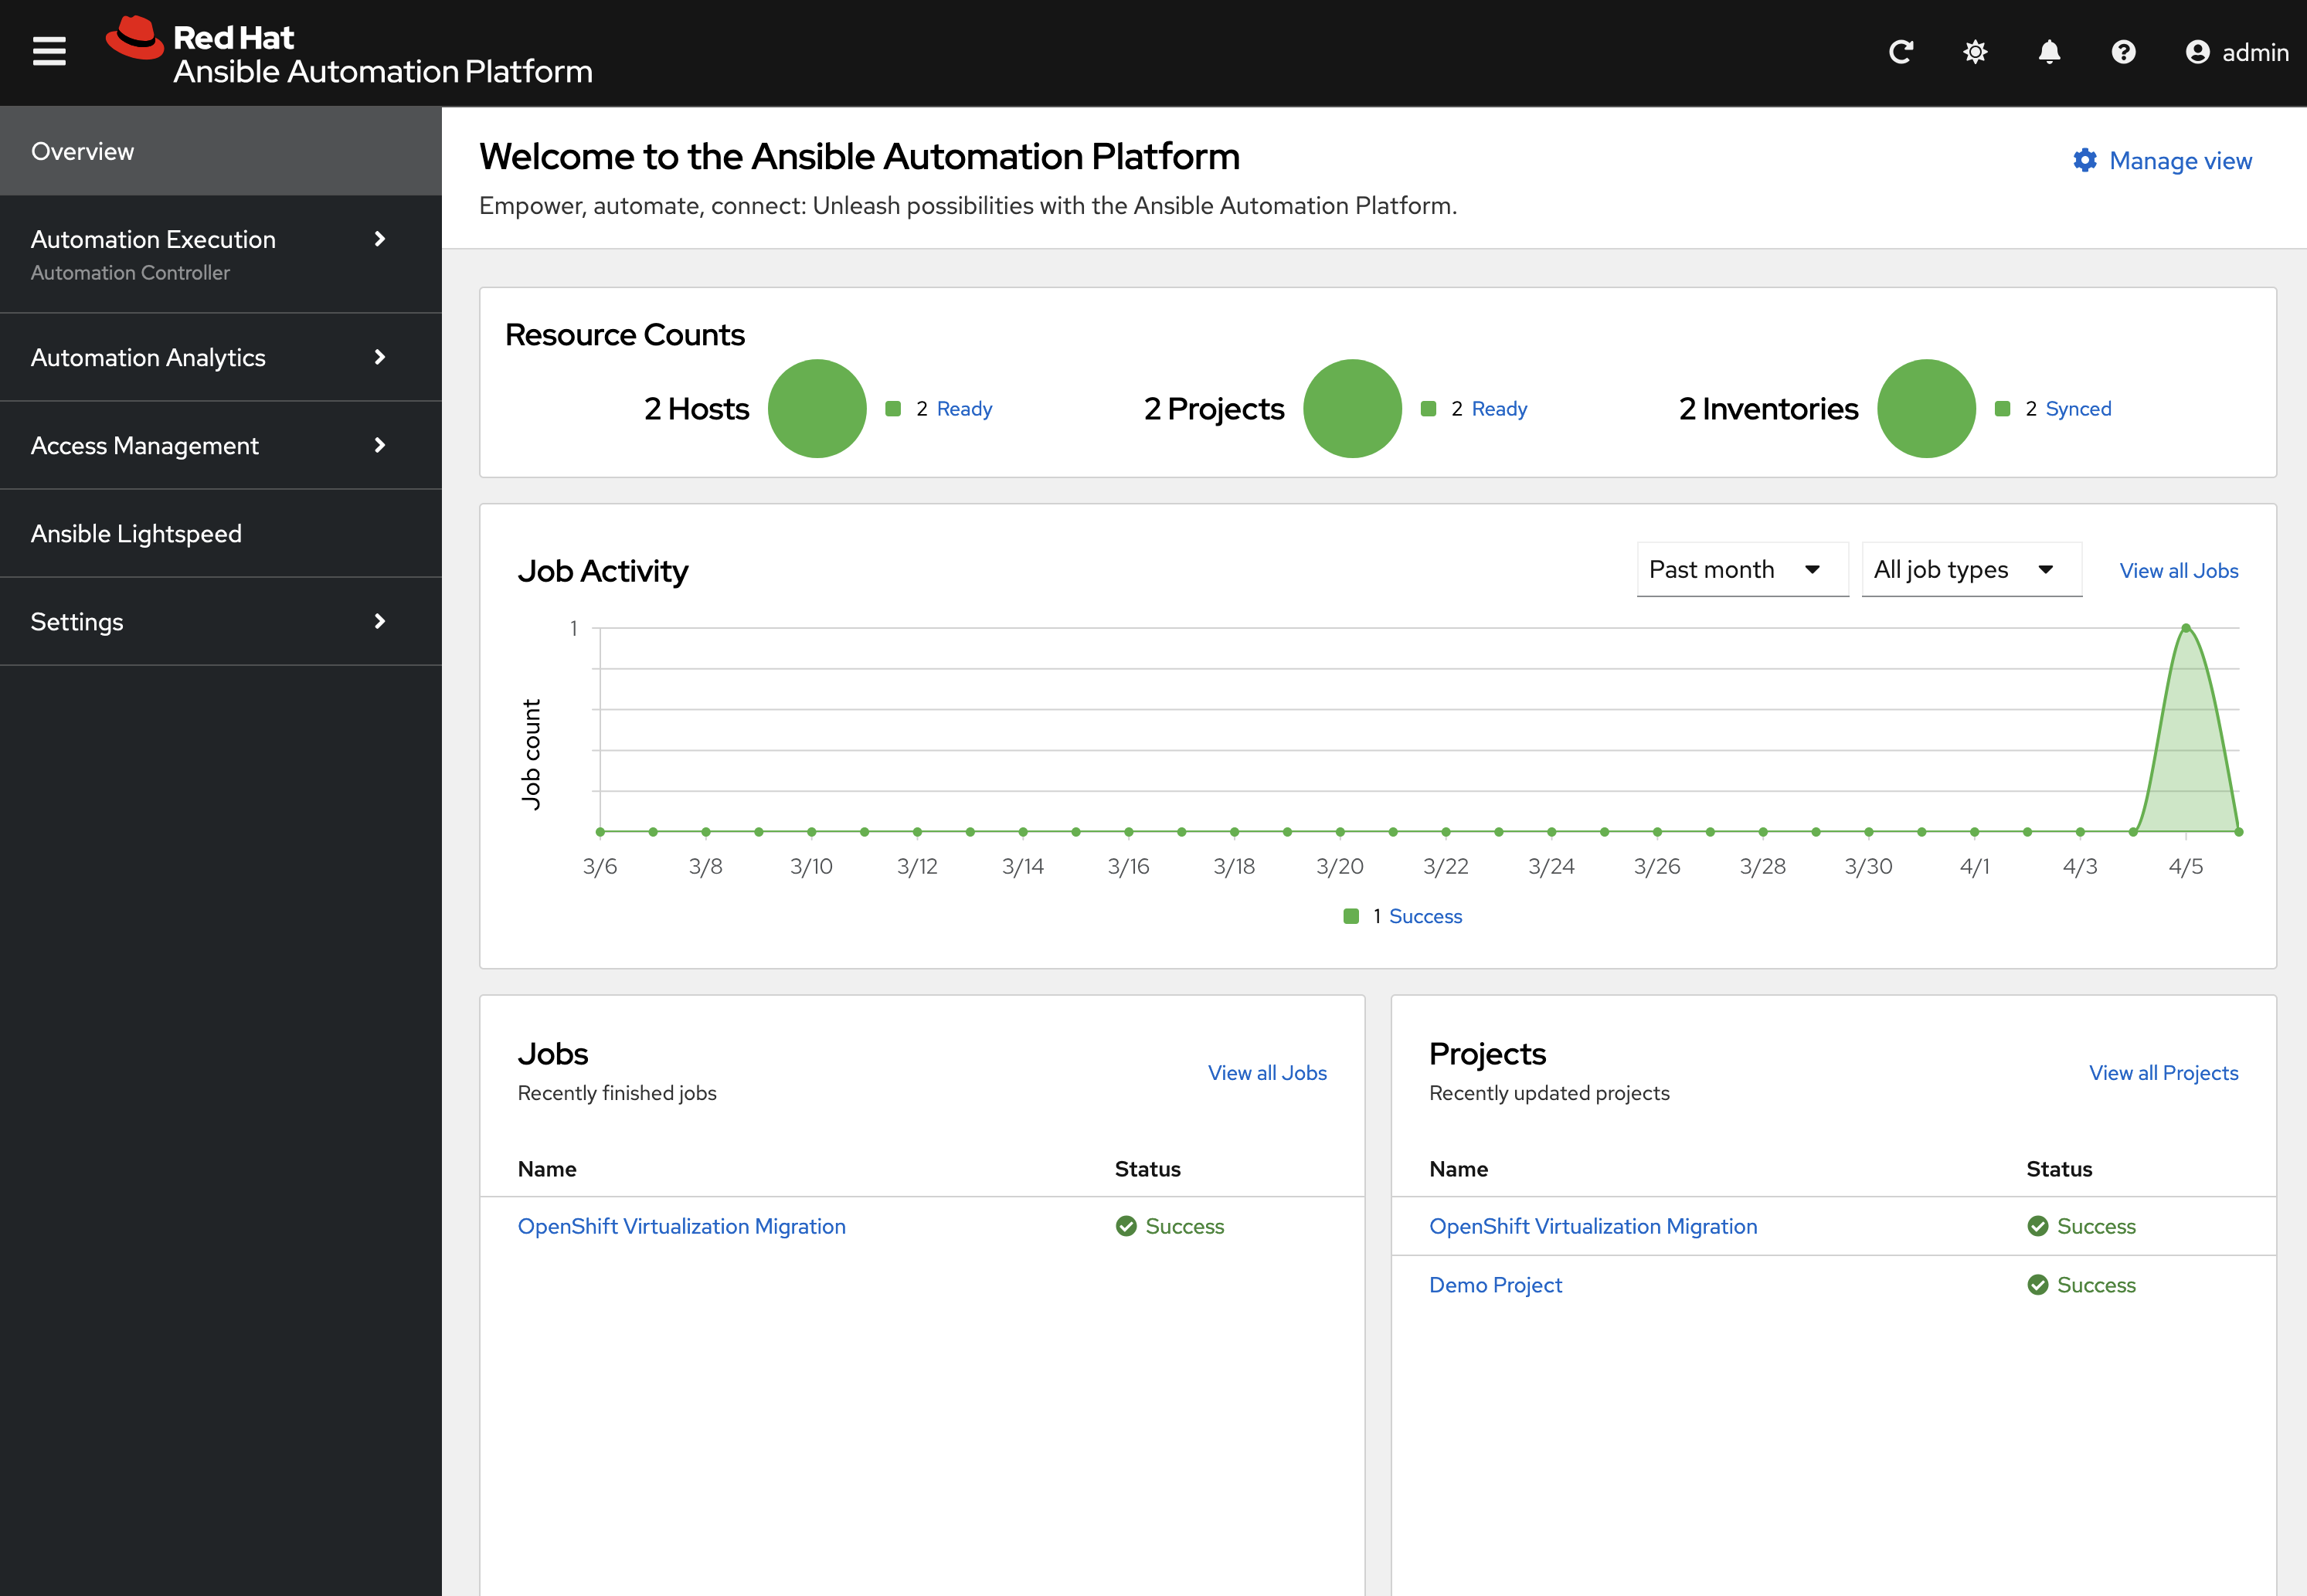
Once authenticated to Ansible Automation Platform, let’s take a moment to explore the Ansible for OpenShift Virtualization Migration related content that was populated within the instance.
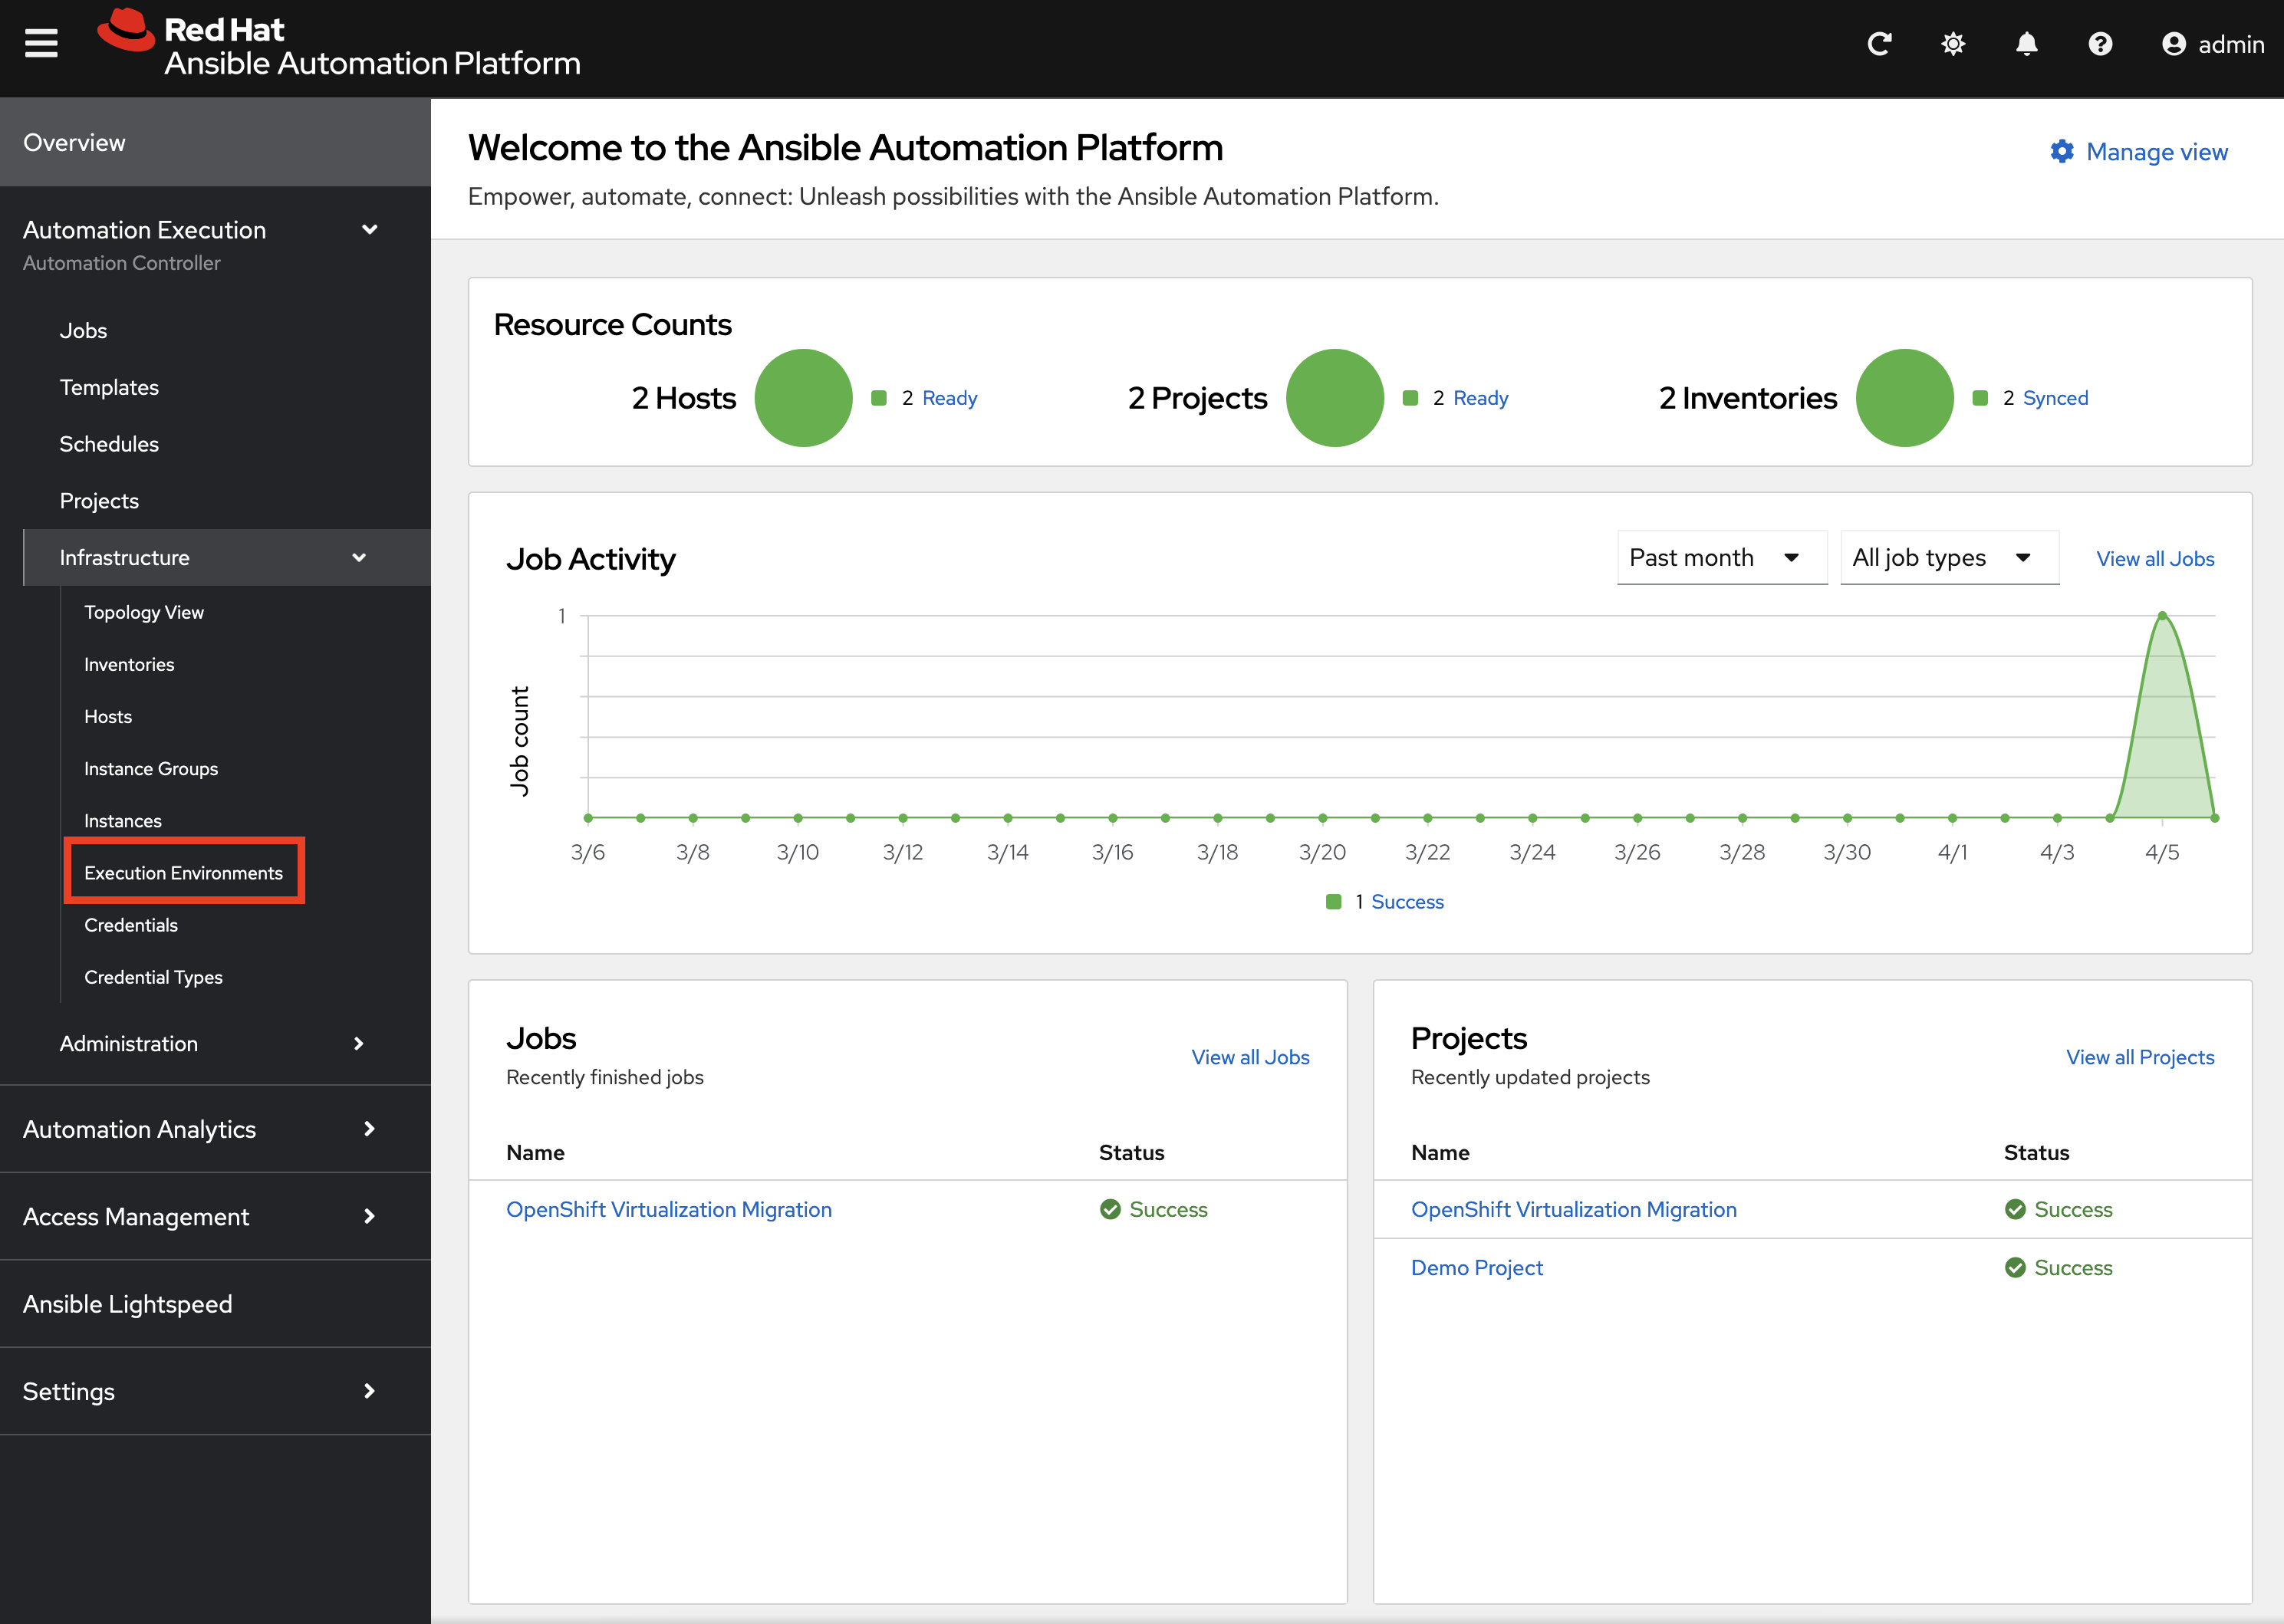
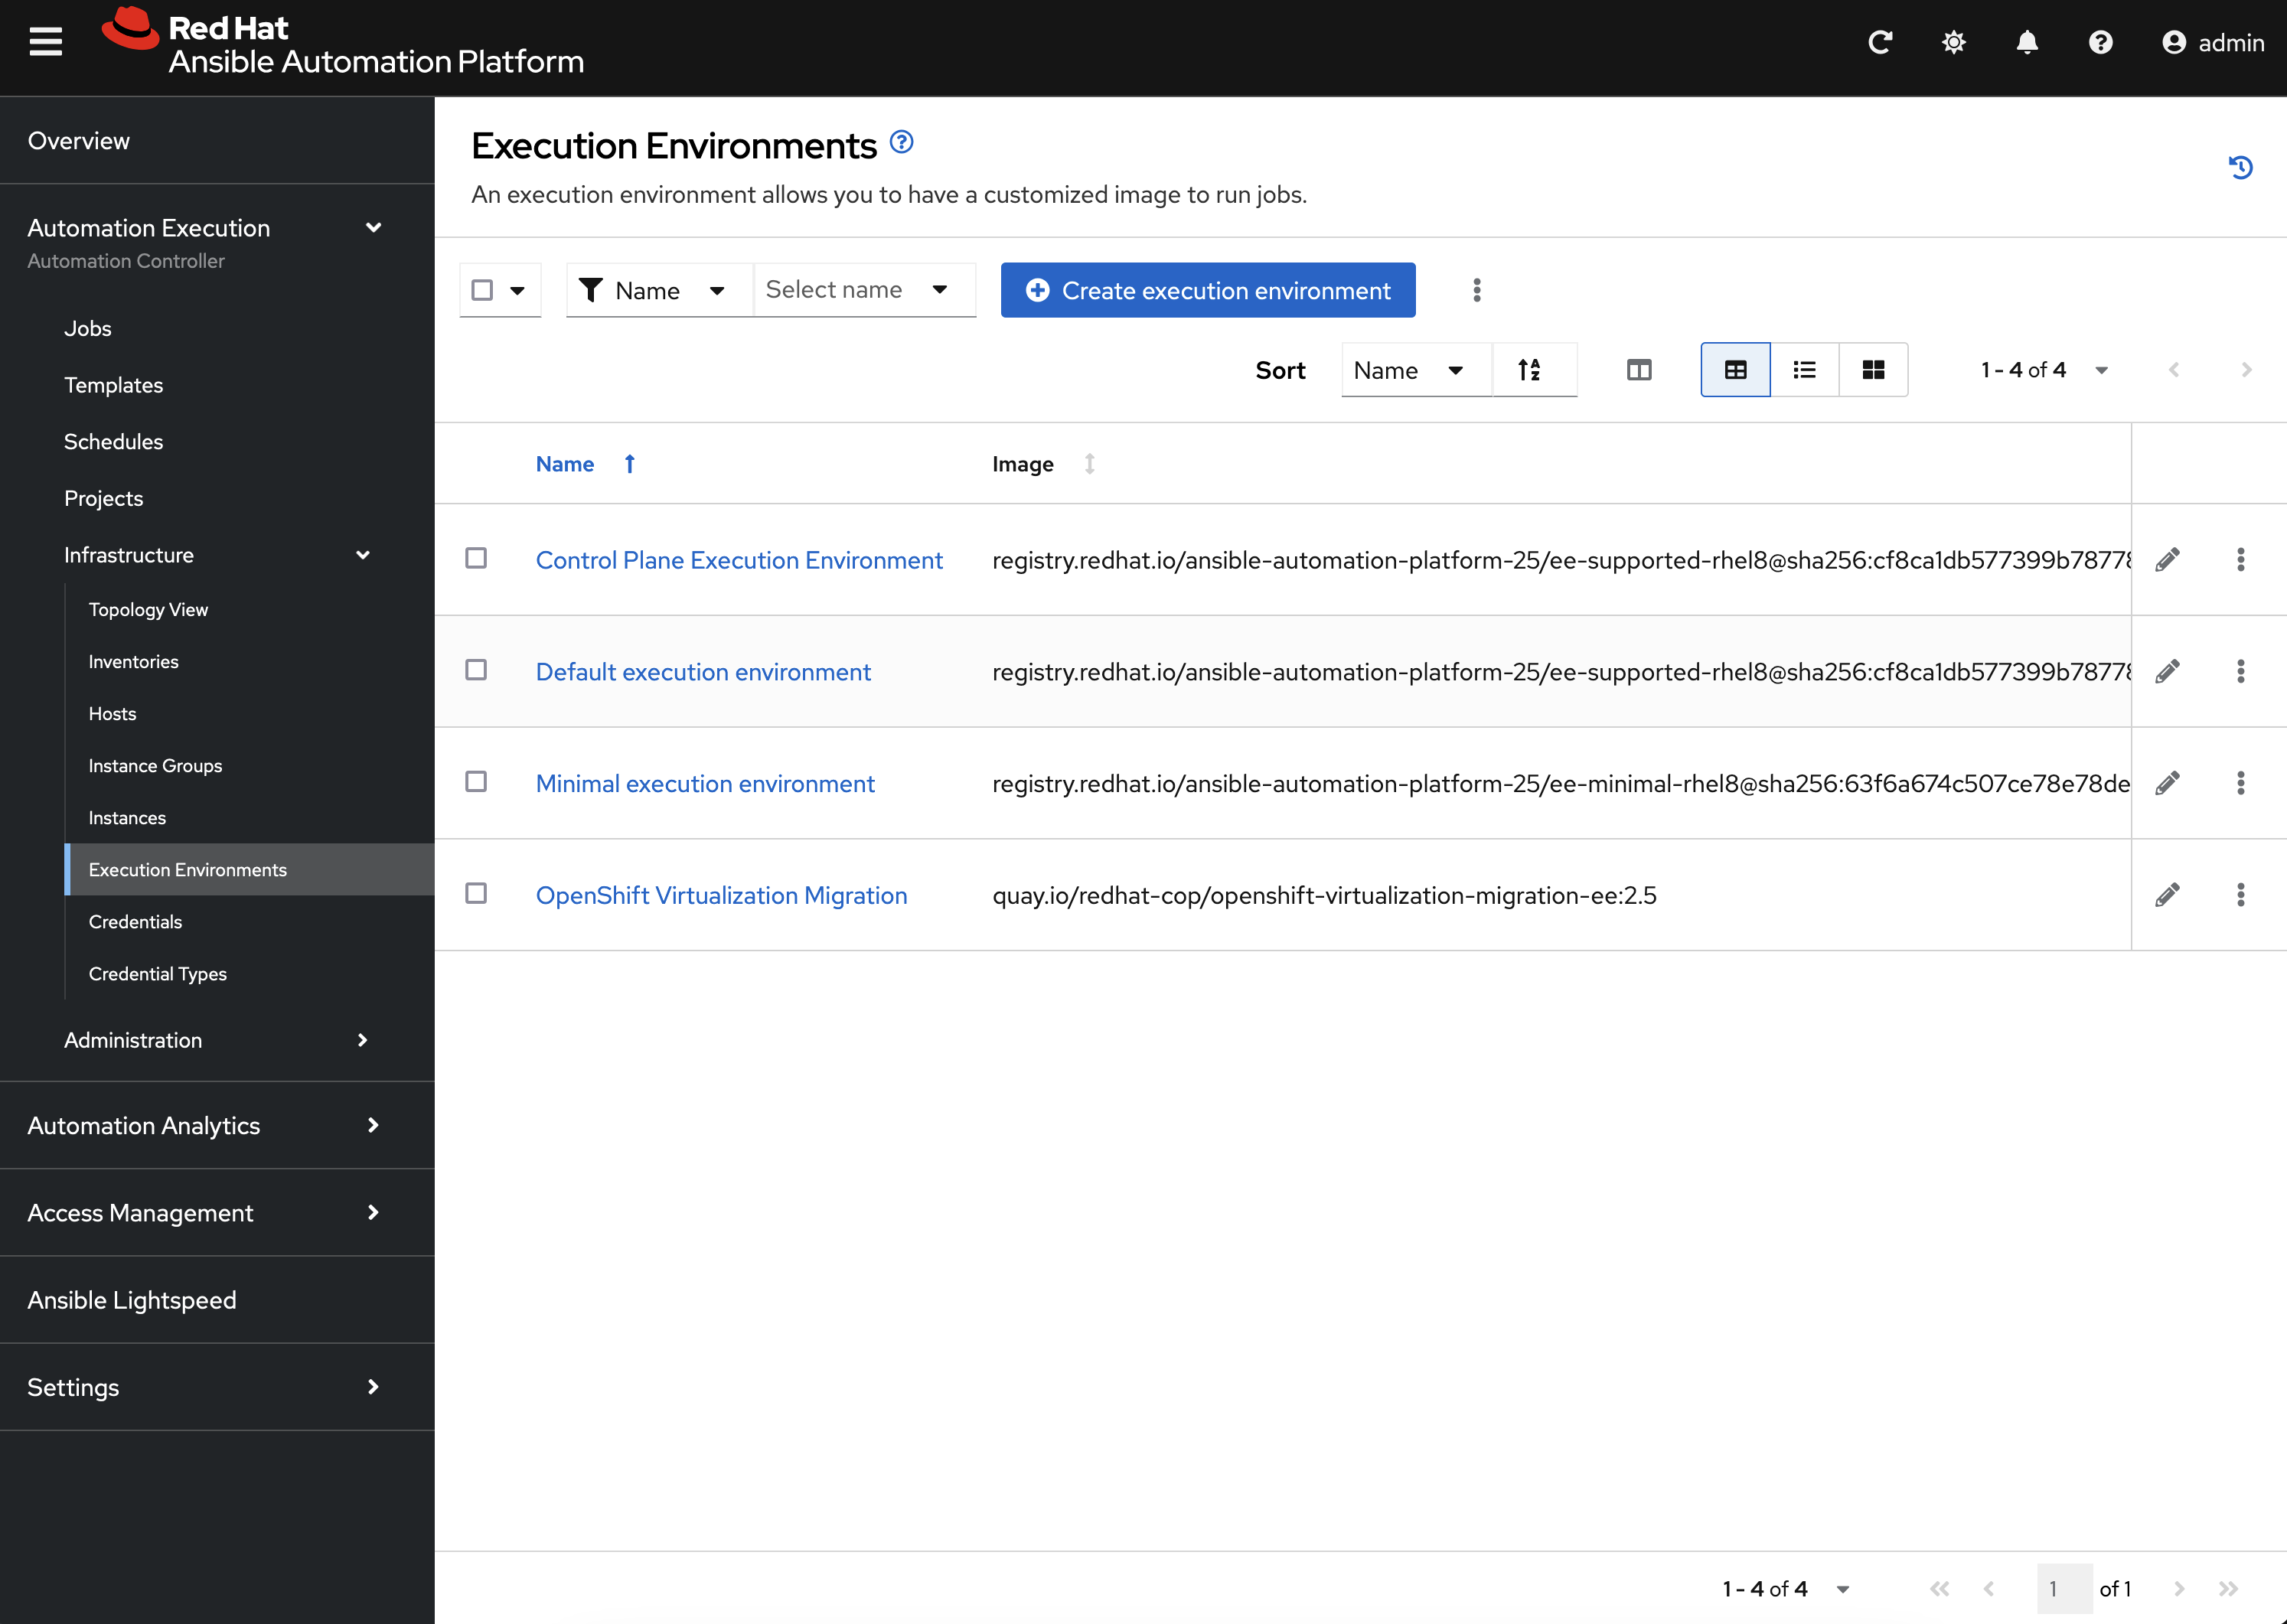
First, the same Ansible Execution Environment that was used to facilitate the deployment of the Ansible for OpenShift Virtualization Migration has been added and will be used to run related automation activities within the platform. This can be verified by expanding the Automation Execution section on the left hand navigation bar, expand Infrastructure, and then select Execution Environments.
OpenShift Virtualization Migration is the name of the Execution Environment that was added to the platform.
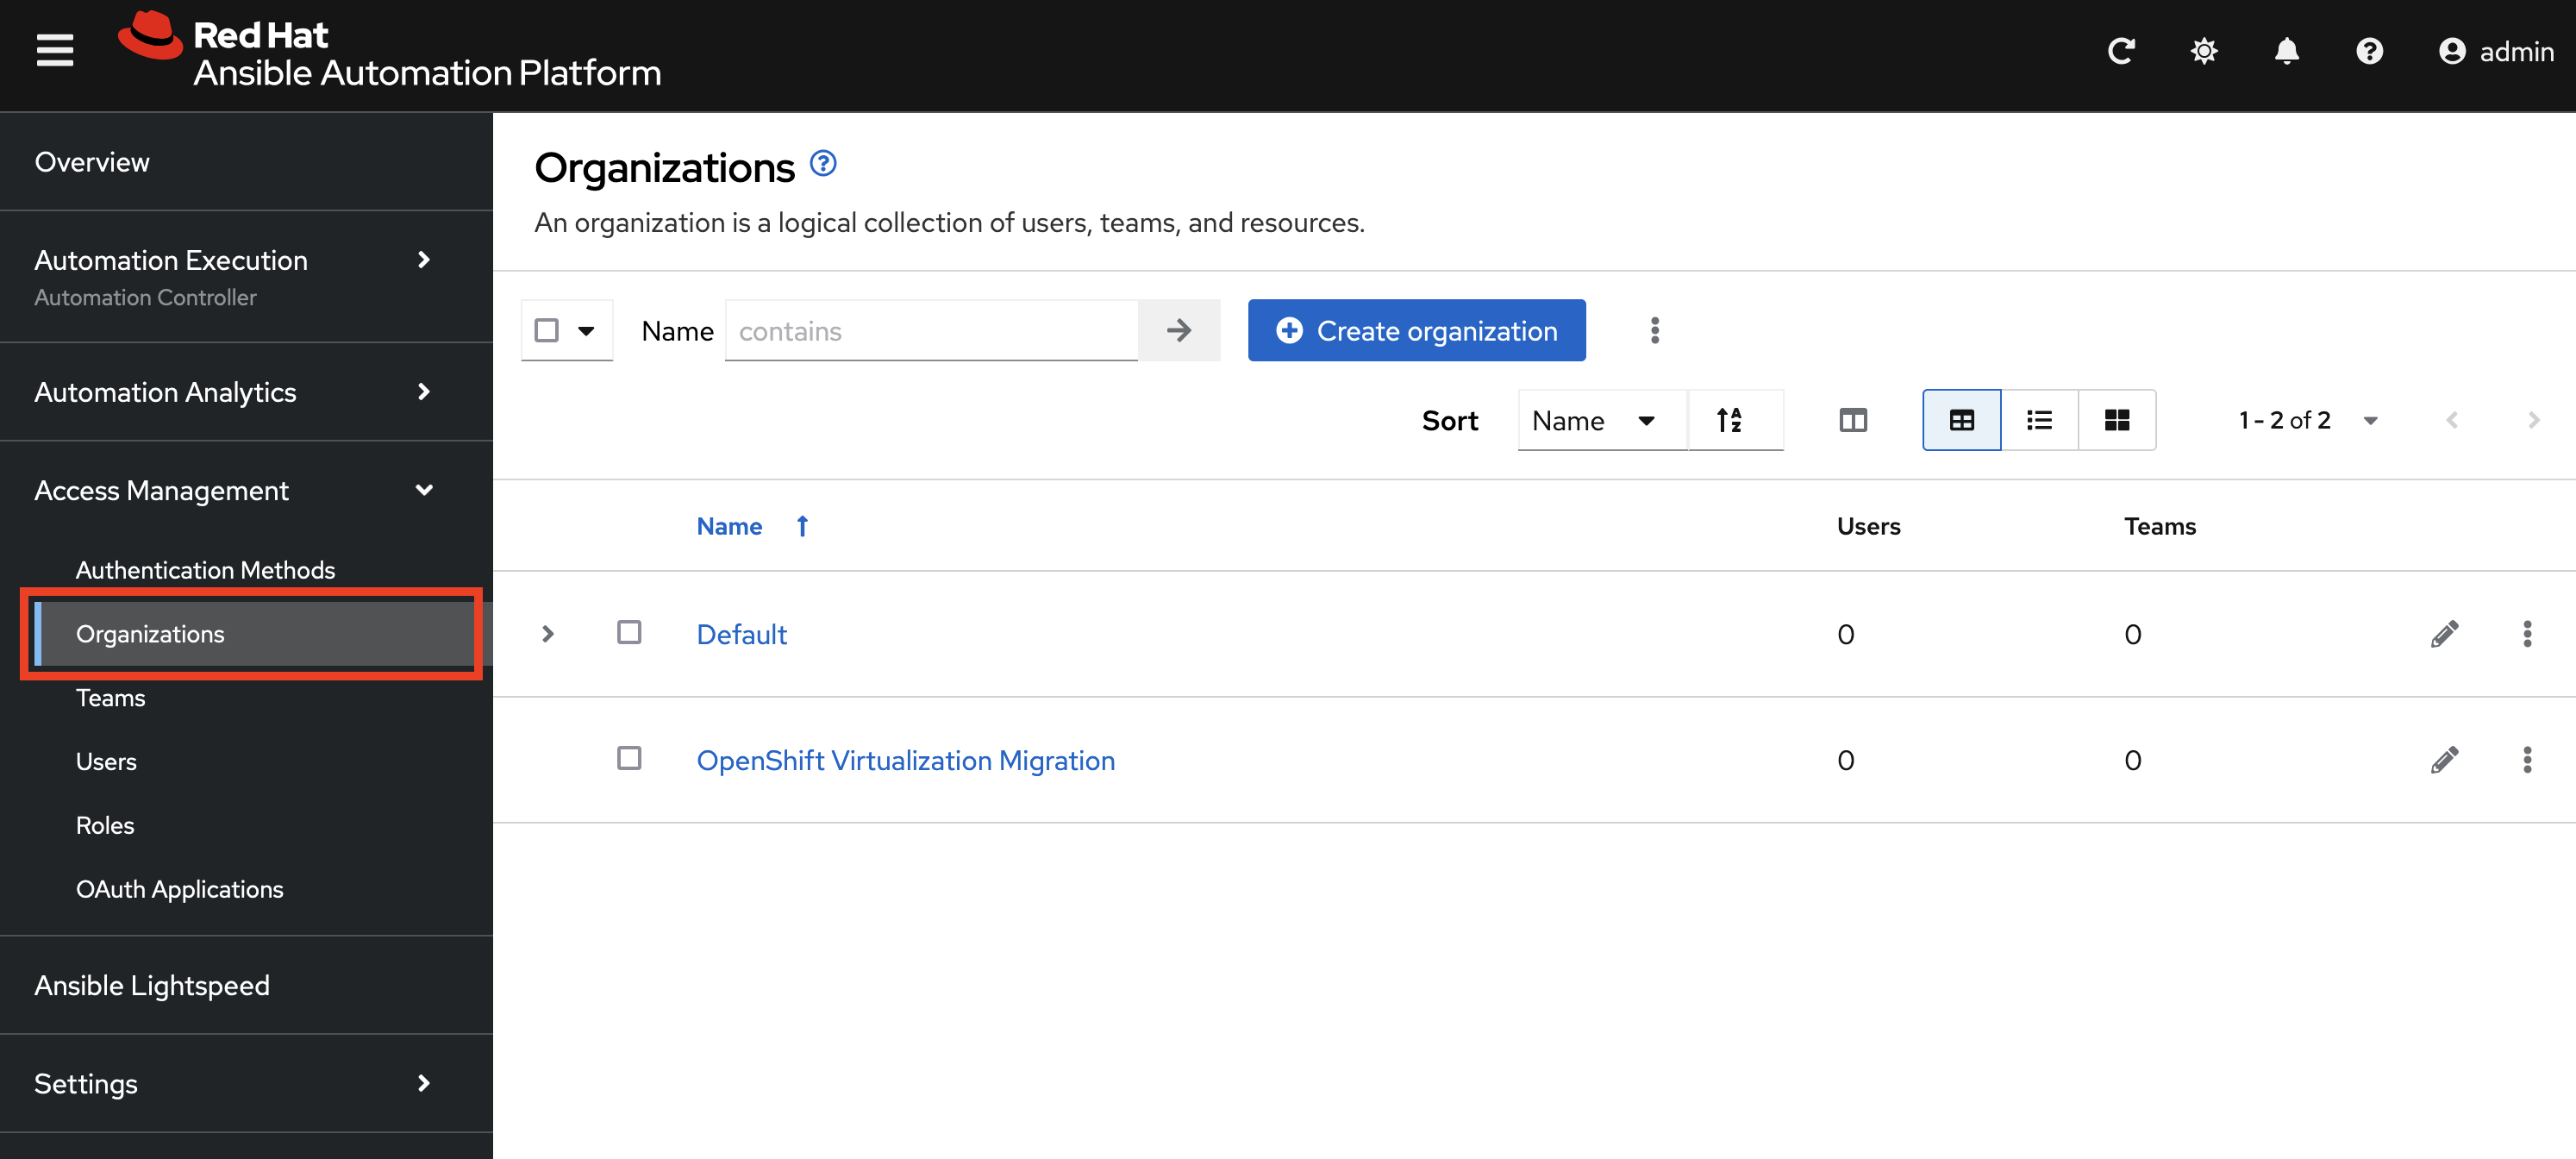
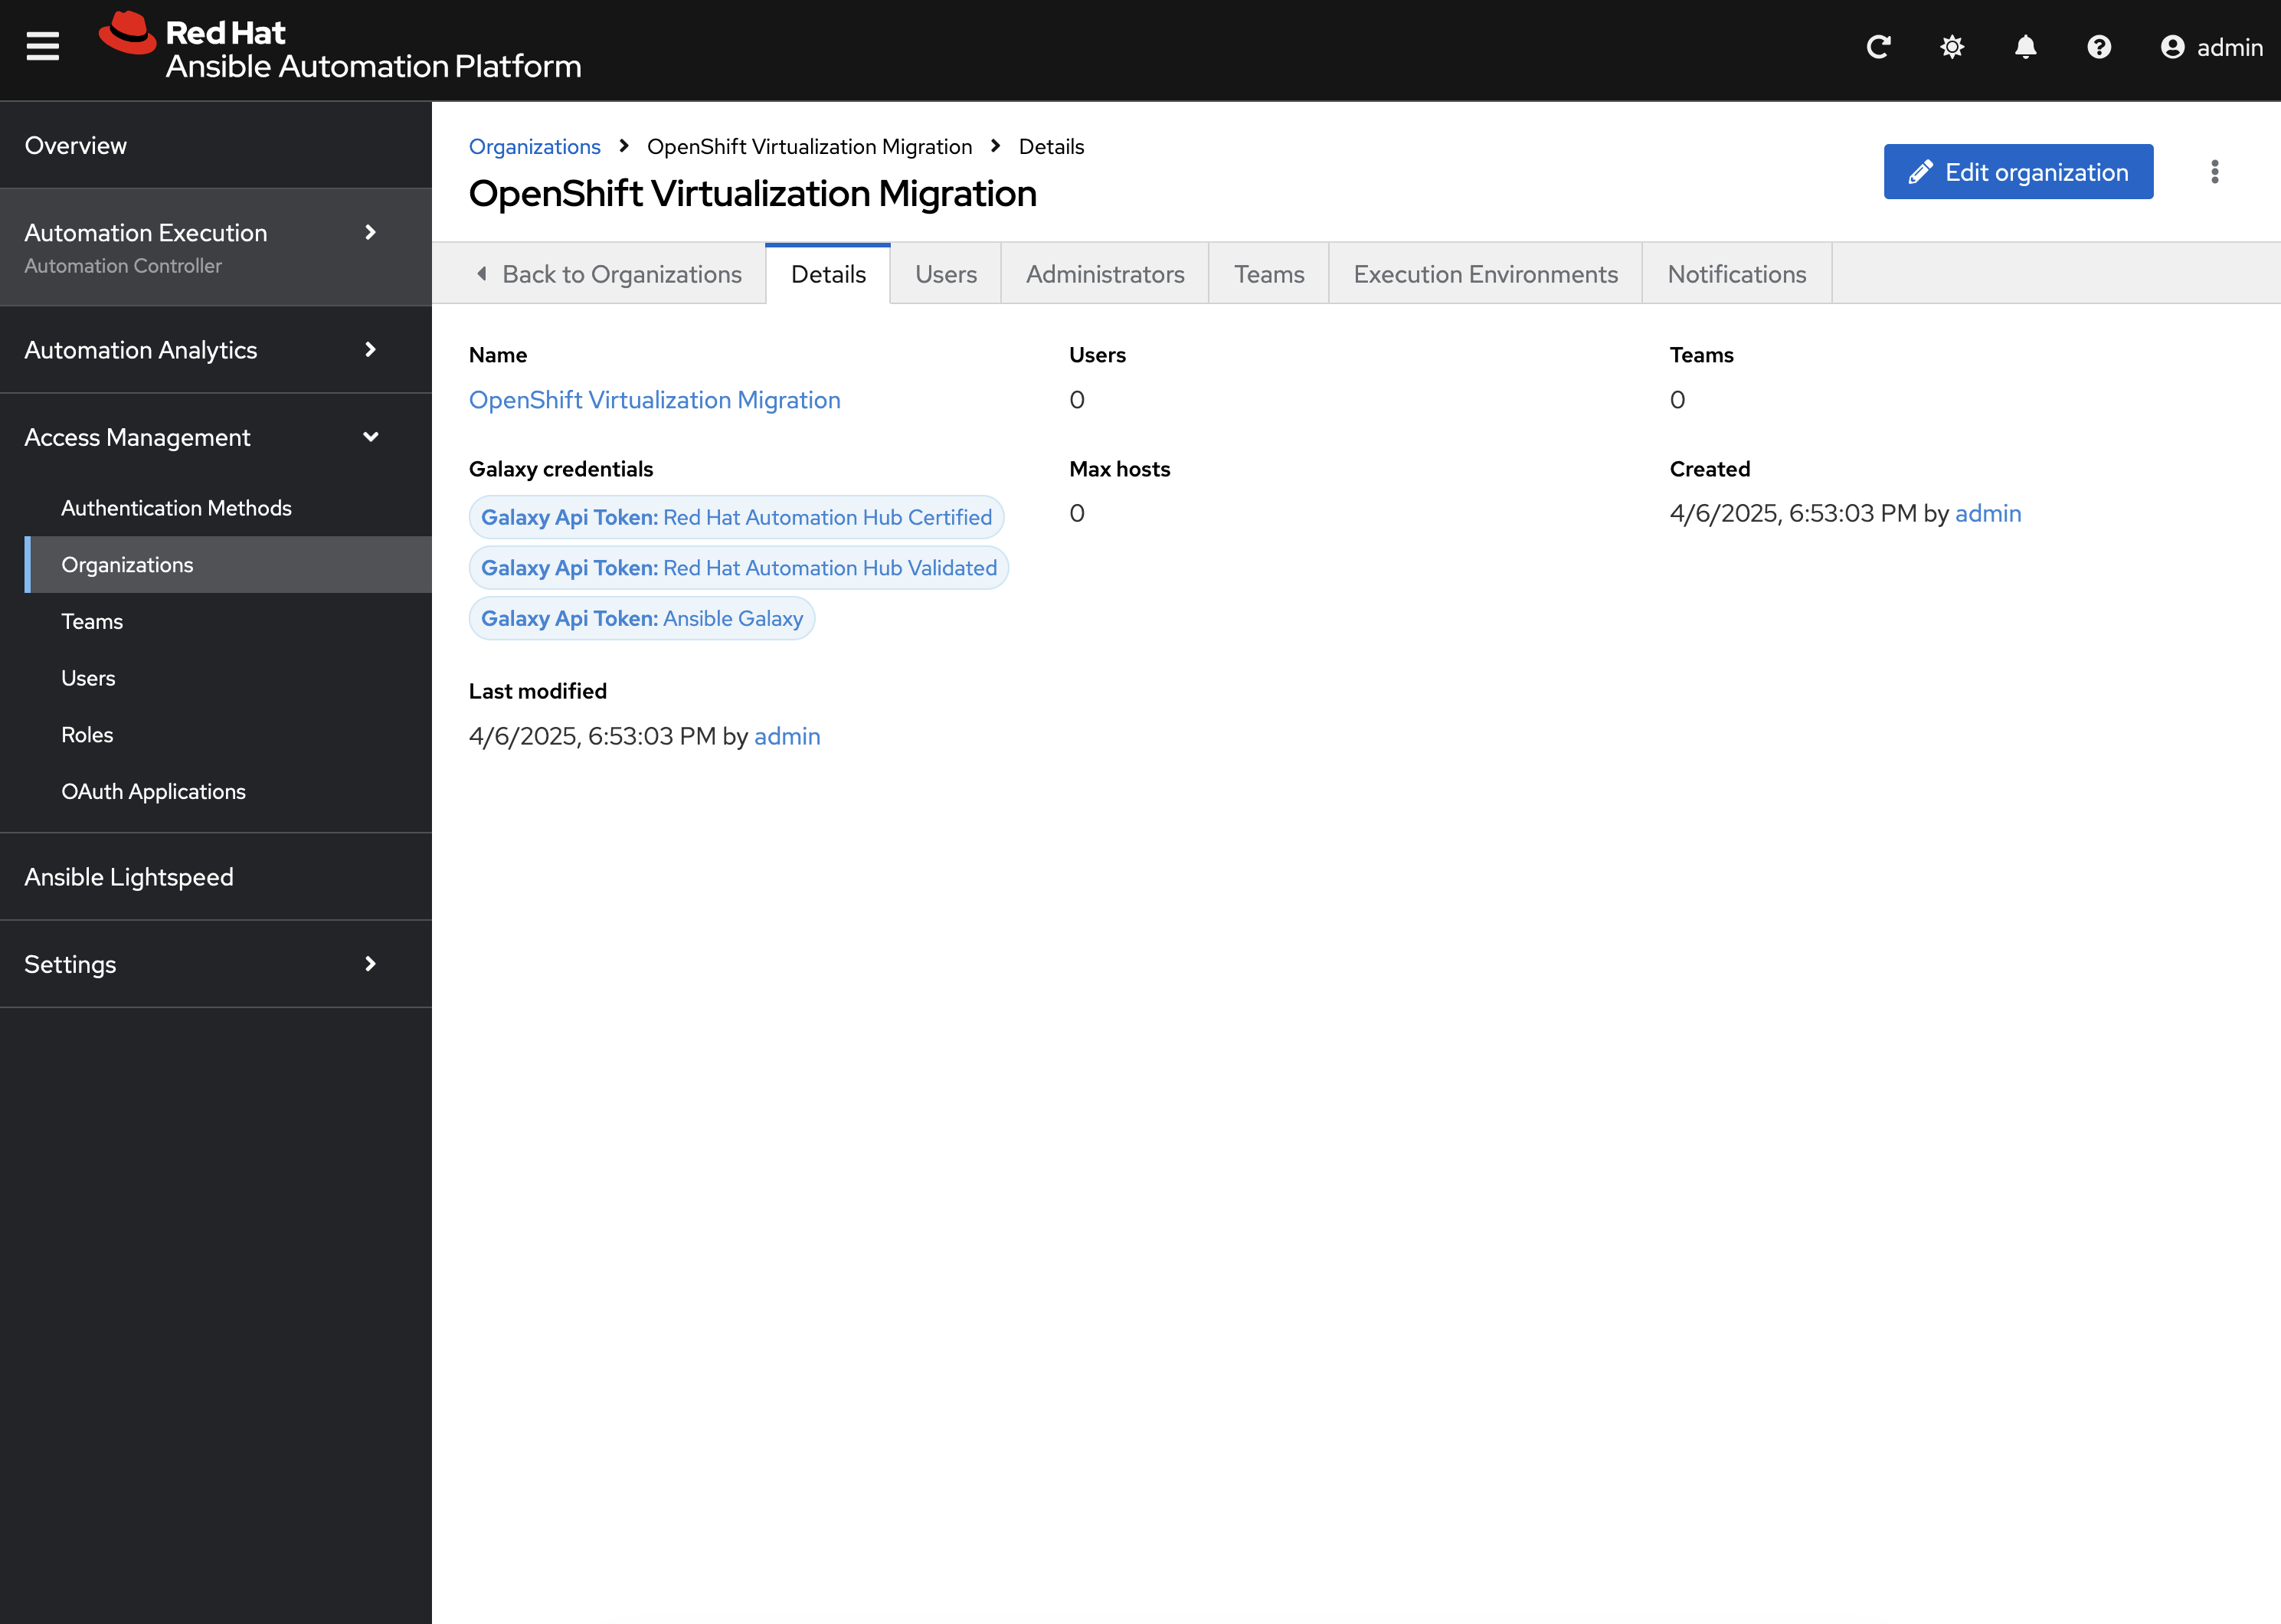
Next, an Organization called OpenShift Virtualization Migration was created to contain all of the resources related to the Ansible for OpenShift Virtualization Migration. This can be seen by expanding the Access Management section on the left hand navigation bar and selecting Organizations.
The credentials associated with Red Hat Automation Hub token provided earlier were added to the Organization so that any certified and validated content that is needed can be retrieved.
In addition to the Credential associated with Red Hat Automation Hub, a set of other credentials were populated and can be seen by expanding the Automation Execution section on the left hand navigation bar, expand Infrastructure, and selecting Credentials.
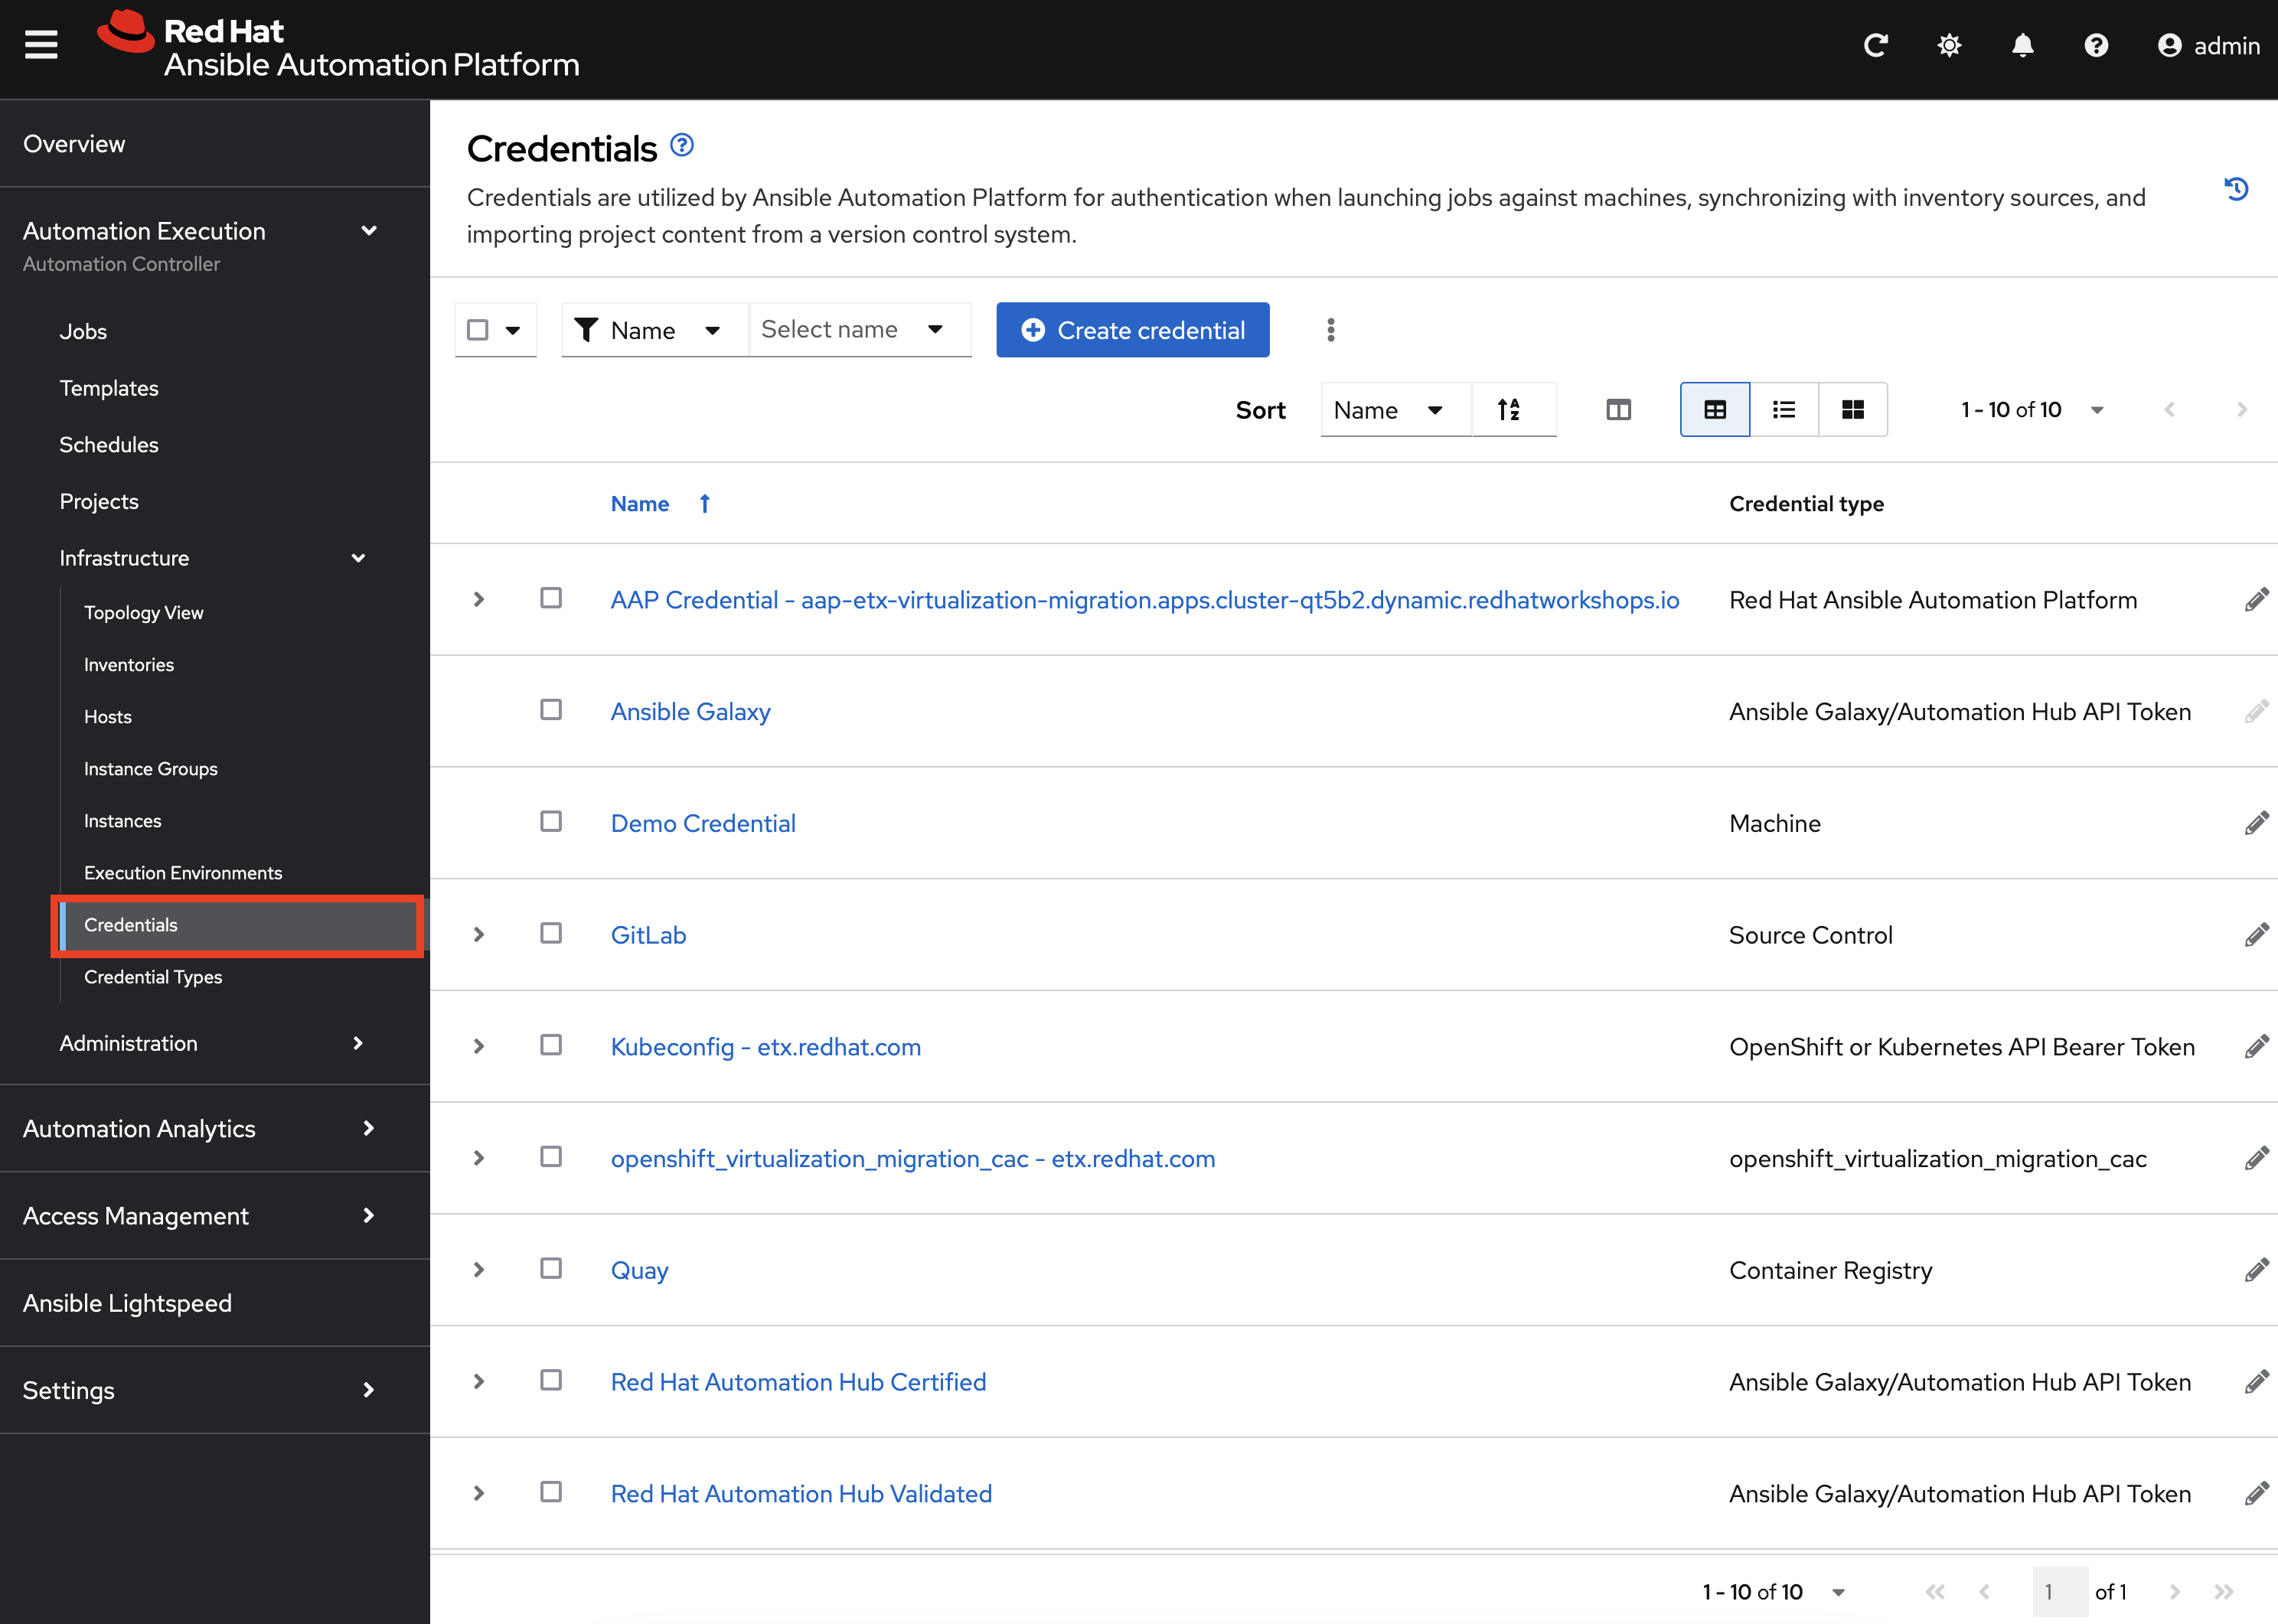
Some of these credentials makes use of custom Credential Types which can be seen by selecting Credential Types right below Credentials on the left hand navigation bar.
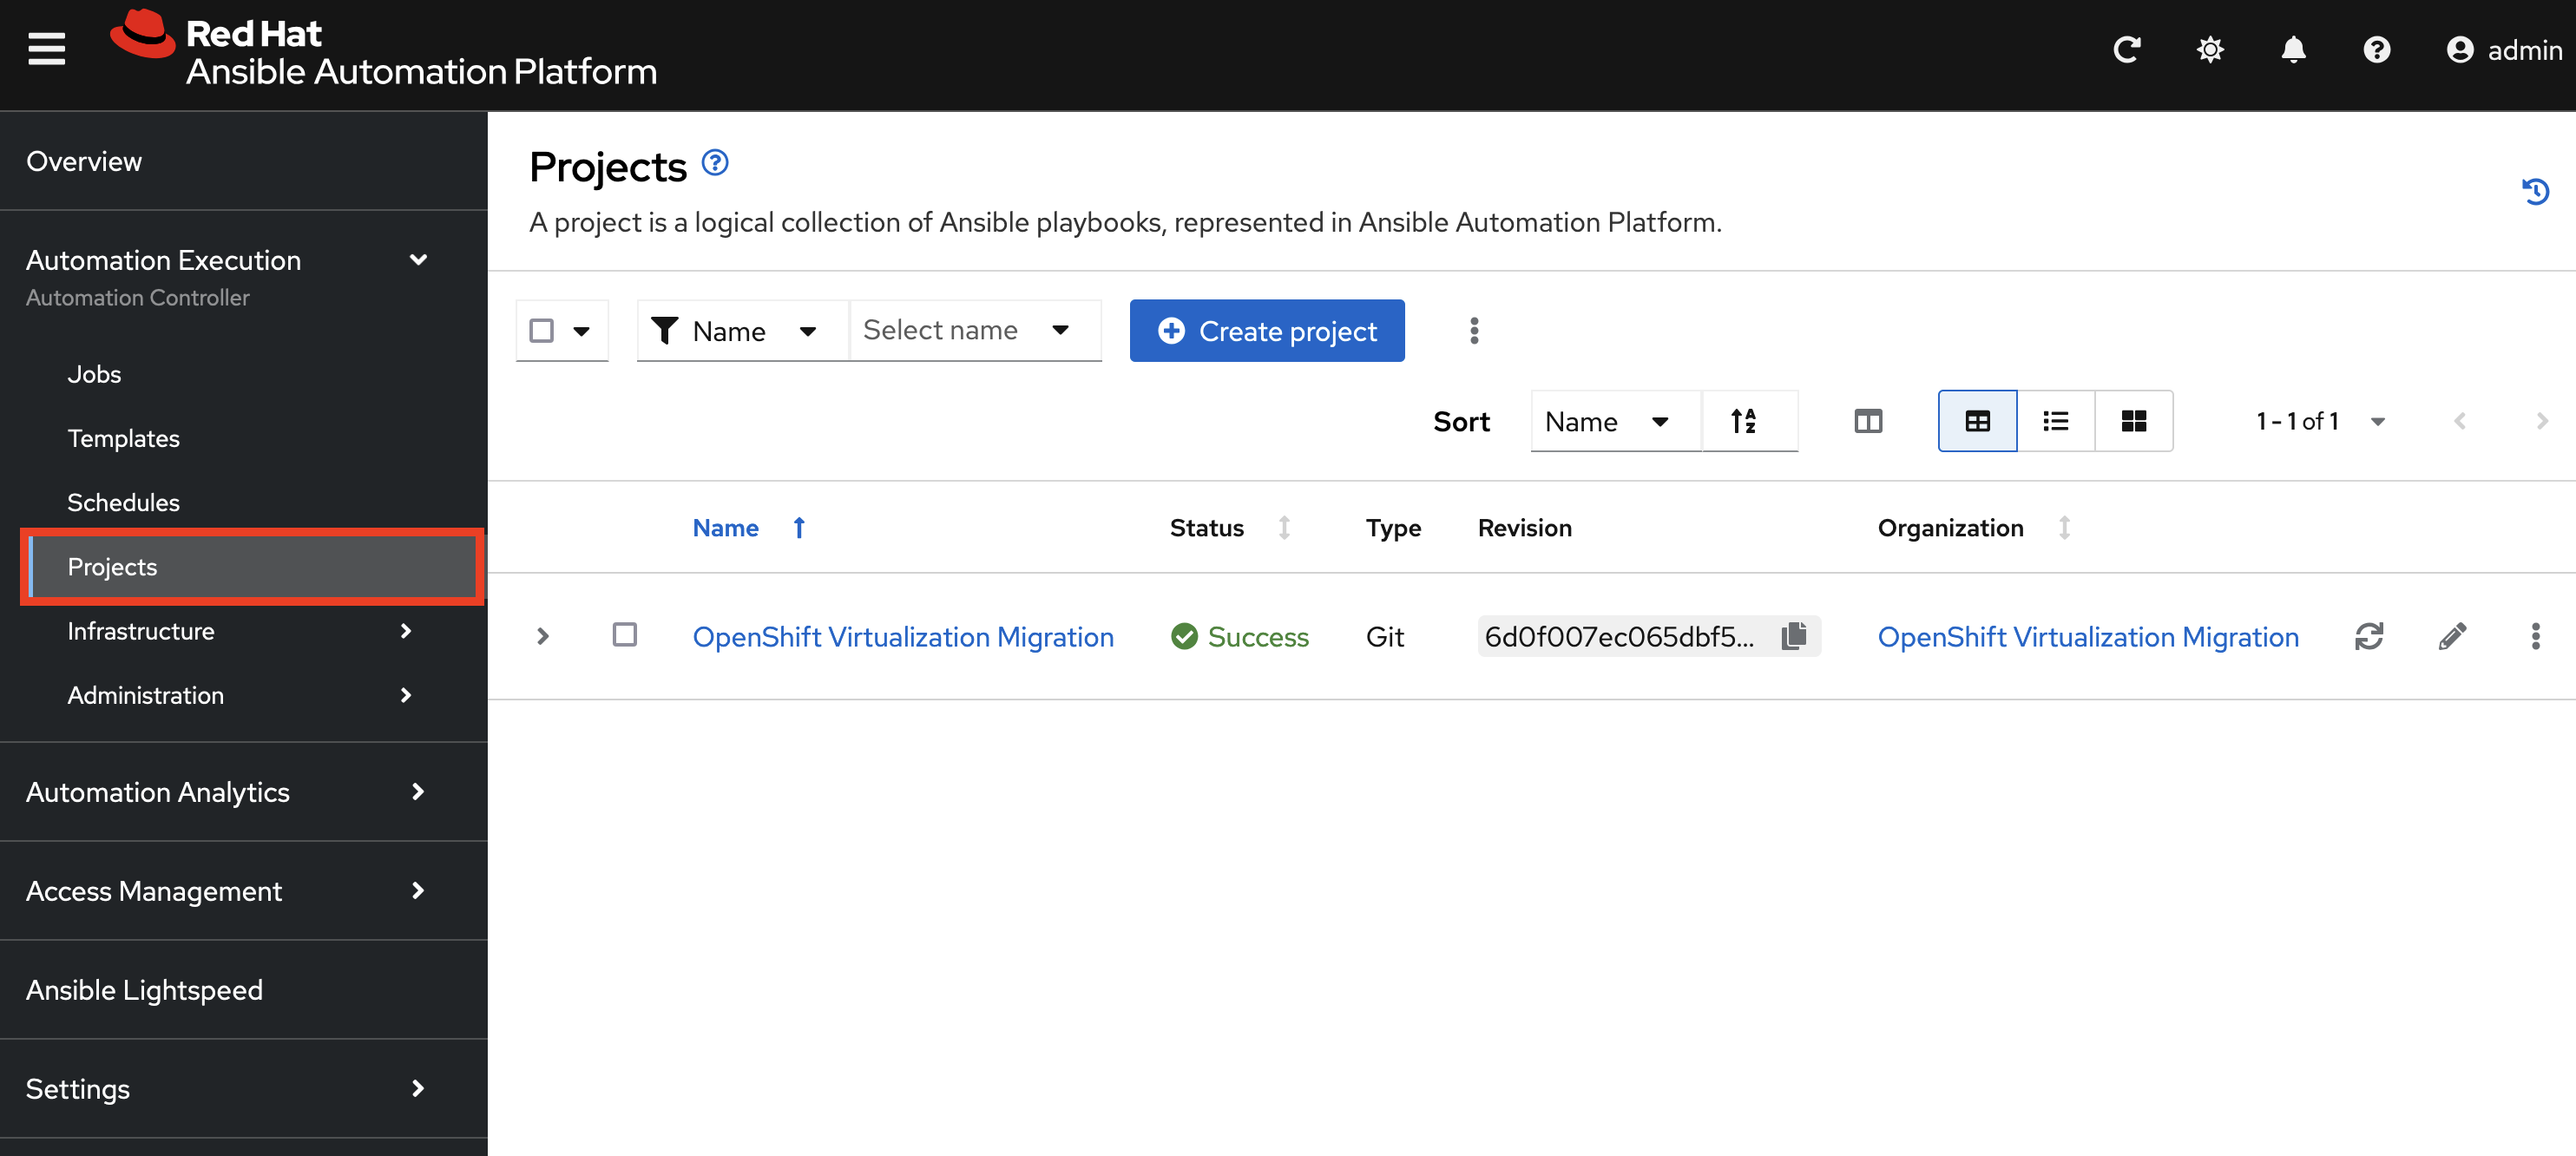
The primary set of content (playbooks) responsible for execution is source from the aforementioned GitLab instance and is brought into Ansible Controller as a Project called OpenShift Virtualization Migration. This can be seen by selecting Projects under the Automation Execution section on the left hand navigation bar.
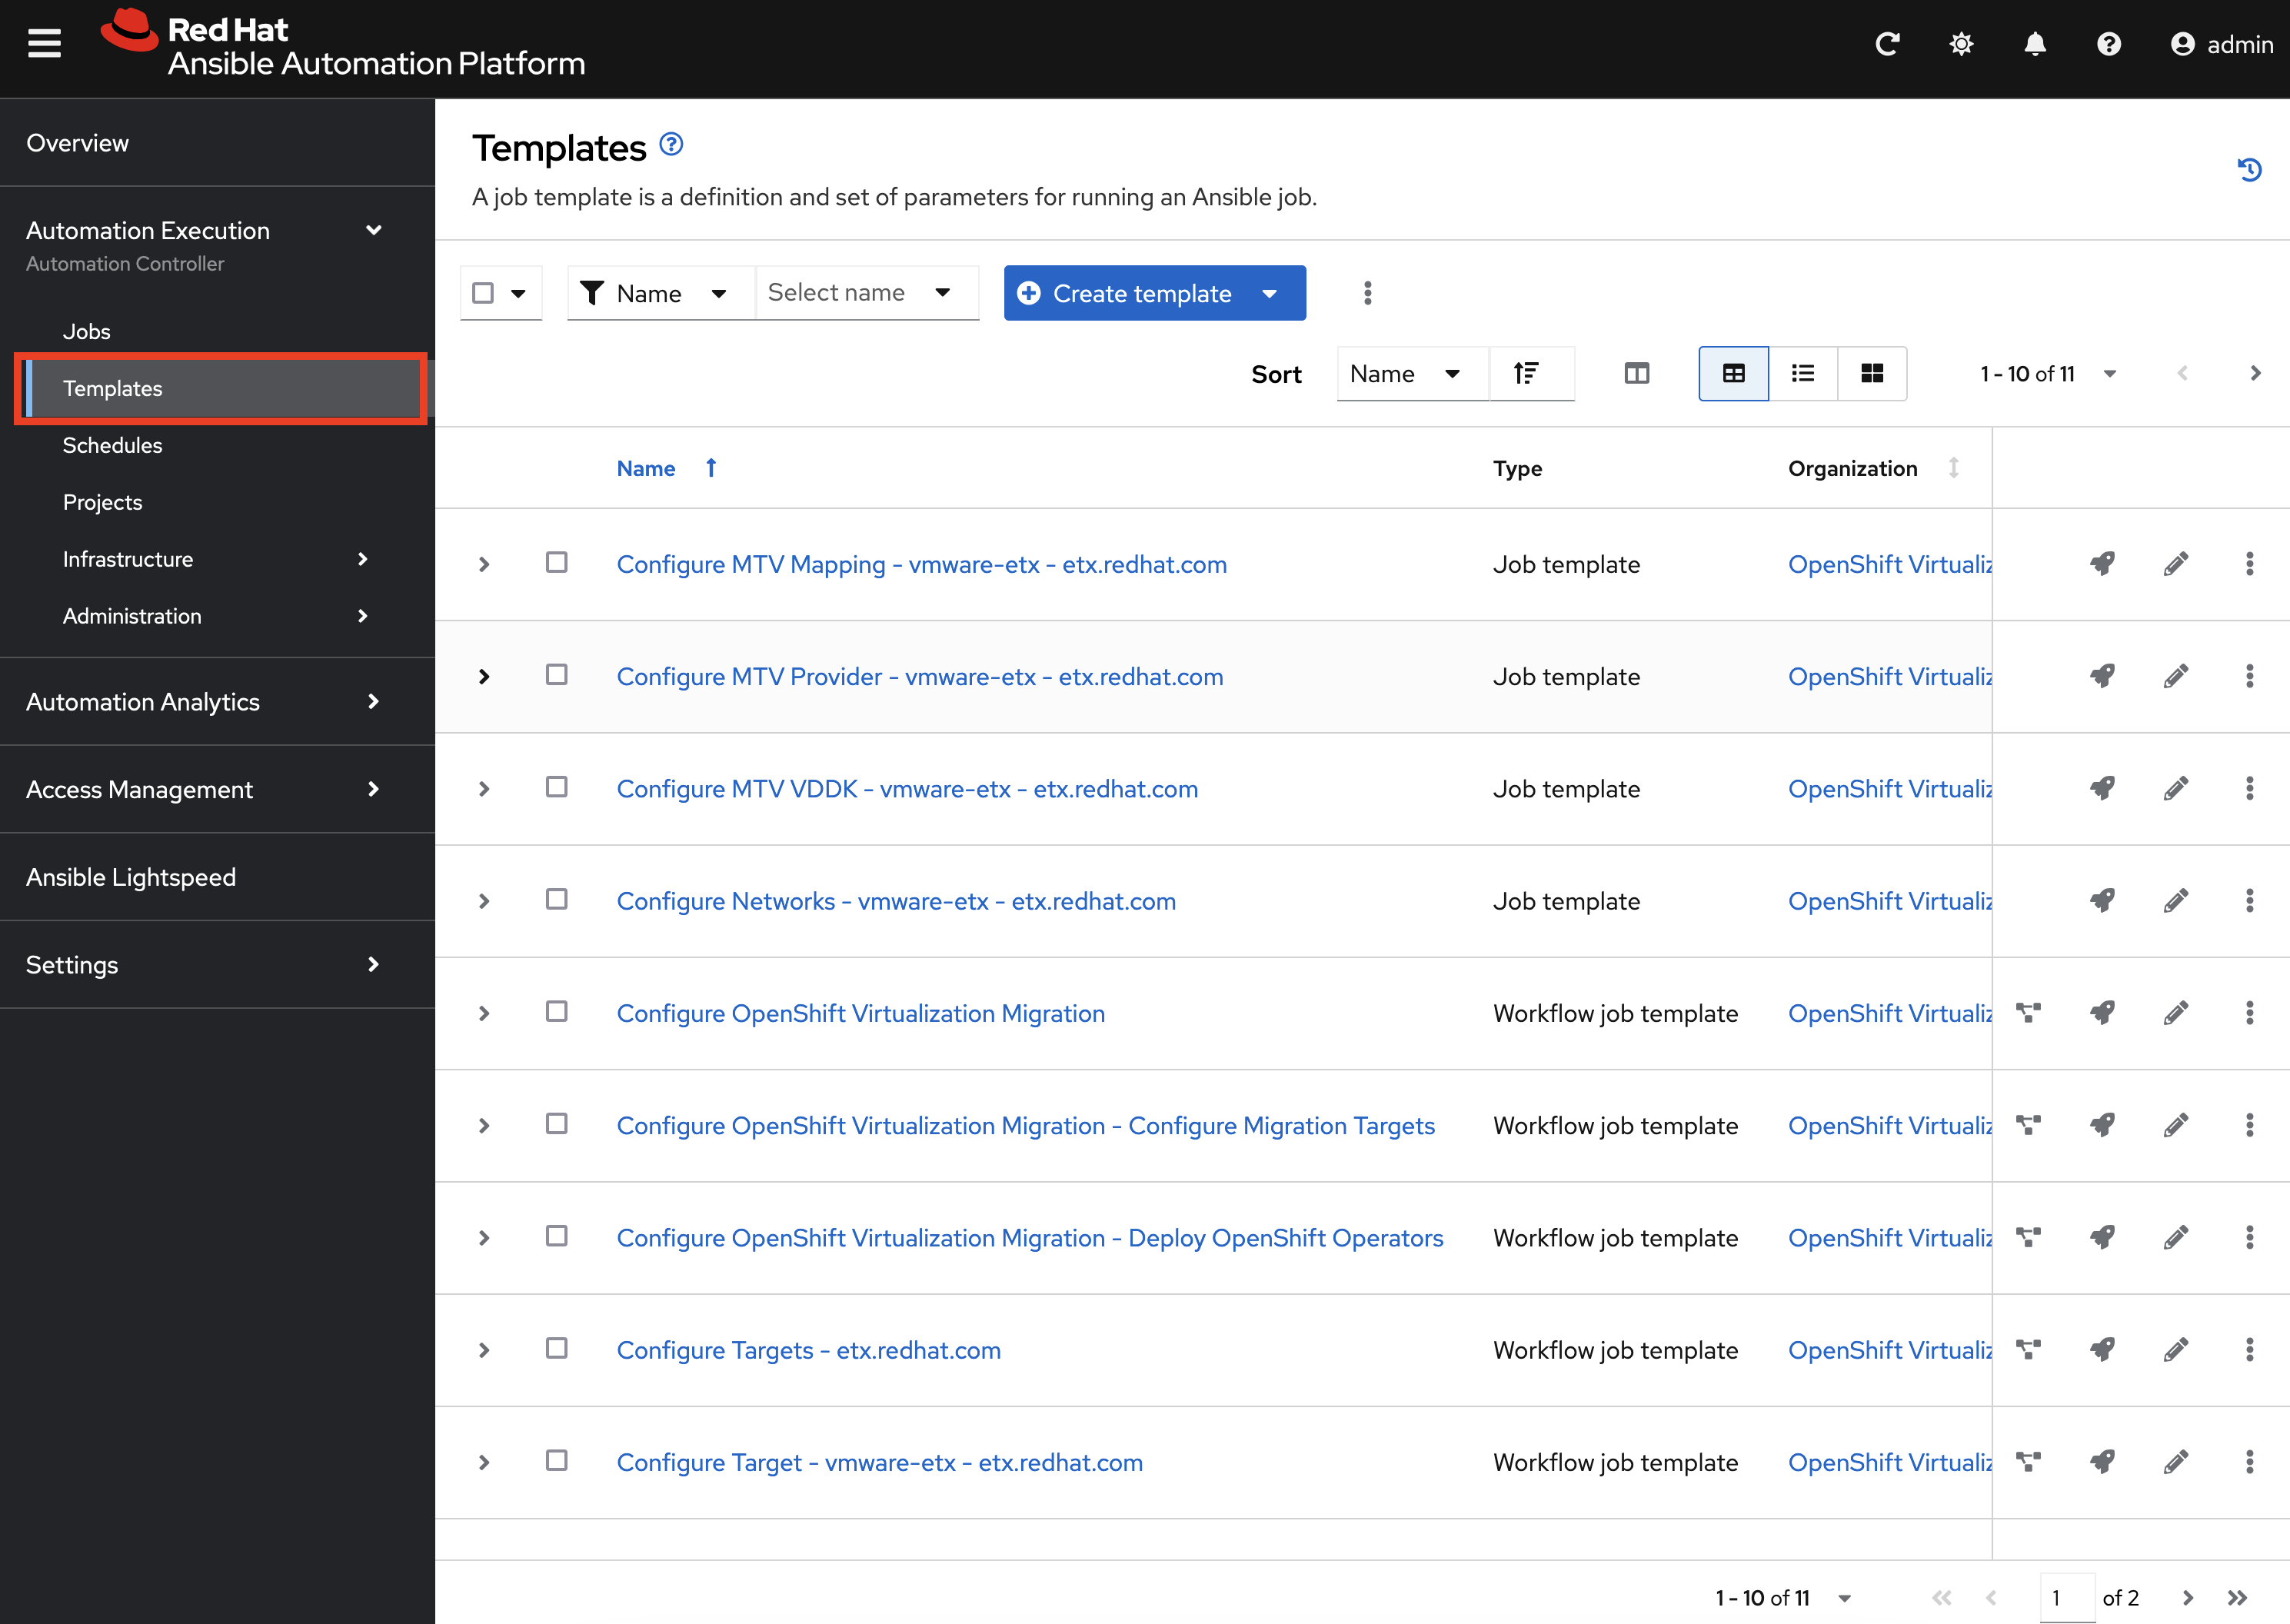
Finally, view all of the Ansible for OpenShift Virtualization Migration related Job Templates and Workflow Job Templates by selecting Templates under the Automation Execution section on the left hand navigation bar. We will be leveraging these resources in the upcoming section to support automating the migration of Virtual Machines into OpenShift.
Finalizing the Installation
The last step in the deployment process of the Ansible for OpenShift Virtualization Migration is to trigger a Workflow Job Template that will setup OpenShift for baseline use. In particular, the following steps will occur:
-
Install Required OpenShift Operators
-
Configure Migration Targets
-
Register the VMware environment as an MTV source Provider
-
Configure credentials associated with the VDDK image
-
Set up StorageMap’s and NetworkMap’s
-
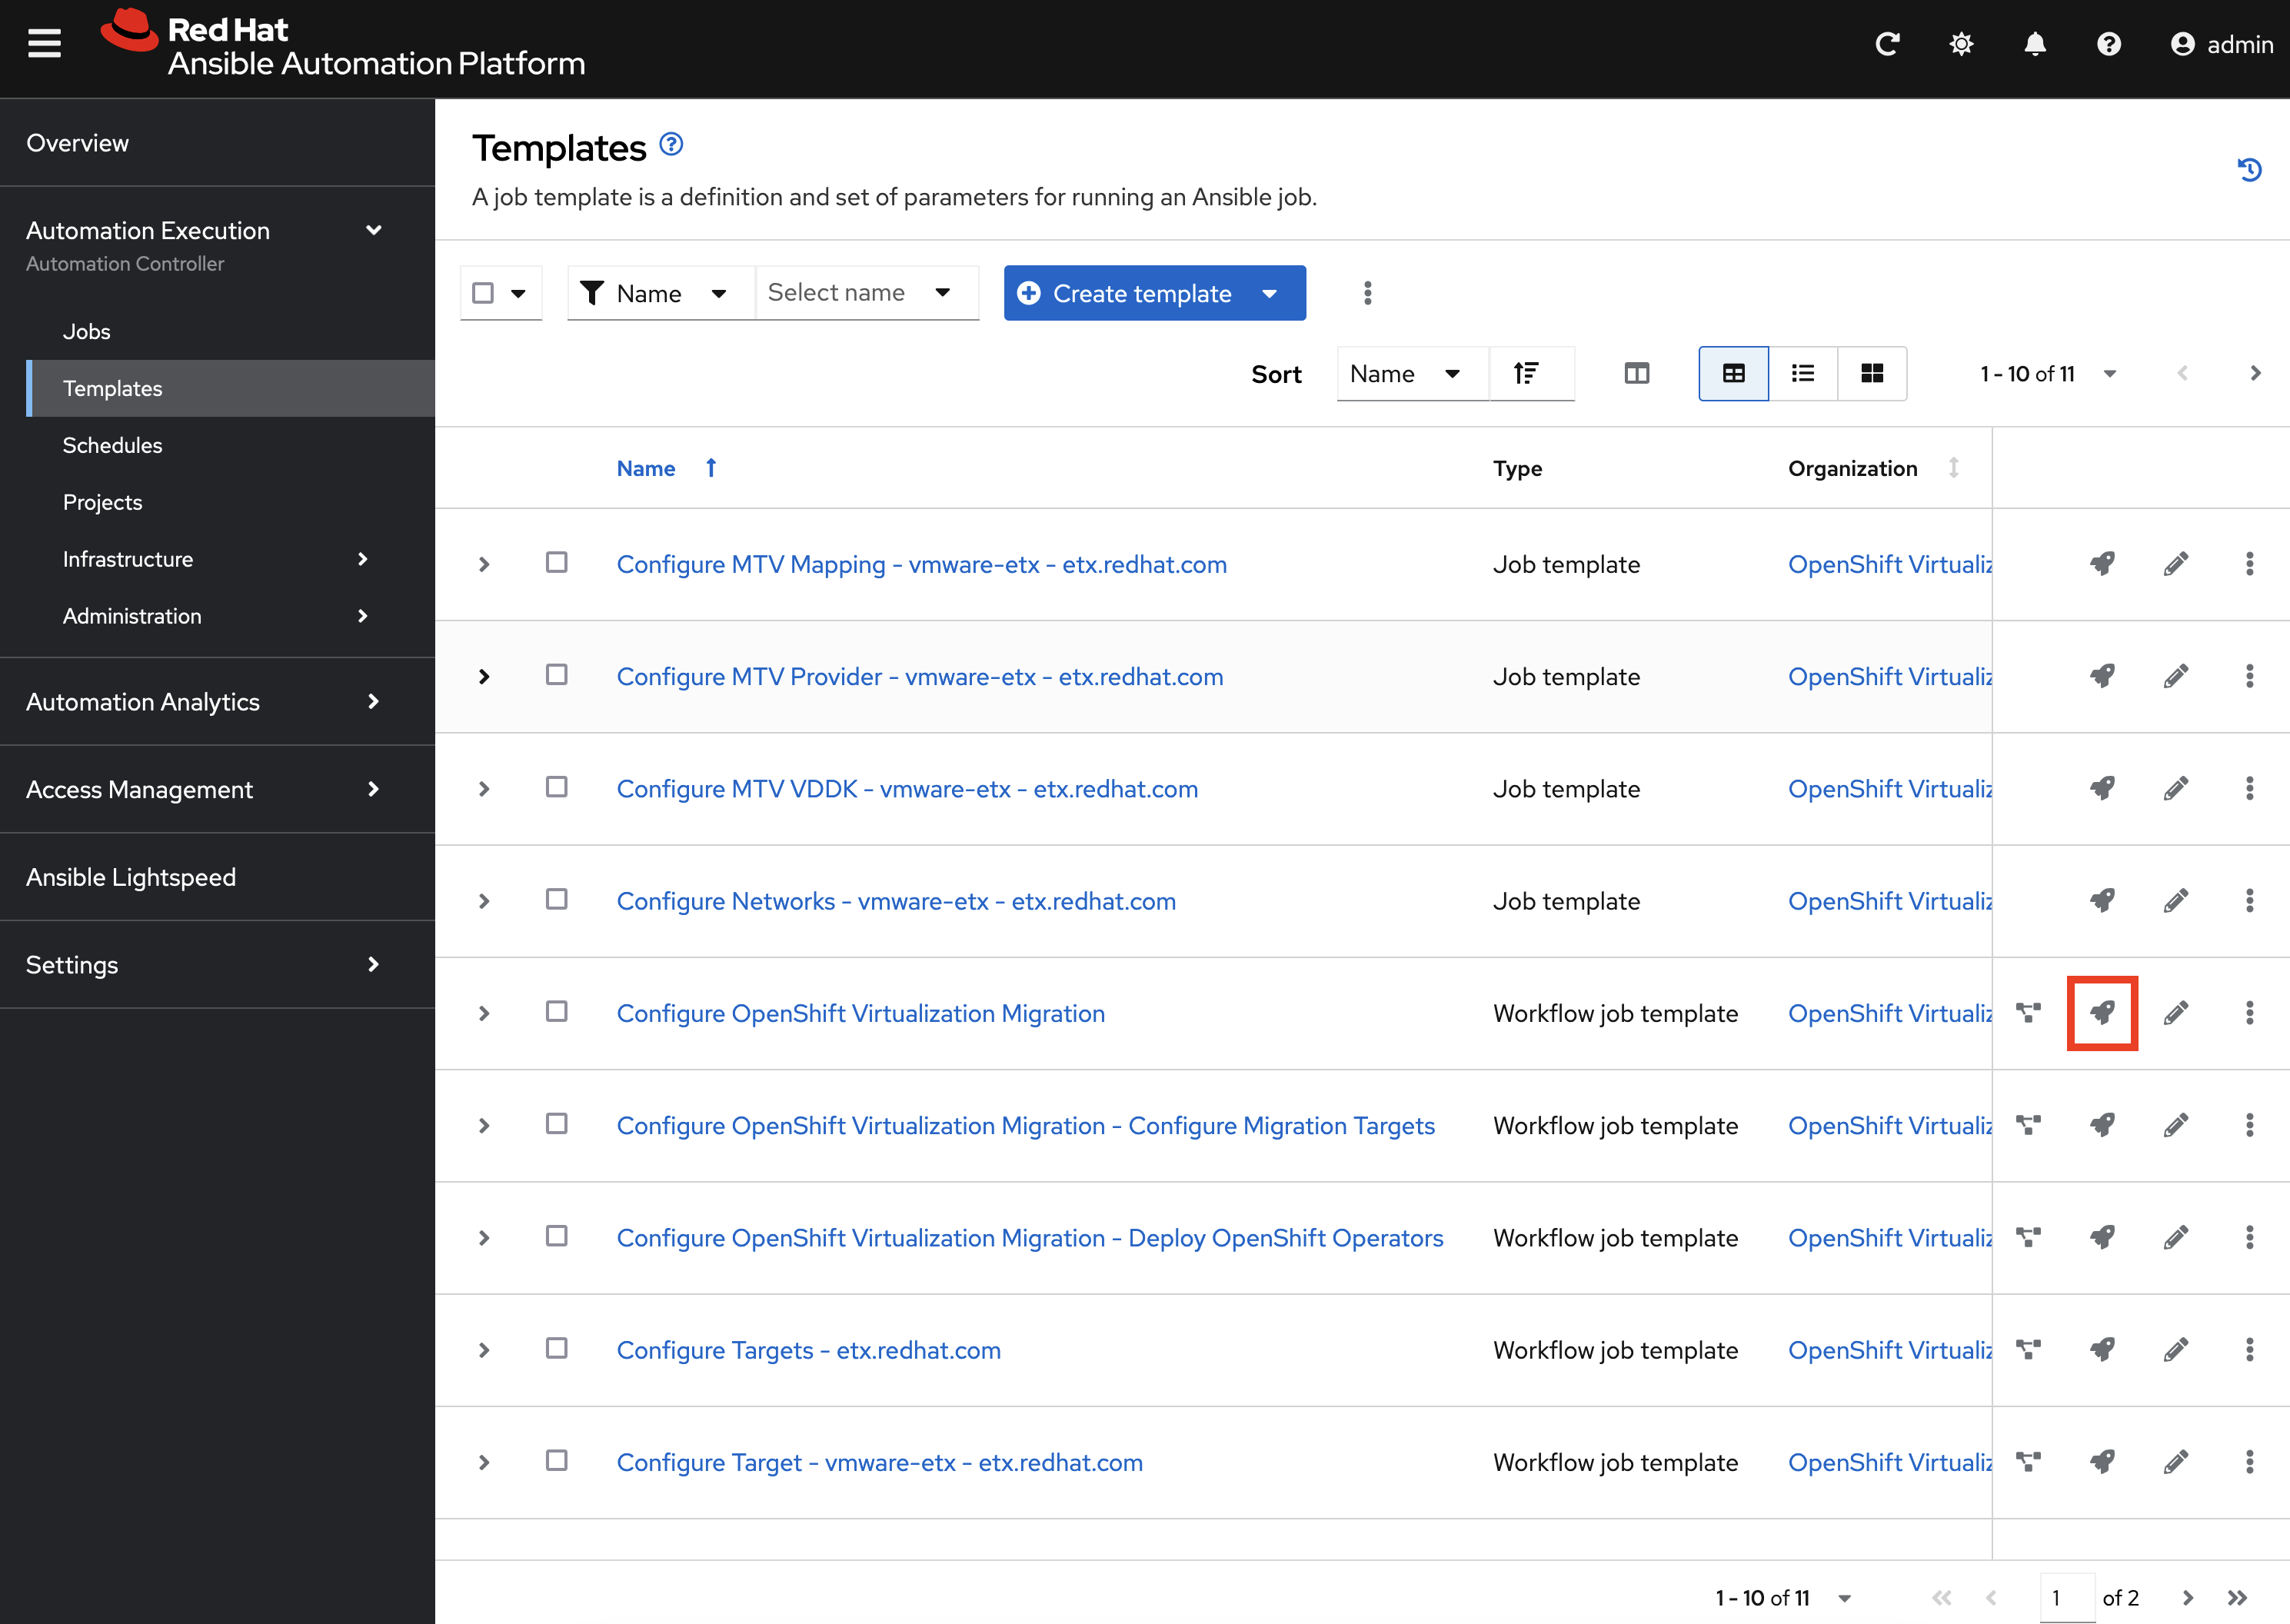
Launch the Workflow Job Template that will configure these steps by selecting Templates under the Automation Execution section on the left hand navigation bar and hitting the Rocket icon next to the Configure OpenShift Virtualization Migration Workflow Job Template.
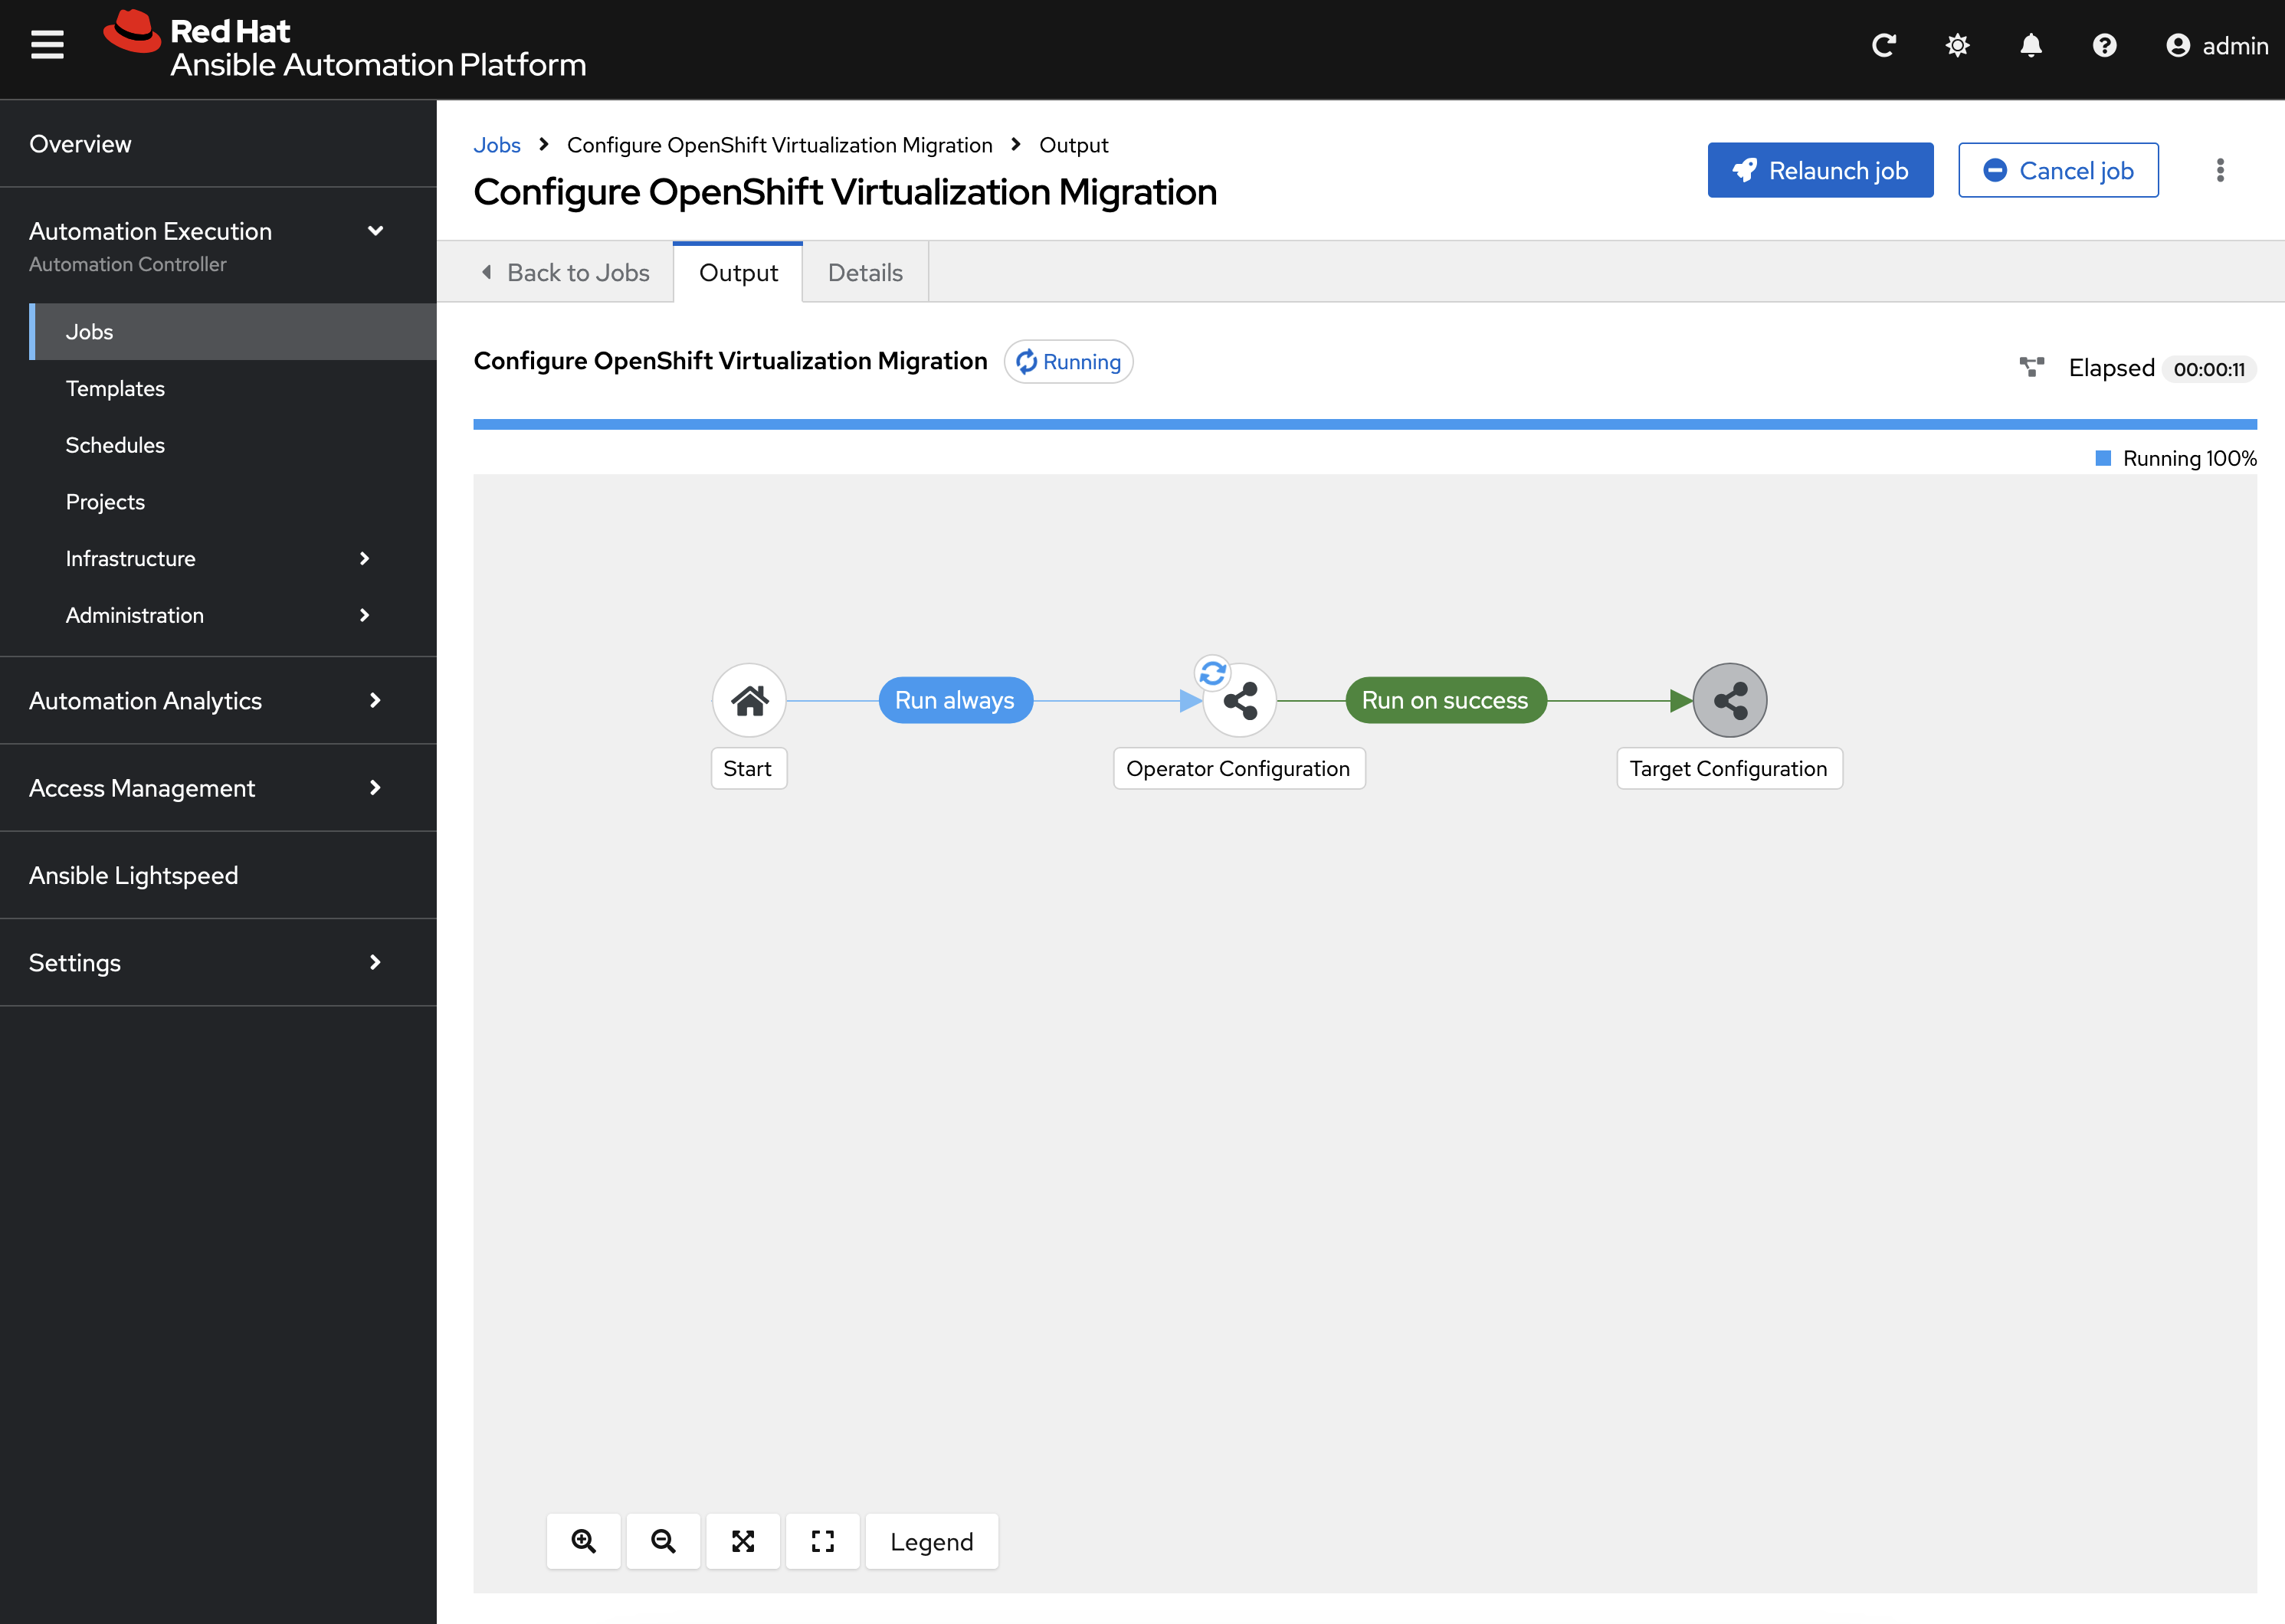
The output for the Workflow Job will be shown which provides a graphical view of the steps being performed.
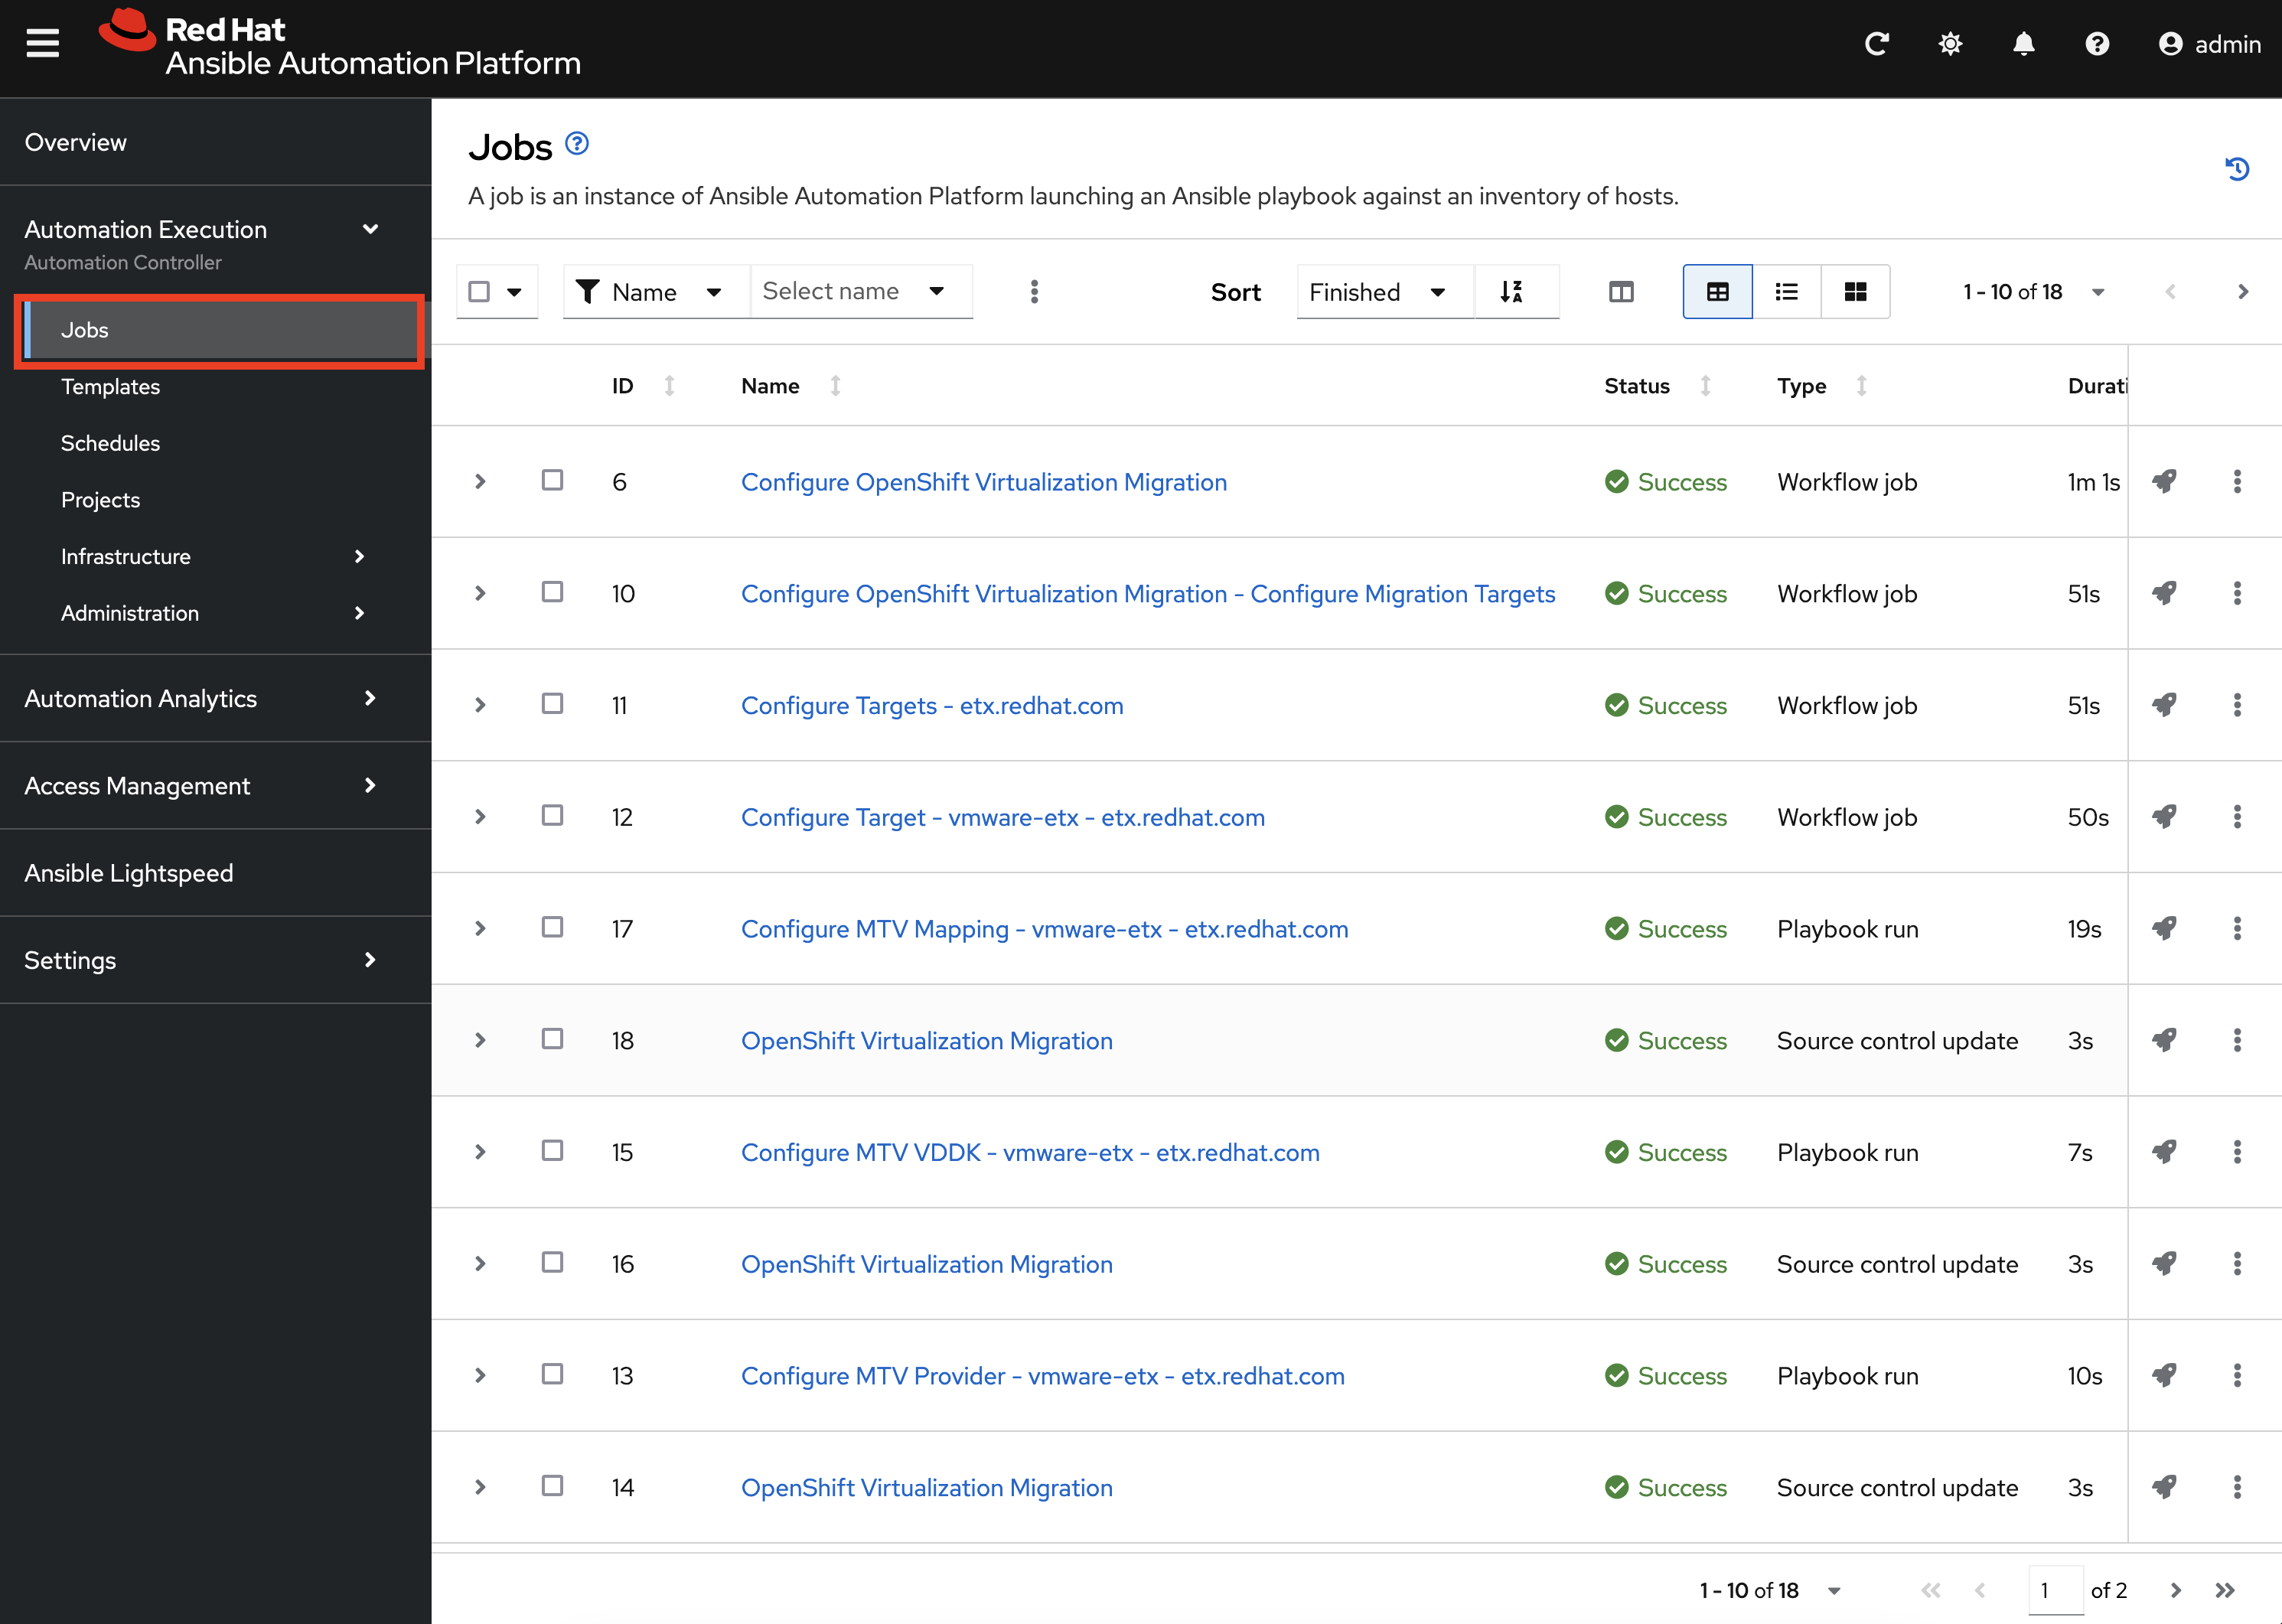
The progress of each individual Job that was spawned by the Workflow Job Template can be viewed by selecting Jobs under the Automation Execution section on the left hand navigation bar.
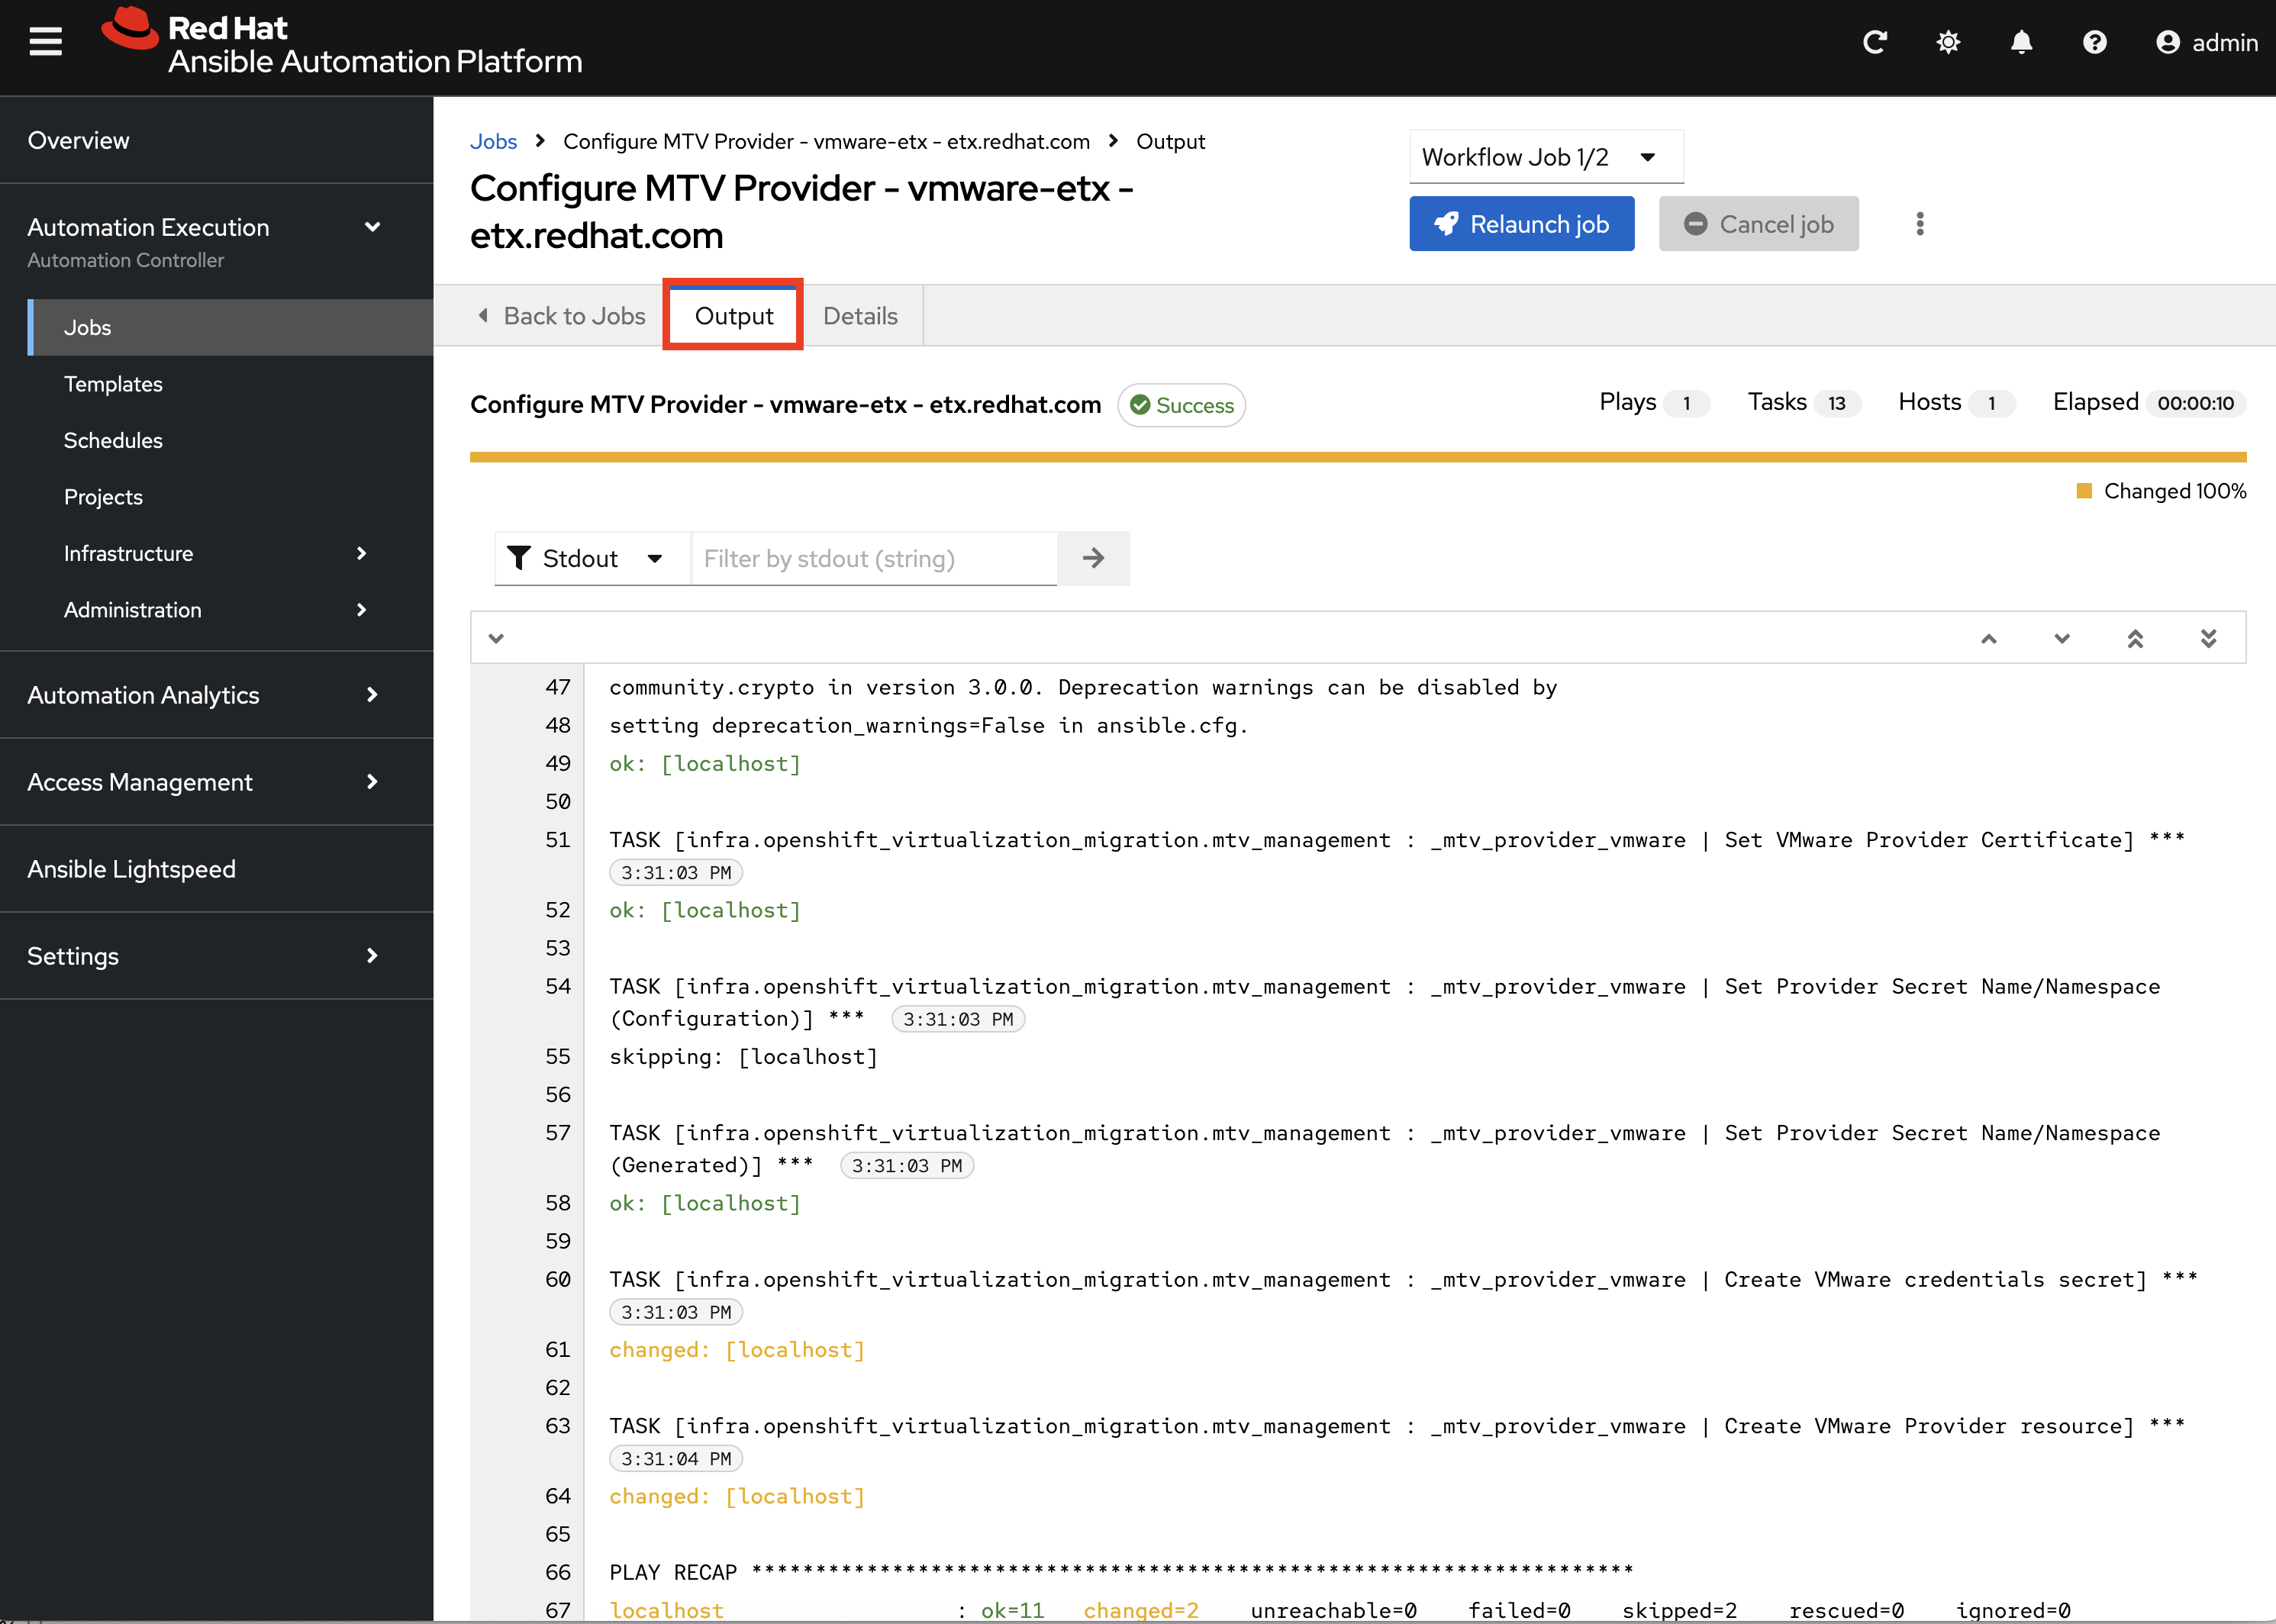
Feel free to track the status of each of the Jobs triggered in the Workflow by selecting the Output tab on the associated Job.
Once complete, you can confirm that the expected outcomes of the workflow were achieved.
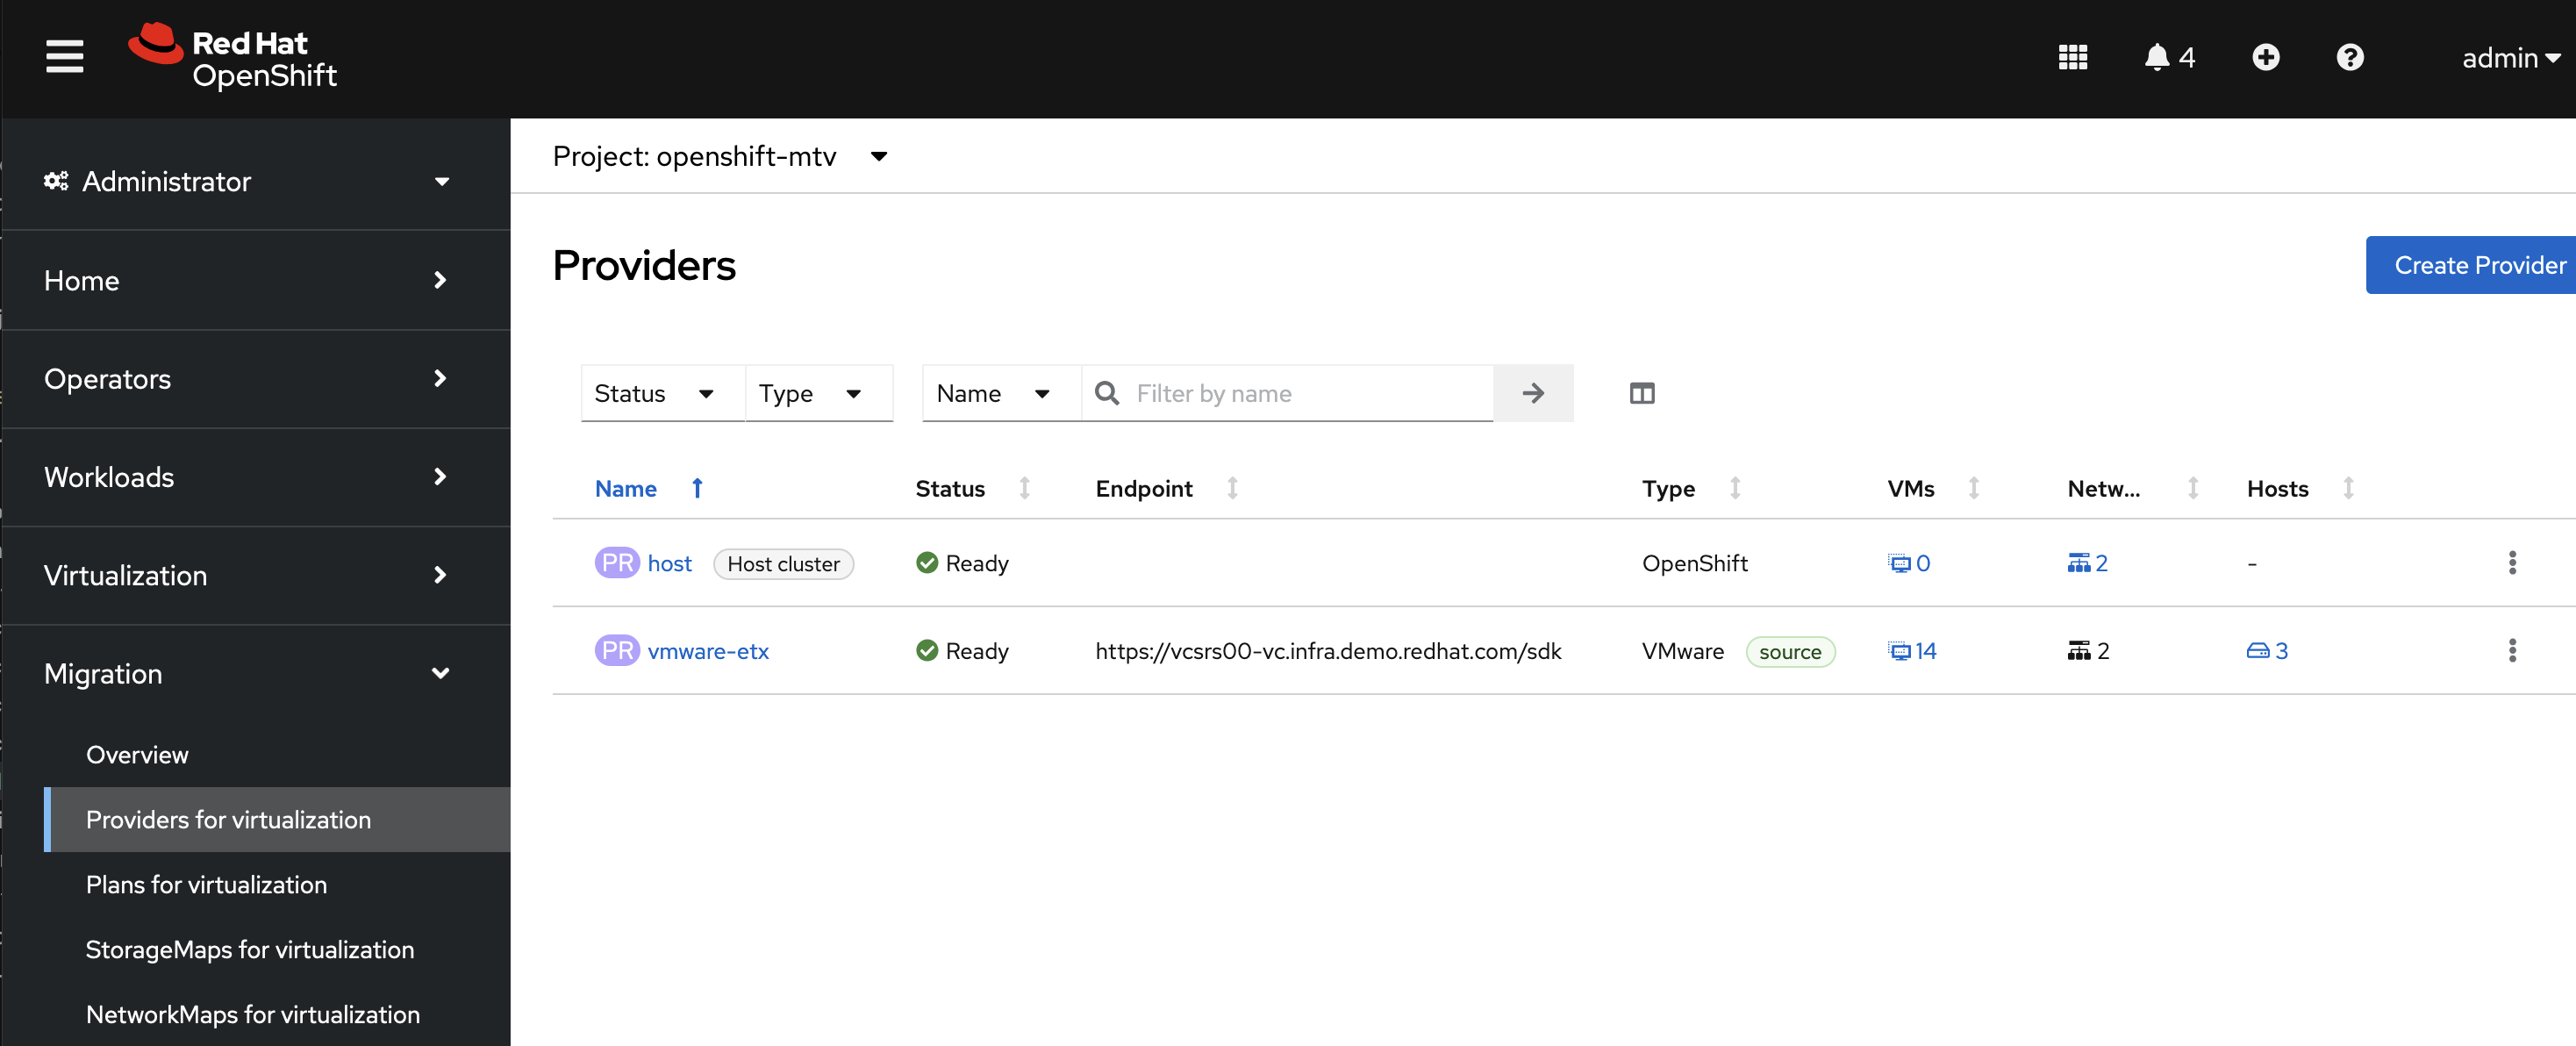
Locate the MTV Provider by Navigating back to the OpenShift Web Console and selecting the Migration dropdown on the left hand navigation Bar, and then Providers for virtualization.
A Provider called vmware-etx was created by the automation in the openshift-mtv Namespace. To view this provider, select the project dropdown at the top of the screen, enable the Show default project toggle and select openshift-mtv.
Verify the vmware-etx Provider is present and confirm that the connection be validated which is indicated with a green check mark.
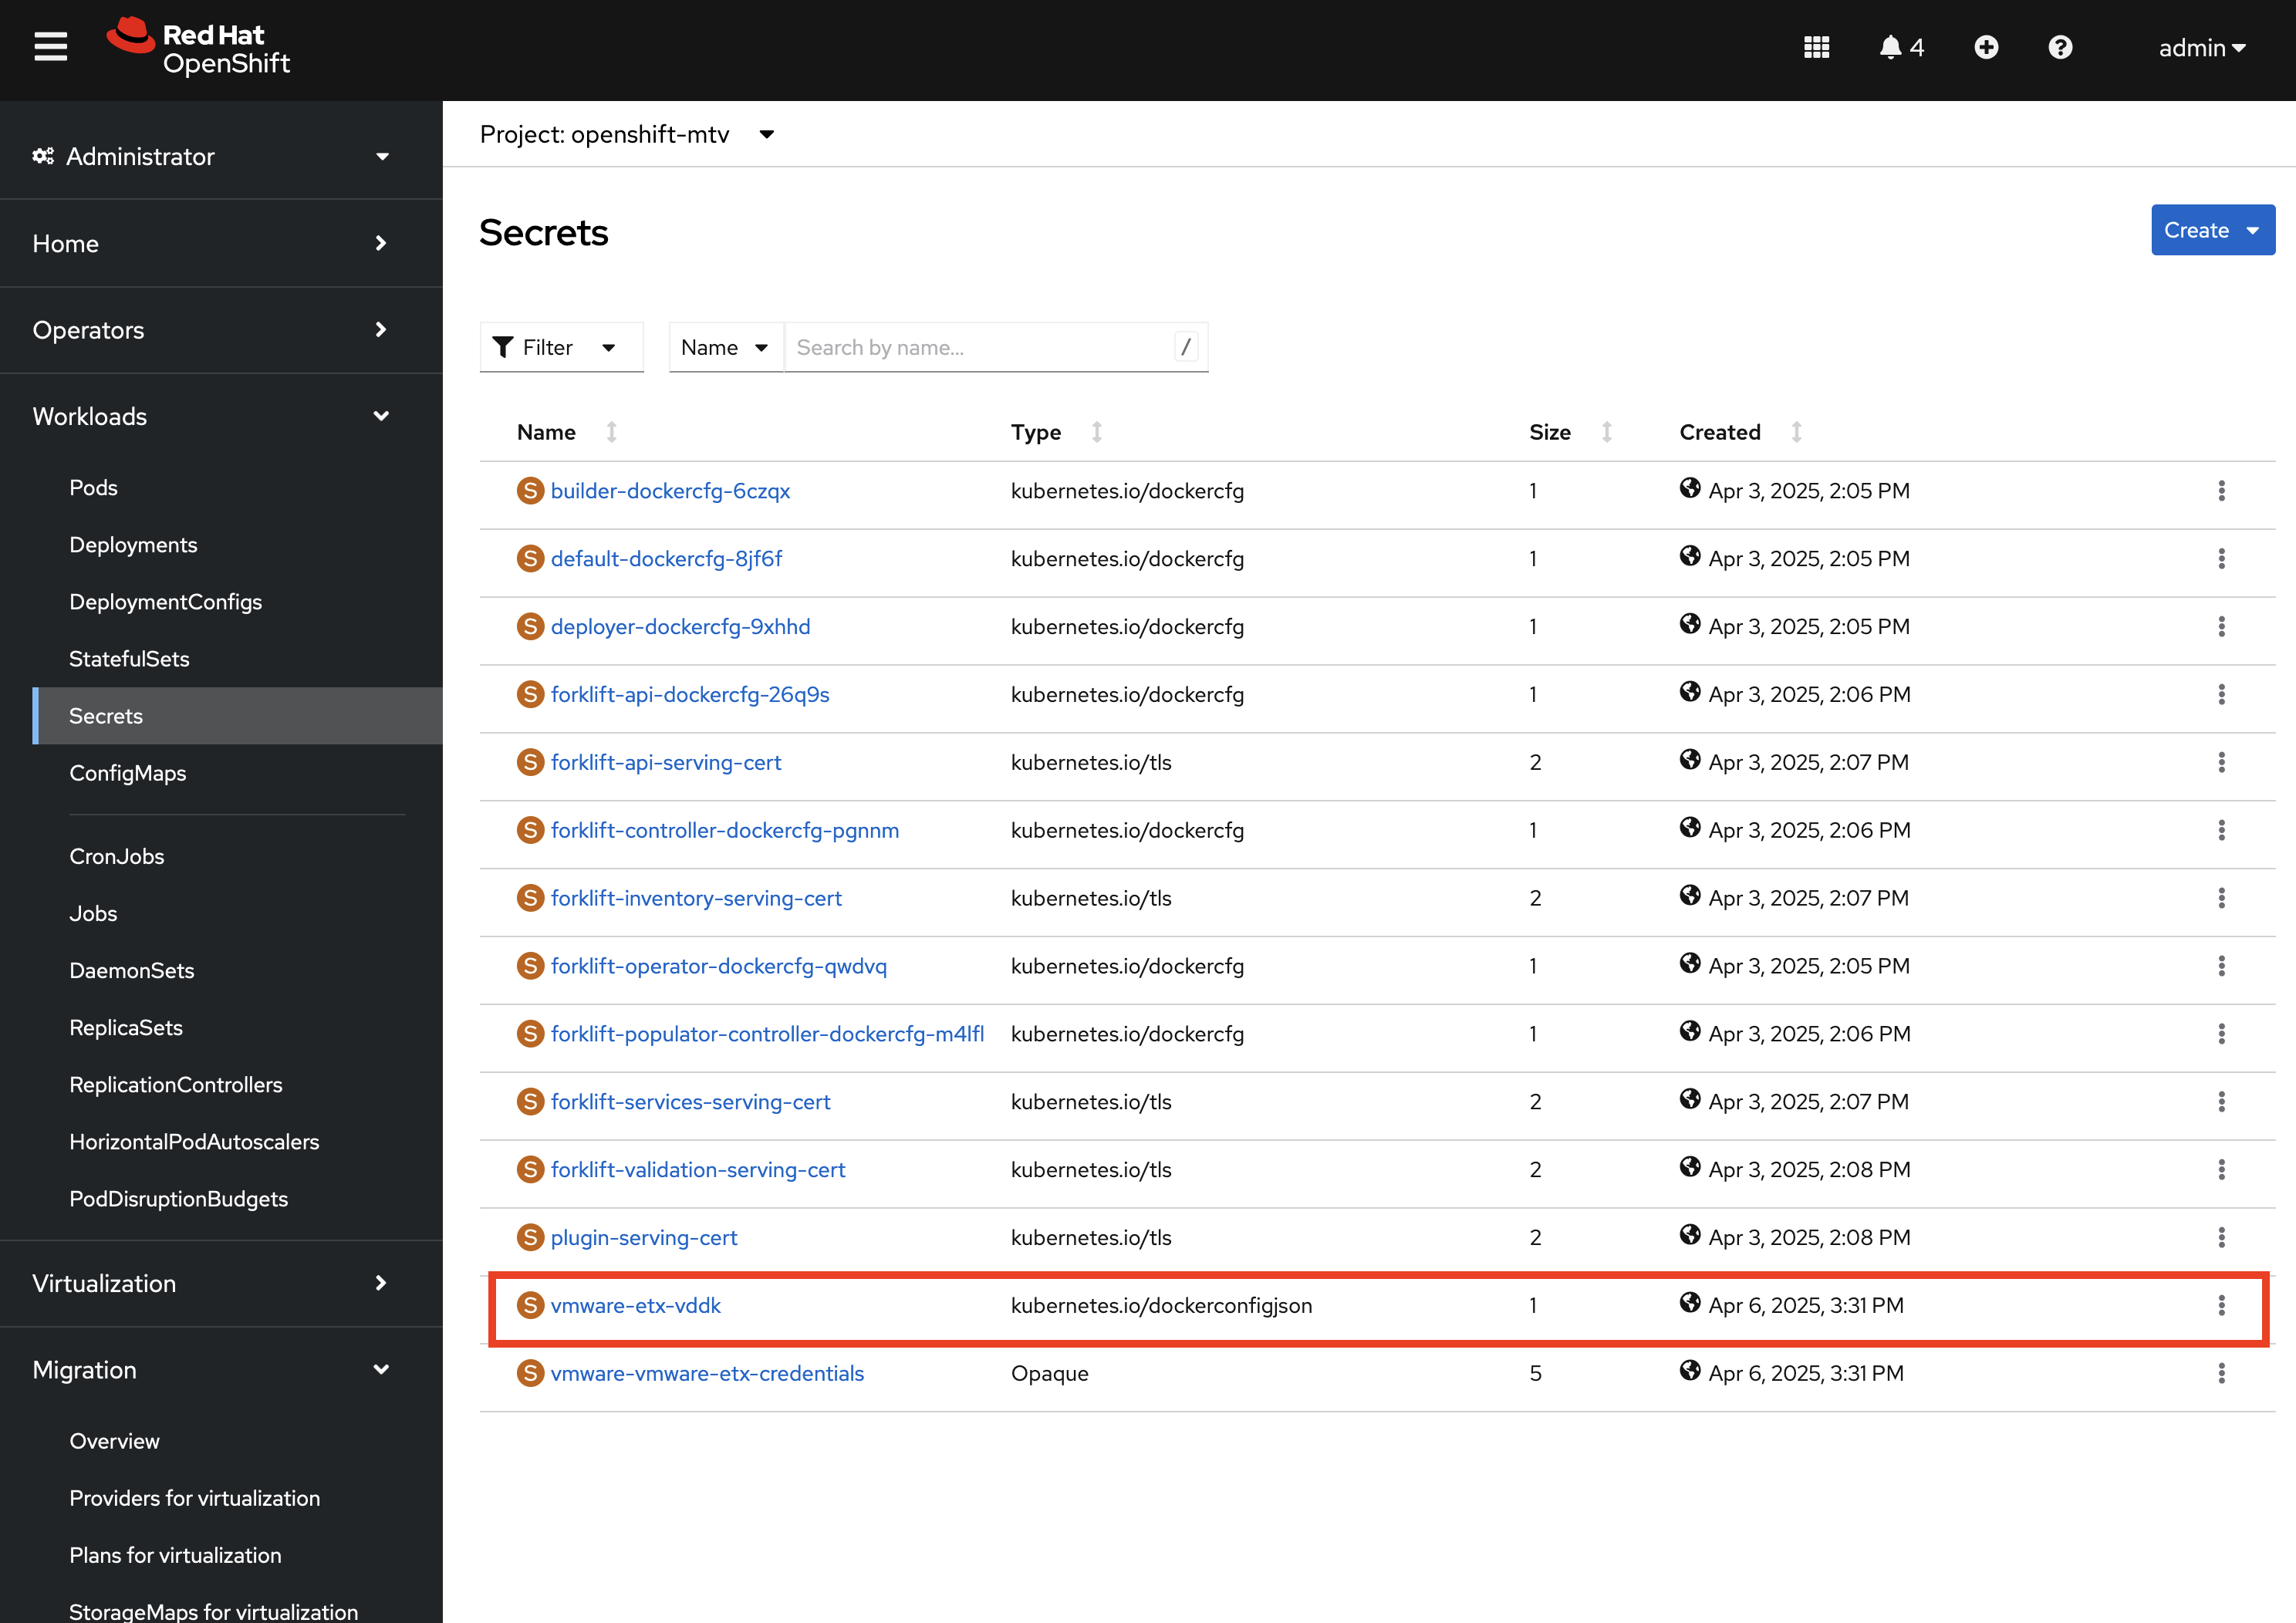
Next, confirm a Secret called vmware-etx-vddk was created in the openshift-mtv Namespace with credentials to pull the VDDK init image by selecting Secrets underneath the Workloads section of the left hand navigation bar.
Finally, confirm NetworkMaps and StorageMaps for MTV with the name vmware-etx-host were created in the openshift-mtv Namespace by selecting either StorageMaps for virtualization or NetworkMaps for virtualization under the Migration section of the left hand navigation bar.
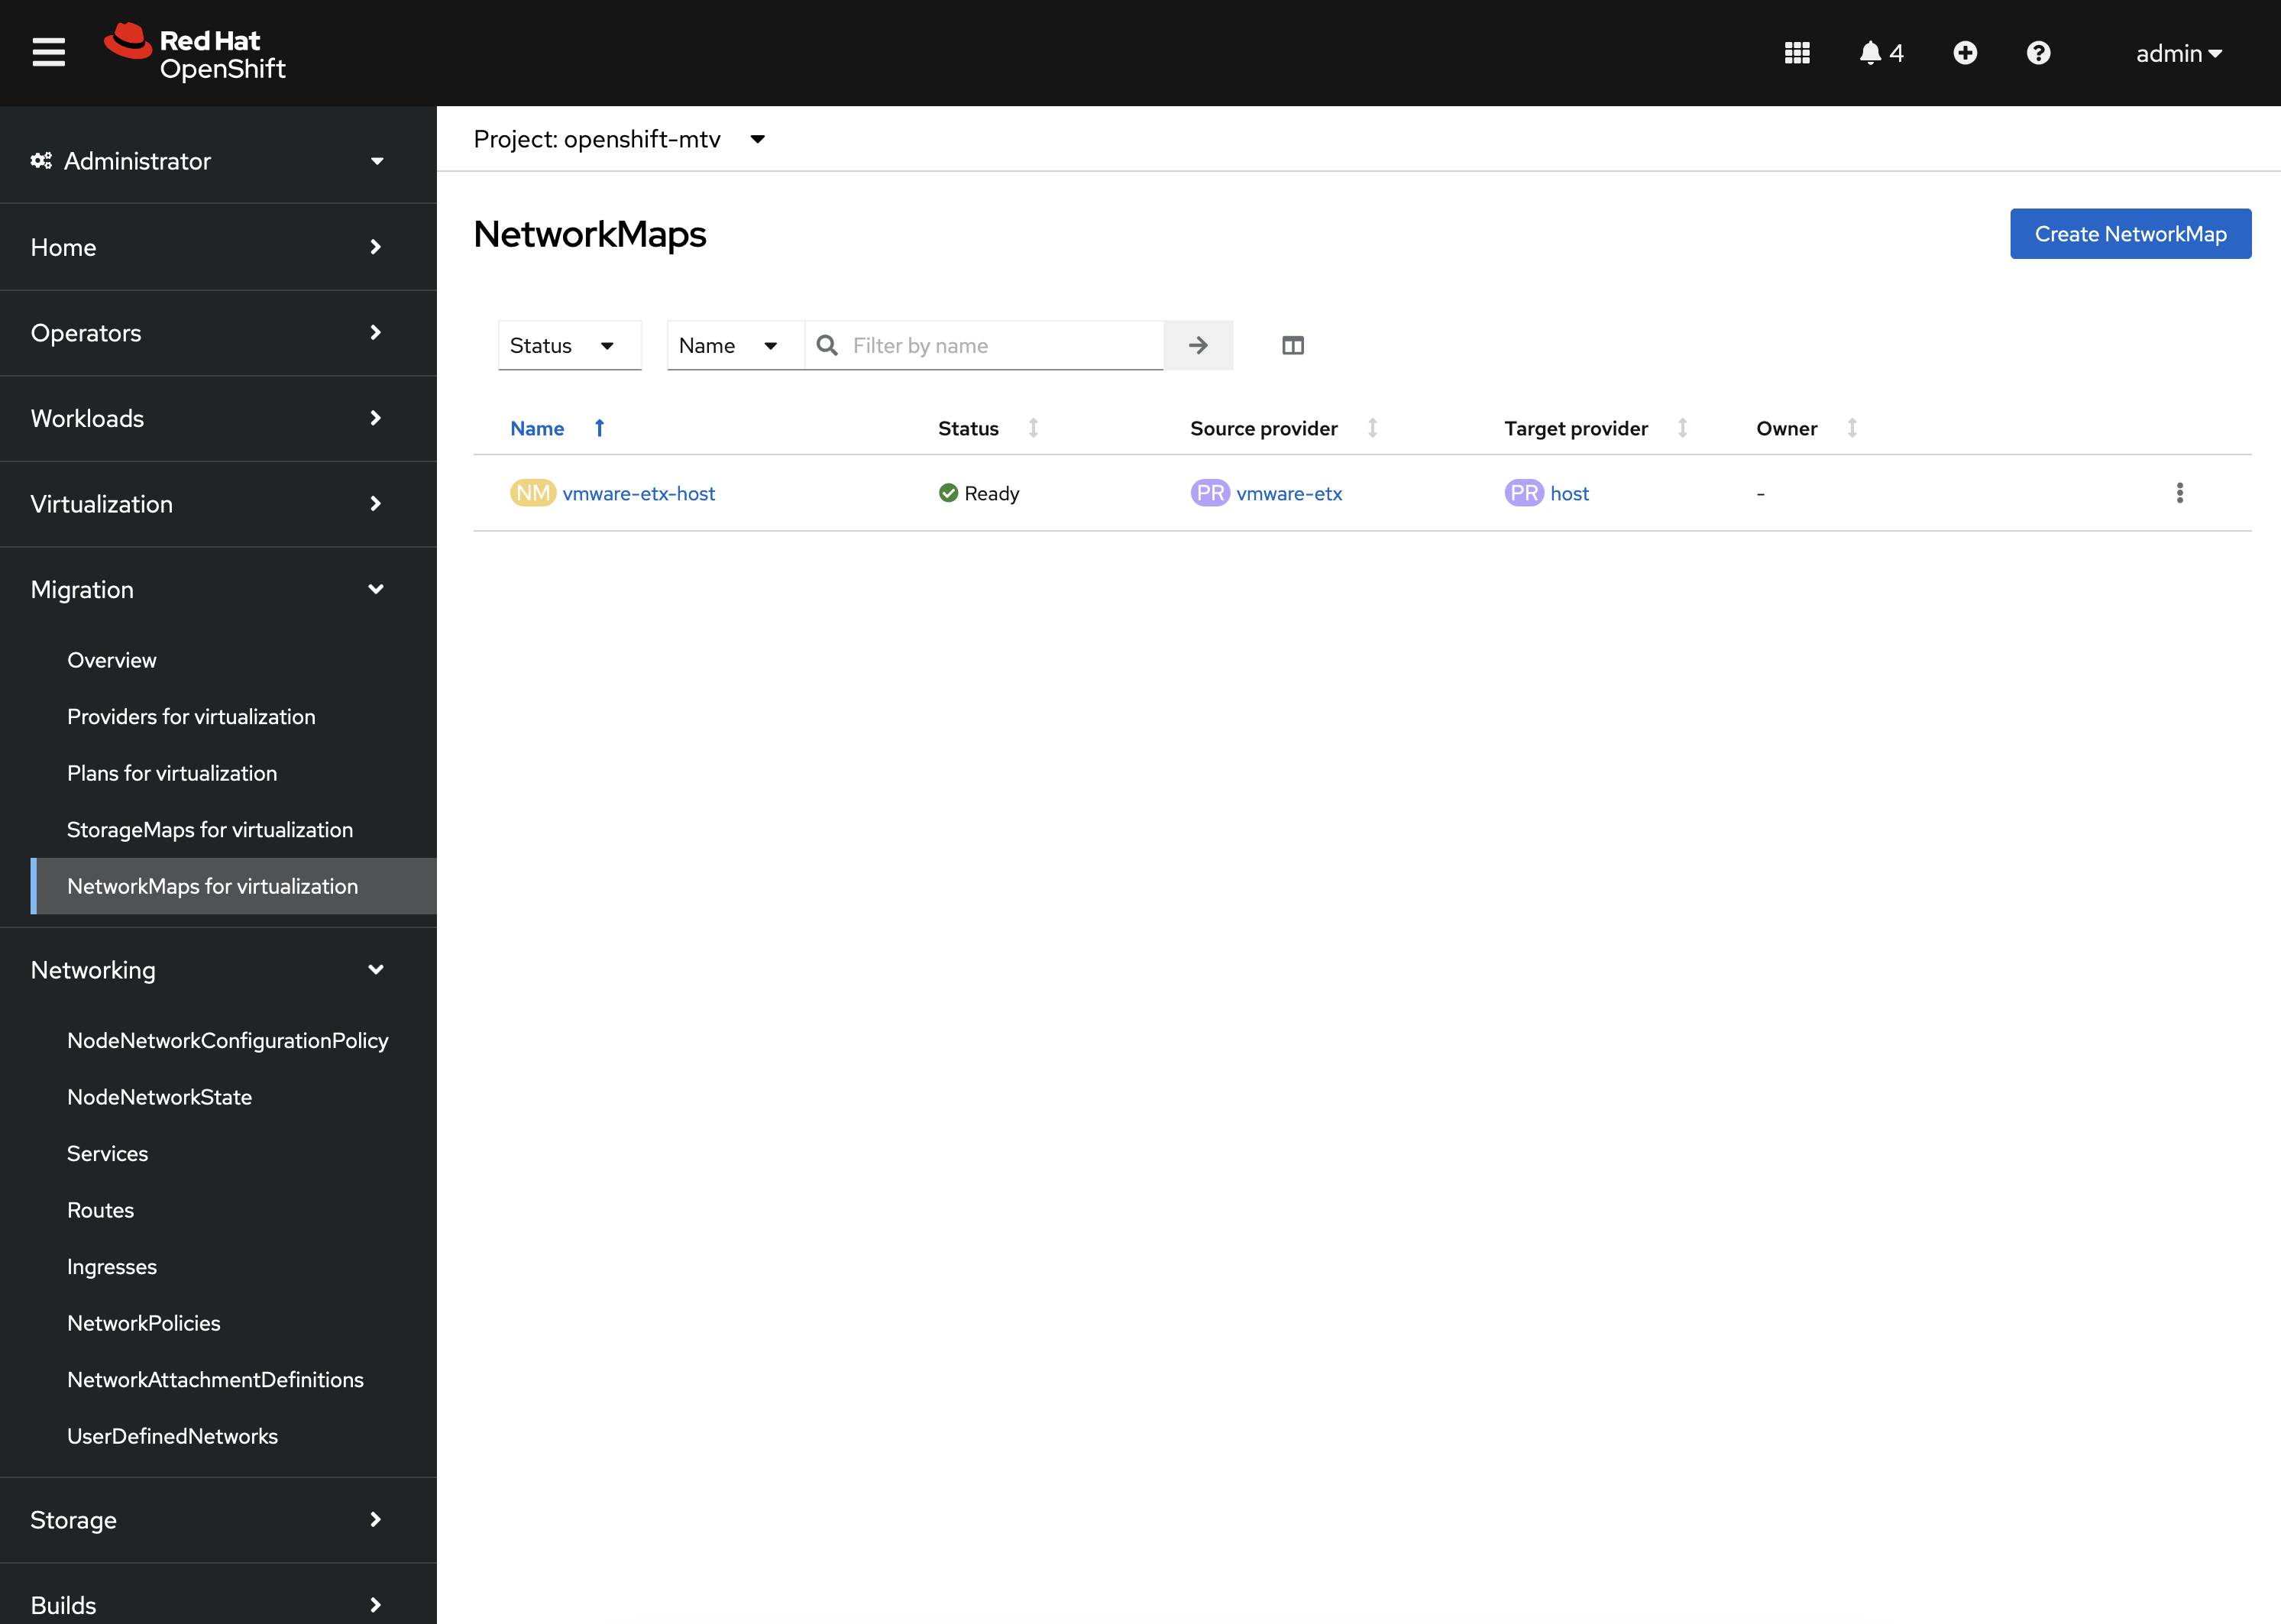

The status of both the StorageMap and NetworkMap should each be Ready indicating that it can be used to migrate Virtual Machines.
If all of the steps above were validated, the Ansible for OpenShift Virtualization Migration has been installed successfully!