Appendix B: OpenShift Platform Environment Setup
Choose one of the options below to prepare your OpenShift platform environment. Option 1 provisions the cluster; then use Option 2 (automated) or Option 3 (manual) to install the workshop components.
Option 1: RHDP Pre-Provisioned Environment (Recommended)
The Red Hat Demo Platform (RHDP) provides a ready-to-use OpenShift 4.21 cluster on AWS. This is the fastest way to get started.
Deploy the Environment
-
Click the link below to open the RHDP catalog:
-
Log in with your Red Hat credentials (SSO for associates, user account for partners)
-
Click Order and wait for the environment to provision (typically 15-30 minutes for a full cluster)
-
Once ready, you will receive connection details including:
-
OpenShift console URL
-
API endpoint
-
Admin credentials
-
ocCLI login command
-
After Provisioning
The RHDP OpenShift cluster provides a clean OpenShift 4.21 environment. You will still need to install the workshop operators and configure the registry. Use Option 2 (Kustomize bootstrap) or Option 3 (manual steps) below to complete the setup.
Verify your cluster access:
oc login {openshift_api_server_url} -u admin
oc version
oc auth can-i create clusterrole
Option 2: Kustomize Bootstrap (Full Stack)
The bootstrap/ directory in this repository contains Kustomize overlays that install all operators (Pipelines, Builds/Shipwright, Quay, ODF, ACS), deploy NooBaa for S3 object storage, deploy Quay with Clair and ODF-backed storage, deploy ACS with admission control, and configure registry credentials — all in one run.
|
An HA cluster with 3+ nodes is required. ODF (OpenShift Data Foundation) provides S3-compatible object storage via NooBaa, which Quay uses for image blob storage. This does not work on Single Node OpenShift (SNO). |
git clone https://github.com/rhpds/zero-cve-hummingbird-showroom.git
cd zero-cve-hummingbird-showroom
./bootstrap/setup-all.sh
For multi-user workshops, set the NUM_USERS environment variable to create multiple Quay accounts and registry credential secrets:
NUM_USERS=10 ./bootstrap/setup-all.shThe script installs the OpenShift GitOps operator, creates an ArgoCD Application that deploys all components via sync waves, and monitors progress. The ArgoCD Application uses SkipDryRunOnMissingResource=true so that CRD-dependent resources (e.g., Tekton Pipelines and Tasks at wave 10) can sync after the operator that registers their CRDs (OpenShift Pipelines at wave 1) finishes installing. Post-configuration (Quay user initialization, registry credentials, ACS init-bundle generation) runs as Kubernetes Jobs managed by ArgoCD PostSync hooks.
|
If the Quay user initialization fails (e.g., on a cluster where Quay was previously deployed), the script will attempt to create the account via the Quay user creation API. If that also fails, open the Quay console URL shown at the end of the script, click Create Account, and register with username |
Option 3: Manual Steps (Full Stack)
Follow the detailed steps below if you prefer to configure each component individually, or if you need to troubleshoot a specific part of the setup.
Prerequisites Check
Step 1: Verify OpenShift Access
Confirm you can access your OpenShift cluster:
oc login {openshift_api_server_url} -u adminWhen prompted, enter your password: PROVIDED-IN-LAB
Login successful.

You have access to XX projects, the list has been suppressed...
Step 2: Verify Cluster Version
Check that you’re running OpenShift 4.21 or later:
oc versionClient Version: 4.21.x Server Version: 4.21.x Kubernetes Version: v1.34.x
|
Builds for Red Hat OpenShift requires OpenShift 4.19+, but 4.21 is recommended for the latest features and security patches. |
Step 3: Verify Cluster-Admin Privileges
Shipwright installation requires cluster-admin privileges:
oc auth can-i create clusterroleyes
|
If you see "no", contact your cluster administrator to grant cluster-admin privileges for this workshop. ClusterBuildStrategies are cluster-scoped resources that require elevated permissions. |
Step 4: Create Workshop Namespace
Create a dedicated namespace for your build experiments:
oc new-project {user}-hummingbird-buildsNow using project "{user}-hummingbird-builds" on server "https://...".
|
In production, you might use separate namespaces for different teams or environments:
- |
Operator Installation
Install all five operators (OpenShift Pipelines, Builds/Shipwright, Quay, ODF, ACS) using the Kustomize overlays from the workshop repository.
Step 5: Install All Operators via Kustomize
Clone the workshop repository (if you haven’t already) and apply the operator manifests:
git clone https://github.com/rhpds/zero-cve-hummingbird-showroom.git
cd zero-cve-hummingbird-showroom
oc apply -k bootstrap/01-operators/namespace/openshift-builds created operatorgroup.operators.coreos.com/openshift-builds-operator-group created subscription.operators.coreos.com/openshift-builds-operator created namespace/quay created operatorgroup.operators.coreos.com/quay-operator-group created subscription.operators.coreos.com/quay-operator created subscription.operators.coreos.com/openshift-pipelines-operator-rh created namespace/openshift-storage created subscription.operators.coreos.com/odf-operator created namespace/rhacs-operator created operatorgroup.operators.coreos.com/rhacs-operator created subscription.operators.coreos.com/rhacs-operator created
|
This single command installs five operators:
The Kustomize overlays reference the gitops-catalog for Pipelines, ODF, and ACS, and use local manifests for Builds and Quay. |
Step 6: Verify All Operators
Wait for each operator to reach the Succeeded phase (this may take 3-5 minutes):
echo "=== Checking Builds operator ==="
for i in $(seq 1 60); do
    PHASE=$(oc get csv -n openshift-builds -l operators.coreos.com/openshift-builds-operator.openshift-builds -o jsonpath='{.items[0].status.phase}' 2>/dev/null || echo "Pending")
    if [ "$PHASE" = "Succeeded" ]; then echo "Builds operator: Succeeded"; break; fi
    if [ "$i" -eq 60 ]; then echo "WARNING: Builds operator not ready"; fi
    sleep 5
done

echo "=== Checking Pipelines operator ==="
if oc get pods -n openshift-pipelines 2>/dev/null | grep -q Running; then
    echo "OpenShift Pipelines: Running"
else
    echo "OpenShift Pipelines: Waiting... (check: oc get pods -n openshift-pipelines)"
fi

echo "=== Checking Quay operator ==="
for i in $(seq 1 60); do
    PHASE=$(oc get csv -n quay -l operators.coreos.com/quay-operator.quay -o jsonpath='{.items[0].status.phase}' 2>/dev/null || echo "Pending")
    if [ "$PHASE" = "Succeeded" ]; then echo "Quay operator: Succeeded"; break; fi
    if [ "$i" -eq 60 ]; then echo "WARNING: Quay operator not ready"; fi
    sleep 5
done

echo "=== Checking ACS operator ==="
for i in $(seq 1 60); do
    PHASE=$(oc get csv -n rhacs-operator -o jsonpath='{.items[0].status.phase}' 2>/dev/null || echo "Pending")
    if [ "$PHASE" = "Succeeded" ]; then echo "ACS operator: Succeeded"; break; fi
    if [ "$i" -eq 60 ]; then echo "WARNING: ACS operator not ready"; fi
    sleep 5
done|
If any operator stays in |
Step 7: Verify Shipwright CRDs
Confirm the Shipwright Custom Resource Definitions are installed:
oc get crd | grep shipwrightbuildruns.shipwright.io builds.shipwright.io buildstrategies.shipwright.io clusterbuildstrategies.shipwright.io
|
These four CRDs are the foundation of Shipwright:
|
Understanding Build Resources
Before starting the Module 2 labs, review the Shipwright resource hierarchy.
Shipwright Resource Types
- BuildStrategy (Namespace-scoped)
-
Defines how to build images within a single namespace. Use for team-specific or experimental build patterns.
oc get buildstrategy -n {user}-hummingbird-builds - ClusterBuildStrategy (Cluster-scoped)
-
Defines how to build images across the entire cluster. Use for organization-wide standards that all teams can leverage.
oc get clusterbuildstrategy - Build
-
References a BuildStrategy and defines the source code location, output registry, and build parameters. This is what developers create to build their applications.
- BuildRun
-
Executes a Build. Can be created manually or triggered by events (git commits, webhooks).
Resource Relationship Diagram
ClusterBuildStrategy: "nodejs-hummingbird"
  -> (used by)
Build: "myapp-build"
  - Source: https://github.com/myorg/myapp.git
  - Output: <on-cluster-quay>/myorg/myapp:latest
  -> (executed by)
BuildRun: "myapp-build-run-abc123"
  - Status: Succeeded
  - Image: <on-cluster-quay>/myorg/myapp:latest@sha256:...
Step 8: List Pre-installed BuildStrategies
oc get clusterbuildstrategyNAME AGE buildah 5m buildpacks-v3 5m source-to-image 5m
|
These are starting points provided by the operator. In the Module 2 labs, you’ll create custom strategies optimized for Hummingbird runtimes. |
Step 9: Inspect a BuildStrategy
Examine the buildah strategy that comes pre-installed:
oc get clusterbuildstrategy buildah -o yaml | head -50-
spec.parameters: Customizable values (Dockerfile path, image registry, etc.)
-
spec.buildSteps: Tekton task steps that execute the build
-
securityContext: Security settings for build pods
-
volumes: Workspace and cache configurations
|
BuildStrategies use Tekton Task syntax. Each step runs in a container with specific tools (buildah, git, etc.). This is how Shipwright integrates with the OpenShift Pipelines ecosystem. |
Red Hat Quay On-Cluster Registry Setup
All Module 2 labs push built images to an on-cluster Quay registry. Quay provides validated TLS via the OpenShift ingress, integrated Clair vulnerability scanning, and a web console for browsing repositories and scan results.
|
The Quay operator was already installed in Step 5. The following steps deploy and configure the Quay registry instance. |
Step 10: Deploy NooBaa for Quay Object Storage
ODF provides S3-compatible object storage via NooBaa. Deploy a standalone NooBaa instance that Quay will use for image blob storage:
oc create namespace openshift-storage 2>/dev/null || true
oc apply -k bootstrap/02a-odf-noobaa/
Wait for NooBaa to become ready:
echo "Waiting for NooBaa..."
for i in $(seq 1 60); do
    PHASE=$(oc get noobaa noobaa -n openshift-storage -o jsonpath='{.status.phase}' 2>/dev/null || echo "Pending")
    if [ "$PHASE" = "Ready" ]; then echo "NooBaa: Ready"; break; fi
    echo "  Phase: ${PHASE} (${i}/60)"
    sleep 5
done
Step 11: Create Quay Configuration Bundle
Create a configuration secret for the Quay registry. With ODF providing object storage, no manual storage configuration is needed:
cat << 'EOF' | oc apply -f -
apiVersion: v1
kind: Secret
metadata:
  name: quay-config-bundle
  namespace: quay
stringData:
  config.yaml: |
    FEATURE_USER_INITIALIZE: true
    CREATE_PRIVATE_REPO_ON_PUSH: true
    CREATE_NAMESPACE_ON_PUSH: true
    SUPER_USERS:
      - workshopuser
EOF|
|
Step 12: Deploy QuayRegistry Instance
Create a QuayRegistry custom resource. The managed configuration lets the operator handle dependencies (PostgreSQL, Redis, Clair, object storage via ODF) automatically:
cat << 'EOF' | oc apply -f -
apiVersion: quay.redhat.com/v1
kind: QuayRegistry
metadata:
  name: quay-registry
  namespace: quay
spec:
  configBundleSecret: quay-config-bundle
  components:
    - kind: clair
      managed: true
    - kind: postgres
      managed: true
    - kind: redis
      managed: true
    - kind: objectstorage
      managed: true
    - kind: route
      managed: true
    - kind: tls
      managed: true
    - kind: horizontalpodautoscaler
      managed: false
    - kind: mirror
      managed: false
    - kind: monitoring
      managed: false
EOF|
Setting |
Wait for Quay to become ready (this typically takes 3-5 minutes):
echo "Waiting for Quay registry pods..."
oc wait --for=condition=Available deployment -l quay-operator/quayregistry=quay-registry -n quay --timeout=300s 2>/dev/null || \
  echo "Still starting -- check: oc get pods -n quay"
Step 12: Get the Quay Registry Route
echo "Quay registry: {quay_hostname}"
echo "Quay console: {quay_console_url}"|
Bookmark the Quay console URL. You will use it throughout Module 2 to browse repositories, inspect image tags, and view Clair vulnerability scan results. |
Step 13: Create a Workshop User
Create a Quay user account for the workshop via the API:
curl -sk "https://{quay_hostname}/api/v1/user/initialize" \
  -H 'Content-Type: application/json' \
  -d '{
    "username": "workshopuser",
    "password": "workshoppass123",
    "email": "workshop@example.com",
    "access_token": true
}' | python3 -m json.tool|
The Click Create Account at the bottom of the login page and register with:
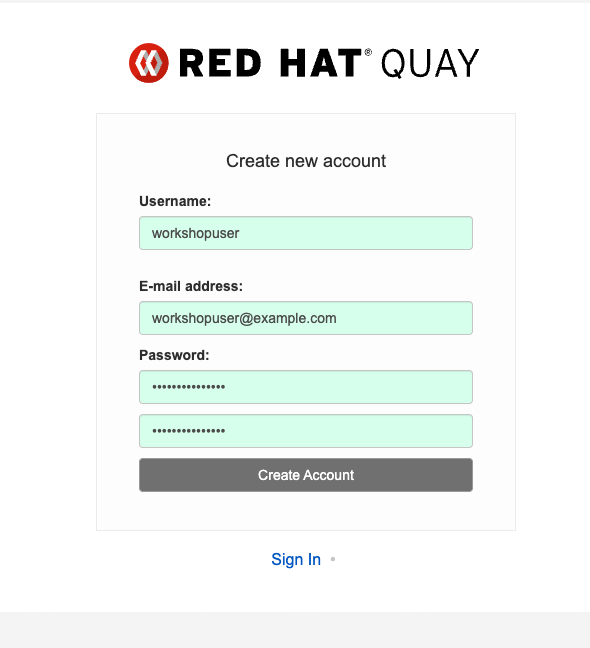
After creating the account you will be logged in and see the Repositories dashboard: 
|
Step 14: Create Registry Credentials Secret
Create the registry-credentials secret that all Module 2 labs reference for pushing images:
oc create secret docker-registry registry-credentials \
  --docker-server="{quay_hostname}" \
  --docker-username={quay_user} \
  --docker-password={quay_password} \
-n {user}-hummingbird-buildssecret/registry-credentials created
Step 15: Link Secret to Pipeline ServiceAccount
oc secrets link pipeline registry-credentials --for=pull,mount -n {user}-hummingbird-builds|
The |
Step 16: Verify Registry Access
Confirm you can authenticate to the on-cluster Quay registry:
podman login "{quay_hostname}" \
  --username={quay_user} \
--password={quay_password}Login Succeeded!
|
Notice that no |
Quay includes Clair as its built-in vulnerability scanner. Every image pushed to the registry is automatically scanned for CVEs. You do not need to install or configure Clair separately — it was deployed as part of the QuayRegistry CR above (clair: managed: true).
You will use Clair scan results in Sub-Module 2.3 alongside the grype-based pipeline scanning.
To verify Clair is running:
oc get pods -n quay -l quay-component=clair-appNAME READY STATUS RESTARTS AGE quay-registry-clair-app-... 1/1 Running 0 ...
Red Hat Advanced Cluster Security (ACS) Setup
|
This section is only required if you plan to complete Sub-Module 2.2: The Immutable Fortress — Zero-CVE with ACS Enforcement. You can skip it for all other Module 2 labs. |
Red Hat Advanced Cluster Security for Kubernetes (RHACS) provides vulnerability scanning, policy enforcement, and admission control. Sub-Module 2.2 uses ACS to enforce a zero-CVE posture on the cluster.
|
The ACS operator was already installed in Step 5. The following steps deploy and configure the ACS Central and SecuredCluster instances. |
Step 17: Deploy ACS Central
Create the Central custom resource, which deploys the ACS management console and scanner:
cat << 'EOF' | oc apply -f -
apiVersion: v1
kind: Namespace
metadata:
  name: stackrox
---
apiVersion: platform.stackrox.io/v1alpha1
kind: Central
metadata:
  name: stackrox-central-services
  namespace: stackrox
spec:
  central:
    exposure:
      loadBalancer:
        enabled: false
      route:
        enabled: true
    persistence:
      persistentVolumeClaim:
        claimName: stackrox-db
  scanner:
    analyzer:
      scaling:
        autoScaling: Enabled
        maxReplicas: 3
        minReplicas: 1
        replicas: 1
    scannerComponent: Enabled
EOF|
The |
Wait for Central to become ready (this typically takes 3-5 minutes):
echo "Waiting for ACS Central pods..."
oc wait --for=condition=Available deployment/central -n stackrox --timeout=300s
Step 18: Retrieve the ACS Admin Password
ACS_PASSWORD=$(oc get secret central-htpasswd -n stackrox -o jsonpath='{.data.password}' | base64 -d)
echo "ACS Central admin password: $ACS_PASSWORD"|
Save this password — you will need it to log in to ACS Central and to generate API tokens for |
Step 19: Access ACS Central
ACS_ROUTE=$(oc get route central -n stackrox -o jsonpath='{.spec.host}')
echo "ACS Central URL: https://$ACS_ROUTE"
Open the URL in your browser and log in with username admin and the password from Step 18.
Step 20: Generate Cluster Init Bundle
The SecuredCluster requires TLS secrets (an init bundle) to authenticate with Central. Generate and apply the bundle via the Central API:
ACS_ROUTE=$(oc get route central -n stackrox -o jsonpath='{.spec.host}')
ACS_PASSWORD=$(oc get secret central-htpasswd -n stackrox -o jsonpath='{.data.password}' | base64 -d)

curl -sk -u "admin:${ACS_PASSWORD}" \
  "https://${ACS_ROUTE}/v1/cluster-init/init-bundles" \
  -X POST -H 'Content-Type: application/json' \
  -d '{"name": "workshop-cluster-init-bundle"}' \
  | python3 -c "import json,base64,sys; d=json.load(sys.stdin); open('/tmp/init-bundle.yaml','w').write(base64.b64decode(d['kubectlBundle']).decode())"

oc apply -f /tmp/init-bundle.yaml -n stackrox
rm -f /tmp/init-bundle.yamlsecret/collector-tls created secret/sensor-tls created secret/admission-control-tls created
|
Without the init bundle, the SecuredCluster will remain stuck in an |
Step 21: Deploy the Secured Cluster Services
Create the SecuredCluster CR:
cat << 'EOF' | oc apply -f -
apiVersion: platform.stackrox.io/v1alpha1
kind: SecuredCluster
metadata:
  name: stackrox-secured-cluster-services
  namespace: stackrox
spec:
  clusterName: workshop-cluster
  admissionControl:
    listenOnCreates: true
    listenOnUpdates: true
    listenOnEvents: true
    contactImageScanners: ScanIfMissing
    timeoutSeconds: 20
    bypass: BreakGlassAnnotation
  perNode:
    collector:
      collection: EBPF
      imageFlavor: Regular
    taintToleration: TolerateTaints
EOF
Wait for the admission controller to start:
oc wait --for=condition=Available deployment/admission-control -n stackrox --timeout=300sStep 22: Install the roxctl CLI
The download endpoint requires authentication with the ACS admin password:
ACS_ROUTE=$(oc get route central -n stackrox -o jsonpath='{.spec.host}')
ACS_PASSWORD=$(oc get secret central-htpasswd -n stackrox -o jsonpath='{.data.password}' | base64 -d)

curl -sk -u "admin:${ACS_PASSWORD}" \
  "https://${ACS_ROUTE}/api/cli/download/roxctl-linux" -o roxctl
chmod +x roxctl
sudo mv roxctl /usr/local/bin/

roxctl version
Step 23: Verify ACS Installation
oc get pods -n stackroxNAME READY STATUS RESTARTS AGE admission-control-... 1/1 Running 0 ... central-... 1/1 Running 0 ... collector-... 2/2 Running 0 ... scanner-... 1/1 Running 0 ... scanner-db-... 1/1 Running 0 ... sensor-... 1/1 Running 0 ...
Verify the admission controller webhook is registered:
oc get ValidatingWebhookConfiguration -l app.kubernetes.io/name=stackroxNAME WEBHOOKS AGE stackrox-validating-webhook 1 ...
|
If the webhook does not appear, check that |
Your ACS installation is ready. Proceed to Step 24 below to provision per-user ACS access before running the workshop.
Step 24: Provision Per-User ACS Access
Run setup-workshop-users.sh to generate per-user ACS API tokens and inject them into each student’s Showroom environment. This step must be completed after ACS Central is running.
The script (one run covers all users):
-
Generates an ACS API token with the Admin role (ACS RBAC only — no OpenShift cluster-admin) for each student account (
workshop-{username}), enabling Exercise 7 policy creation. -
Injects
rhacs_routeandrhacs_api_tokeninto each student’s Showroomuser_data.ymlso the module can use them as{rhacs_route}and{rhacs_api_token}attributes. -
Pre-creates the
{username}-hummingbird-acs-labnamespace with anadminRoleBinding so students can useoc projectwithout cluster-admin. -
Builds a custom Showroom terminal image with
roxctlpre-installed and pushes it to the cluster’s internal image registry.
cd /path/to/zero-cve-hummingbird-showroom
bash scripts/setup-workshop-users.sh|
If ACS Central was not yet deployed when you first ran |
Proceed to Sub-Module 2.2: The Immutable Fortress.
Red Hat Trusted Artifact Signer (RHTAS) Setup
|
This section is only required if you plan to complete Sub-Module 2.6: Keyless Signing with RHTAS. You can skip it for all other Module 2 labs. |
Red Hat Trusted Artifact Signer (RHTAS) provides keyless signing infrastructure for container images using the Sigstore project. It deploys Fulcio (certificate authority), Rekor (transparency log), CTlog (certificate transparency), and TUF (trust root distribution) on-cluster.
|
If you used Option 2 (Kustomize Bootstrap), the RHTAS operator and Keycloak realm were installed automatically. Verify them with the steps below and skip to Step 27: Download RHTAS CLI Tools. |
Step 25: Install the RHTAS Operator
cat << 'EOF' | oc apply -f -
apiVersion: v1
kind: Namespace
metadata:
  name: trusted-artifact-signer
---
apiVersion: operators.coreos.com/v1
kind: OperatorGroup
metadata:
  name: rhtas-operator-group
  namespace: trusted-artifact-signer
spec: {}
---
apiVersion: operators.coreos.com/v1alpha1
kind: Subscription
metadata:
  name: rhtas-operator
  namespace: trusted-artifact-signer
spec:
  channel: stable
  name: rhtas-operator
  source: redhat-operators
  sourceNamespace: openshift-marketplace
  installPlanApproval: Automatic
EOFnamespace/trusted-artifact-signer created operatorgroup.operators.coreos.com/rhtas-operator-group created subscription.operators.coreos.com/rhtas-operator created
Wait for the operator to install (2-3 minutes):
oc wait --for=condition=AtLatestKnown subscription/rhtas-operator \
  -n trusted-artifact-signer --timeout=300s

oc get csv -n trusted-artifact-signerNAME DISPLAY VERSION REPLACES PHASE rhtas-operator.v1.x.x Red Hat Trusted Artifact Signer 1.x.x Succeeded
Step 26: Create the Keycloak Realm for RHTAS
The RHTAS Fulcio service needs an OIDC issuer for human user signing. Create a trusted-artifact-signer realm in Keycloak:
cat << 'EOF' | oc apply -f -
apiVersion: k8s.keycloak.org/v2alpha1
kind: KeycloakRealmImport
metadata:
  name: trusted-artifact-signer
  namespace: keycloak
spec:
  keycloakCRName: keycloak
  realm:
    id: trusted-artifact-signer
    realm: trusted-artifact-signer
    enabled: true
    registrationAllowed: false
    loginWithEmailAllowed: true
    duplicateEmailsAllowed: false
    sslRequired: external
    clients:
      - clientId: trusted-artifact-signer
        clientAuthenticatorType: client-secret
        enabled: true
        publicClient: true
        protocol: openid-connect
        directAccessGrantsEnabled: true
        standardFlowEnabled: true
        frontchannelLogout: false
        redirectUris:
          - "*"
        webOrigins:
          - "*"
    roles:
      realm:
        - name: user
          description: Default user role
    users:
      - username: sigstore-user
        email: sigstore@example.com
        emailVerified: true
        enabled: true
        credentials:
          - type: password
            value: sigstore-user
            temporary: false
        realmRoles:
          - user
EOFkeycloakrealmimport.k8s.keycloak.org/trusted-artifact-signer created
Wait for the realm import to complete:
for i in $(seq 1 30); do
    STATUS=$(oc get keycloakrealmimport trusted-artifact-signer -n keycloak \
      -o jsonpath='{.status.conditions[?(@.type=="Done")].status}' 2>/dev/null || echo "Pending")
    if [ "$STATUS" = "True" ]; then echo "Keycloak realm: Ready"; break; fi
    echo "  Status: ${STATUS} (${i}/30)"
    sleep 5
done
Verify the realm is accessible:
KEYCLOAK_URL=$(oc get route keycloak -n keycloak -o jsonpath='{.spec.host}')
curl -sk "https://${KEYCLOAK_URL}/realms/trusted-artifact-signer/.well-known/openid-configuration" | python3 -m json.tool | head -5
Step 27: Download RHTAS CLI Tools
After the RHTAS operator is installed, download cosign, rekor-cli, and ec (Enterprise Contract) from the operator’s clientserver route:
DOWNLOADS_URL=$(oc get route -n trusted-artifact-signer \
  -l app=trusted-artifact-signer-clientserver \
  -o jsonpath='{.items[0].spec.host}' 2>/dev/null)

if [ -z "$DOWNLOADS_URL" ]; then
    echo "RHTAS clientserver route not yet available. Waiting..."
    for i in $(seq 1 30); do
        DOWNLOADS_URL=$(oc get route -n trusted-artifact-signer \
          -l app=trusted-artifact-signer-clientserver \
          -o jsonpath='{.items[0].spec.host}' 2>/dev/null)
        if [ -n "$DOWNLOADS_URL" ]; then break; fi
        sleep 10
    done
fi

echo "Downloads URL: https://${DOWNLOADS_URL}"

# Download cosign
curl -sSL "https://${DOWNLOADS_URL}/clients/linux/cosign-amd64.gz" -o cosign-amd64.gz
gunzip cosign-amd64.gz && chmod +x cosign-amd64
sudo mv cosign-amd64 /usr/local/bin/cosign

# Download rekor-cli
curl -sSL "https://${DOWNLOADS_URL}/clients/linux/rekor-cli-amd64.gz" -o rekor-cli-amd64.gz
gunzip rekor-cli-amd64.gz && chmod +x rekor-cli-amd64
sudo mv rekor-cli-amd64 /usr/local/bin/rekor-cli

# Download ec (Enterprise Contract CLI)
curl -sSL "https://${DOWNLOADS_URL}/clients/linux/ec-amd64.gz" -o ec-amd64.gz
gunzip ec-amd64.gz && chmod +x ec-amd64
sudo mv ec-amd64 /usr/local/bin/ec

# Verify installations
cosign version
rekor-cli version
ec version|
The RHTAS operator serves CLI binaries that are version-matched to the deployed Sigstore stack. Always use these binaries rather than downloading from upstream to ensure compatibility. If the clientserver route is not yet available, wait 1-2 minutes for the operator to finish initializing. |
Your RHTAS environment is ready. Proceed to Sub-Module 2.6: Keyless Signing with RHTAS.
Gitea In-Cluster Git Service Setup
|
This section is only required if you plan to use Gitea (in-cluster) instead of GitHub for Sub-Module 2.8: Automated Dependency Updates with Renovate + Podman. You can skip it if using GitHub. |
Gitea is a lightweight, self-hosted Git service. Deploying it on-cluster means the entire Renovate workflow — from Git hosting to Tekton pipelines — runs inside your OpenShift environment with no external dependencies.
|
If you used Option 2 (Kustomize Bootstrap), the Gitea operator and instance were installed automatically. Verify them with the steps below and skip to Step 33: Create a Sample Repository. |
Step 30: Deploy the Gitea Operator
Apply the Gitea operator from the rhpds/gitea-operator project:
cat << 'EOF' | oc apply -f -
apiVersion: v1
kind: Namespace
metadata:
  name: gitea
EOF
oc apply -f https://raw.githubusercontent.com/rhpds/gitea-operator/main/deploy/cluster_role.yaml
oc apply -f https://raw.githubusercontent.com/rhpds/gitea-operator/main/deploy/service_account.yaml -n gitea
oc apply -f https://raw.githubusercontent.com/rhpds/gitea-operator/main/deploy/cluster_role_binding.yaml
oc apply -k https://github.com/rhpds/gitea-operator/config/crd
oc apply -f https://raw.githubusercontent.com/rhpds/gitea-operator/main/deploy/operator.yaml -n giteaWait for the operator pod to be ready:
oc wait --for=condition=Available deployment/gitea-operator \
  -n gitea --timeout=120s

oc get pods -n giteaNAME READY STATUS RESTARTS AGE gitea-operator-xxxxxxxxx-xxxxx 1/1 Running 0 ...
Step 31: Create the Gitea Instance
cat << 'EOF' | oc apply -f -
apiVersion: pfe.rhpds.com/v1
kind: Gitea
metadata:
  name: gitea-server
  namespace: gitea
spec:
  giteaSsl: true
  giteaAdminUser: gitea-admin
  giteaAdminPassword: openshift
  giteaAdminEmail: gitea-admin@example.com
  giteaCreateUsers: true
  giteaGenerateUserFormat: "user-%d"
  giteaUserNumber: 1
  giteaUserPassword: openshift
  postgresqlVolumeSize: 4Gi
  giteaVolumeSize: 4Gi
EOF
Wait for the Gitea pods and route to become available (2-3 minutes):
oc wait --for=condition=Available deployment/gitea-server \
  -n gitea --timeout=300s

GITEA_ROUTE=$(oc get route gitea-server -n gitea -o jsonpath='{.spec.host}')
echo "Gitea URL: https://${GITEA_ROUTE}"Gitea URL: https://gitea-server-gitea.apps.<cluster-domain>
Verify access by logging in:
GITEA_ROUTE=$(oc get route gitea-server -n gitea -o jsonpath='{.spec.host}')

curl -s -o /dev/null -w "%{http_code}" \
  "https://${GITEA_ROUTE}/api/v1/version" \
--insecure200
Step 32: Generate a Gitea Personal Access Token
Create a PAT for the Renovate bot. Gitea PATs require repo and user scopes:
GITEA_ROUTE=$(oc get route gitea-server -n gitea -o jsonpath='{.spec.host}')

GITEA_TOKEN=$(curl -s -X POST \
  "https://${GITEA_ROUTE}/api/v1/users/gitea-admin/tokens" \
  -u "gitea-admin:openshift" \
  -H "Content-Type: application/json" \
  -d '{"name": "renovate-bot", "scopes": ["repo", "user", "issue", "organization"]}' \
  --insecure \
  | jq -r '.sha1')

echo "Gitea PAT: ${GITEA_TOKEN}"|
Save this token — you will need it when configuring the Renovate Secret in Sub-Module 2.8. The token is only displayed once. |
Step 33: Create a Sample Repository
Create a repository with a Containerfile so Renovate has something to scan:
GITEA_ROUTE=$(oc get route gitea-server -n gitea -o jsonpath='{.spec.host}')

curl -s -X POST \
  "https://${GITEA_ROUTE}/api/v1/user/repos" \
  -u "gitea-admin:openshift" \
  -H "Content-Type: application/json" \
  -d '{
    "name": "hummingbird-app",
    "description": "Sample Hummingbird application for Renovate scanning",
    "auto_init": true,
    "default_branch": "main"
  }' \
  --insecure | jq '{name: .name, html_url: .html_url}'
Add a Containerfile to the repo:
GITEA_ROUTE=$(oc get route gitea-server -n gitea -o jsonpath='{.spec.host}')

curl -s -X POST \
  "https://${GITEA_ROUTE}/api/v1/repos/gitea-admin/hummingbird-app/contents/Containerfile" \
  -u "gitea-admin:openshift" \
  -H "Content-Type: application/json" \
  -d "{
    \"message\": \"Add Containerfile\",
    \"content\": \"$(echo -n 'ARG BUILDER_REGISTRY=registry.access.redhat.com/ubi9
ARG RUNTIME_REGISTRY=registry.access.redhat.com/hi

FROM ${BUILDER_REGISTRY}/nodejs-20:latest AS builder
WORKDIR /opt/app-root/src
COPY package*.json ./
RUN npm ci --production

FROM ${RUNTIME_REGISTRY}/nodejs-20:latest
COPY --from=builder /opt/app-root/src/node_modules ./node_modules
COPY . .
USER 1001
EXPOSE 8080
CMD [\"node\", \"server.js\"]' | base64 -w 0)\"
  }" \
  --insecure | jq '{path: .content.path, sha: .content.sha}'
Step 34: Create the Webhook Secret for Tekton
Create a shared secret that Gitea webhooks and the Tekton EventListener will use to verify payloads:
WEBHOOK_SECRET=$(openssl rand -hex 20)
echo "Webhook secret: ${WEBHOOK_SECRET}"

cat << EOF | oc apply -f -
apiVersion: v1
kind: Secret
metadata:
  name: gitea-webhook-secret
  namespace: renovate-pipelines
type: Opaque
stringData:
  webhook-secret: "${WEBHOOK_SECRET}"
EOF|
Save the |
Step 35: Verify Renovate Build Infrastructure
The bootstrap (09-renovate-build-infra) automatically provisions the renovate-pipelines namespace with the Tekton tasks, pipelines, registry credentials, and cosign signing keys needed for Sub-Module 2.8. Verify everything is in place:
echo "=== Namespace ==="
oc get namespace renovate-pipelines

echo ""
echo "=== Pipelines ==="
oc get pipelines -n renovate-pipelines

echo ""
echo "=== Tasks ==="
oc get tasks -n renovate-pipelines

echo ""
echo "=== Secrets ==="
oc get secrets -n renovate-pipelines | grep -E 'internal-registry|cosign-signing'

echo ""
echo "=== RBAC ==="
oc get sa -n renovate-pipelines | grep -E 'tekton-triggers|renovate-trigger|pipeline'
oc get clusterrole tekton-triggers-clusterinterceptors=== Namespace === NAME STATUS AGE renovate-pipelines Active ... === Pipelines === NAME AGE hummingbird-build-pipeline ... renovate-pipeline ... === Tasks === NAME AGE buildah-podman-task ... cosign-sign-attest-task ... grype-scan-task ... renovate-scan ... skopeo-promote-task ... syft-sbom-task ... === Secrets === internal-registry-credentials kubernetes.io/dockerconfigjson ... cosign-signing-keys Opaque ...
|
What the bootstrap provides:
|
Your Gitea environment and Renovate build infrastructure are ready. Proceed to Sub-Module 2.8: Automated Dependency Updates with Renovate + Podman and select the Gitea tab at each step.
Additional Resources
OpenShift Builds Documentation: * Official Builds for OpenShift Docs * Builds for OpenShift GA Announcement
Shipwright Project: * Shipwright Official Site * Shipwright GitHub Repository
Troubleshooting
Issue: Operator stuck in Installing
oc logs -n openshift-builds -l name=openshift-builds-operator

oc get events -n openshift-builds --sort-by=.metadata.creationTimestamp
Issue: CRDs not appearing
oc get csv -n openshift-builds

oc get pods -n openshift-builds
Issue: Permission denied creating ClusterBuildStrategy
oc auth can-i create clusterbuildstrategy

oc auth can-i '*' '*' --all-namespaces
Issue: Quay pods not starting
oc get pods -n quay

oc get events -n quay --sort-by=.metadata.creationTimestamp

oc get quayregistry -n quay -o yaml
Issue: ACS SecuredCluster stuck in Irreconcilable
oc get securedcluster -n stackrox -o yaml

oc get secret sensor-tls -n stackrox
If sensor-tls does not exist, the init bundle was not applied. Return to Step 20 to generate and apply it.
Issue: RHTAS operator not installing
oc get csv -n trusted-artifact-signer

oc get events -n trusted-artifact-signer --sort-by=.metadata.creationTimestamp
Issue: RHTAS clientserver route not available
oc get route -n trusted-artifact-signer

oc get pods -n trusted-artifact-signer
The clientserver pod must be running before CLI tools can be downloaded. Wait for the operator to finish initialization.
Issue: Keycloak realm import failing
oc get keycloakrealmimport trusted-artifact-signer -n keycloak -o yaml

oc logs -l app=keycloak -n keycloak --tail=50
Issue: Gitea operator not starting
oc get pods -n gitea

oc get events -n gitea --sort-by=.metadata.creationTimestamp
Issue: ArgoCD sync fails with "could not find tekton.dev/Pipeline"
This happens when the ArgoCD Application is missing the SkipDryRunOnMissingResource=true sync option. ArgoCD validates all resources (including wave 10 Tekton Tasks/Pipelines) before applying any wave, and rejects resources whose CRDs have not yet been registered by the Pipelines operator (wave 1).
oc get application hummingbird-workshop -n openshift-gitops \
  -o jsonpath='{.status.operationState.syncResult.resources}' | python3 -m json.tool
Fix: ensure SkipDryRunOnMissingResource=true is present in the ArgoCD Application’s spec.syncPolicy.syncOptions, then re-apply the application:
# Re-run the bootstrap script to update the ArgoCD Application
./bootstrap/setup-all.sh
Issue: Gitea instance route not available
oc get route -n gitea

oc get gitea gitea-server -n gitea -o yaml
The operator creates the route after the PostgreSQL and Gitea pods are both running. Wait 2-3 minutes for the full initialization.