Sub-Module 2.1: Building with Hummingbird on OpenShift
Introduction
In Module 1, you built Quarkus applications locally using Podman with multi-stage Containerfiles: a full builder image for compilation and a minimal Hummingbird runtime for production. In this sub-module, you’ll bring that same pattern to OpenShift using Shipwright Builds.
Shipwright provides a Kubernetes-native build framework built on Tekton. Instead of running podman build on a developer workstation, you define a Build resource pointing to a Git repository and a ClusterBuildStrategy, then trigger a BuildRun. The Shipwright operator handles the rest — cloning the source, running the build, and pushing the image to the registry.
The pre-installed buildah ClusterBuildStrategy (shipped with the Builds for Red Hat OpenShift operator) works with any standard Containerfile, making it the natural choice for the multi-stage Hummingbird pattern you already know.
Exit the VM
In case you are still logged into the VM from Module 1 exit the VM by typing exit followed by pressing the Enter key.
Don’t worry if you exit one too many times, simply press Enter to reconnect to your terminal.
Log In to the Cluster
Before running any commands, verify you are logged in to the OpenShift cluster. If the Showroom terminal is not already authenticated, run:
oc login -u {user} -p {password} https://api.cluster-PROVIDE-GUID.example.com:6443 --insecure-skip-tls-verifyConfirm the login succeeded:
oc whoamiProject setup
Switch to your hummingbird project on the OpenShift Cluster:
oc project {user}-hummingbird-buildsRegistry Configuration
The on-cluster Quay registry and registry-credentials secret should already be configured from Appendix B: Quay Setup. Verify the secret exists and is linked:
oc get secret registry-credentials -n {user}-hummingbird-builds
oc describe sa pipeline -n {user}-hummingbird-builds | grep registry-credentialsNAME TYPE DATA AGE registry-credentials kubernetes.io/dockerconfigjson 1 ... Mountable secrets: registry-credentials
|
If the secret does not exist, return to Appendix B: Quay Setup and complete Steps 5-6 to create the secret and link it to the |
Verify Pre-Installed BuildStrategy
Step 2: List Available ClusterBuildStrategies
The Builds for Red Hat OpenShift operator ships with several pre-installed strategies. Verify they are available:
oc get clusterbuildstrategyNAME AGE buildah ... buildpacks ... buildpacks-extender ... source-to-image ...
The buildah strategy is the one we’ll use. It builds from a Containerfile (or Dockerfile) using Red Hat’s ubi9/buildah image and pushes the result to the configured registry.
Step 3: Inspect the buildah Strategy
oc get clusterbuildstrategy buildah -o jsonpath='{.spec.parameters[*].name}' | tr ' ' '\n'build-args registries-block registries-insecure registries-search dockerfile storage-driver target
-
dockerfile: Path to the Containerfile (default:Dockerfile). We’ll override this toContainerfile. -
build-args: PassARGvalues to the Containerfile (e.g., override builder/runtime images). -
registries-insecure: Mark registries that don’t have valid TLS (needed for the on-cluster Quay with self-signed certs).
|
Why use the pre-installed strategy? The |
Create Build Resource
Step 4: Create Build
Create a Build resource pointing to the sample Quarkus application with a Hummingbird multi-stage Containerfile:
cat << 'EOF' | oc apply -f -
apiVersion: shipwright.io/v1beta1
kind: Build
metadata:
  name: sample-quarkus-app
  namespace: {user}-hummingbird-builds
spec:
  source:
    type: Git
    git:
      url: https://github.com/tosin2013/sample-quarkus-hummingbird
      revision: main
  strategy:
    name: buildah
    kind: ClusterBuildStrategy
  paramValues:
  - name: dockerfile
    value: "Containerfile"
  - name: build-args
    values:
    - value: "BUILDER_IMAGE=registry.access.redhat.com/hi/openjdk:21-builder"
    - value: "RUNTIME_IMAGE=registry.access.redhat.com/hi/openjdk:21-runtime"
  output:
    image: {quay_hostname}/{quay_user}/sample-quarkus:latest
    credentials:
      name: registry-credentials
EOFbuild.shipwright.io/sample-quarkus-app created
-
Source: Git repository containing a Quarkus REST application with a multi-stage Containerfile
-
Strategy: Pre-installed
buildahClusterBuildStrategy -
Containerfile: Multi-stage build using
registry.access.redhat.com/hi/openjdk:21-builder(Stage 1) andregistry.access.redhat.com/hi/openjdk:21-runtime(Stage 2) -
build-args: Override
BUILDER_IMAGEandRUNTIME_IMAGEto pin the Hummingbird images fromregistry.access.redhat.com/hi(the Red Hat Container Registry) -
Output: Push to
{quay_hostname}/{quay_user}/sample-quarkus:latest -
Credentials: Use
registry-credentialssecret for registry push
|
The Containerfile in the repository follows the same multi-stage pattern from Module 1:
|
Execute BuildRun
Step 5: Trigger a BuildRun
Execute the build by creating a BuildRun resource:
cat << 'EOF' | oc apply -f -
apiVersion: shipwright.io/v1beta1
kind: BuildRun
metadata:
  name: sample-quarkus-app-run-1
  namespace: {user}-hummingbird-builds
spec:
  build:
    name: sample-quarkus-app
EOFbuildrun.shipwright.io/sample-quarkus-app-run-1 created
Step 6: Monitor BuildRun Progress
Watch the build execution:
oc get buildrun sample-quarkus-app-run-1 -n {user}-hummingbird-builds -wNAME SUCCEEDED REASON STARTTIME COMPLETIONTIME sample-quarkus-app-run-1 Unknown Pending 2s sample-quarkus-app-run-1 Unknown Running 15s sample-quarkus-app-run-1 True Succeeded 5m 5s
Press Ctrl+C once you see Succeeded.
|
If the BuildRun shows Common failure reasons and fixes:
|
|
Typical build times for the Quarkus application:
The first build is slower because the Hummingbird builder image and all Maven dependencies must be pulled. This is normal. |
View Build Logs
Step 7: View Detailed Build Logs
Check detailed build logs:
BUILDRUN_POD=$(oc get buildrun sample-quarkus-app-run-1 -n {user}-hummingbird-builds -o jsonpath='{.status.taskRunName}')-pod

oc logs $BUILDRUN_POD -n {user}-hummingbird-builds --all-containers[INFO] Building image ... [1/2] STEP 1/8: FROM registry.access.redhat.com/hi/openjdk:21-builder AS builder ... [1/2] STEP 8/8: RUN mvn package -DskipTests -Dmaven.repo.local=/build/.m2 ... [INFO] BUILD SUCCESS ... [2/2] STEP 1/9: FROM registry.access.redhat.com/hi/openjdk:21-runtime ... [2/2] STEP 7/9: USER 65532 [2/2] STEP 9/9: ENTRYPOINT ["java", "-jar", "quarkus-run.jar"] ... [INFO] Pushing image ...
|
Key build phases visible in the logs:
This is the same multi-stage pattern from Module 1, now running as an automated Shipwright build on OpenShift. |
Verify Built Image
Step 8: Get Image Digest
Confirm the image was pushed successfully:
oc get buildrun sample-quarkus-app-run-1 -n {user}-hummingbird-builds -o jsonpath='{.status.output.digest}'
echo ""sha256:abc123def456789...
|
Verify the image was pushed to Quay via the Docker v2 registry API: Expected output:
|
Step 9: Inspect Image with skopeo
Use skopeo to examine the built image and confirm it uses the Hummingbird runtime:
skopeo inspect docker://{quay_hostname}/{quay_user}/sample-quarkus:latest --username {quay_user} --password {quay_password} 2>/dev/null \
  | python3 -c "
import json,sys
d=json.load(sys.stdin)
print(f'Architecture: {d.get(\"Architecture\")}')
print(f'OS: {d.get(\"Os\")}')
print(f'Layers: {len(d.get(\"Layers\",[]))}')
labels = d.get('Labels',{})
for k,v in sorted(labels.items()):
    if 'hummingbird' in k.lower():
        print(f'Label {k}: {v}')
"|
The image labels from the Hummingbird base image (e.g., |
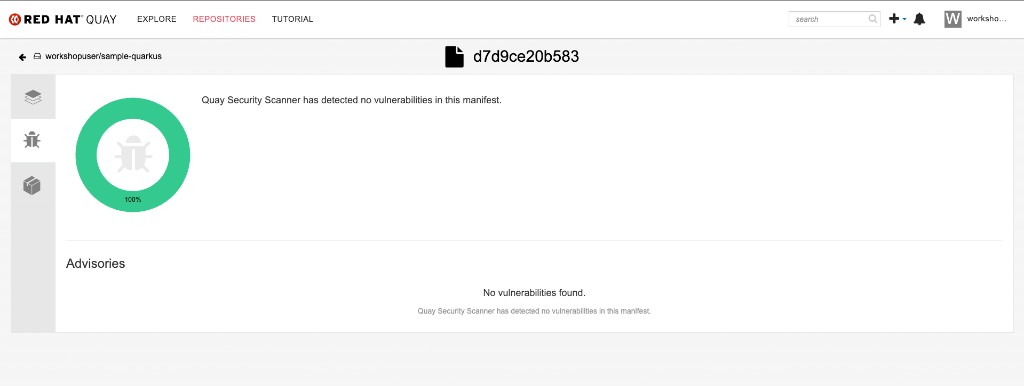
Step 9b: Verify in Quay Console
Open the Quay console and navigate to Repositories → workshopuser/sample-quarkus. You should see the latest tag with a successful security scan:
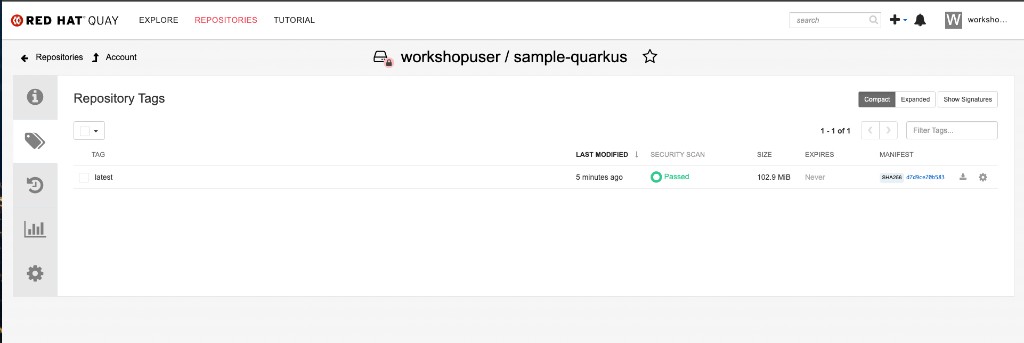
Click the security scan result to view the Clair vulnerability report. A Hummingbird-based image should show zero vulnerabilities:
Deploy Built Image
Step 10: Deploy to OpenShift
Deploy your Hummingbird-built application. First, link the registry credentials to the default ServiceAccount so pods can pull the image from the private Quay repository:
oc secrets link default registry-credentials --for=pull -n {user}-hummingbird-buildsNow create the deployment, service, and route:
oc create deployment sample-quarkus \
  --image={quay_hostname}/{quay_user}/sample-quarkus:latest \
  -n {user}-hummingbird-builds

oc expose deployment sample-quarkus --port=8080 -n {user}-hummingbird-builds

oc expose service sample-quarkus -n {user}-hummingbird-builds|
The |
Step 11: Test the Application
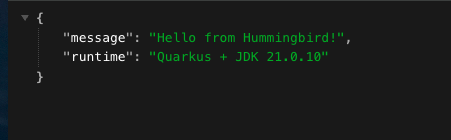
ROUTE=$(oc get route sample-quarkus -n {user}-hummingbird-builds -o jsonpath='{.spec.host}')
echo "Application URL: http://$ROUTE/hello"
curl -s http://$ROUTE/hello | python3 -m json.toolApplication URL: http://sample-quarkus-{user}-hummingbird-builds.apps.<cluster-domain>/hello
{
"message": "Hello from Hummingbird!",
"runtime": "Quarkus + JDK 21.0.10"
}
You can also open the URL in your browser by navigating to http://<route>/hello:
Also verify the Quarkus health endpoint:
curl -s http://$ROUTE/q/health | python3 -m json.tool{
"status": "UP",
"checks": [...]
}
|
If you get a timeout, the application may still be starting. Check pod status: |
|
The route created by The root path |
Verify Hummingbird Runtime
Step 12: Check Image in Quay Console
Log into Red Hat Quay in the tab on the right hand side.
As a reminder your credentials for Quay are:
-
Username:
{quay_user} -
Password:
{quay_password}
Find your container image clicking on the {quay_user} organization, and then clicking on the sample-quarkus image. Then on the image switch to the Tags tab to examine the available tags and their CVE scan results.
Look at your container image and check the results of the Quay Security Scanner for CVE counts. You can click on None detected to open up a detailed security report.
|
Hummingbird Runtime Advantages: The image uses
|
Summary
Congratulations! You’ve built and deployed your first Hummingbird application on OpenShift using Shipwright!
✅ Verified on-cluster Quay registry credentials linked to pipeline ServiceAccount
✅ Inspected the pre-installed buildah ClusterBuildStrategy
✅ Created a Build resource pointing to a Quarkus application Git repository
✅ Executed a BuildRun and monitored progress
✅ Viewed detailed build logs showing the multi-stage Containerfile in action
✅ Verified the image was pushed to Quay with the correct digest
✅ Inspected the image with skopeo to confirm Hummingbird labels
✅ Deployed the Hummingbird-built image to OpenShift
✅ Tested the running Quarkus application via Route
Module 1 Pattern on OpenShift:
-
The same multi-stage Containerfile pattern (builder + Hummingbird runtime) works seamlessly with Shipwright
-
No need to learn a new build system — the
buildahstrategy builds standard Containerfiles -
The Hummingbird distroless runtime provides a near-zero CVE baseline
Developer Experience:
-
Simple YAML to trigger builds from Git
-
Pre-installed strategy — no custom build infrastructure needed
-
Builds run securely within the cluster
-
Quarkus health endpoints work out of the box for Kubernetes probes
Platform Engineering:
-
ClusterBuildStrategy enforces organizational build standards
-
All teams use Hummingbird runtimes automatically
-
Registry credentials managed centrally via Kubernetes secrets
Next Sub-Module
Ready to enforce zero-CVE at the cluster level? Proceed to:
Deploy a legacy image, scan it with ACS to expose CVEs, then rewrite it using a Hummingbird distroless build and enforce a zero-CVE admission policy.
|
Looking for additional depth? The following optional sub-modules extend the workshop with advanced topics: |
Additional Resources
Project Hummingbird: * Project Hummingbird Official Site * Hummingbird Containers Repository * Hummingbird Image Registry
Shipwright Builds: * BuildStrategy Documentation * Builds for OpenShift
Troubleshooting
Issue: BuildRun fails with registry push error
oc get secret registry-credentials -n {user}-hummingbird-builds
oc describe sa pipeline -n {user}-hummingbird-builds | grep registry-credentials
# Recreate secret if needed (use your on-cluster Quay route)
oc delete secret registry-credentials -n {user}-hummingbird-builds
oc create secret docker-registry registry-credentials \
--docker-server="{quay_hostname}" \
--docker-username={quay_user} \
--docker-password={quay_password} \
-n {user}-hummingbird-builds
oc secrets link pipeline registry-credentials -n {user}-hummingbird-buildsIssue: BuildRun stuck in Pending
oc get pods -n openshift-pipelines
oc get events -n {user}-hummingbird-builds --sort-by=.metadata.creationTimestamp
oc describe buildrun sample-quarkus-app-run-1 -n {user}-hummingbird-buildsIssue: BuildRun fails with BLOB_UPLOAD_INVALID
This typically indicates a problem with the NooBaa object storage backend used by Quay:
oc get backingstore -n openshift-storage
oc get noobaa -n openshift-storage -o jsonpath='{.items[0].status.phase}'
# If backing store shows Rejected/ALL_NODES_OFFLINE, wait for recovery
# Once NooBaa returns to Ready/OPTIMAL, delete the failed BuildRun and retry
oc delete buildrun sample-quarkus-app-run-1 -n {user}-hummingbird-builds
# Then re-create the BuildRun (Step 5)Issue: Maven build fails with "permission denied" on mvnw
The Maven wrapper script must be executable in the Git repository. If you see this error, ensure the repo has the correct permissions:
# On the machine where the repo is managed:
chmod +x mvnw
git add mvnw
git commit -m "Fix mvnw permissions"
git pushIssue: Deployment pod stuck in ImagePullBackOff
The on-cluster Quay registry creates repositories as private by default. The default ServiceAccount needs pull credentials:
oc secrets link default registry-credentials --for=pull -n {user}-hummingbird-builds
oc delete pod -l app=sample-quarkus -n {user}-hummingbird-buildsIssue: Application not responding
oc get pods -l app=sample-quarkus -n {user}-hummingbird-builds
oc logs -l app=sample-quarkus -n {user}-hummingbird-builds
oc get route sample-quarkus -n {user}-hummingbird-builds