Sub-Module 2.3: Security Pipeline & Production Deployment
Introduction
Building images is only part of the story. Production deployments require comprehensive security: vulnerability scanning, SBOM generation for compliance, image signing for provenance, and proper runtime security contexts.
In this final sub-module, you’ll create a security-enhanced BuildStrategy that implements the complete workflow: build → scan → SBOM → sign → deploy. This represents production-ready best practices for container supply chain security.
Security-Enhanced BuildStrategy
Step 1: Create Secure Build Strategy
Create an enhanced strategy with SBOM generation and vulnerability scanning:
cat << 'EOF' | oc apply -f -
apiVersion: shipwright.io/v1beta1
kind: ClusterBuildStrategy
metadata:
  name: hummingbird-secure-build
spec:
  parameters:
  - name: DOCKERFILE
    description: "Path to Containerfile/Dockerfile"
    default: "Containerfile"
  - name: RUNTIME_IMAGE
    description: "Hummingbird runtime base image"
    default: "registry.access.redhat.com/hi/nodejs-20:latest"

  securityContext:
    runAsUser: 0
    runAsGroup: 0

  steps:
  - name: build-image
    image: registry.redhat.io/rhel9/buildah:latest
    workingDir: $(params.shp-source-context)
    command:
    - /bin/bash
    args:
    - -c
    - |
      buildah bud \
        --storage-driver=vfs \
        --format=oci \
        -f $(params.DOCKERFILE) \
        -t $(params.shp-output-image) \
        .

      buildah push \
        --storage-driver=vfs \
        --digestfile='$(results.shp-image-digest.path)' \
        $(params.shp-output-image) \
        docker://$(params.shp-output-image)
    env:
    - name: STORAGE_DRIVER
      value: vfs
    securityContext:
      capabilities:
        add: ["SETFCAP"]

  - name: generate-sbom
    image: anchore/syft:latest
    workingDir: $(params.shp-source-context)
    command:
    - /syft
    args:
    - "$(params.shp-output-image)"
    - "-o"
    - "table"

  - name: scan-vulnerabilities
    image: anchore/grype:latest
    workingDir: $(params.shp-source-context)
    command:
    - /grype
    args:
    - "$(params.shp-output-image)"
    - "--only-fixed"
    - "--fail-on"
    - "high"

  - name: sign-image
    image: registry.access.redhat.com/ubi9/ubi-minimal:latest
    workingDir: $(params.shp-source-context)
    command:
    - /bin/sh
    args:
    - -c
    - |
      echo "=== Image signing framework ==="
      echo "Image signing would happen here in production"
      echo "Using keyless signing or KMS-backed keys"
      echo ""
      echo "Production commands:"
      echo "  cosign sign --yes $(params.shp-output-image)"
      echo "  cosign attest --yes --predicate /workspace/sbom.json --type spdxjson $(params.shp-output-image)"
      echo ""
      echo "For this workshop, signing is demonstrated in Module 1 with local keys"

  volumes:
  - name: workspace
    emptyDir: {}
EOFclusterbuildstrategy.shipwright.io/hummingbird-secure-build created
-
SBOM generation: Complete package inventory via
syft(table output in build logs) -
Vulnerability scanning: Fails build on high-severity CVEs via
grype(distroless images — tools are invoked directly without a shell) -
Image signing: Framework for cosign integration (demonstrated via echo, not executed in cluster)
|
Why syft/grype/cosign are invoked differently: The Cosign signing in a cluster requires:
For production, implement one of these methods. The framework is shown here for reference. |
Configure Vulnerability Scanning Policy
Step 2: Create Secure Build
Create a Build that uses the secure strategy:
cat << 'EOF' | oc apply -f -
apiVersion: shipwright.io/v1beta1
kind: Build
metadata:
  name: secure-nodejs-build
  namespace: {user}-hummingbird-builds
spec:
  source:
    type: Git
    git:
      url: https://github.com/tosin2013/sample-nodejs-hummingbird.git
      revision: main
  strategy:
    name: hummingbird-secure-build
    kind: ClusterBuildStrategy
  paramValues:
  - name: RUNTIME_IMAGE
    value: "registry.access.redhat.com/hi/nodejs-20:latest"
  output:
    image: {quay_hostname}/{quay_user}/secure-nodejs:latest
    credentials:
      name: registry-credentials
  retention:
    succeededLimit: 5
    failedLimit: 5
EOF-
Keeps the 5 most recent successful BuildRuns
-
Keeps the 5 most recent failed BuildRuns
-
Automatically cleans up older BuildRuns to prevent resource bloat
Step 3: Trigger Secure Build
cat << 'EOF' | oc apply -f -
apiVersion: shipwright.io/v1beta1
kind: BuildRun
metadata:
  name: secure-build-run-1
  namespace: {user}-hummingbird-builds
spec:
  build:
    name: secure-nodejs-build
EOF
Monitor the build:
oc get buildrun secure-build-run-1 -n {user}-hummingbird-builds -wView Security Pipeline Outputs
Step 4: View SBOM Generation
Once the build completes, view the SBOM generation output:
TASKRUN=$(oc get buildrun secure-build-run-1 -n {user}-hummingbird-builds -o jsonpath='{.status.taskRunName}')
oc logs ${TASKRUN}-pod -n {user}-hummingbird-builds -c step-generate-sbomNAME VERSION TYPE accepts 2.0.0 npm bash 5.3.9-3.hum1 rpm body-parser 2.2.2 npm express 5.2.1 npm glibc 2.42-10.1.hum1 rpm nodejs20 1:20.20.0-7.hum1 rpm ...
|
Syft is invoked directly ( |
Step 5: View Vulnerability Scan Results
oc logs ${TASKRUN}-pod -n {user}-hummingbird-builds -c step-scan-vulnerabilitiesNo vulnerabilities found
|
Grype is invoked directly ( |
|
Hummingbird Zero-CVE Advantage: The scan shows 0 vulnerabilities in the base image. This is the power of Hummingbird — you only need to worry about vulnerabilities in your application dependencies, not the base image. |
Step 5b: View Clair Scan Results from Quay
Because you pushed the image to the on-cluster Quay registry, Clair has already scanned it automatically. This provides a second layer of vulnerability assessment without any pipeline configuration.
Use skopeo to inspect the image and confirm it was built on the Hummingbird runtime:
skopeo inspect docker://{quay_hostname}/{quay_user}/secure-nodejs:latest --username {quay_user} --password {quay_password} 2>/dev/null \
  | python3 -c "
import json,sys
d=json.load(sys.stdin)
print(f'Architecture: {d.get(\"Architecture\")}')
print(f'OS: {d.get(\"Os\")}')
print(f'Layers: {len(d.get(\"Layers\",[]))}')
labels = d.get('Labels',{})
for k,v in sorted(labels.items()):
    if 'hummingbird' in k.lower():
        print(f'Label {k}: {v}')
"Architecture: amd64 OS: linux Layers: 5 Label io.hummingbird-project.base: true Label io.hummingbird-project.version: 1.0.0
|
Grype vs Clair — Defence in Depth:
Using both gives you immediate feedback in the pipeline and continuous monitoring in the registry. |
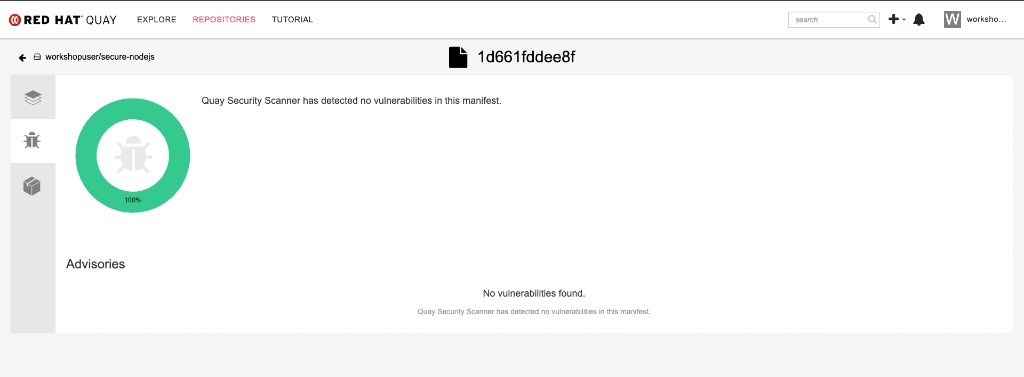
You can also verify the results visually in the Quay console. Navigate to Repositories → {quay_user}/secure-nodejs:
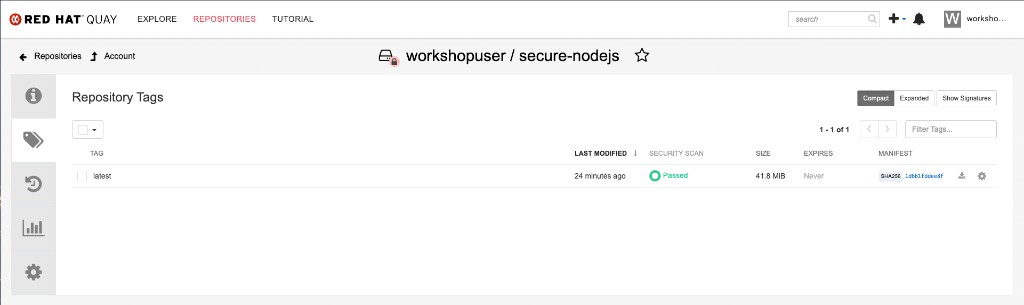
Click the security scan result to view the Clair vulnerability report. A Hummingbird-based image should show zero vulnerabilities:
Production Deployment
Step 6b: Configure Image Pull Credentials
The production namespace needs access to the private Quay registry:
oc create secret docker-registry registry-credentials \
    --docker-server="{quay_hostname}" \
    --docker-username="{quay_user}" \
    --docker-password="{quay_password}" \
    -n hummingbird-production

oc secrets link default registry-credentials --for=pull -n hummingbird-production
Step 7: Deploy with Production Security Context
Deploy the application with production-grade security settings:
cat << EOF | oc apply -f -
apiVersion: apps/v1
kind: Deployment
metadata:
  name: production-app
  namespace: hummingbird-production
  labels:
    app: production-app
spec:
  replicas: 3
  selector:
    matchLabels:
      app: production-app
  template:
    metadata:
      labels:
        app: production-app
    spec:
      imagePullSecrets:
      - name: registry-credentials
      containers:
      - name: app
        image: {quay_hostname}/{quay_user}/secure-nodejs:latest
        ports:
        - containerPort: 8080
          protocol: TCP
        resources:
          requests:
            memory: "64Mi"
            cpu: "100m"
          limits:
            memory: "128Mi"
            cpu: "500m"
        securityContext:
          runAsNonRoot: true
          allowPrivilegeEscalation: false
          capabilities:
            drop:
            - ALL
        livenessProbe:
          httpGet:
            path: /
            port: 8080
          initialDelaySeconds: 10
          periodSeconds: 10
        readinessProbe:
          httpGet:
            path: /
            port: 8080
          initialDelaySeconds: 5
          periodSeconds: 5
---
apiVersion: v1
kind: Service
metadata:
  name: production-app
  namespace: hummingbird-production
spec:
  selector:
    app: production-app
  ports:
  - port: 8080
    targetPort: 8080
---
apiVersion: route.openshift.io/v1
kind: Route
metadata:
  name: production-app
  namespace: hummingbird-production
spec:
  to:
    kind: Service
    name: production-app
  port:
    targetPort: 8080
  tls:
    termination: edge
    insecureEdgeTerminationPolicy: Redirect
EOF-
3 replicas: High availability
-
Resource limits: Prevent noisy neighbor issues
-
Non-root:
runAsNonRoot: true -
Drop all capabilities: Least privilege principle
-
No privilege escalation:
allowPrivilegeEscalation: false -
Liveness/readiness probes: Proper health checks for Kubernetes
-
TLS termination: HTTPS traffic via edge termination
Verify Production Deployment
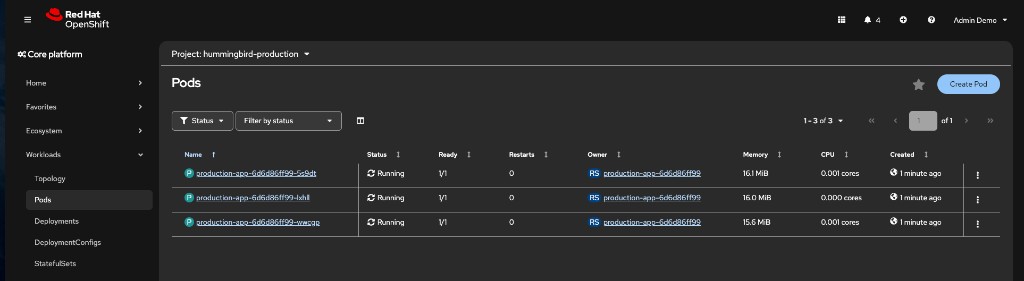
Step 8: Check Deployment Status
oc get pods -n hummingbird-productionNAME READY STATUS RESTARTS AGE production-app-abc123-xyz 1/1 Running 0 30s production-app-def456-uvw 1/1 Running 0 30s production-app-ghi789-rst 1/1 Running 0 30s
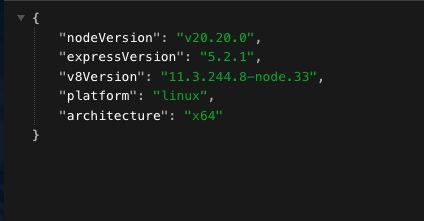
Step 10: Test Production Application
ROUTE=$(oc get route production-app -n hummingbird-production -o jsonpath='{.spec.host}')
curl -sk https://$ROUTE{"nodeVersion":"v20.20.0","expressVersion":"5.2.1","v8Version":"...","platform":"linux","architecture":"x64"}
|
Note the |
Step 11: Verify Image Trust (cosign)
In a production pipeline with signing enabled, verify the deployed image’s signature:
echo "=== Verifying image trust chain ==="
echo ""
echo "In production with cosign signing enabled:"
echo "  cosign verify --key cosign.pub {quay_hostname}/{quay_user}/secure-nodejs:latest"
echo ""
echo "With keyless (Sigstore):"
echo "  cosign verify --certificate-identity=builder@example.com \\"
echo "    --certificate-oidc-issuer=https://token.actions.githubusercontent.com \\"
echo "    {quay_hostname}/{quay_user}/secure-nodejs:latest"
echo ""
echo "For this workshop, verify the image digest matches the BuildRun output:"
BUILDRUN_DIGEST=$(oc get buildrun secure-build-run-1 -n {user}-hummingbird-builds -o jsonpath='{.status.output.digest}' 2>/dev/null || echo "N/A")
echo " BuildRun digest: $BUILDRUN_DIGEST"|
End-to-end trust means verifying that the image running in production is the exact image that came out of the build pipeline. In production, |
Verify Image Size Reduction
Step 12: Compare Image Sizes
If you have podman access locally:
# Pull and compare
podman pull {quay_hostname}/{quay_user}/secure-nodejs:latest 2>/dev/null || echo "Run on a machine with podman"

# Alternative: Check in Quay console
echo "Check image size at: {quay_console_url}/repository/{quay_user}/secure-nodejs"
Security Pipeline Workflow
[Git Push] → [BuildRun Trigger]
  ↓
[Buildah Build] → [Push to Quay Registry]
  ↓                       ↓
[Syft SBOM]          [Clair auto-scan (continuous)]
  ↓
[Grype Scan] → [Fail if CVE threshold exceeded]
  ↓
[Cosign Sign Framework] → [Production: Attest SBOM]
  ↓
[Production Deployment] → [3 replicas, TLS, probes]
|
GitOps Integration (Next Step for Production): In a full production setup, integrate with ArgoCD or OpenShift GitOps:
This completes the automated pipeline: commit code → build → scan → sign → deploy. |
Summary
Congratulations! You’ve completed Sub-Module 2.3!
✅ Created ClusterBuildStrategy with SBOM generation
✅ Integrated vulnerability scanning with failure thresholds (grype)
✅ Viewed Clair continuous scan results from the on-cluster Quay registry
✅ Implemented image signing framework for production
✅ Configured Build with retention policies
✅ Viewed SBOM and scan outputs in build logs
✅ Created production namespace with proper RBAC
✅ Deployed application with production security contexts
✅ Configured liveness and readiness probes
✅ Set up TLS-terminated Route for HTTPS traffic
✅ Verified 3-replica high-availability deployment
✅ Verified image trust chain with cosign workflow
✅ Confirmed Hummingbird zero-CVE advantage
Security Pipeline: * Build → Multi-stage Containerfile with Hummingbird runtime * SBOM → Automated compliance artifact generation * Scan (pipeline) → Grype for fail-fast vulnerability gating * Scan (registry) → Clair for continuous vulnerability monitoring in Quay * Sign → Framework for provenance (integrate with production KMS) * Deploy → Proper security contexts and observability
Production Best Practices: * Non-root containers * Dropped capabilities (least privilege) * Resource limits to prevent resource exhaustion * Liveness/readiness probes for Kubernetes health management * TLS termination for secure traffic * Retention policies to prevent resource bloat
Hummingbird + Shipwright = Platform Excellence: * 70-80% image size reduction at scale * Zero-CVE baseline from Hummingbird * Automated SBOMs for compliance * Standardized builds via ClusterBuildStrategies * No external CI/CD infrastructure required
Next Sub-Module
Ready to automate SELinux policy generation at platform scale? Proceed to:
Create Tekton Tasks that generate udica policies alongside image builds, deploy with seLinuxOptions, and distribute policies via MachineConfig.
Additional Resources
Complete Documentation: * Builds for OpenShift * Shipwright Documentation * Project Hummingbird
Security Best Practices: * SLSA Framework * CISA SBOM Resources
Troubleshooting
Issue: SBOM generation fails
# Check syft step logs
oc logs ${TASKRUN}-pod -n {user}-hummingbird-builds -c step-generate-sbom

# Verify image is accessible
podman pull
Issue: Vulnerability scan fails build
# View scan results
oc logs ${TASKRUN}-pod -n {user}-hummingbird-builds -c step-scan-vulnerabilities

# Review CVEs found
grype  --only-fixed

# Update dependencies to fix CVEs
Issue: Clair scan status shows "queued" or "unsupported"
# Verify Clair is running
oc get pods -n quay -l quay-component=clair-app

# Check Clair logs
oc logs -n quay -l quay-component=clair-app --tail=50

# Clair scans are asynchronous -- wait 30-60 seconds and retry the API call
Issue: Production deployment CrashLoopBackOff
# Check pod logs
oc logs -l app=production-app -n hummingbird-production

# Check events
oc get events -n hummingbird-production --sort-by=.metadata.creationTimestamp

# Verify probes are correct
oc describe deployment production-app -n hummingbird-production