Module 1: Exploring the platform
You have just joined the Parasol Insurance development team. Your manager has given you access to the company’s OpenShift-based application platform and asked you to get up to speed on the tools and workflows. Before you start writing code, you need to understand what has been set up for you: your namespaces, the running application, the CI/CD pipeline, and where your source code lives.
In this module you will log into OpenShift, explore the environment that has been provisioned for you, and get familiar with the tools you will use throughout the lab.
Learning objectives
By the end of this module, you will be able to:
-
Navigate the OpenShift web console and switch between Administrator and Developer perspectives
-
Identify your build, dev, and prod namespaces and understand their purpose
-
Access the running Parasol Insurance application and observe its current behavior
-
Explain how ExternalSecrets sync credentials from Vault without manual management
-
Locate your CI/CD pipelines and understand their stages
-
Find your forked source code and deployment manifests in GitLab
-
Use Argo CD to observe and trigger GitOps-driven deployments
Exercise 1: Log into OpenShift and find your namespaces
Your first task is to log into the OpenShift web console and verify that your environment is ready.
-
Open the OpenShift Console using the tab on the right side of this page, or navigate to {openshift_console_url}
-
Click rhsso as the login provider
-
Enter your credentials:
-
Username:
{user_name} -
Password:
{user_password}
-
-
Navigate to Home > Projects in the OpenShift Console
The various web consoles used throughout this lab have menus on the left. These menus are expanded in the screenshots shown in this lab guide. Depending on the size of your screen, these menus might be collapsed. Use the icons in top-left of each UI to expand them, e.g the OpenShift Console has an icon composed of three horizontal lines that opens/closes the side menu. -
You should see 3 projects:
-
{user_name}-build— where your CI/CD pipelines run -
{user_name}-dev— your development environment -
{user_name}-prod— your production environment
-
Your list should resemble the following screenshot:
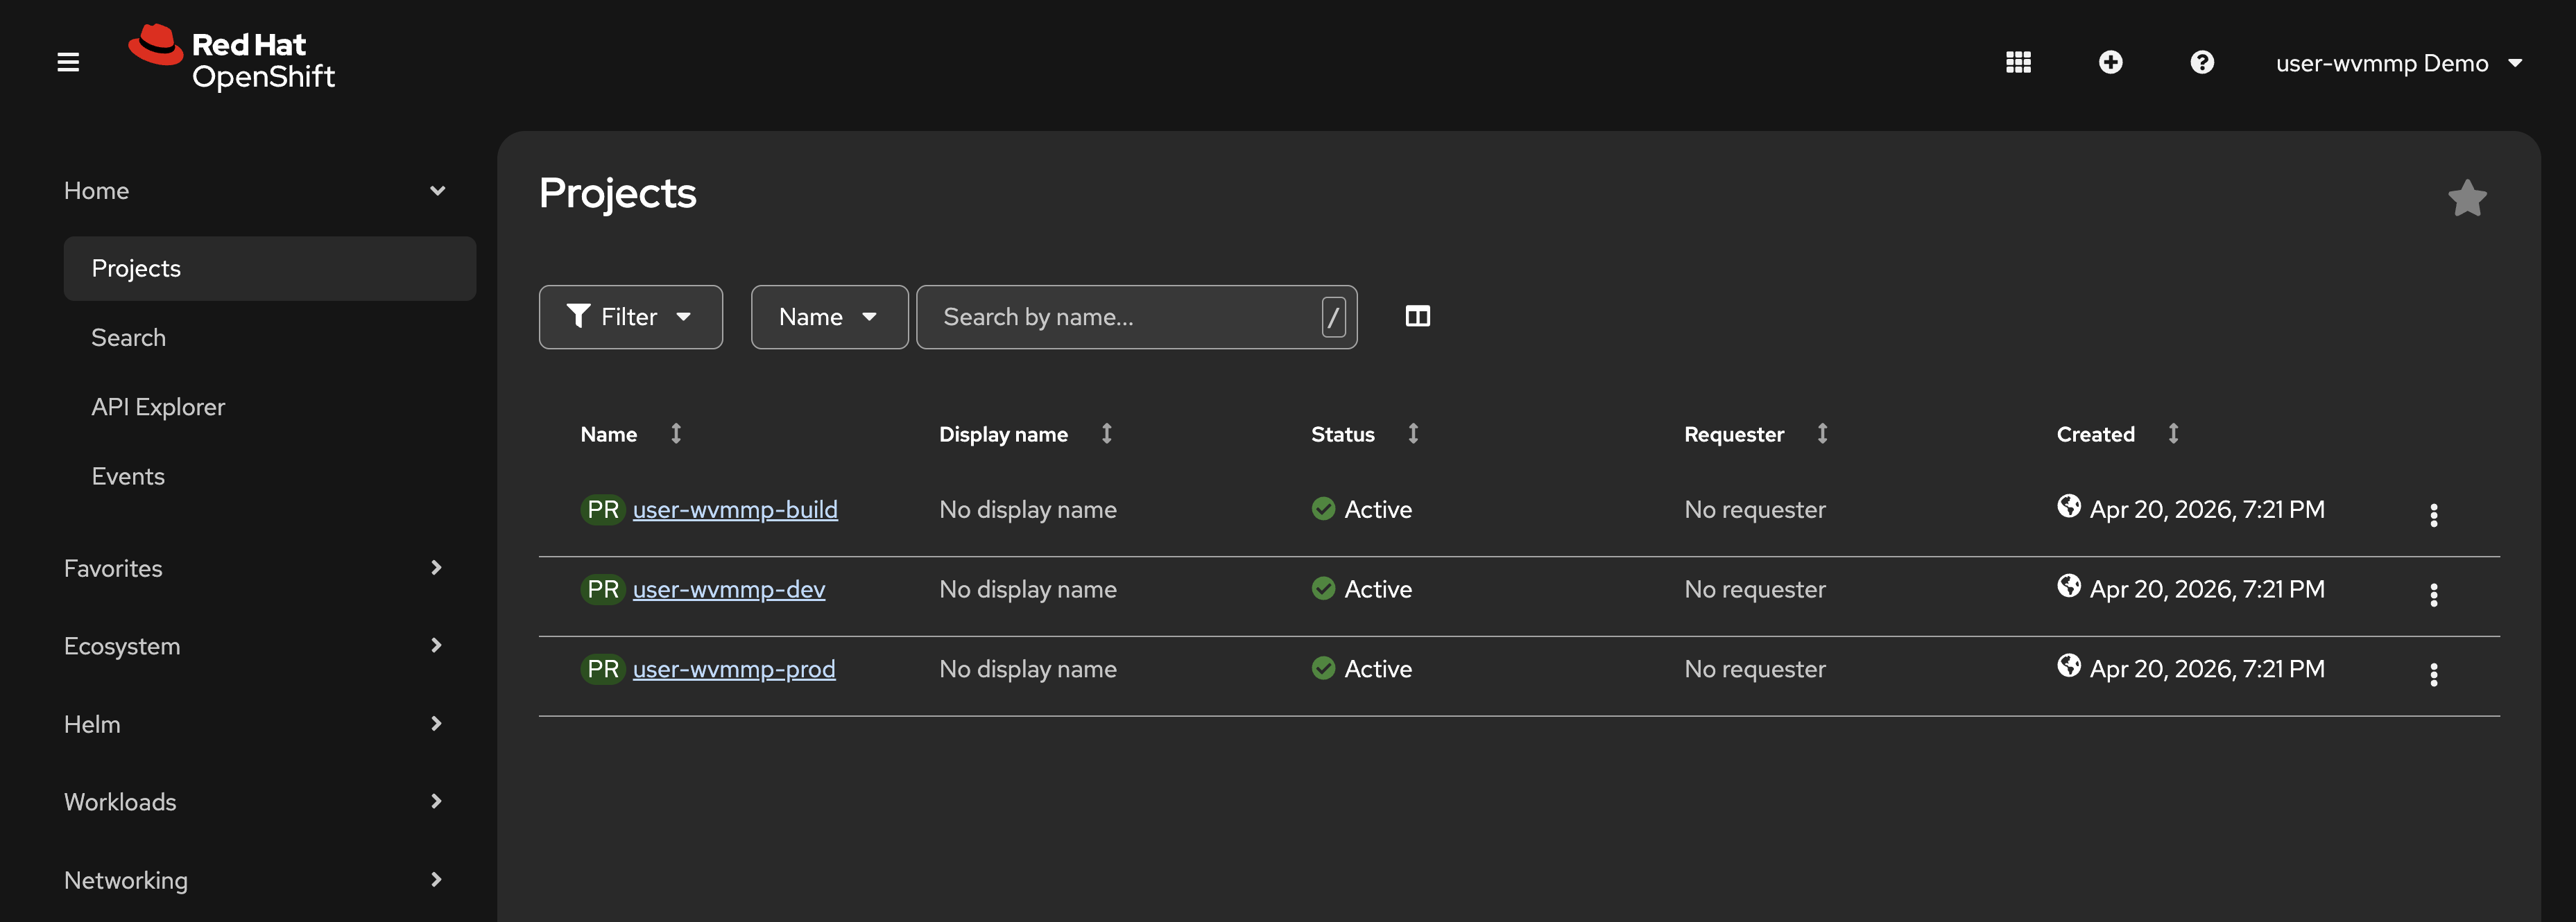
Your access is governed by a custom tenant-user ClusterRole, i.e Kubernetes RBAC. This gives you admin-like permissions in your namespaces with one important restriction: you cannot view Secrets nor read their values. This is by design. Secrets like database credentials, LLM API keys, and Kafka connection strings are managed and made available by the platform team through ExternalSecrets and stored in HashiCorp Vault.
|
You’re using a set of user-specific namespaces created for this lab experience. In reality, an application like Parasol Insurance would have namespaces similar to |
Exercise 2: Explore the running application
The Parasol Insurance application is already deployed in your dev namespace. Let’s take a look at what it does today.
-
Click on the
{user_name}-devproject to open it -
Switch to the Topology view using the Workloads > Topology link on the left
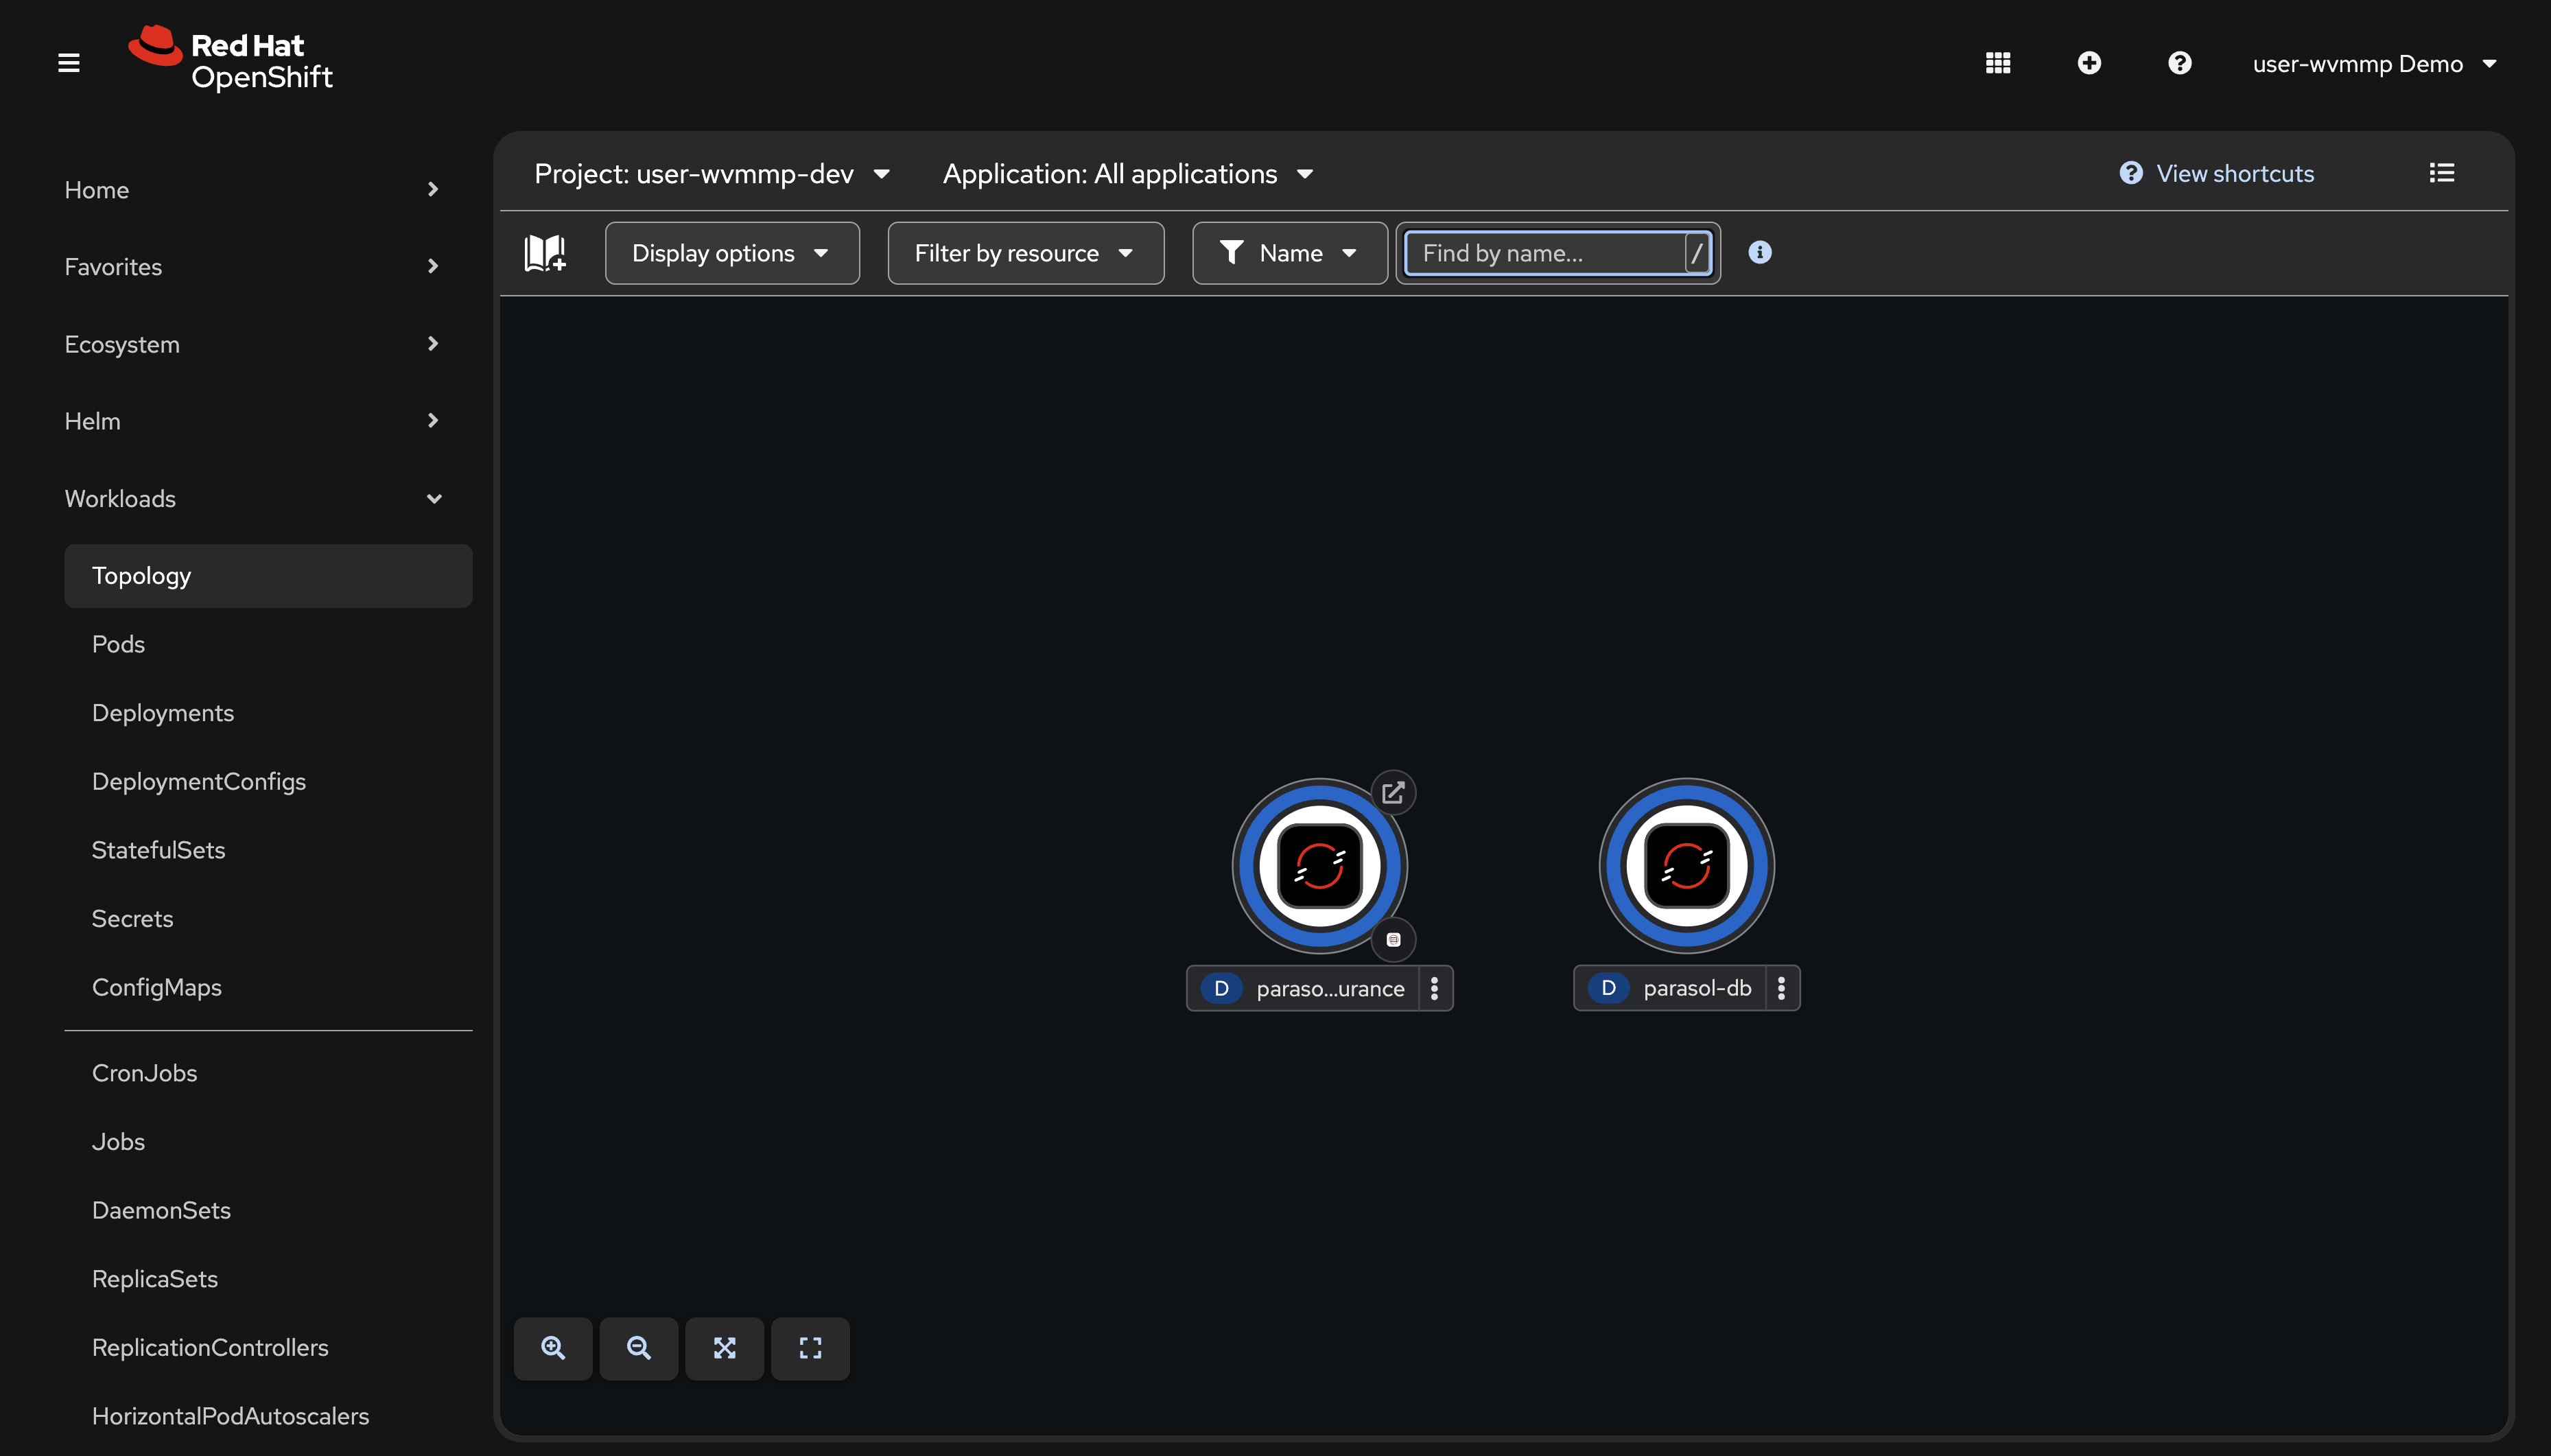 Figure 2. Topology view of the dev namespace
 -
Click the small route icon (the arrow in the top-right corner of the parasol-insurance application circle) to open the Parasol Insurance application in a new tab
-
In the Parasol application, navigate to the Inbox page
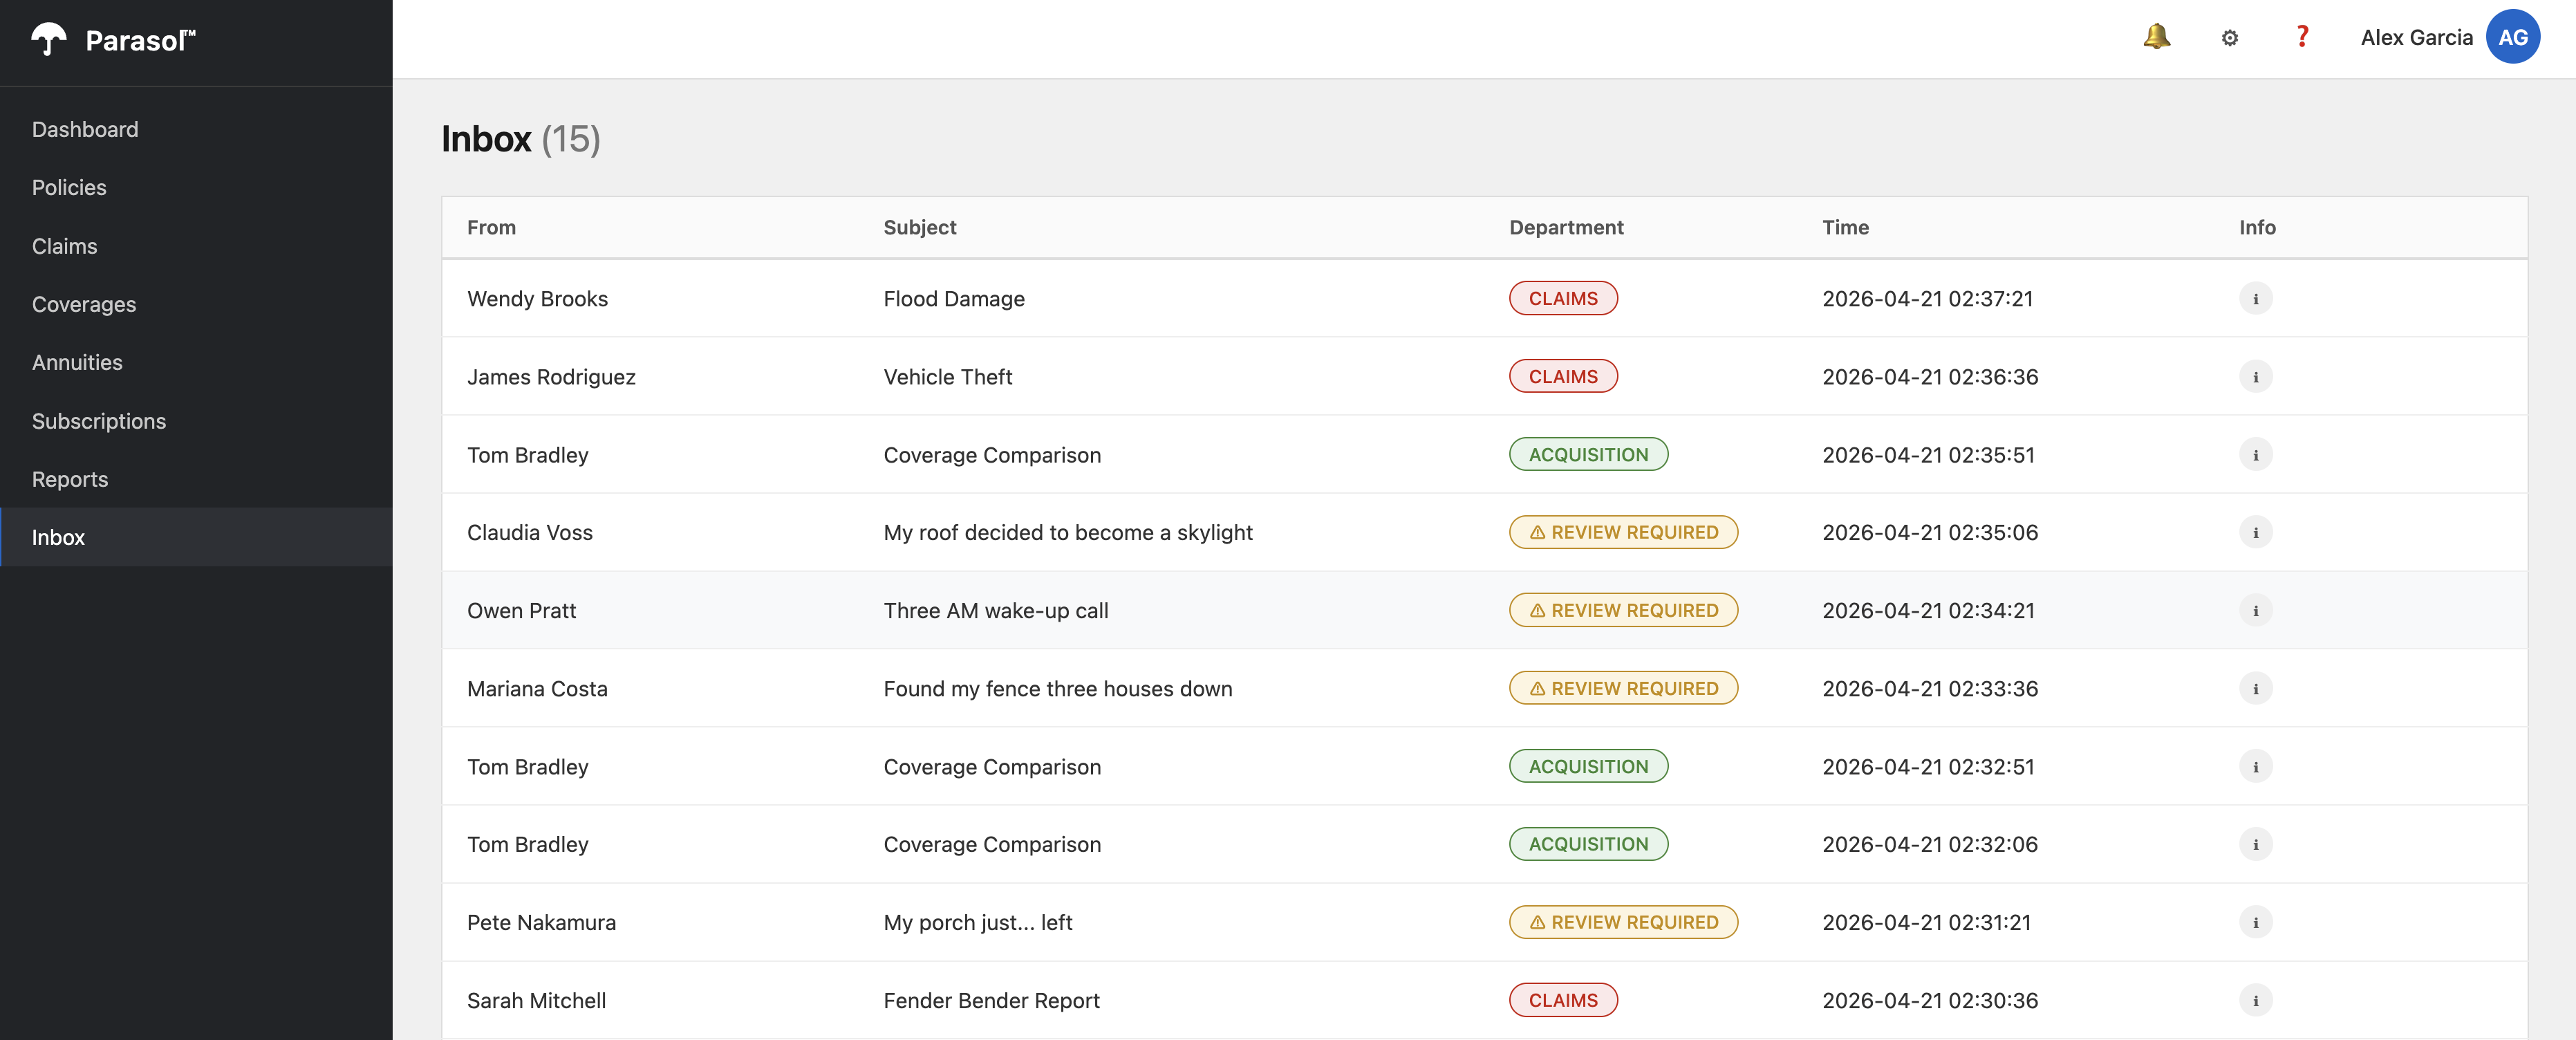 Figure 3. Parasol Insurance inbox with keyword-based classification
 -
Observe the emails in the inbox. Notice that some emails are classified as REVIEW REQUIRED. This is because the current implementation uses simple keyword matching. Any email the keywords cannot confidently classify gets flagged for manual review. You will fix this in Module 3.
You’ve accessed the OpenShift Console, found the Topology view, and learned how to access an application’s public endpoint. OpenShift provides a Route resource to define and manage public endpoints.
Exercise 3: Examine ExternalSecrets
The Parasol Insurance application connects to Apache Kafka and consumes messages from an email Topic to perform routing to specific departments. This requires credentials to connect to the Kafka cluster. The platform team at Parasol has standardized on HashiCorp Vault for secret management. The ExternalSecrets Operator connects to the Vault instance and distributes those secrets to applications.
-
Navigate to Home > Search
-
In the Resources dropdown, type
ExternalSecretand select it -
Make sure you are viewing the
{user_name}-devnamespace -
You should see two ExternalSecrets:
-
litellm-credentials— LLM API endpoint and key, synced from Vault -
kafka-credentials— Kafka connection details, synced from Vault
-
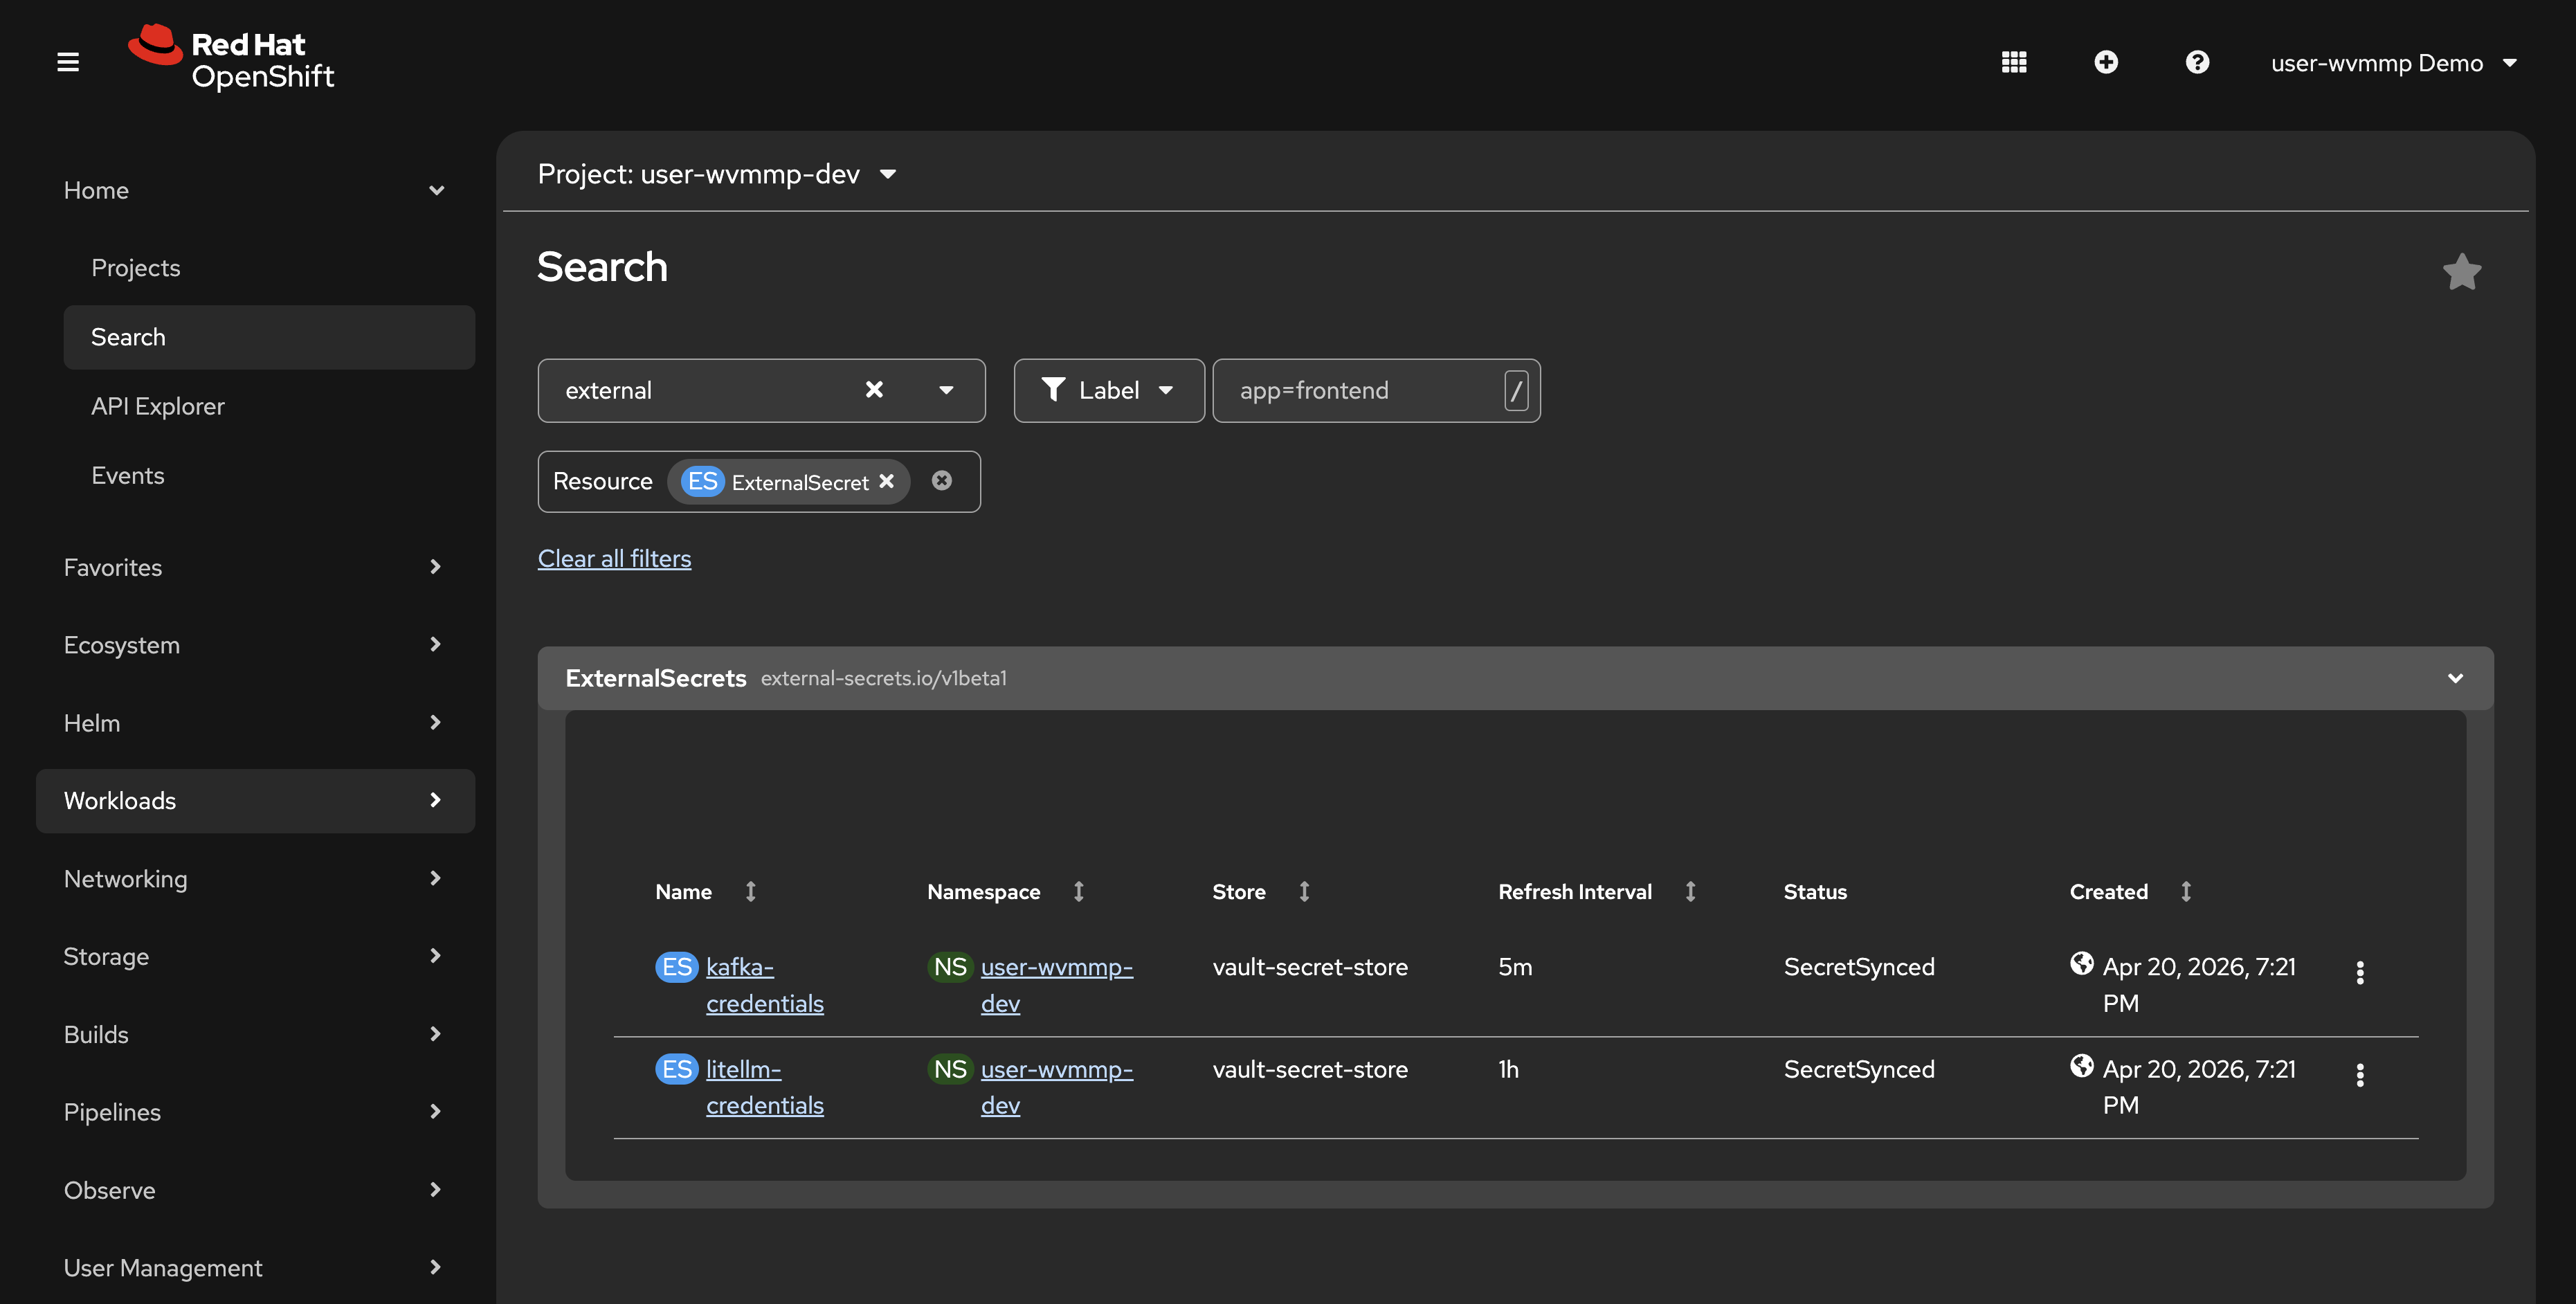
These ExternalSecrets automatically create Kubernetes Secrets in your namespace by pulling values from HashiCorp Vault. The platform team configured this so that sensitive credentials never need to be committed to source code or manually managed.
-
Click on one of the ExternalSecrets and note the Status showing it is synced. This means that the
kafka-credentialsSecret requested by the ExternalSecret of the same name will be available for the Parasol Insurance application to consume and use to connect to the Apache Kafka cluster.
|
If you’re wondering how these resources are created, how they’re managed, and where they come from, that will be answered soon. Right now, we’re just taking a tour and getting familiar with OpenShift and the application you’ll work on during this lab. |
Exercise 4: Review the CI/CD pipelines
Your build namespace contains Tekton pipelines that build, test, scan, and deploy your application. An initial pipeline run has already completed to pre-build your application image.
-
Switch to the
{user_name}-buildnamespace using the project dropdown at the top -
Click Pipelines > Pipelines in the left sidebar. You should see
pushandtag-promotepipelines.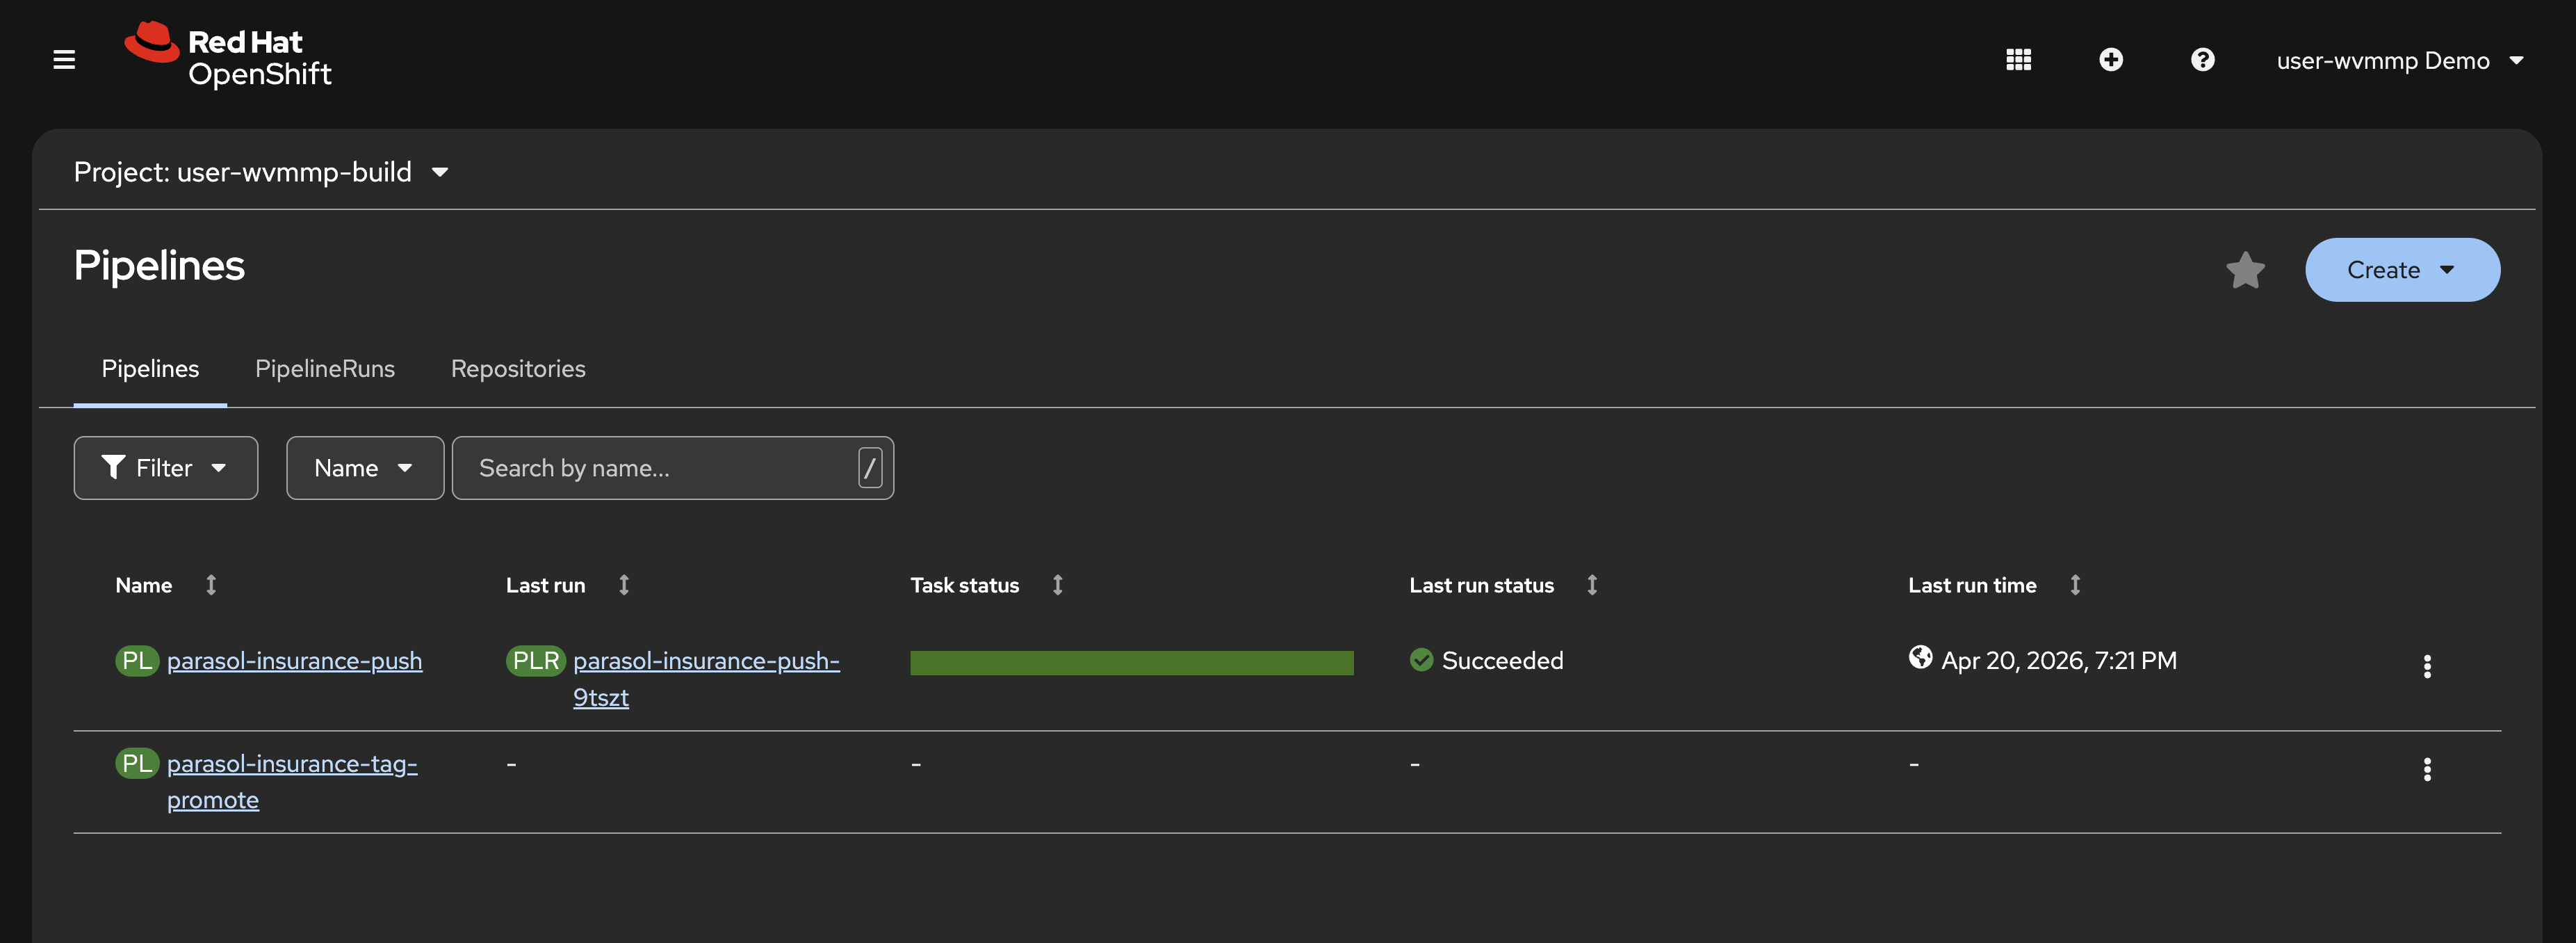 Figure 5. Tekton pipelines in the build namespace
 -
A
pushPipelineRun has already completed. This was triggered automatically when your environment was provisioned to pre-build and pre-deploy the Parasol Insurance application. You viewed this in the{user_name}-devenvironment earlier. -
Click on the link in the Last run column to view the PipelineRun details.
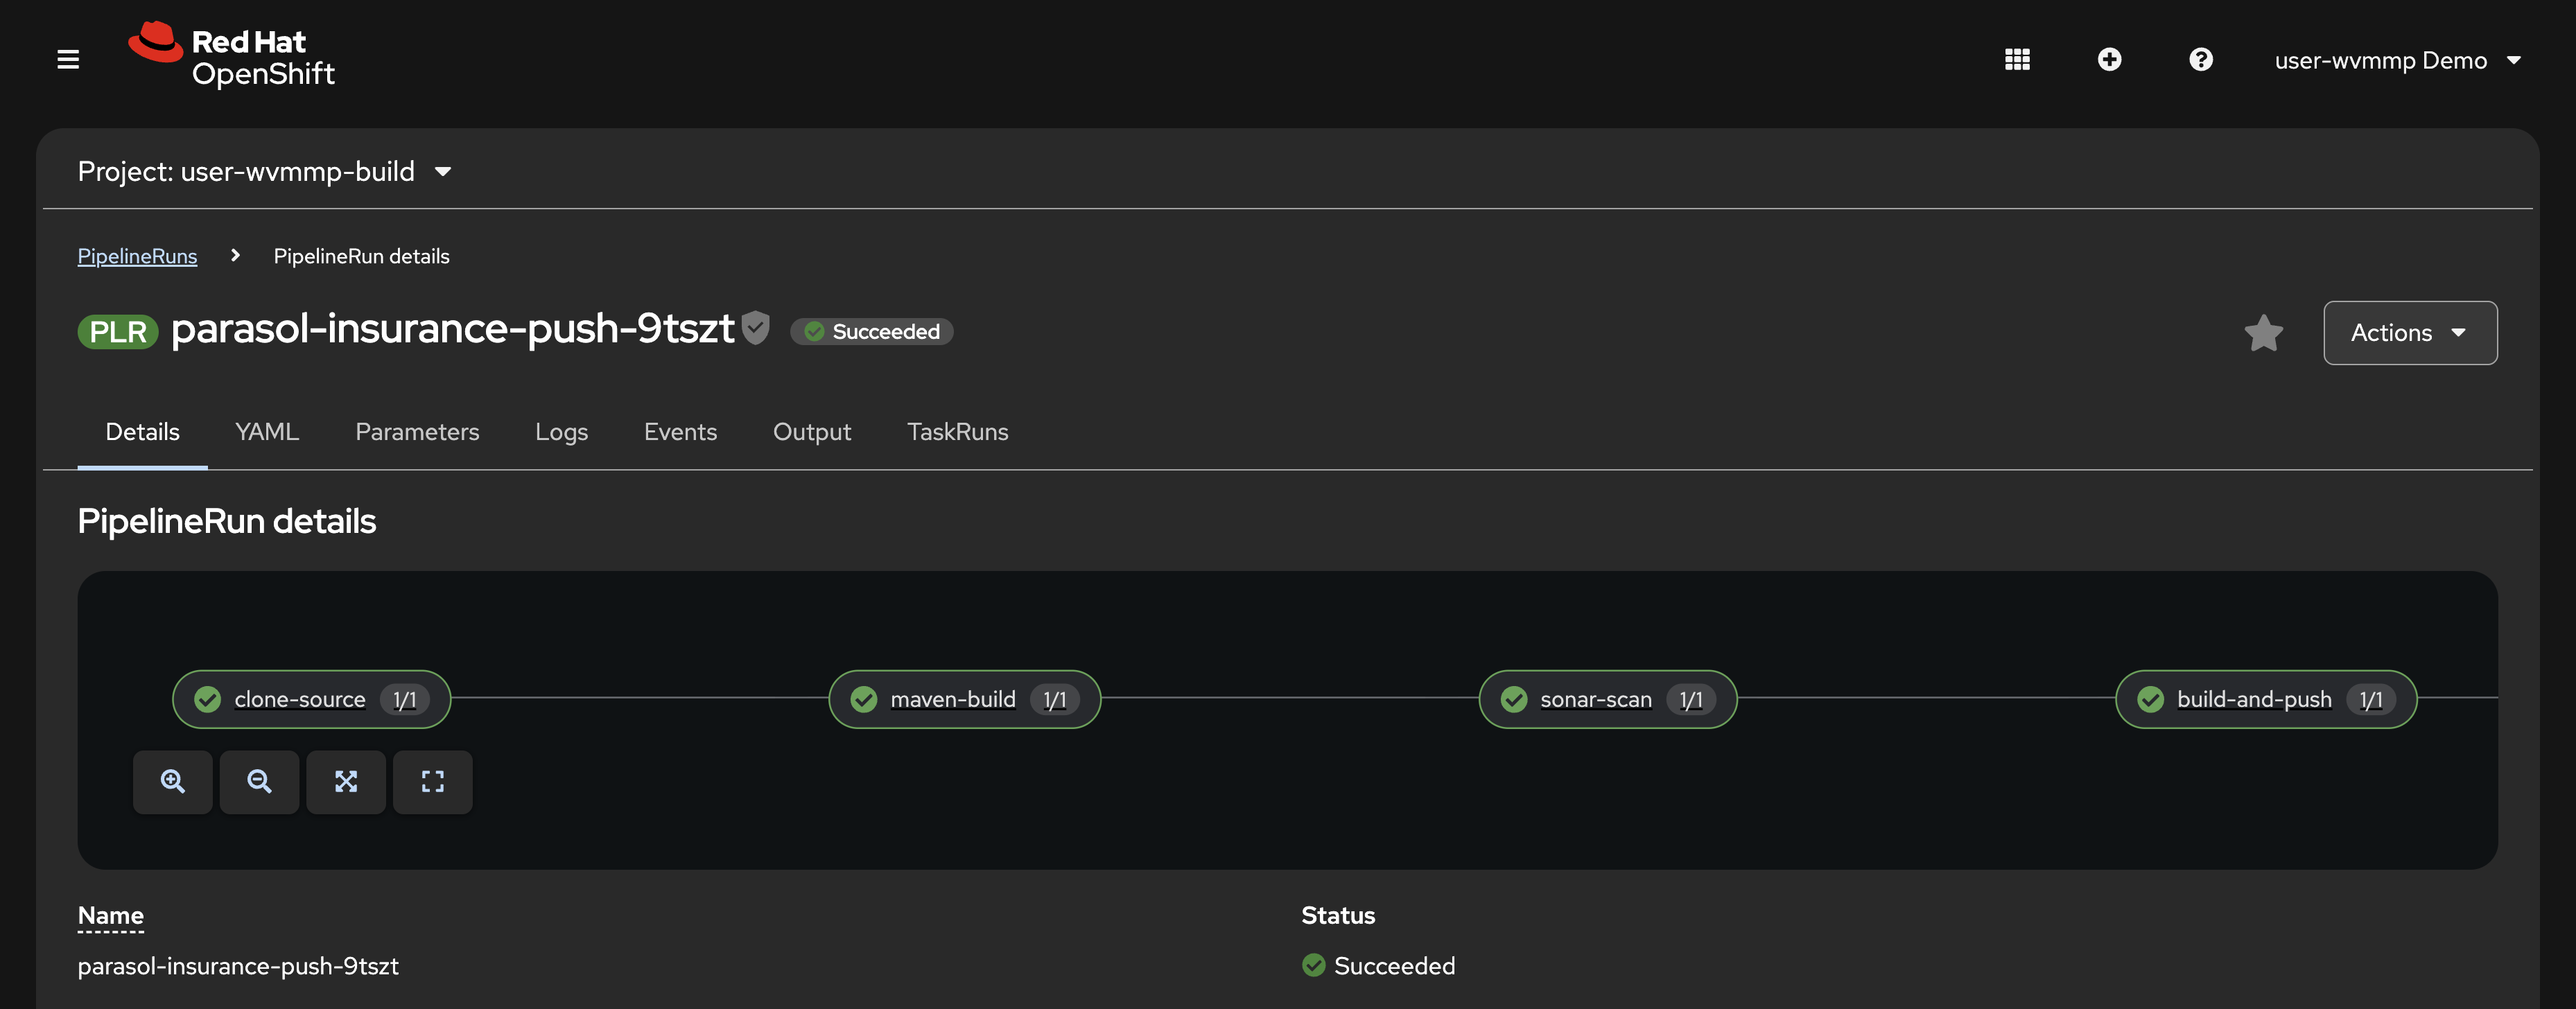 Figure 6. Completed push PipelineRun with all stages passed
 -
Examine the pipeline stages, known as Tasks:
-
clone — clones your source code from GitLab
-
maven-build — compiles the Quarkus application and runs tests
-
sonar-scan — runs SonarQube static analysis for code quality
-
build-and-push — builds the container image and pushes it to Quay
-
rollout-restart — triggers a rolling restart of the deployment in the dev namespace
-
At this point you’ve observed that OpenShift provides multiple application-platform capabilities, including the ability to run CI/CD natively on the platform itself.
As an optional exercise, return to the Home > Search page and view the ExternalSecrets defined in your {user_name}-build namespace. You’ll notice that multiple Secrets required to securely access code, push/pull images, and interact with SonarQube are defined. Platform administrators can rotate these credentials in Vault at any time, and the ExternalSecrets will automatically synchronize and make sure the latest values are available to your applications and CI/CD pipelines.
Verify
Confirm the following:
-
Two pipelines are visible in the
{user_name}-buildnamespace:pushandtag-promote -
A completed PipelineRun is visible for the
pushpipeline -
You can click into the PipelineRun and see 5 stages: clone, maven-build, sonar-scan, build-and-push, rollout-restart
-
All stages show a successful (green) status
Exercise 5: Find your source code in GitLab
Your source code is hosted in GitLab. Each lab participant gets their own fork of the Parasol Insurance repositories.
-
Open the GitLab tab on the right side of this page, or navigate to https://gitlab-gitlab.{openshift_cluster_ingress_domain}/
-
Log in with your credentials:
-
Username:
{user_name} -
Password:
{user_password}
-
-
After logging in, you should see two repositories forked into your Projects list:
-
parasol-insurance — the Parasol Insurance application’s Quarkus source code
-
parasol-insurance-manifests — the build and deployment manifests (Helm Charts) with Kubernetes CRs that are deployed and managed by OpenShift GitOps
-
Review the deployment manifests
Take a look at the manifests first. These define the build and deployment environments, using an Infrastructure as Code (IaC) approach.
-
Click the parasol-insurance-manifests repository. A directory listing is shown.
-
Open the
app/templates/folder. Here you can see the ExternalSecrets (YAML files withes-prefix) and other CRs.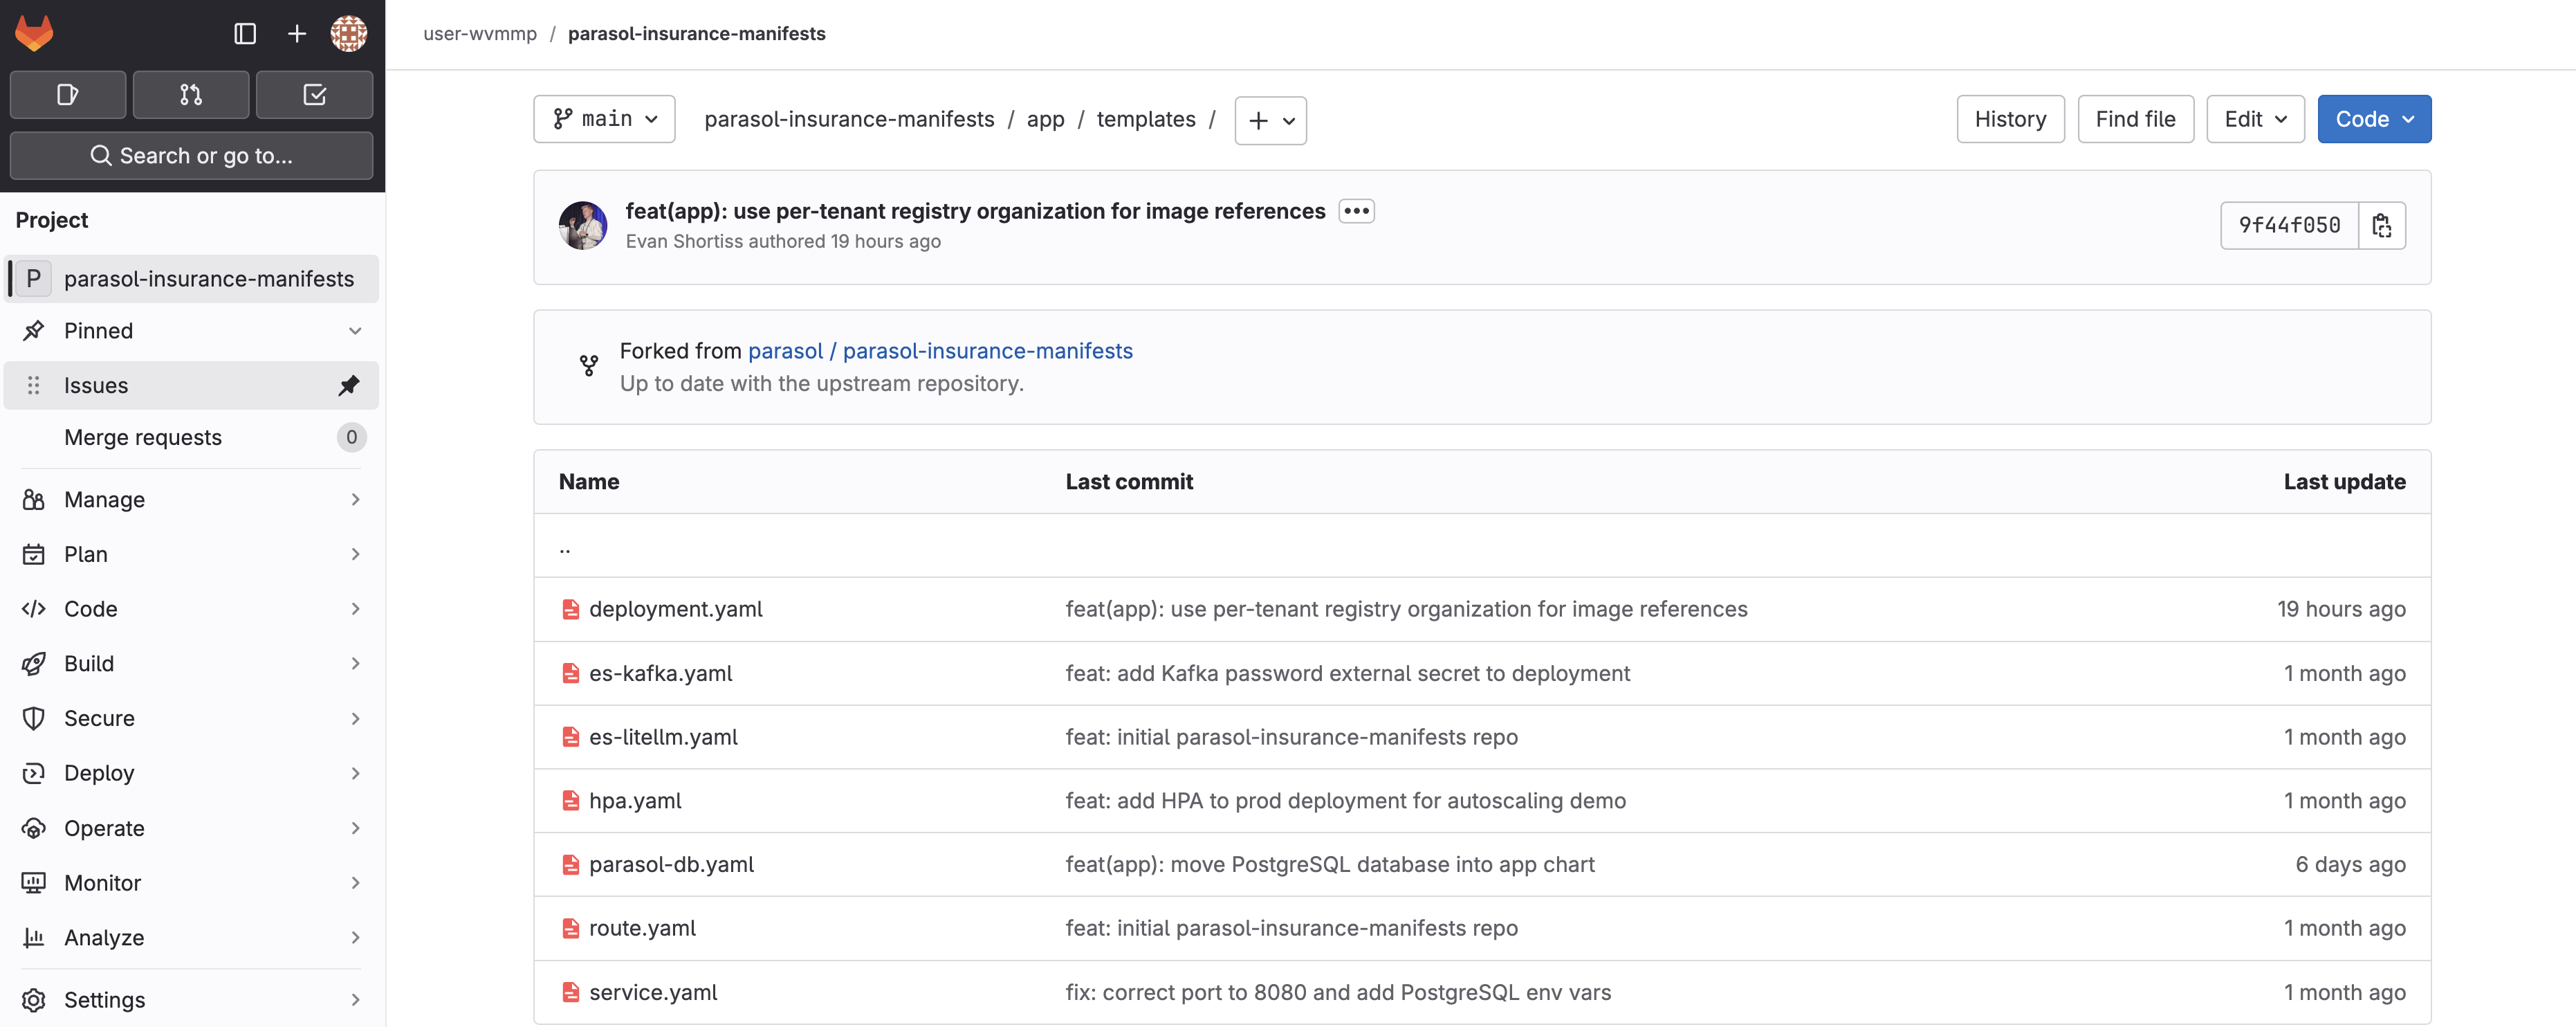 Figure 7. Deployment manifests in GitLab
 -
Click
deployment.yamland locate theDEV_KAFKA_PASSWORD. Notice that it referenceskafka-credentialsdefined by the ExternalSecret.
The manifests are deployed to your namespaces on OpenShift using OpenShift GitOps. You’ll see this in-depth in the next exercise.
Review the application source code
-
Click the GitLab icon in the top-left of the GitLab UI to return to your Projects list.
-
Click into the parasol-insurance repository and explore the project structure. This is a standard Quarkus application with
src/main/javafor source code andsrc/main/resourcesfor configuration. -
Open
src/main/resources/application.propertiesand take note of theDEV_KAFKA_PASSWORDenvironment variable. Recall that this is defined by thedeployment.yamlDeployment that reads thees-kafka.yamlExternalSecret. At no point is the value of the credential stored in plaintext. -
You’ll also notice
mp.messaging.incoming.emails-in.topicinapplication.propertiesdefines the Kafka Topic that the application consumes emails from.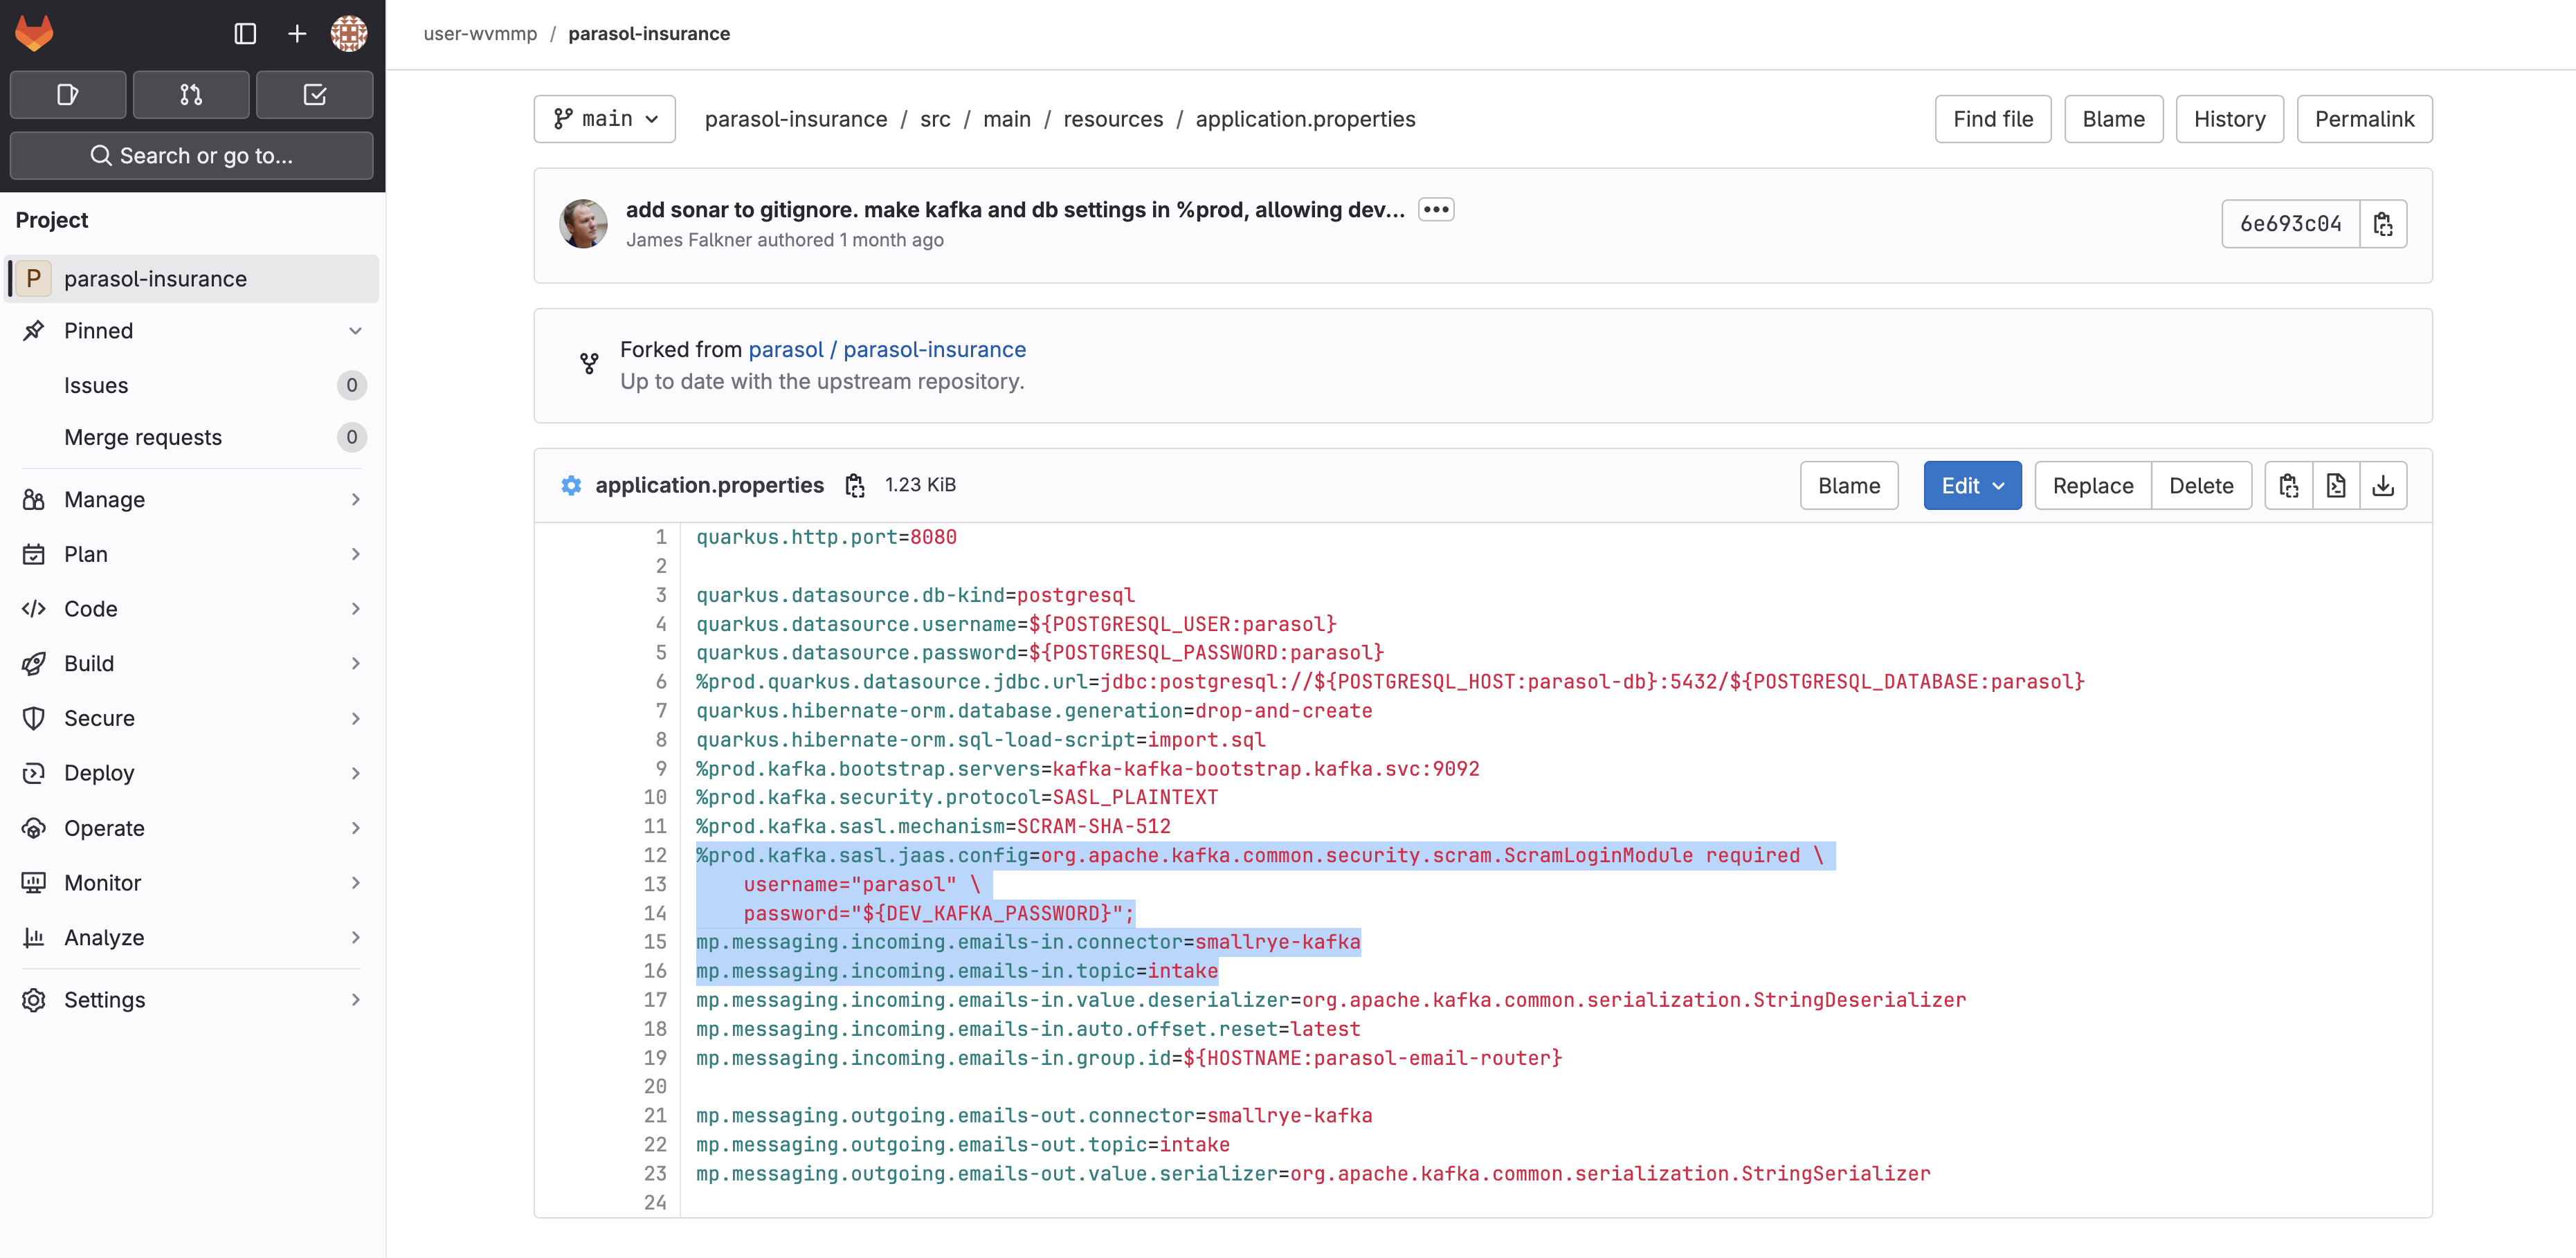 Figure 8. Application properties showing Kafka and credential configuration
 -
Take a look at the code in
src/main/java/com/parasol/EmailRouter.javaand you’ll see theconsumemethod references theemails-inmessage channel that was defined inapplication.properties.
Now you know how the application source code, and build and deployment manifests come together to form a complete application deployment on OpenShift. This application is designed with the Twelve-Factor principles in mind.
Verify
Confirm the following:
-
You can log into GitLab with your credentials
-
Two repositories are visible in your GitLab namespace:
parasol-insuranceandparasol-insurance-manifests -
The
deployment.yamlin the manifests repo references thekafka-credentialsExternalSecret -
The
application.propertiesin the source repo references the same credential via environment variables
Exercise 6: Explore OpenShift GitOps
The manifests you explored in the parasol-insurance-manifests repository are used to manage all aspects of the application build and deployment on OpenShift via OpenShift GitOps (Argo CD). Argo CD watches your manifest repository for changes and continuously reconciles the state of the manifests on the cluster with those in the repository. This prevents configuration drift and ensures applications are in a known state.
View your applications
Argo CD uses Application CRs to manage manifests on your OpenShift cluster.
-
Use the Argo CD tab, or visit the Argo CD UI in a new tab.
Do not click the Log in via OpenShift button.
-
Enter your username and password to login:
-
Username:
{user_name} -
Password:
{user_password}
-
-
You should see 3 Application tiles displayed. These represent your build, development, and production environments.
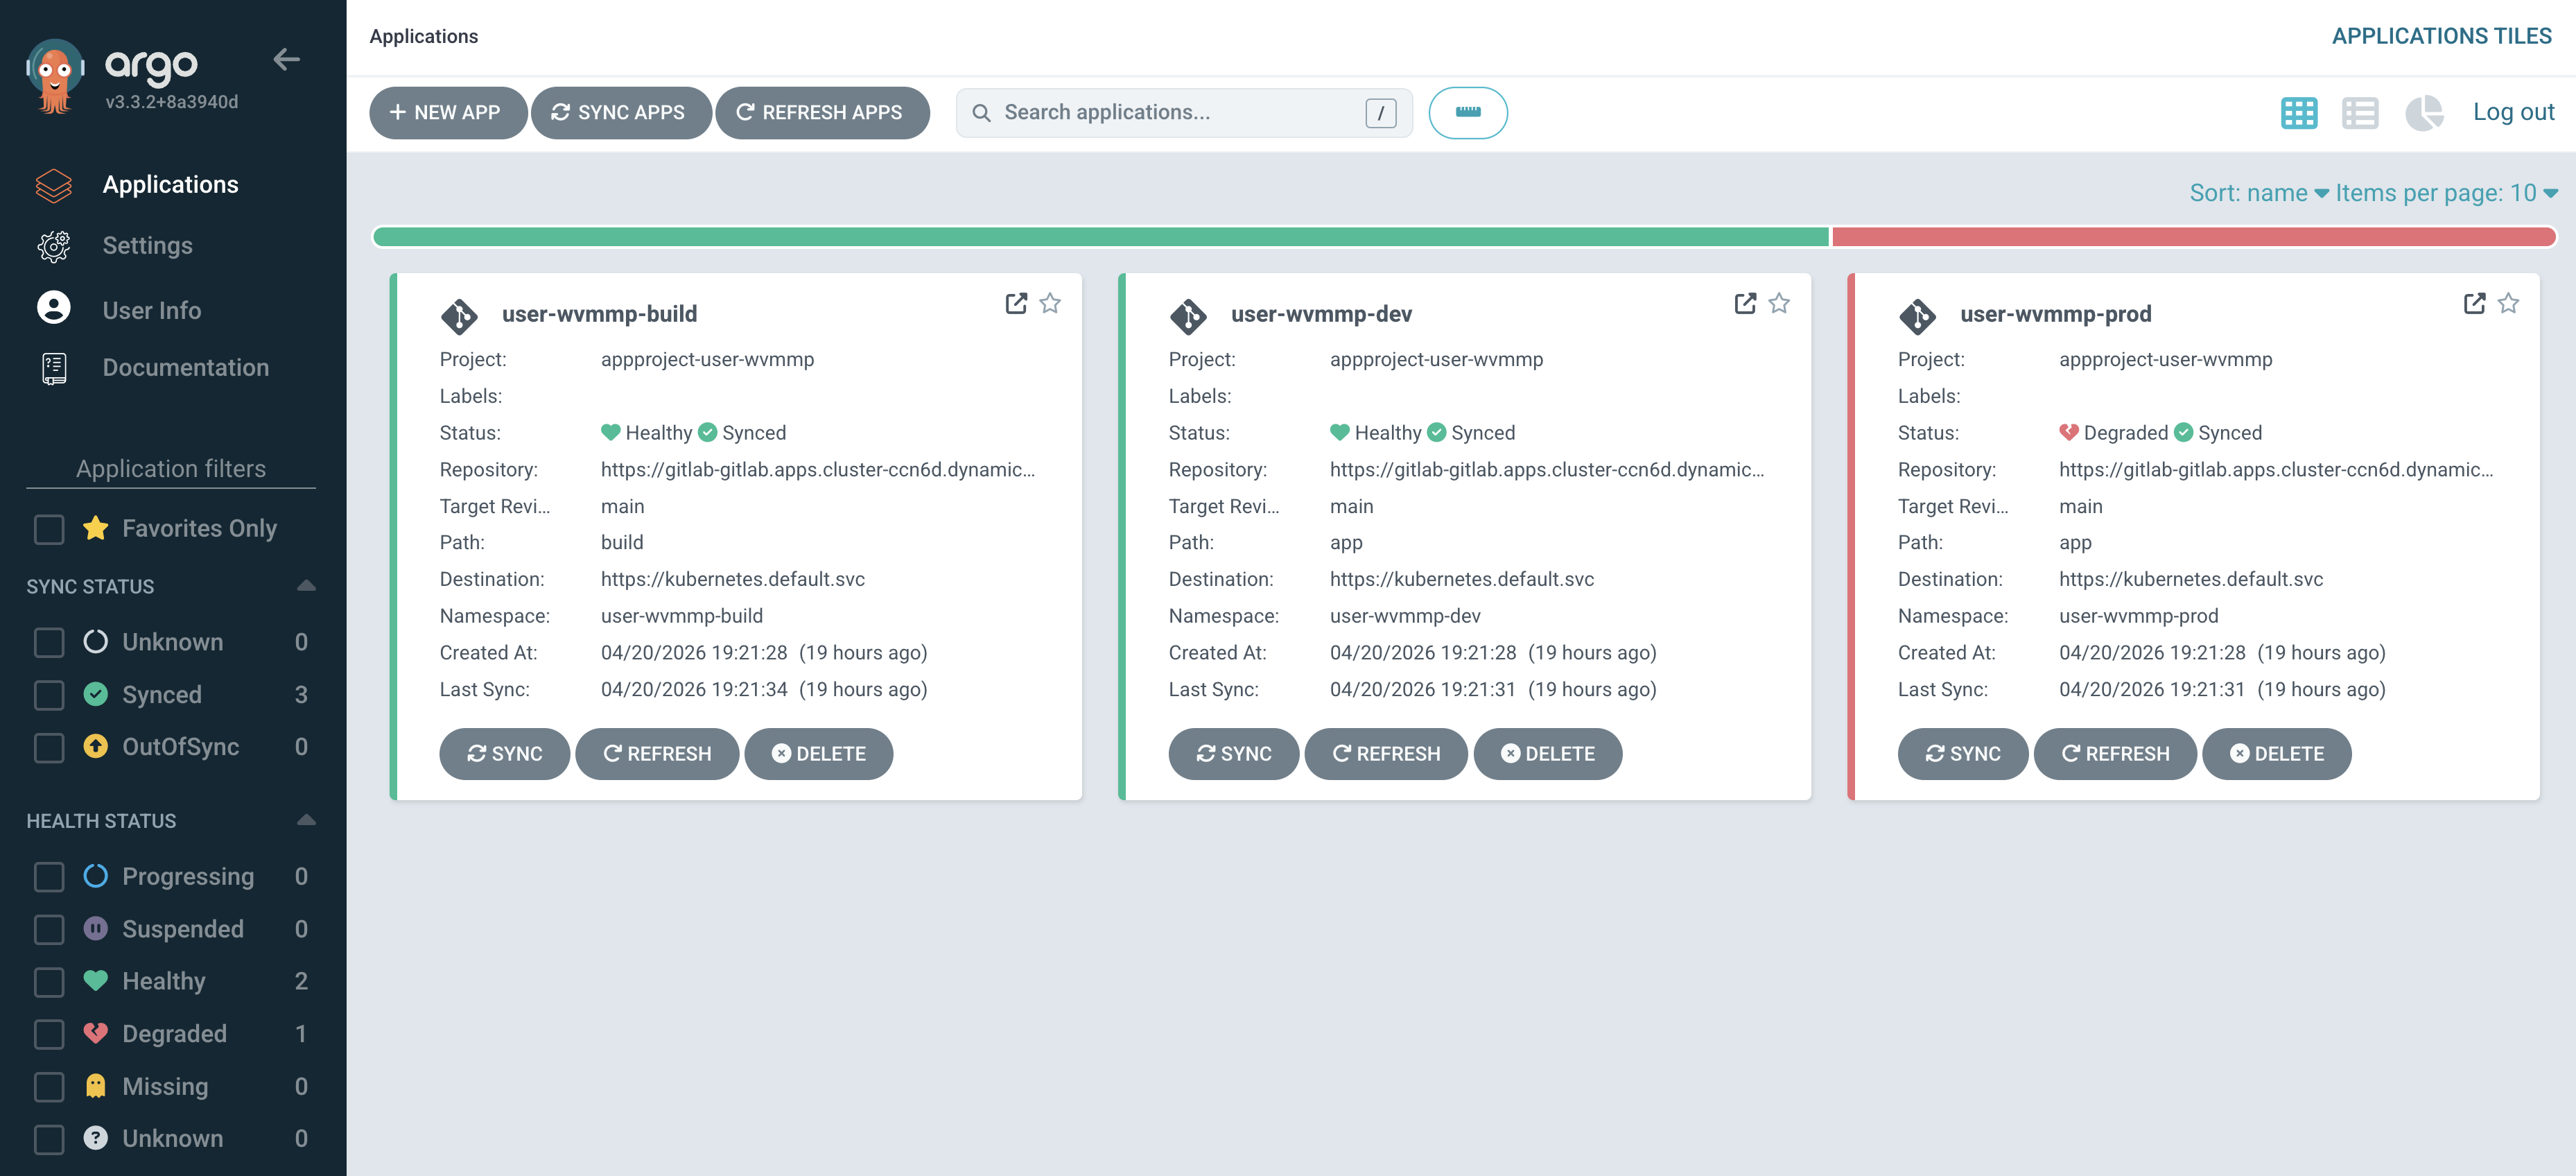 Figure 9. Your three Argo CD Applications
These applications were created for you when your lab environment was provisioned. Each one corresponds to one of your three namespaces.
Update a manifest in GitLab
Let’s see GitOps in action by making a small change to a manifest and watching Argo CD reconcile it.
-
Return to your parasol-insurance-manifests repository in GitLab.
-
Open the
app/templates/deployment.yamland select Edit > Edit single file. -
In the
metadata.labelssection, add the following label:app.openshift.io/runtime: quarkus -
Scroll down. Enter a commit message:
fix: show the quarkus icon in the openshift topology view -
The result will be similar to the following image:
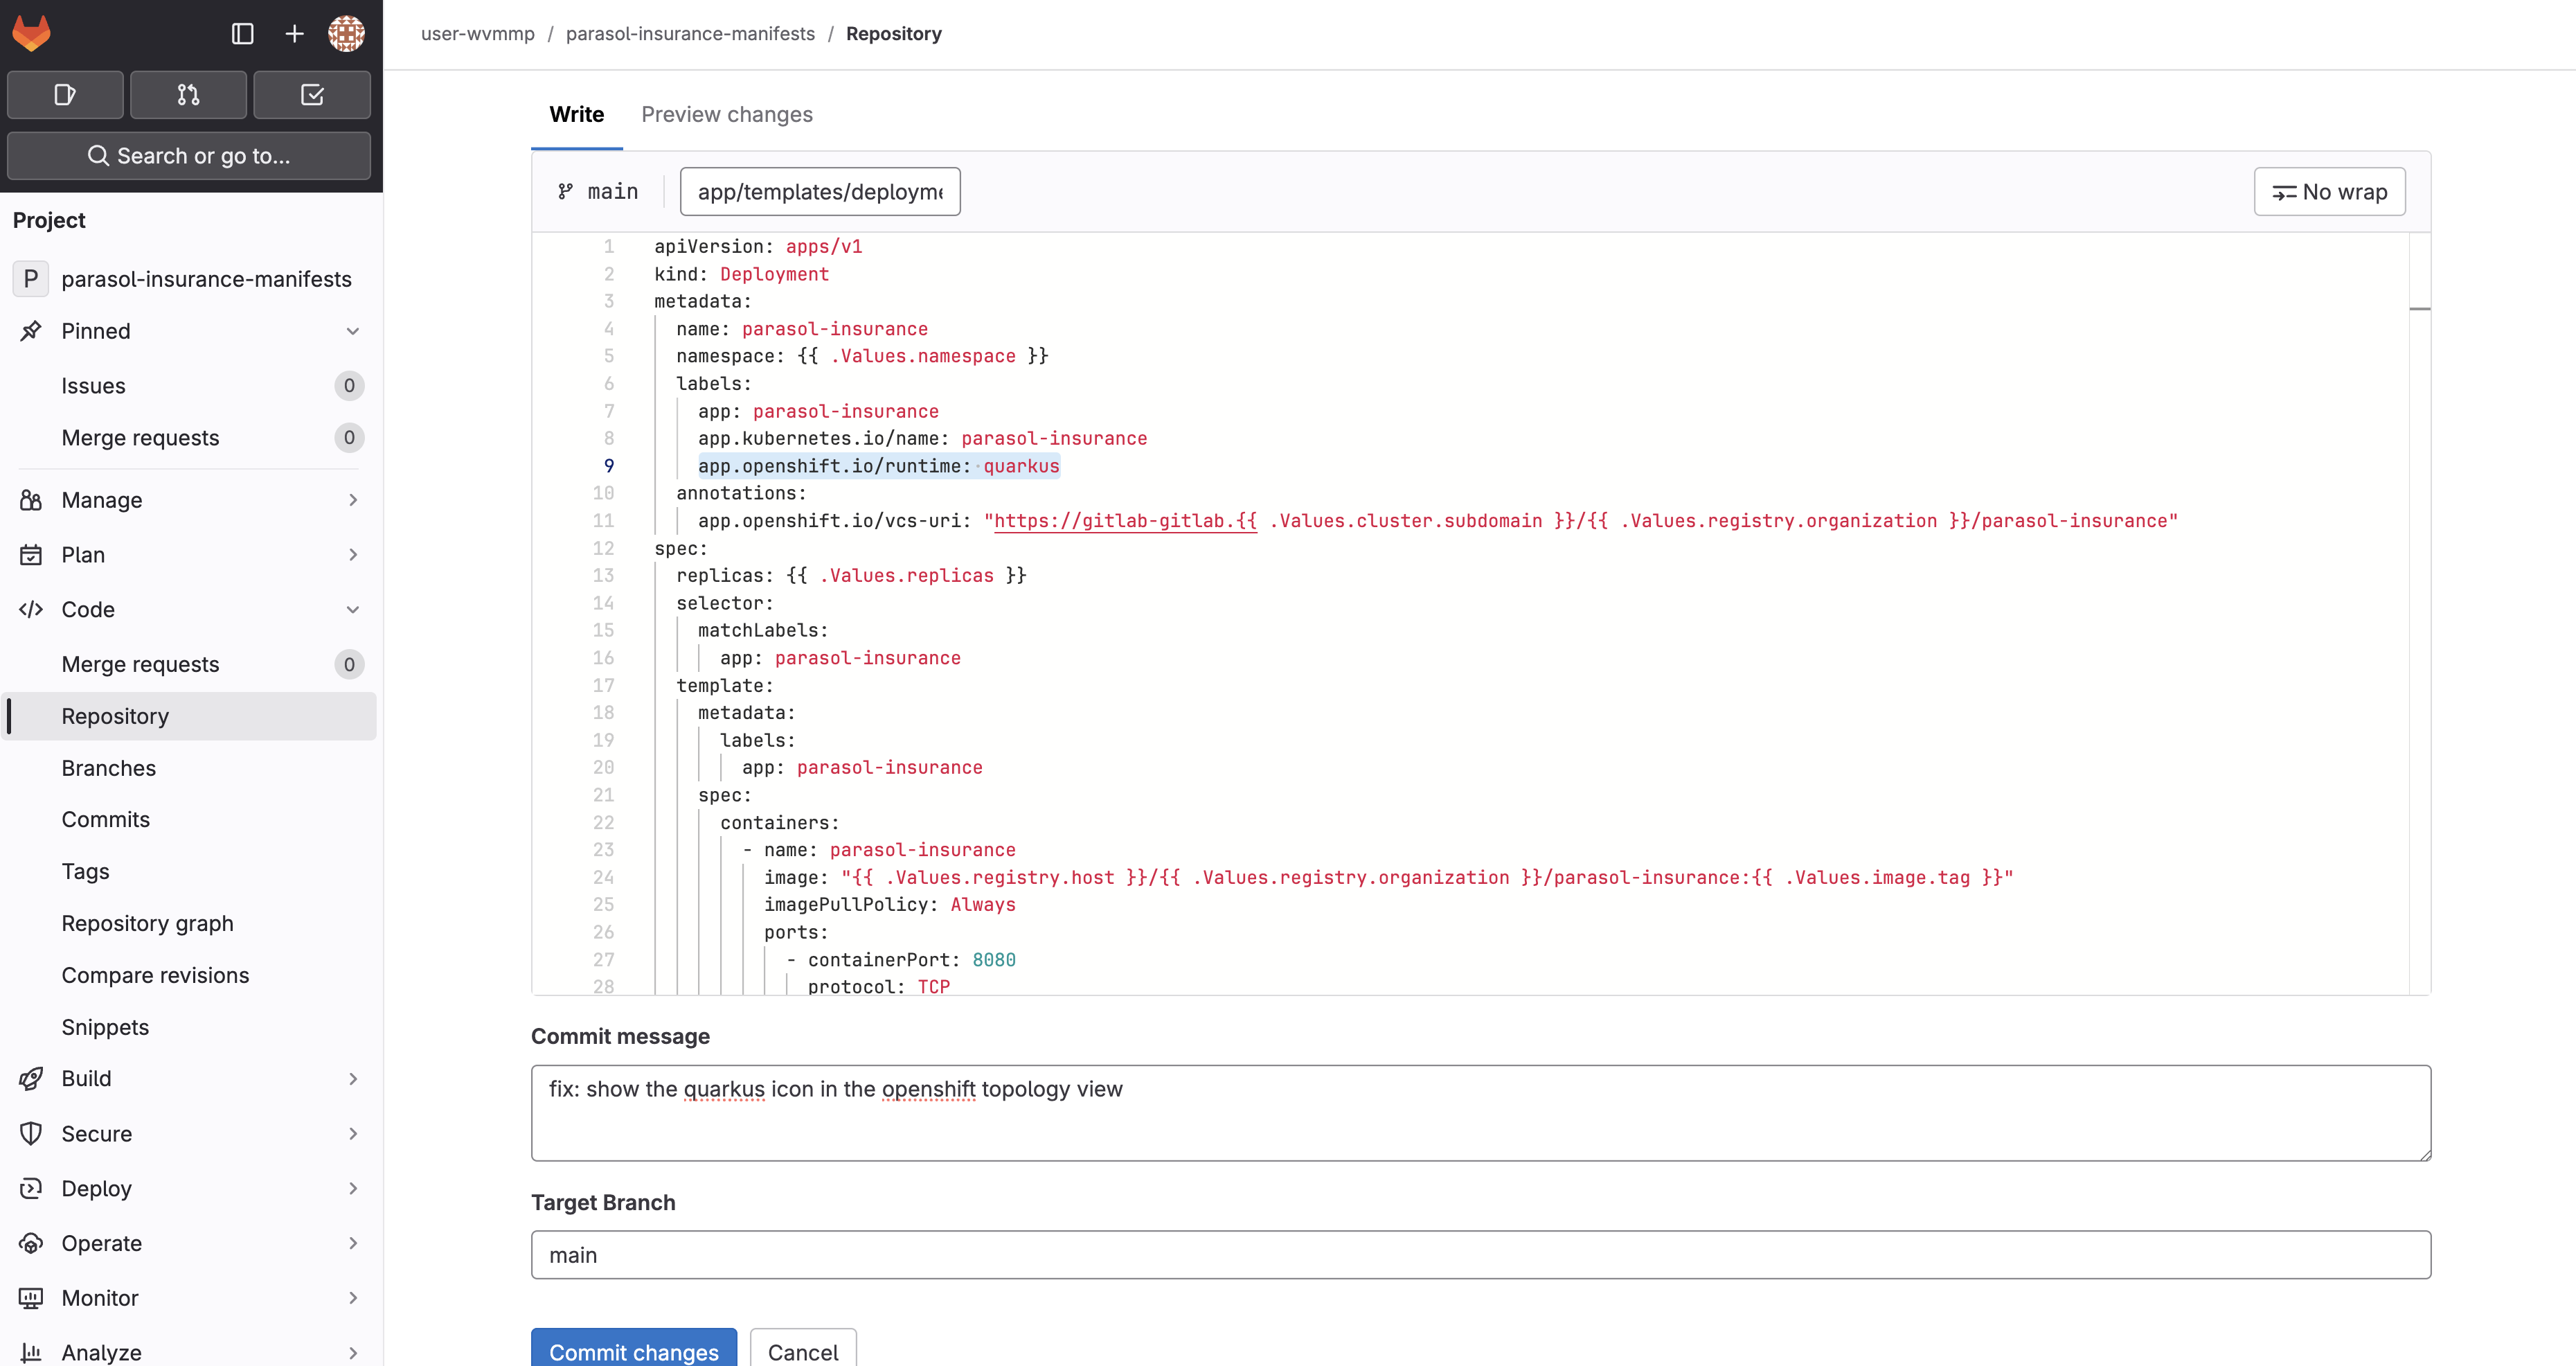 Figure 10. Adding a label to the deployment manifest in GitLab
 -
Click Commit changes.
Synchronize the application in Argo CD
-
Return to the
{user_name}-devApplication in Argo CD, and click Refresh.Clicking Refresh is not strictly required. Argo CD polls for changes every 3 minutes by default, and webhooks can be used to eliminate polling entirely.
-
Once the refresh completes, you’ll briefly see an OutOfSync message.
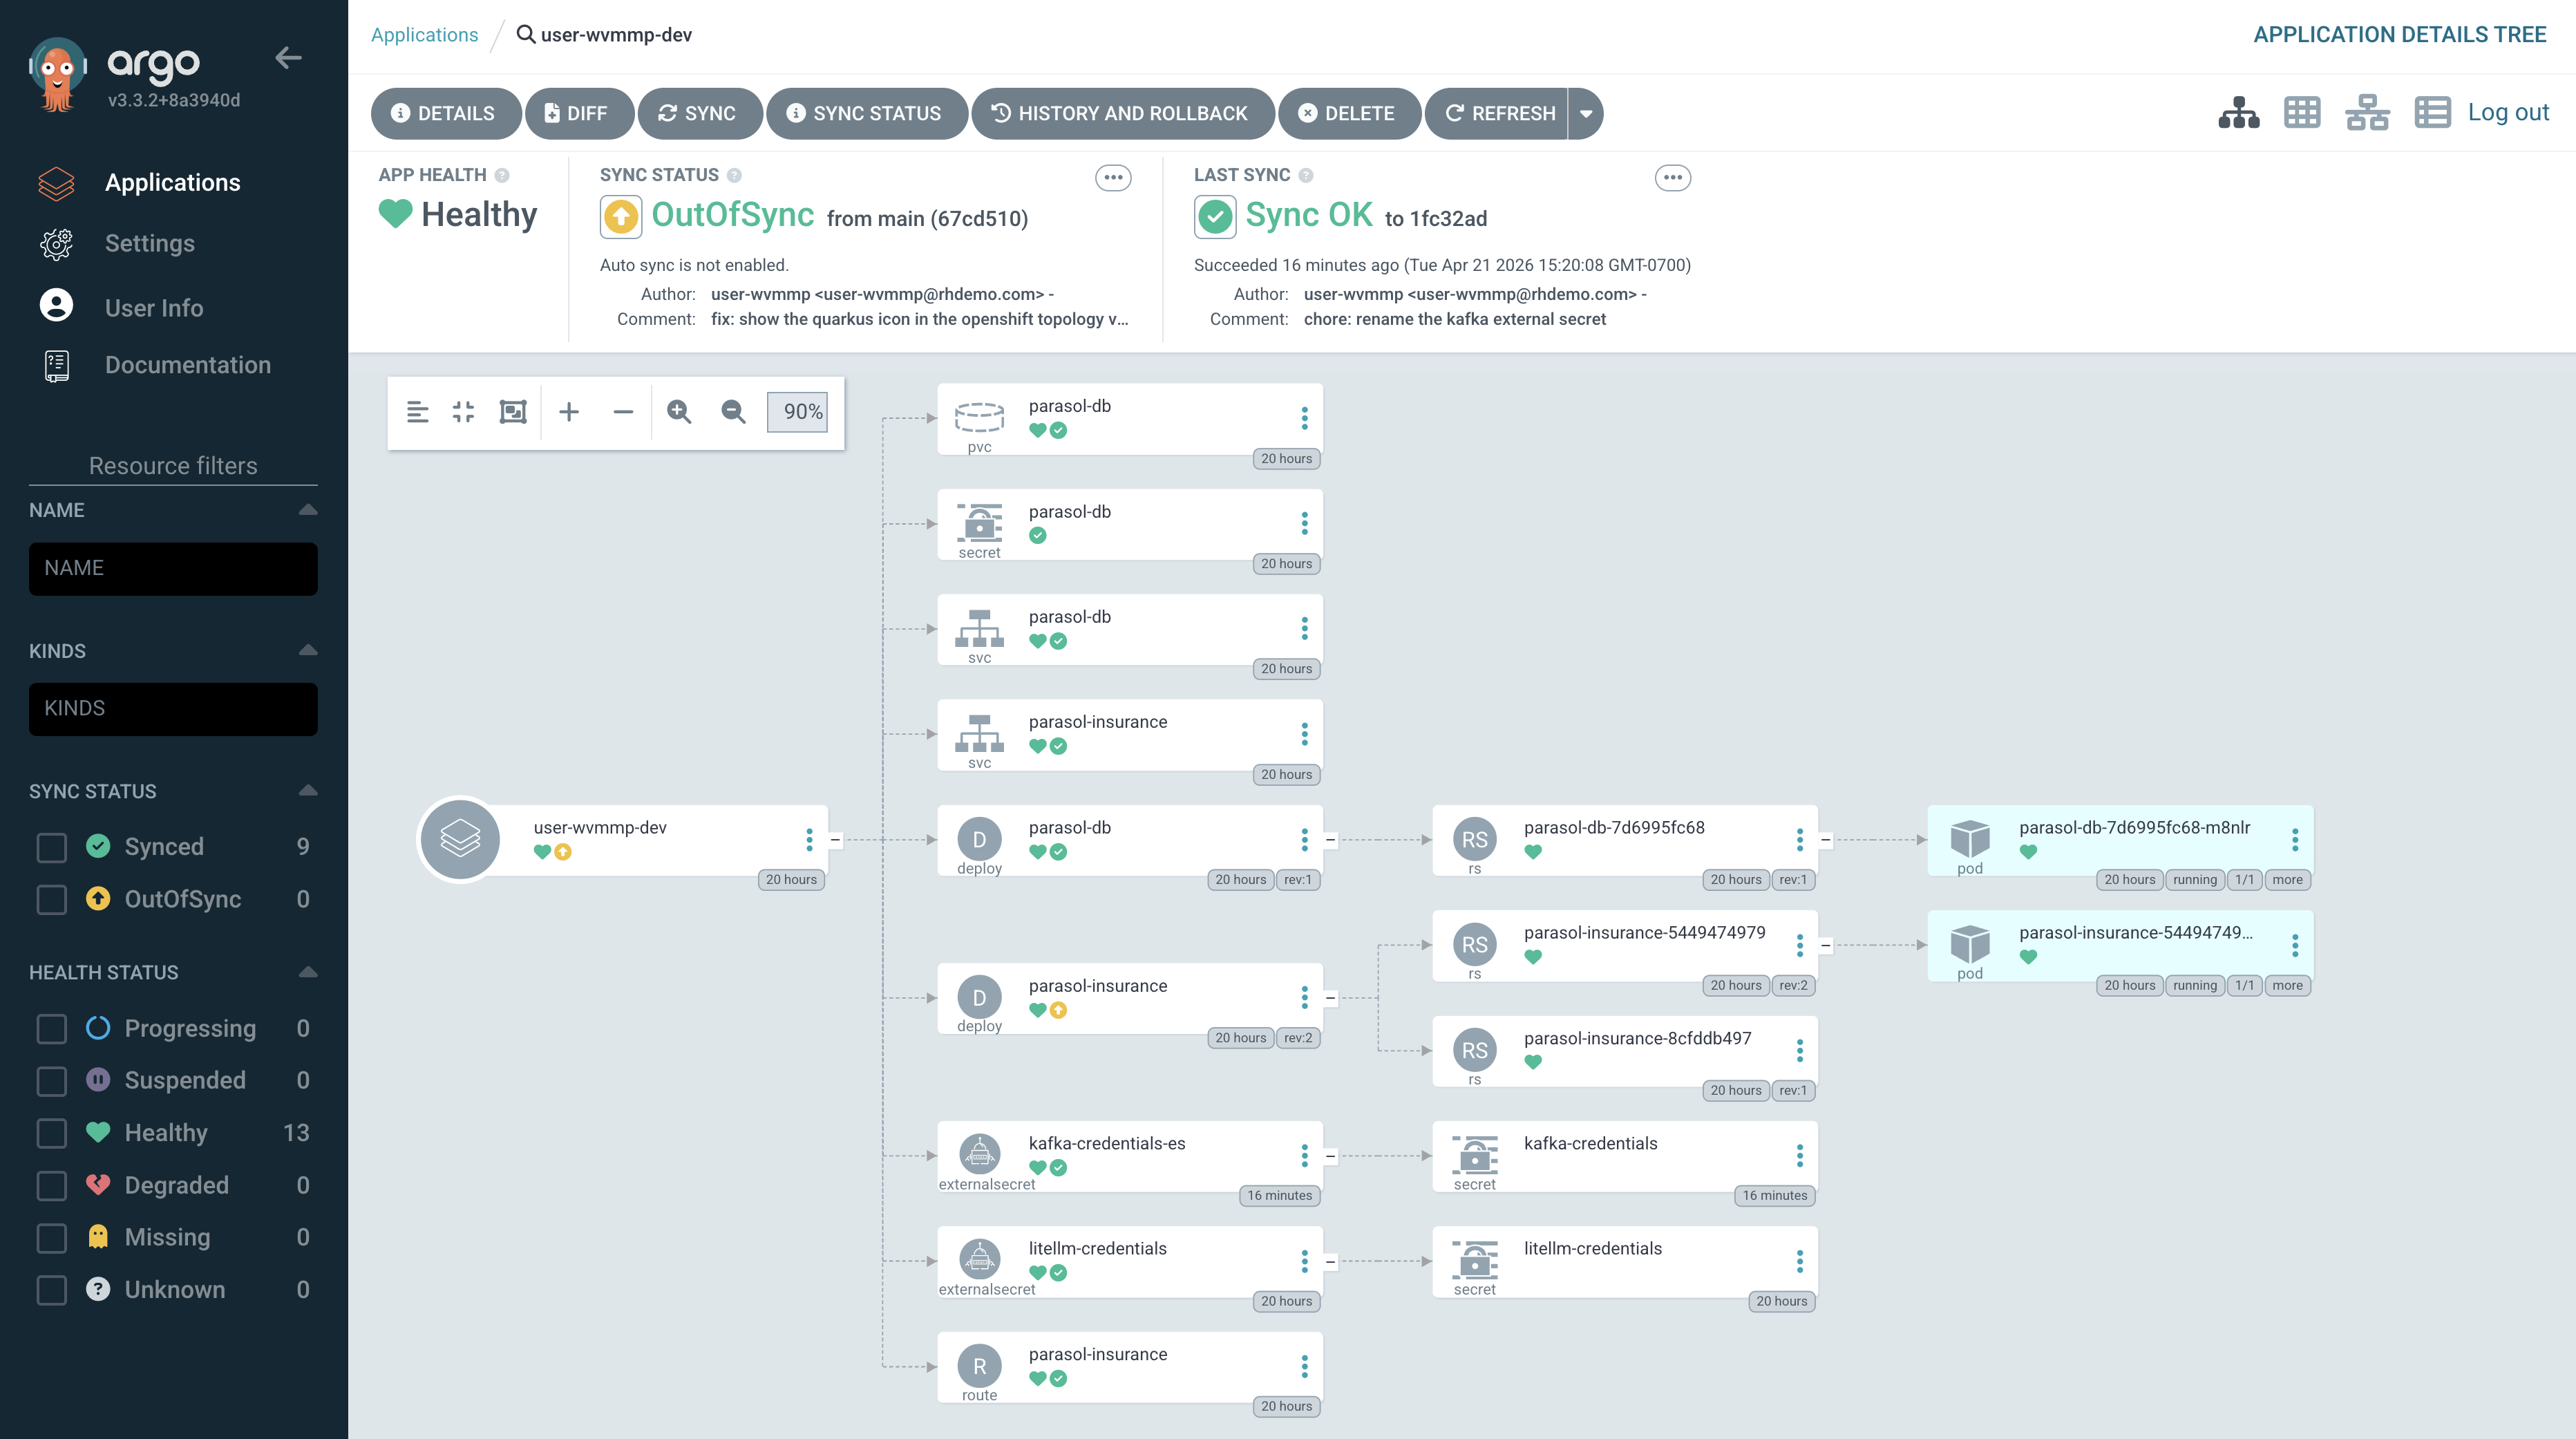 Figure 11. Argo CD detecting an out-of-sync state
 -
The OutOfSync status will quickly change to Syncing since auto-sync is enabled.
-
Wait for the application to report Synced.
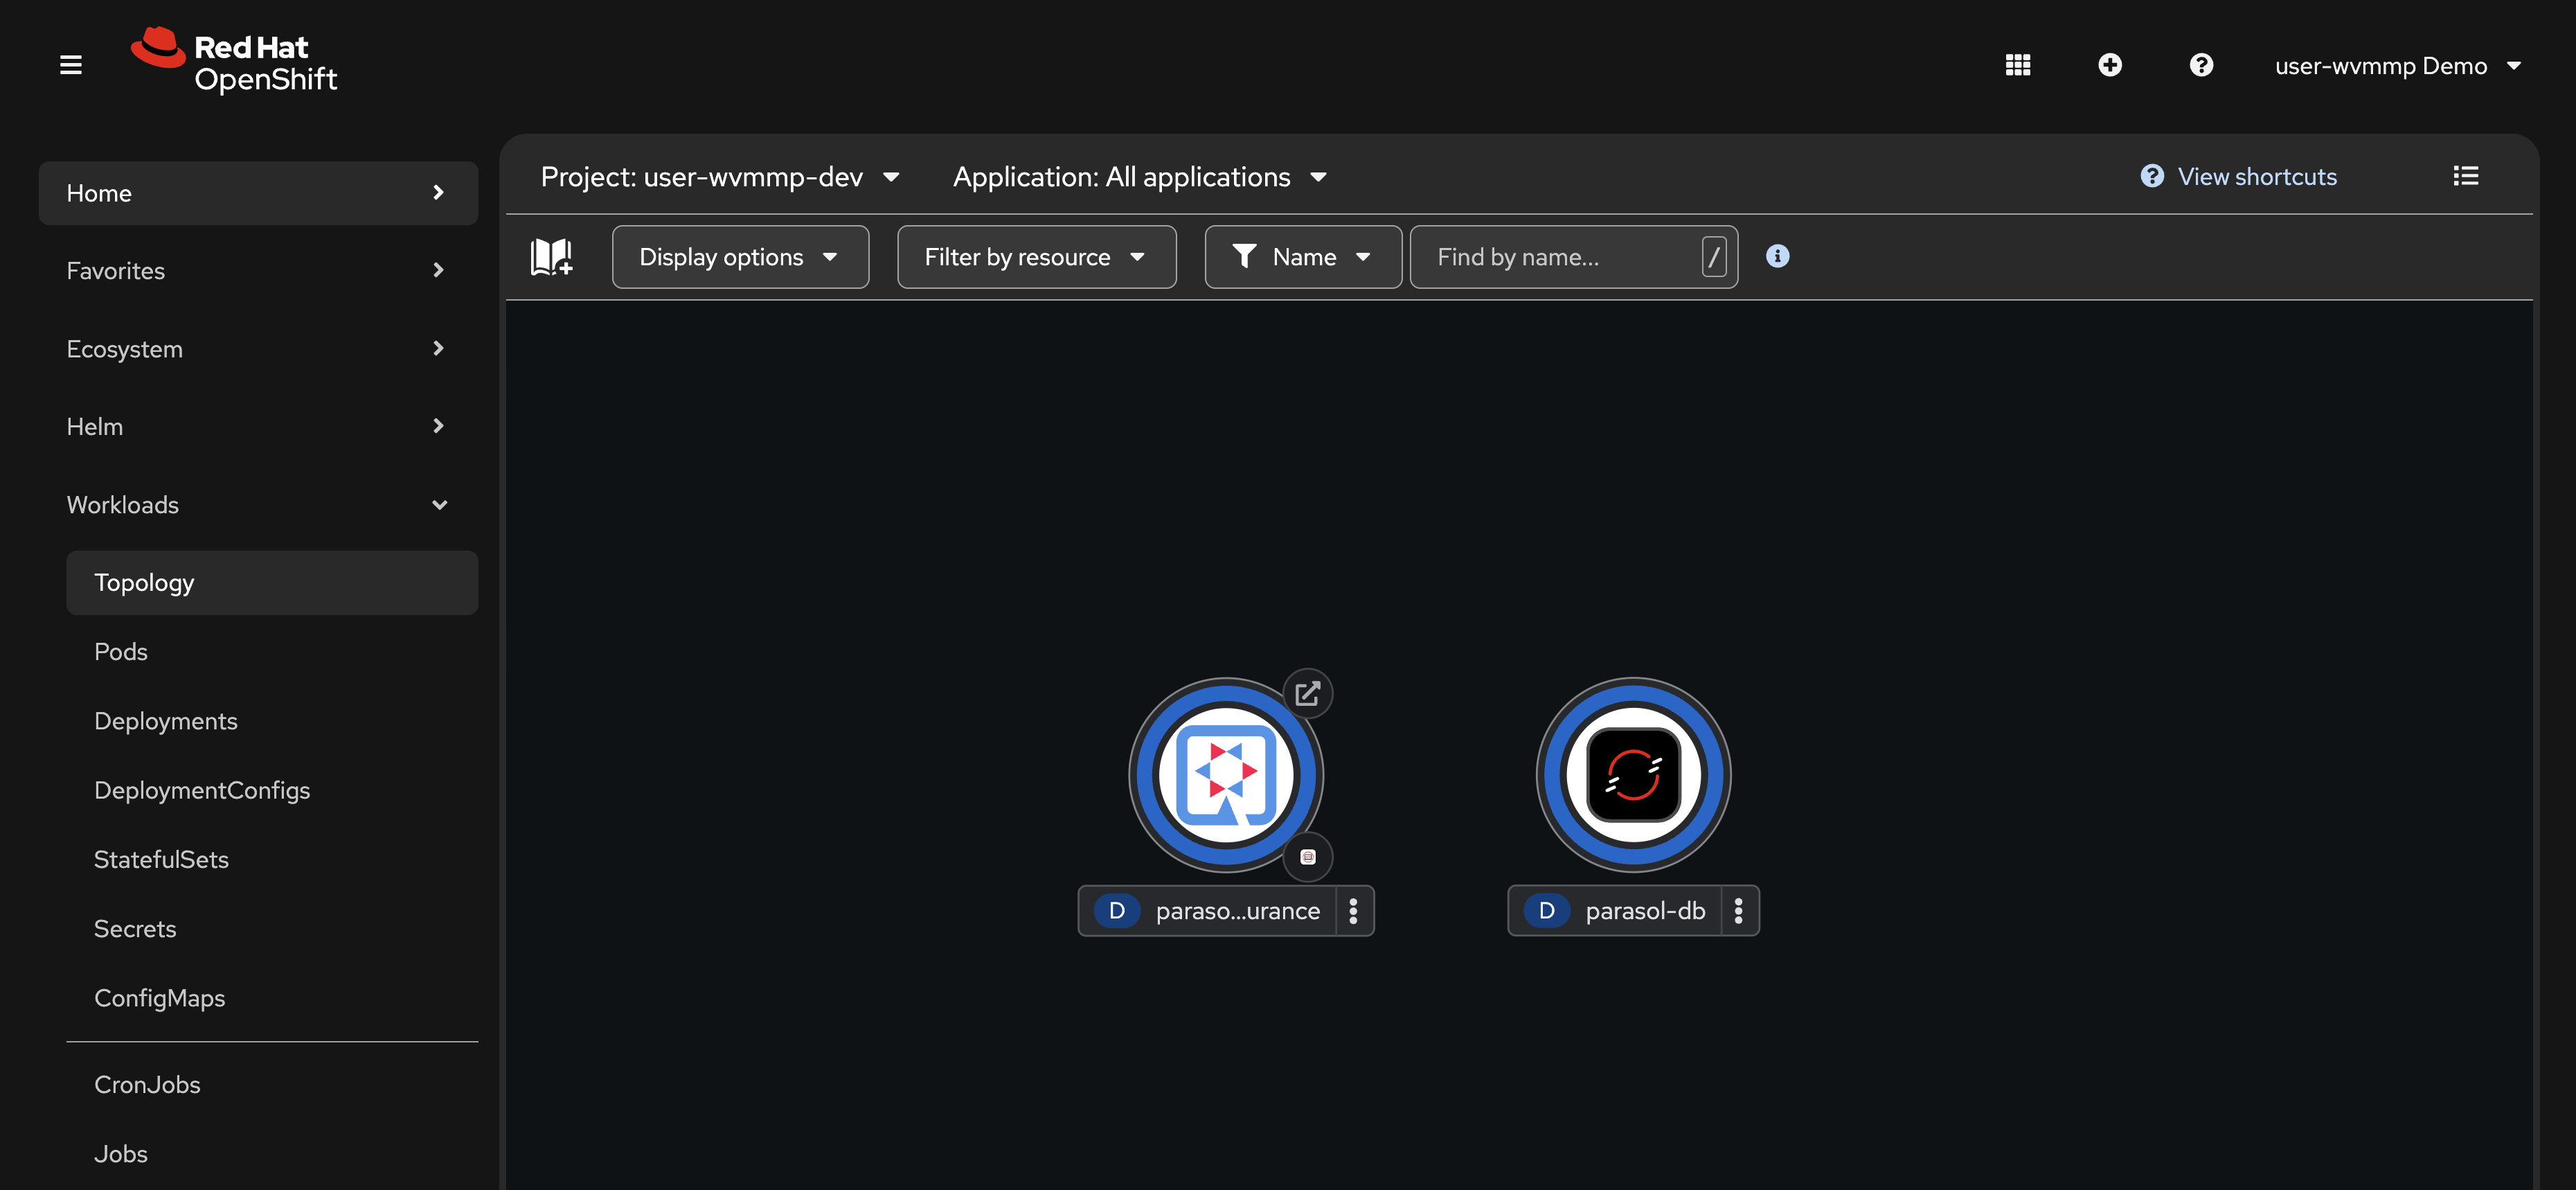
Return to the Workloads > Topology view in the OpenShift Console. Make sure the {user_name}-dev Project is selected. You should see that the Quarkus icon is now displayed on the Parasol Insurance deployment.
Learning outcomes
By completing this module, you should now understand:
-
How OpenShift organizes workloads into namespaces with role-based access control
-
How the
tenant-userrole provides developer access while keeping secrets protected -
How ExternalSecrets and Vault automate credential management without developer intervention
-
How Tekton pipelines can enforce a consistent build, test, scan, and deploy workflow
-
How application source code and deployment manifests work together following Twelve-Factor principles
-
How Argo CD continuously reconciles cluster state with Git, preventing configuration drift
Module summary
You have explored the platform and familiarized yourself with the tools you will use throughout this lab.
What you accomplished:
-
Logged into OpenShift and identified your build, dev, and prod namespaces
-
Opened the running Parasol Insurance application and observed the keyword-based email classification
-
Examined ExternalSecrets that sync credentials from Vault
-
Reviewed the CI/CD pipelines and a completed PipelineRun with five stages
-
Traced how credentials flow from Vault through ExternalSecrets into application configuration
-
Made a manifest change in GitLab and watched Argo CD reconcile it to the cluster
Next steps:
In Module 2 you will launch a cloud development environment, make a code change with an AI coding assistant, and watch it flow through the automated CI/CD pipeline.