Module 2: AI-assisted code modernization
Armed with MTA’s analysis results, you return to your desk at ACME Corp. Your manager stops by: "Great work on the analysis. Now I need to see if we can actually modernize this code faster than our traditional approach. We can’t afford weeks per application."
ACME needs proof that AI-assisted development can accelerate the actual code transformation work. You’ve heard about Red Hat Developer Lightspeed’s AI capabilities, but you need hands-on experience to understand how it accelerates modernization.
In this module, you’ll experience how Developer Lightspeed uses AI to generate modernized code, validate changes, and scale migration work through Agent Mode.
Learning objectives
By the end of this module, you’ll be able to:
-
Set up Red Hat Developer Lightspeed extension in Dev Spaces
-
Run a static code analysis to identify modernization opportunities
-
Generate modernized code using AI assistance
-
Review and validate AI-generated code changes
-
Expand migration work across entire projects using Agent Mode
Exercise 1: Access DevSpaces and configure Developer Lightspeed for MTA
|
The next 2 modules make use of the Developer Lightspeed for MTA extension running in a DevSpaces environment that provides a VSCode based GUI env. Developer Lightspeed is a feature of MTA. The extension is called the MTA Extension because it includes a static code analysis engine and an AI integrated code generation capability commonly referred to as Developer Lightspeed. You may notice that the Developer Lightspeed MTA extension is sometimes referred to as just Developer Lightspeed, Migration Toolkit for Applications extension, or just the MTA extension — In all cases it is referring to the same thing. |
You need to set up your development environment with AI capabilities to start modernizing ACME’s applications.
You prepare to launch DevSpaces and configure the Developer Lightspeed extension.
Prerequisites
-
Incognito mode browser access from user laptop to Workshop materials
-
Splitscreen view in browser to the Workshop Instructions and Tabs for Applications
Steps
-
Switch to Red Hat OpenShift DevSpaces by clicking the OpenShift DevSpaces tab in the workshop interface.
-
Log in to Dev Spaces using your OpenShift credentials:
You will be initially taken to the Keycloak SSO login page -
Username:
user1 -
Password:
openshift
-
-
After logging in, if prompted to Authorize Access
-
Click Allow selected permissions button
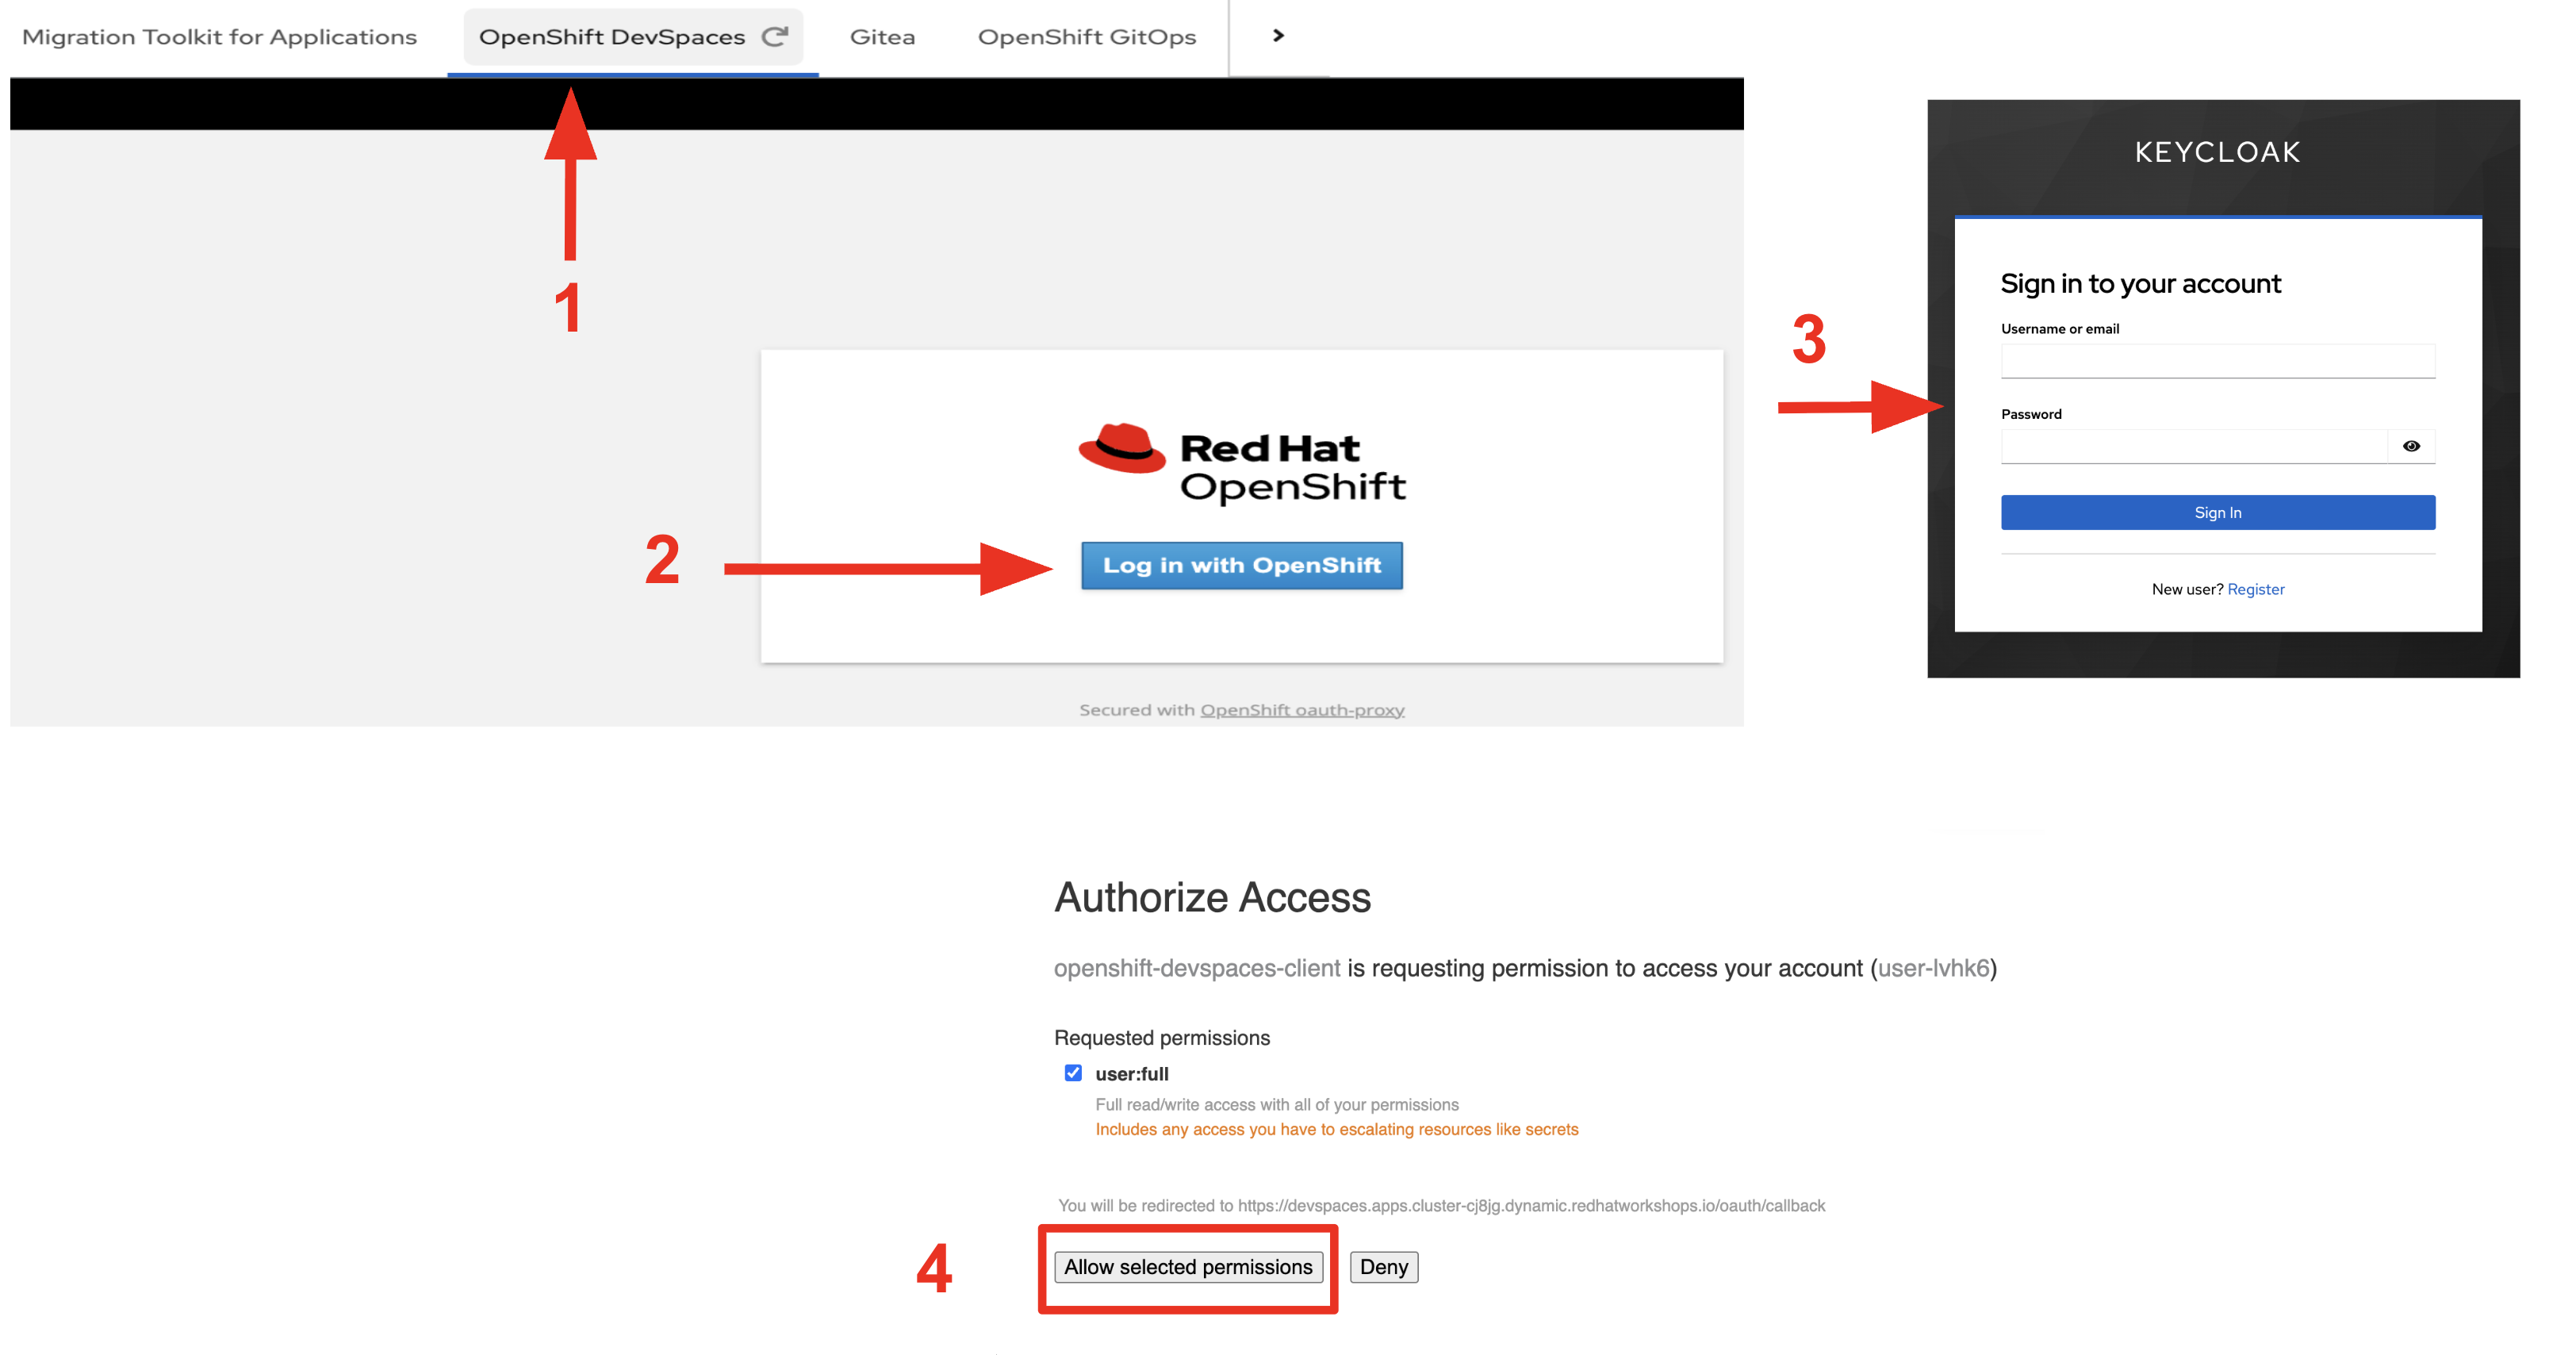 Figure 1. Logging In
If you see a message that says you need to authenticate again, just Click on the OpenShift DevSpaces tab and it should let you into the workspace listing.
-
-
Open the user-user1-workspace
-
After logging into the workspace listing will open up and show the user-user1-workspace entry
-
Click on the Open link on the right side of workspace listing
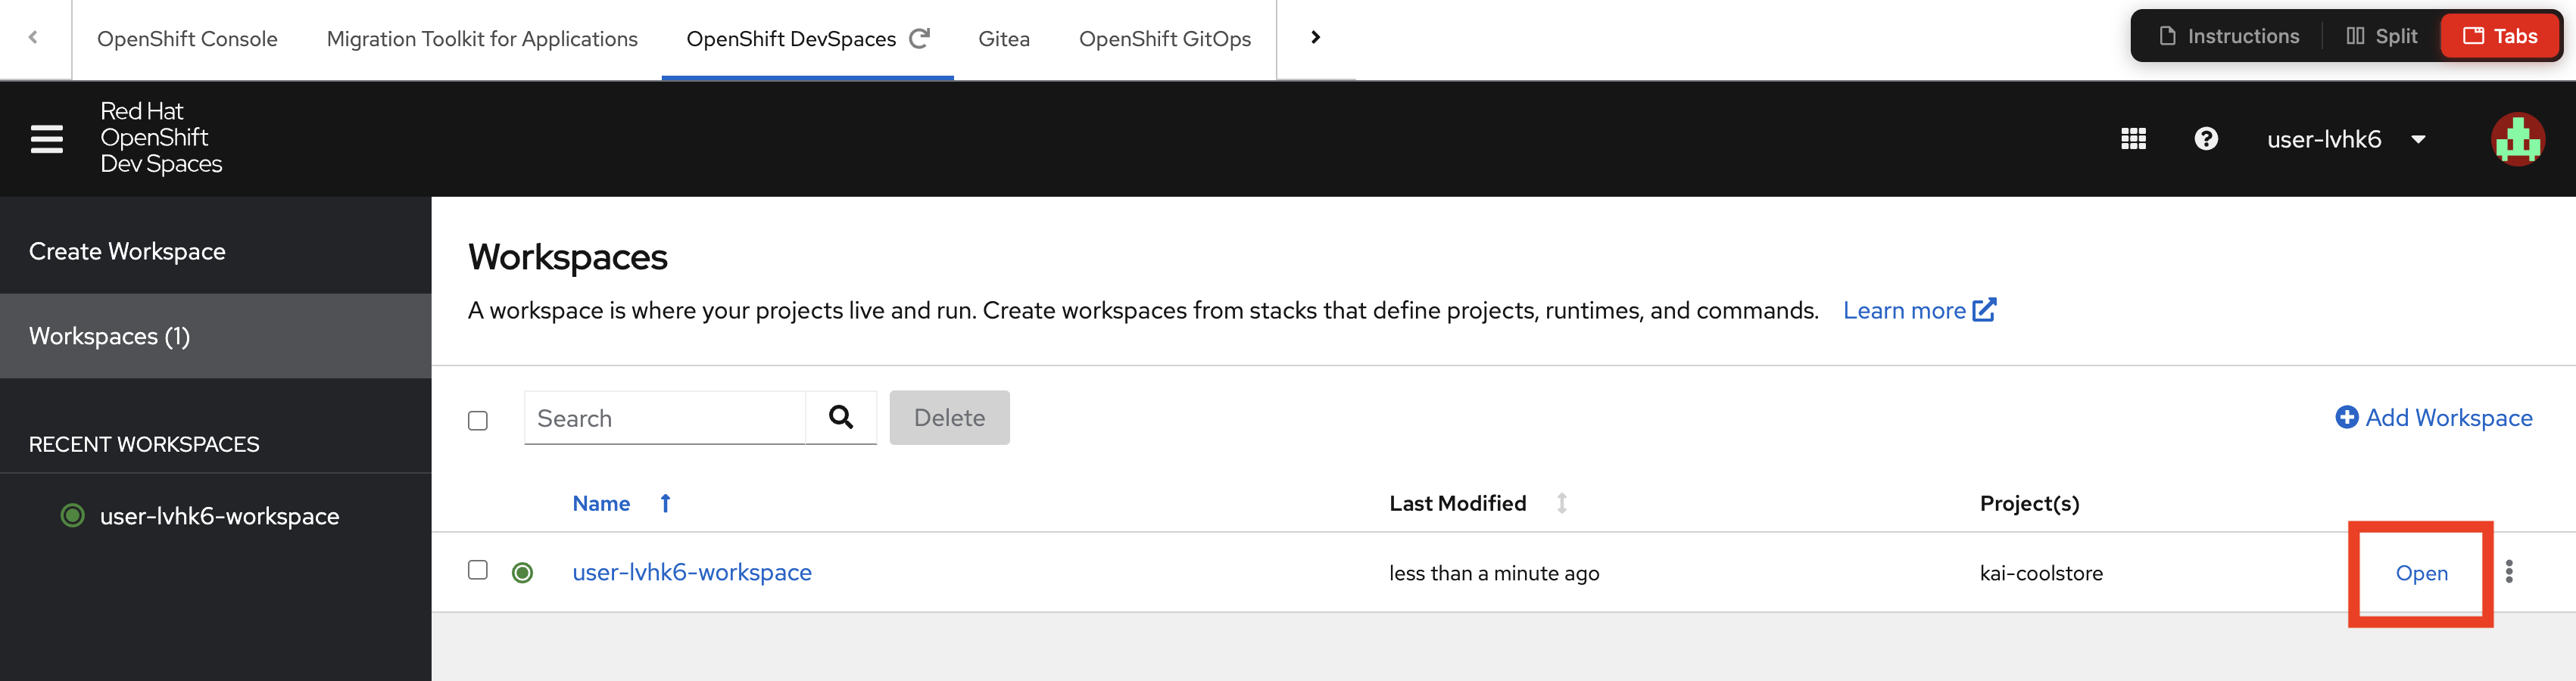 Figure 2. Open Workspace
-
-
Wait for the workspace to initialize and open:
Your kai-coolstore gitea repository will load in DevSpaces and your development environment will be setup.
The workspace will open in a new tab in your browser. The workspace tab is a VSCode GUI environment served up by DevSpaces -
If asked if you trust the content and providers, acknowledge yes, you do.
-
If shown a layout introductory panel, choose Light Modern theme for best contrast later in the exercise and Mark Done.
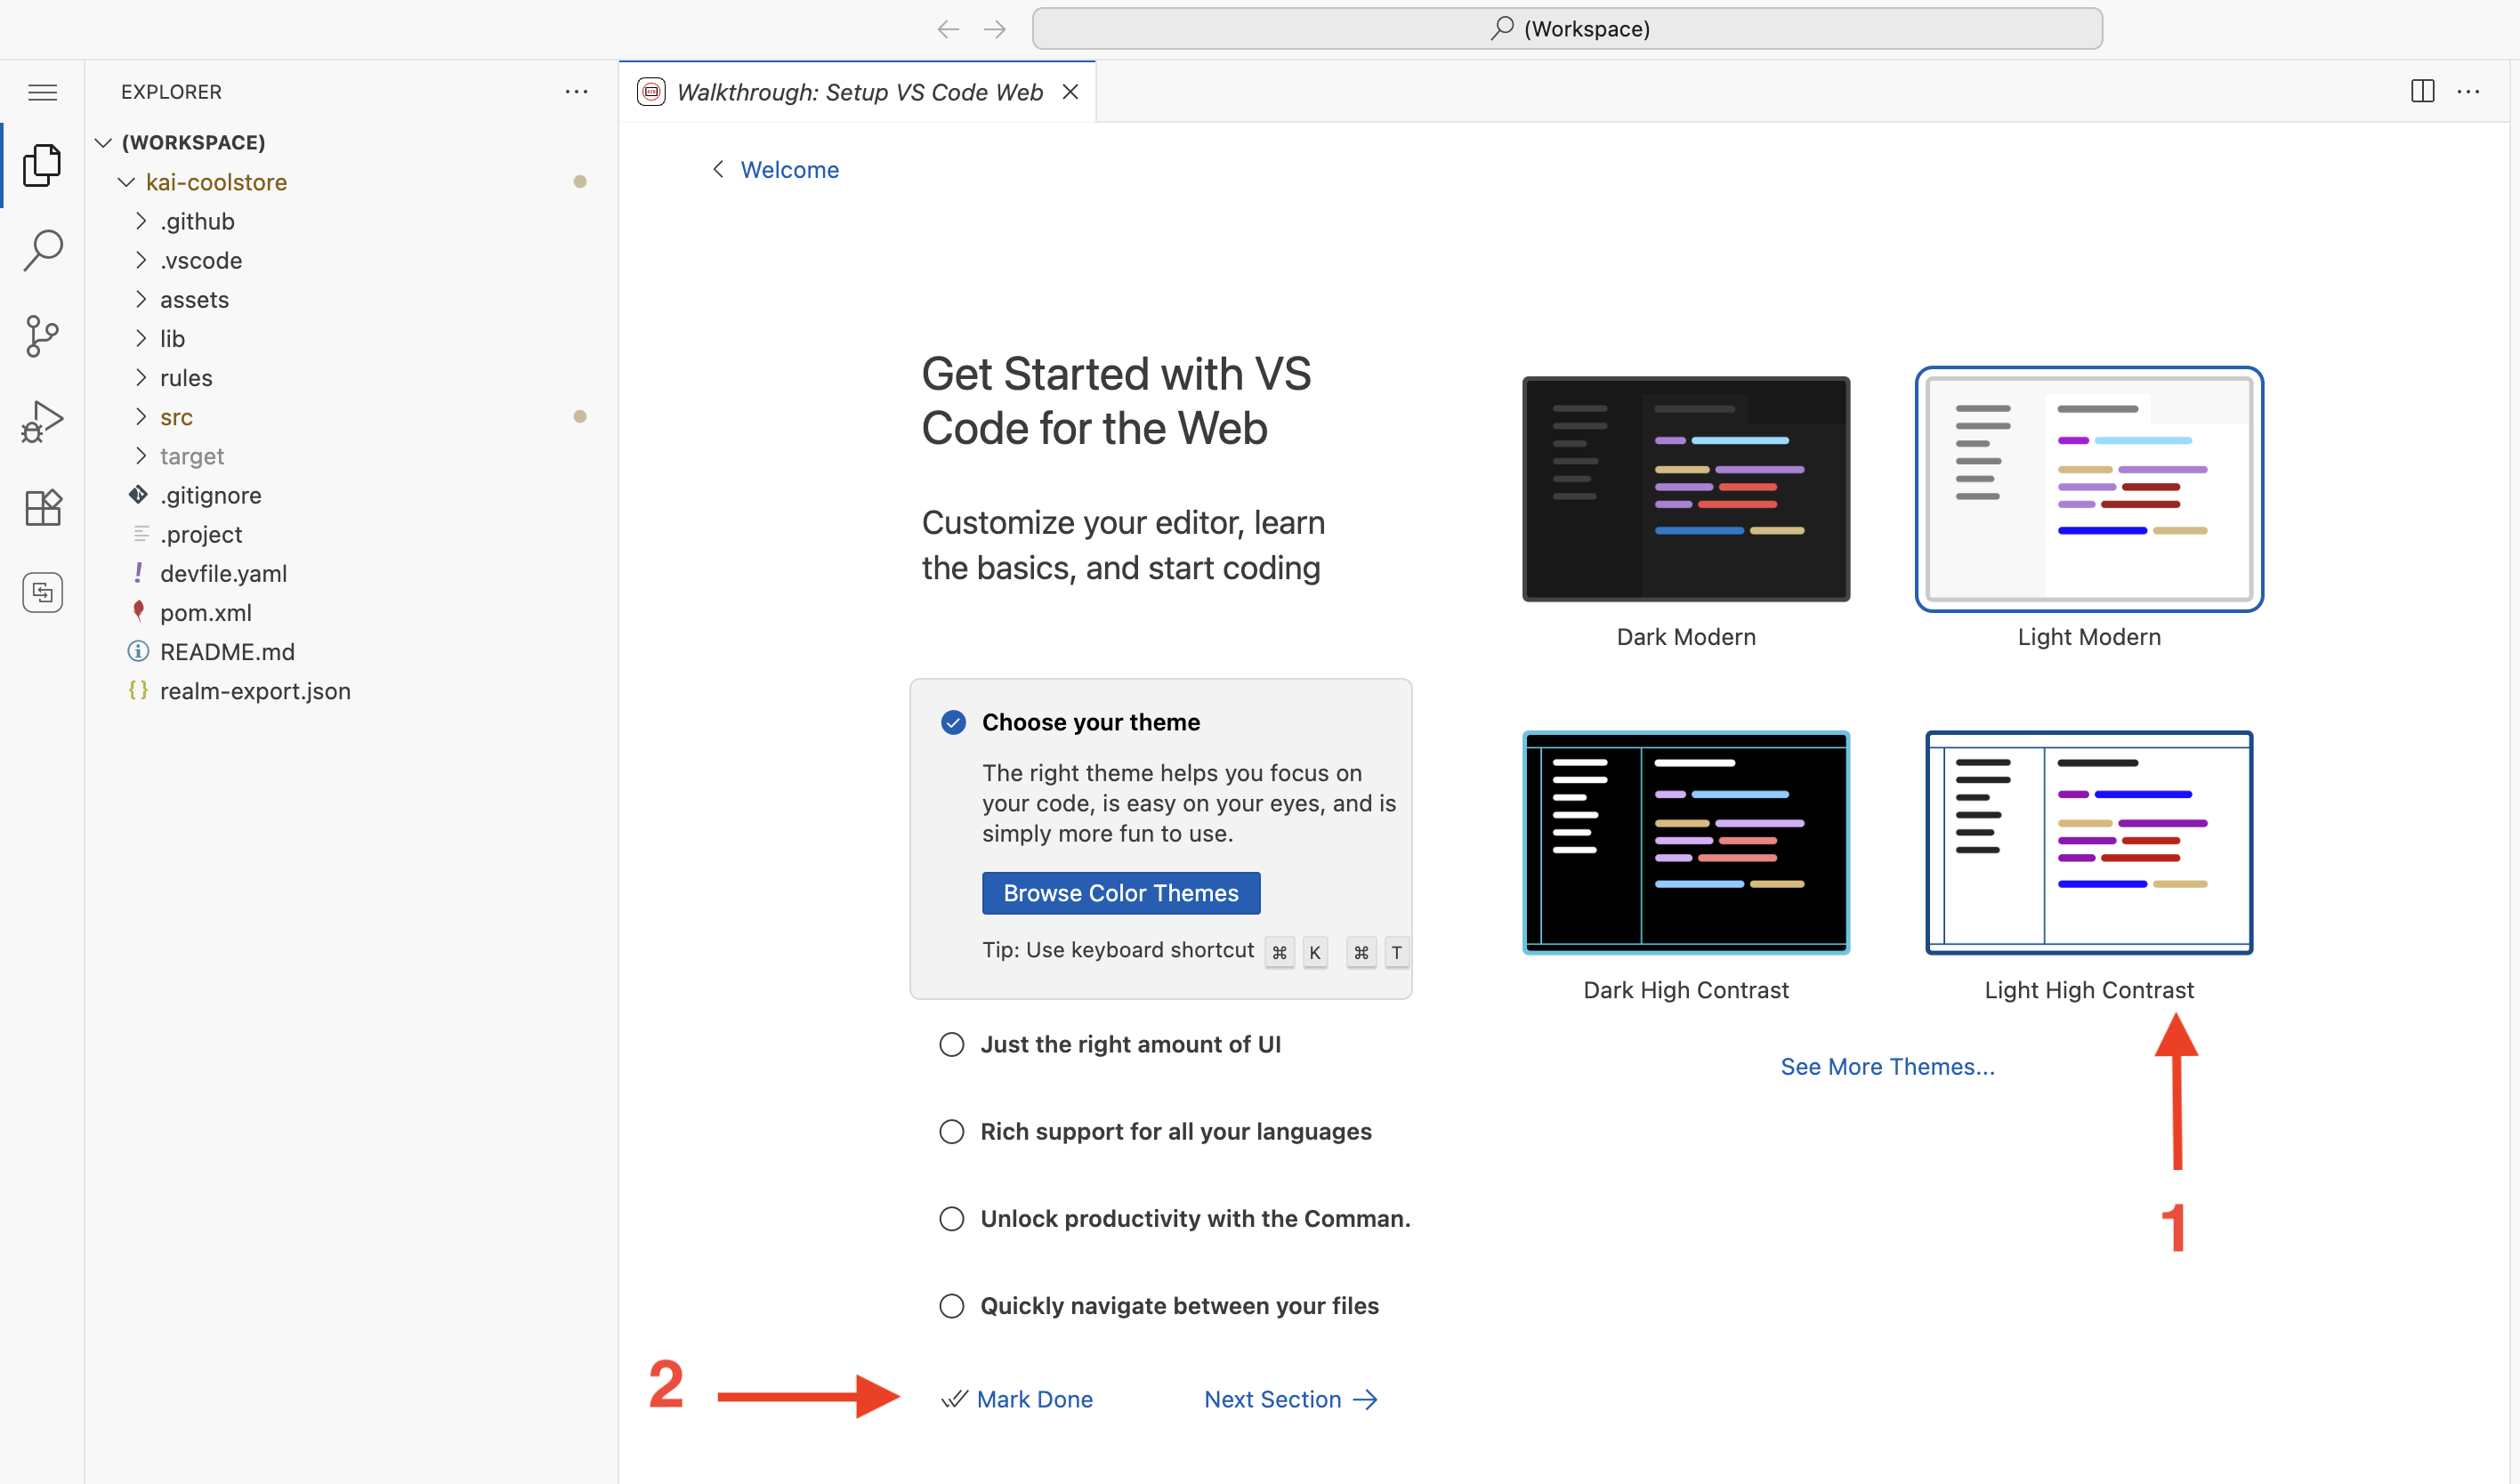 Figure 3. VSCode Tab
-
-
Once the workspace loads, verify the Developer Lightspeed extension, which is named Migration toolkit for applications, is installed:
-
Look for the Developer Lightspeed MTA icon in the left sidebar (it is the bottom icon)
-
If not visible, check Extensions view and search for "Migration toolkit for applications"
-
-
Configure the Developer Lightspeed MTA extension Profile
Before Developer Lightspeed can Analyize your legacy project you need to create a Profile, which will outline which LLM you want to use, and what the expected source and target technologies are that you want to convert from and to in the migration.
Turning on static rules to assist in the analysis is also important. You can also add additional custom rules, which we will do in the next lab module. Basically static rules are known issues to look for when migrating from certain source technologies.
Rules also include hints on how to fix the issue. In a RAG style fashion, these are passed to the LLM and help focus the LLM tapped by Developer Lightspeed for MTA to ensure generated solutions are highly tuned for an optimal fix.
-
Click on the MTA Extension icon on the left side of the screen
-
If you see an Install Extension Pack message just reload the page
-
Click Open Analysis Panel
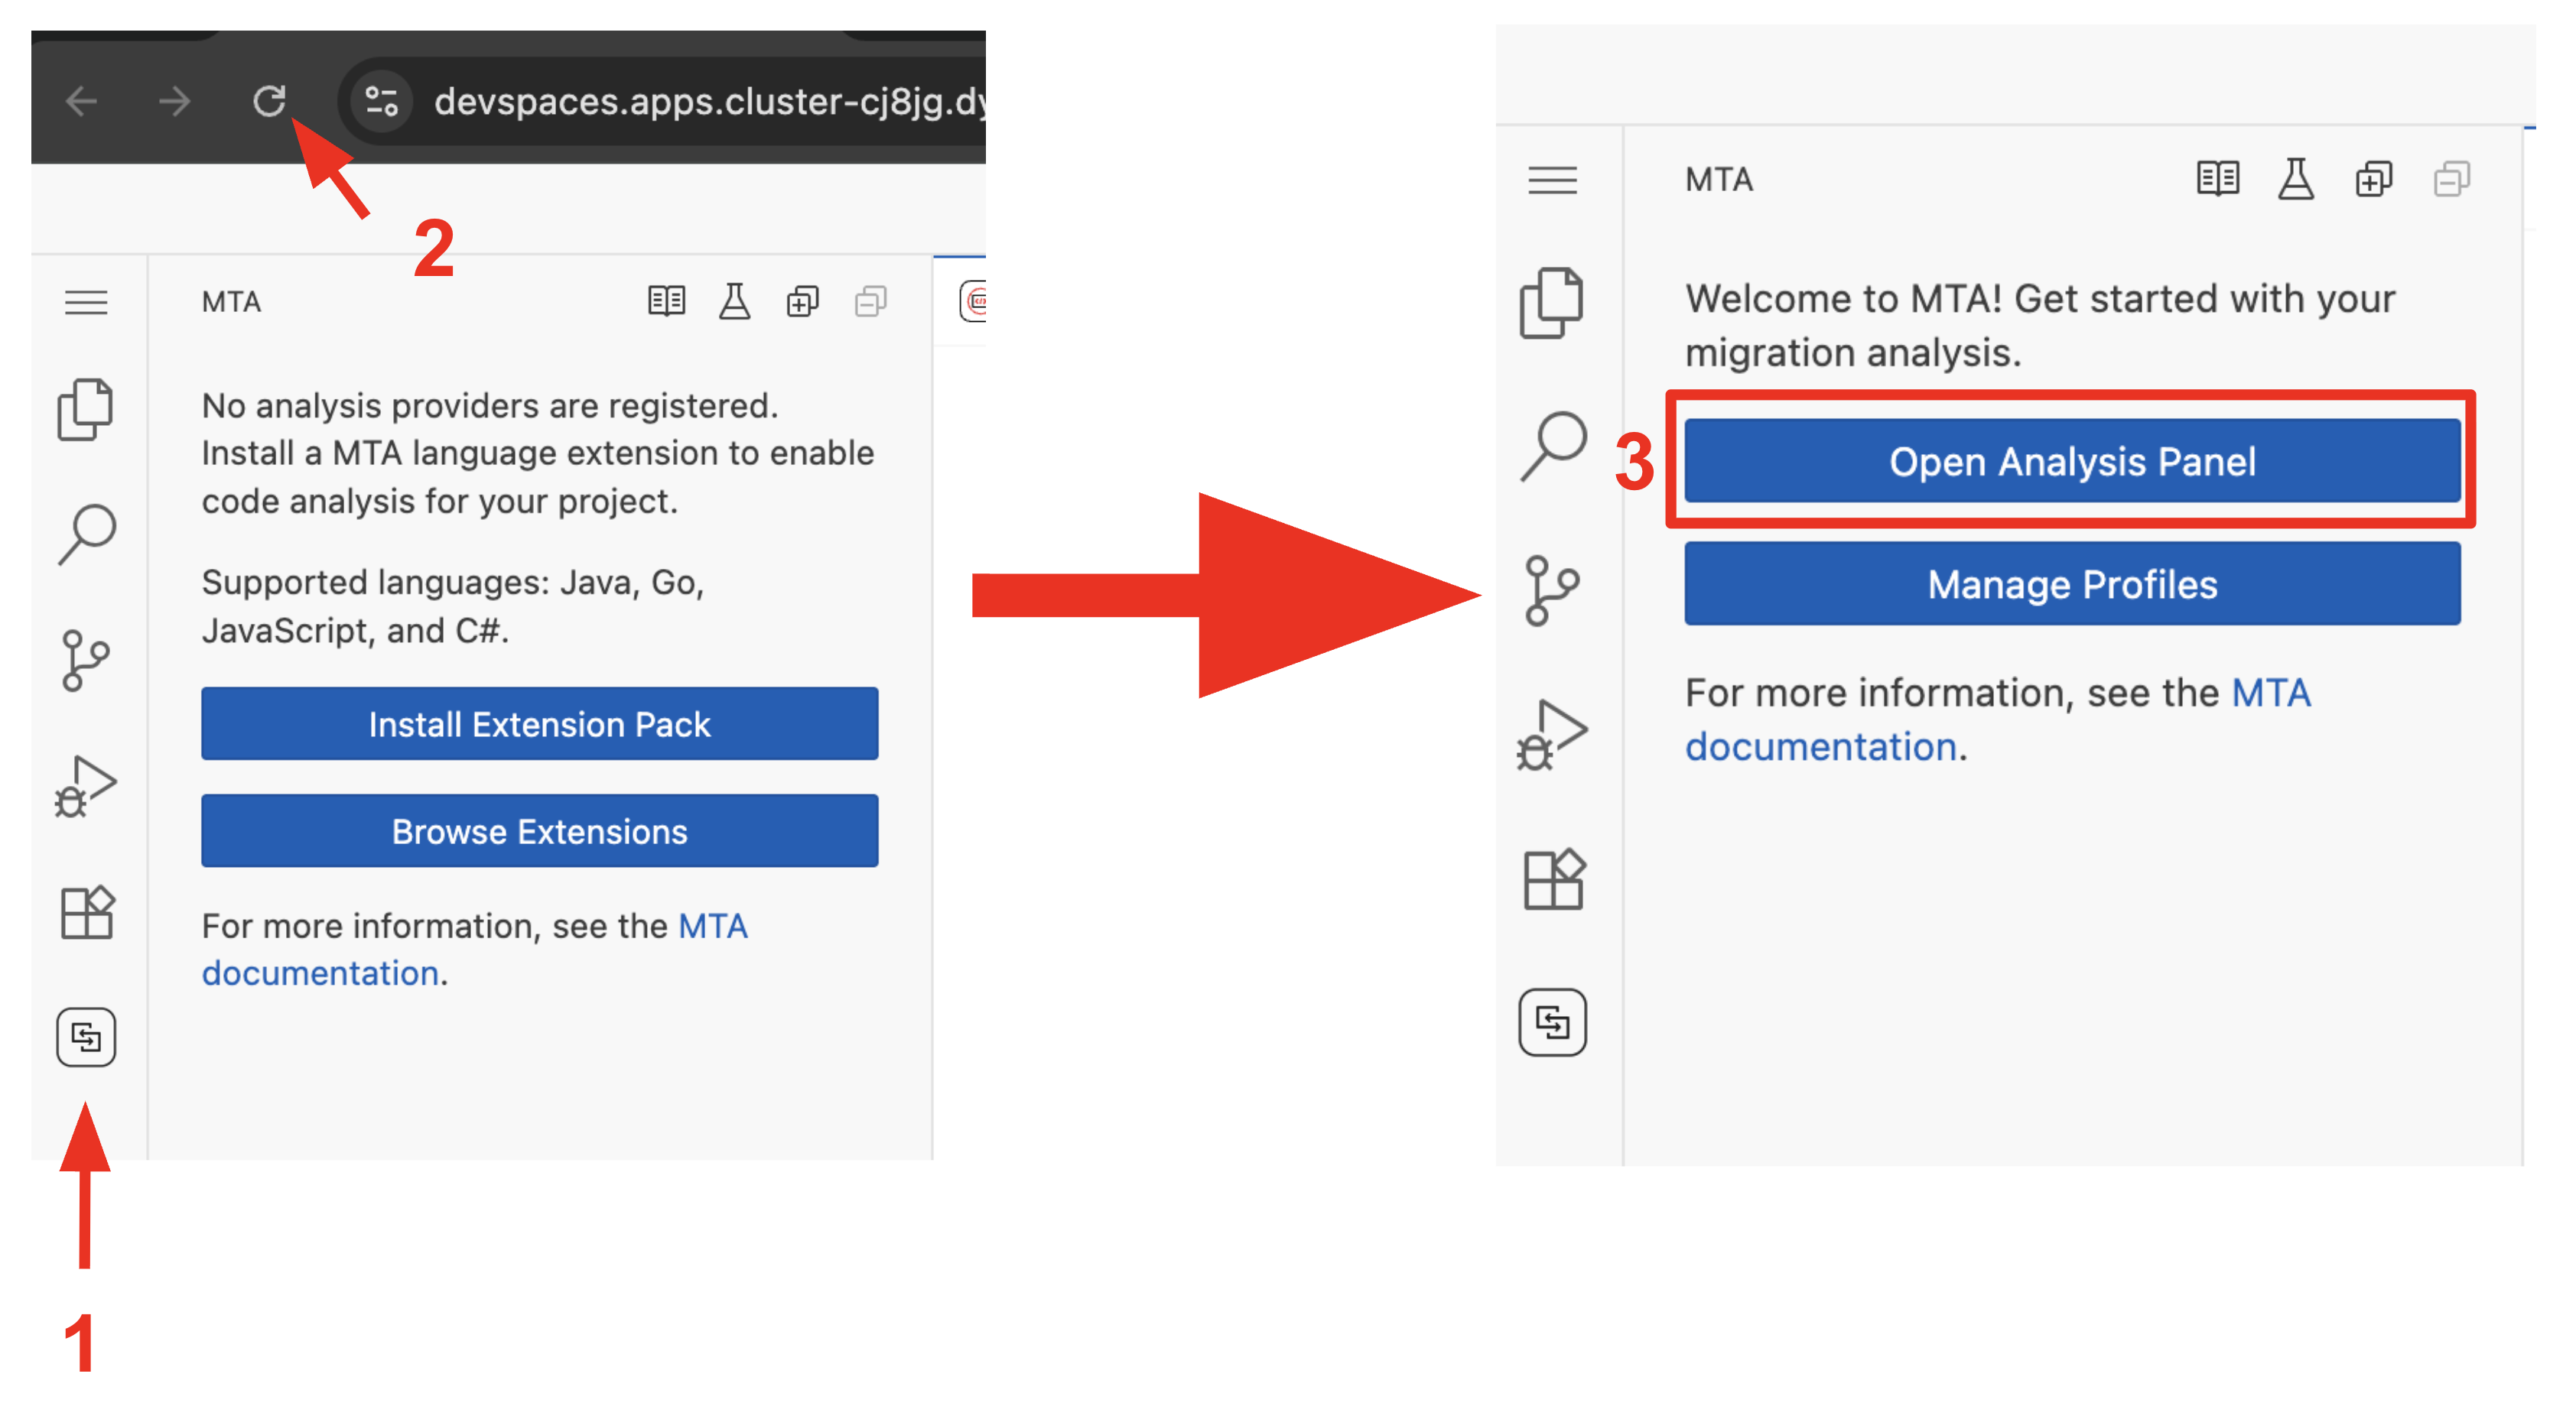 Figure 4. (Reload) And Open Analysis Panel
If you ever accidently close the MTA Analysis View panel, just click on the MTA Extension icon and click on the book icon in the pane just to the right, at the top. 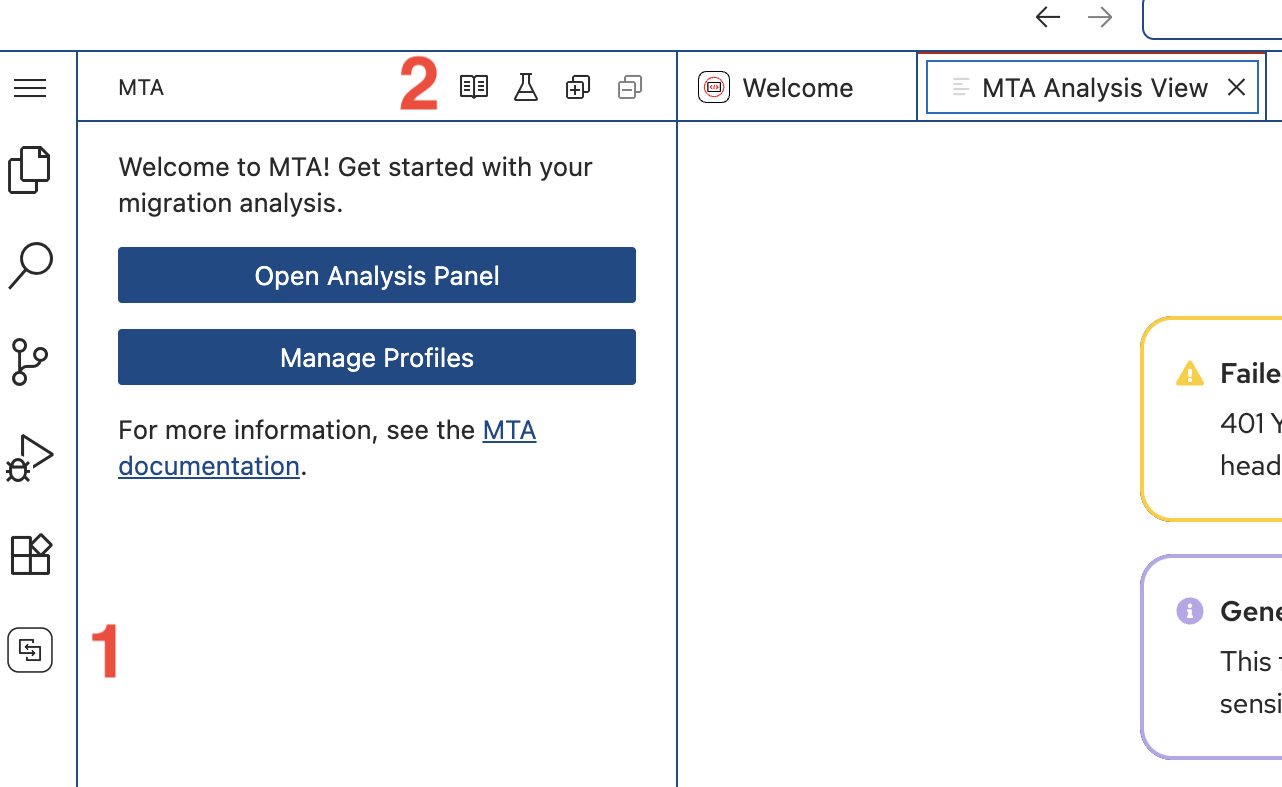 Figure 5. Tip: Re-Open Analysis Pane Icon
 -
Click Manage Profiles on the screen
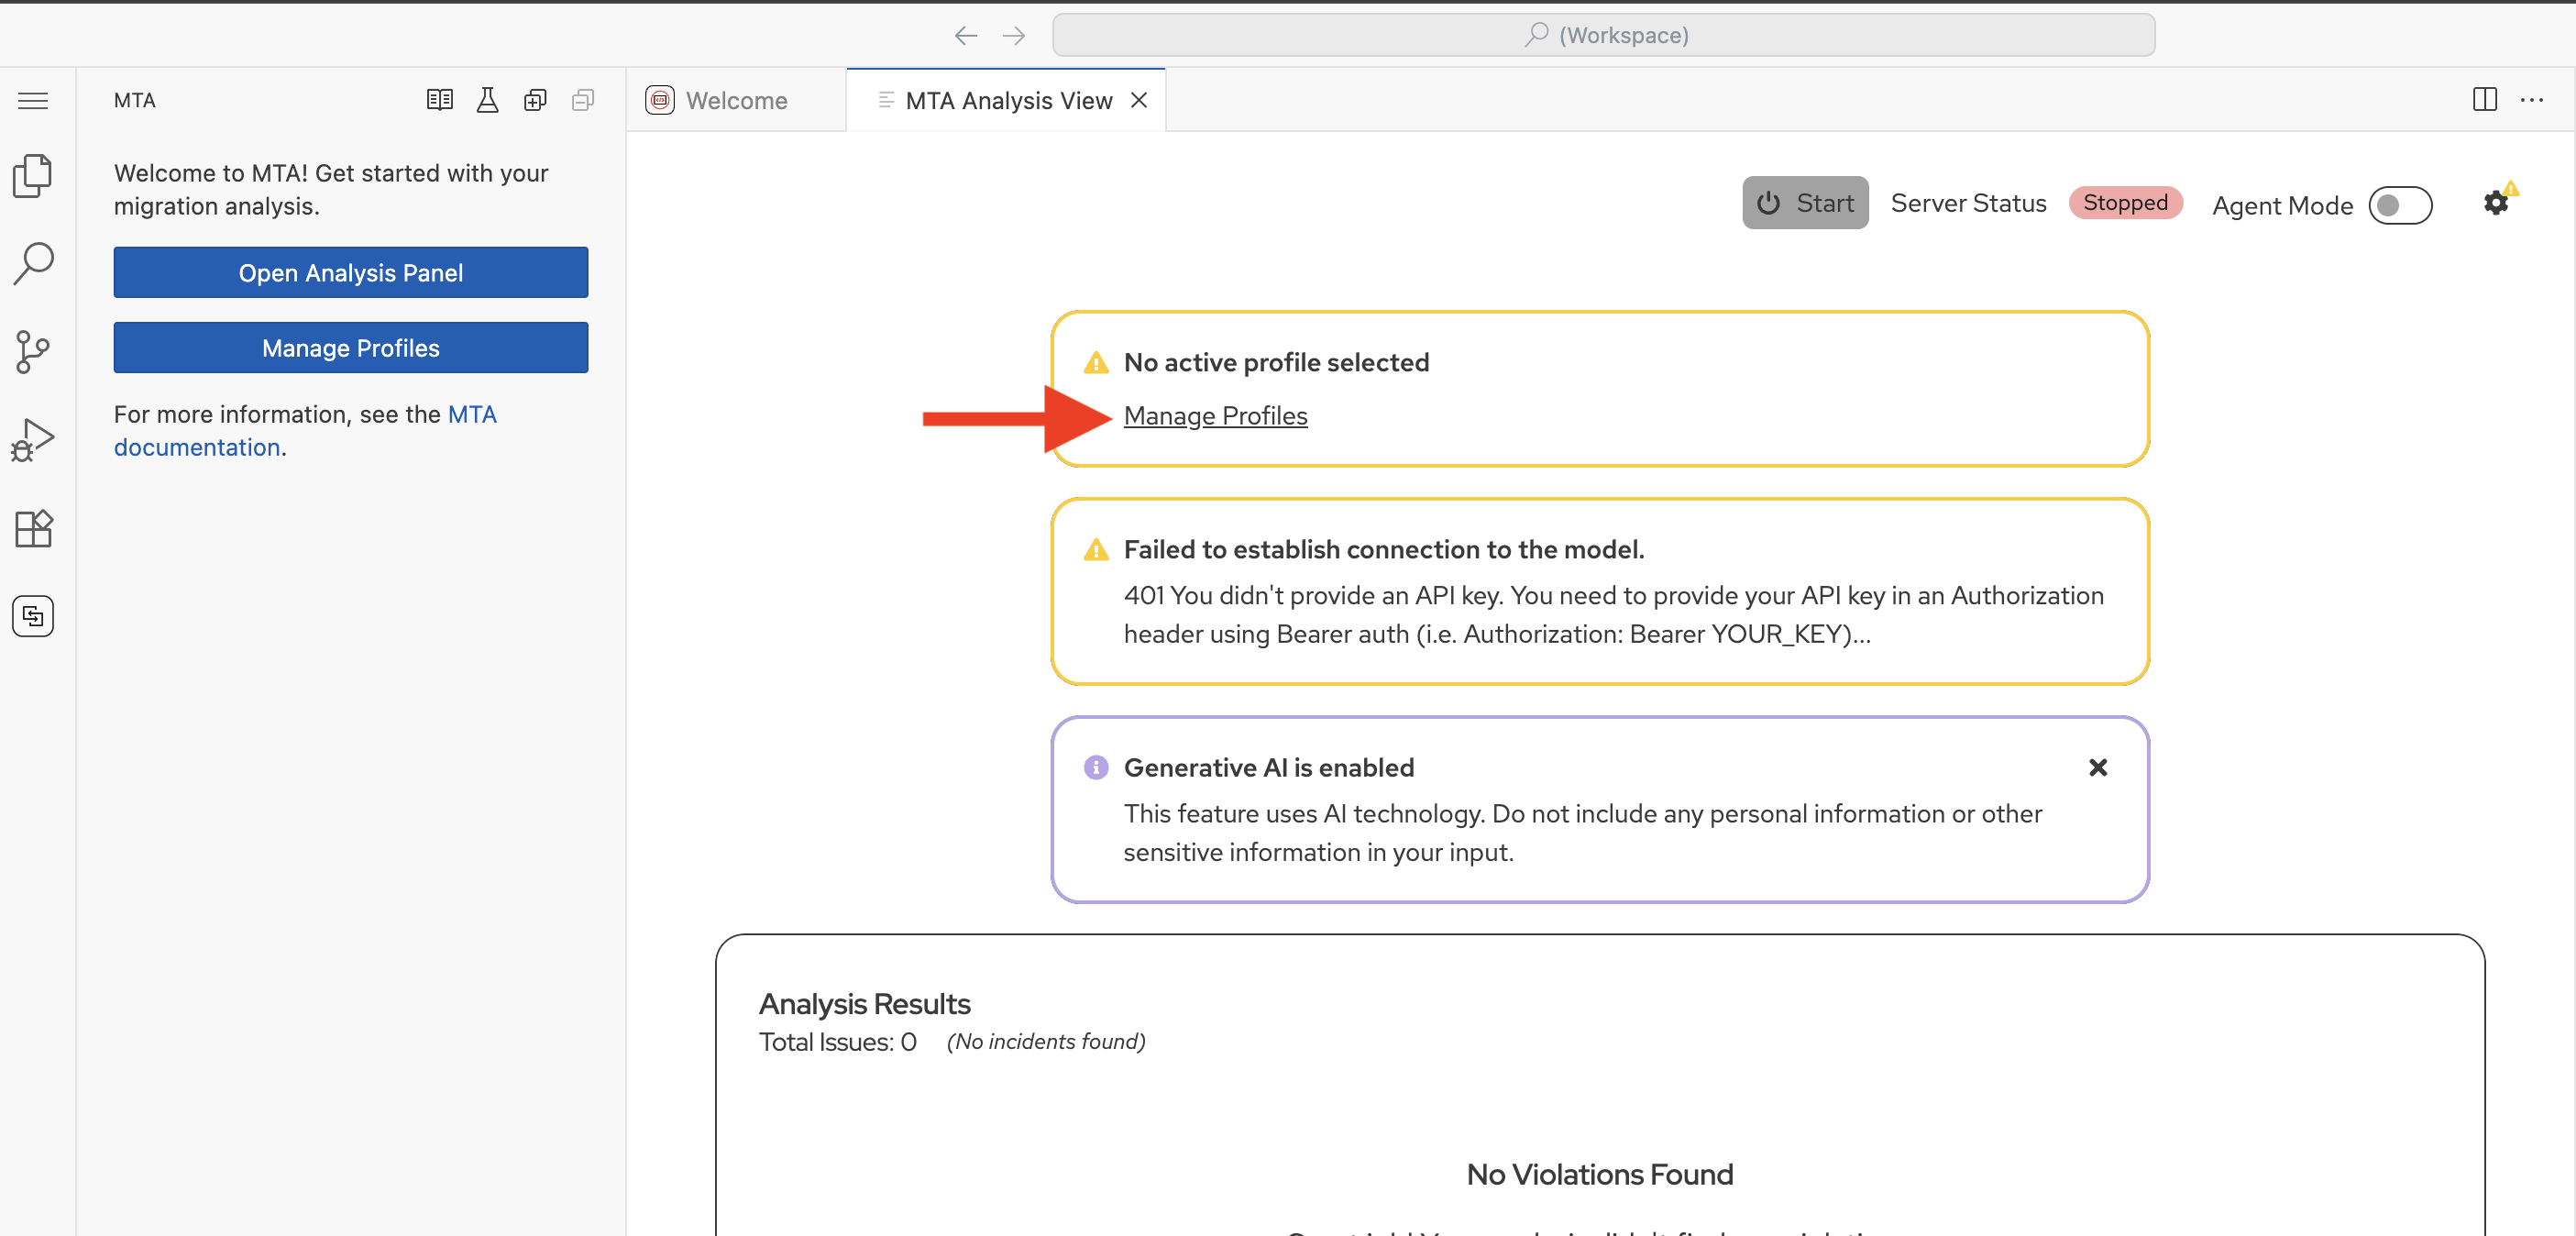 Figure 6. Open Manage Profiles
 -
This will open the MTA Manage Profiles panel
-
Click New Profile
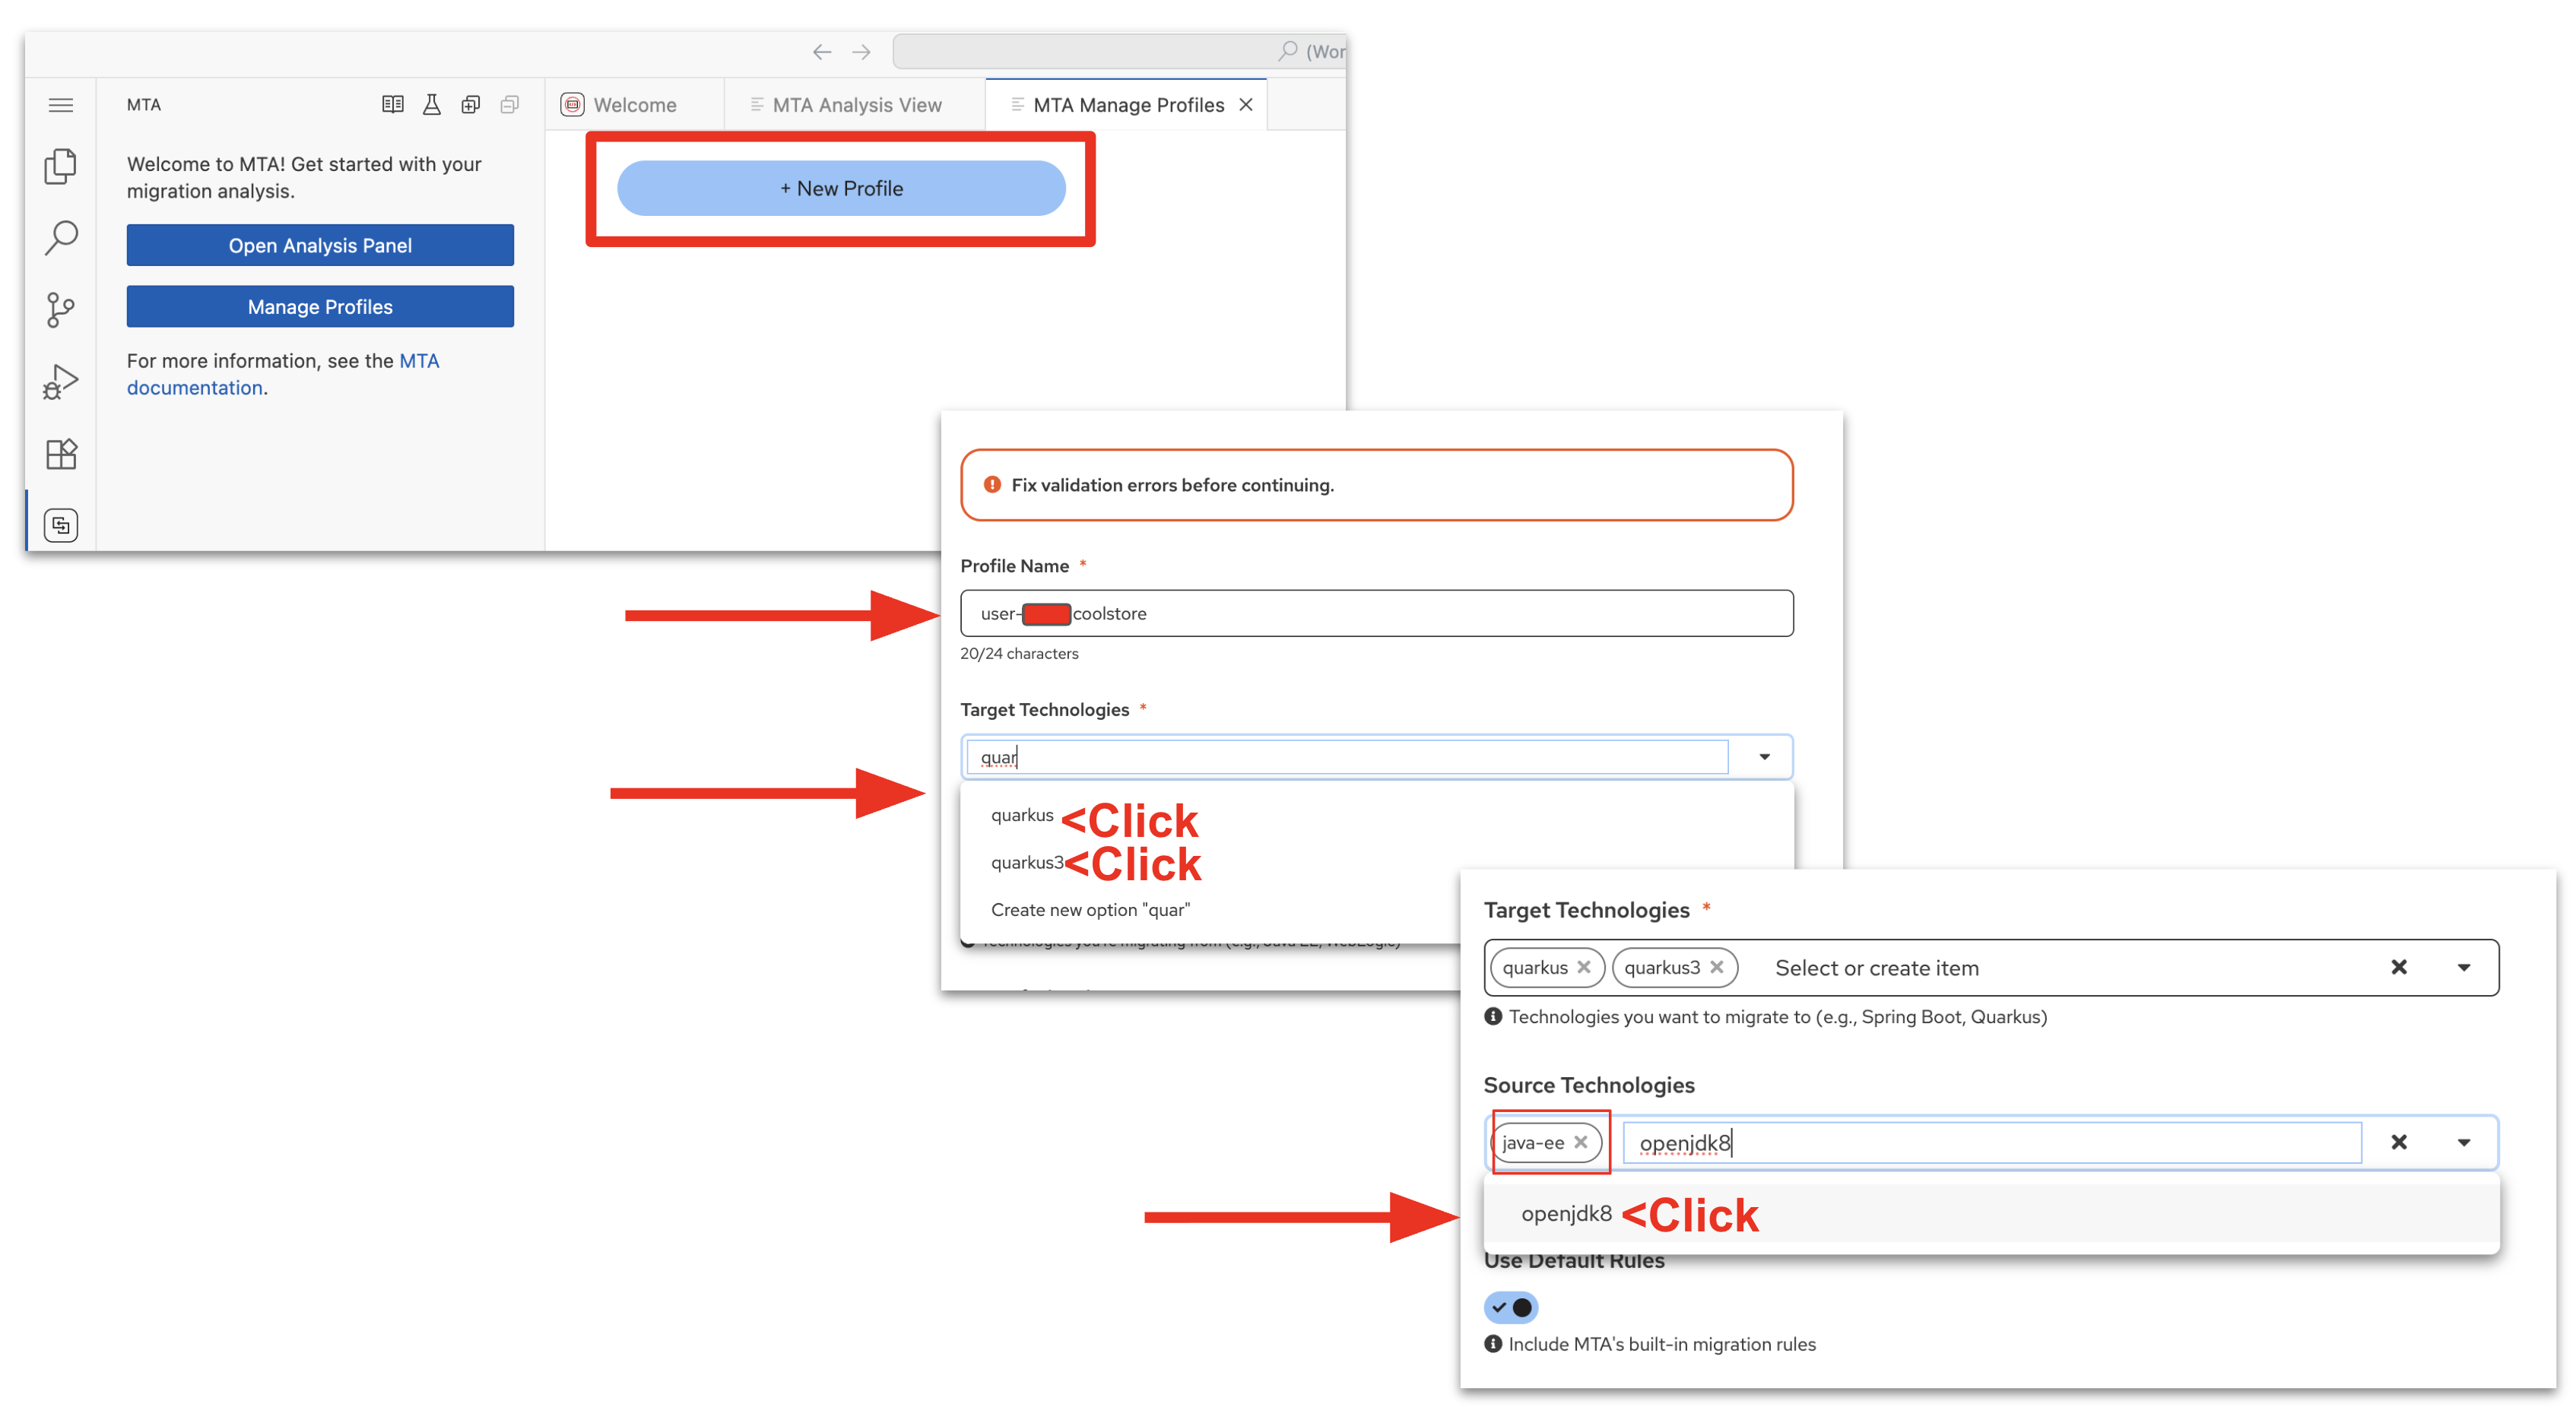 Figure 7. Create a New Profile
 -
Enter Profile Name: user1 coolstore
-
For Target Technologies:
-
Click dropdown arrow and type or scroll to quarkus3 and click it to select it
-
Click dropdown arrow and type or scroll to quarkus and click it to select it
-
-
Source Technologies:
-
Click dropdown arrow and type or scroll to java-ee and openjdk8 , clicking each one to set them.
-
-
Leave Use Default Rules selected
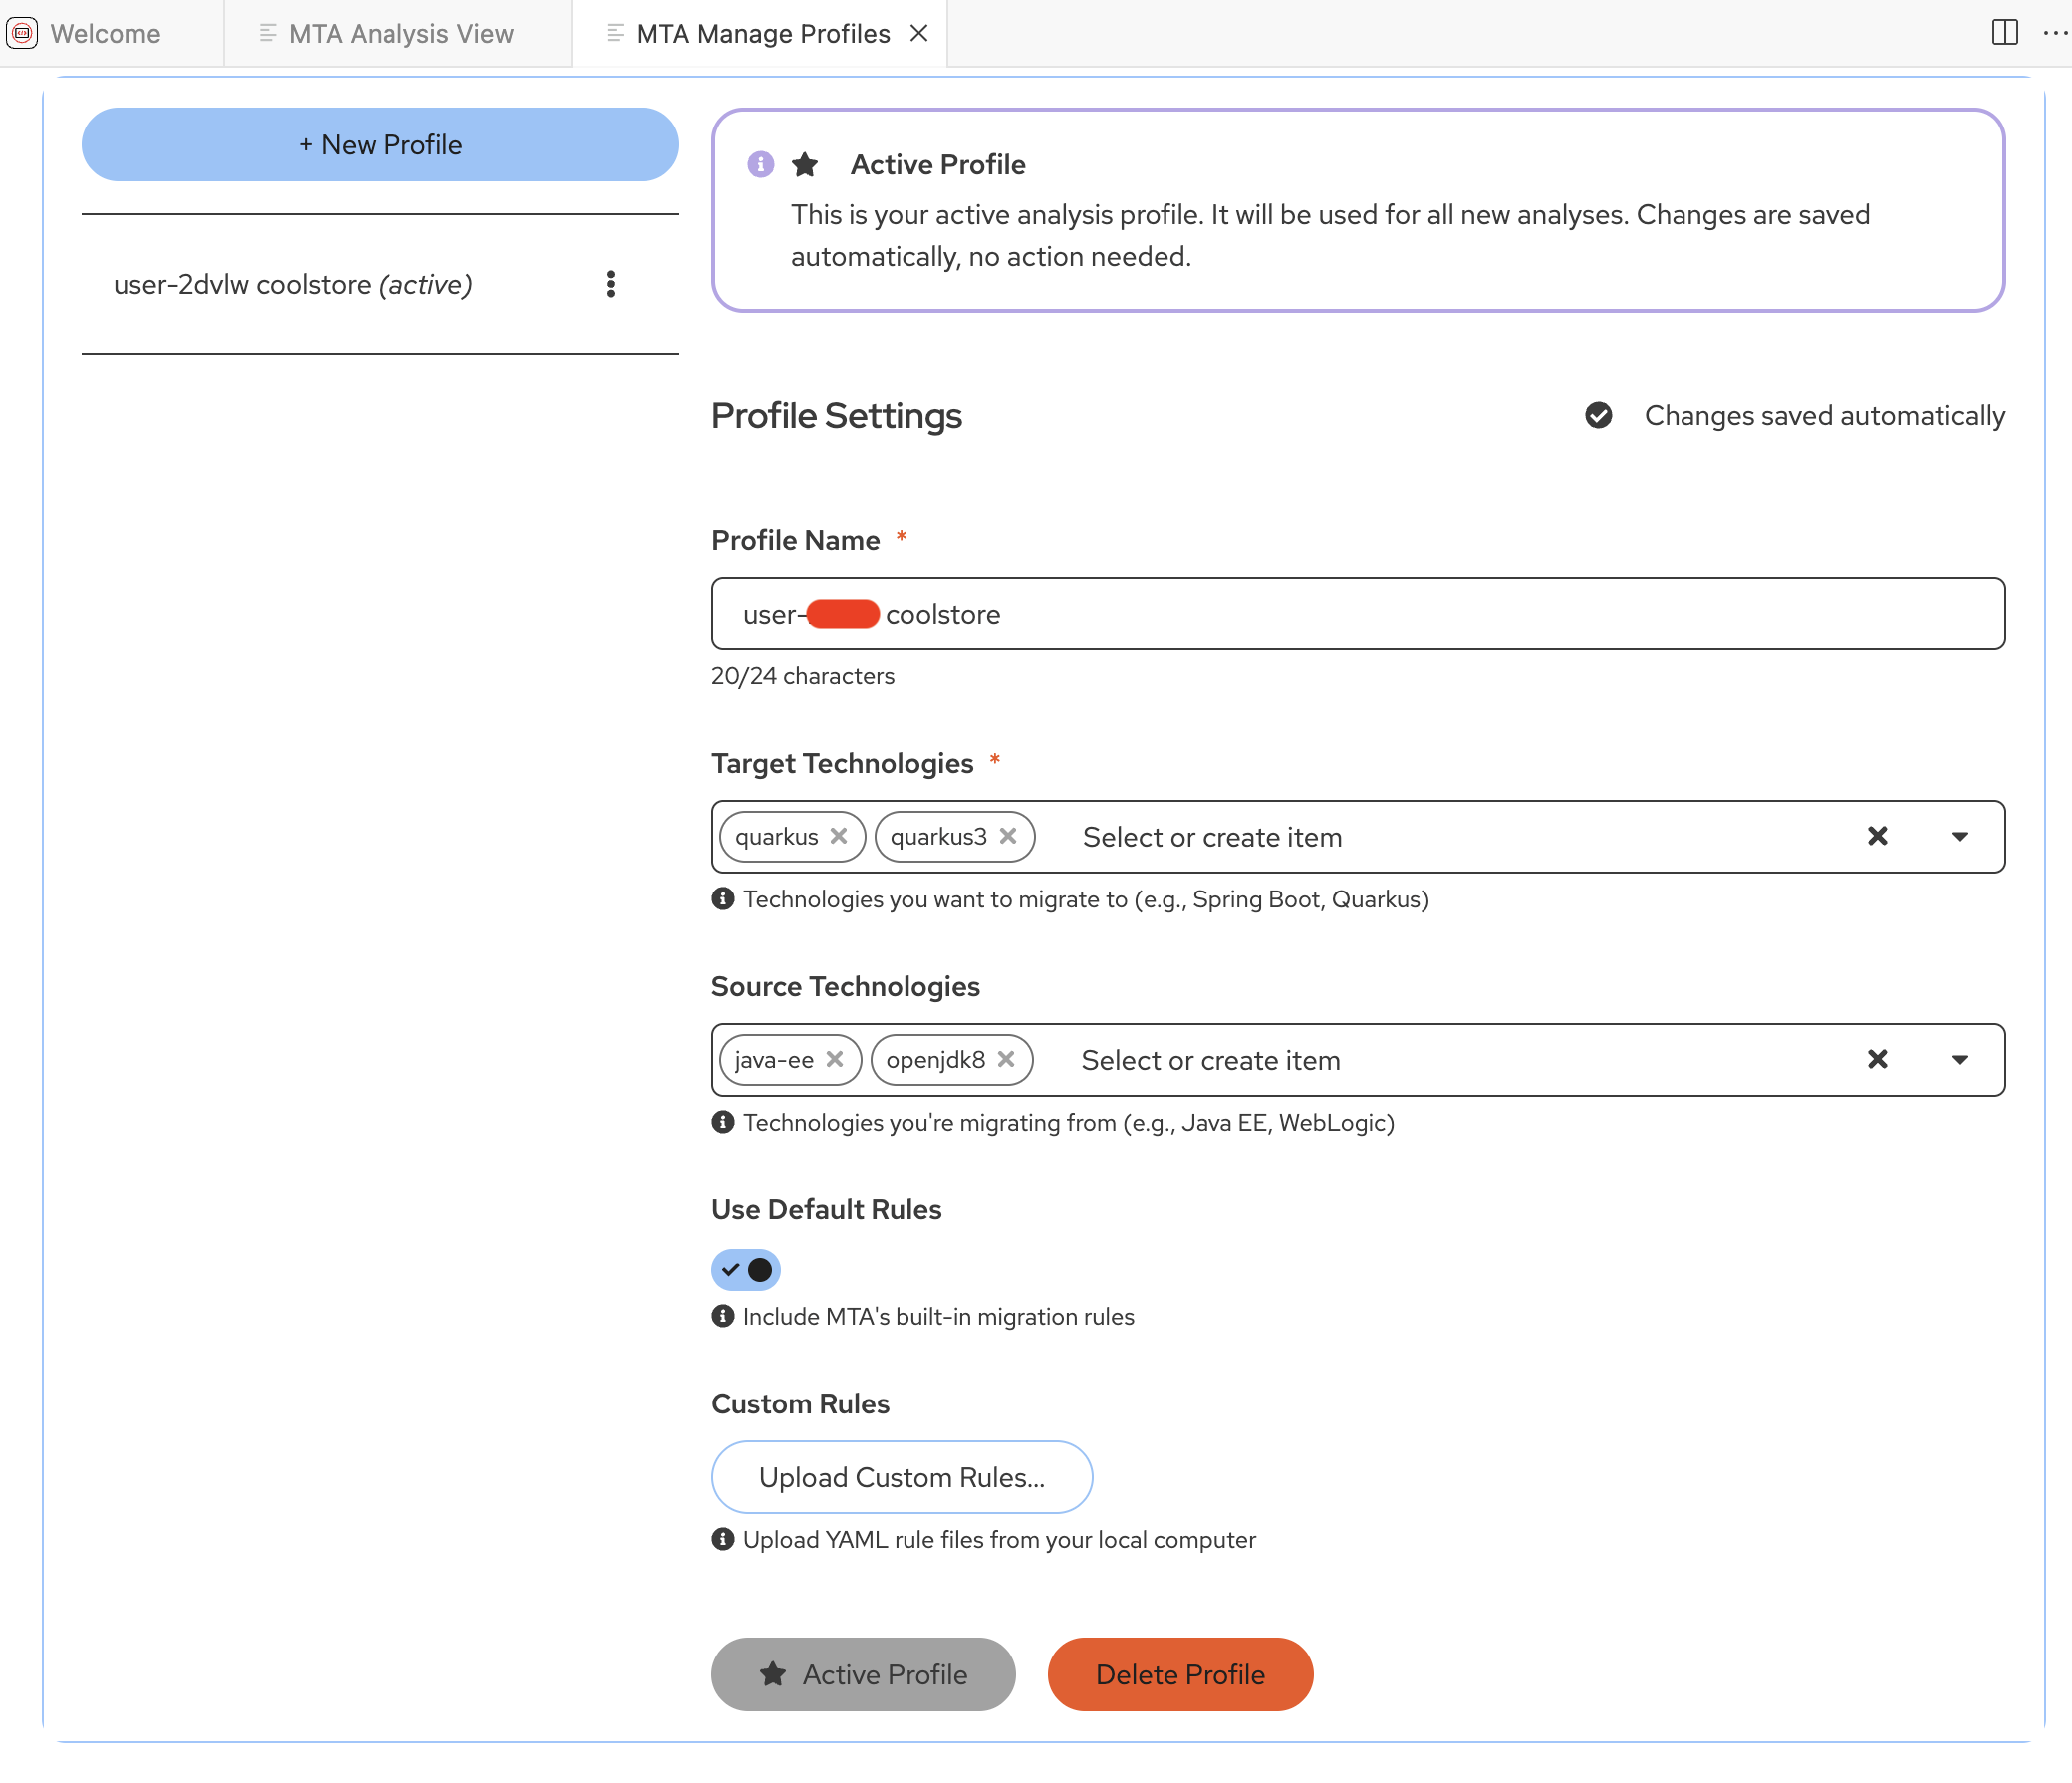 Figure 8. Profile Settings
-
-
Configure the AI model connection for MTA Developer Lightspeed:
-
Click on the MTA Analysis View tab
You will notice a yellow warning about a connection issue, we will resolve this in the next step, and you will see a message about Generative AI being enabled, which indicates this exetension has AI capabilities. -
Click on the gear icon, on the right side of the screen.
-
The Get Ready to Analyze pane will open on the right hand side of the screen
-
Notice most of the settings are already established
-
The Hub Configuration is configured and used in the next lab module.
-
Click on the Configure GenAI Settings link in the bottom message box
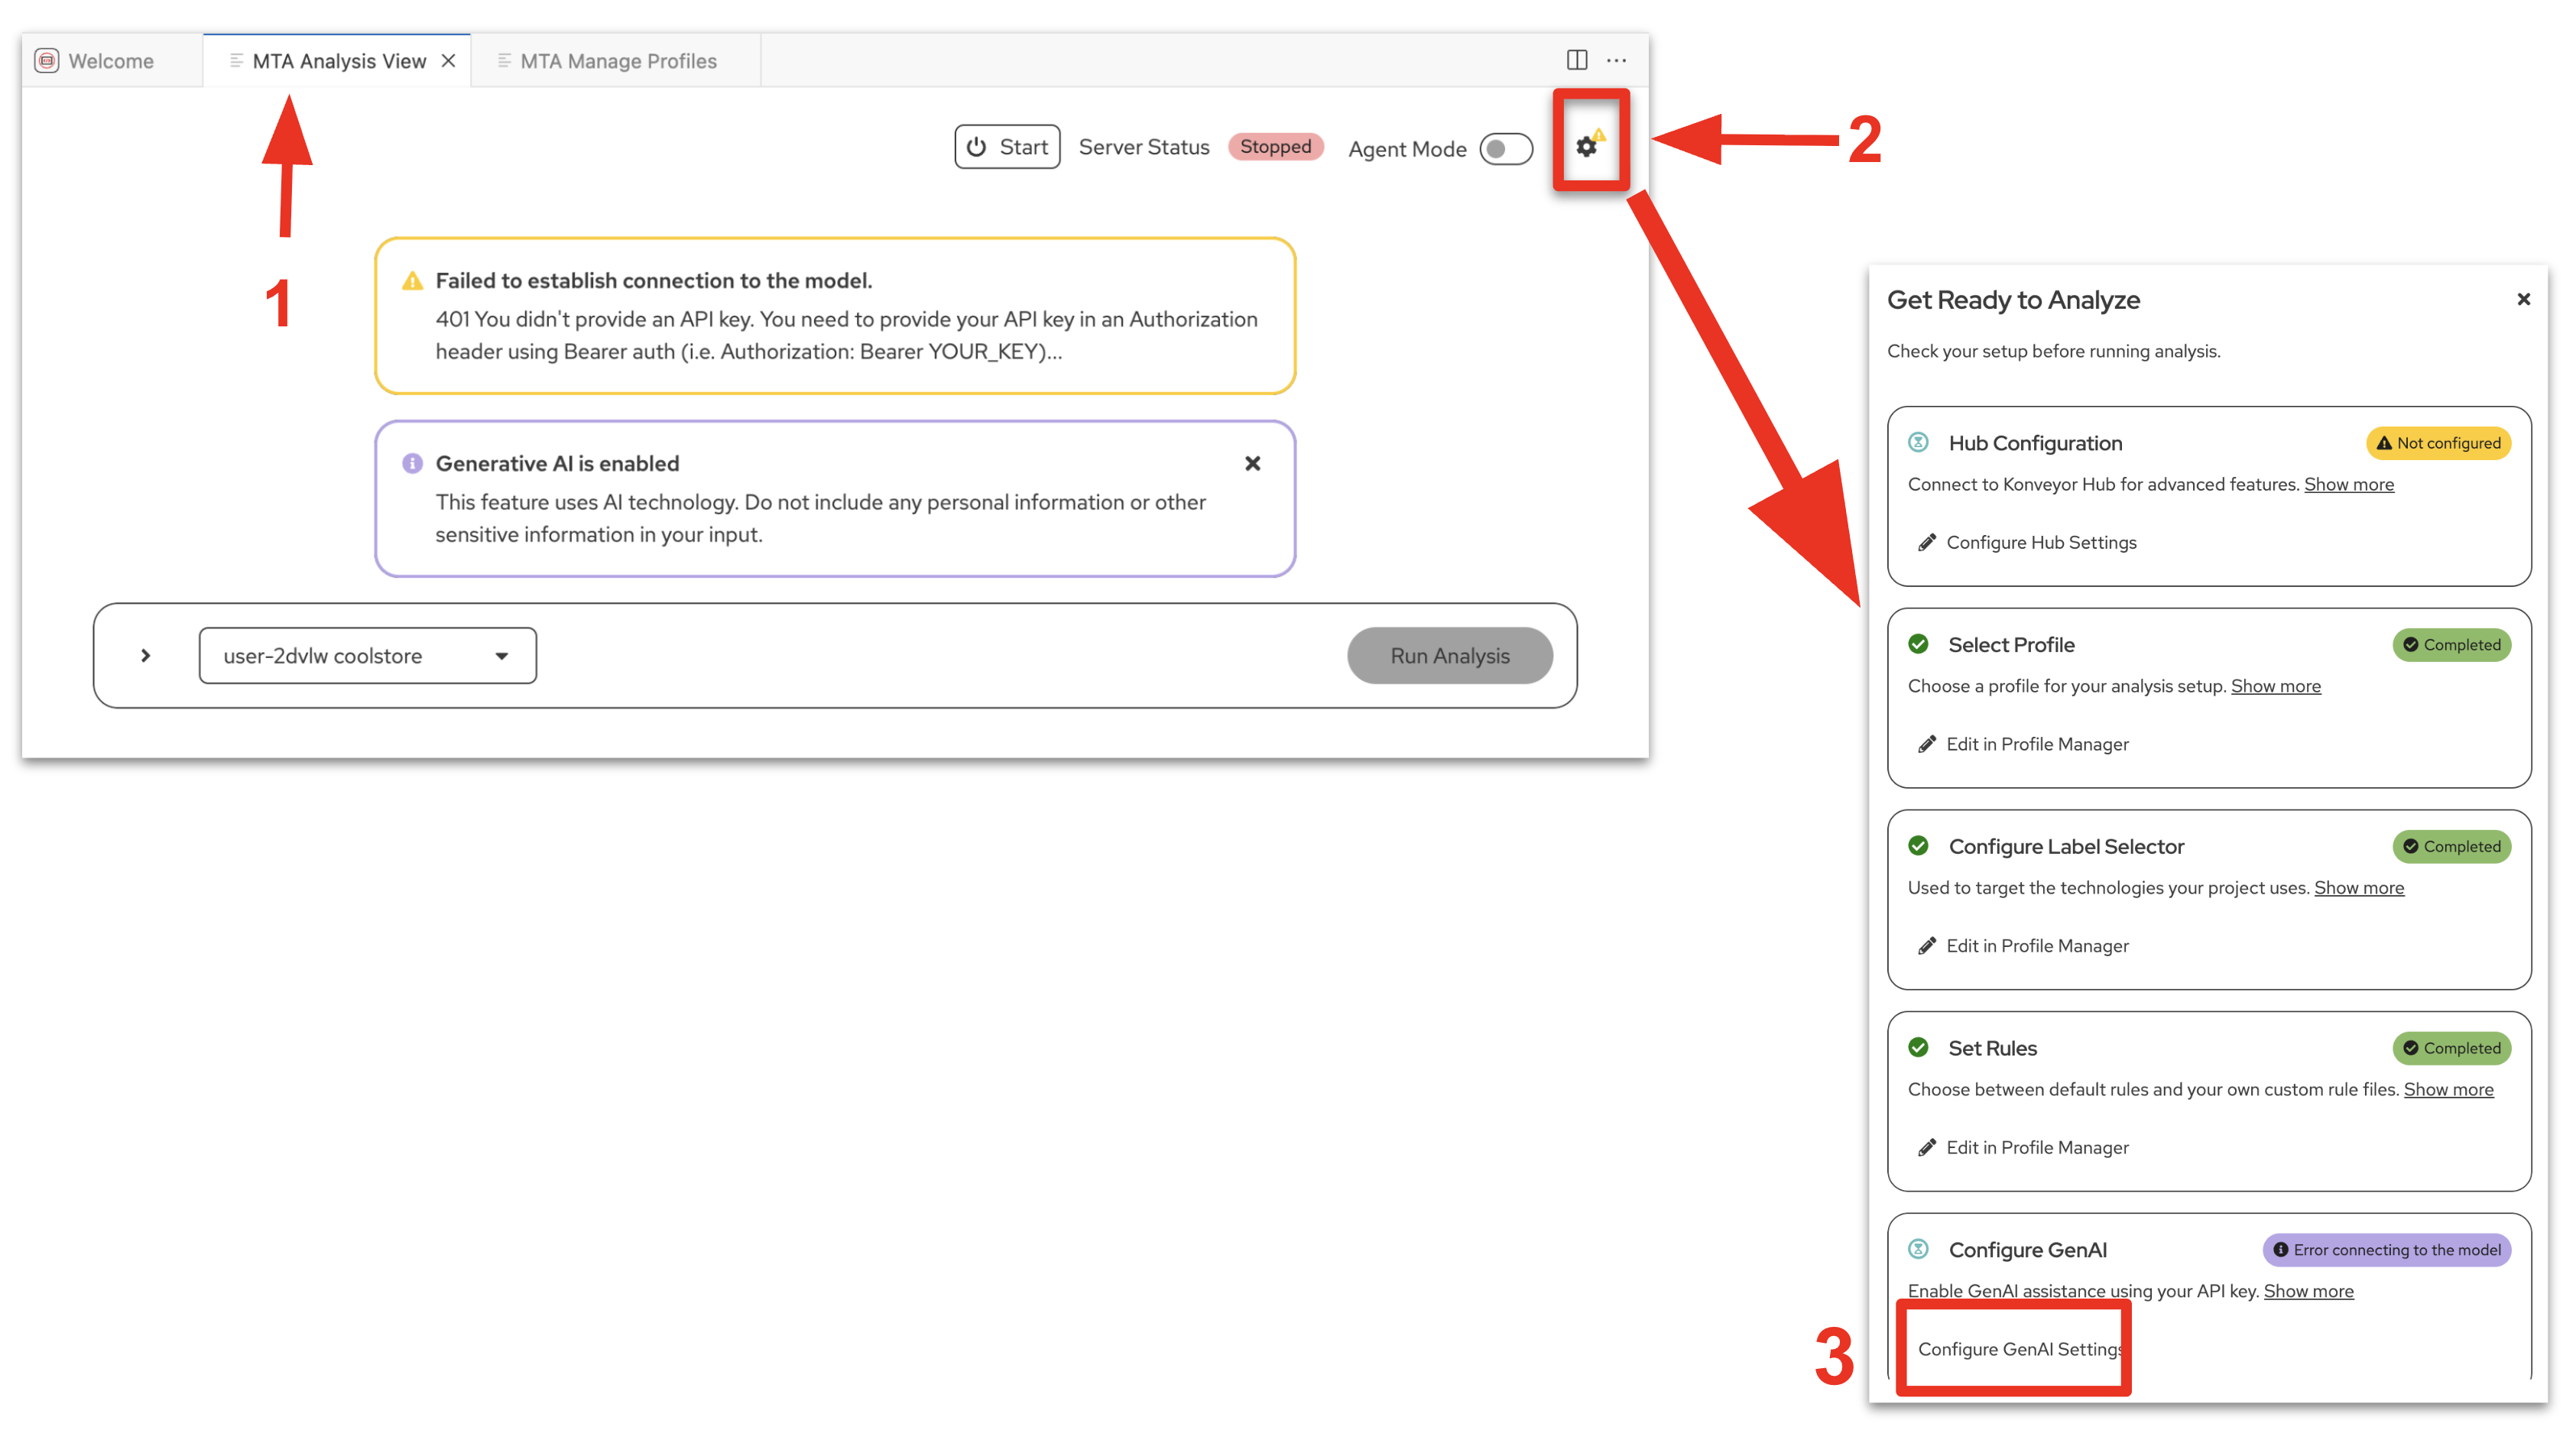 Figure 9. Configure Generative AI Settings
 -
The provider-settings.yaml file will open on a separate pane
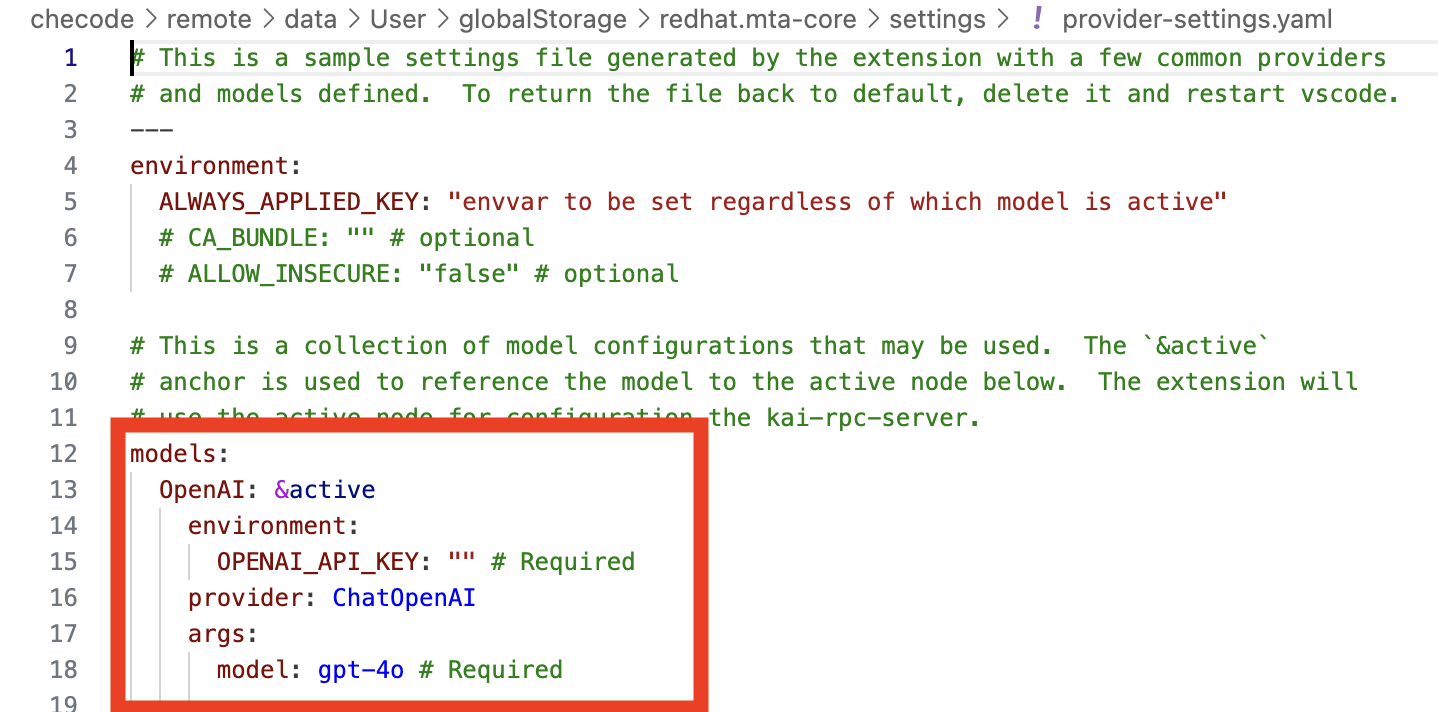 Figure 10. AI Model Settings
 -
Replace/Update from the word models: down through the first entry with the following
This is yaml syntax so ensure to keep the indentions - just copy and paste over existing source models: OpenAI: &active environment: OPENAI_API_KEY: "sk-1234" # Required provider: ChatOpenAI args: model: llama-scout-17b # Required configuration: baseURL: "https://litellm.apps.cluster-abc123.ocpv00.rhdp.net" -
Close the provider-settings.yaml file
-
Click on the MTA Analysis View tab
-
Close the Get Ready to Analyze pane
-
Verify
Confirm your DevSpaces and MTA (Developer Lightspeed for MTA) Extension is setup correctly
-
If you have concerns, Confirm MTA Extension is setup correctly
-
When you click on the MTA extension icon in the left pane, and are able to get to/open the MTA Analysis View Tab
-
Click on the gear icon on the right side of the screen
-
The Get Ready to Analyze pane will open on the right hand side of the screen
-
There should be green check marks in all of the message boxes (except Hub Configuration) and each should be listed as completed
-
-
-
If you have concerns, Confirm the DevSpaces workspace is pointing to the correct gitea repository
-
Click on the file icon on the left side of the DevSpaces environment
-
You should see in the File EXPLORER the kai-coolstore directory listing
-
You may have to click on the file explorer arrows to open the directories.
-
Exercise 2: Run an initial static code analysis
Before making changes, you’ll use Developer Lightspeed MTA extension to analyze the legacy code and identify specific modernization opportunities.
In this exercise the Developer Lightspeed for MTA extension will run a static code analysis against all the source code in the cloned repository. The static code rules are provided by Red Hat to help focus on rapid identification of issues, and customer rules can also be written and included. This provides an efficient starting point focused on identifying migration issues that were highlighted during the risk analysis in the last module.
In the next lab module you will include custom ACME specific company policy code rules.
Later on the analysis results will be used to prompt the LLM for generating code fixes.
Prerequisites
-
Dev Spaces workspace running with Developer Lightspeed extension configured
-
Repository kai-coolstore successfully cloned
Steps
-
Start the Analysis Server
-
Navigate to the MTA Analysis View pane
If you ever accidently close the MTA Analysis View panel, just click on the MTA Extension icon and click on the book icon in the pane just to the right, at the top. 
-
In the center of the screen make sure the profile selected is the user1 coolstore
-
At the top right of the screen, ensure the Server Status is Running
-
Click the Start button if it isn’t and wait till the Server Status is Running
 Figure 11. Turn on GenAI Server
-
-
-
Invoke Developer Lightspeed Analysis:
When you invoke the Analysis engine, Developer Lightspeed runs sets of static rules against the entire codebase of the application that look for potential issues in the code to be migrated. As will be discussed a bit later these rules are tied to known issues with source and target technologies, and many times customers will create additional custom rules to be added to the analysis.
The Analysis Runs create a scrollable list of issues that are present in the code and developers/architects can then invoke the AI driven Developer Lightspeed solution code fix generation functionality, as you will see in the following exercises.
-
In the right side of the screen click on the Run Analysis button.
In this scenario the lead developer is migrating a legacy JavaEE monlithic application into a cloud native Quarkus application to run on OpenShift.
They want to understand the level of effort needed to migrate a representative application within a "wave" of JavaEE apps to be migrated.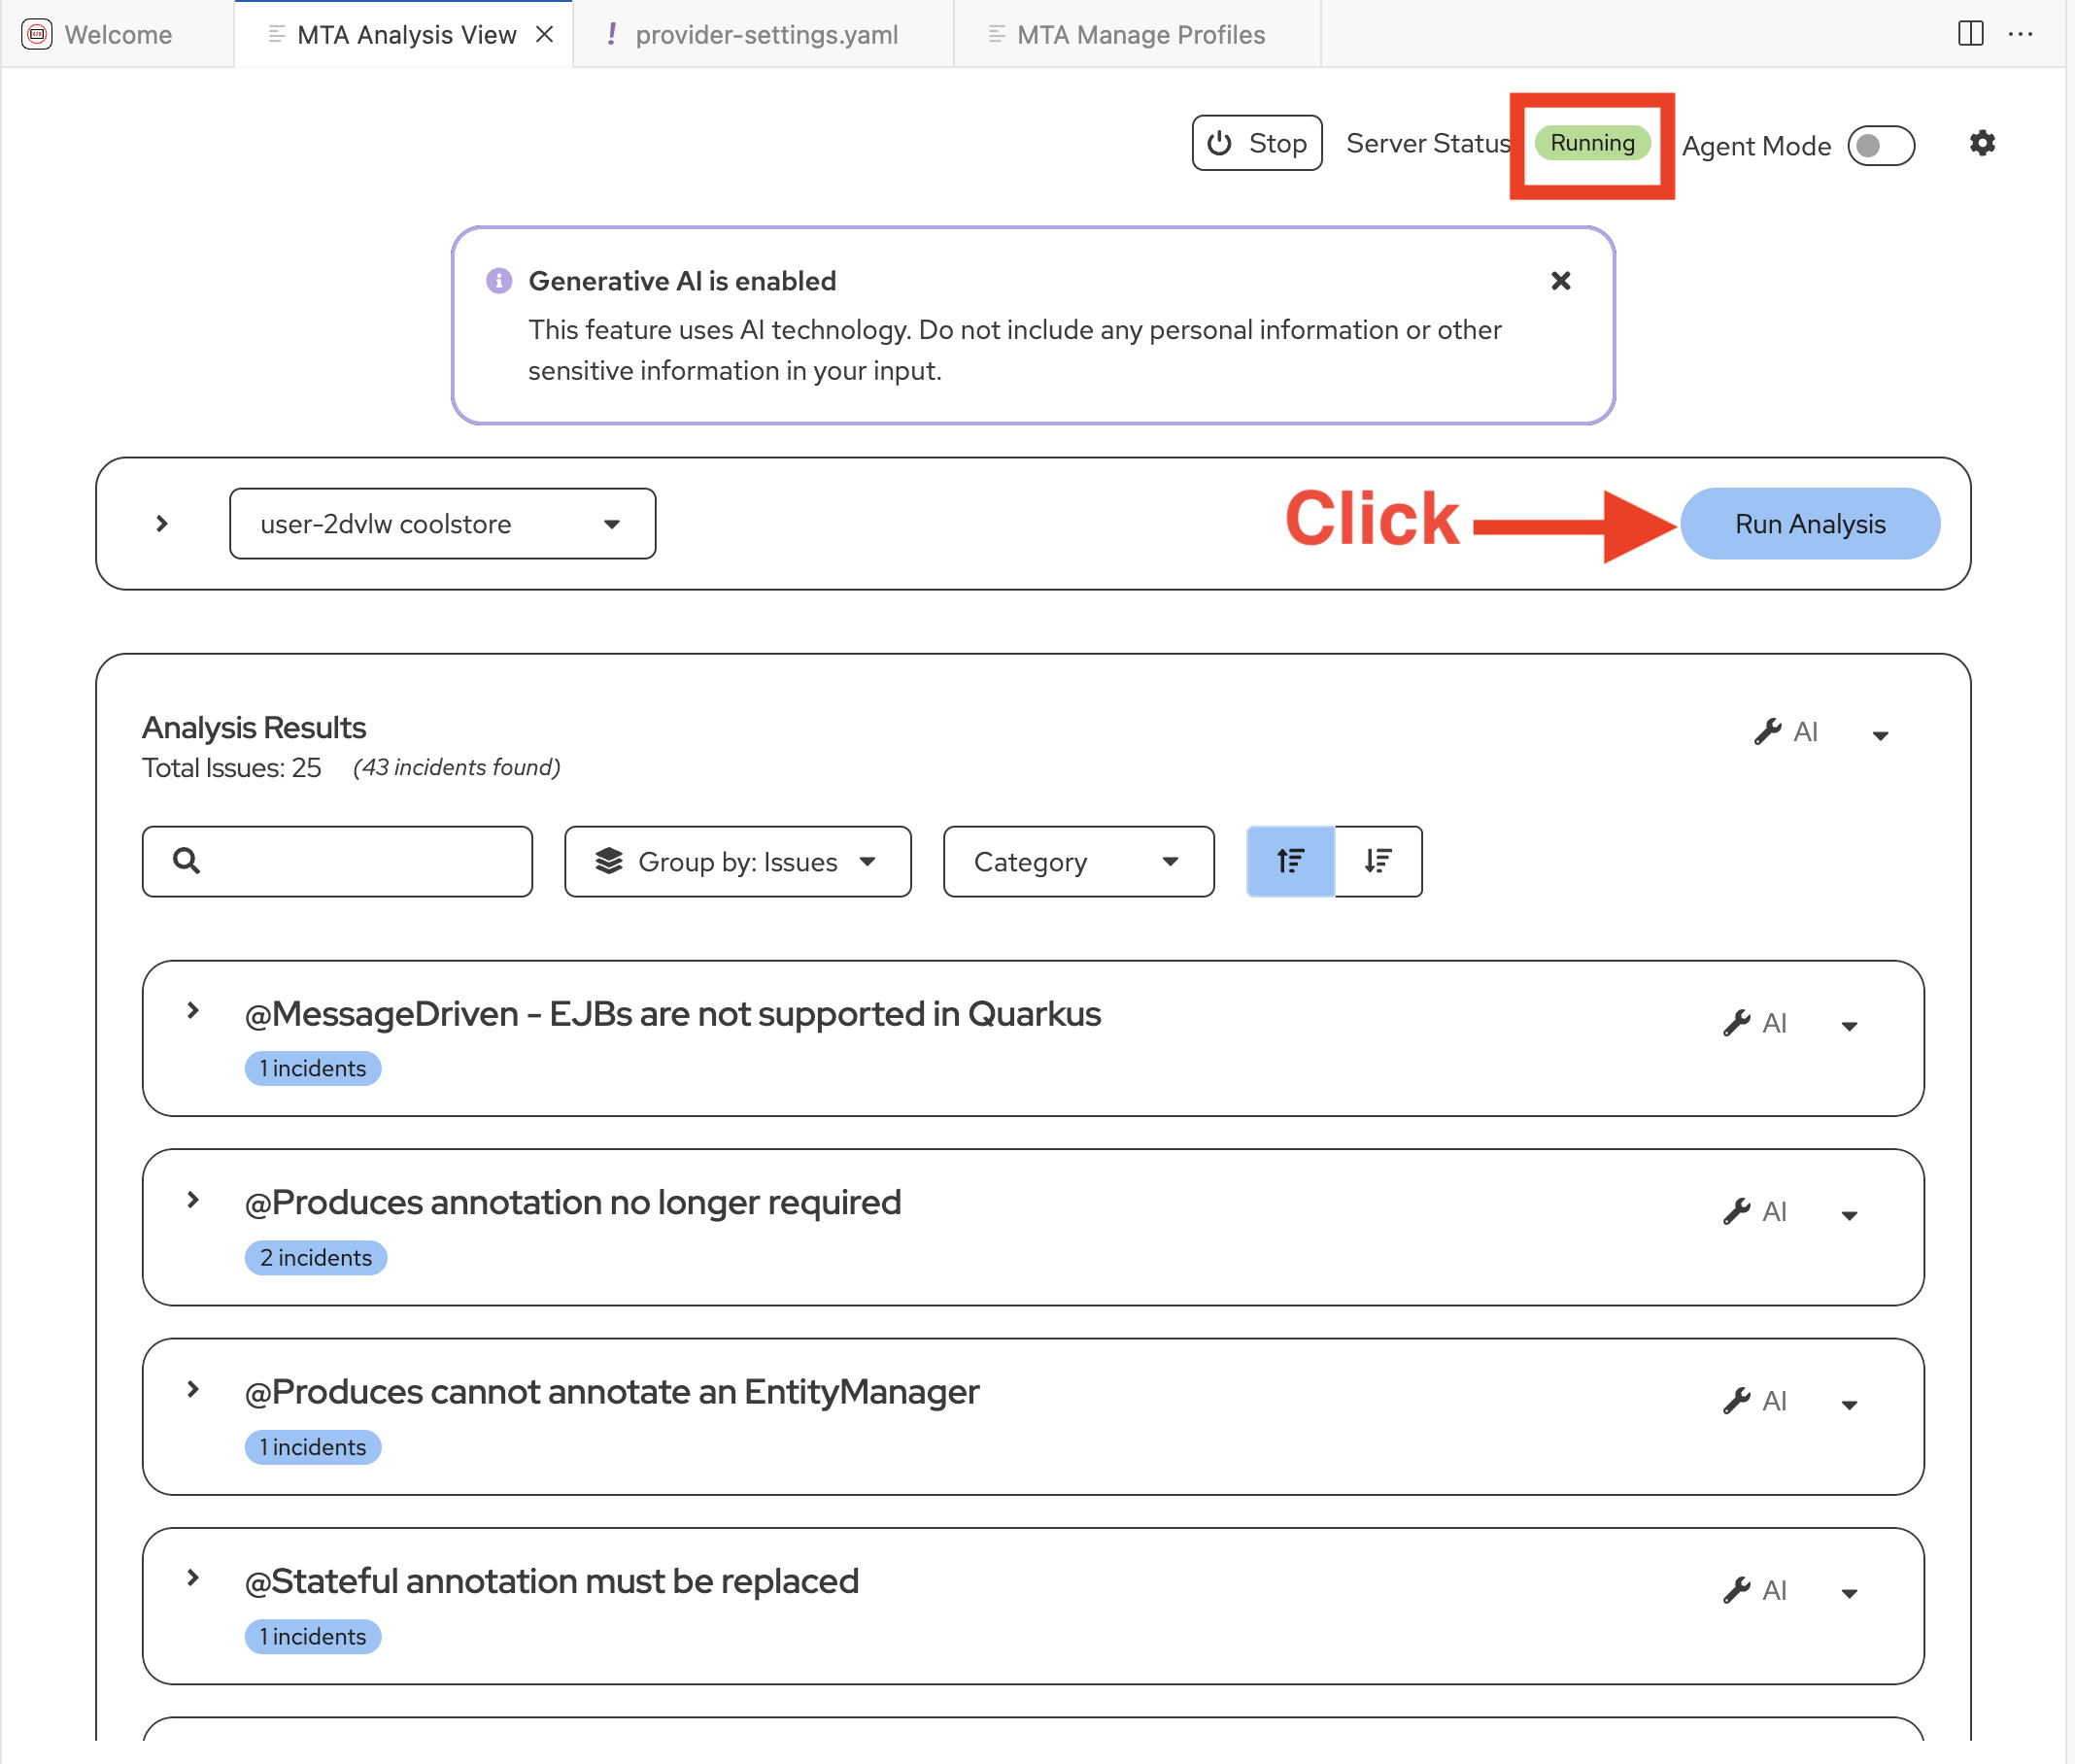 Figure 12. Run Initial Static Code Analysis
-
-
Review the AI analysis results:
You will see the Analysis Results as a listing grouped by Issues
Developer Lightspeed will identify:
-
Required changes to migrate to new frameworks and standards
-
Deprecated APIs that need updating
-
Configuration patterns that should be modernized
-
Container-readiness issues
-
OpenShift-specific optimizations
-
-
Examine a specific recommendation:
Let’s review the result: @MessageDriven - EJBs are not supported in Quarkus
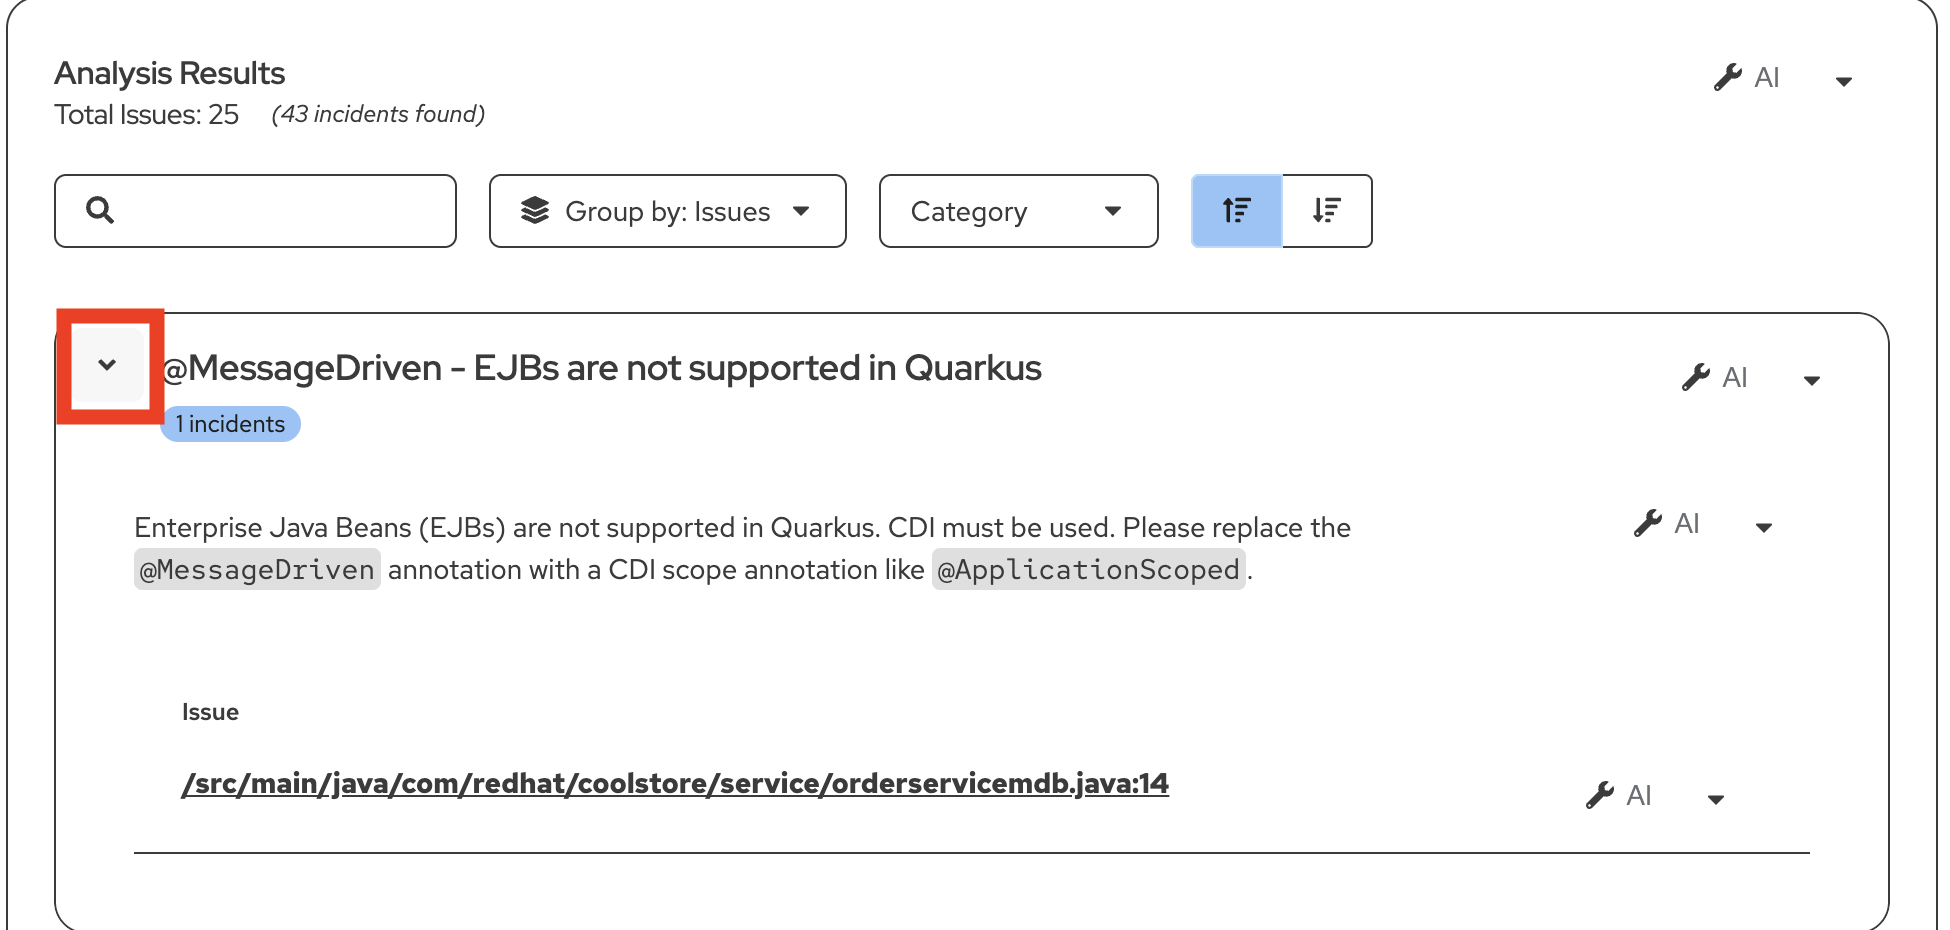 Figure 13. EJB Issue - Not Supported
-
If this is NOT the first result in the listing do the following:
-
Type OrderServiceMDB in the Search box at the top of the Analysis Results listing
-
-
When you locate the issue, Click on the > arrow on the left of the result and view the details
-
You will see a short statement giving more context as to what the issue is and some basic guidance on how such an issue should be resolved
-
You will also see a link to the file itself that has the issue.
-
In the next exercise we will use AI capabilities as Developer Lightspeed has an interactive conversation with an LLM to generate code fixes, prompting it with information from rules. This is a RAG style approach, as it is creating enriched prompts
-
|
For the Lead Developer this is a major issue, newer Java frameworks like Quarkus don’t support legacy JavaEE EJB (Enterprise Java Bean) approaches. Especially when working with messaging solutions, legacy EJB approaches need to be removed and modern MicroProfile approaches need to injected into the code. This also directly reflects the risk assessment reviewed in the first module, where legacy monolithic applications using JavaEE frameworks were a major concern. |
Exercise 3: Generate code fixes using AI
Now you’ll use Developer Lightspeed to automatically generate code changes based on the analysis. This is where AI acceleration becomes real for ACME.
Steps
-
Ensure the Issue: @MessageDriven - EJBs are not supported in Quarkus is visible in the results listing in the MTA Analysis View tab
-
If necessary, type OrderServiceMDB in the Search box at the top of the Analysis Results listing, with Group by: Issues
-
Click on the > arrow on the left of the result and view the details
-
-
Invoke AI solution generation:
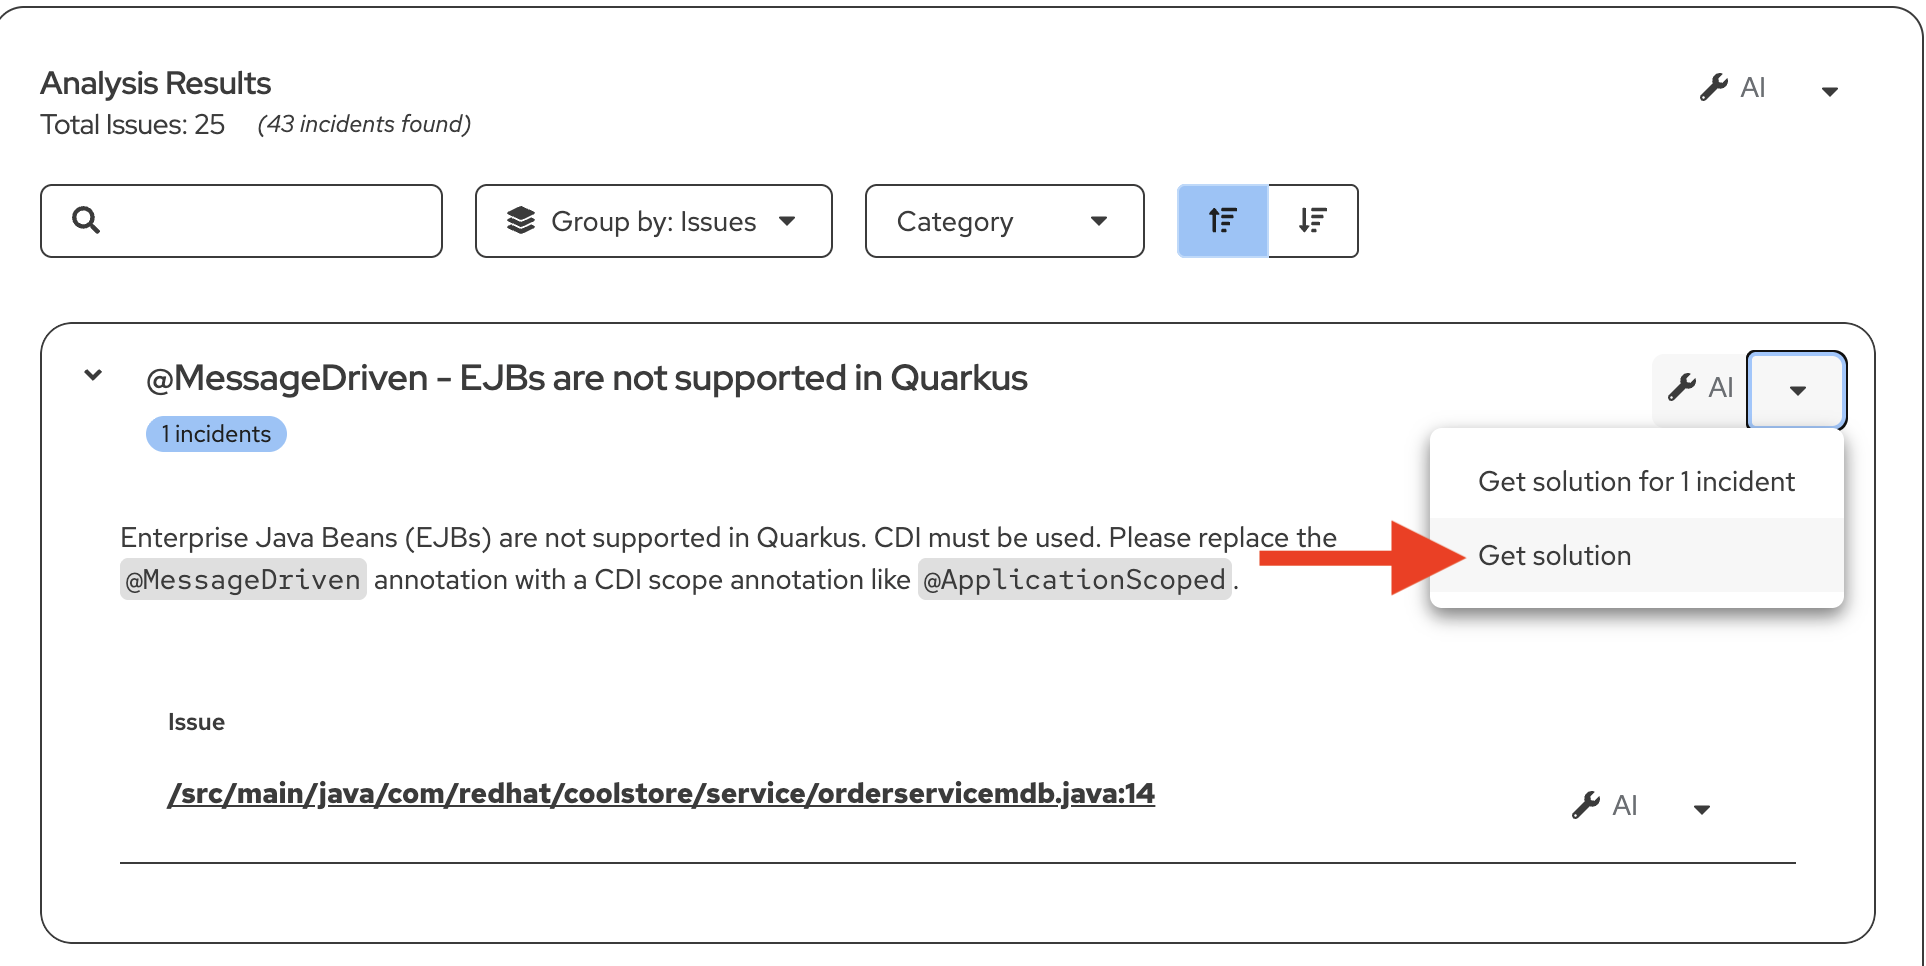 Figure 14. Start AI Code Generation
-
Click on one of the wrench icons down arrows to the right of the screen for the issue.
-
Click on Get Solution from the drop down menu.
-
Notice the MTA Resolution Details tab now opens and an interactive conversation occurs between the MTA extension and the LLM.
-
Scroll through the Generative AI Results screen and observe how Developer Lightspeed for MTA extension has an interactive conversation with the LLM, prompting it with information from rules.
-
Note how the LLM via the MTA AI respondant provides reasoning, change suggestions, and a fully converted Quarkus code approach to replace the existing approach.
-
Notice that it then pauses and asks if the developer wants to Review Changes or just accept, or reject what the AI powered MTA extension suggested.
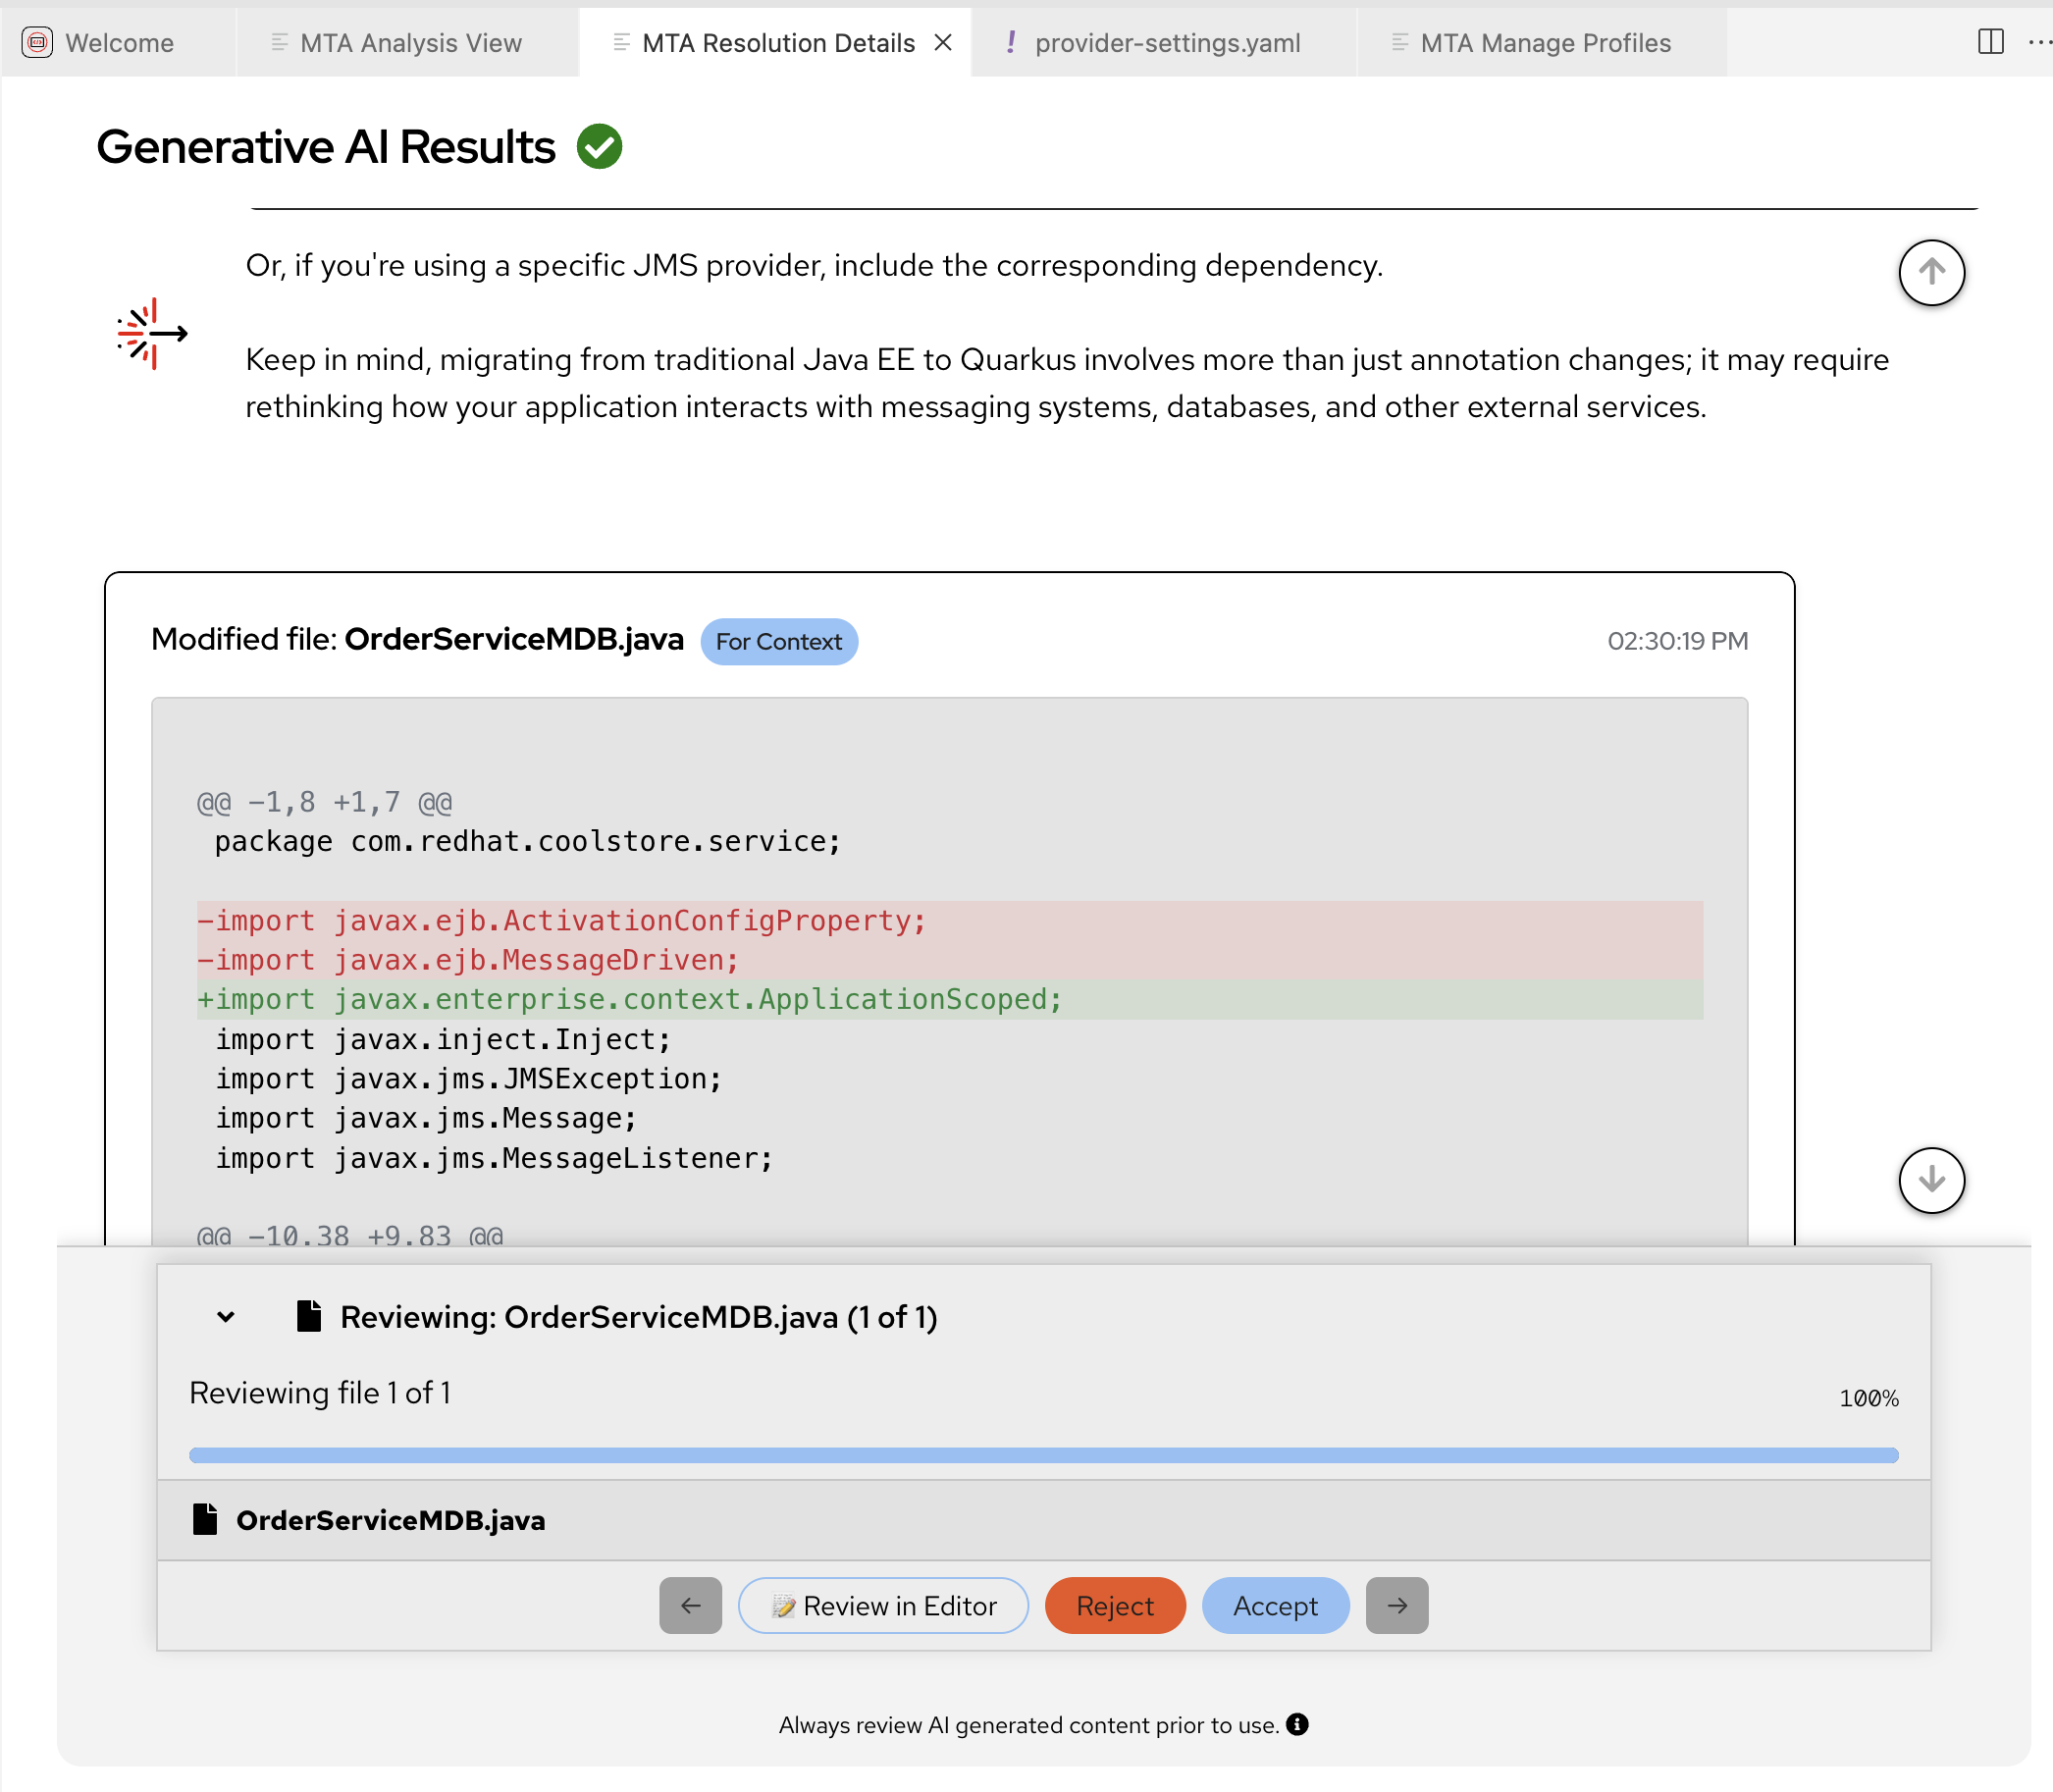 Figure 15. Generative AI Results
-
-
Review the proposed changes:
-
Click on Review In Editor
-
A new code editor pane will open to the right and show the OrderServiceMDB.java file
You can slide the pane divider right/left to increase the view of either the Resolution Details or the Java file -
Original code that doesn’t need changes will not be highlighted
-
Red highlighted code is what needs to be removed
-
Green highlighted code is what needs to be added
-
-
-
Accept the AI-generated changes:
-
At the top of the file is a small prompt/link to Accept All Changes or Reject All Changes
-
Scrolling through the file shows that each highlighted code block can be accepted or rejected individually
-
Scroll to the top of the file and Click Accept All Changes
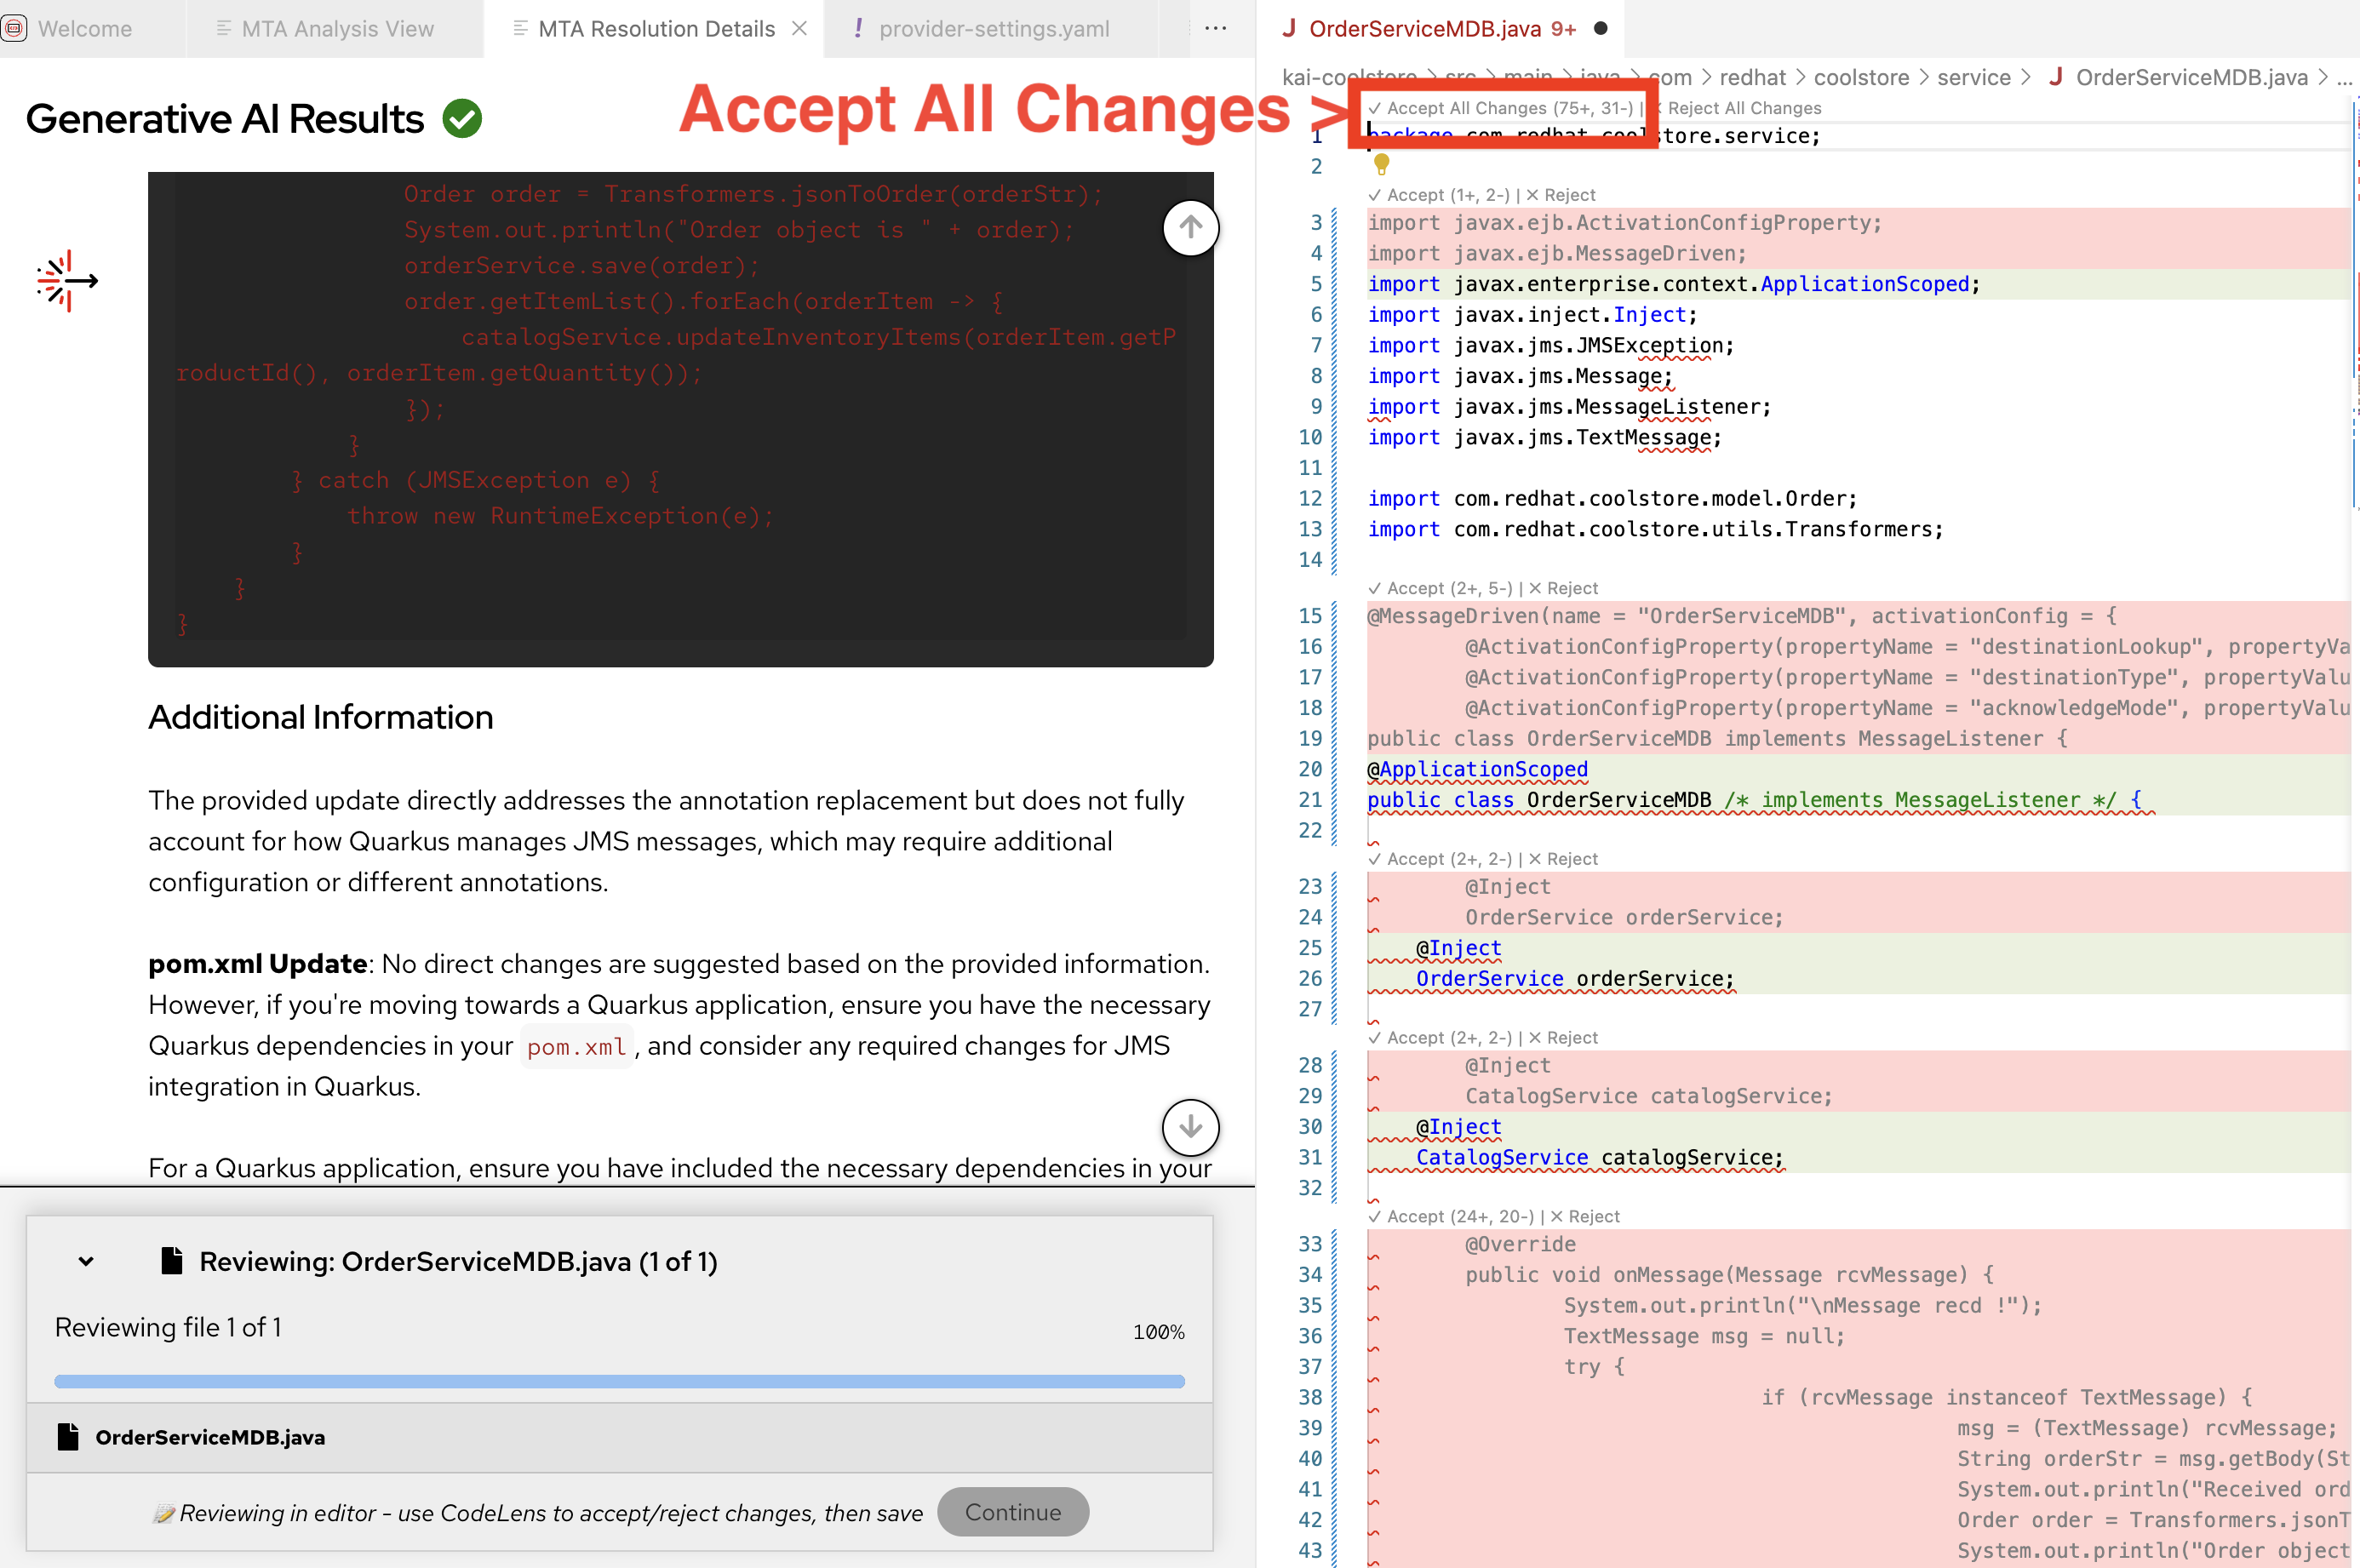 Figure 16. Review and Accept All Changes
 -
Developer Lightspeed will now apply all the corrective changes and rerun the analysis to show it has been resolved
-
In the MTA Resolution Details tab click the Continue button and this will return focus to the MTA Analysis View
-
Close the MTA Resolution Details and fixed OrderServiceMDB.java panes by clicking X on their tabs
-
Exercise 4: Expand migration with Agent Mode
For ACME’s large-scale migration, you need to modernize entire projects, not just individual files. Developer Lightspeed’s Agent Mode enables AI to work autonomously across the codebase.
|
In our scenario the Developer could one by one go through all the the Analysis Results and invoke AI solution generation for each issue individually. However, to speed migration and modernization, once they have checked how effective a few AI generated code fixes are, they could run in Developer Lightspeed Agent Mode and have it work with the LLM to generate cascading fixes across the project |
Steps
-
Activate Developer Lightspeed Agent Mode:
-
Switch to the MTA Analysis View tab in the Developer Lightspeed for MTA extension
-
Ensure in the uppper right Server Status is Running
-
Click Agent Mode toggle to turn it on (it will turn blue)
 Figure 17. Ensure Server and Agent Mode are On
-
-
Start another Analyis run
This Analysis run will use Agent Mode
-
Click the Run Analysis button, which is to the right side partway down the view
-
The Analyis will run again
-
-
Selectively focus on a specific issue Theme
In ACME’S scenario the lead developer is very concerned about a major Java framework issue Adopt Quarkus Maven plugin and they want to see how Developer Lighspeed can cascade changes across files based on fixing this major issue, using Agent Mode.
-
Scroll down the Analysis Results listing to Adopt Quarkus Maven plugin
-
Open the issue by clicking on the > arrow
-
Observe the pom.xml file will need to be changed and as the Java developer knows this will cause cascading changes across the codebase for imported libraries and code approaches
-
Click the wrench icon to the right of the issue, inorder to initiate the AI solution resolution
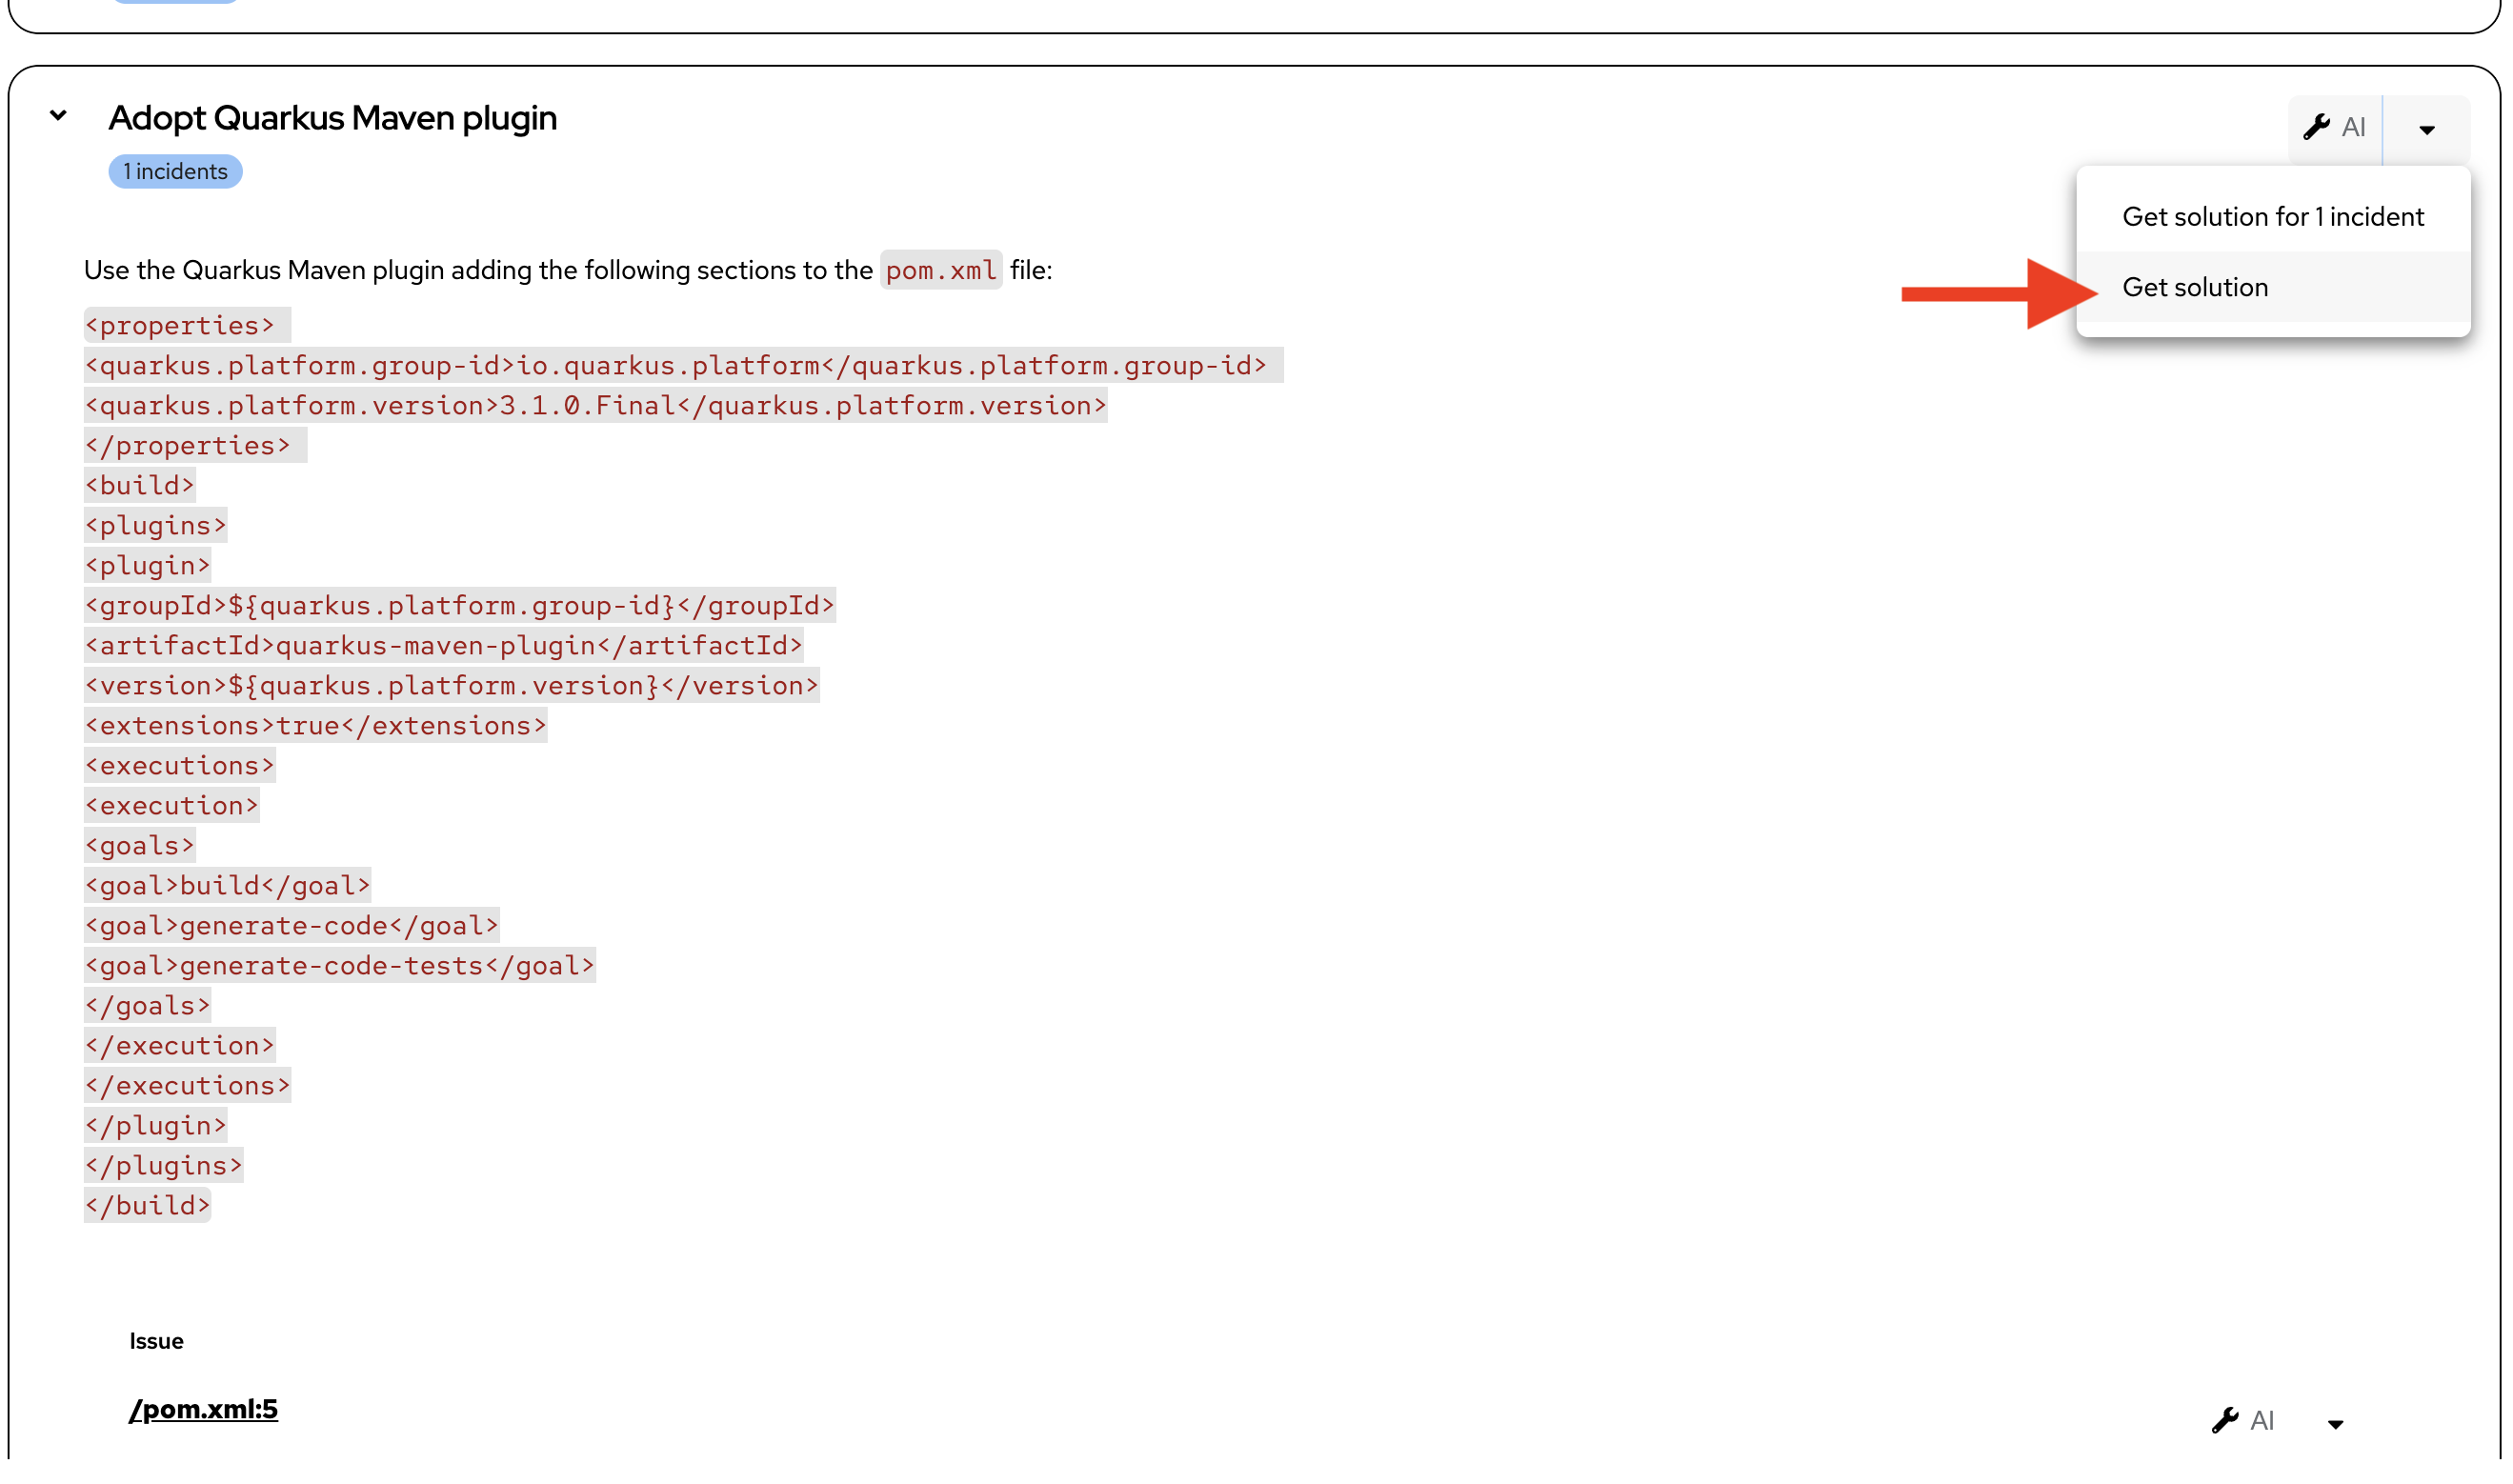 Figure 18. Need To Insert Quarkus Plugin
 -
Developer Lightspeed extension will scroll through the Generative AI Results, which was covered in detail previously
-
Click Accept to suggested changes for the Plugin Issue
-
Developer Lightspeed fixes the issue, and Agent Mode continues to look for all impacted code across the project that are affected by this fix.
At this point the LLM in the background may not always approach locating and suggesting fixes to files in the same order, so screenshots may not match what you see exactly, and because this workshop and other workshops running simultaneously may be really stretching the GPU’s assigned to this model, the Agent process may run into some performance and latency delays. This is only due to potential resource bottlenecks during the workshop. -
Agent Mode offers to continue fixing them
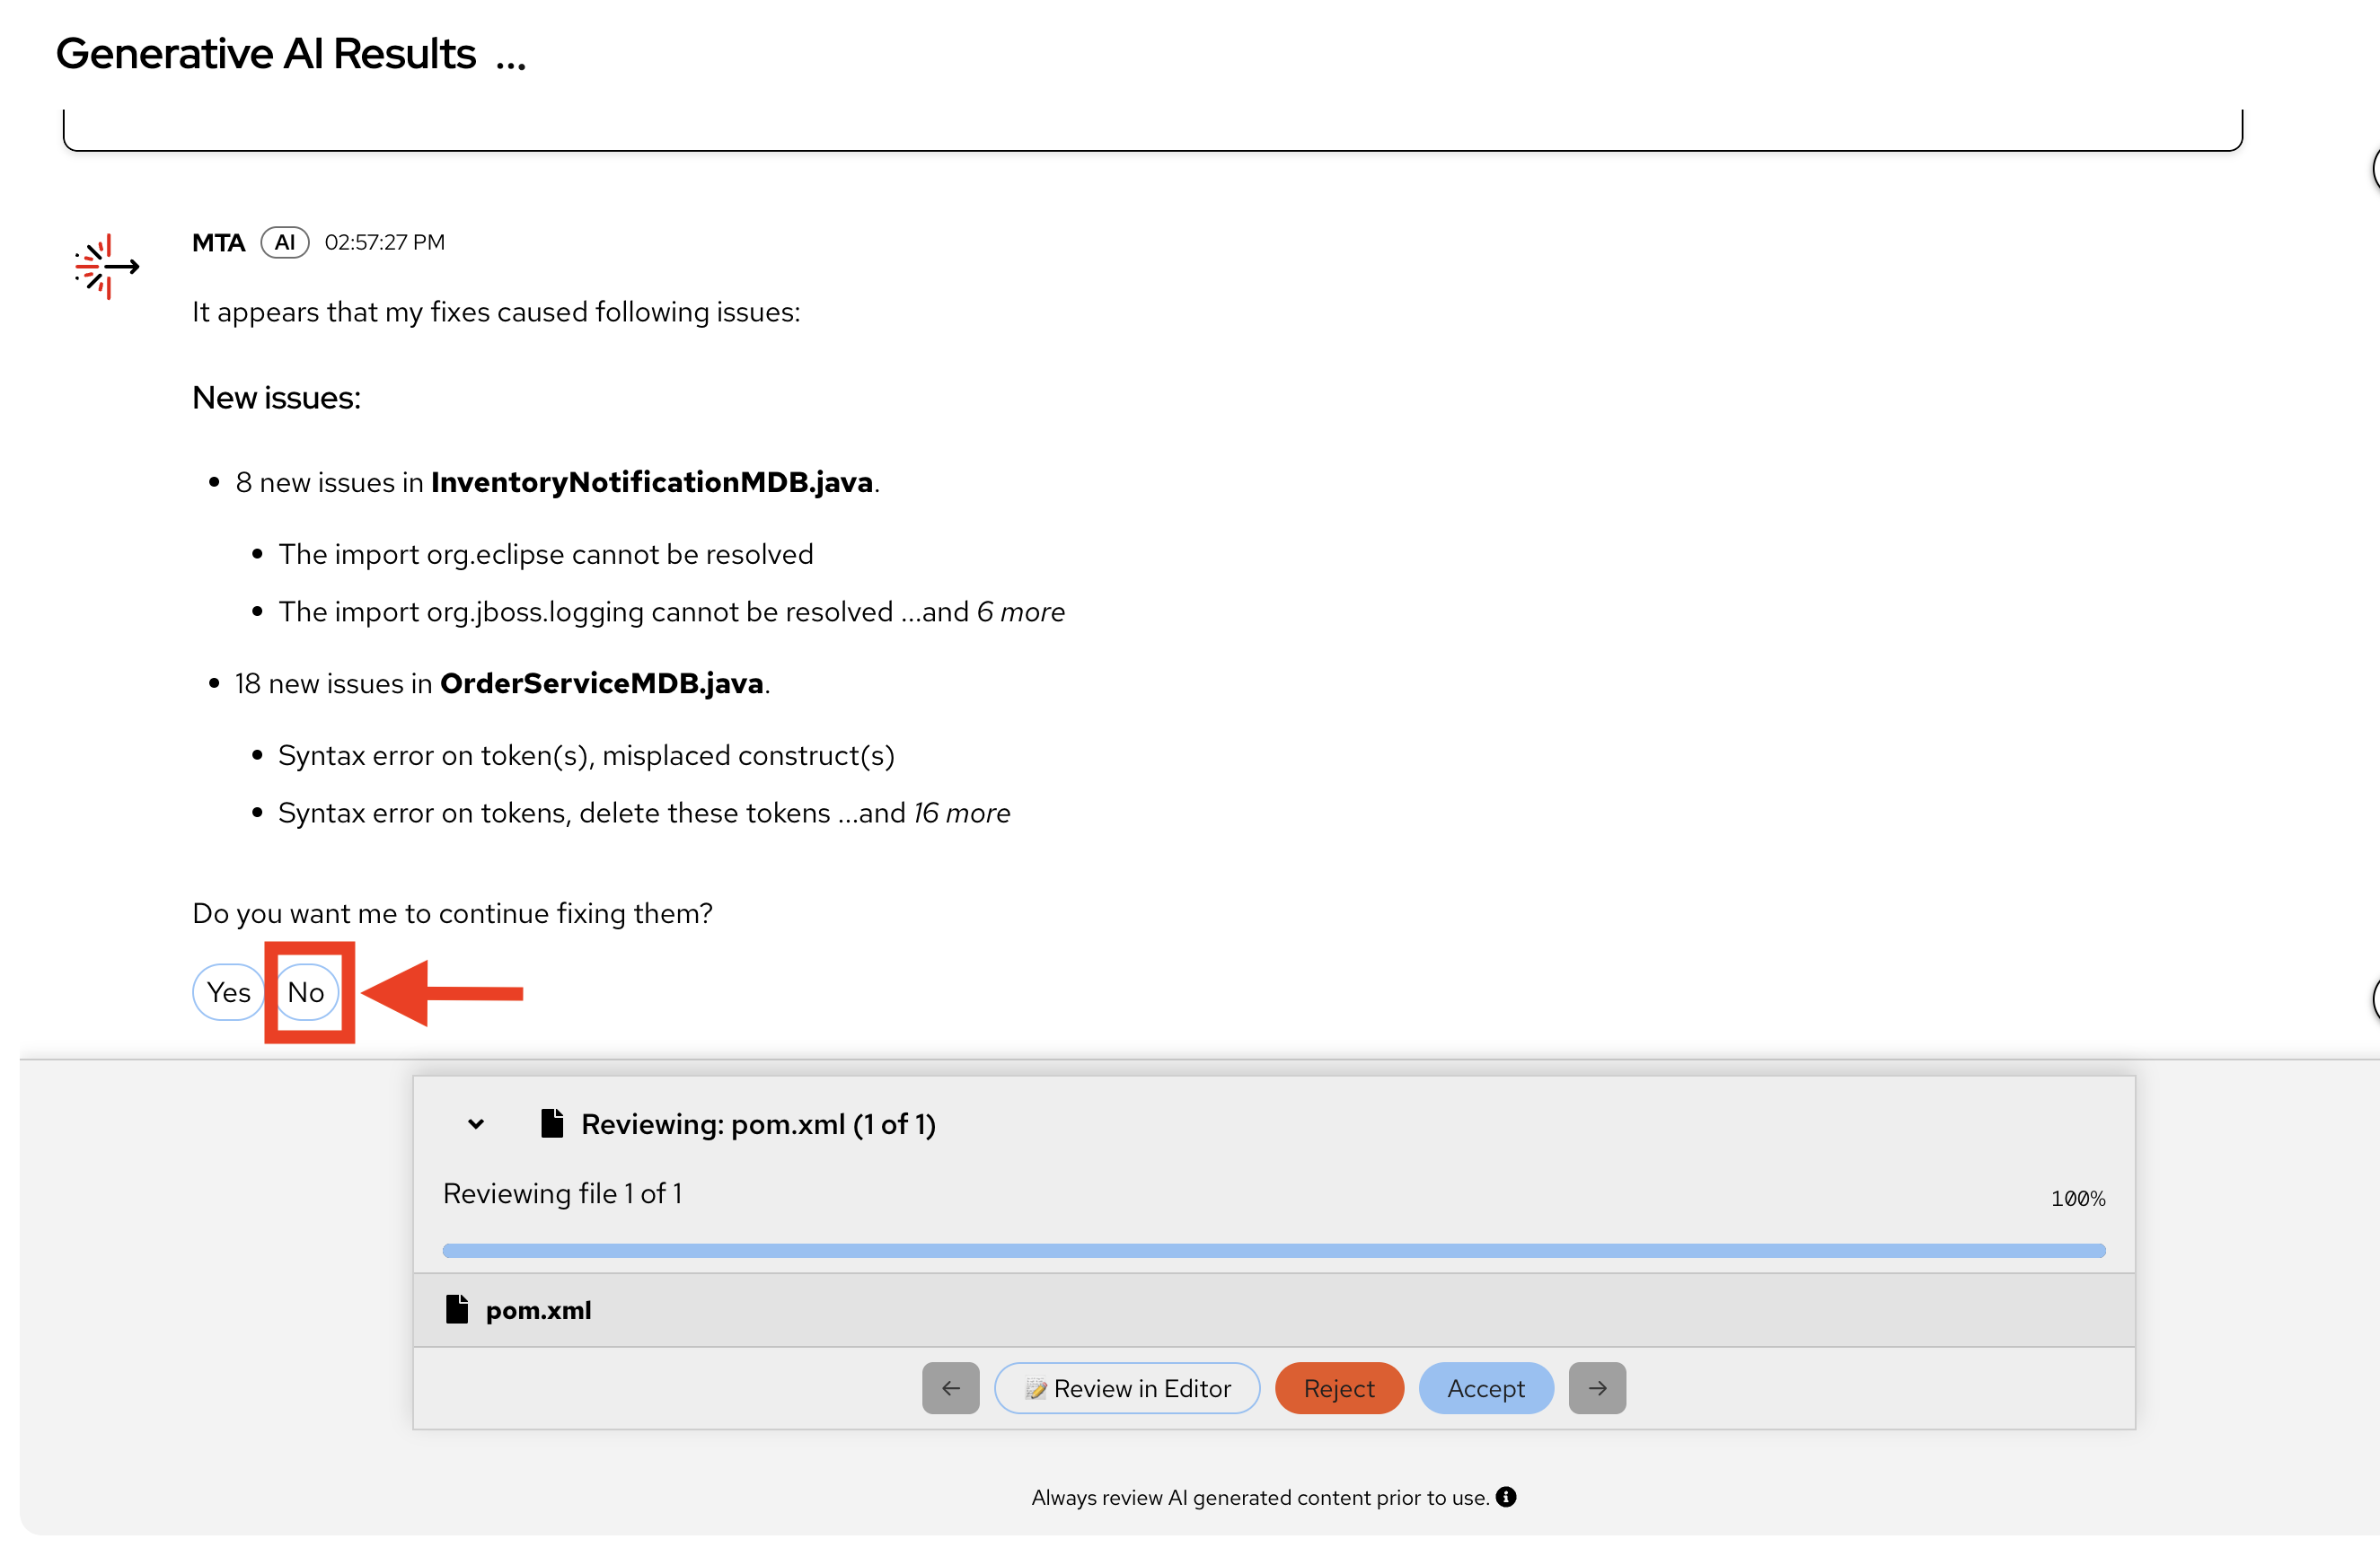 Figure 19. Agent Mode Locates Other Impacted Code
 -
Choose NO
We are choosing NO, because this workshop doesn’t allow enough time and shared resources to simultaneously fully fix all cascading issues across the project, for all participants. -
Close the MTA Resolution Details Tab/Pane
-
If any code files remain open, close them.
-
This Agent Exercise provided a strong case for using Developer Lightspeed for MTA to not only fix specific issues but also be able to use AI capabilities to look across a codebase for all impacted code as the initial change has a ripple effect across the project. Agent mode can then provide fixes along the way and further speed the migration, and scale the effort in a safe consistent way that ensures complete migration.
Troubleshooting
Issue: Developer Lightspeed extension not responding
Solution: Verify AI model endpoint is accessible:
Ask instructor to assist getting a terminal open and run the following
curl -k https://litellm.apps.cluster-abc123.ocpv00.rhdp.net/chat/completions/healthIf endpoint is down, check with workshop instructor. If accessible, try restarting the extension or workspace.
Learning outcomes checkpoint
Before moving forward, confirm you can:
-
Set up and configure Red Hat Developer Lightspeed in Dev Spaces
-
Run AI-powered code analysis on legacy applications
-
Generate modernized code using AI assistance
-
Review and validate AI-generated code changes
-
Use version control to manage AI-assisted modifications
-
Leverage Agent Mode for project-wide modernization
-
Test and verify AI-generated code meets quality standards
If you can check all these boxes, you’re ready to proceed. If not, review the exercises where you need more practice.
Module summary
You’ve successfully demonstrated AI-accelerated code modernization and can now show ACME how to dramatically reduce migration time.
What you accomplished for ACME:
-
Configured AI-powered development environment
-
Generated production-quality modernized code using AI assistance
-
Validated AI changes through proper testing and review
-
Scaled modernization work using Agent Mode across entire projects
Business impact realized:
-
Development velocity: Reduced code modernization time from days to hours
-
Consistency: AI applies patterns uniformly across codebase
-
Quality: Automated testing validates all changes
-
Scalability: Agent Mode enables project-level transformations
Your journey progress:
You now have hands-on experience with AI-assisted code modernization and understand how Developer Lightspeed accelerates the transformation from legacy to cloud-native applications.
Next steps:
Module 3 will show you how to incorporate ACME’s specific coding standards and best practices into AI’s generative code migration, by using Developer Lightspeed Solution Server, ensuring consistency across all developers from senior developer to junior contractor, and across all migration waves.