Disaster Recovery Plan for your VM
For this module, make sure you are connected to the OpenShift PROD Console, then switch to the Virtualization tab
Deploy a simple VM with a Block RWX volume
For this exercise, most tasks are going to be done in the OpenShift GUI.
Project creation
Log into the PROD OpenShift console
| Environment | URL | User | Password |
|---|---|---|---|
PROD |
{rosa_prod_openshift_console_url}[window=_blank] |
|
|
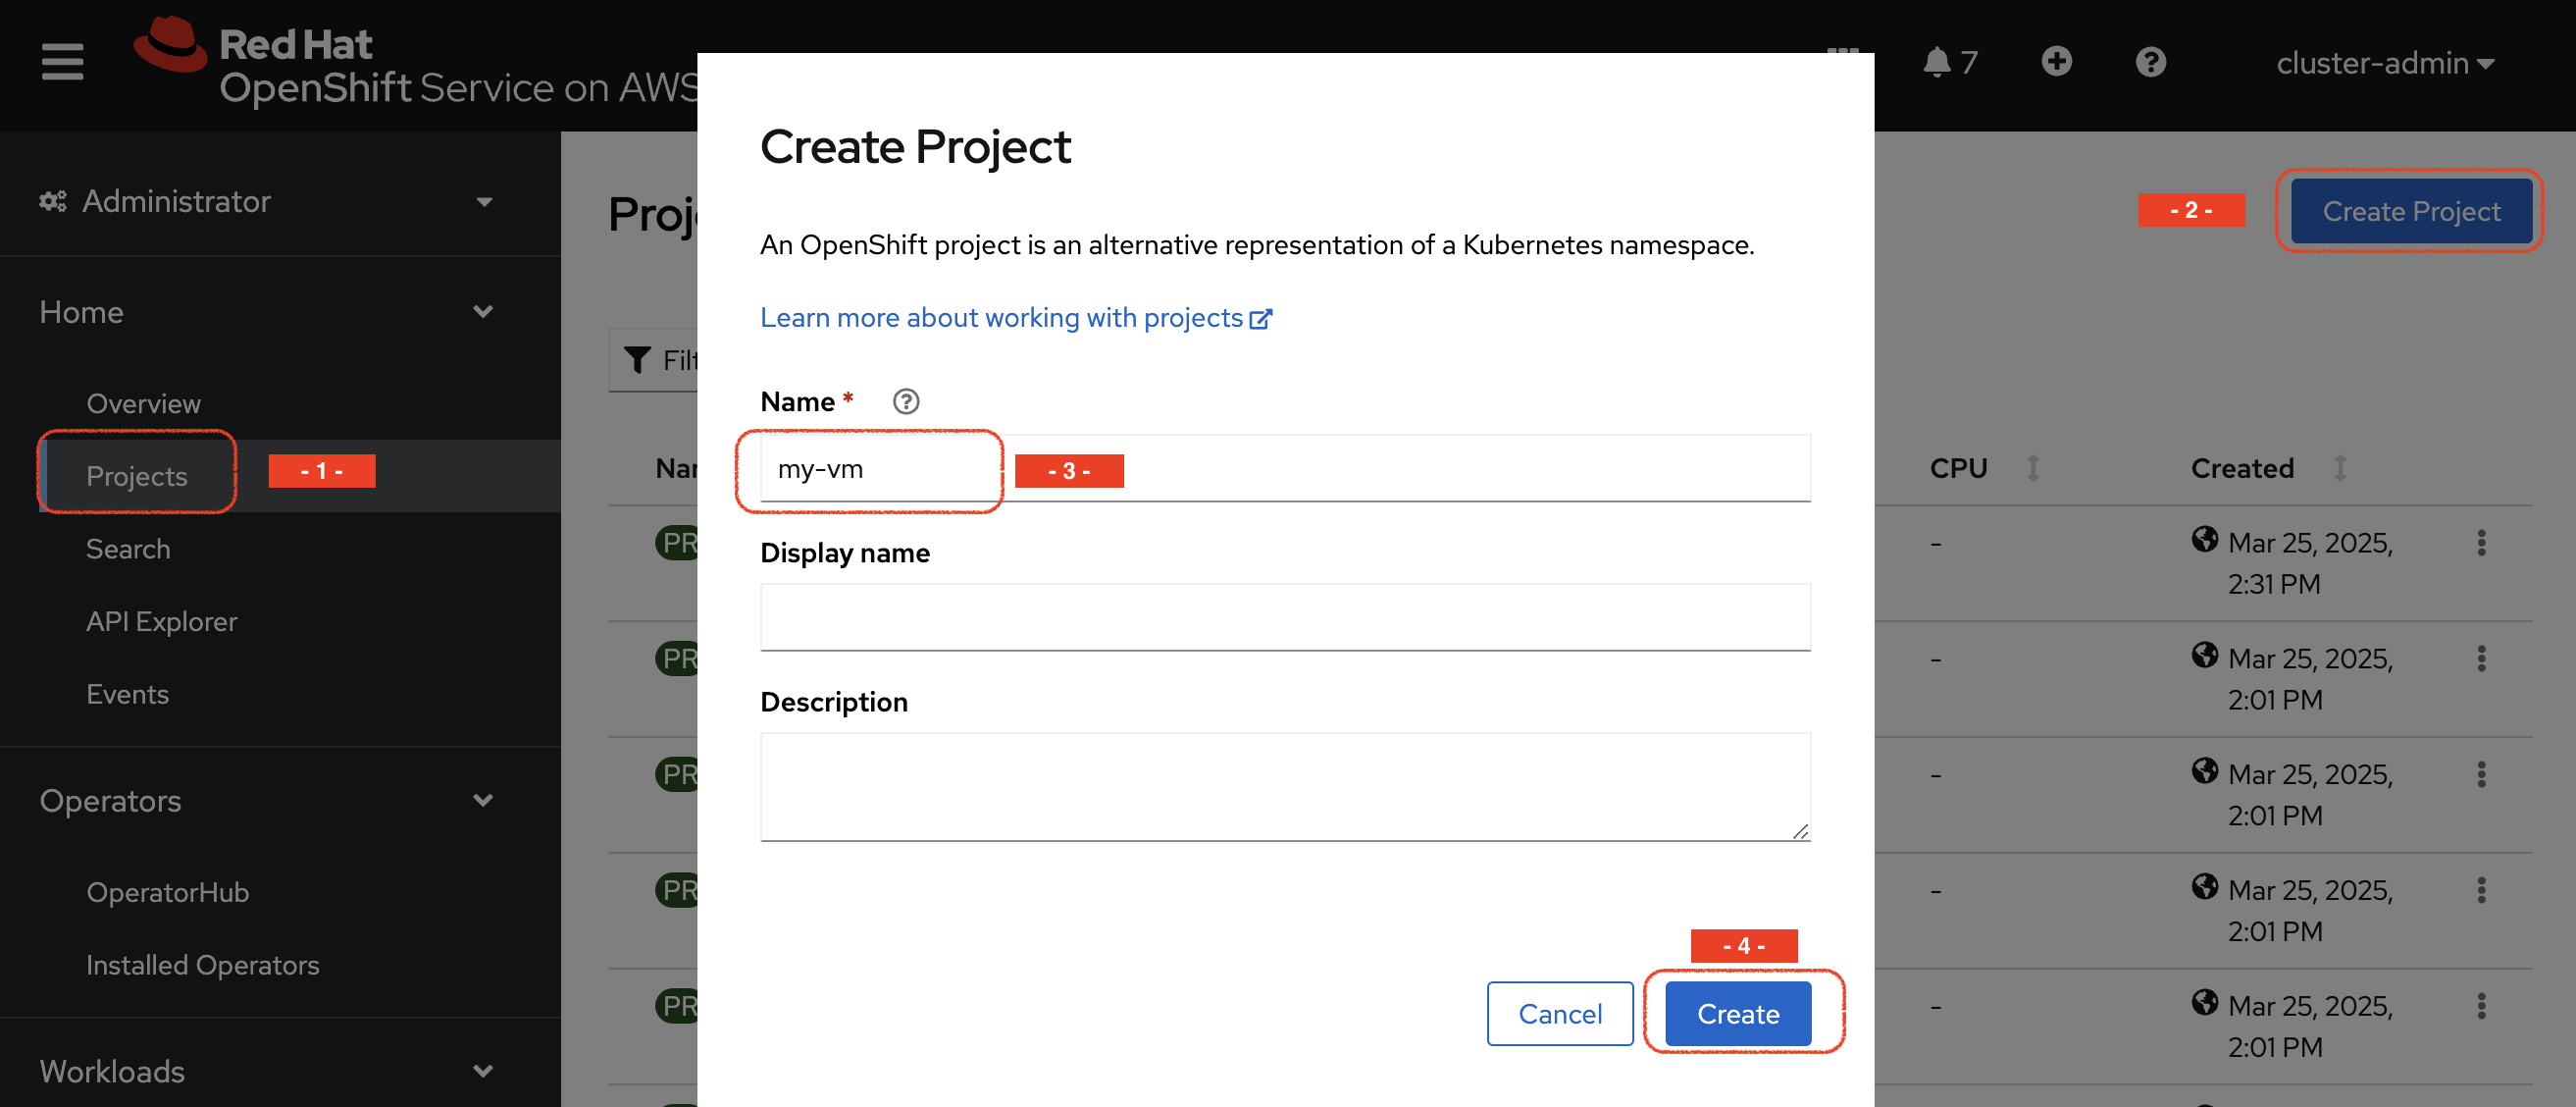
Navigate to Home → Projects and create a new project by using the Create Project button on the top right.
Name the project my-vm
VM creation
-
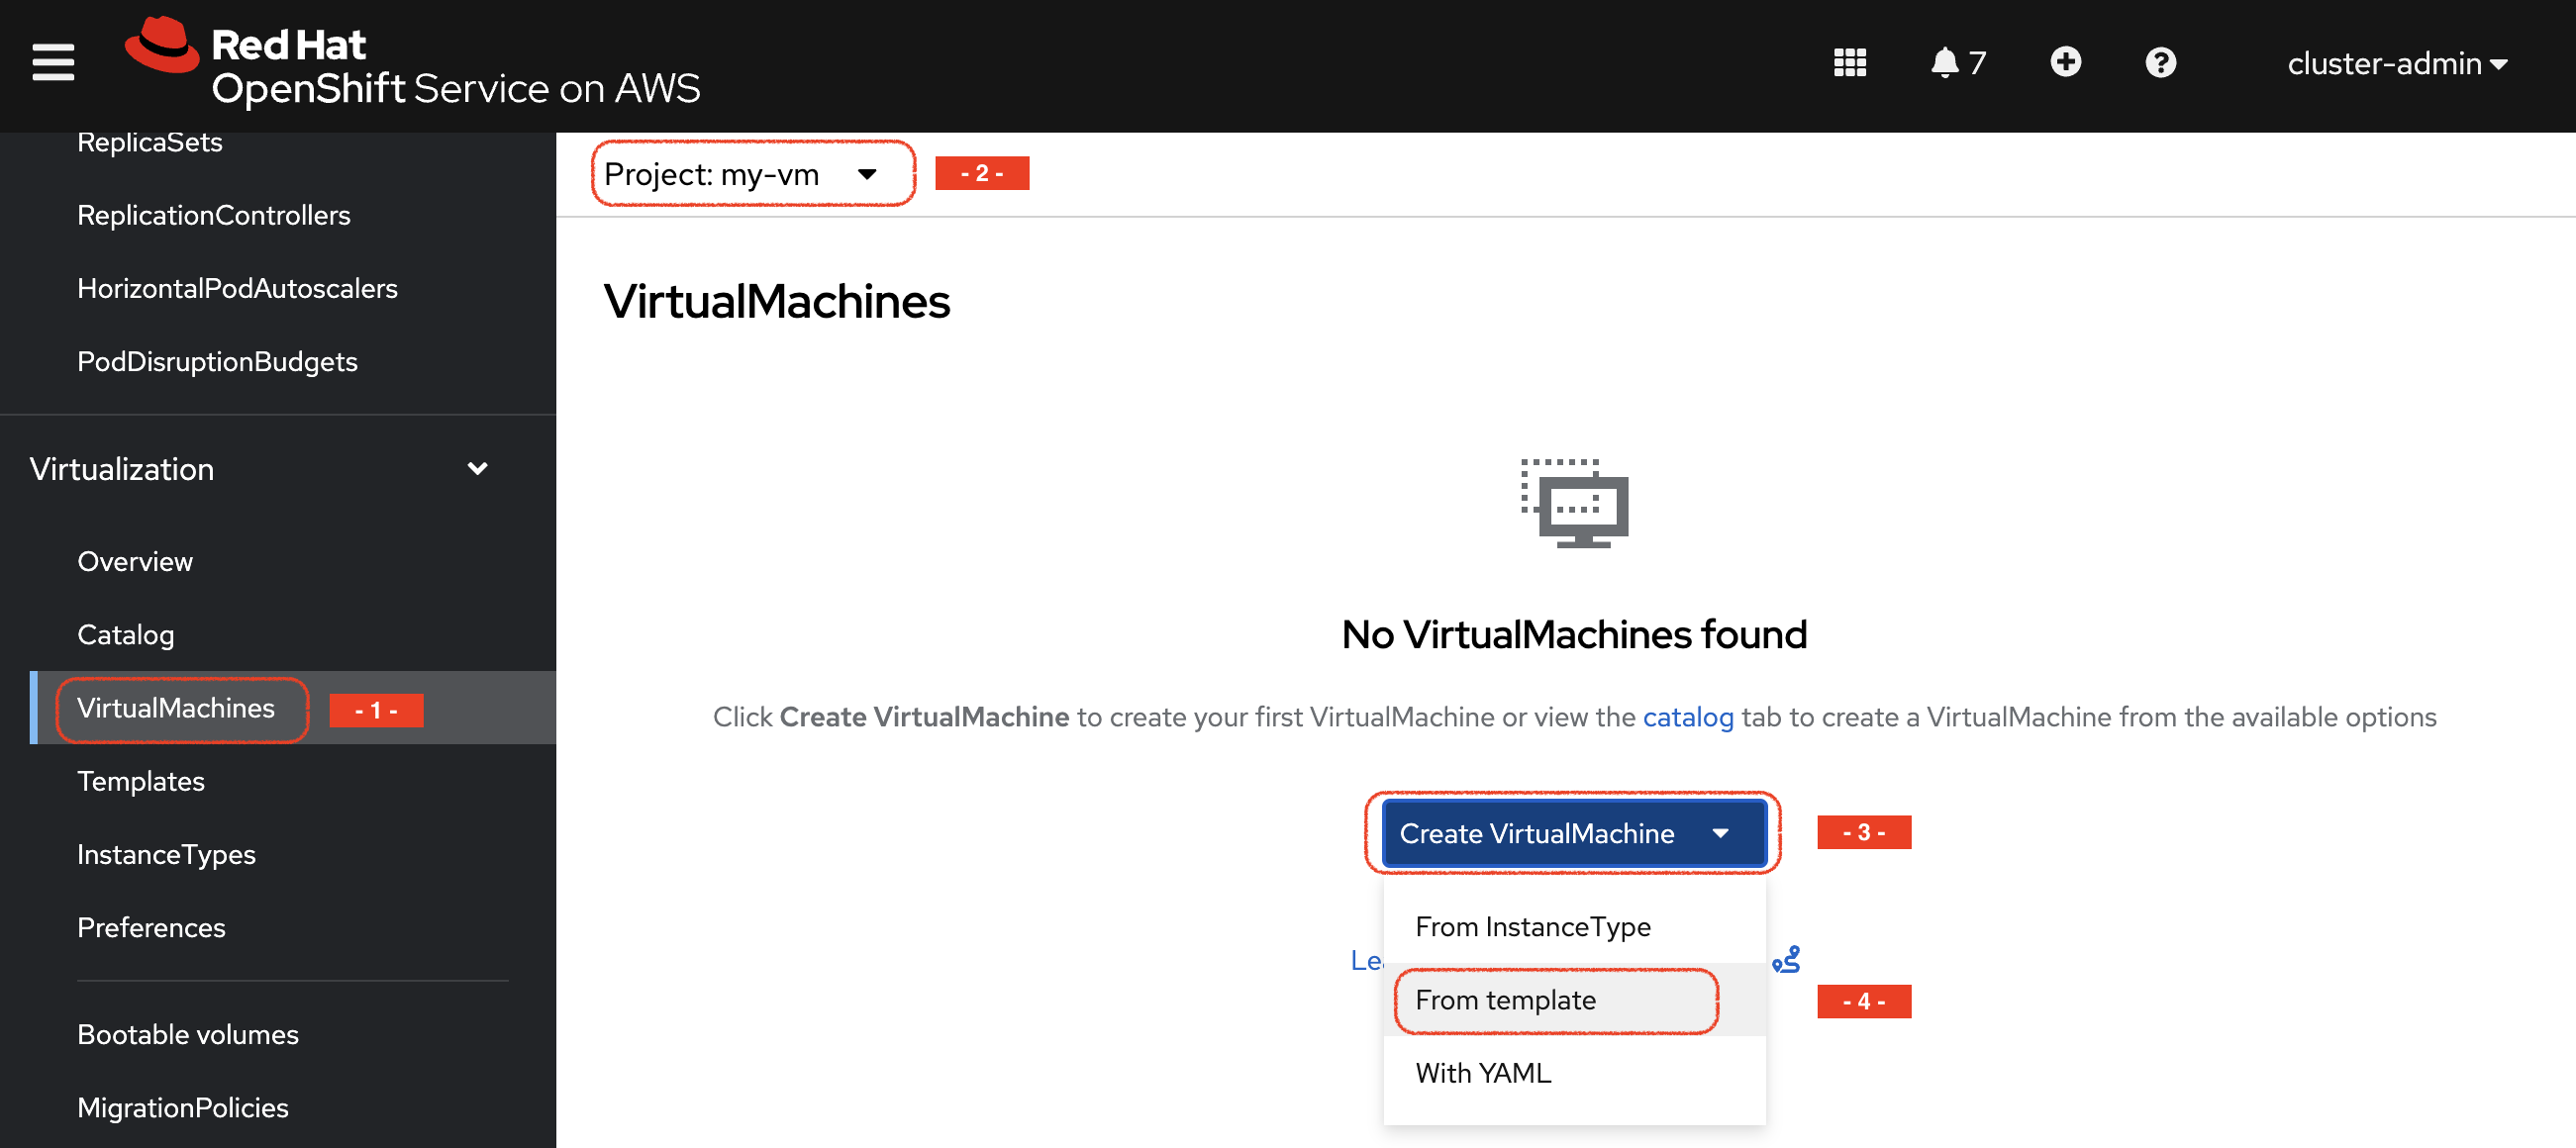
Navigate to the VirtualMachines sub-menu of the Virtualization menu (make sure you are on the right project), press Create *Virtual Machine and then choose From template
-
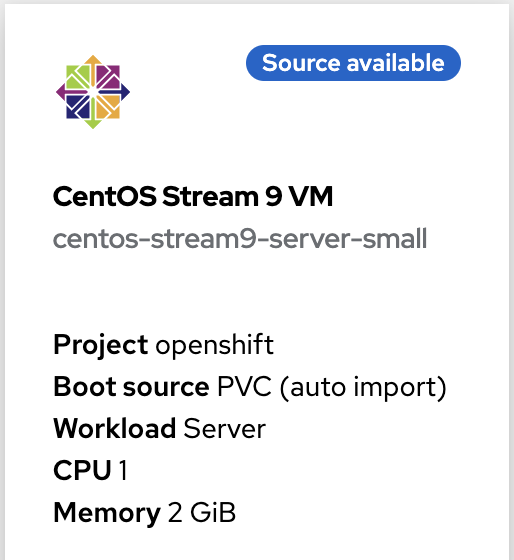
Select the CentOS Stream 9 VM template. This will open a new form.
|
As you can see, the template you are selecting is labelled Source available. |
-
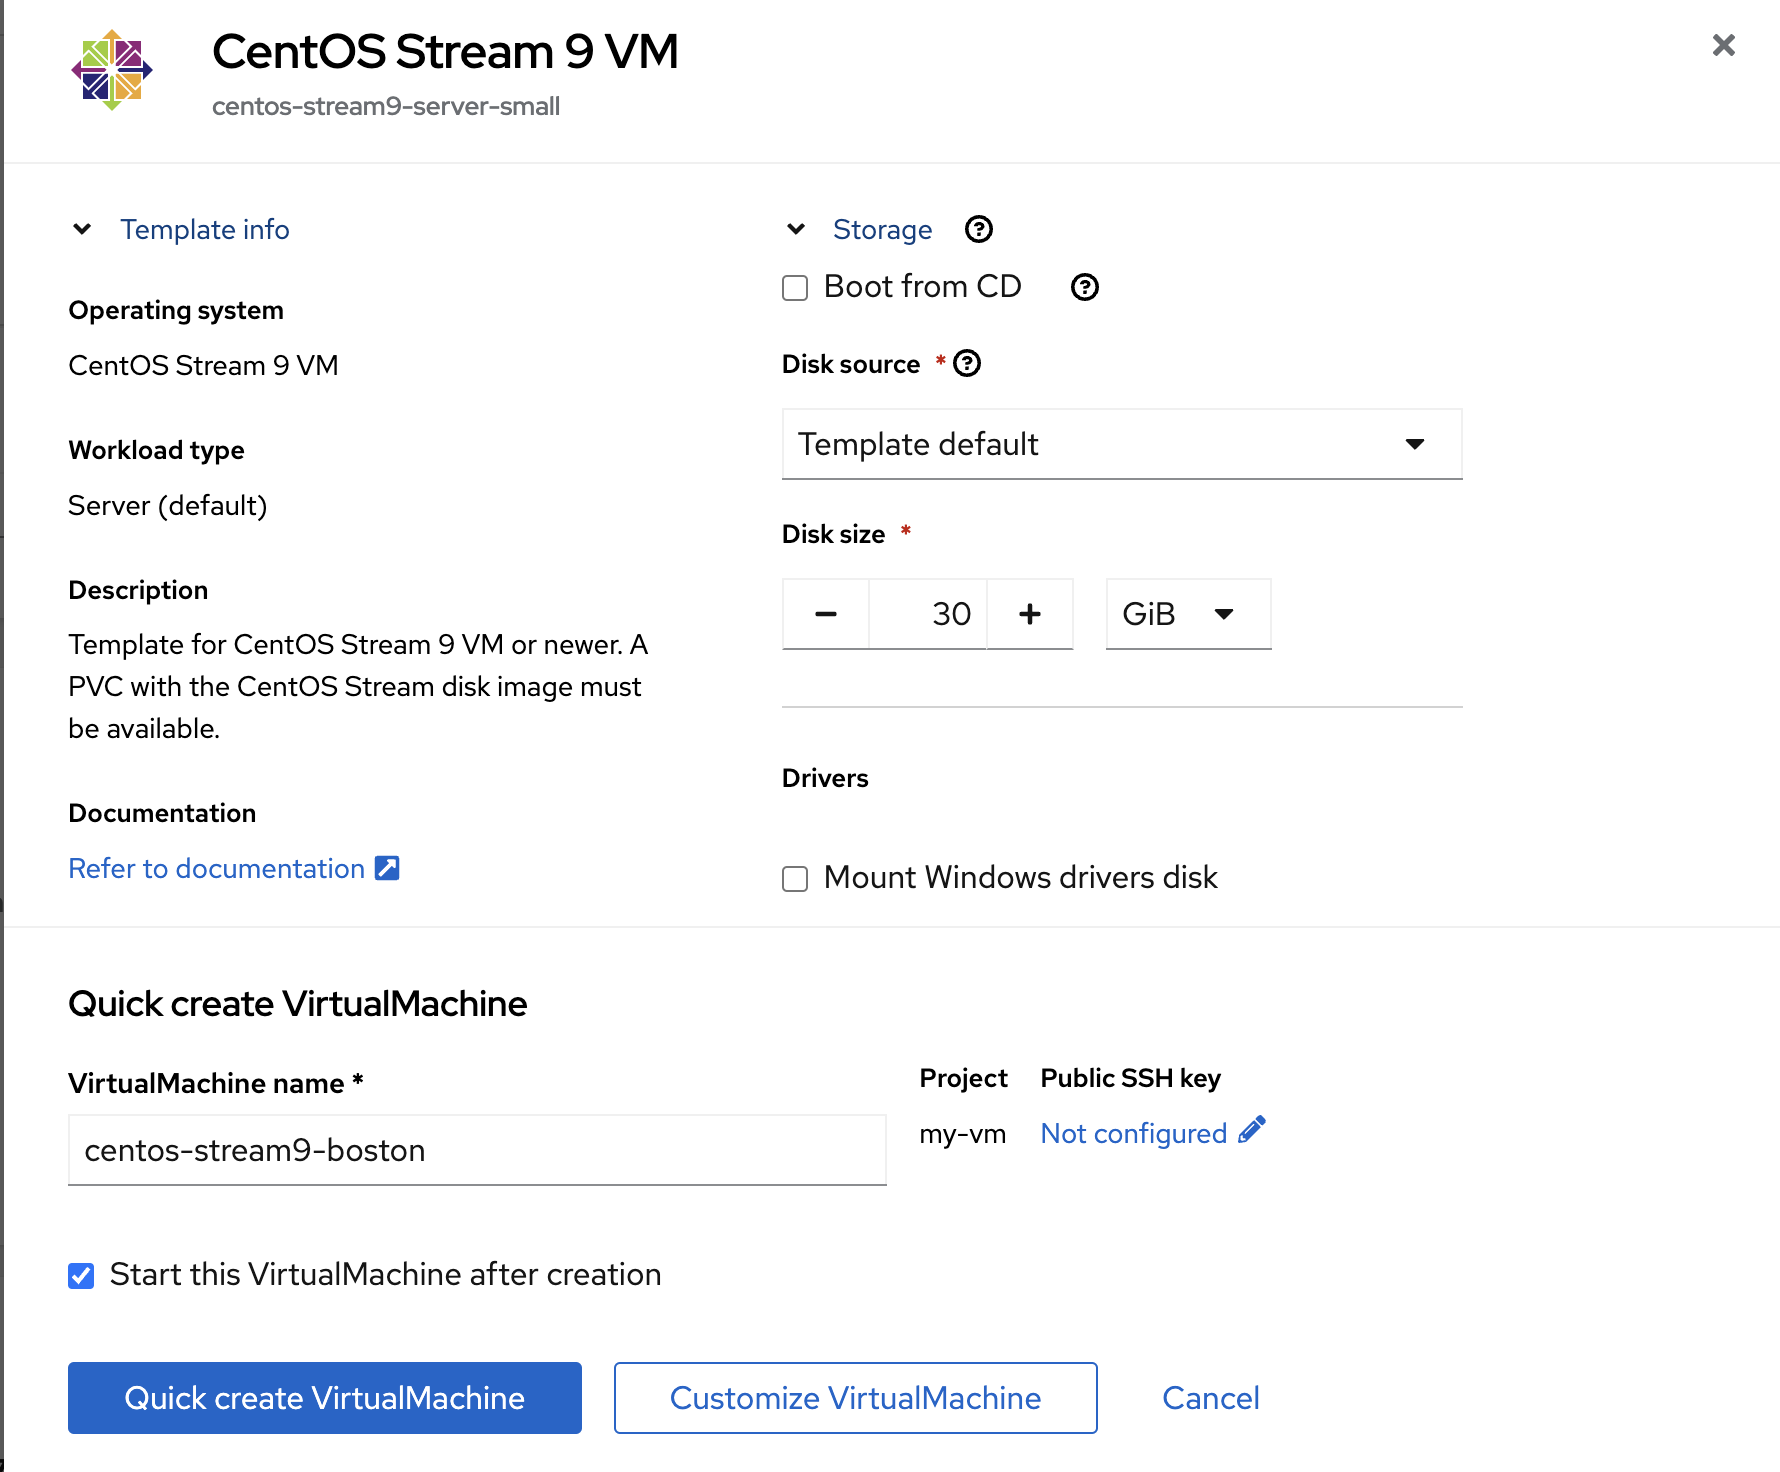
Leave all the default parameters
-
including Disk source = Template default (that will use the volume snapshot set during the optimization configuration in the previous module)
-
you can optionally change the VM name
-
-
Press
Quick create VirtualMachine
Verify the objects related to that VM with the CLI
Switch back to the PROD context and check the status of the VM and its disk/PVC volume.
oc config use-context PROD
oc -n my-vm get dv,vm,pvc
NAME PHASE PROGRESS RESTARTS AGE
datavolume.cdi.kubevirt.io/centos-stream9-boston Succeeded 100.0% 38s
NAME AGE STATUS READY
virtualmachine.kubevirt.io/centos-stream9-boston 38s Running True
NAME STATUS VOLUME CAPACITY ACCESS MODES STORAGECLASS VOLUMEATTRIBUTESCLASS AGE
persistentvolumeclaim/centos-stream9-boston Bound pvc-3d6b8ffd-0483-44b5-9b0c-b0a51b528c40 30Gi RWX storage-class-iscsi <unset> 38sAs you can see, the creation was super fast.
| If the Template Image disk was on a different storage class, the process would have taken much longer (about 10 minutes), as it would first need to copy the data into a different volume. Due to the NetApp ONTAP cloning technology being used in this setup, creation of the VM disk is always fast, independent of the template size. |
-
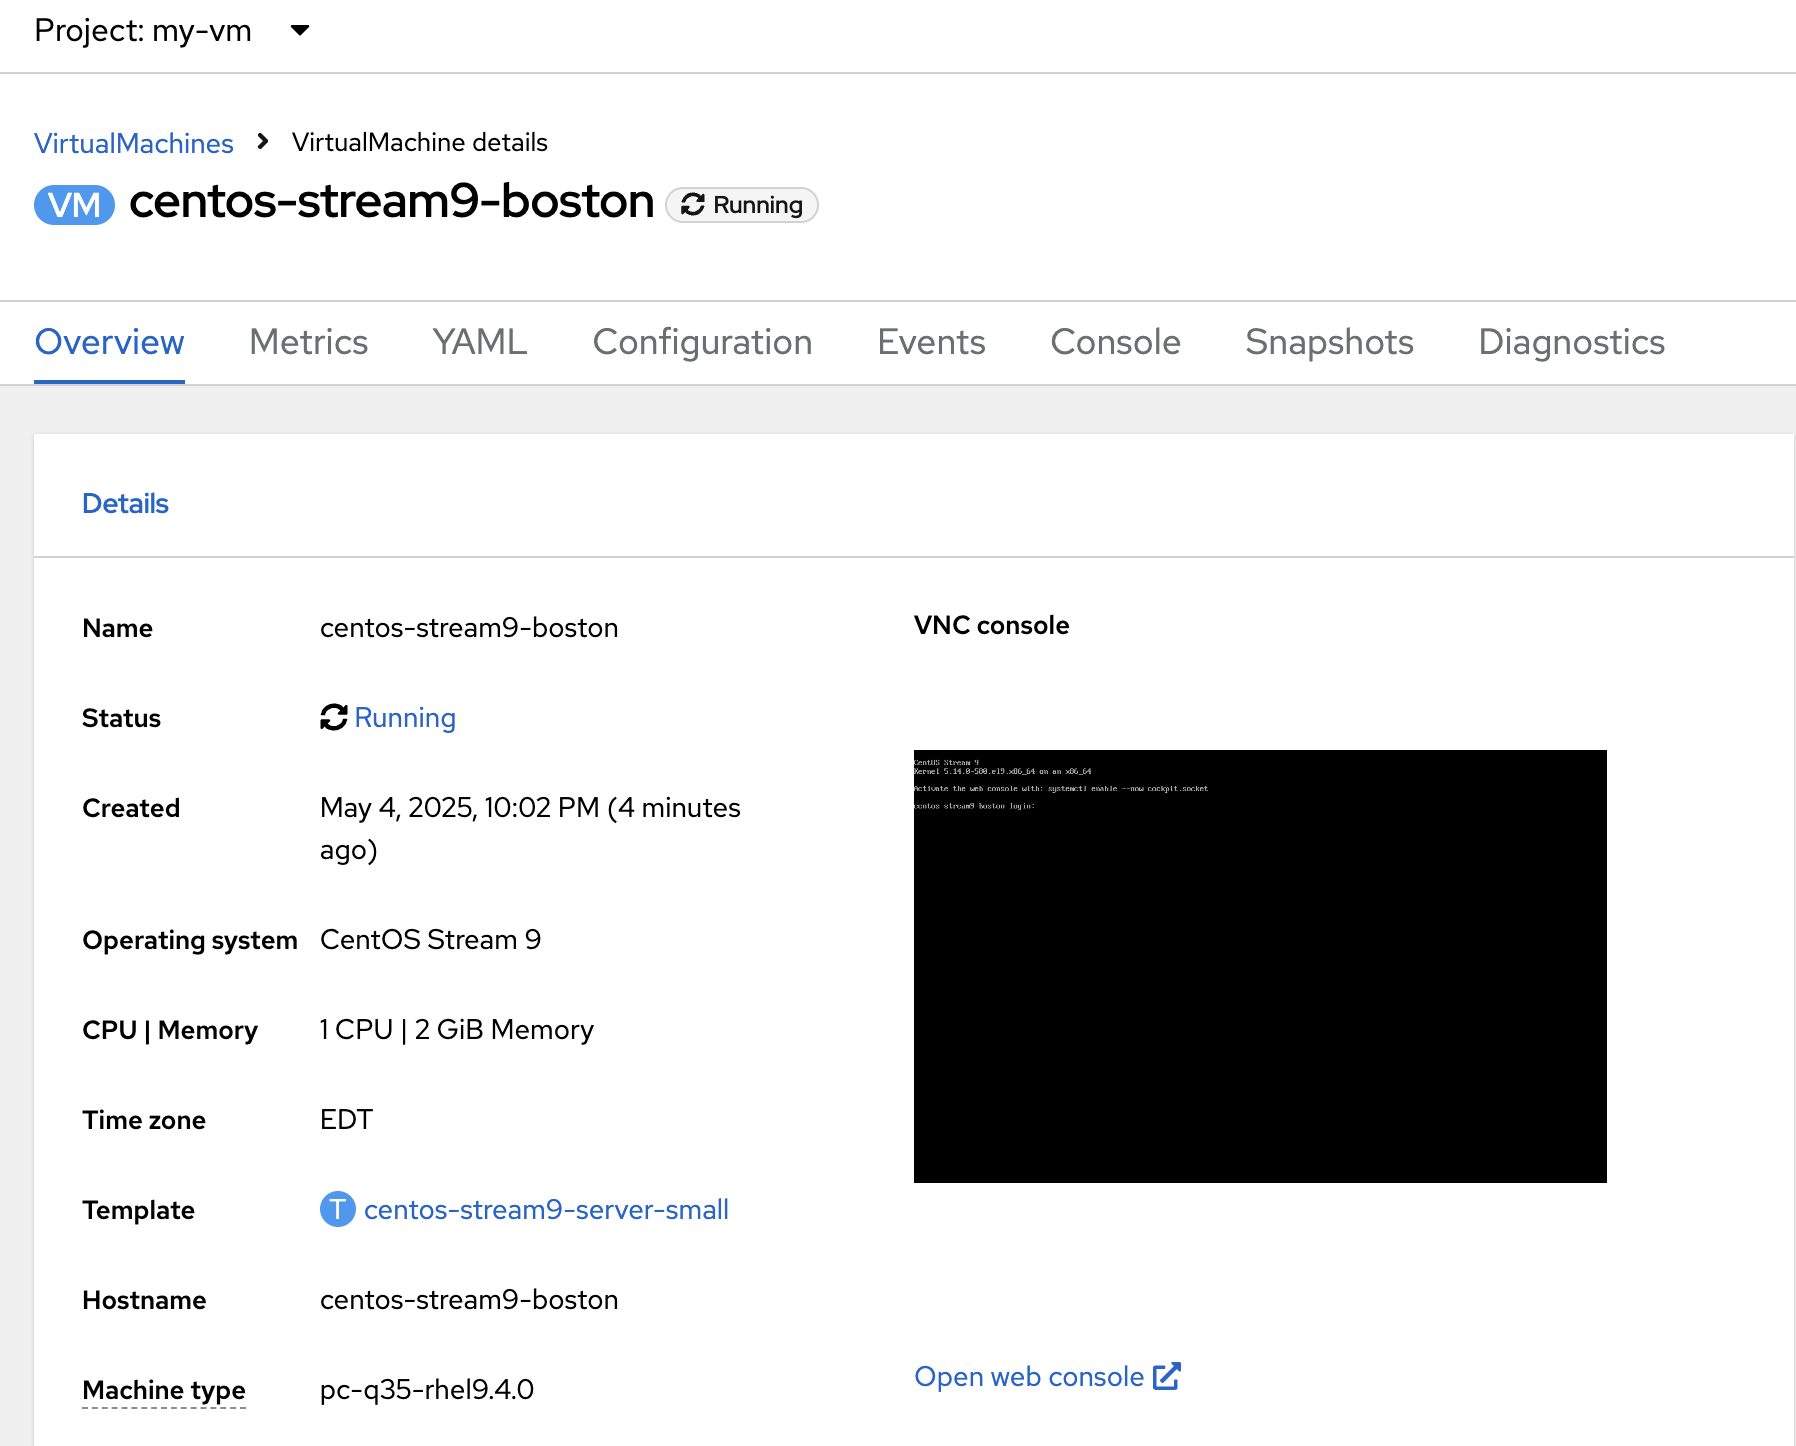
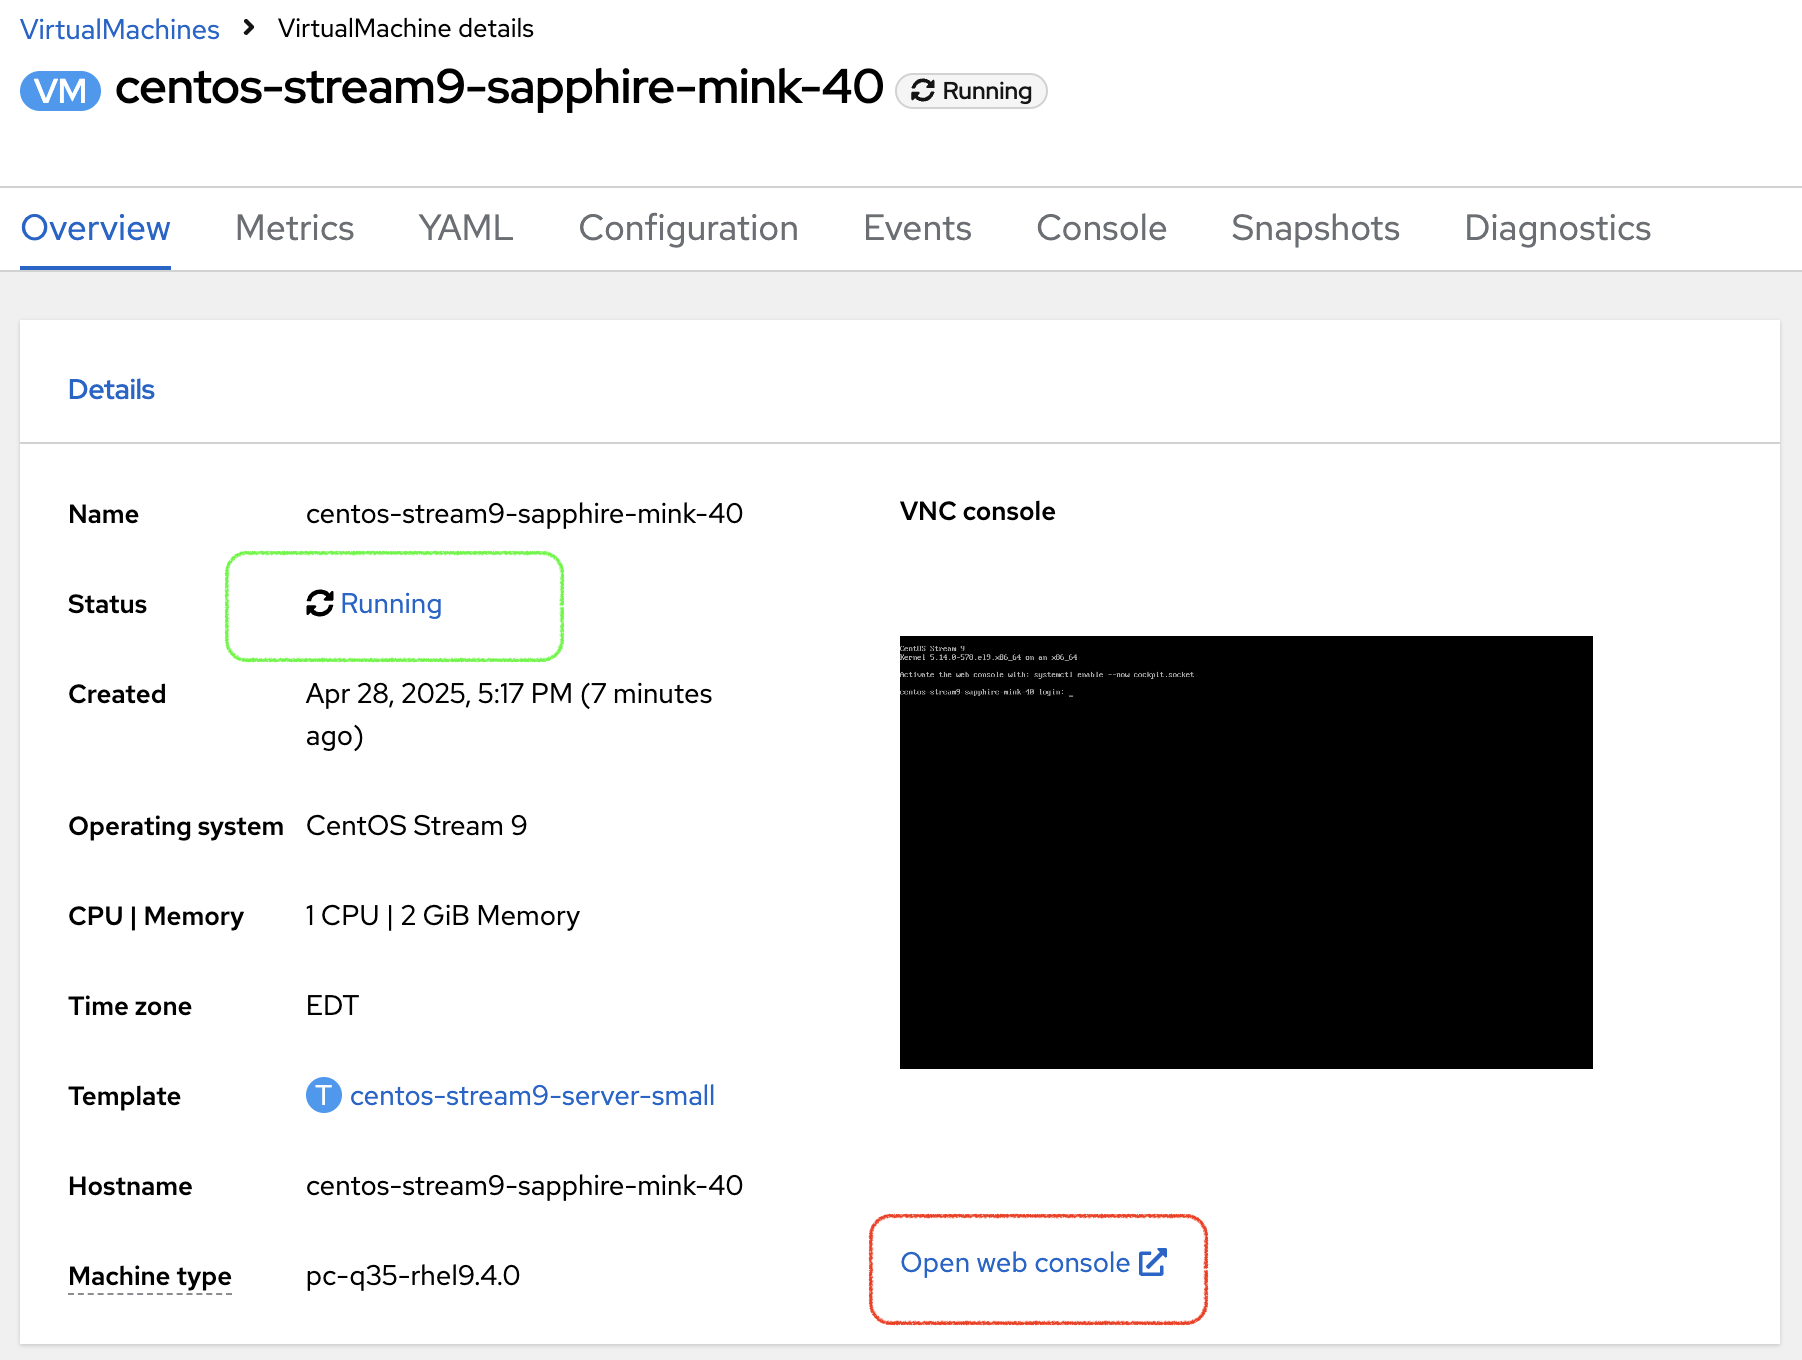
You can also see the status of the VM in the Console:
Virtual Machine customization
-
Navigate to the {rosa_prod_openshift_console_url}[OpenShfit PROD console,window=_blank], and navigate to the Virtualization → VirtualMachines menu.
-
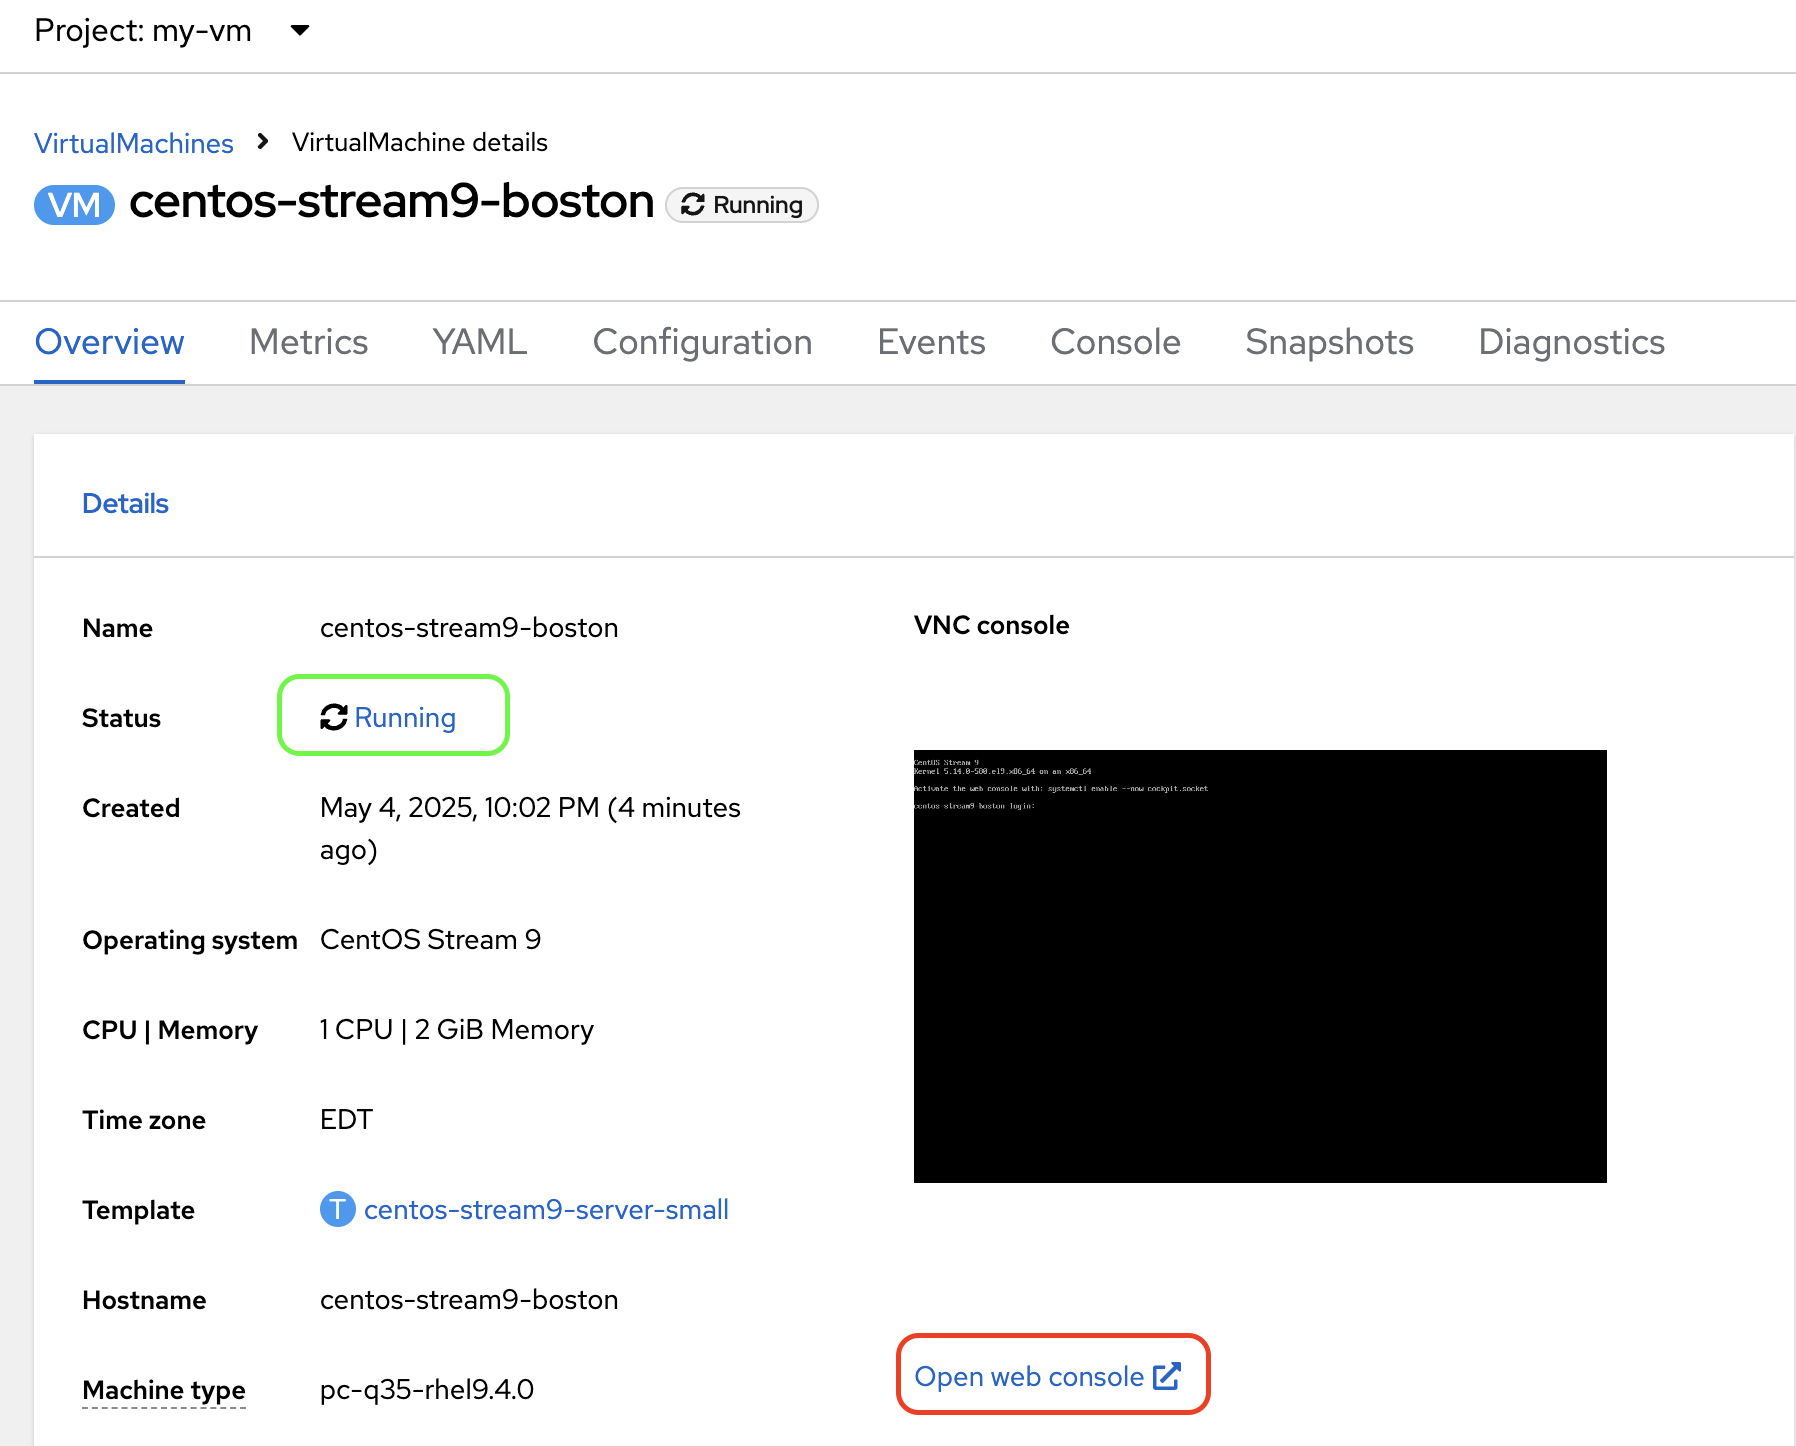
Now that the Virtual Machine is running, you can start adding some content. Press the Open Web console link
-
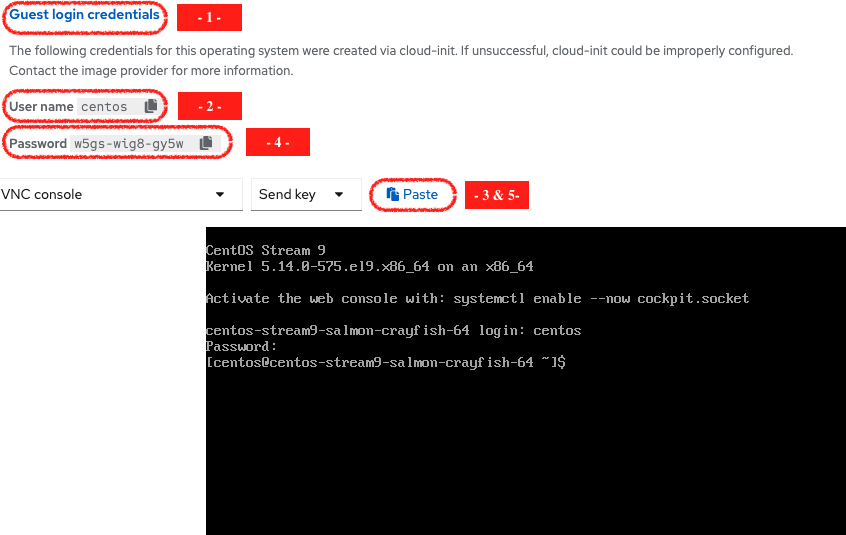
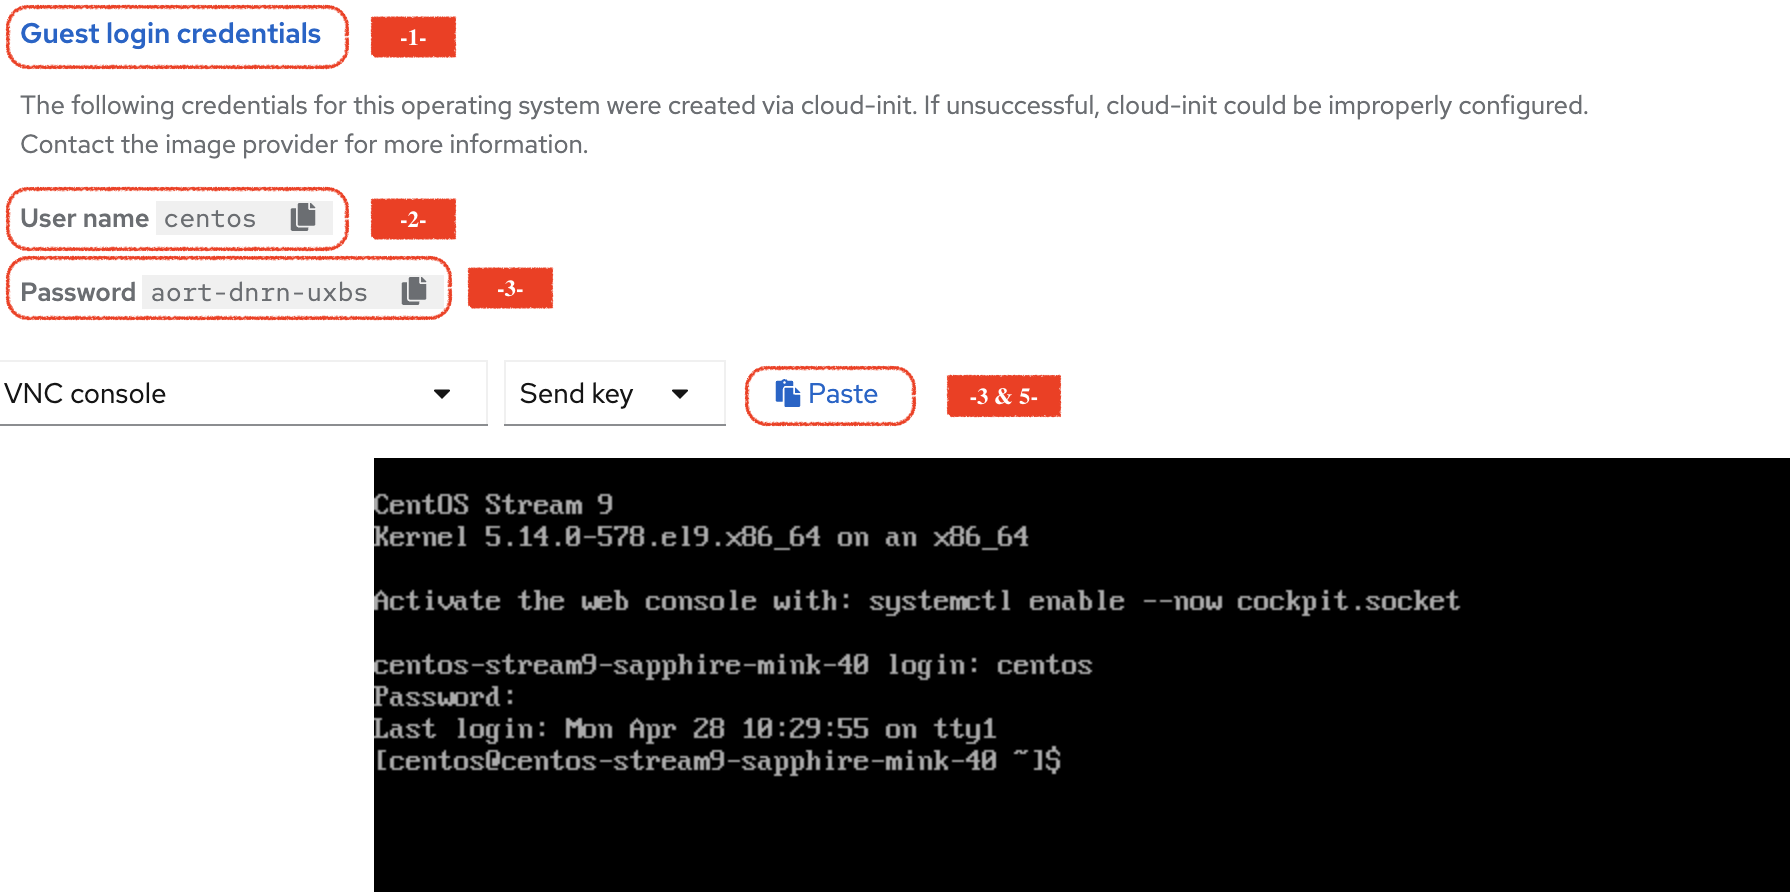
This opens a new window. First Press on the Guest login credentials link, and use the information you see to log into the system
-
Create a file in the home directory
echo "this is my file" > myfile.txtYou can now close that Web Console.
Disaster Recovery Configuration
Time to protect this very critical workloads!
Instead of a backup, we will setup a regular data replication, creating a warm standby on our DR cluster so we can quickly failover in case of a disaster.
We are going to use the CLI to perform that operation.
Make sure you are connected on the PROD cluster:
oc config use-context PRODSetting the Disaster Recovery Plan is done in a few steps:
-
Configure the "storage peering" between the source and target environments (already done for you during the lab creation)
-
Create a Trident Protect application (for the whole namespace in this exercise)
-
Create an Application snapshot (and optionally a schedule)
-
Retrieve the application ID
-
Setup the Trident Protect AMR (Application Mirror Relationship)
|
Create a Trident Protect application for the my-vm namespace
tridentctl-protect create app my-vm --namespaces my-vm -n my-vmCheck that the application is present:
tridentctl-protect get app -n my-vm+-----------+------------+-------+-----+
| NAME | NAMESPACES | STATE | AGE |
+-----------+------------+-------+-----+
| my-vm | my-vm | Ready | 26s |
+-----------+------------+-------+-----+Create a Trident Protect snapshot of the my-vm namespace
tridentctl-protect create snapshot vmsnap1 --app my-vm --appvault lab-vault -n my-vmCheck that the snapshot is done:
tridentctl-protect get snap -n my-vm+-----------+--------------+-----------+-----+-------+
| NAME | APP REF | STATE | AGE | ERROR |
+-----------+--------------+-----------+-----+-------+
| vmsnap1 | my-vm | Completed | 11s | |
+-----------+--------------+-----------+-----+-------+|
Trident Protect automatically freezes and unfreezes KubeVirt filesystems during data protection operations. |
Create a Snapshot Schedule
cat << EOF | kubectl apply -f -
apiVersion: protect.trident.netapp.io/v1
kind: Schedule
metadata:
  name: snap-sched1
  namespace: my-vm
spec:
  appVaultRef: lab-vault
  applicationRef: my-vm
  backupRetention: "0" (1)
  enabled: true
  granularity: Custom
  recurrenceRule: |-
    DTSTART:20250430T000000Z
    RRULE:FREQ=MINUTELY;INTERVAL=5
  snapshotRetention: "3" (2)
EOF| 1 | default value for backupRetention is 3 |
| 2 | default value for snapshotRetention is 3 |
|
You could also use the command line to create traditional schedules (hourly, daily, weekly, monthly). |
Check that it has been taken into account
tridentctl-protect get schedule -n my-vm+-------------+-------+--------------------------------+---------+-------+-------+-----+
| NAME | APP | SCHEDULE | ENABLED | STATE | ERROR | AGE |
+-------------+-------+--------------------------------+---------+-------+-------+-----+
| snap-sched1 | my-vm | DTSTART:20250430T000000Z | true | | | 2s |
| | | RRULE:FREQ=MINUTELY;INTERVAL=5 | | | | |
+-------------+-------+--------------------------------+---------+-------+-------+-----+Retrieve the Trident Protect application ID
This ID is required to configure the mirror relationship.
Place that ID in a variable, and check the result.
SRCAPPID=$(tridentctl-protect get app my-vm -n my-vm -o json | jq -r .metadata.uid)
echo $SRCAPPID
Setup the mirroring relationship
The remaining part of this module will be done in the DR cluster.
Switch context to the DR cluster.
oc config use-context DRYou can now create a new namespace which will host the mirror of the VM, initiated by an AMR (AppMirrorRelationship) setup with Trident Protect.
oc create ns vmdr

cat << EOF | oc apply -f -
apiVersion: protect.trident.netapp.io/v1
kind: AppMirrorRelationship
metadata:
  name: vmamr1
  namespace: vmdr
spec:
  desiredState: Established
  destinationAppVaultRef: lab-vault
  namespaceMapping:
  - destination: vmdr
    source: my-vm
  recurrenceRule: |-
    DTSTART:20240901T000200Z
    RRULE:FREQ=MINUTELY;INTERVAL=5
  sourceAppVaultRef: lab-vault
  sourceApplicationName: my-vm
  sourceApplicationUID: $SRCAPPID
  storageClassName: storage-class-iscsi
EOF|
When creating the AMR with the tridentctl-protect tool, you don’t need to manually create the target namespace. |
|
As you need to specify the target storage class when creating an AMR, make sure it fits the same protocol and services as the source one. You cannot mirror from iSCSI to NFS for instance (but you can backup from iSCSI and restore to NFS) |
Let’s check the status of this new object on the DR cluster.
It should be in the Establishing state, which means that the configuration is on-going.
tridentctl-protect get amr -n vmdr+----------+--------------+-----------------+---------------+--------------+-----+-------+
| NAME | SOURCE APP | DESTINATION APP | DESIRED STATE | STATE | AGE | ERROR |
+----------+--------------+-----------------+---------------+--------------+-----+-------+
| vmamr1 | lab-vault | lab-vault | Established | Establishing | 41s | |
+----------+--------------+-----------------+---------------+--------------+-----+-------+It will take a couple of minutes for the mirroring to be setup, wait and repeat until the State is Established.
tridentctl-protect get amr -n vmdr+----------+--------------+-----------------+---------------+-------------+-------+-------+
| NAME | SOURCE APP | DESTINATION APP | DESIRED STATE | STATE | AGE | ERROR |
+----------+--------------+-----------------+---------------+-------------+-------+-------+
| vmamr1 | lab-vault | lab-vault | Established | Established | 1m30 | |
+----------+--------------+-----------------+---------------+-------------+-------+-------+Everything is now ready. Your VM is protected and the DR plan is setup!
Last thing to check, when the mirror is configured, you will only see the PVC on the target namespace.
All remaining application objects will be deployed once you activate the DR.
oc get -n vmdr pvcNAME STATUS VOLUME CAPACITY ACCESS MODES STORAGECLASS VOLUMEATTRIBUTESCLASS AGE
persistentvolumeclaim/centos-stream9-boston Bound pvc-86c8b548-a9c5-4623-b672-7d4d1d5d01c1 30Gi RWX storage-class-iscsi <unset> 75s|
Even though the PVC is labelled RWX, it is currently Read-Only, as this volume is the mirror replication target. |
Failover your VM
Failover your VM is pretty straight forward.
You just need to patch the AMR on the DR cluster.
This will break the mirror relationship, which in turn changes the volumes from Read-Only to Read-Write.
From there, Trident Protect will redeploy all the protected objects on top of the PVC so you get your VM back, up & running.
oc patch amr vmamr1 -n vmdr --type=merge -p '{"spec":{"desiredState":"Promoted"}}'|
In this lab, you are performing an application failover in the same way you would run a Disaster Recovery exercise with your own infrastructure. |
Fairly quickly, you should get to the following status (Promoting followed by Promoted)
tridentctl-protect get amr -n vmdr+----------+--------------+-----------------+---------------+-------------+-------+-------+
| NAME | SOURCE APP | DESTINATION APP | DESIRED STATE | STATE | AGE | ERROR |
+----------+--------------+-----------------+---------------+-------------+-------+-------+
| vmamr1 | lab-vault | lab-vault | Promoted | Promoted | 20s | |
+----------+--------------+-----------------+---------------+-------------+-------+-------+Let’s check the content of our namespace:
oc get -n vmdr vm,pvcNAME AGE STATUS READY
virtualmachine.kubevirt.io/centos-stream9-boston 9s Running True
NAME STATUS VOLUME CAPACITY ACCESS MODES STORAGECLASS VOLUMEATTRIBUTESCLASS AGE
persistentvolumeclaim/centos-stream9-boston Bound pvc-86c8b548-a9c5-4623-b672-7d4d1d5d01c1 30Gi RWX storage-class-iscsi <unset> 2m44s|
It might take a moment until the VM is started and then in Running state. |
|
If you needed to tailor the target VM, you could setup a PostFailover Hook with Trident Protect! |
Check the result
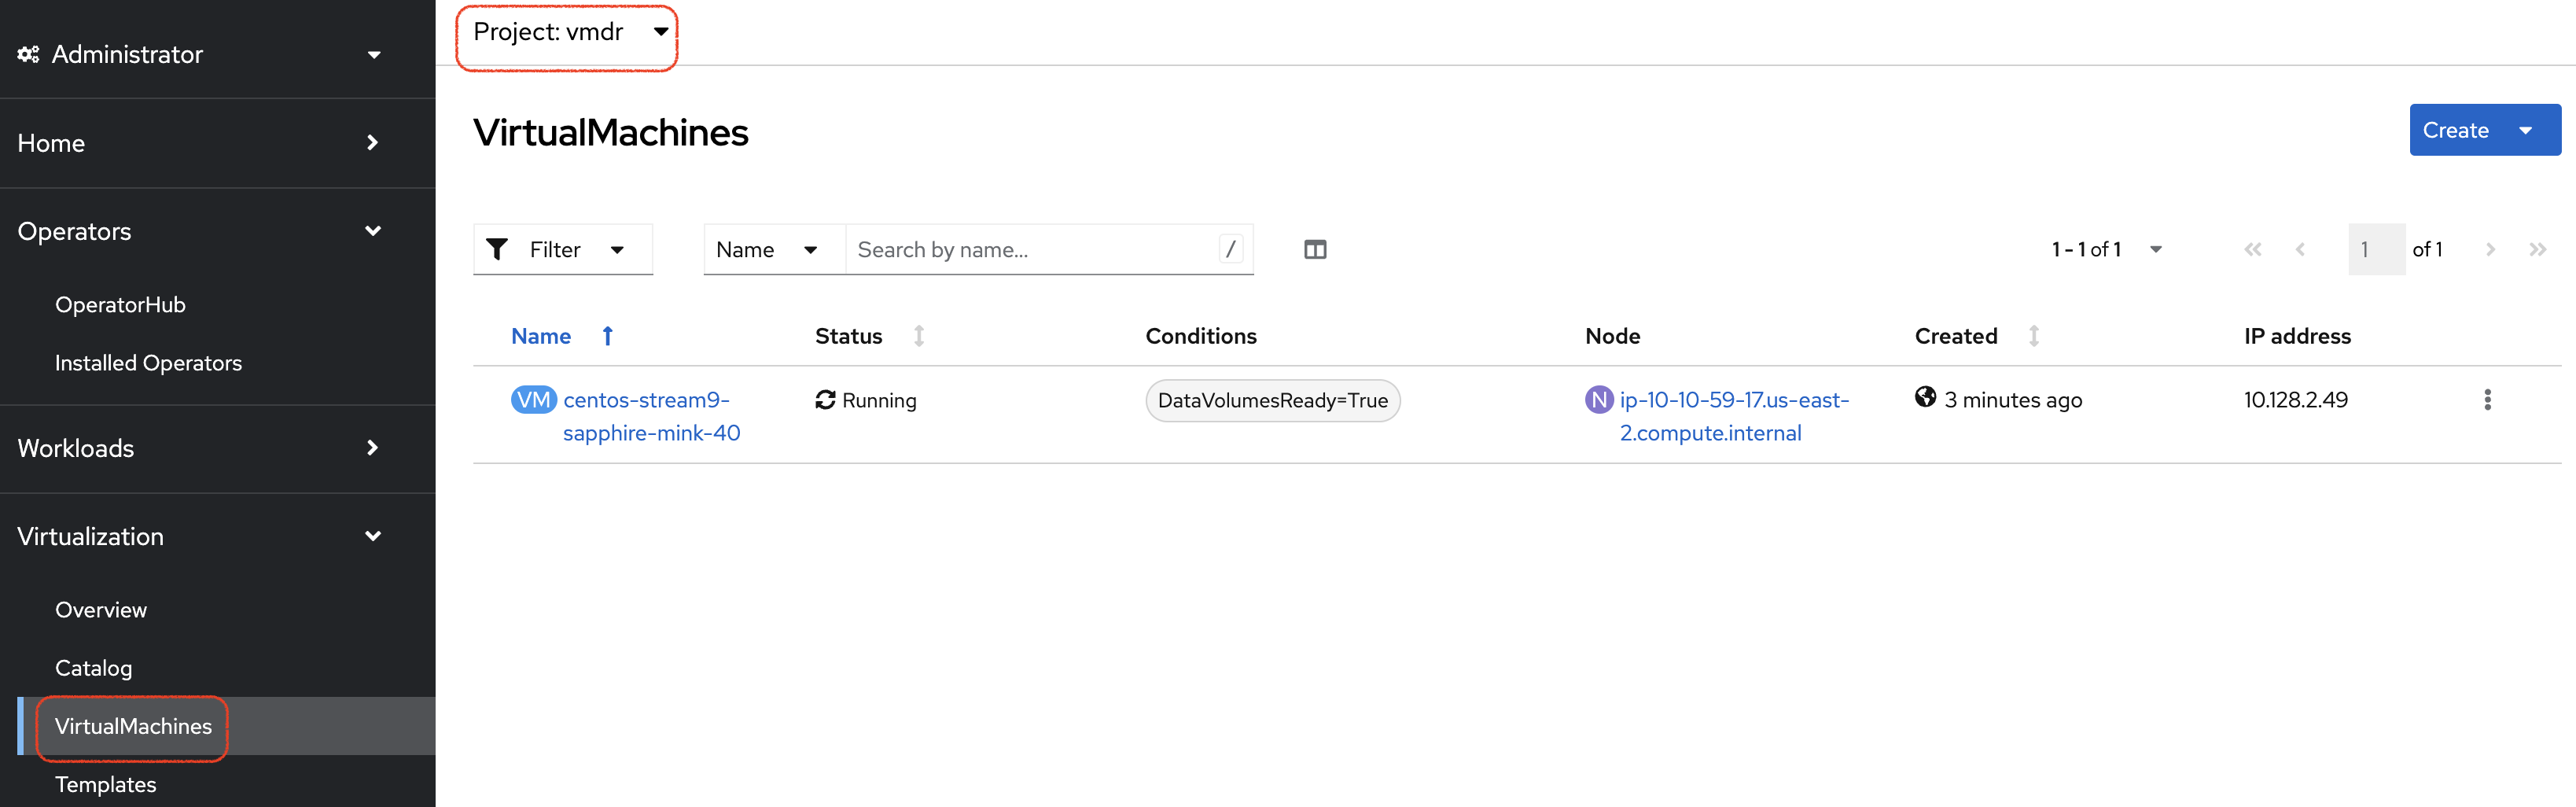
Connect to the rosa_dr_openshift_console_url[OpenShift DR Console,window=_blank] and navigate to the Virtualization → VirtualMachines menu.
Log into the console and verify what our test file is there. Everything is failed over from the production cluster.
-
Connect to the rosa_dr_openshift_console_url[OpenShift DR Console,window=_blank] and navigate to the VirtualMachines menu:
-
Check that the VM is running and press on the Open web console link:
| Even though the VM status may be Ready, it still takes a couple of minutes for the boot and configuration to complete, at which point you can log in. |
-
This opens a new window. First Press on the Guest login credentials link, and use the information you see to log into the system
-
You will then see the content you created earlier:
ls; more *myfile.txt
this is my fileResynchronize the mirror
You have managed to create a VM, configure an asynchronous mirror relationship and test the DR failover.
Let’s go back to an initial state and resynchronize the mirror relationship from PROD to DR
This can be easily achieved by just updating the state of the AMR once again:
oc patch amr vmamr1 -n vmdr --type=merge -p '{"spec":{"desiredState":"Established"}}'You will see that the AMR is now in Reestablishing state:
tridentctl-protect get amr -n vmdr+--------+------------+------------------+-----------------+-----------------------+---------------+----------------+-------+-------+
| NAME | SOURCE APP | SOURCE APP VAULT | DESTINATION APP | DESTINATION APP VAULT | DESIRED STATE | STATE | ERROR | AGE |
+--------+------------+------------------+-----------------+-----------------------+---------------+----------------+-------+-------+
| vmamr1 | my-vm | lab-vault | my-vm | lab-vault | Established | Reestablishing | | 8m33s |
+--------+------------+------------------+-----------------+-----------------------+---------------+----------------+-------+-------+After about 5 minutes, the mirroring should be back to its nominal state:
tridentctl-protect get amr -n vmdr+--------+------------+------------------+-----------------+-----------------------+---------------+-------------+-------+--------+
| NAME | SOURCE APP | SOURCE APP VAULT | DESTINATION APP | DESTINATION APP VAULT | DESIRED STATE | STATE | ERROR | AGE |
+--------+------------+------------------+-----------------+-----------------------+---------------+-------------+-------+--------+
| vmamr1 | my-vm | lab-vault | my-vm | lab-vault | Established | Established | | 13m29s |
+--------+------------+------------------+-----------------+-----------------------+---------------+-------------+-------+--------+| You may see a temporary warning message if you refresh too quickly. Do no take it into account, it will disappear soon. |
|
Resynchronizing the mirror will stop and delete everything but the PVC on the DR site.
When an AMR is established, the only object you can see in the DR namespce is the PVC. |
You are now done with this module. Please proceed with the next one.