Security and Compliance
Introduction
The Mega-Sale was a success, but now a critical security audit is looming. We need to demonstrate strict adherence to industry compliance standards for all our virtualized workloads. Our challenge is to ensure a unified approach to security across both VMs and containers. In this module we will be tasked with scanning our infrastructure with the OpenShift Compliance Operator and remediating any reported vulnerabilities to ensure that our cluster meets our strict security standards. We will also configure distinct user accounts and access roles to be used by the security auditors that only need limited access to our virtualization infrastructure.
Scanning Infrastructure with the OpenShift Compliance Operator
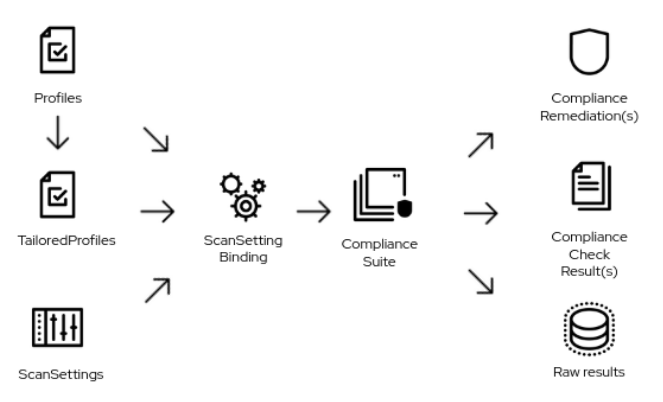
This section of our lab will focus on making use of the OpenShift Compliance Operator to configure security scans in your OpenShift cluster. The compliance operator can help ensure that the hosts in your OpenShift environment meet specific security standards, and are deployed to meet those standards.
| In our lab environment we will only be scanning and remediating our worker nodes, as it is a virtual hosted environment and doing so with the control plane can cause the cluster to become unstable. |
-
Select Operators and then Installed Operators from the left side navigation menu, confirm that you have selected All Projects and select the Compliance Operator.
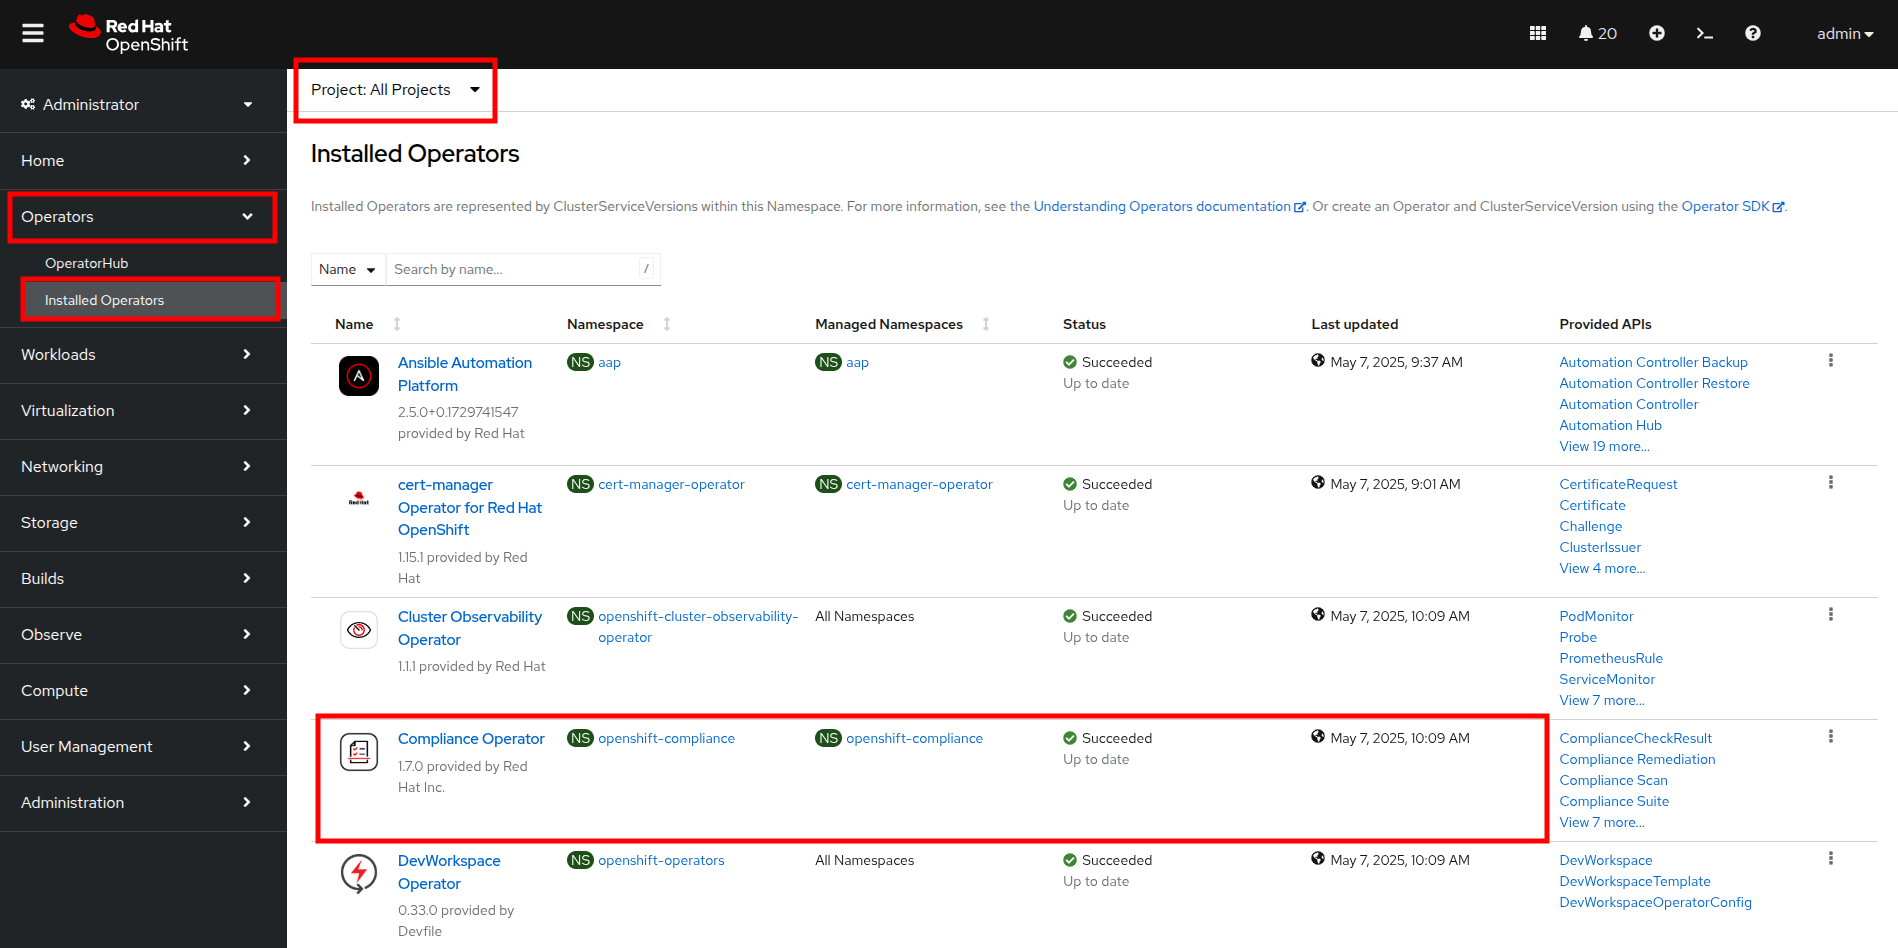 Figure 2. Compliance Operator
 -
This takes you to the Operator details page, use the horizontal scrollbar to move across and locate the ScanSetting tab.
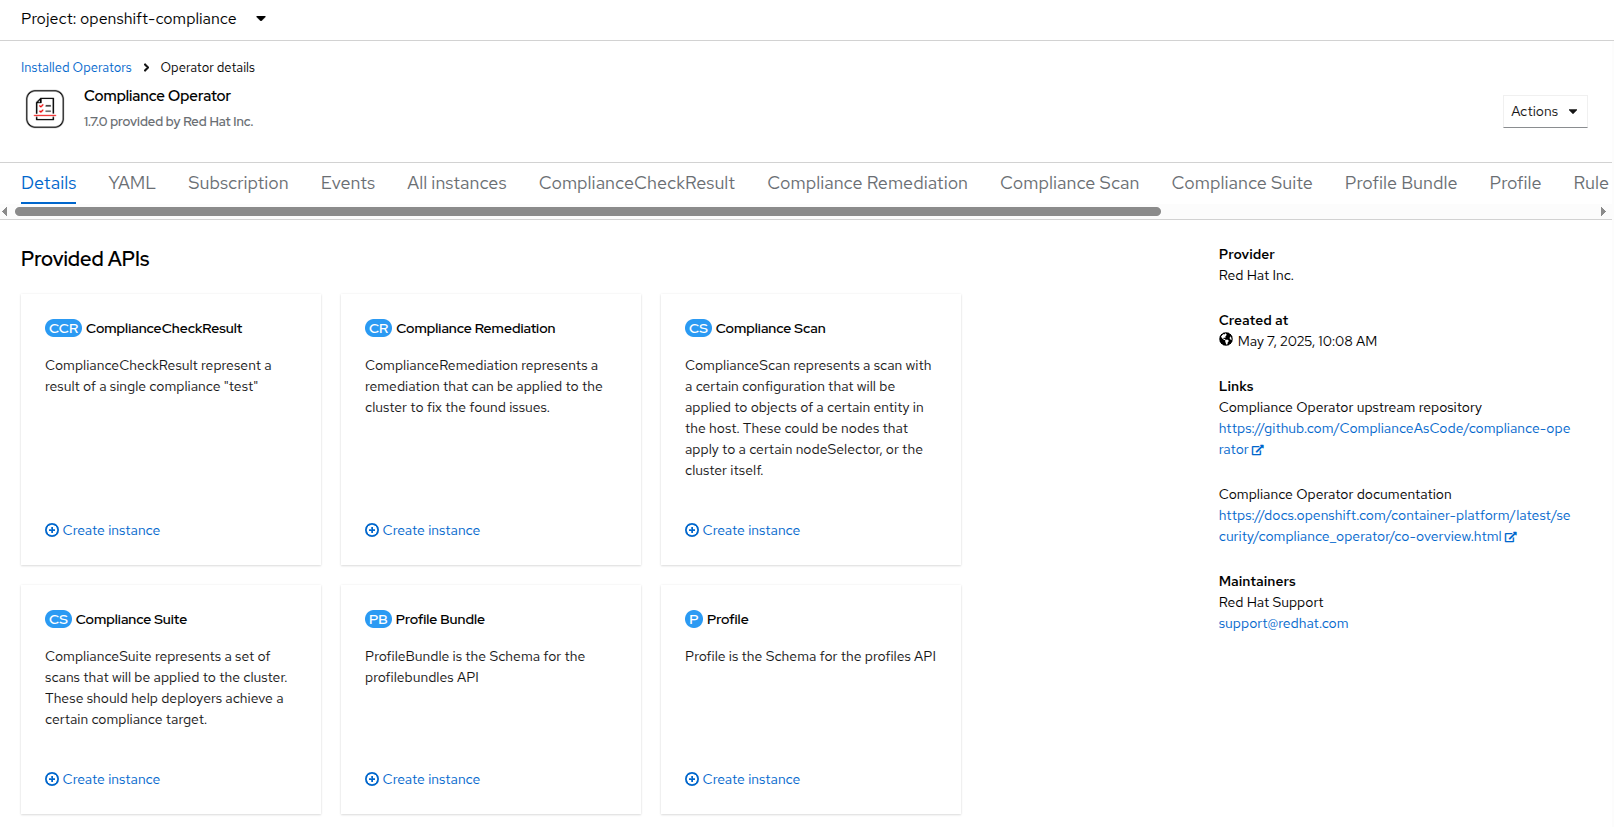 Figure 3. Compliance Details
 -
Click the Create ScanSetting button.
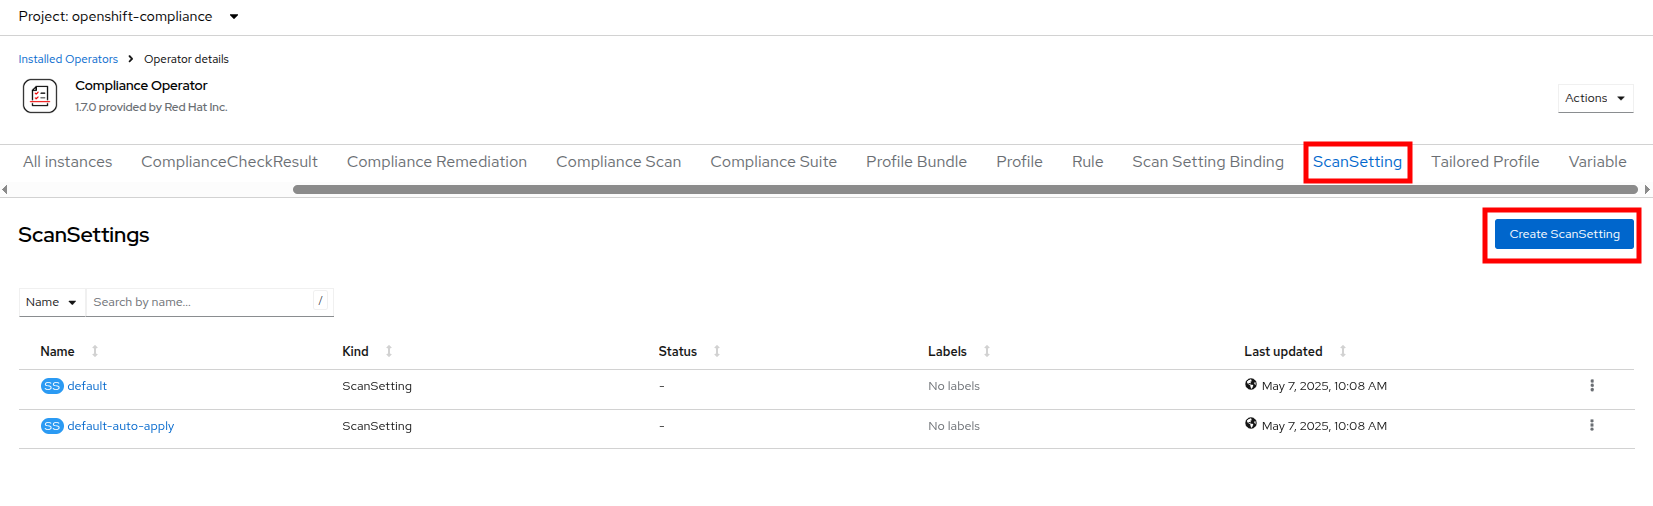 Figure 4. Create ScanSetting Button
 -
On the Create ScanSetting page, set the name of the scan to
scan01. Then click the YAML view radio button.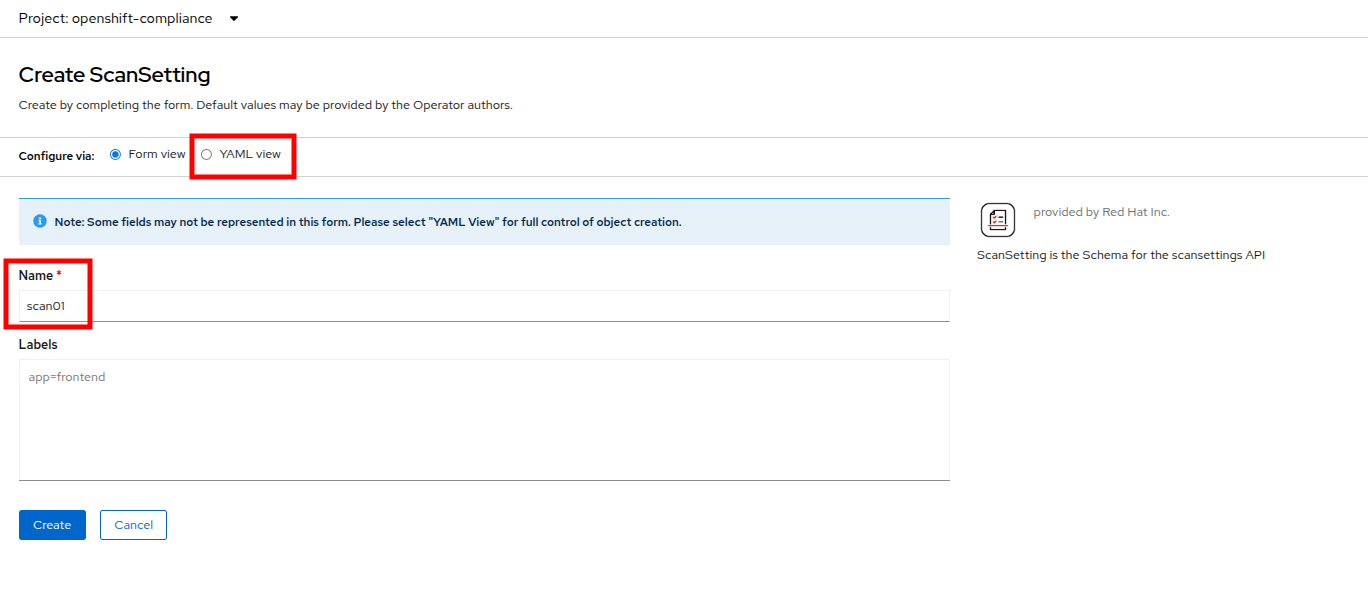 Figure 5. Create Scansetting
 -
In the ScanSetting YAML details, make note of the following values that are set by default:
-
The autoApplyRemediations field is set to false.
-
The roles to be scanned by default include entries for master and worker nodes.
-
The name field is set to scan01 which you entered on the form view.
-
-
Delete the entry for master to ensure we don’t scan or remediate control plane nodes.
-
Click the Create button to create this simple scansetting definition that will only scan worker nodes.
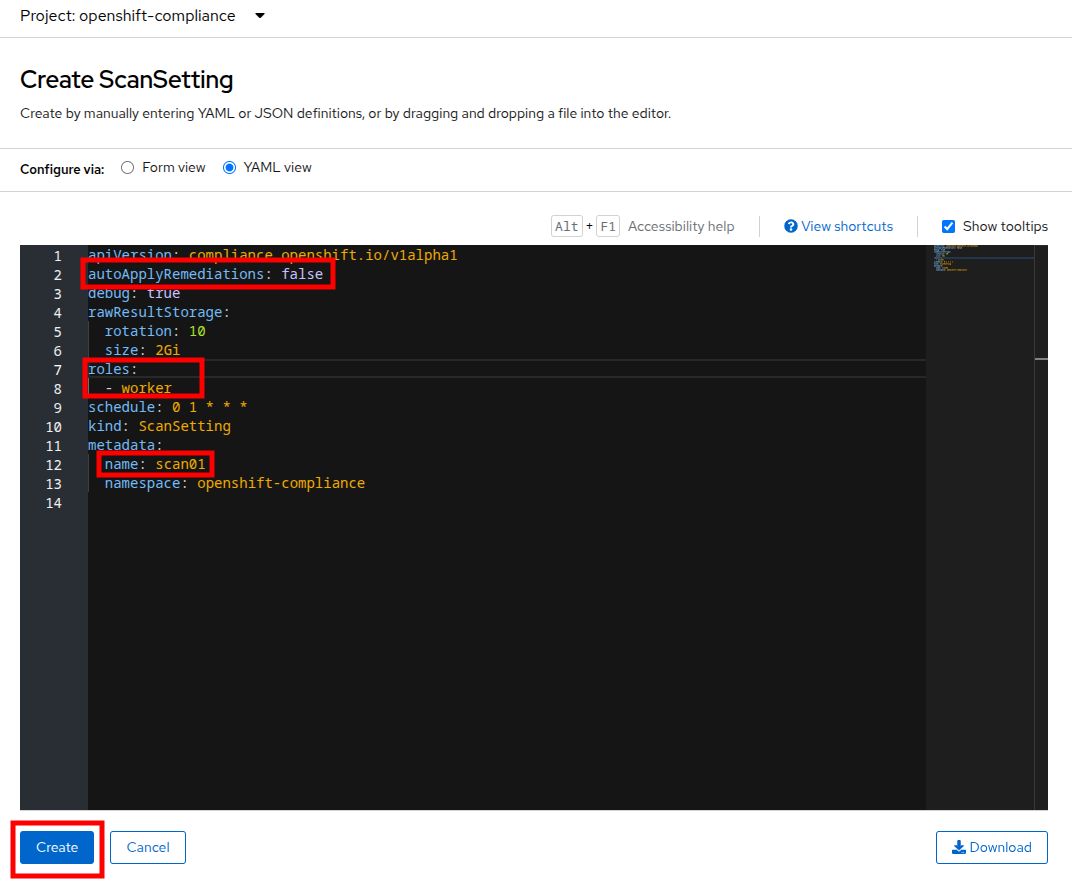 Figure 6. ScanSetting Details
 -
Now click on the Profile tab where there are a number of pre-defined scanning profiles.
-
In the search box, type
rhcos4and locate the FedRamp moderate profile rhcos4-moderate in the list.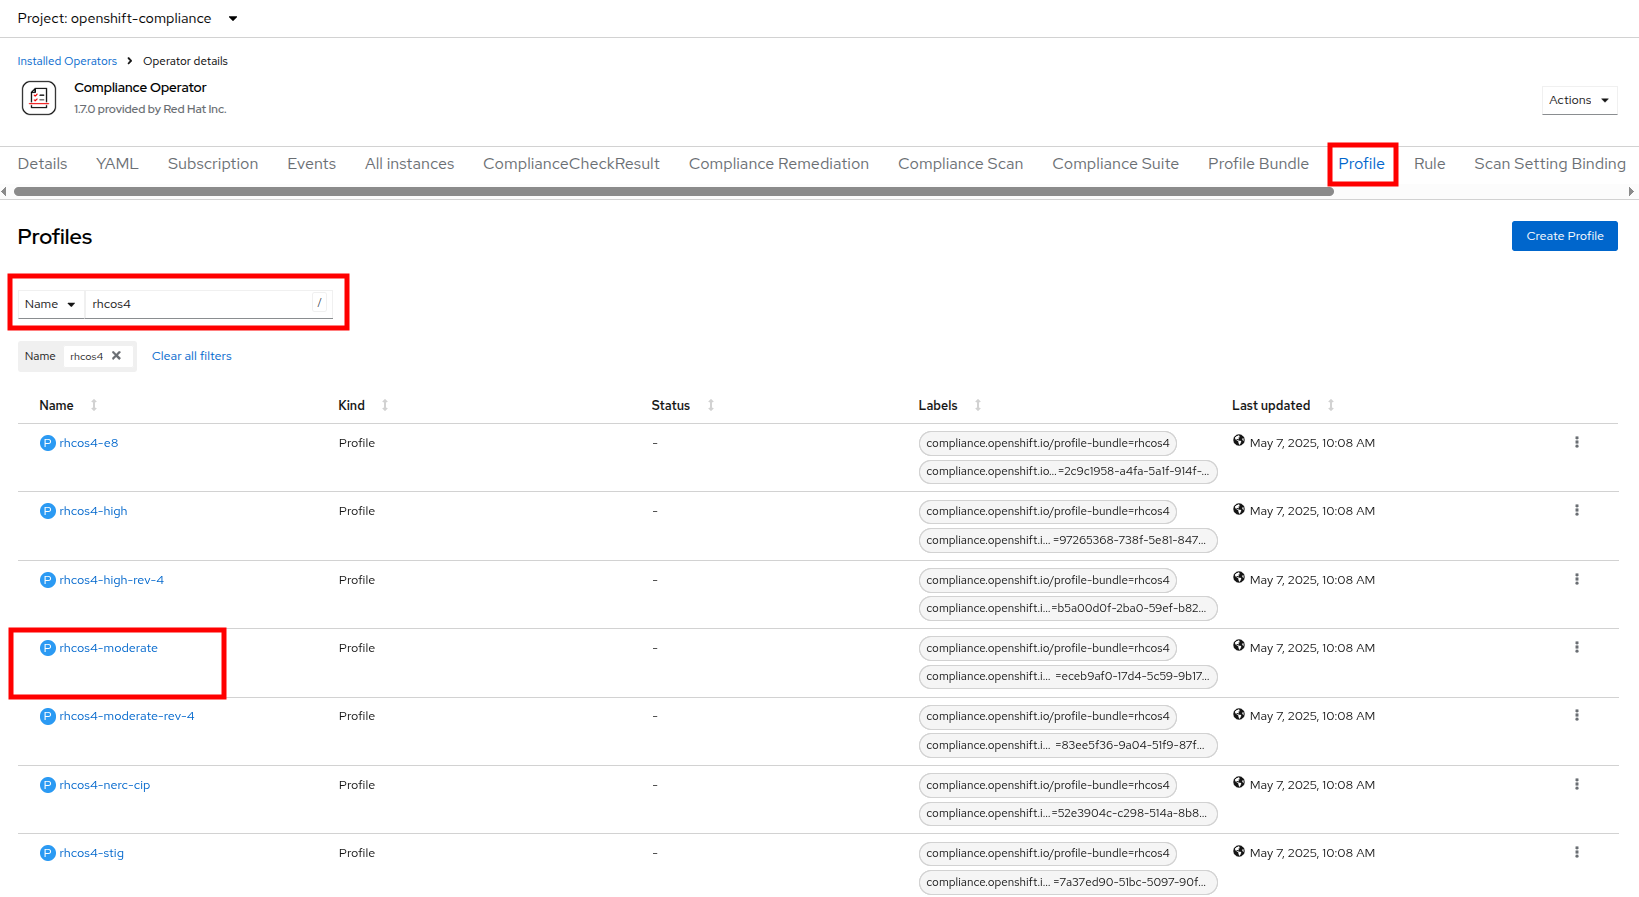 Figure 7. Profiles Detail
 -
Click on rhcos4-moderate and then on the YAML. Scroll down the output to browse the rules that are enforced as a part of this scan. A quick glimpse at the side panel shows that there are quite a few of them.
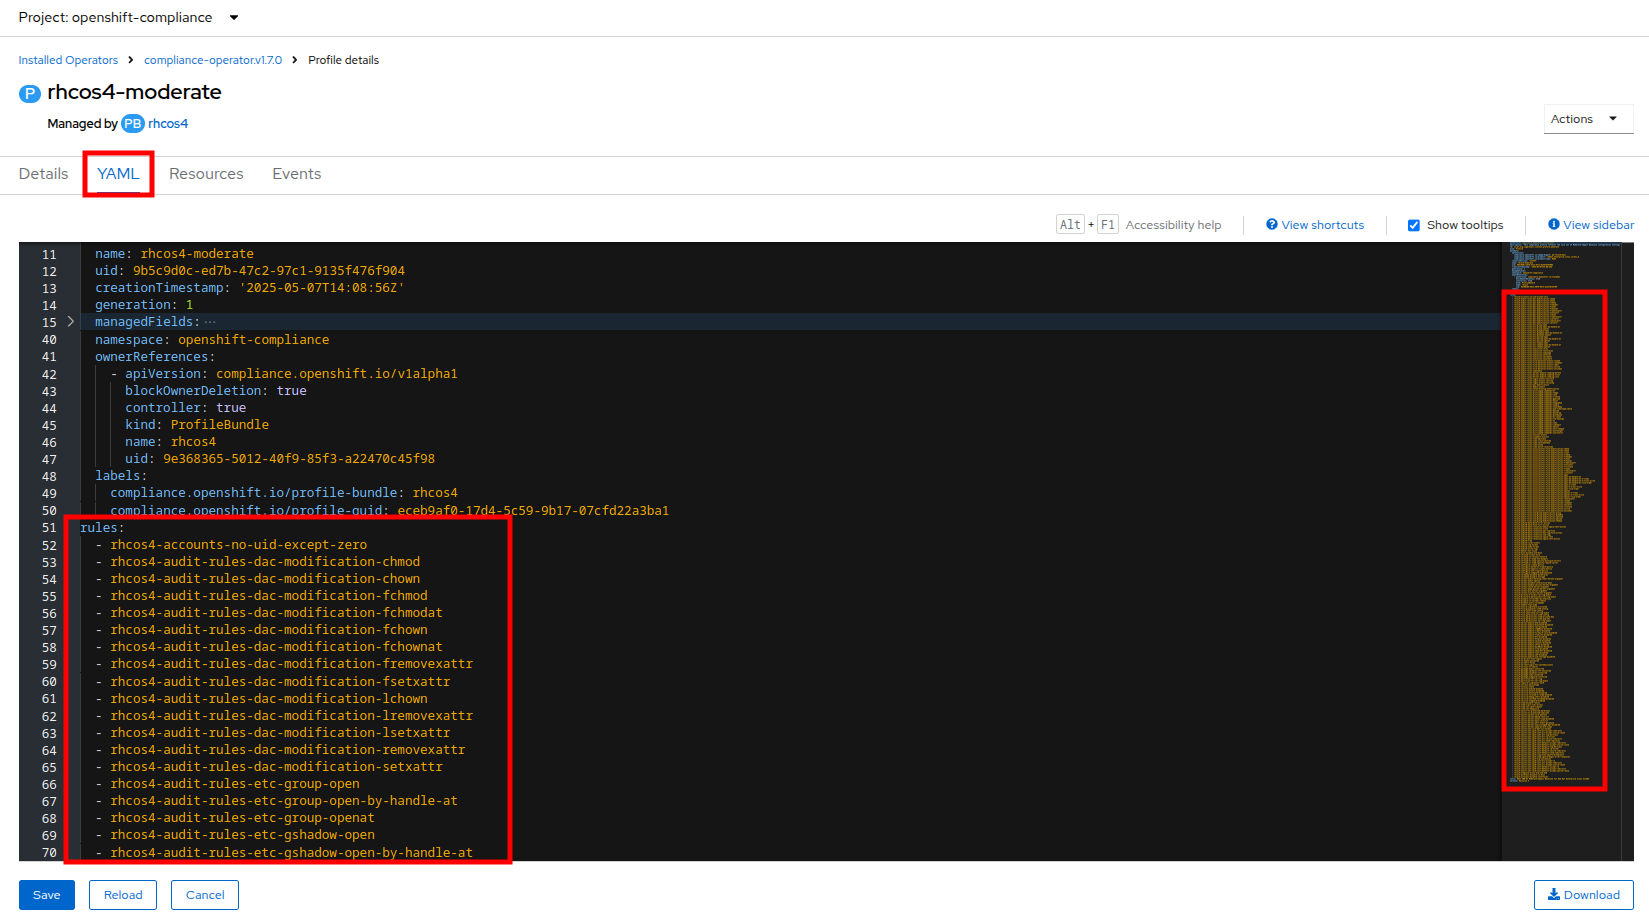 Figure 8. RHCOS4-Moderate Rules
 -
When you are done reviewing the rules, return to the Operator details page by clicking your browser’s back button twice.
Additional details on the profiles available can be found here. -
Next we want to create a ScanSettingBinding, pairing a Profile with our ScanSetting definition we created. We do this by navigating to the Scan Setting Binding tab, and clicking the Create ScanSettingBinding button.
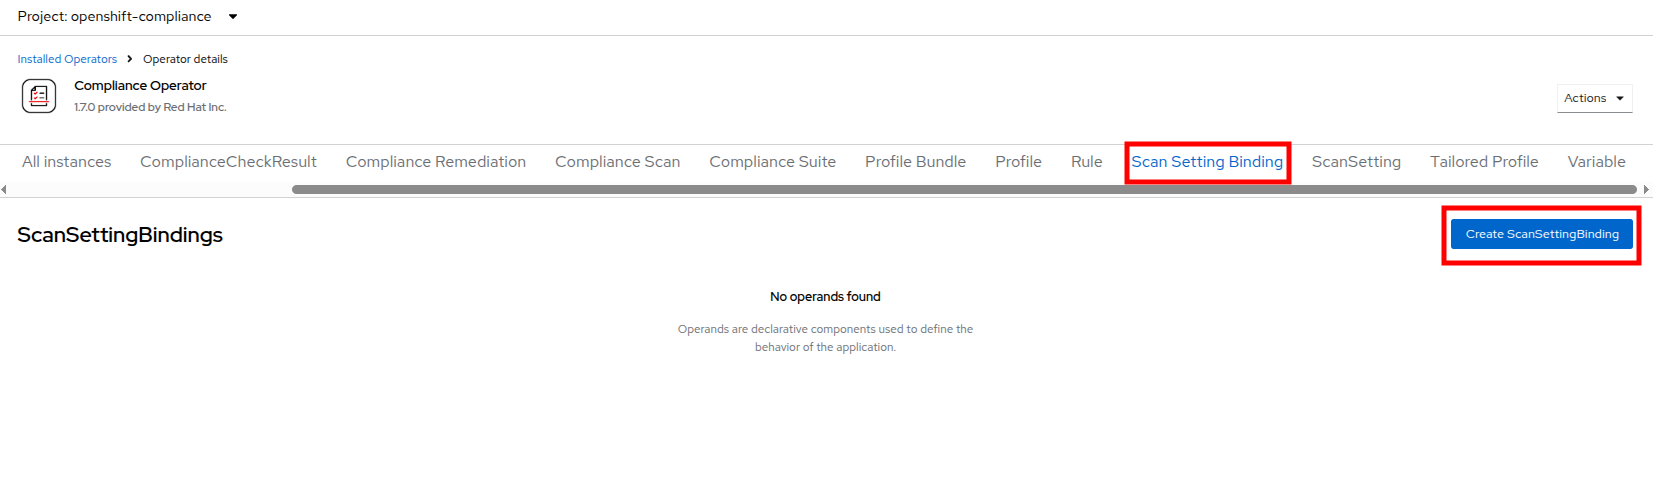 Figure 9. Create ScanSettingBinding
 -
In the ScanSettingBinding YAML details, let us make a few changes:
-
The metadata.name value should be set to
fedramp01 -
The settingsRef.name field is set to
scan01which we created earlier.
-
-
Click the Create button.
The profile is set to rhcos4-moderate (the fedramp moderate profile) by default. 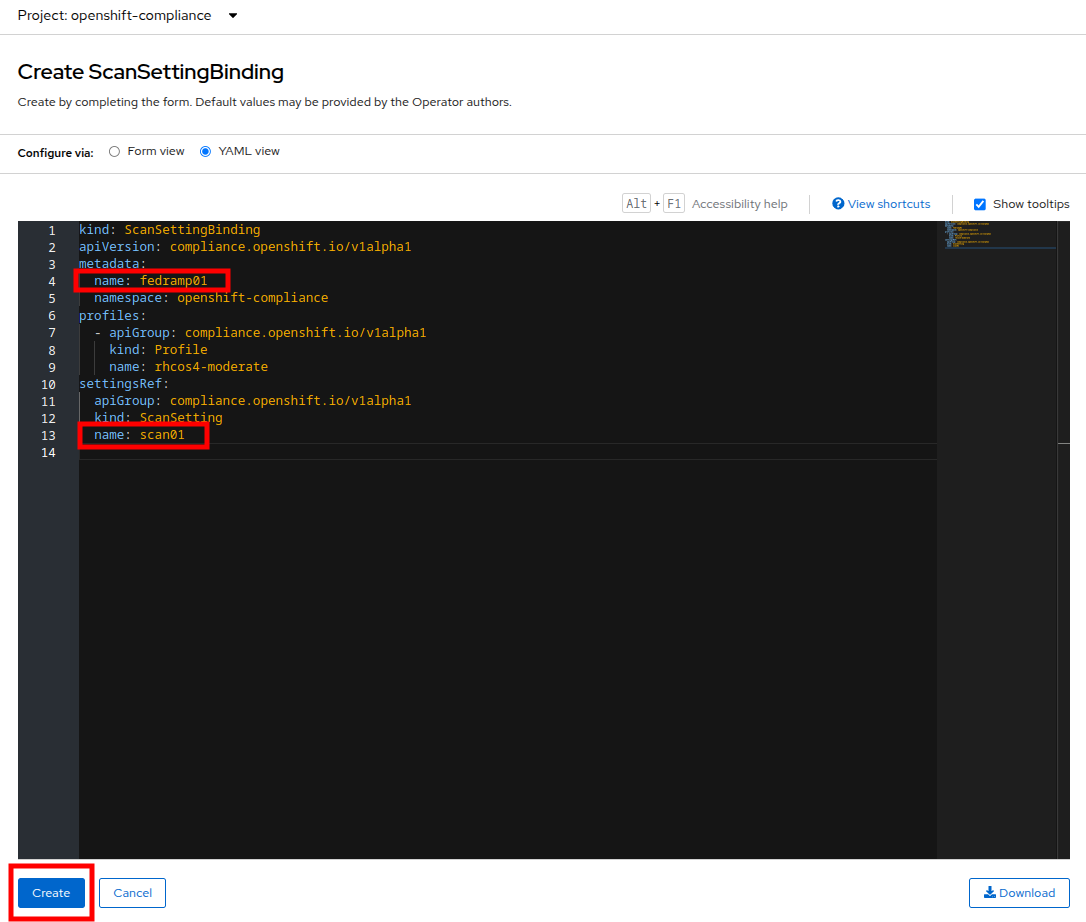 Figure 10. ScanSettingBinding Details
 -
After the ScanSettingBinding is created, the fedramp01 scan will be run automatically. You can view this on the Compliance Suite tab.
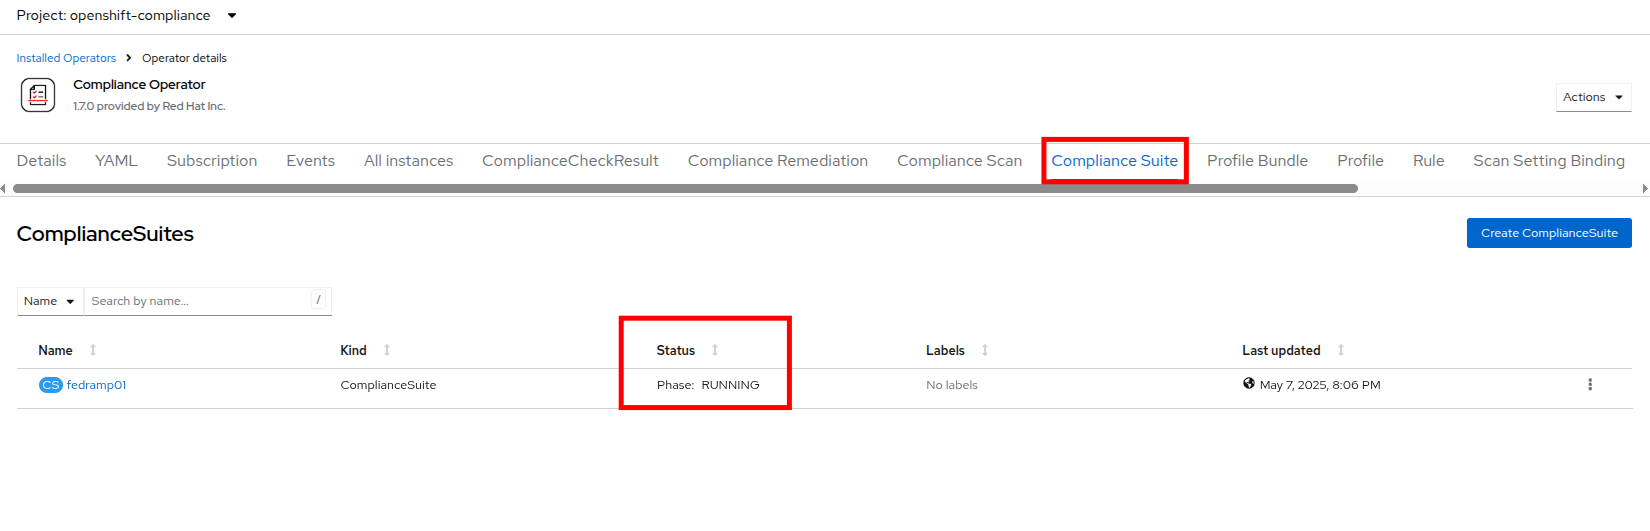 Figure 11. Compliance Suite
 -
This Compliance Suite runs the defined scans against the specified nodes, in our case the worker nodes defined in scan01.
-
For more detailed information you can click on the Compliance Scan tab. There you can watch as the scan proceeds through the steps of RUNNING, AGGREGATING, and DONE.
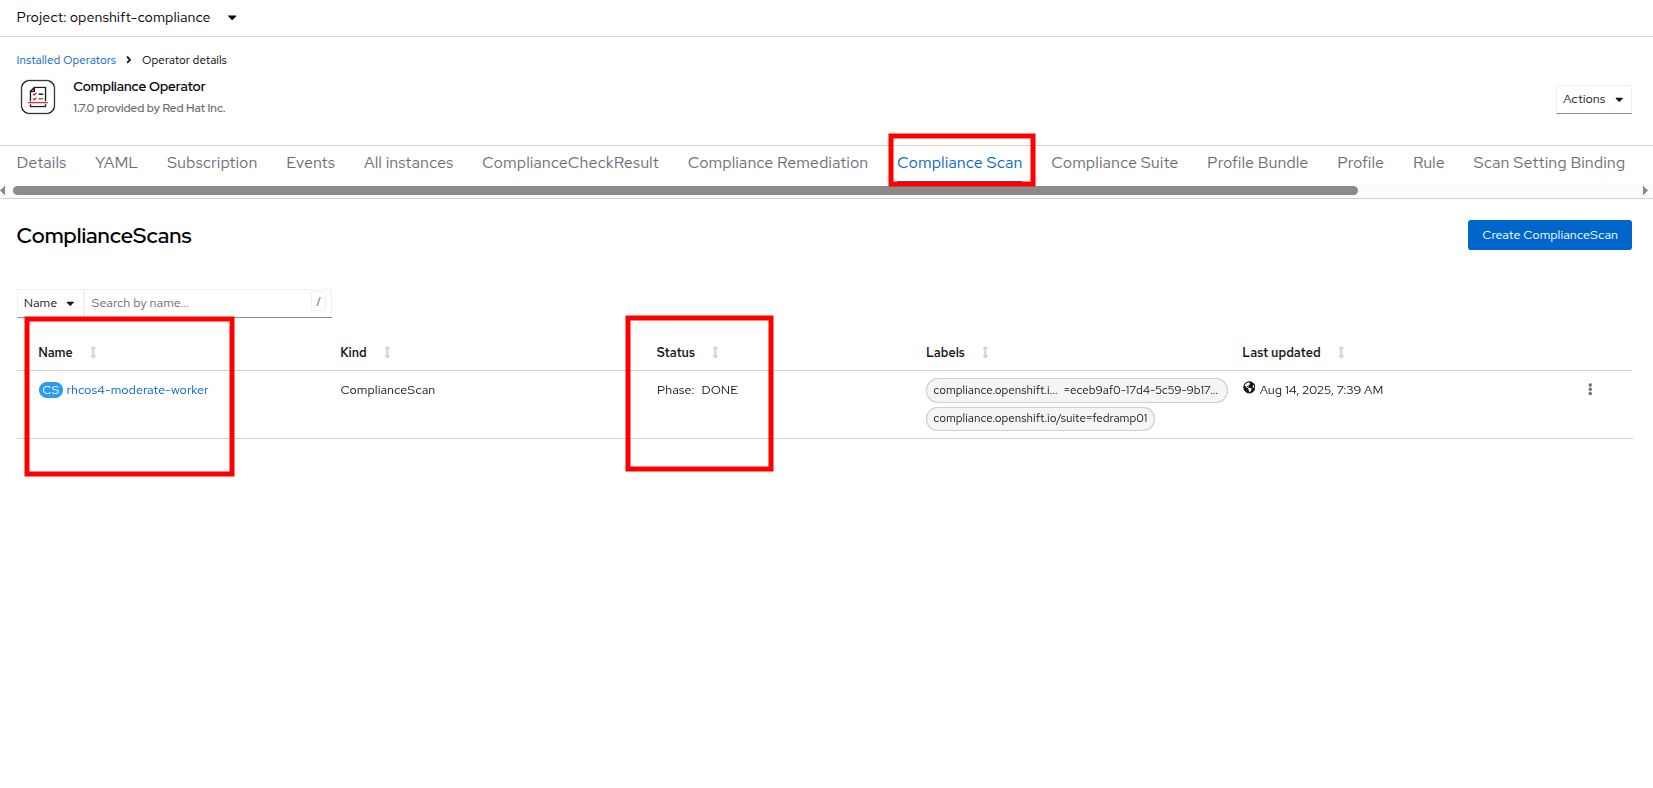 Figure 12. Compliance Scan
 -
Once the scan completes (3-5 minutes on average) you can check your results by clicking on the ComplianceCheckResult tab. It will list all of the scans that were a part of the compliance suite we chose and their results.
-
Change the search bar to Label and apply the following labels:
-
compliance.openshift.io/check-status=FAIL -
compliance.openshift.io/check-severity=high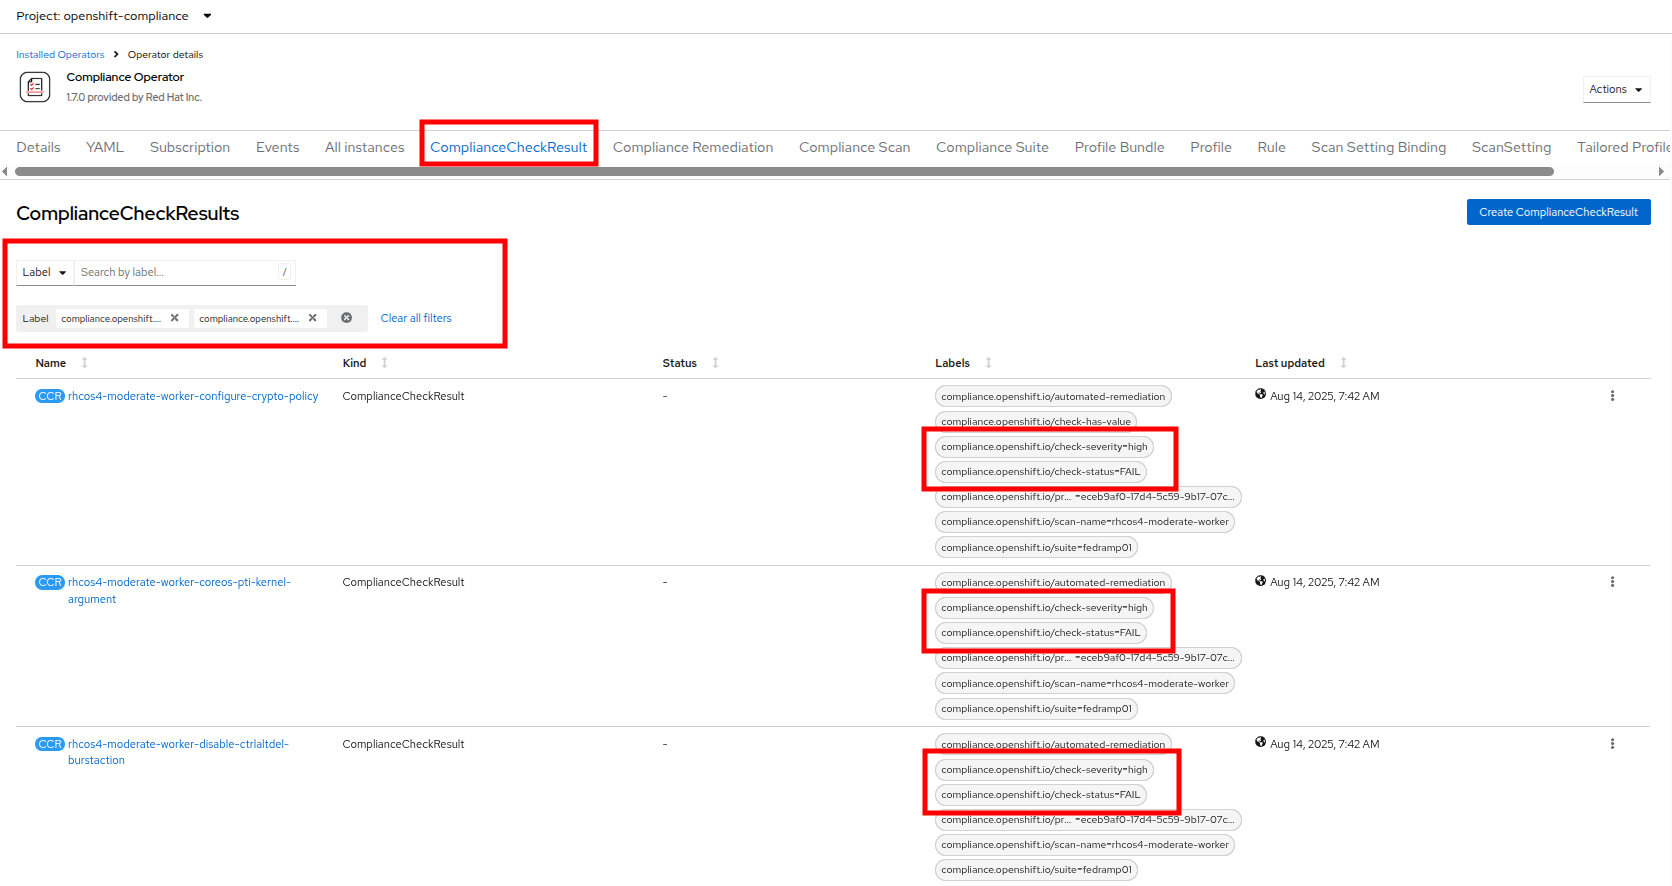 Figure 13. Compliance Check Results
-
-
Six high severity checks have a failed status:
ComplianceCheckResult
Check-Severity
Check-Status
rhcos4-moderate-worker-configure-crypto-policy
high
FAIL
rhcos4-moderate-worker-coreos-pti-kernel-argument
high
FAIL
rhcos4-moderate-worker-disable-ctrlaltdel-burstaction
high
FAIL
rhcos4-moderate-worker-disable-ctrlaltdel-reboot
high
FAIL
rhcos4-moderate-worker-enable-fips-mode
high
FAIL
rhcos4-moderate-worker-no-empty-passwords
high
FAIL
This is a table to better organize the view of each failure detected on the scan, you can search for each of these failures manually in the OpenShift console.
Node Remediation with the OpenShift Compliance Operator
When it comes to remediation, it can be performed in one of two ways. Automatically, which may seem simple and the easiest way to do it, but can lead to unexpected results. Or manually, which can be tedious, but allows you to canary test each application, and later automate through a tool like gitops that checks for failures before proceeding.
| One example of this is the rhcos4-moderate-worker-enable-fips-mode which was listed as a high severity, fail status on our previous scan, cannot be applied unless at install time if FIPS mode is enabled. Attempting to auto-remediate this can lead to issues with your cluster. |
In this section we are going to choose one of our failures from the previous scan, and remediate it manually.
-
Starting from the list above we are going to choose to remediate the following scan result: rhcos4-moderate-worker-coreos-pti-kernel-arguments as required by our audit.
Note: The rhcos4-moderate-worker-coreos-pti-kernel-argument is required to isolate kernel and userspace page tables to prevent attacks like the Meltdown vulnerability.
Click on the Compliance Remediation tab, and in the Name search bar type the term
pti-kernelto find the suggested remediation for rhcos4-moderate-worker-coreos-pti-kernel-argument. When the result appears, click the three-dot menu on the right, and select Edit ComplianceRemediation from the menu that appears.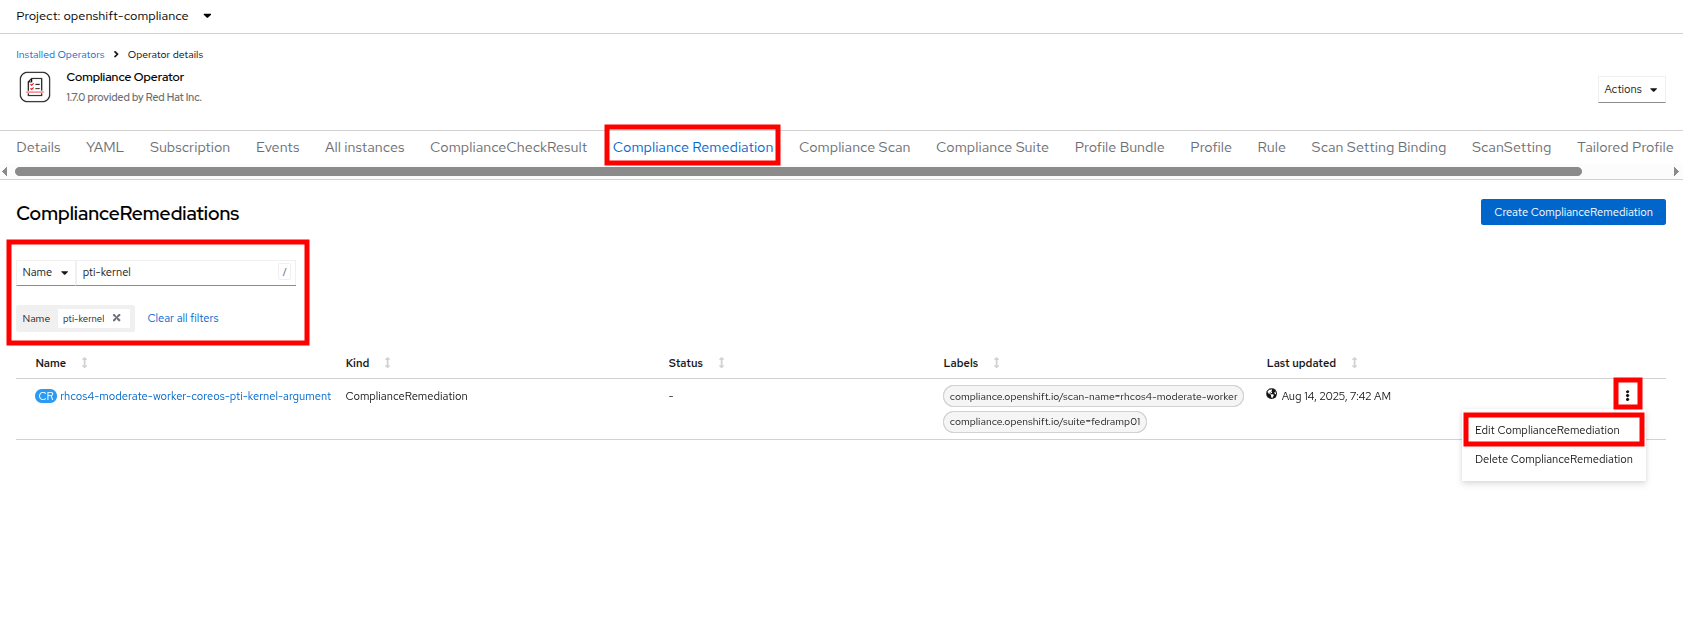 Figure 14. Compliance Remediation
 -
This will launch the ComplianceRemediation details page with a YAML block describing the current status.
-
Under the spec section you will see that the current apply state is false, and the kernelArugument that will be applied is that pti=on. Under the status section we see that the remediation state is NotApplied.
 Figure 15. Compliance Remediation Details
 -
Under the spec section change the apply field to
trueand click the Save button.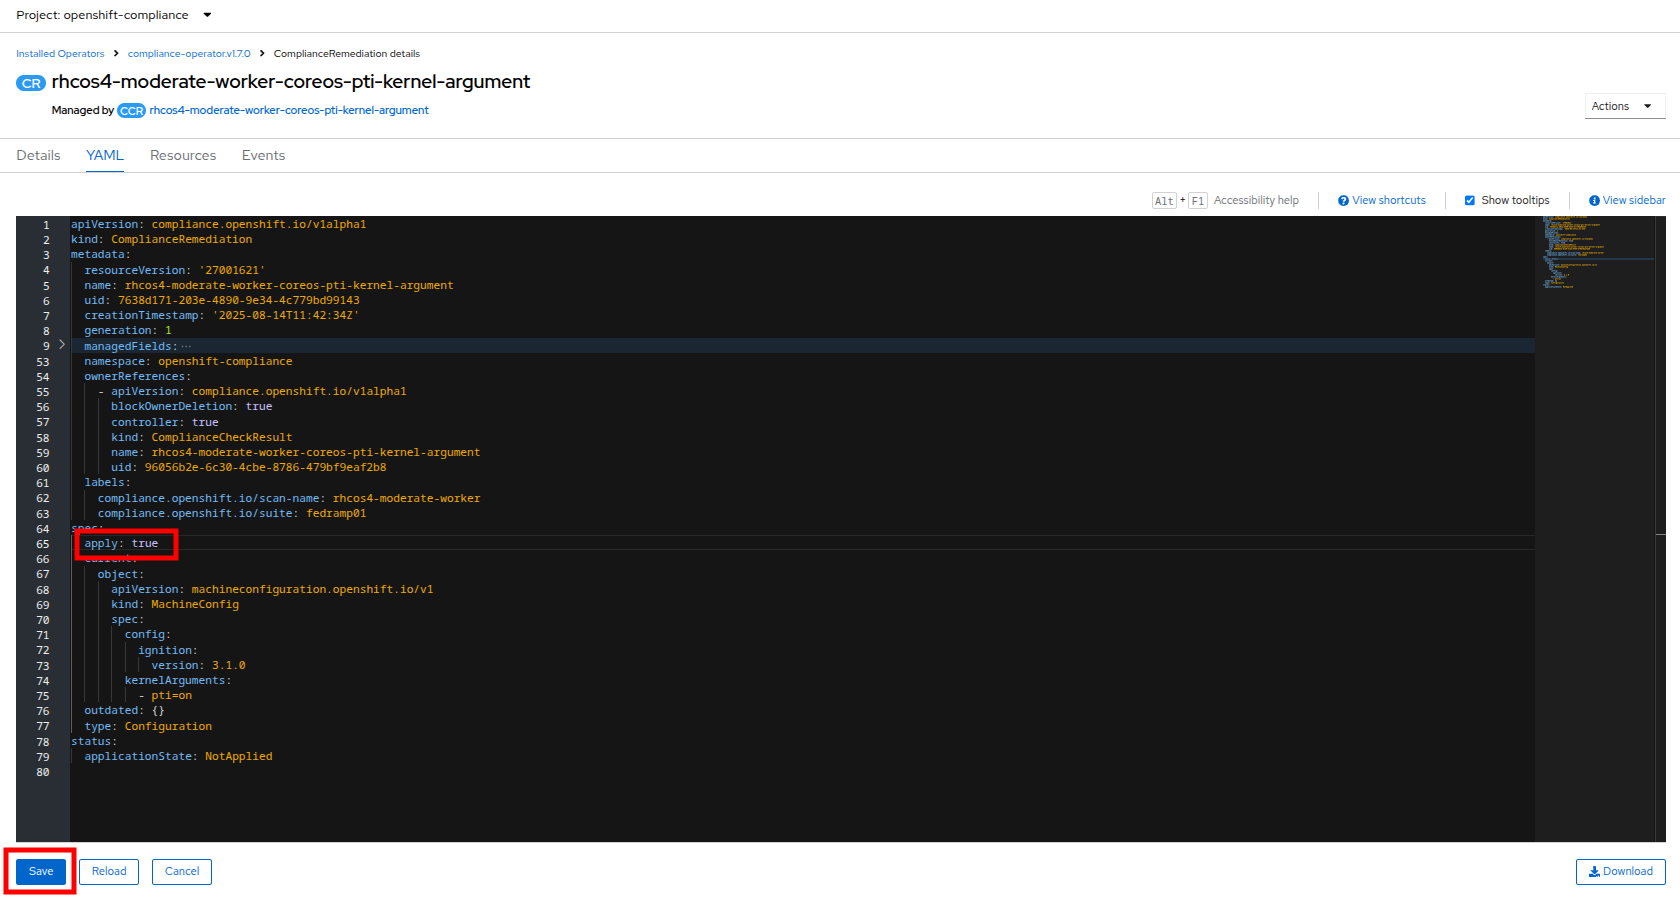 Figure 16. Compliance Remediation True
 -
You will be prompted with a message that lets you know that this is a managed resource, click the Save button to sart the remediation process.
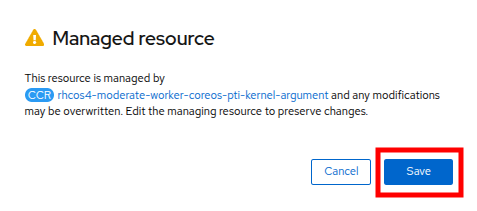 Figure 17. Managed Resource Prompt
 -
Once applied, a MachineConfig will be generated to provide the remediation, and each node in the cluster will be cordoned, drained, and remediated in sequence.
-
On the left side menu, click on Compute and Nodes to observe the process.
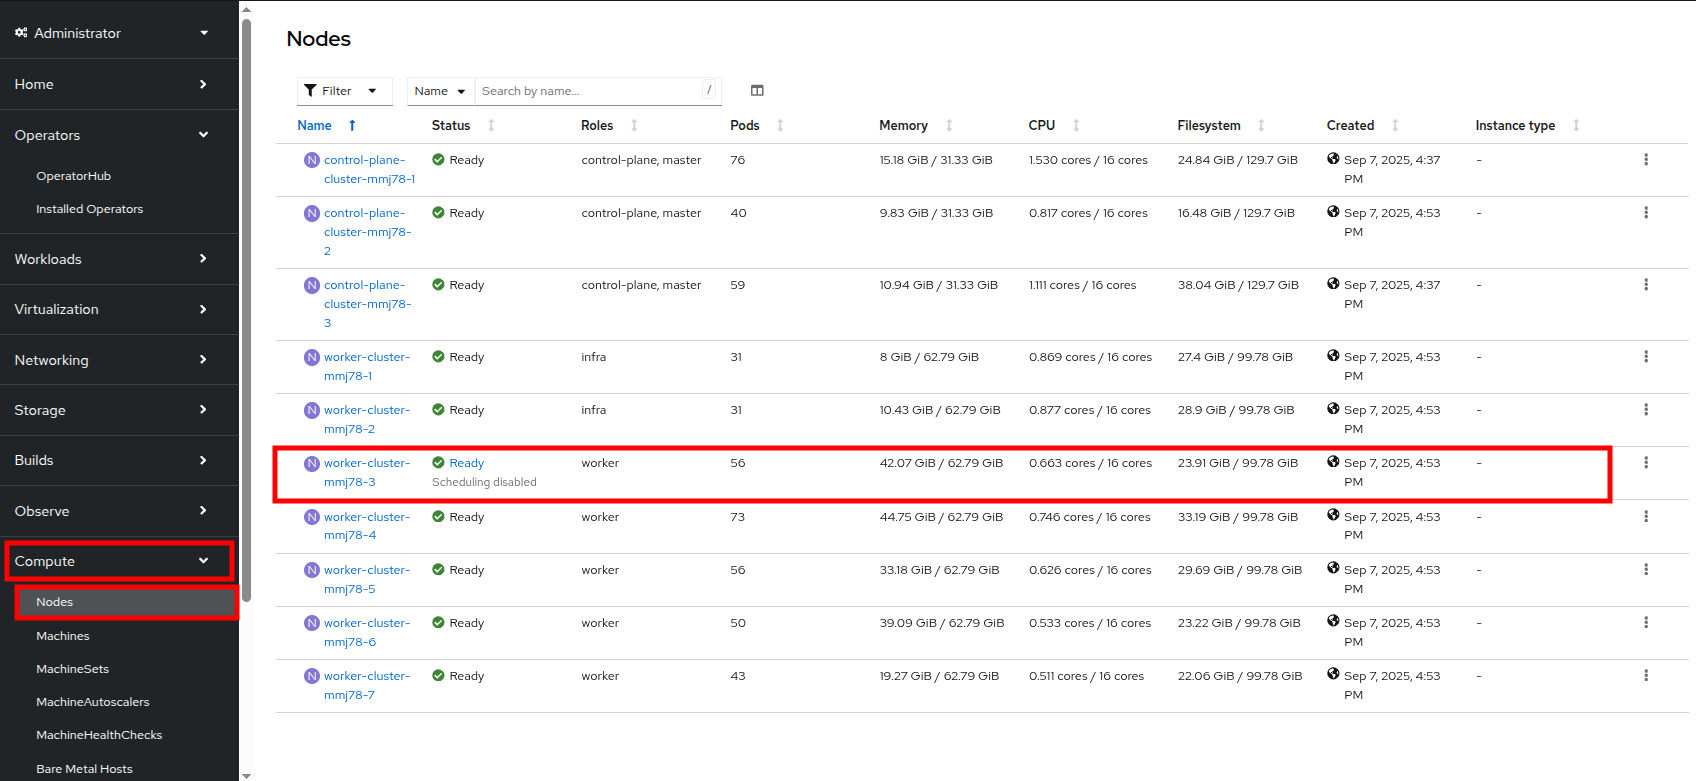 Figure 18. Node 3 Cordoned
 -
You will see a node enter the SchedulingDisabled state to begin its remediation. Click on that node for its Node details page, and notice that the event log shows the node was cordoned to apply the update, and you can also see CPU and Memory utilization drop off as the node was successfully drained.
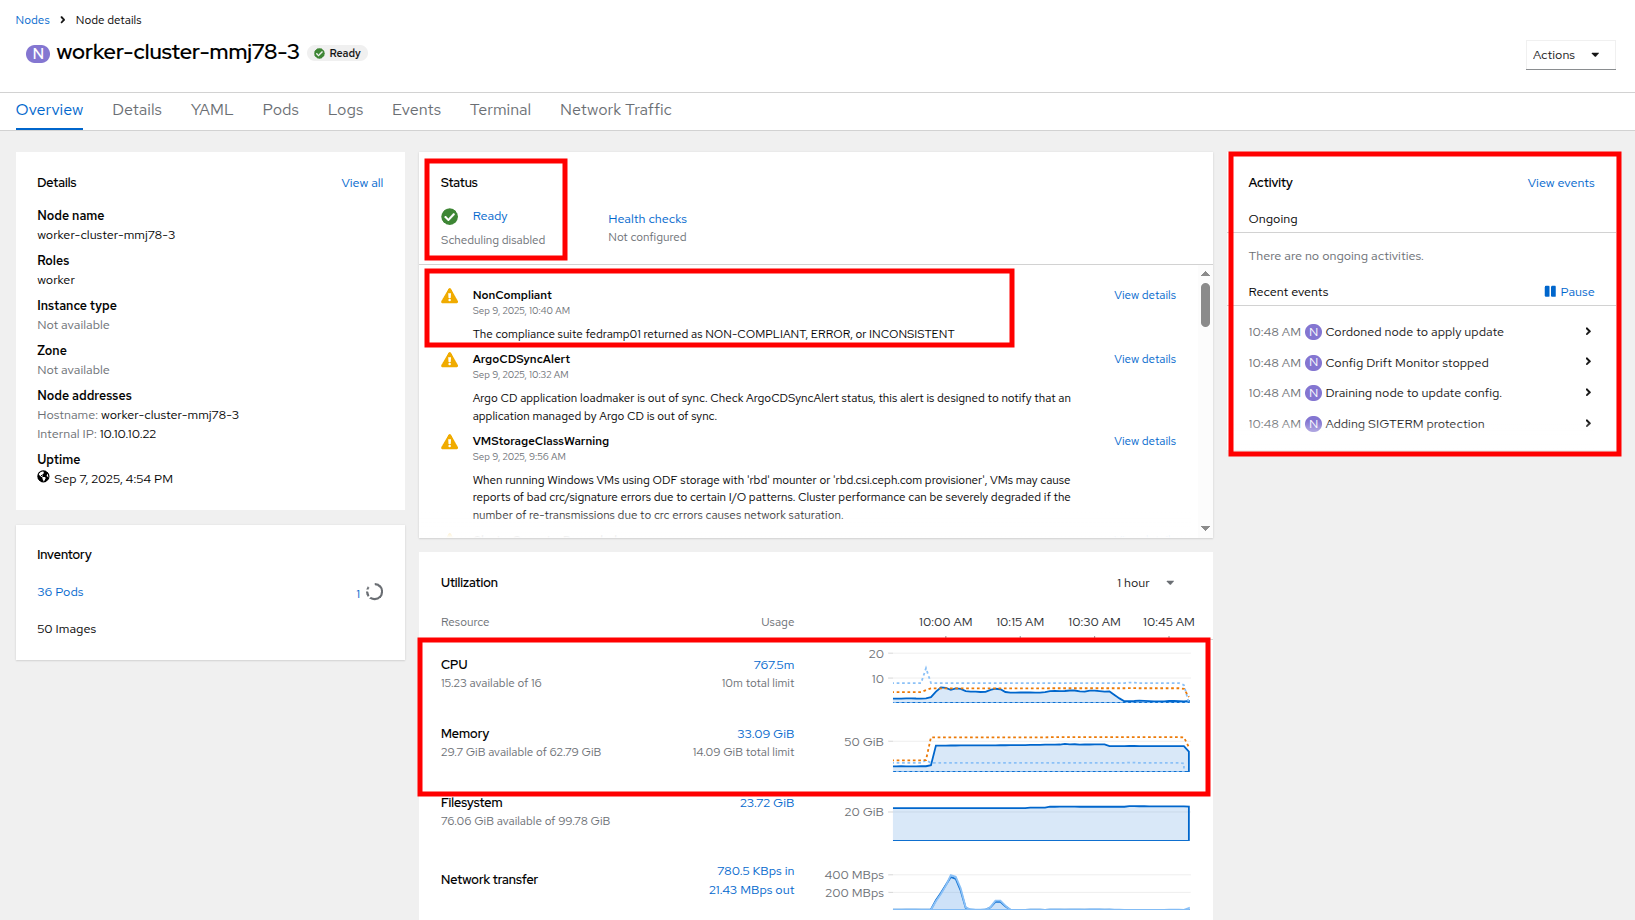 Figure 19. Node 3 Updating
This process can take quite a bit of time to complete depending on how busy the cluster currently is, and how many nodes there are to remediate as they each have to evict pods safely and reboot to apply the update. Also, you may be logged out of the cluster while the oauth pods are being evacuated. -
After several minutes the MachineConfig will be applied to each of the worker nodes in our cluster, and we can recheck our Compliance Scan results.
-
Return to the Compliance Operator configuration by clicking on Operators and Installed Operators in the left side menu.
Figure 20. OpenShift Compliance Operator -
Click on the Compliance Scan tab, where you will see the scan we completed earlier. Click the three-dot menu, and select the option to delete the current scan.
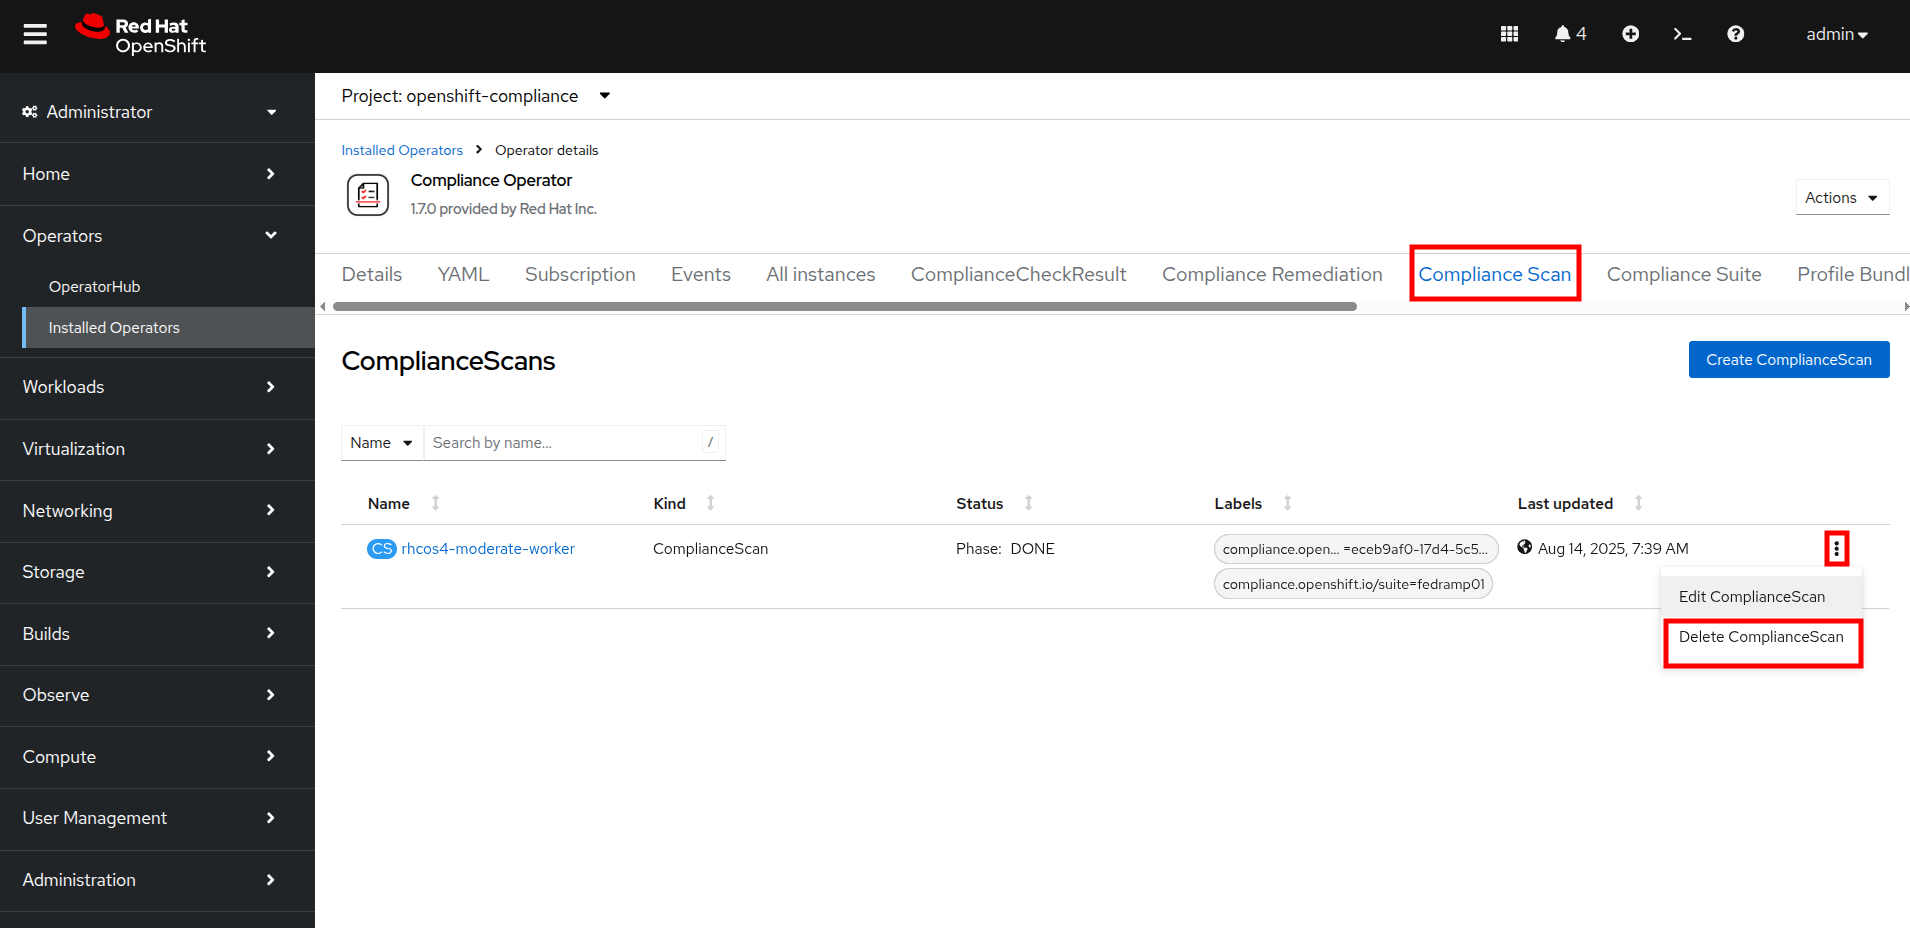 Figure 21. Delete Compliance Scan
 -
You will be prompted to be sure that you want to delete the current compliance scan. Click the Delete button.
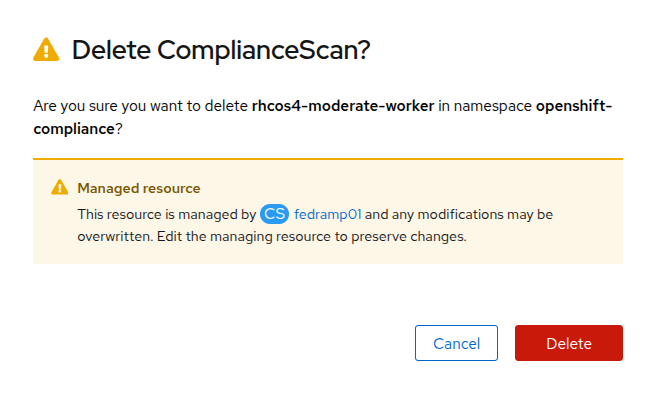 Figure 22. Delete Scan Prompt
 -
The Compliance Suite object defined earlier will automatically kick off a new scan which you will see appear on your screen.
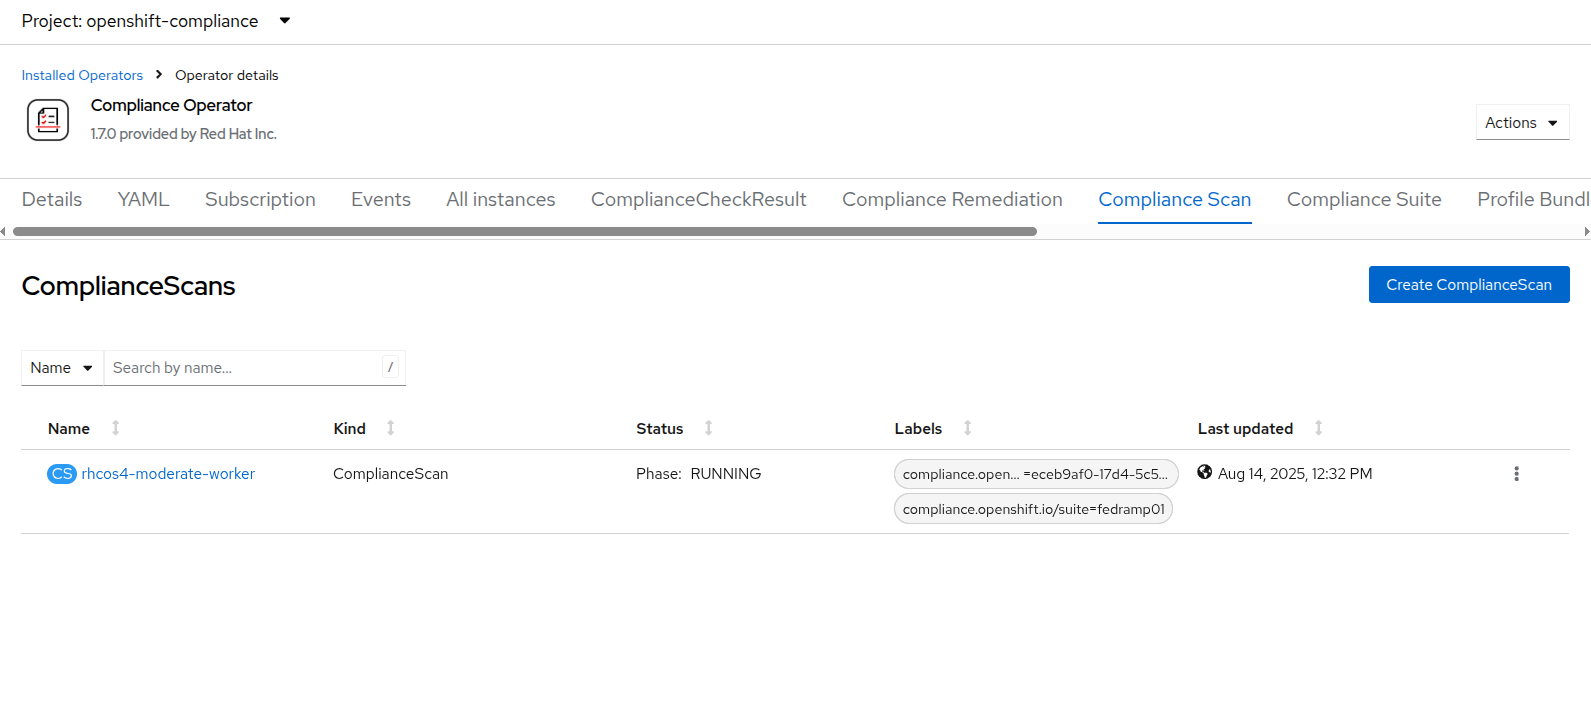 Figure 23. New Compliance Scan
 -
As before this can will take a few minutes to complete, but once it is complete the results can be viewed by clicking on the ComplianceCheckResult tab, and searching for the rhcos4-moderate-worker-coreos-pti-kernel-argument and noticing that its label is now check-status=PASS instead of FAIL
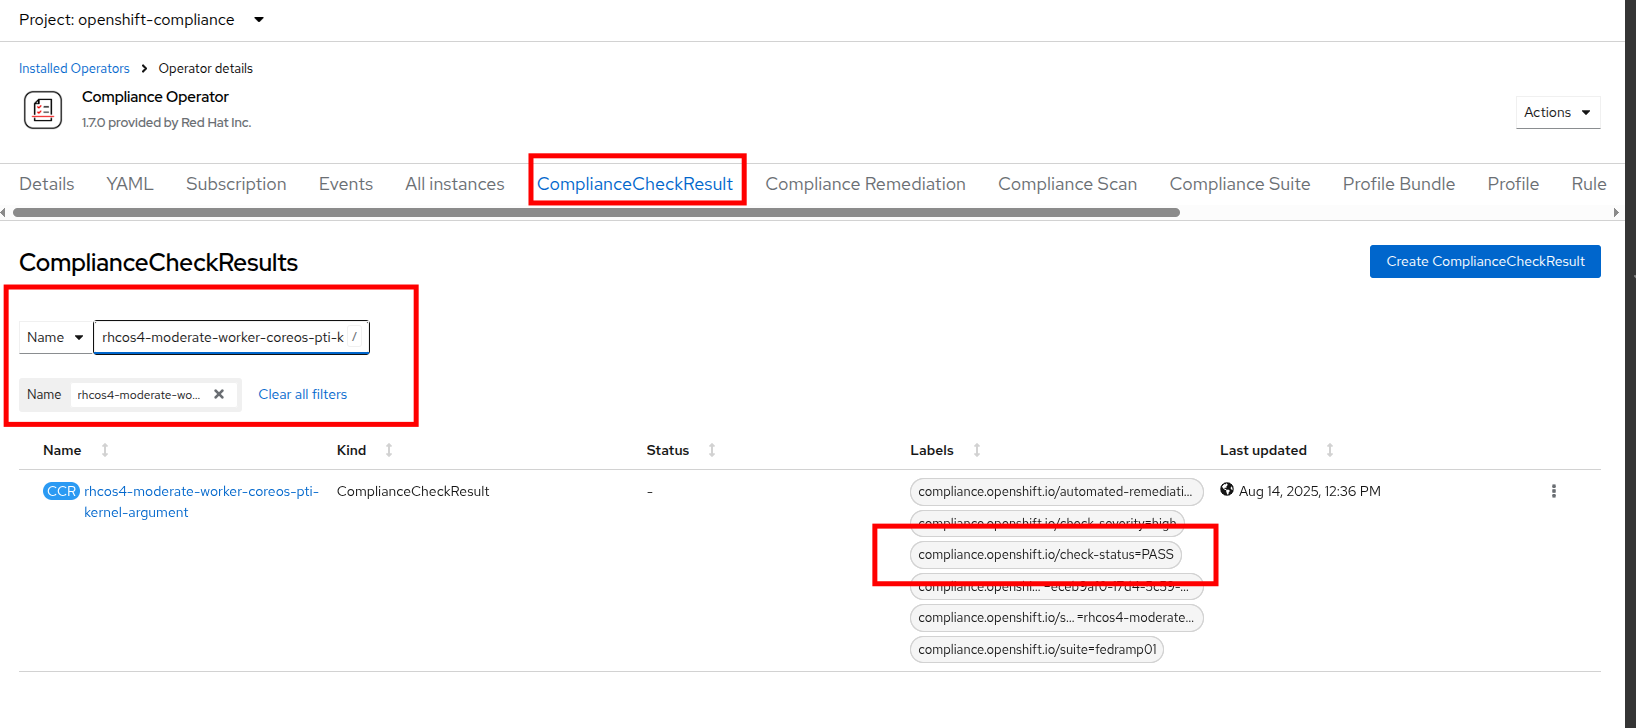 Figure 24. Check Status Pass
With the completion of these sections we have created a compliance scan and successfully remediated an identified vulnerability using the OpenShift Compliance Operator.
Configuring Role-based Access Control for Cluster Roles
One of the notable features that OpenShift is known for compared to vanilla Kubernetes is its rich set of Role-Based Access Controls for separate user accounts and cluster roles that define what each user is able to do when logged into the cluster. In this section of the module we are going to create a read-only account for our auditor and explore the limitations by which they are bound.
-
Start by clicking on User Management and Users in the left side menu.
-
You will see the current admin user that you are logged in as listed, and you will see that the identity is provided by the htpasswd_provider:admin authenticator.
 Figure 25. User List
If no other authenication source has been set up prior and you are logged in as the default kubeadmin account, you will see a wizard here to assist with setting up your first authentication source.
Create a Group
-
Now click on Groups on in the left menu, and click the button for Create Group
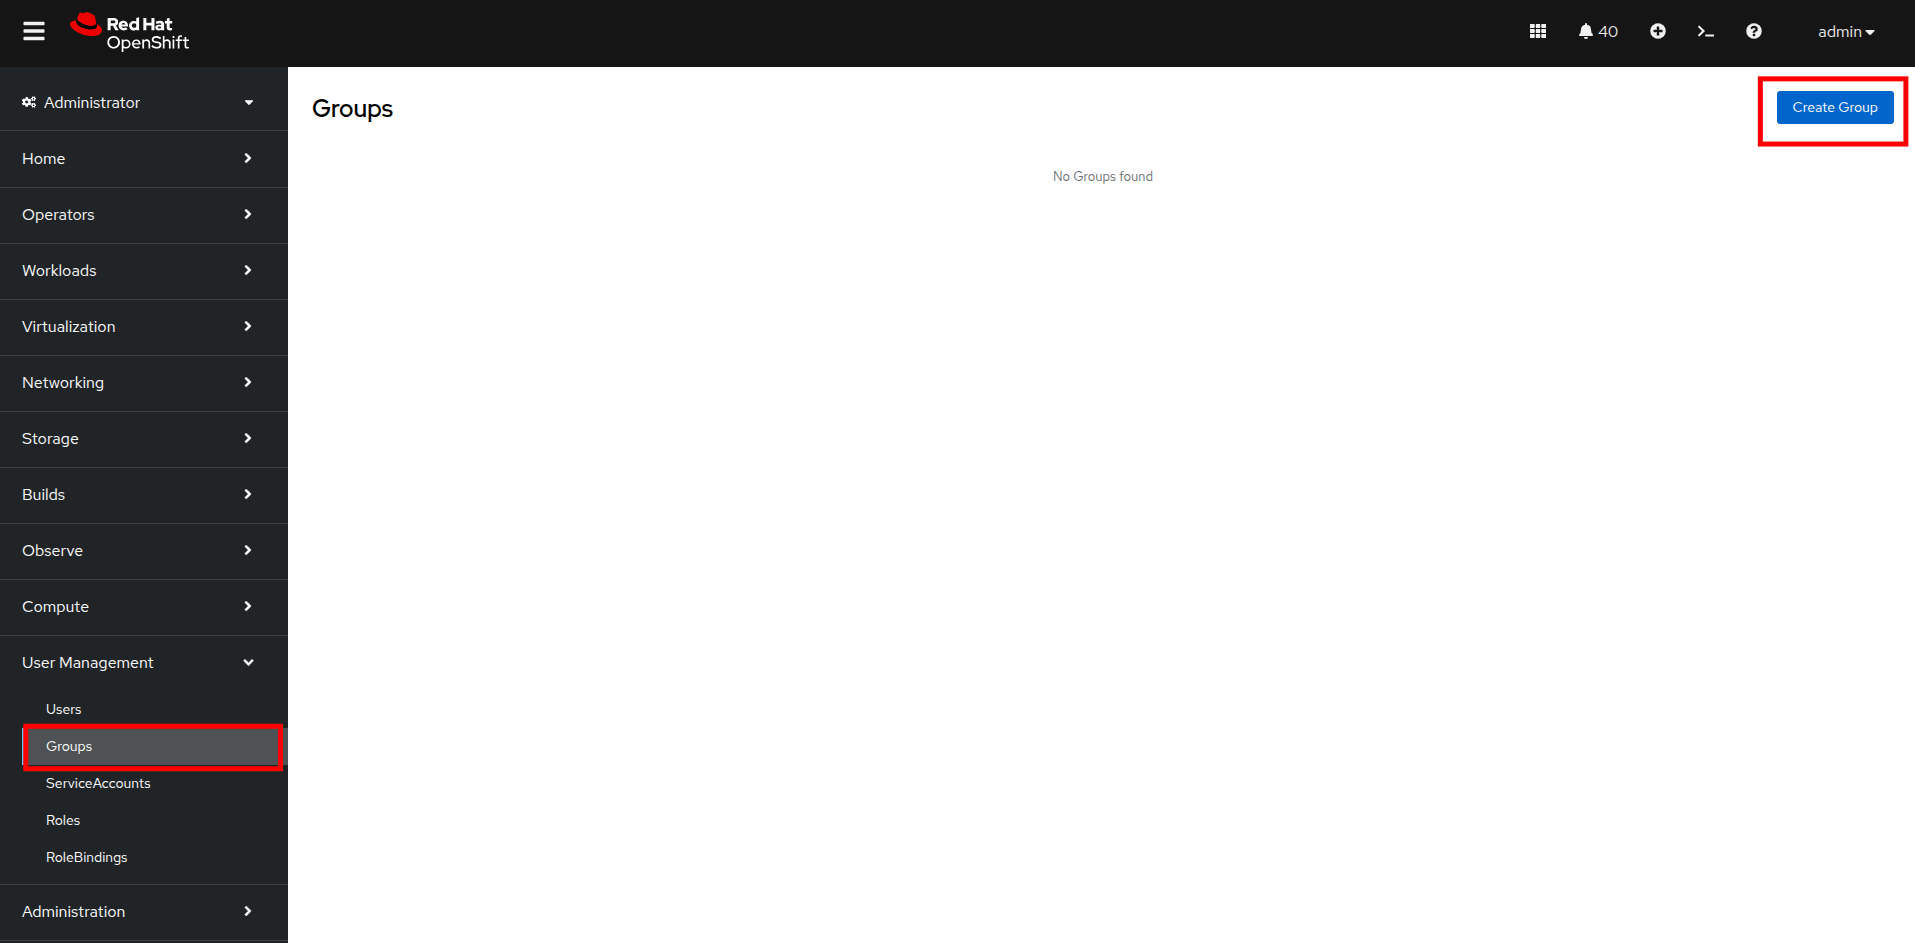 Figure 26. Create Group
 -
In the Create Group YAML dialog, set the name of the group to
auditor_readonlyand add the usersauditor1andauditor2. Click the Create button.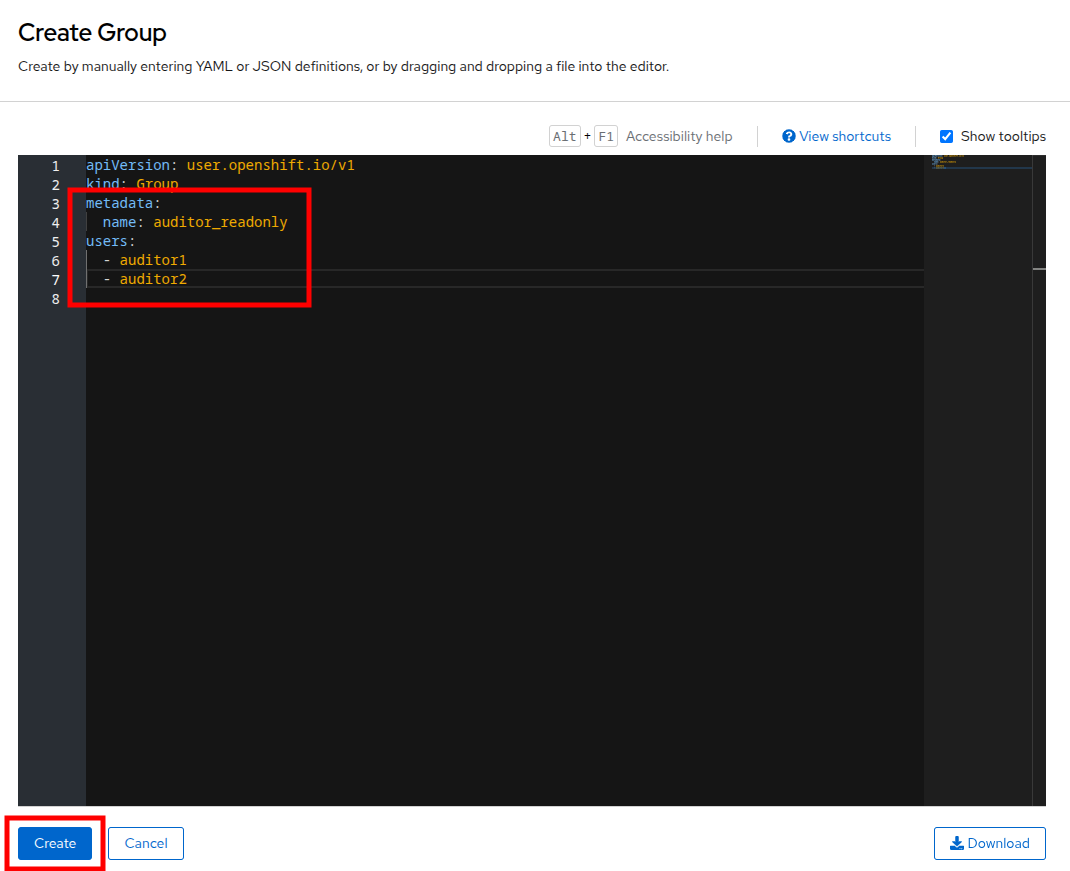 Figure 27. Create Group Settings
 -
You will be presented with the Group details screen where you can see the two user accounts listed, and we can define permissions by assigning the group a role binding. Click on the RoleBindings menu.
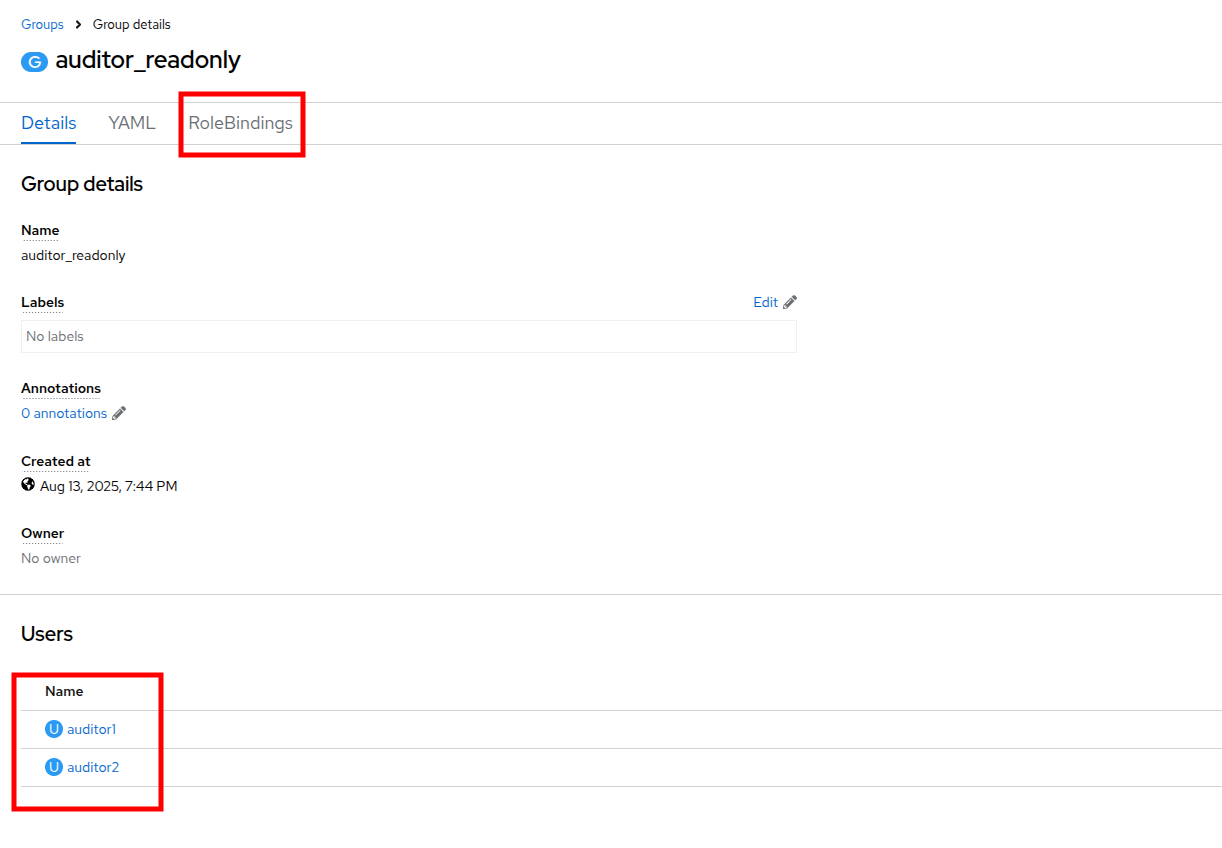 Figure 28. Group Details
 -
After clicking on RoleBindings, click the Create binding button.
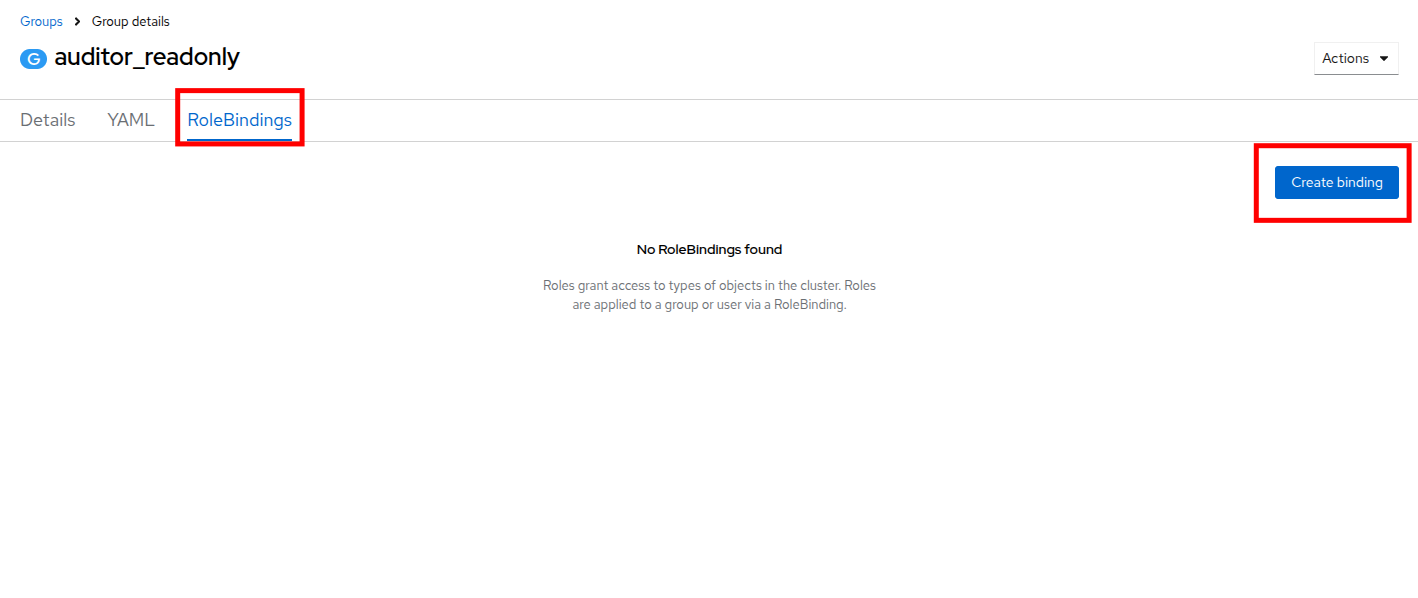 Figure 29. Create Binding
 -
This will bring you to the Create RoleBinding page, on this page select the following to create a read-only role binding for the auditor, and click the Create button:
-
Binding type: Cluster-wide role binding
-
Name:
cluster_readonly -
Role name: view
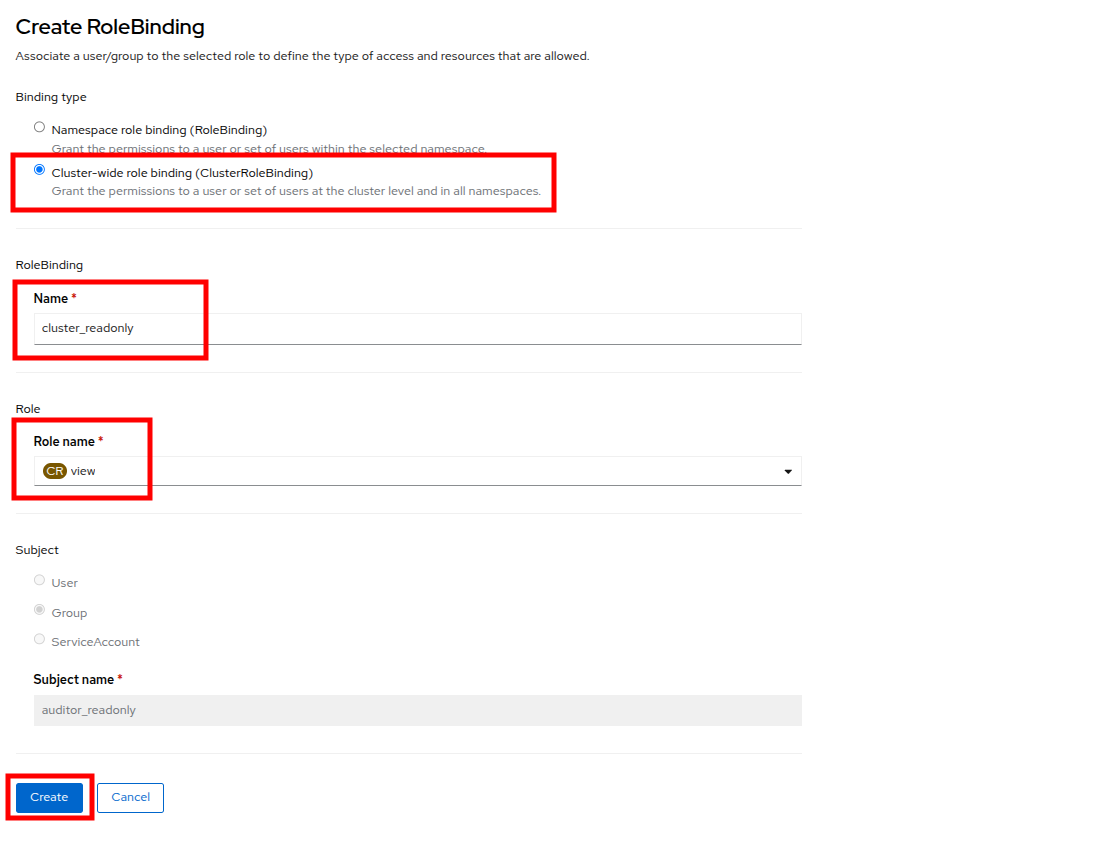 Figure 30. RoleBinding Details
-
Create the User Accounts
-
With the role binding created, we now need to add our two auditor accounts to our group.
-
In the left side menu, click Administration and CustomResourceDefinitions and use the search bar to look for the OAuth entry. When you find it, click it.
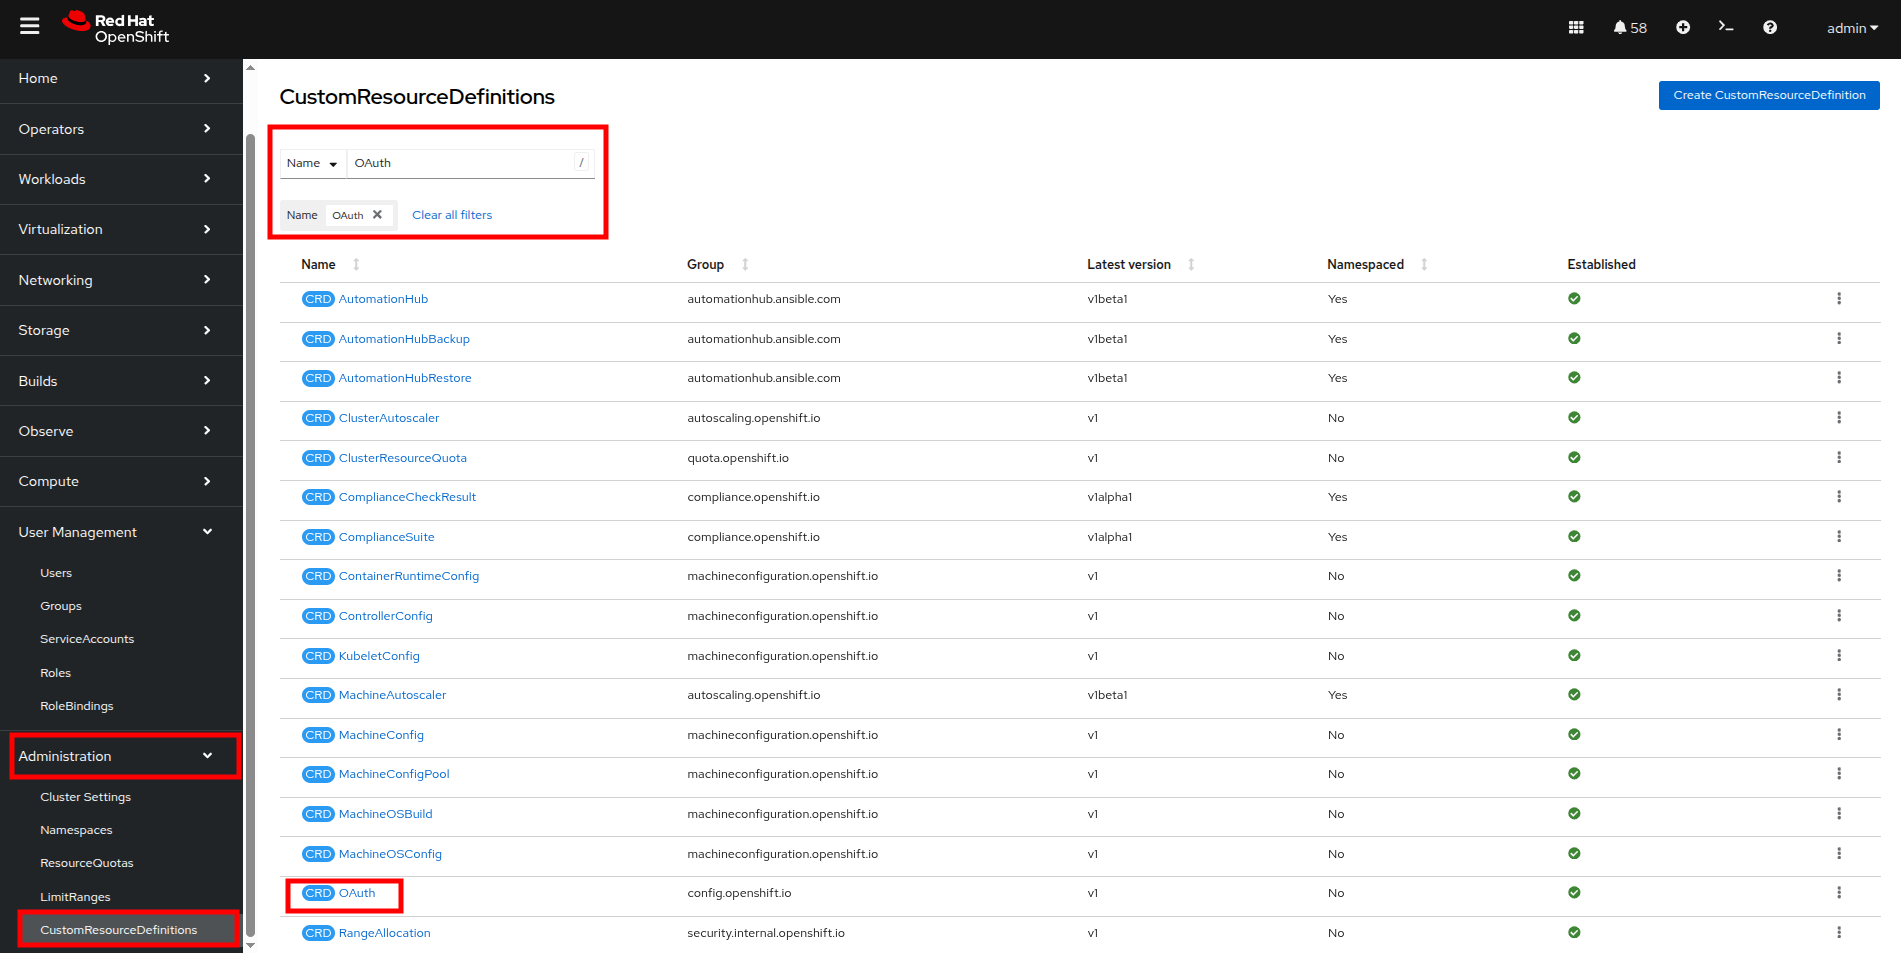 Figure 31. CRDs OAuth
 -
This will load the details page for the OAuth custom resource definition. On this page, click on Instances, and then click on cluster.
 Figure 32. OAuth Instances
 -
On the cluster configuration page you will see where the htpasswd_provider is already currently configured, but there will also be a dropdown menu that has the word Add and you can select another provider from that list. Click and select HTPasswd as the option.
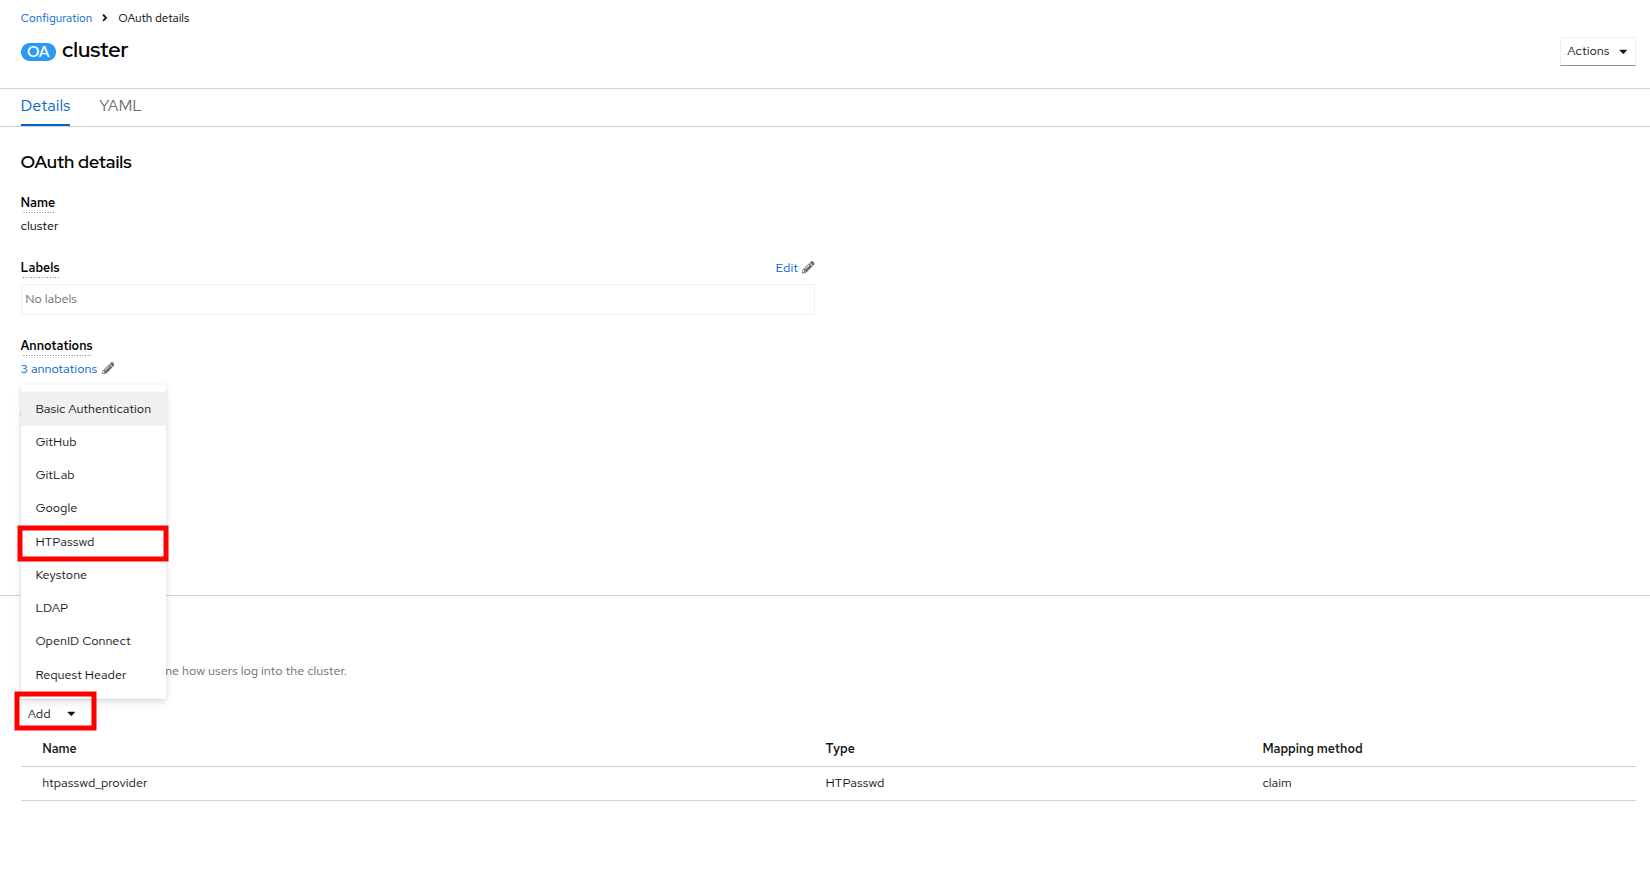 Figure 33. Add Authentication
Notice that in addition to HTPasswd, there are many options that allow you to integrate external authorization and authentication solutions with Red Hat OpenShift, which is perfect for larger enterprises. -
You will be presented with a page that allows you to add in an HTPasswd file or supply usernames and hashed credentials for that purpose. Set the name of the identiry provider to
auditor_loginand paste the following syntax into the text box before clicking the Add button.auditor1:$apr1$VtSYSShP$CikLVoVy5sobCaHCvuxCv. auditor2:$apr1$4Vpe3O5u$OhjtFGDNHnl2RWiNnhlhZ0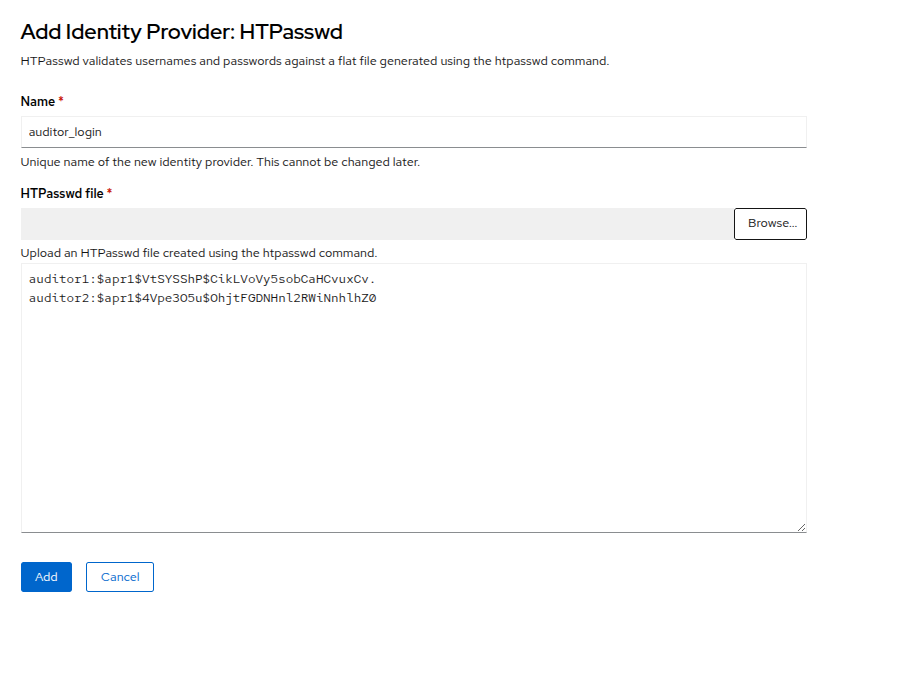 Figure 34. Add Identity Provider
 -
Once added you will be returned to the Cluster OAuth details page and you will now see two identity providers listed, along with a blue notice that OAuth is being reconfigured. Click on the link provided for View authentication conditions for reconfiguration status.
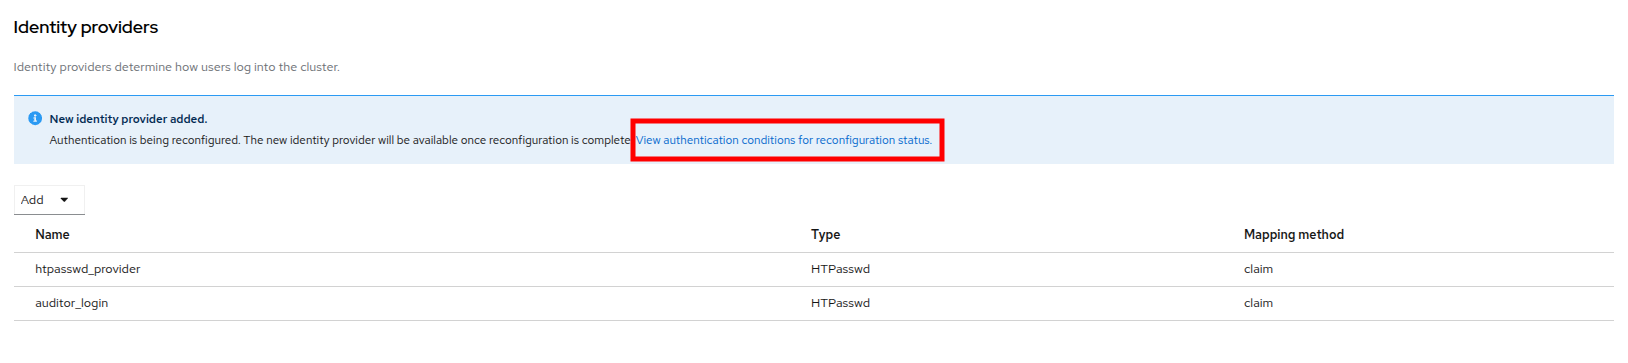 Figure 35. OAuth Reconfiguration
 -
You will be brought to a page that shows the progress as the authentication cluster operator is reconfigured, once all the pods are restarted, the status will change to Available and the message will say All is well.
 Figure 36. OAuth Reconfiguration Progressing
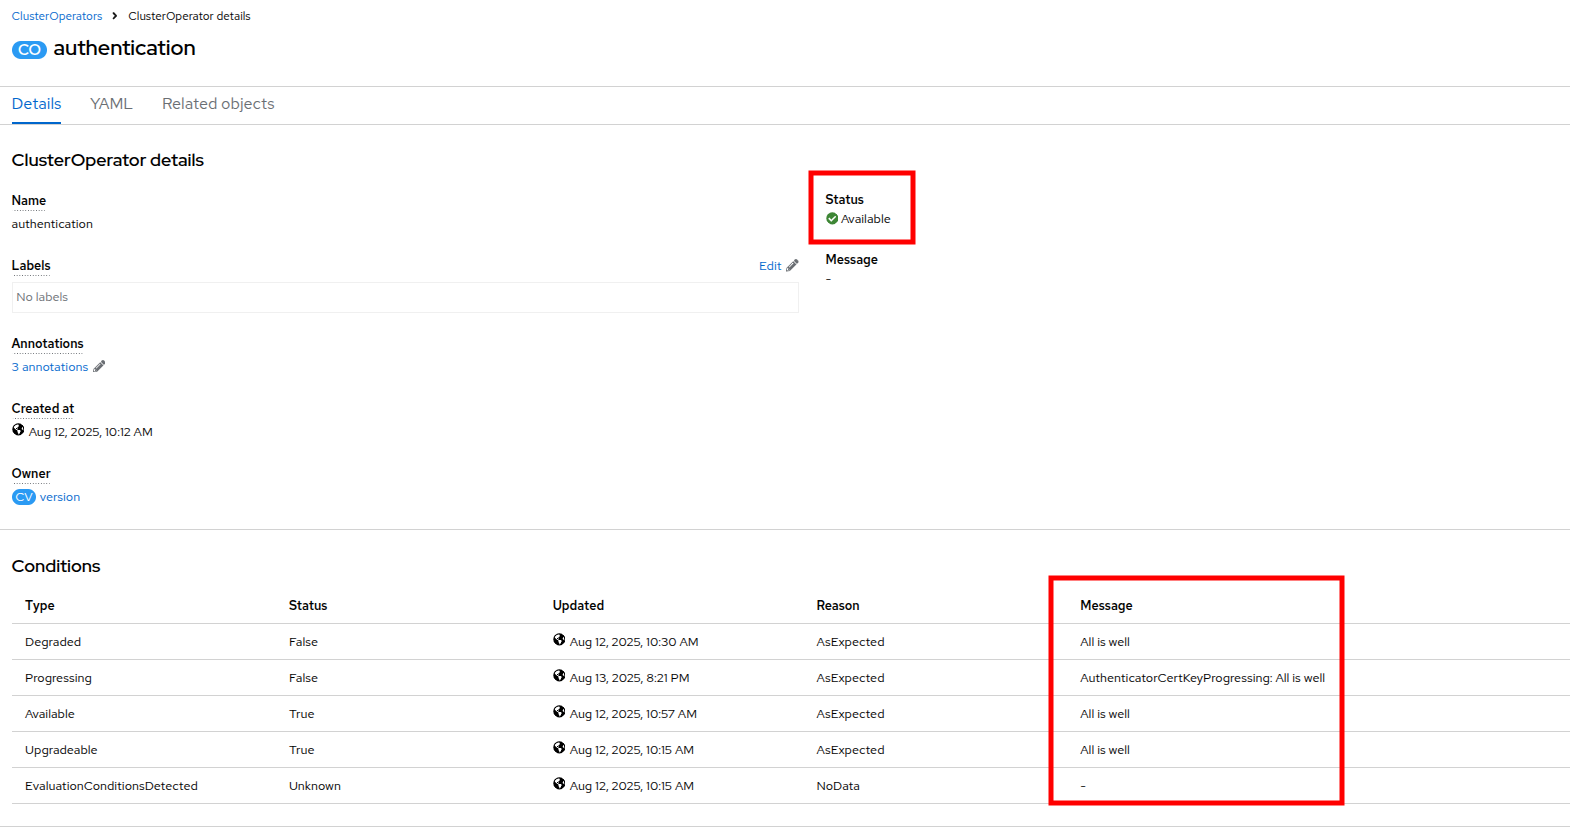 Figure 37. OAuth Reconfiguration Complete
Testing the Configuration
-
With the OAuth configuration complete, we can now test our auditor login, and the limits of their account.
-
Log out of Red Hat OpenShift by clicking on admin at the top, and selecting Log out from the drop down menu.
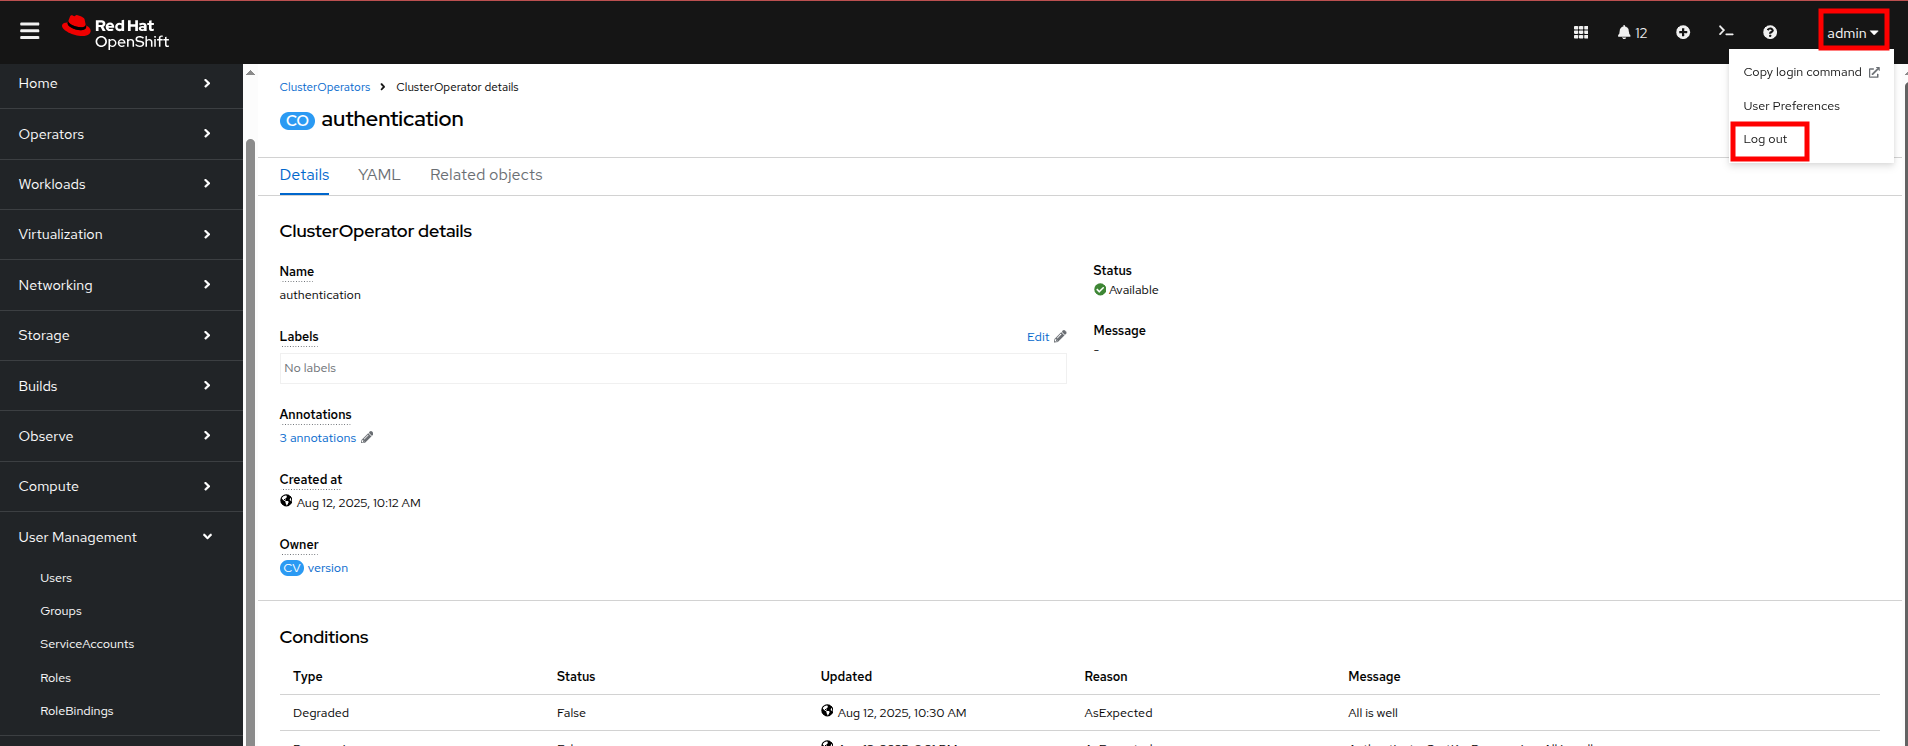 Figure 38. Log Out OpenShift
 -
There is now an option to login with the auditor_login identity provider on the main OpenShift page.
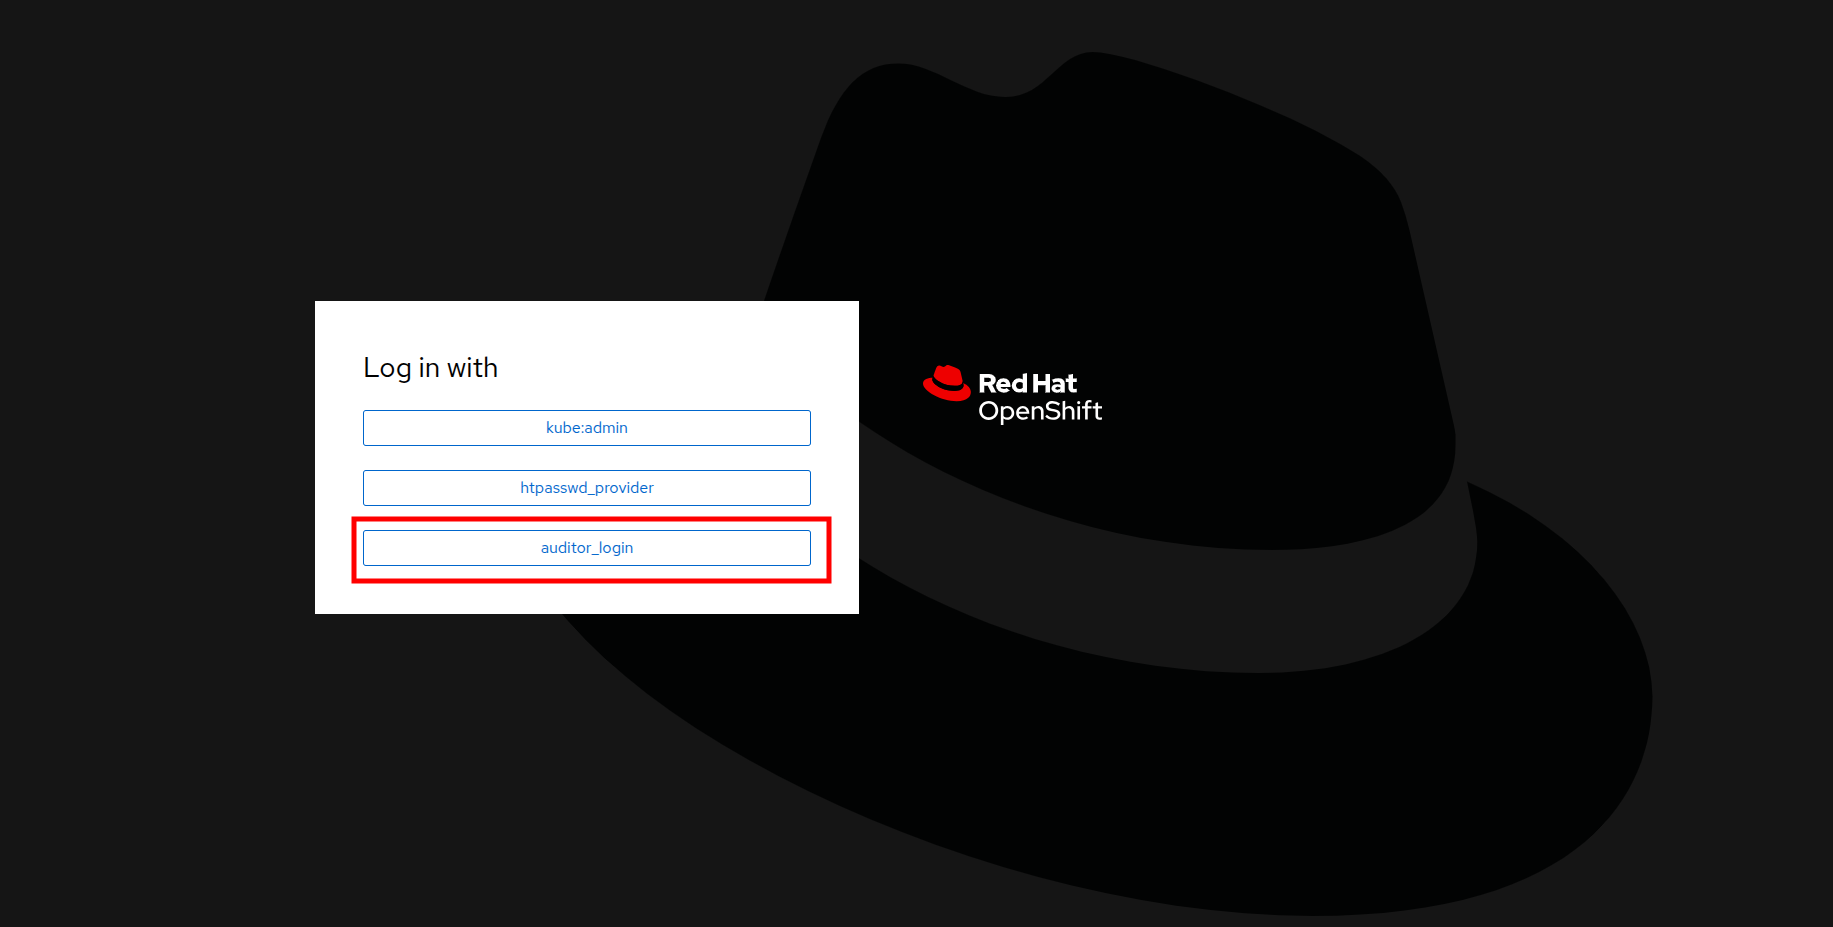 Figure 39. Log In OpenShift
 -
Click on auditor_login and when presented use the following username and password combination:
-
Username:
auditor1 -
Password:
auditor1pass!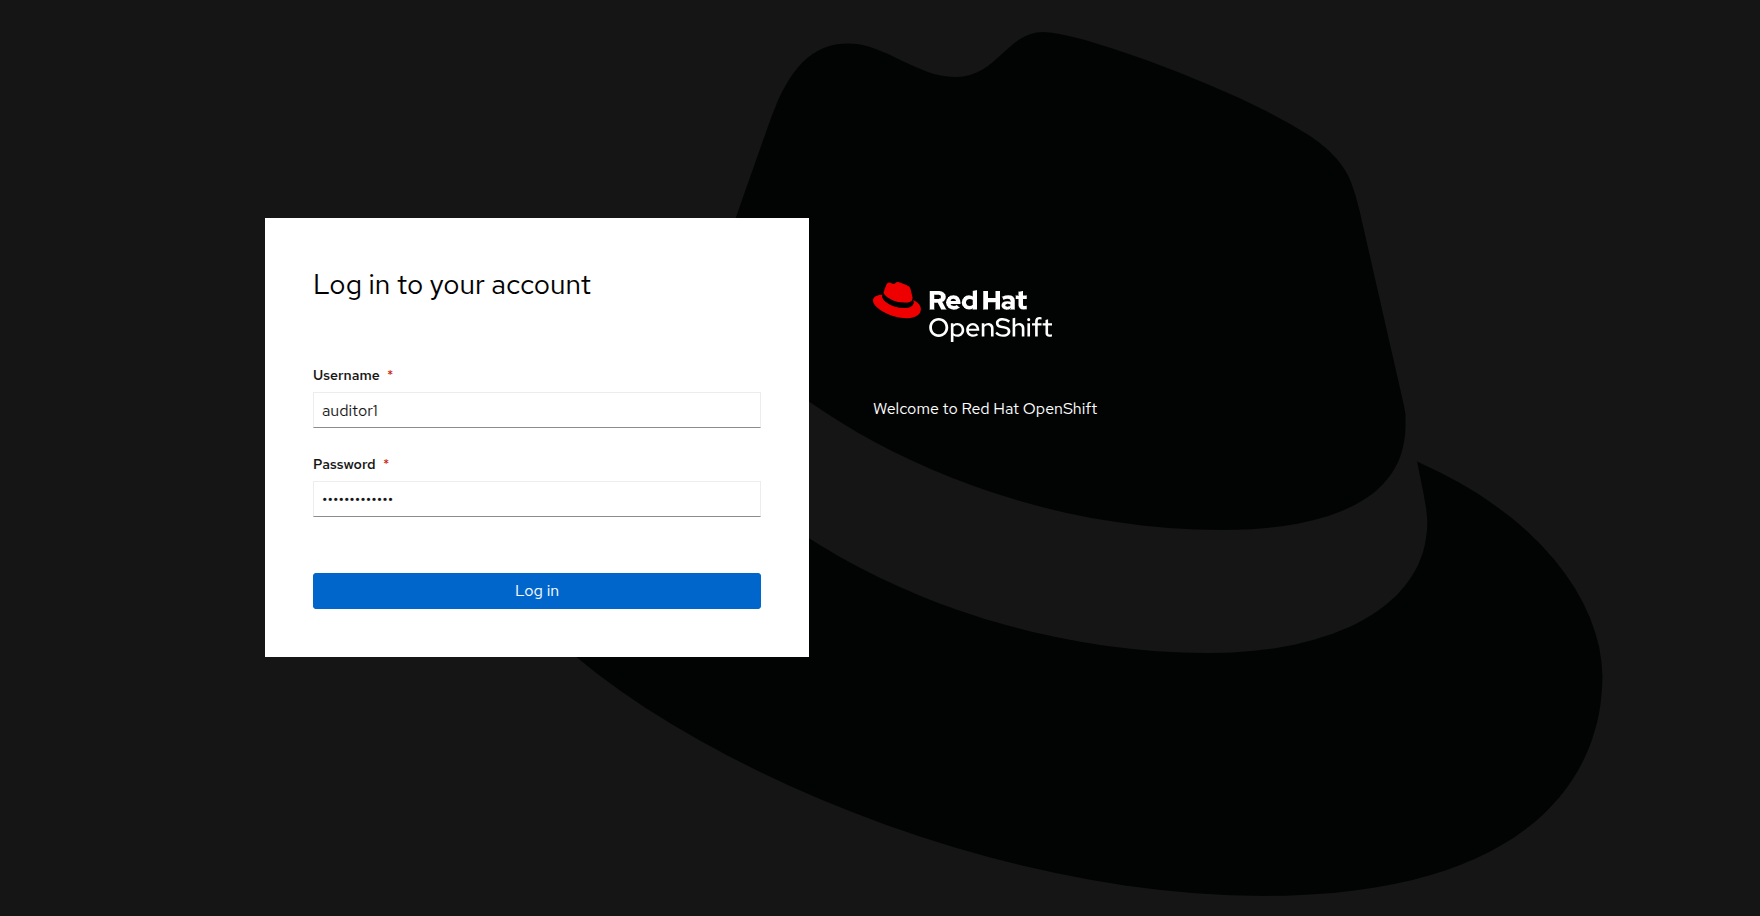 Figure 40. Auditor 1 Login
-
-
When the auditor logs in with the read-only persmissions they will only be able to see a limited view of the OpenShift console from the Admin perspective.
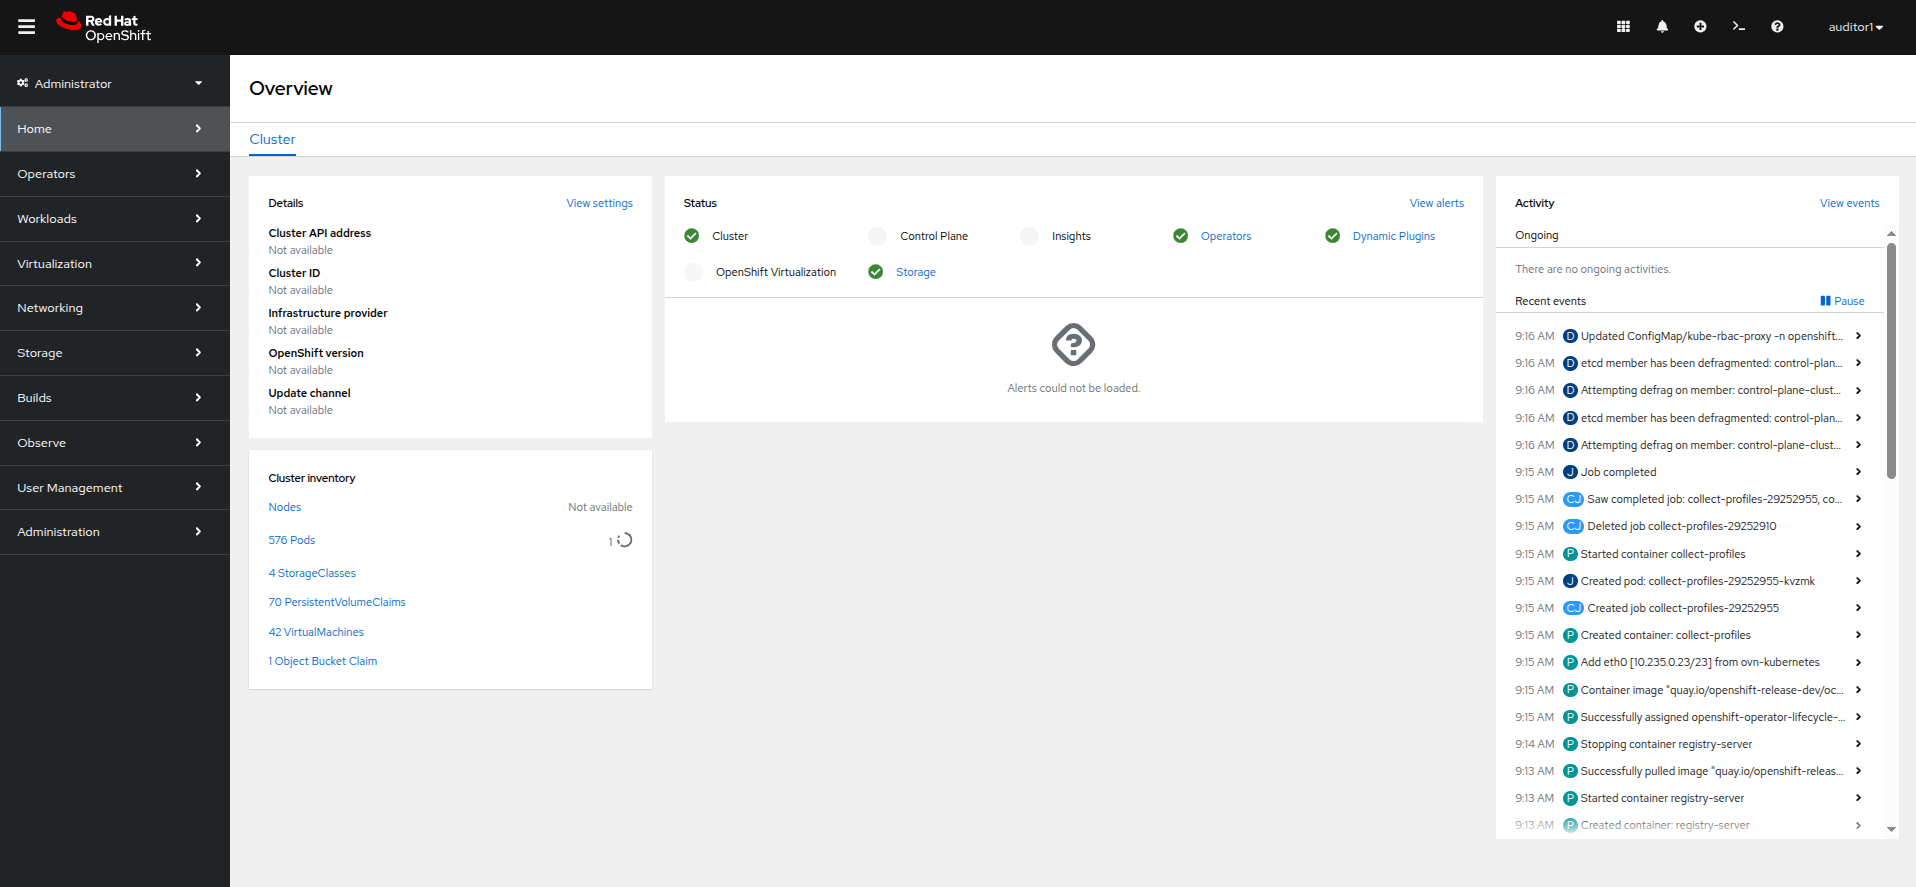 Figure 41. Auditor 1 Admin View
 -
If the auditor needs to validate our virtual machine environment, they can still access that by clicking on Virtualization and VirtualMachines in the left side menu.
-
They can see all virtual machines in each project, and their current status.
-
The auditor can even click on a specific machine and get additional details. In this case, they want to test the database server in the webapp-vms namespace.
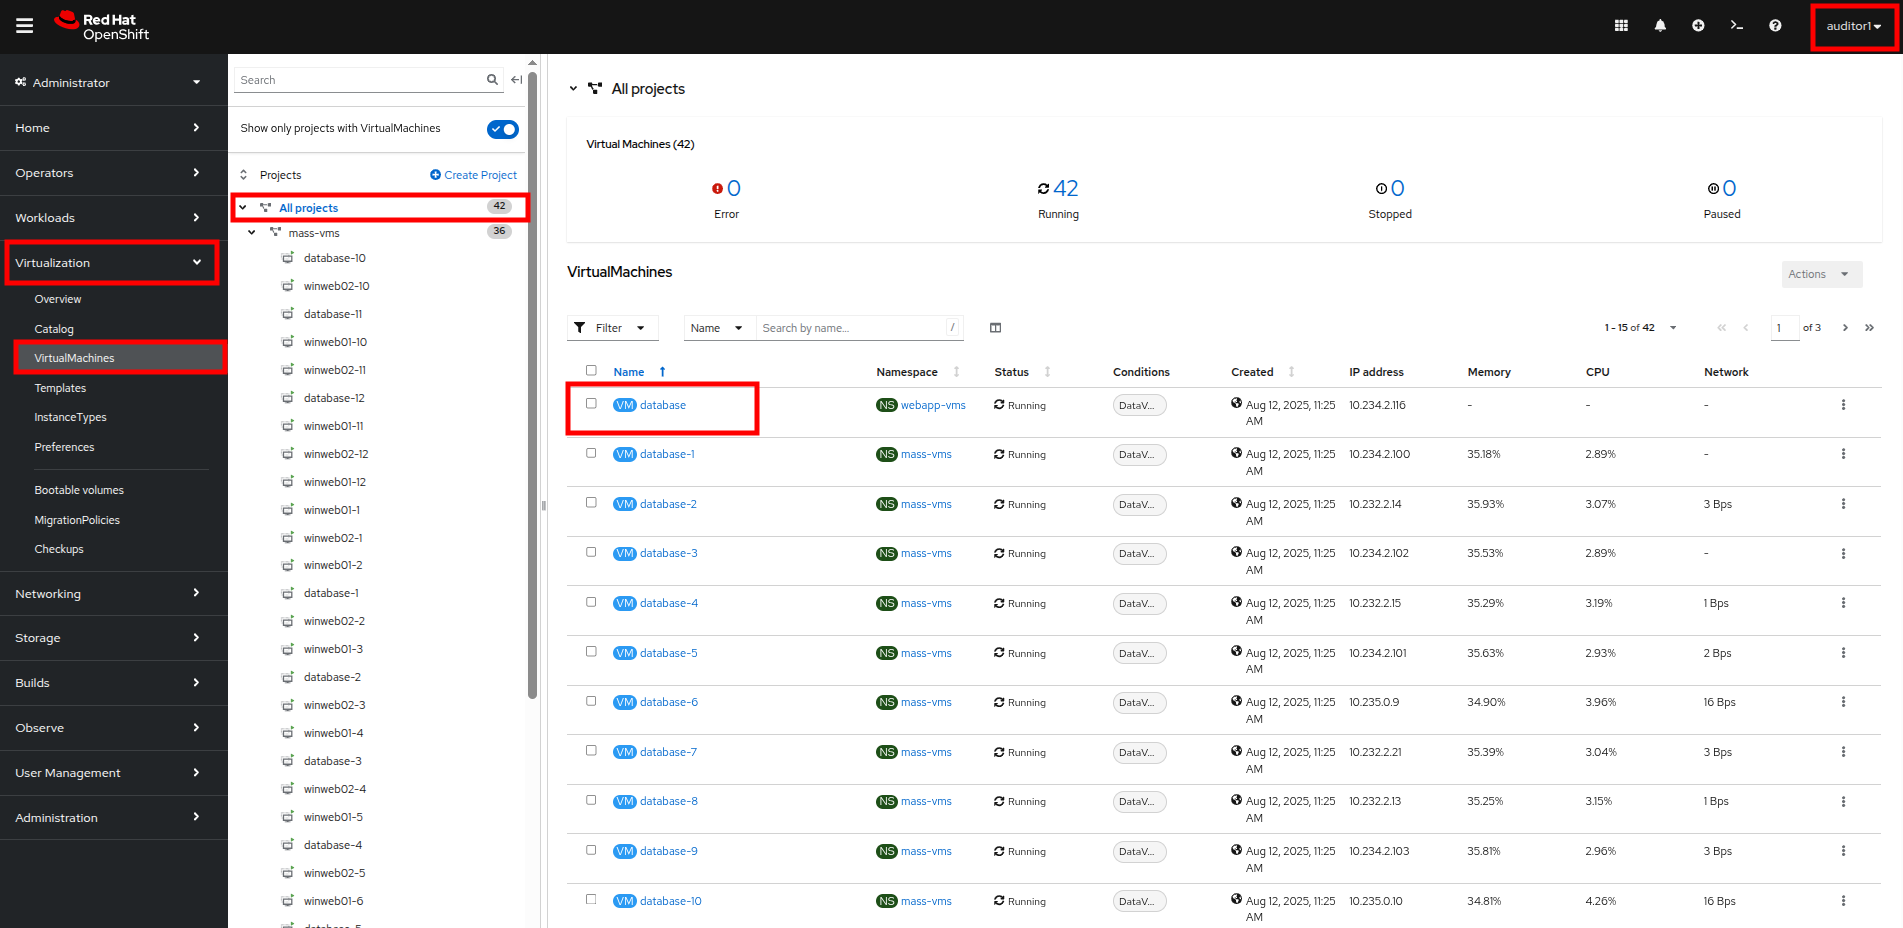 Figure 42. Auditor 1 VM View
 -
Once they are on the VirtualMachine details page they can see the information about the virtual guest, including its CPU and memory utilization, but they are prevented from launching the VNC console, or manipulating the machine state in any way as the buttons are greyed out.
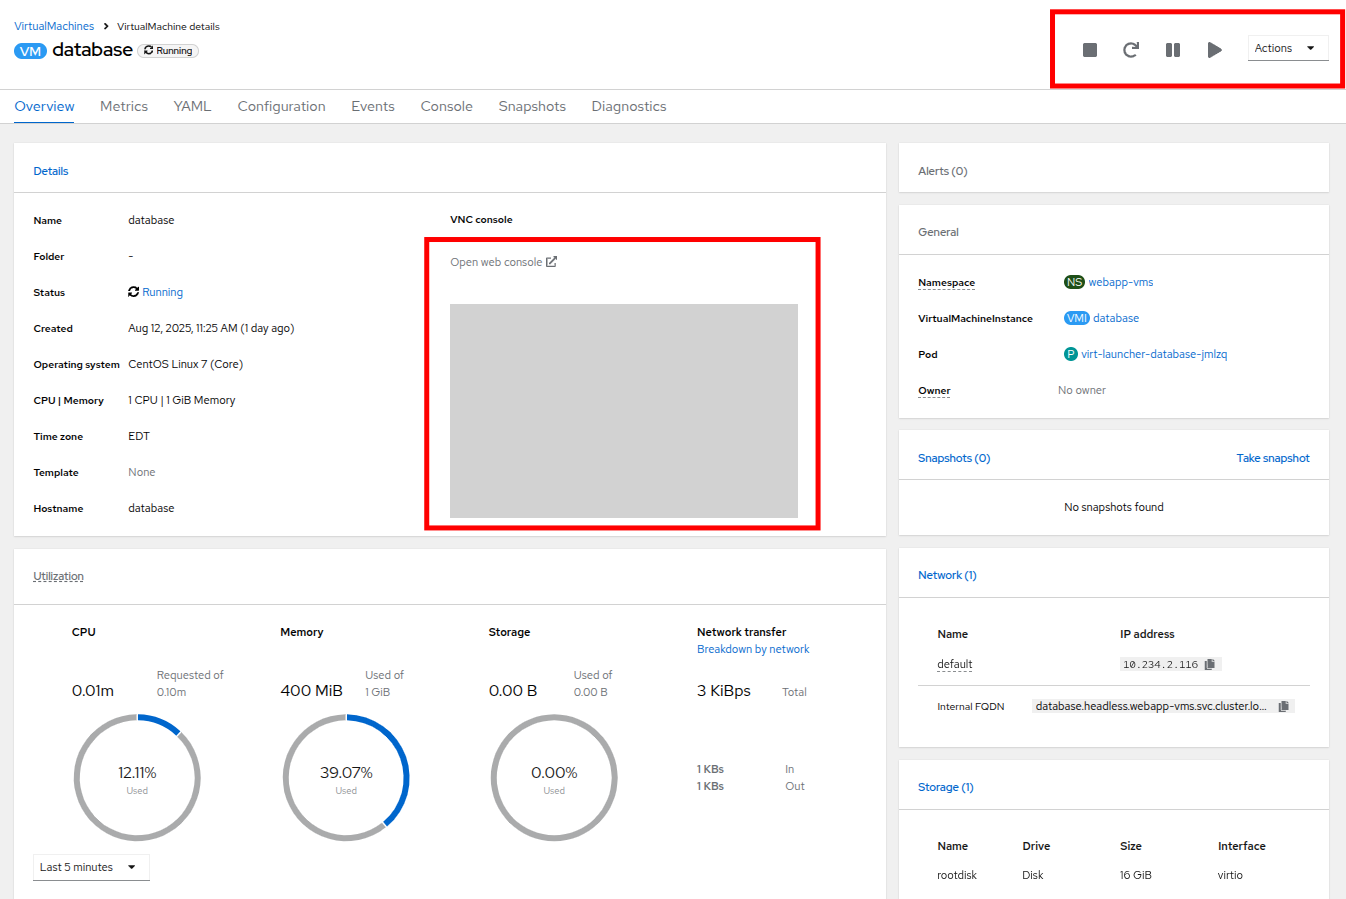 Figure 43. Auditor 1 Database ReadOnly
 -
At your leisure you may explore the UI and confirm that the Auditor1 account is read only. When you are finished proceed to the next module.
In this section of our lab we created a limited read-only account with view permissions for the auditors that will be examining our infrastructure. As mentioned before RBAC in Red Hat OpenShift is extremely versatile, and you can explore other customized roles and rolebindings by viewing the documentation here.
Summary
In this module we were preparing for our company’s annual security audit. By using the OpenShift Compliance Operator to scan and apply settings to our environment to ensure they meet our security standards, and by showing how RBAC can be configured to allow limited access to specific individuals, we can demonstrate how our OpenShift Virtualization infrastructure can be tightened and secured.