Automation of Virtual Machines
Introduction
The rapid expansion of our VM fleet at "Legacy Systems Inc." has led to a significant increase in manual, repetitive tasks – patching, resource modification, and state management. We, as the VM administrators, are struggling to keep up, limiting our ability to innovate and respond quickly to business demands. Organizations need a solution that makes it simple to migrate their existing virtual machines onto an alternative platform with minimal risk of disrupting their existing workloads and associated services, and to automate their VM lifecycle to improve efficiency and speed of delivery. In this module we will cover how to create a dynamic inventory of virtual machines, and how to leverage Ansible Automation Platform to perform a number of virtual infrastructure management tasks in an automated manner.
Credentials for Ansible Automation Platform
Your Ansible Automation Platform console is available here.
Your admin login is available with the following credentials:
-
User:
username -
Password
password
| The Ansible Automation Platform console has a 5 minute timeout for admin users for security purposes. If you find yourself logged out accidentally you can log back in using the credentials above. |
Creating a Dynamic Inventory for OpenShift Virtual Machines
OBJECTIVE:
Dynamic inventories allow Ansible Automation Platform (AAP) to automatically fetch and update the list of systems from external sources, eliminating the need for manual management.
In this lab, we will configure a dynamic inventory to pull data from OpenShift Virtualization. This will enable AAP to manage OpenShift VMs residing in the vms-aap-day2 namespace of an OCP cluster.
Create an Inventory
-
In the left-side menu, click to expand the menu for Automation Execution, then click on Infrastructure, followed by Inventories.
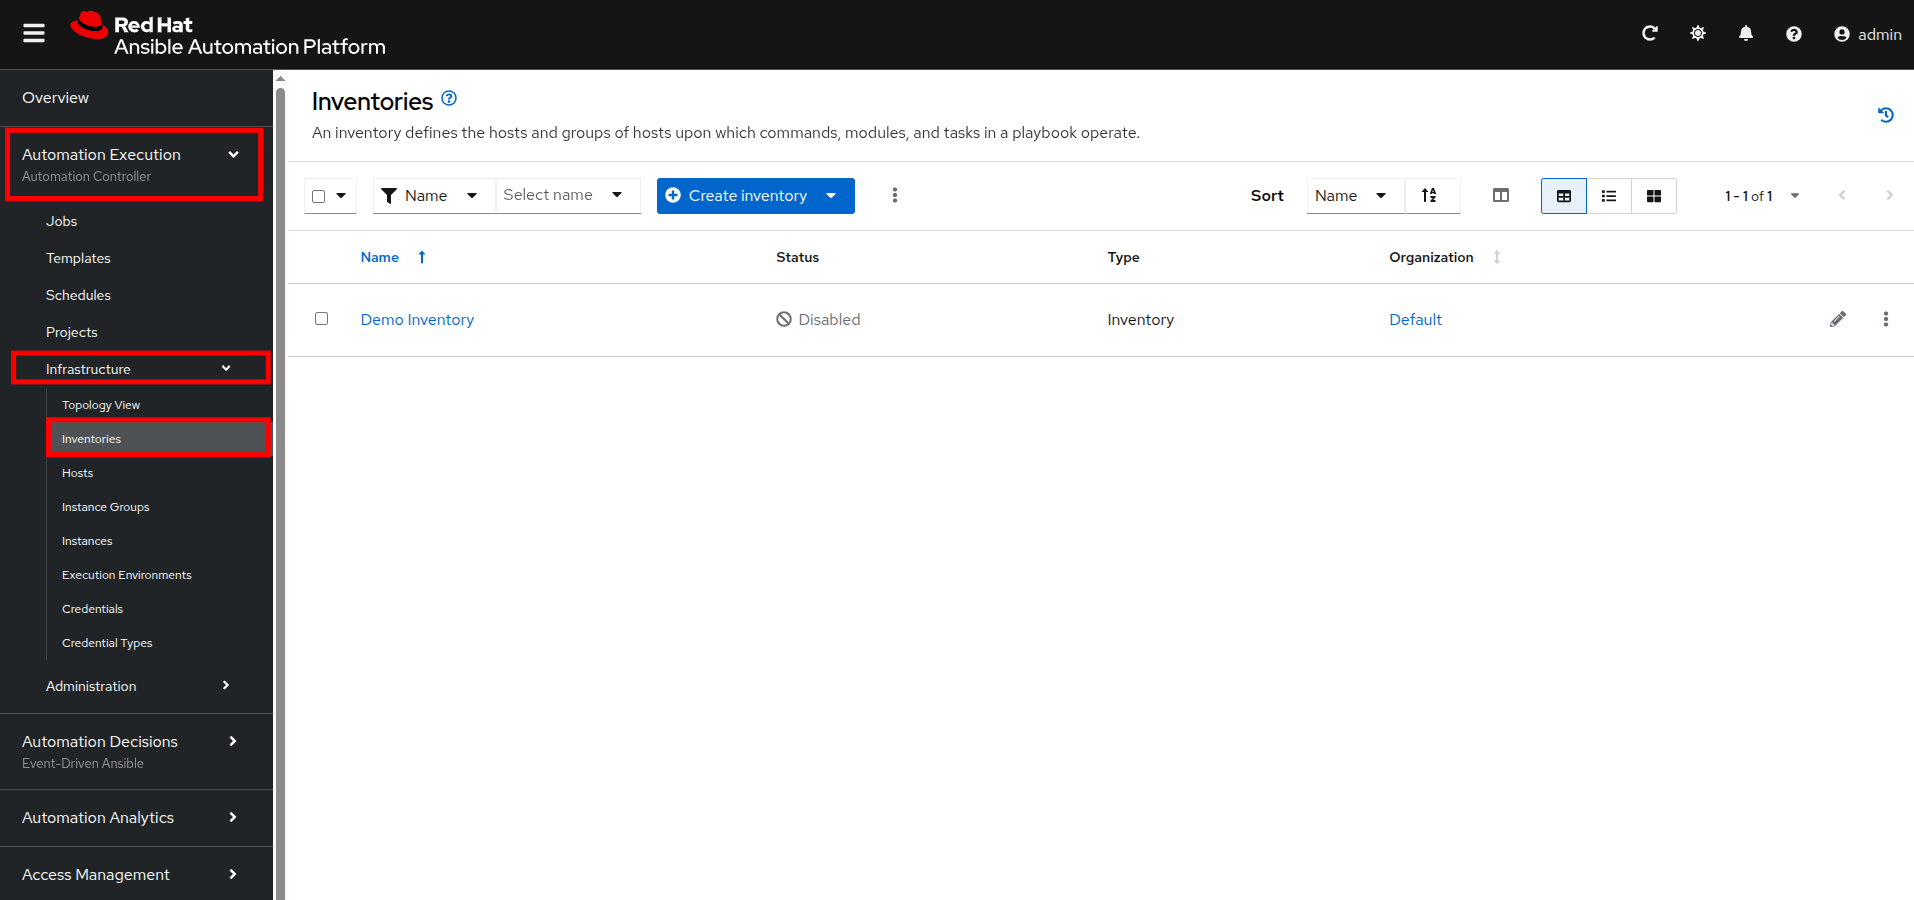 Figure 2. Automation Execution, Infrastucture, Inventories
 -
Click the Create inventory drop-down box and select the Create inventory option.
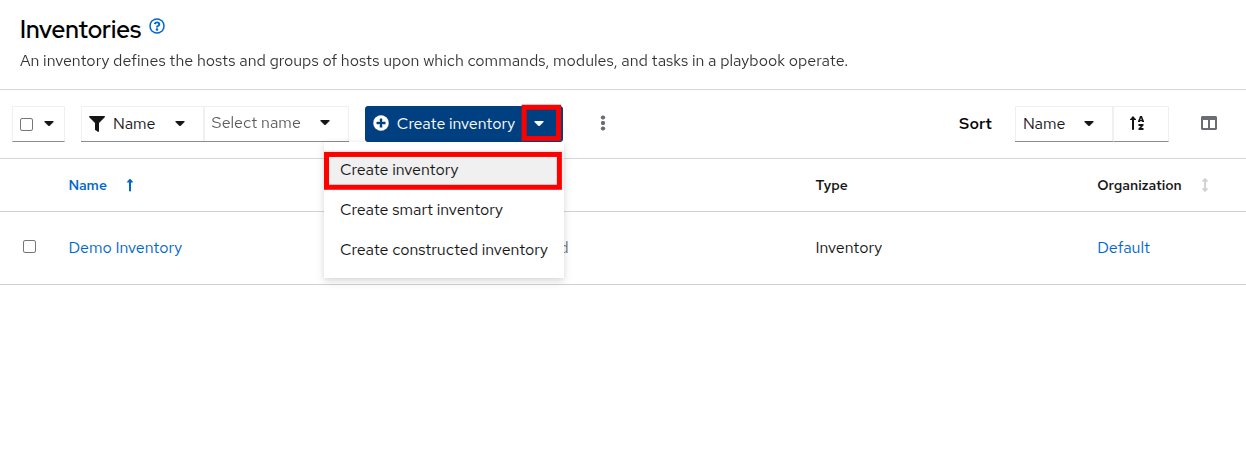 Figure 3. Create Inventory Dropdown
 -
Fill out or select the appropriate value from the drop down menus available for the following fields in the Create Inventory form:
-
Name:
OpenShift Virtual Machines -
Organization: Default
-
-
Click the Create inventory button at the bottom.
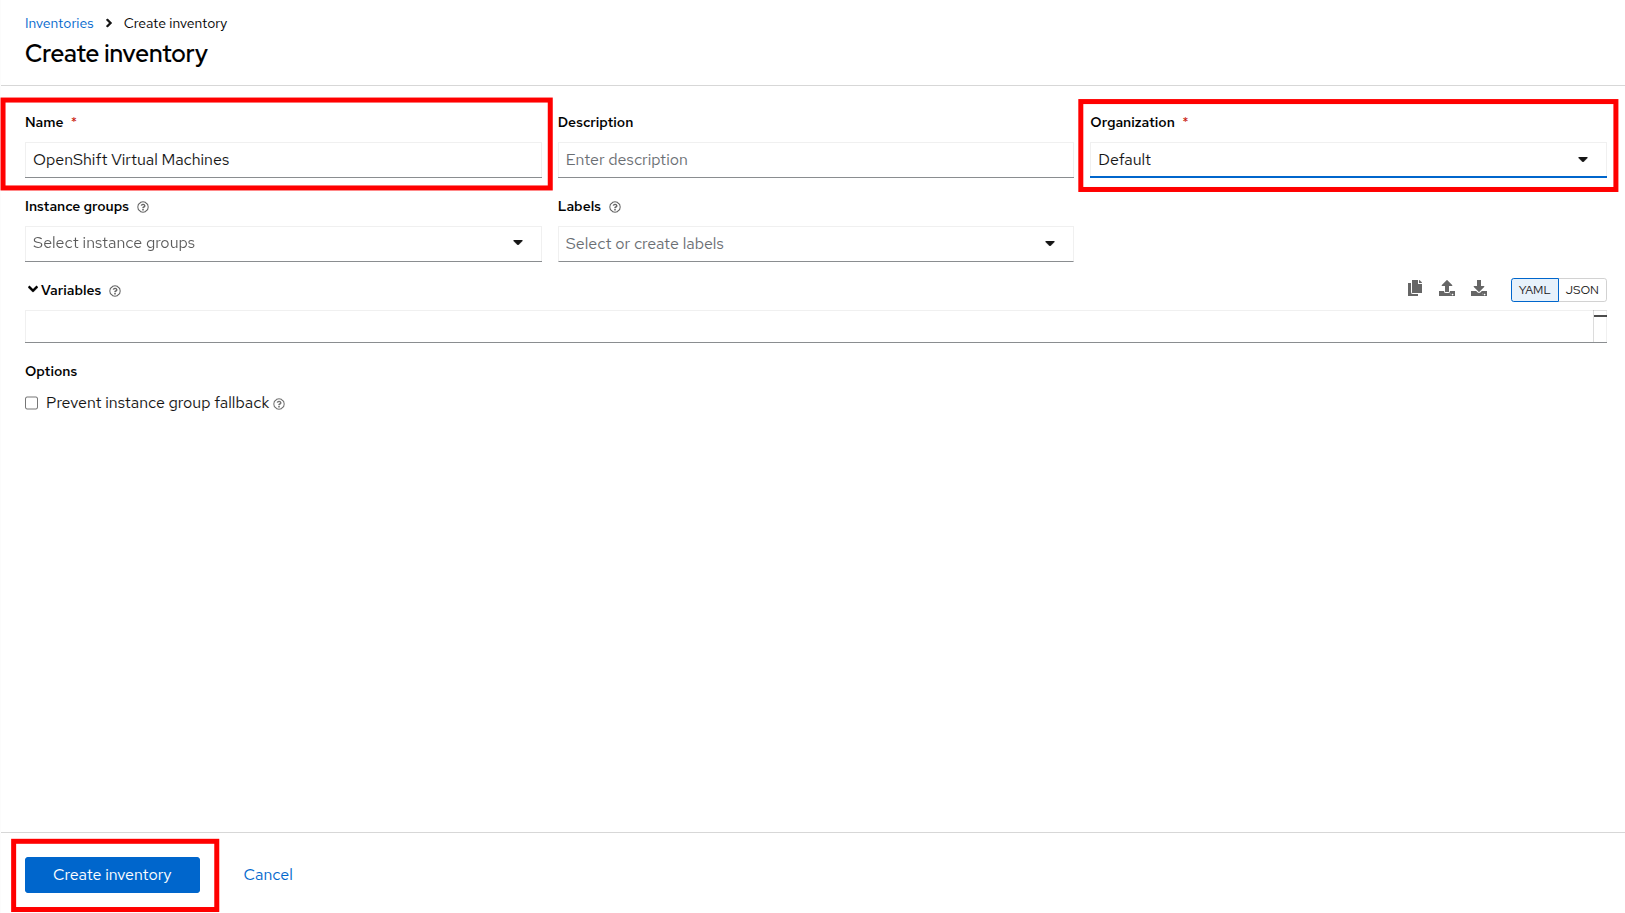 Figure 4. Create Inventory
Add a Source to the Inventory
-
After creating the inventory, switch to the Sources tab.
-
Select the Create source button.
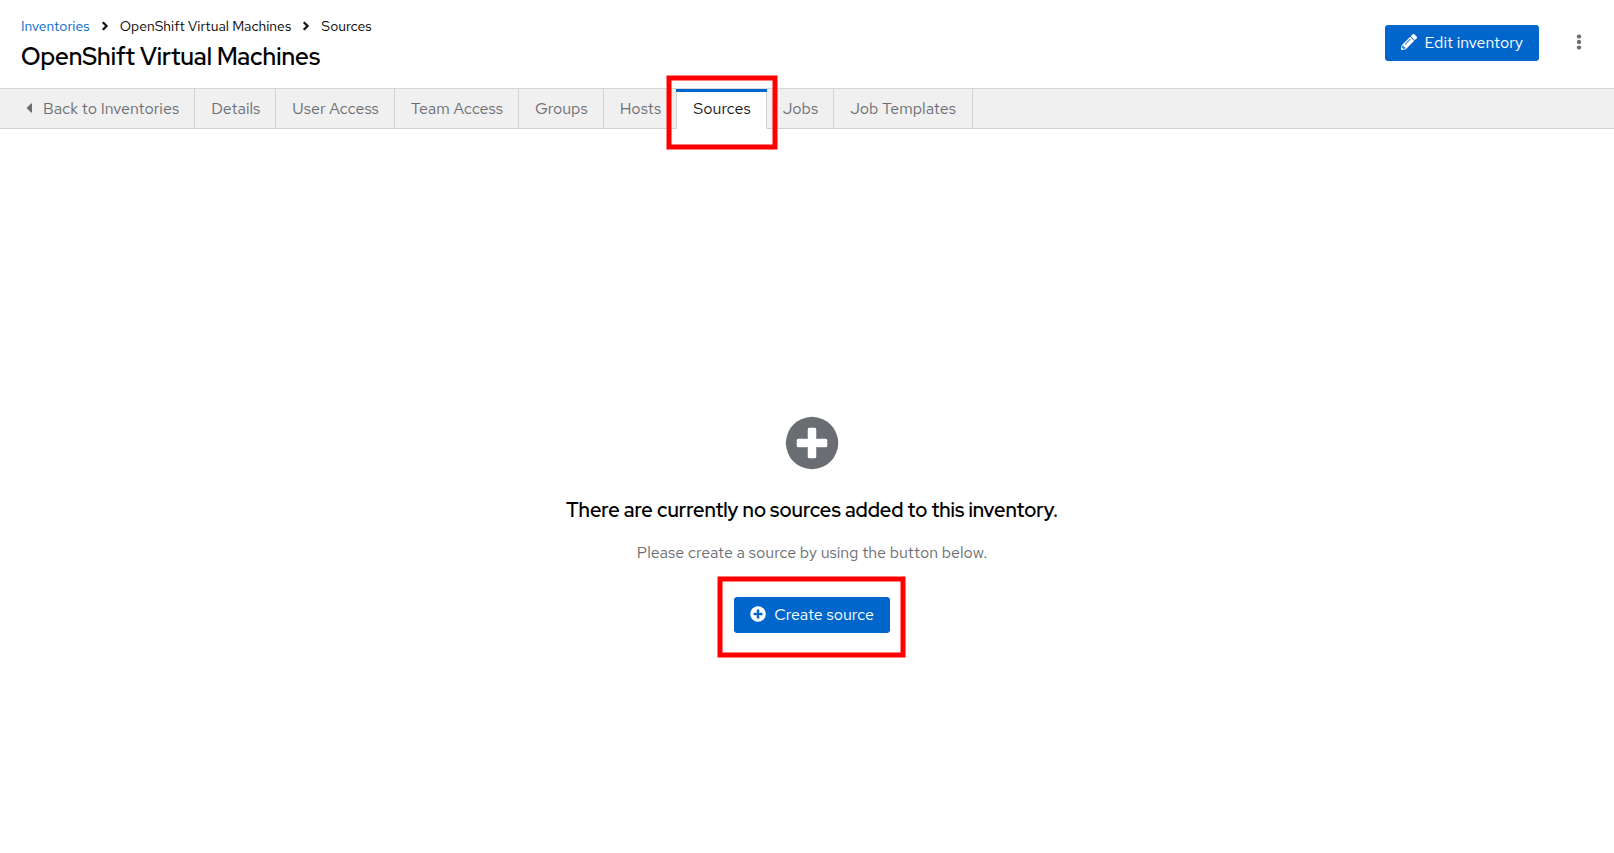 Figure 5. Sources Tab
 -
Fill out or select the appropriate value from the drop down menus available for the following fields in the Create Source form:
-
Name:
OpenShift Virtual Machines Source -
Execution environment: Day 2 EE
-
Source: OpenShift Virtualization
-
Credential: OpenShift Credential
-
Update on launch Checkbox: Checked
-
Cache timeout (seconds): 0
-
-
Copy and paste the following YAML snippet into the Source variables field on the form.
namespaces: - vms-aap-day2 -
Click the Create source button to save the configuration.
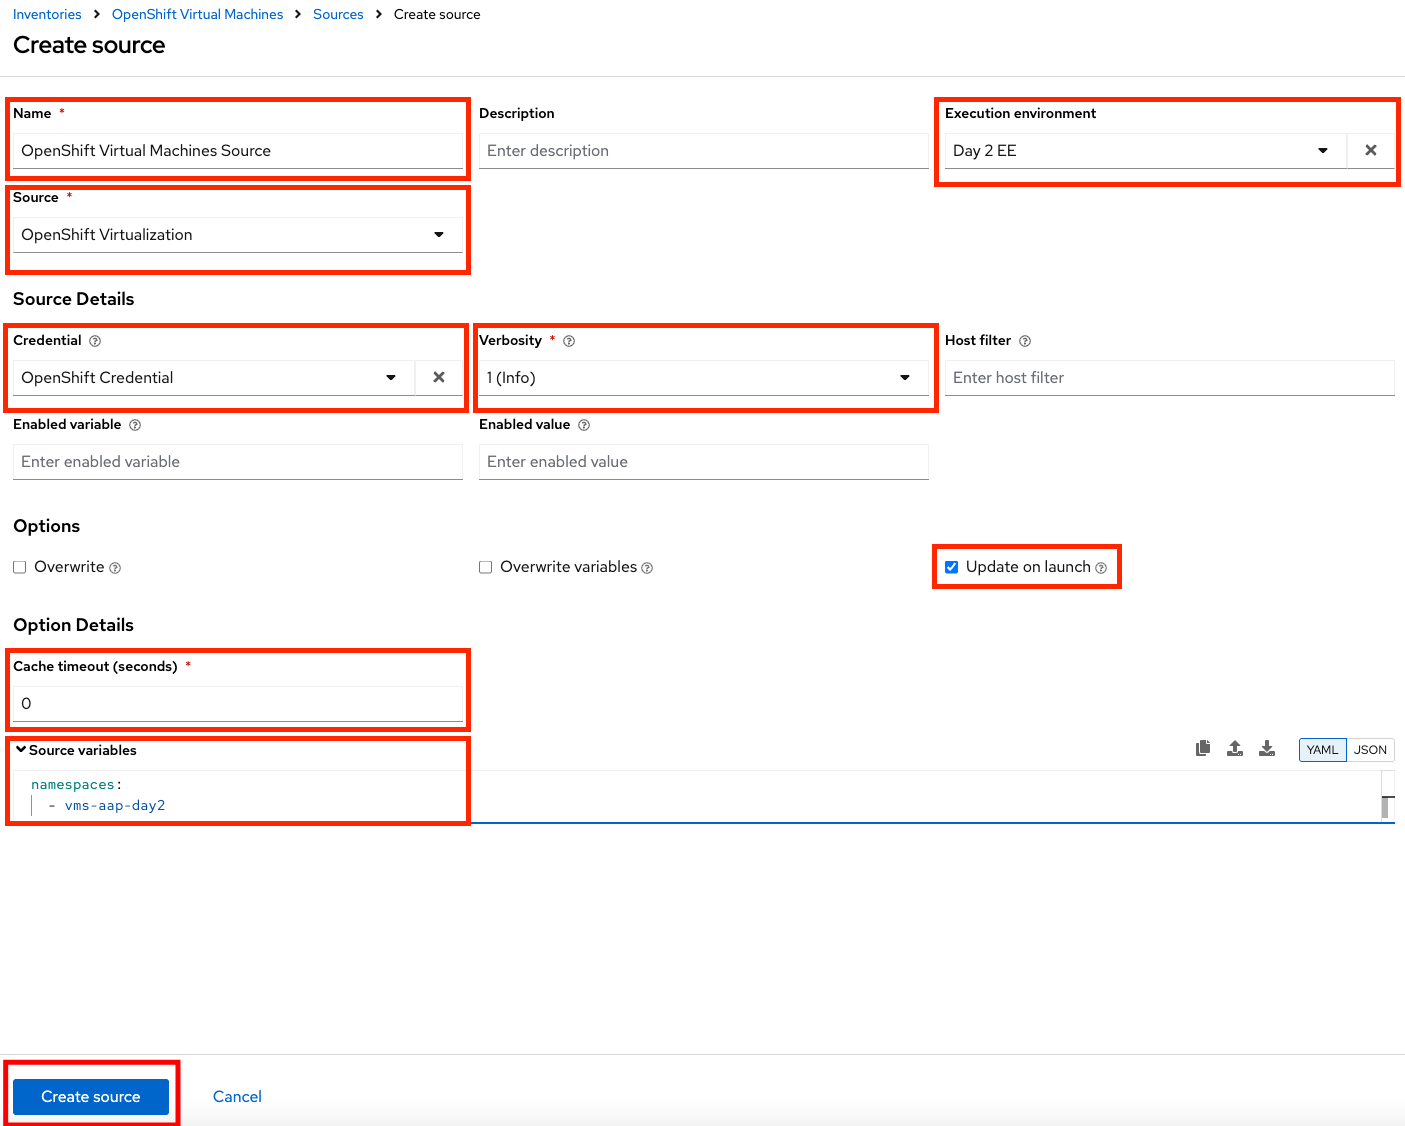 Figure 6. Create Inventory Source
Update the Inventory
-
Click the Launch Inventory Update button in the top-right corner to start inventory collection.
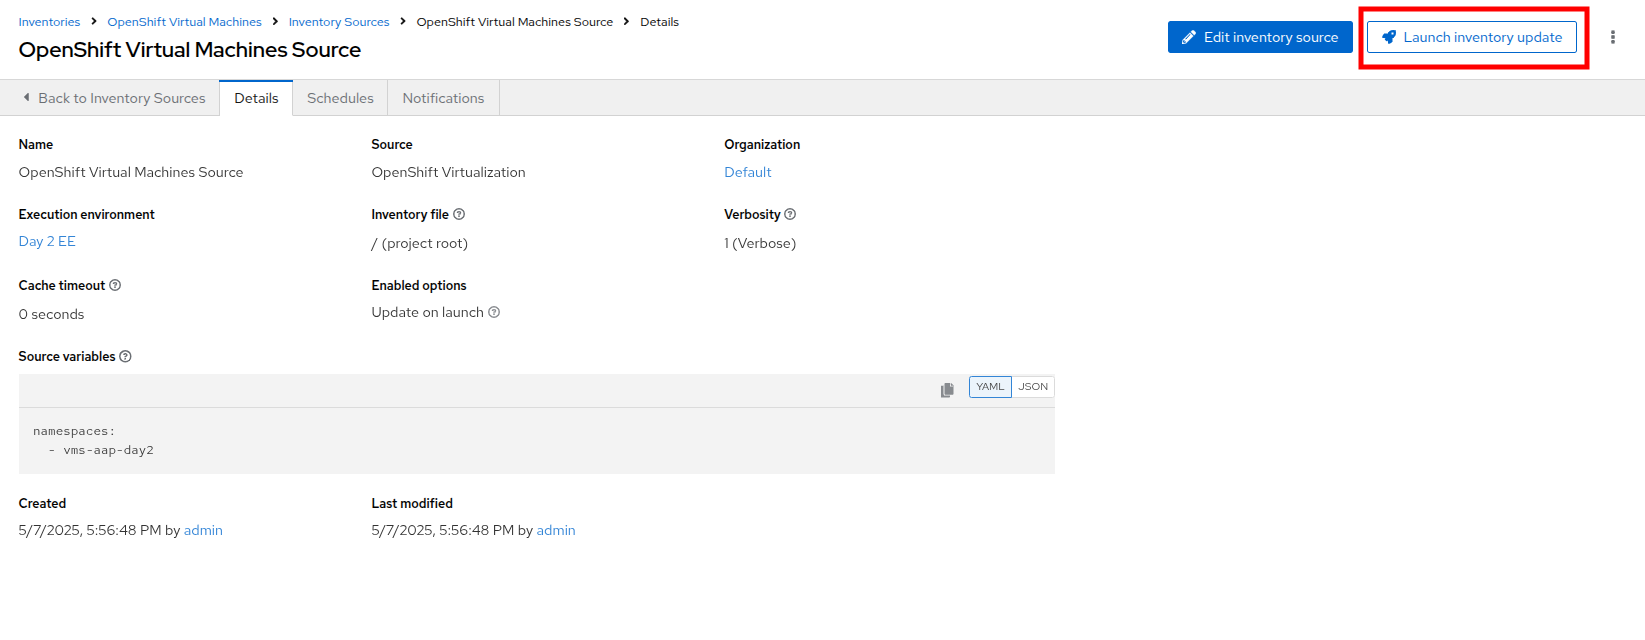 Figure 7. Update Inventory
 -
Wait for the Last Job Status to show Success.
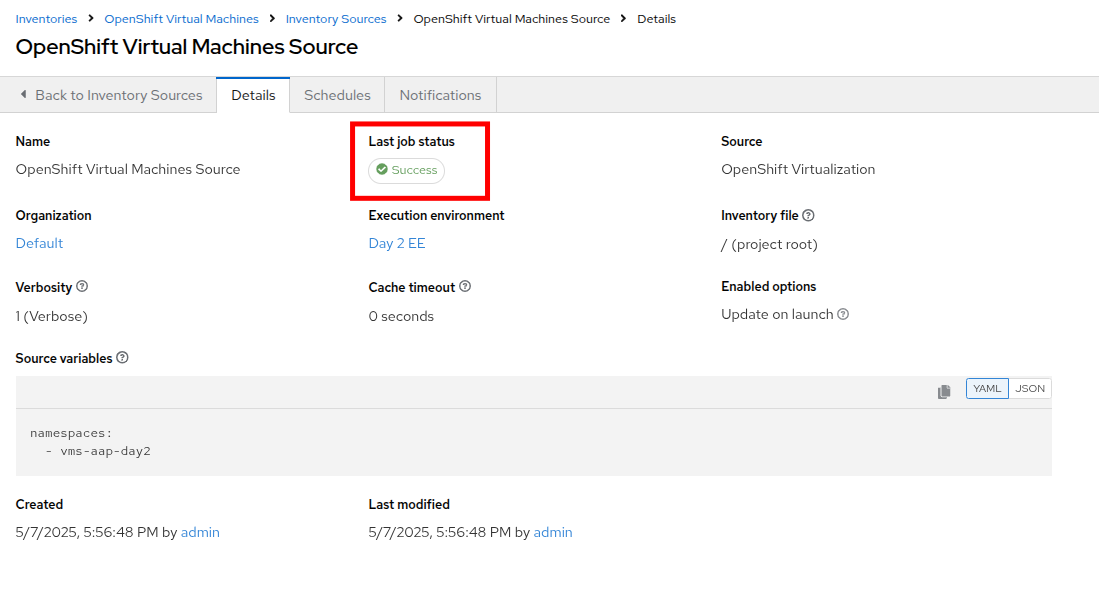 Figure 8. Job Status Success
 -
Click on the tab for Back to Inventory Sources.
 Figure 9. Back to Inventory Sources
 -
Switch to the Hosts tab at the top of the screen.
-
Confirm that the Virtual Machines from the vms-app-day2 namespace of your OpenShift cluster are listed as inventory hosts.
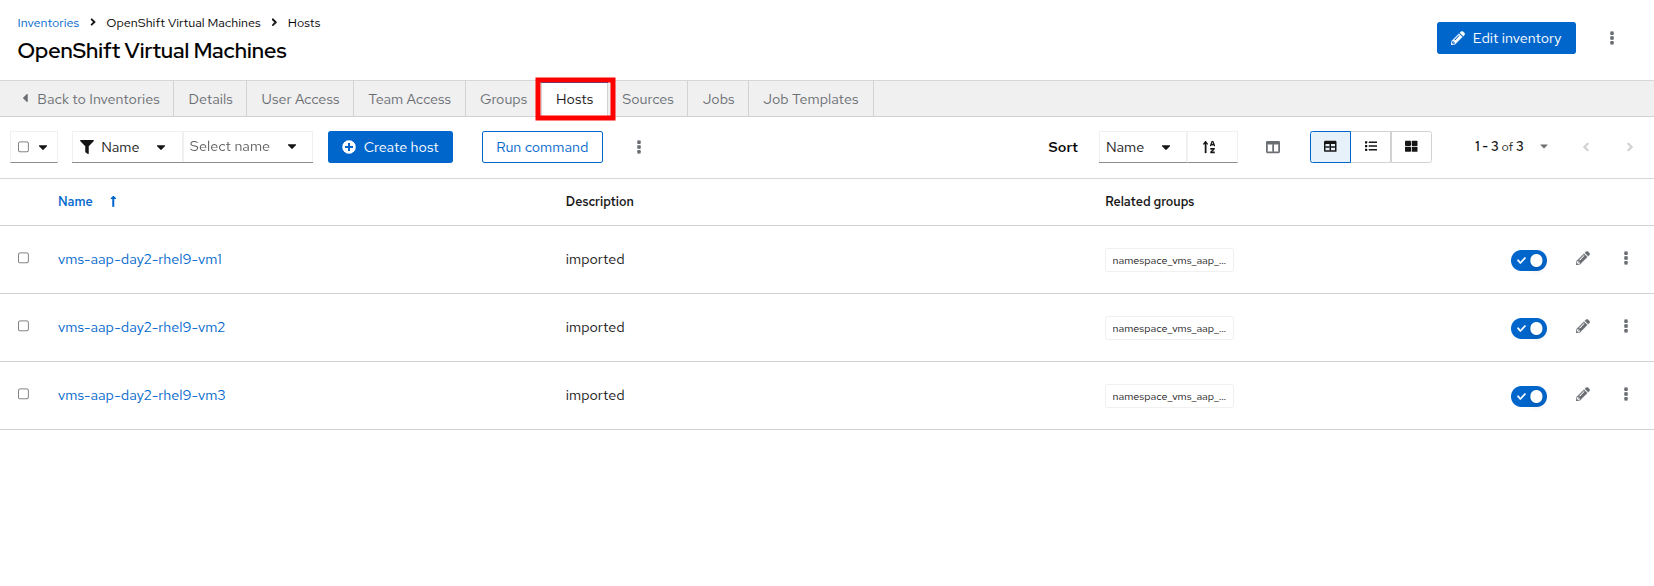 Figure 10. Verify Hosts
 -
To verify that the machines are alive we can select the three VMs we have discovered and run an automated ping job against them by clicking the Run command button.
 Figure 11. Run Command
 -
You will be presented with the Run command wizard with several pages:
-
On the Details page, select ping from the Module dropdown menu, and click Next.
-
On the Execution Environment page, select Day2 EE from the Execution Environment dropdown, and click Next.
-
On the Credential page, select Workshop Credential from the Credential dropdown, and click Next.
-
On the Review page, check over your selected options, and when you are ready click the Finish button.
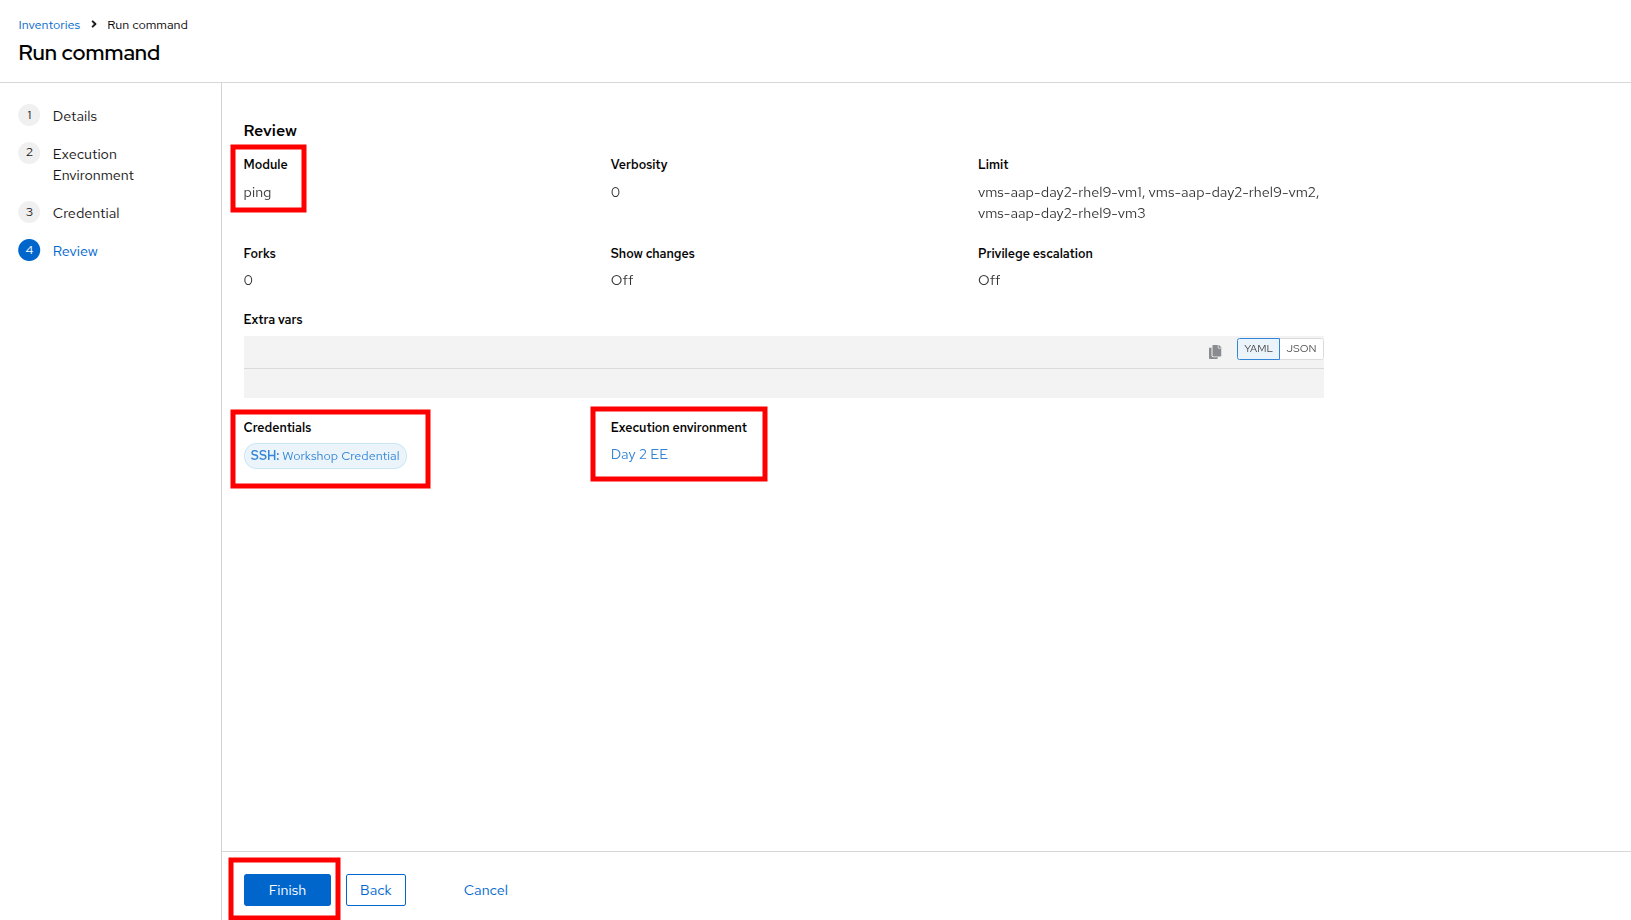 Figure 12. Review Run Command
-
-
The output of running the command should be similar to the output below, including the names of each VM and their status:
vms-aap-day2-rhel9-vm1 | SUCCESS => { "ansible_facts": { "discovered_interpreter_python": "/usr/bin/python3" }, "changed": false, "ping": "pong" } vms-aap-day2-rhel9-vm2 | SUCCESS => { "ansible_facts": { "discovered_interpreter_python": "/usr/bin/python3" }, "changed": false, "ping": "pong" } vms-aap-day2-rhel9-vm3 | SUCCESS => { "ansible_facts": { "discovered_interpreter_python": "/usr/bin/python3" }, "changed": false, "ping": "pong" }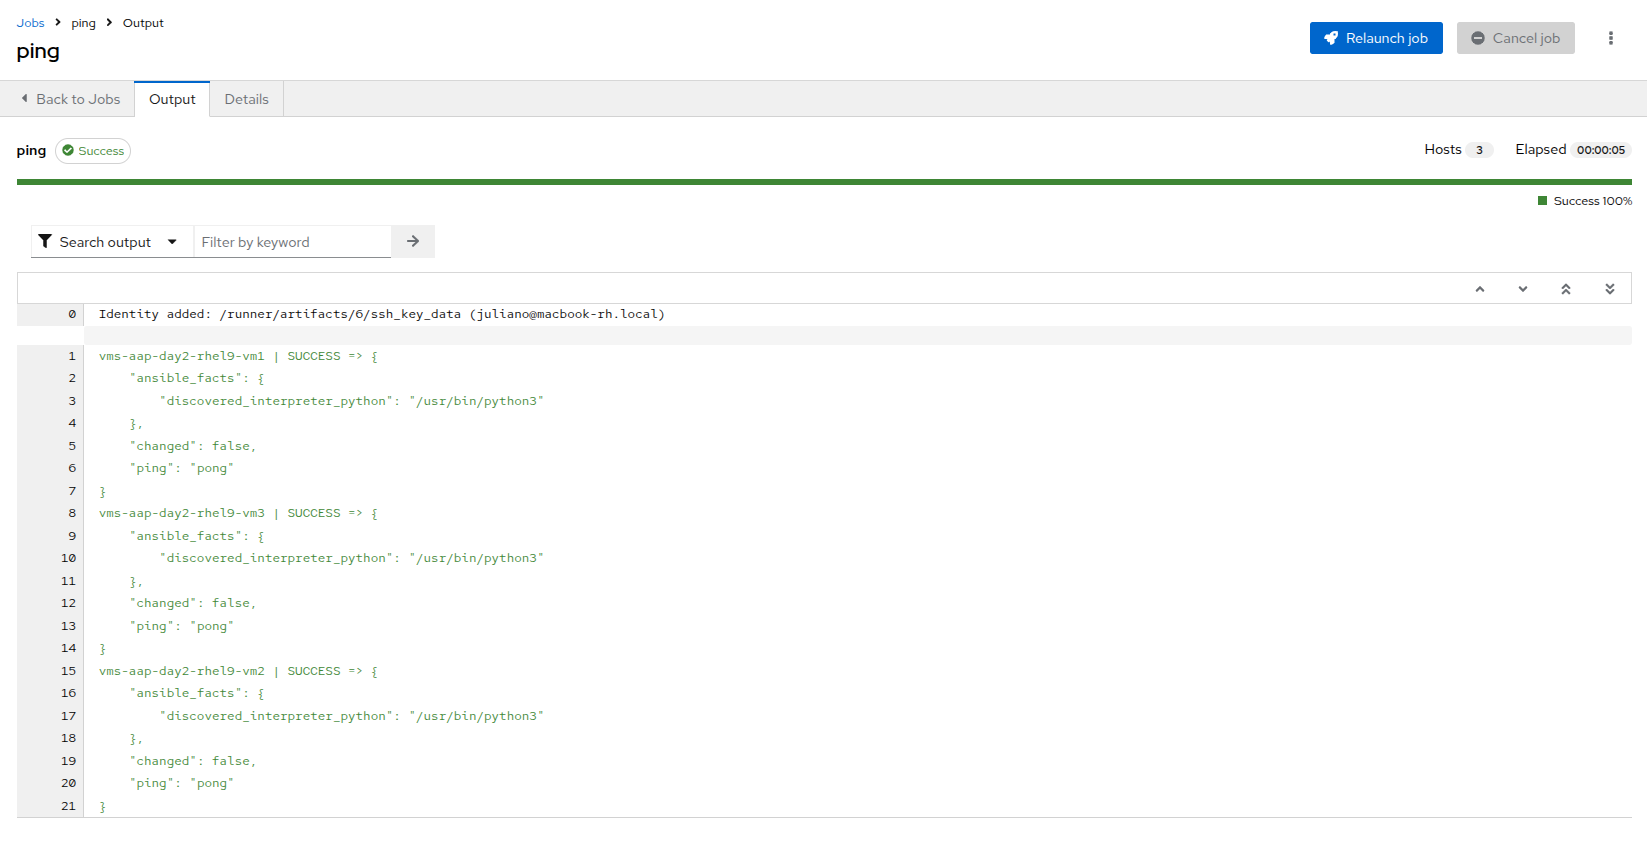 Figure 13. Ping Success
You may also confirm the VMs are running in a manual manner by logging into your OpenShift console, and viewing the virtual machines there manually.
Verifying VM Inventory in the OpenShift Console
-
Switch to your OpenShift administration console window.
-
On the left side navigation menu, click on Virtualization and then VirtualMachines.
-
Highlight the vms-aap-day2 project in the central navigation column.
-
Confirm that the virtual machines are running.
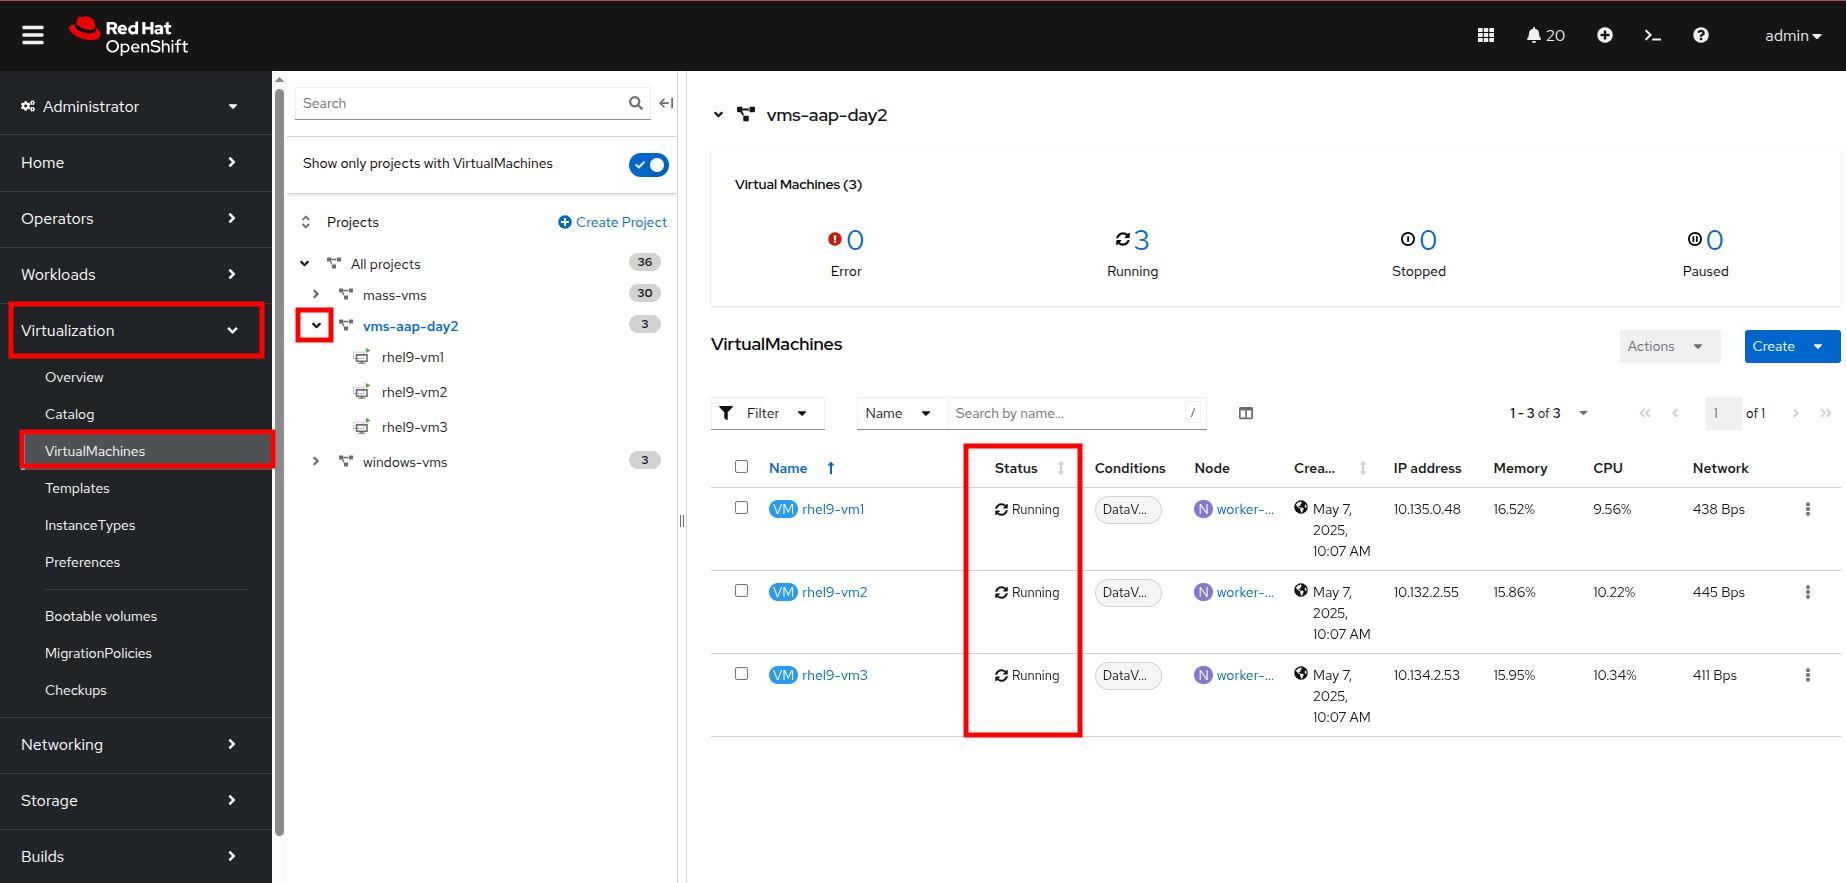 Figure 14. Virtual Machines Running on OpenShift
Automated VM Management
Stop, Start, Restart Guest VMs
Now that we’ve spent some time working with the OpenShift console, lets see what types of activities we can automate to make our administration jobs easier.
In this section, you’ll learn how to manage the lifecycle of your guest VMs running in Red Hat OpenShift Virtualization using Ansible Automation Platform (AAP).
While much of the groundwork, such as creating playbooks and VM task files, has already been completed for you, this section of the lab will focus on understanding how the pieces work together and how to run the automation via AAP.
To begin, we’ll perform some common VM lifecycle actions such as stopping, starting, and restarting all VMs in a given namespace. These tasks are designed to demonstrate how the automation behind these actions is structured.
The Existing Setup
To assist with your experience, the following content has already been created and configured for you:
-
The tasks/main.yml file has been pre-populated with dynamic task inclusion logic.
-
The Ansible playbook (manage_vm_playbook.yml) that calls the appropriate task based on input variables is already in place.
-
Individual task files for stopping, starting, and restarting VMs (stop_vm.yml, start_vm.yml, and restart_vm.yml) have been pre-written.
Although you don’t need to create or modify these files, it’s important to understand how they work, as you’ll be referencing them when creating job templates in Ansible Automation Platform.
Understanding the Task Files
Each of the task files works by retrieving all virtual machines within a specific namespace (in our case vms-aap-day2), and then performing an action (stop, start, restart) based on their current status. The ansible.builtin.debug task provides insights to understanding the structure of your VM resource vm_info to identify key fields required to create dynamic Ansible tasks.
stop_vm.yml
This task file stops any VMs that are currently running within a given namespace.
---
- name: Get all VirtualMachines in the namespace
  redhat.openshift_virtualization.kubevirt_vm_info:
    namespace: "{{ vm_namespace }}"
  register: vm_info

- name: Debug the vm_info variable
  ansible.builtin.debug:
    var: vm_info

- name: Stop VM using OpenShift API
  ansible.builtin.uri:
    url: "{{ OCP_HOST }}/apis/subresources.kubevirt.io/v1/namespaces/{{ vm_namespace }}/virtualmachines/{{ item.metadata.name }}/stop"
    method: PUT
    headers:
      Authorization: "Bearer {{ OCP_BEARER_TOKEN }}"
    validate_certs: false
    status_code:
      - 202
  loop: "{{ vm_info.resources }}"
  loop_control:
    label: "{{ item.metadata.name }}"
  changed_when: item.status.printableStatus != "Stopped"
start_vm.yml
This task file starts any VMs that are currently stopped within a given namespace.
---
- name: Get all VirtualMachines in the namespace
  redhat.openshift_virtualization.kubevirt_vm_info:
    namespace: "{{ vm_namespace }}"
  register: vm_info

- name: Debug the vm_info variable
  ansible.builtin.debug:
    var: vm_info

- name: Start VM using OpenShift API
  ansible.builtin.uri:
    url: "{{ OCP_HOST }}/apis/subresources.kubevirt.io/v1/namespaces/{{ vm_namespace }}/virtualmachines/{{ item.metadata.name }}/start"
    method: PUT
    headers:
      Authorization: "Bearer {{ OCP_BEARER_TOKEN }}"
    validate_certs: false
    status_code:
      - 202
  loop: "{{ vm_info.resources }}"
  loop_control:
    label: "{{ item.metadata.name }}"
  changed_when: item.status.printableStatus != "Running"
restart_vm.yml
This task file restarts any VMs that are currently running within a given namespace.
---
- name: Get all VirtualMachines in the namespace
  redhat.openshift_virtualization.kubevirt_vm_info:
    namespace: "{{ vm_namespace }}"
  register: vm_info

- name: Debug the vm_info variable
  ansible.builtin.debug:
    var: vm_info

- name: Restart VM using OpenShift API
  ansible.builtin.uri:
    url: "{{ OCP_HOST }}/apis/subresources.kubevirt.io/v1/namespaces/{{ vm_namespace }}/virtualmachines/{{ item.metadata.name }}/restart"
    method: PUT
    headers:
      Authorization: "Bearer {{ OCP_BEARER_TOKEN }}"
    validate_certs: false
    status_code:
      - 202
  loop: "{{ vm_info.resources }}"
  loop_control:
    label: "{{ item.metadata.name }}"
  changed_when: item.status.printableStatus != "Running"
These task files interact with the OpenShift REST API directly using the ansible.builtin.uri module to invoke the appropriate lifecycle action of stopping, starting, or restarting the virtual machine.
In addition, the debug task helps you to visualize the structure of VM data returned by the kubevirt_vm_info module and breaks down as follows:
-
The kubevirt_vm_info module retrieves all VMs in the namespace.
-
metadata.name: The name of the VirtualMachine.
-
metadata.namespace: The namespace the VM belongs to.
-
The loop_control option sets a label for each task iteration, showing the VM name (item.metadata.name) in the output. This makes the playbook output more readable and easier to debug.
-
status.printableStatus: The current status of the VM (e.g., Stop, Start,Restart).
A snippet sample of the ansible.builtin.debug module is shown below.
changed: true
result:
  apiVersion: kubevirt.io/v1
  kind: VirtualMachine
  metadata:
    annotations:
      kubectl.kubernetes.io/last-applied-configuration: >
        ...
    ...
    name: rhel9-vm1
    namespace: vms-aap-day2
  spec:
    ...
  status:
    ...
    printableStatus: Stopped
  ...
Creating and Running the VM Job Templates with Ansible Automation Platform
Each VM lifecycle template that you will create takes advantage of the manage_vm_playbook.yml.
In this section, you will make use of the Ansible Automation Platform (AAP) dashboard and create a VM Job Template for each scenario: Start VMs, Stop VMs, and Restart VMs. You will be able to see the effects of your automation jobs by checking back with the OpenShift console.
-
In the OpenShift console, use the left side navigation menu and click on Virtualization and then VirtualMachines. In the center column, click on the vms-aap-day2 project and verify that all three VMs are currently running.
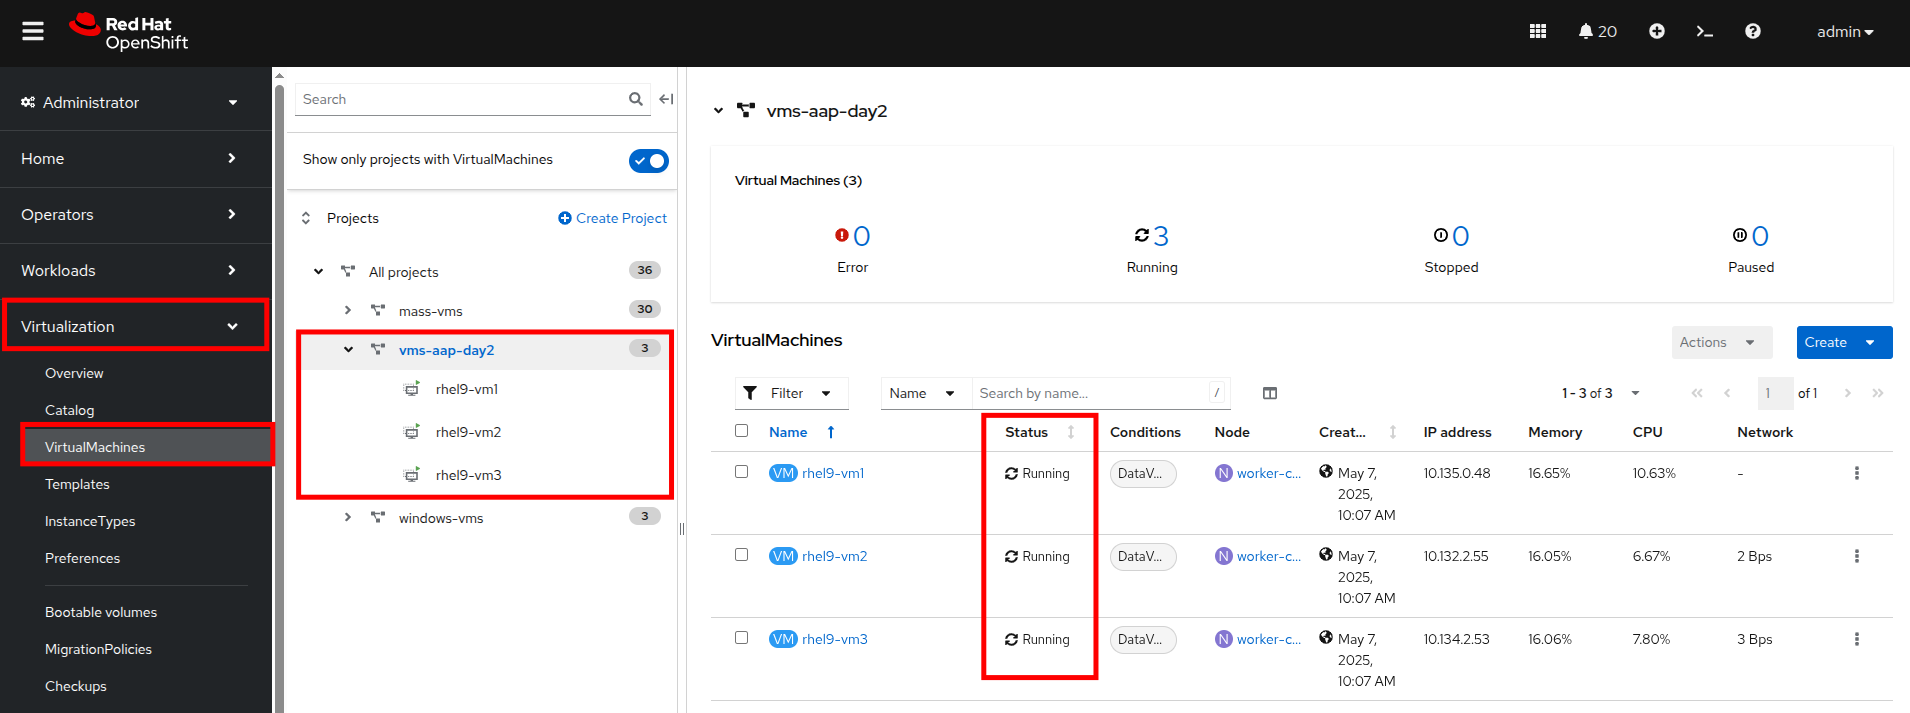 Figure 15. Running AAP VMs
 -
Return to the tab where you have Ansible Automation Platform open. If your previous login has timed out, or you have accidentally closed the window, the information to login again is here:
Your Ansible Automation Platform console is available here.
Your admin login is available with the following credentials:
-
User:
username -
Password
password-
Within the AAP UI dashboard, use the left side menu to navigate to Automation Execution then click on Templates. On the templates screen, click the Create template button, and chose Create job template from the dropdown menu.
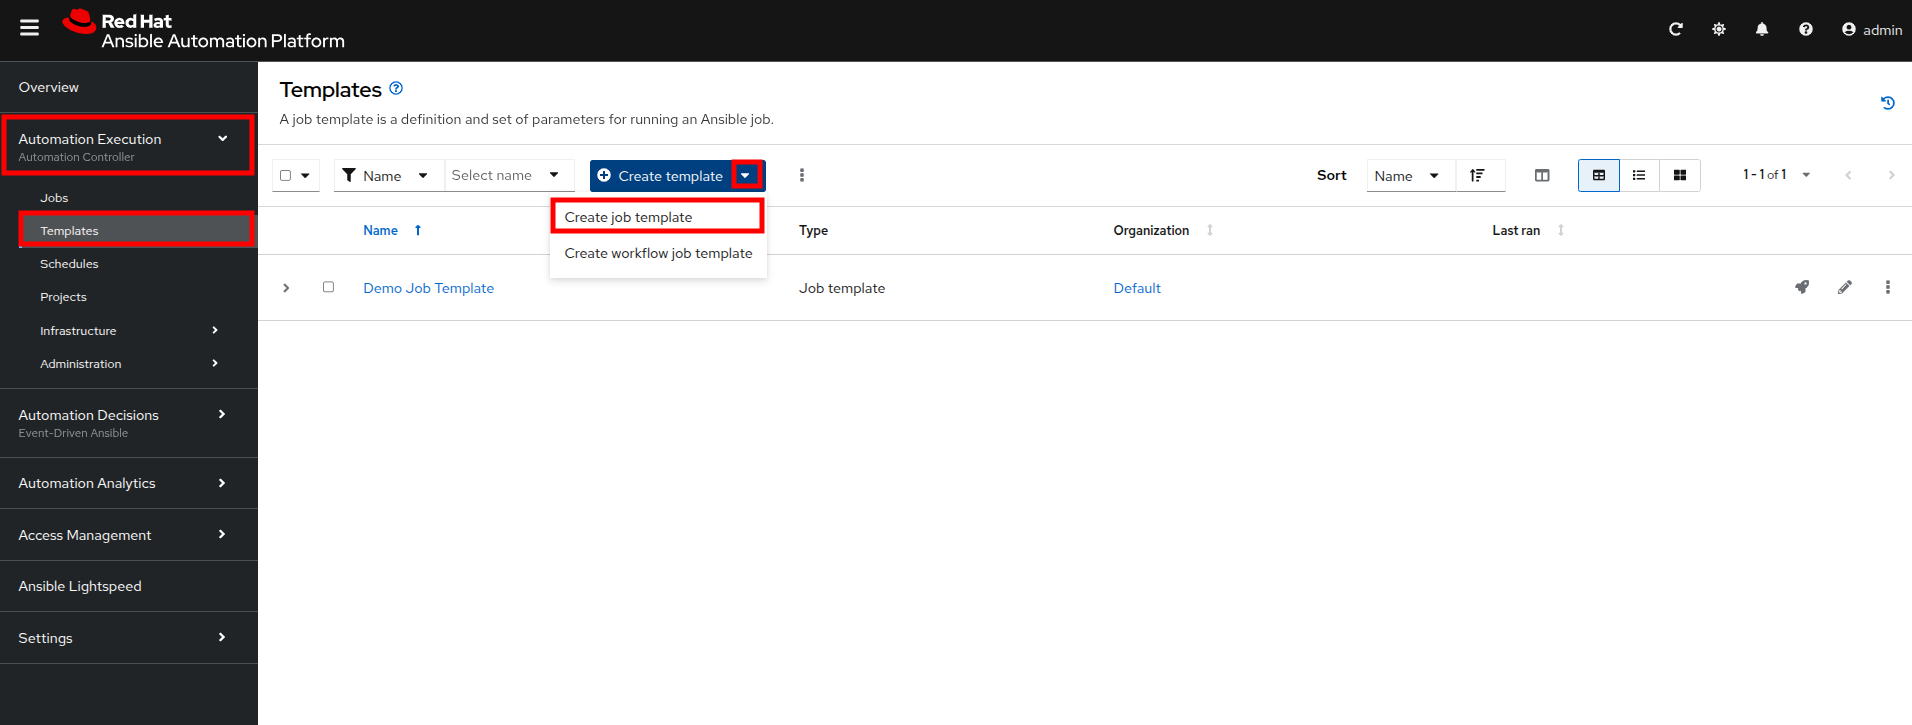 Figure 16. Create Job Template
 -
Fill out the following details on the Create job template page:
Parameter Value Name
Stop VMsJob Type
Run
Inventory
OpenShift Virtual Machines
Project
Workshop Project
Playbook
solutions/manage_vm_playbook.yml
Execution Environment
Day2 EE
Credentials
OpenShift Credential
Extra variables
vm_namespace: vms-aap-day2
task_file: stop_vm.yml -
Once filled out, click the Create job template button.
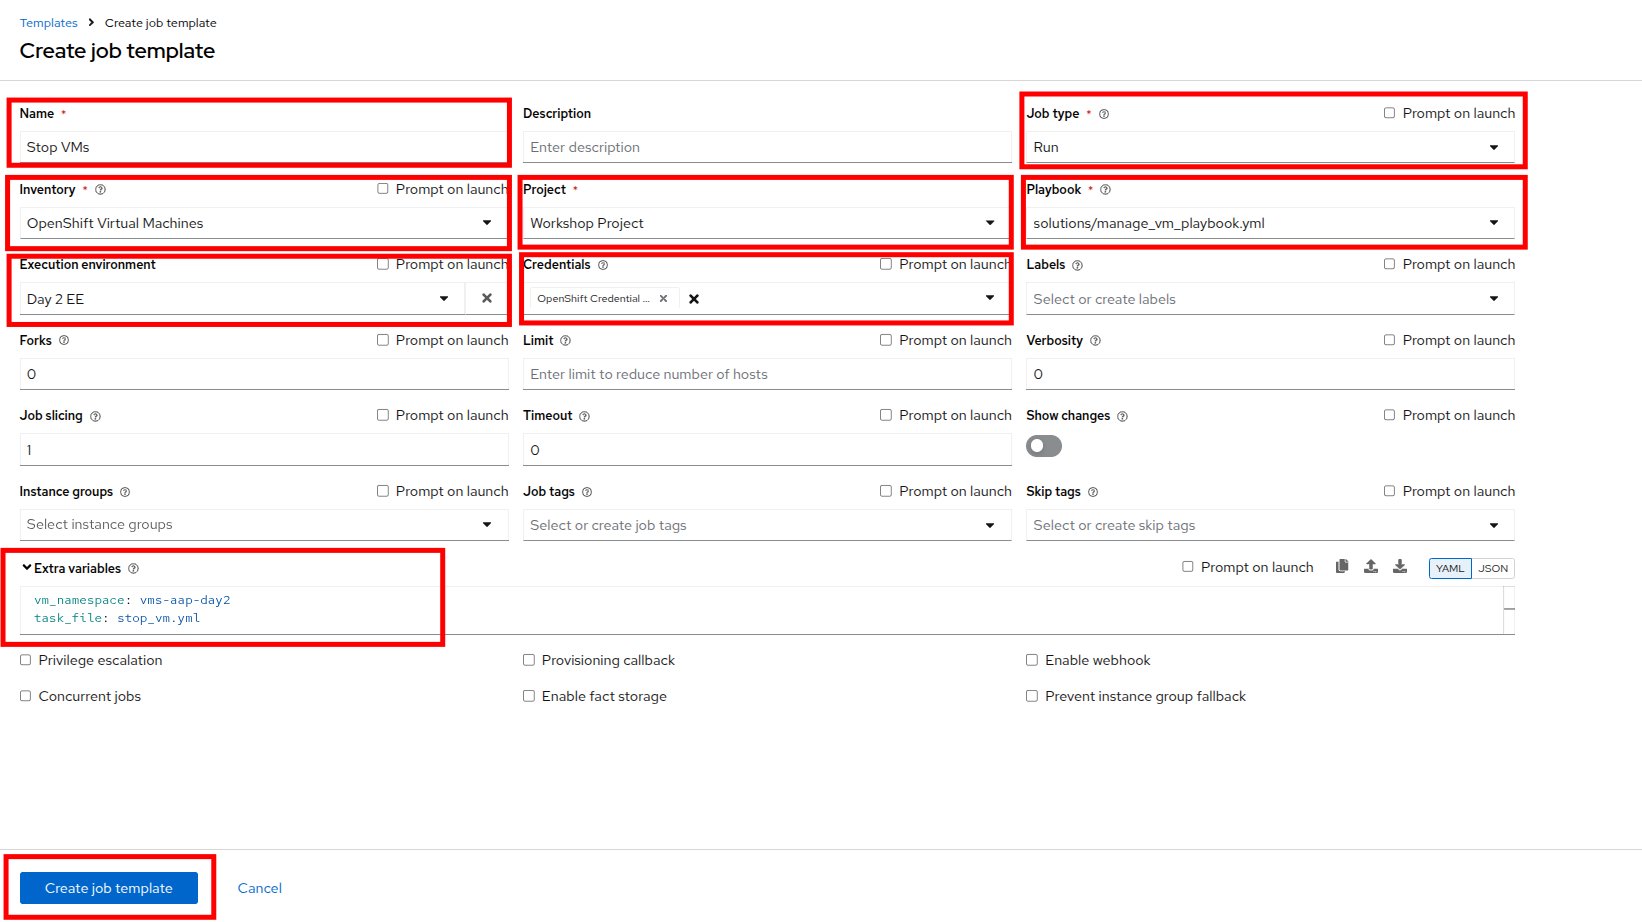 Figure 17. Stop VMs Template
 -
Once the Stop VMs Job Template is created, select the Launch template button on the top right corner to run the job.
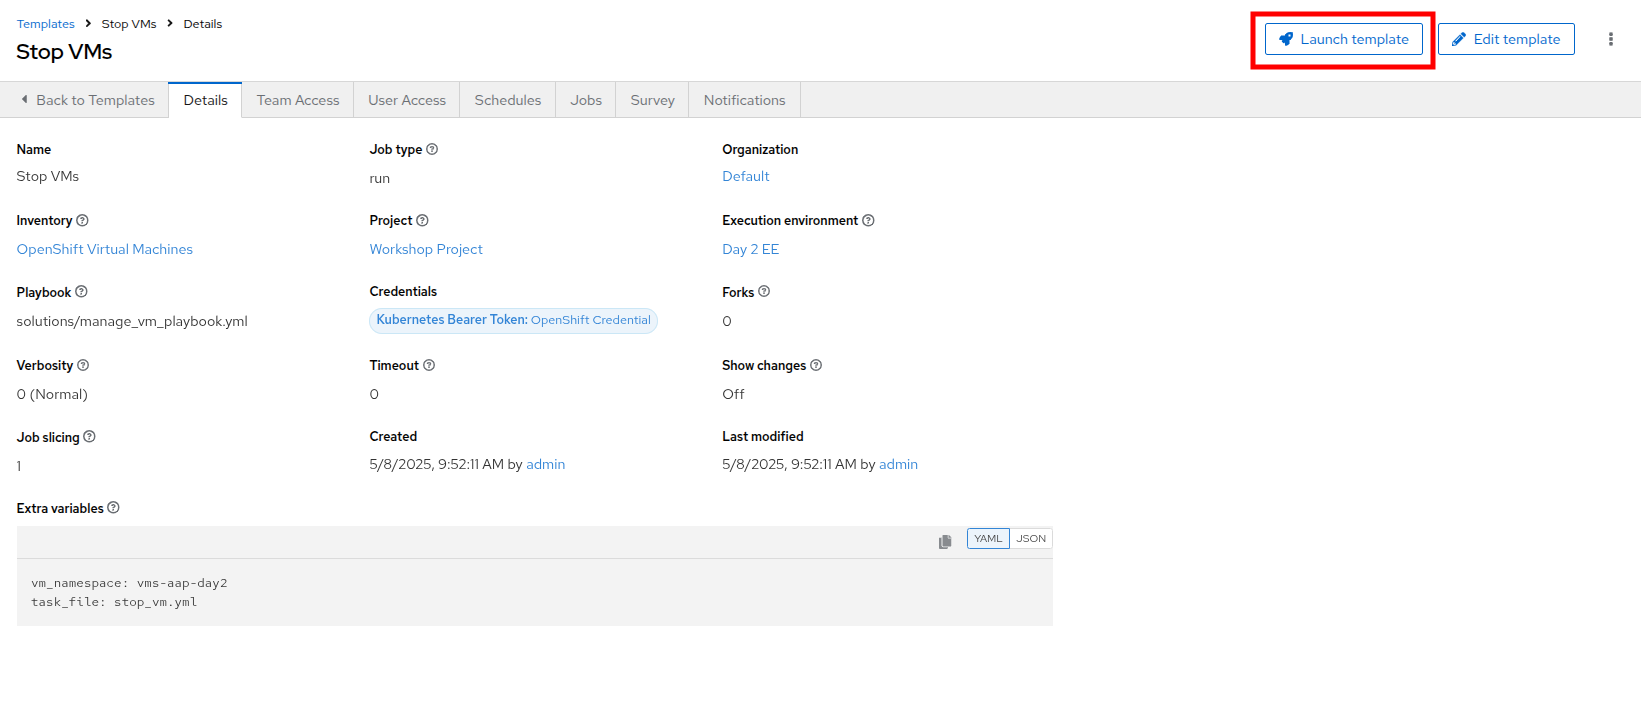 Figure 18. Launch Stop VMs Template
 -
The job will start running, and once it is successful you will see changes displayed in yellow.
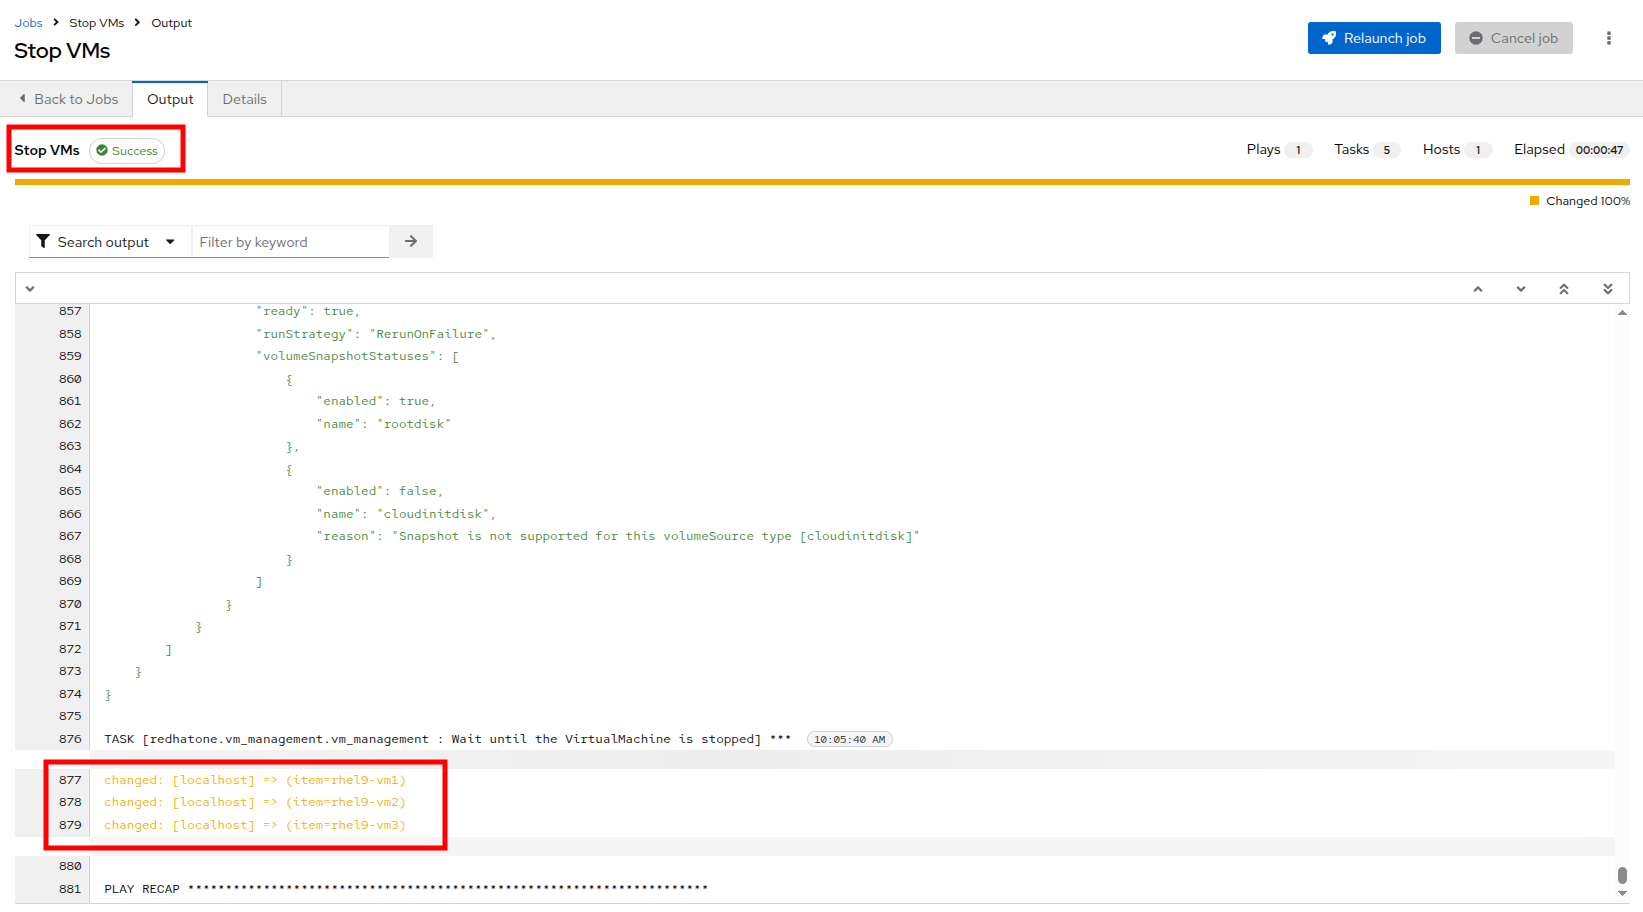 Figure 19. Successful Job
 -
Return to the OpenShift console to see that the virtual machines in the vms-aap-day2 project have all now stopped.
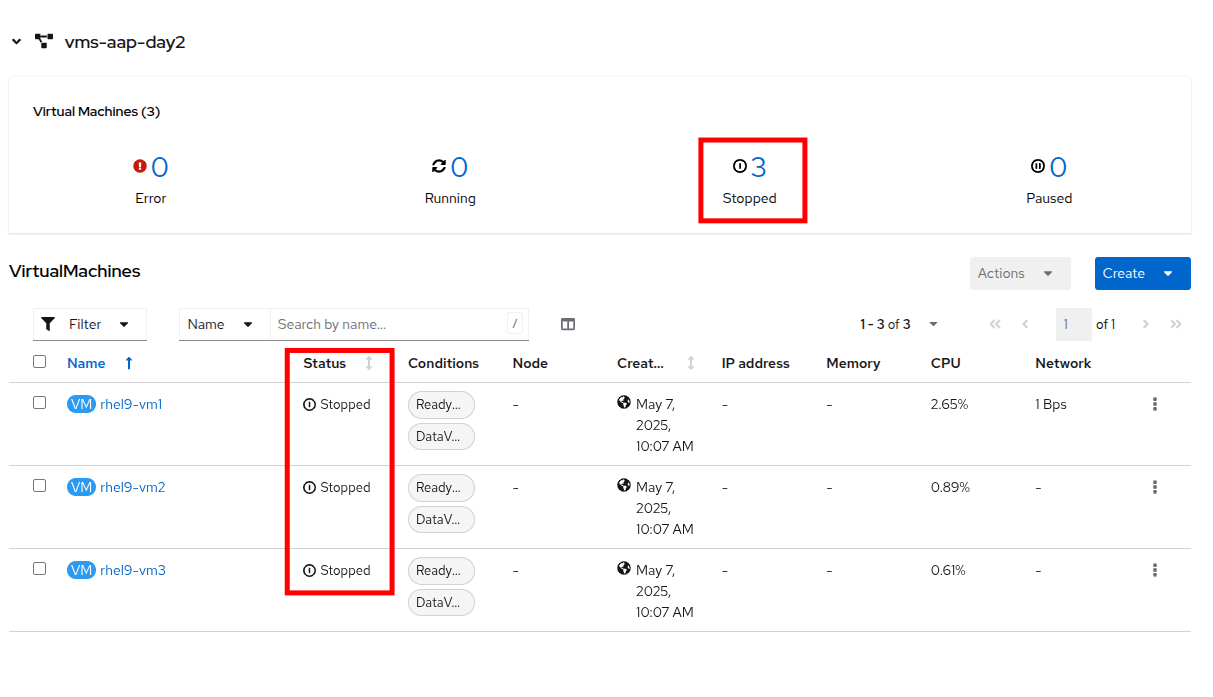 Figure 20. Stopped VMs
 -
Return to the AAP Dashboard, and repeat this process to create the Start VMs and Restart VMs Ansible Job Templates. The details for each is provided below.
-
For Starting VMs, use the following details to create the job template:
Parameter Value Name
Start VMsJob Type
Run
Inventory
OpenShift Virtual Machines
Project
Workshop Project
Playbook
solutions/manage_vm_playbook.yml
Execution Environment
Day2 EE
Credentials
OpenShift Credential
Extra variables
vm_namespace: vms-aap-day2
task_file: start_vm.yml -
For Restarting VMs, use the following details to create the job template:
Parameter Value Name
Restart VMsJob Type
Run
Inventory
OpenShift Virtual Machines
Project
Workshop Project
Playbook
solutions/manage_vm_playbook.yml
Execution Environment
Day2 EE
Credentials
OpenShift Credential
Extra variables
vm_namespace: vms-aap-day2
task_file: restart_vm.yml -
Once you have created these Job templates select the Launch template button on the top right corner to run the job and notice the changes of these VMs within the OpenShift console. Each VM should start back up after executing the Start VMs template, and then each machine should reboot after executing the Restrat VMs template.
-
Patching Guest VMs
In this exercise, you’ll automate the patching of RHEL virtual machines by applying only security-related updates using Ansible Automation Platform.
The virtual machines you’ll target are already part of the dynamic inventory that was set up in a previous step — specifically, the OpenShift Virtual Machines inventory.
Rather than writing playbooks or tasks from scratch, you’ll be working with provided automation content, which includes:
-
A task file that performs security updates using the dnf module.
-
A playbook that executes roles that are responsible for system registration and patching.
Your goal is to understand what this content does and then create a Job Template to execute the automation using Ansible Automation Platform’s web UI.
| This lab uses Vault Credentials to securely handle sensitive authentication data and a subscription management role to register RHEL systems to Red Hat. This ensures VMs have access to the correct repositories for updates and demonstrates secure automation practices. |
Understanding the Provided Task File: update_security_packages.yml
This task file lives inside the tasks/ directory of the redhatone.vm_management.vm_management role. It uses the ansible.builtin.dnf module to scan for and install the latest security-related updates on all hosts in the inventory.
- name: Update security-related packages on all hosts
  ansible.builtin.dnf:
    name: "*" (1)
    security: true (2)
state: latest (3)| 1 | name: "*" — Targets all available packages. |
| 2 | security: true — Filters for only security-related updates. |
| 3 | state: latest — Ensures the latest available security updates are installed. |
This task is designed to be modular. It is included in your role and can be triggered from any playbook using a variable like task_file, which will be used shortly.
Understanding the Provided Playbook: patch_vm_playbook.yml
This playbook is responsible for executing the logic that handles both system registration and patching. It is already present in your project directory.
- name: Patch Virtual Machines
  hosts: all
  roles:
    - redhatone.vm_management.rhsm_subscription (1)
- redhatone.vm_management.vm_management (2)| 1 | redhatone.vm_management.rhsm_subscription: Registers the RHEL VMs to Red Hat using credentials provided via Vault. This step ensures the systems have access to the necessary repositories for receiving updates. |
| 2 | redhatone.vm_management.vm_management: Calls the role that includes the security update task (update_security_packages.yml), referenced via the task_file variable. |
The playbook ensures that every target host goes through both registration and patching in the correct order.
Creating the Patch VMs Job Template in Ansible Automation Platform
Now lets connect all the pieces through the AAP web interface and run the automation using a Job Template.
-
Using the left side navigation bar, click on Automation Execution and then Templates.
-
Click on the Create template button, and then select Create job template from the dropdown menu.
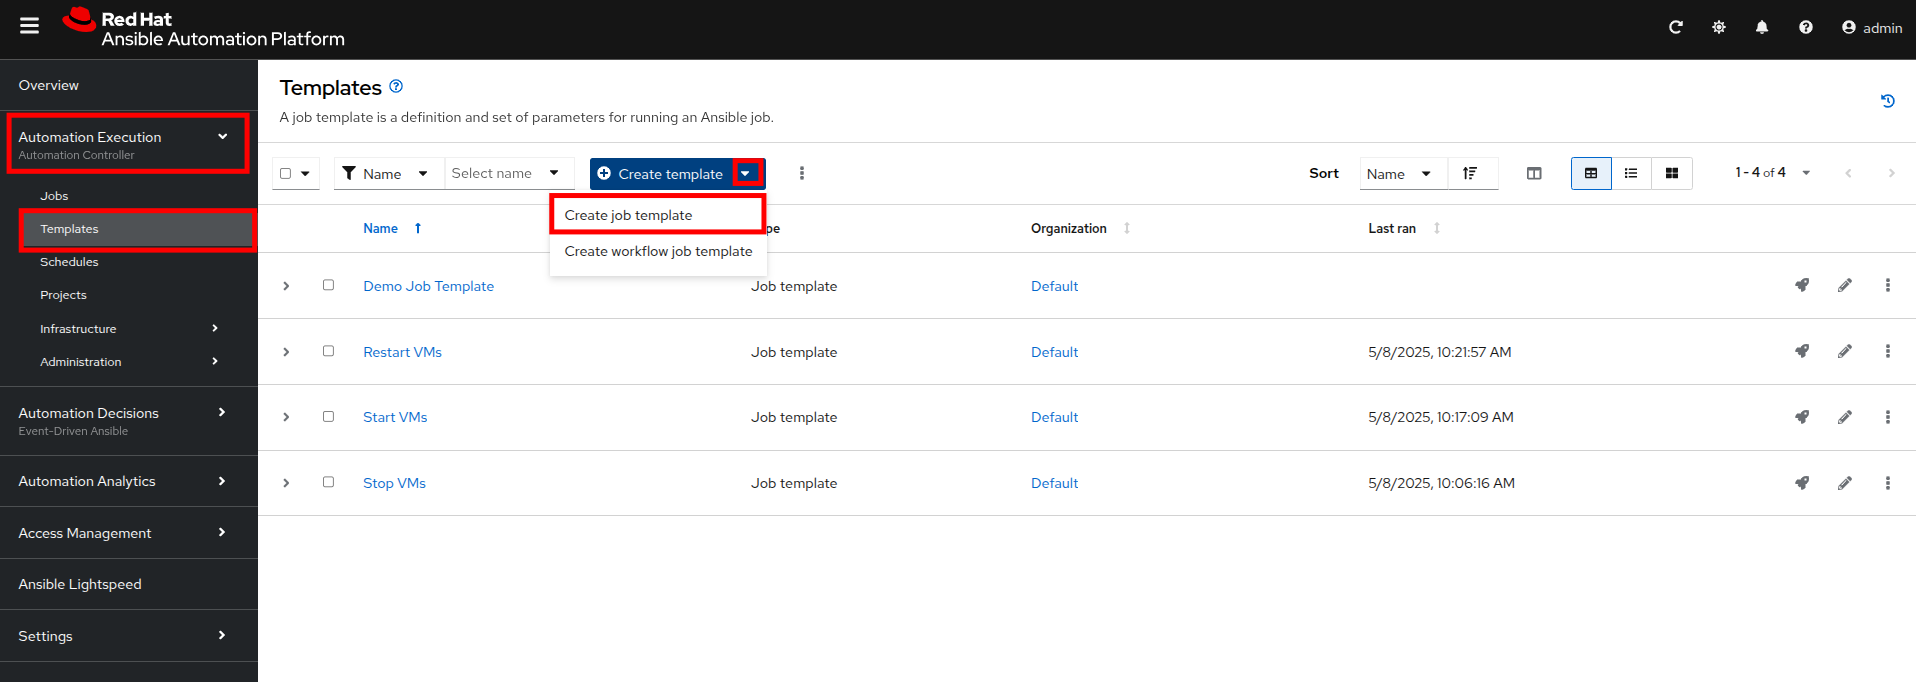 Figure 21. Stop VMs Template
 -
On the Create job template page, fill out the following fields:
Parameter Value Name
Patch VMsJob Type
Run
Inventory
OpenShift Virtual Machines
Project
Workshop Project
Playbook
solutions/patch_playbook.yml
Execution Environment
Day2 EE
Credentials
Workshop Credential, Vault Credential
Extra Variables
task_file: update_security_packages.ymlPrivilege Escalation
Enabled
Notice there are two credentials attached and privilege escalation is enabled. -
Once the form is filled out, click the Create job template button.
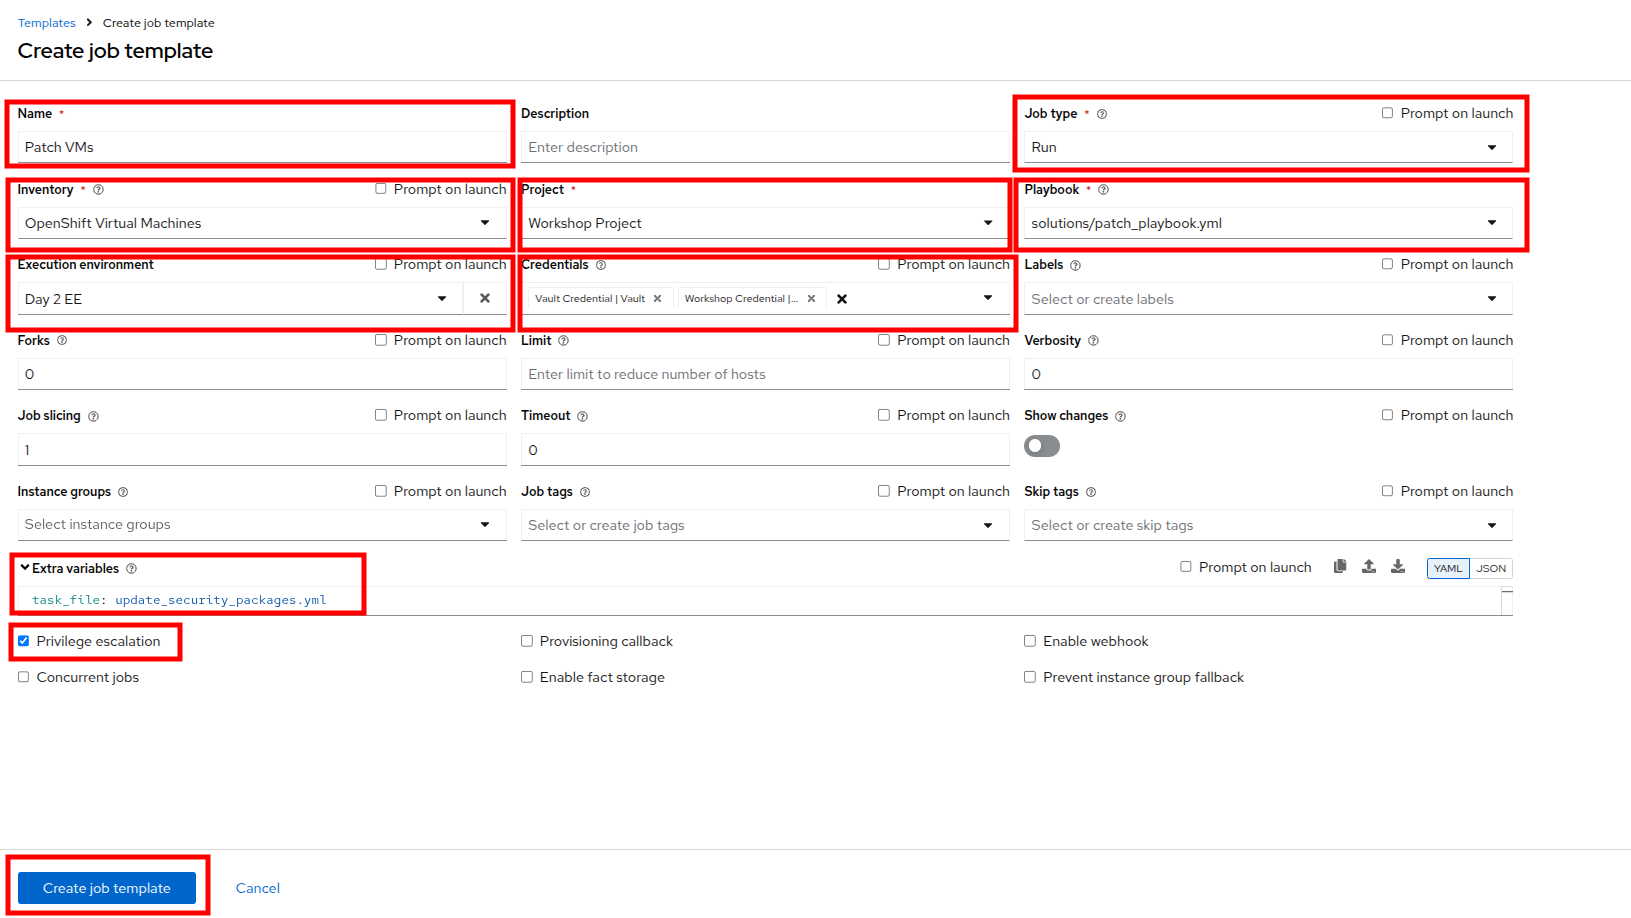 Figure 22. Create Patch Template
 -
Once created, click Launch Template button in the top-right corner to start the job.
-
When the Patch VMs job has completed successfully, you should see output similar to:
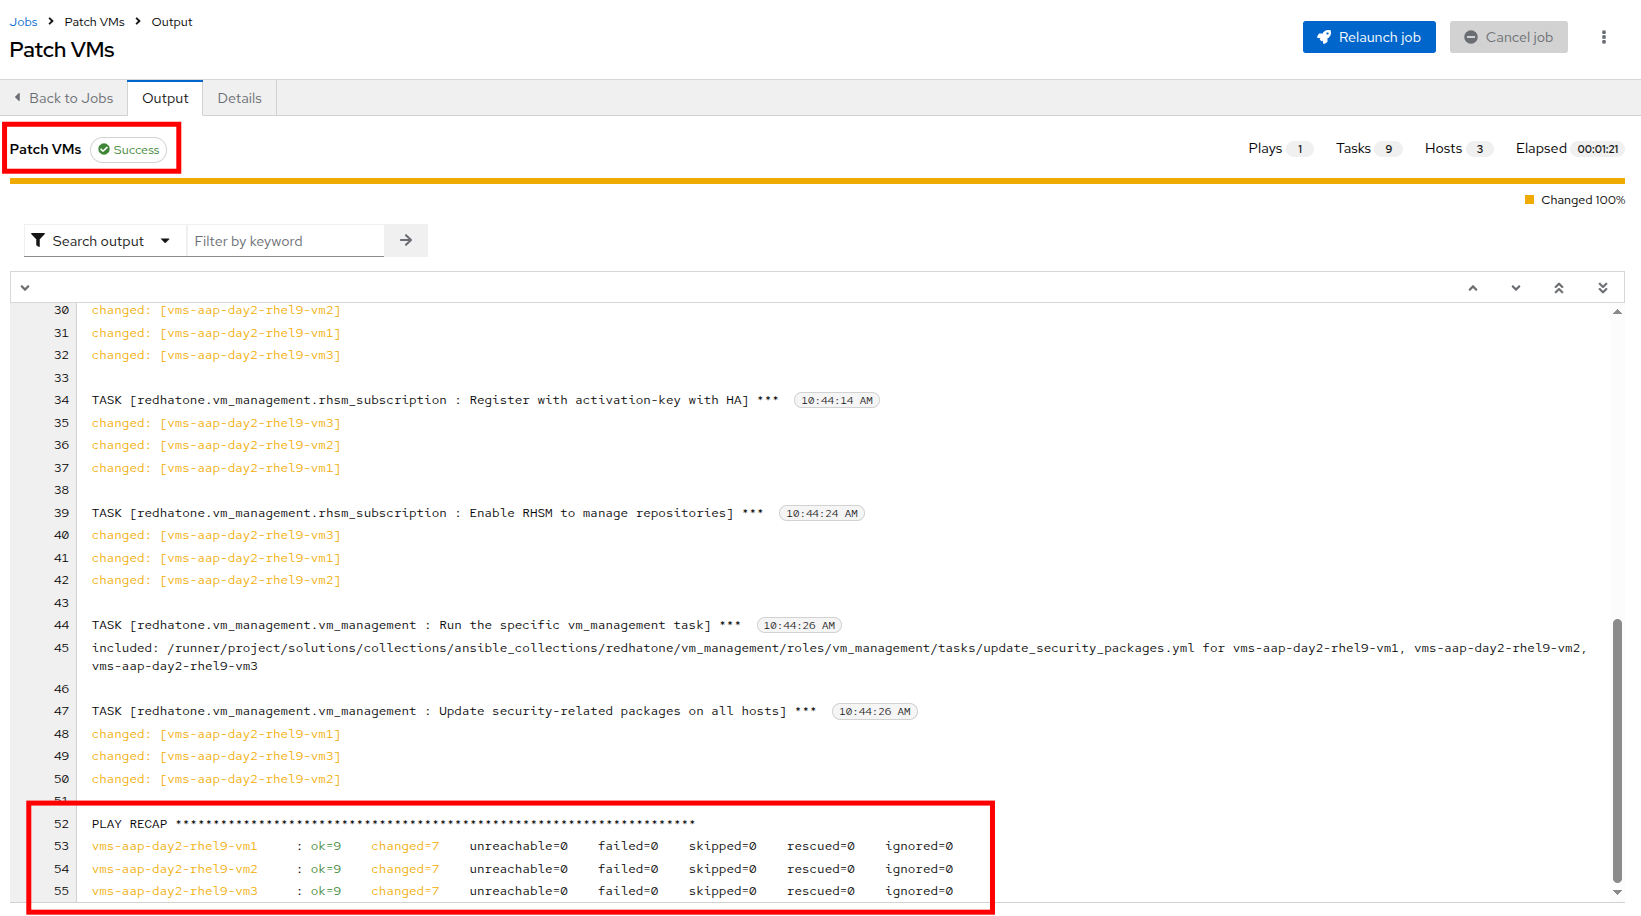 Figure 23. Patch VM
Reviewing the Job Output
After the job runs, you’ll be able to see:
-
A task-by-task breakdown showing which operations were performed.
-
Output for the task titled Update security-related packages on all hosts.
-
Per-host details indicating which security updates were applied.
-
Under the TASK for Update security-related packages on all hosts, click on vms-aap-day2-rhel9-vm1.
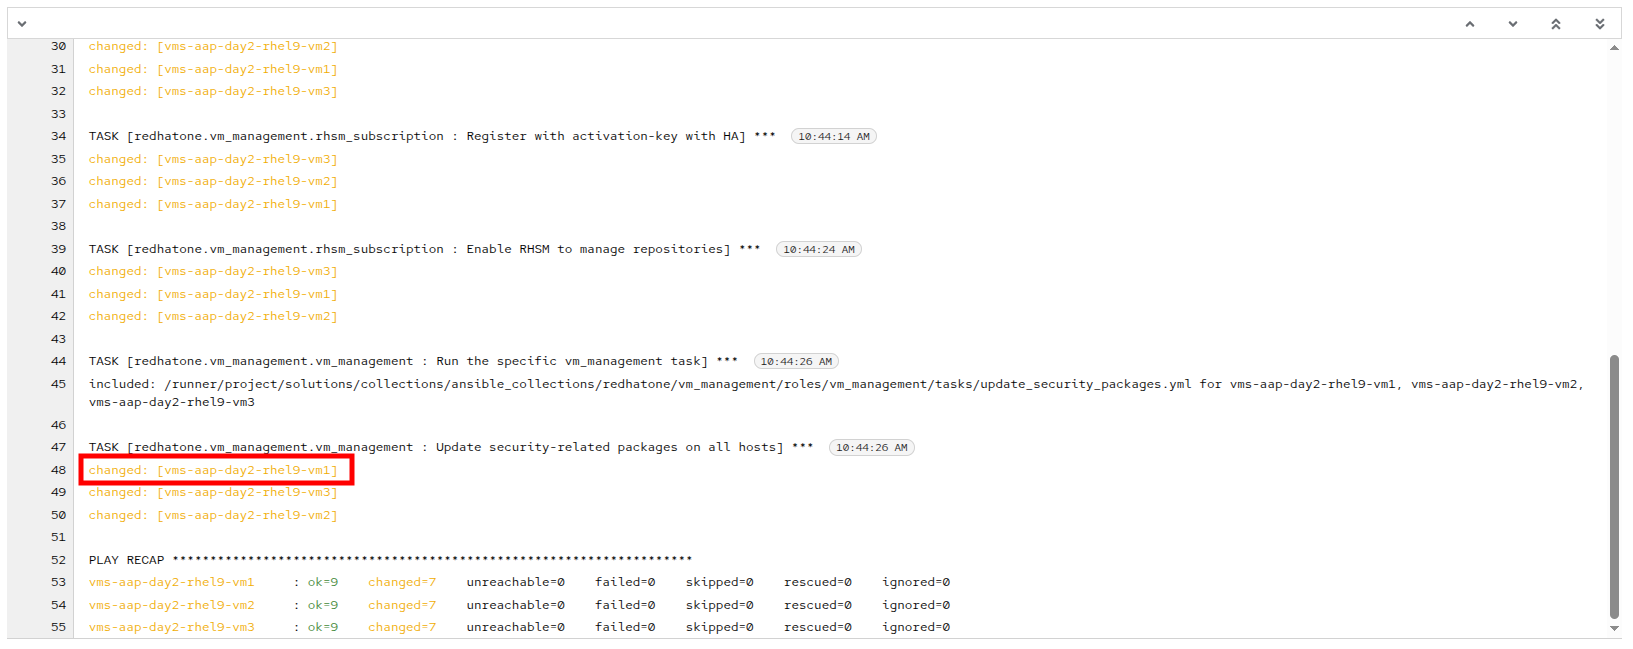 Figure 24. Patching Complete
 -
You will be presented with additional Details about the task, and be able to validate that system was indeed patched by our automation job by clicking on the Data tab.
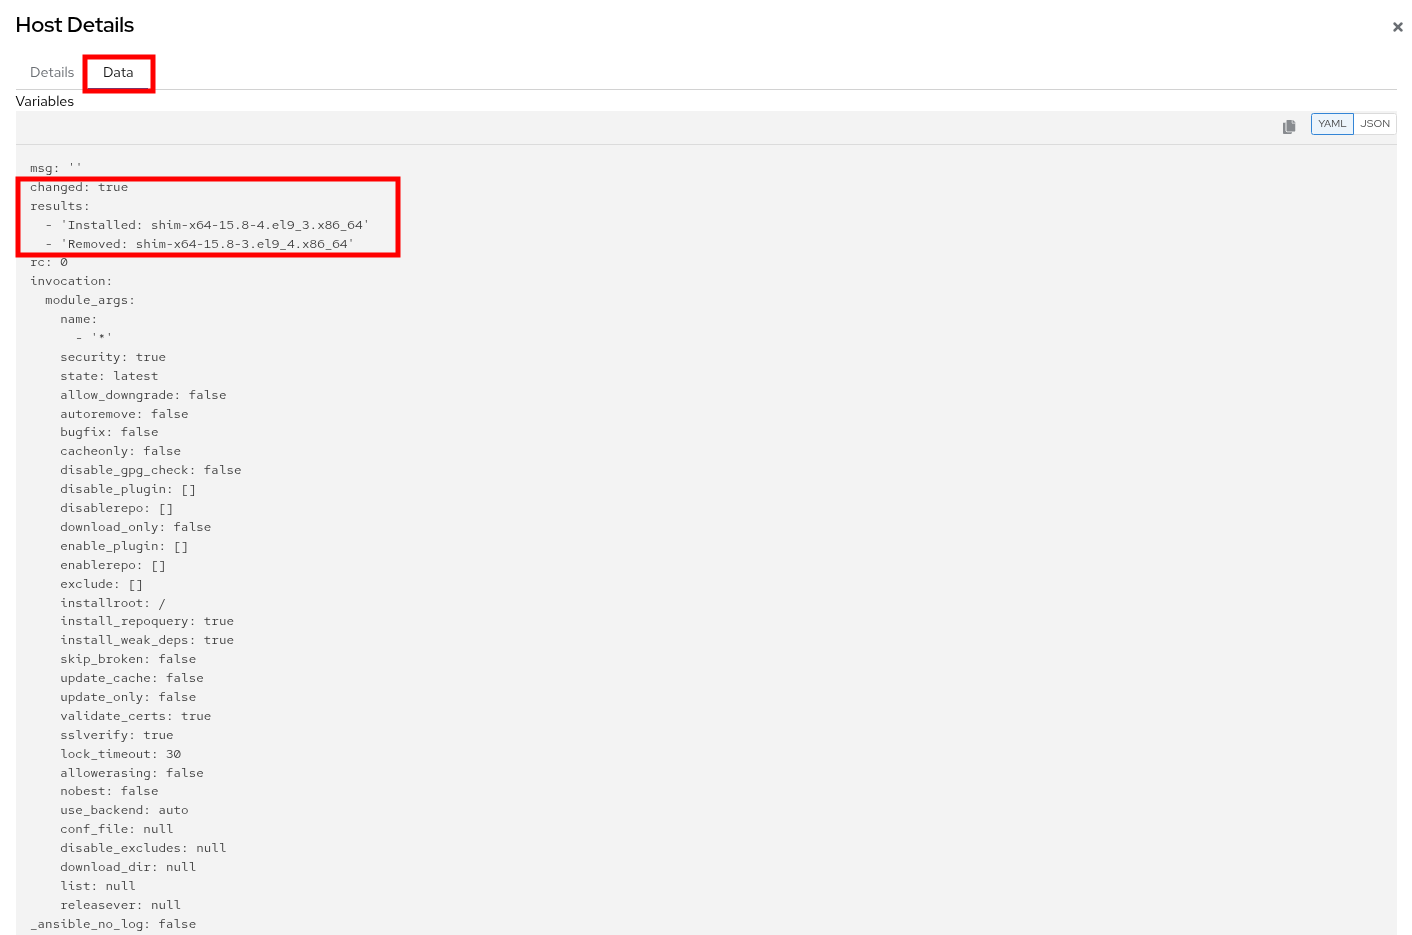 Figure 25. Patch Details
-
Hot-Plugging CPU and Memory Resources
One of the great benefits of having virtual workloads is the ability to adjust the resources used by those workloads on the fly to meet workload demands. Compared to the days of having to shut down the server to physically add RAM or upgrade the processor, the ability to scale VM resources dynamically by hot-plugging additional resources is a fantastic timesaver. Also, being able to automate the scaling up and down of these requests using Ansible Automation Platform based on metrics gathered from the guests ensures efficiency in both resource consumption and physical administrative time.
In this section, you will learn how to hot-plug CPU and memory resources into a running Virtual Machine (VM) using Ansible Automation Platform and the redhat.openshift_virtualization collection.
Hot-plugging is the ability to add or remove hardware resources, such as CPU or memory, to a running VM without requiring a reboot. This capability is critical for dynamic workloads, allowing you to scale resources based on demand while minimizing downtime.
This exercise focuses on using instance types, which are reusable objects in OpenShift Virtualization that define the resources and characteristics for VMs. Instance types simplify resource management by enabling consistent configurations across VMs.
What Are Instance Types?
An instance type is a reusable configuration object where you define resources (like CPU and memory) and characteristics for new VMs. OpenShift Virtualization provides two types of instance types:
-
VirtualMachineInstancetype: A namespaced object for instance types limited to a specific namespace.
-
VirtualMachineClusterInstancetype: A cluster-wide object for instance types available across all namespaces.
Both types share the same VirtualMachineInstancetypeSpec, which allows you to define custom configurations or use the variety of instance types included by default when OpenShift Virtualization is installed.
By using instance types, you can simplify VM configuration management and ensure consistency throughout all your deployments, making them the recommended approach for hot-plugging resources.
In this lab, you will primarily focus on using the instance type method while also learning about the classic approach of directly modifying the VM specification for context.
| The classic method only works when creating VMs that do not use an instance type. |
How to Identify if a VM Uses Instance Types or Not?
To determine whether a VM is created with an instance type or not, follow these steps:
-
Navigate to the Overview tab of the rhel9-vm1 in the OpenShift Virtualization console.
-
In the Details section, look for the following:
-
Instance Type: If the VM uses an instance type, this field will display the name of the instance type applied to the VM (e.g., u1.small).
-
Template: If no instance type is used, this field will display either None or the name of the template used to create the VM.
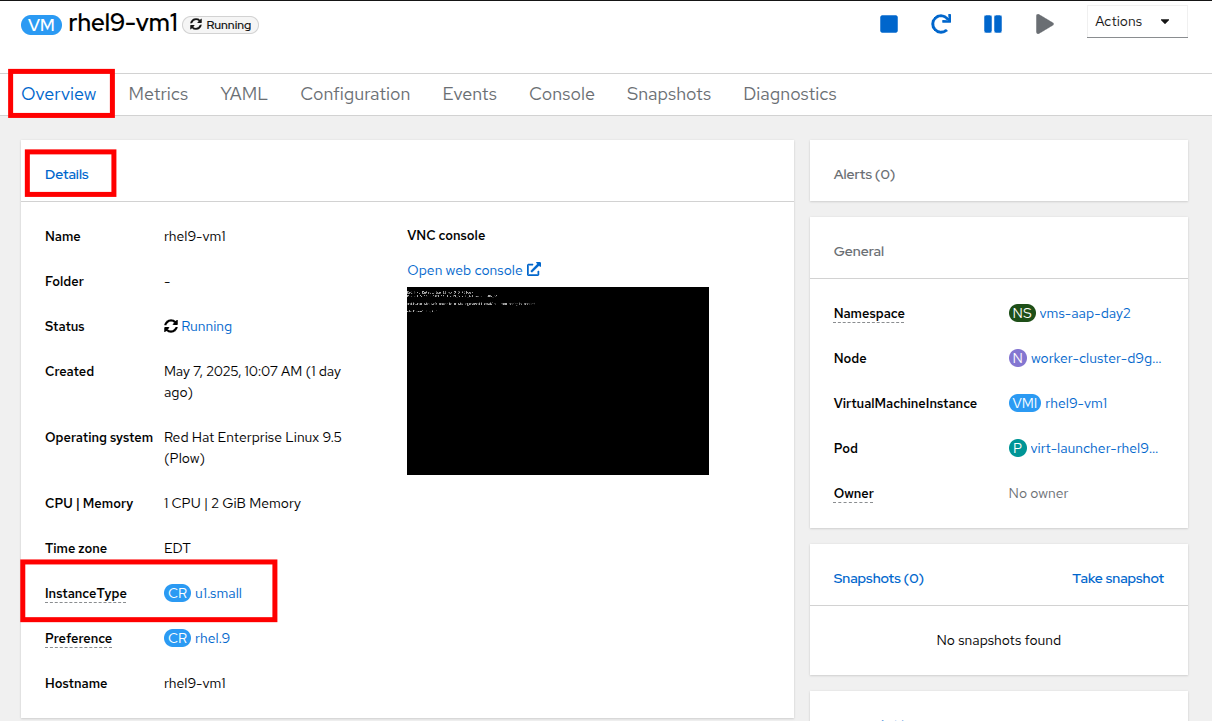 Figure 26. VM Details
-
The instance_type method is the recommended approach for hot-plugging resources into a VM. It ensures consistent and reusable resource configurations across multiple VMs while leveraging the powerful features of OpenShift Virtualization.
Using the Pre-created hot_plug.yml File to Update Resources
The hot_plug.yml file consists of a task that updates a running VM by applying a new instance type. This approach lets you add CPU and memory resources dynamically without needing to recreate or power off the VM.
- name: Swap Instance Type to add more Resources
  redhat.openshift_virtualization.kubevirt_vm: (1)
    name: "rhel9-vm1" (2)
    namespace: "{{ vm_namespace }}" (3)
    state: present (4)
    run_strategy: RestartOnError (5)
    instancetype: (6)
      name: "{{ instance_type }}" (7)
revisionName: "" (8)| 1 | redhat.openshift_virtualization.kubevirt_vm: Specifies the module used to manage VMs in OpenShift Virtualization. |
| 2 | name: The name of the VM to which the new resources will be applied. |
| 3 | namespace: The namespace in which the VM resides. |
| 4 | state: Ensures the VM is present and available. |
| 5 | run_strategy: Restarts the VM in case of errors, does not start machines stopped manually. |
| 6 | instancetype: Defines the instance type for the VM, allowing you to use pre-configured or custom resource settings. |
| 7 | instancetype.name: The name of the instance type to be applied. |
| 8 | instancetype.revisionName: Optionally specifies the exact revision of the instance type, ensuring compatibility with the VM. It is typically auto-generated, thus left empty. |
| VMs must be created using Instance Types for this task method to work. Otherwise you must use the Classic method. |
Classic Method: Modifying the Spec Directly (Informational Only)
The classic method involves directly modifying the VM’s spec file to update CPU and memory resources. While this approach is flexible, it lacks the reusability and consistency offered by instance types, making it less ideal for managing resources across multiple VMs.
- name: Modify CPU & Memory Resources
  redhat.openshift_virtualization.kubevirt_vm: (1)
    name: "rhel9-vm2" (2)
    namespace: "{{ vm_namespace }}" (3)
    state: present (4)
    spec: (5)
      domain: (6)
        cpu: (7)
          sockets: 2
        memory: (8)
guest: 4Gi| 1 | redhat.openshift_virtualization.kubevirt_vm: Specifies the module used to manage VMs in OpenShift Virtualization. |
| 2 | name: The name of the VM being modified. |
| 3 | namespace: The namespace in which the VM resides. |
| 4 | state: Ensures the VM is in the desired state, in this case, present. |
| 5 | spec: Directly modifies the VM’s specification. |
| 6 | spec.domain: Contains settings related to the VM’s virtualized environment. |
| 7 | spec.domain.cpu: Specifies the number of CPU sockets for the VM (e.g., 2). |
| 8 | spec.domain.memory: Defines the memory allocated to the VM, (e.g., 4Gi). |
| Classic VMs are not a part of this lab exercise, and the Classic Method is for informational purposes only. |
Create and Run the Hot-Plug Job Template
-
Within the AAP UI Dashboard, use the left side menu to navigate to Automation Execution and then click on Templates.
-
Click Create Template and select Create job template from the dropdown menu that appears.
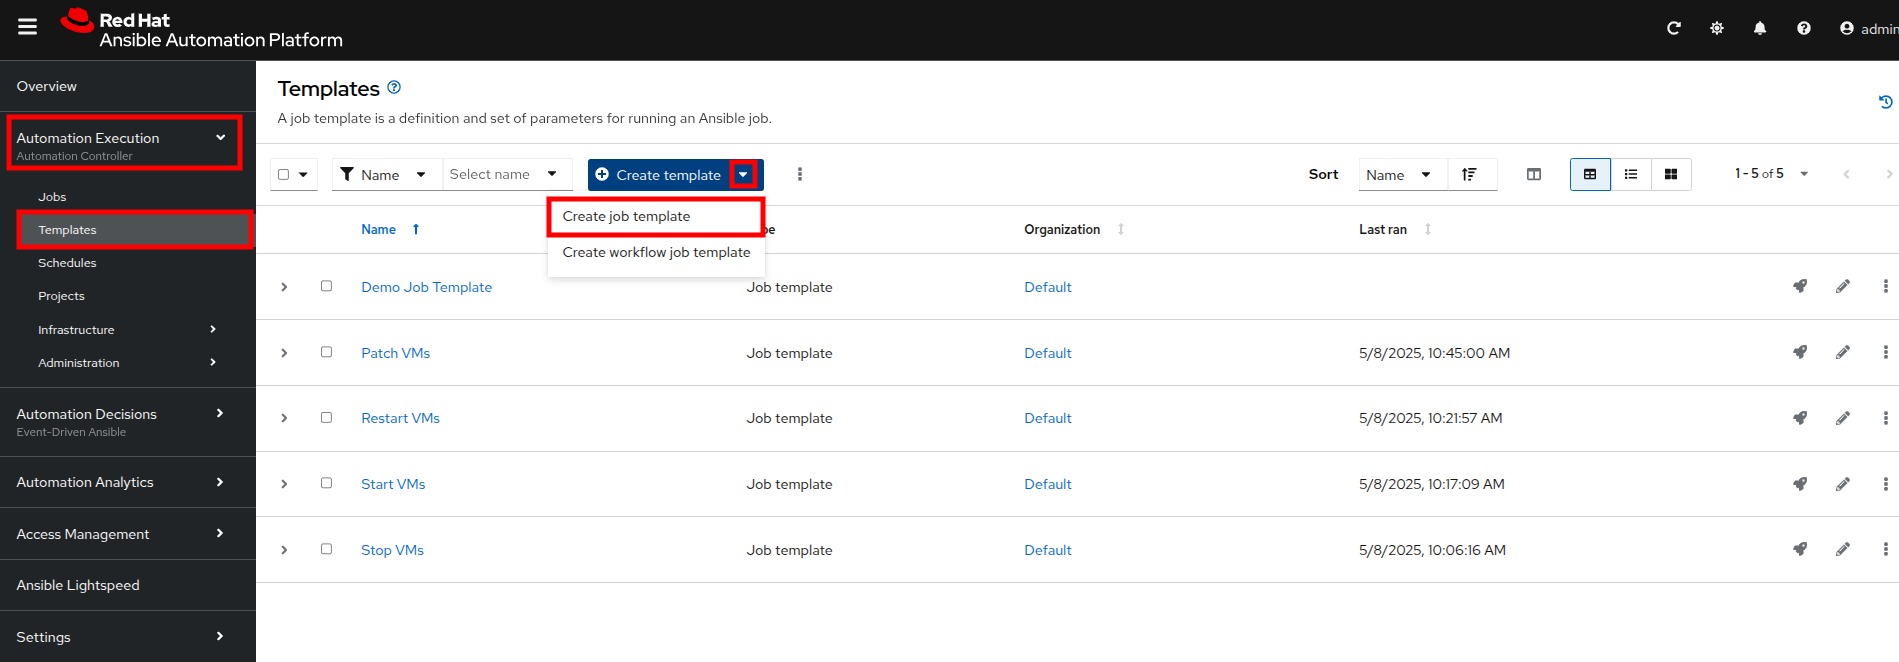 Figure 27. Create Job Template
 -
Fill in the following details to create a job template:
Parameter Value Name
Hot Plug VMsJob Type
Run
Inventory
OpenShift Virtual Machines
Project
Workshop Project
Playbook
solutions/manage_vm_playbook.yml
Execution Environment
Day 2 EE
Credentials
OpenShift Credential
Extra variables
vm_namespace: vms-aap-day2
task_file: hot_plug.yml
instance_type: u1.2xmedium -
When the details are filled out, click Create Job Template.
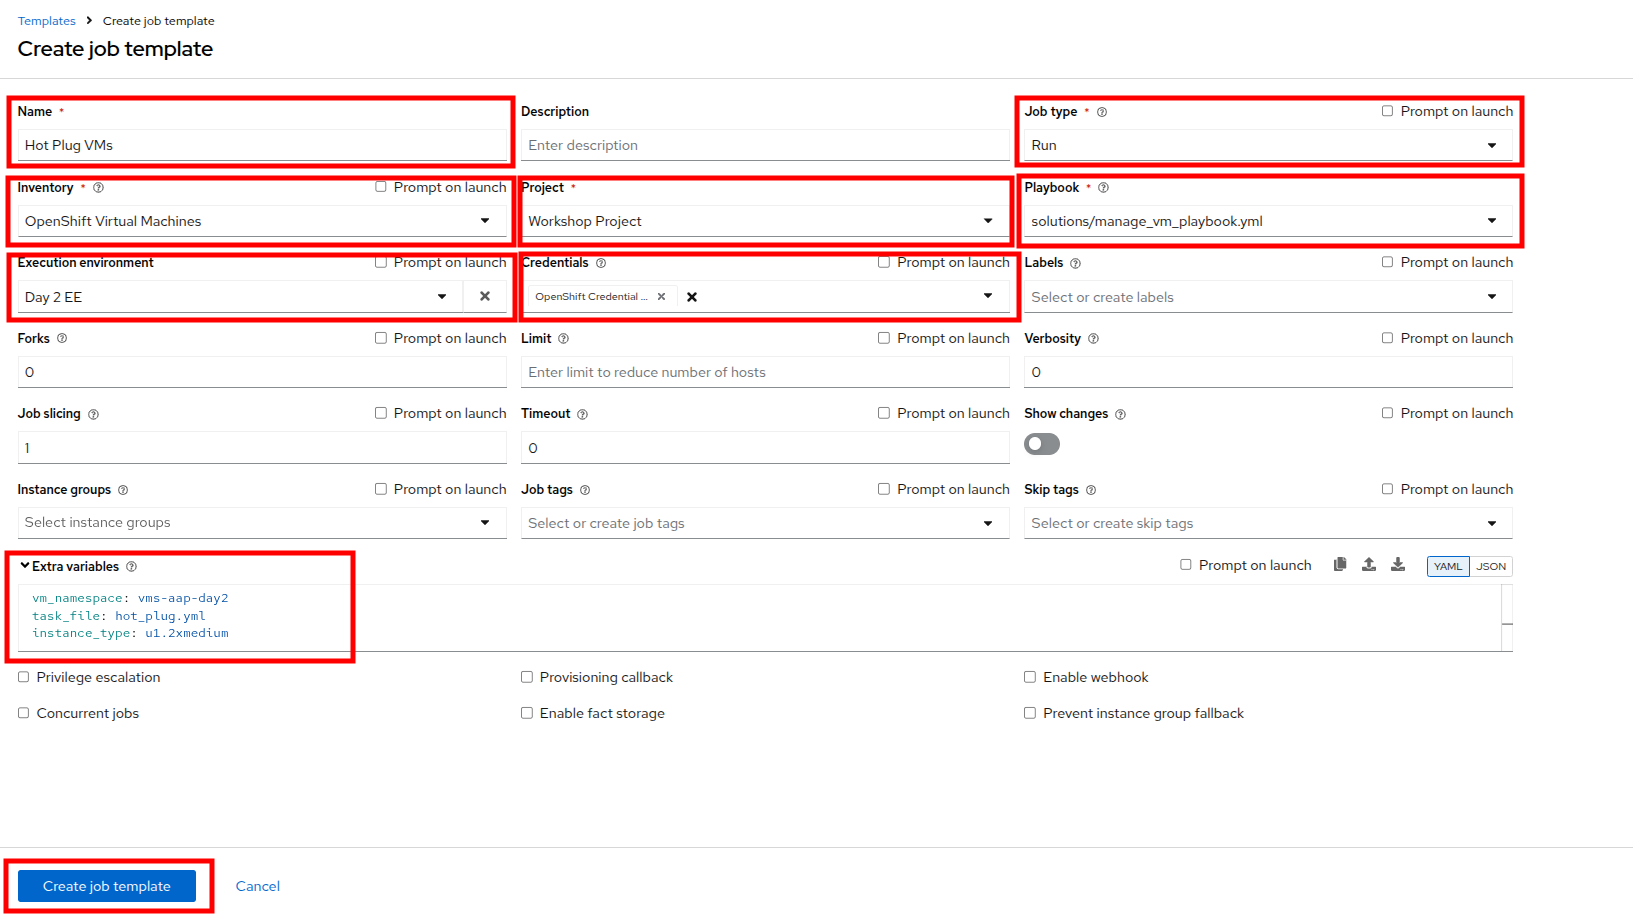 Figure 28. Create HotAdd Template
 -
Launch the job by selecting the Launch Template button from the top-right corner. When the job completes you should see output that shows it was able to modify the virtual machines instance type.
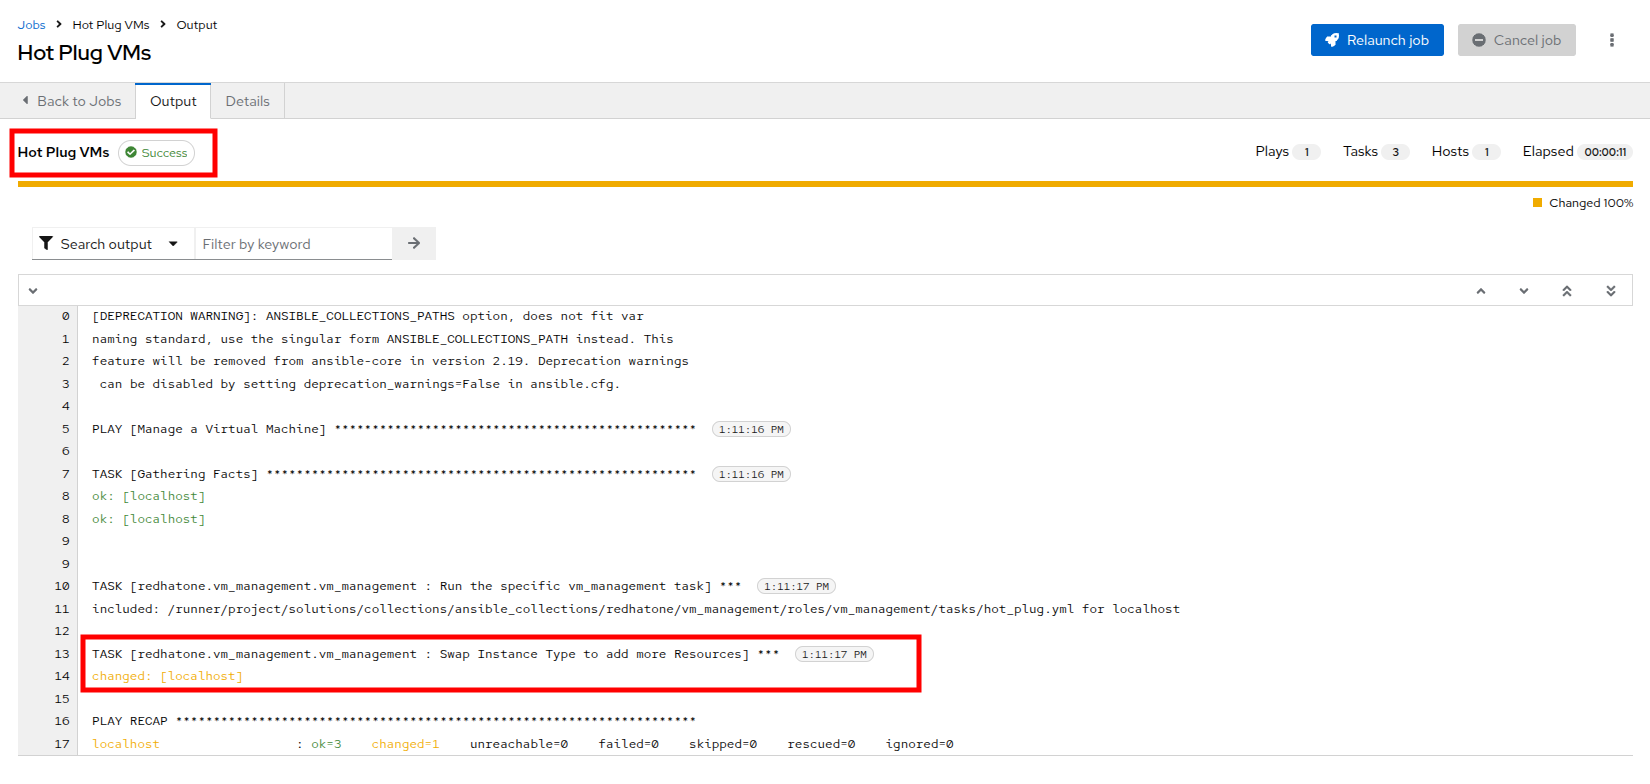 Figure 29. HotAdd Template Success
 -
When the job completes, return to the OpenShift console and view the details of the rhel9-vm1 Virtual Machine once again. You should see that the InstanceType field has changed and is now set to u1.2xmedium.
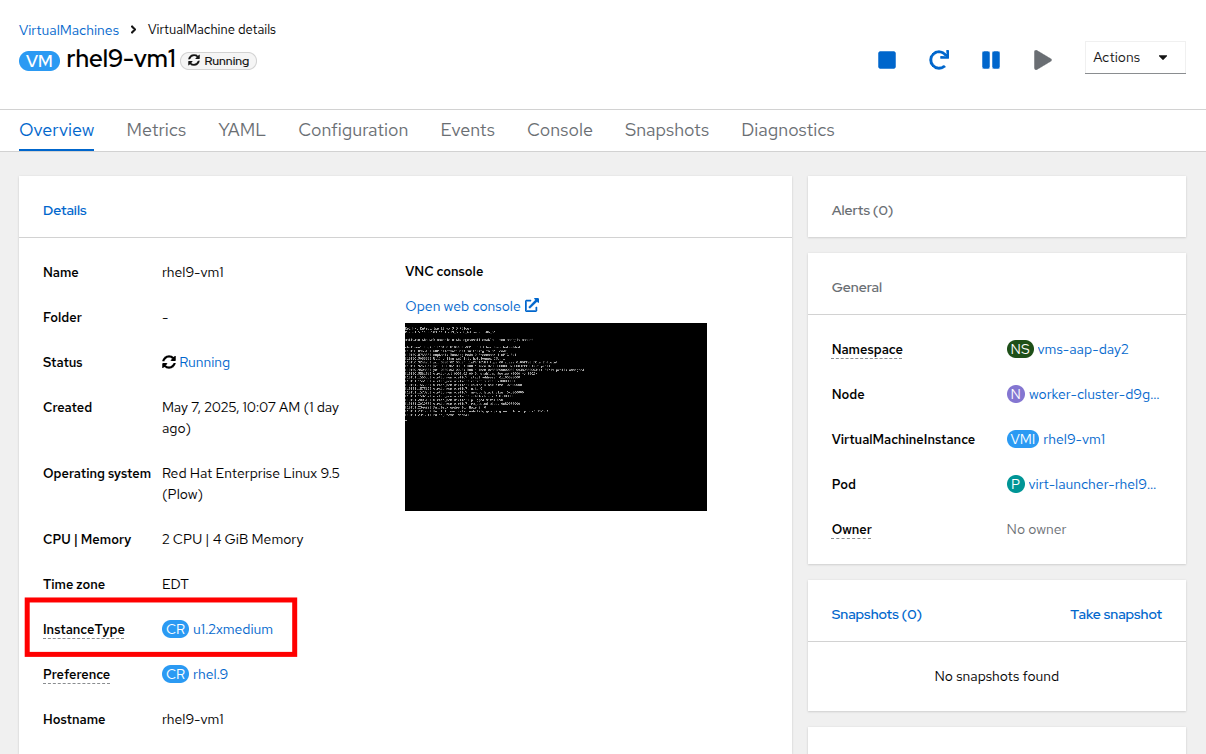 Figure 30. VM InstanceType Modified
Backup and Restore Virtual Machines
One of the most critical aspects of virtual machine administration is ensuring business continuity through reliable backup and restore capabilities. The ability to capture point-in-time snapshots of running VMs and quickly restore them in case of disasters, system failures, or unintended changes can save organizations significant time and resources compared to traditional backup methods.
In this exercise, you’ll automate the backup and restoration of Virtual Machines using VM Snapshots with Ansible Automation Platform. This capability enables you to protect your virtualized workloads at scale while maintaining operational efficiency.
Virtual Machine Snapshots in OpenShift Virtualization capture the complete state and data of a VM at a specific point in time, including all attached Container Storage Interface (CSI) volumes and VM configuration metadata. For running VMs, the QEMU guest agent coordinates I/O operations during snapshot creation, ensuring data consistency by freezing the filesystem, taking the snapshot, and then thawing the filesystem.
Snapshots are managed through three OpenShift APIs:
-
VirtualMachineSnapshot: Represents a user request to create a snapshot and contains information about the current state of the VM
-
VirtualMachineSnapshotContent: Represents a provisioned resource on the cluster (the actual snapshot) created by the VM snapshot controller
-
VirtualMachineRestore: Represents a user request to restore a VM from a snapshot
The Existing Setup
To assist with your experience, the following content has already been created and configured for you:
-
The snapshot automation tasks (snapshot_vms.yml and _snapshot_vm.yml) have been prewritten to handle the VM snapshots using a loop based approach.
-
The restoration automation tasks (restore_vm_snapshots.yml and _restore_vm_snapshot.yml) have been precreated to manage the complete restoration workflow including stopping, restoring, and restarting VMs.
-
The manage_vm_playbook.yml playbook is already configured to execute these tasks based on input variables of whether to take or restore the snapshot of the VMs.
Although you don’t need to create or modify these files, it’s important to understand how they work, as you’ll be referencing them when creating job templates in Ansible Automation Platform.
Understanding the Provided Snapshot Task Files
The snapshot automation uses a two tiered approach where one task file handles multiple snapshots using loops, and an include task file takes the individual VM snapshots.
snapshot_vms.yml
This main task file processes a comma-delimited string of VM names and creates individual snapshot tasks for each VM using Ansible’s loop functionality.
---
- name: Snapshot individual VM
  ansible.builtin.include_tasks:
    file: _snapshot_vm.yml
  loop_control:
    loop_var: vm_to_snapshot
  loop: "{{ vms_to_snapshot.replace(' ','').split(',') }}"
  when: vms_to_snapshot | default('', True) | length > 0
Explanation of the Task:
-
when: Validates that the
vms_to_snapshotvariable contains content before proceeding using filters to check variable state -
loop: Processes the comma-delimited VM names, removing spaces and creating a list using Jinja2 functions
-
loop_control/loop_var: Sets the variable name (
vm_to_snapshot) for each iteration of the loop -
ansible.builtin.include_tasks: Calls the included task file
_snapshot_vm.ymlfor each VM that captures the necessary steps (tasks) to complete the snapshot process.
_snapshot_vm.yml
A task file beginning with an underscore "_" indicates that it is included within another task file. This file handles the actual snapshot creation for a single VM using OpenShift APIs and contains the core snapshot logic.
---
- name: Verify VM to Snapshot Provided
  ansible.builtin.assert:
    that:
      - vm_to_snapshot | default('', True) | length > 0
    quiet: True
    fail_msg: VM to Snapshot not specified

- name: Get VirtualMachine to snapshot
  redhat.openshift_virtualization.kubevirt_vm_info:
    namespace: "{{ vm_namespace }}"
    name: "{{ vm_to_snapshot }}"
  register: vm_info

- name: Create Snapshot
  redhat.openshift.k8s:
    state: present
    definition:
      apiVersion: snapshot.kubevirt.io/v1alpha1
      kind: VirtualMachineSnapshot
      metadata:
        generateName: "{{ vm_info.resources[0].metadata.name }}-"
        namespace: "{{ vm_info.resources[0].metadata.namespace }}"
        ownerReferences:
          - apiVersion: kubevirt.io/v1
            blockOwnerDeletion: false
            kind: VirtualMachine
            name: "{{ vm_info.resources[0].metadata.name }}"
            uid: "{{ vm_info.resources[0].metadata.uid }}"
      spec:
        source:
          apiGroup: kubevirt.io
          kind: VirtualMachine
          name: "{{ vm_info.resources[0].metadata.name }}"
    wait: true
    wait_condition:
      type: Ready
  when: "'resources' in vm_info and vm_info.resources | length == 1"
Explanation of the Tasks:
There are three tasks in this included task file:
-
Verifies that a variable called
vm_to_snapshothas been provided usingansible.builtin.assert -
Retrieves the definition of the
VirtualMachineresource usingkubevirt_vm_infoand stores it invm_info -
Creates a new
VirtualMachineSnapshotresource usingredhat.openshift.k8smodule
Key details of the snapshot creation:
-
generateName: OpenShift capability to generate a unique name when
nameis not provided -
ownerReferences: Creates a relationship between the
VirtualMachineSnapshotand theVirtualMachineso that if the VM is deleted, the OpenShift garbage collector will automatically delete the snapshot -
wait/wait_condition: Pauses execution until the snapshot completes successfully (condition type
Readyset totrue) -
when: Ensures the snapshot is only created if exactly one VM resource was found
Creating and Running the Snapshot VMs Job Template
Now let’s connect all the pieces through the AAP web interface and run the snapshot automation using a Job Template.
-
Head to the AAP UI Dashboard, navigate to Automation Execution → Templates.
-
Click Create Template and select Create job template.
-
Fill in the following details:
Parameter Value Name
Snapshot VMsJob Type
Run
Inventory
OpenShift Virtual Machines
Project
Workshop Project
Playbook
solutions/manage_vm_playbook.yml
Execution Environment
Day2 EE
Credentials
OpenShift Credential
Extra variables
vm_namespace: vms-aap-day2
task_file: snapshot_vms.yml
vms_to_snapshot: rhel9-vm1 -
Click Create Job Template.
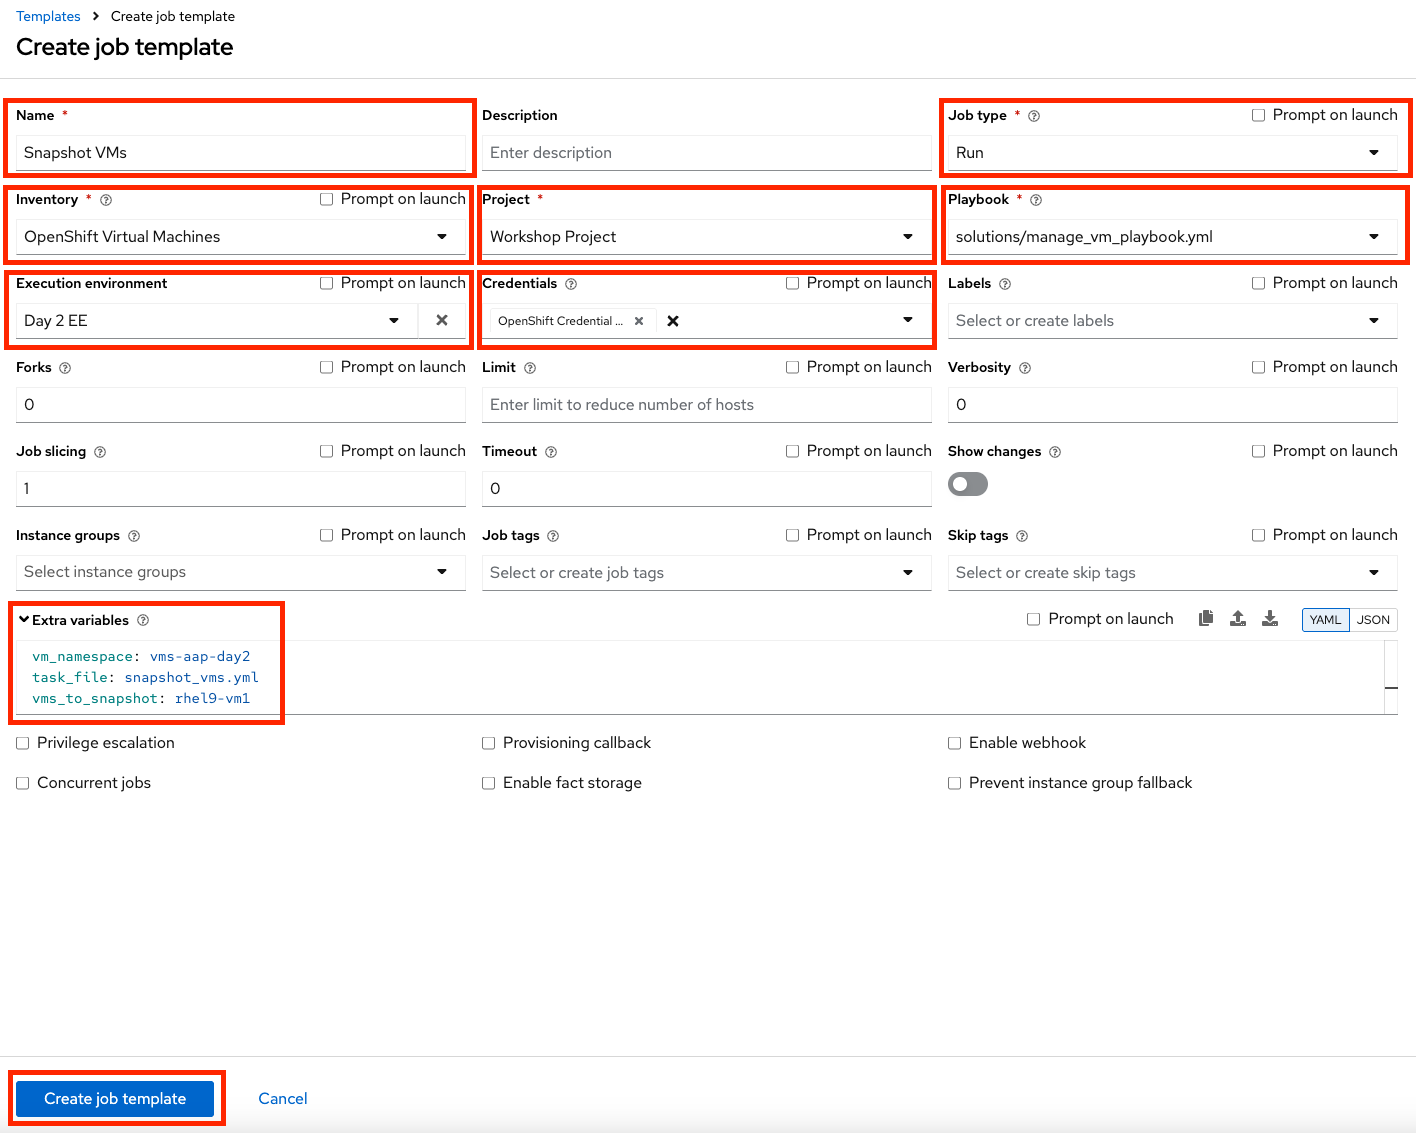 Figure 31. Create Snapshot Template
 -
Launch the job by selecting Launch Template from the top-right corner.
Verifying Snapshot Creation
Once the Job completes successfully, confirm the new Snapshot has been created.
-
Navigate to the OpenShift console and go to Virtualization → VirtualMachines within the vms-aap-day2 project.
-
Select the rhel9-vm1 instance and click the Snapshots tab.
-
Verify that the snapshot appears in the list.
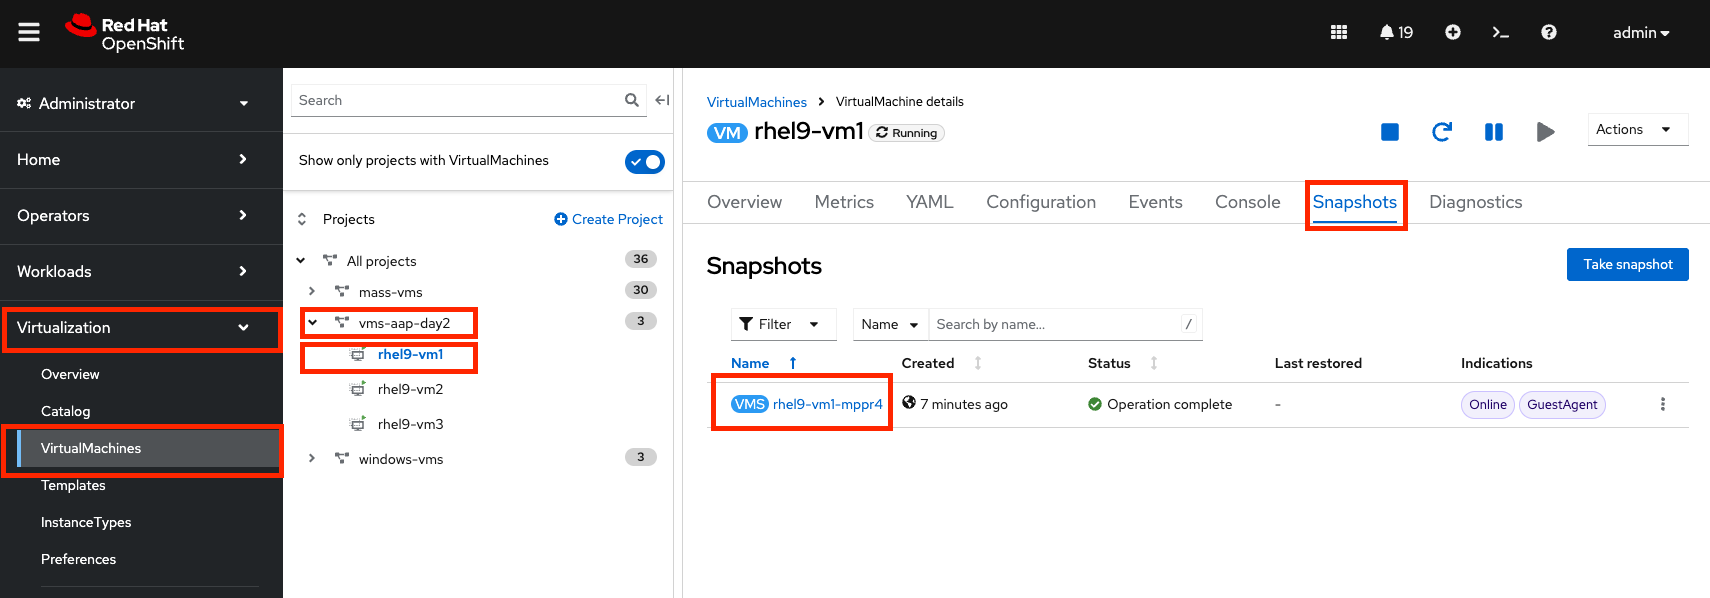 Figure 32. Snapshot Details
| Make a note of this snapshot name, as it will be used in the next section to restore the snapshot. |
Understanding the Provided Restoration Task Files
The restoration automation handles the complete workflow of stopping a VM, restoring from a snapshot, and restarting the VM. Unlike snapshot creation, a Virtual Machine must be powered off prior to initiating a restoration from a snapshot. This automation follows the same two-tiered pattern as the snapshot process.
restore_vm_snapshots.yml
This main task file processes a comma-delimited string of snapshot names and creates individual restoration tasks. The primary difference from the snapshot task is that it references snapshot names rather than VM names.
---
- name: Restore VM Snapshot
  ansible.builtin.include_tasks:
    file: _restore_vm_snapshot.yml
  loop_control:
    loop_var: vm_snapshot
  loop: "{{ vm_snapshots.replace(' ','').split(',') }}"
  when: vm_snapshots | default('', True) | length > 0
This task operates on a variable called vm_snapshots that contains a comma-delimited string of VirtualMachineSnapshot resource names to restore.
_restore_vm_snapshot.yml
This included task file manages the complete restoration workflow following these steps:
-
Retrieve the
VirtualMachineSnapshotbased on the snapshot name provided -
Stop the Virtual Machine
-
Create the
VirtualMachineRestoreresource and wait until restoration completes -
Start the Virtual Machine
---
- name: Verify VM Snapshot Provided
  ansible.builtin.assert:
    that:
      - vm_snapshot | default('', True) | length > 0
    quiet: True
    fail_msg: VM Snapshot not specified

- name: Get VirtualMachine Snapshot
  kubernetes.core.k8s_info:
    api_version: snapshot.kubevirt.io/v1alpha1
    kind: VirtualMachineSnapshot
    namespace: "{{ vm_namespace }}"
    name: "{{ vm_snapshot }}"
  register: vm_snapshot_instance

- name: Create Restore
  block:
    - name: Stop Virtual Machine
      redhat.openshift_virtualization.kubevirt_vm:
        name: "{{ vm_snapshot_instance.resources[0].metadata.ownerReferences[0].name }}"
        namespace: "{{ vm_snapshot_instance.resources[0].metadata.namespace }}"
        run_strategy: Halted
        wait: true

    - name: Create Restore
      redhat.openshift.k8s:
        state: present
        definition:
          apiVersion: snapshot.kubevirt.io/v1alpha1
          kind: VirtualMachineRestore
          metadata:
            generateName: "{{ vm_snapshot_instance.resources[0].metadata.ownerReferences[0].name }}-"
            namespace: "{{ vm_snapshot_instance.resources[0].metadata.namespace }}"
            ownerReferences:
              - apiVersion: kubevirt.io/v1
                blockOwnerDeletion: false
                kind: VirtualMachine
                name: "{{ vm_snapshot_instance.resources[0].metadata.ownerReferences[0].name }}"
                uid: "{{ vm_snapshot_instance.resources[0].metadata.ownerReferences[0].uid }}"
          spec:
            target:
              apiGroup: kubevirt.io
              kind: VirtualMachine
              name: "{{ vm_snapshot_instance.resources[0].metadata.ownerReferences[0].name }}"
            virtualMachineSnapshotName: "{{ vm_snapshot_instance.resources[0].metadata.name }}"
        wait: true
        wait_timeout: 600
        wait_condition:
          type: Ready

    - name: Start Virtual Machine
      redhat.openshift_virtualization.kubevirt_vm:
        name: "{{ vm_snapshot_instance.resources[0].metadata.ownerReferences[0].name }}"
        namespace: "{{ vm_snapshot_instance.resources[0].metadata.namespace }}"
        run_strategy: Always
        wait: true
  when: "'resources' in vm_snapshot_instance and vm_snapshot_instance.resources | length == 1"
Explanation of the Tasks:
-
kubernetes.core.k8s_info: Retrieves the snapshot details to identify the associated VM (instead of
kubevirt_vm_infowhich is specific to Virtual Machines, this allows retrieval of any OpenShift resource) -
block: Groups the restoration steps together with a conditional check at the end
-
Stop Virtual Machine: Powers off the VM before restoration begins using
run_strategy: Halted -
Create Restore: Creates the VirtualMachineRestore resource with a
wait_timeoutof 600 seconds (10 minutes) since restoration may take longer than the default 120 seconds -
Start Virtual Machine: Powers the VM back on after restoration completes using
run_strategy: Always
Creating and Running the Restore VM Snapshots Job Template
-
Head to the AAP UI Dashboard, navigate to Automation Execution → Templates.
-
Click Create Template and select Create job template.
-
Fill in the following details, making sure to include the name of the snapshot created previously:
Parameter Value Name
Restore VM SnapshotsJob Type
Run
Inventory
OpenShift Virtual Machines
Project
Workshop Project
Playbook
solutions/manage_vm_playbook.yml
Execution Environment
Day2 EE
Credentials
OpenShift Credential
Extra variables
vm_namespace: vms-aap-day2
task_file: restore_vm_snapshots.yml
vm_snapshots: <snapshot_name>Replace <snapshot_name>with the actual name of your snapshot created previously. -
Click Create Job Template.
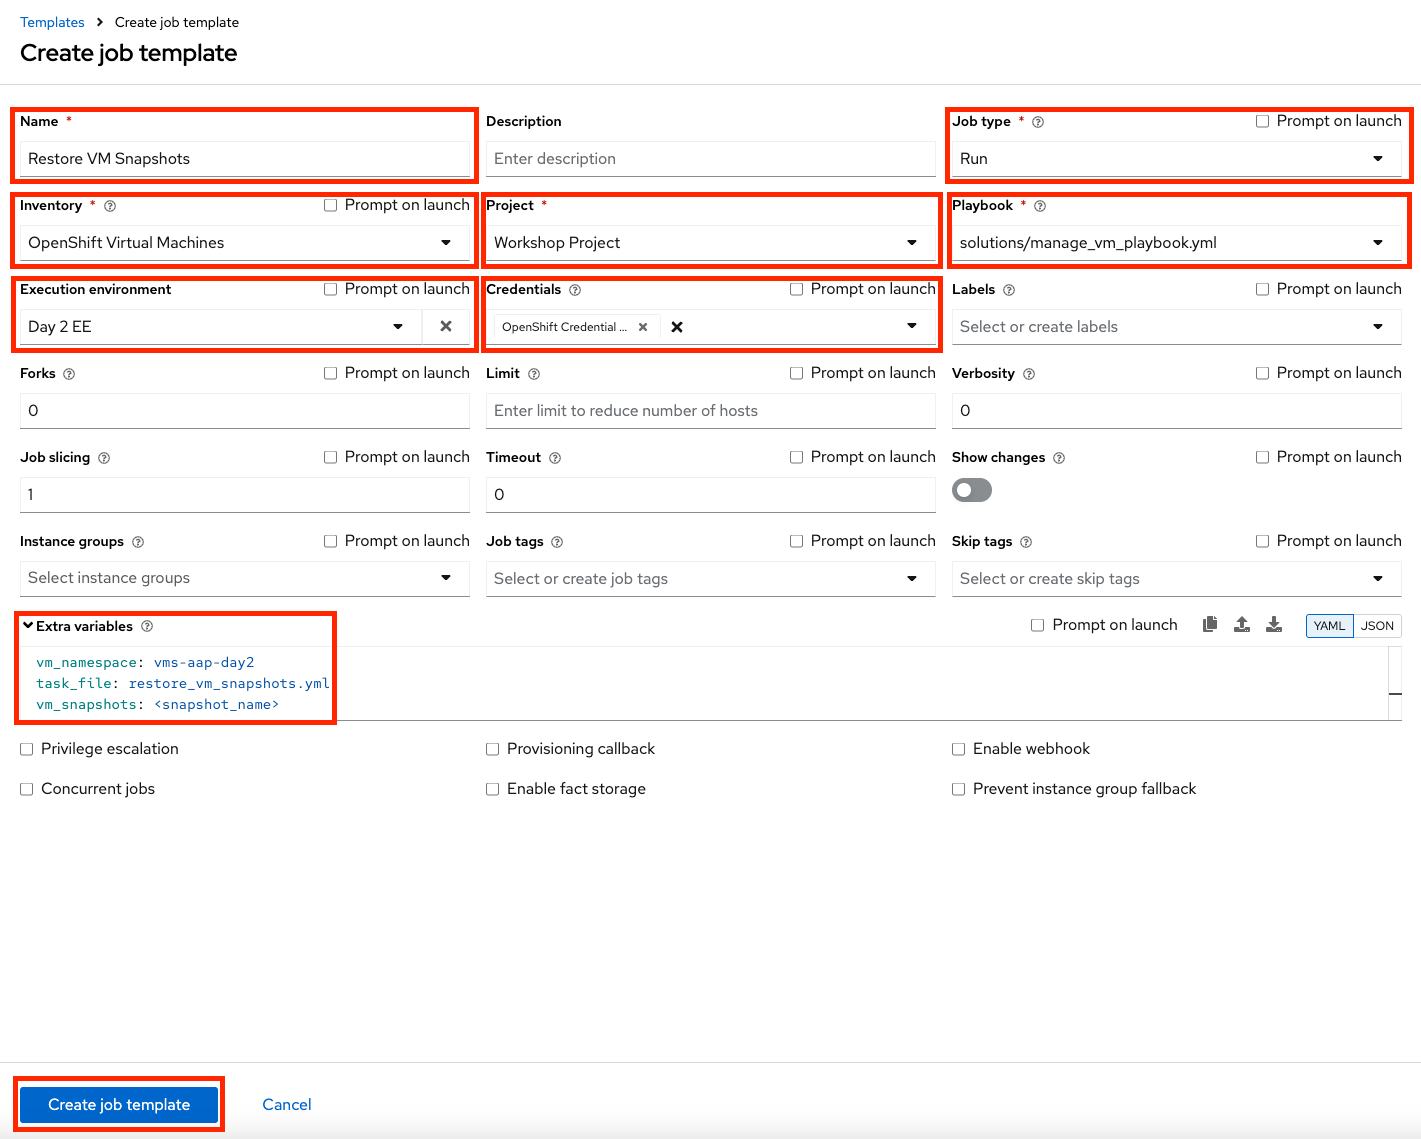 Figure 33. Restore Snapshot Template
 -
Launch the template by clicking Launch Template.
Verifying Snapshot Restoration
Once the Job completes successfully, confirm the restoration was applied.
-
Navigate to the OpenShift console and go to Virtualization → VirtualMachines within the vms-aap-day2 project.
-
Select the rhel9-vm1 instance and click the Snapshots tab.
-
-
Locate the snapshot you restored and verify the Last restored column shows the recent restoration timestamp.
 Figure 34. Restore Snapshot Details
Summary
In this module you have spent a day in the life of an OpenShift Virtualization administrator making use of Ansible Automation Platform to automate a number of administrative tasks that staff experience often on a day-to-day basis from discovering a dynamic inventory of the virtual machines available to manage, to ensuring they are safely backed up and restored in a disaster recovery scenario.