Jenkins Pipelines - Development
- Learning Objectives
- Your Jenkins Development Challenge
- Activity 1: Accessing Your Enhanced Jenkins Environment
- Activity 2: Creating Your First Self-Service Jenkins Application
- Activity 3: Understanding Your Generated Jenkins Environment
- Activity 4: Making Your First Code Change
- Activity 5: Monitoring Your Jenkins Pipeline
- What You Just Accomplished
- Understanding Enhanced Jenkins Benefits
- Next Steps
Learning Objectives
By the end of this section, you will:
-
Understand how organizations preserve Jenkins investments while gaining modern self-service capabilities
-
Create a new secure Quarkus application using Jenkins pipeline templates
-
Experience self-service development that reduces setup time from weeks to minutes
-
Learn how security is automatically integrated into Jenkins workflows
-
See how existing Jenkins expertise becomes more valuable with enhanced capabilities
Your Jenkins Development Challenge
As a developer joining a team with significant Jenkins investments, you’re facing familiar enterprise development challenges while working with trusted Jenkins infrastructure:
Your Current Jenkins Reality: Weeks of Setup
Here’s what you’ve been experiencing with traditional Jenkins pipeline setup:
-
1-2 weeks waiting for the DevOps team to create custom Jenkins pipelines for your project
-
Multiple coordination meetings between development, platform, and security teams
-
Manual integration of security tools into Jenkins workflows that feels complex and error-prone
-
High risk of configuration inconsistencies across different Jenkins pipelines
-
Each custom Jenkins pipeline becomes a maintenance burden requiring ongoing platform team support
What This Really Costs Your Team
-
Platform team spends 40+ hours per new application on Jenkins pipeline setup
-
Security integration delays add another 1-2 weeks to project timelines
-
You spend more time coordinating Jenkins setup than writing code
-
Each Jenkins pipeline configuration feels like starting from scratch
-
Teams are hesitant to create new services due to Jenkins setup complexity
Your New Reality with RHADS: Enhanced Jenkins Self-Service
But you’re about to discover how your Jenkins investment can be transformed:
-
Zero Jenkins setup time: Instant production-ready Jenkins pipelines with security built-in
-
Zero platform coordination: Self-serve Jenkins capabilities without DevOps team involvement
-
Zero configuration drift: Standardized Jenkins templates ensure consistency
-
Zero security gaps: Enterprise security automatically integrated into Jenkins workflows
What This Means for Your Daily Jenkins Work
-
Jenkins pipeline creation time: 1-2 weeks → 5 minutes
-
Pipeline configuration: Manual coordination → Self-service automation with Jenkins expertise
-
Security compliance: 100% consistent without becoming a Jenkins security expert
-
Your productivity: Immediate access to enhanced Jenkins capabilities
| Today you’ll experience how organizations can transform their Jenkins investment from a bottleneck into a competitive advantage, creating production-ready Jenkins applications in minutes while preserving valuable team expertise. |
Activity 1: Accessing Your Enhanced Jenkins Environment
Let’s begin your journey by logging into your modernized development environment that preserves your Jenkins workflows while adding powerful self-service capabilities.
Step 1: Open Red Hat Developer Hub
-
Navigate to the Red Hat Developer Hub, which now provides self-service Jenkins capabilities:
-
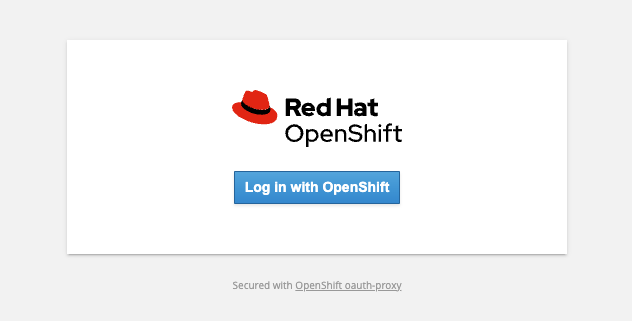
You see the "Select a sign-in method" screen and click the OIDC option
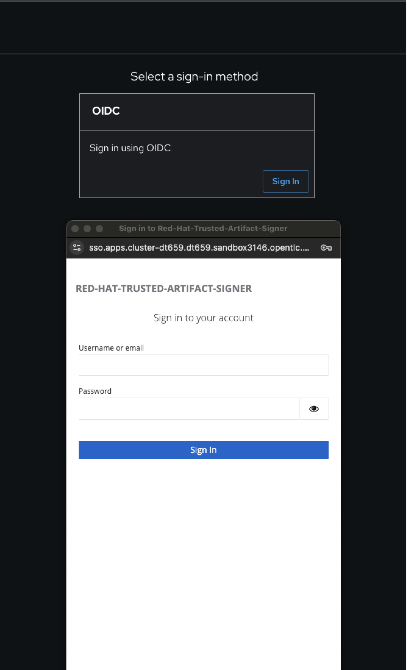
| This secure authentication integration will streamline your Jenkins workflow access and eliminate multiple login prompts. |
Step 2: Enter Your Credentials
-
You’re presented with the authentication form
-
Enter your lab credentials:
Username: user Password: password -
Click the Sign In button to proceed
What You Just Discovered
You’ve just accessed your organization’s Internal Developer Portal (IDP) that’s been specifically designed to enhance your Jenkins capabilities while preserving familiar workflows:
-
Self-service Jenkins pipeline templates that eliminate waiting for platform teams
-
Integrated Jenkins resources that "just work" with security built-in
-
Automated Jenkins pipeline creation that handles the complex security integration for you
-
A streamlined onboarding experience that makes Jenkins expertise more valuable
"This will transform how we work with Jenkins," you realize as you explore the enhanced interface.
Activity 2: Creating Your First Self-Service Jenkins Application
Now comes the exciting part - you’re about to experience the magic of self-service Jenkins application creation that preserves your Jenkins expertise while adding modern capabilities!
Step 1: Discovering Jenkins Software Templates
-
Ready to leverage your Jenkins skills on a new project, you spot the + Self-service button in the top-right corner
-
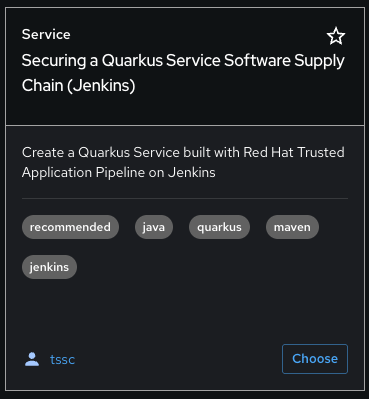
You click + Self-service and discover a catalog of ready-to-use Jenkins templates

Step 2: Choosing Your Jenkins Pipeline Template
-
As you browse through the available templates, one immediately catches your attention:
Securing a Quarkus Service Software Supply Chain (Jenkins) -
"Perfect!" you think, "This leverages Jenkins - the tool I know and trust - but with modern security capabilities"
-
You click Choose to select this Jenkins template
| You’re about to witness something powerful - this single template will automatically create your complete Jenkins environment with pipelines, security integration, and Kubernetes resources* No tickets, no waiting, no manual Jenkins configuration! |
Step 3: Configure Your Jenkins Application
The template form will guide you through Jenkins pipeline configuration:
Application Information
Ensure that the following values are set for your Jenkins application:
| Field | Default Value |
|---|---|
Name |
|
Group ID |
|
Artifact ID |
|
Java Package Name |
|
Description |
|
Click Next to continue.
Image Registry Information
These settings determine where your Jenkins pipeline will store container images:
| Field | Default Value |
|---|---|
Image Registry |
|
Organization |
|
Click Next to continue.
Repository Information
This configures your Jenkins integration with source control:
| Field | Default Value |
|---|---|
Source Repo |
|
Repo Owner |
|
Verify Commits |
|
Note that Verify Commits is enabled - this ensures Jenkins pipelines include cryptographic commit signing for enterprise security.
Click Review to see a summary of your Jenkins configuration.
Step 4: Create Your Jenkins Application
-
Review all the settings in the summary page

-
Click Create to generate your Jenkins application
The Jenkins software template will now:
-
Create GitLab repositories for your source code and GitOps manifests
-
Set up Jenkins pipelines with automated security scanning and signing
-
Configure Kubernetes resources for your application
-
Set up container image signing and verification in Jenkins workflows
-
Deploy the Jenkins pipeline infrastructure and trigger the initial build
| This entire Jenkins setup that traditionally takes weeks is completed in under a minute while preserving familiar Jenkins workflows! |
Step 5: Access Your New Jenkins Component
-
Once the template execution completes, click Open Component in Catalog
-
In Red Hat Developer Hub, go to the Catalog and locate your new component (
qrks-jnk-{user})
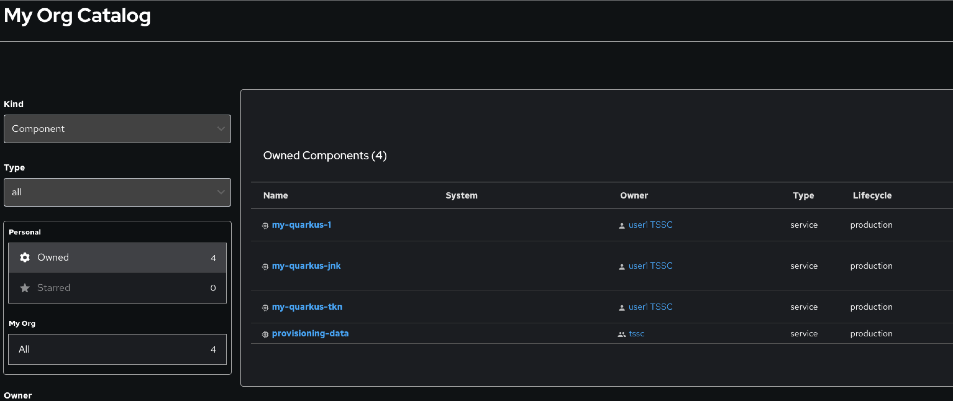
-
Click the component name to open its Overview page
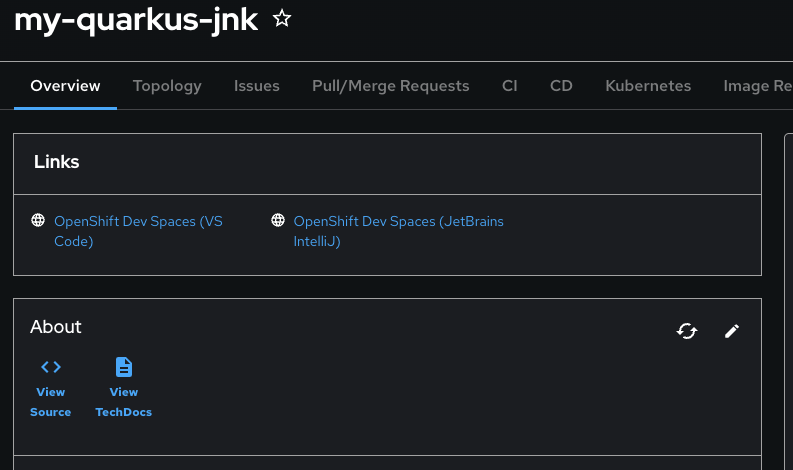
-
You’ll see your new Jenkins application component with links to:
-
Source code repository with Jenkins pipeline definitions
-
Jenkins CI/CD pipelines and build status
-
Application overview and health monitoring
-
OpenShift Dev Spaces development environment
Activity 3: Understanding Your Generated Jenkins Environment
Step 1: Exploring the Jenkins Pipeline Structure
The template you just used created a sophisticated Jenkins environment with key components:
🏗️ Developer Hub Configuration Repository:
-
Location: Contains the Jenkins template you just used
-
Purpose: Defines the self-service Jenkins template that generated your application
-
What it does: Provides the blueprint for Jenkins pipeline creation with security integration
⚙️ Your Generated Application Repository:
-
Location:
https://gitlab-gitlab.apps.cluster-pc8p5.pc8p5.sandbox275.opentlc.com/development/qrks-jnk-{user} -
Purpose: Contains your application source code with Jenkins pipeline definitions
-
Jenkins Pipeline Files: Multiple Jenkins pipeline files configured for different Git events:
📁 Jenkins Pipeline Structure in Your Repository
Your Jenkins application repository at [qrks-jnk-{user}](https://gitlab-gitlab.apps.cluster-sc8ld.sc8ld.sandbox2279.opentlc.com/development/qrks-jnk-user9) contains specialized Jenkins pipeline files that trigger automatically based on Git events:
-
📄
Jenkinsfile.push- Triggered on Code Commits -
Activates when you commit and push code changes to your repository
-
Runs development pipeline with build, test, and security scanning
-
Performs continuous integration validation for development workflow
-
🏷️
Jenkinsfile.tag- Triggered on Git Tags -
Activates when you create a Git tag on a branch in your repository
-
Runs staging pipeline for release candidate validation
-
Prepares artifacts for staging environment deployment
-
🚀
Jenkinsfile.release- Triggered on GitLab Releases -
Activates when you create a release from an existing tag
-
Runs production pipeline with enhanced security validation
-
Deploys verified artifacts to production environment
Each pipeline includes comprehensive security features: - Cryptographic commit verification and image signing - Enterprise Contract policy enforcement - Software Bill of Materials (SBOM) generation - Red Hat Advanced Cluster Security scanning
📚 Reusable Jenkins Library Functions
Your Jenkins pipelines leverage the powerful rhtap (Red Hat Trusted Application Pipeline) shared library, which provides standardized, enterprise-grade functions:
-
🏗️
buildah_rhtap()- Container image building with security integration -
Creates OCI-compliant container images using Buildah
-
Automatically integrates with enterprise registries and signing
-
Handles multi-architecture builds and security scanning
-
🔐
cosign_sign_attest()- Cryptographic signing and attestation -
Signs container images with enterprise PKI certificates
-
Creates SLSA (Supply Chain Levels for Software Artifacts) provenance
-
Generates cryptographic attestations for compliance
-
📋
update_deployment()- GitOps repository management -
Updates deployment manifests in GitOps repositories
-
Handles environment-specific configurations automatically
-
Triggers ArgoCD synchronization for deployment
-
🛡️
acs_deploy_check()/acs_image_check()/acs_image_scan()- Security validation -
Integrates with Red Hat Advanced Cluster Security (RHACS)
-
Performs policy enforcement and vulnerability scanning
-
Validates deployment manifests against security policies
-
📊
show_sbom_rhdh()- Software Bill of Materials integration -
Displays SBOM information in Red Hat Developer Hub
-
Provides visibility into software components and dependencies
-
Supports compliance and security auditing
-
📈
summary()- Build reporting and status -
Generates comprehensive build reports
-
Provides pipeline execution summaries
-
Integrates with Red Hat Developer Hub dashboards
These shared library functions ensure consistency, security, and compliance across all your Jenkins pipelines while reducing code duplication and maintenance overhead.
Understanding Jenkins Pipelines as Code
What is Jenkins Pipelines as Code?
Your Jenkins pipeline definition lives alongside your application code in the same Git repository* This approach provides:
-
Version Control: Jenkins pipeline changes are tracked with your code changes
-
Reproducibility: Anyone can see exactly how your application is built in Jenkins
-
Consistency: The same Jenkins pipeline runs regardless of environment
-
Developer Ownership: You control your Jenkins pipeline without platform team dependencies
Your Jenkins Pipeline Stages:
🔍 verify-commit
// Verifies cryptographic commit signatures using gitsign
// Downloads gitsign client and verifies commit signatures
// Integrates with Red Hat Trusted Application Signer via TUF and Rekor
📦 mvn package
// Runs mvn clean package in Maven container
// Compiles and packages Quarkus application
// Uses Maven 3.8.6 with OpenJDK 11
⚙️ init
// Initializes RHTAP library and build environment
// Sets IMAGE_URL with Git commit as tag
// Generates timestamps and prepares shared functions
🔨 build
// Uses buildah_rhtap() to create container images
// Signs images and creates attestations with cosign_sign_attest()
// Generates SLSA provenance and captures image digest
🚀 deploy-and-upload-to-tpa (parallel)
// deploy: Updates GitOps repository with update_deployment()
// upload_sbom_to_trustification: Processes and uploads SBOM files
// Triggers automated deployment via GitOps
🛡️ acs (parallel)
// acs_deploy_check: Verifies Kubernetes manifests
// acs_image_check: Enforces container image policies
// acs_image_scan: Scans for vulnerabilities with RHACS
📊 summary
// Executes show_sbom_rhdh() for Developer Hub integration
// Runs summary() function for comprehensive build status
// Displays artifacts, SBOM, and security scan results
Why This Matters for Your Jenkins Work:
-
Familiar Tools: You’re using Jenkins Blue Ocean and interfaces you already know
-
Enhanced Capabilities: Your Jenkins expertise gains modern security and GitOps features
-
Self-Service Power: Modify Jenkins pipelines via pull requests instead of platform tickets
-
Enterprise Security: All the security integration happens automatically in your Jenkins workflows
Activity 4: Making Your First Code Change
Time to trigger your enhanced Jenkins pipeline and see the automation in action!
Step 1: Accessing Your Development Environment
-
In your component overview, you notice a link for OpenShift Dev Spaces and click it
-
"A browser-based development environment integrated with Jenkins?" you wonder
-
If prompted for authentication, click Log in with OpenShift
-
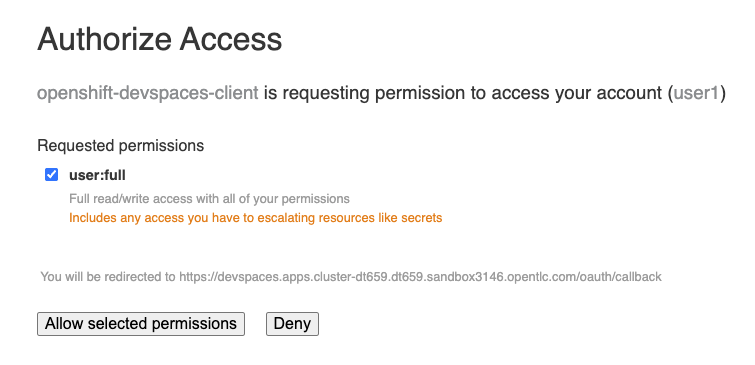
On the Authorize Access screen, click Allow selected permissions
-
On the repository trust prompt, click the checkbox and then click Continue

-
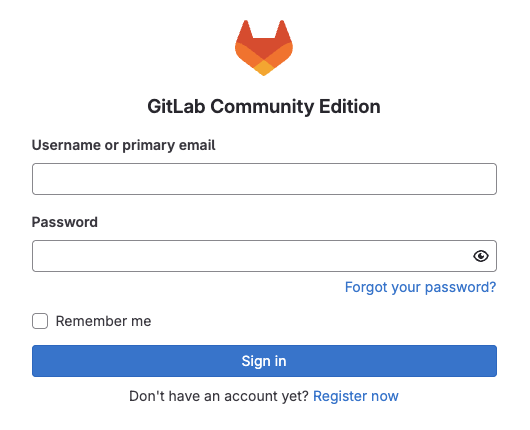
When prompted to authenticate with GitLab, enter your credentials:
Username: {gitlab_user}
Password: {gitlab_user_password}
-
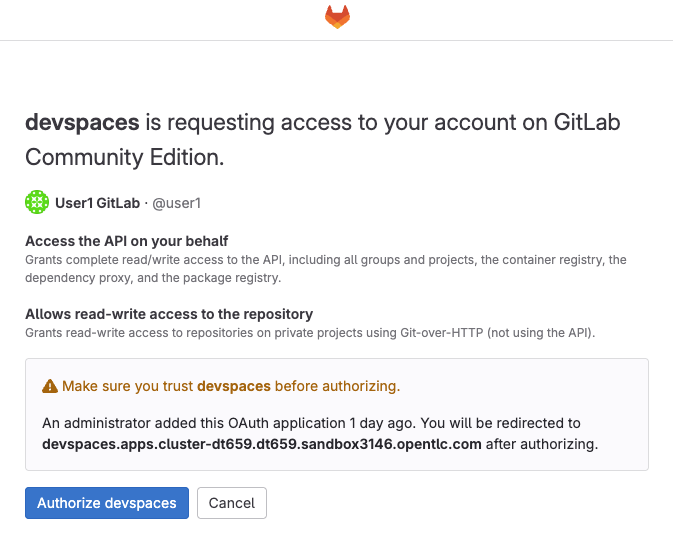
Click Authorize devspaces on the next window
-
Wait for the workspace to start and fully load VS Code
-
If prompted, trust all workspaces and authors
Step 2: Explore Your Jenkins-Integrated Development Environment
Once your workspace loads, you’ll see:
-
Pre-configured Quarkus project with Jenkins best practices
-
Jenkins pipeline definition (
Jenkinsfile) showing your automated workflow -
Kubernetes manifests optimized for Jenkins deployments
-
Security configuration that integrates with your Jenkins pipeline
Step 3: Making Your First Code Change
Let’s trigger your enhanced Jenkins pipeline:
-
You expand the
docsfolder in the file explorer -
You open the
index.mdfile to document your Jenkins-powered setup -
You add this line at the end of the document:
This application uses Jenkins pipelines with enterprise security integration. -
You save the file (Ctrl+S or Cmd+S)
Step 4: Your First Signed Commit for Jenkins
-
You open a terminal in Dev Spaces (Terminal → New Terminal)
-
You stage your changes:
git add . -
You commit your changes:
git commit -m "Add Jenkins pipeline documentation"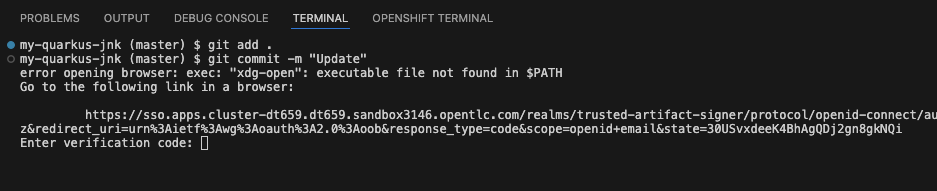
-
You’re prompted for signed commit authentication - this integrates with your Jenkins security workflow
-
The terminal displays a URL that you need to follow for authentication
-
You click the URL directly in the terminal, or copy and paste it into a new browser window
-
If prompted for credentials during the browser authentication, you use your RHDH credentials:
Username: user Password: password -
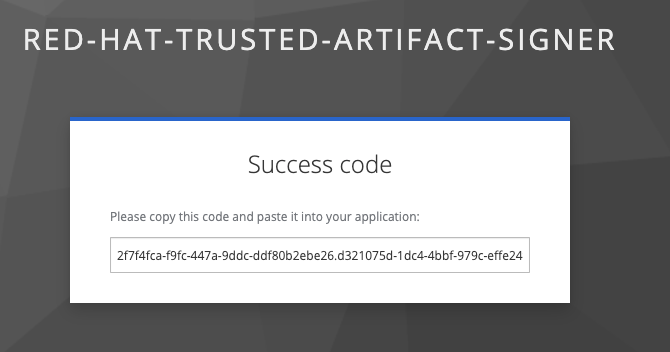
Once successfully authenticated in the browser, a verification code appears on the screen
-
You copy this verification code from the browser
-
You return to the terminal and paste the verification code when prompted
-
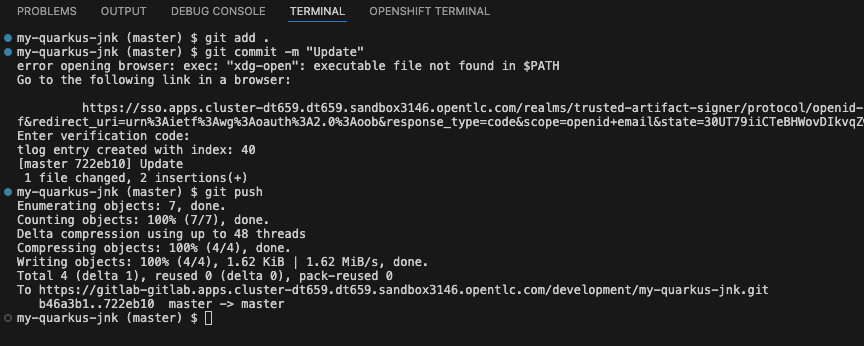
After entering the code, your commit is cryptographically signed for enterprise security
-
You push your changes:
git push
| You just witnessed the power of enhanced Jenkins workflows - your commit triggered a complete Jenkins pipeline with enterprise security, all automatically configured and integrated! |
Activity 5: Monitoring Your Jenkins Pipeline
Now let’s see your enhanced Jenkins pipeline in action and understand what’s happening behind the scenes.
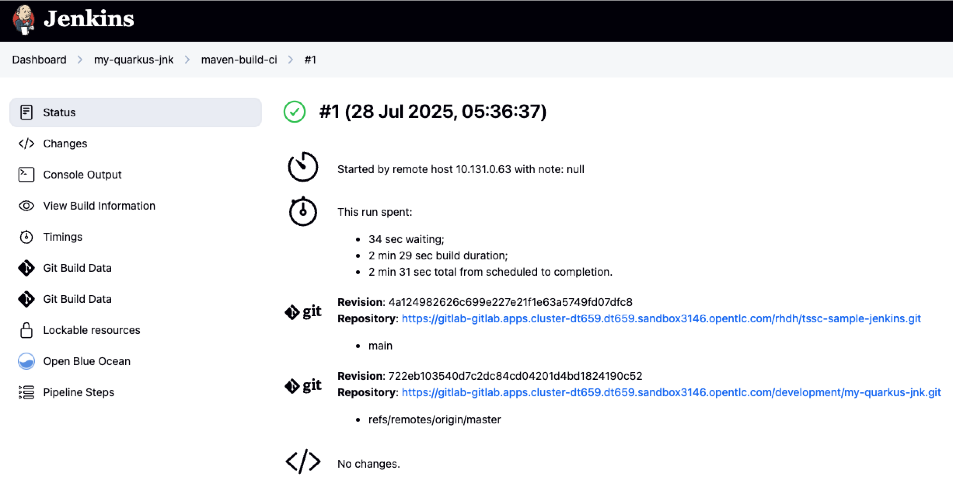
Step 1: Access Jenkins Pipeline Execution
-
Navigate back to Developer Hub
-
Go to the CI tab of your
qrks-jnk-{user}component -
You should see your Jenkins pipeline runs:
-
maven-ci-build -
promote-to-stage -
promote-to-prod
-
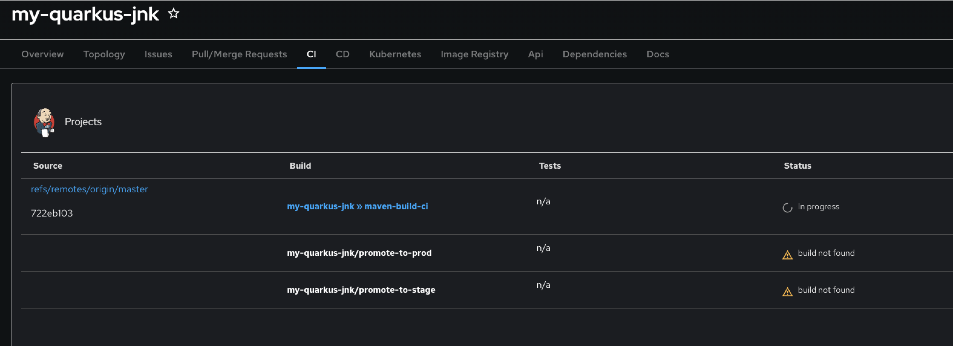
-
Click on View build to open Jenkins
-
Click Open Blue Ocean to view the Jenkins pipeline visually
Step 2: Understanding Your Jenkins Pipeline Stages
As your Jenkins pipeline executes, you can observe each stage in the familiar Blue Ocean interface:

Stage: verify-commit
-
Verifies that your Git commit was cryptographically signed using
gitsign -
Downloads and uses the gitsign client to verify commit signatures
-
Integrates with Red Hat Trusted Application Signer (RHTAS) via Rekor and TUF
-
Ensures the commit came from a trusted developer identity
-
This enterprise security happens automatically in your Jenkins workflow
Stage: mvn package
-
Runs
mvn clean packagein a dedicated Maven container -
Compiles and packages your Quarkus application
-
Produces the runnable JAR for container image creation
-
Uses Maven 3.8.6 with OpenJDK 11 for consistent builds
Stage: init
-
Prepares the Jenkins build environment using the
rhtaplibrary -
Sets IMAGE_URL with the Git commit as the tag
-
Generates ISO timestamp for effective time tracking
-
Initializes the RHTAP shared library functions
-
Standardizes behavior across all Jenkins pipelines
Stage: build
-
Uses
buildah_rhtap()function to containerize your application -
Automatically signs the image and creates attestations using
cosign_sign_attest() -
Generates provenance metadata and SLSA attestations for supply chain security
-
Captures the image digest for downstream pipeline stages
-
All security integration happens transparently in Jenkins
Stage: deploy-and-upload-to-tpa (parallel)
-
deploy: Uses
update_deployment()to update GitOps repository with new image tag -
upload_sbom_to_trustification: Processes and uploads SBOM files to Trustification
-
Updates SBOM component name to match the application
-
Removes non-CycloneDX JSON files from the SBOM directory
-
Pushes Software Bill of Materials to Red Hat Trusted Profile Analyzer
-
-
No manual coordination required between Jenkins and deployment teams
Stage: acs (parallel)
-
acs_deploy_check: Verifies Kubernetes manifests for security compliance
-
acs_image_check: Enforces policy on container image configuration
-
acs_image_scan: Performs vulnerability scanning using Red Hat Advanced Cluster Security
-
All security validation integrated into your Jenkins workflow
Stage: summary
-
Executes
show_sbom_rhdh()to display SBOM information for Developer Hub integration -
Runs
summary()function to provide comprehensive build status and artifacts -
Shows build status and key artifacts (SBOM, scan summary, security results)
-
Provides comprehensive build information in familiar Jenkins interface
-
Uses reusable functions from the
rhtaplibrary
Step 3: Exploring the Jenkins Pipeline Definition
-
In your GitLab repository, open the
Jenkinsfilein the root directory -
Notice how this Pipelines as Code approach gives you:
-
CI logic living alongside your application code
-
Easy updates via pull requests
-
Version-controlled pipeline definitions
-
Full transparency into the Jenkins build process
-
What You Just Accomplished
Congratulations! You’ve experienced the transformation of Jenkins capabilities with RHADS:
Jenkins Enhancement Results
-
Traditional Jenkins setup: 1-2 weeks of manual pipeline configuration
-
RHADS Jenkins approach: Less than 5 minutes of self-service with enhanced security
Security by Default in Jenkins
Your Jenkins application now includes: * Automated container vulnerability scanning in Jenkins workflows * Image signing and verification integrated with Jenkins pipelines * Enterprise security policies enforced automatically * Complete audit trails generated through Jenkins processes
Preserved Jenkins Investment
Everything leverages your existing Jenkins knowledge: * Familiar Jenkins Blue Ocean interface with enhanced capabilities * Same Jenkins pipeline concepts with modern security integration * Jenkins expertise becomes more valuable, not obsolete * Proven Jenkins infrastructure enhanced rather than replaced
Understanding Enhanced Jenkins Benefits
Developer Experience
-
Familiar Jenkins Interface - Blue Ocean and tools you already know
-
Enhanced Pipeline Capabilities - Modern security without complexity
-
Self-Service Power - Create Jenkins pipelines without platform team dependency
-
Integrated Development - Cloud-based development environment with Jenkins integration
Operational Advantages
-
Jenkins Investment Protection - Leverage existing Jenkins infrastructure and expertise
-
Enhanced Security - Enterprise-grade security automatically integrated
-
Standardized Pipelines - Consistent Jenkins workflows across all applications
-
Reduced Maintenance - Shared Jenkins libraries eliminate custom pipeline overhead
Enterprise Security Enhancements
-
Automated Security Scanning - Integrated into familiar Jenkins workflows
-
Cryptographic Signing - Container and commit signing through Jenkins
-
Policy Enforcement - Enterprise security policies enforced automatically
-
Complete Audit Trails - Full compliance evidence through Jenkins processes
Next Steps
In the next section, Staging - Jenkins Pipeline Promotion, you’ll:
-
Experience Jenkins-based staging promotion using familiar tools
-
Learn how Git tags trigger Jenkins staging pipelines automatically
-
See how Enterprise Contract validation integrates with Jenkins workflows
-
Understand GitOps deployment through Jenkins pipeline automation
Your enhanced Jenkins foundation is now in place - let’s see your staging promotion in action!