OpenShift Pipelines - Staging
Learning Objectives
By the end of this section, you will:
-
Understand how automated staging validation transforms development cycles from weeks to minutes
-
Experience enterprise-grade security validation with Enterprise Contract and Artifact Signer
-
Trigger staging pipelines using Git tags and observe automated promotion workflows
-
Learn how GitOps ensures validated changes reach staging environments automatically
Understanding Staging Validation Transformation
Enterprise development teams often face significant challenges with staging validation processes:
Traditional Staging Challenges
-
3-5 days required for staging validation processes
-
1-2 weeks for manual security reviews and compliance checks
-
Multiple coordination meetings between development, security, and platform teams
-
Manual deployment processes that are error-prone and time-consuming
-
"Works in staging, fails in production" surprises due to environment inconsistencies
Red Hat Advanced Developer Suite Solution
Red Hat Advanced Developer Suite (RHADS) transforms this experience with:
-
Staging time: 3-5 days → 30 minutes with automated validation pipelines
-
Security validation: 1-2 weeks → minutes with integrated Enterprise Contract validation
-
Zero manual coordination overhead between teams
-
Production-ready confidence with every staging deployment
-
Consistent validation that eliminates environment surprises
Key Business Benefits:
-
Feature validation: Weeks → Hours
-
Early risk detection prevents costly production incidents
-
Same security standards as production ensure audit readiness
-
Platform teams focus on innovation, not deployment coordination
Activity 1: Triggering the Staging Pipeline
Let’s create a Git tag to trigger the automated staging pipeline and observe how enterprise validation works.
Step 1: Access Your GitLab Repository
-
Open your GitLab repository at qrks-tkn-{user}
-
Sign in using:
Username: {gitlab_user}
Password: {gitlab_user_password}
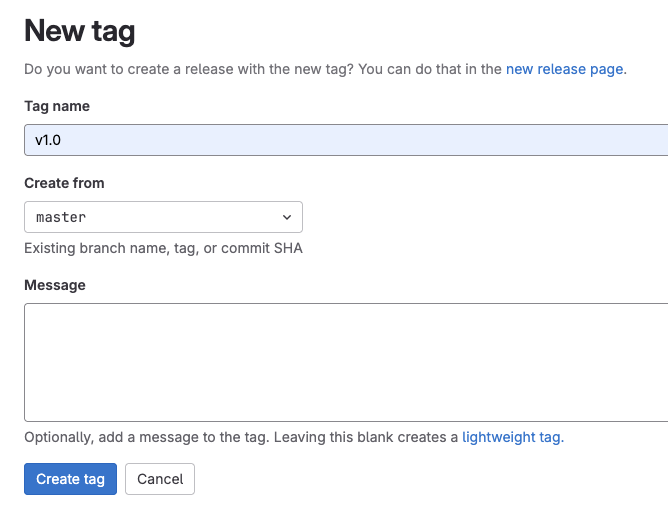
Step 2: Create a Git Tag
Creating a Git tag simulates a release event that triggers the staging pipeline.
-
In the left menu, click on Code > Tags > New Tag
-
Enter a version tag like
v1.0 -
Choose the target branch (typically
main) -
Click Create Tag
|
This tag creation triggers a GitLab webhook that kicks off the OpenShift Pipelines pipeline — the one that promotes the image to the staging environment. |
Alternative: CLI Approach
If you prefer the CLI, you can trigger the same automation:
git tag v1.0
git push --tags
The CLI approach does the same thing — triggers the pipeline tied to this Git tag.
Step 3: Monitor Pipeline Execution
-
Go to Red Hat Developer Hub
-
Navigate to the qrks-tkn-{user} component
-
Click the CI tab to see pipeline runs
-
Expand the job labeled promote-to-stage to follow its progress
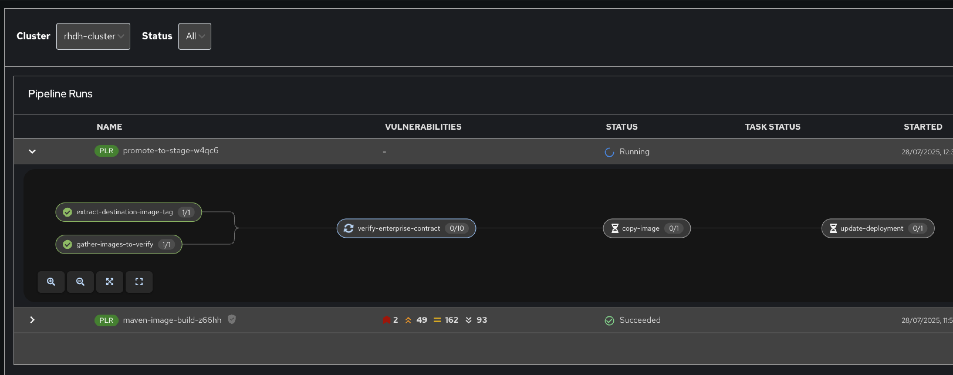
|
Use the Developer Hub view to observe each task as it executes* You’ll see automation in action — no manual approvals, just policy-driven promotion. |
Activity 2: Understanding Pipeline Tasks
The staging pipeline provides production-level confidence while eliminating manual bottlenecks* Let’s examine each task in detail.
Task 1.1: extract-destination-image-tag
Purpose: Perfect traceability through Git tags
This task extracts the commit ID of the Git tag* The commit ID becomes the image tag of the image we are promoting to staging, enabling:
-
Coordinated feature rollouts
-
Complete audit trails for compliance
-
End-to-end traceability from code to deployment
Task 1.2: gather-images-to-verify
Purpose: Ensuring staging mirrors production exactly
This task selects the image based on the commit ID and generates images.json, which:
-
Ensures same validated images eliminate "works in staging, fails in production" surprises
-
Provides a guarantee that staging validation represents real production deployment quality
-
Creates mapping between Git commit and container image for complete traceability
|
This mapping between Git commit and container image provides end-to-end traceability — we know exactly what code went into what image. |
Sample images.json:
{
  "components": [
    {
      "containerImage": "quay.tssc-quay/tssc/qrks-tkn-{user}:abc123def456",
      "source": {
        "git": {
          "url": "https://gitlab-gitlab.apps.cluster-pc8p5.pc8p5.sandbox275.opentlc.com/development/qrks-tkn-{user}",
          "revision": "abc123def456"
        }
      }
    }
  ]
}
Task 2: verify-enterprise-contract
Purpose: Critical business protection through automated security validation
This step enforces multiple critical validations that protect your business and customers:
Enterprise Security Validations: - Container image signature verification using cryptographic signing - Software Bill of Materials (SBOM) validation for supply chain security - CVE scanning to catch security vulnerabilities before production - Policy compliance ensuring enterprise security standards - Provenance attestation to verify source repository integrity
Business Value:
-
Security validation: 1-2 weeks → Minutes
-
Early risk detection prevents costly production incidents
-
Same security standards as production ensure audit readiness
-
Automatic CVE scanning and policy compliance
Enterprise Impact:
-
Security incident prevention: Issues caught before customer exposure
-
Audit confidence: Staging proves production security compliance
-
Deployment velocity: Minutes for security validation instead of weeks
-
Risk mitigation: 100% consistent security enforcement across environments
|
If any check fails, the pipeline halts* If everything passes, the image moves forward to the next promotion step. |
Technical Implementation:
First, the pipeline bootstraps trust using cosign and a local TUF (The Update Framework) server:
cosign initialize \
  --mirror https://tuf.tssc-tas.svc \
  --root https://tuf.tssc-tas.svc/root.json
Then, the Enterprise Contract CLI performs validation:
ec validate image \
  --image quay.tssc-quay/tssc/qrks-tkn-{user}:abc123..* \
  --policy default \
  --public-key k8s://openshift/trusted-keys \
  --output json
Sample validation output:
{
  "successes": [
    "Image is signed and verified with cosign",
    "SBOM (CycloneDX) is present",
    "Provenance attestation matches source repo",
    "No critical vulnerabilities found"
  ],
  "failures": []
}
Task 3: copy-image
Purpose: Quality gateway ensuring only validated images reach staging
This task promotes the validated image with a human-readable tag (e.g., v1.0), ensuring:
-
Only validated, compliant images reach staging
-
Production-grade quality assurance
-
No unauthorized image changes slip through
Technical Implementation:
skopeo copy \
  docker://quay.tssc-quay/tssc/qrks-tkn-{user}:abc123..* \
docker://quay.tssc-quay/tssc/qrks-tkn-{user}:v1.0|
This guarantees that only validated artifacts are promoted — no sneaky image changes slip through. |
Task 4: update-deployment
Purpose: Automated GitOps bridge for immediate feature validation
This task ensures validated changes reach staging automatically through GitOps, enabling:
-
QA teams can test immediately after development completion
-
Staging catches configuration issues before production
-
No manual coordination needed for deployments
-
Staging success reliably predicts production success
|
No manual |
GitOps Implementation Details:
The pipeline updates deployment files automatically:
kustomization.yaml:
apiVersion: kustomize.config.k8s.io/v1beta1
kind: Kustomization
patchesStrategicMerge:
  - deployment-patch.yaml
resources:
- ../../basedeployment-patch.yaml:
apiVersion: apps/v1
kind: Deployment
metadata:
  name: qrks-tkn-{user}
spec:
  template:
    spec:
      containers:
        - name: qrks-tkn-{user}
          image: quay.tssc-quay/tssc/qrks-tkn-{user}:v1.0
Example Git diff showing automatic update:
-          image: quay.io/redhat-appstudio/rhtap-task-runner:latest
+          image: quay.tssc-quay/tssc/qrks-tkn-{user}:v1.0
Activity 3: Observing GitOps Deployment
Watch how ArgoCD automatically syncs your validated changes to the staging environment.
ArgoCD (OpenShift GitOps) continuously monitors your GitOps repository and automatically applies any changes to your staging environment* When the pipeline updates deployment manifests, ArgoCD detects these changes and deploys them without any manual intervention - ensuring your staging environment always matches what’s defined in Git.
Step 1: Verify Deployment Updates
-
Access your GitOps repository at qrks-tkn-{user}-gitops
-
Check the updated deployment manifests in the
components/qrks-tkn-{user}/overlays/stagedirectory -
Notice how the image tag has been automatically updated to your release version
-
Observe that this happens without any manual intervention
What You’ve Learned
You’ve experienced how Red Hat Advanced Developer Suite transforms enterprise staging validation:
Pipeline Task Summary
| Phase | Purpose |
|---|---|
1.1 extract-destination-image-tag |
Extracts the commit ID of the Git tag* The commit ID is the image tag of the image we are promoting to |
1.2 gather-images-to-verify |
Selects the image based on the commit ID and generates |
2 verify-enterprise-contract |
Validates signature, SBOM, provenance, CVEs — all enforced via the EC CLI. |
3 copy-image |
Promotes the validated image with a human-readable tag (e.g., |
4 update-deployment |
Updates |
Key Business Transformation
Staging Validation Benefits:
-
Staging time: 3-5 days → 30 minutes
-
Production-grade validation catches issues early
-
Zero manual coordination overhead
-
Teams trust staging validation represents production reality
Enterprise Security Excellence:
-
Automated security validation replaces weeks of manual review
-
Complete audit trails for compliance requirements
-
Cryptographic proof of image integrity and source
-
Consistent security enforcement across all deployments
What’s Next
Your application is now successfully validated and running in staging with enterprise-grade security!
In the next section, you’ll experience:
-
Production deployment with the same automated validation
-
Advanced monitoring and observability features
-
Complete audit trails that satisfy enterprise compliance requirements
-
Zero-downtime deployment strategies for production environments
The transformation from weeks-long staging cycles to 30-minute automated validation demonstrates the power of Red Hat Advanced Developer Suite in modern enterprise development.