Red Hat Lightspeed via the Hybrid Cloud Console - Evaluate and remediate CVEs.
While this is a Red Hat Lightspeed advisor in Satellite lab, this software is only a part of the overall Red Hat Lightspeed offering. In this module and the next you will explore some of the Red Hat Lightspeed capabilities on the Hybrid Cloud Console.
You will start by evaluating common vulnerabilities and exposures (CVEs) that are present in your environment and on your system using the Red Hat Lightspeed vulnerability service.
There are thousands of CVEs - Red Hat Lightspeed helps you to focus on CVE information that pertains to Red Hat systems and some CVEs have gone through additional evaluation to share impact specific to the version of RHEL your system is running.
-
Please use a web browser to navigate to the Hybrid Cloud Console .
-
Log into the Hybrid Cloud Console with the following credentials:
User:
rhdp-insights-demoPassword:
rhdp*insights2025!-
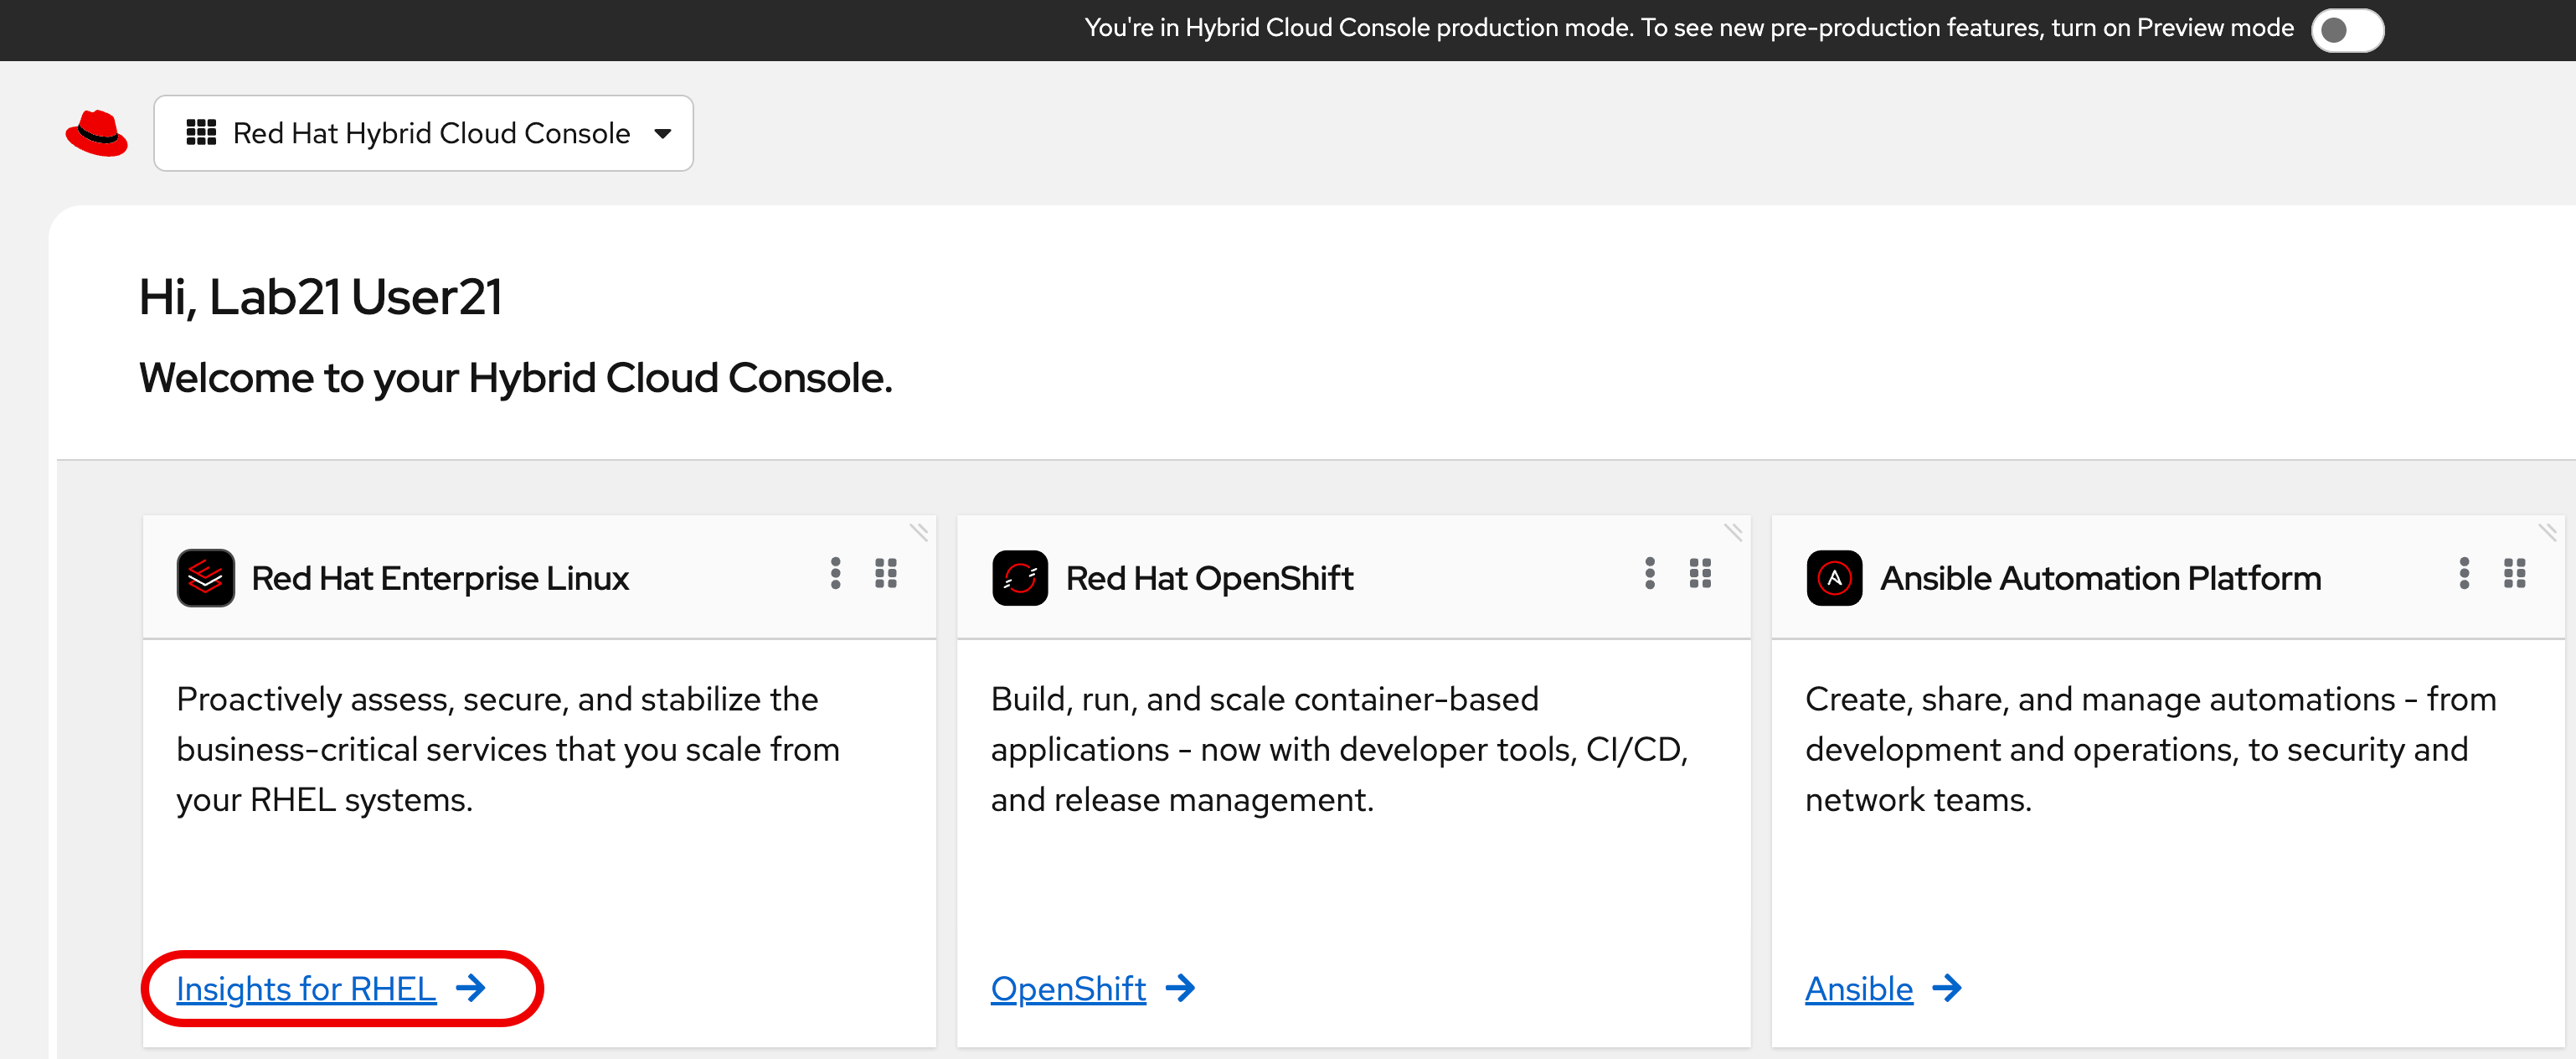
On the main page locate the
Red Hat Enterprise Linuxtile in the upper left and click RHEL.
-
On the left hand navigation bar go to
Security → Vulnerability → CVEs
| Depending on your screen resolution the left hand navigation bar may automatically minimize. You may need to click the hamburger menu (3 lines stacked on top of each other) in the upper left corner in order to see the menu bar. |
The summary bar at the top of the page helps you focus on the most impactful issues in your environment. If you have a high number of CVEs in your environment, this summary bar highlights the biggest risks that you should likely focus on addressing first. Clicking on any of the numbers in the summary bar will apply filters that will show you these CVEs.

| The numbers you see may not match what is shown in the screenshot above. That is expected. |
Here is an explanation of the items in the summary bar:
-
CVEs with known exploitsindicate unpatched CVEs with known public exploits. CVEs with this label should be addressed with high priority due to the risks posed by them. "Known exploit" does not mean we have taken steps to determine if the CVE has been exploited in your environment. -
CVEs with security rulesindicate CVEs that have gone through the "Product Security Incident Response Plan" that takes a deeper look at impactful CVEs and adds deep threat intelligence on how the vulnerability impacts Red Hat systems. This could include things like executive summaries, alternative mitigation strategies, and related CVEs that need to be considered. Red Hat Lightspeed takes this information and makes it more succinct through the use of what we call security rules. -
CVEs with critical severity. Critical ratings are given to flaws that could be easily exploited by a remote unauthenticated attacker and lead to system compromise (arbitrary code execution) without requiring user interaction. These are the types of vulnerabilities that can be exploited by worms. -
CVEs with important severity. Important ratings are given to flaws that can easily compromise the confidentiality, integrity, or availability of resources. These are the types of vulnerabilities that allow local users to gain privileges, allow unauthenticated remote users to view resources that should otherwise be protected by authentication, allow authenticated remote users to execute arbitrary code, or allow remote users to cause a denial of service.
The default view also applies a number of filters.

-
The first filter chips show you only CVEs that affect
1 or more systemsin your infrastructure. This could be a Conventional (RPM-DNF based) system or an Immutable (OSTree based) system. -
The second filter only shows you CVEs with an
Advisory Available. That means you are looking at vulnerabilities that you can fix.
Combining these two filters together means that the initial focus is on CVEs that are affecting your system AND CVEs that you can remediate.
List all systems with a specific CVE
Let’s say your security team knows about a vulnerability that affects SQLlite3 and they want to know if we have any systems with this vulnerability. The CVE number is CVE-2023-7104.
From the vulnerability page the default filter is CVE (located to the right of the empty checkbox in the image above). You can type the CVE number in the search box OR even a common search term that might be present in the CVE description like sqlite.
-
In the search box type
7104. -
This will return
CVE-2023-7104(as well as others). Notice that a new filter chip has been added forSearch term: 7104 -
In the row with the CVE ID you will see basic information about the CVE including the number of systems that are impacted by the CVE.
-
Click on the CVE ID for CVE-2023-7104
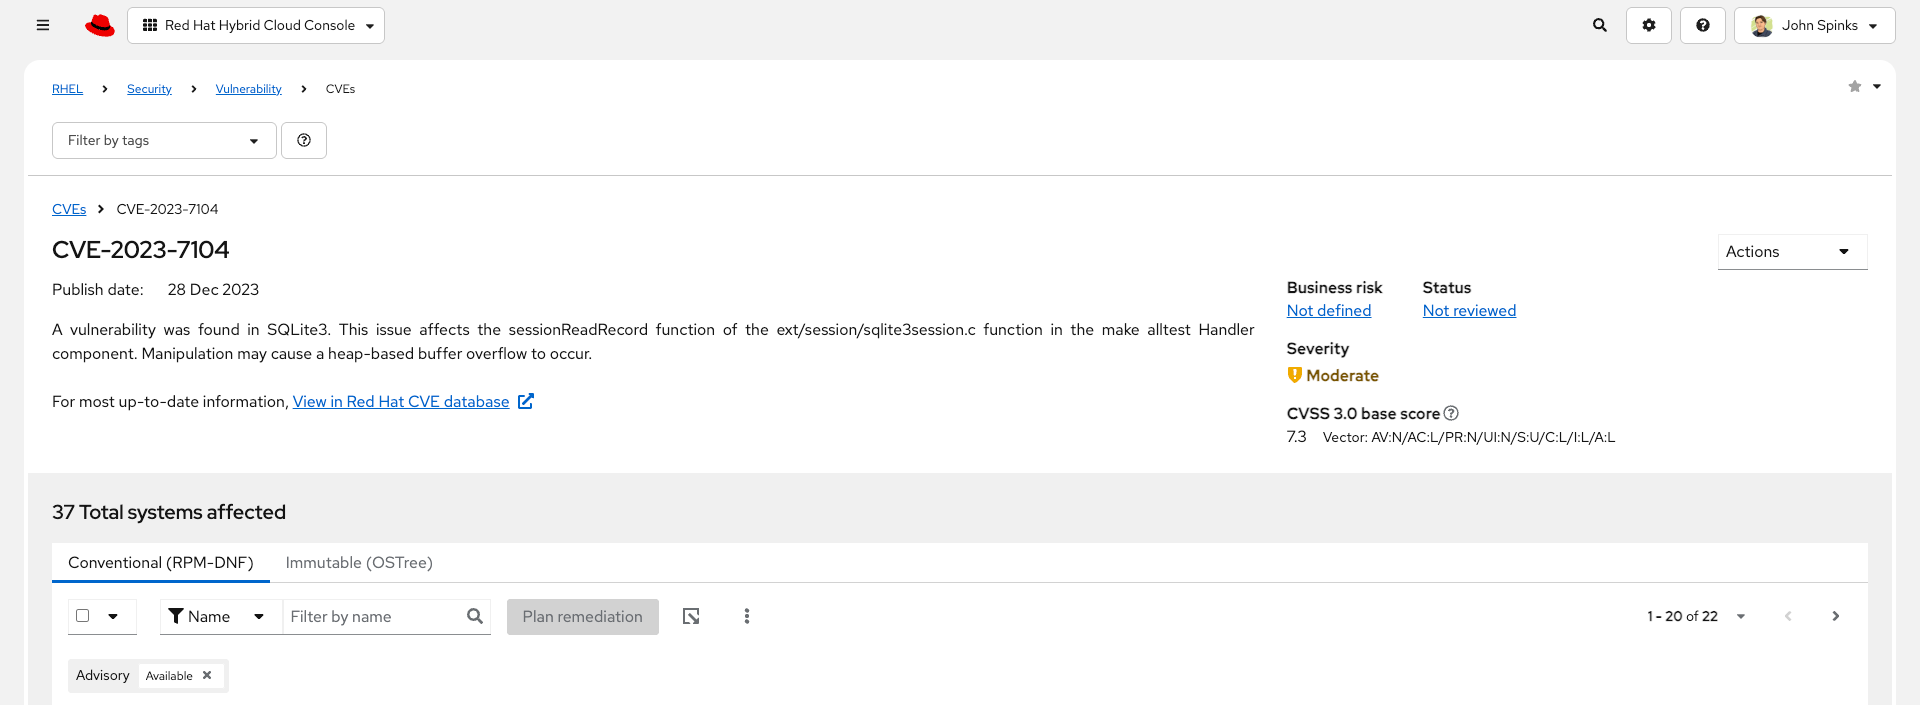
| The next few steps will reference the number in the screenshot above - not the number you see in your environment. You will see a different number and that is expected! |
In the image above you will see that this CVE impacts 37 total systems in the environment. You will have a different number.
Some of these are conventional systems. If you were to click the ‘Immutable (OSTree)` tab there would be additional systems.
In the upper right of the page you will see a Business risk and a Status. In the screenshot above they are shown as Not defined and Not reviewed respectively.
You may see a different Business risk or Status than Not defined or Not reviewed. That is ok.
|
Business risk is intended for you to be able to define a risk that is specific to your business - this CVE is tagged with a severity of moderate, but if you have a workload that is deeply affected by this vulnerability, then this may be a more critical issue for you.
-
Click
Actionsin the upper right. You will have the option toEdit business risk. Click this option.
You can set the business risk to:-
Critical
-
High
-
Medium
-
Low
-
Not defined
-
You can also add a justification note as to why you set the business risk.
-
Click
Cancelso that you make no changes at this time.
| You aren’t making any changes so that you don’t impact what other people taking the lab might see. If you change the status of the CVE then it will change for other people. |
-
Similarly, click
Actionsin the upper right. You will have the option toEdit status. Click this option.
You can use the status field to identify where you are in the mitigation process.
Status options are:-
Not reviewed
-
In review
-
On-hold
-
Scheduled for patch
-
Resolved
-
No action - risk accepted
-
Resolved via mitigation
-
You can also add a justification note to indicate any details about the status that you select.
-
Click
Cancelso that you make no changes at this time. -
Locate the export button (just to the right of the
Plan remediationbutton). It looks like this:

-
Click the export button which will give you the option to export this list into CSV or JSON formats.
You should know that the exported data is WYSIWYG (what you see is what you get), so an export on theConventional (RPM-DNF)tab will show you only the RPM/DNF based systems. If you apply any filters to the view, those filters will affect what is exported.
In other words, getting a list of systems impacted by a vulnerability takes just seconds - search for the CVE then export the list of impacted systems.
Generating a remediation playbook
To fix this issue you will need to create a remediation plan for this CVE.
-
Find and locate your system, then click the checkbox to the left of your system’s name.
Reminder: your system name is:node-{guid}-1.example.com
| The following steps are for Conventional (RPM-DNF) based systems. Immutable (OSTree) systems are image based and you update the image vs making system changes. |
-
Once you have hosts selected, click the
Plan remediationbutton which will launch a wizard that will create a playbook for you.
You can add this fix to an existing playbook or you can create a new playbook. Red Hat Lightspeed defaults to Create new playbook. -
Give your playbook a name like:
7104 fix {guid}
Reminder: your system name is: node-{guid}-1.example.com
| Please add some sort of unique identifier to the playbook name. Above we suggest using your environment’s unique ID even if you are selecting multiple hosts. |
-
Click
Next.
At this time you are fixing this issue on all affected systems. -
Click
Next.
Review the summary. Notice that a reboot is required to resolve this issue.
You do have the option to disable the reboot in the playbook by clicking theTurn off autoreboottext with a blue toggle. -
Click
Submit.
At the bottom of the wizard there is a link that will allow you toOpen playbook 7104 fix {guid}. -
Click the link. This will redirect you to the Remediations section of the Hybrid Cloud Console.
For context, in the left hand navigation bar you have just been redirected toAutomation Toolkit → Remediations.
From the remediations page, while looking at your remediation plan you created, you have a couple of options in the upper right.
The Execute button is unavailable. Your user in this lab does not have permission to execute remediation. No user gets this permission by default - it has to be explicitly provided, With so many people taking this lab at the same time we have opted to not enable this feature.
We do have an interactive demo that can show you how this works, end to end that is at the end of this module.
-
Click the Download button.
The playbook is downloaded via your browser. You will need to extract the file then open the .yaml.
This playbook can help simplify the resolution of this issue - you could easily adapt this to run via ansible automation or sync this playbook with Ansible Automation Platform (AAP) - this is covered in the AAP documentation but we are not covering it in this lab. -
Close the playbook and return to the Hybrid Cloud Console browser window.
List all CVEs impacting your system
Let’s return to the vulnerability page and look at your specific host with the goal of getting a list of all CVEs that affect your specific host.
| Depending on your screen resolution the left hand navigation bar may automatically minimize. You may need to click the hamburger menu (3 lines stacked on top of each other) in the upper left corner in order to see the menu bar. |
-
On the left hand navigation bar go to
Security → Vulnerability → Systems -
Locate your host and click on the hostname.
Reminder: your system name is:node-{guid}-1.example.com
This view will show you all of the vulnerabilities present on this specific host. -
Notice that the default filter applied is
Advisory: Available.
This means we are showing you all CVEs that have an advisory available (in other words - we are showing you all of the vulnerabilities that you can fix).
Because we are showing you only CVEs with advisories, in the remediation column on the far right, almost every CVE has the option for a remediation playbook - meaning Red Hat Lightspeed can generate a playbook for almost all of these CVEs.
If you just need the list of CVEs that you can fix - exporting this list will get you what you need.
However, sometimes you need a complete list of system vulnerabilities - the CVEs with and without errata.
Red Hat Lightspeed can show you this information as well. -
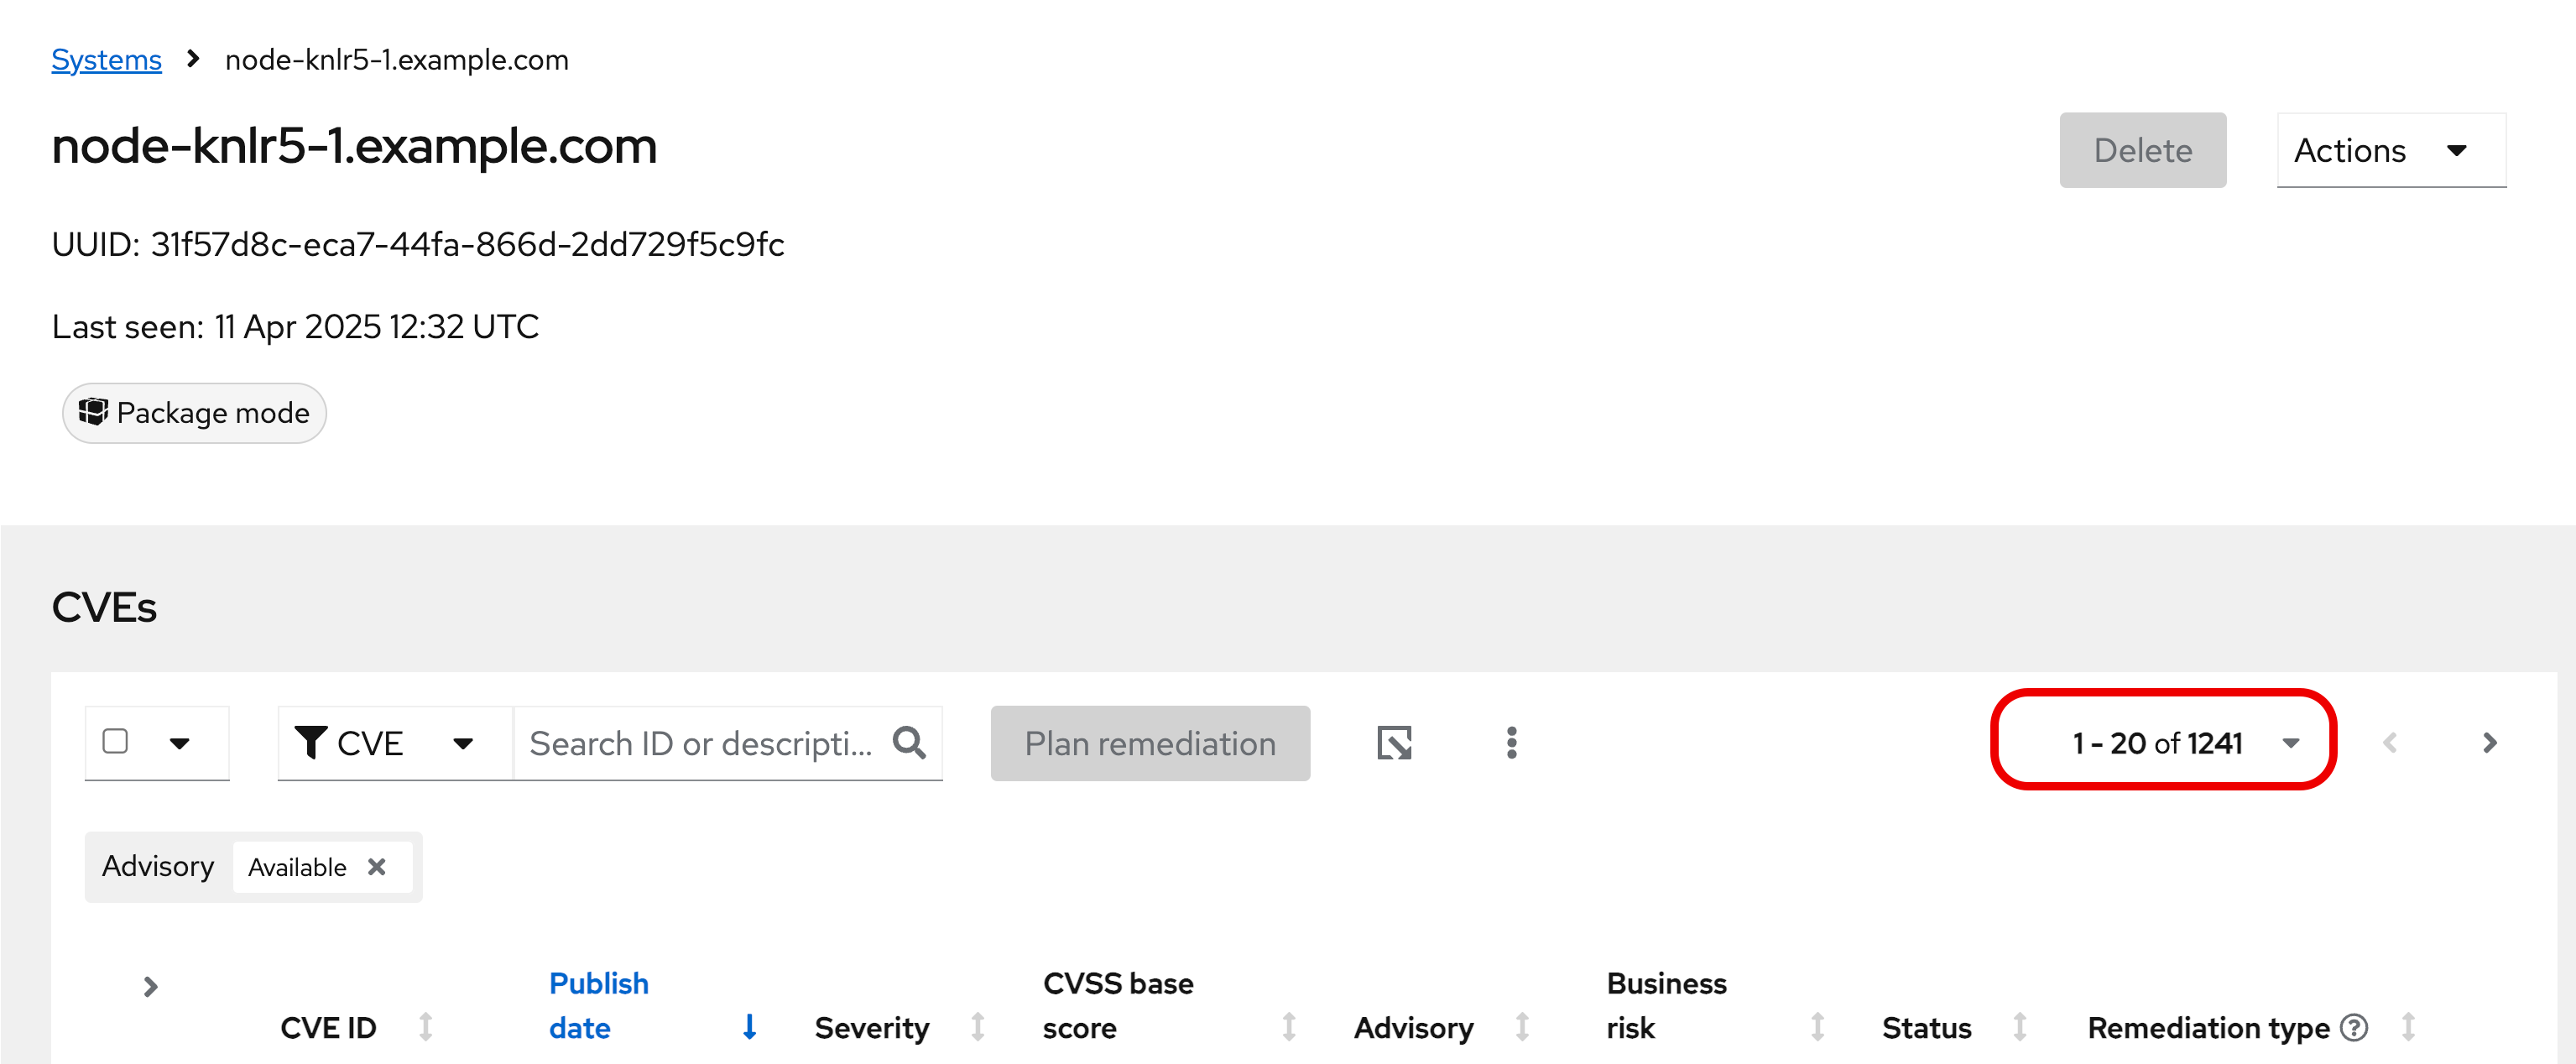
Take note of the number of CVEs listed for the host. These are shown in the upper right side of the list of CVEs.
In the image below there are 1241 CVEs with errata on the host in the image - the number you see may differ.
-
Now - click the
xto the right of theAdvisory: Availablefilter chip to remove it.
This will show you all CVEs in the database that affect this system - with and without advisories. -
Look again at the number of CVEs - the number is significantly larger, probably more than double!
In the image below there are 3440 CVEs when looking at the full picture - these are CVEs with and without errata. Having this information gives us a full view of all of the issues that affect your RHEL hosts - the ones you can fix as well as the ones you can’t.
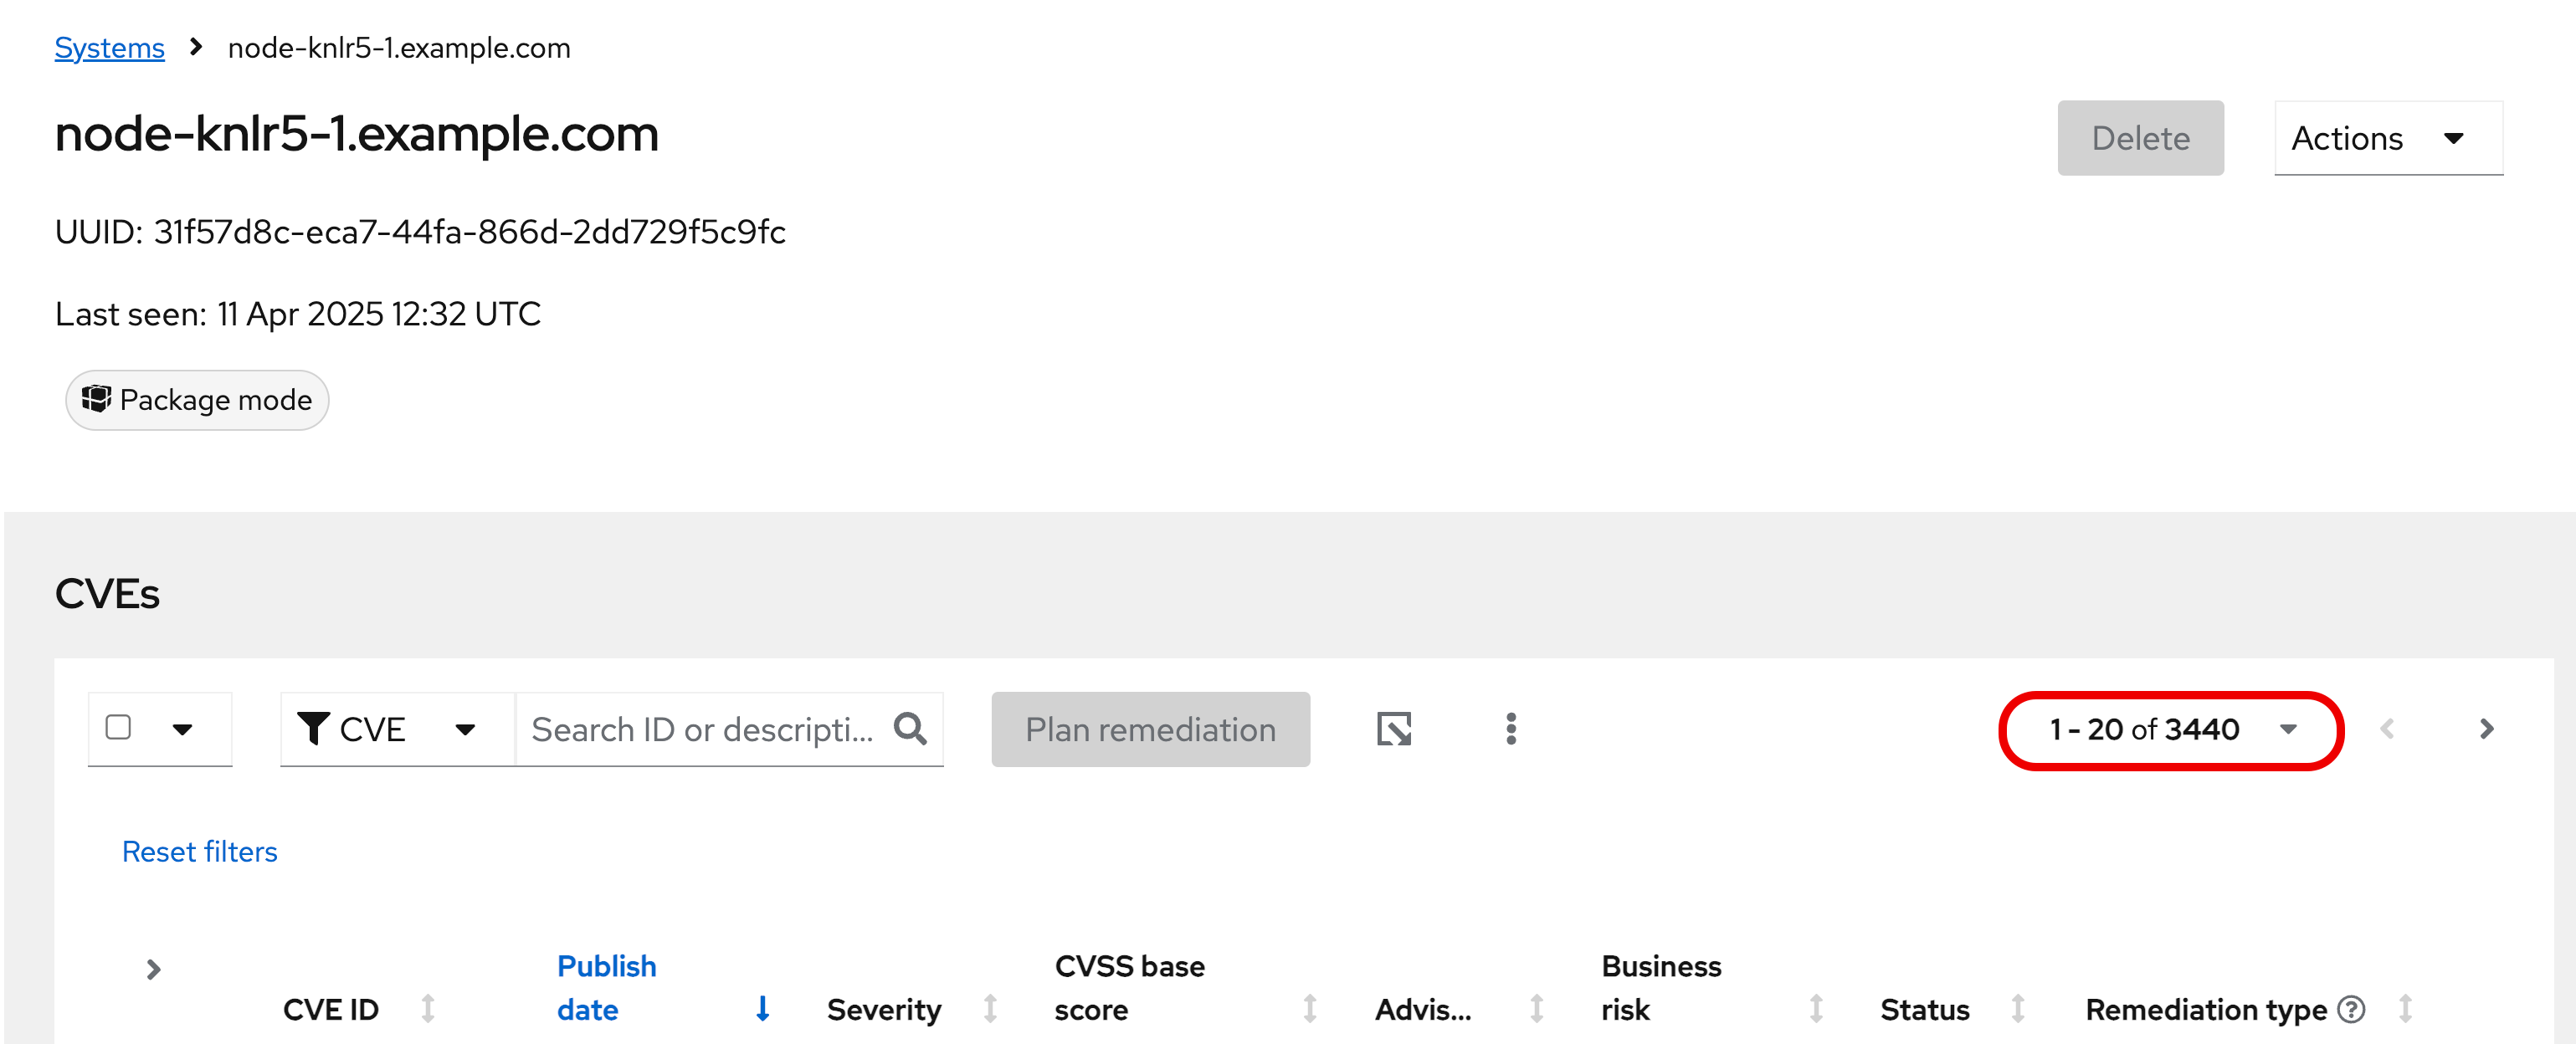
The advisory column will tell you if the CVE has an advisory available to resolve the CVE.
-
Click the export button (just to the right of the Plan remediation button) you have the option to export this list into CSV or JSON formats.

Again - you can get a list of all of the CVEs that impact a specific system very quickly.
Reporting on CVEs
The vulnerability service has some built in reporting capability - you will finish up this module by generating some reports.
Executive Report
-
On the left hand navigation bar go to
Security → Vulnerability → Reports
There are three types of reports - an executive report, a customizable CVE report, and a report by operating system versions. -
Start with the executive report - click
Download PDF.
The PDF file will be downloaded via your browser. -
Locate and open the report.
The executive report shows you a summary of the systems, CVEs, and security rules.
The report then breaks down the CVEs by CVSS (Common Vulnerability Scoring System) score, identifies the top 3 CVEs in your environment, and the top 3 security rules.
This is a nice pre canned report that you can send to your management or security team. -
Close the report and return to the reports page of the Hybrid Cloud Console.
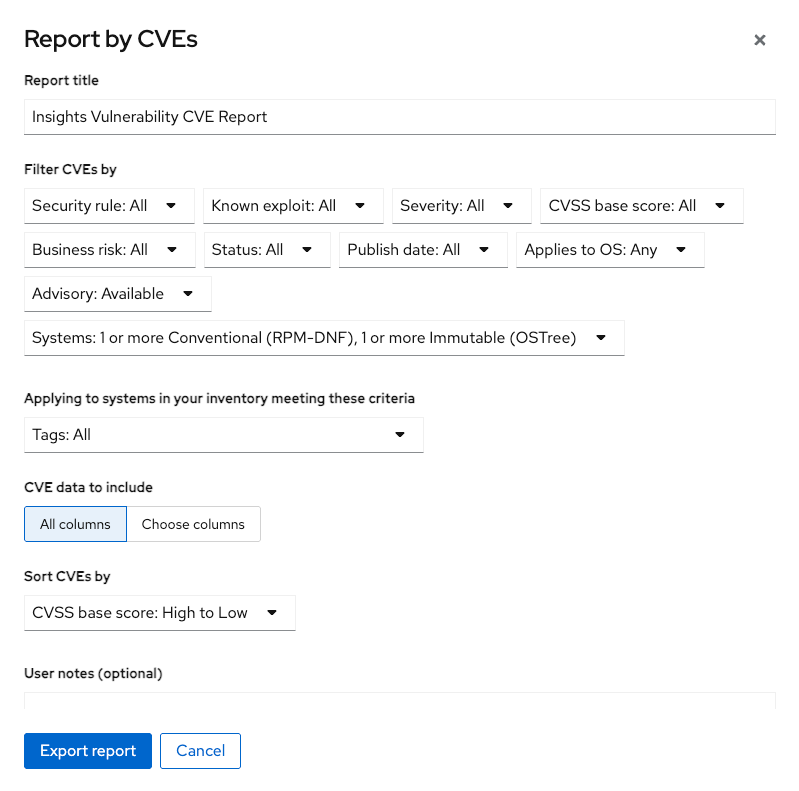
Report by CVEs
The information in the executive report may not exactly meet your needs, which is where the customizable report comes in.
Let’s say you have been asked to provide your security team with a list of all vulnerabilities with a CVSS score from 6-10 that have been released in the last 90 days.
-
Under
Report by CVEsclickCreate report.
This opens a window where you can identify what you want the report to contain.
-
Complete the report wizard
-
If desired you can change the
Report title. -
Locate the
CVSS base scorefilter and change this to read 6.0 - 10 (you can type in the number or use the arrows). -
Locate
Publish dateand select theLast 90 days. -
Add
User notesif desired. -
Click
Export report.
The PDF file will be downloaded via your browser.
-
-
Locate and open the report.
This report will show you the information that you selected - in this case all CVEs with a CVSS base score between 6.0 and 10 within the last 90 days. -
When finished reviewing, close the report and return to the Hybrid Cloud Console.
Report by operating system versions
This report will provide you a breakdown of vulnerabilities affecting the minor operating system versions of your RHEL systems.
-
Under
Report by operating system versionsclickCreate report.
This opens a window where you can identify what you want the report to contain.
-
Complete the report wizard
-
If desired you can change the
Report title. -
Select
RHEL 9.5(The Satellite servers are running on thie version),RHEL 9.1(Your RHEL nodes are running on this version), andRHEL 9.0(you don’t have any systems running this version of RHEL). -
Notice that you can filter the CVE severity - Critical, Important, Moderate, and/or Low. Leave this as the default of All.
-
Notice that you can filter the
Advisory:Availableoption toNot Availableor All (Select both options). This would allow you to report on CVEs without errata. Leave this as the default of All. -
If desired, add user notes about the report.
-
You can export to PDF of CSV. Click
Export PDF. -
The report will take several seconds to generate. Once done, click
Save.
-
-
Locate and open the report.
-
Notice that the report will show you the CVEs reported for the specific minor versions of RHEL that you selected.
If you scroll to the second page of the report you can see a graph of the severity breakdown.
Unsurprisingly, newer versions of RHEL have less CVEs.
If you want to see this work end-to-end including the remediation, please check out this interactive demo on Evaluating systems for Common Vulnerabilities and Exposures (CVEs):
This module is complete.