Operations and Security
Operational and Security Sovereignty means ensuring your organization can operate technology independently and autonomously, with complete control over your data, infrastructure, and security information.
This requires a flexible platform that can be used to deploy and manage your clusters, containers, virtual machines, and AI applications, while providing hardened authorization, authentication, data controls, encryption, vulnerability management, and more.
Multi-Environment Red Hat OpenShift Cluster and Virtual Machine Creation and Management
Creating and managing clusters is the first step in building a sovereign cloud. When you control your clusters — from setup to daily operations — you decide where your workloads and data live, set your own policies, and stay compliant. This way, you can quickly adapt to regulations, keep your business flexible, and avoid relying on outside providers. With flexible management of clusters and virtual machines, you can build a cloud that fits your security and compliance needs from the start.
RHACM Management Cluster Overview
Red Hat Advanced Cluster Management (RHACM) serves as the central control plane of your sovereign cloud environment for managing your entire fleet of OpenShift clusters. It provides a single point of authority and unified interface for cluster lifecycle management, policy enforcement, application deployment, and observability across multiple environments.
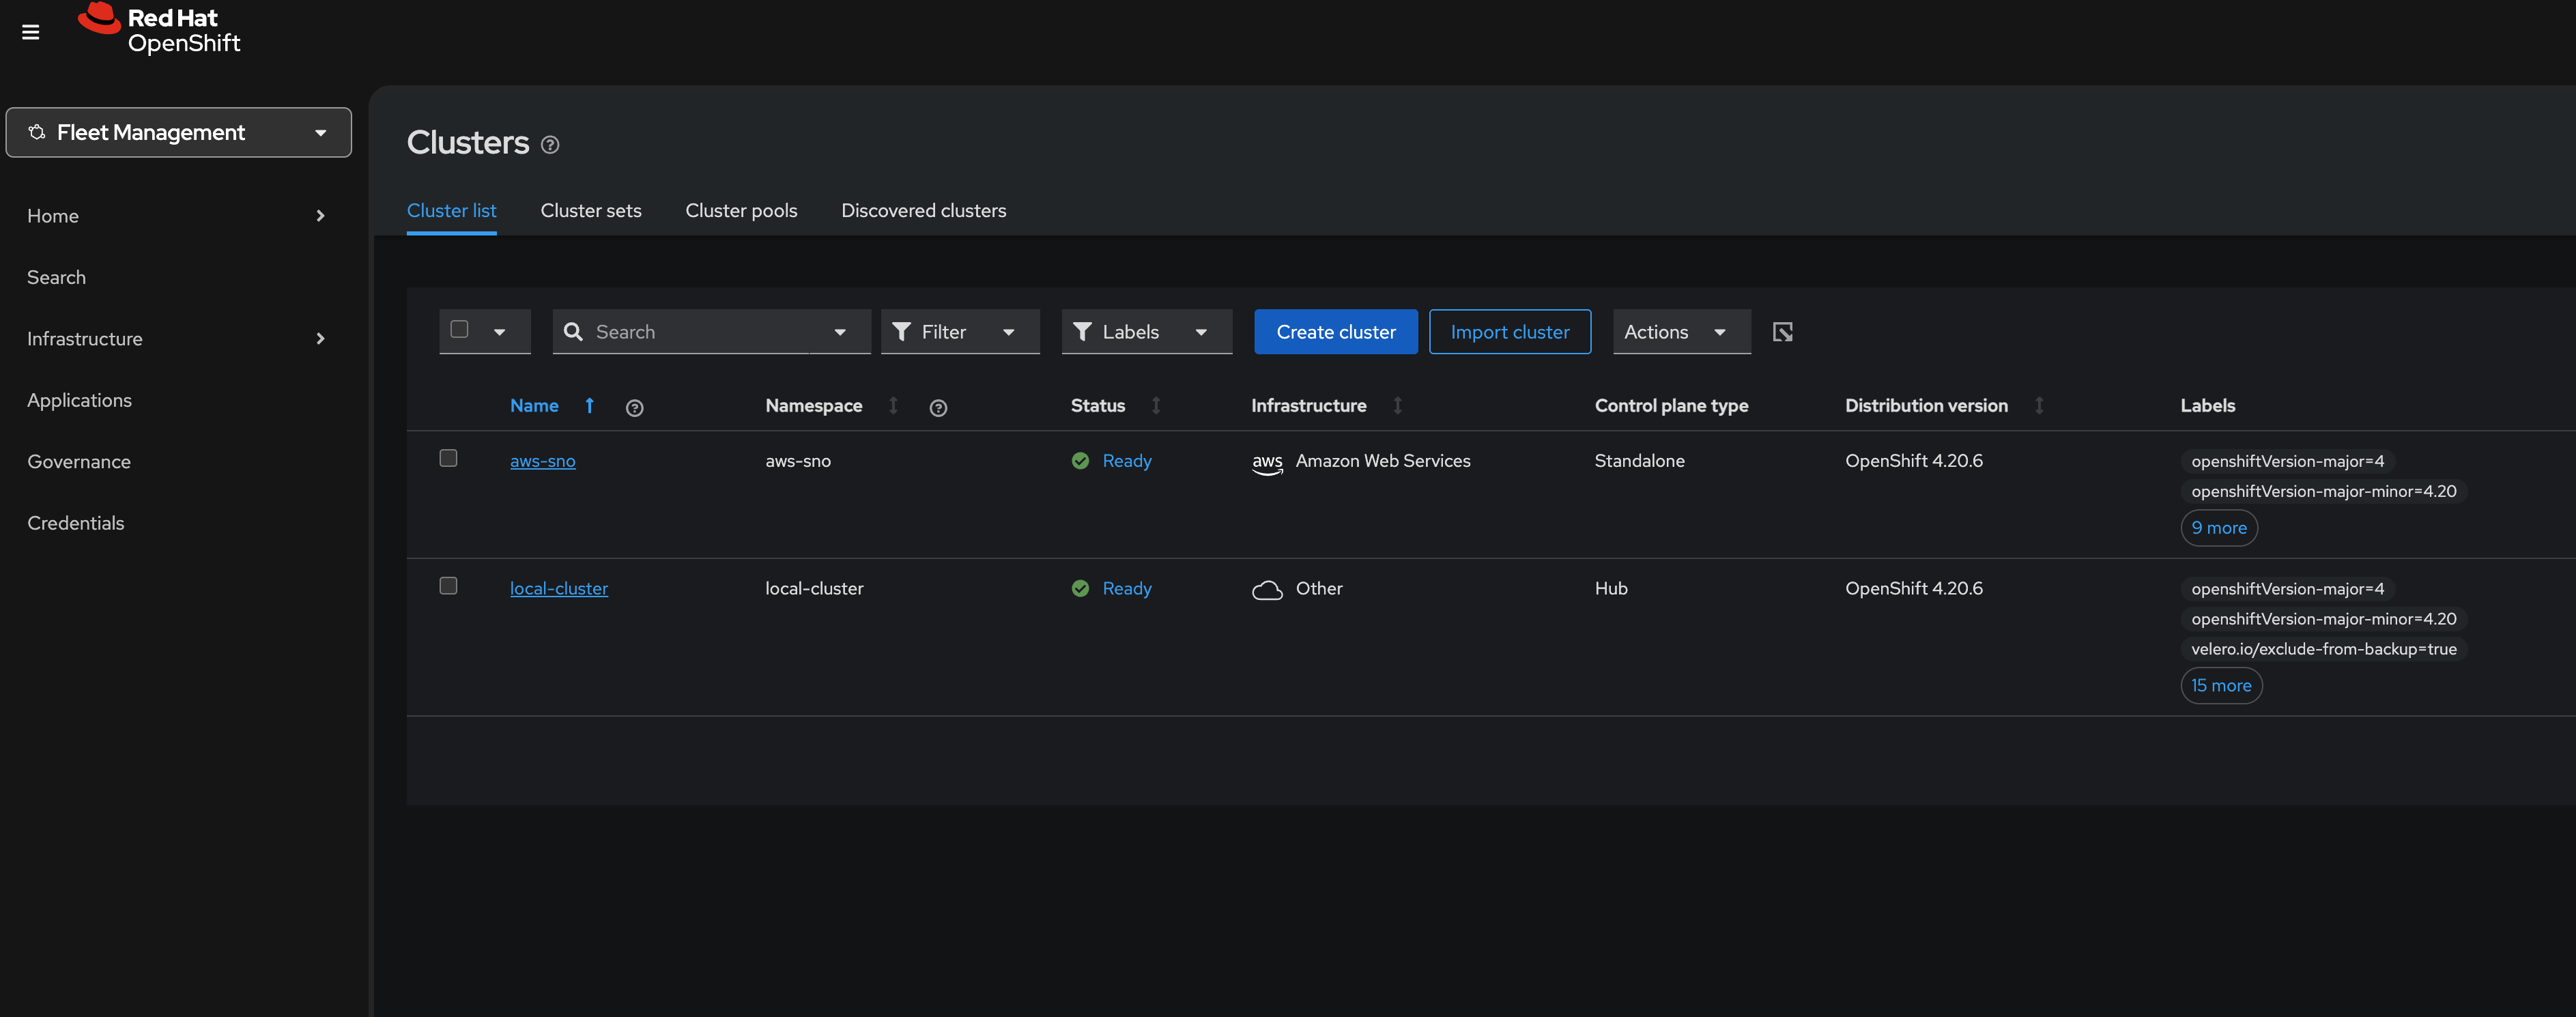
Create and Manage Kubernetes Clusters
Red Hat Advanced Cluster Management for Kubernetes (RHACM) simplifies the deployment and management of new OpenShift clusters. Strategies such as IPI and the Assisted Installer are available, but RHACM takes it a step further, allowing you to deploy new clusters with just a few clicks using the cluster creation wizard.
For the first exercise, you will deploy a new cluster in the EMEA region so that you will have local, US and EMEA clusters to deploy your applications to.
-
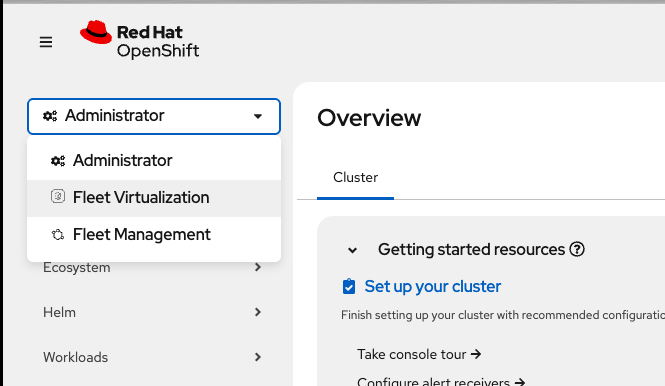
On the top left of the OpenShift Console, click the "Hamburger" drop down and select Fleet Management → *Infrastructure → Clusters
If you don’t see the dropdown your window is not wide enough - just click the "hamburger menu" (the three dashes) to reveal the side menu.
-
Next, click on the Create cluster button in the center of the screen:
-
Click on the Red Hat OpenShift Virtualization button. You will see one option for the control plane type: Hosted
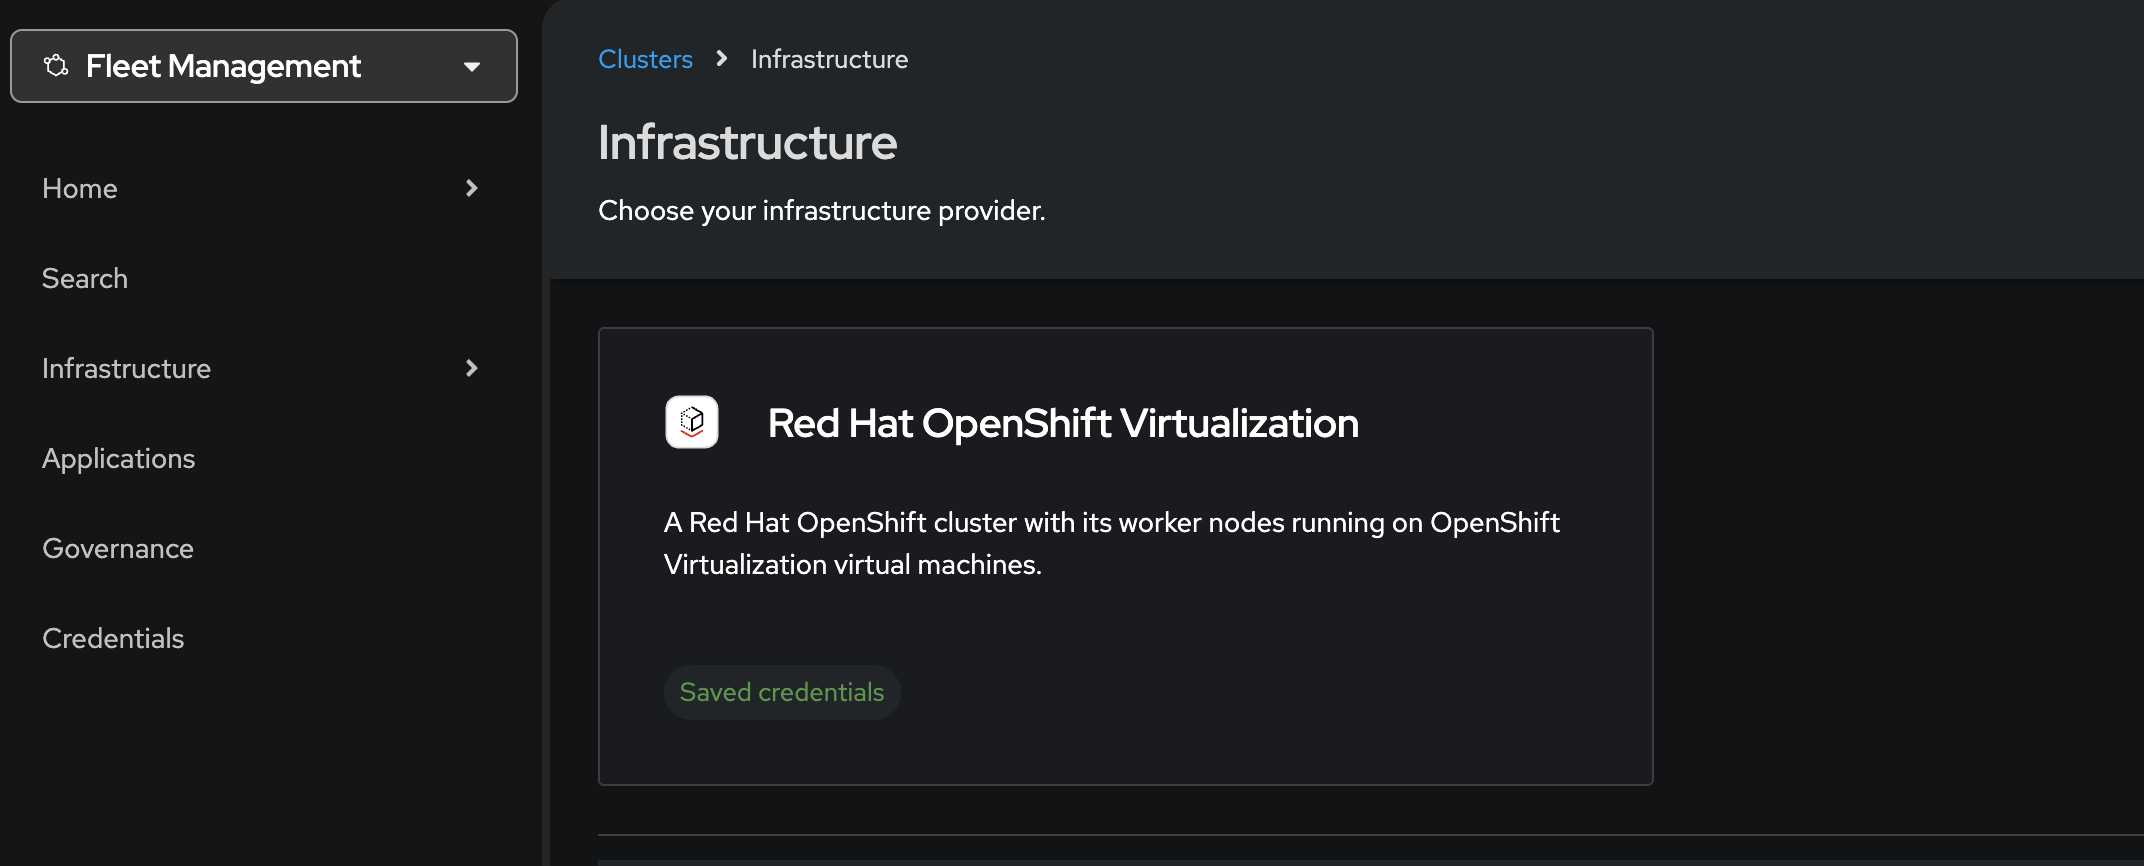
You’ll notice that the only option already highlighted is Red Hat OpenShift Virtualization, indicating that your credentials are saved for the purpose of speeding up this lab. -
Click on the Hosted option.
-
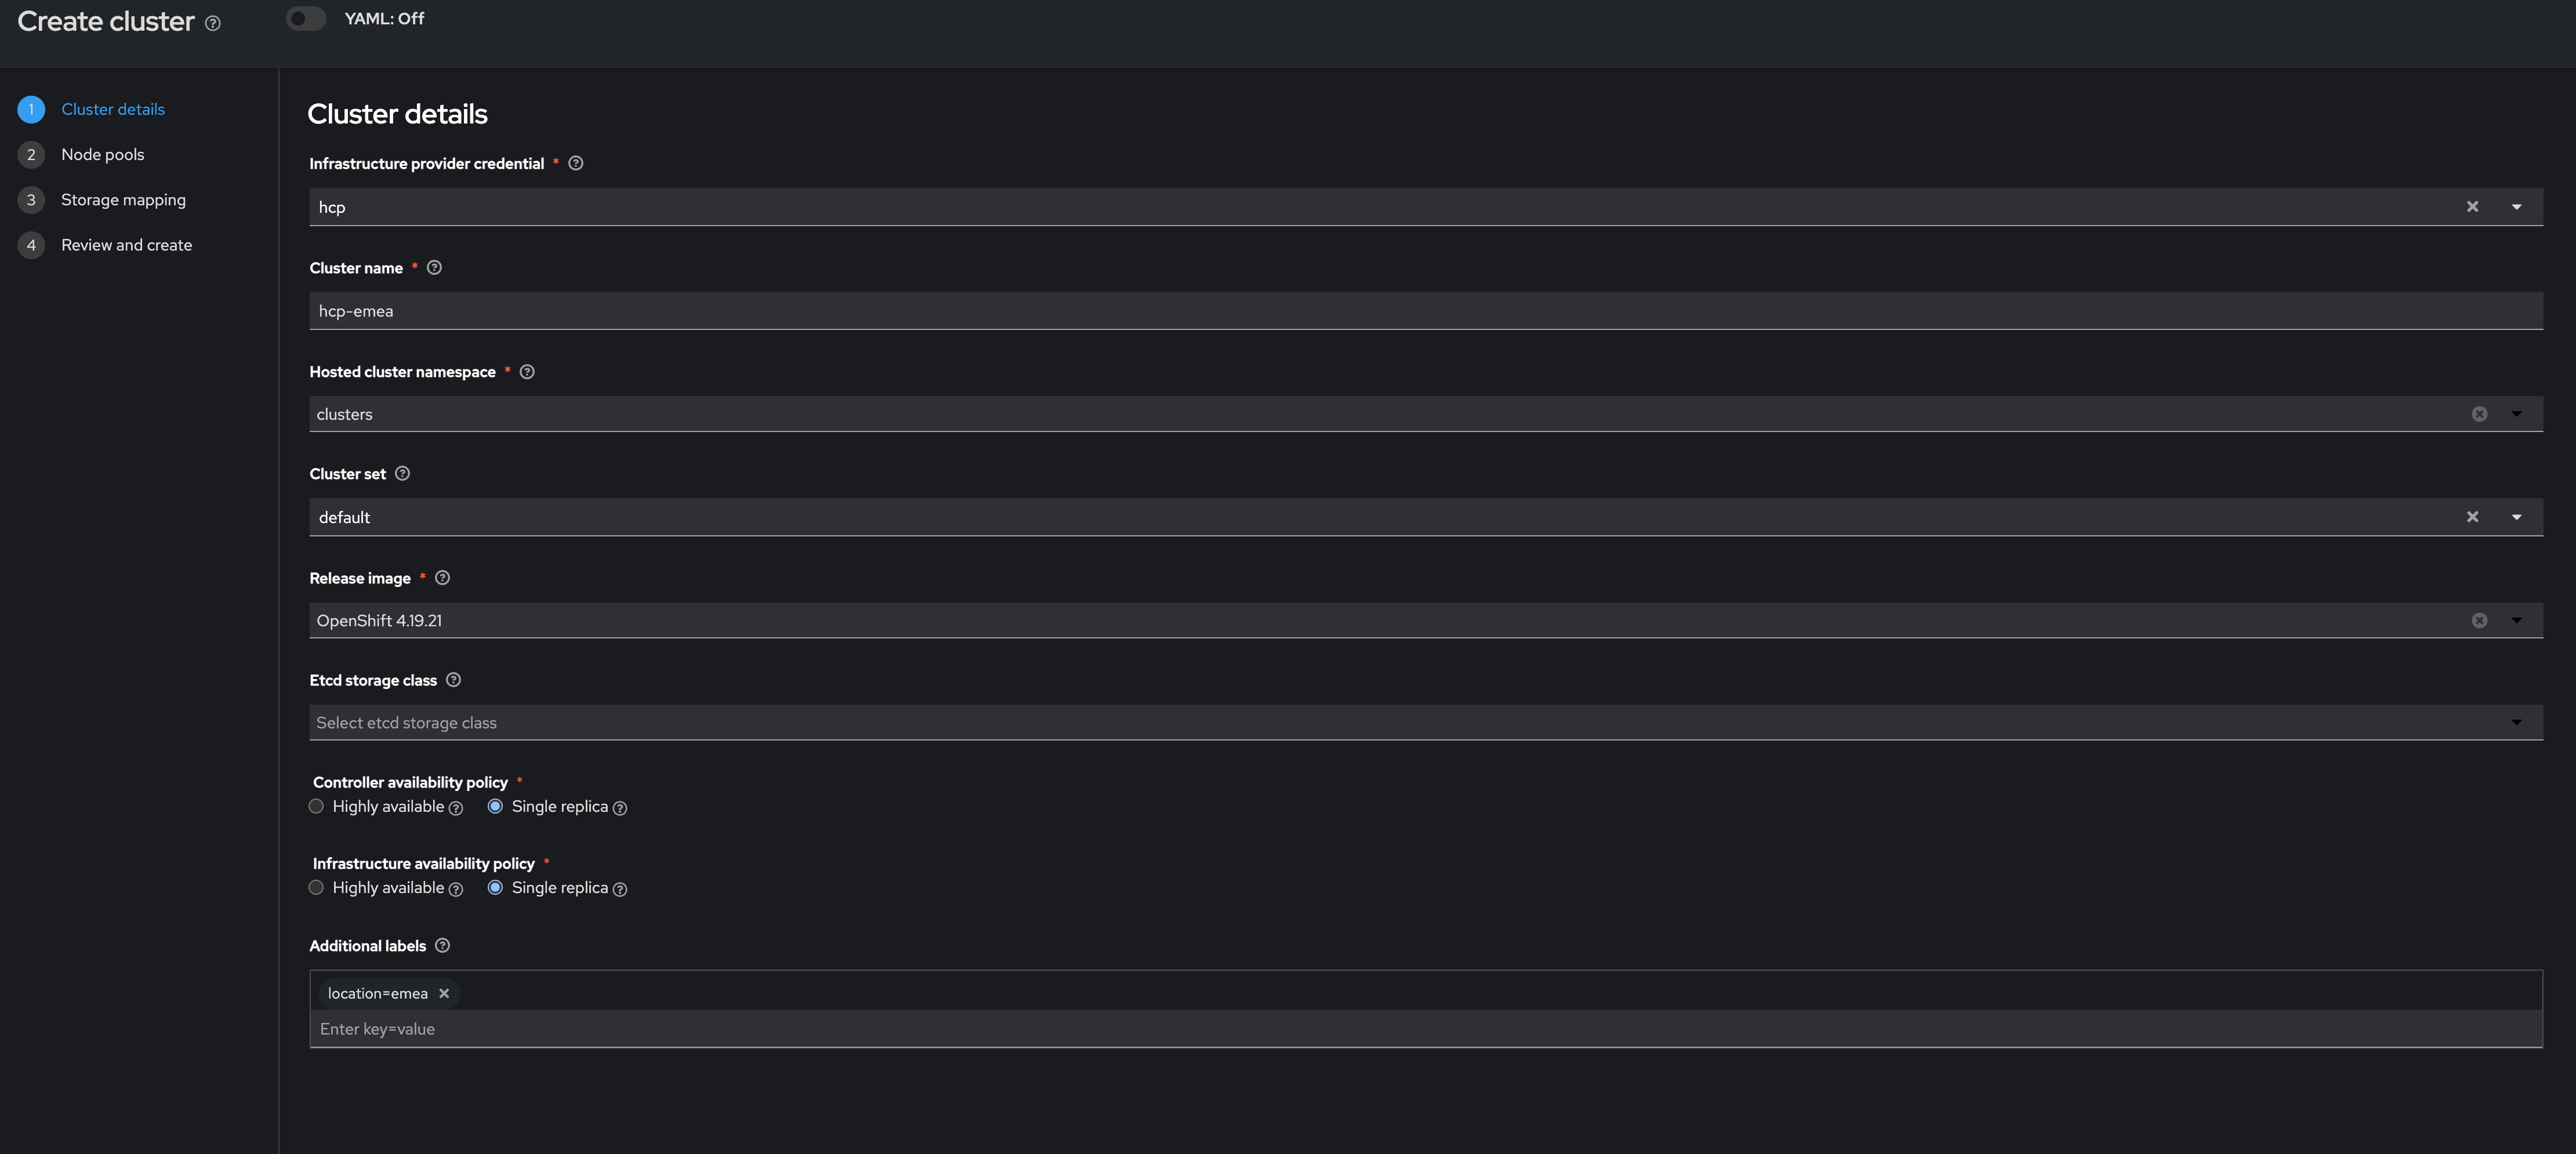
Leave the Infrastructure provider credential as hcp.
-
Name your cluster hcp-emea
hcp-emea -
Verify that is on the clusters space for the hosted cluster namespace
-
Select managed for the
Cluster Set -
Next, select the release image OpenShift 4.21.0 (or whatever the current 4.21.x release image is).
-
Select Single replica for both the Controller availability policy and the Infrastructure availability policy.
-
Under Additional Labels enter location=emea
location=emeaSingle replica means components are not expected to be resilient to problems across most fault boundaries associated with high availability. This usually means running critical workloads with just 1 replica and with toleration of full disruption of the component.
-
Click on Next to continue.
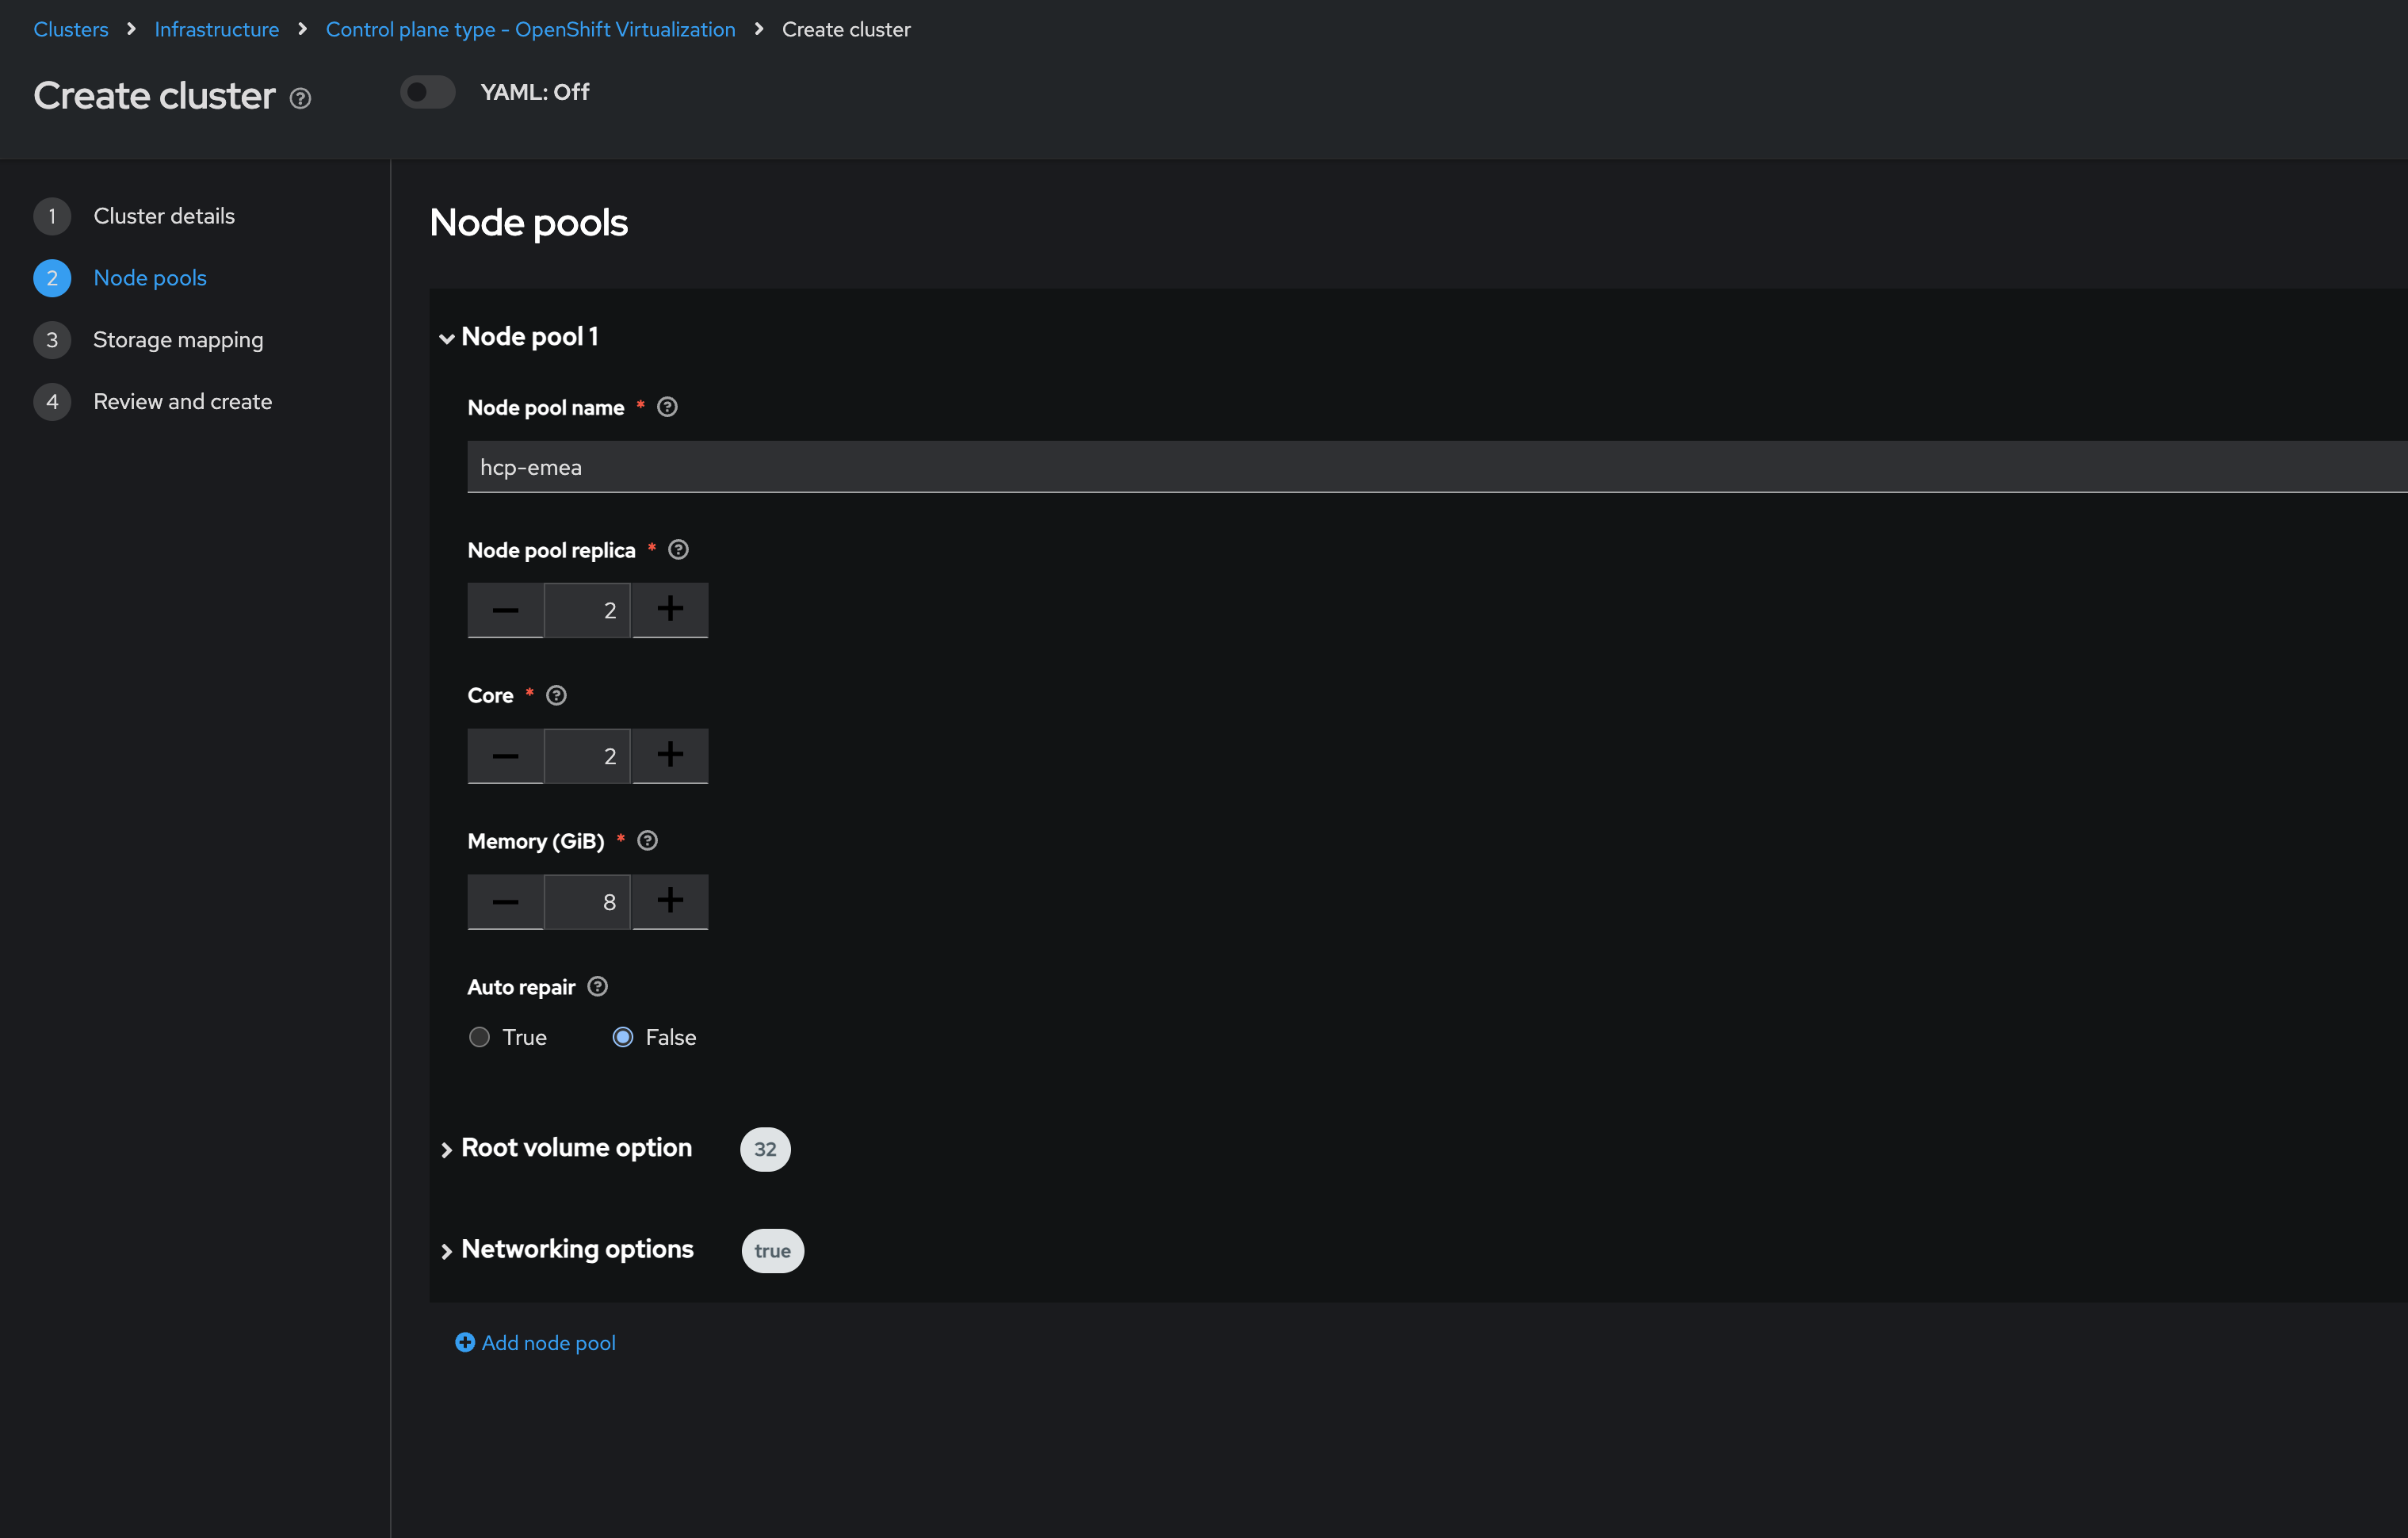
On the next screen you can customize the name for the node pools, the amount of pool replicas, cores and memory.
-
Enter the name
hcp-emeafor the Node pool name and leave the other details as default.hcp-emea -
Click on Next to proceed.
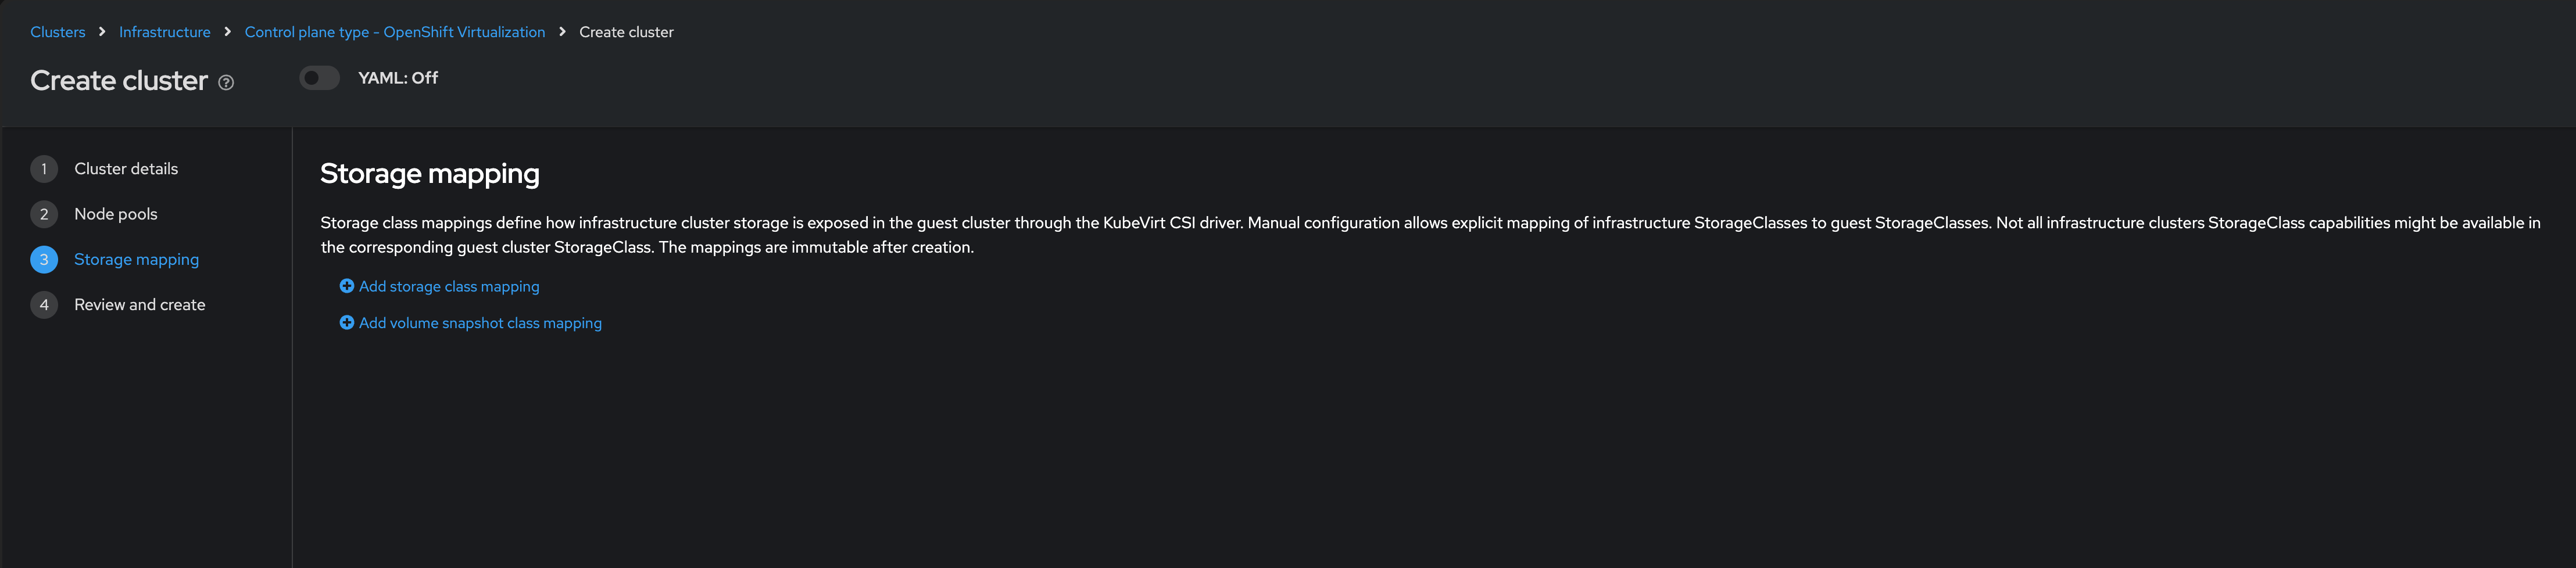
The next screen allows you to configure storage mappings type to use and its associated variables. We will leave these as default as these have already been configured on the backend and you do not need to change them.
-
Click on Next to proceed.
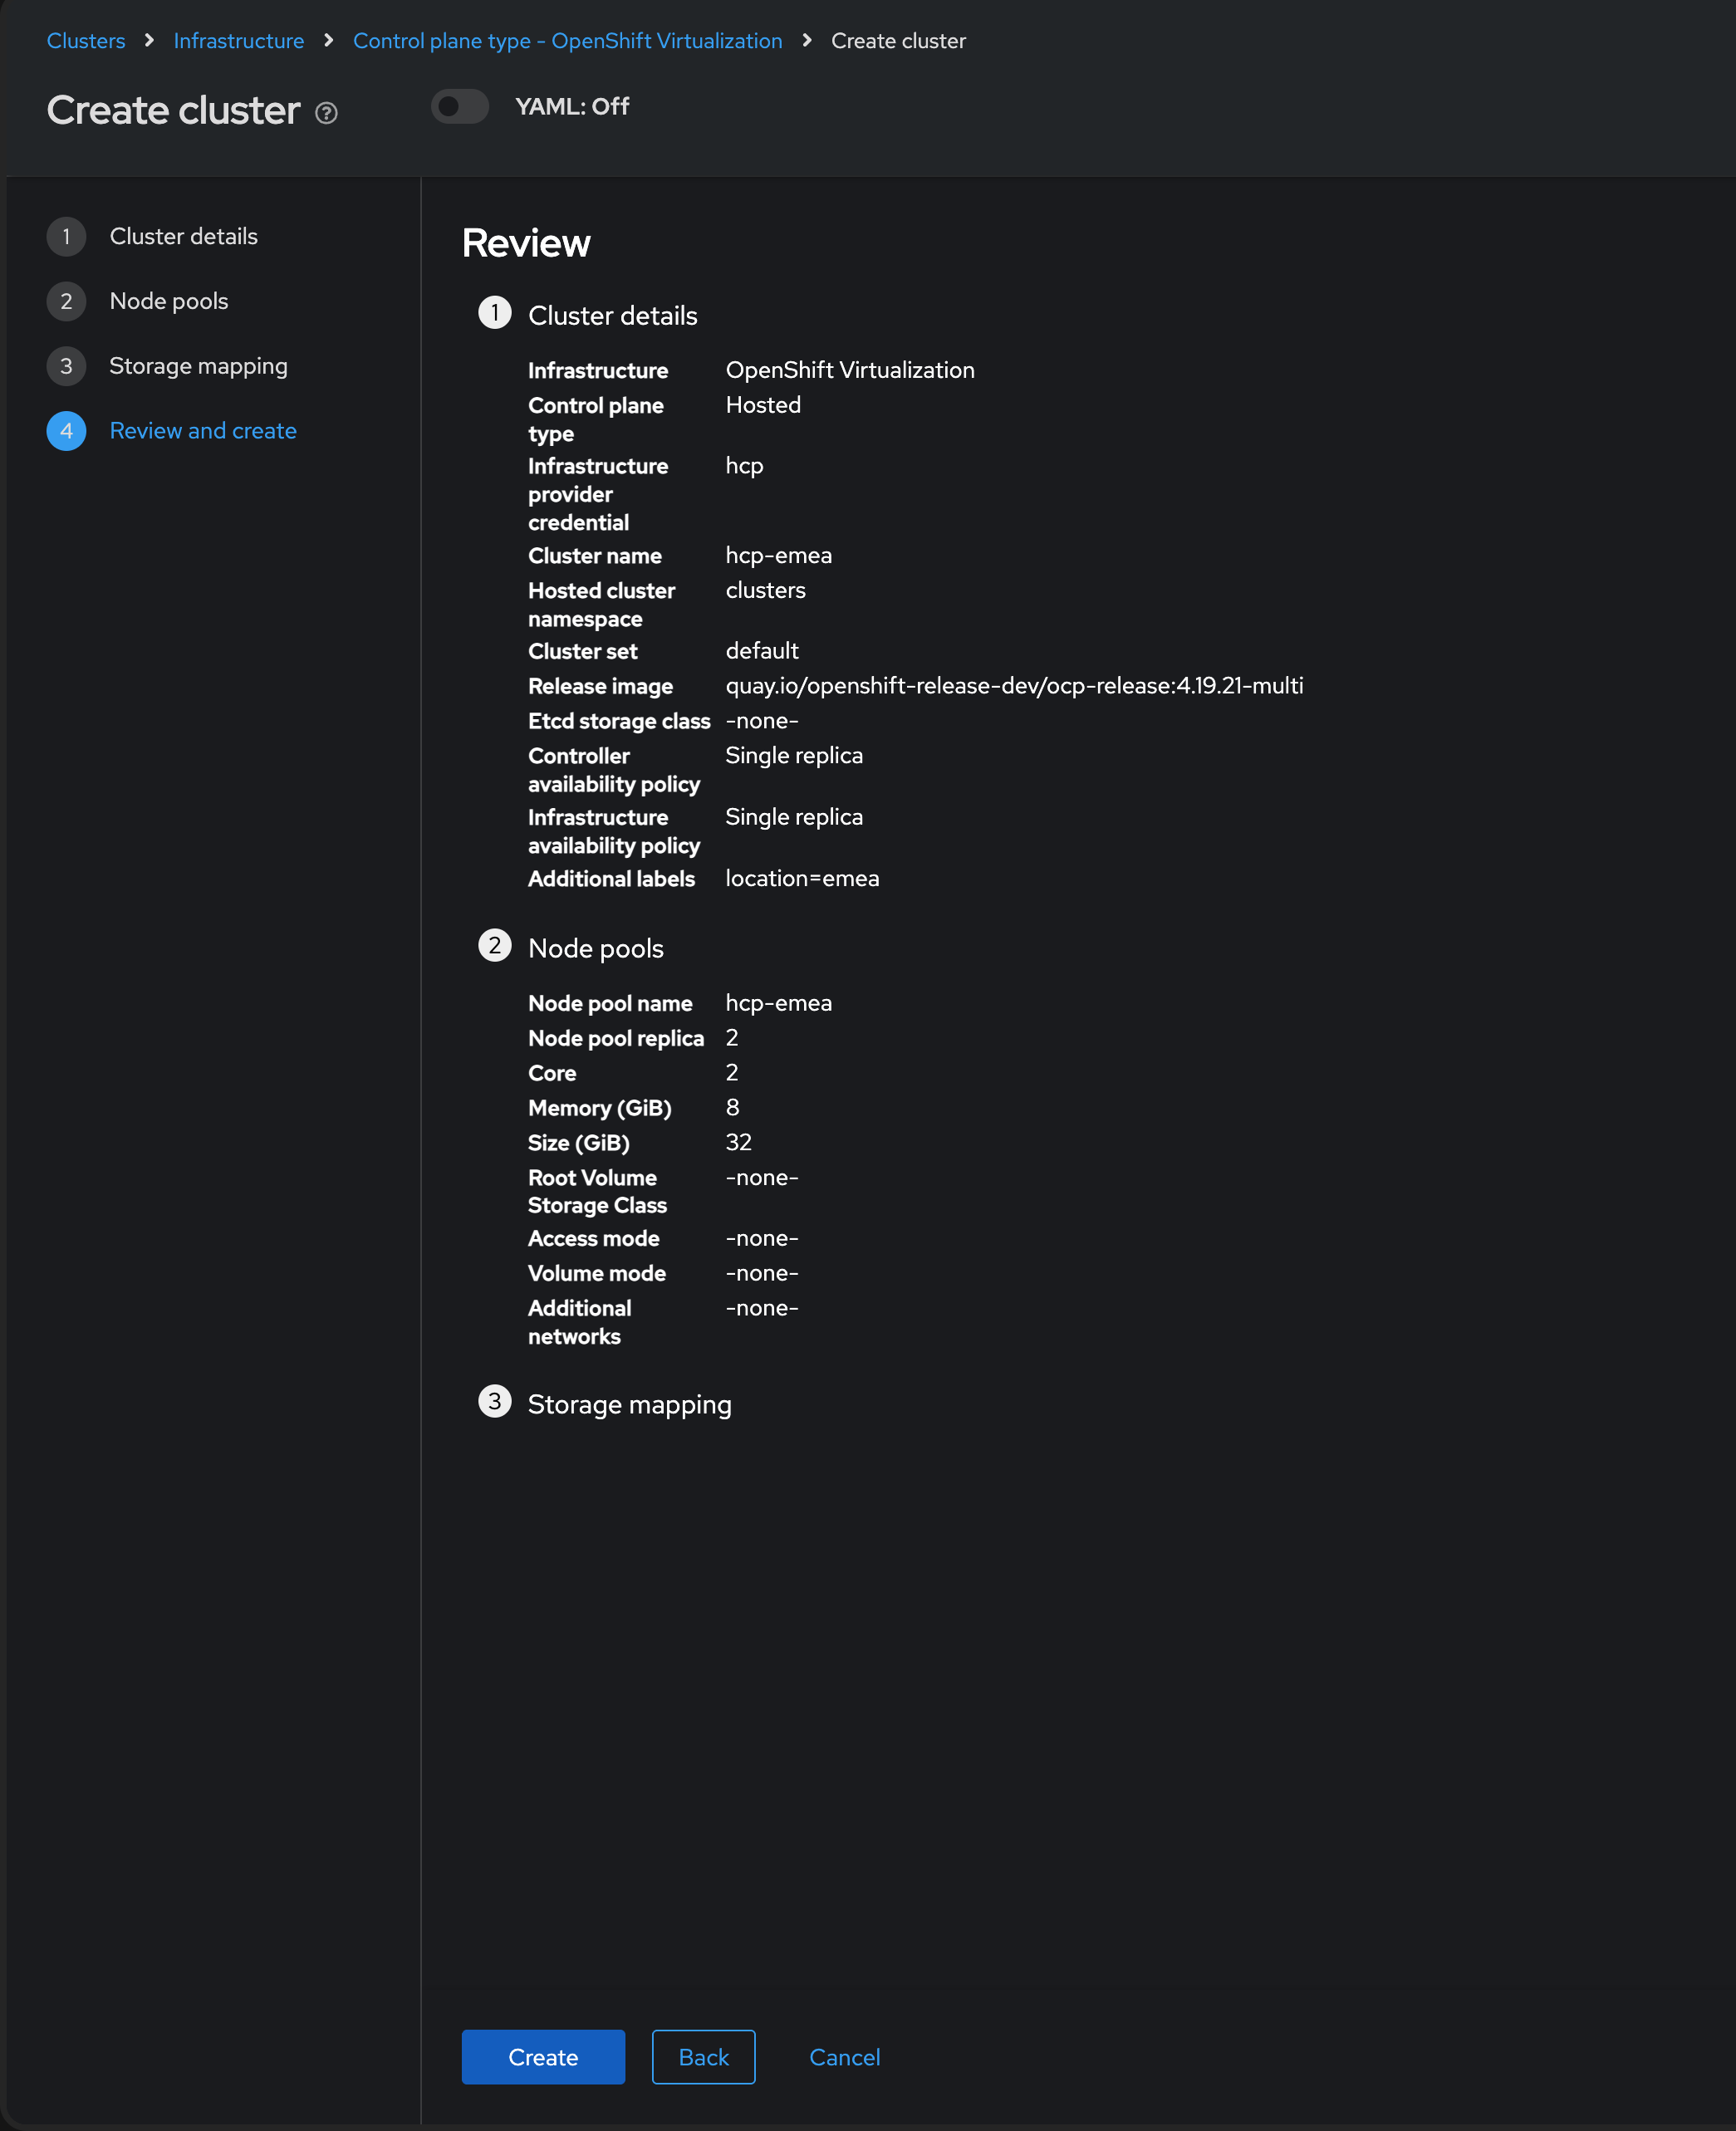
Once you are on the final Review section you will see a description of the cluster you are creating.
-
Click the blue Create button to start the deployment process.
-
Sit back and watch RHACM do its thing. You should see the Cluster creation process starting in the UI.
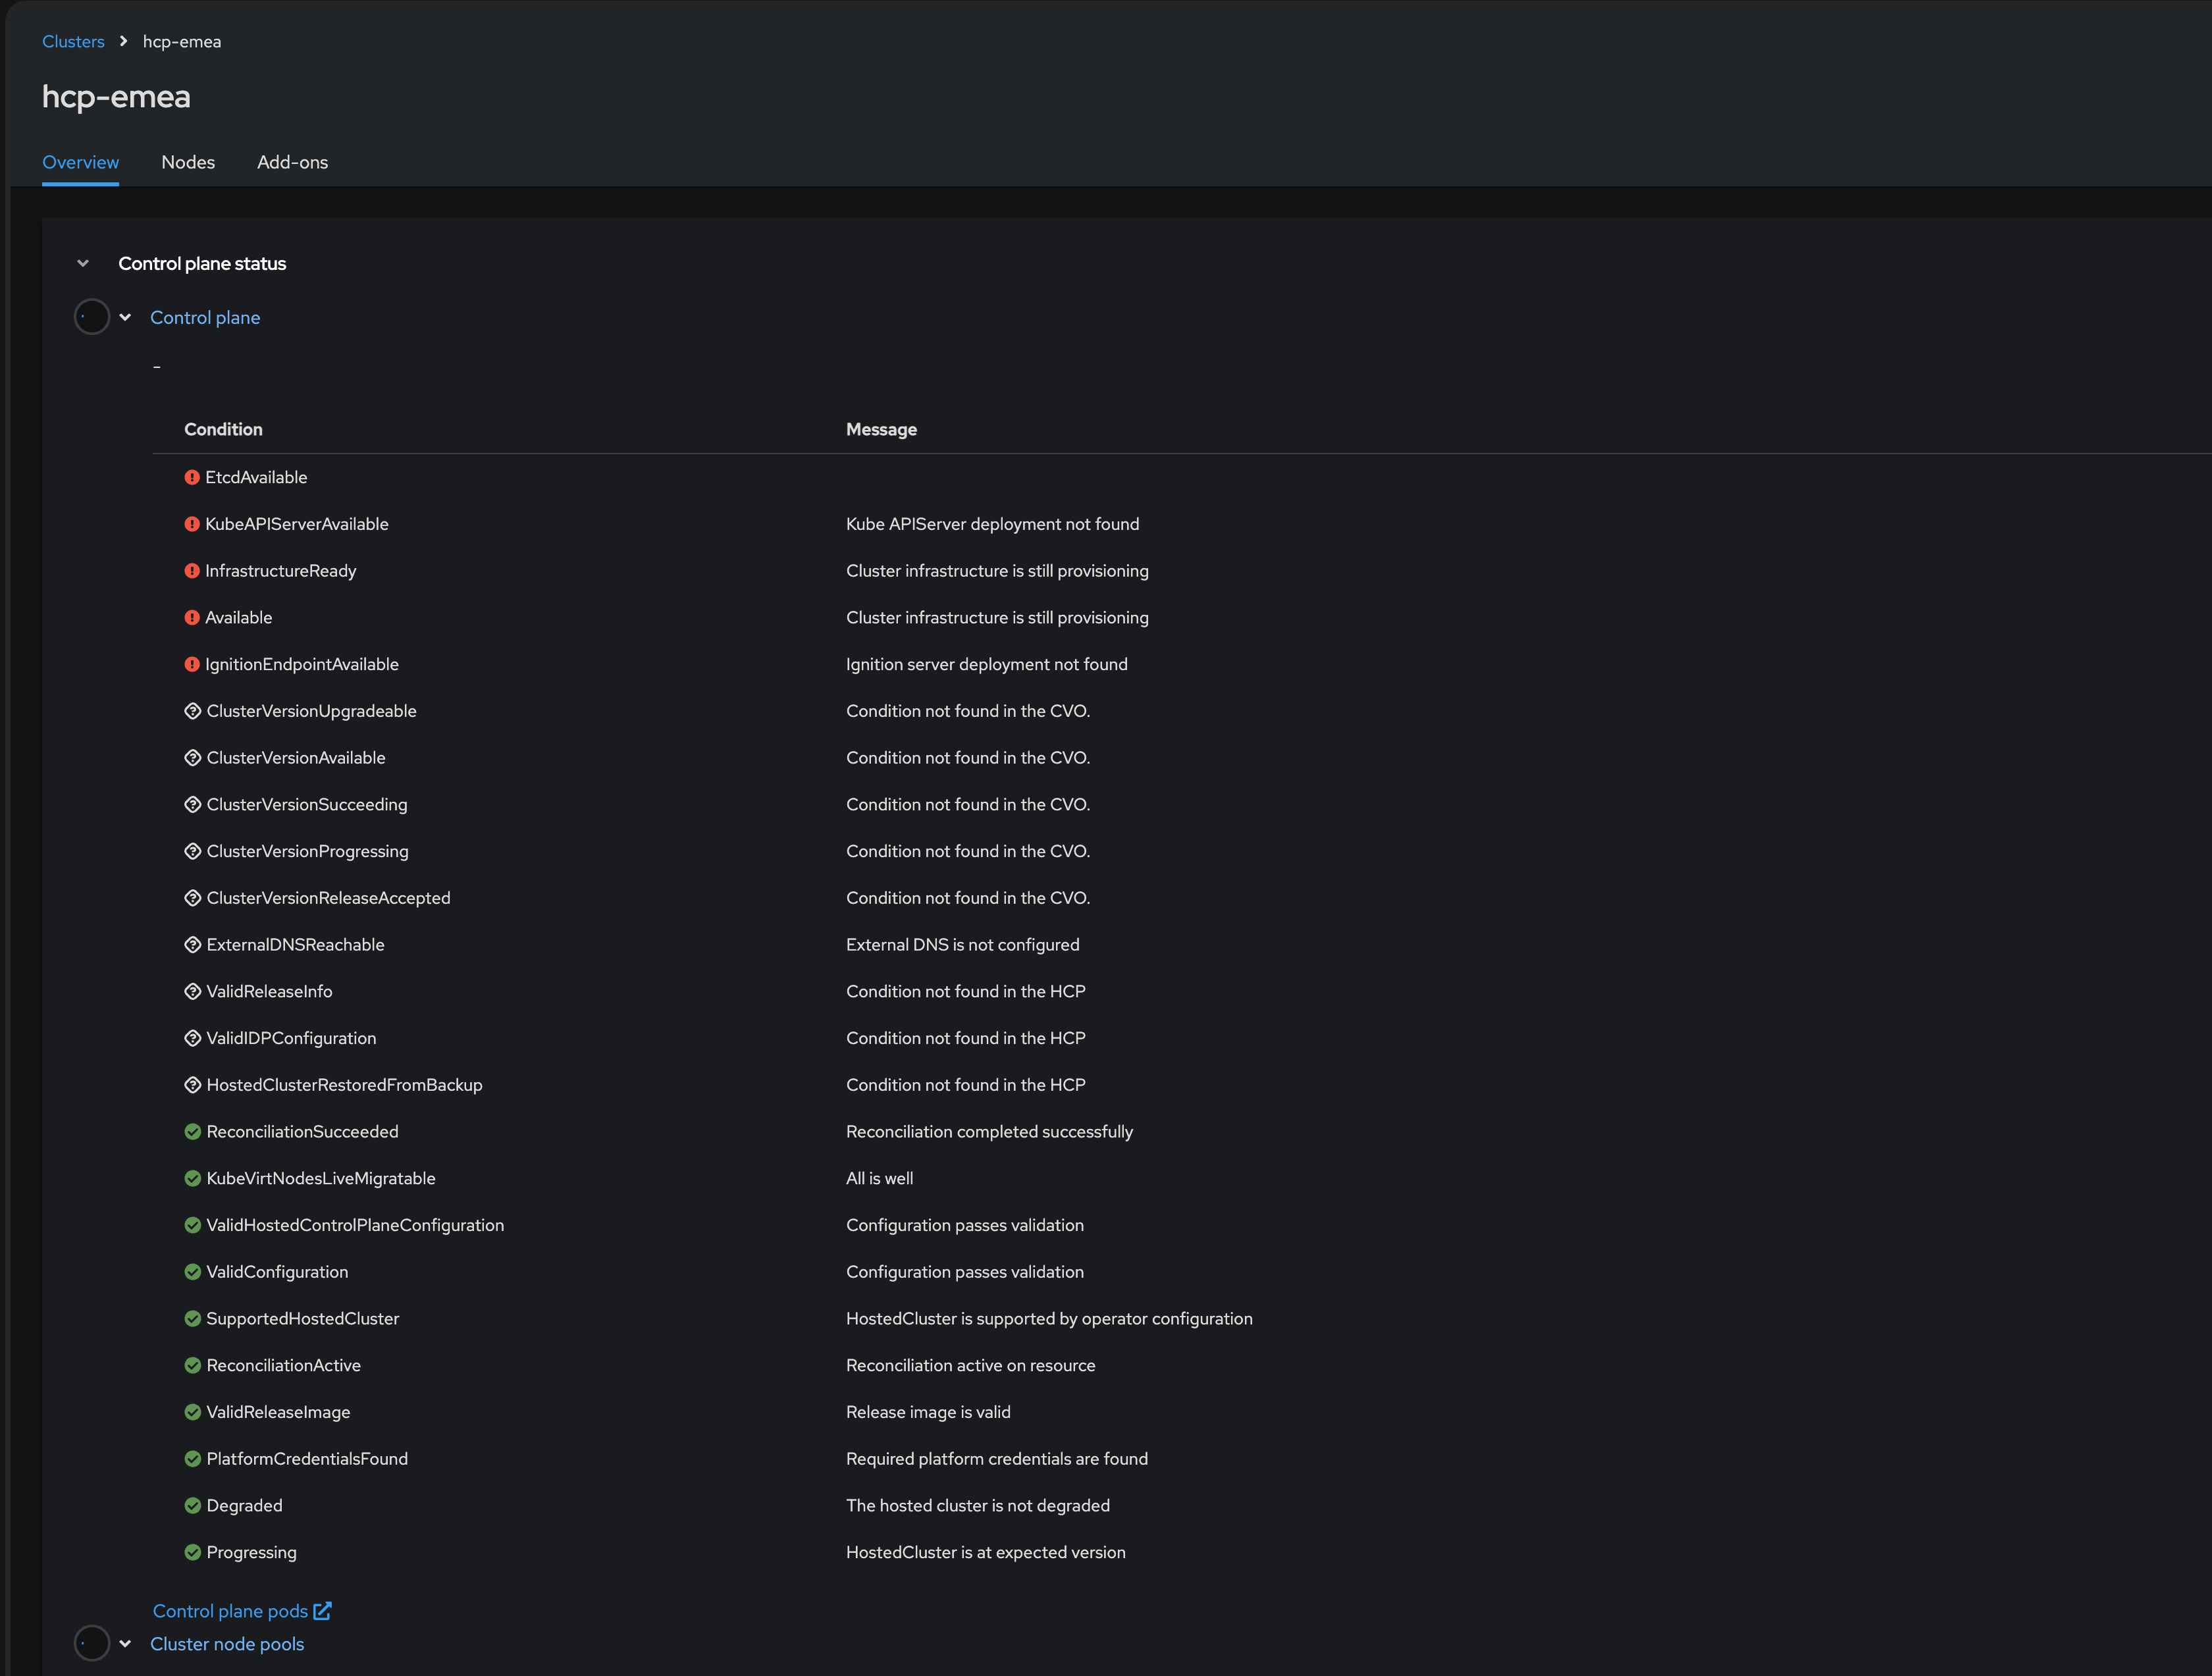
Deploying this Hosted Control Plane (HCP) cluster will take about 5 to 10 minutes. Please continue the lab while waiting for this cluster to provision, we will use it later on.
Multi-environment Workload Creation, Management, and Observability
Sovereign cloud operations require that organizations retain full control over where and how their containers and virtual machines run.
RHACM empowers you to deploy, manage, and observe all workloads — VMs, containers, and AI/ML — centrally with policy-driven governance and compliance across the hybrid cloud.
Create and Manage Virtual Machines Using the RHACM Console
Red Hat Advanced Cluster Management (RHACM) with OpenShift Virtualization provides unified, policy-as-code driven control of clusters and VMs from a single console. It lets you label resources, enforce placement, and automate compliance — removing the need to jump between different management tools and ensuring consistent controls across all workloads.
By the end of this exercise, you will:
-
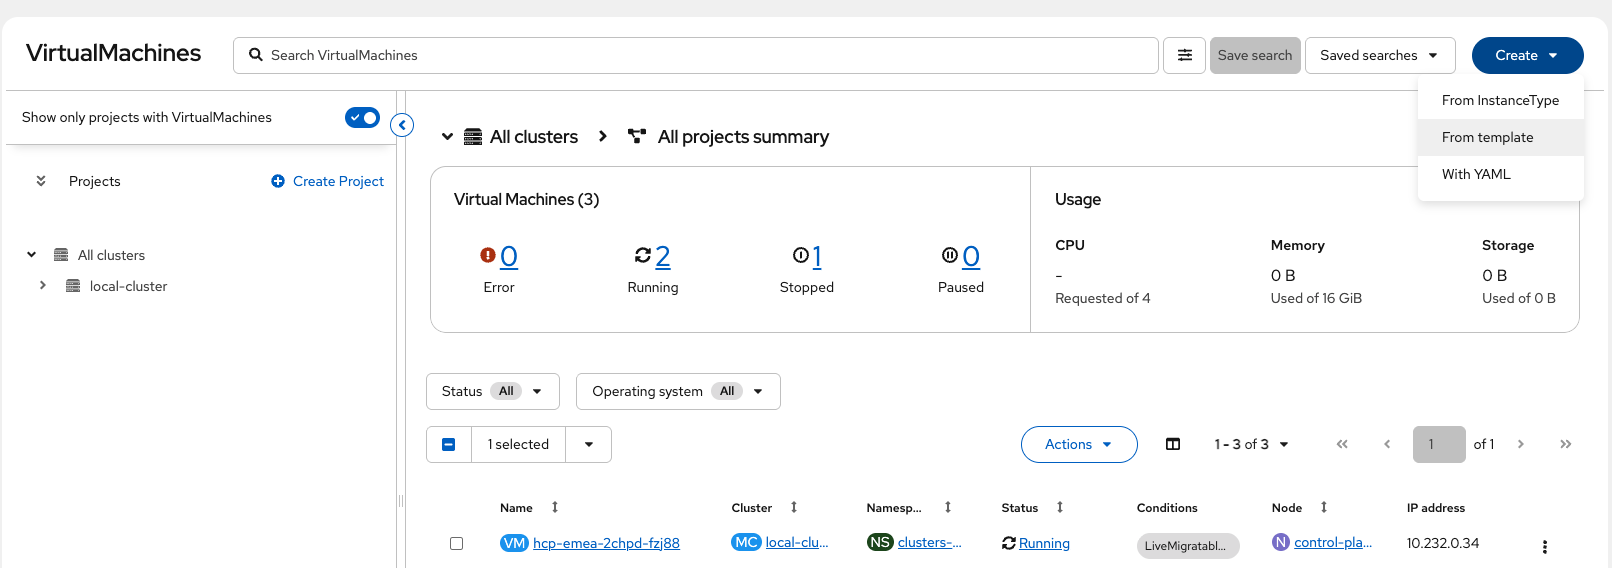
Navigate the RHACM Search interface to locate Virtual Machine resources across the entire fleet.
-
Provision a new Virtual Machine using the RHACM Creation Wizard.
-
Perform Day 2 operations (Stop, Start, Migrate) directly from the multi-cluster view.
| You might noticed that we have already deployed a Virtual Machine for you called rhel-webserver we will use this machine in later exercises do not delete or power off as it will affect the other modules. |
Deploy Virtual Machines Using the RHACM Console
-
Using the Hamburger menu select the dropdown and click on select Fleet Virtualization
-
Click the Create dropdown and select From template
-
Under default template select Red Hat Enterprise Linux 9 VM
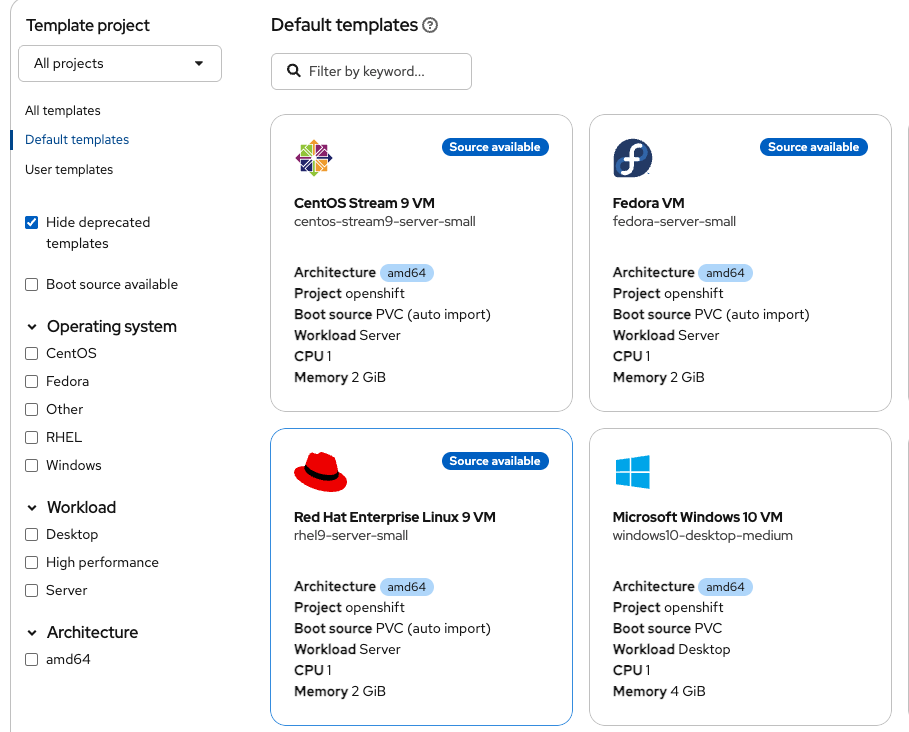
Notice all of the available templates to use, Windows VMs are fully supported as well. -
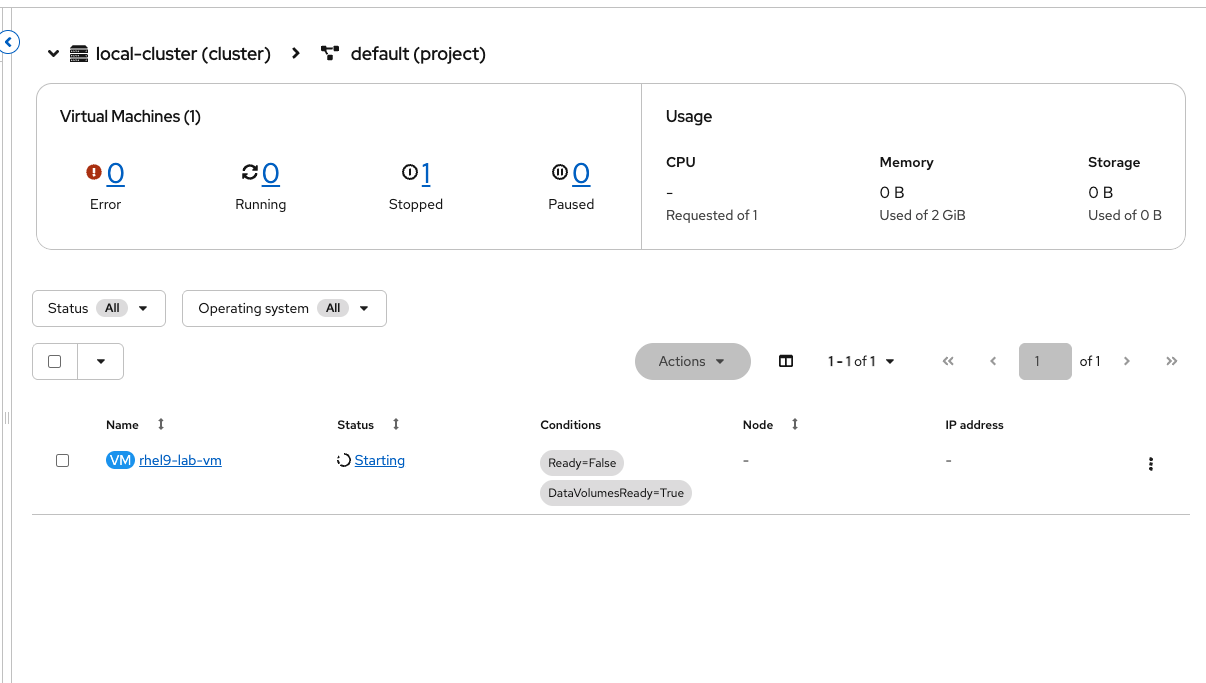
Under Virtual machine name, enter the following and leave all other options as default (Disk size, Disk Source):
rhel9-lab-vmPlease notice all of the available options to configure the VM with, these will change depending on your operating system
-
Click Quick create Virtual Machine and watch for progress, this should take a couple of minutes to complete.
-
Once completed you will see the live console as well as stats about your VM.
|
UI or GitOps — The Choice is Yours! While this lab demonstrates the graphical capabilities of the RHACM console, Virtual Machines in OpenShift are fundamentally Kubernetes objects. You can define your VMs as code using YAML and deploy them using Red Hat OpenShift GitOps (ArgoCD). RHACM supports both workflows: use the UI for quick administration and discovery, or use GitOps for a fully declarative, audit-ready production pipeline. In sovereign cloud environments, GitOps workflows provide version-controlled infrastructure that meets compliance requirements and audit trails for regulatory demonstrations. |
Deploy and Manage Container Workloads via OpenShift GitOps
OpenShift GitOps (using Argo CD and RHACM) lets you deploy and manage apps across clusters using Git as your source of truth.
There are two main ways clusters get updates from Git: - In pull mode, each cluster gets its own updates, making things more secure and keeping everything within specific regions. - In push mode, a central tool sends updates out to clusters.
For this lab, you’ll use the push model (with Argo CD already set up), so you can see how easy it is to deploy and manage apps with GitOps — even across multiple clusters in different locations.
Multi-environment Application Deployment and Management
Sovereign cloud operations require that organizations retain full control over where and how their containers and virtual machines run and provide the flexibility in how they are deployed and managed.
In this next step, you’ll use Red Hat® OpenShift® GitOps with Argo CD to declaratively deploy the a demo application to all three clusters, including the local-cluster, EMEA cluster and the AWS US cluster.
This is all to demonstrate automated, Git-driven multi-cluster consistency while supporting sovereign cloud requirements by keeping patient data securely within approved geographic boundaries.
-
From the Fleet Management tab, navigate to Applications from the left side menu.
-
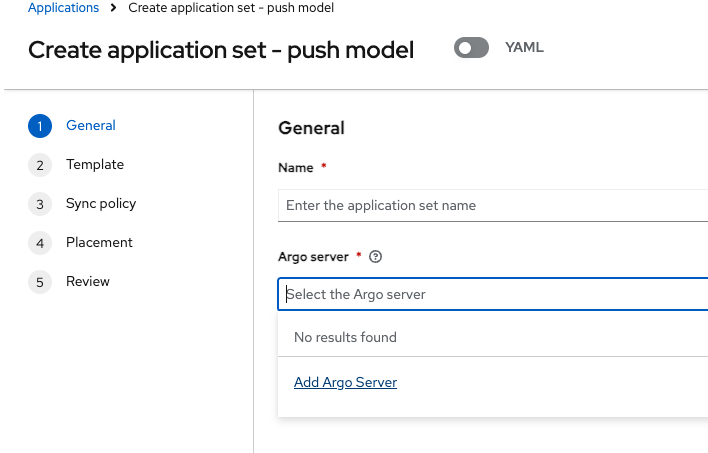
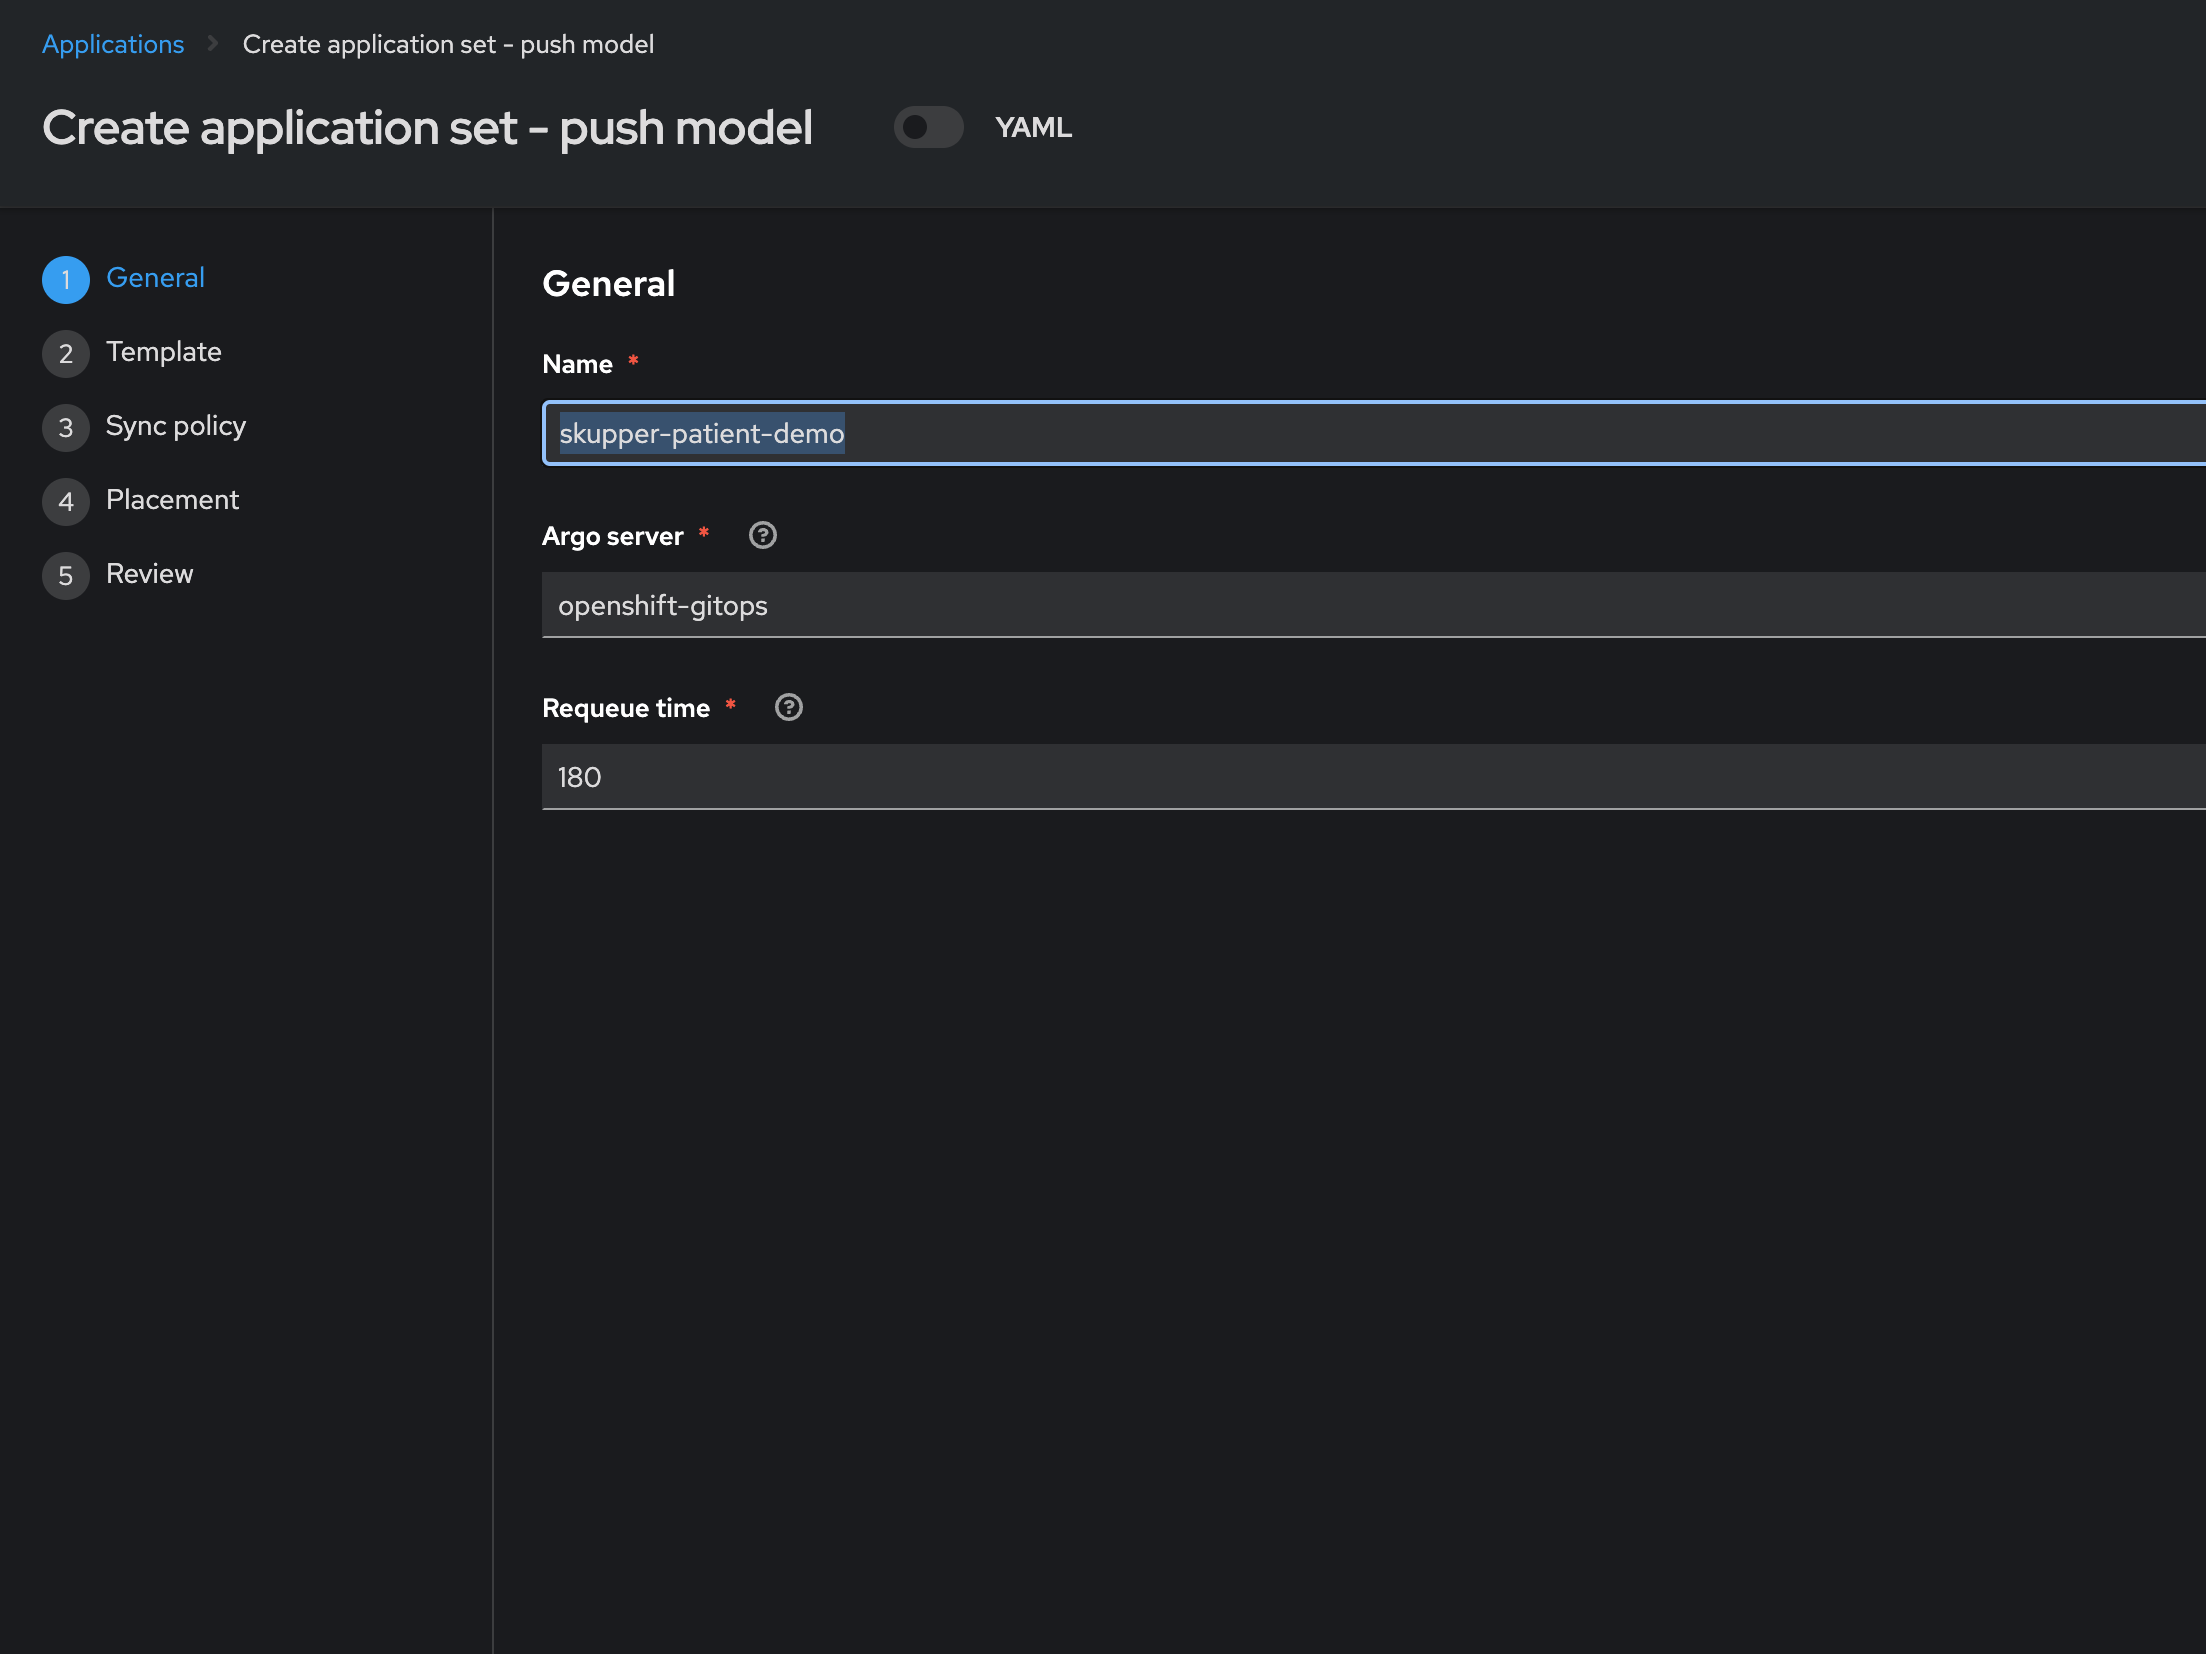
Click Create application, select ArgoCD ApplicationSet - Push Model.
-
Enter the following information:
skupper-patient-demoskupper-patient-demo -
Open the Argo server dropdown and select Add Argo Server
-
Enter the following information:
-
Name:
openshift-gitops-globalopenshift-gitops-global -
Namespace:
openshift-gitops(select from dropdown) -
ClusterSet:
global(removedefault)In the next step, ensure Cluster set is set to
global, otherwise you will have issues in the next steps.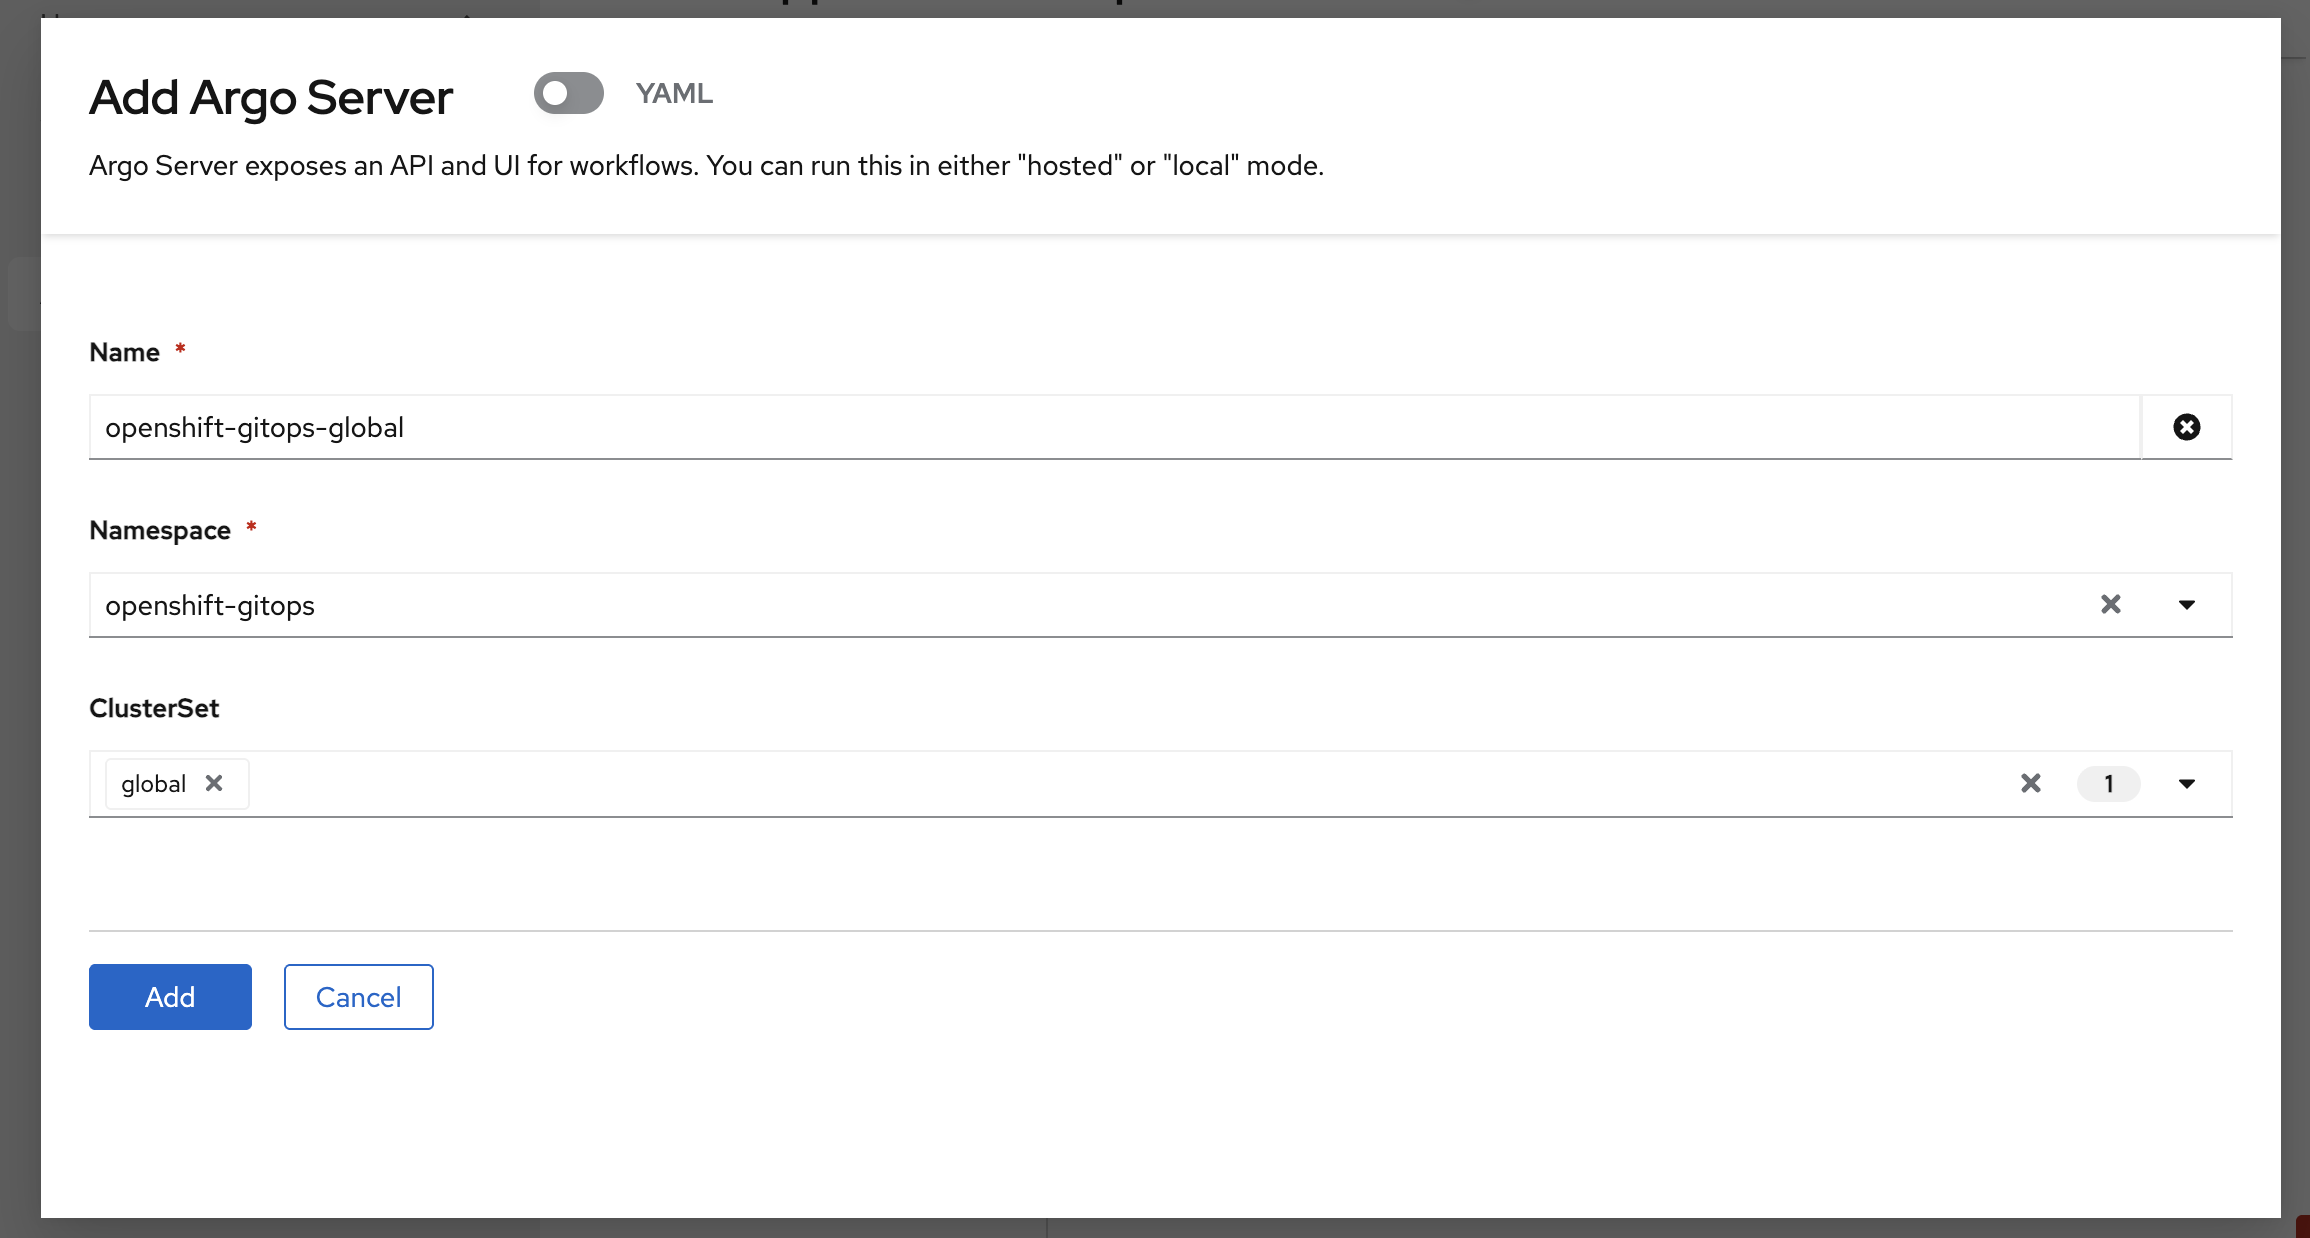
-
-
Click Add
-
Select your newly registered ArgoCD server from the Argo server dropdown
-
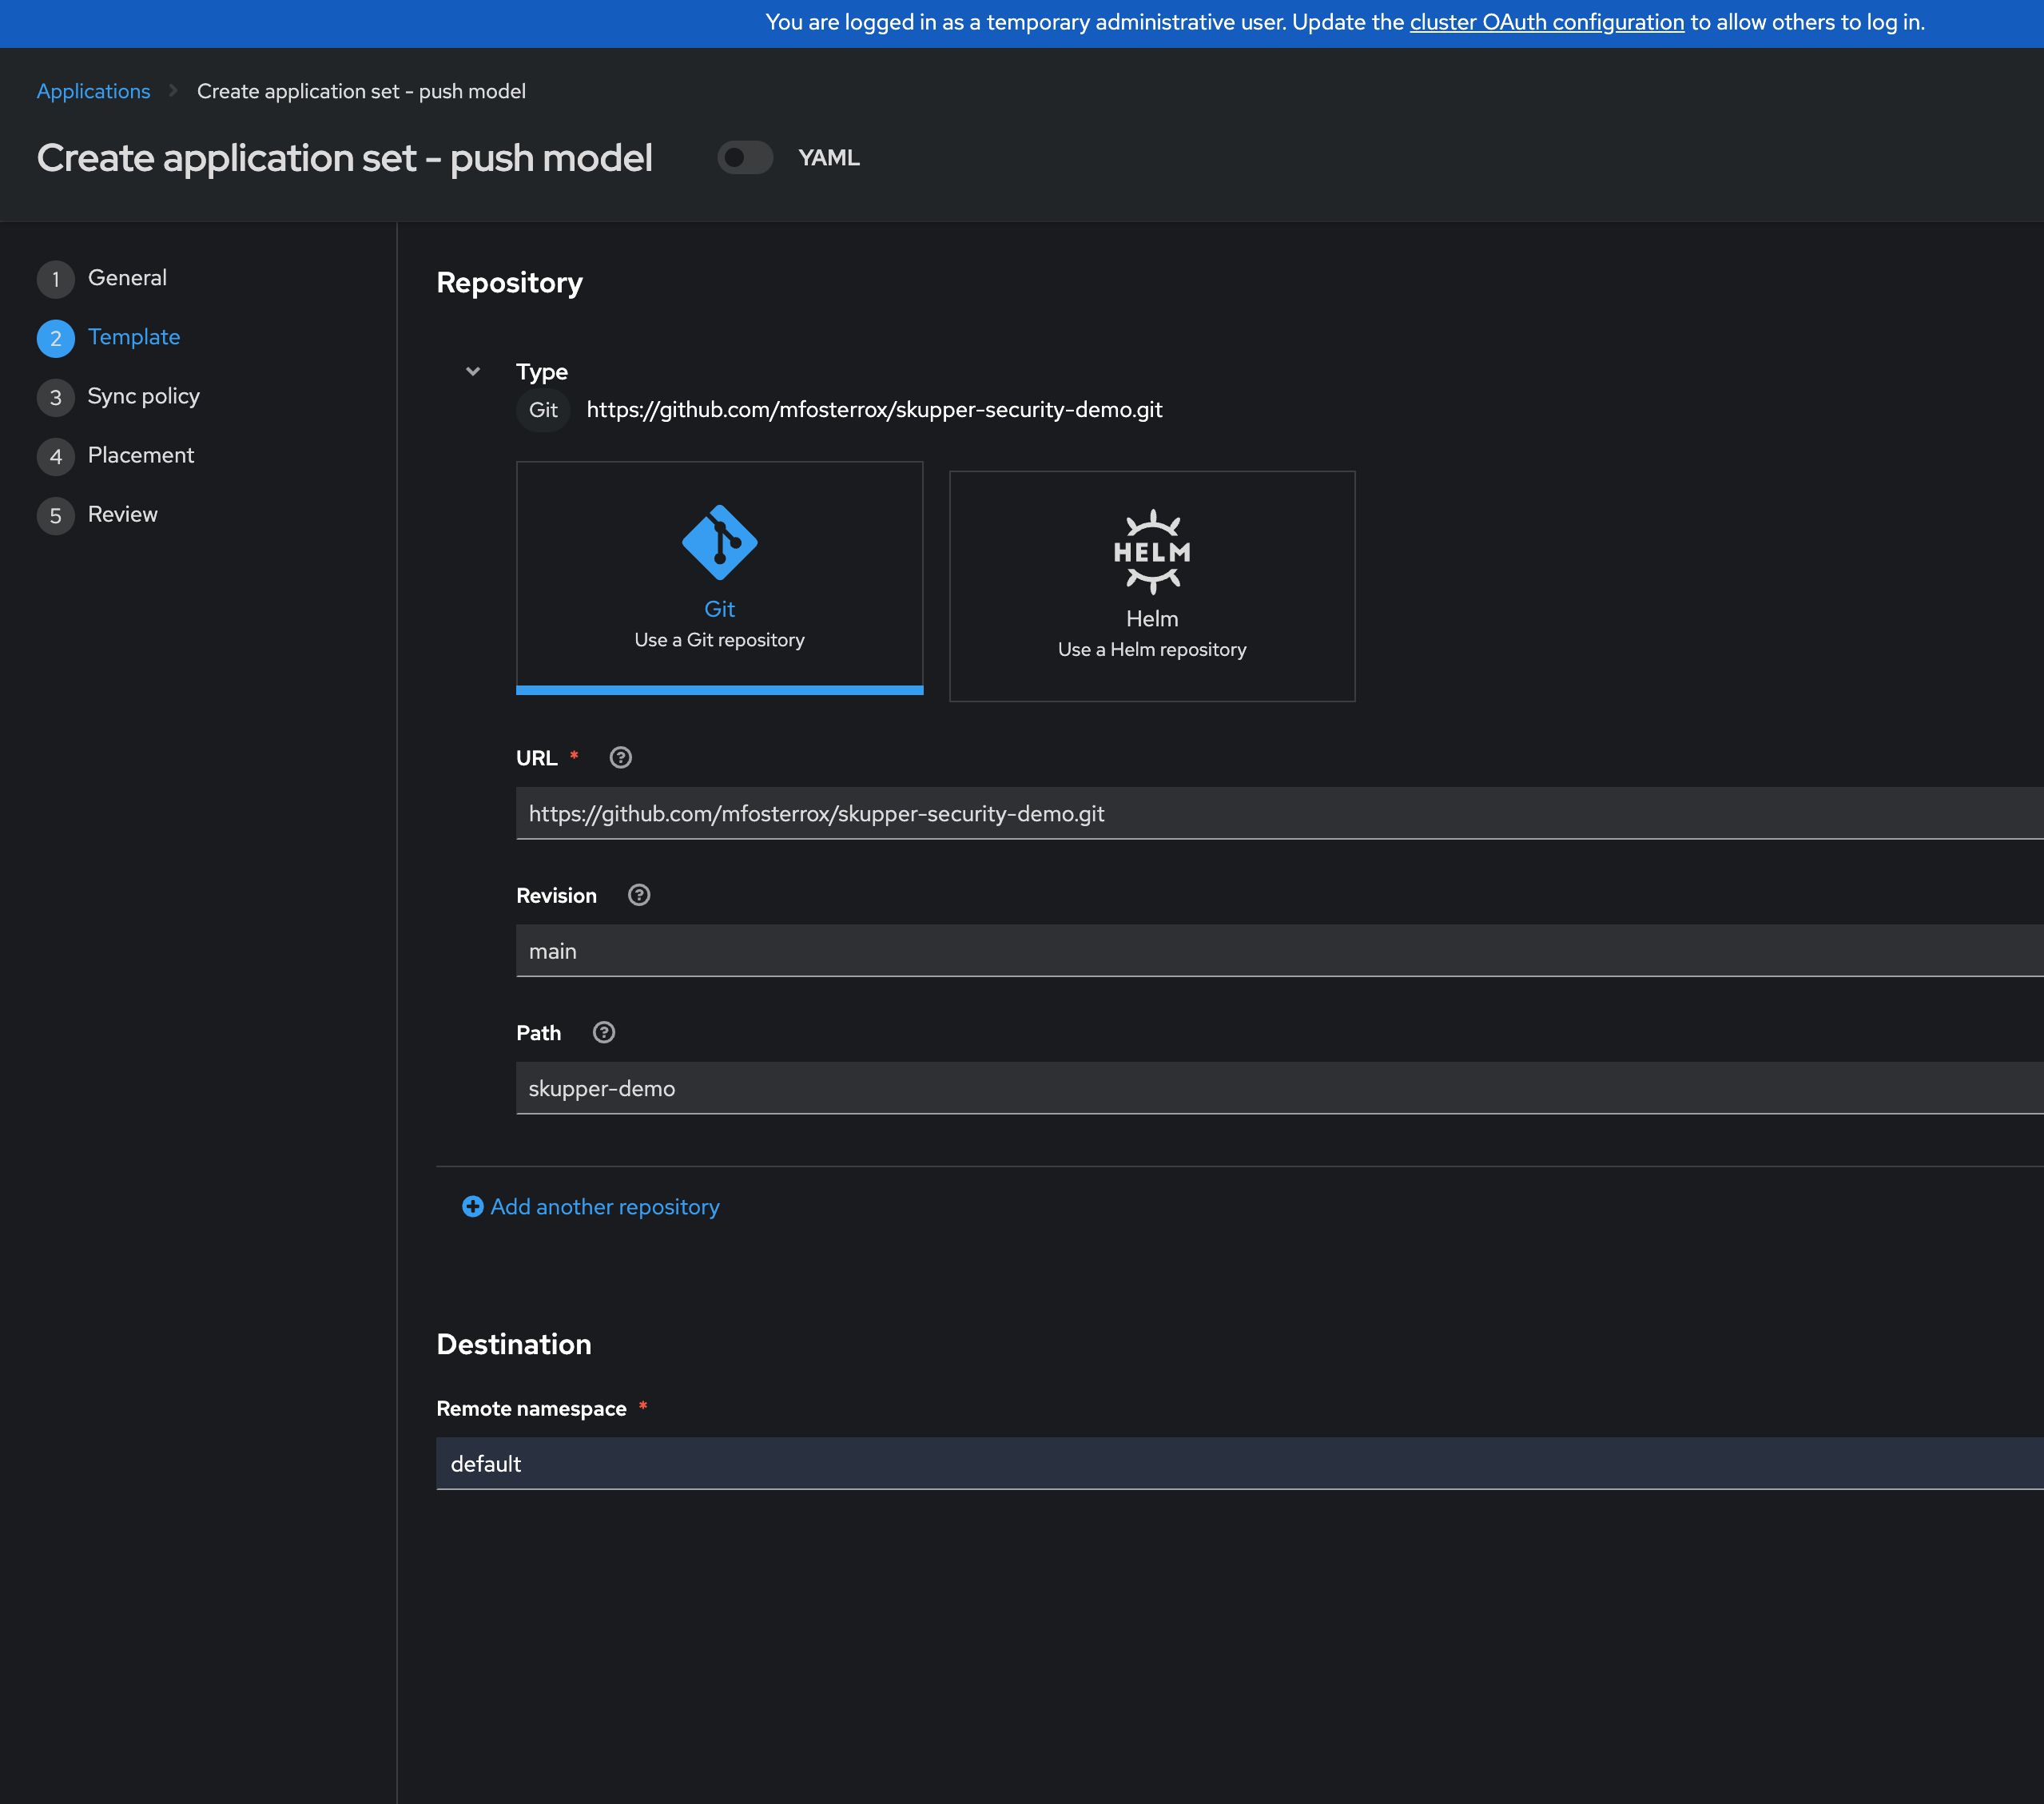
Click Next to continue to 3. Repository.
-
Under repository types, select the Git repository type
-
Enter the URL and select Create new option for the Repository URL
https://github.com/mfosterrox/demo-applications.git -
Enter revision
mainand select Create new option for the Revision -
Select Path from the dropdown (if you don’t see anything in the dropdown make sure you created new options in the previous steps):
skupper-demo -
Set Destination:
patient-portal -
Then click Next to continue to 5. Placement.
-
Click Next
-
Under Placement, verify that New Placement is selected.
-
Cluster set: Select
global
-
-
Under Label expressions click Add label expression and select the following
-
Label: name
-
Operator: equals any of
-
Values: aws-us, local-cluster, emea-cluster
-
-
Uncheck the Set a limit on the number of clusters selected.
The Cluster set needs to be set to Global and the label values to be present in the placement rule, otherwise the application will not be deployed to the correct clusters.
-
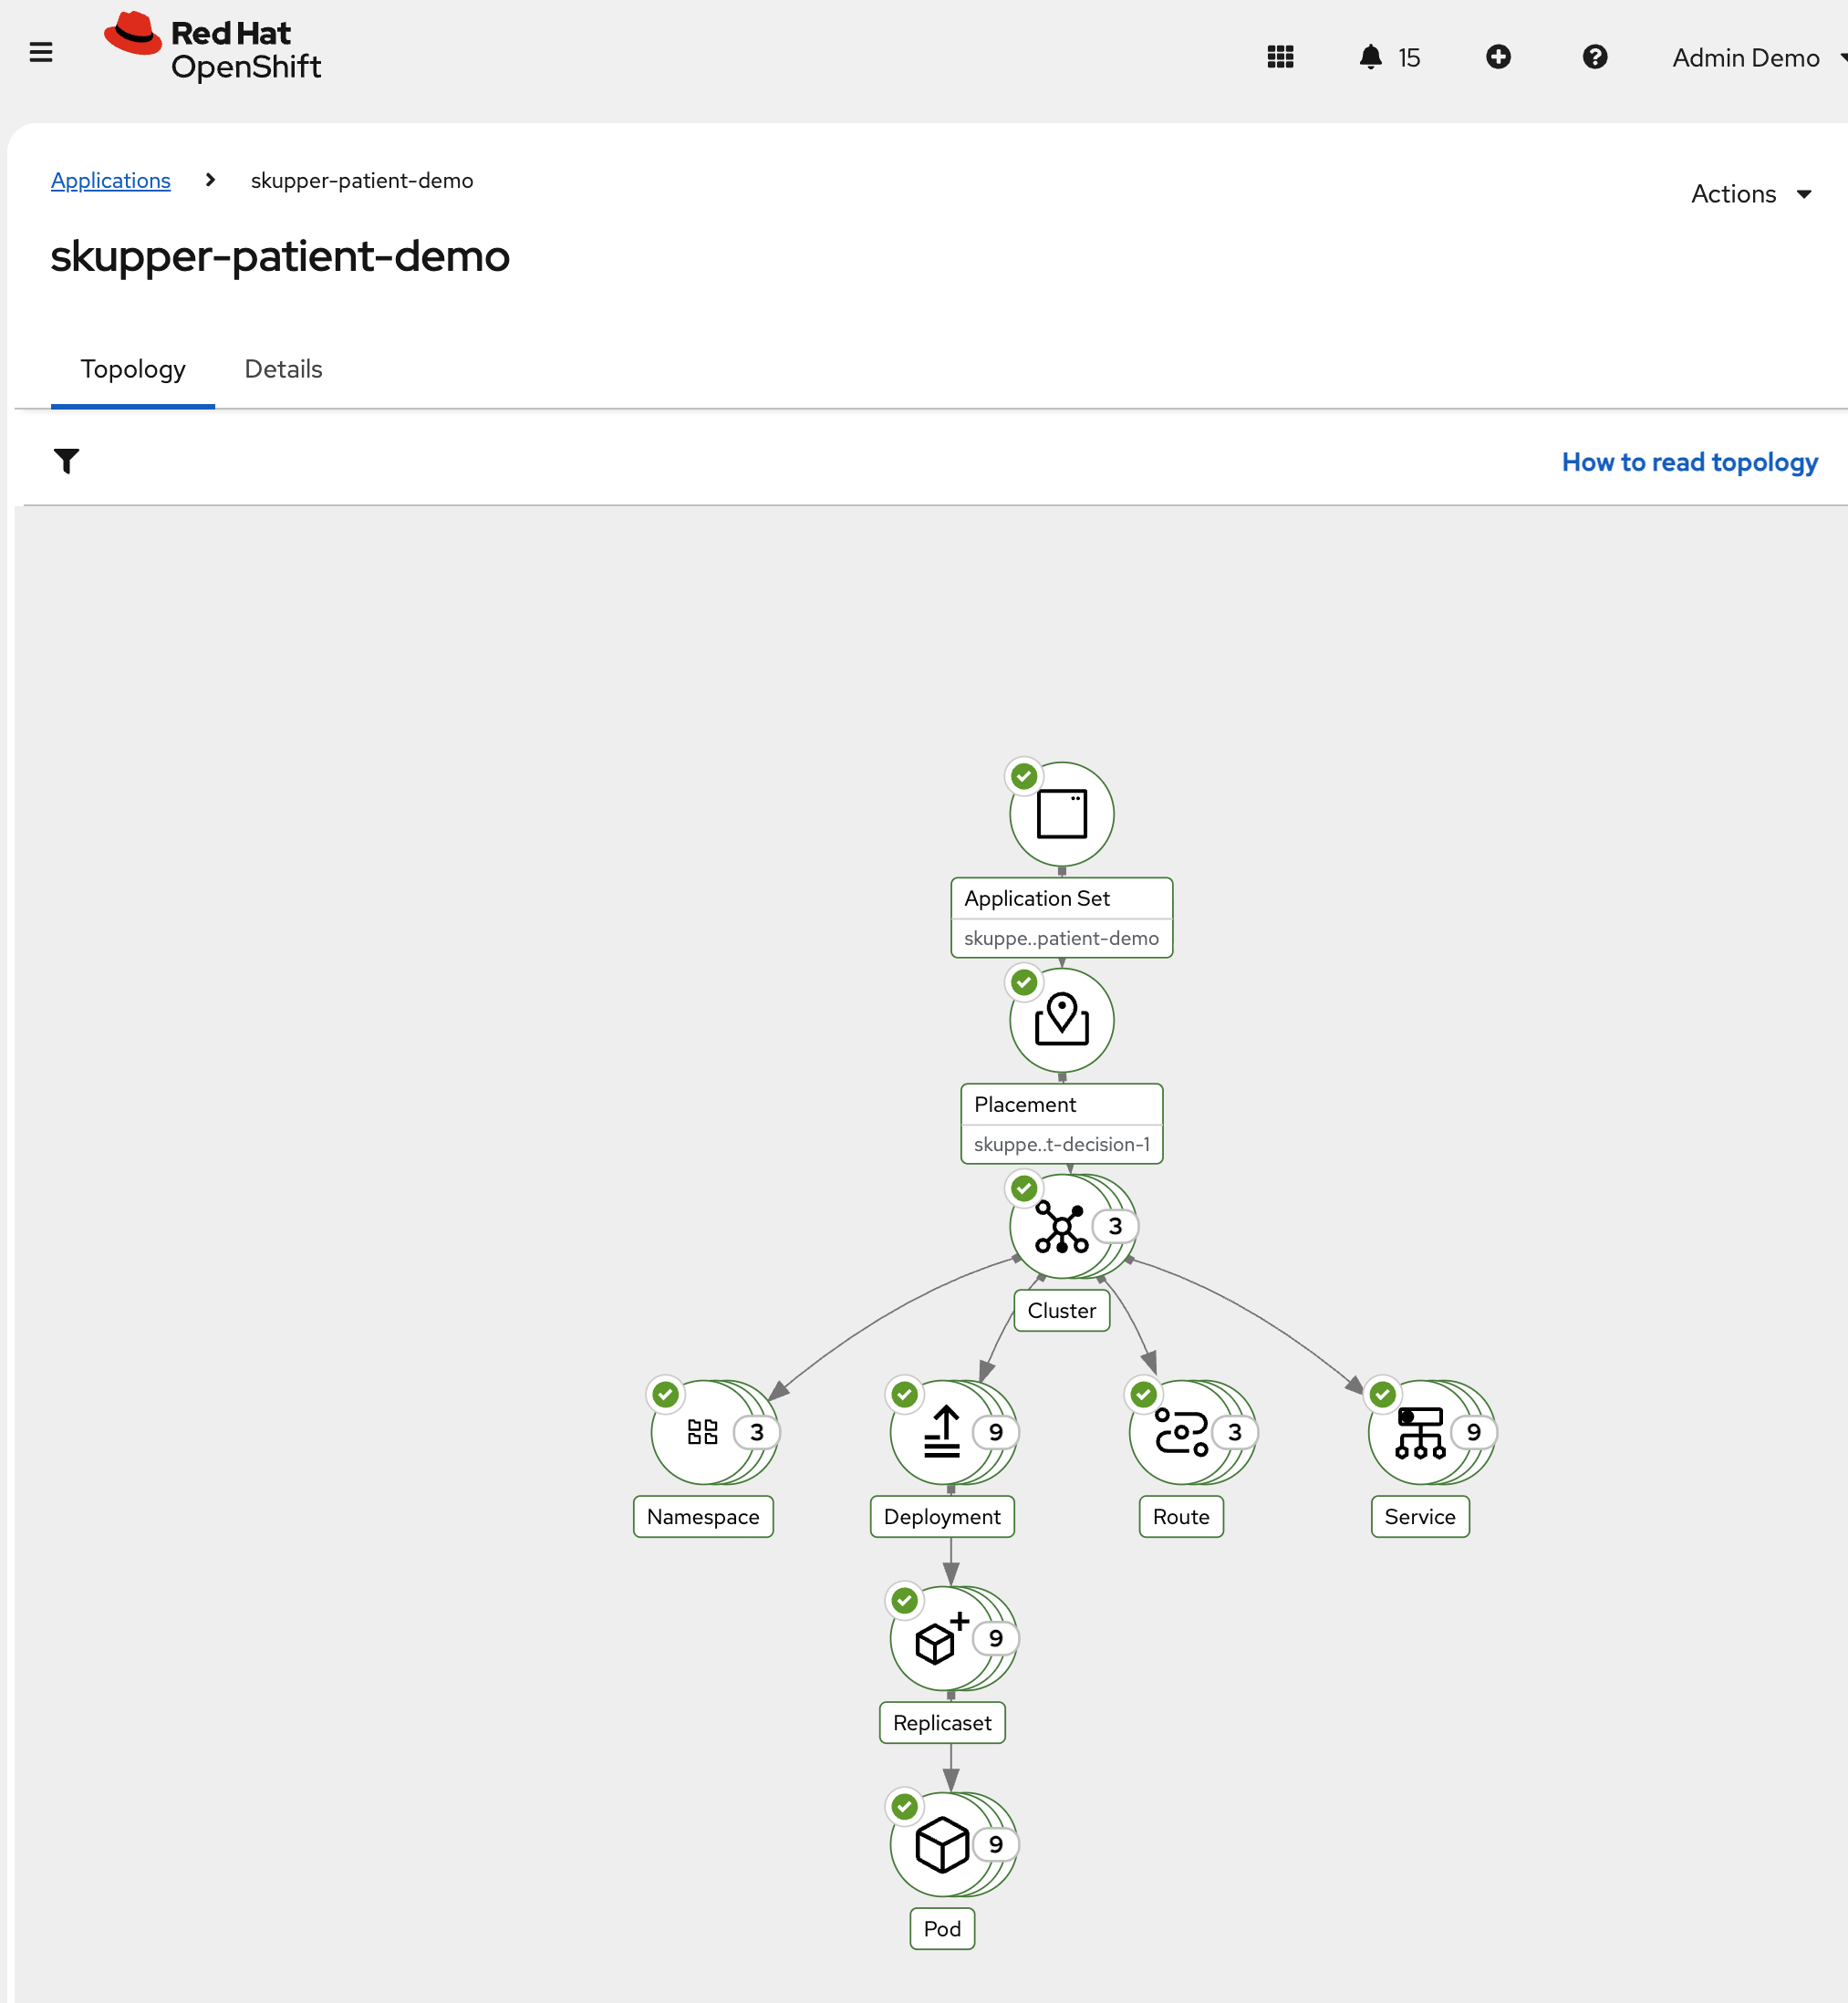
Verify all of the information is correct and click Submit.
If all steps were followed, you will be able to see the application deployed with all green checkmarks - This might take 15 minutes to complete so feel free to continue to the next module.
Security Through Policy Guardrails
Sovereignty is not just about control — it’s about confidence
Achieving true sovereignty across your cloud environments includes governance and the ability to change as geographic boundaries and governments do. You need automation and flexible guardrails, as code, to achieve this.
RHACM is built for this purpose!
-
Codify sovereignty policies — express sovereignty and compliance requirements as policy resources, versioned and reviewed alongside your application code.
-
Govern at scale — target policies to specific regions or environments using ClusterSets and labels, enforcing consistency across geographies.
-
Monitor autonomously — continuously check for “drift” against your defined guardrails, surfacing violations centrally to maintain trust.
-
Delegate, but enforce boundaries — let application teams move fast within a framework set by platform teams, ensuring business autonomy never compromises organizational standards.
Addressing Sovereignty in a Single Cluster with Region
The EMEA - European Union’s - General Data Protection Regulation (GDPR) is one of the most comprehensive data protection frameworks in the world. It also comes with a lot of headaches for organizations that operate in the EU. For Kubernetes clusters operating in EMEA, GDPR imposes specific technical requirements that must be codified as policy.
Let’s deploy 3 policies to the EMEA cluster to address the core pillars of GDPR’s technical requirements: - data residency labeling (Articles 44-49 — ensuring sovereignty namespaces exist with proper classification metadata) - data protection by design (Article 25 — network isolation) - and security of processing (Article 32 — pod security hardening).
Deploying Policies to the EMEA Managed Cluster
-
From the Fleet Management Console Click on the + sign → Import YAML tab.

-
Next, paste the following YAML Click Create
apiVersion: policy.open-cluster-management.io/v1
kind: Policy
metadata:
  name: policy-emea-namespace-compliance
  namespace: policies
  annotations:
    policy.open-cluster-management.io/standards: GDPR
    policy.open-cluster-management.io/categories: Data Protection
    policy.open-cluster-management.io/controls: Data Residency Labeling
spec:
  remediationAction: inform
  disabled: false
  policy-templates:
    - objectDefinition:
        apiVersion: policy.open-cluster-management.io/v1
        kind: ConfigurationPolicy
        metadata:
          name: emea-sovereignty-namespace
        spec:
          remediationAction: inform
          severity: high
          object-templates:
            - complianceType: musthave
              objectDefinition:
                apiVersion: v1
                kind: Namespace
                metadata:
                  name: gdpr-workloads
                  labels:
                    data-classification: gdpr-restricted
                    sovereignty: emea-only
                    compliance-framework: gdpr
                    pod-security.kubernetes.io/enforce: restricted
                    pod-security.kubernetes.io/audit: restricted
                    pod-security.kubernetes.io/warn: restricted
                  annotations:
                    compliance.example.com/regulation: "EU General Data Protection Regulation"
                    compliance.example.com/articles: "Article 25, Article 32, Article 44-49"
                    compliance.example.com/data-residency: "EU/EEA only"
                    compliance.example.com/contact: "dpo@example.com"
    - objectDefinition:
        apiVersion: policy.open-cluster-management.io/v1
        kind: ConfigurationPolicy
        metadata:
          name: emea-data-residency-namespace
        spec:
          remediationAction: inform
          severity: high
          object-templates:
            - complianceType: musthave
              objectDefinition:
                apiVersion: v1
                kind: Namespace
                metadata:
                  name: data-residency-emea
                  labels:
                    data-classification: gdpr-restricted
                    sovereignty: emea-only
                    compliance-framework: gdpr
                  annotations:
                    compliance.example.com/regulation: "EU General Data Protection Regulation"
                    compliance.example.com/data-residency: "EU/EEA only"
---
apiVersion: cluster.open-cluster-management.io/v1beta1
kind: Placement
metadata:
  name: placement-policy-emea-namespace-compliance
  namespace: policies
spec:
  clusterSets:
    - managed
  predicates:
    - requiredClusterSelector:
        labelSelector:
          matchExpressions:
            - key: location
              operator: In
              values:
                - emea
---
apiVersion: policy.open-cluster-management.io/v1
kind: PlacementBinding
metadata:
  name: binding-emea-namespace-compliance
  namespace: policies
placementRef:
  name: placement-policy-emea-namespace-compliance
  kind: Placement
  apiGroup: cluster.open-cluster-management.io
subjects:
  - name: policy-emea-namespace-compliance
    kind: Policy
    apiGroup: policy.open-cluster-management.io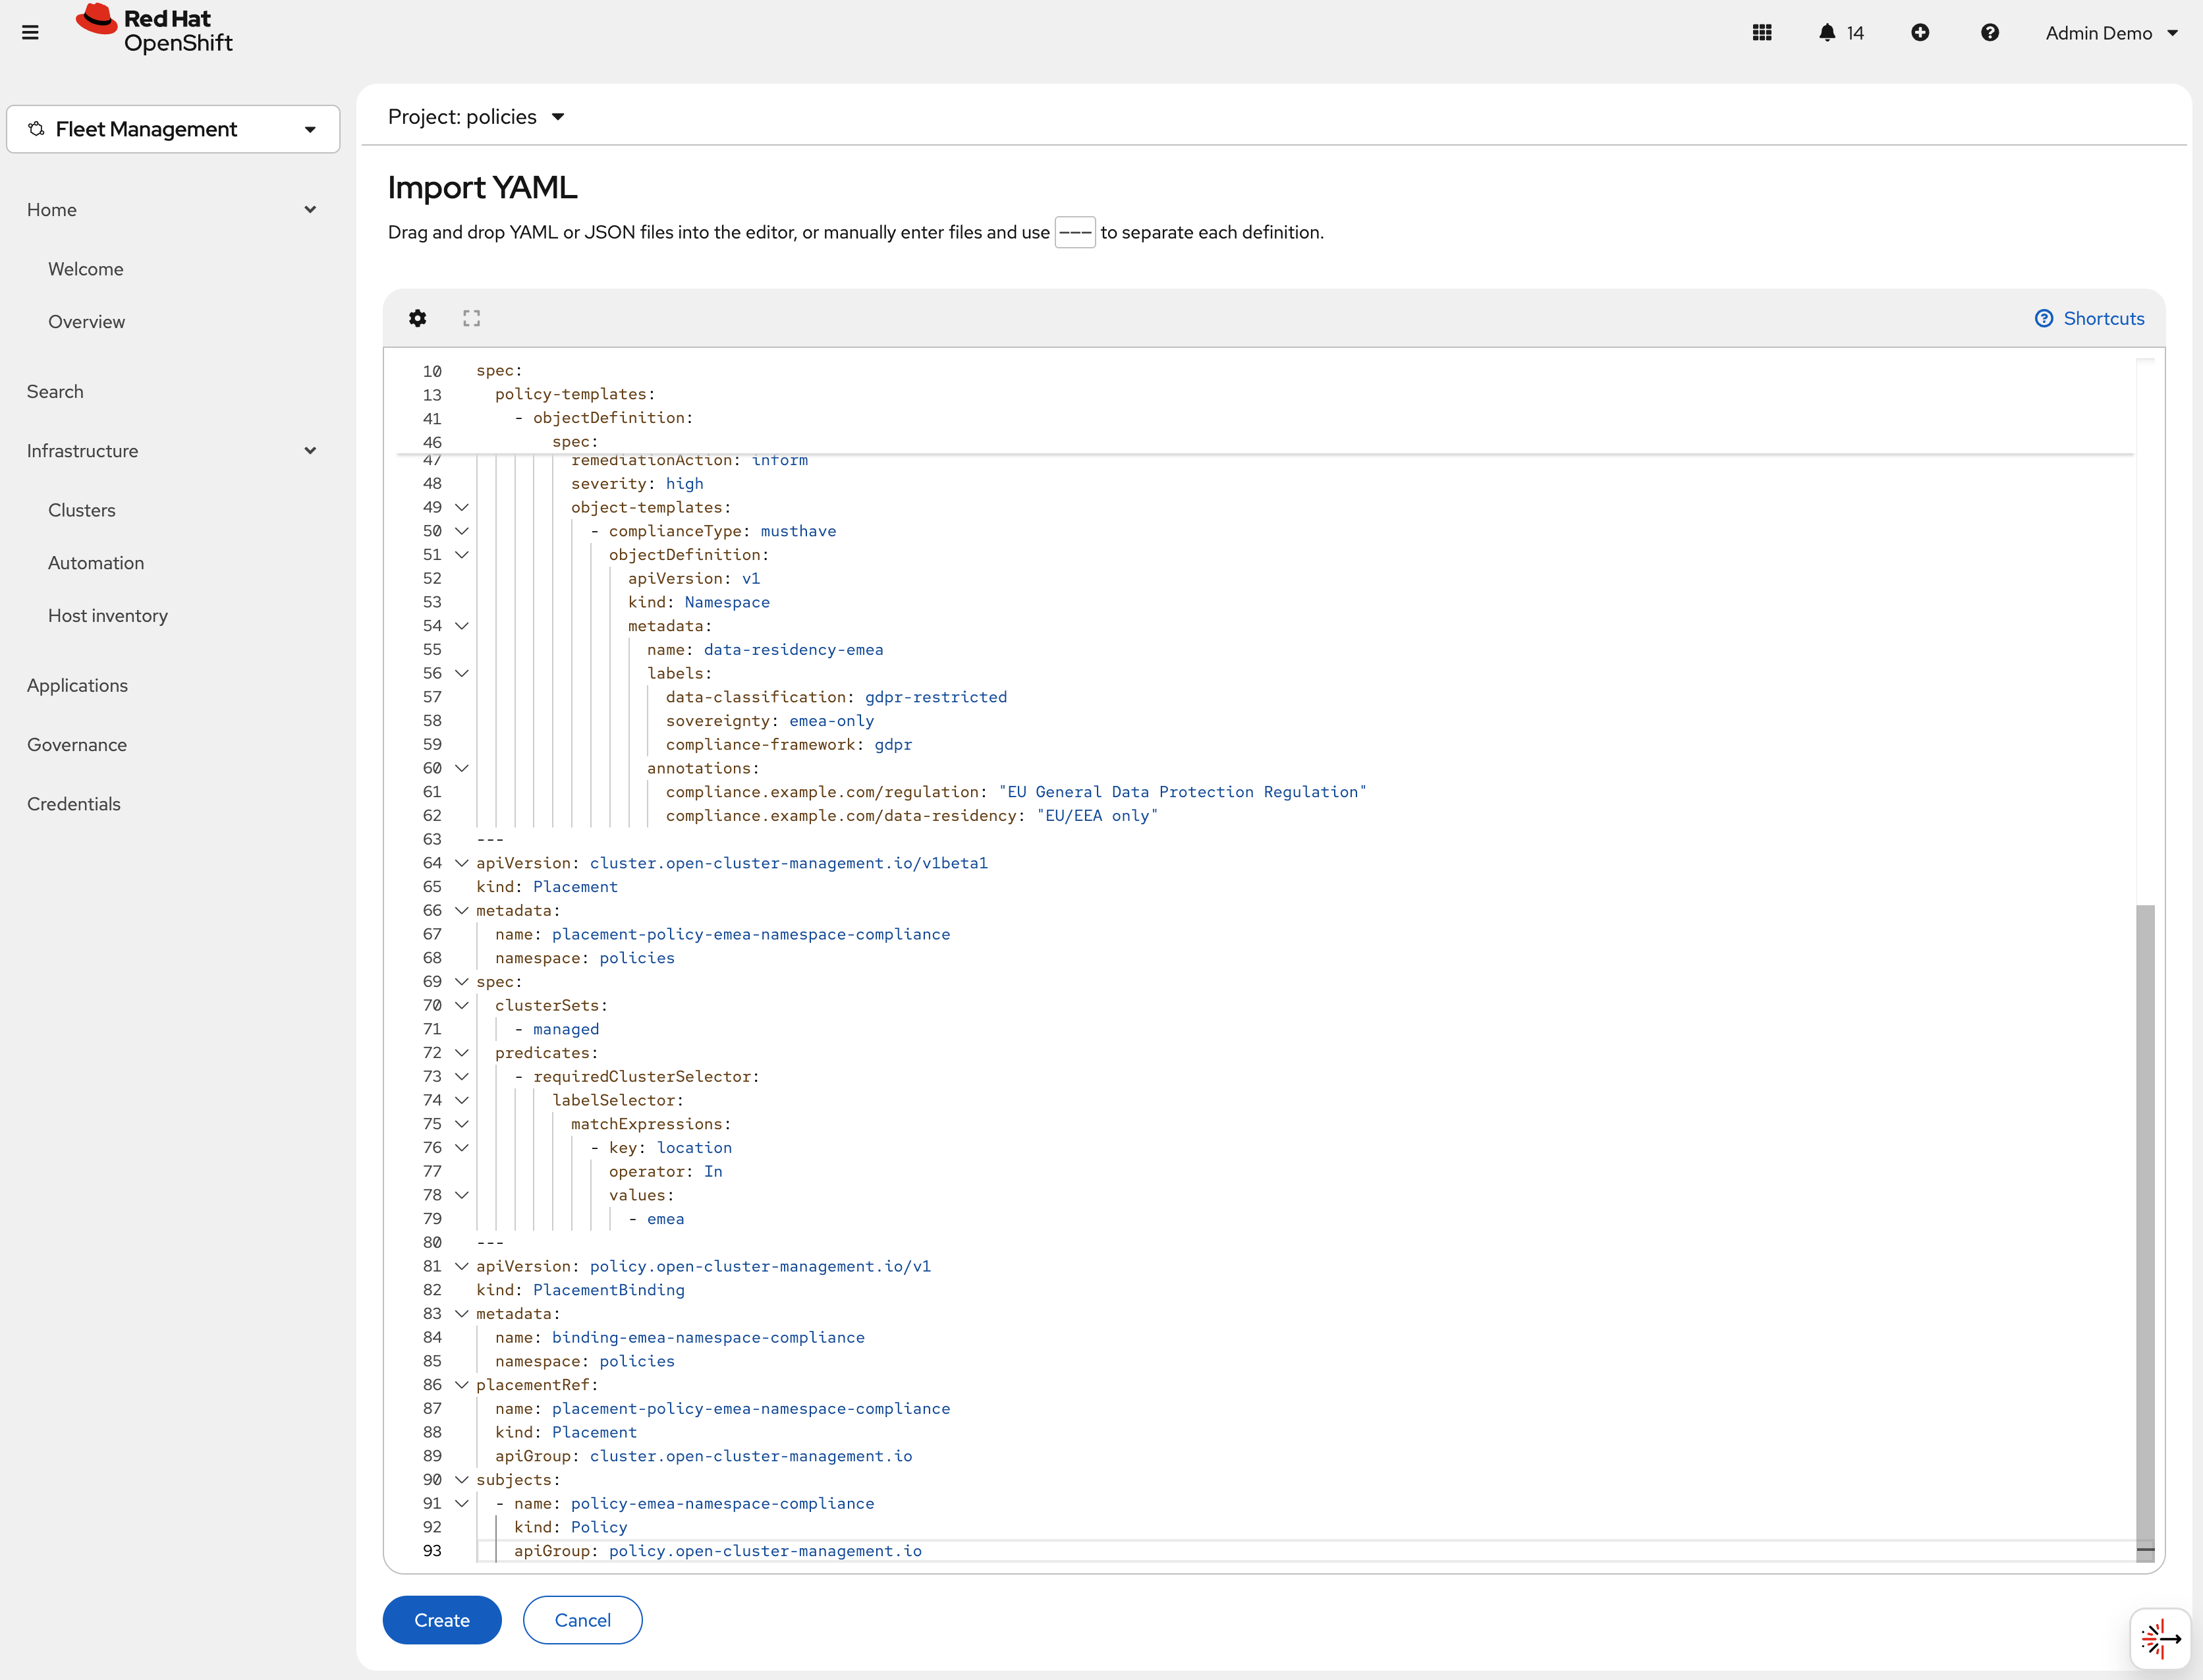
GDPR compliance starts with having clearly labeled namespaces. Labels and annotations allow policies to target GDPR-restricted workloads, support audit requirements, and enforce data residency. This policy requires that every EMEA cluster includes two key namespaces:
gdpr-workloads(fully labeled for compliance) anddata-residency-emea(for strict EU-only workloads). Proper labeling is essential for demonstrating GDPR compliance to regulators. -
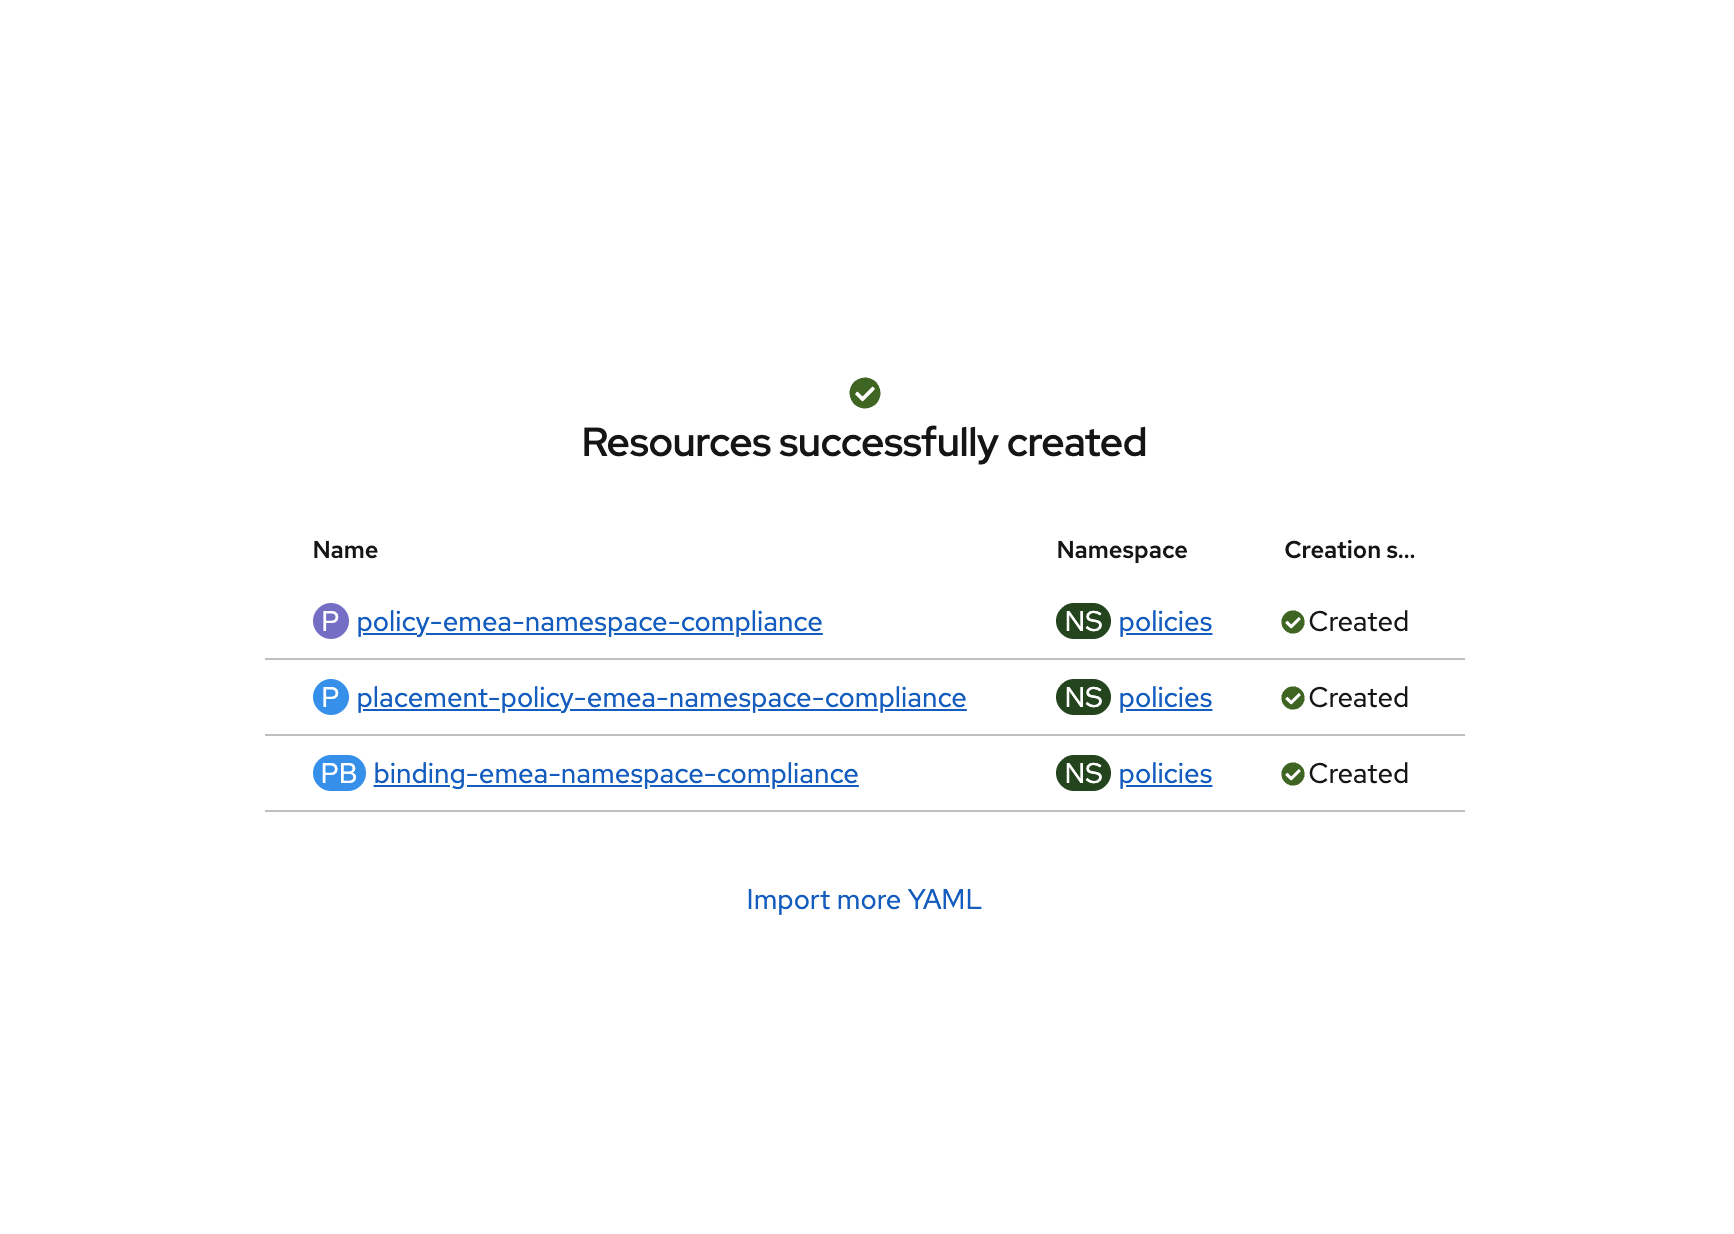
Click "Create" and verify that the YAML was added properly and there are no errors.
-
Next, click Governance Screen and Navigate to the Policies tab. Select Filter and check the policies namespace, this will show only the policies on this namespace.
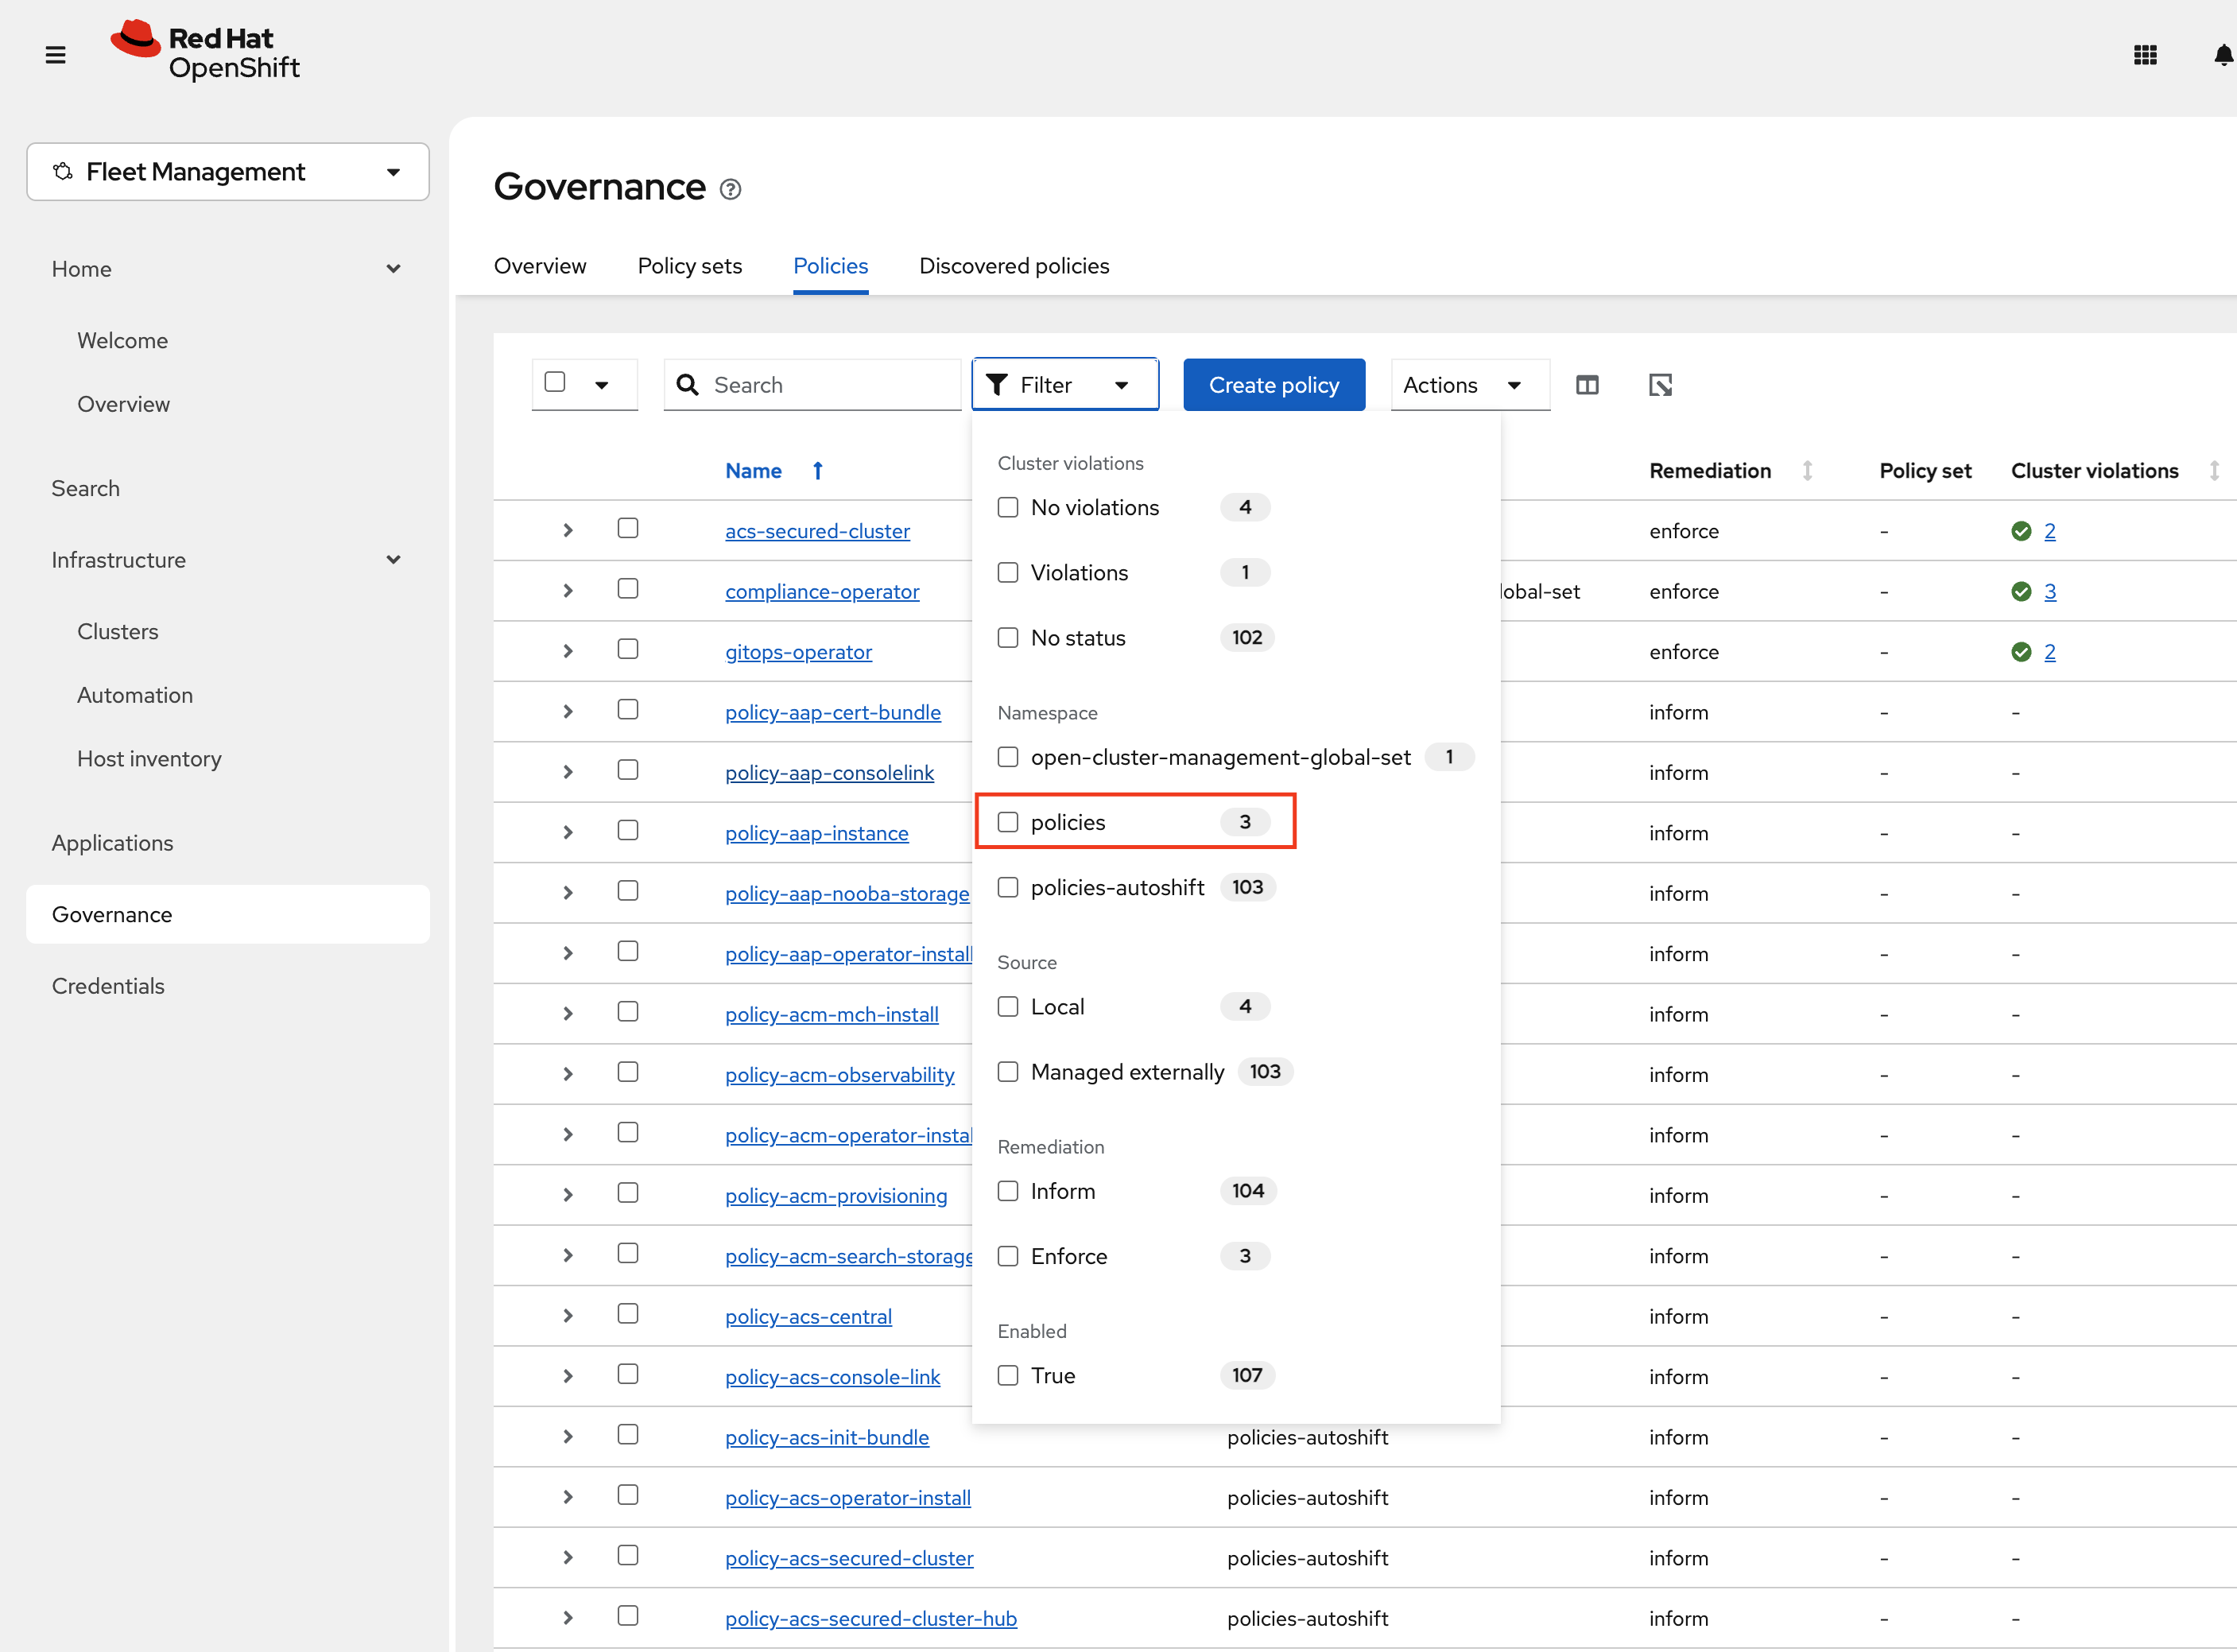
-
Verify that the policy-emea-namespace-compliance was created. Notice the Remediation is set to Inform.
-
Change this to Enforce by selecting the policy -→ Actions -→ Remediation -→ Enforce

-
It will take a few seconds to execute but you should see the Cluster Violations go from Red to Green, indicating that your cluster is now in compliance.
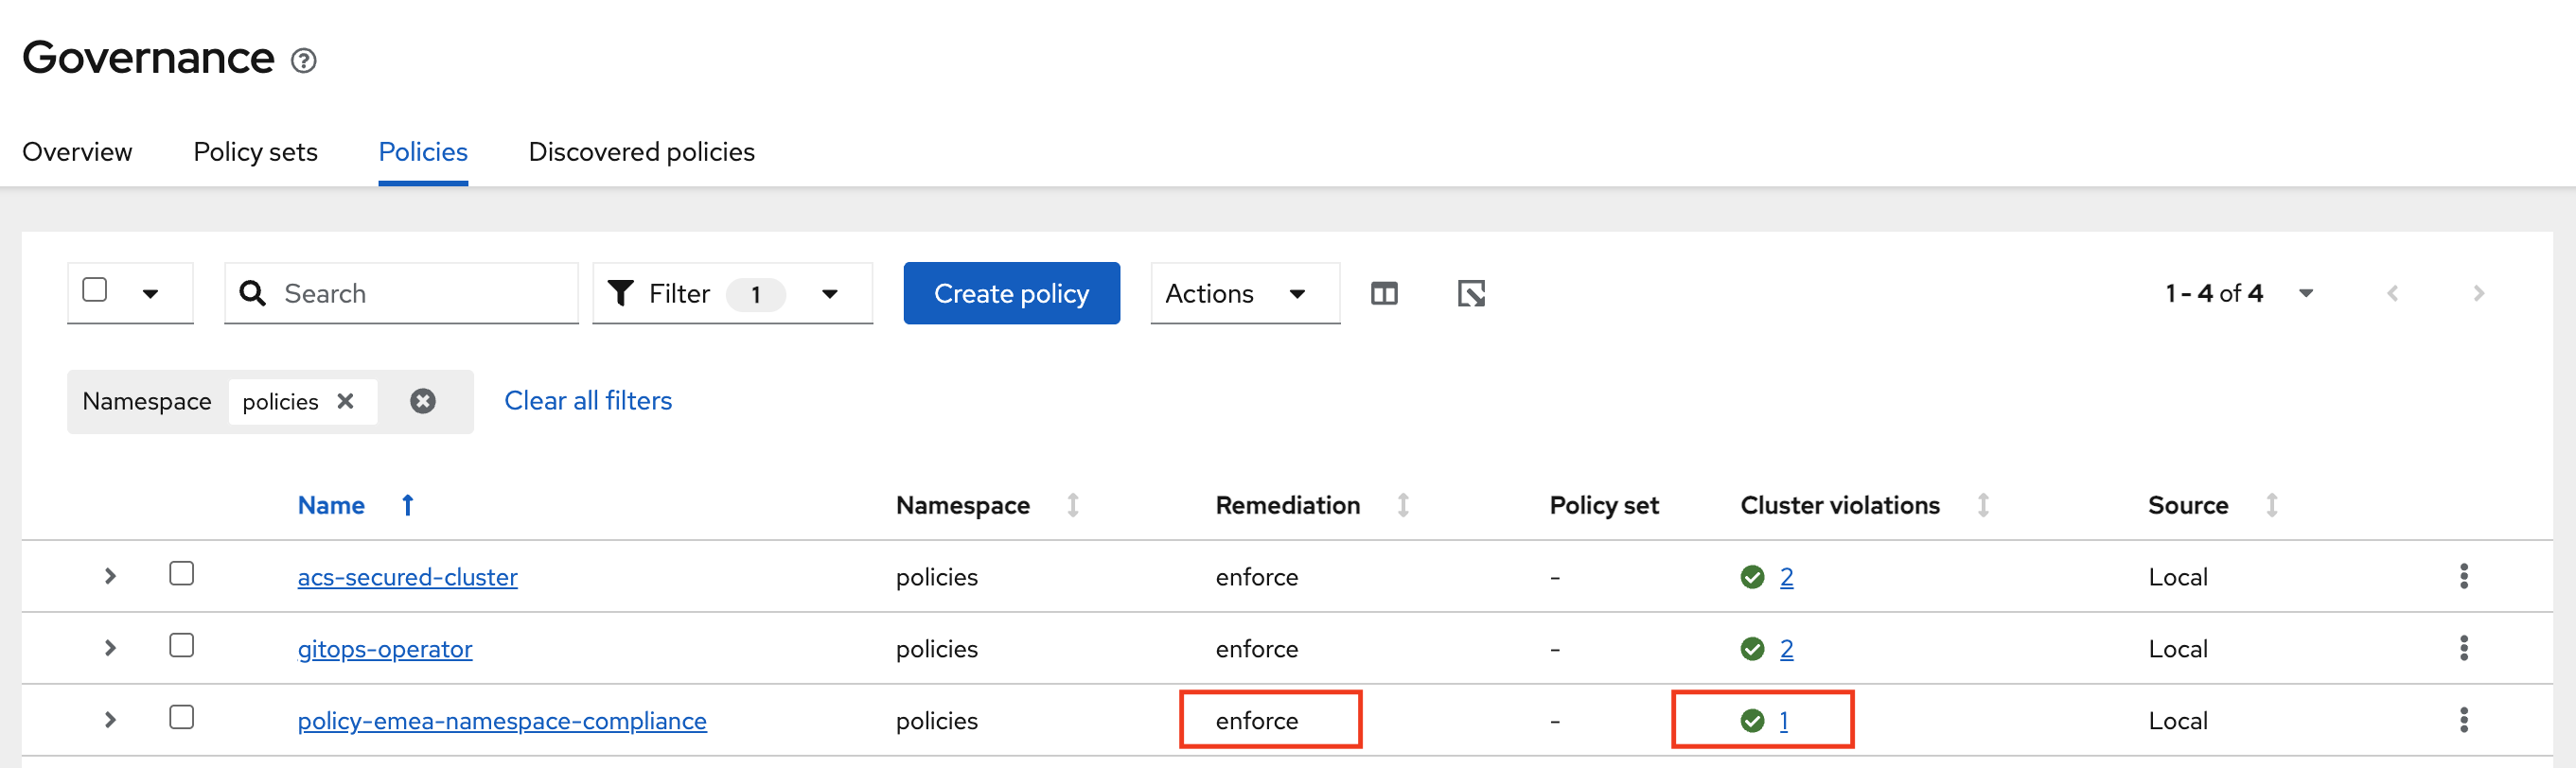
By creating and informing on the policies you have now ensured that the EMEA cluster is in compliance with the GDPR requirements. All new clusters with the same label will be in compliance with the GDPR requirements.
If you want to deploy more policies to the EMEA cluster, you can do so by following the steps in Deploying MORE Policies to the EMEA Cluster.
Operations and Security Takeaways
-
Centralized cluster management — Use RHACM to create, label, and manage OpenShift clusters across multiple regions from one place.
-
Unified workload management — Operate virtual machines and containers together, with full visibility across clusters.
-
Consistent app deployment — Deploy and update applications to multiple clusters using Git-backed automation with OpenShift GitOps and RHACM.
-
Automated compliance — Define and enforce policies as code to meet residency and organizational requirements.
