Assurance
Sovereignty isn’t just about control — it’s about confidence
Confidence that your applications and clusters operate exactly as intended, fully compliant with regulations, security standards, and internal policies no matter where they run.
Without continuous assurance, even the most advanced cloud native environments carry hidden risks. A single compliance gap can expose your organization to regulatory fines, security breaches, data sovereignty violations, or loss of customer trust. Assurance eliminates that uncertainty. It delivers verifiable proof that every workload and cluster meets the highest standards of security and compliance across EMEA, the US, and beyond.
Achieving this level of assurance requires a practical and structured approach.
So let’s get practical in our example of an EMEA environment and a US environment and observe, audit, police and manage our clusters and applications. We will start by looking at the security, compliance and environment insights that we can get from Red Hat Advanced Cluster Security for Kubernetes (RHACS).
Security and Environment Insights
First let’s review the basics of Red Hat Advanced Cluster Security.
RHACS Basics
Red Hat Advanced Cluster Security (RHACS) provides essential tools for Kubernetes security, including:
-
Vulnerability management (Platform, workload, and Virtual Machine)
-
Policy lifecycle management (Policy as Code)
-
Built-in compliance auditing
-
Risk profiling
-
Threat detection and response
With RHACS, you can ensure your Kubernetes clusters remain secure and compliant across CNCF supported Kubernetes environment.
Compliance Checks with RHACS and the Compliance Operator
Sovereign cloud operations require that organizations are assured that their clusters and applications are compliant with regulations, security standards, and internal policies no matter where they run.
First let’s add a configuration to the local-cluster to see the difference between the compliance checks.
Make a Simple Cluster Change to Pass the Compliance Check
Let’s focus on the ocp4-e8 compliance checks and see how we can pass the ocp4-e8-ocp-allowed-registries standard. Follow the steps below to pass the check for the local-cluster.
-
Copy and paste the following into the Terminal tab on the right.
oc config use-context local-cluster oc apply -f - <<EOF --- apiVersion: config.openshift.io/v1 kind: Image metadata: name: cluster spec: registrySources: allowedRegistries: - quay.io - registry.redhat.io - registry.access.redhat.com - image-registry.openshift-image-registry.svc:5000 - gcr.io - docker.io - {quay_console_url} EOF -
Check that your changes have been accepted:
oc get image.config.openshift.io/cluster -o yaml | grep allowedRegistries -A 10Output
    allowedRegistries:
    - quay.io
    - registry.redhat.io
    - registry.access.redhat.com
    - image-registry.openshift-image-registry.svc:5000
    - gcr.io
    - docker.io
    - https://quay.apps.cluster-j9vv7.dynamic.redhatworkshops.io
status:
  internalRegistryHostname: image-registry.openshift-image-registry.svc:5000
Great! Now let’s set up compliance checks across the regional clusters.
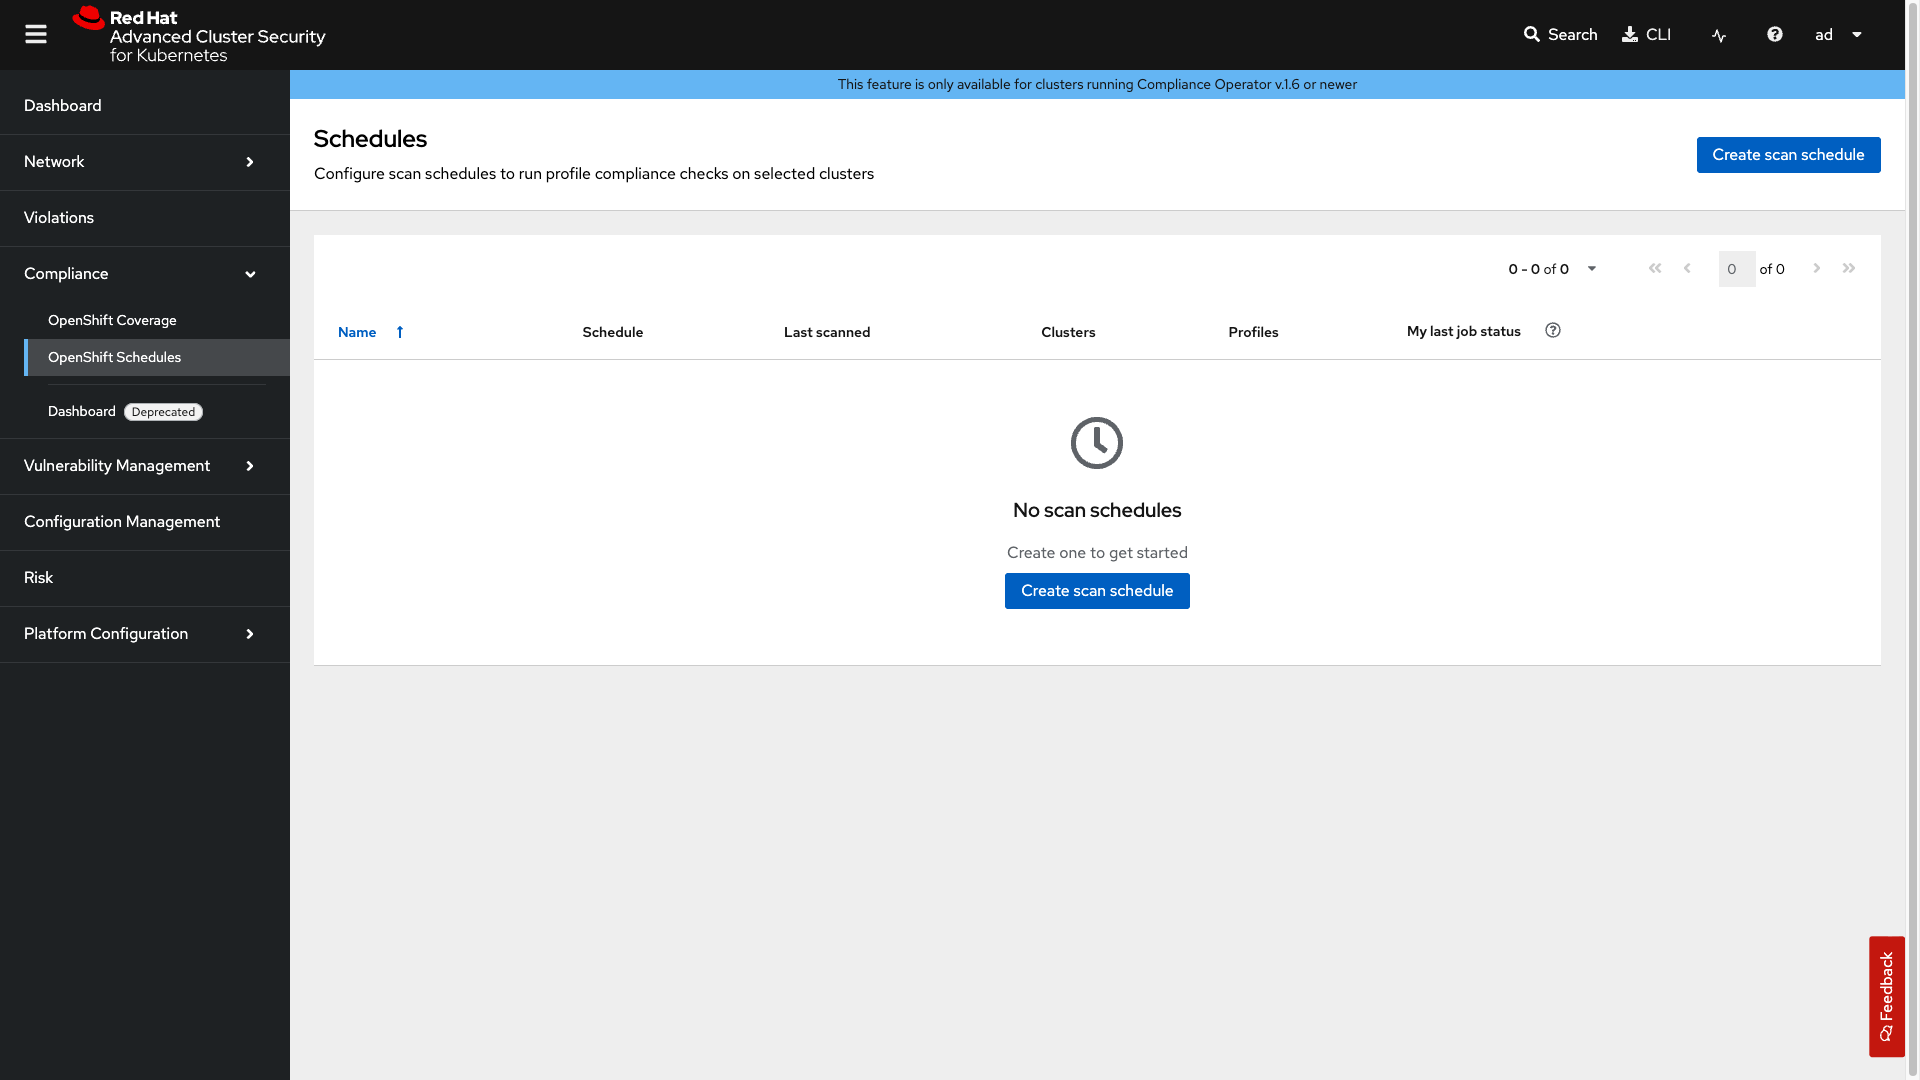
Set up a Compliance Scan
Follow the steps below to set up the compliance scan.
-
Click on the Compliance → OpenShift Schedules tab.
-
Next, click on the Create scan schedule.

-
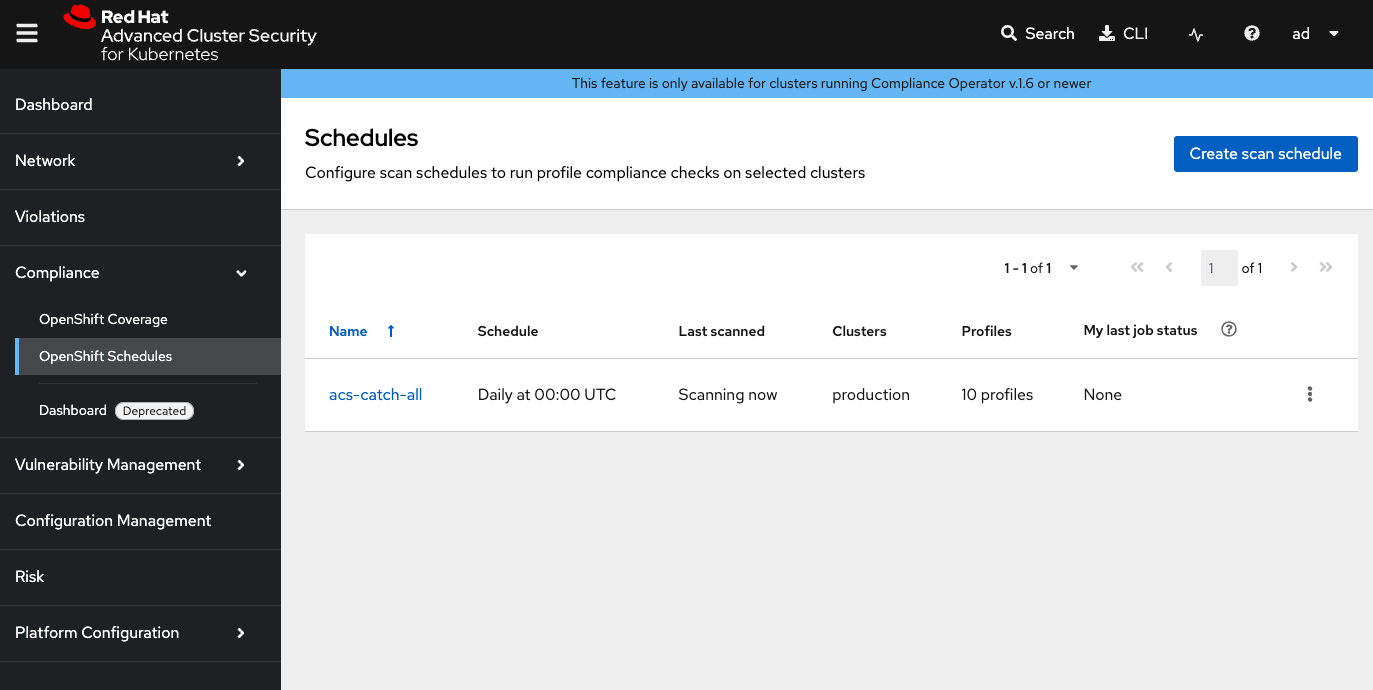
Next, fill in the form with the following information:
-
Name:
acs-catch-all -
Description:
Daily compliance scan for all profiles covering CIS, E8, Moderate, NERC-CIP, PCI-DSS, and STIG standards for both platform and node-level checks -
Frequency:
Daily -
Time: 00:00 UTC
-
-
Click Next
-
Select the clusters: production AND aws-us
-
Click Next
-
Add the following profiles:
-
ocp4-cis -
ocp4-e8 -
ocp4-nerc-cip -
ocp4-pci-dss -
ocp4-pci-dss-node -
ocp4-stigThere are many profiles to select but here we are selecting the most common profiles that are used in most organizations. If you want to only add the ones necessary for the lab. Select `ocp4-cis` & `ocp4-e8` only.
-
-
Click Next
We will not add a delivery destination so we will skip this step. However you can send notifications via email, get details via API or download reports via the console.
-
Click Next
-
Review your masterpiece and click Save
-
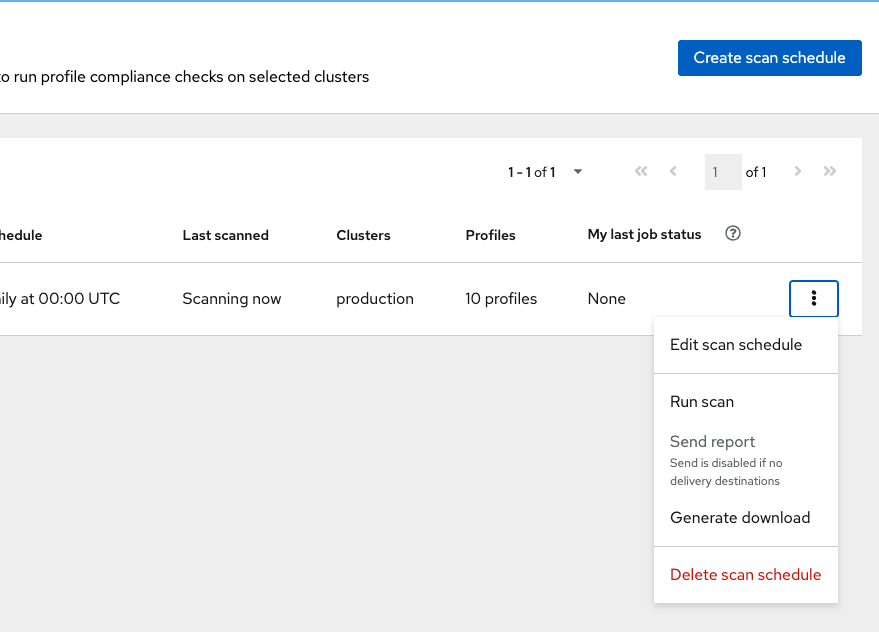
Use the menu on the schedule (three dots) and select Run scan to trigger a manual scan.
-
Head over to the OpenShift coverage section where you can view all of the details from the scan.
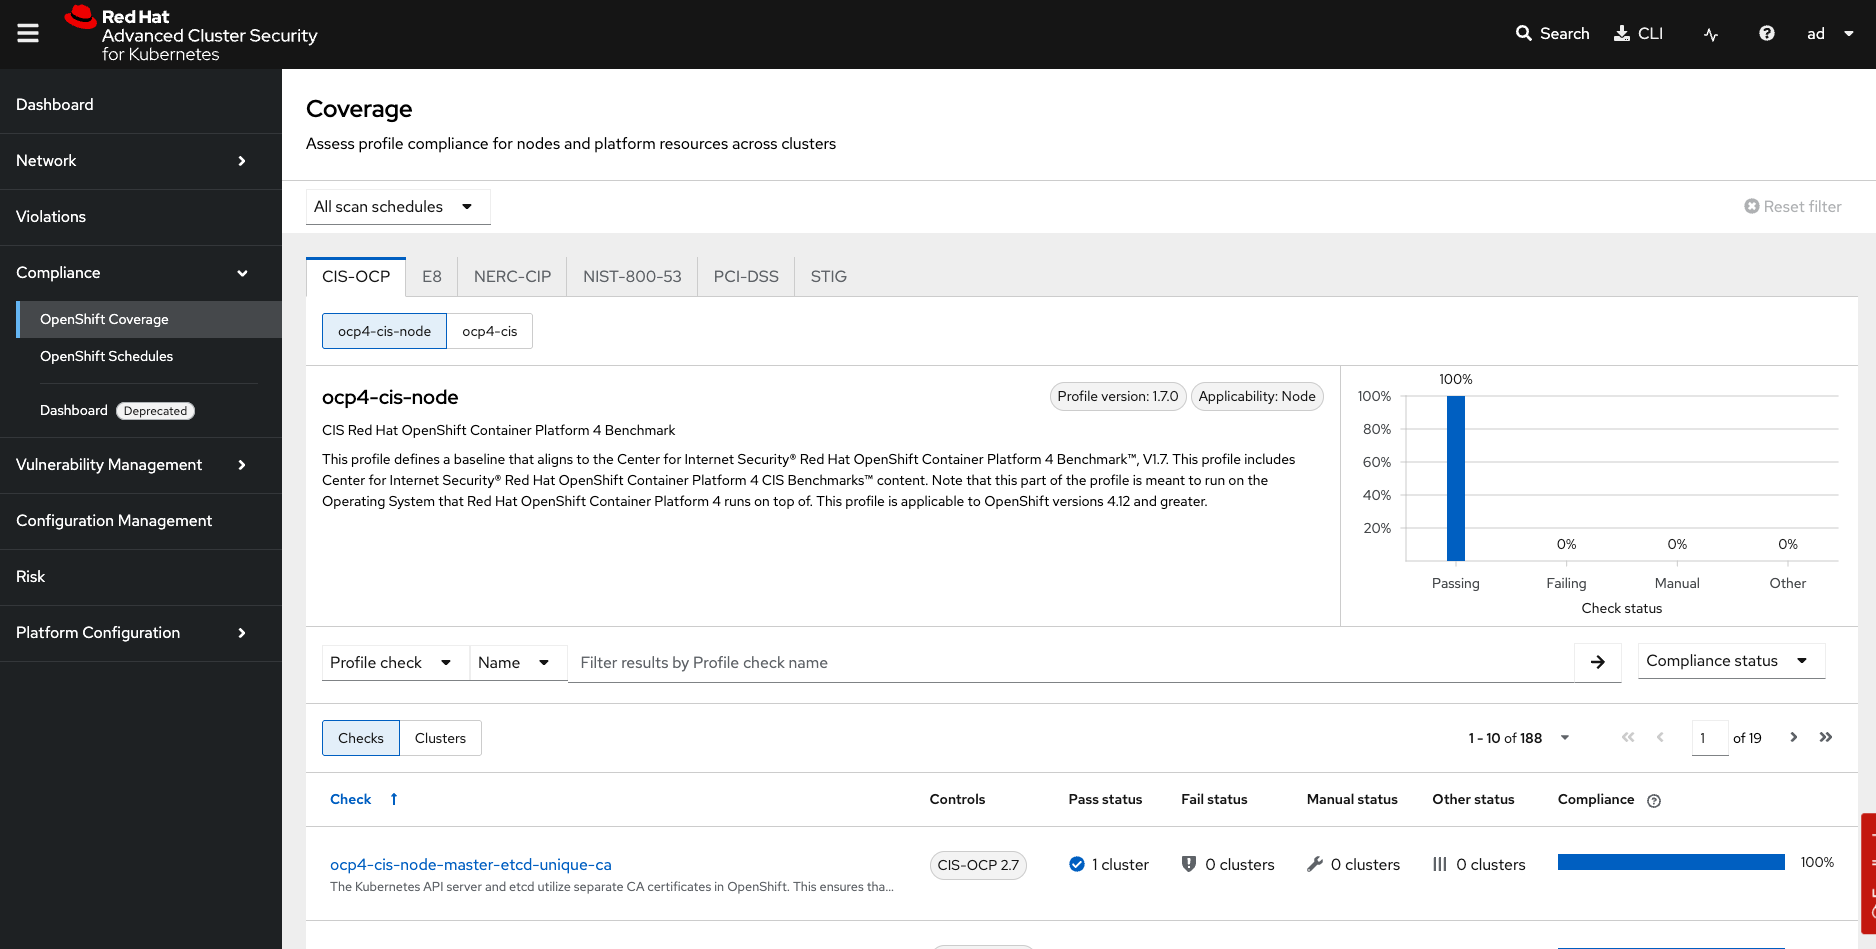
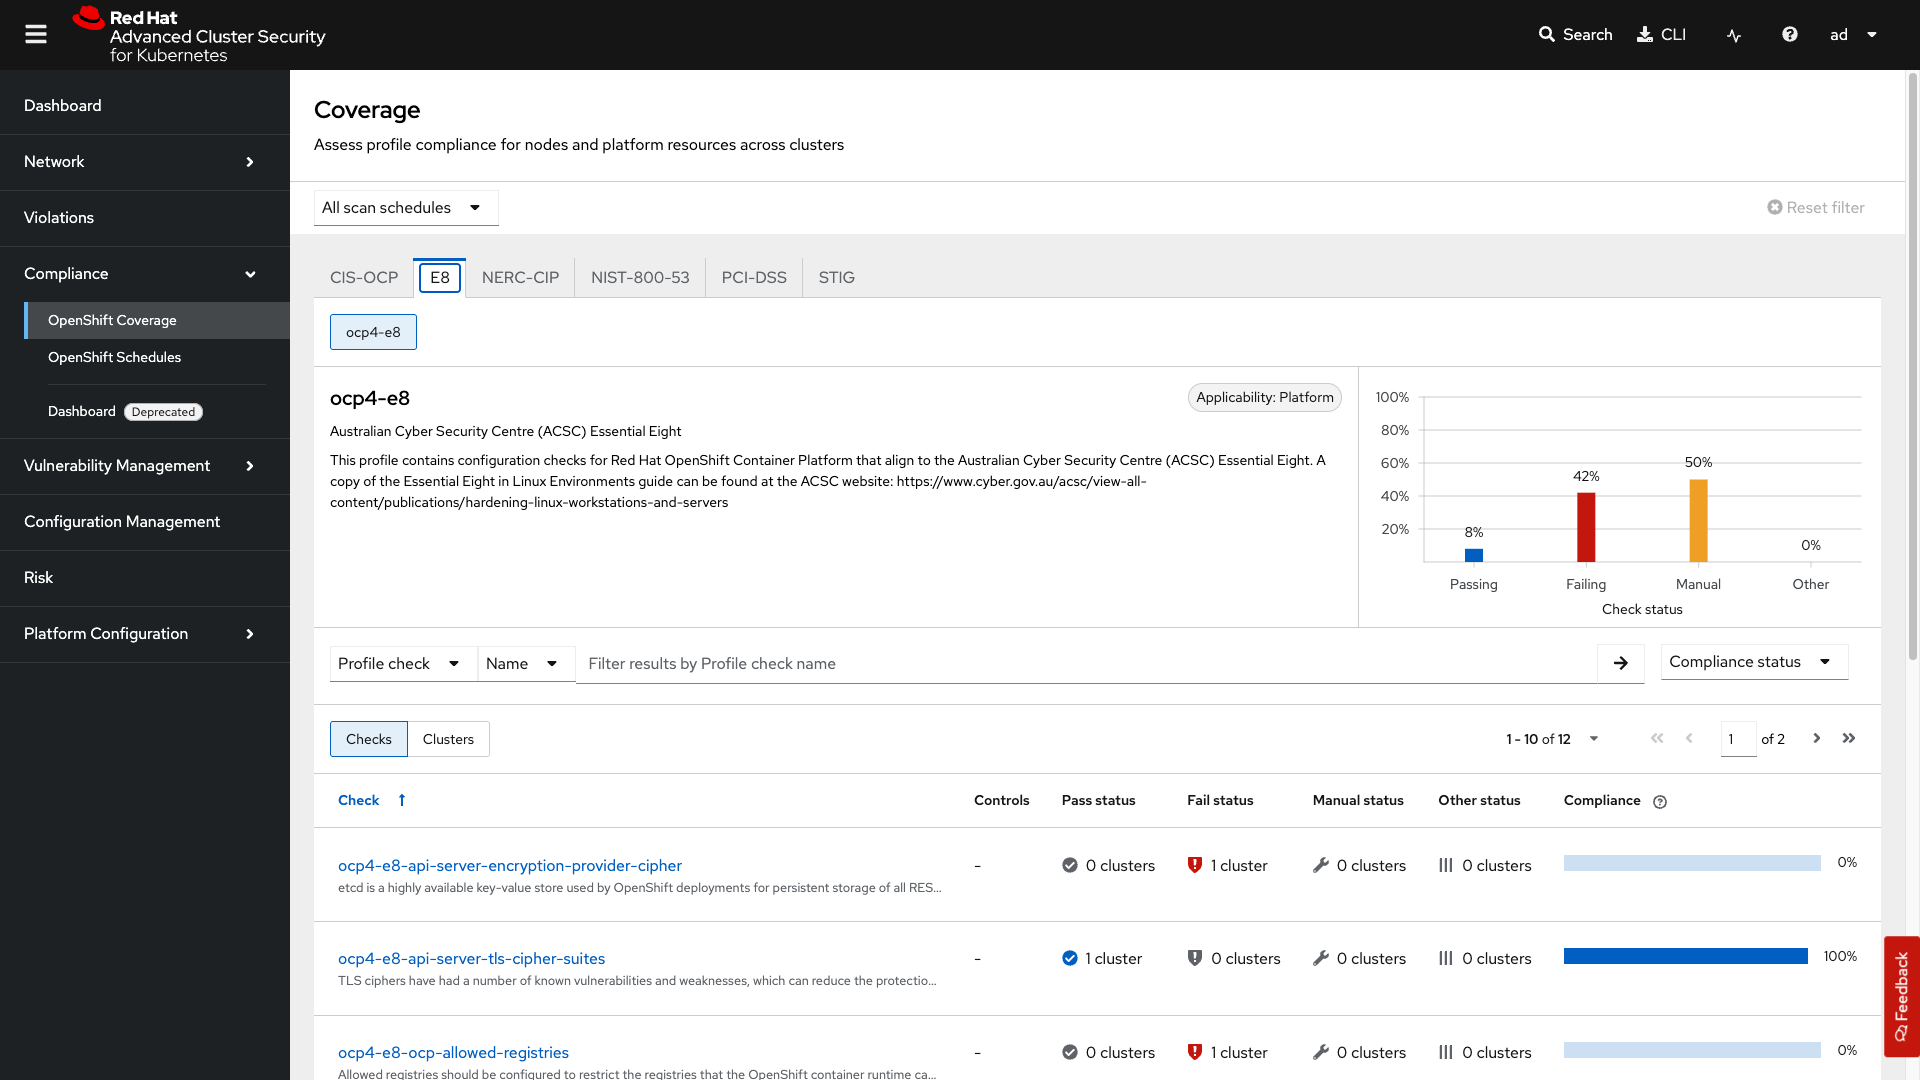
First let’s take a look at the standard.
Click on the Compliance → OpenShift Coverage → E8 tab.
-
Let’s first check the failing standards by sorting by compliance status. Under Compliance Status select
FailandManual.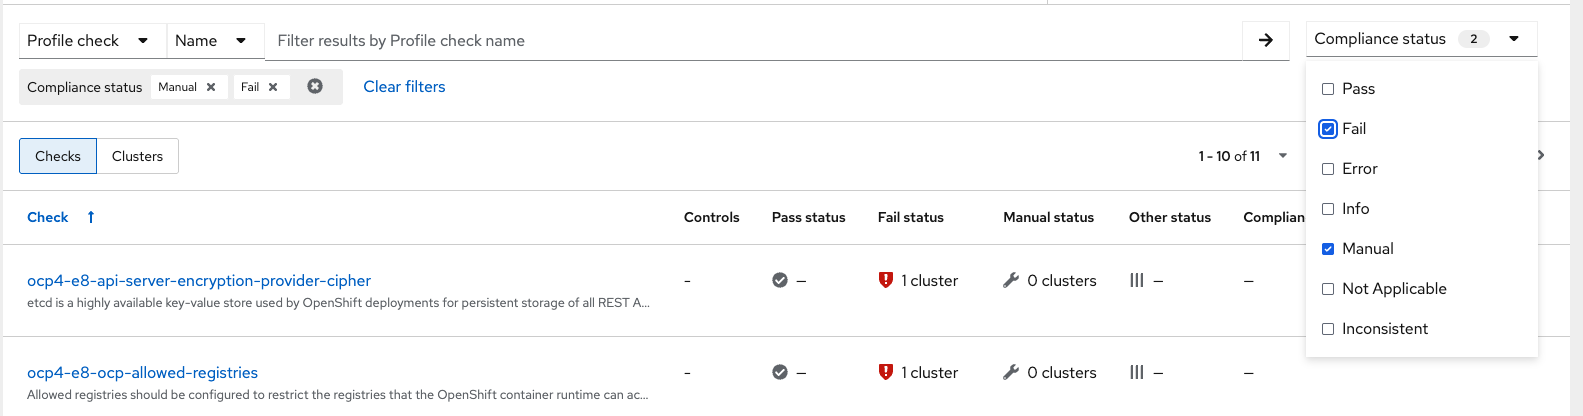
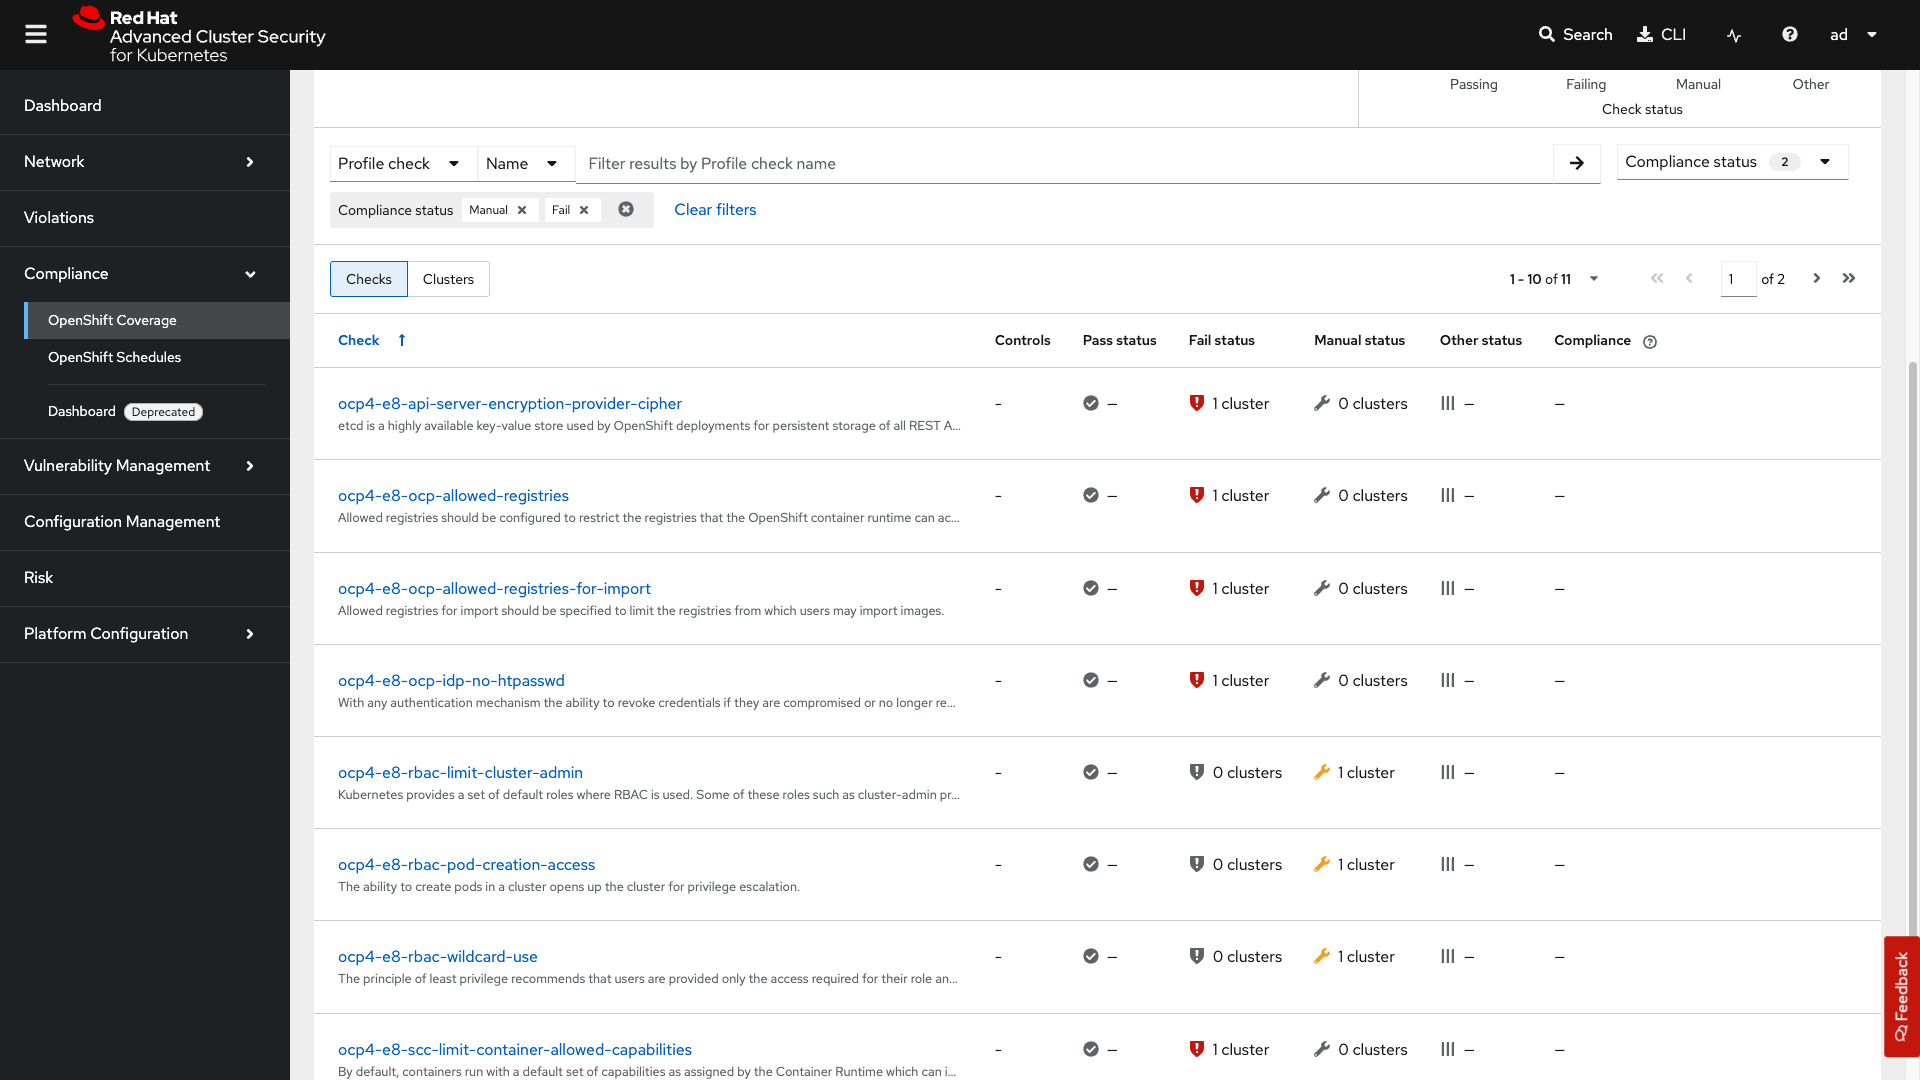
-
And then clicking on the failing standard
ocp4-e8-ocp-allowed-registries.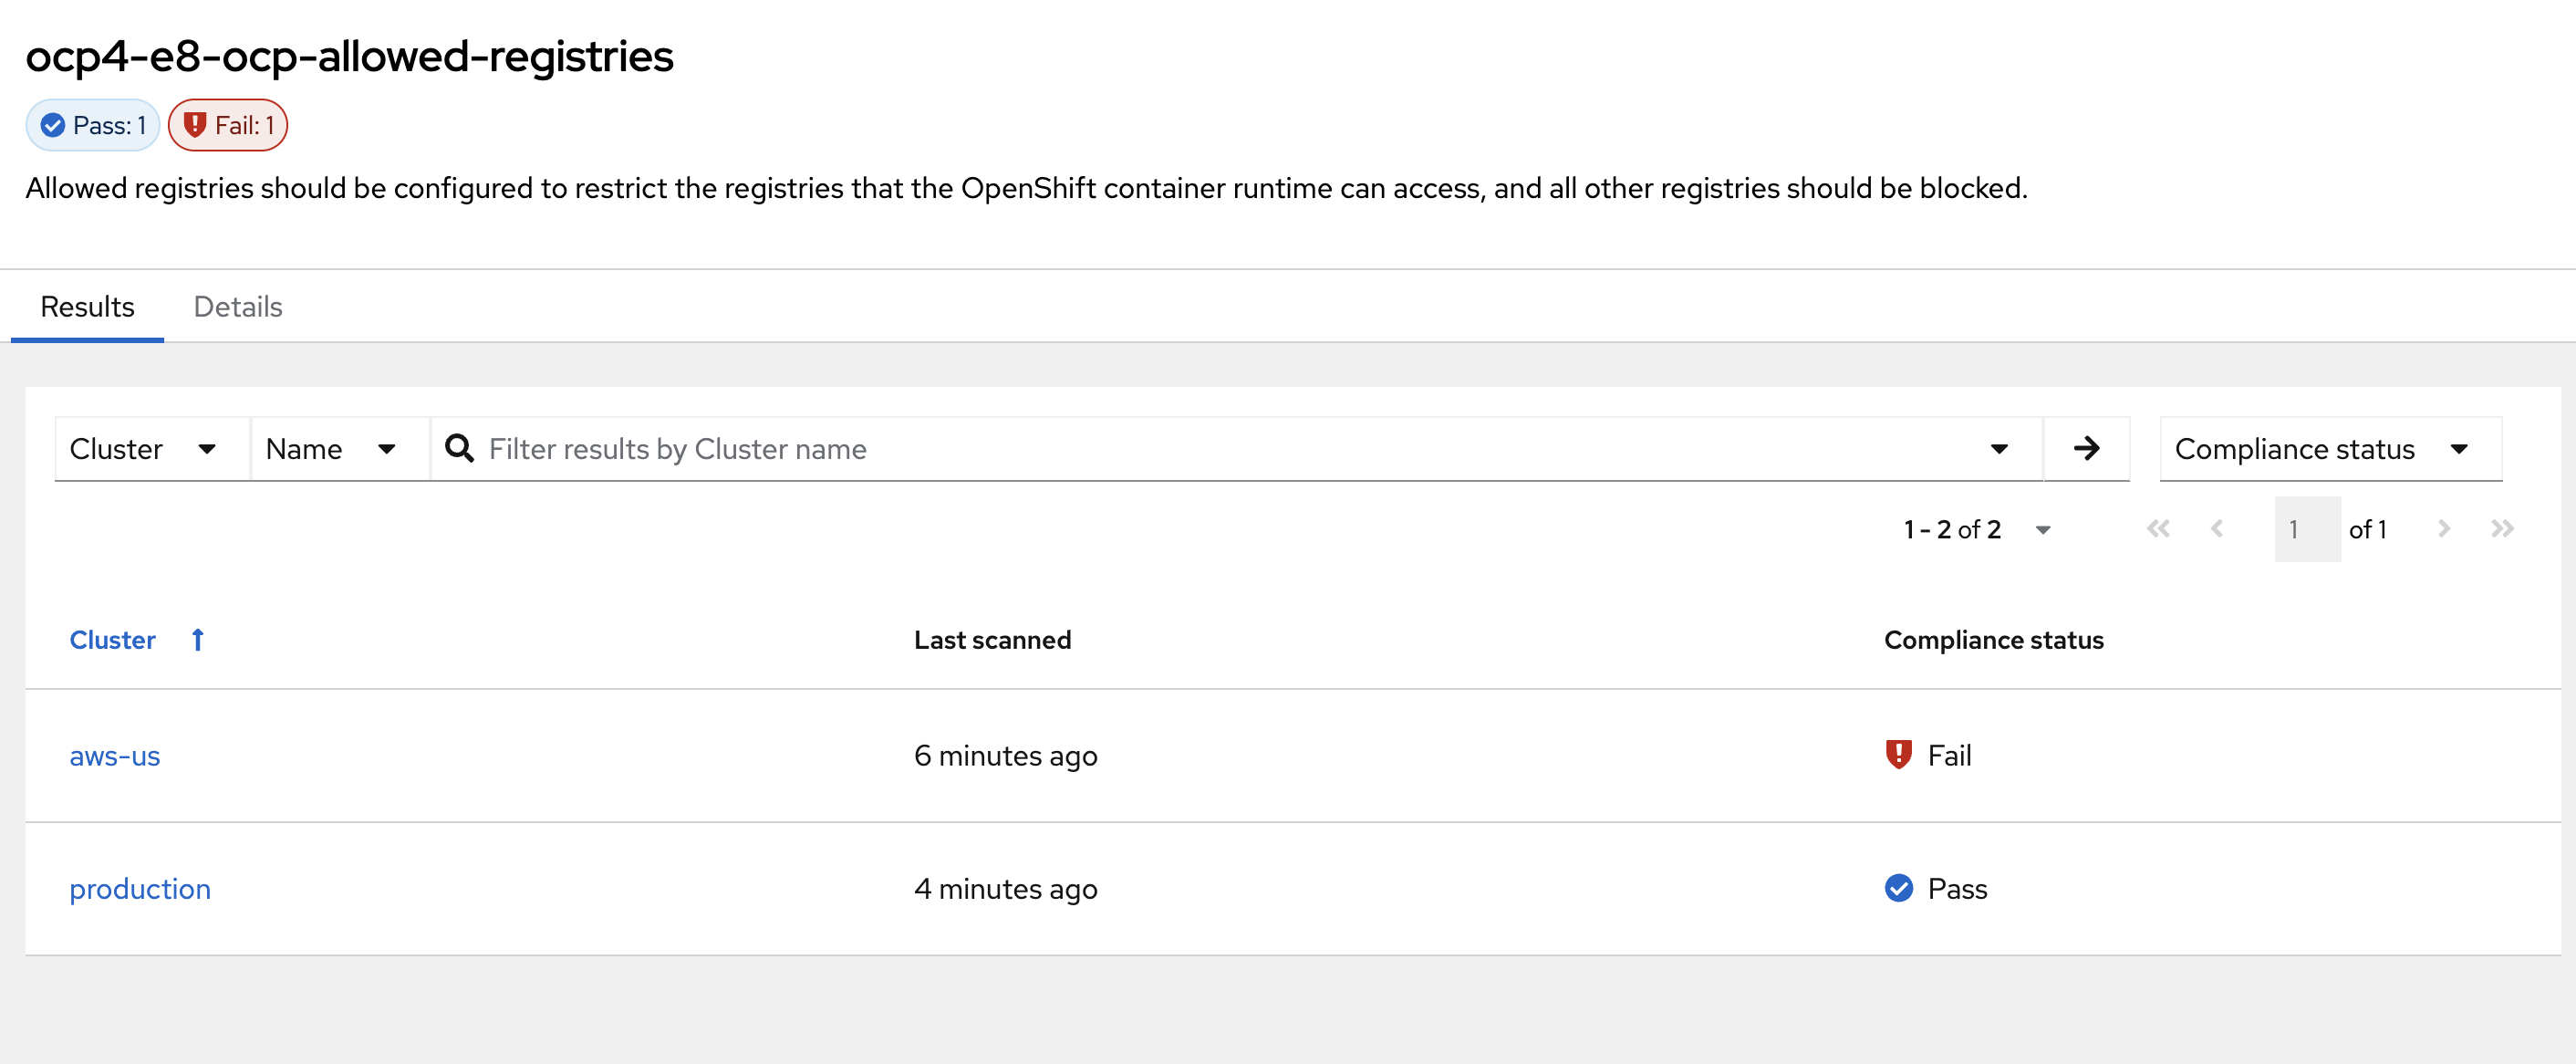
Here you will see the local-cluster, named "Production", is compliant because of our earlier change but the aws-us cluster is not.
-
Click on the Details tab next to Results and review the findings for the failing check.
The RHACS compliance dashboard shows an overview of your scan schedules and results. In the Coverage tab, you can see all scans, filter by schedule, and view which compliance checks pass or fail for your clusters.
Maintaining Control in Sovereign and Multi-Region Environments
In sovereign cloud setups, strict control over what runs inside your infrastructure is essential for data protection. Monitoring for file integrity and anomalous behavior is essential.
Red Hat Advanced Cluster Security (RHACS) includes built-in policies that detect and block risky behaviors such as unauthorized access attempts, persistent threats, lateral movement, and file integrity violations. These policies help you enforce the immutable container principle — containers should only run exactly what you approved, with no unexpected changes.
Use Policy-as-Code to Block Anomalous Behavior at Runtime
Package managers such as apt, apk, yum, and dnf are useful on virtual machines, but they have no place in production containers. Allowing them enables uncontrolled software installation, dramatically increases the attack surface, and breaks auditability and immutability — all of which are core requirements for sovereign cloud environments.
Policy-as-Code is an effective way to scale this across your global environments.
Let’s look at an example of how we can use Policy-as-Code to block anomalous behavior at runtime.
-
Apply the following policy configuration via copy paste into the terminal. It will create a security policy to enforce runtime protection against package manager execution.
oc apply -f - <<EOF
---
apiVersion: config.stackrox.io/v1alpha1
kind: SecurityPolicy
metadata:
  name: alpine-linux-package-manager-execution-patient-portal-enforcement
  namespace: stackrox
spec:
  policyName: Alpine Linux Package Manager Execution - Patient-Portal Enforcement
  description: Alert when the Alpine Linux package manager (apk) is executed at runtime
  rationale: Use of package managers at runtime indicates that new software may be being introduced into containers while they are running.
  remediation: Run 'apk --purge del apk-tools' in the image build for production containers. Change applications to no longer use package managers at runtime, if applicable.
  categories:
    - Anomalous Activity
    - Package Management
  lifecycleStages:
    - RUNTIME
  eventSource: DEPLOYMENT_EVENT
  severity: LOW_SEVERITY
  enforcementActions:
    - FAIL_KUBE_REQUEST_ENFORCEMENT
    - KILL_POD_ENFORCEMENT
  policySections:
    - policyGroups:
        - fieldName: Process Name
          booleanOperator: OR
          values:
            - value: apk
            - value: apk-tools
            - value: apk update
            - value: apk add
            - value: apk remove
            - value: apk upgrade
            - value: apk del
            - value: apk cache
            - value: apk clean
            - value: apk info
            - value: apk show
            - value: apk version
  mitreAttackVectors:
    - tactic: TA0011
      techniques:
        - T1105
  criteriaLocked: false
  mitreVectorsLocked: false
  isDefault: false
EOF
Next, you will use
tmuxto watch OpenShift events while running the test so you can see how RHACS enforces the policy at runtime. -
From the terminal, start tmux with two panes:
tmux new-session \; split-window -v \; attach -
Next, run a watch on OpenShift events in the first shell pane:
oc get events -n patient-portal -w -
Press Ctrl+b, o to switch to the next pane. (Ctrl+b THEN o)
Ctrl+bis the prefix key for tmux.ois the command to switch to the next pane. -
Exec into our patient-frontend application by getting the pod details and adding them to the following command.
POD=$(oc get pod -n patient-portal -l app=frontend -o jsonpath="{.items[0].metadata.name}")
oc exec -n patient-portal $POD -i --tty -- /bin/sh
Sample output[demo-user@bastion ~]$ POD=$(oc get pod -n patient-portal -l app=frontend -o jsonpath="{.items[0].metadata.name}") oc exec -n patient-portal $POD -i --tty -- /bin/sh /home/fritz $ -
Run the alpine package manager in this shell:
apk update -
Examine the output and expect to see that the package manager attempts to perform an update operation:
/home/fritz $ apk update ERROR: Unable to lock database: Permission denied ERROR: Failed to open apk database: Permission denied /home/fritz $ command terminated with exit code 137 [demo-user@bastion ~]$ -
Examine the oc get events tmux pane (The pane on the bottom), and note that it shows that RHACS detected the package manager invocation and deleted the pod:
^C^C[demo-user@bastion ~]$ oc get events -n patient-portal -w
LAST SEEN   TYPE      REASON                 OBJECT                           MESSAGE
50s         Normal    Killing                pod/frontend-8667d5c56b-f9fcj    Stopping container frontend
50s         Normal    Scheduled              pod/frontend-8667d5c56b-s6dph    Successfully assigned patient-portal/frontend-8667d5c56b-s6dph to ip-10-0-61-109.us-east-2.compute.internal
49s         Normal    AddedInterface         pod/frontend-8667d5c56b-s6dph    Add eth0 [10.131.0.167/23] from ovn-kubernetes
49s         Normal    Pulling                pod/frontend-8667d5c56b-s6dph    Pulling image "quay-czscm.apps.cluster-czscm.czscm.sandbox478.opentlc.com/quayadmin/frontend:0.1"
49s         Normal    Pulled                 pod/frontend-8667d5c56b-s6dph    Successfully pulled image "quay-czscm.apps.cluster-czscm.czscm.sandbox478.opentlc.com/quayadmin/frontend:0.1" in 46ms (46ms including waiting). Image size: 117738460 bytes.
49s         Normal    Created                pod/frontend-8667d5c56b-s6dph    Created container frontend
49s         Normal    Started                pod/frontend-8667d5c56b-s6dph    Started container frontend
50s         Normal    SuccessfulCreate       replicaset/frontend-8667d5c56b   Created pod: frontend-8667d5c56b-s6dph
50s         Warning   StackRox enforcement   deployment/frontend              A pod (frontend-8667d5c56b-f9fcj) violated StackRox policy "Alpine Linux Package Manager Execution - Enforce" and was killed
After a few seconds, you can see the pod is deleted and recreated. In your tmux shell pane, note that your shell session has terminated and that you are returned to the Bastion VM command line. -
Exit the tmux session and return to the bastion host terminal:
-
If you are still inside the container shell, type
exitto exit the container. -
Press
Ctrl+Cto stop thewatchcommand running in the tmux pane. -
Type
exitorCtrl-Dto exit the tmux session and return to the bastion host terminal.
-
Congrats!
You have successfully stopped yourself from downloading malicious packages! However, the security investigative process continues, as you have now raised a flag that must be triaged! You will triage our violations after you look at deploy time policies.
Violations and Reporting for Audit and Compliance
Event audits are crucial not just for security best practices, but also to meet regulatory requirements and uphold data sovereignty standards that can vary by region. Tailoring security policies and audit events to regional needs helps ensure compliance with local laws and regulations, giving your organization greater control and transparency over your workloads and security posture.
Procedure
-
Switch back to the Red Hat Advanced Cluster Security console in your browser and navigate to the Violations page.
-
Filter by the policy violation Policy, Name,
r/alpineOR by the most recent policy violations (sort by time). You will see a policy violation that has been enforced.
-
Click on your Alpine Linux Package Manager Execution - Patient-Portal Enforcement to view the details.
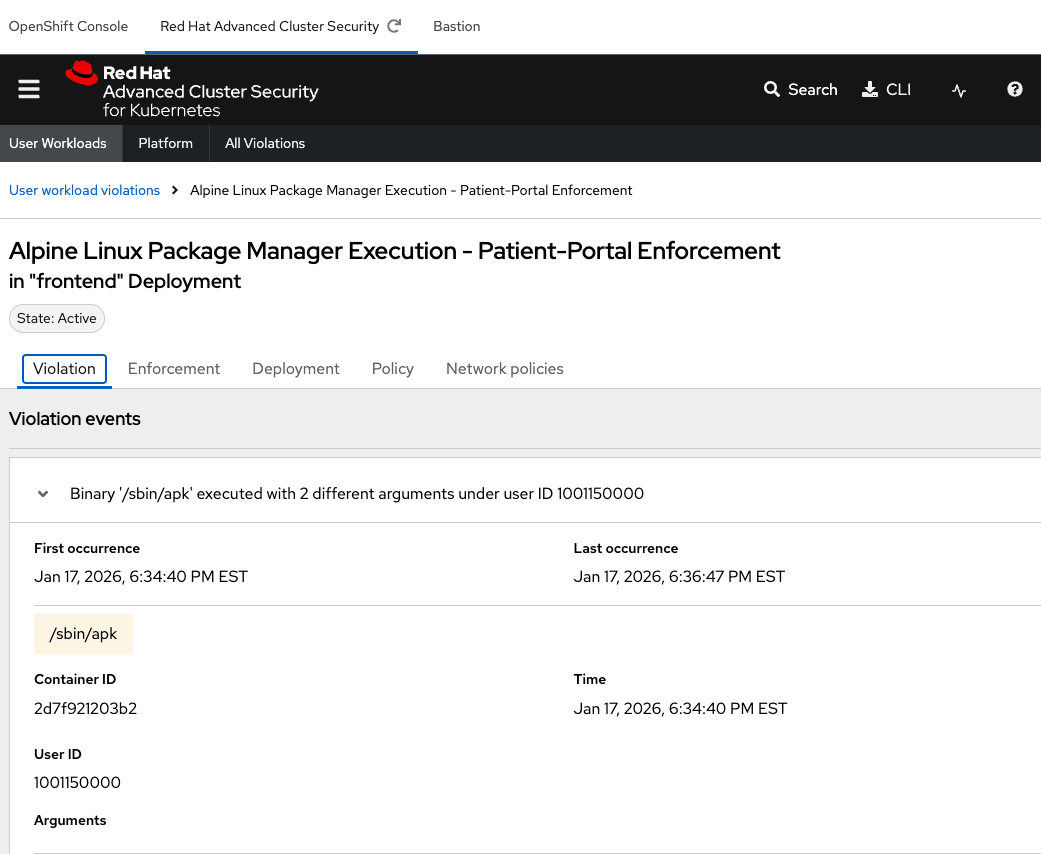
If configured properly, each violation record should be pushed to a Security Information and Event Management (SIEM) application and is available to be retrieved via the API. The forensic data shown in the UI is recorded, including the timestamp, process user IDs, process arguments, process ancestors, and enforcement action.
Hey! Great job! Proceed to Module 3.
