Lab Guide: Using the Ansible Development Environment tool
A guide to exploring what ansible-creator and ade (Ansible Dev Environment) can do for your collection.
Lab briefing
Ansible Dev Environment (ade) is a management tool for Ansible content development that provides isolated workspaces for development. ade manages virtual environments, collection installation and removal, and Python dependency resolution to ensure consistent, reproducible development environments.
ade provides comprehensive collection development environment management by:
-
Creating isolated virtual environments
-
Installing and removing collections with full dependency tracking
-
Resolving and installing collection Python dependencies from requirements.txt and test-requirements.txt
-
Installing collections in editable mode with symlinks for active development
-
Managing development dependencies like ansible-dev-tools
-
Providing configurable workspace isolation
In this section, you will explore the content that was automatically generated for the collection you just created and learn how to customize your requirements using ade.
Learning objectives
After completing this module, you will be able to:
-
Customize the
galaxy.ymlmetadata for your collection -
Use
adeto install and manage collection dependencies -
Understand how
adetracks Python and system-level requirements
Lab guide: Hands-on tasks
You will now set up your Ansible development environment, check the scaffolded collection content, and add a dependency to your collection’s galaxy.yml to see how the new ade tool helps manage it.
Task 1: Activate your Ansible Development Environment
First, you will activate the Python virtual environment (.venv) that ansible-creator built for you.
-
View the generated files in the left sidebar of VS Code. You can see the list of all files generated by Ansible Creator.
-
Activate the Ansible extension by opening the
galaxy.ymlfile in the file explorer sidebar. This ensures VS Code recognizes the project as an Ansible collection and activates the Ansible language features.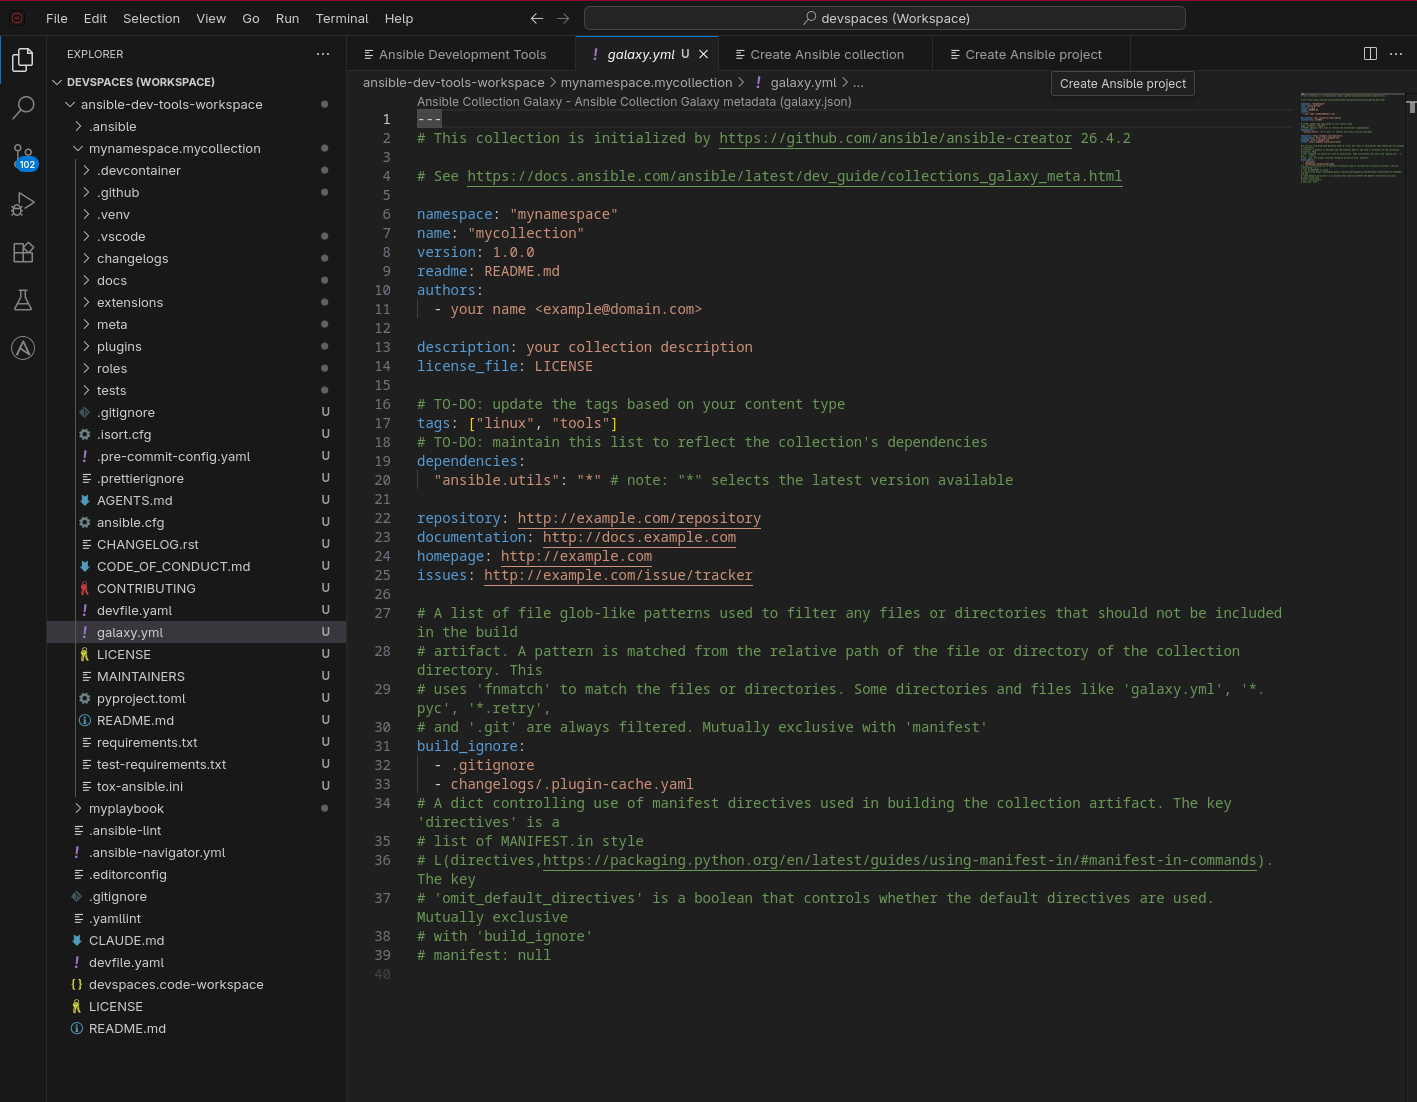
-
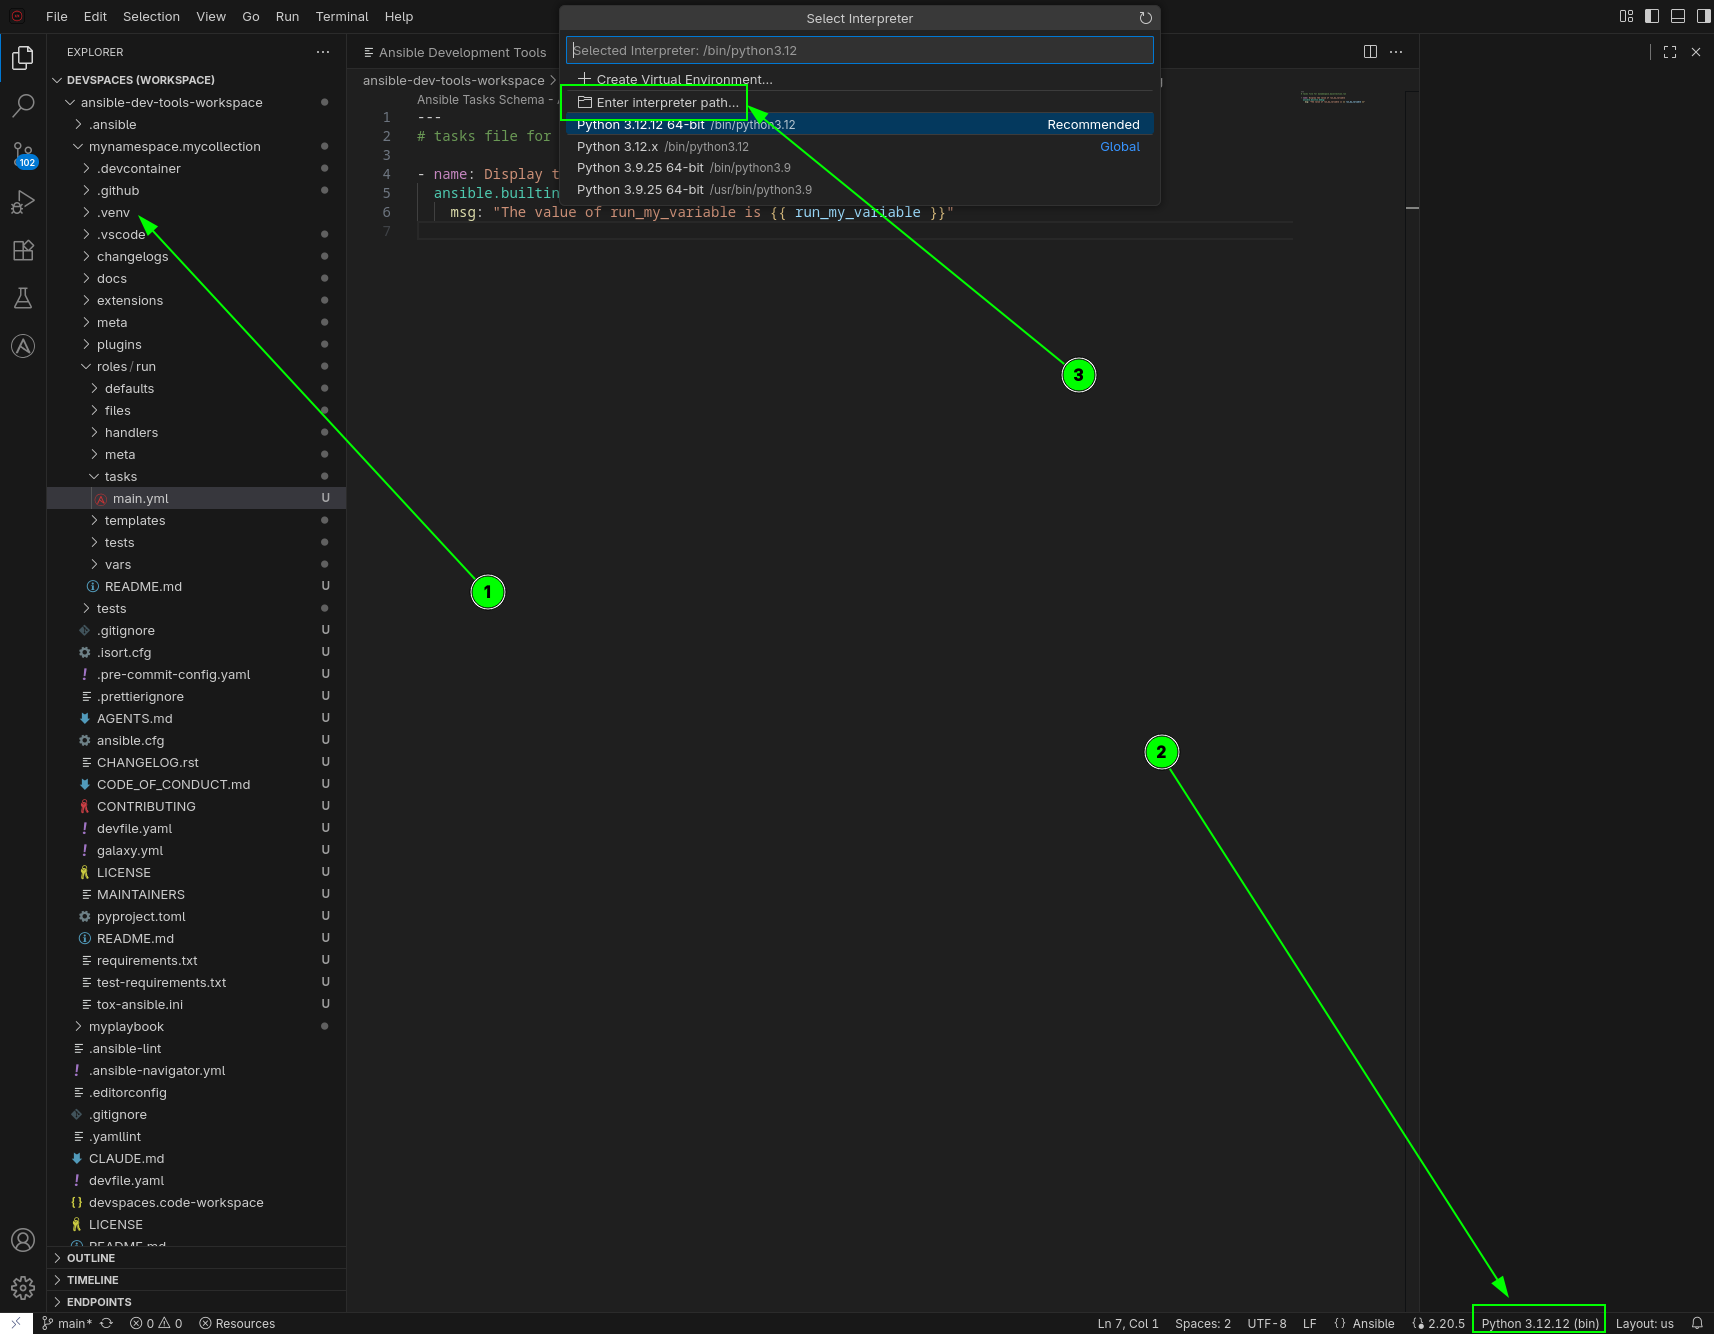
Activate the Python virtual environment. The
.venvcreated byansible-creatorneeds to be set as the active Python interpreter for VS Code:-
In the VS Code file explorer sidebar, right-click on the
.venvfolder and select Copy Path. -
Click the Python version shown in the bottom status bar of VS Code (it may say
Python: Select Interpreteror show a system Python version). A dropdown will appear at the top of the editor. -
Select Enter interpreter path… from the dropdown.
-
Paste the path you copied and press Enter.
-
This is an alternative to manually running source .venv/bin/activate in the terminal.
|
Task 2: Add collection dependencies
The Ansible Development Environment (ade) tool helps manage dependencies for your collections.
-
Explore the scaffolded files. Take a moment to explore the content of these auto-generated files (do not edit them yet):
-
.gitignore: This is pre-loaded with settings to ignore common temporary files, making your Git commits cleaner. -
test-requirements.txt: This already includes the Python dependencies required for running tests with Molecule. -
galaxy.yml: This is the identity card of an Ansible collection. It describes what the collection is, who owns it, how it should be discovered and how it should be trusted and consumed.
-
-
Open
galaxy.ymlby clicking on it in the file explorer sidebar: We will replace the default values, this directly affects how your content is indexed, validated, searched and governed.namespace: "mynamespace" name: "mycollection" version: 1.0.0 readme: README.md authors: - your name <example@domain.com> description: your collection description license_file: LICENSE # TO-DO: update the tags based on your content type tags: ["linux", "tools"]You will notice the
namespaceandnamehave already been auto-filled correctly, they are immutable and changing them is like creating a new collection. Theversionis important as well as it’s used for dependency constraints, version resolution and upgrade/downgrade logic.You will also notice the
readmeandlicense_fileare pointing to existing files, we can leave those as they are. You can modify the scaffolded README.md and LICENSE files if you wish to change those.We will replace the following fields:
-
your name <example@domain.com>in theauthors:section with your own name and email. This is used for ownership attribution, support and maintenance. -
your collection descriptionin thedescription:section withmycowsay collectionThis is used for the search results summaries in Galaxy and Automation Hub, as well as the collection landing page. -
the
tags:These tags are used in Galaxy and Automation Hub for discoverability and they are specially important in large catalogs. Consider the purpose of your collection for them. The available categories areapplication,cloud,database,eda,infrastructure,linux,monitoring,networking,security,storage,tools,windows.
-
-
Let’s add a requirement to see
adein action: Modify thedependencies:block to addansible.posix. This is used for automatic dependency installation and compatibility validation. The result should look like this:dependencies: "ansible.utils": "*" "ansible.posix": "*"+ The asterisk (
*) mean latest version. This could be a pinned version (1.5.0) as well or even a greater (>=) or smaller (<=) than. -
Save the file using the menu (
File→Save) or by pressingCtrl + S(Cmd + Son Mac).
Task 3: Check Ansible Development Tools versions
Let’s check the versions of the Ansible development tools installed in your environment.
-
Open the Terminal in VS Code from the top menu by clicking Terminal → New Terminal
-
Check the tool versions by running the following command to see the versions of all installed tools:
adt --versionNotice the command is
adt(Ansible Development Tools). In the next task, you will useade(Ansible Development Environment). These are different tools.The output should look similar to this:
$ adt --version
ansible-builder                          3.1.1
ansible-core                             2.20.5
ansible-creator                          26.4.2
ansible-dev-environment                  26.4.0
ansible-dev-tools                        26.4.5
ansible-lint                             26.4.0
ansible-navigator                        26.4.0
ansible-sign                             0.1.5
molecule                                 26.4.0
pytest-ansible                           26.4.0
tox-ansible                              26.3.0
Versions might differ, don’t worry. The list above is an example.
Task 4: Manage dependencies with ade
Now you will use ade to install the dependencies you declared in galaxy.yml.
-
Navigate to the collection directory in the VS Code terminal:
cd /projects/ansible-dev-tools-workspace/mynamespace.mycollection -
Install the collection dependencies by running the following command. This will install your collection and its dependencies into the virtual environment.
Notice the
-e .with a dot at the end of the command. This tellsadeto perform an editable (the-e) install, creating a link from the virtual env into your working directory (the.).ade install -e .The output should look like this:
$ ade install -e . Note: Installed collections include: ansible.posix, ansible.utils, and mynamespace.mycollection Note: Note: If you add new root-level directories or files to your collection, you will need to re-run 'ade install -e .' to include them in the editable install. Note: All python requirements are installed. Note: All required system packages are installed. -
Update
build_ignoreingalaxy.yml. Whenademanages your collection, it creates directories like.venvandcollectionsinside the collection root. These are development artifacts that should not be included when building the collection tarball. Thebuild_ignorefield ingalaxy.ymltellsansible-galaxy collection buildto exclude them. Opengalaxy.ymland update thebuild_ignoresection to:build_ignore: - .gitignore - changelogs/.plugin-cache.yaml - .venv - collections - .toxThis ensures that development tooling directories are excluded from the packaged collection artifact. The
.venvandcollectionsentries preventade-managed content from bloating the tarball, and.toxexcludes test runner artifacts fromtox-ansible. We are adding these entries manually due to a known bug — in a future version,adeis expected to handle this automatically. -
Check the dependency tree by running
ade tree -vto see the installed dependencies. -
Add another collection dependency by going back to the
galaxy.ymlfile and adding"ansible.netcommon": "*"to thedependencies:list. Save the file. The result should look like this:dependencies: "ansible.utils": "*" "ansible.posix": "*" "ansible.netcommon": "*" -
Attempt to re-run the installation by running the
ade install -e .command again in the terminal.The command will fail. Don’t panic! This is expected.
adehas detected thatansible.netcommonrequires certain system-level packages that are not installed on your workstation’s operating system.$ ade install -e . Note: Installed collections include: ansible.posix, ansible.utils, and mynamespace.mycollection Note: Note: If you add new root-level directories or files to your collection, you will need to re-run 'ade install -e .' to include them in the editable install. Note: All python requirements are installed. Warning: Required system packages are missing. Please use the system package manager to install them. - python3-cffi - python3-cryptography - python3-lxml - python3-pycparser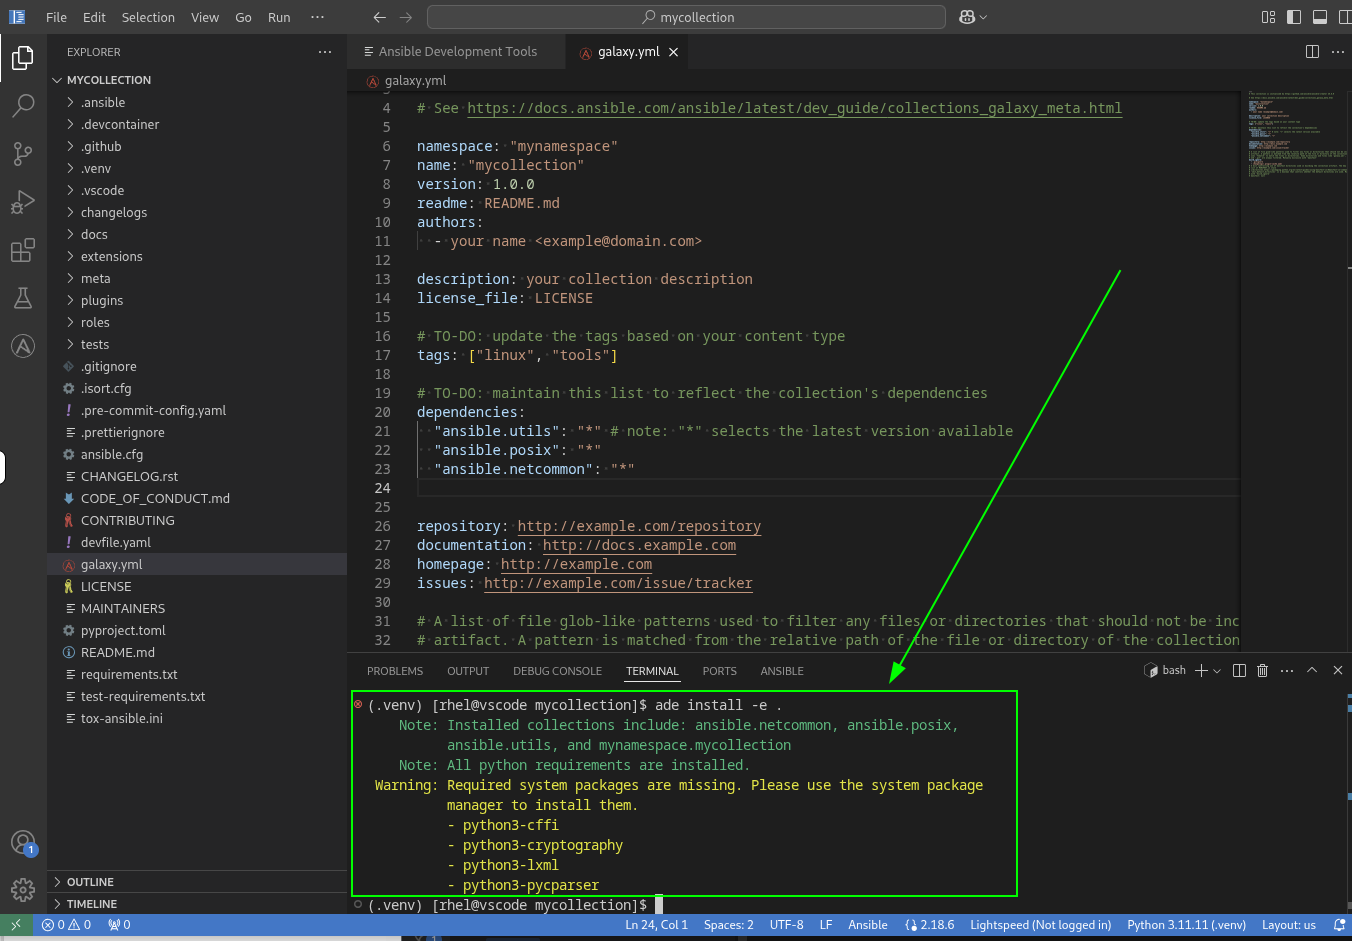
-
Install the system dependencies by running the following command in the VS Code terminal to install the missing OS packages:
sudo dnf install -y python3-cffi python3-cryptography python3-lxml python3-pycparserIf you see an Error: Transaction failedmessage, you can safely dismiss it. Thednf installstep is designed for workstation users (pip/rpm/devcontainer workflows). In Dev Spaces environments, system-level dependencies are managed through the container image — no action is needed. Ask us about it if you are interested to learn more! -
Re-run the
adeinstallation. Now, runade install -e .one more time in the terminal. It should succeed.$ ade install -e . Note: Installed collections include: ansible.netcommon, ansible.posix, ansible.utils, and mynamespace.mycollection Note: Note: If you add new root-level directories or files to your collection, you will need to re-run 'ade install -e .' to include them in the editable install. Note: All python requirements are installed. Note: All required system packages are installed. -
Check the new dependency tree. Finally, run
ade tree -vagain. The output will now show thatadehas successfully added theansible.netcommoncollection to your environment, along with its Python requirements.
Remember the "Install collection from source code (editable mode)" option you selected during the Collection creation wizard? That option used ade install -e to automatically create the virtual environment (.venv) that you are using now.
|
Next steps
You have successfully explored how Ansible Dev Tools (adt) and Ansible Dev Environment (ade) work. Please click the Next button below to proceed to Lab 1.3 - Adding a Module to a Collection.