Lab Guide: Testing a Collection with Ansible Molecule
A guide to testing your Ansible collection using Ansible Molecule and a pre-configured test scenario.
Learning objectives
After completing this module, you will be able to:
-
Describe the Molecule test lifecycle and its stages
-
Configure a Molecule test scenario using
molecule.yml -
Write assertion-based integration tests for Ansible content
-
Create an integration test and Molecule scenario for a new plugin
-
Run and troubleshoot Molecule test scenarios from the command line
Lab briefing
In this challenge, you will explore and test the collection you created in previous modules using Ansible Molecule.
Ansible Molecule is a tool designed to aid in developing and testing Ansible playbooks, collections, and roles. It provides support for testing Ansible content across multiple instances, operating systems, and providers.
Why is testing important? Testing ensures your Ansible content works as expected before deploying to production. Molecule automates the testing process, checking for syntax errors, idempotency, and correct behavior across different environments. In production environments, these tests run automatically in CI/CD pipelines, catching issues before they impact your infrastructure.
What does Molecule test? Molecule validates:
-
Syntax: Ensures your Ansible code is syntactically correct
-
Idempotency: Verifies that running your playbook multiple times produces the same result
-
Integration: Tests that your collection components work correctly with systems and services
-
Assertions: Validates that expected outcomes are achieved
Scenarios are the starting point for Molecule’s core functionality. Think of a scenario as a test suite for your Ansible content. Each scenario defines:
-
The test environment (containers, VMs, cloud instances)
-
The sequence of actions to perform (create, converge, verify, destroy)
-
How to verify that tests passed
-
Any dependencies or preparation steps needed
You can have as many scenarios as you like, and Molecule will run them sequentially.
The Molecule Test Lifecycle:
When you run molecule test, it executes these stages in sequence:
-
Dependency: Install required Ansible collections and roles
-
Cleanup: Remove any previous test infrastructure
-
Destroy: Ensure a completely clean test environment
-
Syntax: Validate Ansible syntax in your playbooks
-
Create: Set up the test environment (spin up containers or VMs)
-
Prepare: Configure the test environment with any prerequisites
-
Converge: Run the playbook being tested
-
Verify: Execute test assertions to validate expected behavior
-
Cleanup: Clean up test resources
-
Destroy: Tear down the test infrastructure
This lifecycle ensures your content is tested in a clean, reproducible environment every time.
Lab guide: Hands-on tasks
Now, let’s explore the test scenario that was automatically added to your collection project.
Task 1: Explore the Molecule scenario
When you created the collection in the previous modules, ansible-creator also generated a Molecule test scenario named integration_hello_world.
-
Locate the Molecule scenario. In the VS Code file explorer, expand the following directory path: mynamespace.mycollection > extensions > molecule > integration_hello_world.
You can also copy and paste the path: mynamespace.mycollection/extensions/molecule/integration_hello_world. -
Examine the Molecule configuration. Within the
integration_hello_worlddirectory, open themolecule.ymlfile. Molecule uses this file to define the settings and scenarios for testing the Ansible collection.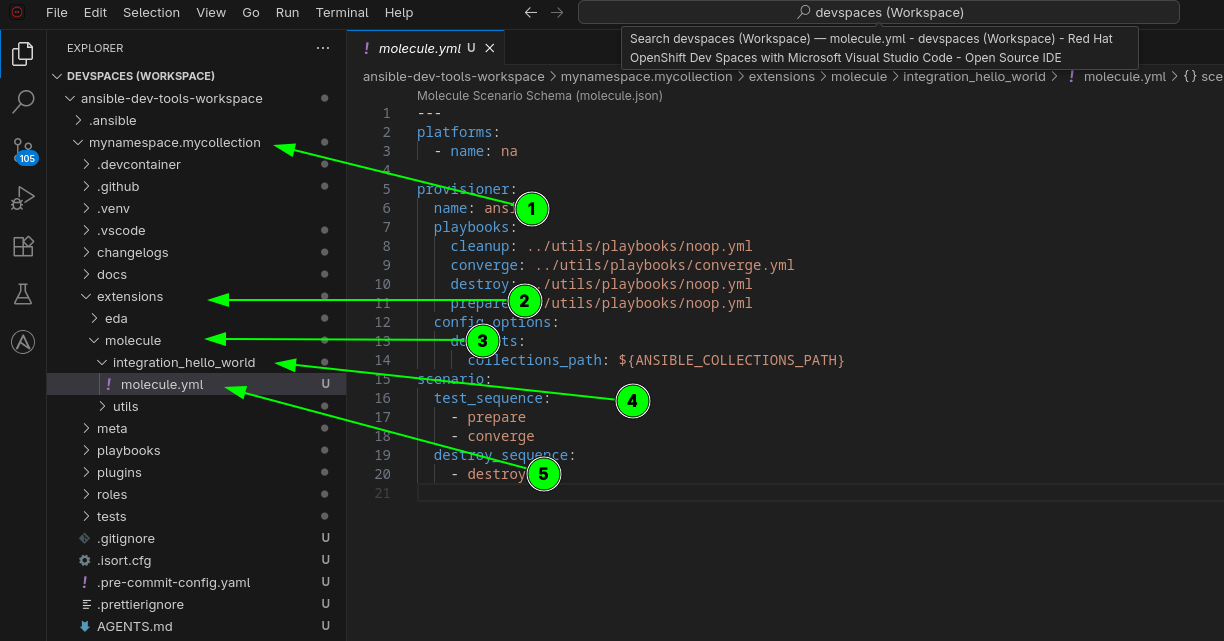
-
Understand the scenario configuration. Let’s examine the key sections of the
molecule.ymlfile:-
platforms: Defines the test environment where your tests will run. This could be containers (Docker/Podman), virtual machines, or cloud instances. For this scenario, it typically uses a container-based environment for fast, lightweight testing.
-
provisioner: Configures how Ansible runs during the test. The default provisioner is
ansible, which uses the standard Ansible engine to execute your playbooks. This section can also include inventory settings and additional Ansible configuration. -
verifier: Defines how to verify that your tests passed. The default verifier uses
ansiblewith assertion tasks to check that expected conditions are met. -
scenario: Defines the sequence of actions Molecule performs during the test lifecycle. You can customize which stages run and in what order.
The
molecule.ymlfile is the heart of your test scenario. Understanding its structure helps you customize testing to match your specific needs, whether that’s testing across multiple operating systems, different Ansible versions, or complex multi-node deployments.
-
-
Examine the test playbook. Under the
extensionsdirectory, expand theutils/playbooksdirectory. Open theconverge.ymlplaybook and observe how it is structured to call integration tests from thetests/directory.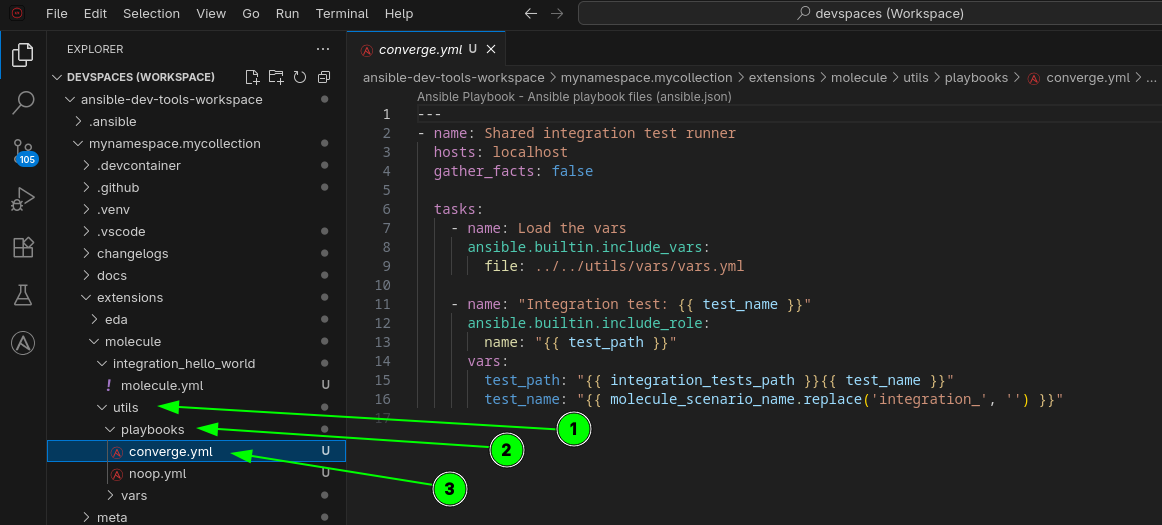
This playbook runs during the converge stage of the Molecule lifecycle. It’s the "system under test" - the playbook that exercises your collection’s functionality. Notice how it dynamically derives the test target name from the scenario name by stripping the
integration_prefix — this convention is how Molecule knows which integration test to run.
Task 2: Examine the integration tests
Before running tests, let’s understand what those tests actually verify. This is where assertion-based testing comes into play.
-
Navigate to the tests directory. In the VS Code file explorer, expand the following path: mynamespace.mycollection > tests > integration > targets > hello_world.
-
Examine the test tasks. Within the
hello_worlddirectory, open thetasks/main.ymlfile. This file contains the actual test assertions that Molecule will execute during the verify stage. -
Understand assertion-based testing. Notice how the tests use
assertmodules to validate expected behavior. Each assertion checks a specific condition:-
Does a module return the expected result?
-
Does a filter transform data correctly?
-
Are variables set to expected values?
When Molecule runs the verify stage, these assertions must all pass for the test to succeed. If any assertion fails, Molecule reports the failure and shows which condition wasn’t met.
Assertion-based testing is a common pattern in Ansible testing. Think of assertions as automated checks that verify "did this do what I expected?" This is much more reliable than manually checking outcomes, especially when you have dozens or hundreds of tests.
-
-
Review the test structure. Observe how the test file is organized:
-
Setup tasks that prepare the test environment
-
Tasks that exercise the functionality being tested
-
Assertion tasks that validate the results
This setup → execute → verify pattern is fundamental to effective testing.
-
-
Understand the naming convention. Notice how the integration test target directory is named
hello_worldand corresponds to the Molecule scenario namedintegration_hello_world. This naming convention is how Molecule’s shared converge playbook maps a scenario to its test target. When you create a new plugin, you will need to create both a test target and a matching scenario.
Task 3: Create a filter plugin
Now that you understand how tests work, let’s add a new filter plugin to your collection and then write a proper test for it.
-
Open the Collection plugin creator. In the VS Code sidebar, click the Ansible extension icon. In the ADD section, click Collection plugin.
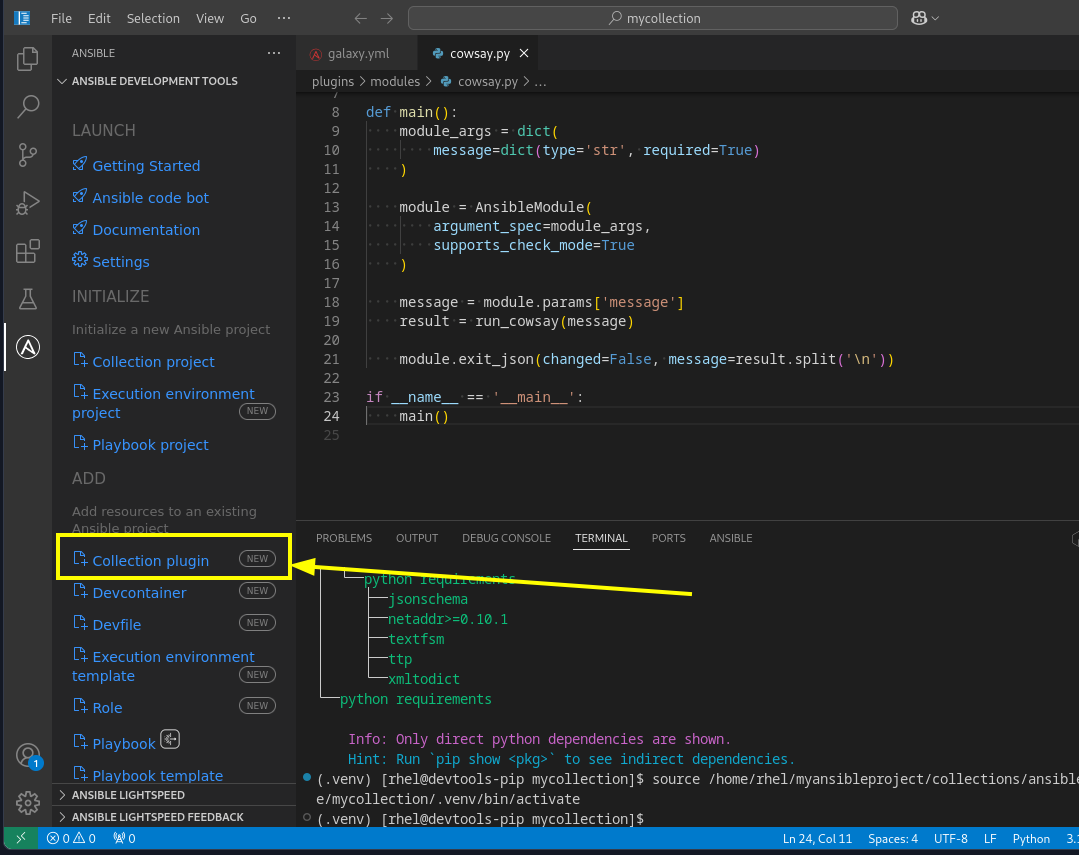
-
Fill out the plugin details. Fill out the form with the following information:
-
Collection root directory:
/projects/ansible-dev-tools-workspace/mynamespace.mycollection/ -
Plugin type: Select
Filterfrom the dropdown. -
Plugin name:
myfilter
-
-
Create the plugin by clicking the blue Create button.
-
Verify the plugin was created. In the VS Code file explorer, expand mynamespace.mycollection > plugins > filter and confirm that
myfilter.pynow exists alongside the scaffoldedsample_filter.py.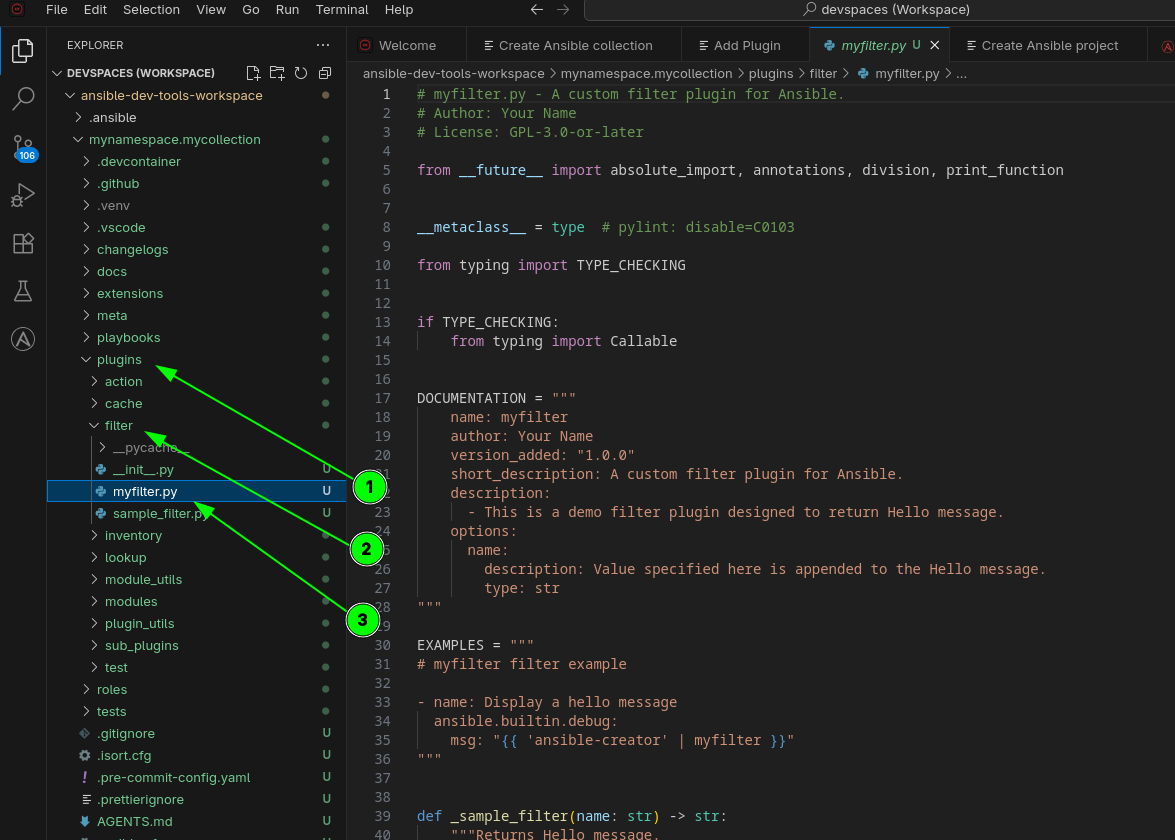
The CLI equivalent of this wizard is: ansible-creator add plugin filter myfilter /projects/ansible-dev-tools-workspace/mynamespace.mycollection
Task 4: Write an integration test for the new plugin
The scaffolded collection includes a test for the default sample_filter plugin, but your new myfilter plugin doesn’t have one yet. In a real development workflow, every new plugin should have a corresponding test. Let’s create one.
-
Create the test target directory and file. In the VS Code Explorer sidebar, right-click on the
targetsdirectory inside mynamespace.mycollection > tests > integration > targets and select New Folder. Name itmyfilter. Then, right-click on the newmyfilterfolder, select New Folder again, and name ittasks. Finally, right-click ontasksand select New File, naming itmain.yml.Alternatively, you can use the terminal:
mkdir -p /projects/ansible-dev-tools-workspace/mynamespace.mycollection/tests/integration/targets/myfilter/tasks -
Write the test assertions. Open the new
main.ymlfile and paste the following content:--- - name: Test the myfilter filter plugin ansible.builtin.set_fact: msg: "{{ 'ansible-creator' | mynamespace.mycollection.myfilter }}" - name: Assert that the filter worked ansible.builtin.assert: that: - msg == 'Hello, ansible-creator'This test applies the
myfilterfilter to the string'ansible-creator'and asserts that the result is'Hello, ansible-creator'— matching the default behavior of the scaffolded filter plugin. -
Create the Molecule scenario. Each integration test target needs a matching Molecule scenario. The scenario configuration is identical to the existing one — only the directory name changes. Copy the existing scenario:
cp -r /projects/ansible-dev-tools-workspace/mynamespace.mycollection/extensions/molecule/integration_hello_world /projects/ansible-dev-tools-workspace/mynamespace.mycollection/extensions/molecule/integration_myfilterThe shared
converge.ymlplaybook automatically derives the test target name from the scenario directory name by stripping theintegration_prefix. Sointegration_myfiltermaps totests/integration/targets/myfilter/— no code changes needed in the scenario configuration.
Task 5: Run the Molecule tests
Now you will use the command line to run the Molecule test scenarios and observe the complete test lifecycle in action.
-
Navigate to the correct directory. In the VS Code Terminal, change to the
extensions/sub-directory of your collection:cd /projects/ansible-dev-tools-workspace/mynamespace.mycollection/extensions/ -
Create a default Molecule configuration. In the VS Code Explorer sidebar, expand the
extensions/folder, then right-click on themolecule/folder inside it and select New File. Name it:default/molecule.ymlVS Code will create the
default/directory automatically. Paste the following content into the new file and save it:--- scenario: name: defaultThis empty default scenario prevents Molecule from showing a warning when no default configuration is found.
-
Run the test for your new filter plugin. Run
molecule testspecifying the scenario for your newmyfilterplugin:molecule test -s integration_myfilter -
Understand the Molecule test sequence. As the test runs, you’ll see Molecule execute the stages we discussed earlier. Watch the output carefully and observe:
-
Dependency: Installing required Ansible collections or roles
-
Cleanup & Destroy: Removing any previous test infrastructure to ensure a clean state
-
Syntax: Validating that your Ansible playbooks are syntactically correct
-
Create: Setting up the test environment (typically creating containers)
-
Prepare: Configuring the test environment with any prerequisites
-
Converge: Running the playbook being tested against the test environment
-
Verify: Executing the test assertions you wrote in Task 4
-
Cleanup & Destroy: Cleaning up and tearing down the test infrastructure
Each stage must complete successfully for the overall test to pass. If any stage fails, Molecule stops and reports the failure.
-
-
Observe the successful test run. Success! You can see Molecule running your integration test and confirming that all assertions passed. The test validates that your
myfilterplugin correctly transforms the input string into the expected greeting.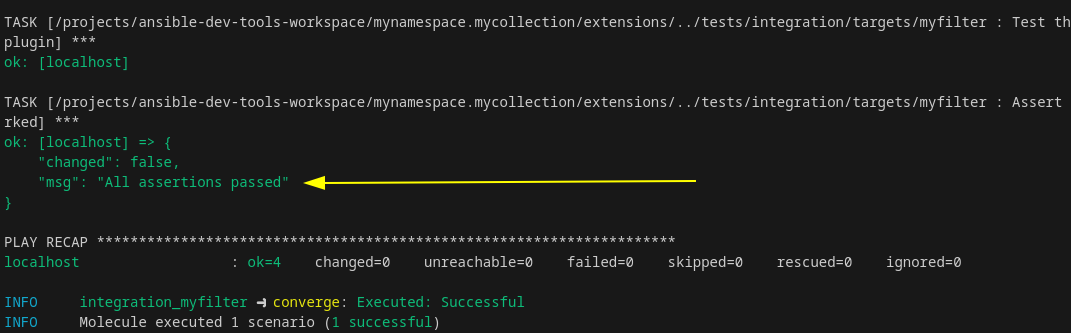
A passing Molecule test means your new plugin has been validated in an automated, reproducible way. This gives you confidence that your code works as expected and can be safely shared or deployed.
-
Run the scaffolded test. You can also run the pre-existing test that was generated when you created the collection. This test validates the scaffolded
sample_filterplugin:molecule test -s integration_hello_worldBoth tests should pass, confirming that your collection’s filter plugins are working correctly.
Useful Molecule Commands:
-
molecule test -s <scenario>- Run the full test lifecycle for a scenario -
molecule converge -s <scenario>- Run the converge stage without destroying the environment (useful for iterative development) -
molecule verify -s <scenario>- Run only the verification stage -
molecule list- Show all available scenarios -
molecule login -s <scenario>- SSH into the test container for manual inspection and debugging -
molecule destroy -s <scenario>- Tear down the test environment
Troubleshooting common issues
-
If you see "No such file or directory" errors:
Verify you’re in the correct directory by running
pwd. You should be in:/projects/ansible-dev-tools-workspace/mynamespace.mycollection/extensions/ -
If you see "No scenario name provided" errors:
Make sure you’re using the
-s integration_myfilterflag when running molecule commands. -
If the test fails during the verify stage:
Review the assertion output carefully to understand which condition wasn’t met. This is actually the expected behavior when tests catch issues! The assertion failure message will tell you exactly what was expected versus what was received.
-
If you see container or platform errors:
Check that the required container runtime (Docker or Podman) is running and accessible. You can verify this by running:
podman psor
docker ps -
If dependency installation fails:
Ensure you have network connectivity and that any required Ansible Galaxy collections are accessible. Check the error message for specific collection names that couldn’t be installed.
-
If syntax validation fails:
Review the syntax error message carefully. It will point you to the specific file and line number where the issue was detected. Use
ansible-lint(covered in earlier modules) to catch these issues before running Molecule tests.
Summary
In this lab, you have:
-
Explored a Molecule test scenario structure and understood its purpose in Ansible development
-
Examined Molecule configuration files (
molecule.yml) and learned how they define test behavior -
Reviewed integration test files to understand assertion-based testing patterns
-
Created a new filter plugin using the Ansible VS Code extension
-
Written an integration test and Molecule scenario for the new plugin
-
Successfully executed the complete Molecule test lifecycle for an Ansible collection
-
Observed how Molecule validates collection functionality automatically through multiple stages
-
Learned troubleshooting techniques for common Molecule issues
Molecule is essential for maintaining high-quality Ansible content. The automated testing approach you’ve learned ensures that:
-
Code changes don’t break existing functionality (regression testing)
-
New features work as expected before deployment
-
Your collection behaves consistently across different environments
-
Integration with other Ansible components works correctly
In production environments, these tests run automatically in CI/CD pipelines (such as GitHub Actions, GitLab CI, or Jenkins), ensuring every code change is validated before merging. This "test-driven development" approach catches bugs early when they’re cheapest to fix, and gives teams confidence to make changes without fear of breaking things.
The skills you’ve learned in this module - understanding test scenarios, writing assertions, and running automated tests - are fundamental to professional Ansible development and will serve you well as you build more complex automation solutions.
Next steps
You have successfully used Molecule to test your collection. Please click the Next button below to proceed to Lab 2.2 - Functional testing with pytest-ansible.