Workshop Exercise - Review Pre-upgrade Reports
Objectives
-
Understand the different options for managing Leapp pre-upgrade reports
-
Use the RHEL Web Console to review the reports we generated
-
Learn how to filter pre-upgrade report entries
-
Embrace failure!
Guide
Step 1 - Managing Leapp Pre-upgrade Results
In the previous exercise, we used a playbook job template to generate a Leapp pre-upgrade report on each of our pet app servers. Now we need to review the findings listed in those reports. There are a number of different ways that we can access the reports. Let’s review these and consider the pros and cons:
-
If we were using the Leapp framework to manually upgrade just a single RHEL host, we could simply get to a shell prompt on the host and look at the local report file output. In Exercise 1.1, Step 2, we learned how to open an ssh session to your pet app servers. Follow those steps and after logging in, use this command to review the local Leapp pre-upgrade report file:
sudo less /var/log/leapp/leapp-report.txtThis is a "quick and dirty" way to review the report, but doesn’t scale if you need to review reports for a large number of hosts.
Note
Use the up and down arrow keys to scroll through the file and type
qwhen you are ready to quit thelesscommand. -
If your RHEL hosts are registered to Red Hat Insights, you can see the Leapp pre-upgrade reports on your Insights console. The pet app servers provisioned for this workshop are not registered to Insights, so we can’t demonstrate this here. Read the blog article Take the unknowns out of RHEL upgrades with Red Hat Insights to see an example of how Insights can be used to review and manage Leapp pre-upgrades.
-
RHEL includes an optional administration web console based on Cockpit that we call the RHEL Web Console. We will explore how to review the Leapp pre-upgrade reports using the RHEL Web Console in the next step of this exercise.
-
In addition to writing the plain text
leapp-report.txtfile, Leapp also generates a JSON formatleapp-report.jsonfile. This file includes the same report results as the plain text file, but in JSON format which is perfect for being ingested by log management tools like Elastic/Kibana or Splunk. Many large enterprises will push their pre-upgrade report data to one of these tools to develop their own custom dashboards that can filter reports by environment (e.g., Dev/Test/Prod), location, app ID, owning team, etc.
Step 2 - Navigating the RHEL Web Console
For this workshop, we will be using the RHEL Web Console to access the Leapp pre-upgrade reports we generated.
-
Return to the RHEL Web Console browser tab you opened from Exercise 1.1, Step 4. This is the RHEL Web Console of the AAP controller host, but we need to access our pet app server hosts to see their pre-upgrade reports. Do this by clicking the "lab-user@ansible-1" box in the top left corner of the RHEL Web Console to reveal the remote host menu. For example:
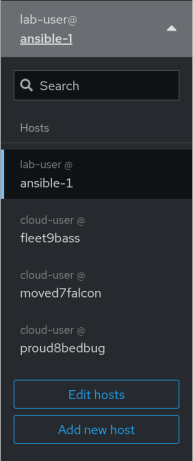
You can use the remote host menu to navigate to the web consoles of each of your pet app servers. Try selecting one of your pet servers now. The RHEL Web Console system overview page will show the operating system version installed. For example, this pet app server is running RHEL8:
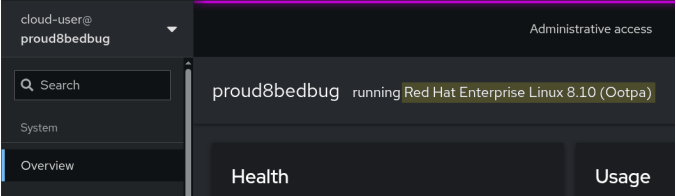
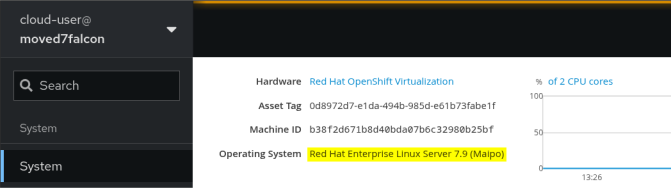
Here is an example of one running RHEL7:
-
When you navigate to different hosts in the RHEL Web Console, look out for the "limited access mode" warning:
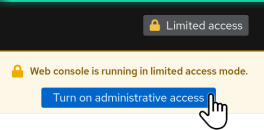
If you see this, use the button to switch to administrative access mode before proceeding. A confirmation will appear like this:
-
Take some time to explore the navigation menus available with the RHEL Web Console of your different pet app servers. Once you feel comfortable navigating around the console and switching between hosts, move on to the next step where we will look at our first pre-upgrade report.
Step 3 - Review Leapp Pre-upgrade Report of RHEL8 Host
Now we are ready to use the RHEL Web Console to see the Leapp pre-upgrade reports. Let’s start by looking at the RHEL8 host and then we’ll look at the other hosts in the next step.
While you might be interested in learning about upgrading only RHEL7, 8, or 9, we recommend following the exercise steps for all of them. This workshop presents the skills you need with the RHEL7, RHEL8 and RHEL 9 examples covering different topics you must know irrespective of the OS version being upgraded. Additionally, many times these upgrades will be chained together, for instance an upgrade from RHEL7 to RHEL8 followed by an immediate upgrade from RHEL8 to RHEL9. Therefore, we recommend following the steps for all of them.
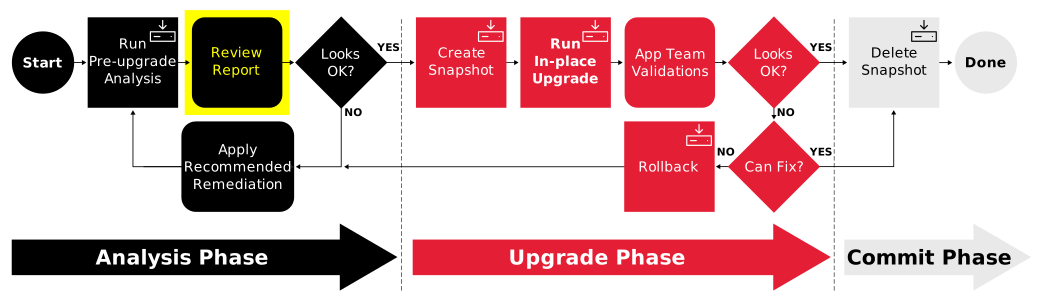
We are now here in the automation approach workflow:
-
Navigate to the RHEL Web Console remote host menu and click on the hostname of one of your RHEL8 pet app servers. Remember as we learned in the previous step, you can confirm the RHEL version on the system overview page. Also make sure you enabled administrative access as explained in the previous step.
-
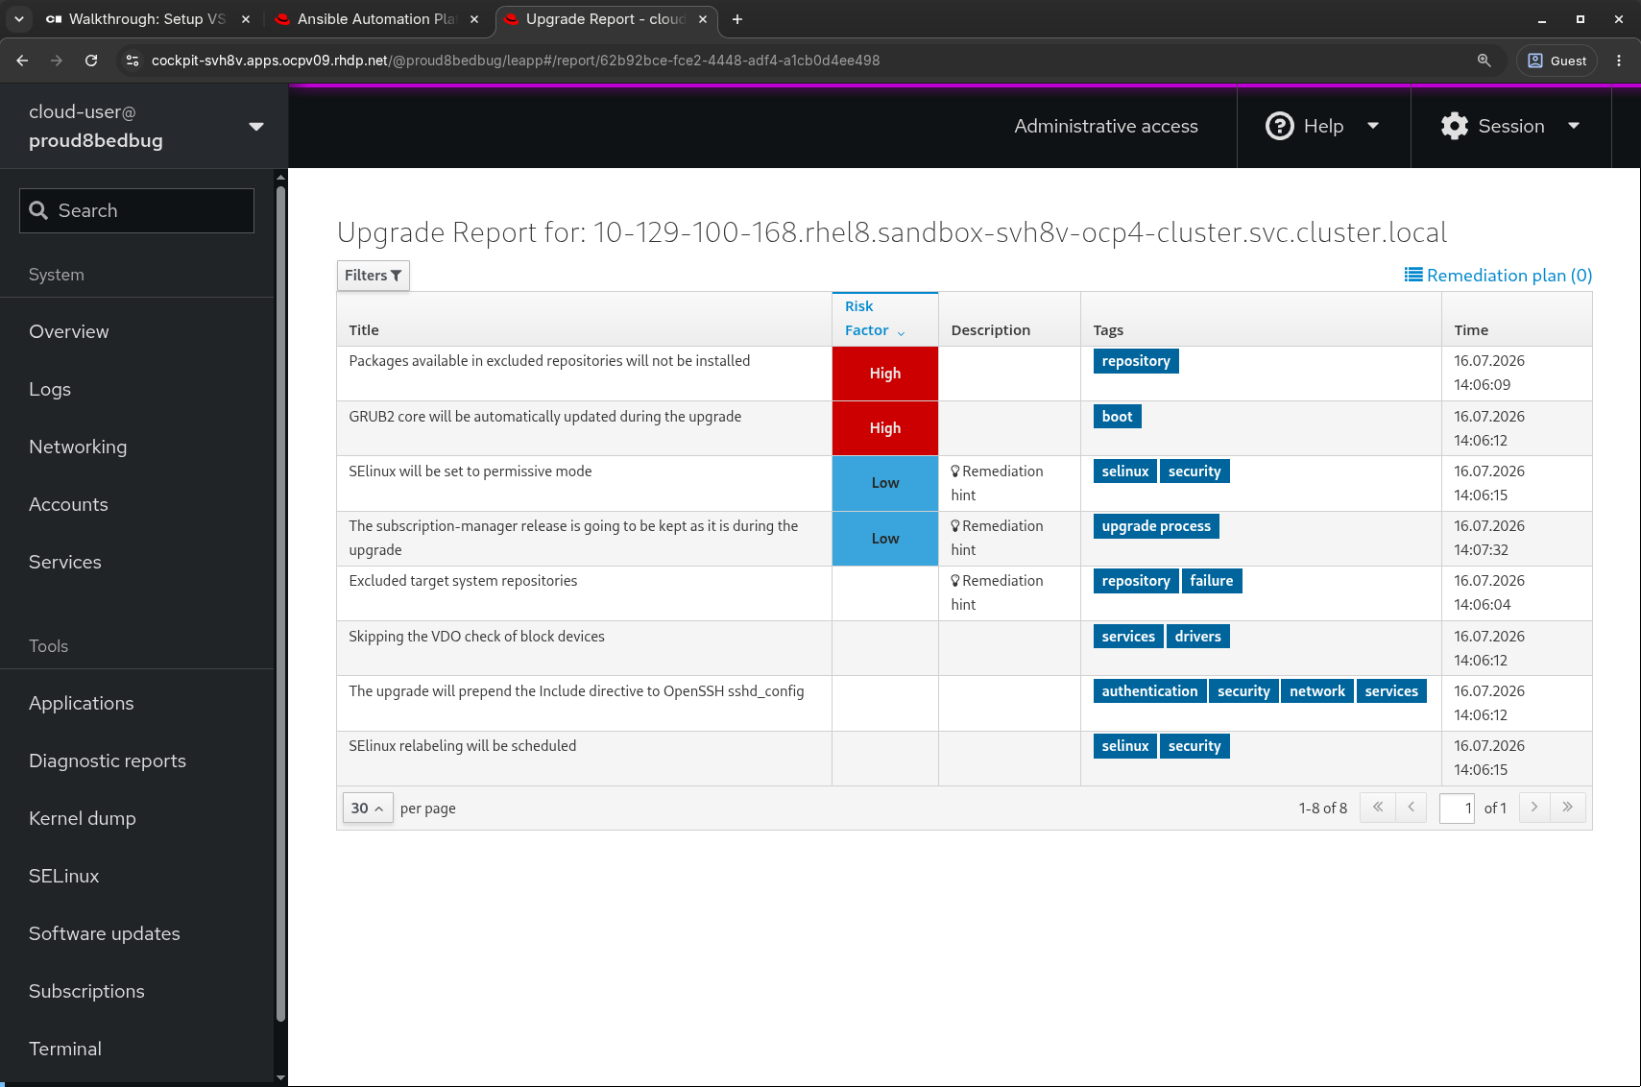
Having verified you are looking at your RHEL8 pet app server, use the main menu to navigate to Tools > Upgrade Report. This will display the Leapp pre-upgrade report that was generated for the selected host. For example, the report might look like this:
Note
The contents of your report may differ from the example above because of updates made to the Leapp framework and other RHEL packages released over time since this workshop was written. If you discover any differences that materially break the flow of the exercises in the workshop, kindly let us know by raising an issue here.
-
When the pre-upgrade report is generated, the Leapp framework collects system data and assesses upgradeability based on a large collection of checks. When any of these checks uncovers a potential risk, it is recorded as a finding in the report. These findings are listed in order from highest risk to lowest. In the report above, we see there are two high risk findings. Let’s review each of these.
-
You can see additional details for any finding by clicking on it in the list. For example, click on the first finding and you will see the details like this:
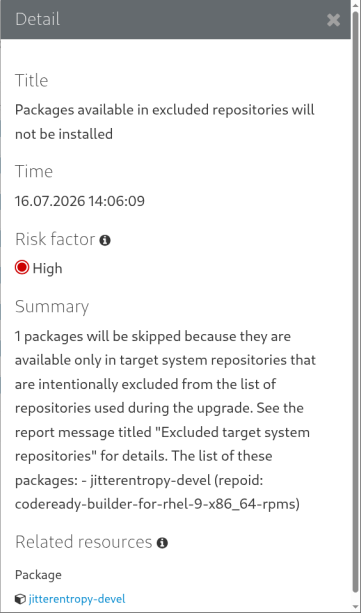
The first finding is blah blah. leapp is actually telling you/customer that it’s ignoring that package. what is the problem then?
[11:51 AM]you see the msg because the system has installed rng-tools rpm which has been split to multiple rpms on RHEL 9 (https://pes.osci.redhat.com/?fromRelease=all&toRelease=all&search=jitterentropy-devel&detail=8811) and one of them is in CRB repository. obviously, customer will most likely not be interested in the devel package, but if so, they know it’s there and what to do in case it should be installed (and where it’s actually located)
[11:52 AM](/me is going offline for couple of hours)
[11:53 AM]in case you just do not want to see this rpm reported for any reason, I think it could be resolved if you specify it in the /etc/leapp/files/transaction/to_remove file. I am not 100% sure right now, so I suggest to test it manually, but it could work.
-
The next finding we see listed has the title "GRUB2 core will be automatically updated during the upgrade."
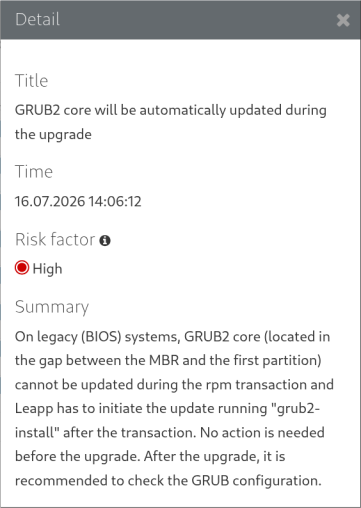
This finding is reported on every upgrade, as it is potentially impactful. The summary provides the details of the issue and the recommended action to take. We’ll ignore this one for now, but make a note of it for later.
-
The other findings on our RHEL8 report are not marked as high, but are still worth understanding. We will go into some of these more later in this exercise.
-
As we saw here, there’s a lot of information in the report, and it can be overwhelming. The good news is that we can filter the findings to make it easier to focus on the most important ones.
-
There are a number of filtering options you can use to limit the findings that are displayed according to risk level, audience, etc. Click on the "Filters" button to experiment with this feature. For example, if you click the "Is inhibitor?" filter checkbox, you will see just the blocking inhibitor findings listed.
Let’s now move on to the pre-upgrade report for your RHEL7 hosts.
-
Step 4 - Review Leapp Pre-upgrade Report of RHEL7 Host
In the previous step, we reviewed the pre-upgrade report for your RHEL8 host. Now let’s take a look at the report from your RHEL7 host.
-
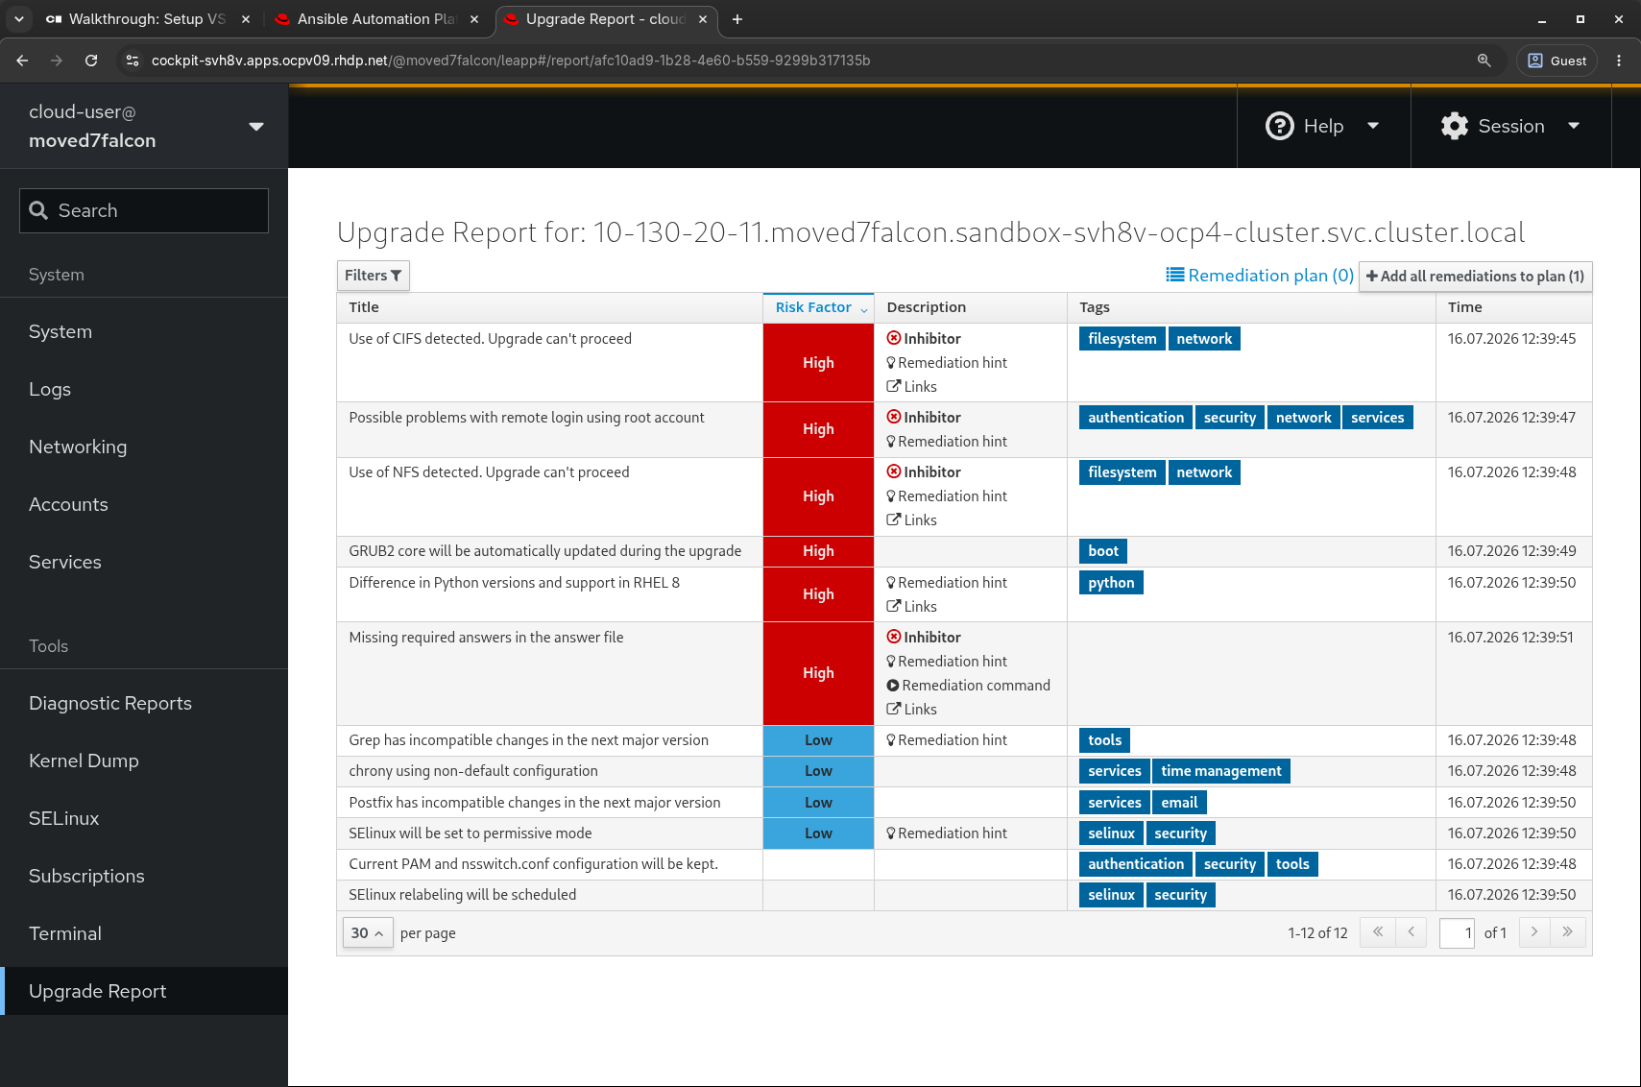
Navigate to the RHEL Web Console remote host menu and click on the hostname of your RHEL7 pet app server. Verify the host you have chosen is RHEL7. Then use the main menu to navigate to Tools > Upgrade Report. This will bring up the Leapp pre-upgrade report for the selected host. For example, the report might look like this:
Note
The contents of your report may differ from the example above because of updates made to the Leapp framework and other RHEL packages released over time since this workshop was written. If you discover any differences that materially break the flow of the exercises in this workshop, kindly let us know by raising an issue here.
-
In the report for our RHEL7 pet app server above, we see there are many more findings we need to address. Let’s start by reviewing the high risk findings that are not inhibitors.
-
The "GRUB core will be updated during upgrade" finding is no different than the finding with the same title we learned about in the RHEL8 pre-upgrade report, so we’ll ignore this for now.
-
Now let’s look at the new findings we are seeing only on our RHEL7 pre-upgrade report. The first entry on the list is the "Difference in Python versions and support in RHEL8" finding:
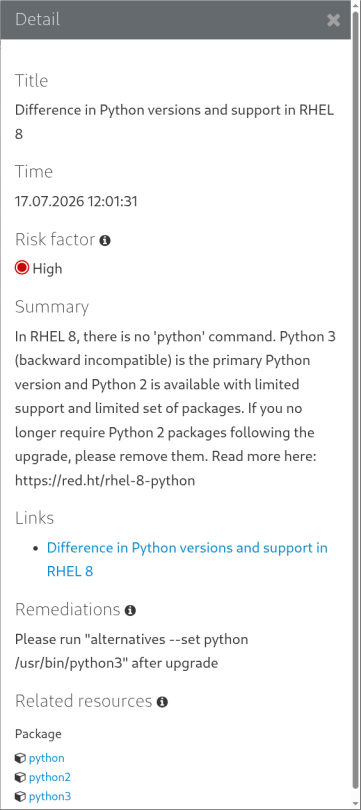
This finding could be a concern if we have any apps on our pet server that are using the system-provided Python interpreter. Let’s assume we don’t have any of those in which case we can blissfully ignore this finding. But be aware, when working with servers in the wild, it’s important to understand the applications running on the server, as this could be a significant issue if you have any Python-based apps.
-
The other new high risk finding, and also an inhibitor, is the "Missing required answers in the answer file" finding. Here are the details for this one:
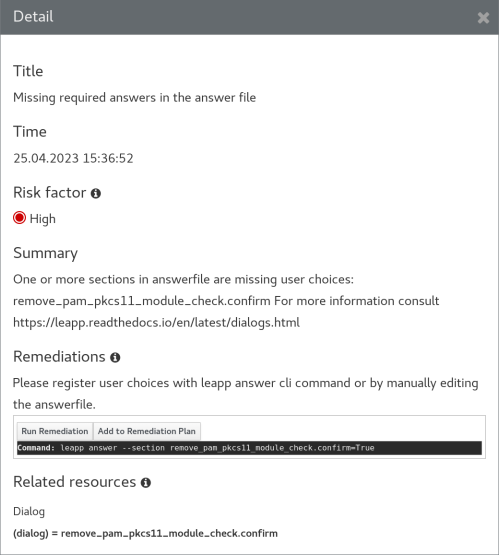
Here again, we will need to take action to remediate this finding. Don’t panic! In the next exercise, we will explore different options for automating the required remediation actions and recommendations.
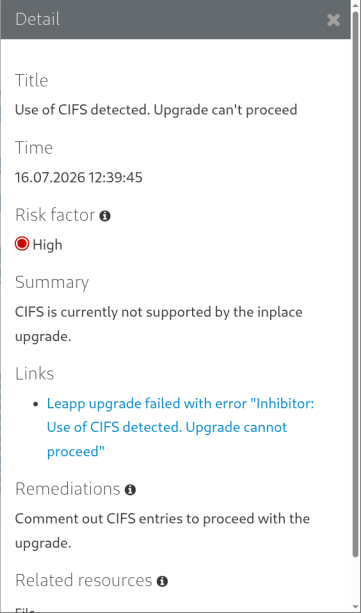
The other inhibitor findings are related, as they are both unsupported network systems. We will have to resolve these as well before we can upgrade.
-
This may be concerning to see so many high risk findings on the RHEL7 pre-upgrade report. However, as we look into remediating these findings in the next exercise, we will see how easy it is to address them with automation.
-
Let’s take a look at our last system, the RHEL 9 one.
Step 5 - Review Leapp Pre-upgrade Report of RHEL9 Host
Following the same steps as in the previous two exercises, let’s now take a look at the report from our RHEL9 host.
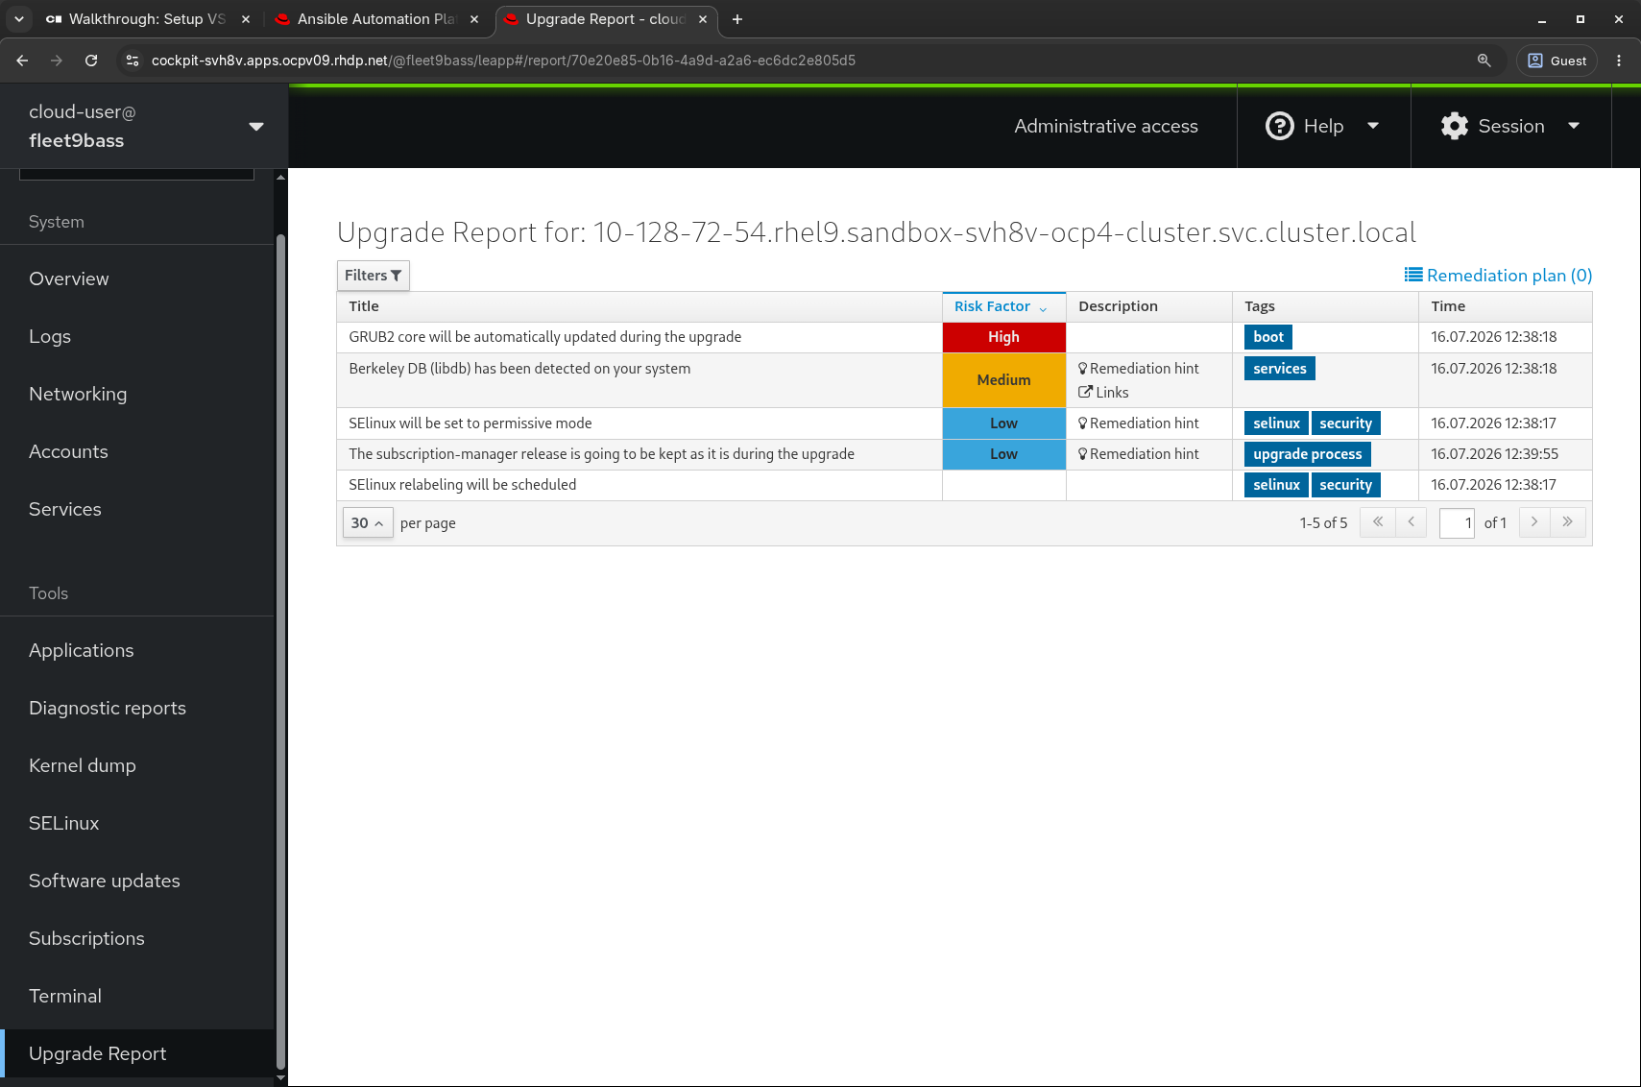
-
In the report for our RHEL9 app server above, we see there is only 1 high risk finding. It’s the same GRUB2 core update findings we saw in the RHEL8 and RHEL7 pre-upgrade reports, and there’s not much new here.
-
However, lets take a look at the rest of the findings. There’s a finding that is marked as a low risk, "SElinux will be set to permissive mode."
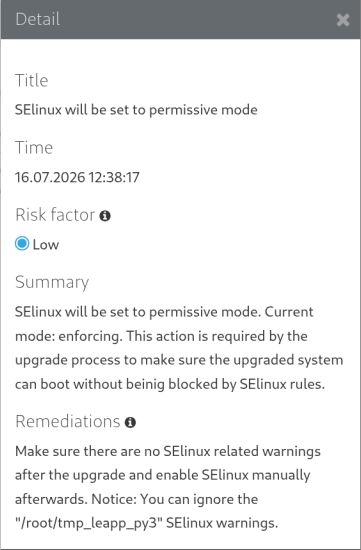
This finding is a low risk issue and it’s not an inhibitor. This finding is low because the impact to the upgrade process is minimal. However, in many environments, this is a big deal, so we must take note of it as part of our post-upgrade checklist and re-enable SELinux after the upgrade!
Challenge Lab: What About Ignoring So Many High Findings?
You may be wondering why are we only worrying about the inhibitor findings. What about all the other high risk findings showing up in red on the report? Red means danger! Why would we be going forward with attempting an upgrade without first resolving all the findings on the report? It’s a fair question.
Tip
Think back to the four key features that we introduced at the beginning of the workshop.
Is there a specific feature that helps with reducing risk?
Warning
Solution below!
Of course, the answer is our automated snapshot/rollback capability.
-
If any of the high risk findings listed in the pre-upgrade report ultimately leads to the upgrade failing or results in application compatibility impact, we can quickly get back to where we started by rolling back the snapshot. Before rolling back, we can debug the root cause and use the experience to understand the best way to eliminate the risk of that failure or impact happening in the future.
-
There is a concept explained quite well in the famous article Fail Fast published in IEEE Software. The article dates back to 2004, so this is hardly a new concept. Unfortunately, there is a stigma associated with failure that can lead to excessively risk-averse behavior. The most important benefit of having automated snapshots is being able to quickly revert failures. That allows us to safely adopt a fail fast and fail smart mantra.
-
Of course, there are many best practices we can follow to reduce risk. Obviously, test for application impacts by trying upgrades in your lower environments first. Any issues that can be worked out with Dev and Test servers will help you be prepared to avoid those issues in production.
-
The high risk findings reported by the Leapp pre-upgrade report are there to make us aware of potential failure modes, but experience has shown that they are not a problem in many cases. Don’t become petrified when you see those red findings on the report. Upgrade early and often!
Conclusion
In this exercise, we learned about the different options for managing Leapp pre-upgrade reports. We used the RHEL Web Console to look at the reports we generated in the previous exercise and reviewed a number of the reported findings. In the challenge lab, we explored the importance of snapshots and learned to embrace failure.
In the next exercise, we are going to look at how to automate the remediation actions required to resolve our inhibitor findings.