Hot Plugging Virtual Machine Resources
Introduction
One of the benefits of running workloads on virtual machines is the fact that they are just that, virtual. When you consider the maintenance required to expand resources on a physical server, by upgrading a CPU or adding a few extra DIMMs to increase memory, you realize how advantageous it is to be running in a virtual server environment. The same goes for if you need increased disk drive space, or if you’d like to add an additional network interface. In OpenShift Virtualization each of these tasks can be achieved in a hot-plug manner, that is to say while the machine is running without any adverse affect on the applications running on the VM. In this module we will demonstrate this.
-
Increase the CPU and Memory of a running virtual machine.
-
Add a hotplug virtual disk to a running virtual machine.
-
Add a hotplug network interface (NIC) to a running virtual machine.
Accessing the OpenShift Cluster
Your OpenShift cluster console is available {openshift_cluster_console_url}[here^].
Your console login is available with:
-
User: {openshift_cluster_admin_username}
-
Password: {openshift_cluster_admin_password}
You can login to your OpenShift cluster on the provided terminal by copying and pasting the following syntax:
oc login -u {openshift_cluster_admin_username} -p {openshift_cluster_admin_password} --server={openshift_api_server_url}Adding CPU and Memory to a Running VM
In this part of the lab, we will add additional CPU and Memory resources to a Virtual Machine by changing the Virtual Machine’s Instance Type. To do this, you will start with an existing VM that has a single vCPU and 2 GiB of memory. Using the OpenShift Virtualization console, you will modify the configuration of the VM Instance Type to a type that has 2 vCPU and 4 GiB of memory.
-
Lets get started by powering on the hot-plug-vm-1 virtual machine in the hot-plug namespace. Click on VirtualMachines then expand the hot-plug namespace and click on the VM. Once selected click the Play button to Start the virtual machine.
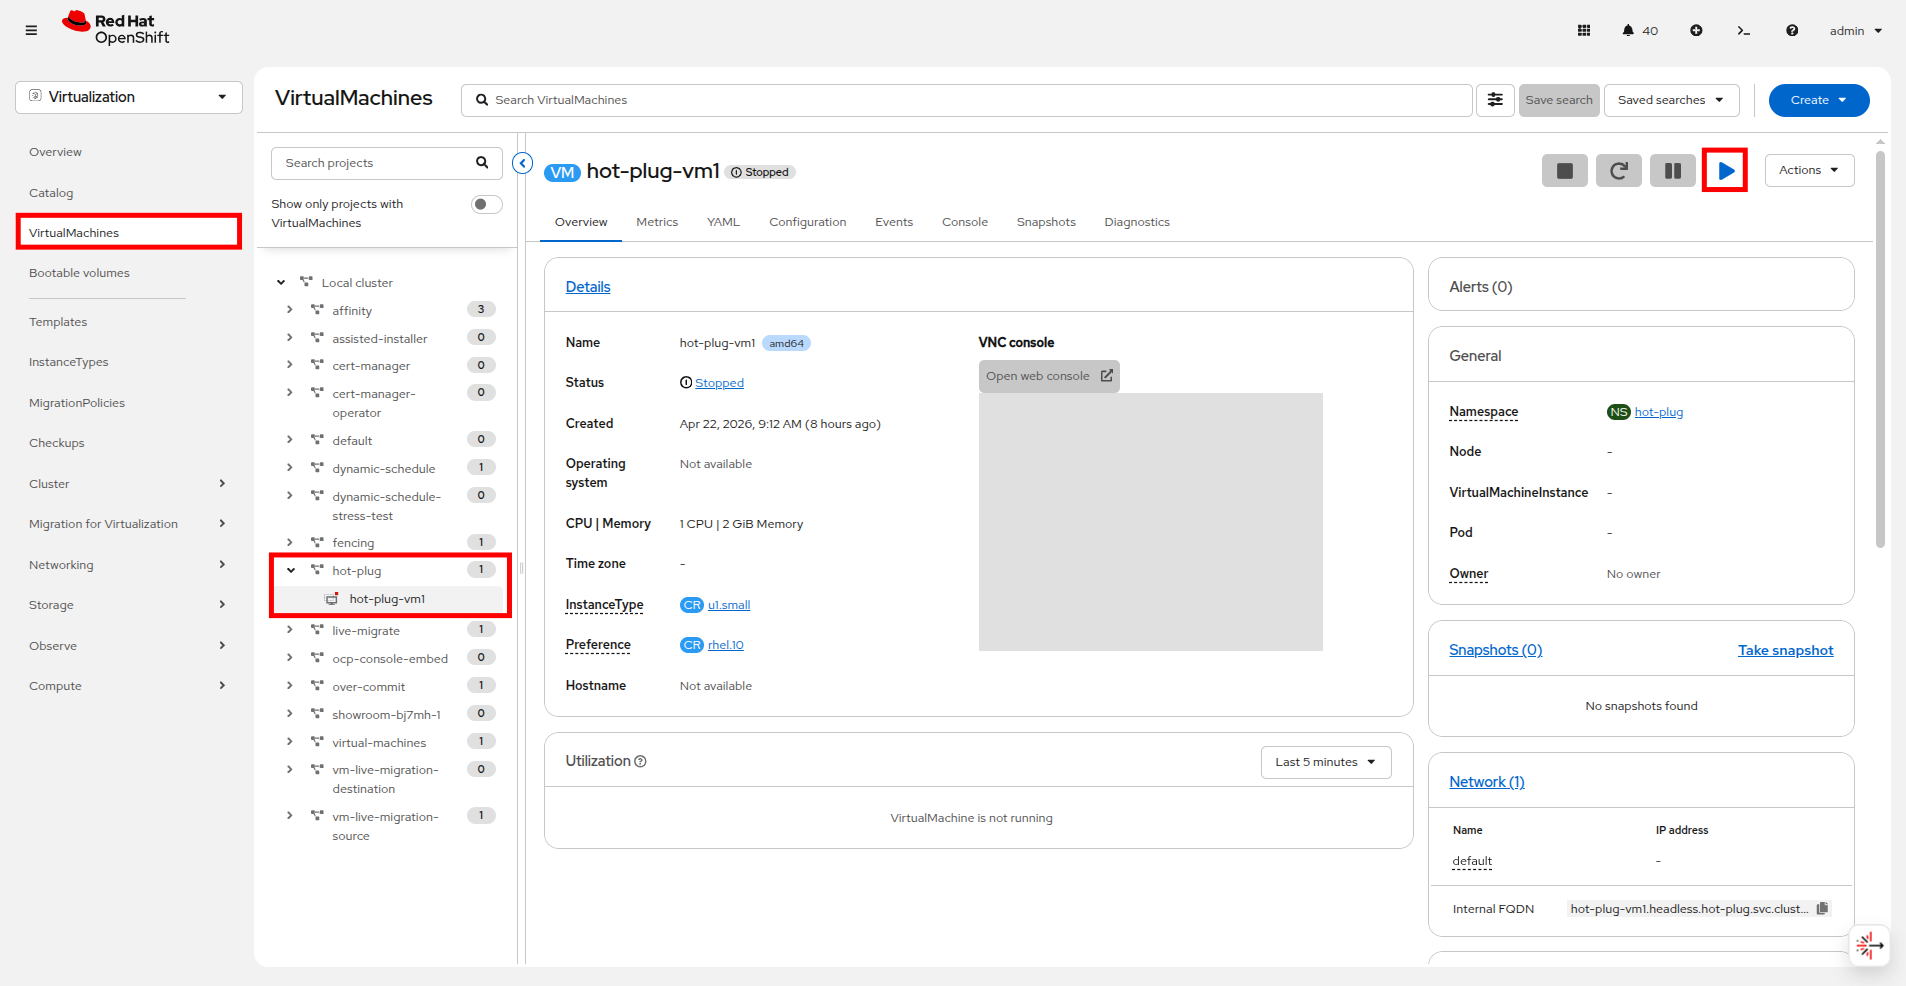 Figure 1. Start the VM
 -
While the VM is booting up make a note of the InstanceType which is u1.small, and the current CPU | Memory for this VM, which is 1 CPU | 2GiB Memory
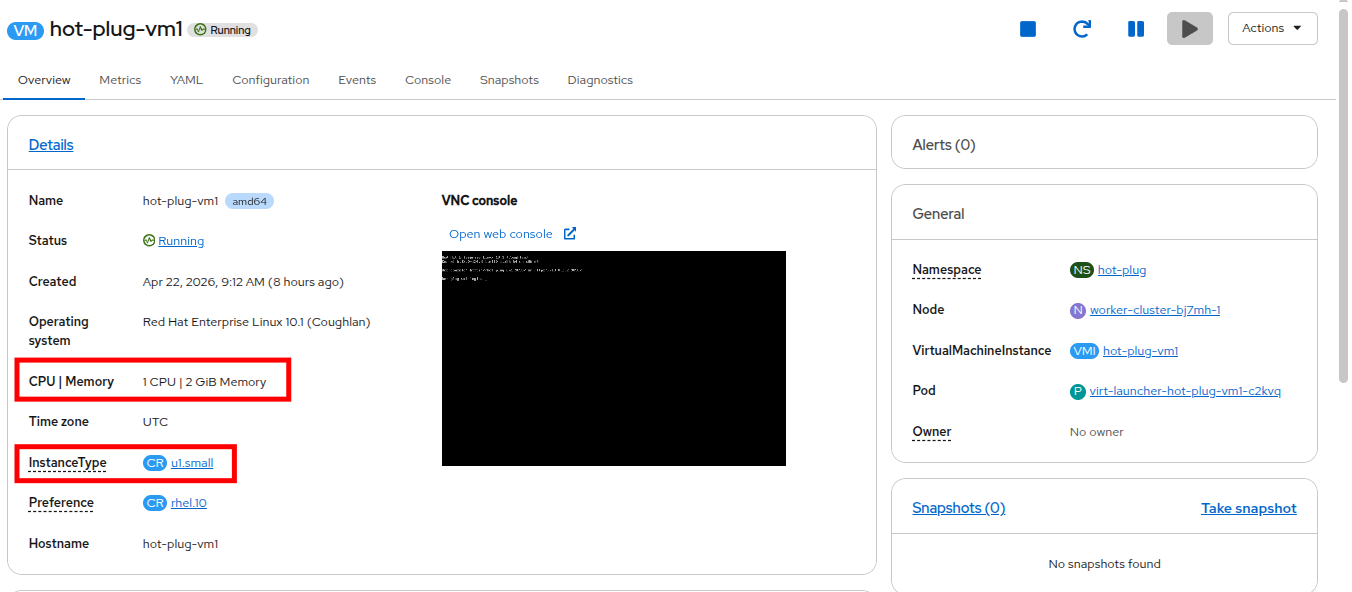 Figure 2. CPU and Memory before hot plug
 -
Click on the Configuration tab and select Details, if it is not already selected. You can see that the InstanceType is General Purpose and also states that the VM has 1 CPU | 2GiB Memory.
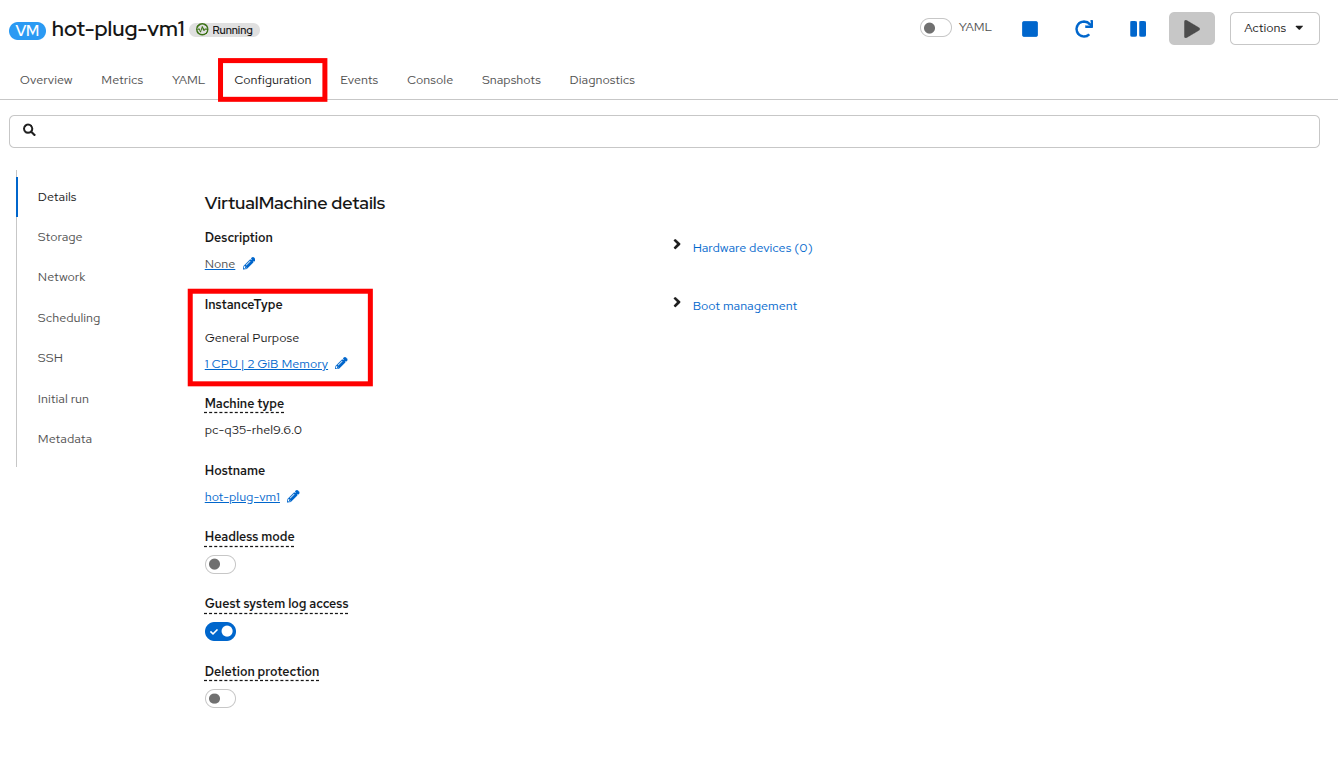 Figure 3. Virtual Machine details
 -
Click on the blue pencil icon to modify the CPU and Memory resources.
-
In the window that appears, click the Size drop down and select 2xmedium: 2CPUs, 4Gi Memory.
 Figure 4. Edit Instance Type
 -
The configuration in the Details panel will now show that the virtual machine now has 2 CPUs and 4 GiB of memory.
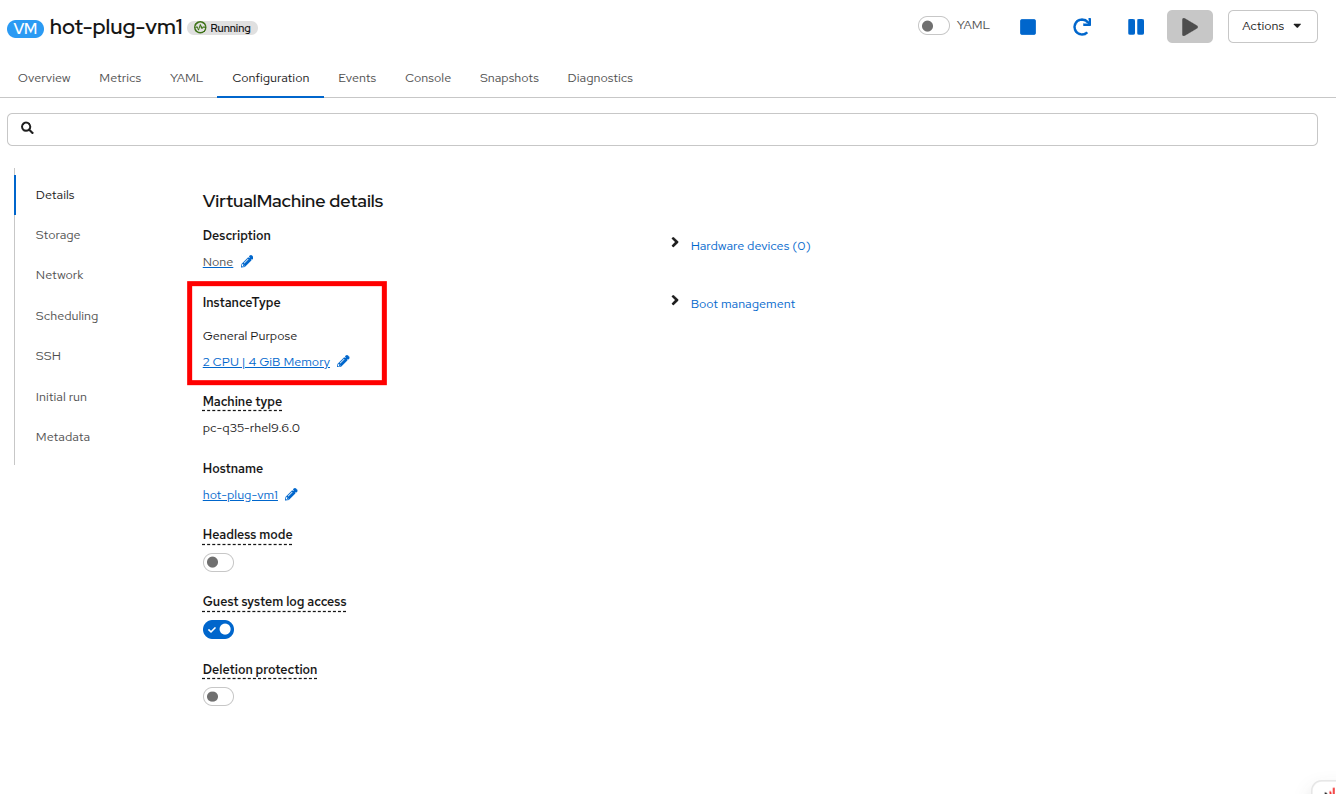 Figure 5. Virtual Machine details
You may notice that the virtual machine live migrates at this stage, this is because it needs to redefine the pod definition to support the new higher resource request, but keeps the VM online during the process. -
Click on the Console tab. If necessary, click the blue Connect button.
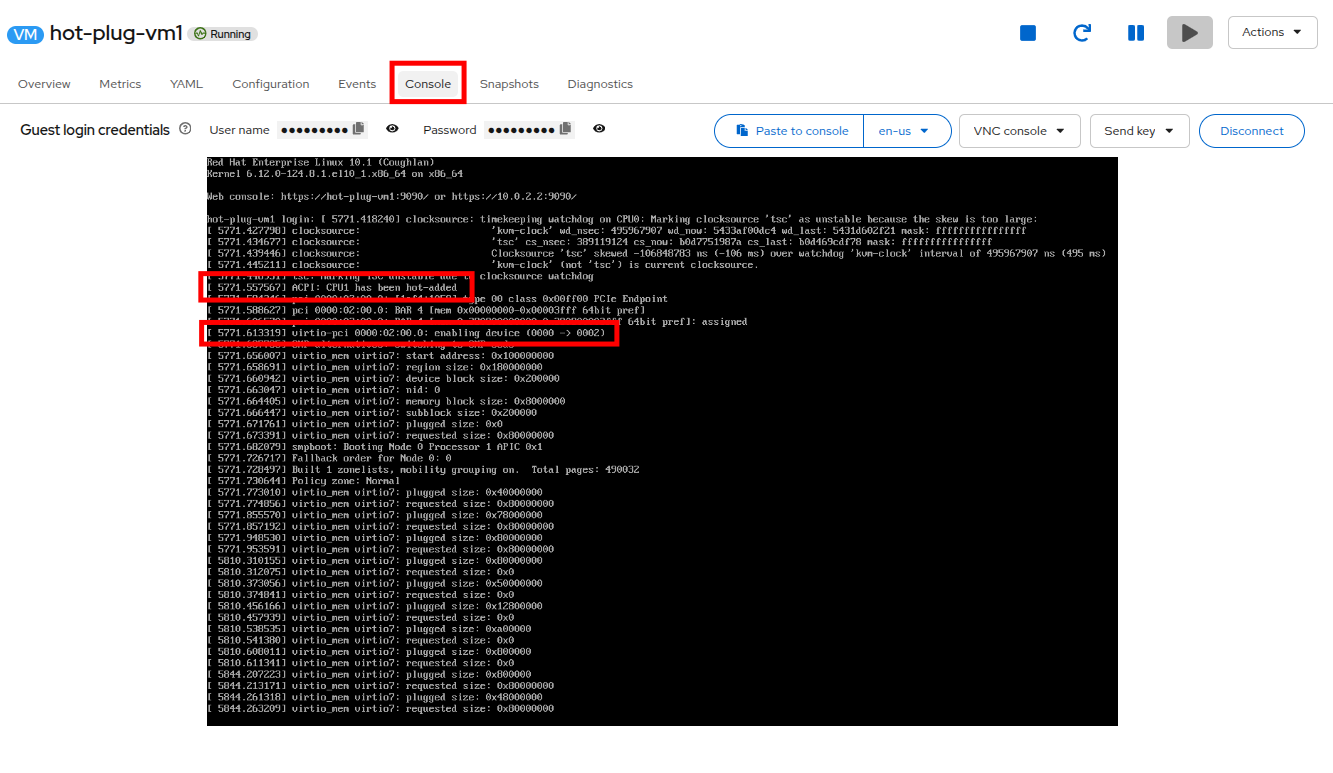 Figure 6. CPU and Memory messages
 -
Login to the Virtual Machine using Copy to clipboard and the Paste to console button with the User name and Password credentials that are provided.
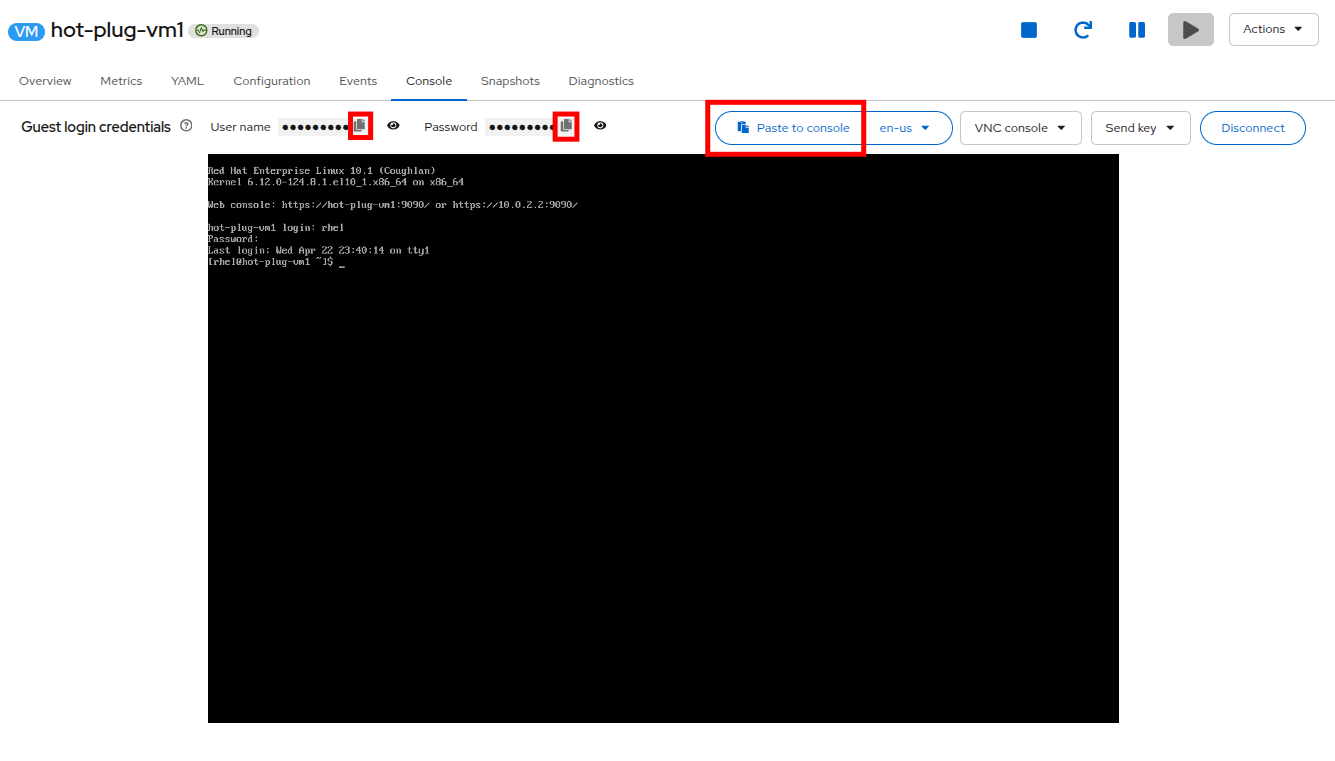 Figure 7. Login to VM
 -
To validate that the VM now has 2 CPUs and 4GiB of memory, run the following:
Get the number of processorsnprocGet the amount of memoryfree -m -
You will see that the VM has 2 CPUs and approximately 4 GiB of total memory.
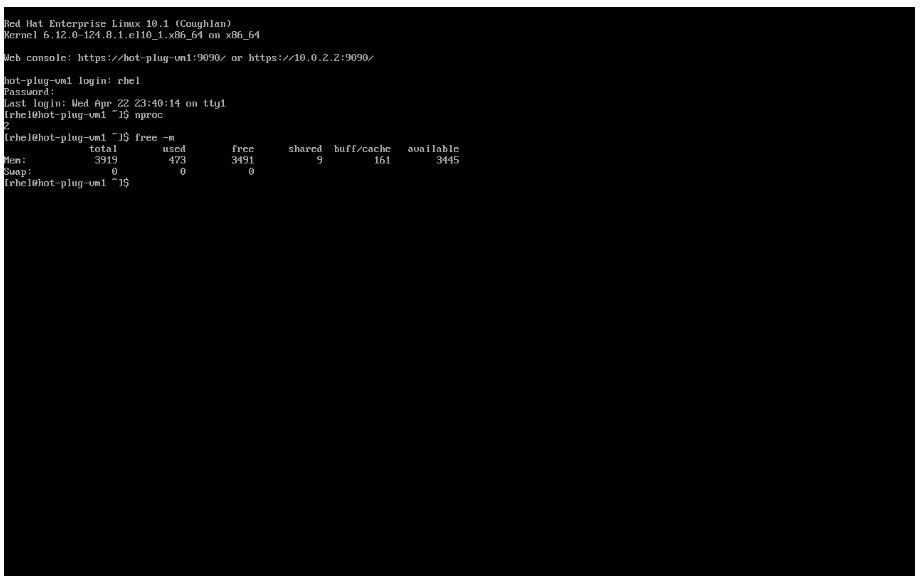 Figure 8. Updated CPU and Memory
You may notice that the amount of memory shown is actually less than 4GiB. This is because the VM image has kdump enabled, which reserves some memory for the kernel. If kdump were disabled, the total memory would be 4 GiB.
Adding a Hotplug Disk to a Running VM
In this portion of the lab, we will hot add a new disk to an existing VM using the OpenShift console. To do this, you will start with an existing running VM that already has one more disks configured, and add an additional one.
-
In the left side navigation menu click on Virtualization, expand the hot-plug namespace, and select the hot-plug-vm1 virtual machine.
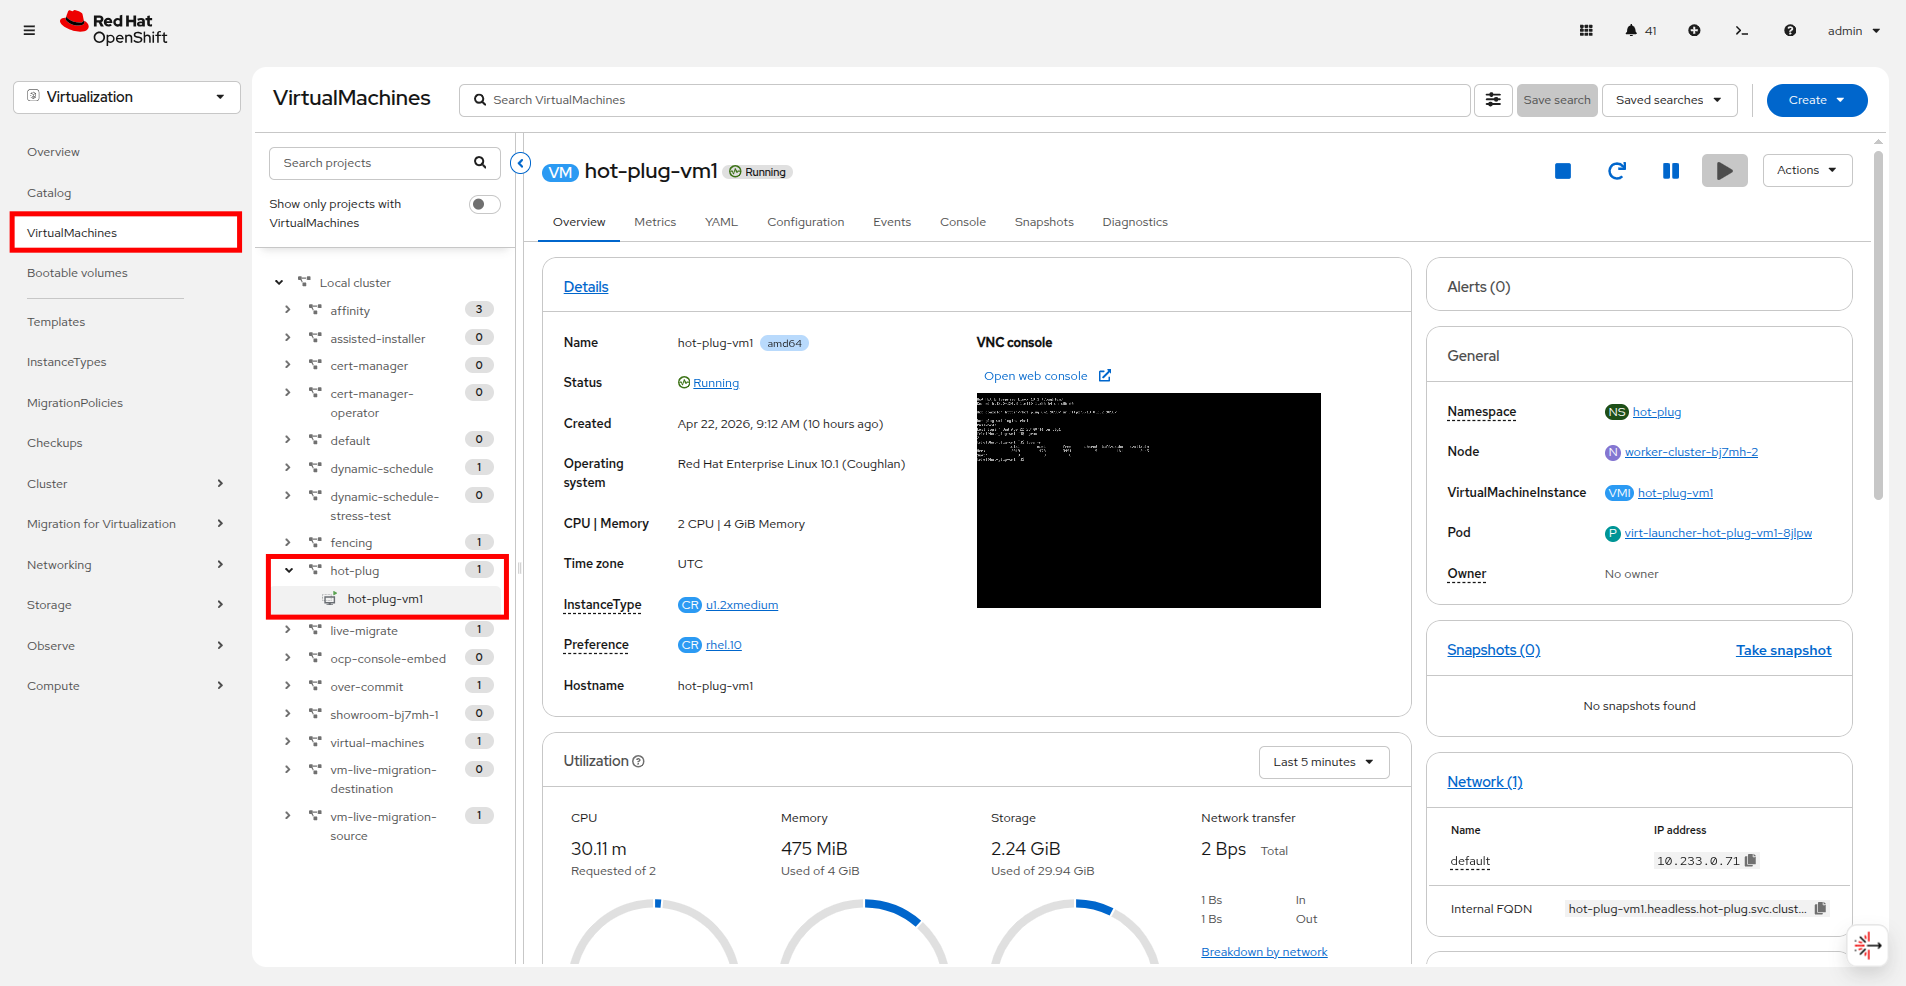 Figure 9. hot-plug-vm1 details
 -
Click on the Configuration tab and select Storage. You can see that the Virtual Machine currently has a single 30GB bootable disk that is using the Storage class called ocs-external-storagecluster-ceph-rbd.
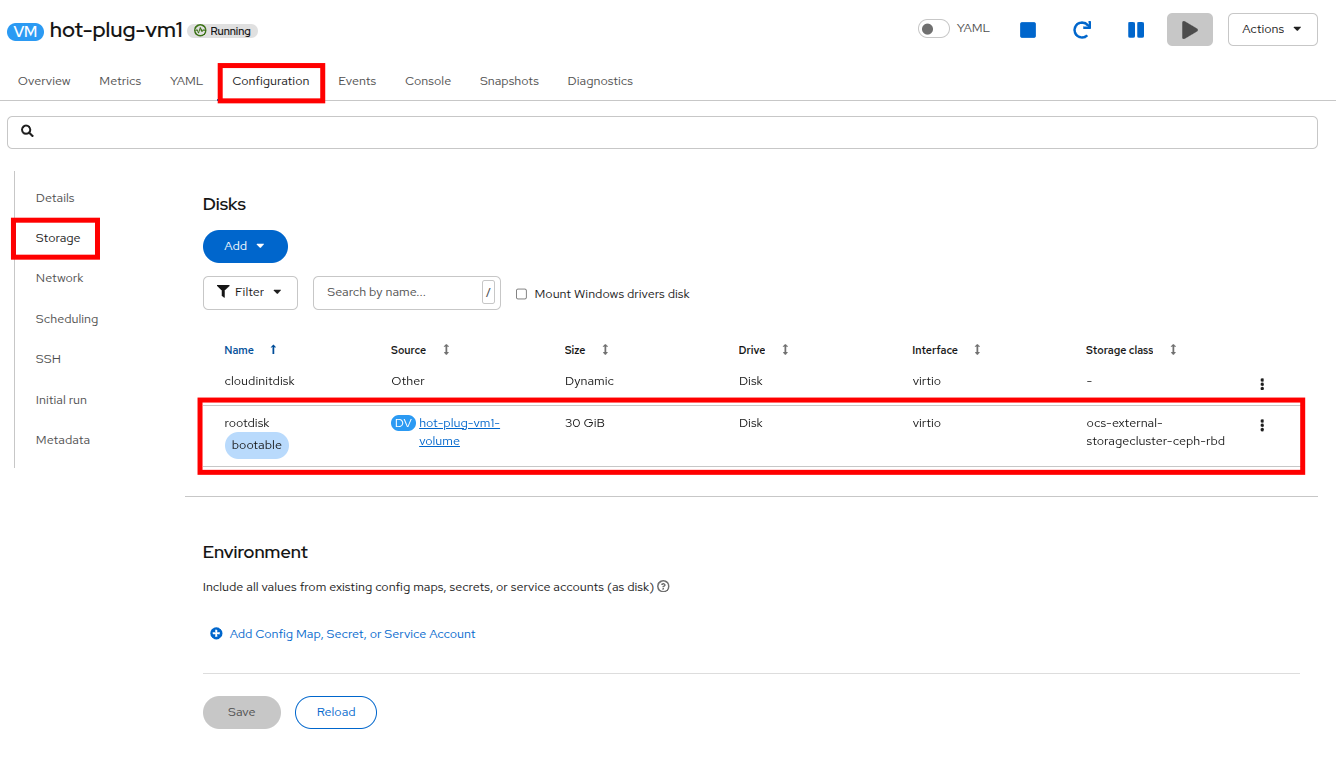 Figure 10. VM has only one disk
 -
Add an empty disk by clicking the Add button under Disks and then selecting Empty disk (blank).
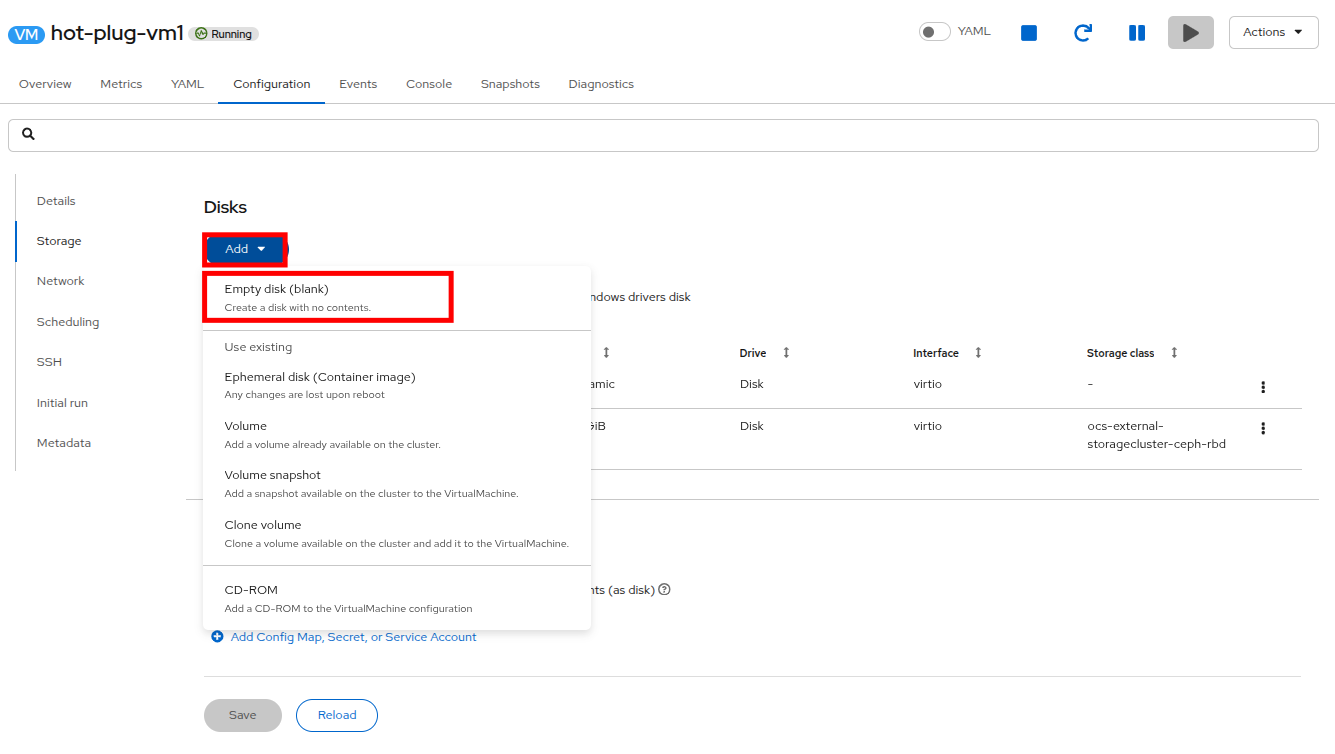 Figure 11. Add an empty disk
 -
In the window that appears, give the new disk a name data-disk-01 and change the size to 5 GiB. The rest of the options may remain at their defaults, and when ready click the Save button.
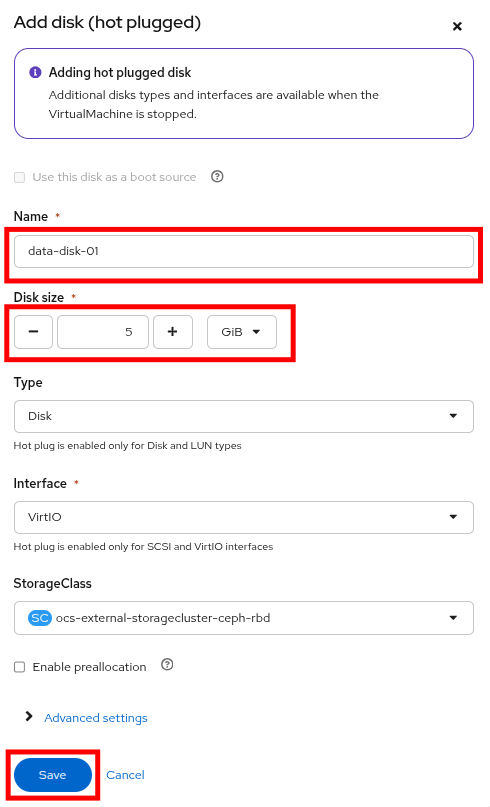 Figure 12. Configure the new disk
 -
You can see that the new disk has been added with a label of Persistent Hotplug.
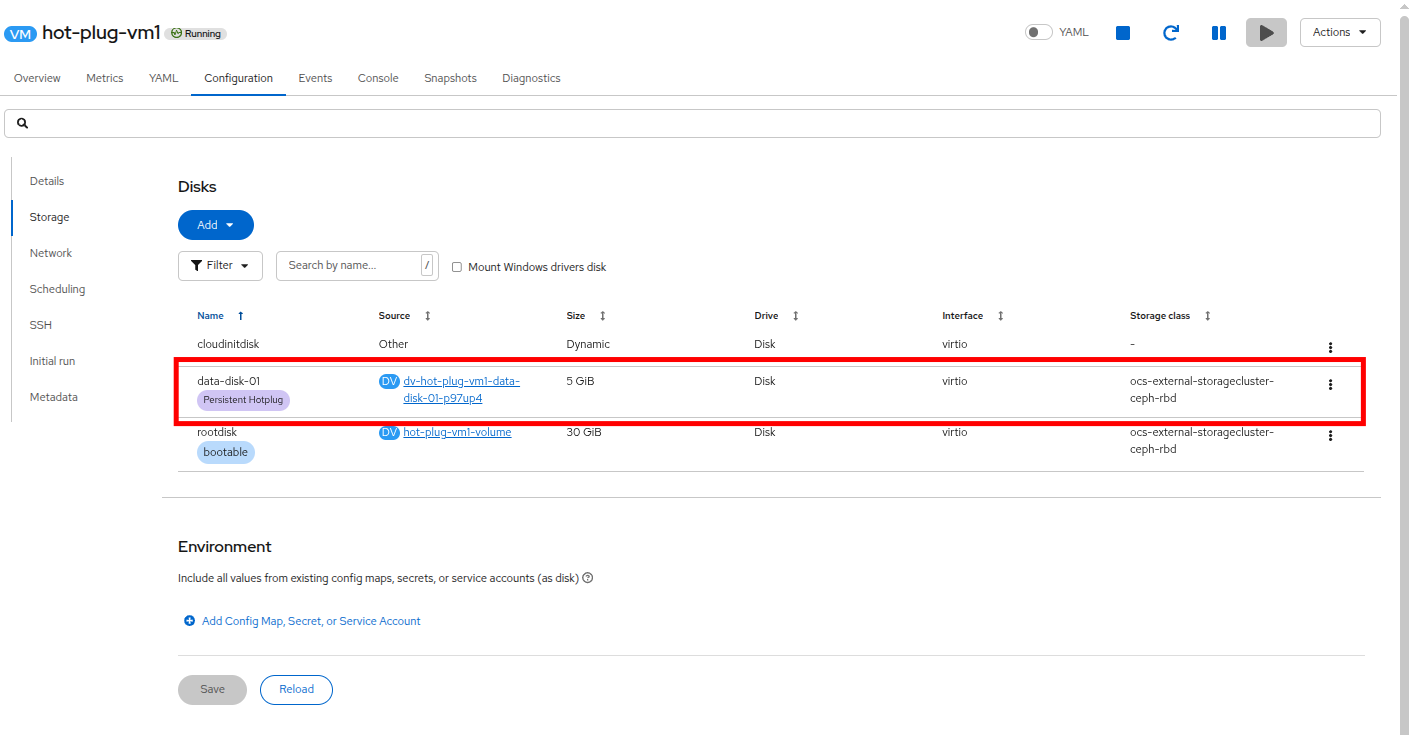 Figure 13. The disk is added
 -
Click on the Console tab above and log into the virtual machine using Copy to clipboard and Paste to console with the User name and Password credentials from above the console window. If necessary, click the blue Connect button to restart the console.
-
Run the lsblk command and you will see the new 5 GiB disk added as /dev/vdc.
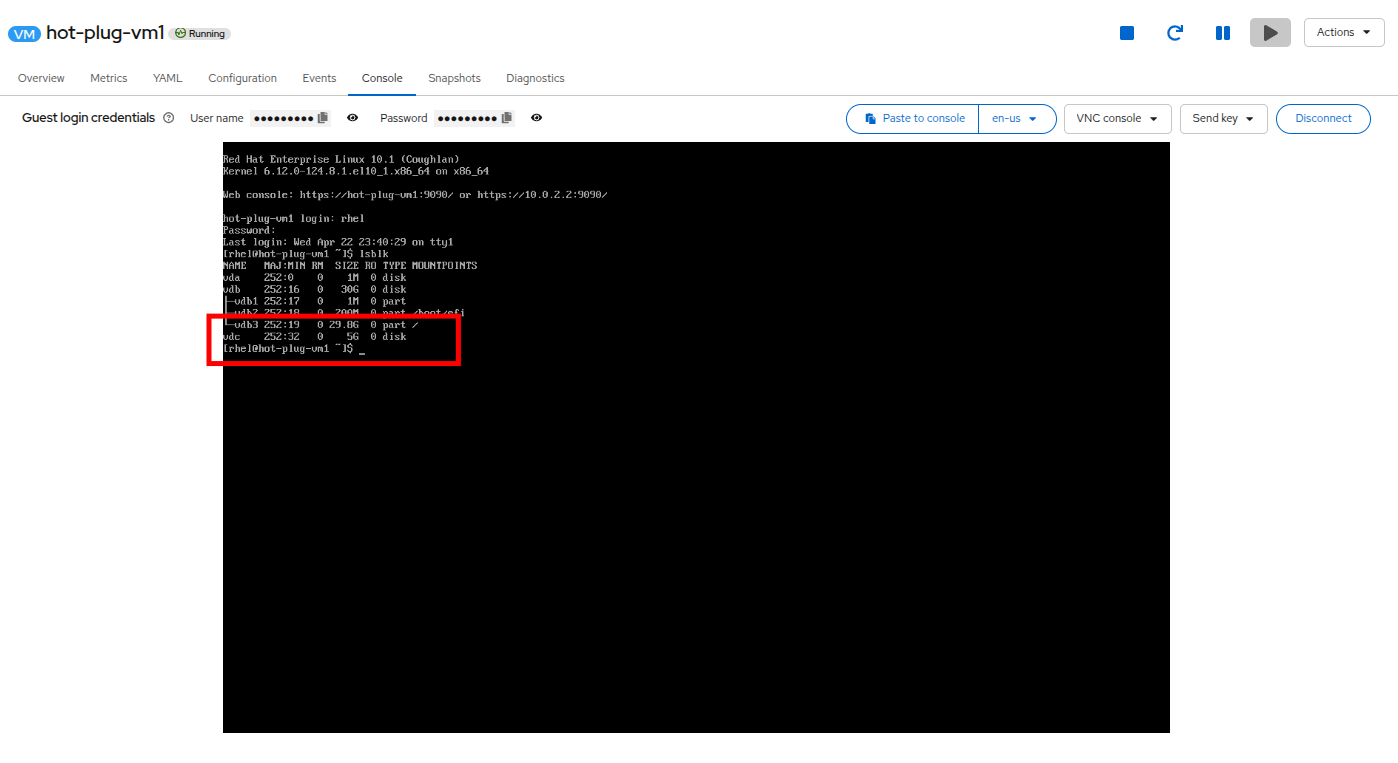 Figure 14. View the new disk from the OS
 -
The new disk is hot-plugged to the virtual machine by way of a new pod that manages access to the disk. The new pod is created in same project as the VM and is called hp-volume-xxxxx. This pod runs in addition to the virt-launcher pod that we explored in earlier modules.
-
To see the pod that is running alongside the virtual machine, return to the embedded terminal and run the following command:
Get a list of podsoc get pods -n hot-plugOutputNAME READY STATUS RESTARTS AGE NAME READY STATUS RESTARTS AGE hp-volume-jgxbg 1/1 Running 0 6m19s virt-launcher-hot-plug-vm1-8jlpw 2/2 Running 0 47m
-
The hp-volume pod will stop if the VM is stopped and the pod will start again when the VM is started. The new disk can be used as any normal disk would be used and will persist even if the VM is stopped and started.
While we are not going to do it in this lab, you are perfectly able to create a filesystem on this new disk, mount it, and use it as needed.
Remove a Hotplugged Disk
For the next step in this section of the module we will remove the hot-plugged disk from the virtual machine.
-
Starting from the Configuration tab of the hot-plug-vm1 virtual machine on the Storage sub-tab.
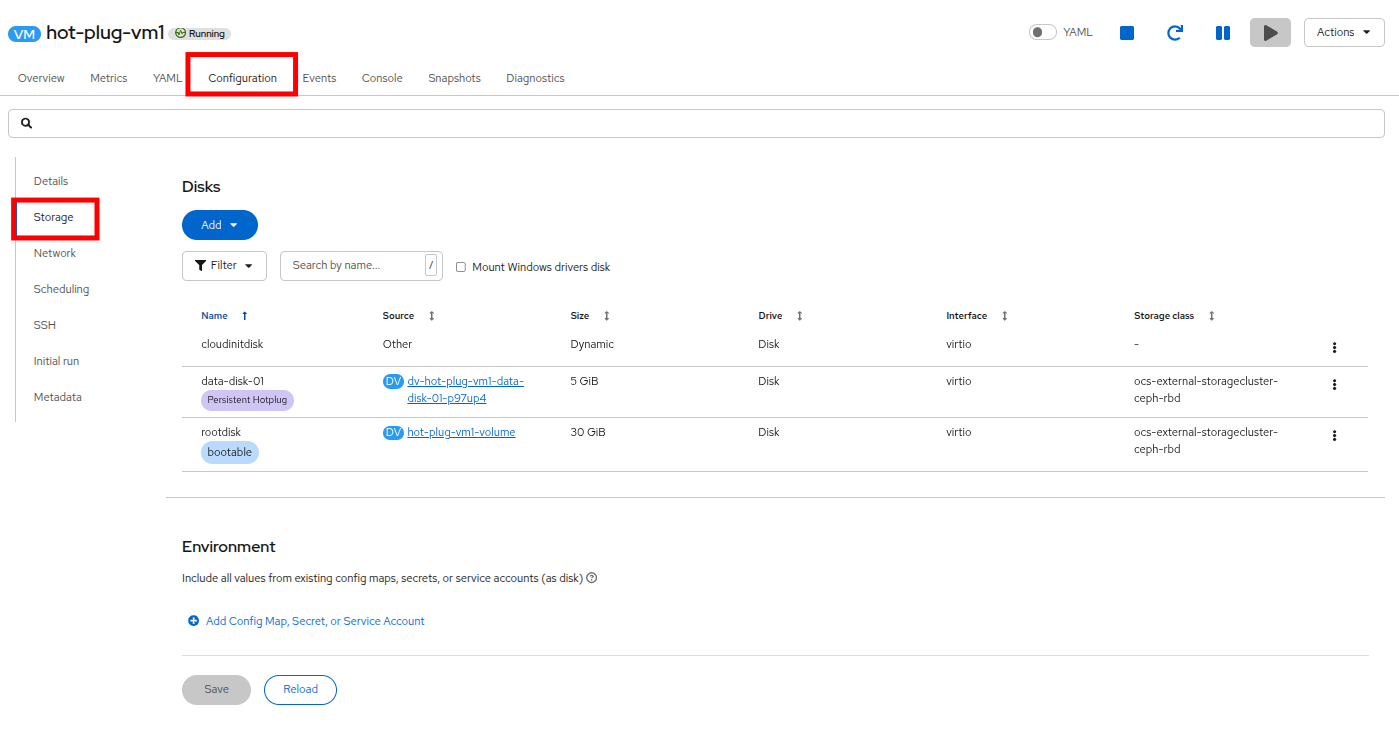 Figure 15. Configuration and Storage Page
 -
Click on the three dots on the right side of the hot-plugged disk and select Detach from the menu that pops out.
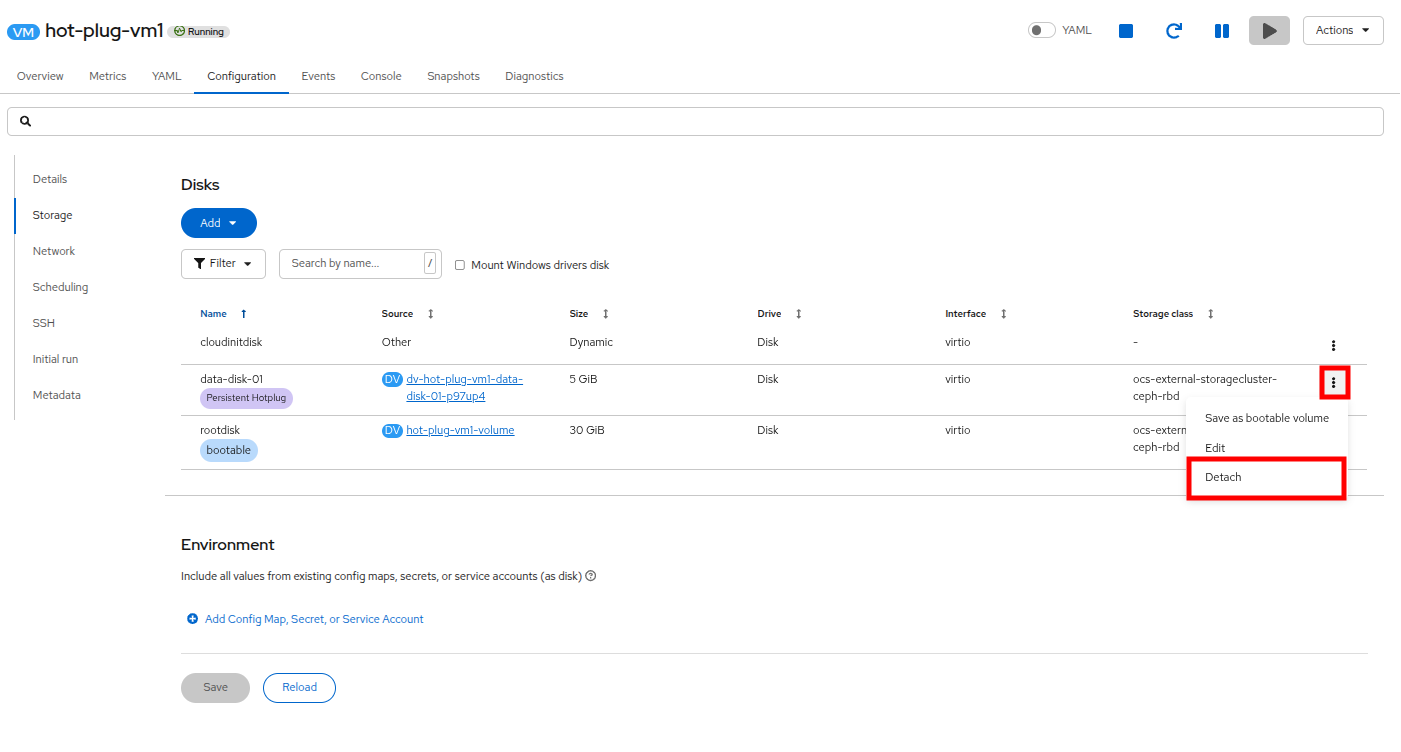 Figure 16. Detach the disk
 -
When prompted, complete the action by clicking on the Detach button.
 Figure 17. Confirm disk detach
 -
You will see the disk immediately disappear from the Configuration screen.
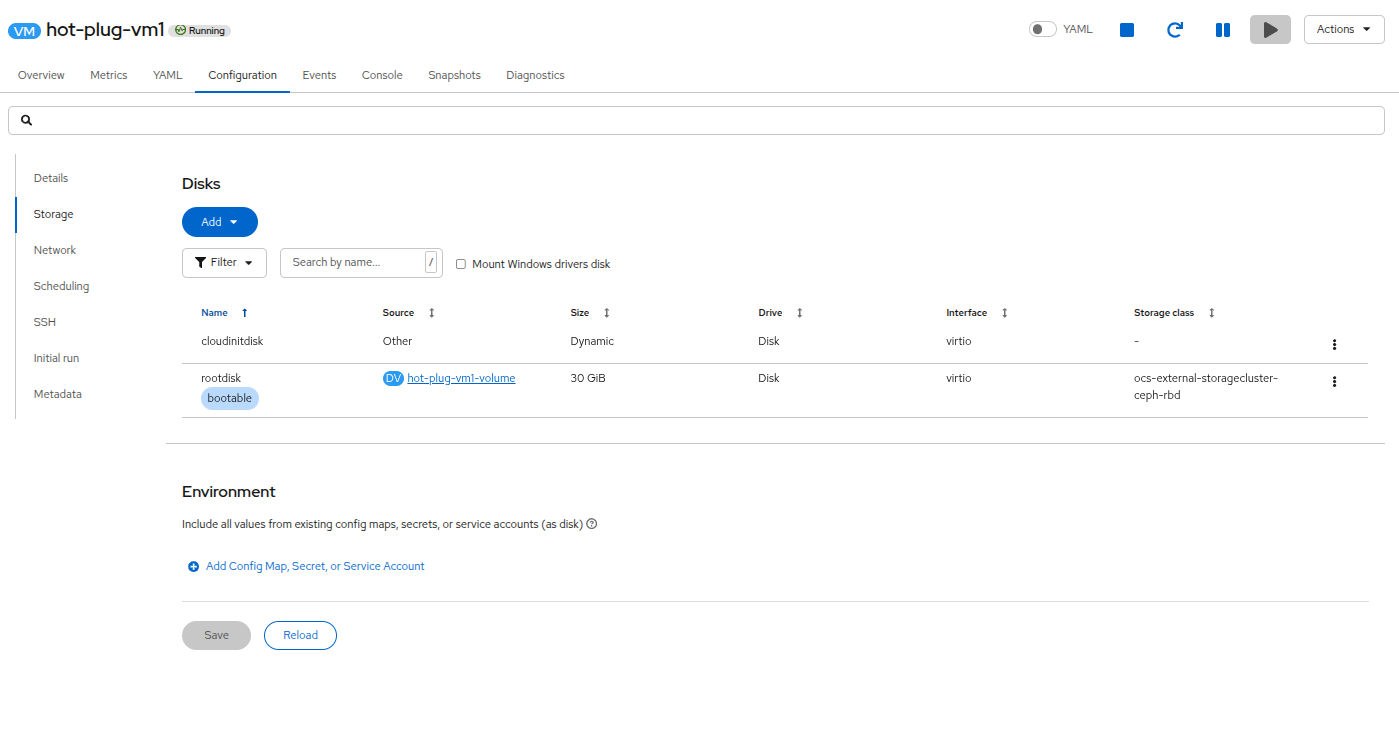 Figure 18. Hotplug disk removed
 -
Return to the Console tab and log into the virtual machine using Copy to clipboard and Paste to console with the User name and Password credentials from above the console window.
-
Run the lsblk command and you will see that the hot-plugged disk is no longer present on the system.
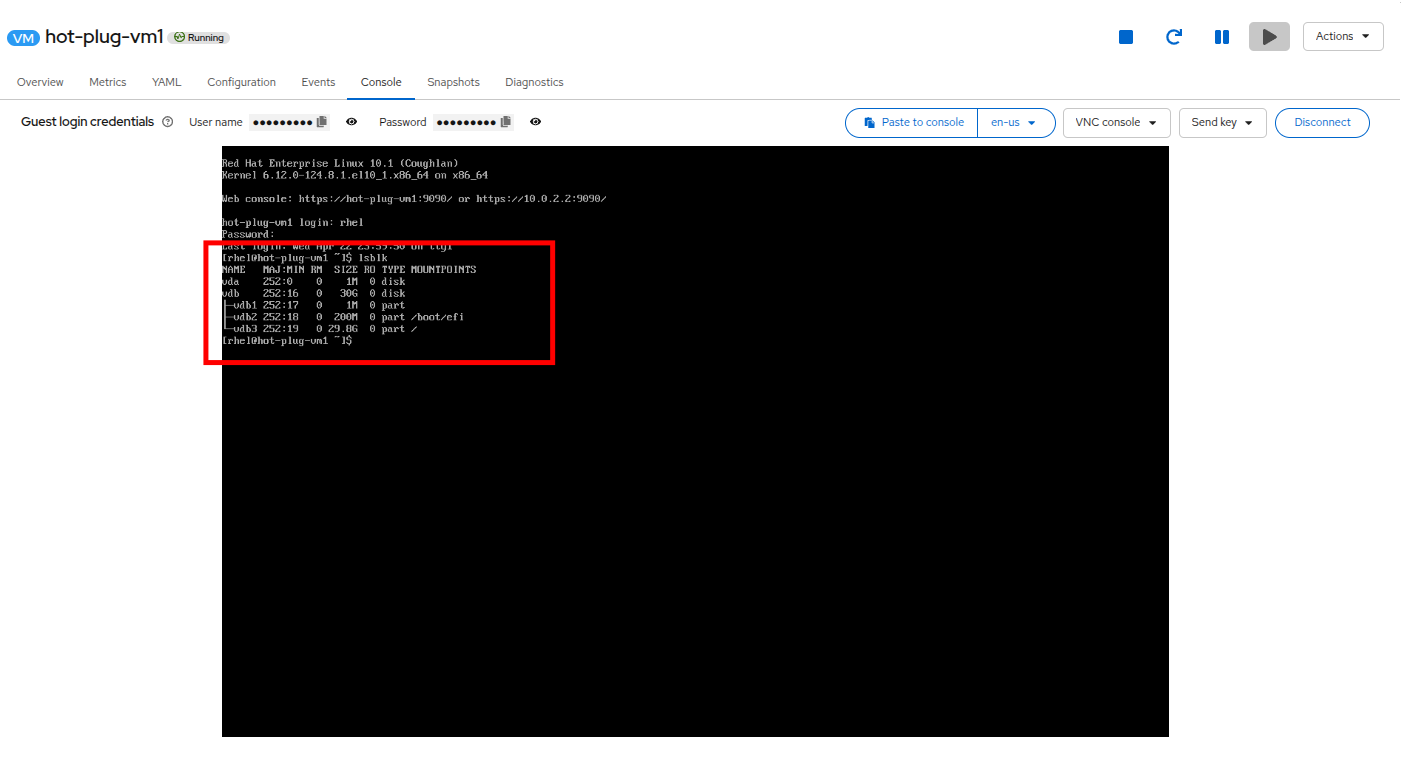 Figure 19. Hotplug disk removed
The detached disk still exists as a PVC. It can be re-attached, or attached to a different VM, or it can be deleted if it is no longer needed. -
To confirm that the persistent disk still exists on the cluster, click on Storage → PersistentVolumeClaims on the left side navigation menu. You will see the disk still listed in the hot-plug namespace alongside the standard boot disk.
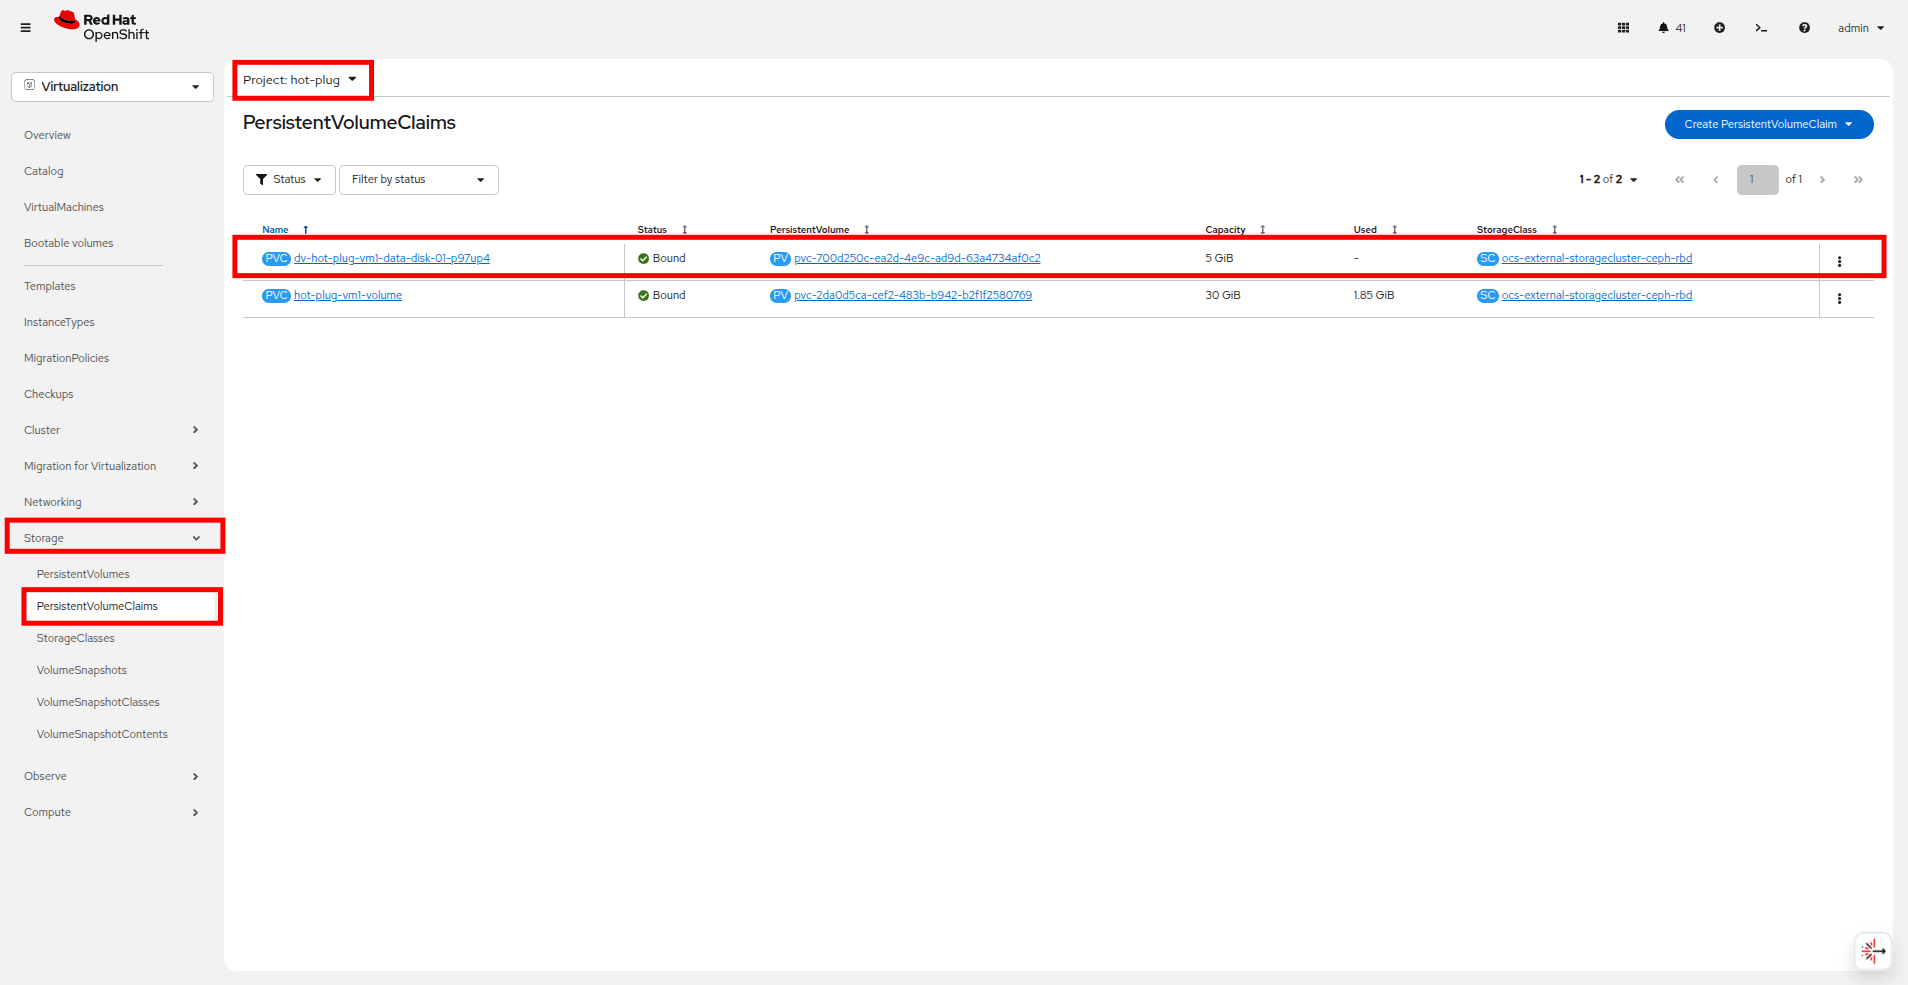 Figure 20. Disk is removed in OS
Adding a NIC to a Running VM
In this lab, we will add a new Network Interface Card (NIC) to an existing VM. To do this, you will start with an existing VM that has a single NIC on the pod network. Using the OpenShift Virtualization console, you will modify the configuration of the VM to include an additional NIC on a new network.
-
Click on Virtualization in the left side navigation menu, expand the hot-plug namespace, and click on the hot-plug-vm1 virtual machine.
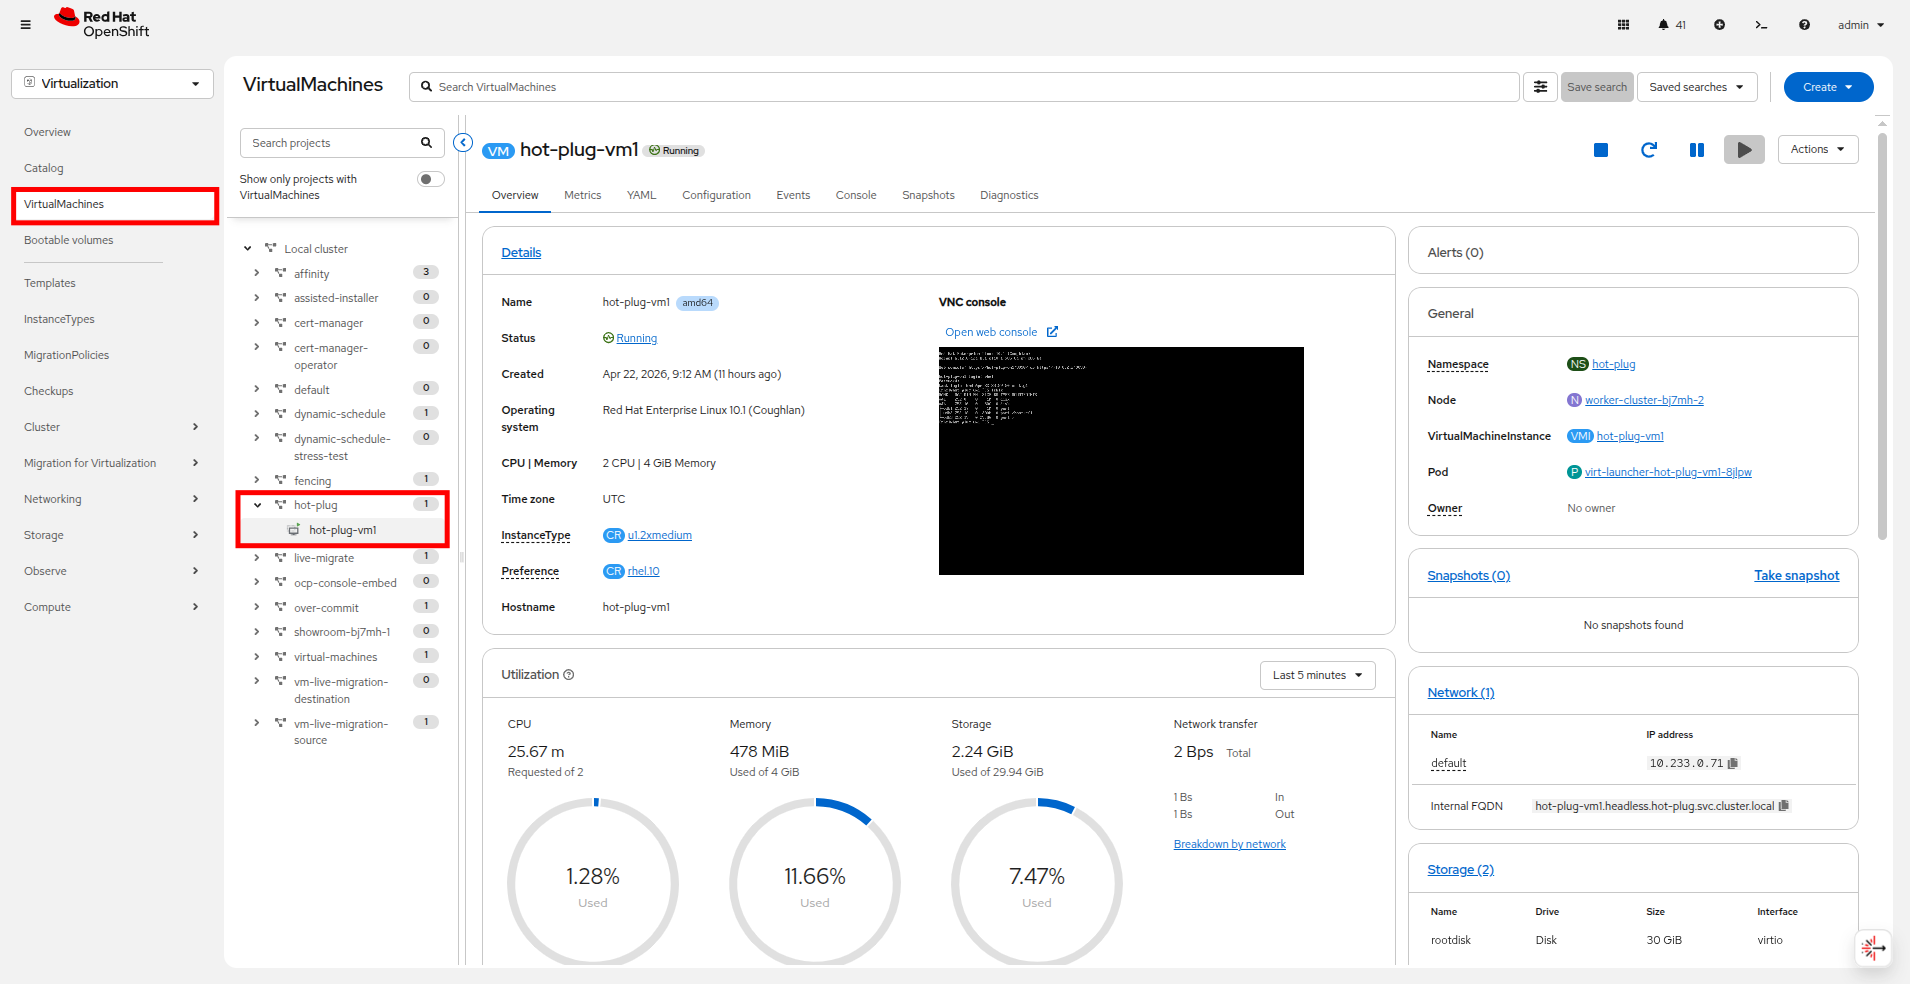 Figure 21. Select the hot-plug-vm1
 -
Make a note of which compute node the VM is currently on, this will be important later.
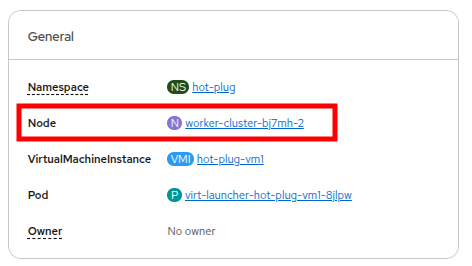 Figure 22. Identify the worker node
 -
Click on the Configuration tab and select the Network sub-tab, and note that the VM currently has a single NIC named default and attached to the Pod networking network.
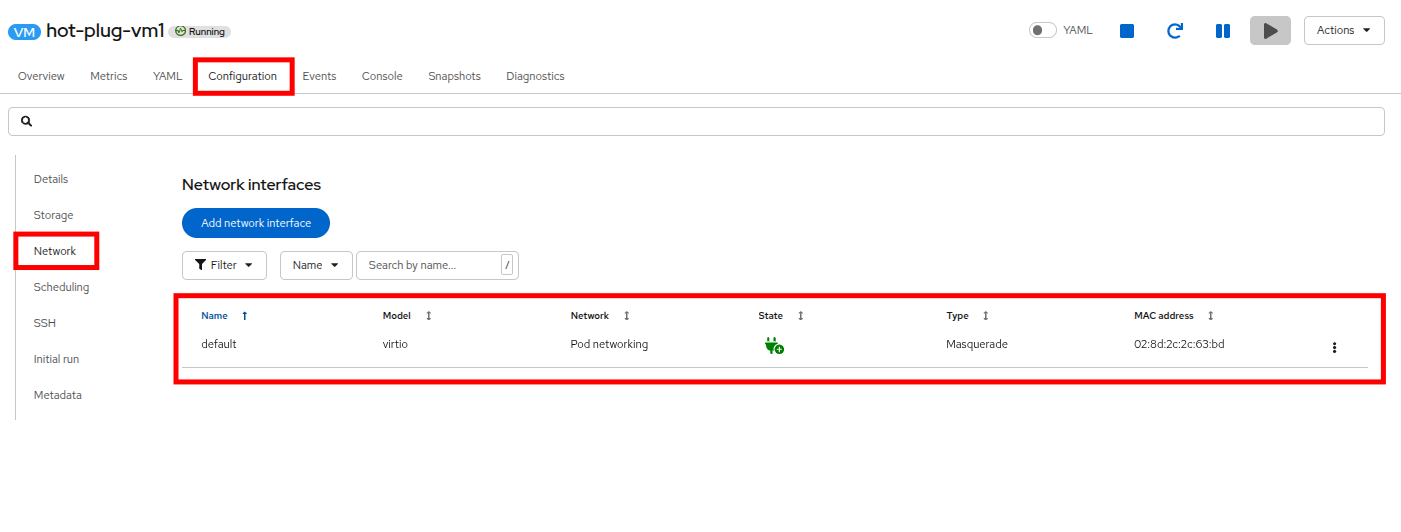 Figure 23. Single NIC only
 -
From this page you can add a new NIC by clicking on the Add network interface button.
-
In the new window that appears, provide a Name for the new interface, such as nic-1. The Model should be virtio, and the Network should be hot-plug/east-west-nad selected from the drop down menu. When you are ready, click the Save button.
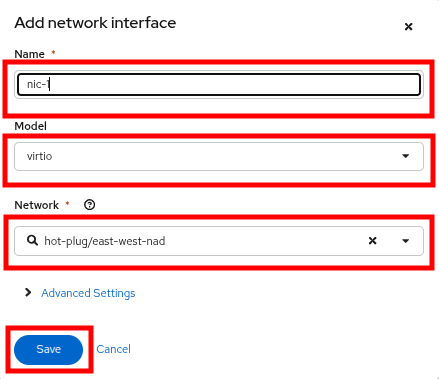 Figure 24. Add network interface
 -
What may surprise you since this is a hot-add procedure is that the status of nic-1 says Pending and a banner appears that says there are Pending Changes.
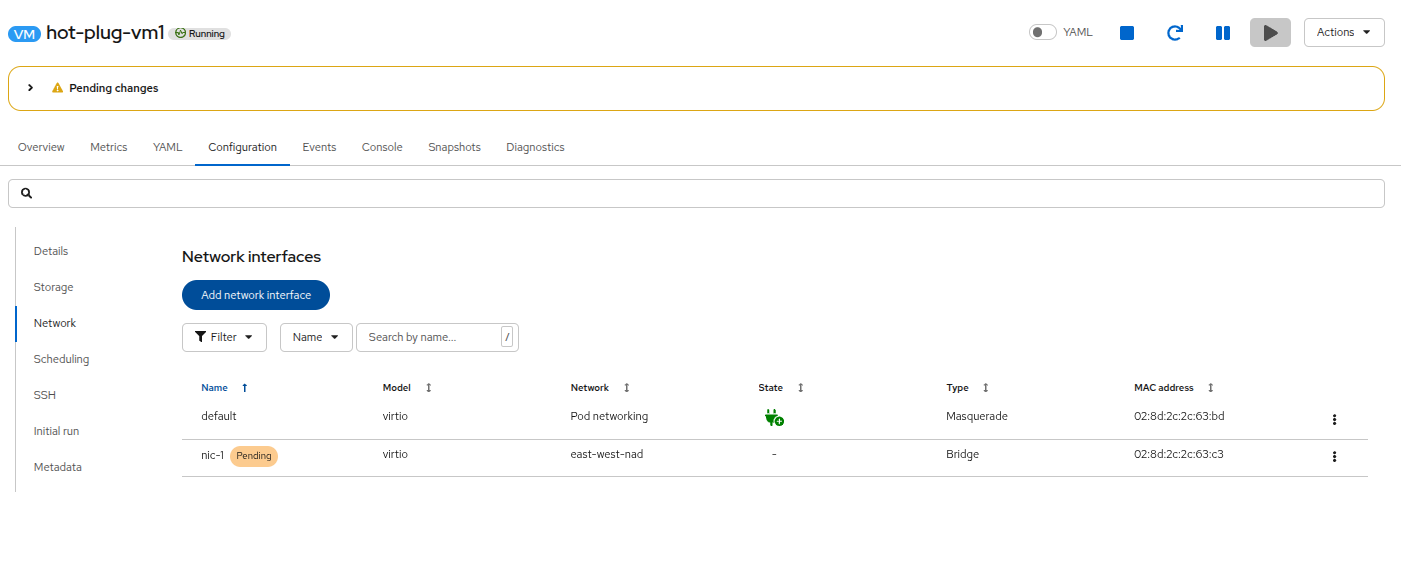 Figure 25. View pending changes
 -
If you click on the > on the banner you can find out why this is the case. Note that the message indicates a restart or migration is required for the NIC addition to take effect.
-
Just as it was with modifying the CPU and Memory in the earlier section, the virtual machine will perform a live migration so that new resources can be added to the pod.
The process may take just a minute or two, but you will notice the Pending status and the banner goes away, and*nic-1* is now connected. 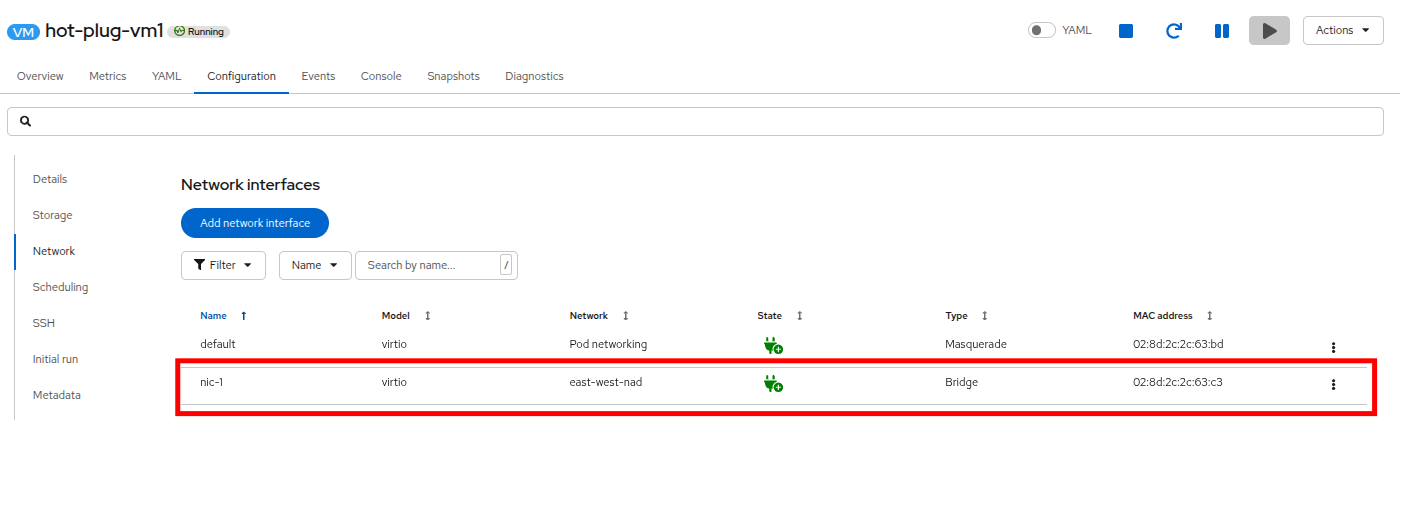 Figure 26. nic-1 connected
 -
If you return to the Overview tab, you can observe in the General area that the VM now resides on a different worker node.
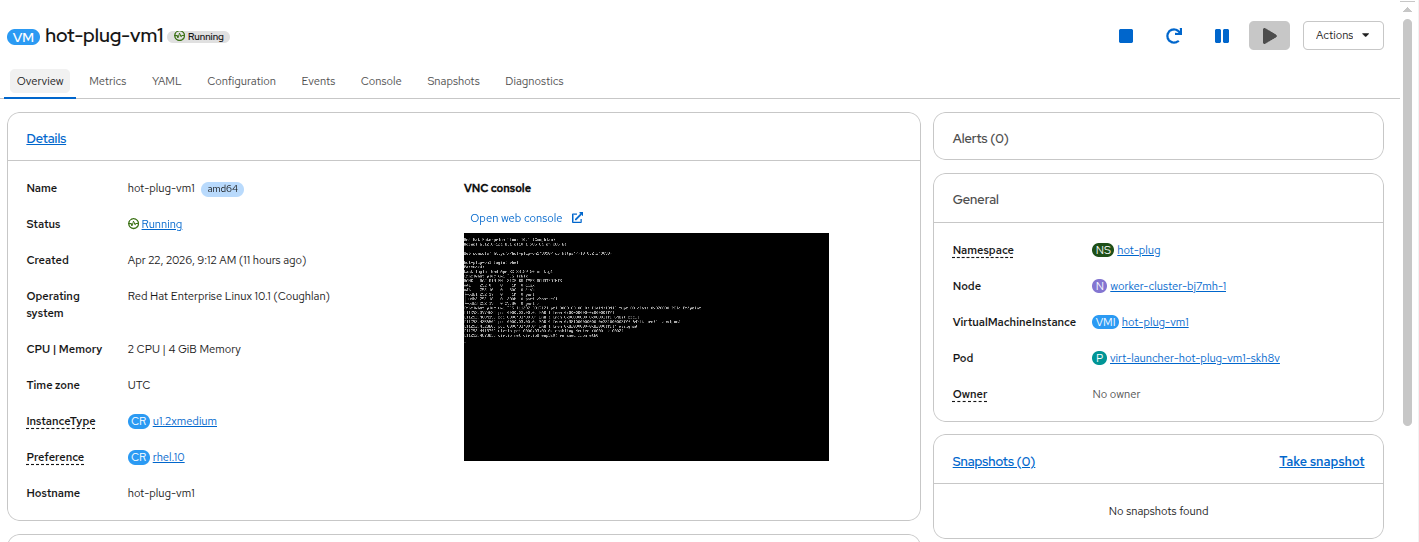 Figure 27. Different worker node
 -
Click on the Console tab, and log into the Virtual Machine using Copy to clipboard and Paste to console with the User name and Password credentials from above the console window.
You may see messages on the console when you first view it that show the new NIC being added. 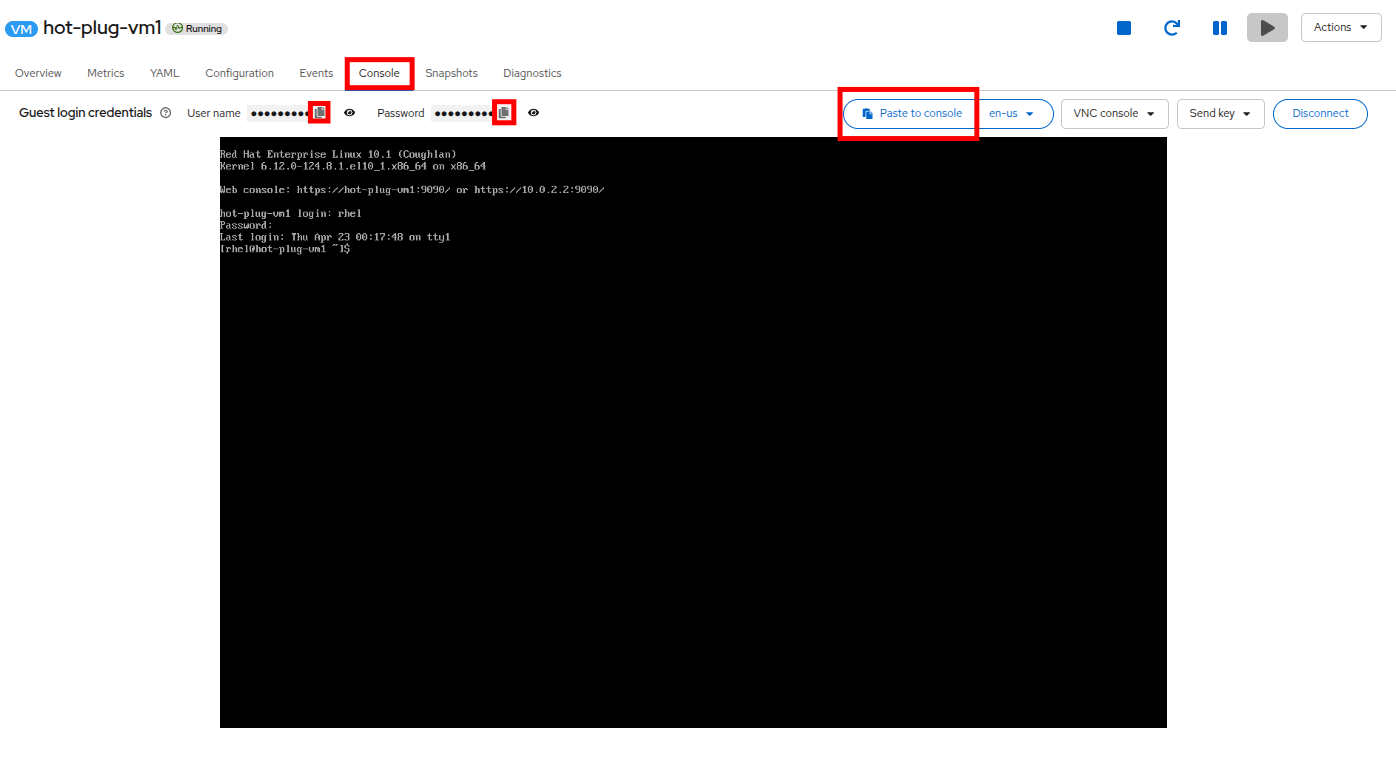 Figure 28. Log into VM console
 -
You can view the new NIC from the operating system by running the command ip address on the console.
-
The new NIC is listed as enp3s0 and is recieving an IP address from the 192.168.20.0/24 subnet.
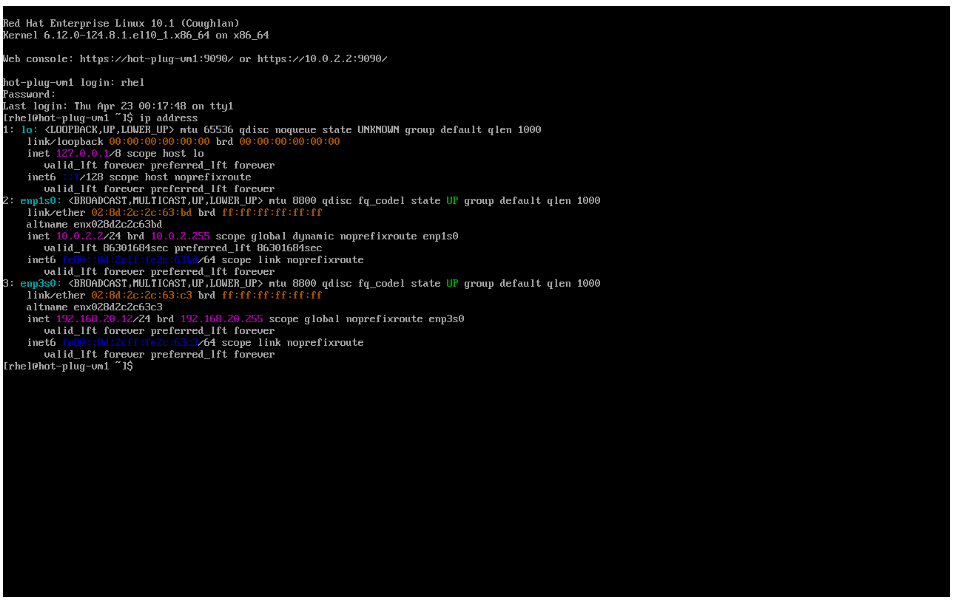 Figure 29. New NIC is up
It’s possible that the newly added network adapter is assigned another name by the OS, e.g. enp2s0, this is perfectly fine.
Congratulations, you have completed this module!
| At the end of this module be sure to shut down the virtual machine hot-plug-vm-1 that we were working with in order to conserve lab resources for future modules. |
Summary
In this module we explored how to hotplug resources into a running VM. We demonstrated this by modifying the cpu, memory, storage, and networking configurations of a running virtual machine to show that OpenShift Virtualization is a highly versatile platform capable of meeting the needs of many different customers, with many different use cases.