Affinity and Anti-Affinity for Virtual Machines
Introduction
Affinity and Anti-affinity are a set of rules that allow us to select where a virtual machine can be placed by the Kubernetes scheduler when it is deployed. In many cases these rules are defined to ensure that two interdependant workloads are not placed on the same node through anti-affinity rules. Think of an application that may have two frontend web servers and a backend databaseserver with traffic load balanced evenly to the web servers. You would not want both of those VMs placed on the same node. Should an issue happen with the host system, the entire virtual application would be affected. By setting both affinity and anti-affinity rules for the placement of VMs, we can ensure situations like this don’t happen.
-
Understand how node affinity can help you deterministically schedule where your VMs are placed.
-
Understand how pod affinity rules can help workloads with co-dependencies be scheduled together for better performance.
-
Understand how pod anti-affinity rules can ensure that workloads are segregated to provide high availability and increase fault tolerance.
Accessing the OpenShift Cluster
Your OpenShift cluster console is available {openshift_cluster_console_url}[here^].
Your console login is available with:
-
User: {openshift_cluster_admin_username}
-
Password: {openshift_cluster_admin_password}
You can login to your OpenShift cluster on the provided terminal by copying and pasting the following syntax:
oc login -u {openshift_cluster_admin_username} -p {openshift_cluster_admin_password} --server={openshift_api_server_url}Node Affinity
Node Affinity is a set of rules that guide the scheduler to attract a Virtual Machine to a specific node or group of nodes. These rules rely on matching labels that are applied to the nodes.
The core use case for Node Affinity is to ensure that a VM runs only on nodes that possess specific features or needs, such as a particular GPU model or a high amount of RAM, by matching the corresponding labels on the node.
This lab will demonstrate how Node Affinity is set up and how it functions.
-
To get started, select Virtualization from the left side navigation menu and expand the node-affinity namespace. You will see that it contains three virtual machines. For the time being select the node-affinity-vm virtual machine, and start it by pressing the Play button or using the Actions menu.
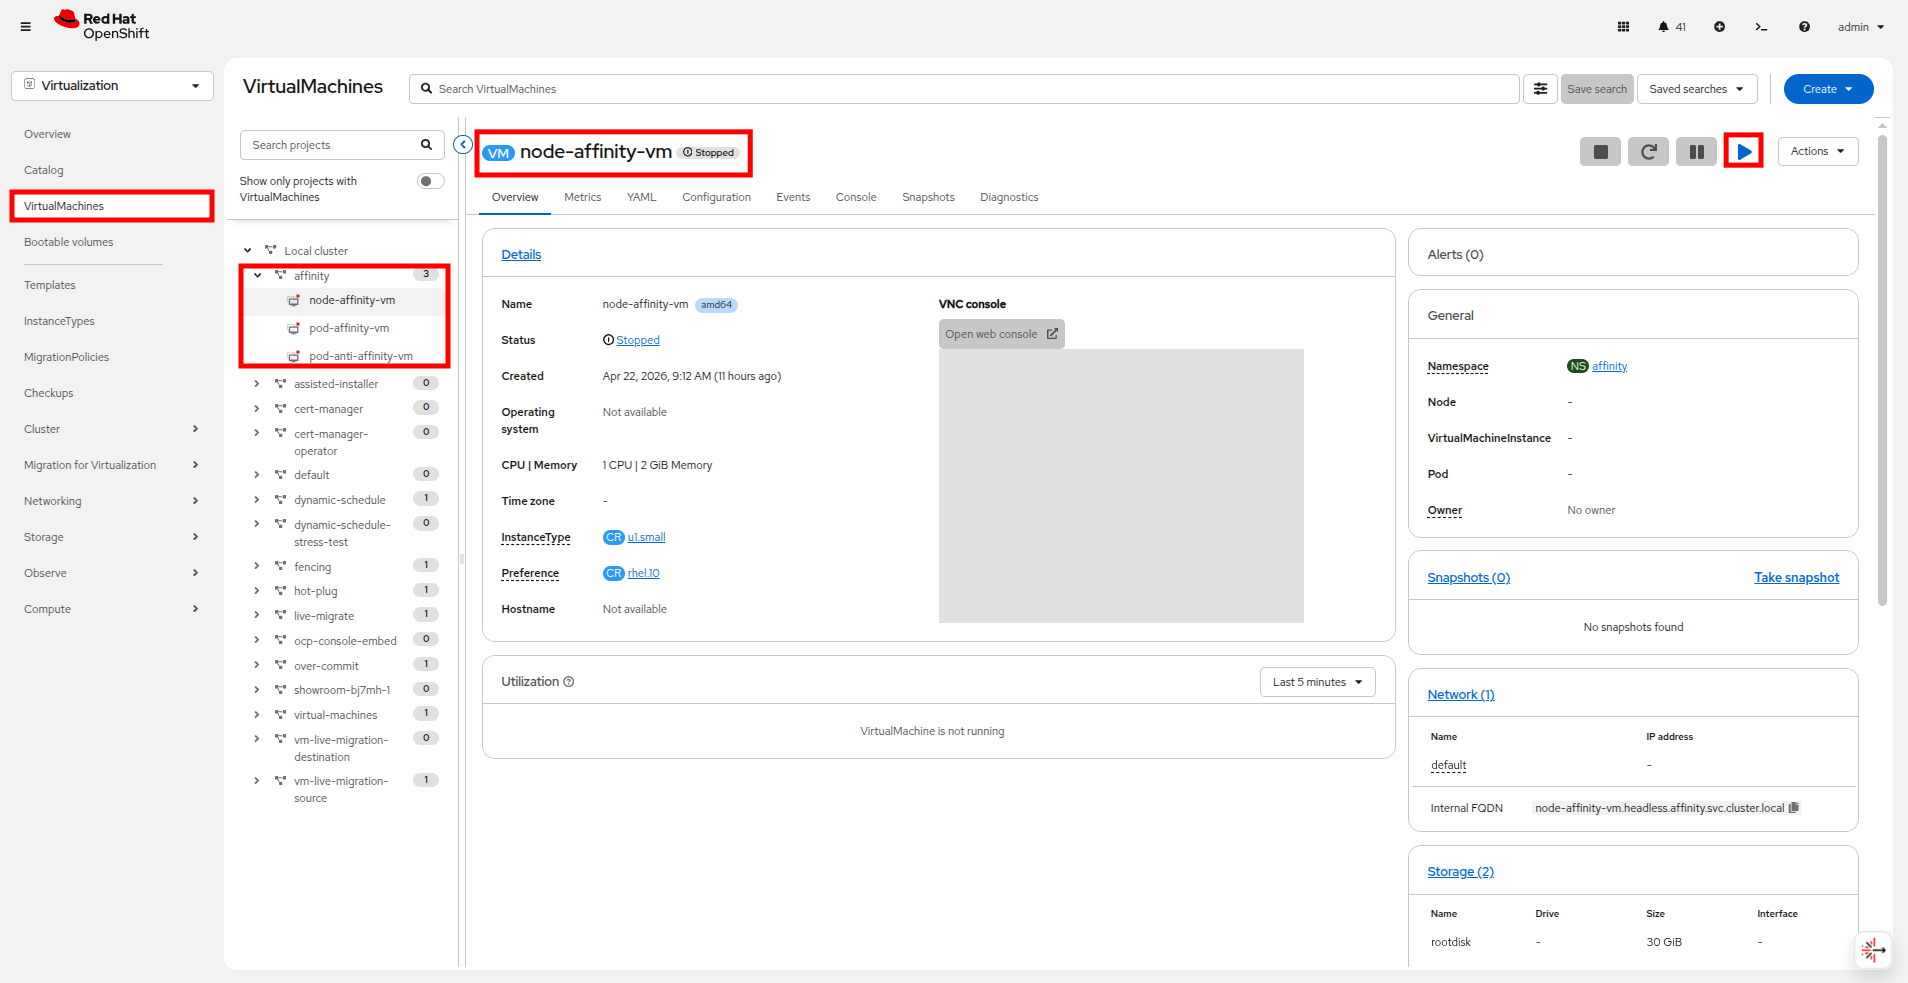 Figure 1. Start node affinity VM
 -
Verify that the virtual machine is running and determine what node it is running on by checking the General section of the Overview tab.
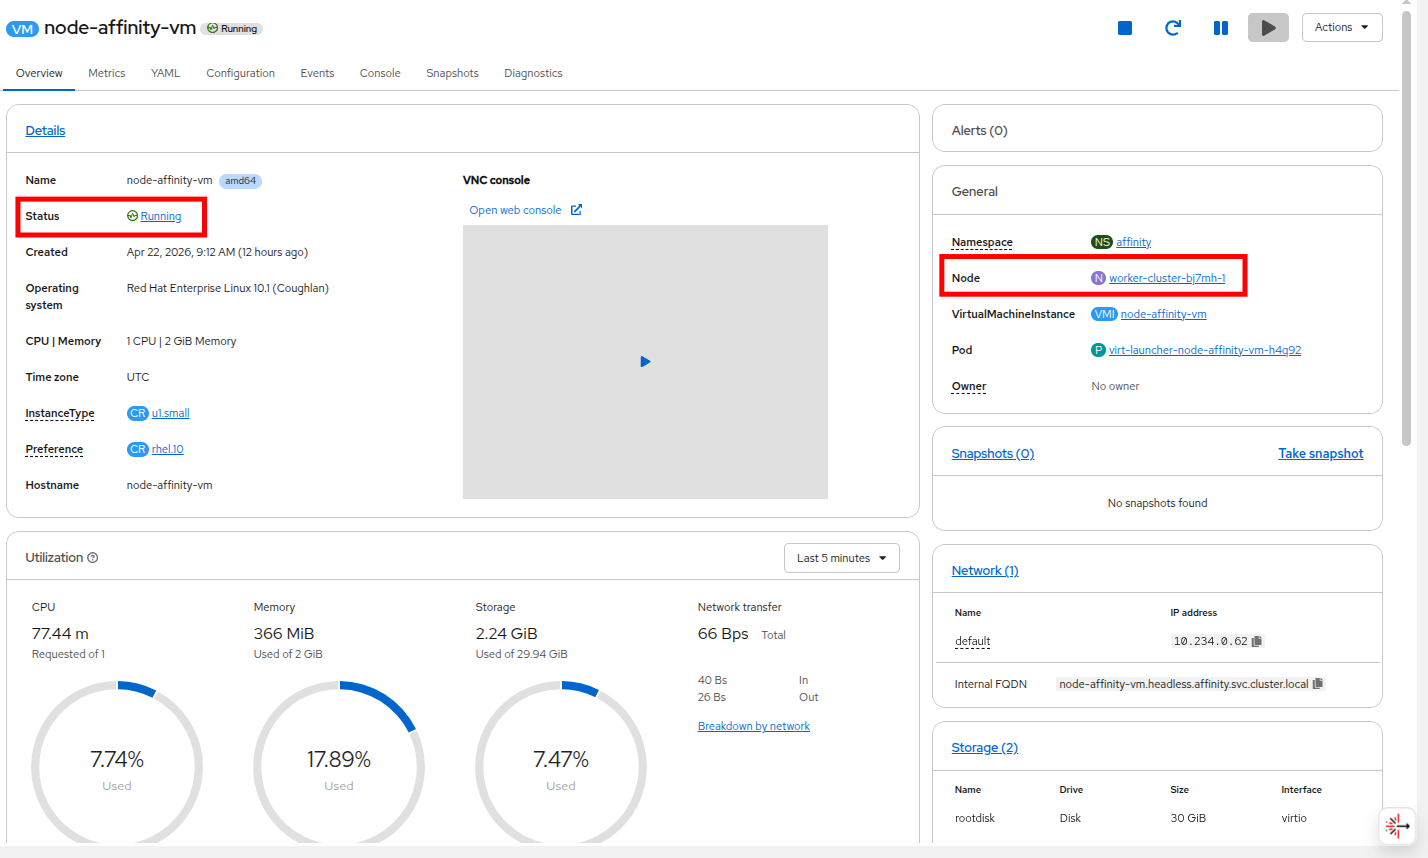 Figure 2. Check what node the VM is on
 -
To test affinity we want to set a label, for example
zone=easton any node where the node-affinity-vm is currently not running. -
From the left side navigation panel, navigate to Compute → Nodes, and pick a worker node where the node-affinity-vm is not running, click the 3 dots and select Edit labels.
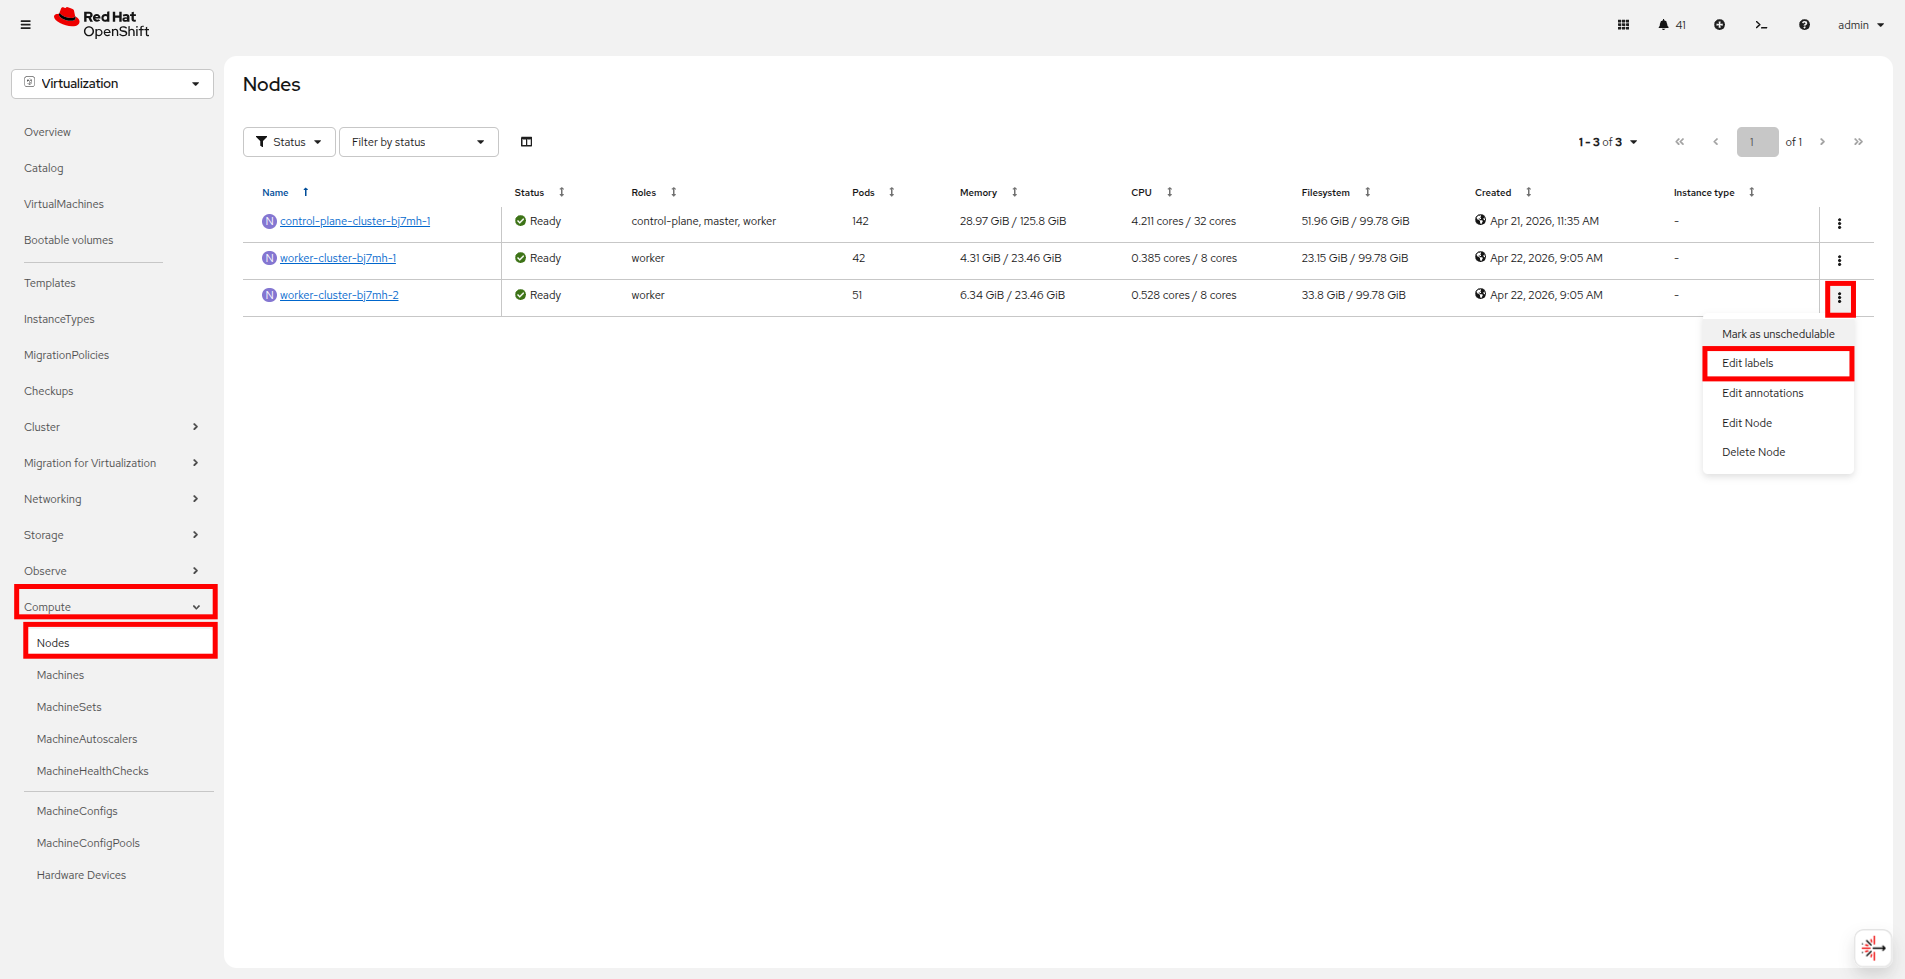 Figure 3. Edit Node Labels
In the example screenshots the VM was running on worker-cluster-bj7mh-1, so we are editing the labels on worker-cluster-bj7mh-2. -
In the new window, enter zone=east and click Save
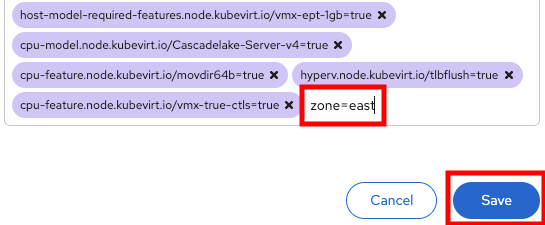 Figure 4. Add Label
 -
To confirm that the label was applied click on the node where you added the label click the Details tab and check the Labels section for zone=east.
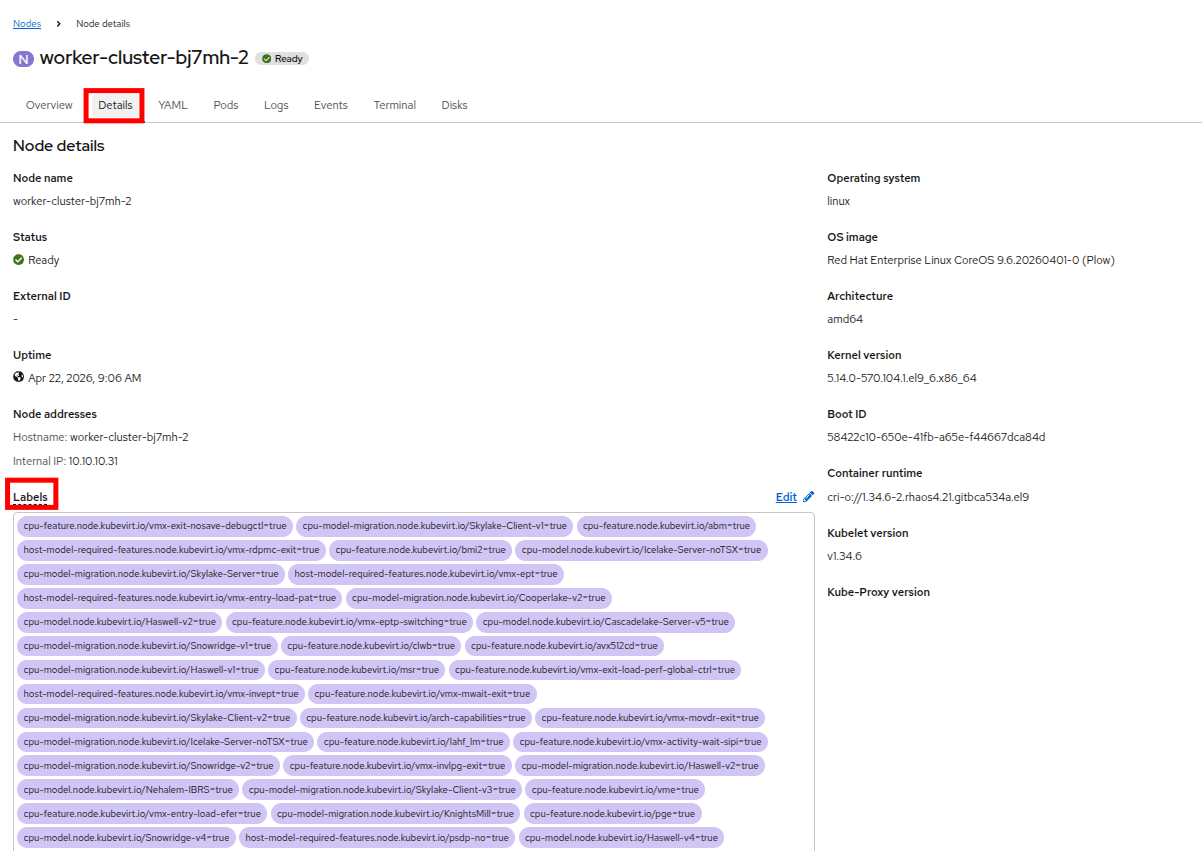 Figure 5. Check the Label
 -
There are often a lot of labels assigned in affect on an OpenShift node, so it may be best once on this page to use Ctrl+f in your browser and search for zone=east.
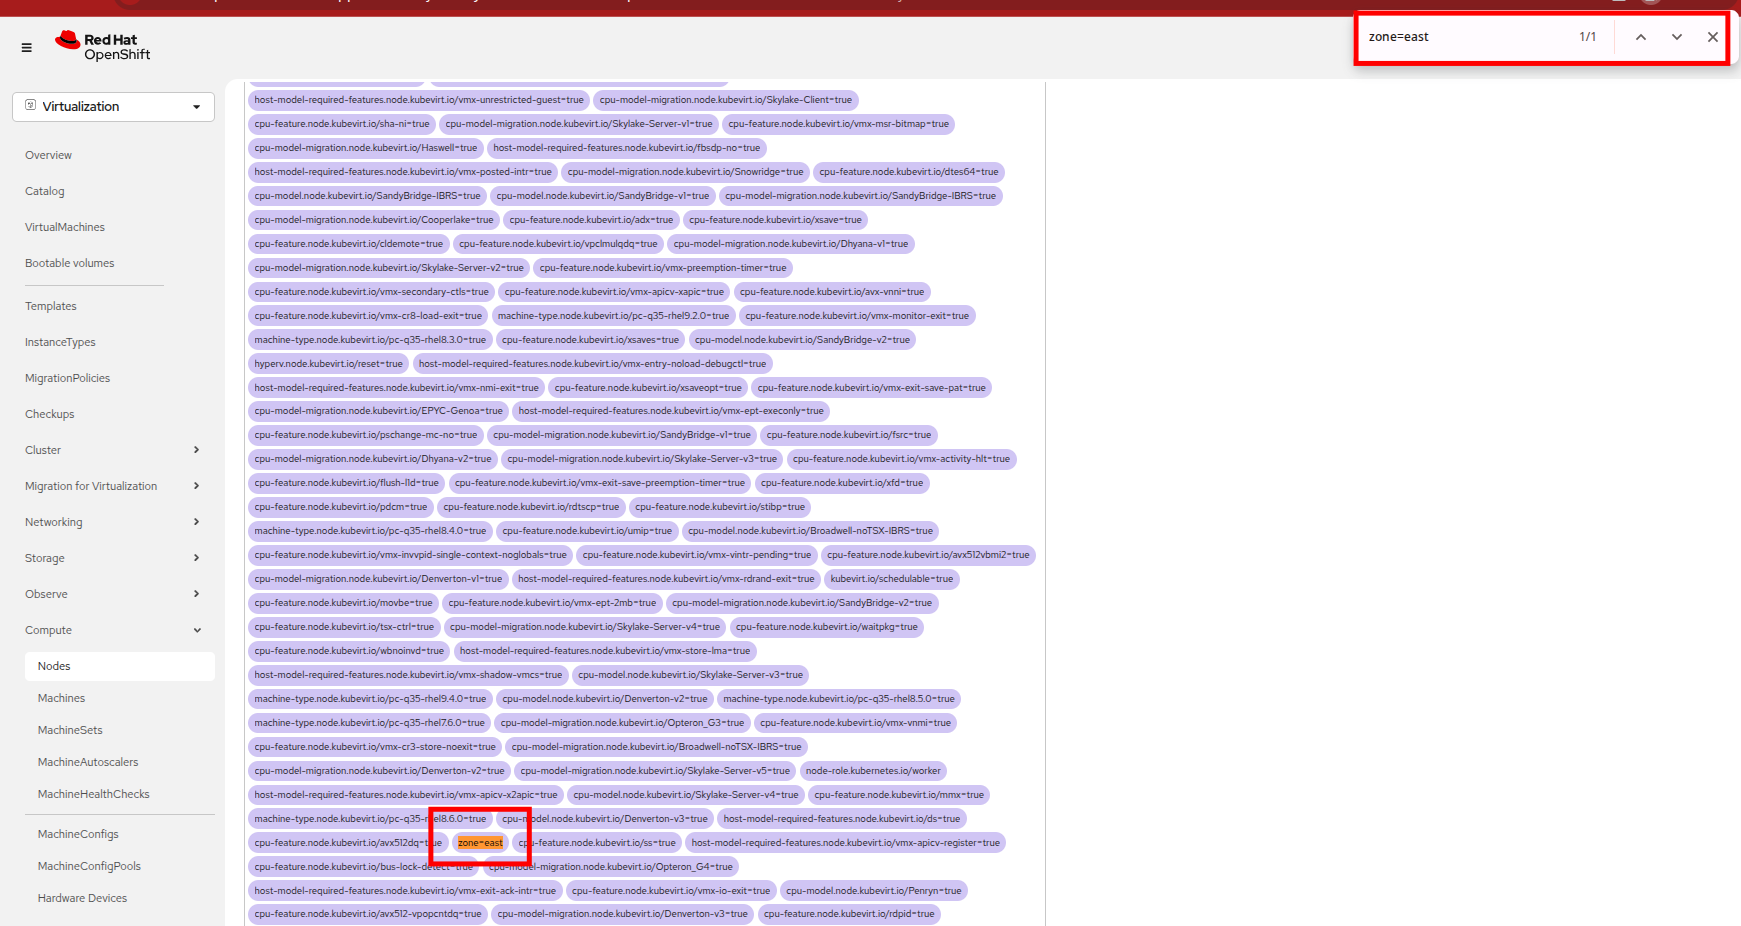 Figure 6. Search for the Label
 -
Click on Virtualization in the left side navigation menu and select the affinity namespace and click on the virtual machine named node-affinity-vm and once selected click the Configuration tab.
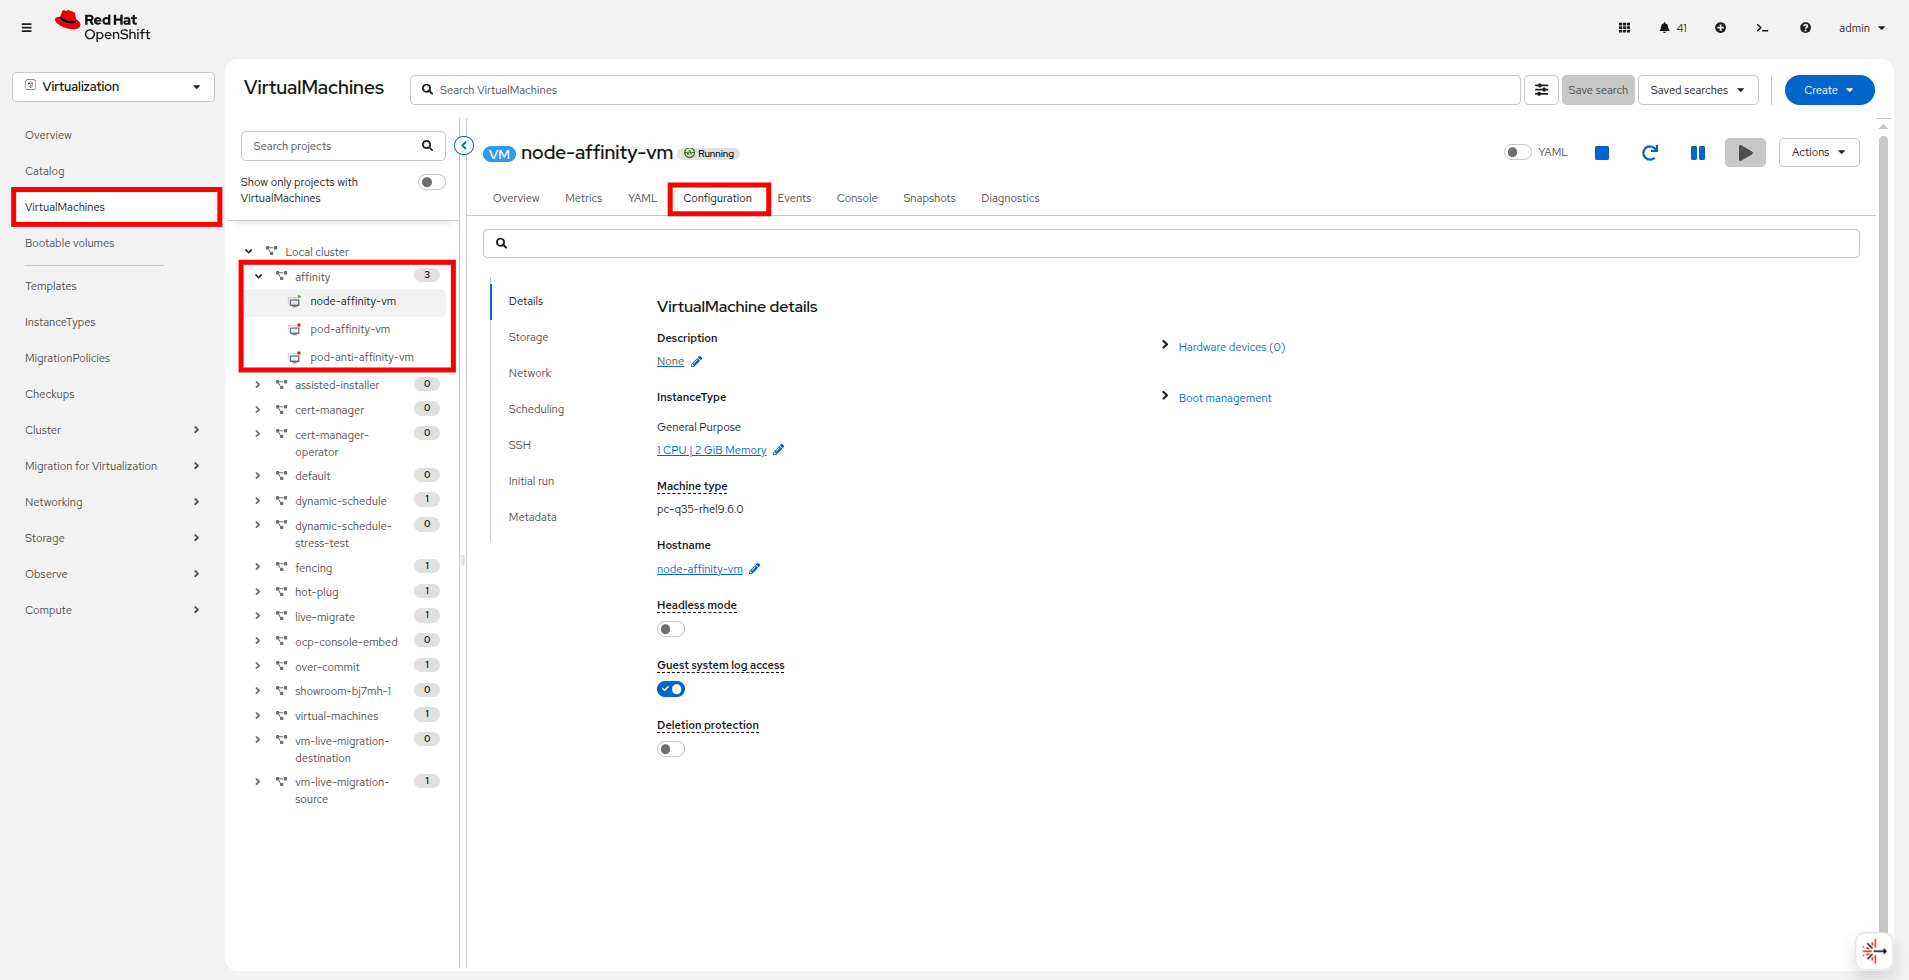 Figure 7. Node Affinity Navigation
 -
From the Configuration tab, select Scheduling and click the blue pencil icon under Affinity rules to add a new one.
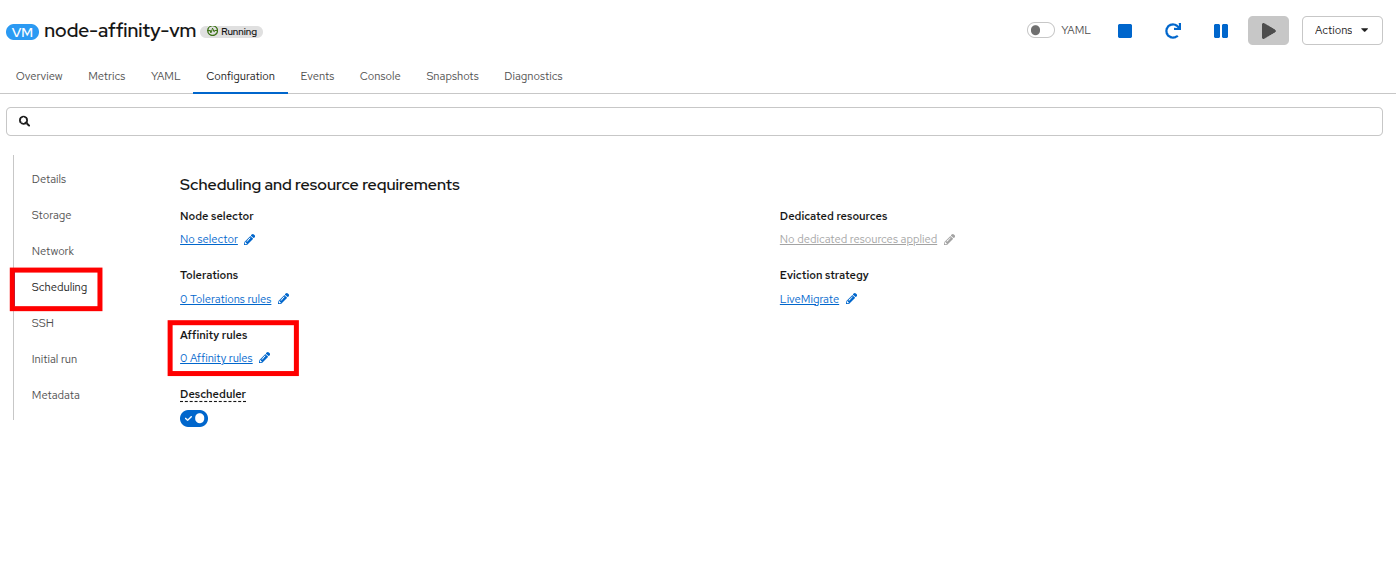 Figure 8. Node Affinity edit
 -
On the new screen that appears click Add affinity rule.
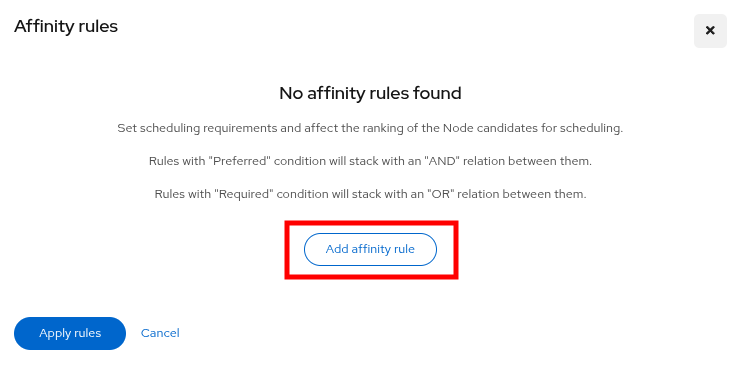 Figure 9. Node Affinity add rule
 -
Change the Condition to Preferred during scheduling and set the weight to 75. Under Node Labels click Add Expression and set the Key field to
zoneand the Values field toeastand click Add. When done editing, click the Save affinity rule button.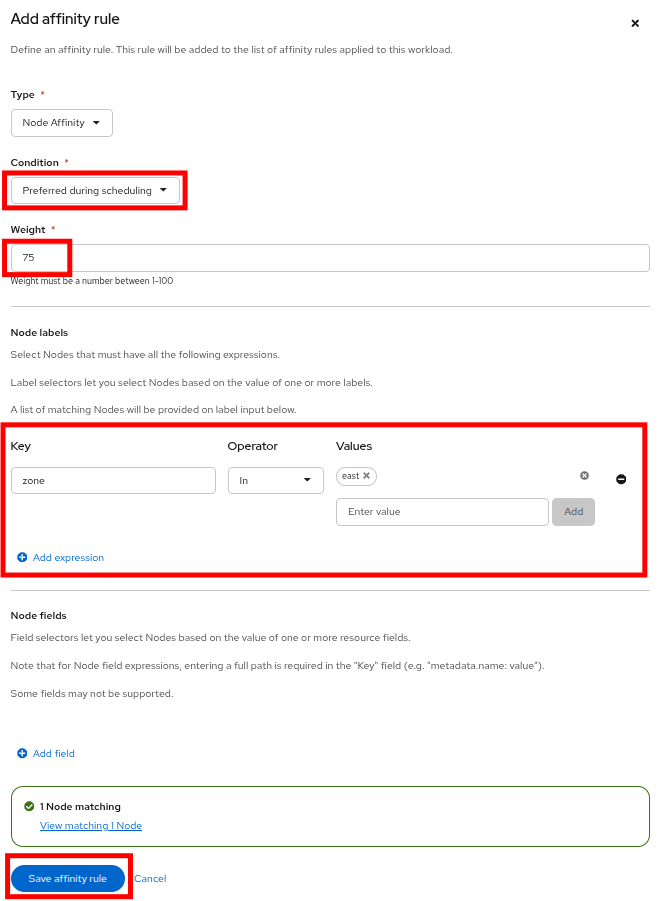 Figure 10. Node Affinity Rule
You will see a prompt that there is a node matching this rule, which is the node we labeled earlier. -
You will be returned to the previous prompt with the Affinity rule defined. Click the Apply rules button.
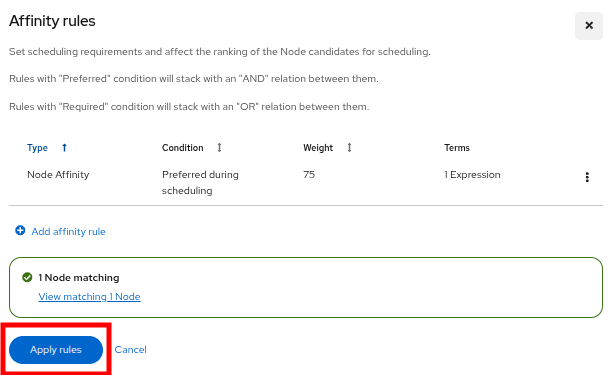 Figure 11. Node Affinity Rule
 -
Without an external force to move or restart the VM, new Affinity rules do not take effect. To apply the changes manually, you can live migrate or restart the VM. For automatic enforcement, you can configure the Descheduler with the AffinityAndTaints profile.
-
Restart the node-affinity-vm VM using either the restart button or the Actions menu.
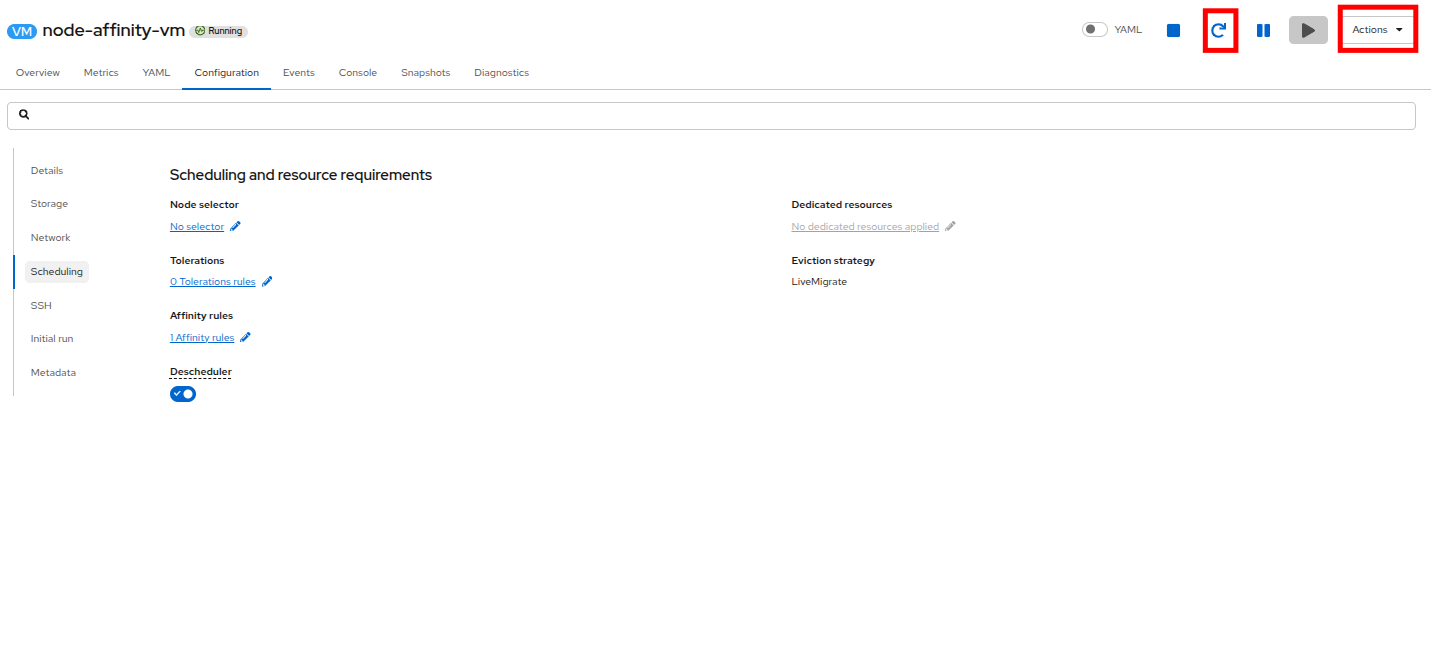 Figure 12. Restart the VM
 -
Once the VM restarts, it will be running on the node with the affinity label. To validate this click on the Overview tab, and check the General section on that page. The VM should be scheduled on the node where the label was appliedearlier in this section.
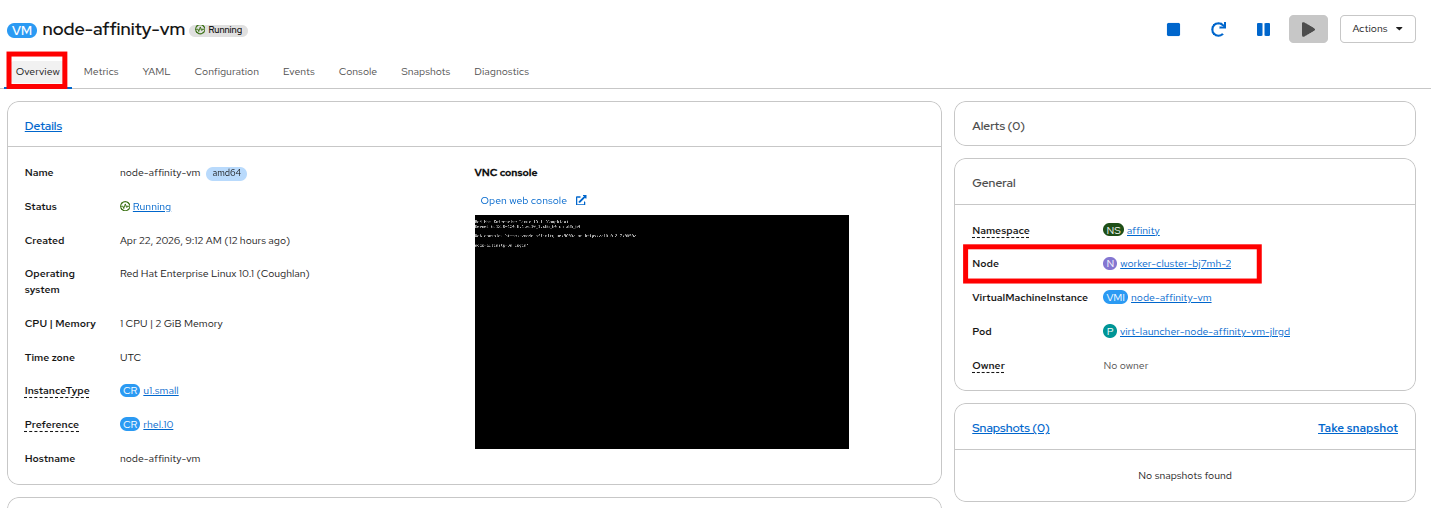 Figure 13. VM Affinity Verified
Pod Affinity
Pod Affinity is a scheduling rule that co-locates a VMs (or pods) with a specific labels onto the same node.
The primary benefit of using pod affinity is to improve performance for dependent VMs or services that require low-latency communication by guaranteeing their placement on the same node.
This section of the lab will demonstrate the setup and usage of Pod Affinity.
| This section of the lab will use the embedded terminal and a number of CLI commands to perform advanced operations on virtual machine pods and worker nodes. |
-
To begin, we are going to leverage our existing node-affinity-vm from the previous lab. This will serve as 1 of the 2 VMs we use to demonstrate Affinity.
-
There are 2 ways to add a label:
-
Editing the VM YAML from the CLI or Console
-
Using oc label
-
-
Both methods have benefits and drawbacks. In many production use cases, they will be used together.
-
Editing the VM YAML requires a restart of the VM for the new labels to take effect. This is because the label on the VM must get passed down to the virt-launcher pod and that only happens after a restart.
-
Using oc label is ephemeral and is lost after a VM restart. This is because the label is applied directly to the virt-launcher pod, with immediate effect, but not set on the VM object.
-
-
To make things permanent, we will use the the embedded terminal to run some OpenShift CLI commands to set a label
app: fedoraon the node-affinity-vm. -
Add the label under spec.template.metadata.labels NOT metadata.labels at the top of the YAML:
Modify the VMoc edit vm node-affinity-vm -n affinityapiVersion: kubevirt.io/v1 kind: VirtualMachine metadata: annotations: kubemacpool.io/transaction-timestamp: "2026-01-16T18:46:28.5004163Z" generation: 3 labels: app.kubernetes.io/instance: module-affinity *<---Do not put the label here* name: node-affinity-vm namespace: affinity resourceVersion: "714752" uid: 5cf5a3d2-203c-41cb-8da2-d696acd9e71a spec: dataVolumeTemplates: - metadata: creationTimestamp: null name: node-affinity-vm-volume spec: sourceRef: kind: DataSource name: rhel10 namespace: openshift-virtualization-os-images storage: resources: requests: storage: 30Gi instancetype: kind: virtualmachineclusterinstancetype name: u1.small preference: kind: virtualmachineclusterpreference name: rhel.10 runStrategy: Manual template: metadata: creationTimestamp: null labels: app: fedora *<---Put the label here* <1> network.kubevirt.io/headlessService: headless spec: affinity: nodeAffinity: preferredDuringSchedulingIgnoredDuringExecution: - preference: matchExpressions: - key: zone operator: In values: - east weight: 75 architecture: amd64 domain: devices: autoattachPodInterface: false disks: - disk: bus: virtio name: cloudinitdisk interfaces: - macAddress: 02:f9:4a:ad:c3:06 masquerade: {} name: default firmware: serial: 212f42c0-c2ac-4581-96e2-5297e2436a8d uuid: ad3a3d79-9539-4585-826e-9cca5a71f775 machine: type: pc-q35-rhel9.6.0 resources: {} networks: - name: default pod: {} subdomain: headless volumes: - dataVolume: name: node-affinity-vm-volume name: rootdisk - cloudInitNoCloud: userData: | chpasswd: expire: false password: redhat user: rhel name: cloudinitdiskSave and Exit:wq! -
Make sure the VM was edited successfully and did not fail for any reason.
virtualmachine.kubevirt.io/node-affinity-vm edited -
Restart the node-affinity-vm so the label is applied to the virt-launcher pod.
virtctl restart node-affinity-vm -n affinityVM node-affinity-vm was scheduled to restart -
Next, we are going to configure the pod-affinity-vm, we must begin by starting it up. Use the following CLI command to do so:
virtctl start pod-affinity-vm -n affinityVM pod-affinity-vm was scheduled to start -
Verify that the VirtualMachineInstance is running and see what node it is running on.
oc get vmi -n affinity pod-affinity-vmOutputNAME AGE PHASE IP NODENAME READY pod-affinity-vm 36s Running 10.234.0.63 worker-cluster-bj7mh-1 True
-
Once the VM has started, using the OpenShift console, from the left side navigation panel, navigate to VirtualMachines, select the affinity namespace, click on the virtual machine named pod-affinity-vm and click on the Configuration tab.
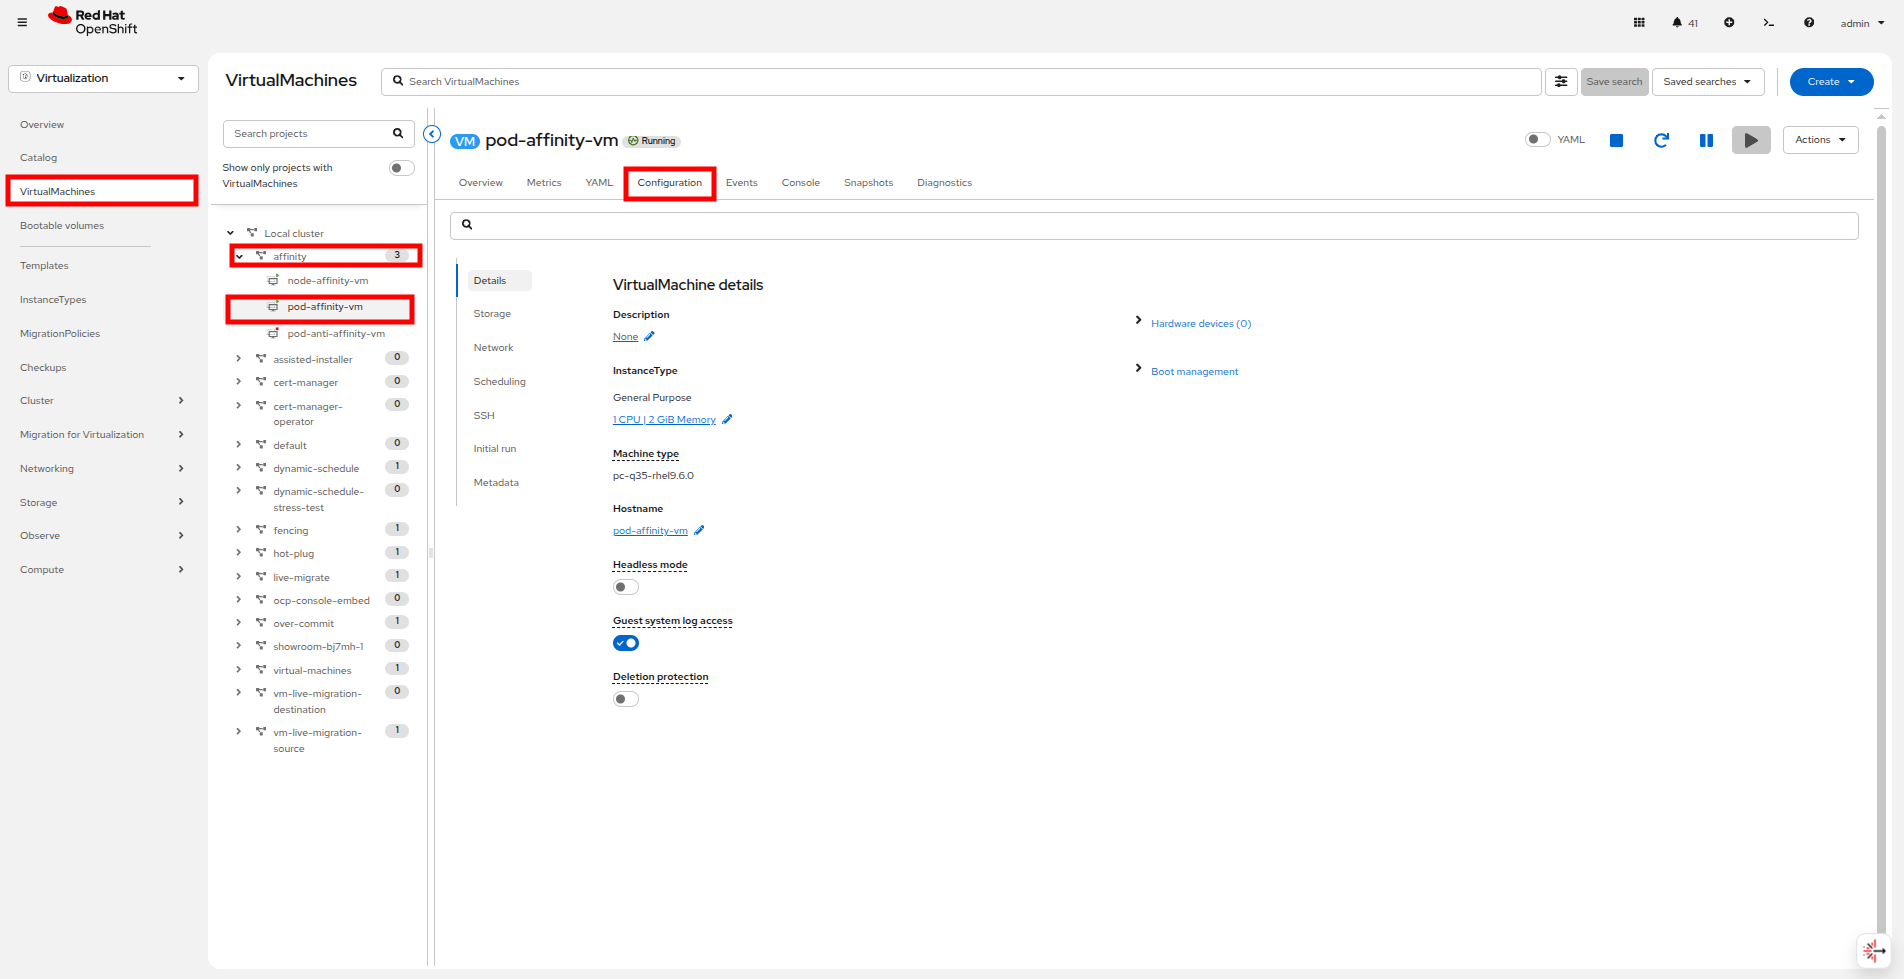 Figure 14. Pod-affinity-vm Configuration
 -
From the Configuration tab, select Scheduling and click the blue pencil icon under Affinity rules to add a new one. When the new window appears click on the Add affinity rule button.
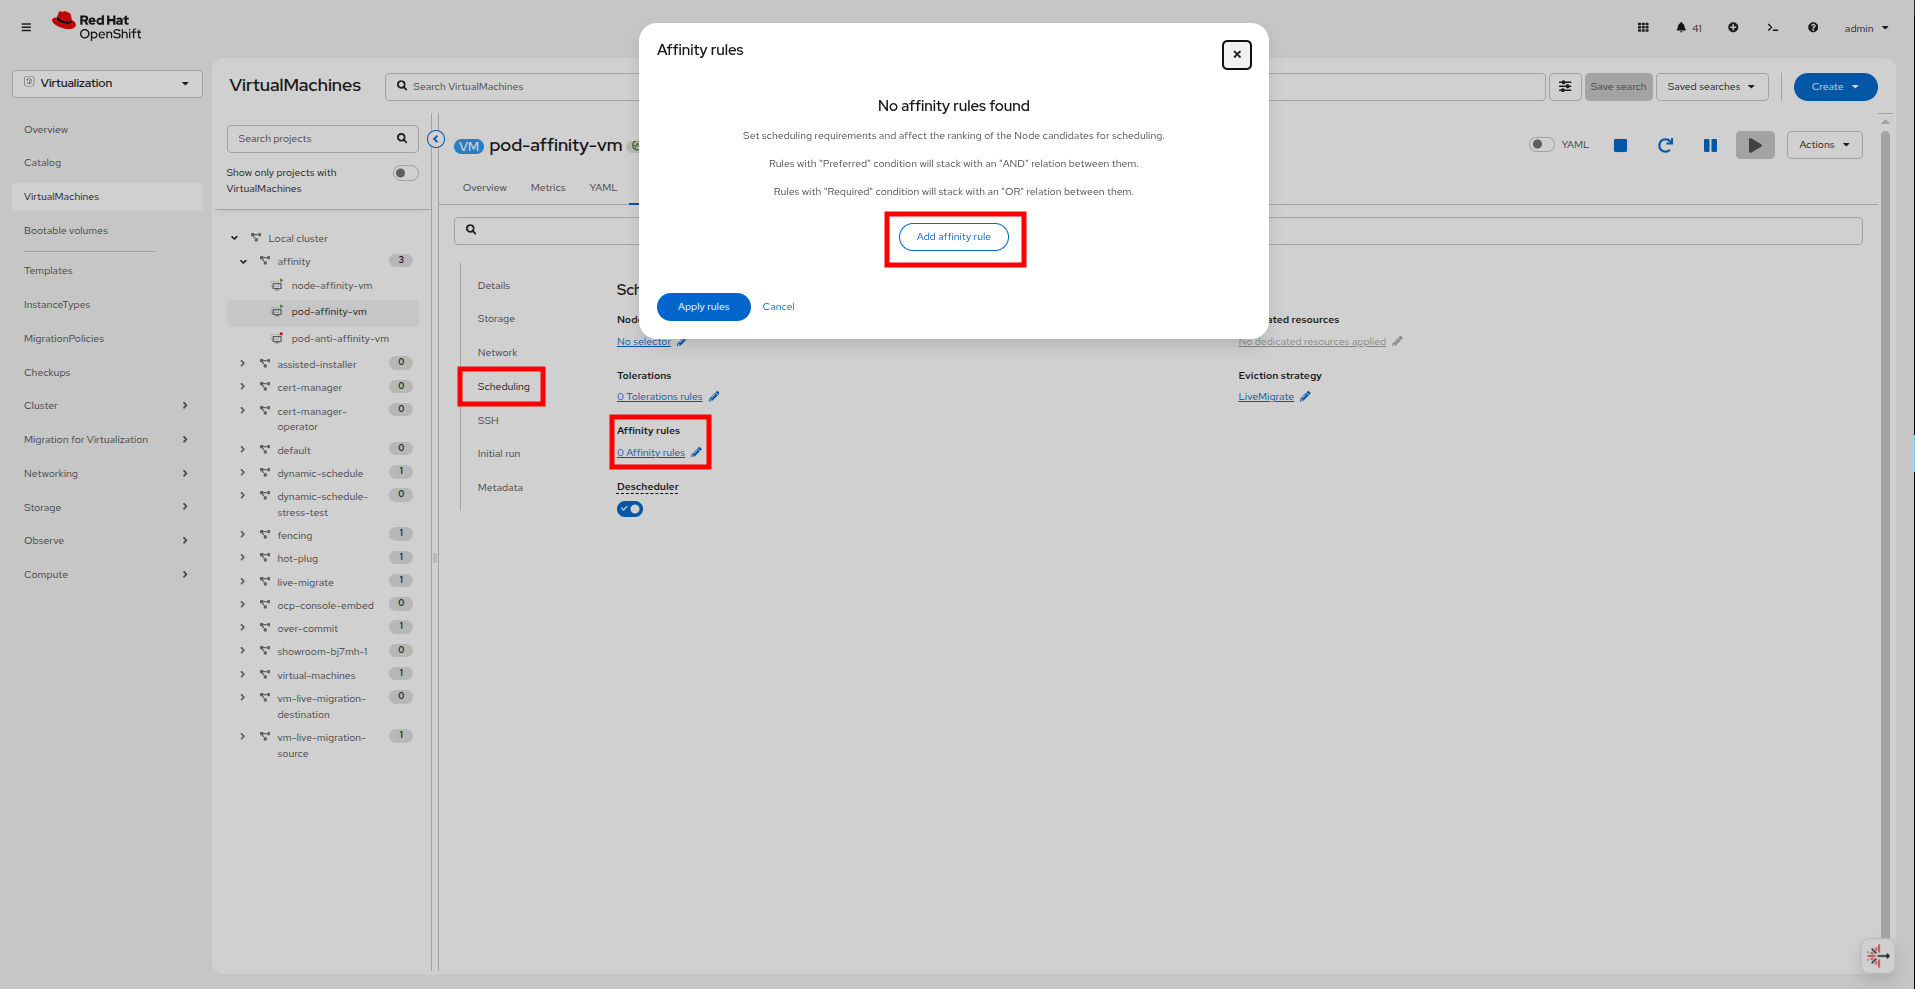 Figure 15. Pod Affinity Rule
 -
Change the Type to Workload (pod) Affinity, and keep the Condition set to Required during scheduling and leave the Topology key at the default value.
-
Click Add expression under Workload labels and set the Key field to
appand the Values field tofedoraand click Add.This is the same label applied to the node-affinity-vm earlier through the CLI commands. -
When complete your final pod affinity rule will look like the picture below. When ready to proceed, click the Save affinity rule button.
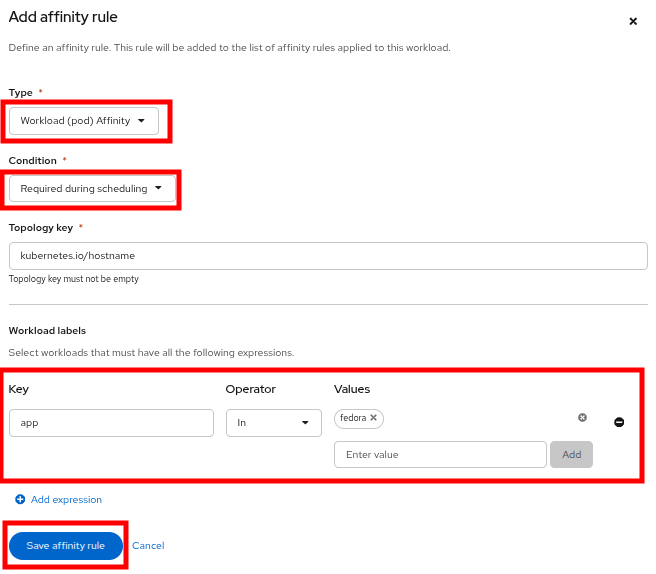 Figure 16. Pod Affinity Rule
 -
When you are returned to the original window, click Apply rules
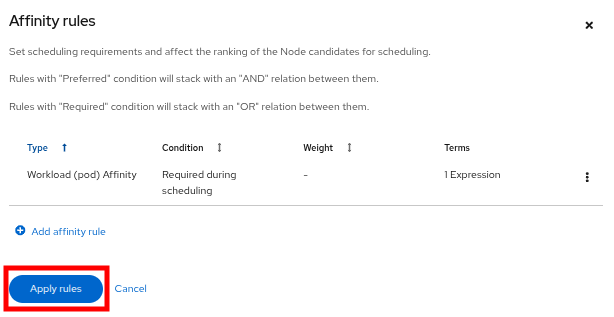 Figure 17. Pod Affinity Rule
 -
Now let’s take a look at the Pod Affinity rule on pod-affinity-vm. Return to the embedded terminal and run the following command:
oc get vm pod-affinity-vm -n affinity -o jsonpath='{.spec.template.spec.affinity}{"\n"}'Output{"podAffinity":{"requiredDuringSchedulingIgnoredDuringExecution":[{"labelSelector":{"matchExpressions":[{"key":"app","operator":"In","values":["fedora"]}]},"topologyKey":"kubernetes.io/hostname"}]}} -
With the affinity applied, lets check where the pod-affinity-vm and node-affinity-vm are running by looking at OpenShift Console or using the OpenShift CLI. On the embedded terminal run the following command:
oc get vmi pod-affinity-vm node-affinity-vm -n affinityOutputNAME AGE PHASE IP NODENAME READY pod-affinity-vm 15m Running 10.234.0.63 worker-cluster-bj7mh-1 True node-affinity-vm 16m Running 10.233.0.77 worker-cluster-bj7mh-2 True
As we noted in the last section of this module, without an external force to move or restart the VM, the new affinity rules do not take effect. -
Restart the pod-affinity-vm VM with the following CLI command:
virtctl restart pod-affinity-vm -n affinityVM pod-affinity-vm was scheduled to restart -
Once the VM has been restarted, the pod affinity will be in effect. We can validate this by running the
oc get vmicommand again on the embedded terminal:oc get vmi pod-affinity-vm node-affinity-vm -n affinityOutputNAME AGE PHASE IP NODENAME READY pod-affinity-vm 67s Running 10.233.0.78 worker-cluster-bj7mh-2 True node-affinity-vm 19m Running 10.233.0.77 worker-cluster-bj7mh-2 True
-
You will now see the pod-affinity-vm running on the same node node-affinity-vm because of the pod affinity rule pairing the two together.
Pod Anti-Affinity
Pod Anti-Affinity is a crucial feature in achieving cross-cluster High Availability (HA) for your workloads. It works by instructing the scheduler to prevent the co-location of related VMs on the same node.
The primary benefit is to enhance application resilience. It ensues that VMs belonging to the same service (such as a database cluster) are distributed across different nodes. The failure of a single node will not cause an outage for the entire service.
This portion of the module will demonstrate the setup and usage of Pod Anti-Affinity.
-
To begin, we are going to leverage our existing node-affinity-vm and the app: fedora label from the previous lab. This will serve as 1 of the 2 VMs we use to demonstrate Anti-Affinity.
-
Next, we are going to configure the pod-anti-affinity-vm, lets begin by starting it up with either the OpenShift console, or the CLI on the embedded terminal:
virtctl start pod-anti-affinity-vm -n affinityVM pod-anti-affinity-vm was scheduled to start -
Verify the VirtualMachineInstance is running and see what node it is running on.
oc get vmi pod-anti-affinity-vm -n affinityOutputNAME AGE PHASE IP NODENAME READY pod-anti-affinity-vm 30s Running 10.234.0.64 worker-cluster-bj7mh-1 True
-
Once the VM has started, using the OpenShift console, from the left side navigation panel, navigate to VirtualMachines, select the affinity namespace, click on the virtual machine named pod-anti-affinity-vm and click on the Configuration tab.
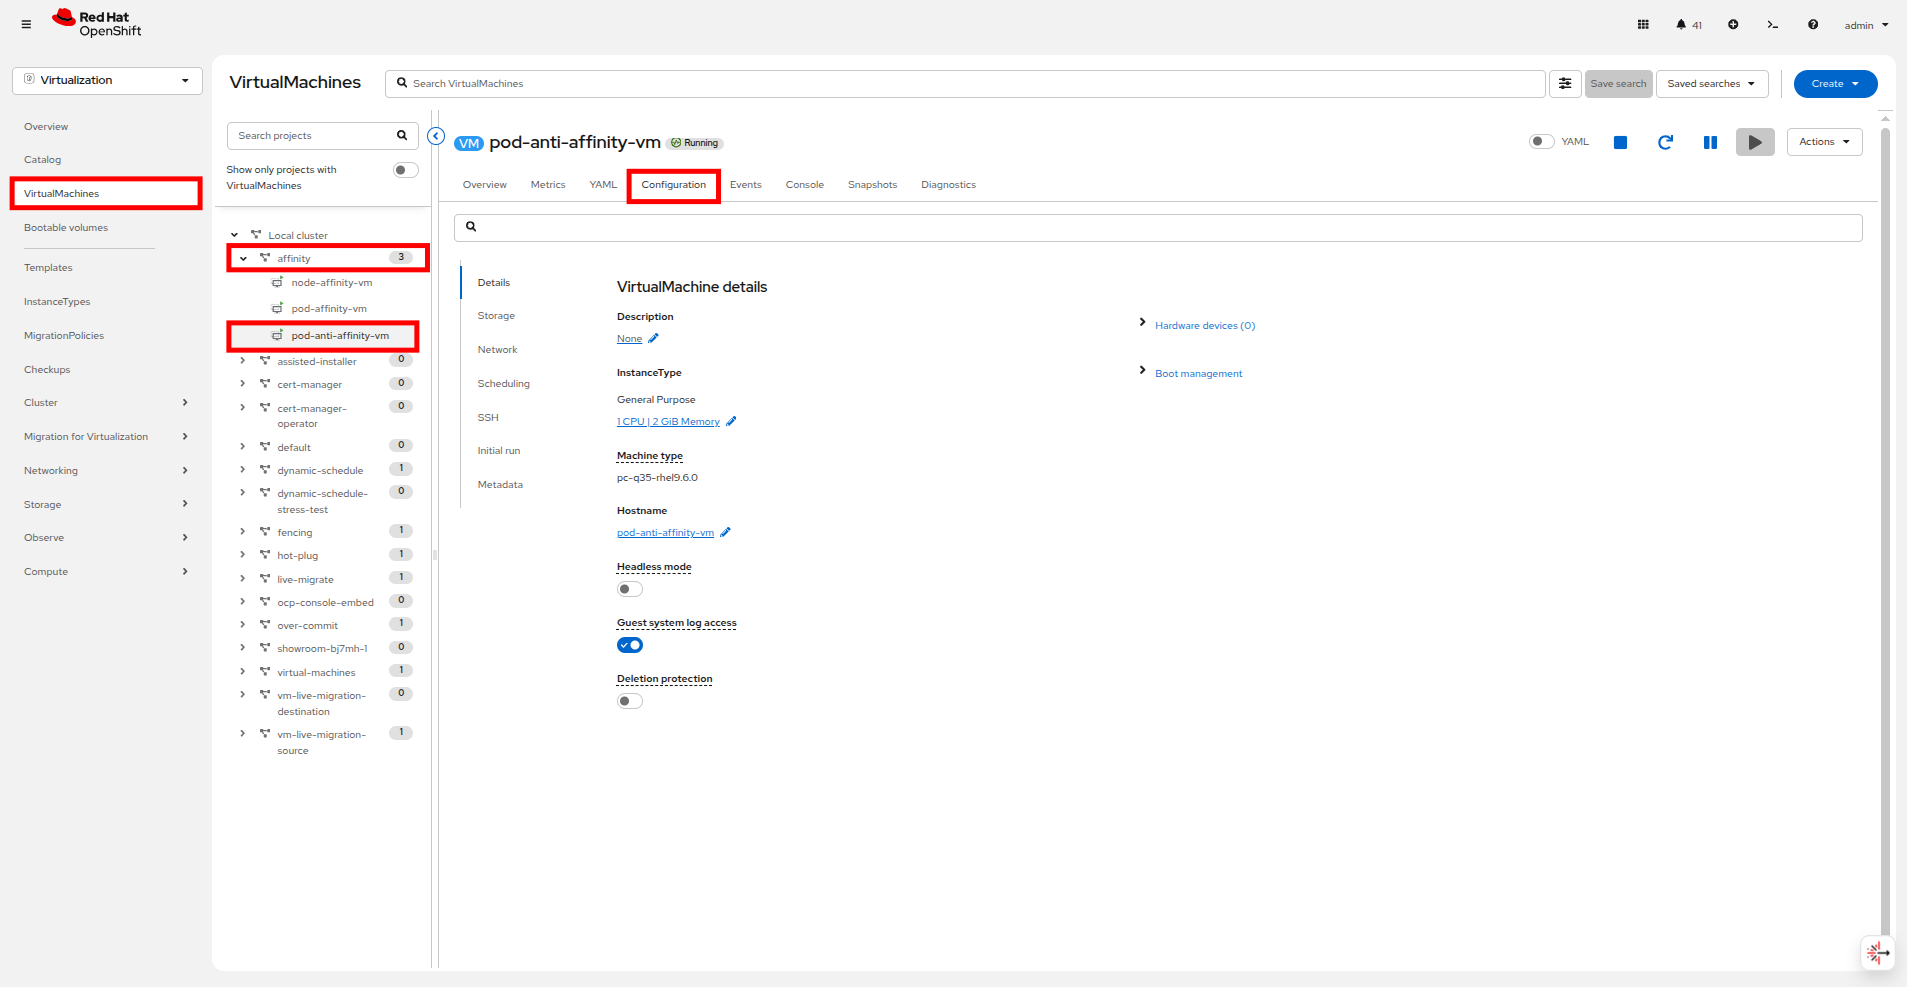 Figure 18. Pod-anti-affinity-vm Configuration
 -
From the Configuration tab, select Scheduling and click the blue pencil icon under Affinity rules to add a new one. When the new window appears click on the Add affinity rule button.
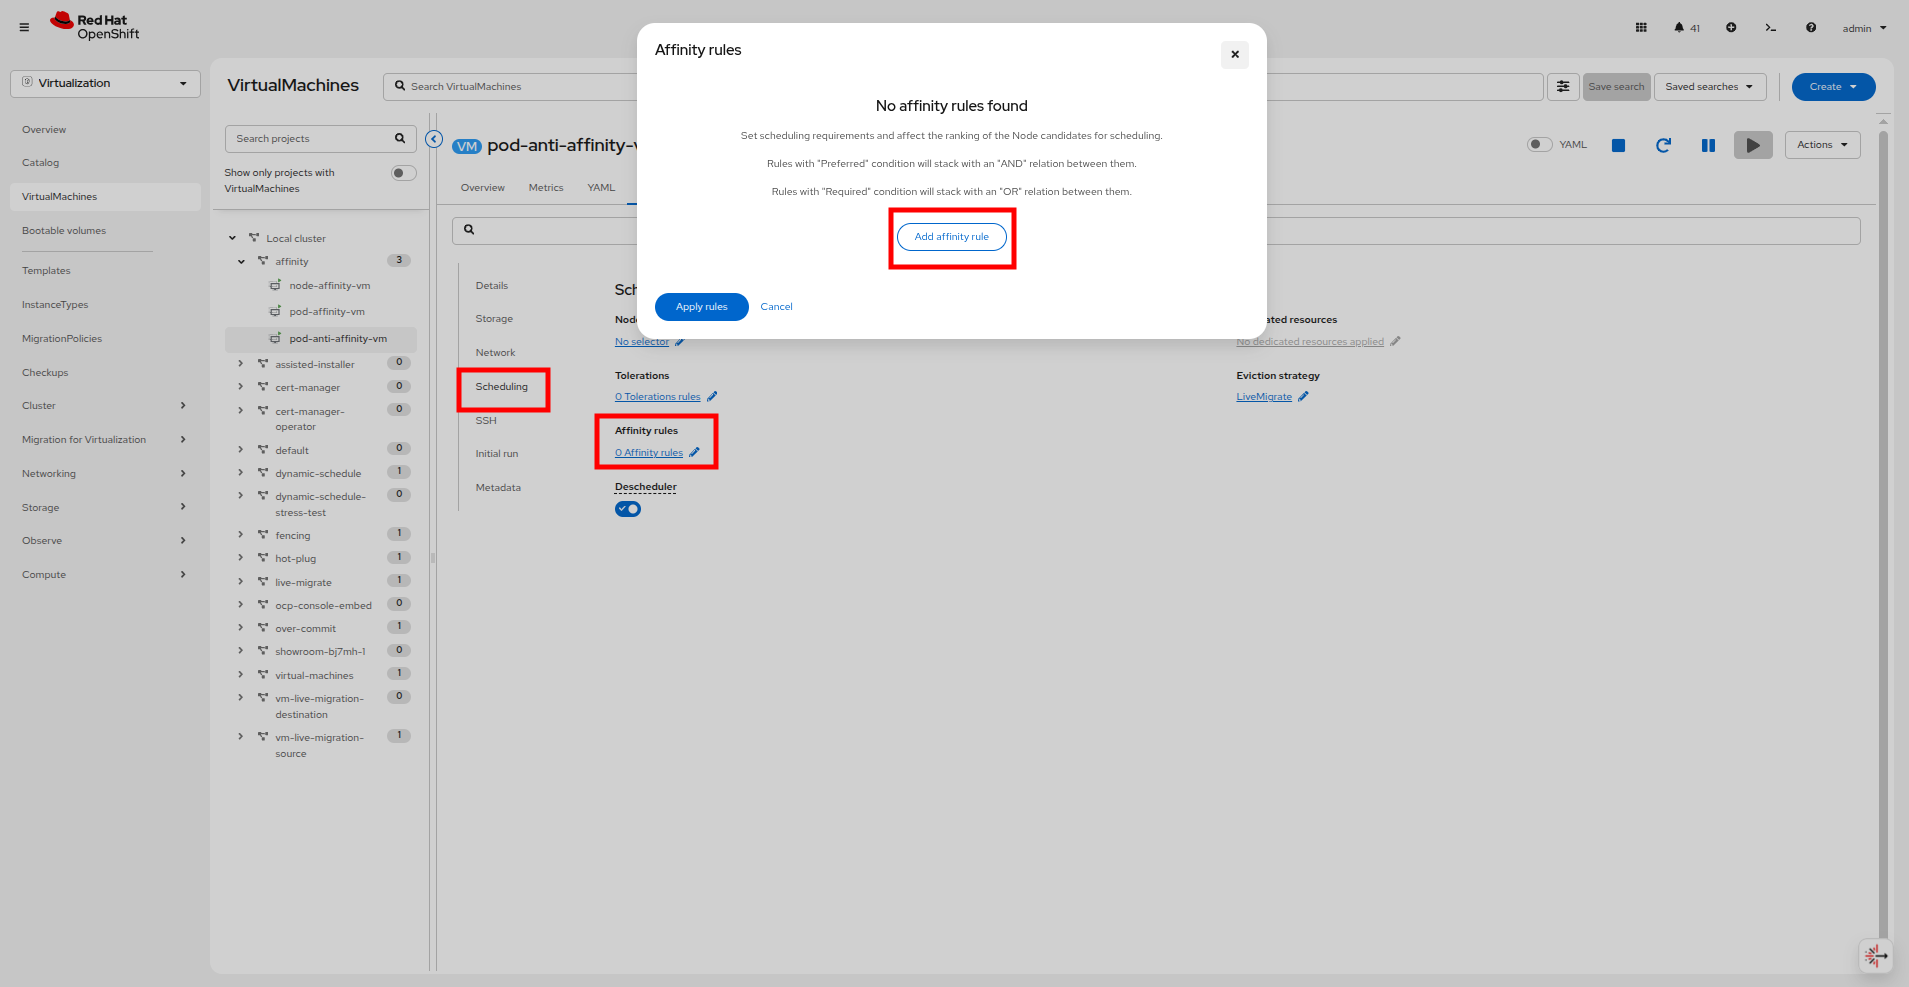 Figure 19. Add Pod Anti-Affinity Rule
 -
Change the Type to Workload (pod) Anti-Affinity, and keep the Condition set to Required during scheduling and leave the Topology key at the default value.
-
Click Add expression under Workload labels and set the Key field to
appand the Values field tofedoraand click Add.This is the same label applied to the the previous two VMs. -
Your final pod affinity rule will look like the picture below, once satisfied click the Save affinity rule button.
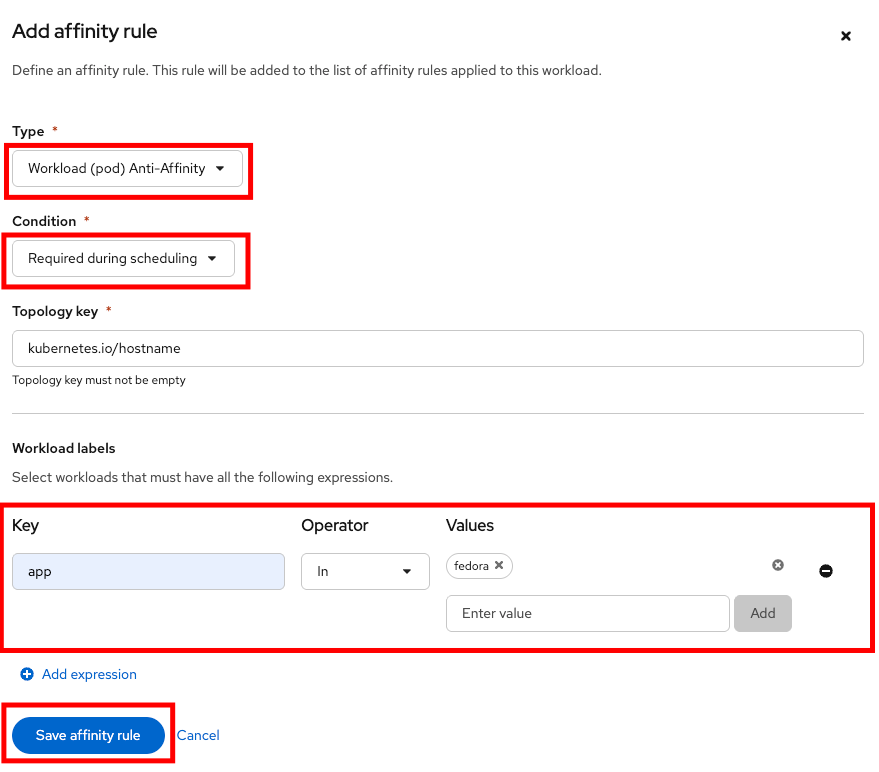 Figure 20. Add Pod Anti-Affinity Rule
 -
When you are returned to the original prompt click the Apply Rules button.
-
Now let’s take a look at the pod anti-affinity rule on pod-anti-affinity-vm.
-
Return to the embedded terminal and run the following command to see the settings:
oc get vm pod-anti-affinity-vm -n affinity -o jsonpath='{.spec.template.spec.affinity}{"\n"}'Output{"podAntiAffinity":{"requiredDuringSchedulingIgnoredDuringExecution":[{"labelSelector":{"matchExpressions":[{"key":"app","operator":"In","values":["fedora"]}]},"topologyKey":"kubernetes.io/hostname"}]}} -
Confirm where the pod-anti-affinity-vm and node-affinity-vm are running by looking at OpenShift Console or using the OpenShift CLI.
oc get vmi pod-anti-affinity-vm node-affinity-vm -n affinityOutputNAME AGE PHASE IP NODENAME READY pod-anti-affinity-vm 12m Running 10.234.0.64 worker-cluster-bj7mh-1 True node-affinity-vm 33m Running 10.233.0.77 worker-cluster-bj7mh-2 True
It’s possible your pod-anti-affinity-vm and node-affinity-vm are already on different nodes because the cluster is lightly loaded. Even so, you can restart the pods endlessly and they never will end up on the same node. -
As we noted in the previous sections, without an external force to move or restart the VM, new Affinity rules do not take effect. To apply the changes manually, you can live migrate or restart the VM. For automatic enforcement, you can configure the Descheduler with the AffinityAndTaints profile.
-
Restart the pod-anti-affinity-vm VM using the following command:
virtctl restart pod-anti-affinity-vm -n affinityVM pod-anti-affinity-vm was scheduled to restart -
Once the VM restarts, the pod anti-affinity will be in effect, and this VM will not be allowed to occupy the same node as the node-affinity-vm virtual machine.
-
You can validate this in the GUI by navigating to the pod-anti-affinity-vm and node-affinity-vm, and looking at the Node name in the General box on the right side of the Overview tab or by using the OCP CLI on the embedded terminal.
oc get vmi pod-anti-affinity-vm node-affinity-vm -n affinity
NAME                   AGE   PHASE     IP            NODENAME                        READY
pod-anti-affinity-vm   109s   Running   10.234.0.65   worker-cluster-bj7mh-1   True
node-affinity-vm       37m    Running   10.233.0.77   worker-cluster-bj7mh-2   True
Congratulations, you have completed this module!
| Stop the node-affinity-vm, pod-affinity-vm, and pod-anti-affinity-vm VMs from this module to ensure that there are enough resources to continue for the next module |
Summary
By ensuring that Affinity and Anti-Affinity rules are set appropriately for your cluster nodes and workloads you can help ensure that virtual workloads with shared dependences can be co-located on the same node for improved performance, or that for other workload types there is no single point of failure within your cluster for your virtual machines or other applications.