Model Context Protocol
So far, we have enabled rudimentary agentic capabilities in our playground by enabling the websearch tool, which is provided by Llama Stack as a built-in tool. For our use case, our agent also needs to interact with OpenShift and GitHub, neither of which can be done with built-in Llama Stack tools. However, Llama Stack supports usage of external tool providers, so we can leverage custom or pre-built tools that are available via Model Context Protocol:
MCP (Model Context Protocol) is an open-source standard for connecting AI applications to external systems. Using MCP, AI applications like Claude or ChatGPT can connect to data sources (e.g. local files, databases), tools (e.g. search engines, calculators) and workflows (e.g. specialized prompts)—enabling them to access key information and perform tasks. Think of MCP like a USB-C port for AI applications. Just as USB-C provides a standardized way to connect electronic devices, MCP provides a standardized way to connect AI applications to external systems.
In other words, as long as our agent runtime supports MCP, we can plug in existing MCP-based tool providers to unlock arbitrary integration capabilities. Furthermore, as per MCP specification:
MCP provides a standardized way for applications to:
  - Share contextual information with language models
  - Expose tools and capabilities to AI systems
  - Build composable integrations and workflows
This means the details of the provided tools (which tools, for which purpose, how to use them) are exposed directly to the language model, so there is zero configuration overhead on our side once the MCP integration is taken care of. The dynamic discoverability and exposing of contextual information is tailored for language models.
Let’s now dive into how to add MCP-based tool providers to Llama Stack.
The process of registering MCP servers in 3.x is different than the steps you will take in this module. Instead of editing the llama-stack-config itself, there is a separate ConfigMap resource for your MCP servers you must apply to register them properly with the Llama Stack, AI Assets and Gen AI playground features of the new platform.
|
Adding the OpenShift MCP Server to Llama Stack
For this lab, we’ve already deployed the pod that runs the OpenShift MCP server that interacts with our OpenShift cluster. Let’s add it to Llama Stack as a new tool provider.
We need to edit the run.yaml in our llama-stack-config ConfigMap to add the tool runtime and tool group.
-
Within the
userX-llama-stackproject, click on ConfigMaps and selectllama-stack-configfile.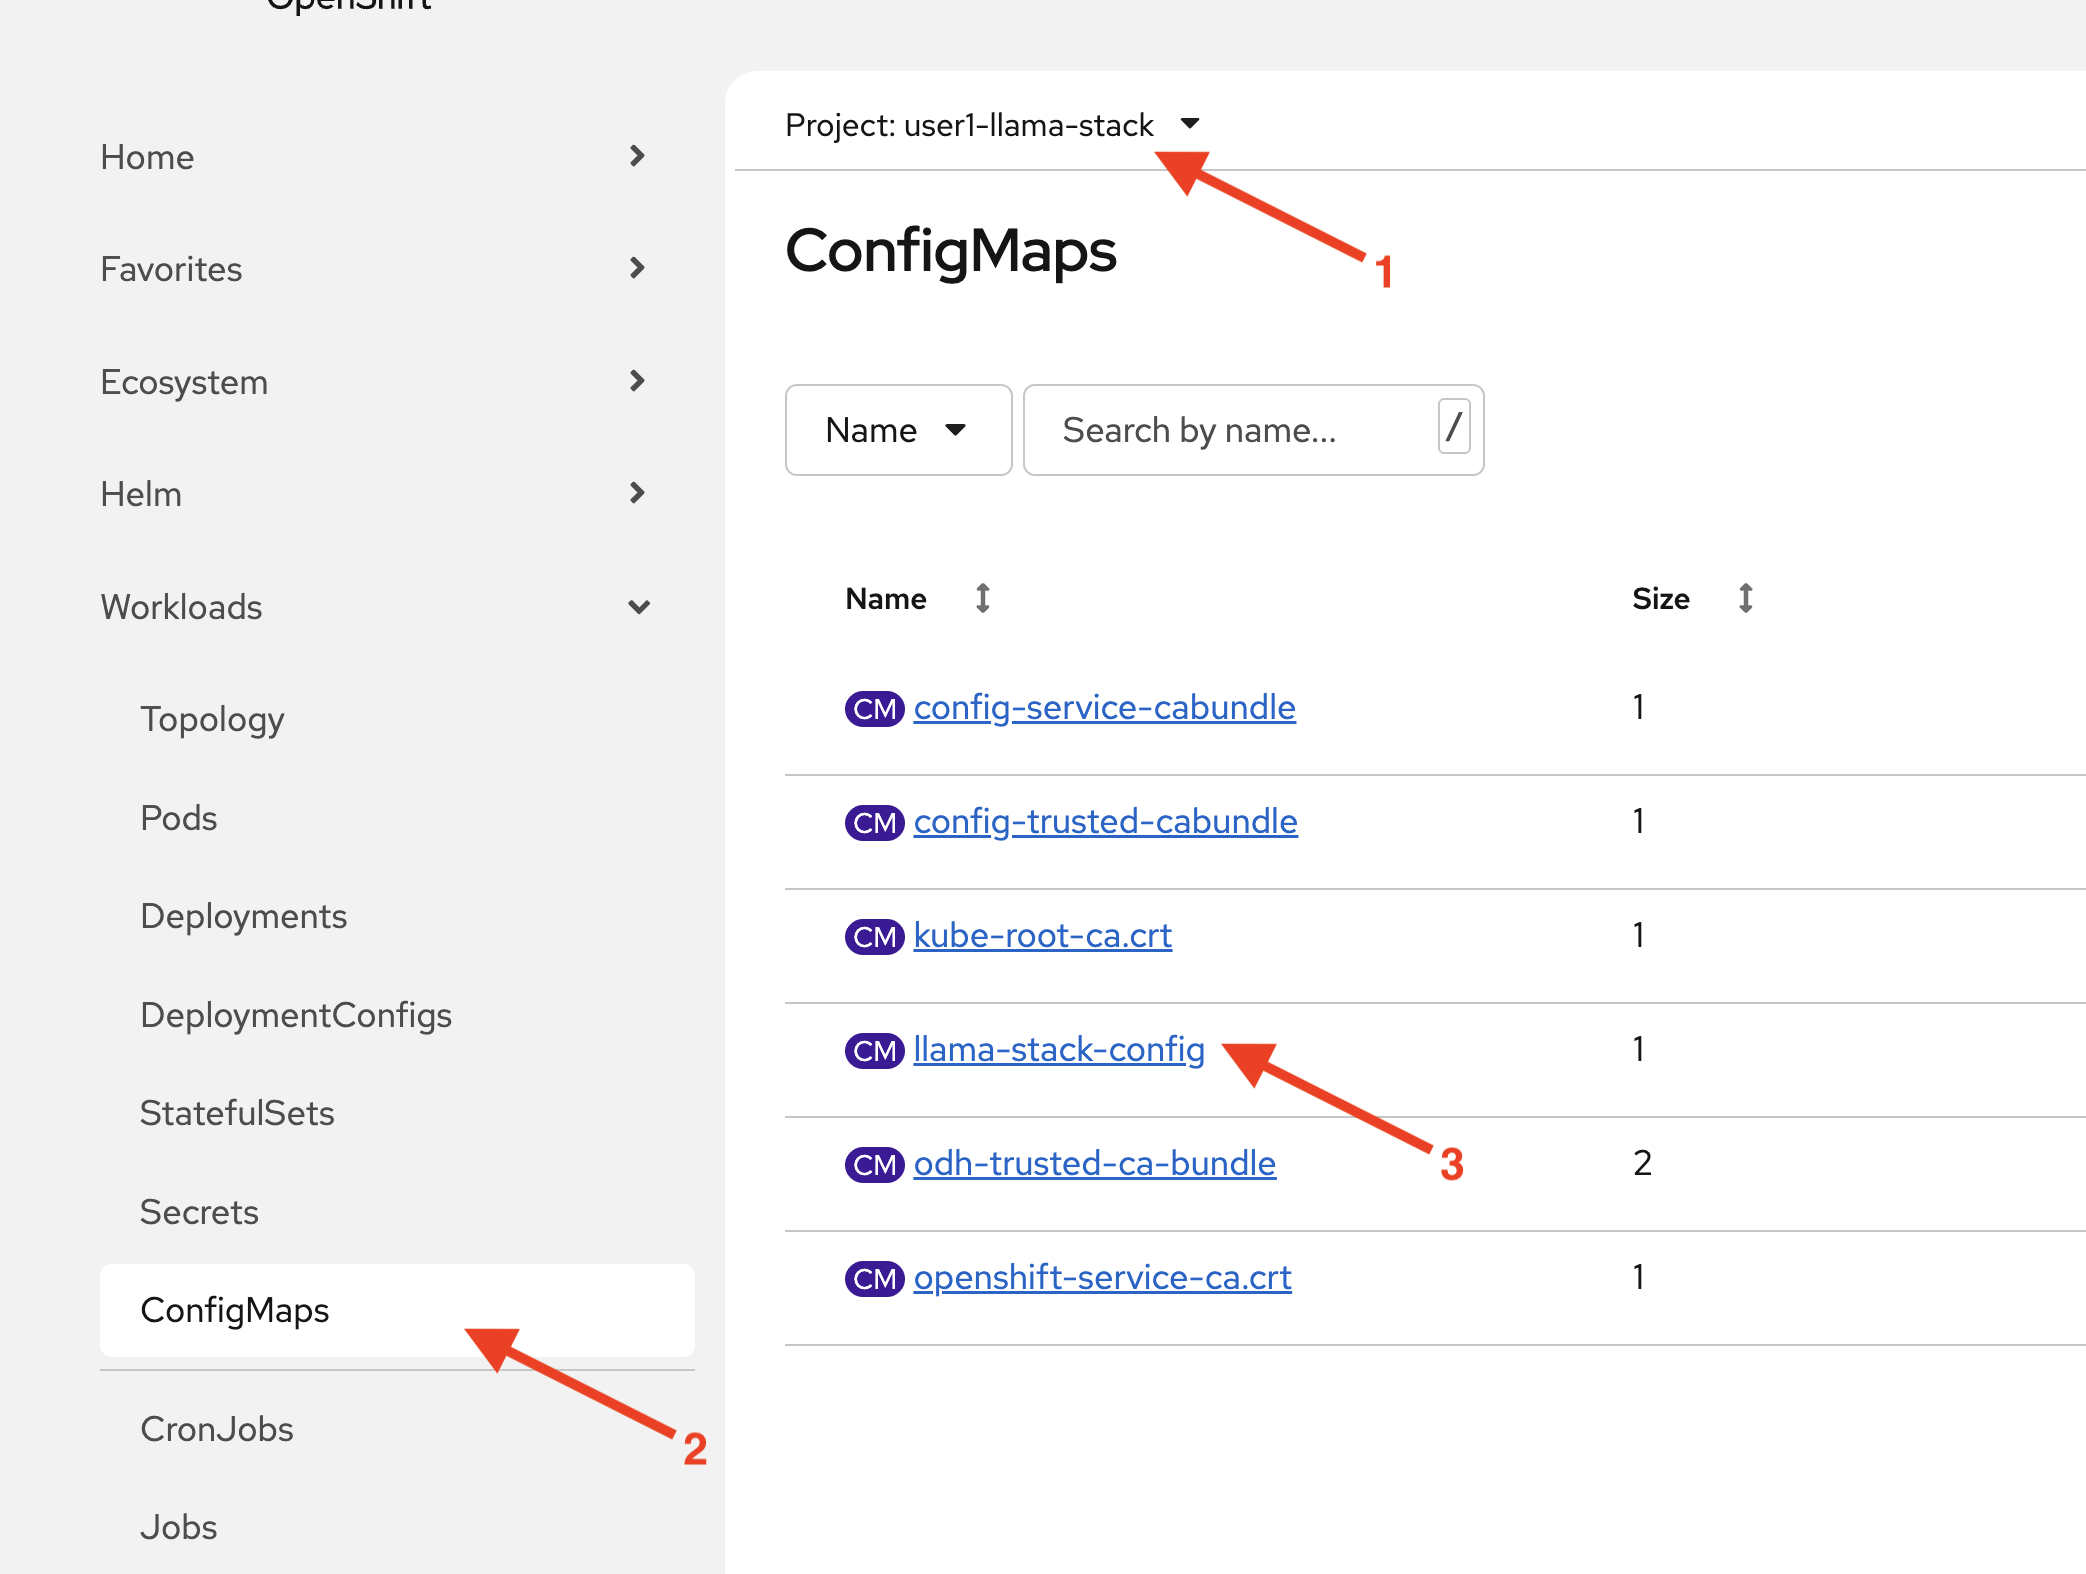
-
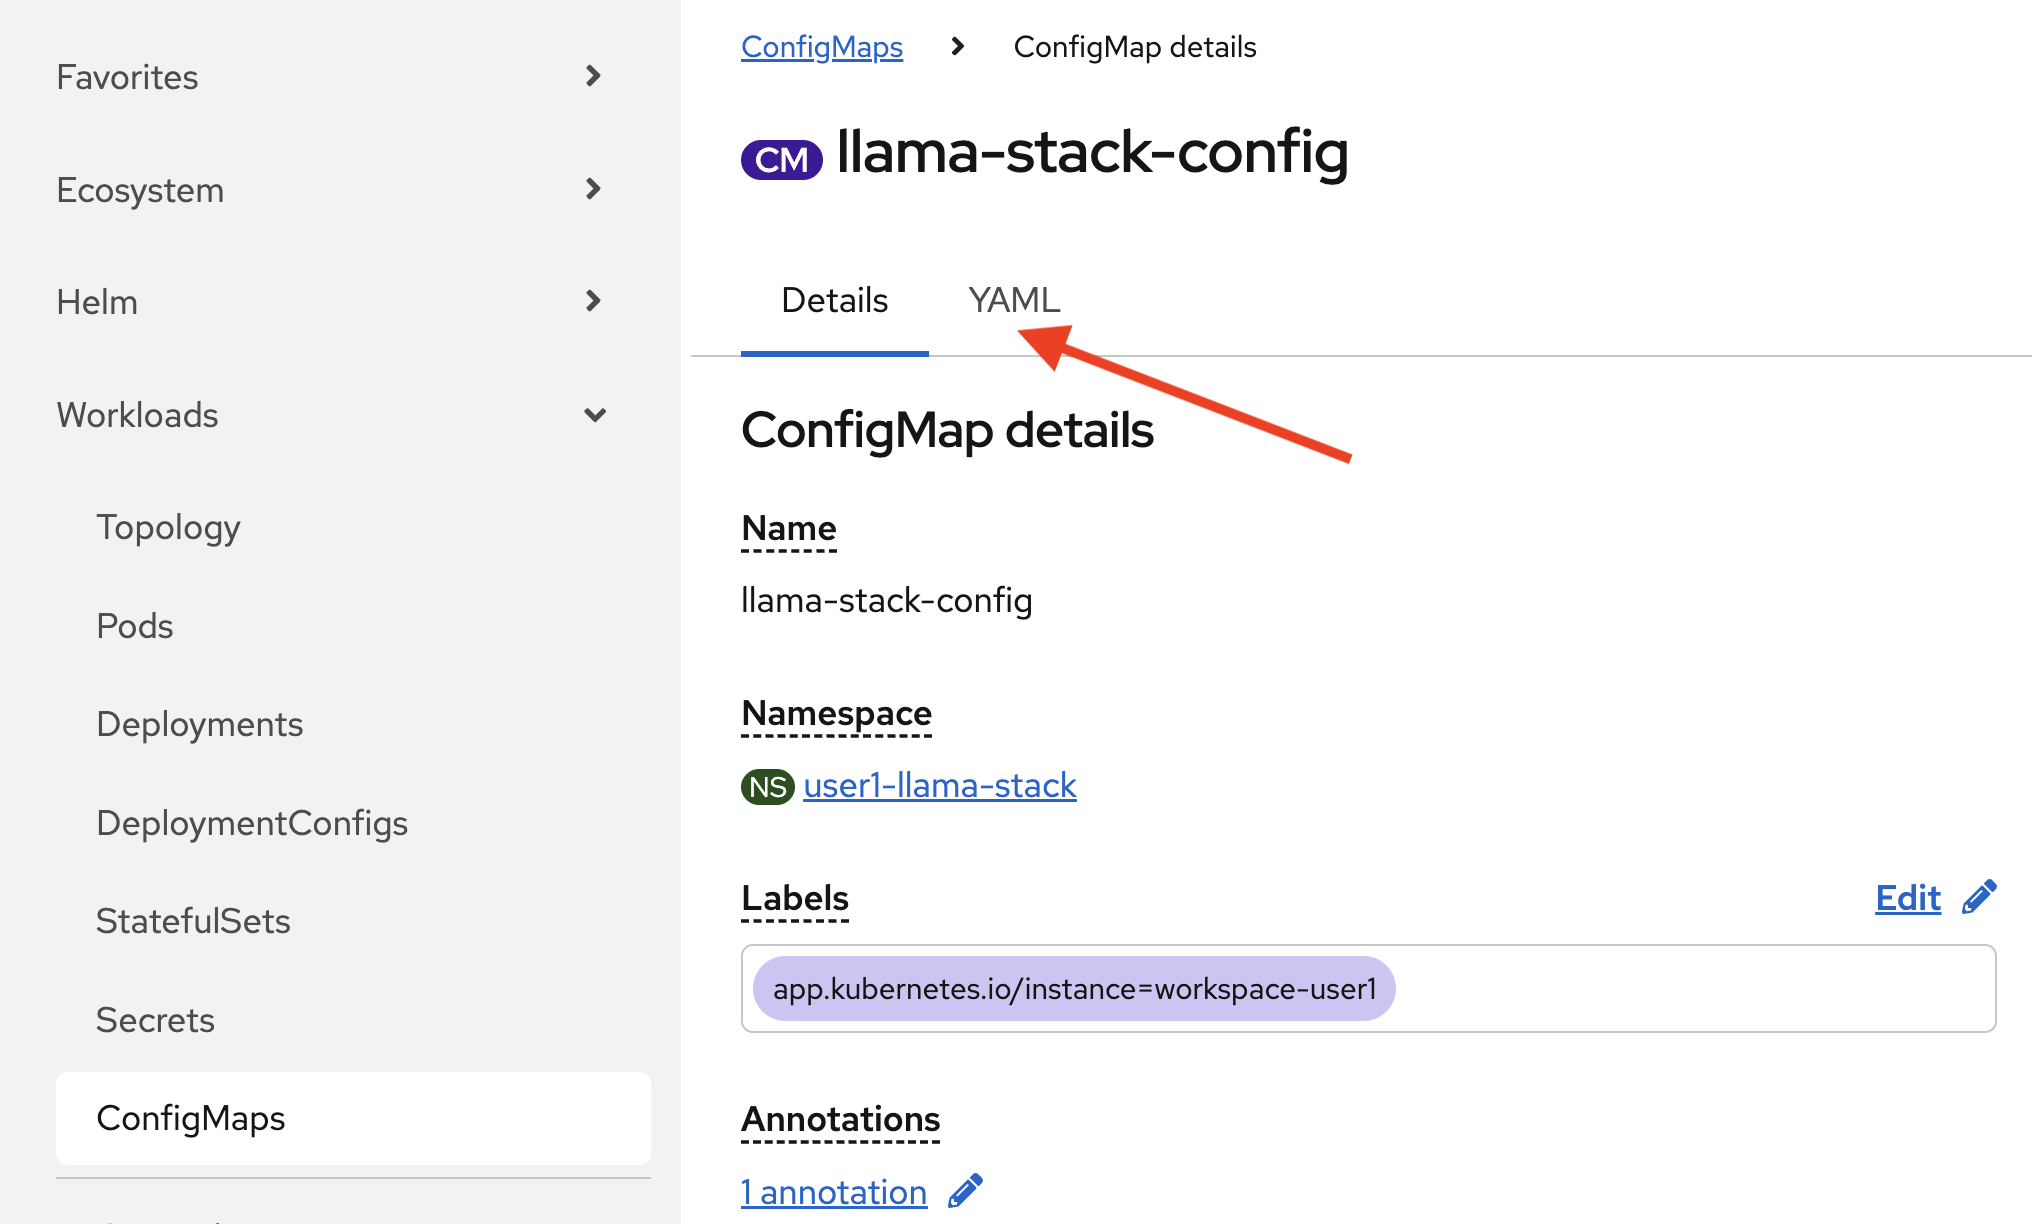
Click on the YAML tab.
-
Add the following entry under
providers.tool_runtime:- provider_id: model-context-protocol provider_type: remote::model-context-protocol config: {} -
Next, add the following entry under
tool_groups:- toolgroup_id: mcp::openshift provider_id: model-context-protocol mcp_endpoint: uri: http://ocp-mcp-server.mcp-openshift.svc.cluster.local:8000/sseYour run.yaml should now look like this.
# Llama Stack configuration version: '2' image_name: rh apis: - inference - tool_runtime - agents - safety - vector_io models: - metadata: {} model_id: granite-3-2-8b-instruct provider_id: vllm provider_model_id: granite-3-2-8b-instruct model_type: llm providers: inference: - provider_id: vllm provider_type: "remote::vllm" config: url: https://litellm-prod.apps.maas.redhatworkshops.io/v1 context_length: 4096 api_token: ${env.DEFAULT_MODEL_API_TOKEN} tls_verify: true tool_runtime: - provider_id: tavily-search provider_type: remote::tavily-search config: api_key: ${env.TAVILY_API_KEY} max_results: 3 - provider_id: model-context-protocol provider_type: remote::model-context-protocol config: {} agents: - provider_id: meta-reference provider_type: inline::meta-reference config: persistence_store: type: sqlite db_path: ${env.SQLITE_STORE_DIR:=~/.llama/distributions/rh}/agents_store.db responses_store: type: sqlite db_path: ${env.SQLITE_STORE_DIR:=~/.llama/distributions/rh}/responses_store.db server: port: 8321 tools: - name: builtin::websearch enabled: true tool_groups: - provider_id: tavily-search toolgroup_id: builtin::websearch - toolgroup_id: mcp::openshift provider_id: model-context-protocol mcp_endpoint: uri: http://ocp-mcp-server.mcp-openshift.svc.cluster.local:8000/sse -
Hit
Save. The Llama Stack operator restarts Llama Stack since its configuration changed. This may take several minutes. -
Restart the playground by deleting its pod (starting with
llama-stack-playground). Wait until it’s Ready and Running.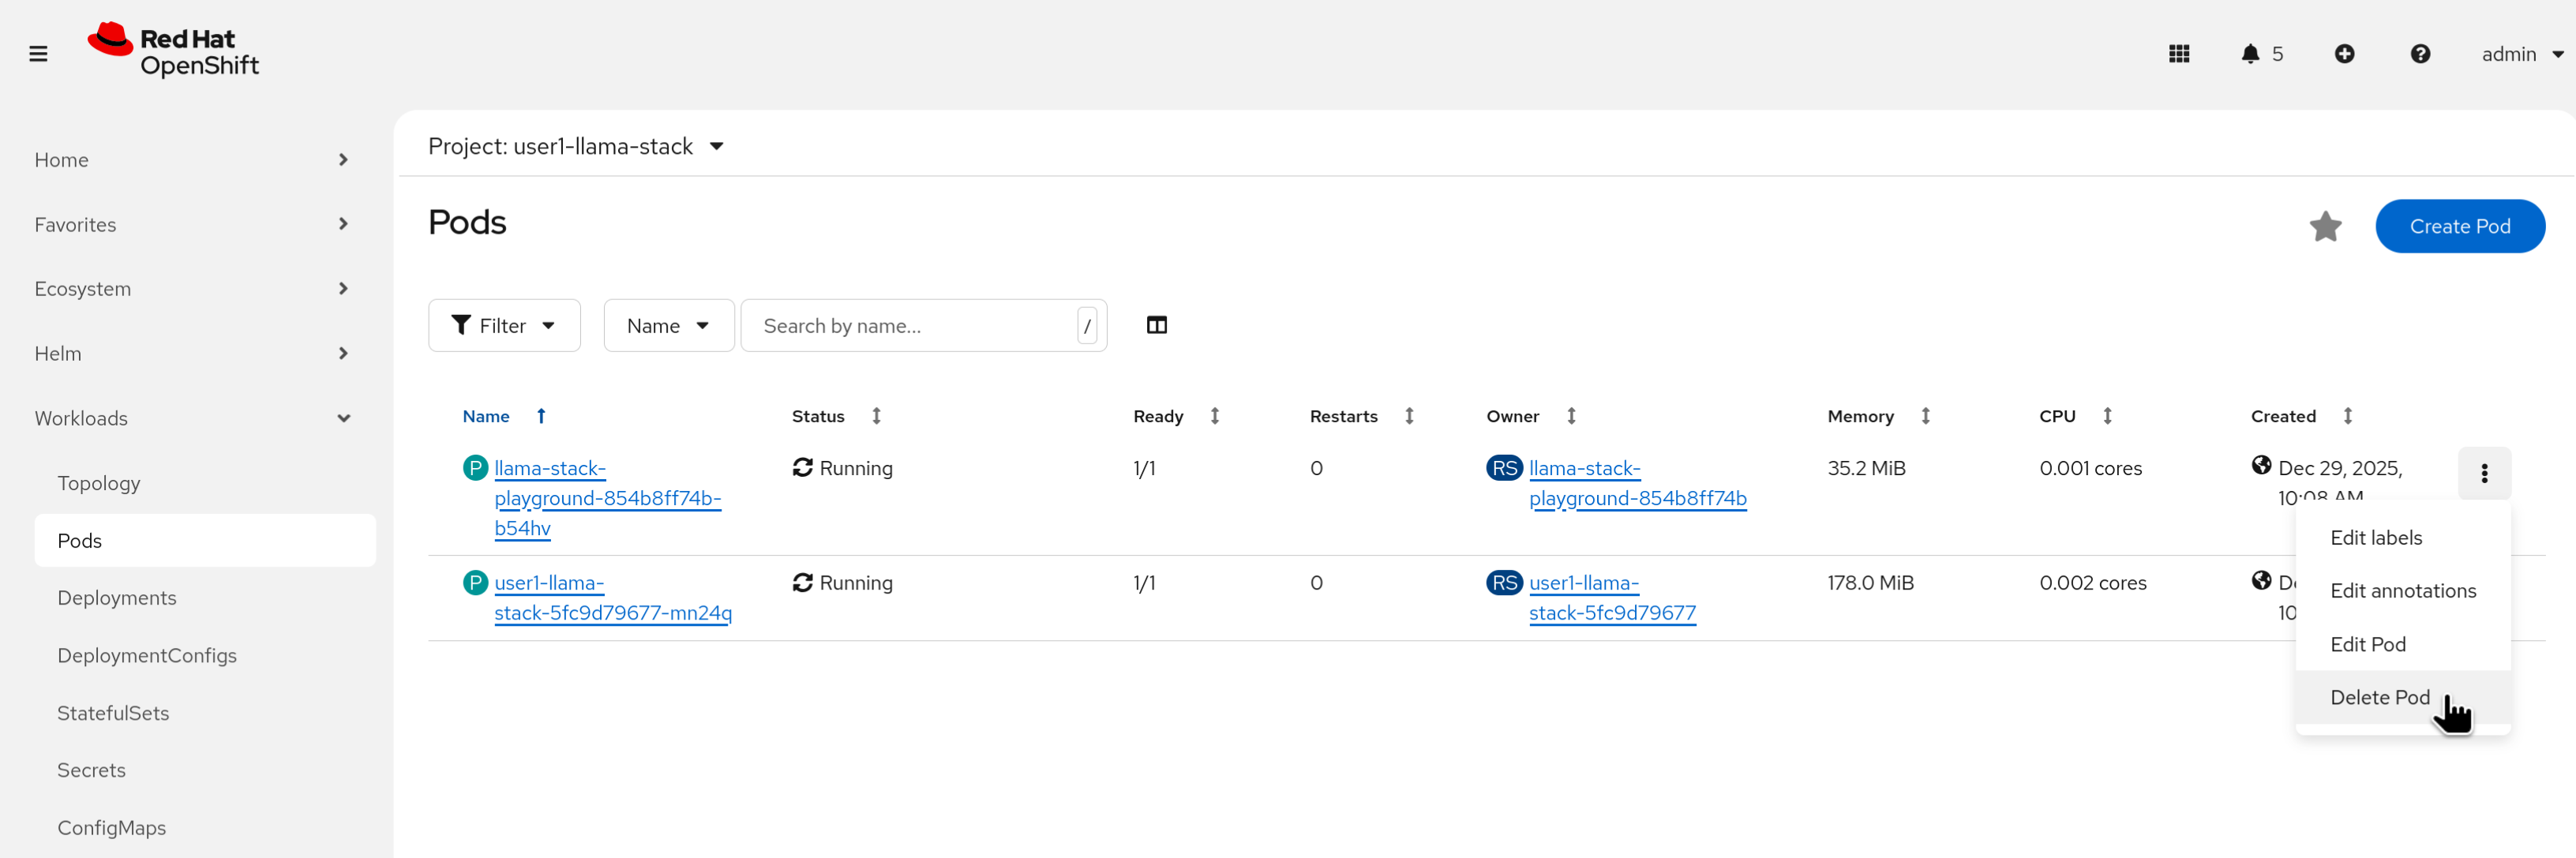
-
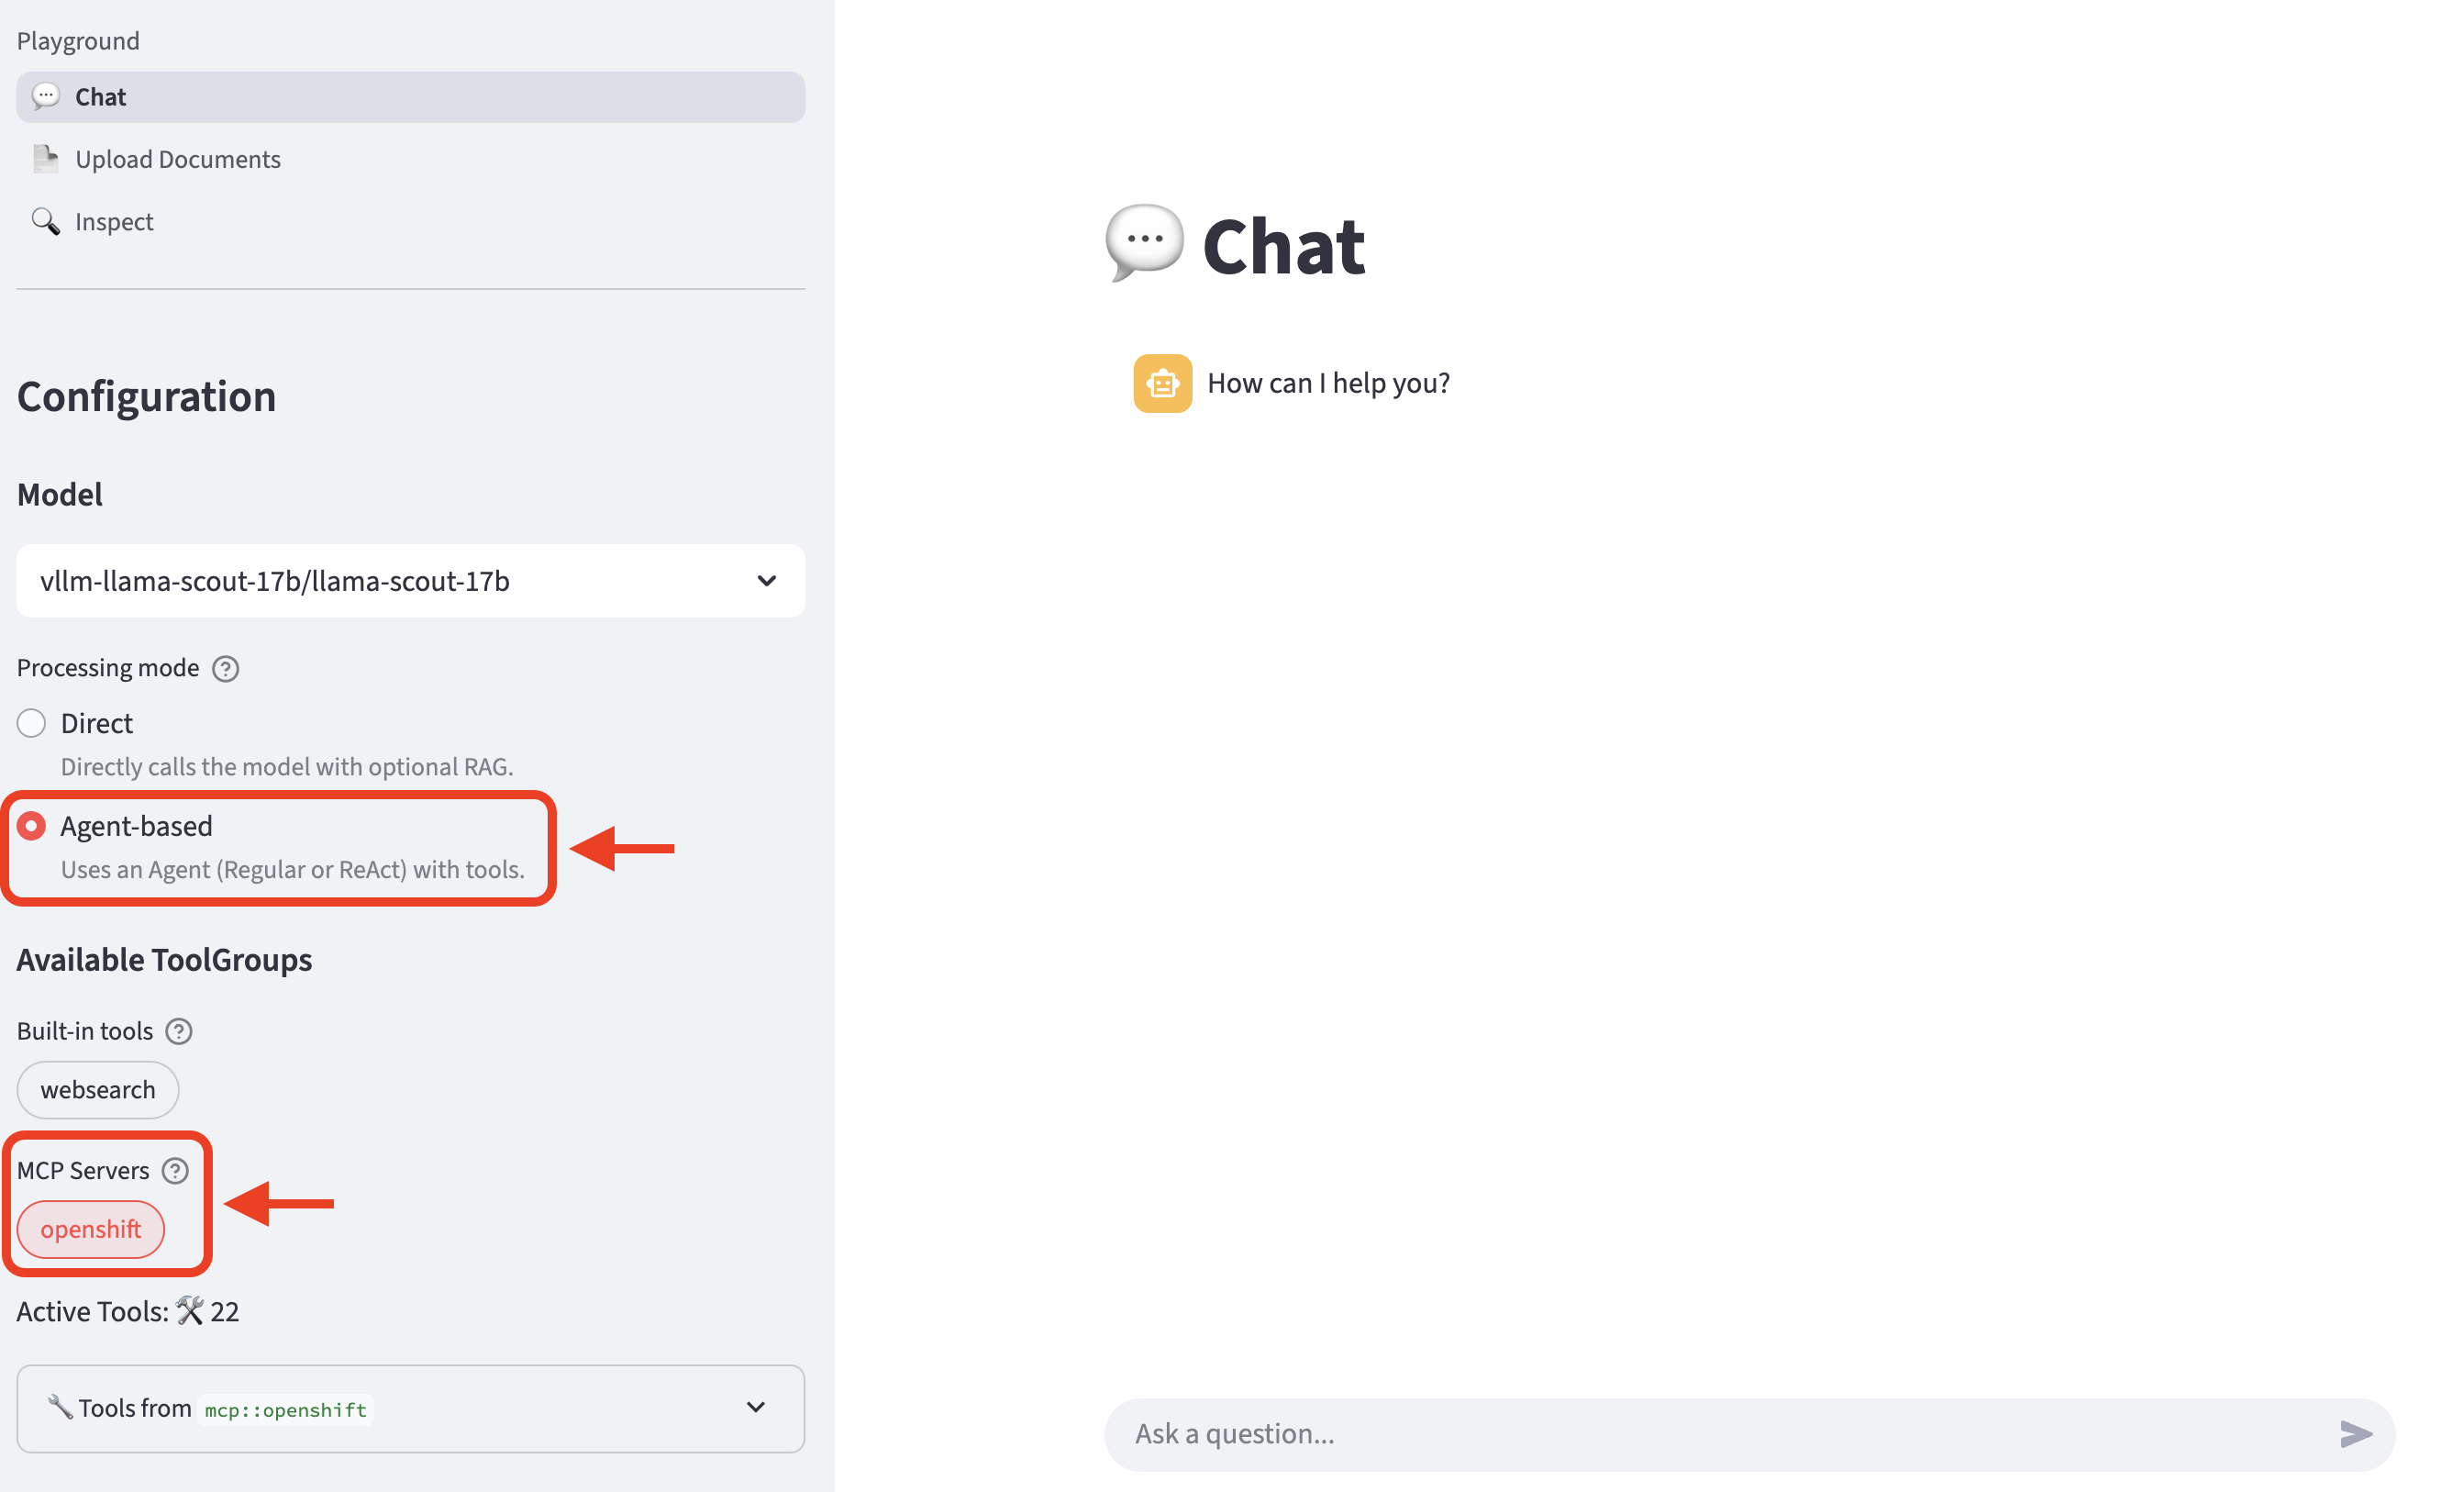
Refresh the playground in the browser. Select Agent-based, and then select the openshift MCP Server entry underneath the available tool groups.
-
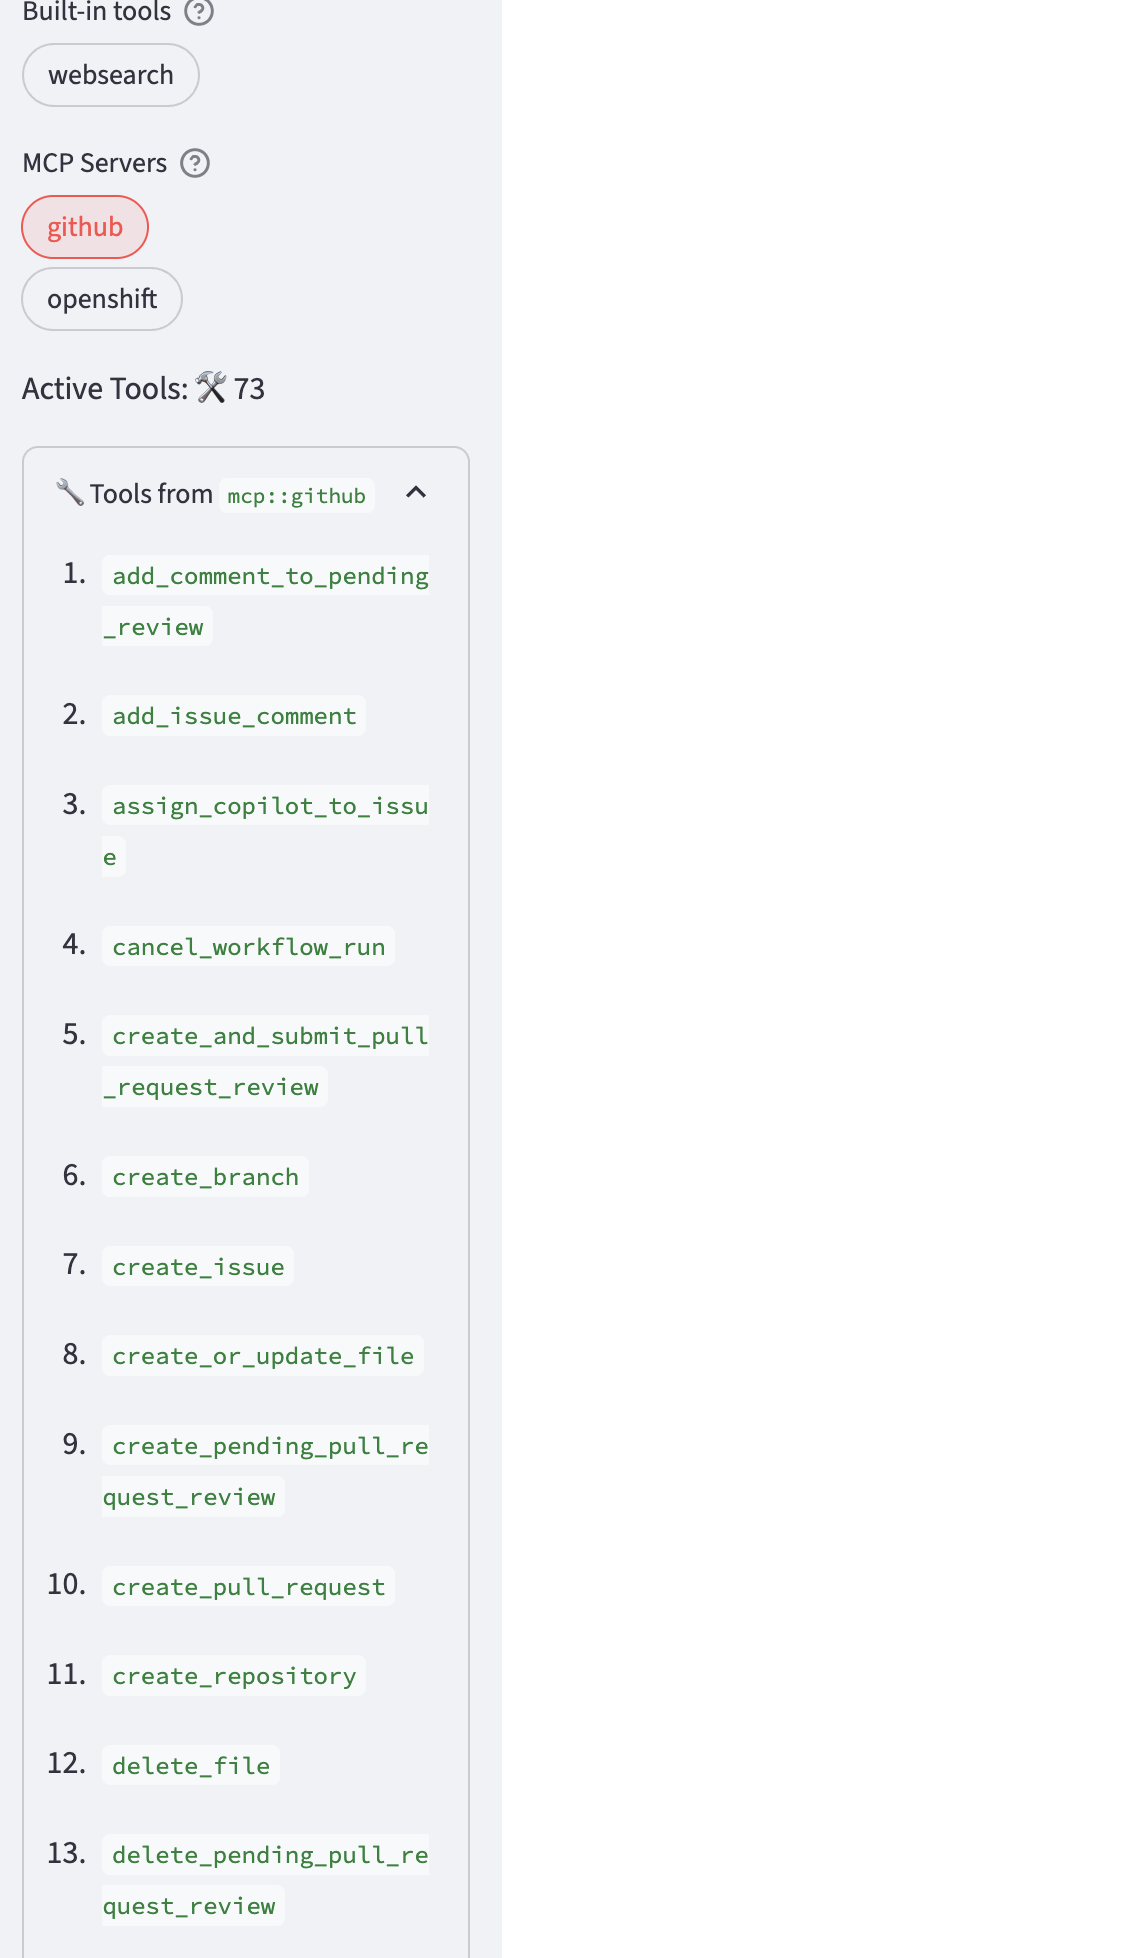
Expand
Tools fromto review the list of tools available from the MCP server.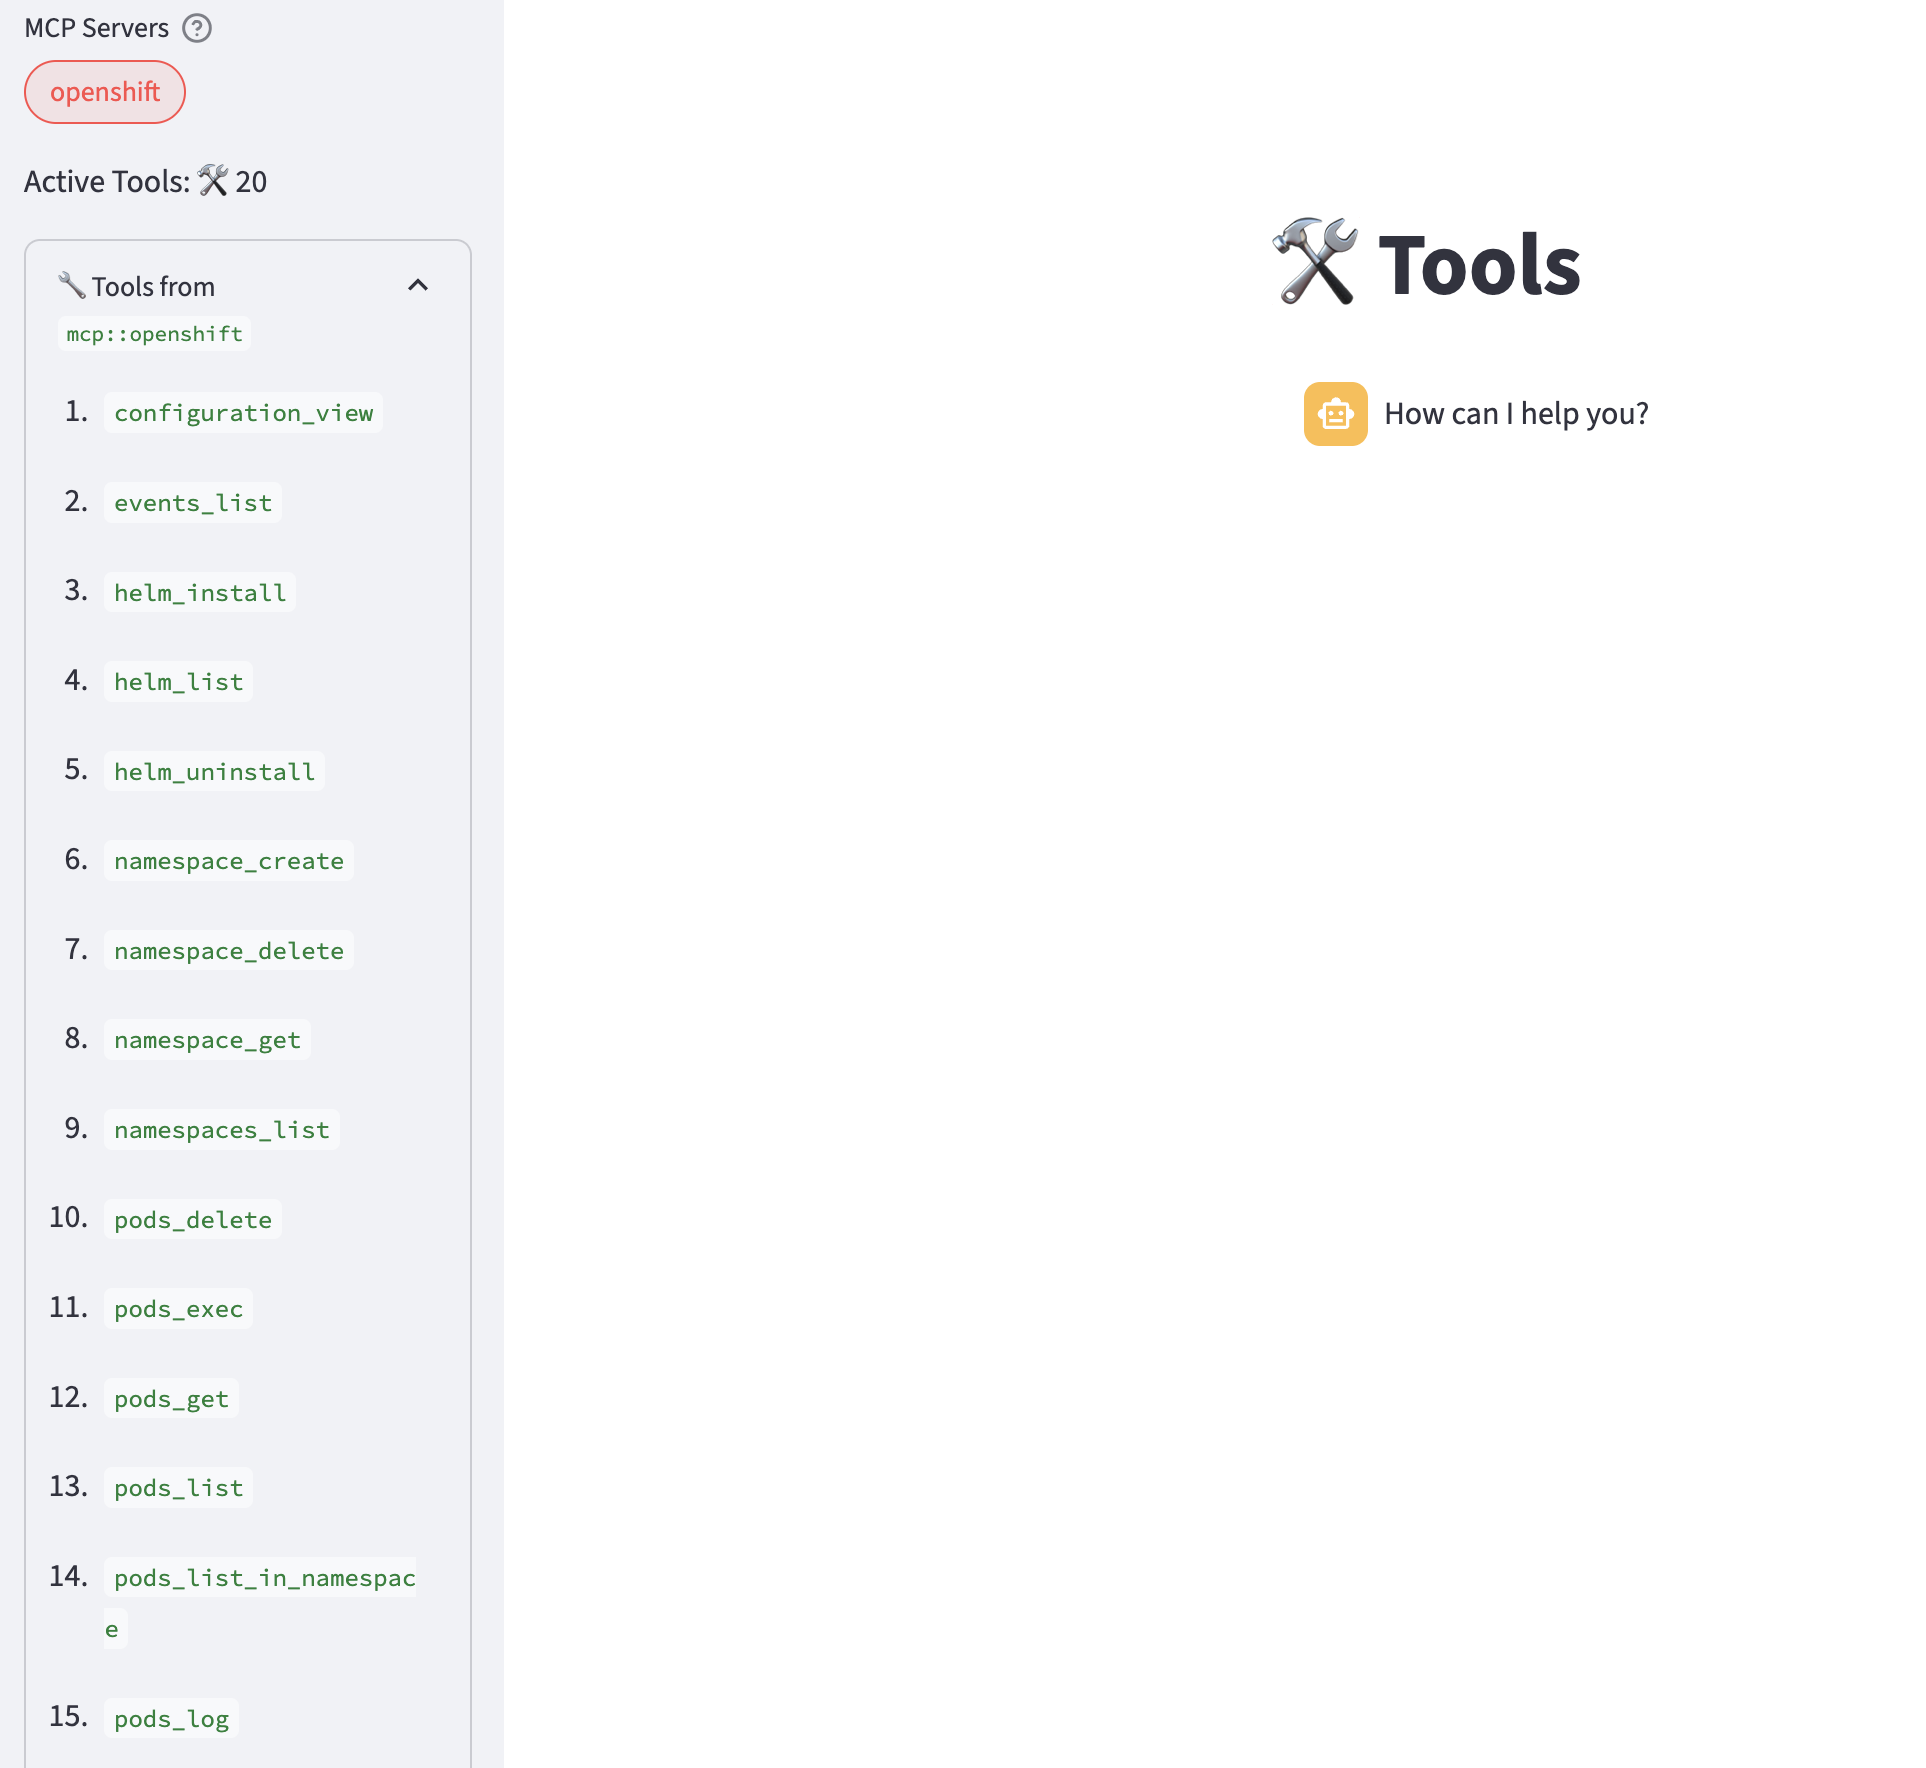
-
Try the prompt:
List the pods in the mcp-openshift namespace. -
Experiment with different prompts to activate the various tools available with the MCP server.
|
Not all the prompts work all of the time. This is a common problem with tool calling and LLMs. In general, larger and more capable models often perform more reliably and predictably with tools. Granite performs decently well but is imperfect. |
Adding the GitHub MCP Server to Llama Stack
In the previous section, we used an MCP server that was already provisioned for us. In this section, we’ll:
-
Enable access to a GitHub repository
-
Deploy the GitHub MCP server
-
Enable it in Llama Stack
-
Use it in the playground
First, we need to enable access to our GitHub repository so our GitHub tools can interact with it.
-
Set up your repository
-
Fork the lab repository to your personal GitHub account.
 Figure 1. GitHub Repo Fork
 -
Ensure that you Enable Issues for your fork under Settings > General > Features > Issues as they are disabled for forked repositories by default.
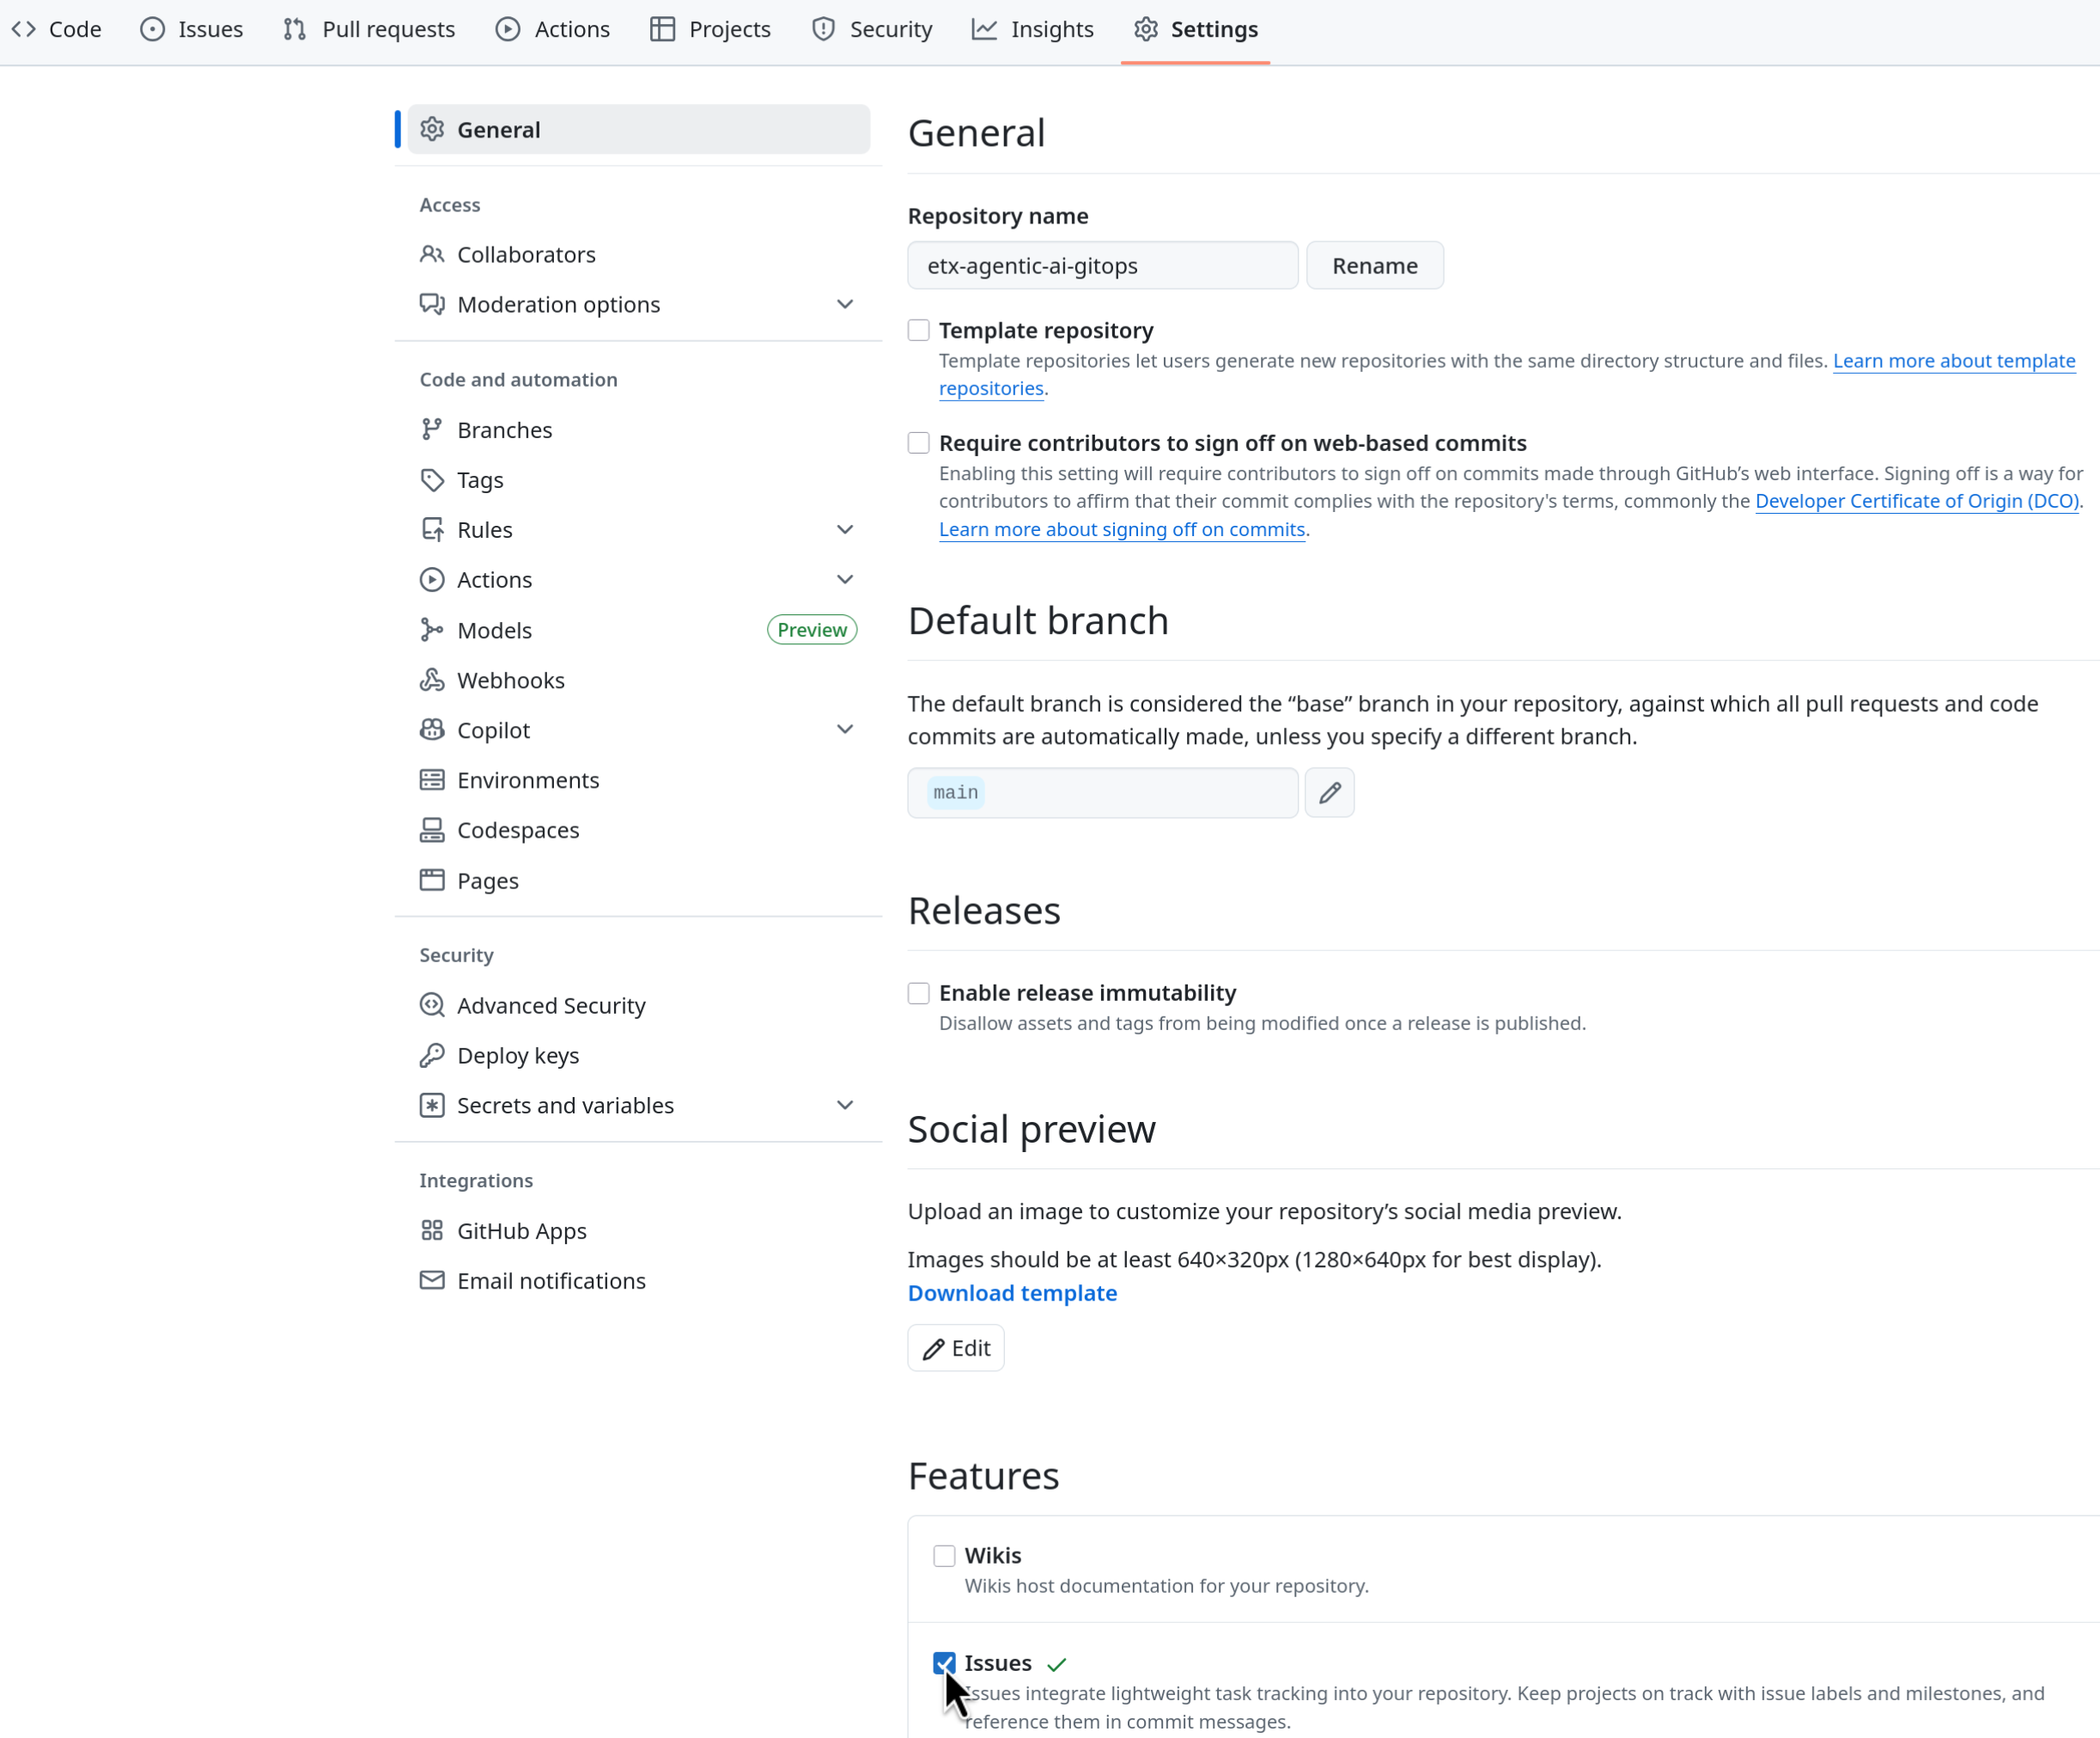 Figure 2. GitHub Repo Enable Issues
-
-
Setup GitHub Token
-
Click on your user icon > Settings
-
Select Developer Settings > Personal Access Tokens > Fine-grained personal access tokens
-
Select Button Generate a new token - give it a token name e.g. agent-lab
-
Set Repository access
Select repositories: allow access to the repository you forked above.
-
Give it the following permissions:
Commit statuses: Read-Only
Content: Read-Only
Issues: Read and Write
Metadata: Read-Only (this gets added automatically)
Pull requests: Read-Only
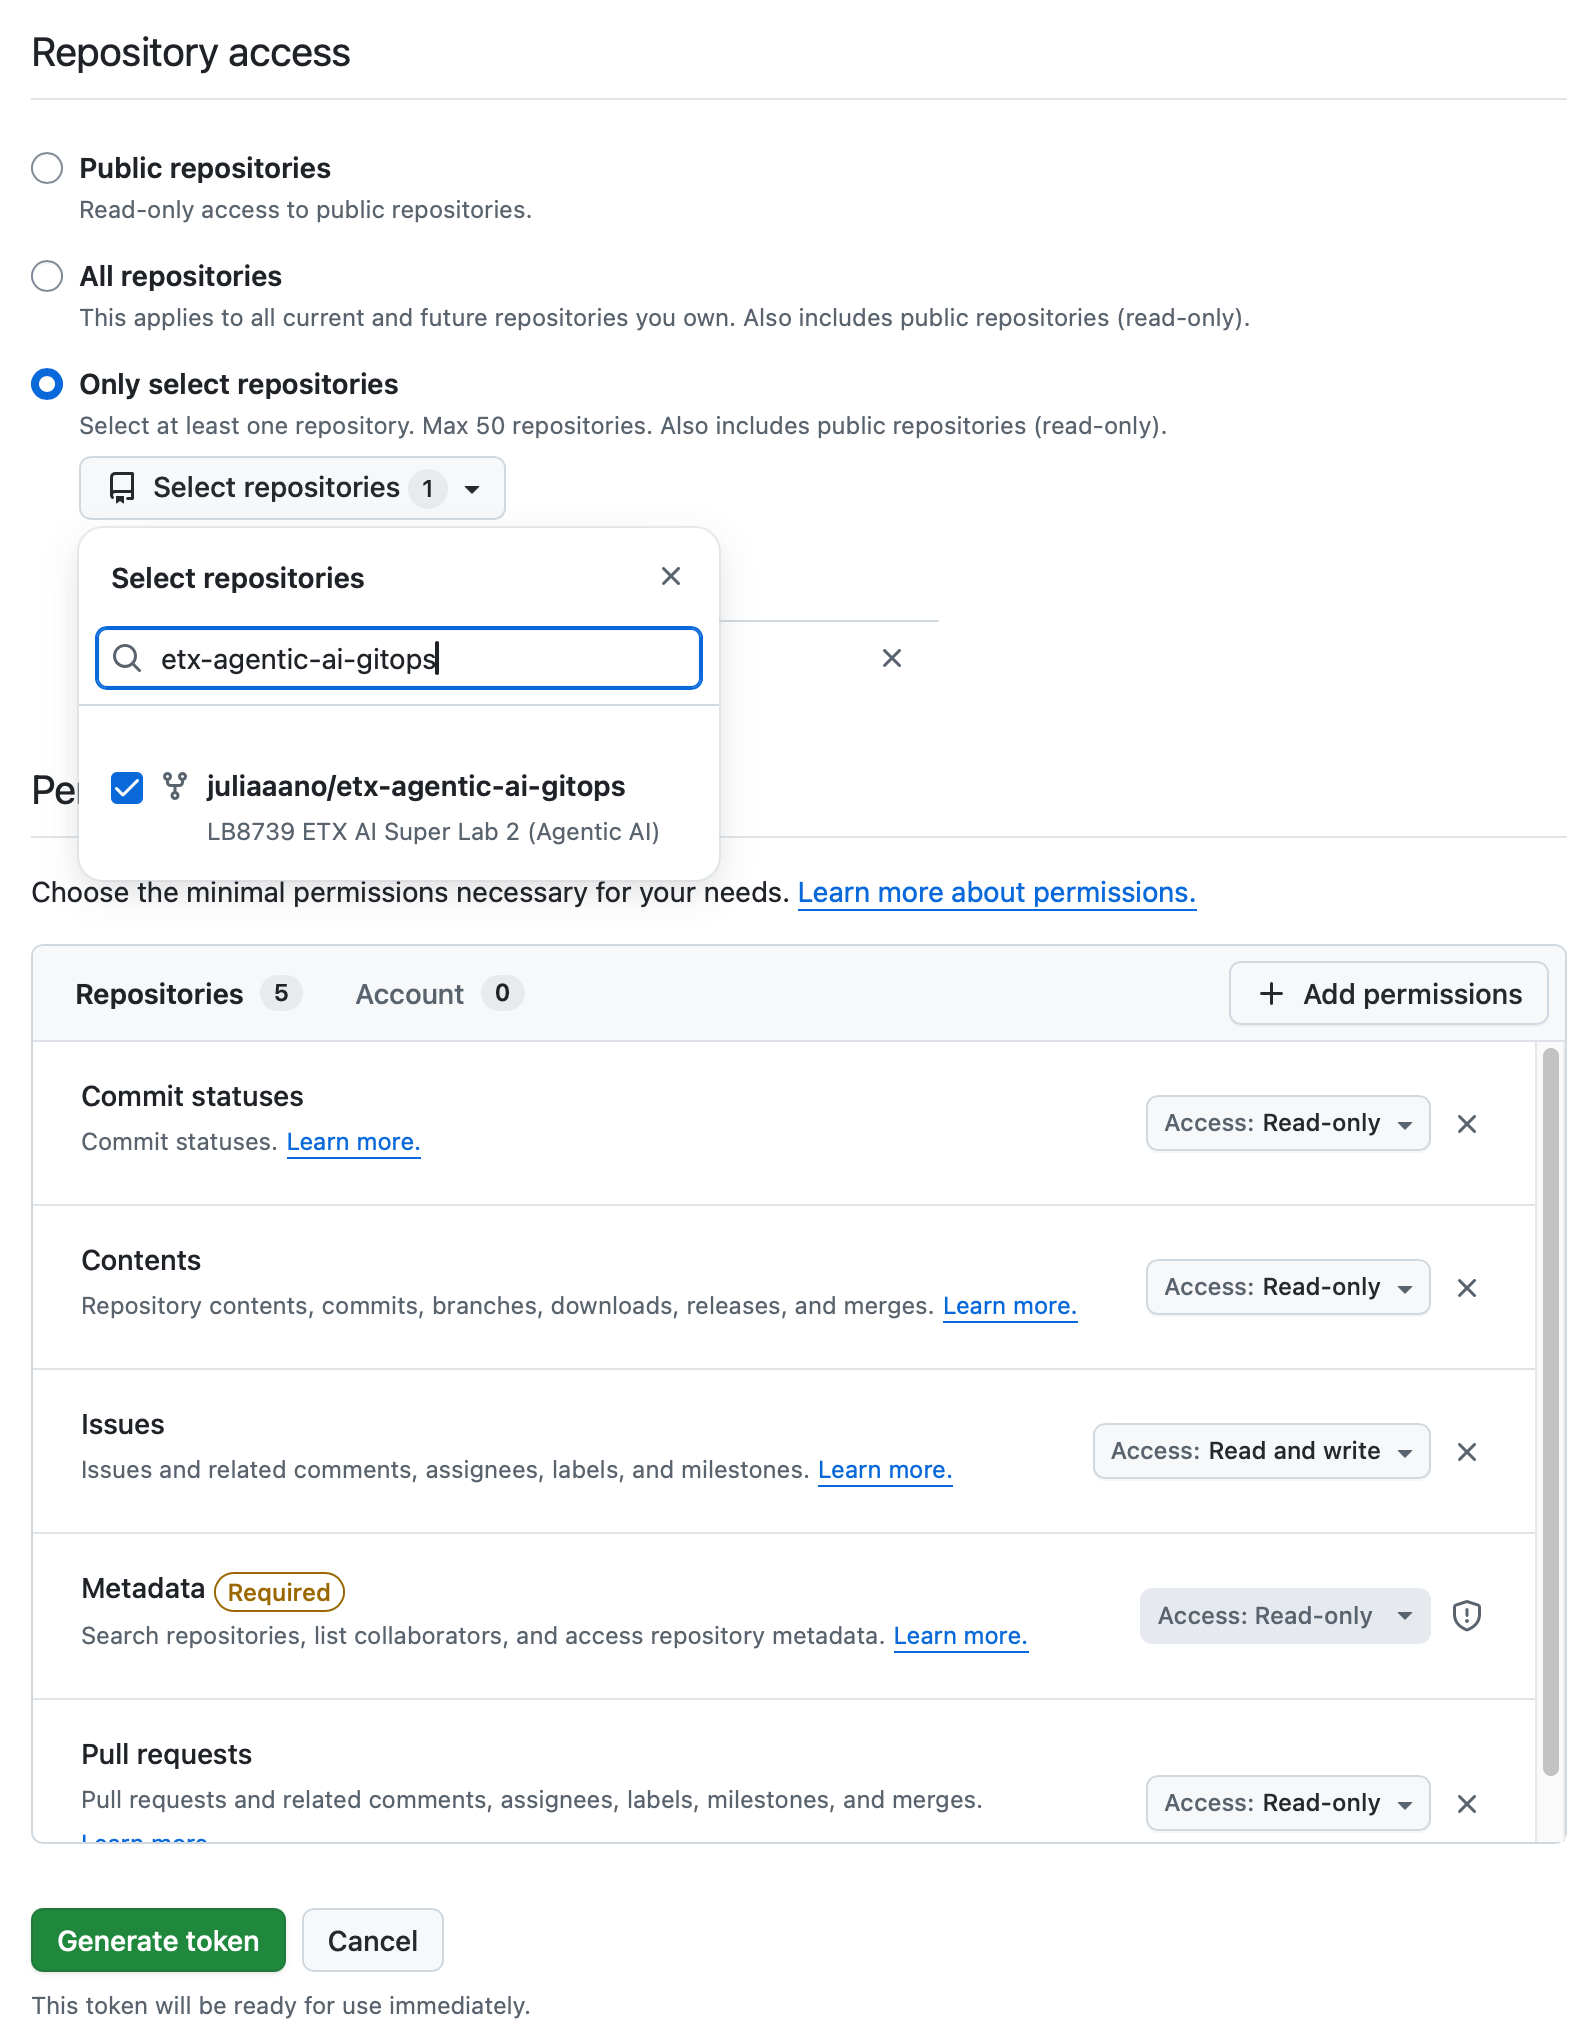 Figure 3. GitHub Repo Perms
 -
Generate the token.
Save the token for easy access as you’ll need to use it in a moment.
-
-
Deploy GitHub MCP Server
-
Git clone your forked repository either in the browser terminal or in your local terminal. If you use the terminal in the showroom browser, you will need to authenticate to your GitHub account.
-
Authenticate to your cluster if working in your local terminal for the first time.
oc login --insecure-skip-tls-verify=false -u userX -p password https://api.cluster.example.com:6443 -
We have a yaml resource file prepared for the GitHub MCP server deployment. Review the file contents in your preferred editor at
etx-agentic-ai-gitops/lab-resources/github-mcp.yamlpath in your cloned repository. -
Note the following resources created for the GitHub MCP server: a secret containing your GitHub credentials, a deployment, and a service.
-
Replace the token placeholder
<YOUR_GITHUB_PERSONAL_ACCESS_TOKEN>in the secret with your GitHub personal access token you had created earlier. Save the file.
-
-
Deploy with the following command in your chosen terminal. You may also choose to copy paste the contents into the OpenShift console quick create UI (ensure the project is set to userX-llama-stack):
oc apply -f etx-agentic-ai-gitops/lab-resources/github-mcp.yaml -n userX-llama-stack -
If you deployed locally with the above command, revert your file edit and delete the token from your file to avoid any accidental token commits to GitHub. You will push changes in the next module.
Add the GitHub tool provider to Llama Stack
As in the previous section, we’ll reference the GitHub MCP server in the Llama Stack configuration.
-
Edit the Llama Stack ConfigMap
llama-stack-config. -
Add the following entry under
tool_groupsand save your changes. Note that we don’t have to edit the tool runtime section since we already added the MCP runtime entry previously.- toolgroup_id: mcp::github provider_id: model-context-protocol mcp_endpoint: uri: http://github-mcp-server:80/sseFor reference, your run.yaml should now look like this.
# Llama Stack configuration version: '2' image_name: rh apis: - inference - tool_runtime - agents - safety - vector_io models: - metadata: {} model_id: granite-3-2-8b-instruct provider_id: vllm provider_model_id: granite-3-2-8b-instruct model_type: llm providers: inference: - provider_id: vllm provider_type: "remote::vllm" config: url: https://litellm-prod.apps.maas.redhatworkshops.io/v1 context_length: 4096 api_token: ${env.DEFAULT_MODEL_API_TOKEN} tls_verify: true tool_runtime: - provider_id: tavily-search provider_type: remote::tavily-search config: api_key: ${env.TAVILY_API_KEY} max_results: 3 - provider_id: model-context-protocol provider_type: remote::model-context-protocol config: {} agents: - provider_id: meta-reference provider_type: inline::meta-reference config: persistence_store: type: sqlite db_path: ${env.SQLITE_STORE_DIR:=~/.llama/distributions/rh}/agents_store.db responses_store: type: sqlite db_path: ${env.SQLITE_STORE_DIR:=~/.llama/distributions/rh}/responses_store.db server: port: 8321 tools: - name: builtin::websearch enabled: true tool_groups: - provider_id: tavily-search toolgroup_id: builtin::websearch - toolgroup_id: mcp::openshift provider_id: model-context-protocol mcp_endpoint: uri: http://ocp-mcp-server.mcp-openshift.svc.cluster.local:8000/sse - toolgroup_id: mcp::github provider_id: model-context-protocol mcp_endpoint: uri: http://github-mcp-server:80/sse -
Restart the playground by deleting its pod (starting with
llama-stack-playground). Wait until it’s Ready and Running. -
Refresh the playground in the browser. Select Agent-based with the github MCP tool provider. Try the prompt (replace the GitHub user with your user).
List the branches of the ${YOUR_GITHUB_USER}/etx-agentic-ai-gitops repository.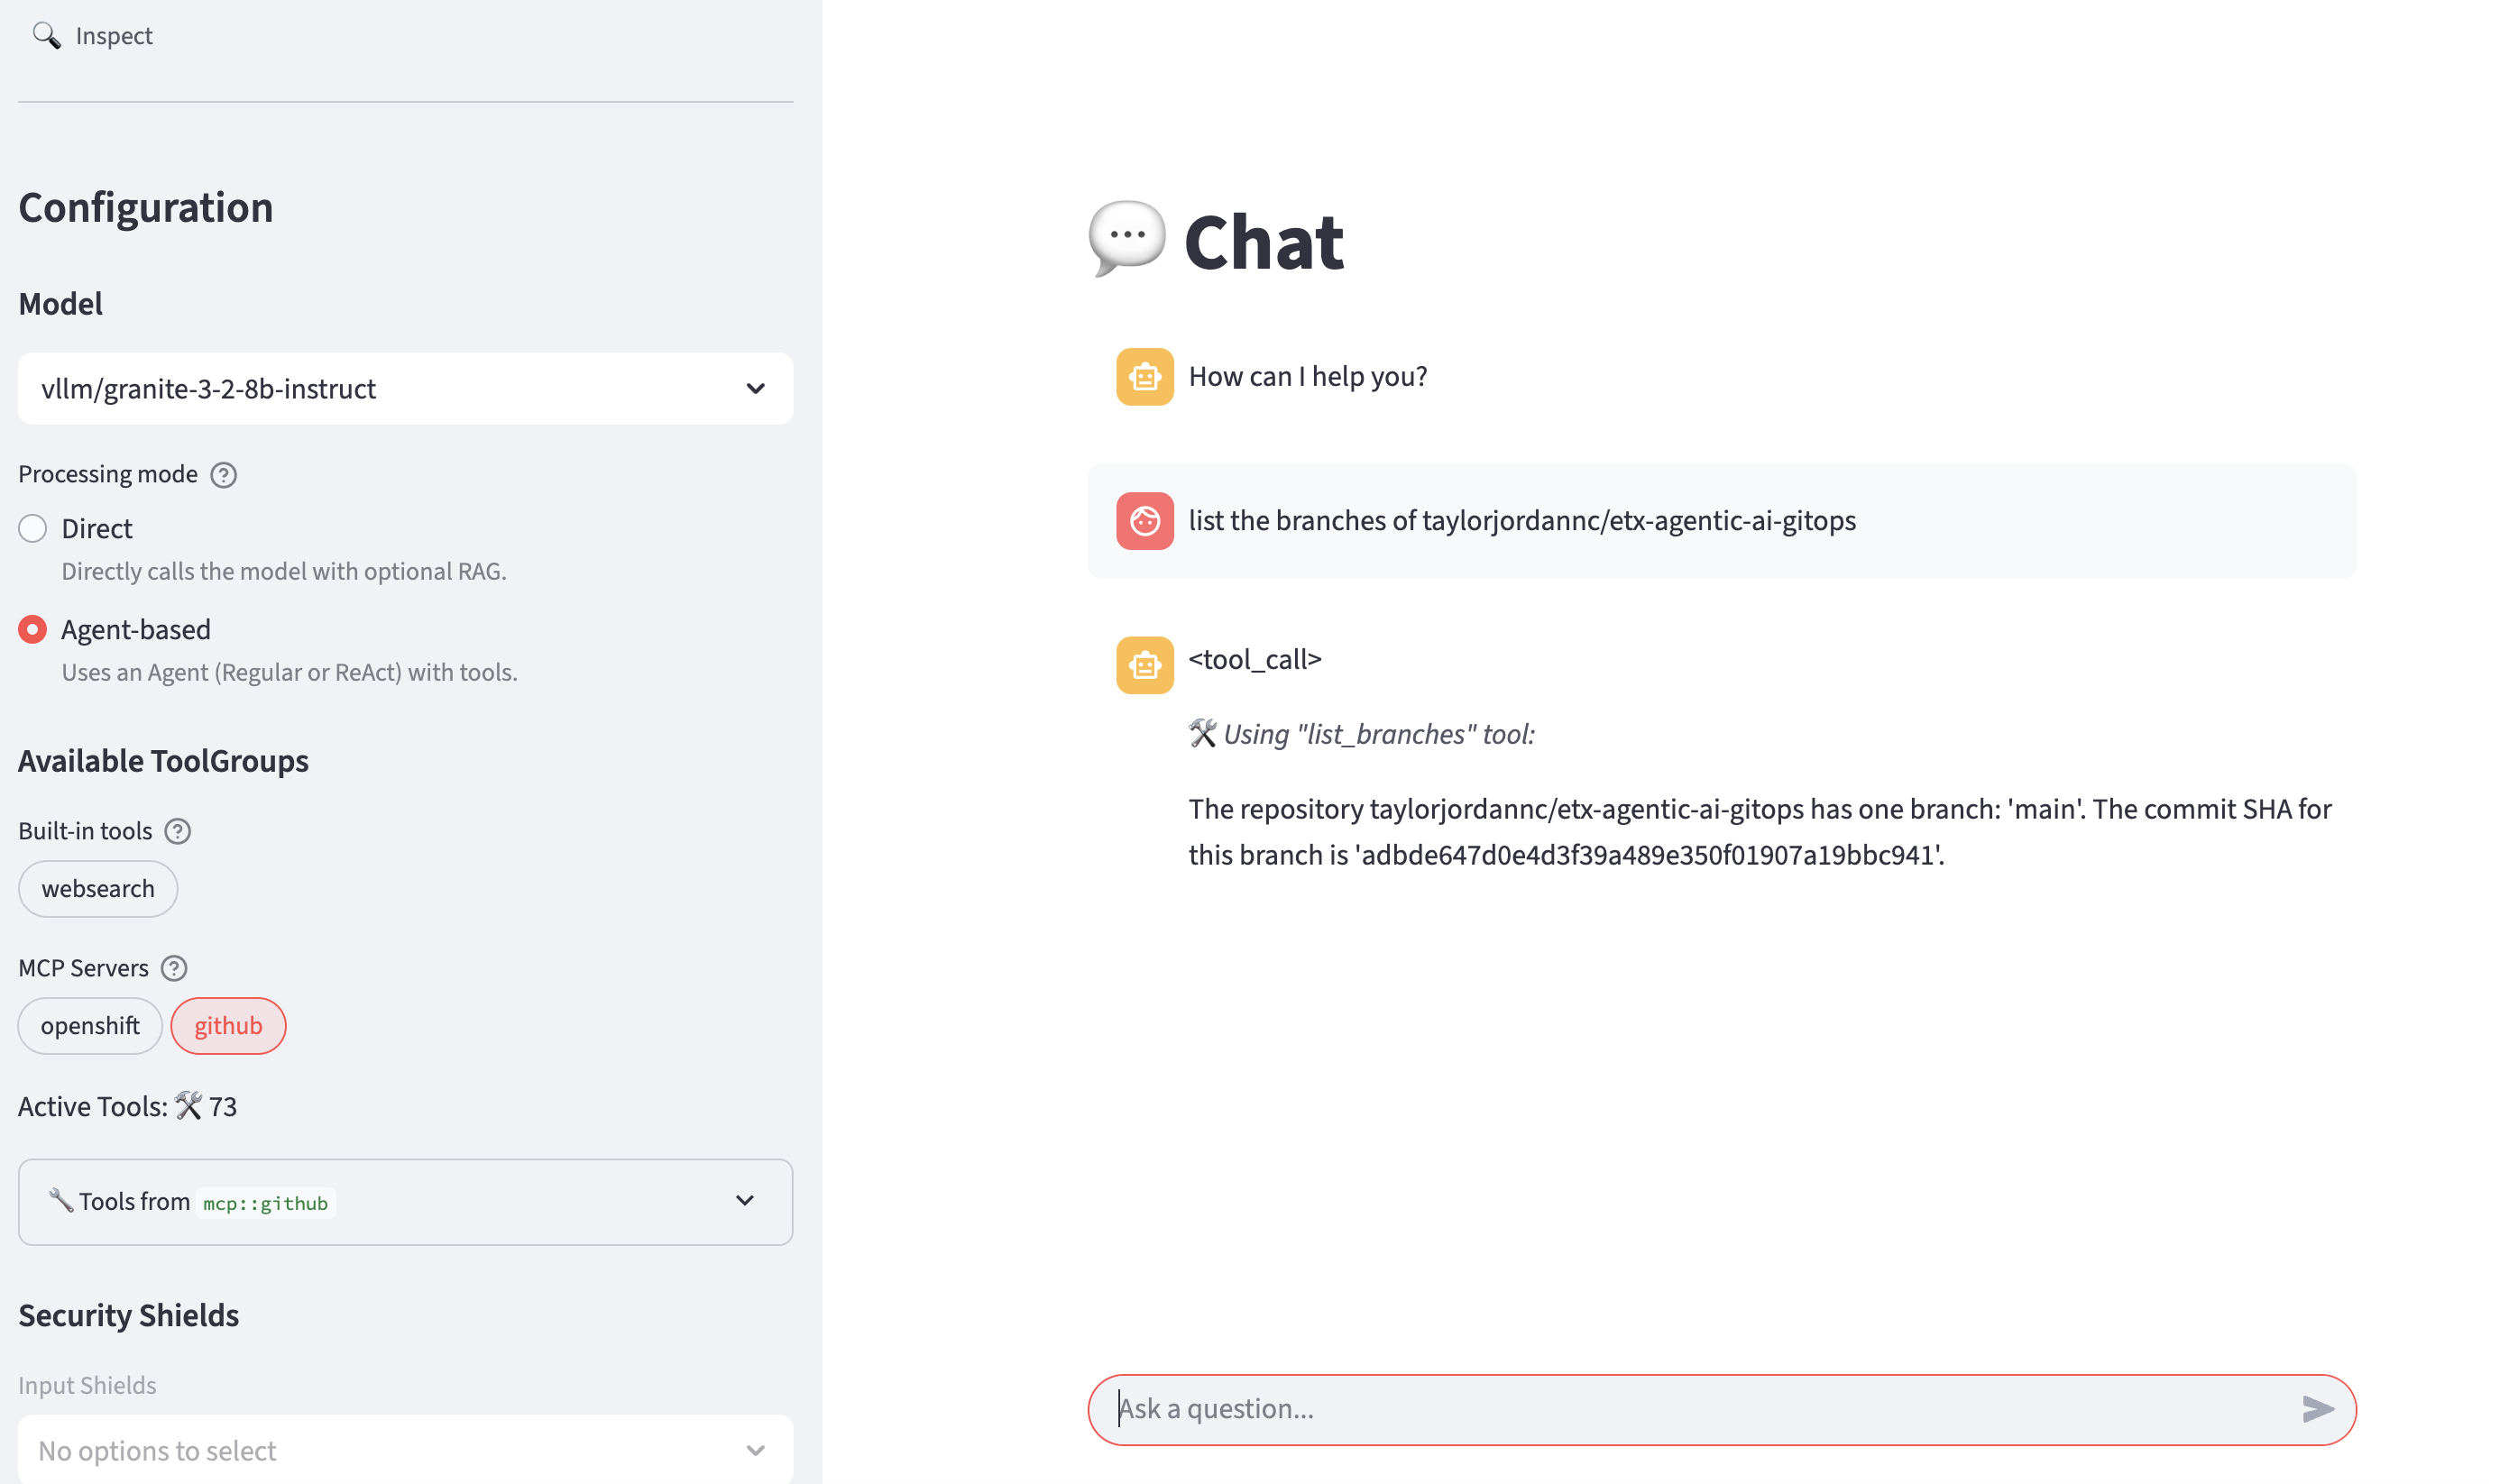
-
Experiment with prompts and perhaps multiple tools at a time.
-
Review the list of tools that can invoked via the github tool provider.
-
Create a GitHub issue
-
Try this prompt (replace
${YOUR_GITHUB_USER}with your GitHub user ID).Create a GitHub issue for a fake error in order to demonstrate GitHub tool usage. Use the "create_issue" tool with these tool parameters: {"arguments": {"owner": "${YOUR_GITHUB_USER}", "repo": "etx-agentic-ai-gitops", "title": "Fake Error: Agentic AI Service Unresponsive", "body": "The Agentic AI service is not responding. This is a fake error report."} Do not add any optional parameters.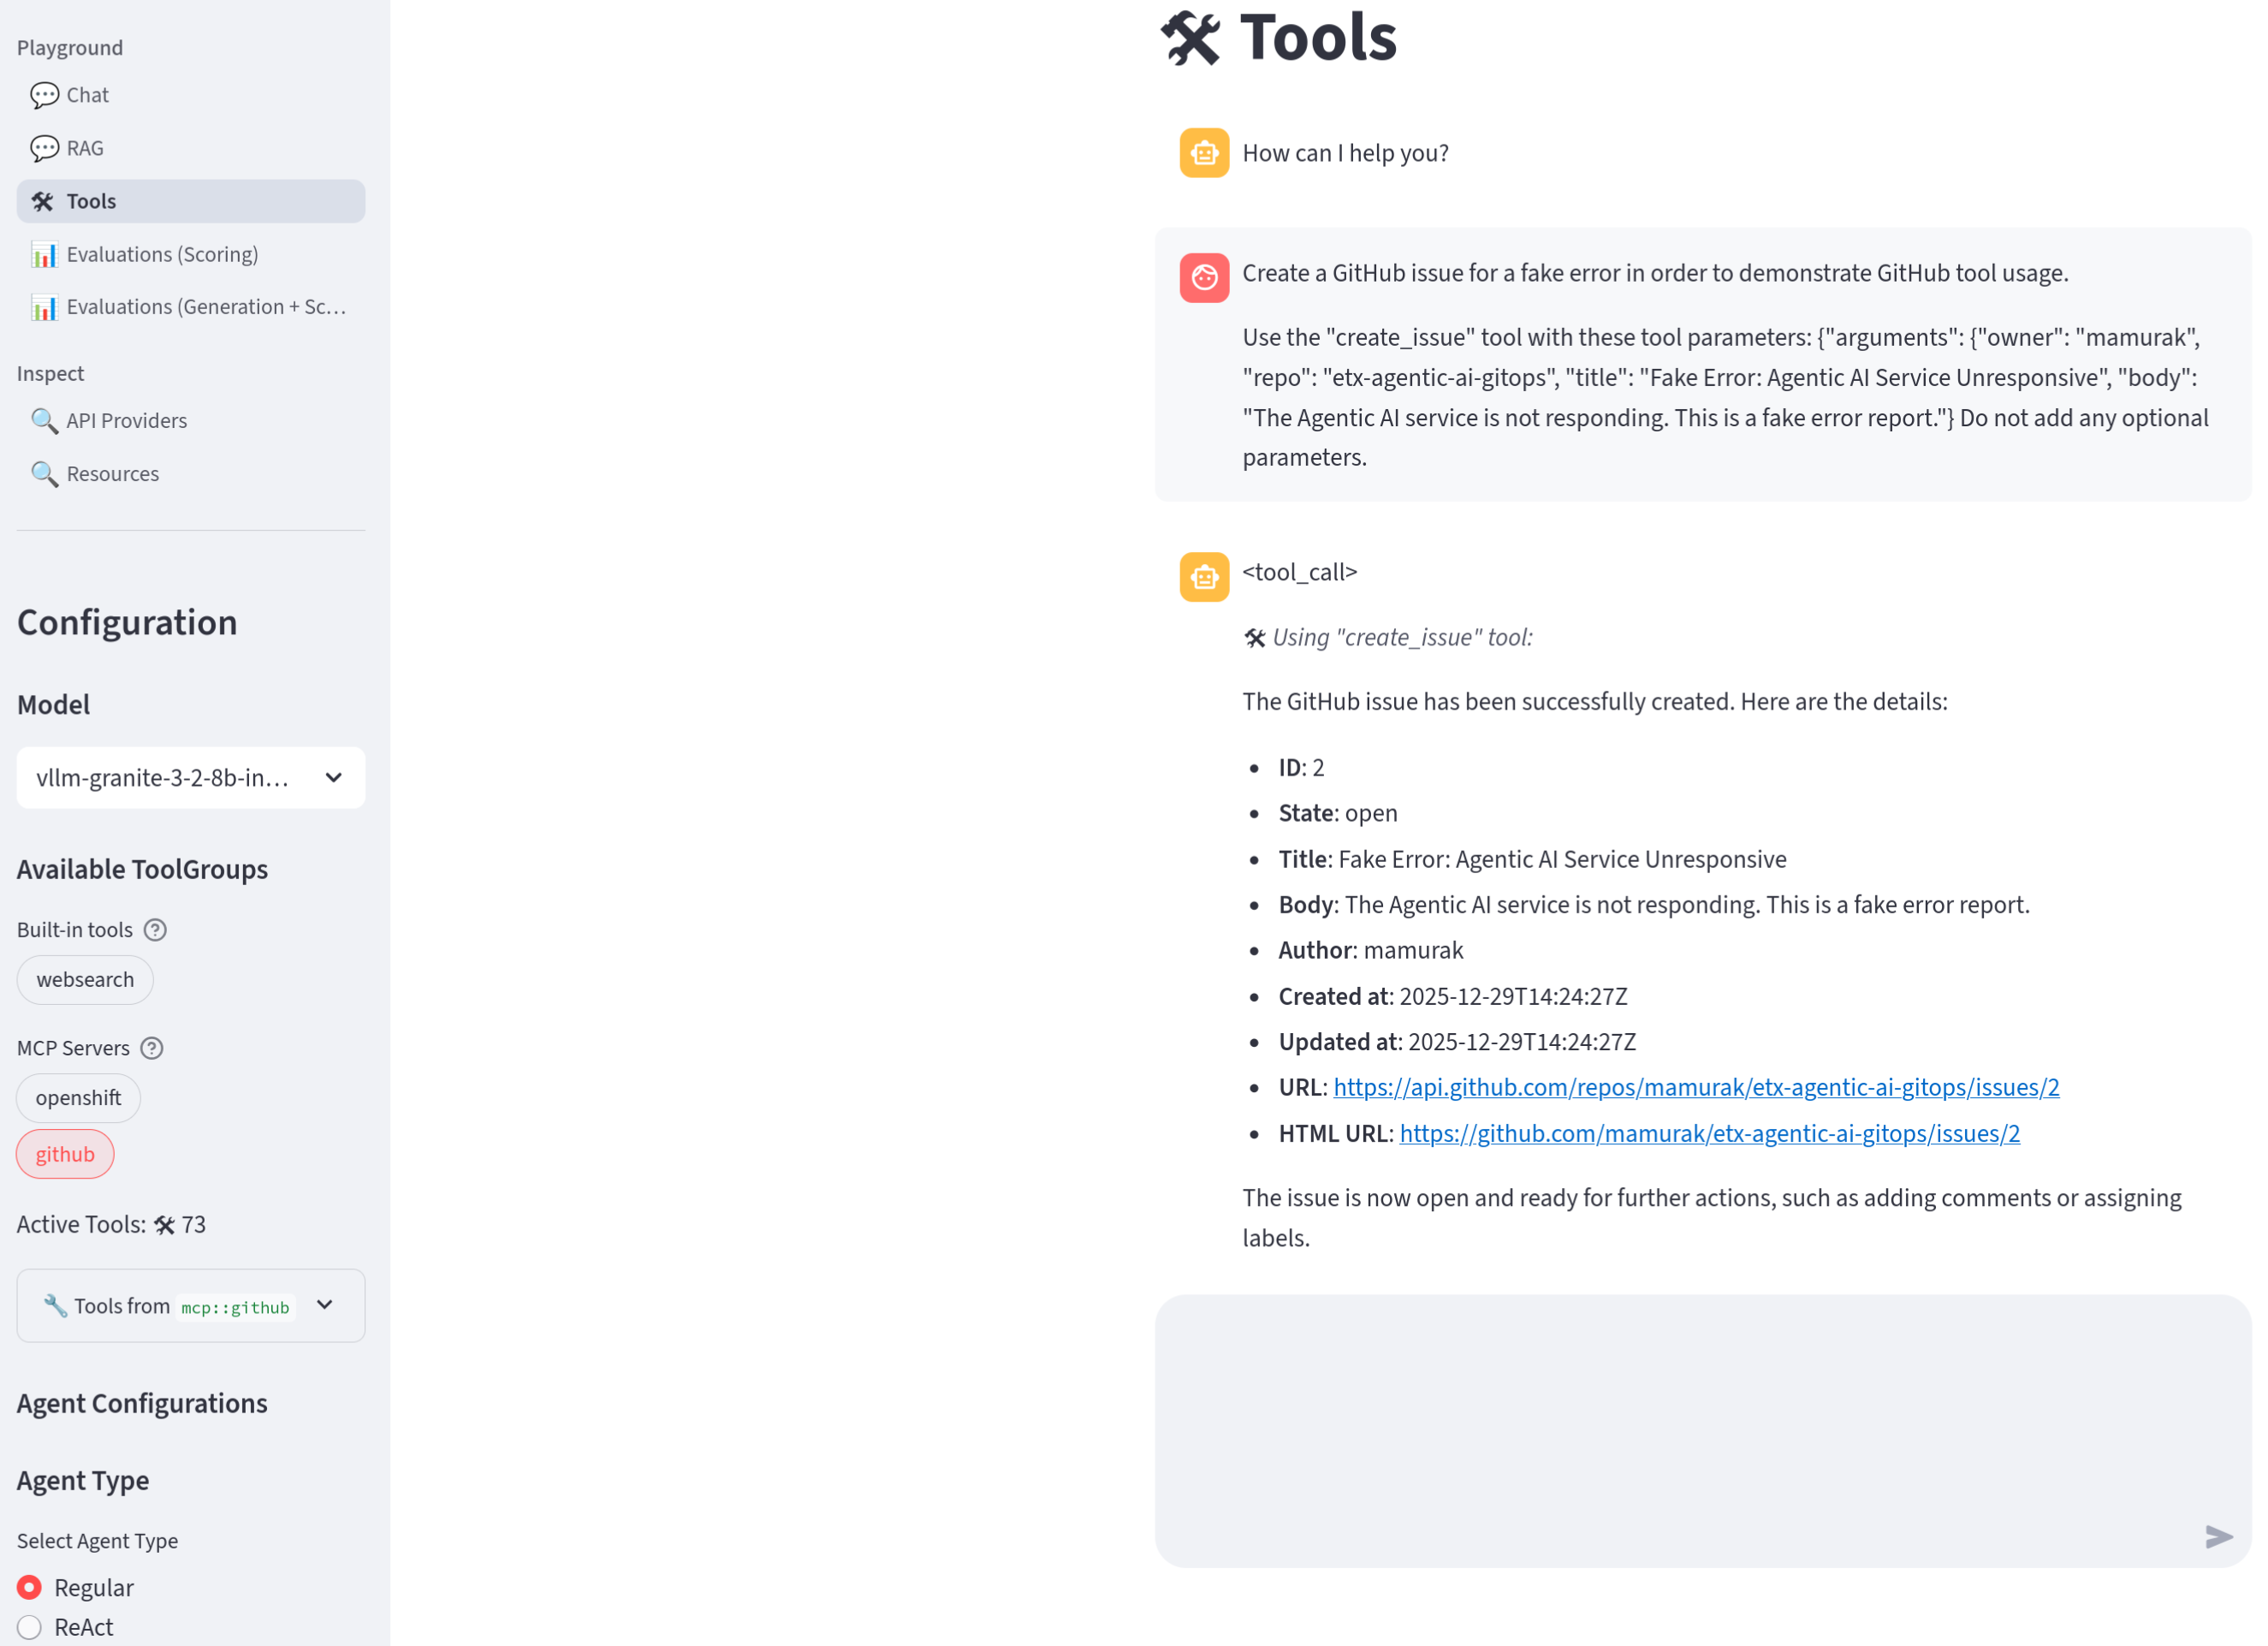
If it is unsuccessful, try refreshing the playground. -
Confirm that the issue has been created in your repo
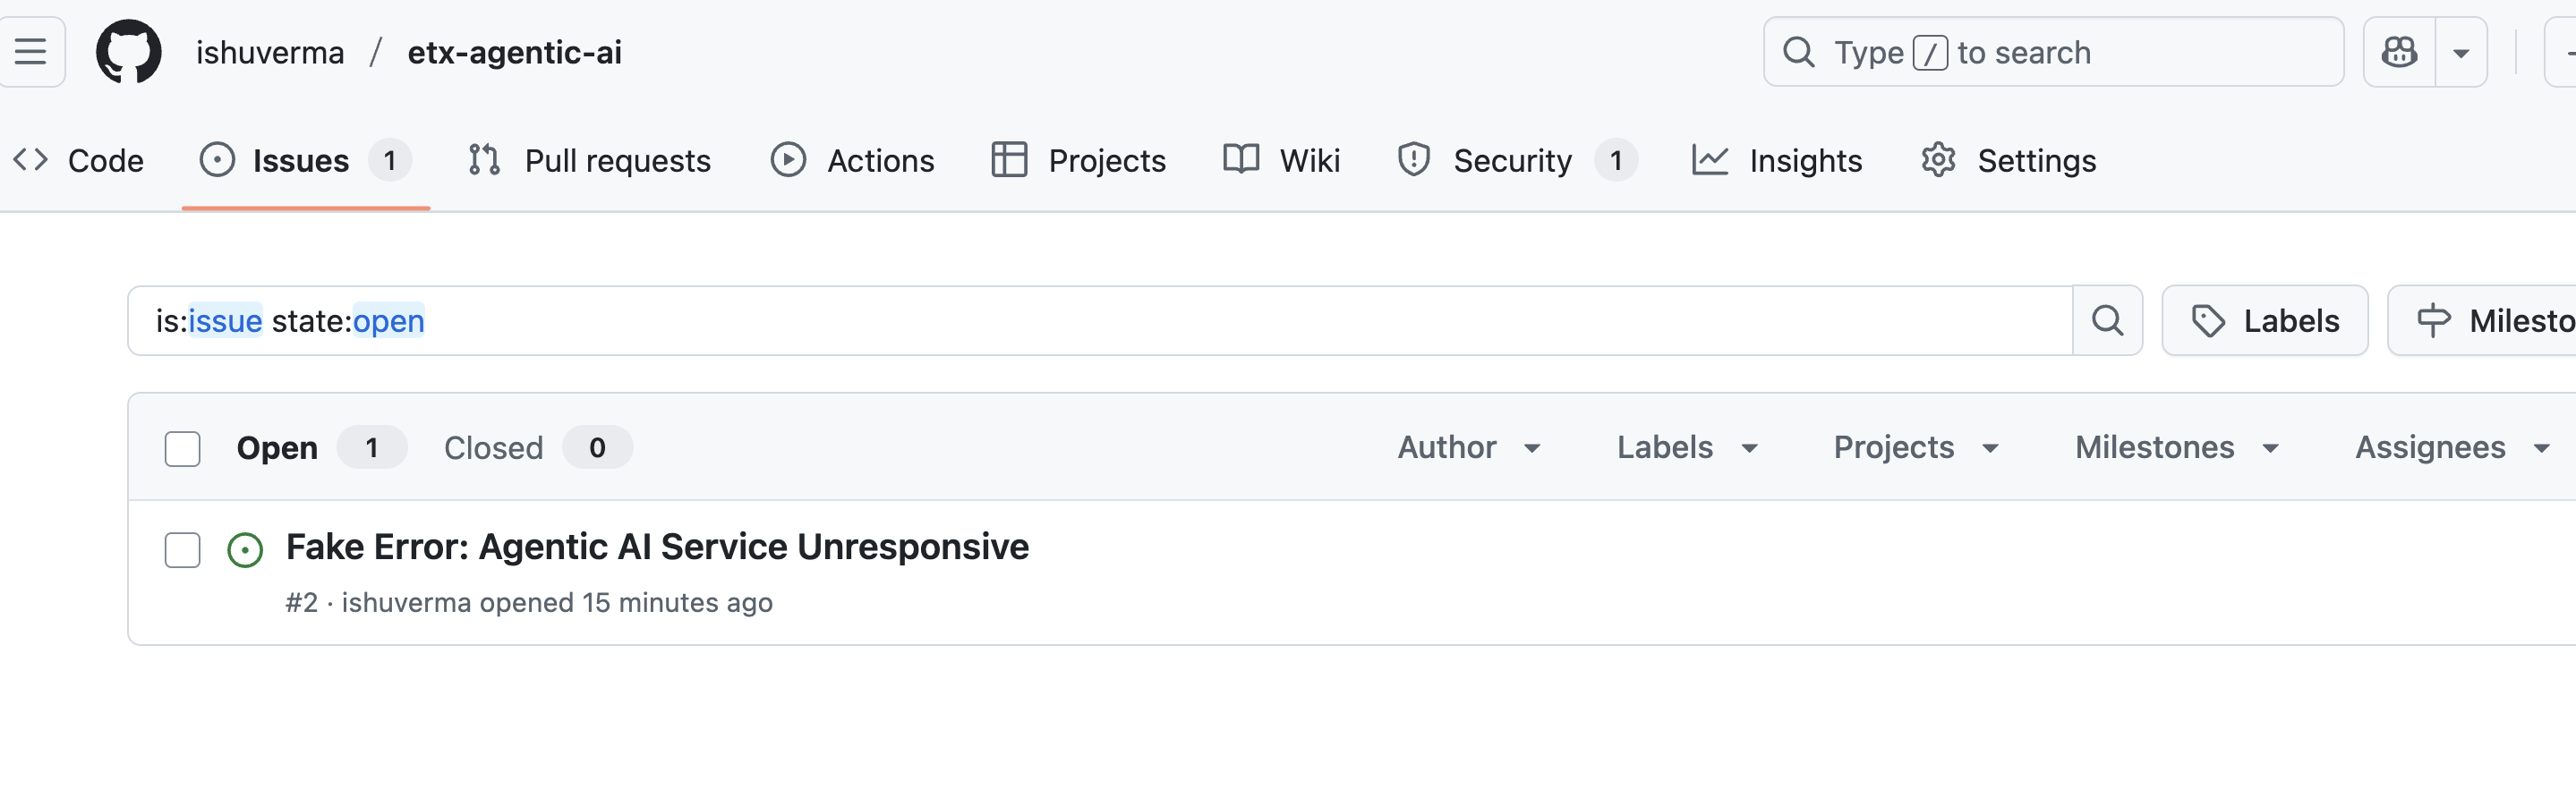
-
Great, we were able to have the LLM create a GitHub issue for us through a simple chat interface! We’re now ready to move on from interactive experimentation to agent development.
Summary
In this module, we covered the basics of Llama Stack and agent prototyping:
-
We introduced Llama Stack and interacted with it via the Llama Stack Playground.
-
We enabled the websearch tool in Llama Stack and used it to perform simple web search queries.
-
We reviewed the basics of tool calling and Regular vs. ReAct agents.
-
We introduced MCP and unlocked OpenShift and GitHub tools in Llama Stack using pre-built MCP servers.
We’ve now got all the pieces we need to build our CI/CD agent. Let’s jump right in!