Overcommit in OpenShift Virtualization
Overcommit occurs when the allocated virtual resources exceed the physical resources available on the host. Overcommit allows users to enable higher workload density by leveraging the fact that Virtual Machines (VMs) rarely use their full allocated capacity simultaneously.
In this module, you will perform two overcommit tasks:
Accessing the OpenShift Cluster
{openshift_cluster_console_url}[{openshift_cluster_console_url},window=_blank]
oc login -u {openshift_cluster_admin_username} -p {openshift_cluster_admin_password} --server={openshift_api_server_url}{openshift_api_server_url}[{openshift_api_server_url},window=_blank]
{openshift_cluster_admin_username}{openshift_cluster_admin_password}CPU Overcommit
In OpenShift Virtualization, compute resources assigned to Virtual Machines (VMs) are backed by either Guaranteed CPUs or time-sliced CPU shares.
Guaranteed CPUs, also known as CPU reservations, dedicate CPU cores or threads to a specific workload, making them unavailable to any other workload. Assigning guaranteed CPUs to a VM ensures sole access to a reserved physical CPU. You enable dedicated resources for VMs to use guaranteed CPUs.
Time-sliced CPUs dedicate a slice of time on a shared physical CPU to each workload. You can specify the slice size during VM creation or when the VM is offline. By default, each vCPU receives 100 milliseconds (1/10 of a second) of physical CPU time.
With time-sliced CPUs, the Linux kernel’s Completely Fair Scheduler (CFS) manages how VMs share physical CPU cores. CFS rotates VMs through available cores, giving each VM a proportional slice of CPU time based on its configured CPU requests.
By default OpenShift Virtualization has a 10:1 overcommit ratio. To achieve CPU overcommit, each VM’s virt-launcher pod will define 100m of CPU requests or 1/10th of a CPU from a Kubernetes resource and scheduling perspective, per vCPU requested by the VM.
The default 10:1 overcommit ratio can be configured to the desired overcommit level by changing the vmiCPUAllocationRatio on the hyperconverged Custom Resource. Changing this ratio will influence the CPU requests for each vCPU that is allocated by default, which enforces the maximum level of CPU overcommit through Kubernetes based request scheduling.
|
Resource assignments are made at virt-launcher pod scheduling time, so any VMs will need to be live migrated stopped and restarted to change CPU allocation behavior after a ratio change. |
Instructions
-
Ensure you are logged in to both the OpenShift Console and CLI as the admin user from your web browser and the terminal window on the right side of your screen and continue to the next step.
-
To understand CPU overcommit, you must first identify how many physical CPU cores are available on your worker nodes.
-
List all worker nodes in your cluster:
oc get nodes -l node-role.kubernetes.io/worker=OutputNAME STATUS ROLES AGE VERSION control-plane-cluster-jlkcx-1 Ready control-plane,master,worker 21h v1.33.6 worker-cluster-jlkcx-1 Ready worker 52m v1.33.6 worker-cluster-jlkcx-2 Ready worker 52m v1.33.6 -
Show available CPU resources on a specific node:
oc describe node $(oc get nodes -o custom-columns=":metadata.name" --no-headers | grep worker | head -n 1) | grep -A 9 "Capacity:"OutputCapacity: cpu: 8 devices.kubevirt.io/kvm: 1k devices.kubevirt.io/tun: 1k devices.kubevirt.io/vhost-net: 1k ephemeral-storage: 104266732Ki hugepages-1Gi: 0 hugepages-2Mi: 0 memory: 24600612Ki pods: 250The
cpuvalue shows the number of physical CPU cores (or threads if hyper-threading is enabled) available on the node. -
Alternatively, check CPU allocatable resources (physical CPUs minus system reservations):
oc get node $(oc get nodes -o custom-columns=":metadata.name" --no-headers | grep worker | head -n 1) -o jsonpath='{.status.allocatable.cpu}{"\n"}'Output7500m -
Using the OpenShift Console, you can navigate to Compute → Nodes to view their key specifications.
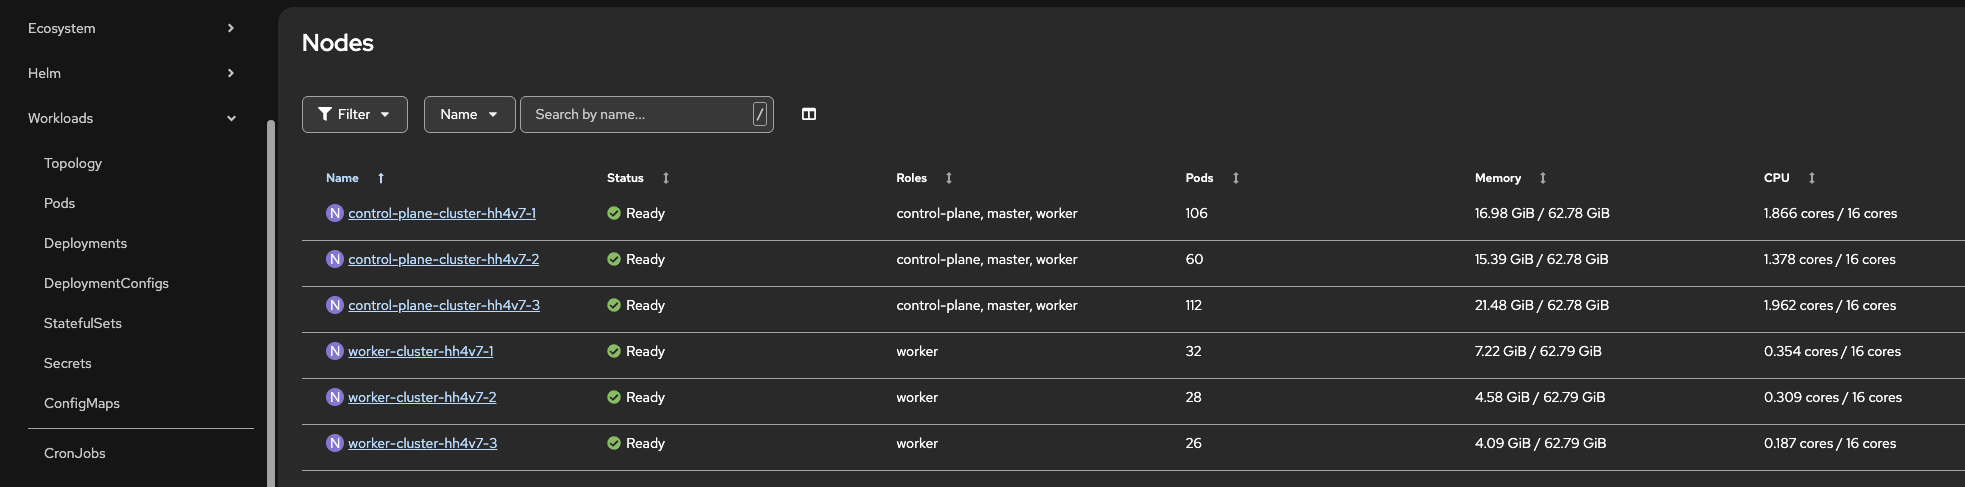 Figure 1. Confirm number of CPUs
-
-
Viewing VM vCPU Allocations
-
List all running VMs and their vCPU counts:
oc get vms -n over-commit -o custom-columns=\ NAMESPACE:.metadata.namespace,\ NAME:.metadata.name,\ vCPUs:.spec.template.spec.domain.cpu.cores,\ STATUS:.status.printableStatusOutputNAMESPACE NAME vCPUs STATUS over-commit overcommit-vm-1 16 Stopped -
For a specific VM, check the vCPU configuration:
oc get vm overcommit-vm-1 -n over-commit -o jsonpath='{.spec.template.spec.domain.cpu.cores}{"\n"}'Output16 -
Start the overcommit-vm-1 Virtual Machine
-
You can do this via the Console
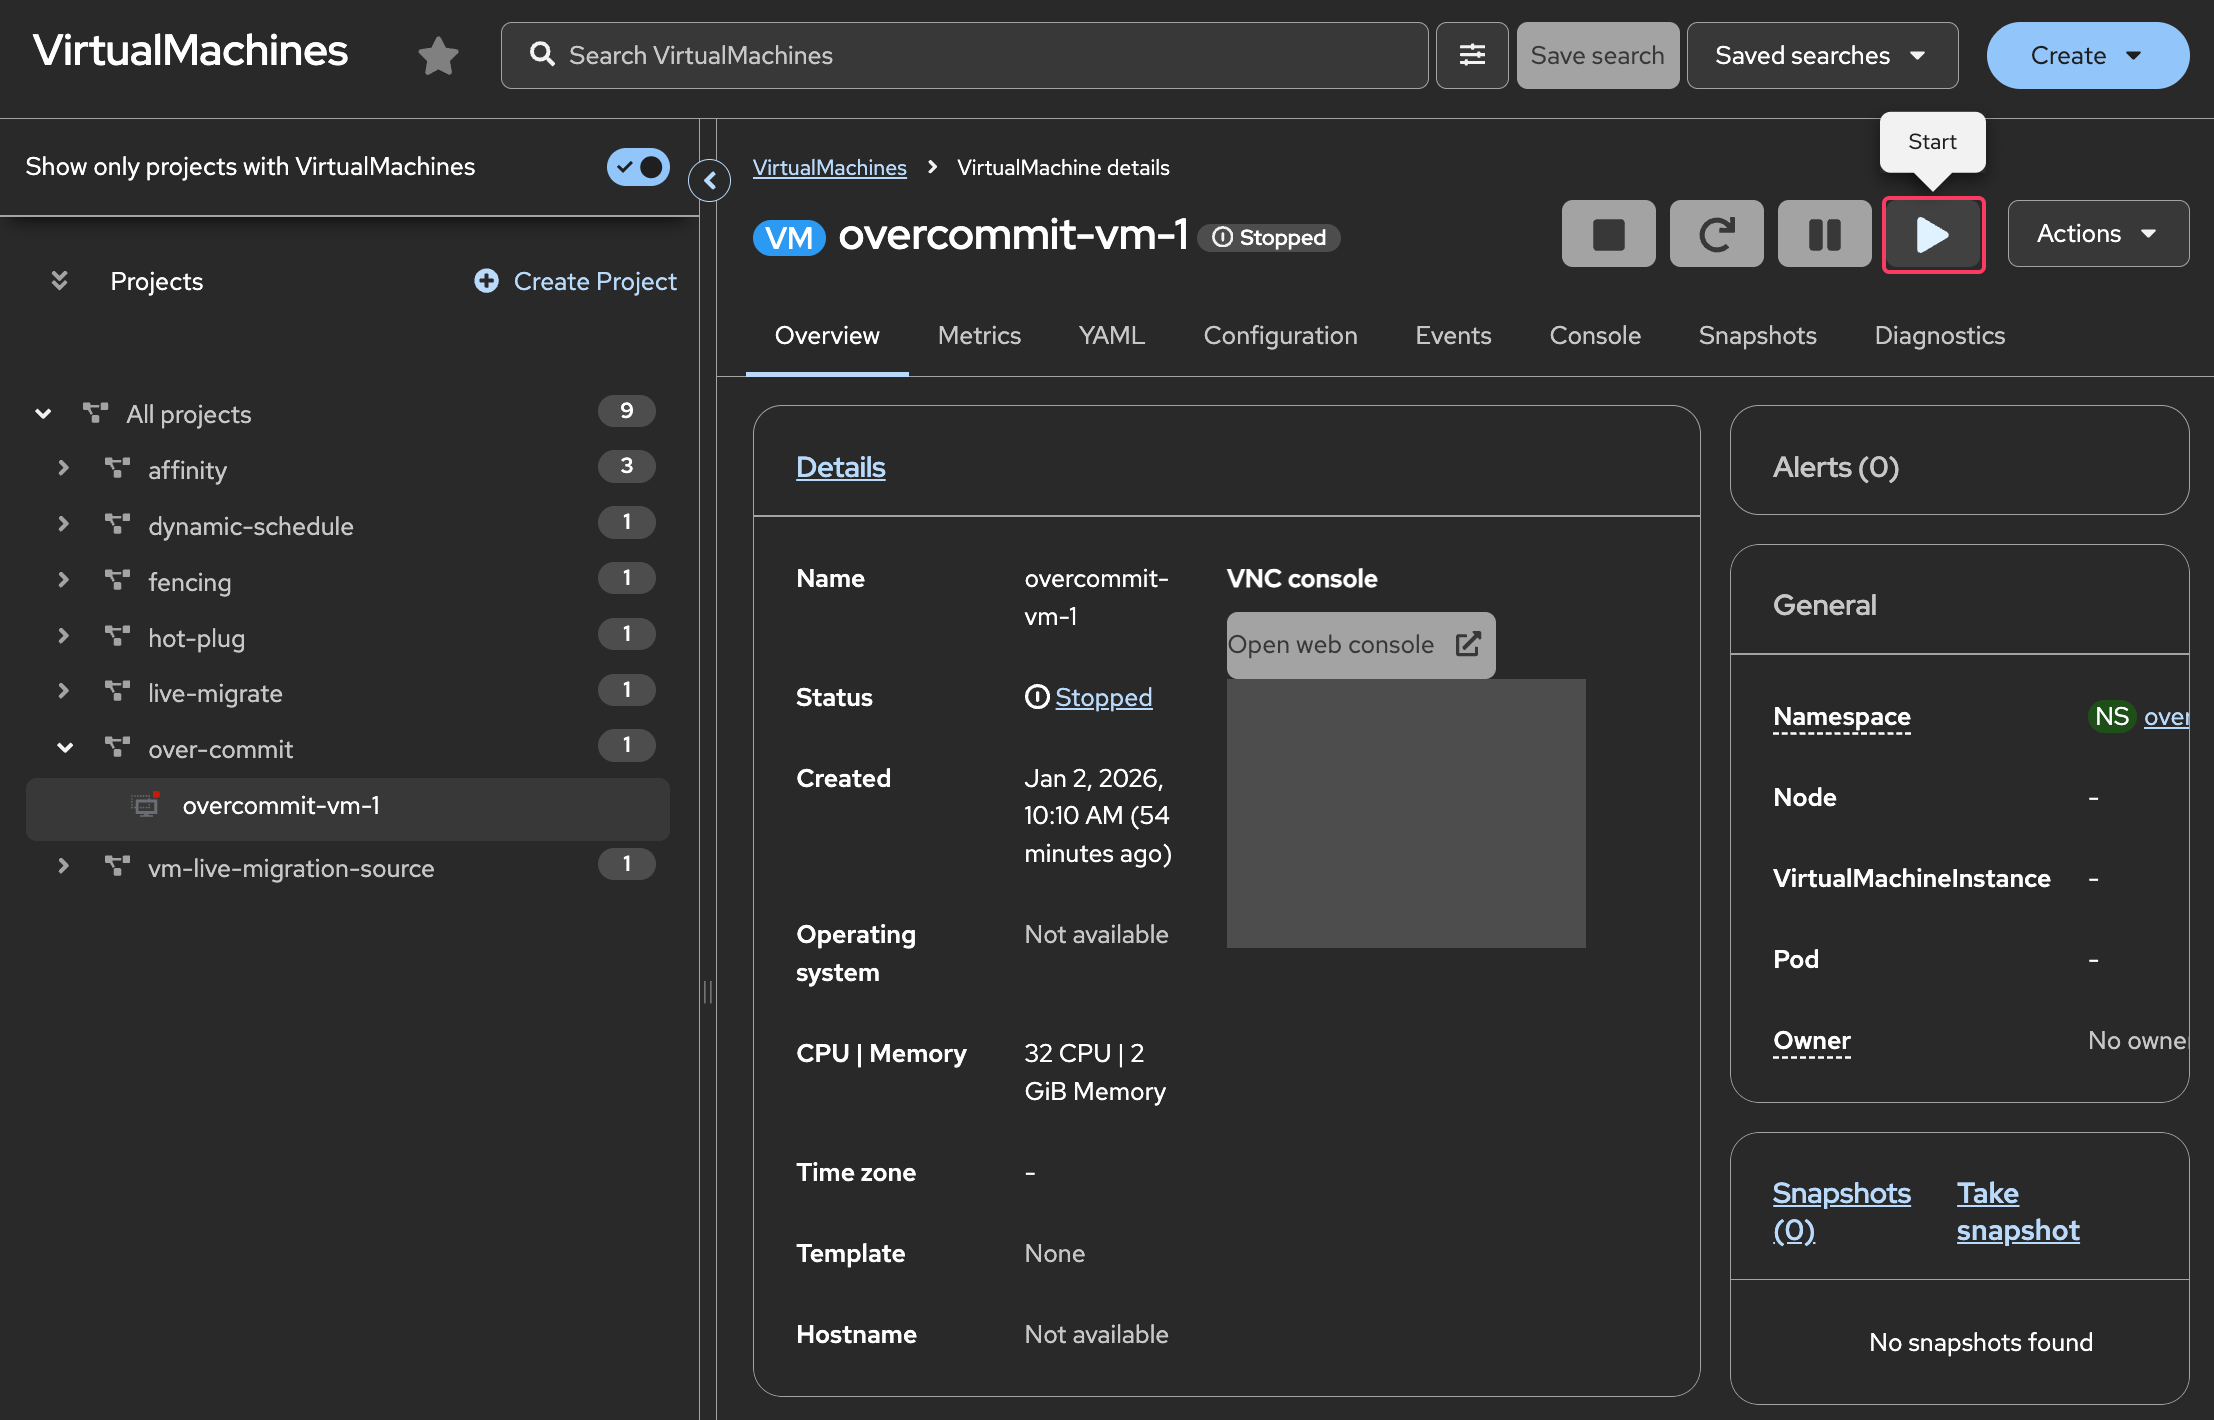 Figure 2. Start VM
 -
Or you can use virtctl to start it from your Terminal window
virtctl start overcommit-vm-1 -n over-commitOutputVM overcommit-vm-1 was scheduled to start
-
-
View CPU requests and limits for the running VM:
oc get vmi overcommit-vm-1 -n over-commit -o jsonpath='{.spec.domain.cpu}{"\n"}'Output{"cores":16,"maxSockets":8,"model":"Icelake-Server-v2","sockets":2,"threads":1} -
Using the OpenShift Console, navigate to Virtualization → Virtual Machines.
Under All projects, select the over-commit namespace and select the overcommit-vm-1 VM to view the CPU/Memory allocation.
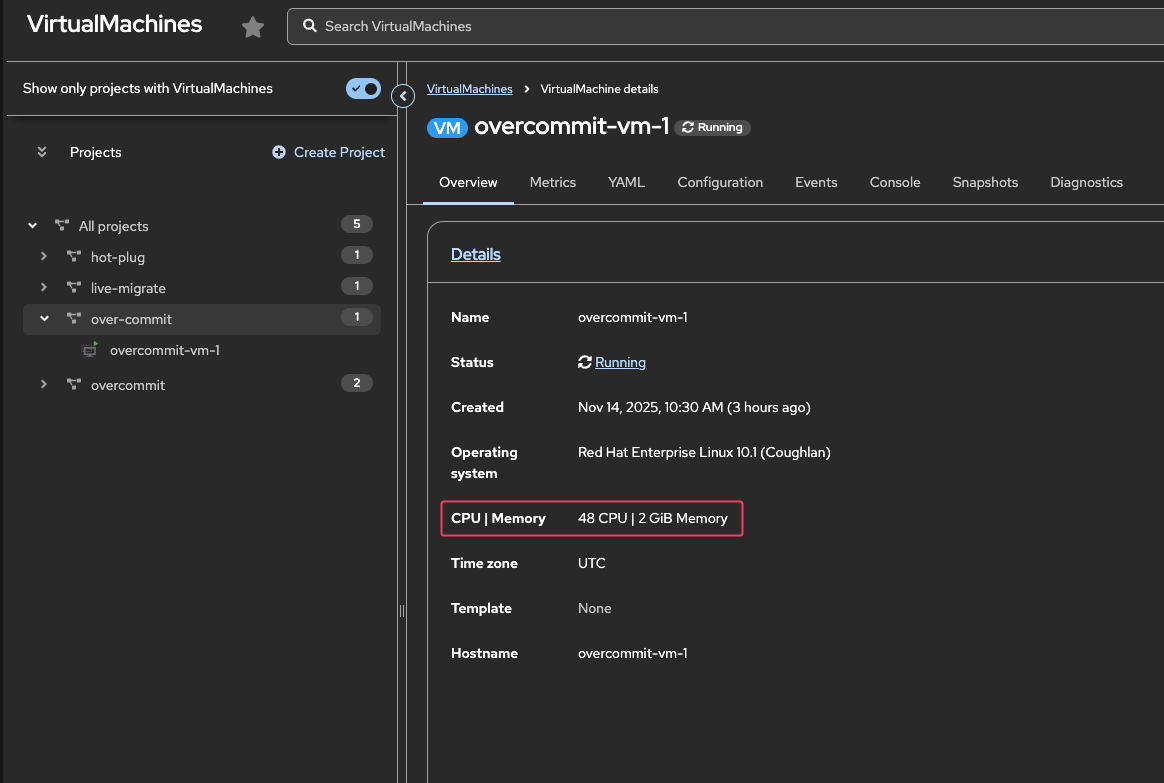 Figure 3. Confirm number of CPUs
 -
Confirm the number of CPUs inside the guest
Click on the Console tab. If necessary, click the blue Connect button.
Login to the Virtual Machine using Copy to clipboard and Paste to console with the User name and Password credentials from above the console window.
From the console, run the following command to verify the number of CPUs:
nprocOutput32 Figure 4. Confirm number of CPUs
-
-
Calculating CPU Overcommit Ratio
To calculate the overcommit ratio on a specific node:
-
Identify all VMs running on the node:
oc get vmi -A -o wide | grep $(oc get vmi overcommit-vm-1 -n over-commit -o json | jq -r '.status.nodeName')OutputNAME AGE PHASE IP NODENAME READY LIVE-MIGRATABLE PAUSED overcommit-vm-1 75m Running 10.232.0.121 control-plane-cluster-qc86c-1 True True -
Sum the vCPUs for all VMs on the node:
NODE=$(oc get nodes -o custom-columns=":metadata.name" --no-headers | grep $(oc get vmi overcommit-vm-1 -n over-commit -o json | jq -r '.status.nodeName')) oc get vmi -A -o json | \ jq -r --arg NODE "$NODE" \ '.items[] | select(.status.nodeName == $NODE) | { name: .metadata.name, total_vcpus: ((.spec.domain.cpu.sockets // 1) * (.spec.domain.cpu.cores // 1) * (.spec.domain.cpu.threads // 1)) }' | \ jq -s 'map(.total_vcpus) | add'Output32You should at least see "32" but it may differ if more VMs are actually running on the same node. -
Calculate the overcommit ratio:
Overcommit Ratio = Total vCPUs allocated / Physical CPU cores

Example:
- Physical CPU cores: 8 (Available capacity from step 3.b)
- Total vCPUs allocated: 32
- Overcommit ratio: 32 / 8 = 4:1
-
-
Understanding the Default 10:1 CPU Overcommit Ratio
OpenShift Virtualization applies a default 10:1 CPU overcommit ratio when you don’t explicitly specify CPU requests. This means that if a VM has multiple vCPUs, the actual CPU request on the virt-launcher pod will be 1/10th of the total cpu requested by the VM.
-
Check virt-launcher pod CPU Requests
oc get pods -n over-commit -l vm.kubevirt.io/name=overcommit-vm-1OutputNAME READY STATUS RESTARTS AGE virt-launcher-overcommit-vm-1-rtspw 2/2 Running 0 47moc get pods -n over-commit -l vm.kubevirt.io/name=overcommit-vm-1 \ -o jsonpath='{.items[0].spec.containers[?(@.name=="compute")].resources}{"\n"}' | jqOutput{ "limits": { "devices.kubevirt.io/kvm": "1", "devices.kubevirt.io/tun": "1", "devices.kubevirt.io/vhost-net": "1" }, "requests": { "cpu": "3200m", "devices.kubevirt.io/kvm": "1", "devices.kubevirt.io/tun": "1", "devices.kubevirt.io/vhost-net": "1", "ephemeral-storage": "50M", "memory": "2564Mi" } }Using the OpenShift Console, navigate to Workloads → Pods.
From the Project: dropdown and select the over-commit namespace to see the virt-launcher pod for the VM.
Click on the virt-launcher pod and to go the YAML tab to see the cpu requests value.
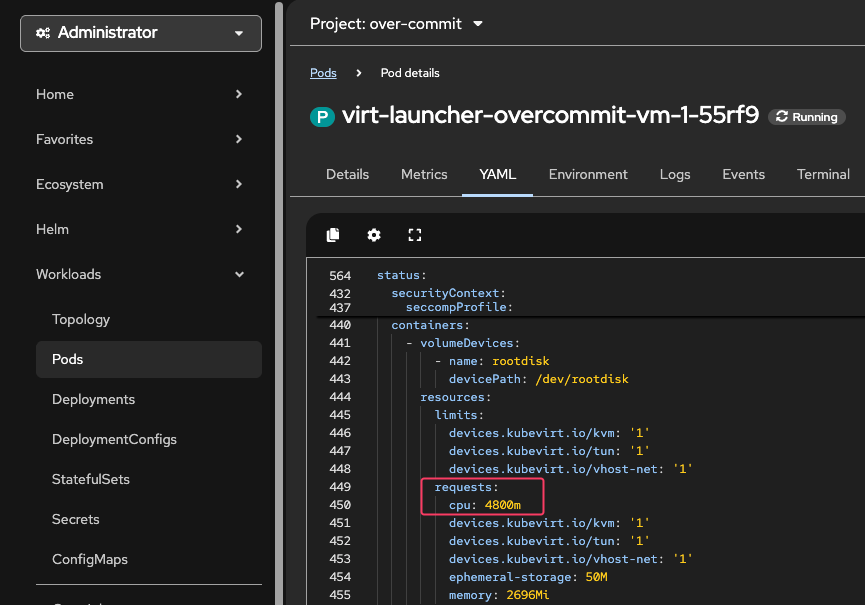 Figure 5. Confirm number of CPUs
A VM with 32 vCPUs only requests 3200m(0.1 * 32 = 3.2 CPU) by default!
Memory Overcommit
Kubernetes, until 1.21, and OpenShift, until 4.21, did not have a Generally Available native SWAP implementation and thus did not allow use of SWAP.
Memory oversubscription without use of swap is hazardous because if the amount of memory required by processes running on a node exceeds the amount of RAM available, processes will be killed. That’s not desirable, particularly for VMs where the workloads will be go offline if the VM is killed.
OpenShift Virtualization ships the wasp-agent to permit the controlled use of swap with VMs. Refer to the wasp-agent component documentation for more information.
| We won’t configure the wasp-agent in this lab due to time and resource constraints but you can read the documentation and install procedures on your own time. |
| Starting with Kubernetes 1.21 and OpenShift 4.21 the wasp-agent will be superseded by the native Kubernetes SWAP implementation. |
The memoryOvercommitPercentage parameter on the hyperconverged Custom Resources tells OpenShift Virtualization how to scale the memory requests for each VM. When set to the default, 100, it calculates memory requests based on the full amount of memory declared by the VM. When it’s set to a higher value, the request is set to a proportionally smaller value than the VM requested, allowing for memory overcommit.
For example, with a VM with 16GiB of memory.
If the overcommit percentage is set to its default value of 100, the memory request on the pod will be 16 GiB plus some extra for the overhead for the QEMU process running the VM.
If it’s set to 200, the request on the pod will be set to 8GiB plus the overhead, with the VM still seeing 16GiB.
|
To calculate the request value when overcommitting memory, you can use the following formula: requested memory = VM memory * (100 / memoryOvercommitPercentage) 16 * (100 / 200) = 8GiB or, with 150% overcommit 16 * (100 / 150) = 10.66GiB |
|
Memory overhead per virtual machine ≈ (0.002 × requested memory) + 218 MiB + 8 MiB × (number of vCPUs) + 16 MiB × (number of graphics devices) + (additional memory overhead) See the section on Virtual machine memory overhead in the OpenShift Virtualization docs. |
Instructions
-
Ensure you are logged in to both the OpenShift Console and CLI as the admin user from your web browser and the terminal window on the right side of your screen and continue to the next step.
Using the OpenShift Console, navigate to Virtualization → Virtual Machines.
Under All projects, select the over-commit namespace and select the overcommit-vm-1 VM to view the CPU/Memory allocation.
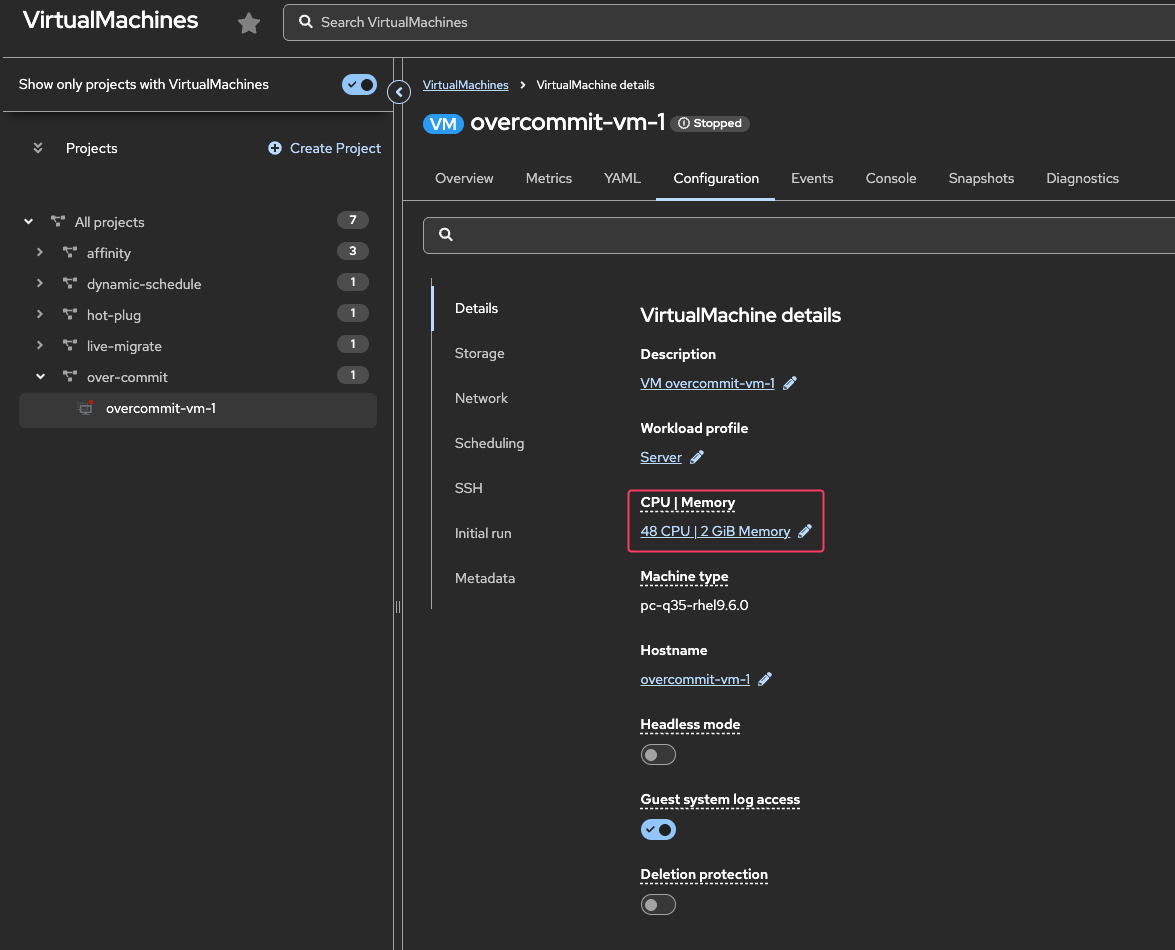 Figure 6. VM Memory Assigned
oc get vm -n over-commit overcommit-vm-1 -o json | jq .spec.template.spec.domain.memoryOutput{ "guest": "2Gi" }Using the OpenShift Console, navigate to Workloads → Pods.
From the Project: dropdown and select the over-commit namespace to see the virt-launcher pod for the VM.
Click on the virt-launcher pod and to go the YAML tab to see the memory requests value.
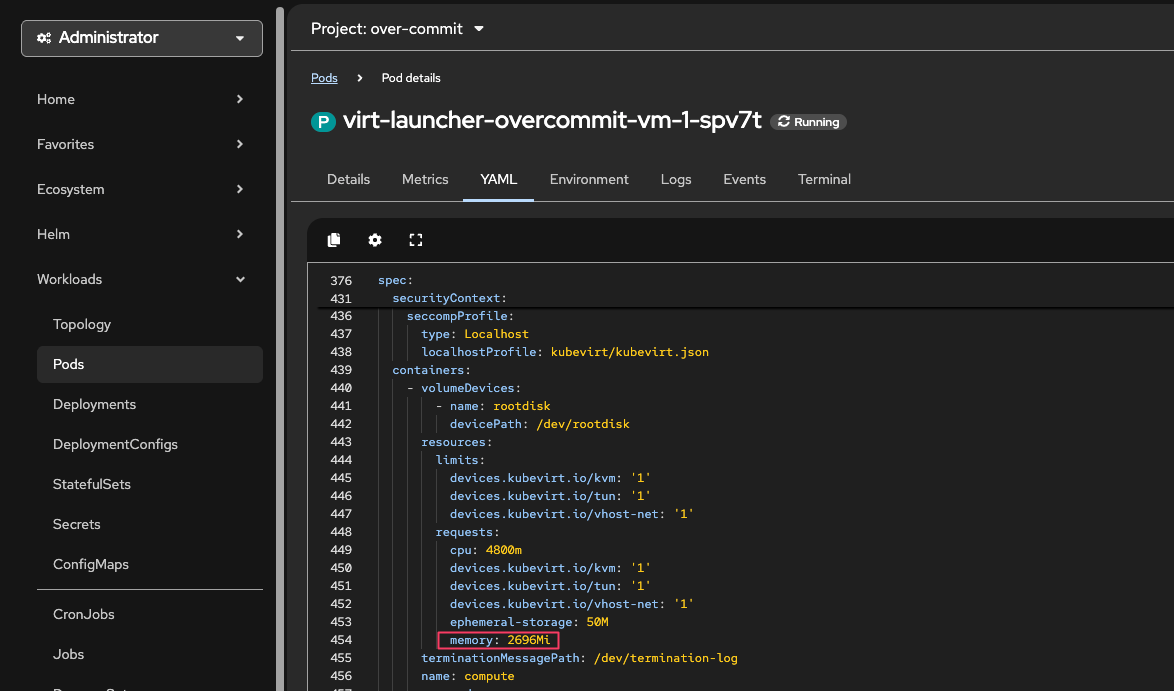 Figure 7. Virt-Launcher Memory Request
 -
Observe the memory requests for the virt-launcher pod compared to the memory allocated to the VM :
oc get pod -n over-commit -l vm.kubevirt.io/name=overcommit-vm-1 -o json | jq '.items[0].spec.containers[0].resources.requests.memory'Output"2564Mi"The virt-launcher pod is requesting 2564Mi which is 2048Mi + overhead. This overhead is necessary and expected - it ensures the VM has enough resources to run properly. -
Enable Memory Overcommit
Using the OpenShift Console, navigate to Virtualization → Overview → Settings → Cluster → General Settings
Click the Toggle Switch to "Enable Memory Density"
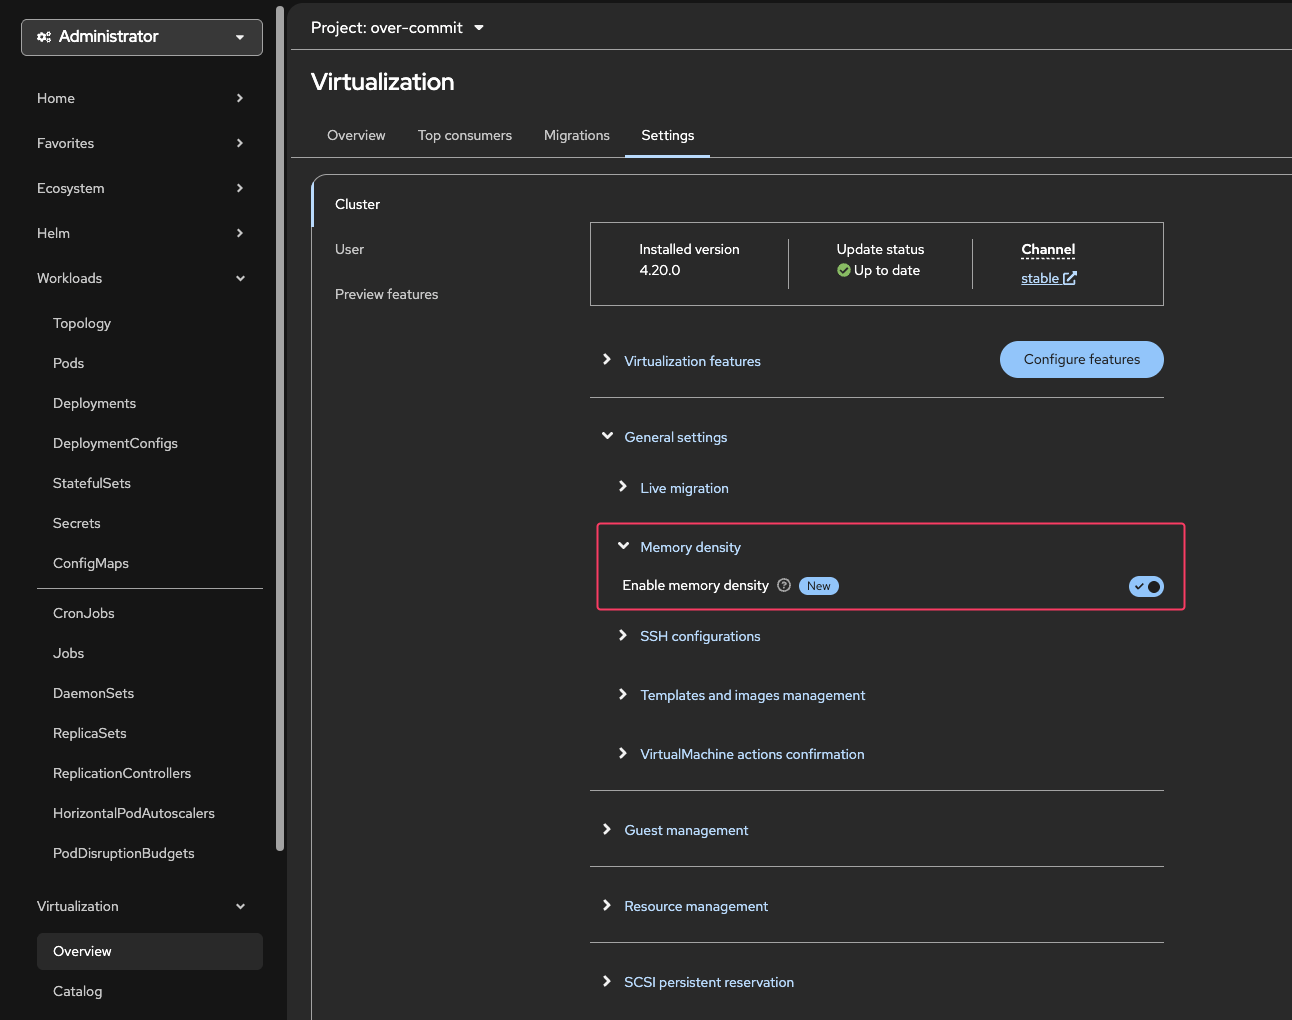 Figure 8. Enable Memory Overcommit
You can confirm memory overcommit is enabled by checking the hyperconverged CR using the CLI:
oc get hyperconverged -n openshift-cnv kubevirt-hyperconverged -o json | jq '.spec.higherWorkloadDensity.memoryOvercommitPercentage'Output150This means that the memory overcommit ratio is 150% which is 1.5:1. -
Now let’s restart the VM and observe the memory request on the virt-launcher pod compared to the memory allocated to the VM.
virtctl restart overcommit-vm-1 -n over-commitOutputVM overcommit-vm-1 was scheduled to restartUsing the OpenShift Console, navigate to Workloads → Pods.
From the Project: dropdown and select the over-commit namespace to see the virt-launcher pod for the VM.
Click on the virt-launcher pod and to go the YAML tab to see the memory requests value.
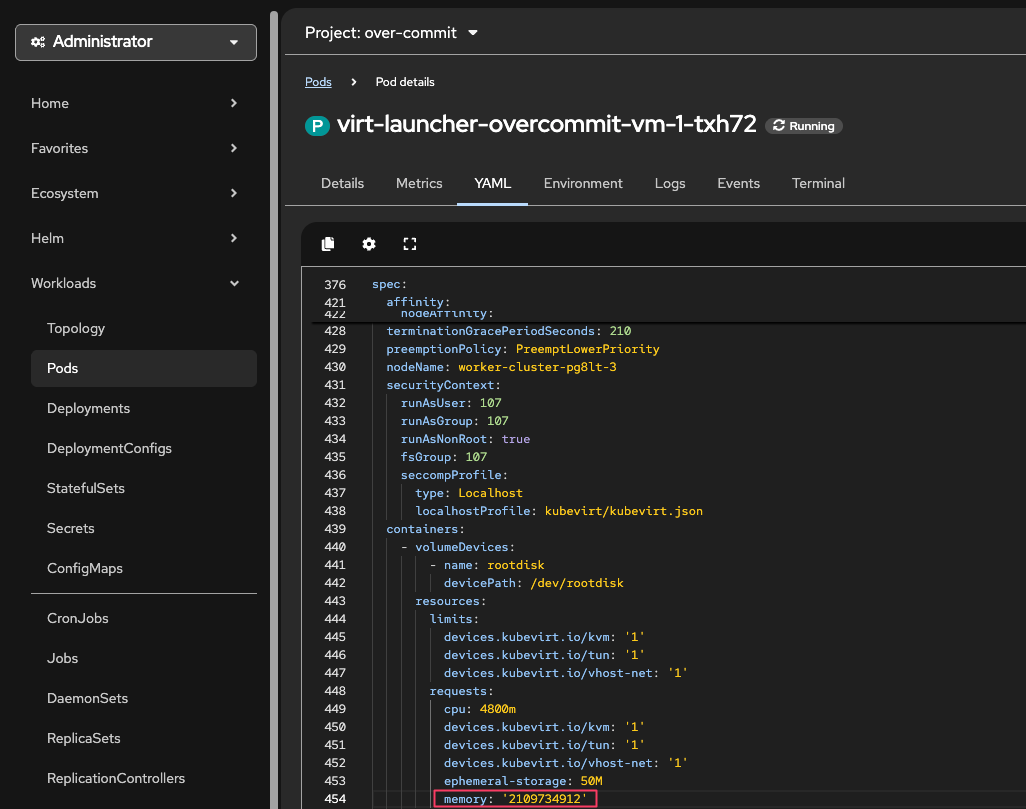 Figure 9. Virt-Launcher Memory Request 1.5x
The virt-launcher pod is requesting 1972720981 bytes which is ~ 1972Mi ~ 1.97GiB.
This is less than the 2048MiB requested by the VM. This is because the memory overcommit ratio is 150%. -
Increase the memory overcommit ratio to 200% by patching the hyperconverged Custom Resource.
oc patch hyperconverged -n openshift-cnv kubevirt-hyperconverged --type merge -p '{"spec":{"higherWorkloadDensity":{"memoryOvercommitPercentage":200}}}'Outputhyperconverged.hco.kubevirt.io/kubevirt-hyperconverged patchedoc get hyperconverged -n openshift-cnv kubevirt-hyperconverged -o json | jq '.spec.higherWorkloadDensity.memoryOvercommitPercentage'Output200This means that the memory overcommit ratio is now 200% which is 2:1.
-
Restart the VM and observe the memory request on the virt-launcher pod compared to the 2GiB allocated to the VM.
virtctl restart overcommit-vm-1 -n over-commitOutputVM overcommit-vm-1 was scheduled to restartoc get pod -n over-commit -l vm.kubevirt.io/name=overcommit-vm-1 -o json | jq '.items[0].spec.containers[0].resources.requests.memory'Output"1540Mi"The virt-launcher pod is now requesting 1540Mi which is ~ 1.54GiB.
Calculated as:
2 * (100/200) = 1GiB + VM overhead
|
Stop the overcommit-vm-1 VM using virtctl from your Terminal window to ensure you have enough resources for the next labs. VM overcommit-vm-1 was scheduled to stop |