Hot Plugging Resources
In this module, you will perform three tasks:
Accessing the OpenShift Cluster
{openshift_cluster_console_url}[{openshift_cluster_console_url},window=_blank]
oc login -u {openshift_cluster_admin_username} -p {openshift_cluster_admin_password} --server={openshift_api_server_url}{openshift_api_server_url}[{openshift_api_server_url},window=_blank]
{openshift_cluster_admin_username}{openshift_cluster_admin_password}Adding CPU and Memory to a Running VM
In this lab, we will add additional CPU and Memory resources to a Virtual Machine by changing the Virtual Machine’s Instance Type. To do this, you will start with an existing VM that has a single vCPU and 2 GiB of memory. Using the OpenShift Virtualization console, you will modify the configuration of the VM Instance Type to a type that has 2 vCPU and 4 GiB of memory.
Instructions
-
Ensure you are logged in to the OpenShift Console as the admin user from your web browser and continue to the next step.
-
Using the OpenShift Console, navigate to Virtualization → Virtual Machines.
Under All projects, select the hot-plug namespace and select the hot-plug-vm1 VM.
Note that the InstanceType is set to u1.small.
Above the InstanceType, you can see that the current CPU | Memory for this VM is 1 CPU | 2GiB Memory.
 Figure 1. CPU and Memory before hot plug
 -
Start the hot-plug-vm1 VM using virtctl from your Terminal window
virtctl start hot-plug-vm1 -n hot-plugOutputVM hot-plug-vm1 was scheduled to start -
Click on the Configuration tab and select Details, if it is not already selected.
You can see that the InstanceType is General Purpose and 1 CPU | 2GiB Memory.
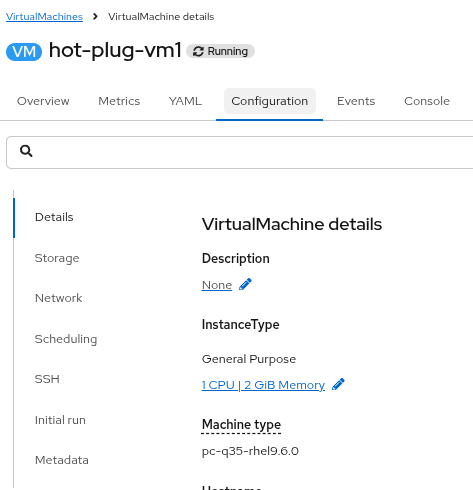 Figure 2. Virtual Machine details
 -
Click on the blue pencil icon to modify the CPU and Memory resources.
In the window that appears, click the Size drop down and select 2xmedium: 2CPUs, 4Gi Memory.
Click the Save button.
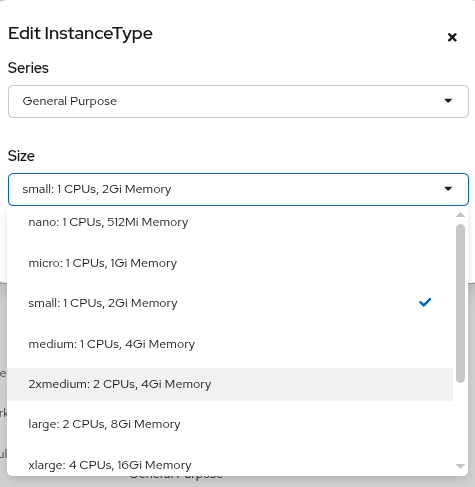 Figure 3. Edit Instance Type
 -
The configuration in the Details panel will now show that the virtual machine has 2 CPUs and 4 GiB of memory.
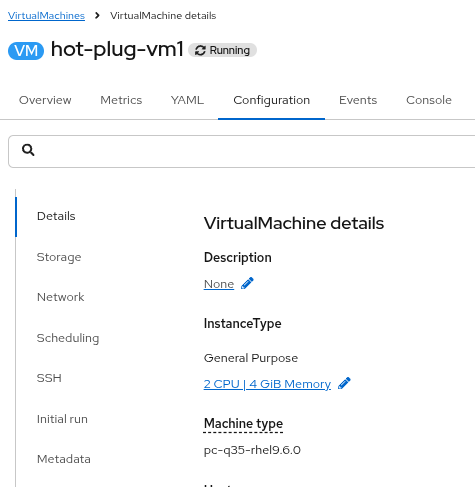 Figure 4. Virtual Machine details
In order for the new CPU and Memory configuration to take effect, the virtual machine will automatically migrate from one worker node to another. If the new CPU and Memory configuration does not appear immediately, you may have to wait a few minutes. 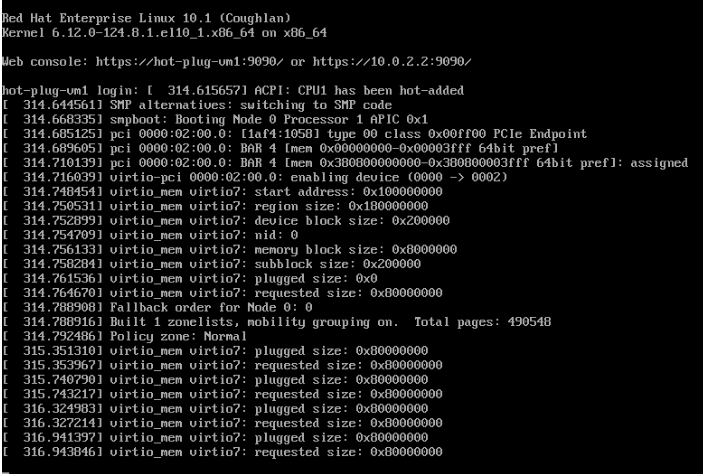 Figure 5. CPU and Memory messages
 -
From the UI, click on the Console tab. If necessary, click the blue Connect button.
Login to the Virtual Machine using Copy to clipboard and Paste to console with the User name and Password credentials from above the console window.
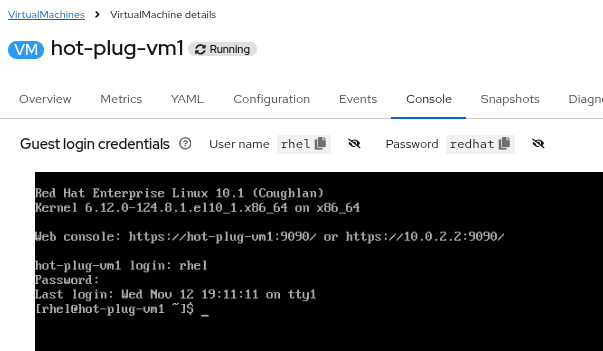 Figure 6. Login to VM
 -
To validate that the VM now has 2 CPUs and 4GiB of memory, run the following:
Get the number of processorsnprocGet the amount of memoryfree -mYou will see that the VM has 2 CPUs and approximately 4 GiB of total memory.
This VM image has kdump enabled, which reserves some memory for the kernel. This is why the memory amount appears to be less than 4 GiB. In fact, 4 GiB of memory is configured for the VM, but the operating system sees a lower number. If kdump were disabled, the total memory would be 4 GiB. 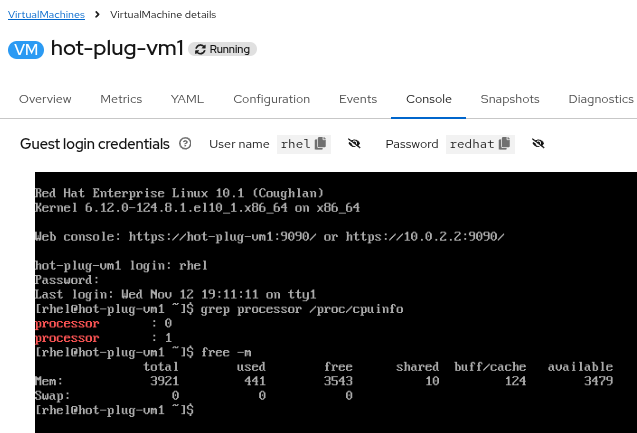 Figure 7. Verify new resources
Adding a Virtual Disk to a Running VM
In this lab, we will add a new Disk to an existing VM. To do this, you will start with an existing VM with 1 or more Disks. Using the OpenShift Virtualization console, you will modify the configuration of the VM to include an additional hot plugged Disk.
|
This is similar to VMware’s Hot Add feature. |
Instructions
-
Ensure you are logged in to the OpenShift Console as the admin user from your web browser and continue to the next step.
-
Using the OpenShift Console, navigate to Virtualization → Virtual Machines.
Under All projects, select the hot-plug namespace and select the hot-plug-vm1 VM.
 Figure 8. hot-plug-vm1 details
 -
Click on the Configuration tab and select Storage. You can see that the Virtual Machine currently has a single 30GB bootable disk that is using the Storage class called ocs-external-storagecluster-ceph-rbd.
 Figure 9. VM has only one disk
 -
Add an empty disk by clicking the Add button under Disks and then selecting Empty disk (blank).
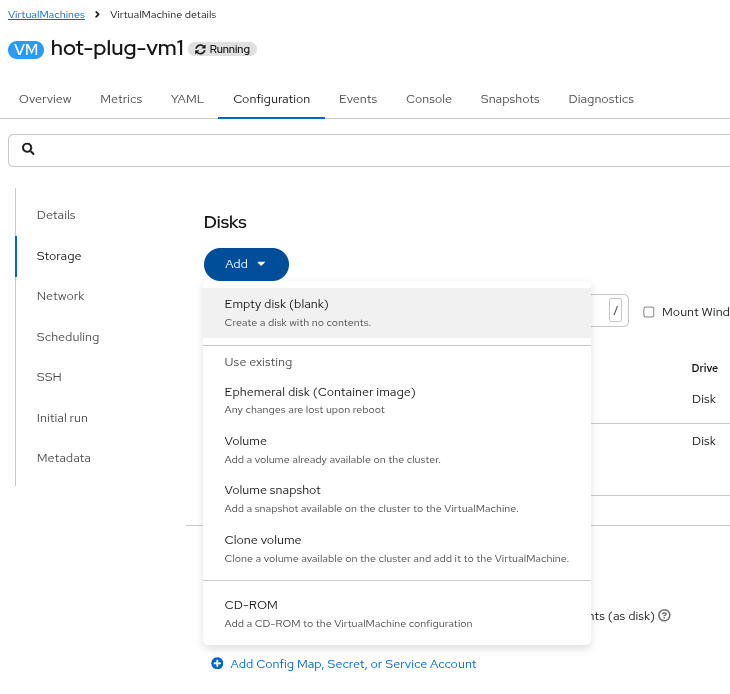 Figure 10. Add an empty disk
 -
In the window that appears, give the new disk a name (e.g. data-disk-01) and change the size to 5 GiB. The rest of the options may remain at their defaults.
Click the Save button.
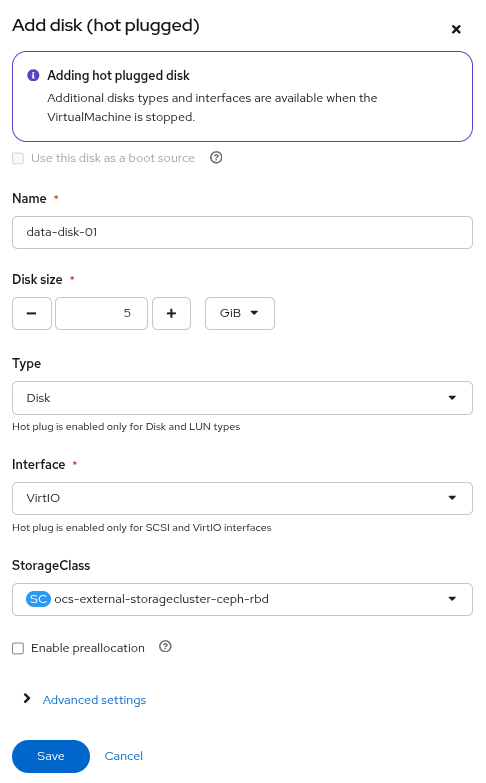 Figure 11. Configure the new disk
 -
The new disk has been added with a label of Persistent Hotplug.
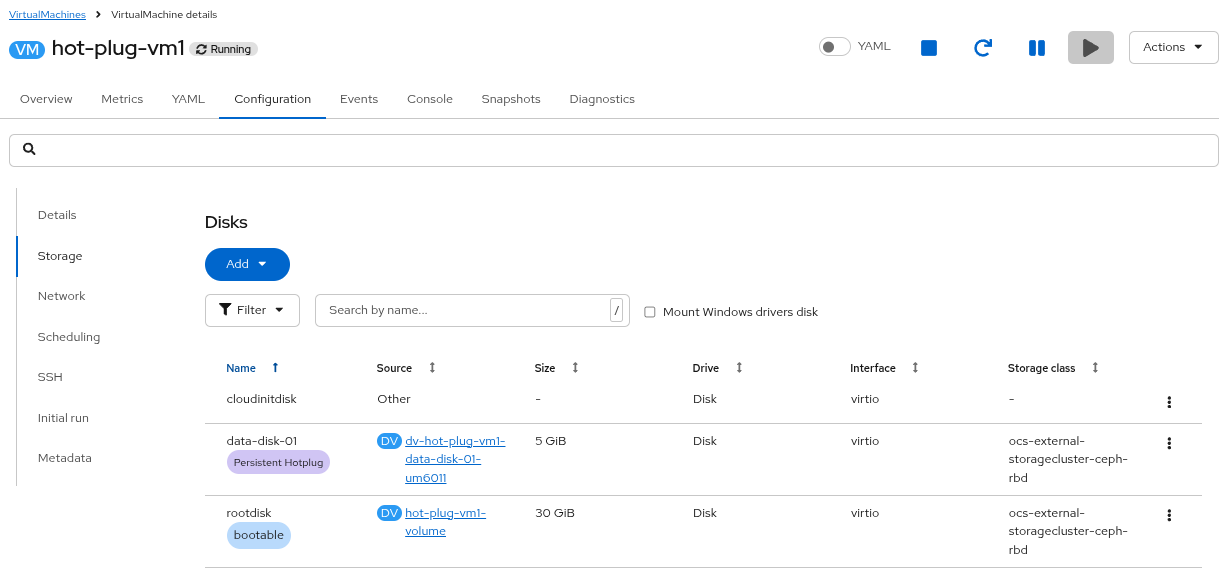 Figure 12. The disk is added
 -
Scroll up and click on the Console tab. The standard out of the VNC console will show logs that a new disk has been attached (/dev/vdc). The new disk may not appear immediately, so please be patient
If there are no logs in standard out, sudo dmesg will show them and the addition of the disk
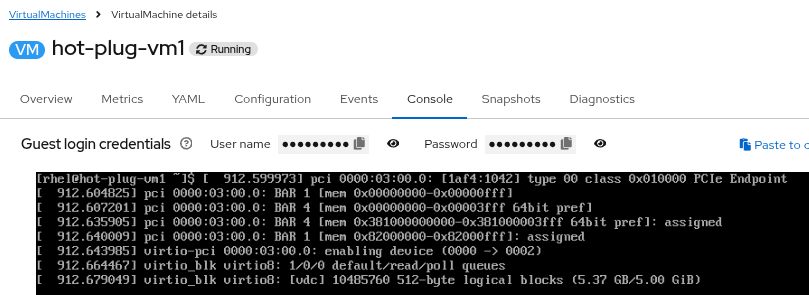 Figure 13. Kernel messages about a new disk
 -
Login to the Virtual Machine using Copy to clipboard and Paste to console with the User name and Password credentials from above the console window. If necessary, click the blue Connect button.
Run the lsblk command and you will see the new 5 GiB disk added as vdc.
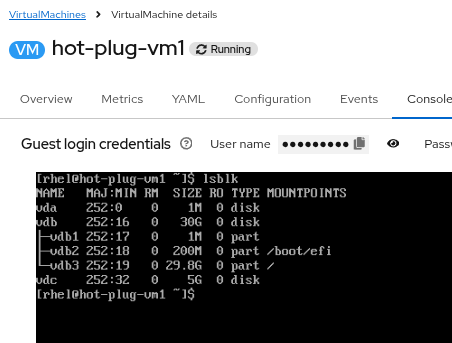 Figure 14. View the new disk from the OS
 -
The new disk is hot-plugged to the virtual machine by way of a new pod that manages access to the disk. The new pod is created in same project as the VM and is called hp-volume-xxxxx. This pod runs in addition to the virt-launcher.
Get a list of podsoc get pods -n hot-plugOutputNAME READY STATUS RESTARTS AGE hp-volume-mdnjd 1/1 Running 0 114s virt-launcher-hot-plug-vm1-rb6lg 2/2 Running 0 147m
-
The hp-volume pod will stop if the VM is stopped and the pod will start again when the VM is started. The new disk can be used as any normal disk would be used and will persist even if the VM is stopped and started.
-
We are not going to do it, but at this point you can create a filesystem on the new disk, mount it and use it as needed.
-
Now you will remove the hot-plugged disk from the Virtual Machine.
-
Using the OpenShift Console, navigate to Virtualization → Virtual Machines.
Under All projects, select the hot-plug namespace and select the hot-plug-vm1 VM.
Click on the Configuration tab and select Storage.
Note the name of the object that you will remove (e.g. dv-hot-plug-vm1-data-disk-01-um6O11) because you may want it for the Bonus Lab later!
Click on the three dots on the right side of the hot-plugged disk and select Detach.
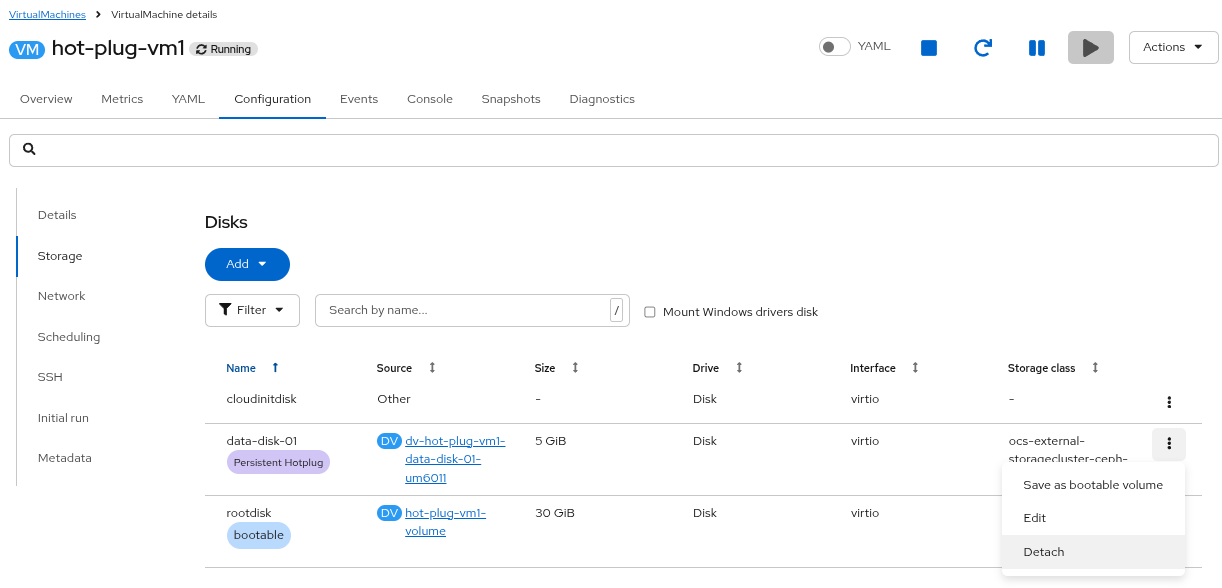 Figure 15. Detach the disk
 -
Confirm the action by clicking on the Detach button.
 Figure 16. Confirm disk detach
 -
Confirm that the disk (vdc) has been removed.
From the VM page, click on the Console tab. If necessary, click the blue Connect button.
Login to the Virtual Machine using Copy to clipboard and Paste to console with the User name and Password credentials from above the console window.
Run the lsblk command and you will see that the hot-plugged disk is no longer present on the system.
The detached disk still exists as a PVC. It can be re-attached, or attached to a different VM, or it can be deleted if it is no longer needed. 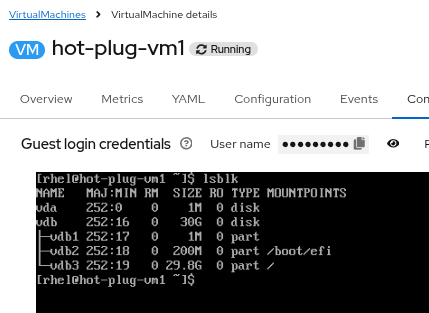 Figure 17. Disk is removed in OS
Bonus Lab - Convert a Hot Plug Disk to a Permanent Disk
The steps below are optional as they are not directly relate to hot plugging a new disk. However, it may be advantageous for you to know how to convert a hot-plugged disk to a standard disk, which requires a VM restart.
-
The PVC you detached above still exists until it is deleted manually. Therefore, you can reattach the PVC as a standard disk while the VM is shut down.
-
Navigate to Virtualization → Virtual Machines, and select the hot-plug project. Select the VM named hot-plug-vm1.
Stop the VM, either by using the square stop button or by selecting the Actions menu and clicking on Stop.
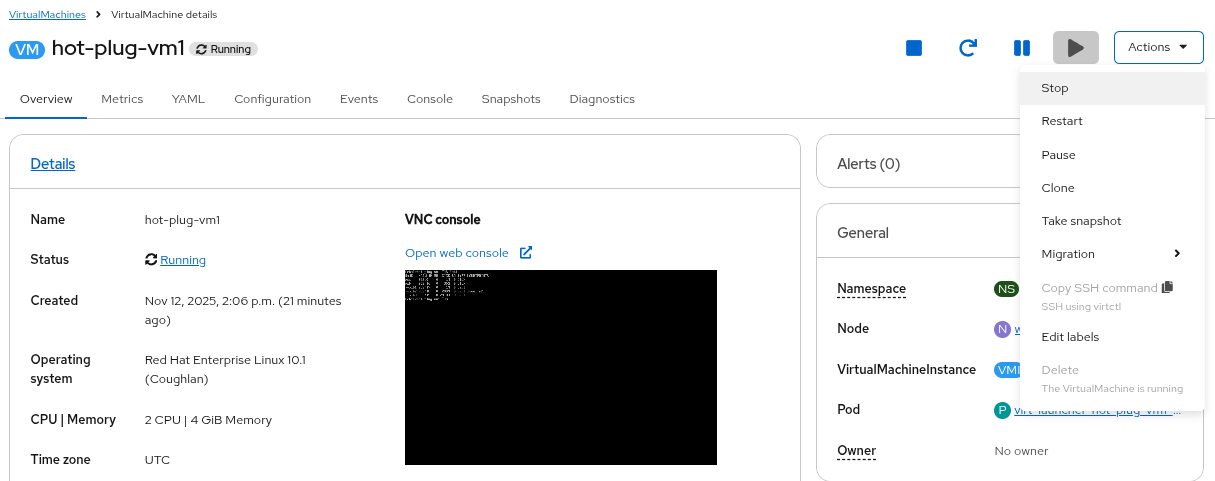 Figure 18. Stop the VM
 -
Click on the Configuration tab, and then Storage.
Click on the Add pull down menu and select Volume.
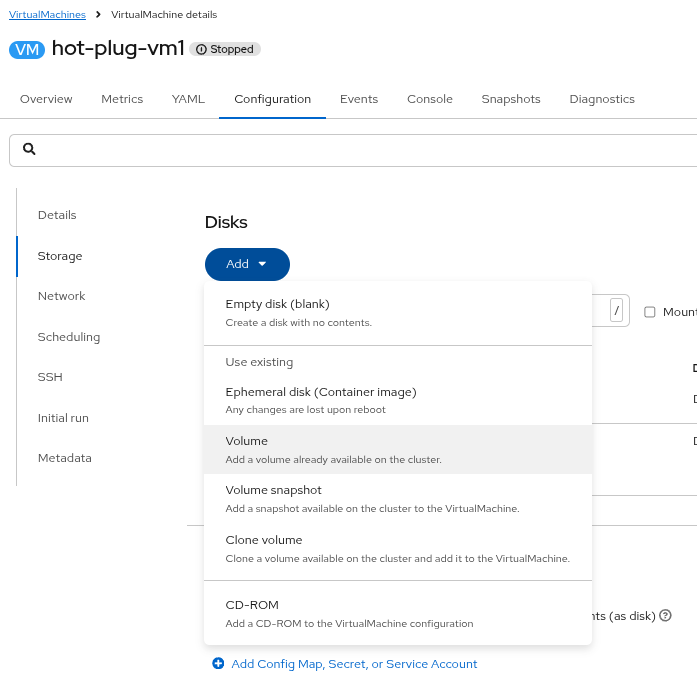 Figure 19. Add a volume
 -
Give the disk a name, if desired, and select the previously disconnected PVC from the PersistentVolumeClaim name dropdown (e.g. dv-hot-plug-vm1-data-disk-01-um6O11)
Click Save
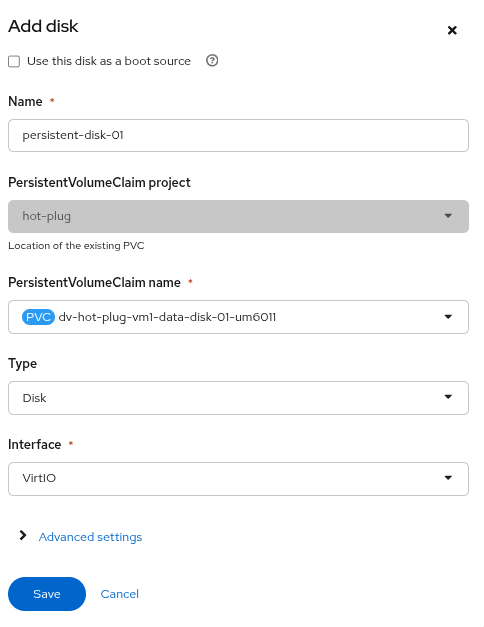 Figure 20. Select the PVC
 -
Now both the boot volume and the new disk are visible in the virtual machine configuration.
The new disk no longer has the Hotplug persistent label because it is not being added while the VM is running. 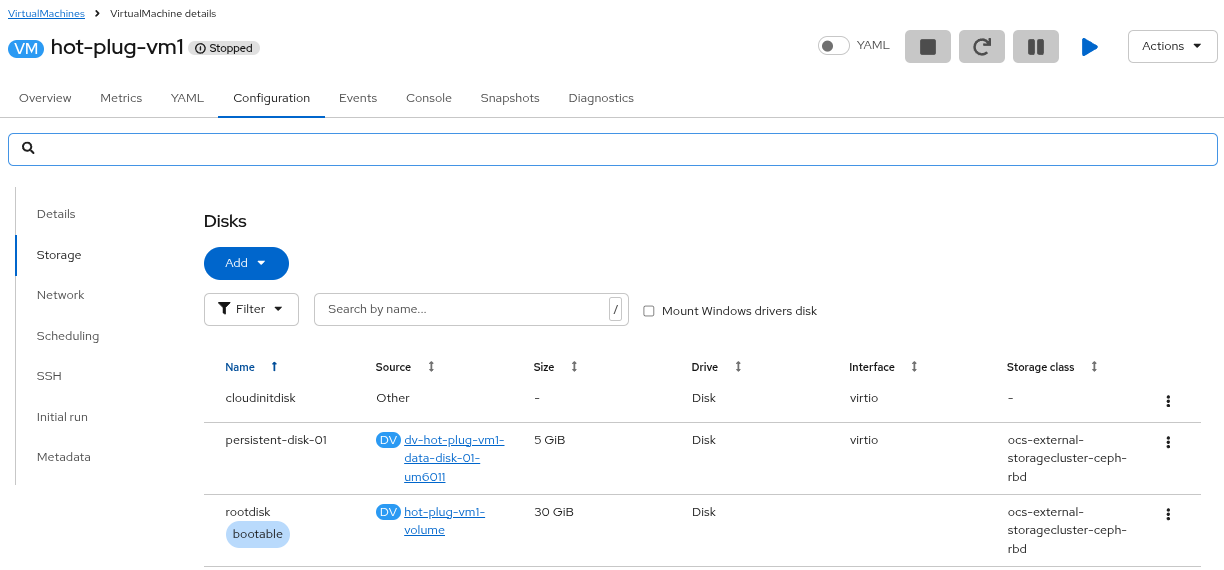 Figure 21. Both disks are attached
 -
Start the virtual machine by clicking on the blue Play icon, or by selecting the Actions menu and clicking Start.
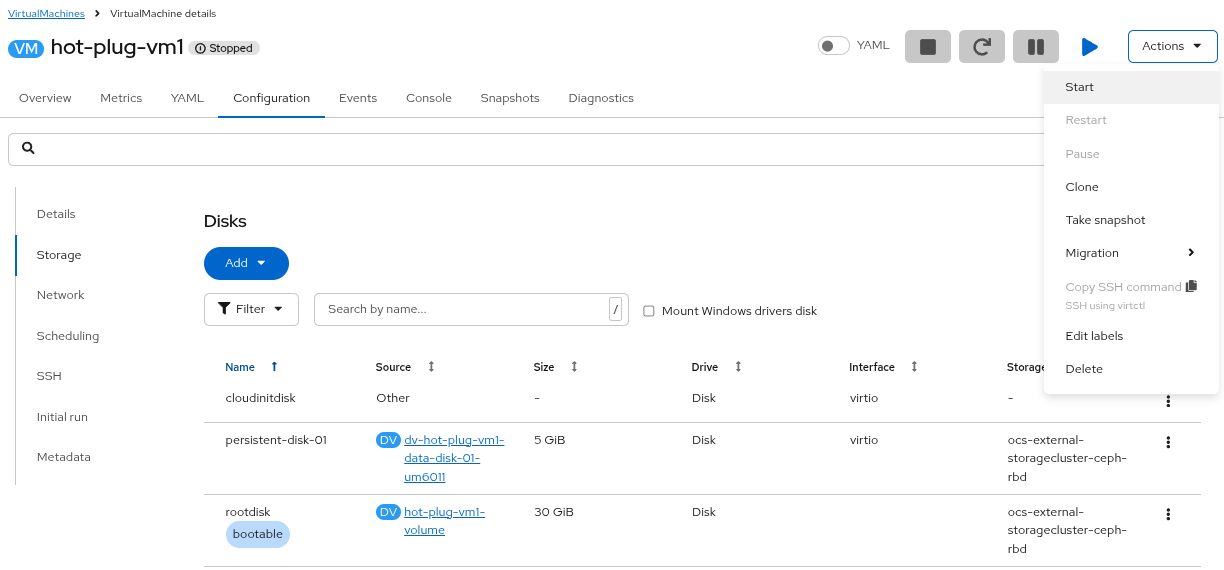 Figure 22. Both disks are attached
 -
Once the virtual machine is Running, click on the Console tab. If necessary, click the blue Connect button.
Login to the Virtual Machine using Copy to clipboard and Paste to console with the User name and Password credentials from above the console window.
Run lsblk and you can see that the disk is attached, although it may have changed names.
If you formatted or wrote data to the disk while it was hot plugged, you would see that the data is still on the disk.
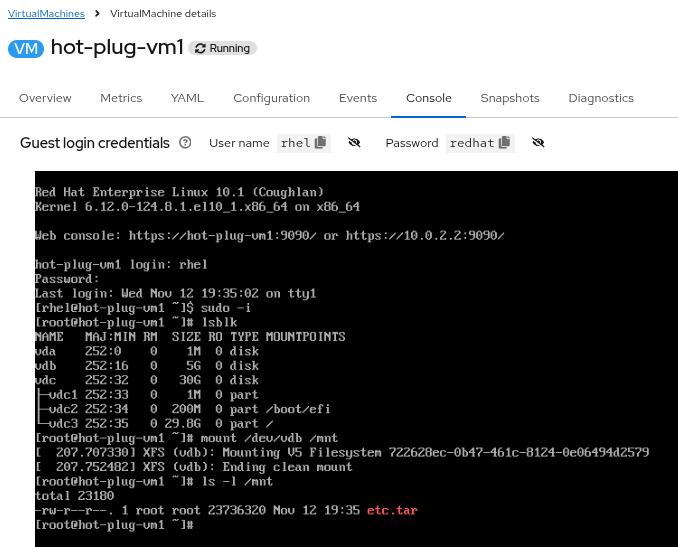 Figure 23. The disk is attached
Adding a NIC to a Running VM
In this lab, we will add a new Network Interface Card (NIC) to an existing VM. To do this, you will start with an existing VM that has a single NIC on the pod network. Using the OpenShift Virtualization console, you will modify the configuration of the VM to include an additional NIC on a new network.
Instructions
-
Ensure you are logged in to the OpenShift Console as the admin user from your web browser and continue to the next step.
-
Using the OpenShift Console, navigate to Virtualization → Virtual Machines.
Under All projects, select the hot-plug namespace and select the hot-plug-vm1 VM.
-
Take note of the Node on which the VM is running (e.g. worker-cluster-m2ssq-3)
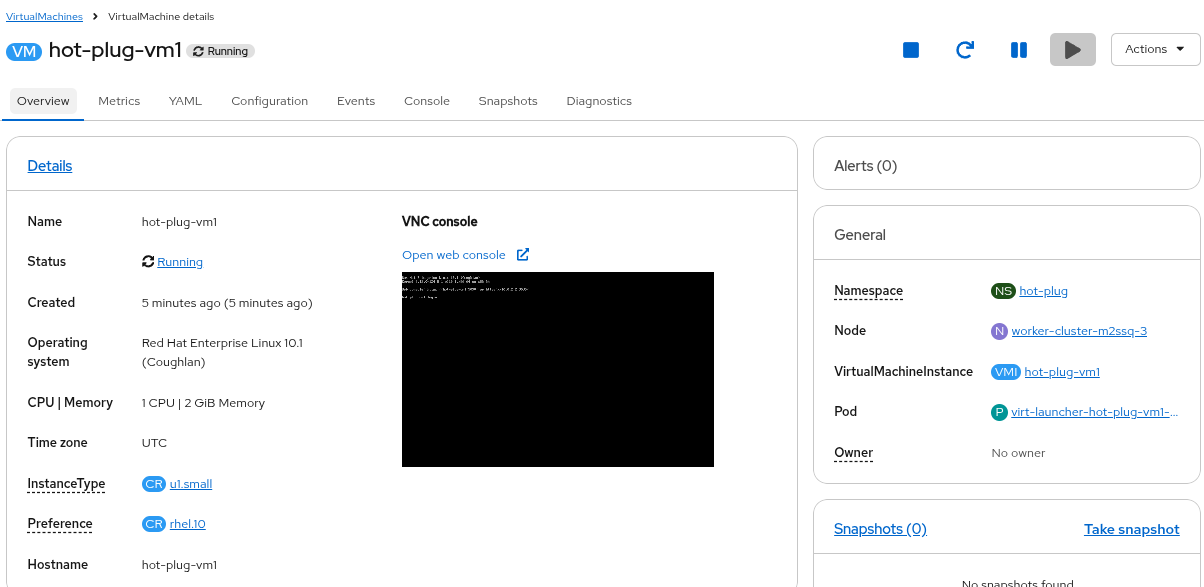 Figure 24. Identify the worker node
 -
Click on the Configuration tab and select Network.
Note that the VM currently has a single NIC.
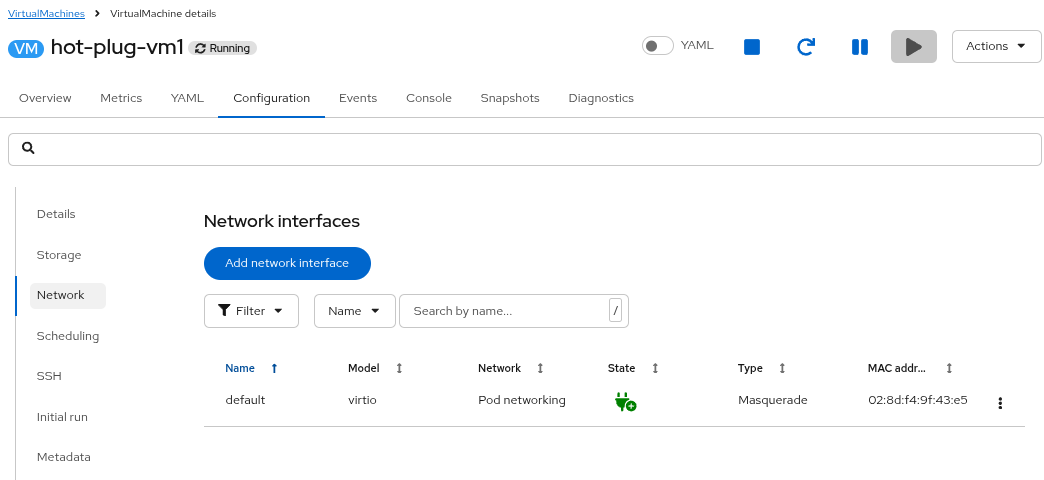 Figure 25. Single NIC only
You may also login to the VM via the Console tab and view the NIC details from the operating system.
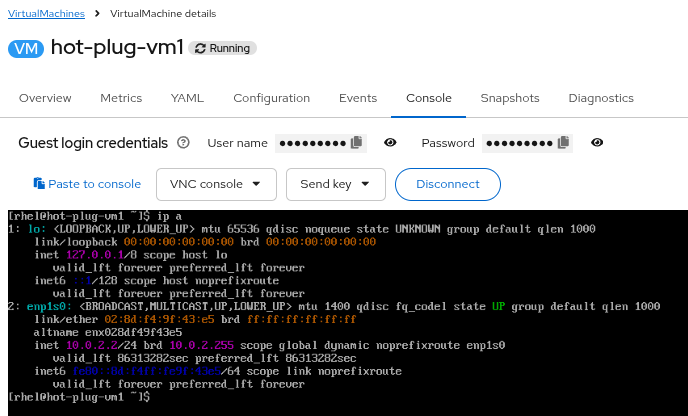 Figure 26. Single NIC in Console
 -
Back on the Network configuration screen, click on the button Add network interface.
In the new window, provide a name for the new interface, such as nic-1.
The model should be virtio, and the Network should be hot-plug/east-west-nad from the drop down.
Click the Save button.
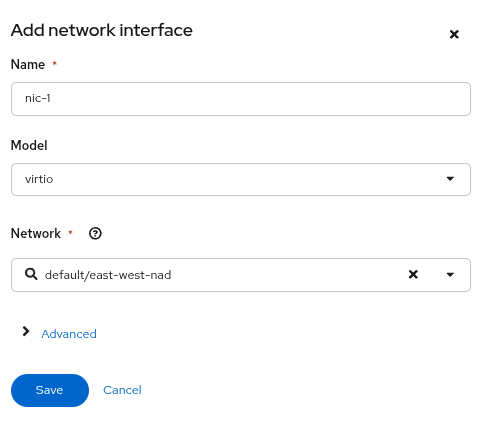 Figure 27. Add network interface
 -
Click on the > symbol next to the Pending changes banner that has appeared below the VM name.
Note that the message indicates a restart or migration is required for the NIC addition to take effect and that there is a Pending label on the new NIC in the Network interfaces section.
 Figure 28. View pending changes
 -
After the NIC is added, the VM will automatically live migrate in order to complete the hardware addition.
In order for the new NIC configuration to take effect, the virtual machine will automatically migrate from one worker node to another. If the new NIC configuration does not appear immediately, you may have to wait a few minutes. -
Navigate back to the Console tab. If necessary, click the blue Connect button.
Login to the Virtual Machine using Copy to clipboard and Paste to console with the User name and Password credentials from above the console window.
-
You may see messages on the VM console that new hardware has been added.
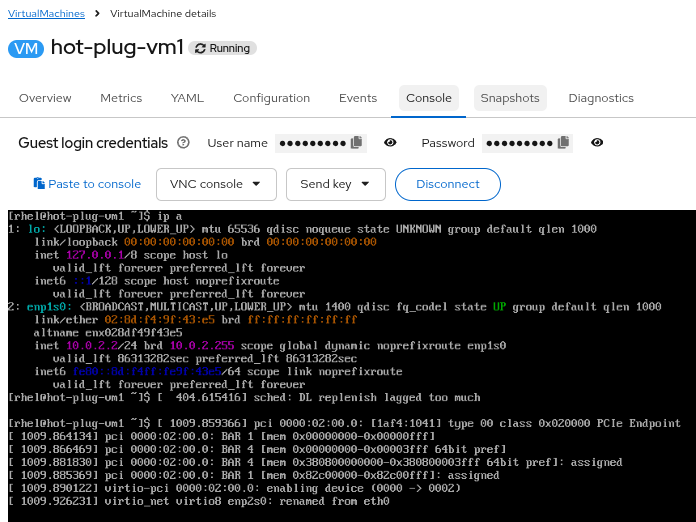 Figure 29. Messages on console about new NIC
 -
The new NIC is now available for use (e.g. enp2s0, although it may have a different name in your environment).
You can view the new NIC from the operating system by running the command ip address and viewing the output.
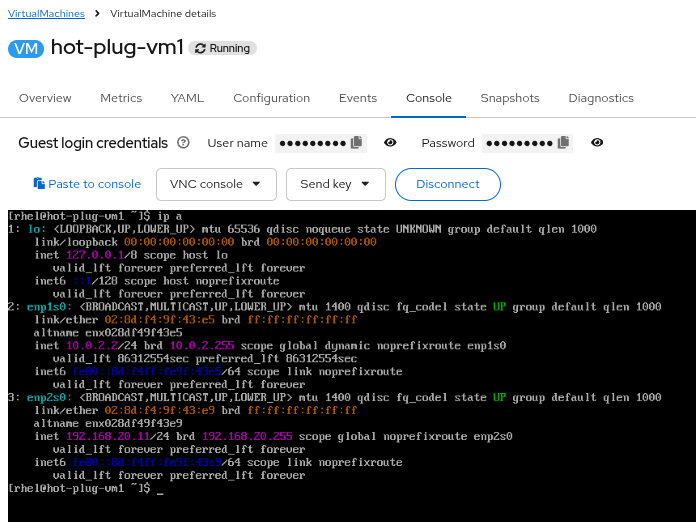 Figure 30. New NIC is up
|
Stop the hot-plug-vm1 VM using virtctl from your Terminal window to ensure you have enough resources for the next labs. VM hot-plug-vm1 was scheduled to stop |