Decentralized Live Migration
A decentralized live migration is a variation of a storage live migration that allows you to migrate a running VirtualMachine between namespaces and clusters.
This can be useful to:
Balance Workloads: Distributing virtual machines between clusters helps optimize resource utilization. If one cluster is heavily loaded while another is idle, rebalancing can significantly improve operational efficiency.
Facilitate Maintenance: For environments with multiple clusters, virtual machine migration allows for seamless maintenance. You can move virtual machines off a cluster slated for upgrades or shutdown, ensuring zero downtime for your services.
Expedite Restores: Instant restore capabilities from backup vendors, particularly when coupled with namespace migration, can drastically speed up recovery times. virtual machines can be quickly restored to a temporary location and then migrated to their original namespace and storage.
This lab demonstrates the forthcoming Tech Preview capabilities of Decentralized Live Migration. In this lab, we will walk through the live migration of a VirtualMachine from one Namespace to another. The process of live migrating between namespaces follows the same process as if you were to migrate a VirtualMachine between 2 clusters.
|
The UI based workflow is not fully functional yet. During this lab we will introduce you to the UI workflow, but perform the migration through the CLI. |
How does it work?
The migration involves two VirtualMachineInstances and two VirtualMachineInstanceMigration objects. Like a storage live migration, disk contents are copied over the network to the receiving VirtualMachine. The key difference is that the receiving virtual machine has a completely separate VirtualMachineInstance. In order to coordinate the migration, the status of the source and target VirtualMachineInstance has to be synchronized. A dedicated synchronization controller, running in the openshift-cnv namespace facilitates communication between the source and target VirtualMachineInstances.
Requirements
These requirements have already been enabled on your cluster and are noted for your reference.
-
The Migration Toolkit for Virtualization (MTV) Operator must be installed with the feature feature_ocp_live_migration set to true when creating the ForkliftController CR
-
You must enable the DecentralizedLiveMigration featureGate on the hyperconverged Custom Resource
Accessing the OpenShift Cluster
{openshift_cluster_console_url}[{openshift_cluster_console_url},window=_blank]
oc login -u {openshift_cluster_admin_username} -p {openshift_cluster_admin_password} --server={openshift_api_server_url}{openshift_api_server_url}[{openshift_api_server_url},window=_blank]
{openshift_cluster_admin_username}{openshift_cluster_admin_password}CLI Based Instructions
-
Ensure you are logged in to both the OpenShift Console and CLI as the admin user from your web browser and the terminal window on the right side of your screen and continue to the next step.
-
Start the source Virtual Machine
virtctl start vm-migration-ns-ns-live -n vm-live-migration-sourceVM vm-migration-ns-ns-live was scheduled to start -
Verify the source VirtualMachineInstance is running.
oc get vmi -n vm-live-migration-sourceThe output will look similar to the following, with a different IP and NODENAME:
NAME                     AGE  PHASE    IP          NODENAME               READY
vm-migration-ns-ns-live  28m  Running  10.233.2.16 worker-cluster-hflz6-3 True
Now let’s migrate our virtual machine vm-migration-ns-ns-live from the namespace vm-live-migration-source to a new namespace vm-live-migration-destination.
-
As we noted above, the migration requires two VirtualMachineInstances.
The first step is to create an empty DataVolume for the receiver virtual machine in the destination namespace.
Execute the following command to create the destination DataVolume:
cat <<EOF | oc apply -f -
apiVersion: cdi.kubevirt.io/v1beta1
kind: DataVolume
metadata:
  annotations:
    cdi.kubevirt.io/storage.usePopulator: "true"
  name: vm-migration-ns-ns-live
  namespace: vm-live-migration-destination
spec:
  source:
    blank: {}
  storage:
    storageClassName: ocs-external-storagecluster-ceph-rbd
    resources:
      requests:
        storage: 30Gi
EOF
Confirm the DataVolume and associated PersistentVolumeClaim have been created by executing the following two commands:
It is expected that the DV and PVC are PendingPopulation and Pending until the migration starts.
oc get DataVolume -n vm-live-migration-destinationNAME PHASE PROGRESS RESTARTS AGE vm-migration-ns-ns-live PendingPopulation N/A 107soc get PersistentVolumeClaim -n vm-live-migration-destinationNAME STATUS VOLUME CAPACITY ACCESS MODES STORAGECLASS VOLUMEATTRIBUTESCLASS AGE vm-migration-ns-ns-live Pending ocs-external-storagecluster-ceph-rbd <unset> 2m5s -
Next, create the receiver virtual machine in the destination namespace
The destination VirtualMachine is same as the source VirtualMachine except for two key differences:
-
The destination VirtualMachine has an annotation to set the post live migration runStrategy
kubevirt.io/restore-run-strategy: Always -
The destination virtual machine has different spec.runStrategy
runStrategy: WaitAsReceiver
-
-
Execute the following command to create the destination virtual machine:
cat <<EOF | oc apply -f -
apiVersion: kubevirt.io/v1
kind: VirtualMachine
metadata:
  annotations:
    kubevirt.io/restore-run-strategy: Always
  name: vm-migration-ns-ns-live
  namespace: vm-live-migration-destination
spec:
  runStrategy: WaitAsReceiver
  template:
    metadata:
      annotations:
        vm.kubevirt.io/flavor: small
        vm.kubevirt.io/os: rhel9
        vm.kubevirt.io/workload: server
      creationTimestamp: null
      labels:
        kubevirt.io/domain: vm-migration-ns-ns-live
        kubevirt.io/size: small
        network.kubevirt.io/headlessService: headless
    spec:
      architecture: amd64
      networks:
      - name: default
        pod: {}
      domain:
        cpu:
          cores: 1
          sockets: 1
          threads: 1
        devices:
          disks:
          - disk:
              bus: virtio
            name: rootdisk
          - disk:
              bus: virtio
            name: cloudinitdisk
          interfaces:
          - macAddress: 02:a1:3b:00:00:85
            masquerade: {}
            model: virtio
            name: default
          logSerialConsole: false
          rng: {}
        features:
          acpi: {}
          smm:
            enabled: true
        firmware:
          bootloader:
            efi: {}
          serial: 94f58dd1-b1e1-4aab-add2-ab3d3483d297
        machine:
          type: pc-q35-rhel9.6.0
        memory:
          guest: 2Gi
        resources: {}
      terminationGracePeriodSeconds: 180
      volumes:
      - dataVolume:
          name: vm-migration-ns-ns-live
        name: rootdisk
      - cloudInitNoCloud:
          userData: |-
            #cloud-config
            user: cloud-user
            password: redhat
            chpasswd: { expire: False }
        name: cloudinitdisk
EOF
Confirm the VirtualMachine and associated VirtualMachineInstance have been created by executing the following two commands:
oc get VirtualMachine -n vm-live-migration-destinationNAME AGE STATUS READY vm-migration-ns-ns-live 51s WaitingForReceiver Falseoc get VirtualMachineInstance -n vm-live-migration-destinationNAME AGE PHASE IP NODENAME READY vm-migration-ns-ns-live 5m55s WaitingForSync FalseYou will notice that the VirtualMachine and VirtualMachineInstance have a unique PHASE, WaitingForReceiver and WaitingForSync.
This indicates the VirtualMachine is waiting for the migration to start as a receiver and the VirtualMachineInstance is waiting for data to be synchronized from the source VirtualMachine.
-
With the destination VirtualMachine and VirtualMachineInstance waiting, create the destination VirtualMachineInstanceMigration by executing the following command:
cat <<EOF | oc apply -f -
apiVersion: kubevirt.io/v1
kind: VirtualMachineInstanceMigration
metadata:
  name: ns-to-ns-vm-live-migration-instance-destination
  namespace: vm-live-migration-destination
spec:
  receive:
    migrationID: 52e4398d-bdbf-42b5-b0f4-1e7c6c0a08f5-38cec1f6-43bb-412d-8477-b3d635fd7123
  vmiName: vm-migration-ns-ns-live
EOF
The migrationID field in the YAML above does not refer to anything specific, but must be unique across all migrations. You may use any unique text in that field, but both the source and destination VirtualMachineInstanceMigration objects must use the same migrationID for a migration.
Confirm the destination VirtualMachineInstanceMigration has been created by executing the following command:
oc get VirtualMachineInstanceMigration -n vm-live-migration-destinationNAME PHASE VMI ns-to-ns-vm-live-migration-instance-destination WaitingForSync vm-migration-ns-ns-live
-
With the destination VirtualMachineInstanceMigration waiting, the final step is to create the source VirtualMachineInstanceMigration.
To create the source VirtualMachineInstanceMigration, we need the IP address of the leader virt-synchronization-controller.
-
Find the IP address of the virt-synchronization-controller lease holder:
oc get pods $(oc get leases virt-synchronization-controller -n openshift-cnv -o json | jq -r '.spec.holderIdentity') -o json -n openshift-cnv | jq -r '.status.podIP'The IP address in your cluster will be different! Make sure you use the correct IP address from the output!
Example output10.232.1.136
-
-
Take the pod IP address from the previous command output (10.232.1.136 in the example) and replace <leader_sync_controller_ip> in the VirtualMachineInstanceMigration YAML below. Take care that you do not remove the port :9185
cat <<EOF | oc apply -f -
apiVersion: kubevirt.io/v1
kind: VirtualMachineInstanceMigration
metadata:
  name: ns-to-ns-vm-live-migration-instance-source
  namespace: vm-live-migration-source
spec:
  sendTo:
    connectURL: <leader_sync_controller_ip>:9185
    migrationID: 52e4398d-bdbf-42b5-b0f4-1e7c6c0a08f5-38cec1f6-43bb-412d-8477-b3d635fd7123
  vmiName: vm-migration-ns-ns-live
EOF
Monitor the Migration
When the source VirtualMachineInstanceMigration above is created, the migration will start. You can monitor the migration through the CLI or the Console.
Ensure you are logged in to both the OpenShift Console and CLI as the admin user from your web browser and the terminal window on the right side of your screen and continue to the next step.
-
From the CLI
oc get vmim -A -wUsing -w to apply a watch, you will see the Migration progress through a number of PHASE*s from *Scheduling through to Succeeded.
NAMESPACE                       NAME                                              PHASE        VMI
vm-live-migration-destination   ns-to-ns-vm-live-migration-instance-destination   Scheduling   vm-migration-ns-ns-live
vm-live-migration-source        ns-to-ns-vm-live-migration-instance-source        Scheduling   vm-migration-ns-ns-live
vm-live-migration-destination   ns-to-ns-vm-live-migration-instance-destination   Scheduled    vm-migration-ns-ns-live
vm-live-migration-destination   ns-to-ns-vm-live-migration-instance-destination   PreparingTarget   vm-migration-ns-ns-live
vm-live-migration-source        ns-to-ns-vm-live-migration-instance-source        Scheduled         vm-migration-ns-ns-live
vm-live-migration-source        ns-to-ns-vm-live-migration-instance-source        PreparingTarget   vm-migration-ns-ns-live
vm-live-migration-destination   ns-to-ns-vm-live-migration-instance-destination   TargetReady       vm-migration-ns-ns-live
vm-live-migration-source        ns-to-ns-vm-live-migration-instance-source        TargetReady       vm-migration-ns-ns-live
vm-live-migration-source        ns-to-ns-vm-live-migration-instance-source        Running           vm-migration-ns-ns-live
vm-live-migration-destination   ns-to-ns-vm-live-migration-instance-destination   Running           vm-migration-ns-ns-live
vm-live-migration-destination   ns-to-ns-vm-live-migration-instance-destination   Succeeded         vm-migration-ns-ns-live
oc get vm -n vm-live-migration-sourceThe VirtualMachine will show it is Migrating.
NAME                      AGE    STATUS      READY
vm-migration-ns-ns-live   7m1s   Migrating   False
-
From the Console
From the left side panel, navigate to Virtualization → Virtual Machines. Under All projects, select the vm-live-migration-source namespace and click on the Virtual Machine named vm-migration-ns-ns-live.
On the Virtual machine details page, you will see the Source VM is Running.
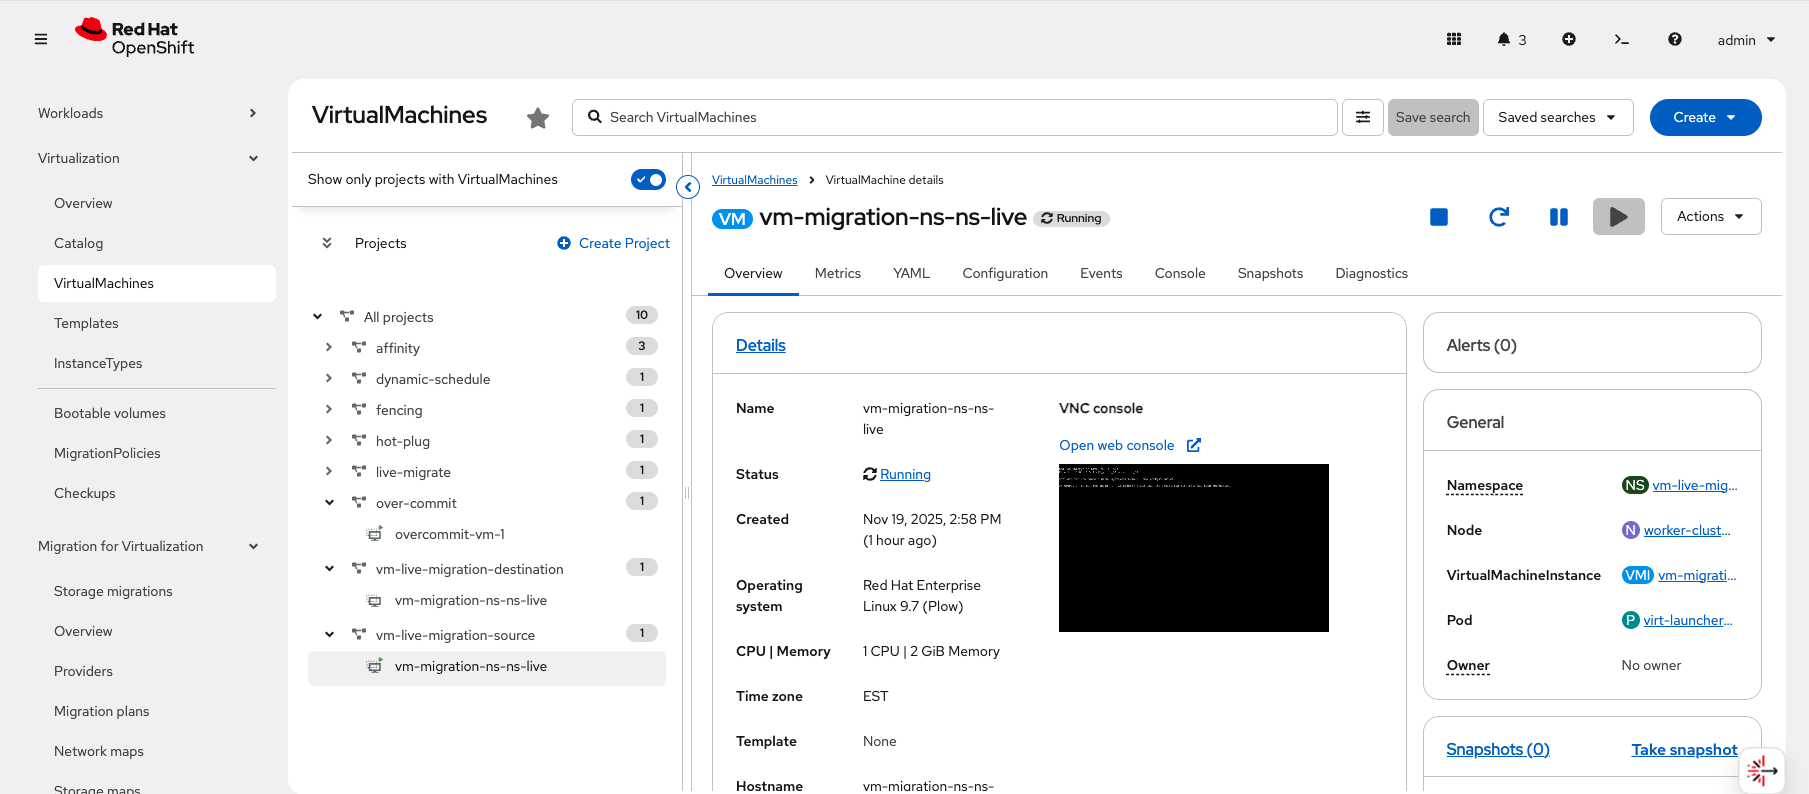 Figure 1. Source Virtual Machine Details - Running
To view the Destination VM, select by the Namespace vm-live-migration-destination to expand it and click on the virtual machine named vm-migration-ns-ns-live.
On the Virtual machine details page, you will see the Destination VM. If the migration has not started, it will have a status of WaitingForReceiver.
 Figure 2. Destination Virtual Machine Details - WaitingForReceiver
If the Migration has started and is in the early stages, the VM will a status of Starting.
 Figure 3. Destination Virtual Machine Details - Starting
When the Source and Destination are ready, the status of the Destination VM will change to Migrating.
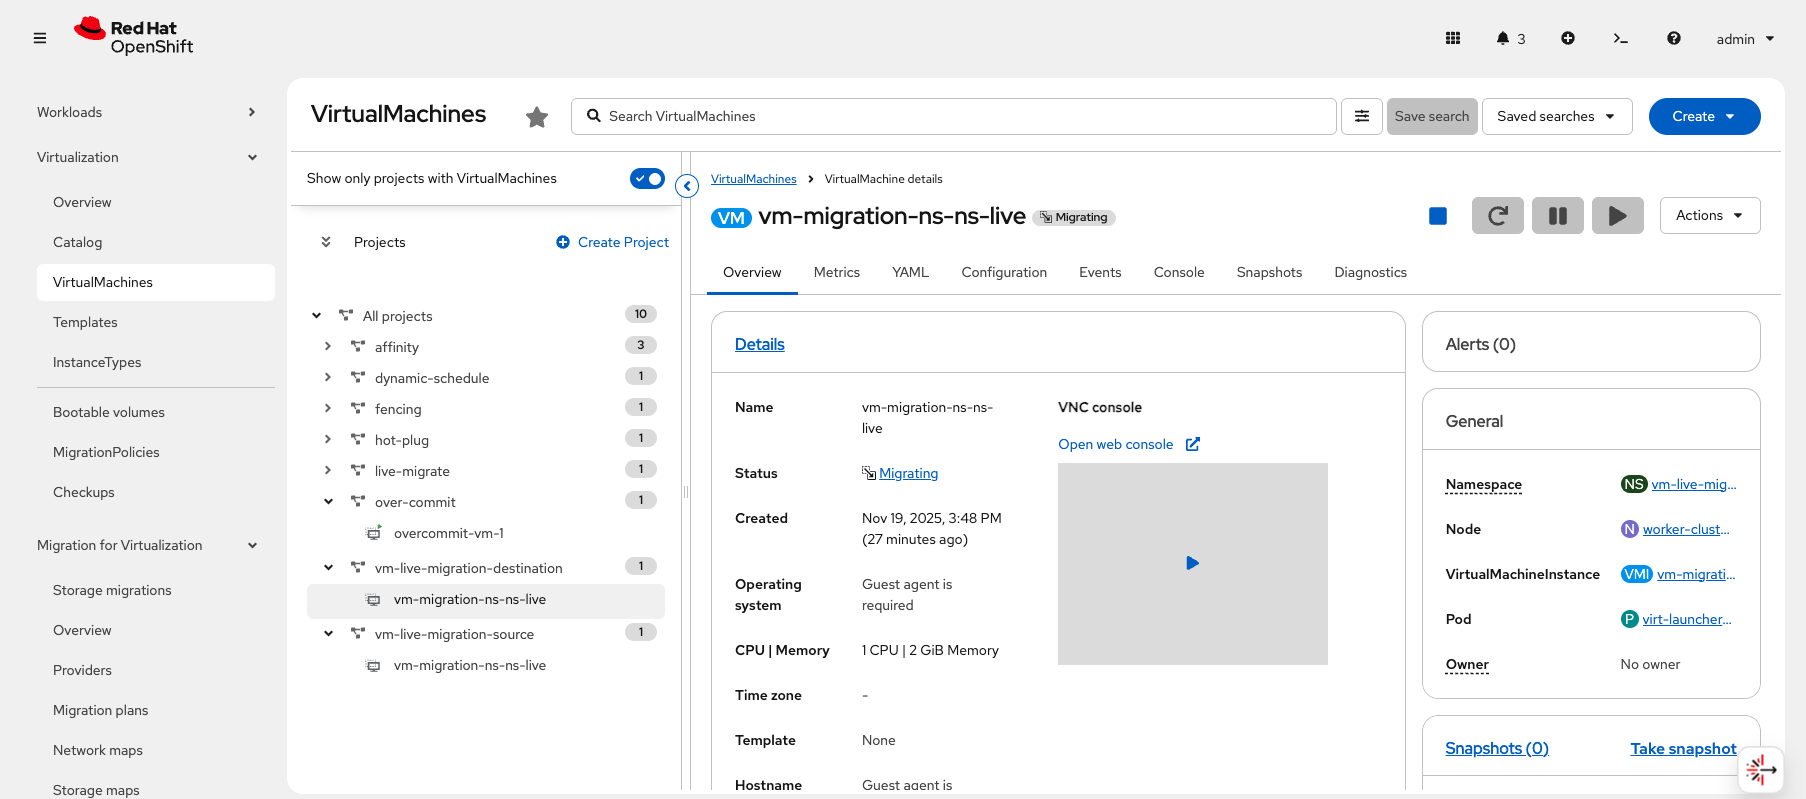 Figure 4. Destination Virtual Machine Details - Migrating
Once the Destination VM starts Migrating, you can click on the Migrating status which will display a pop-up panel with information about the state of the migration.
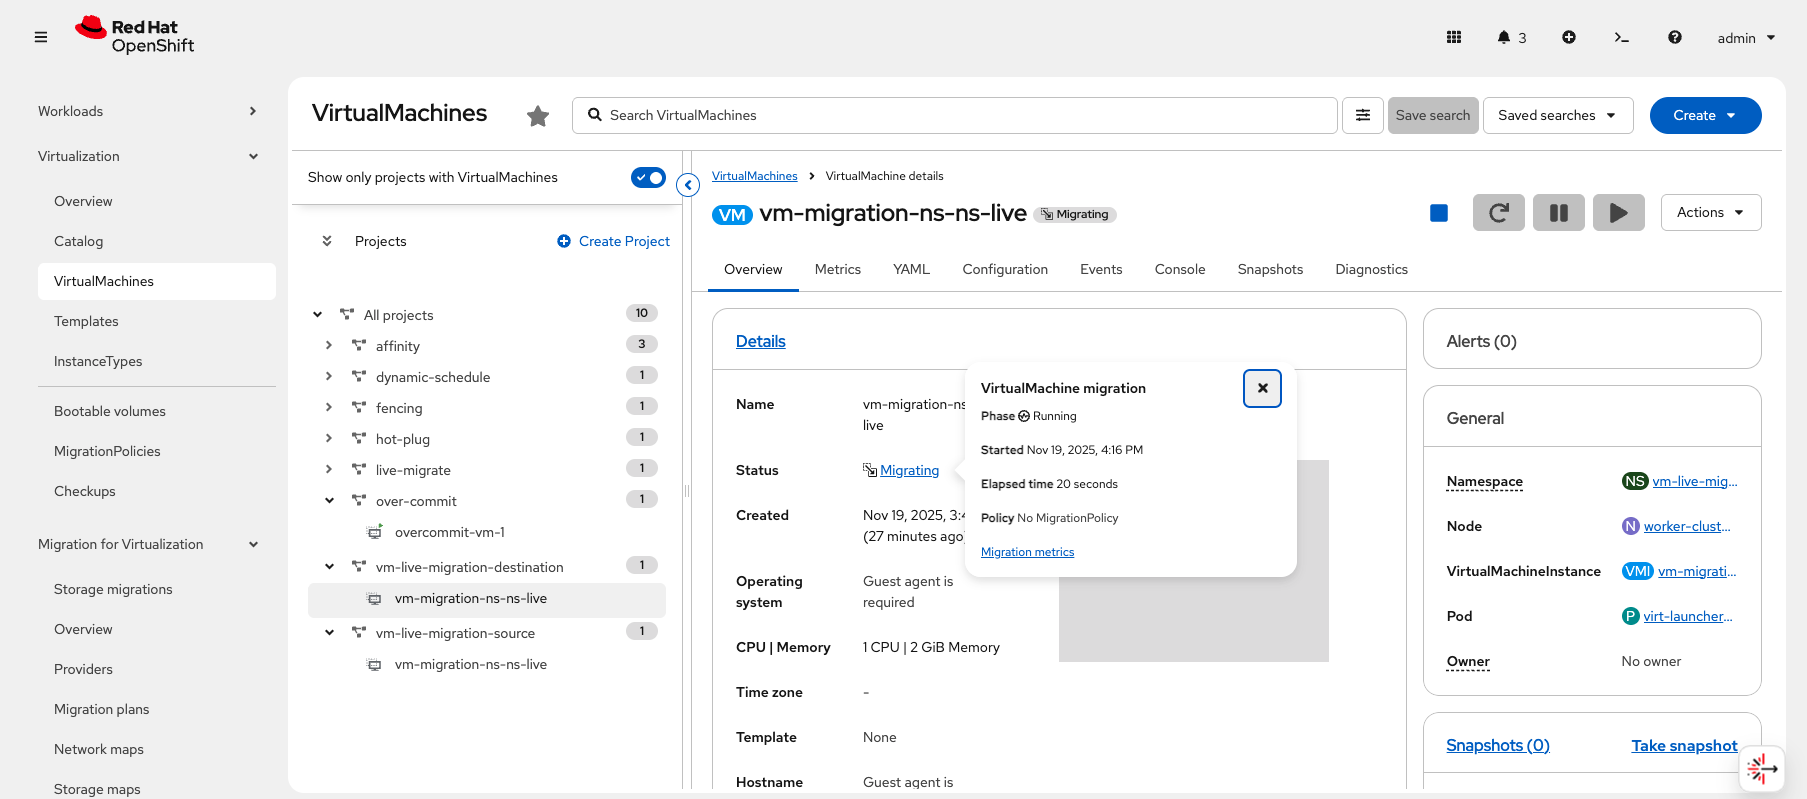 Figure 5. Destination Virtual Machine - Migration Pop-up Panel
From the Migrating pop-up panel, there is a link Migration metrics. Clicking that link will take you to the Metrics tab with detailed information about the VM and the migration.
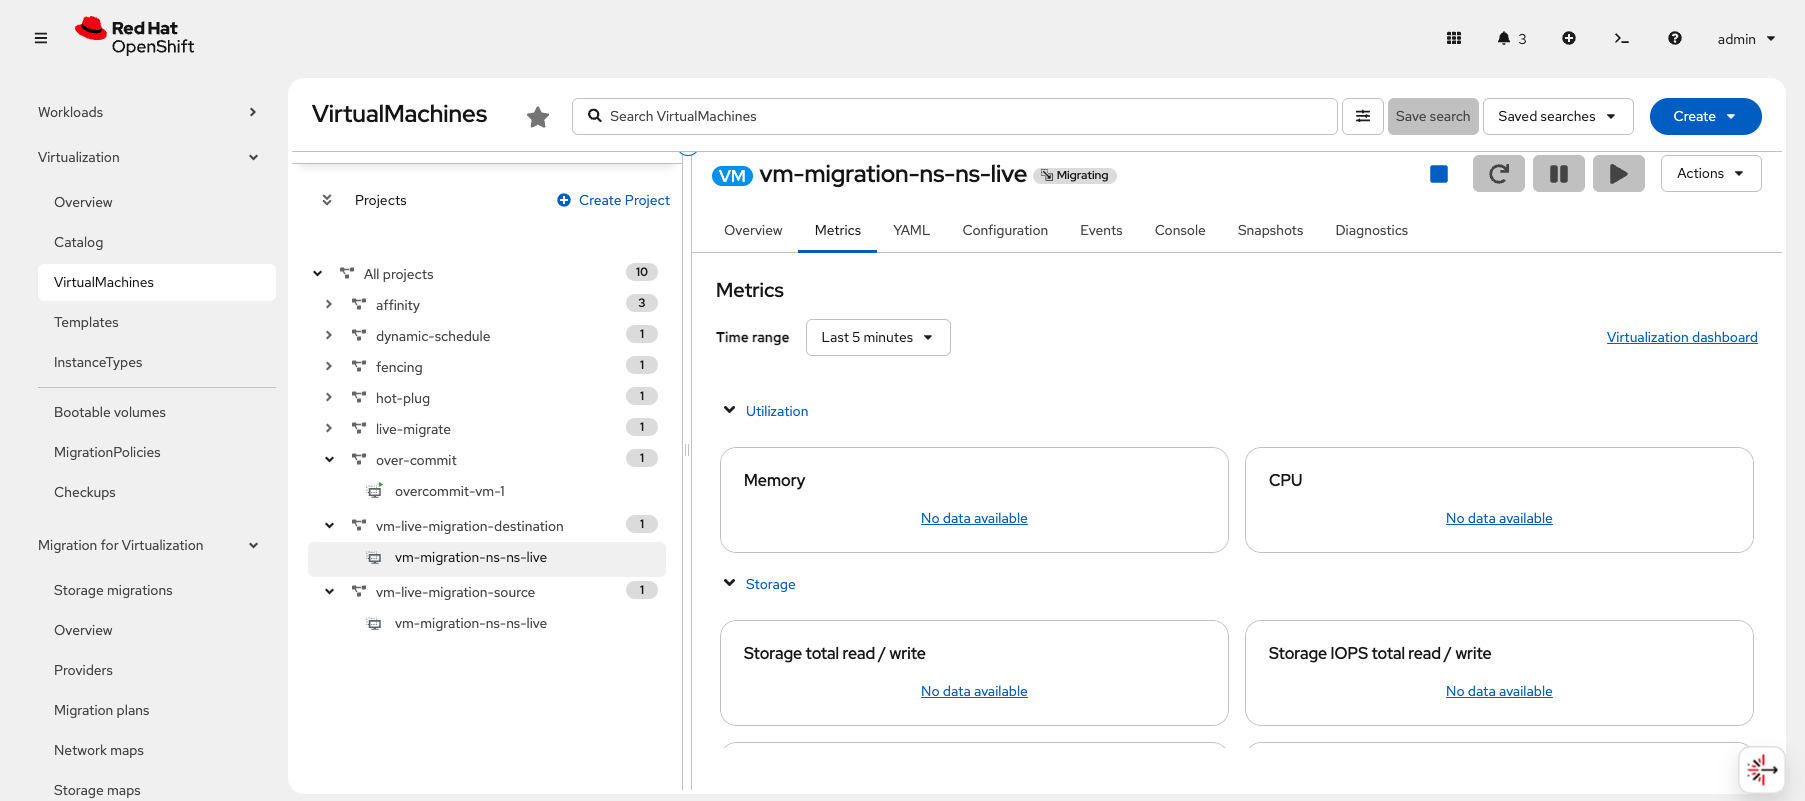 Figure 6. Destination Virtual Machine - Migration Metrics
Scrolling down on the Metrics page, you will see more migration metrics and a LiveMigration progress bar.
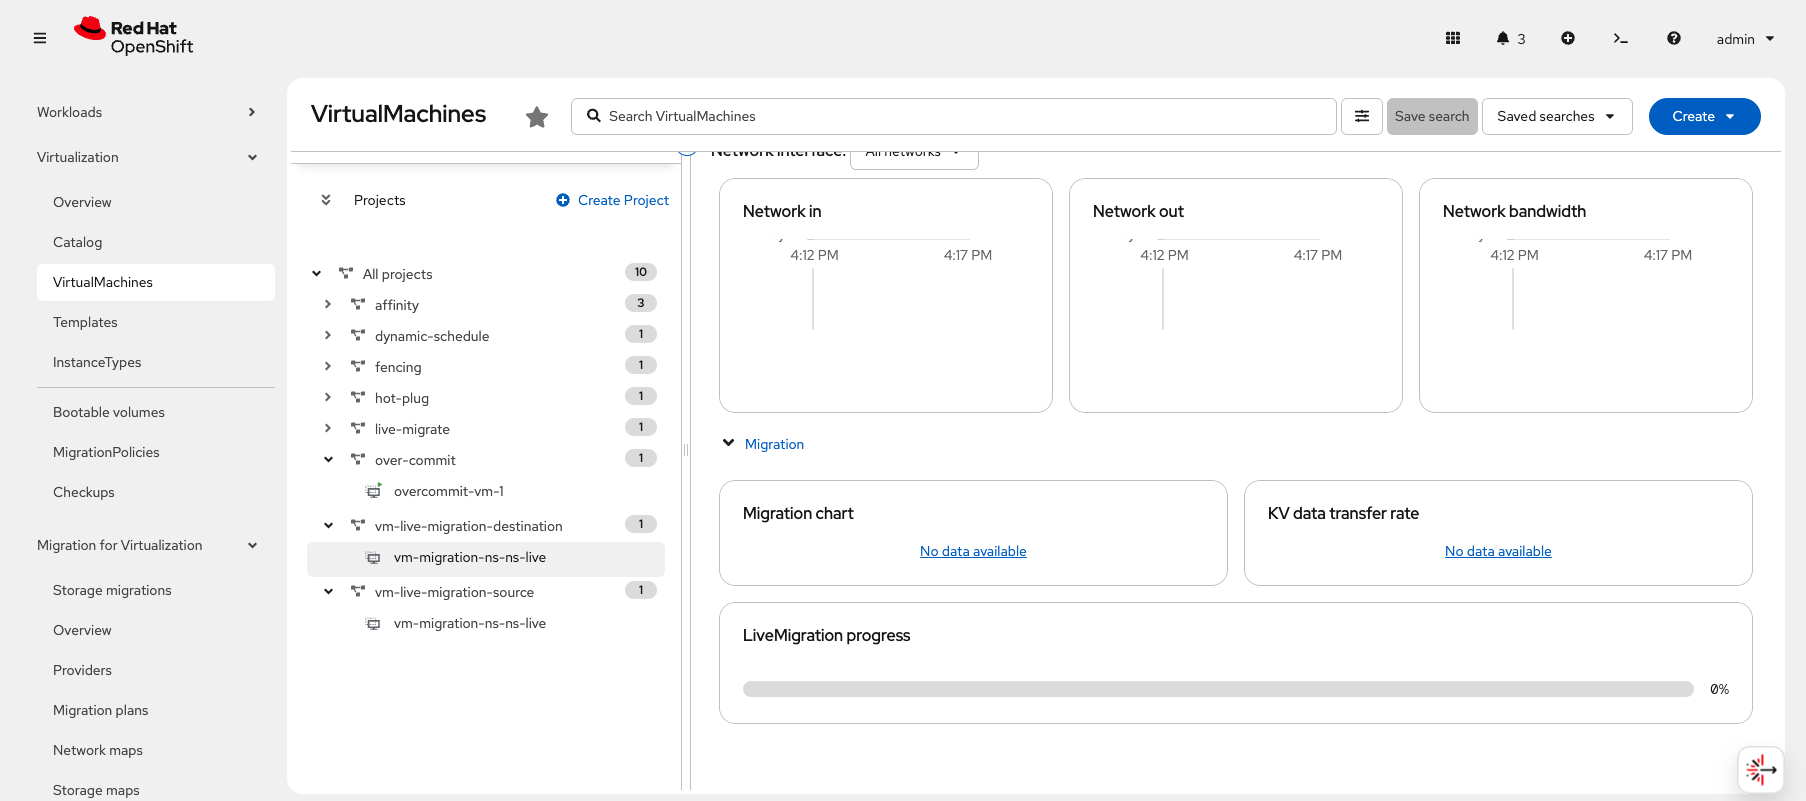 Figure 7. Destination Virtual Machine - Migration Metrics
As the migration progresses, you will see the LiveMigration progress bar move until it reaches 100% and displays a Complete time.
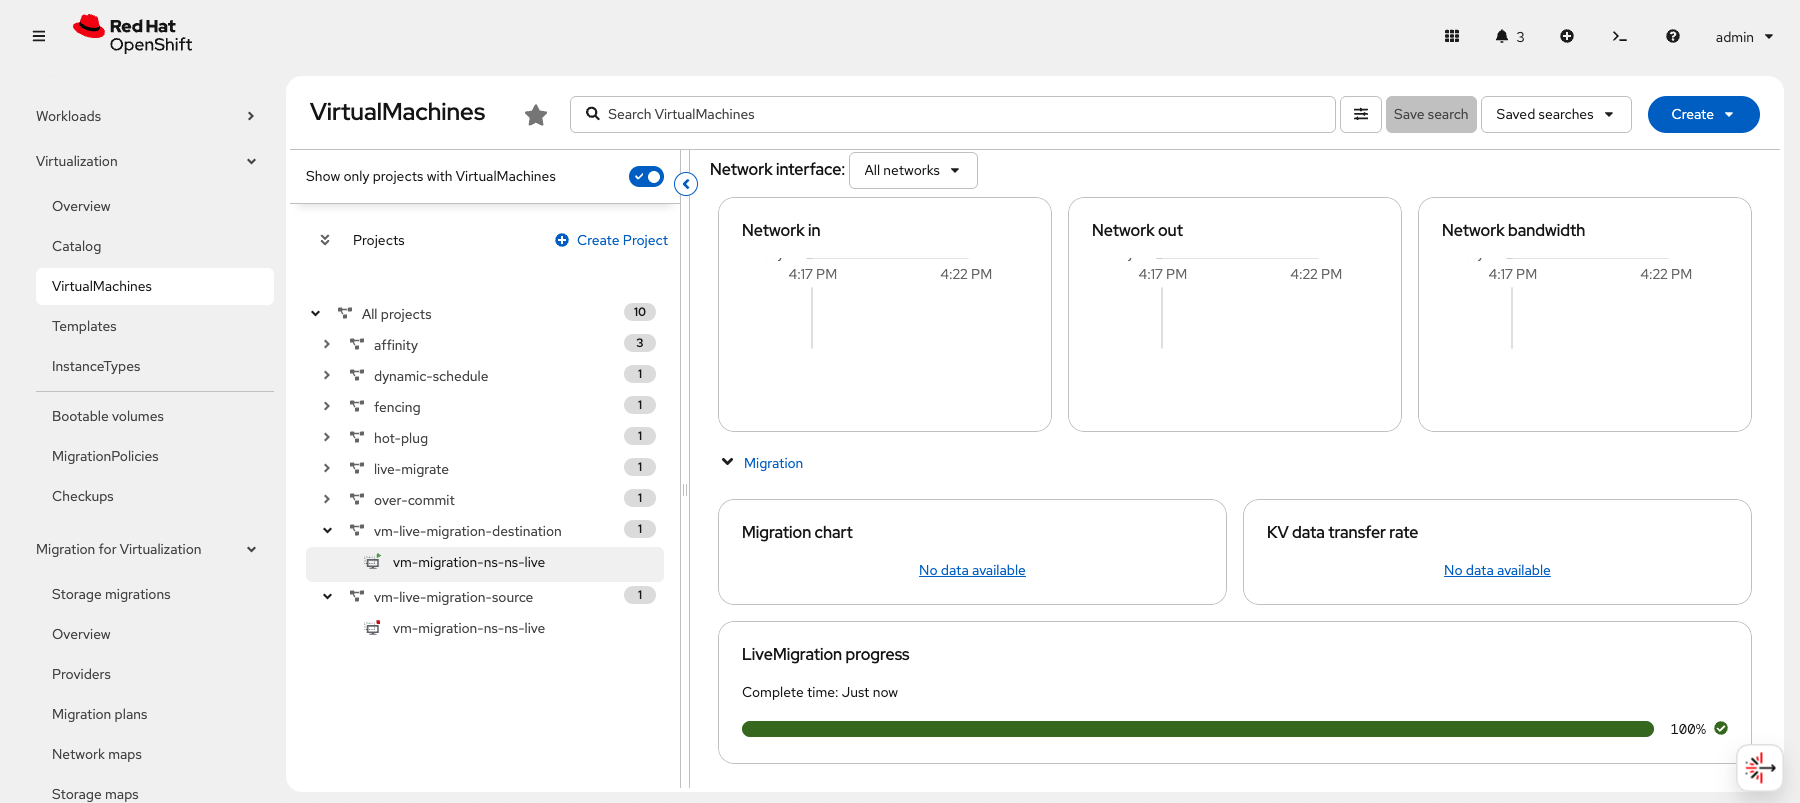 Figure 8. Destination Virtual Machine - Migration Progress Bar
Navigating back to the Overview tab, you will see that the Destination VM is now in a Running state. You can also see, in the Projects sidebar, that the Source VM is now Stopped.
This marks the successful completion of the Namespace to Namespace live migration.
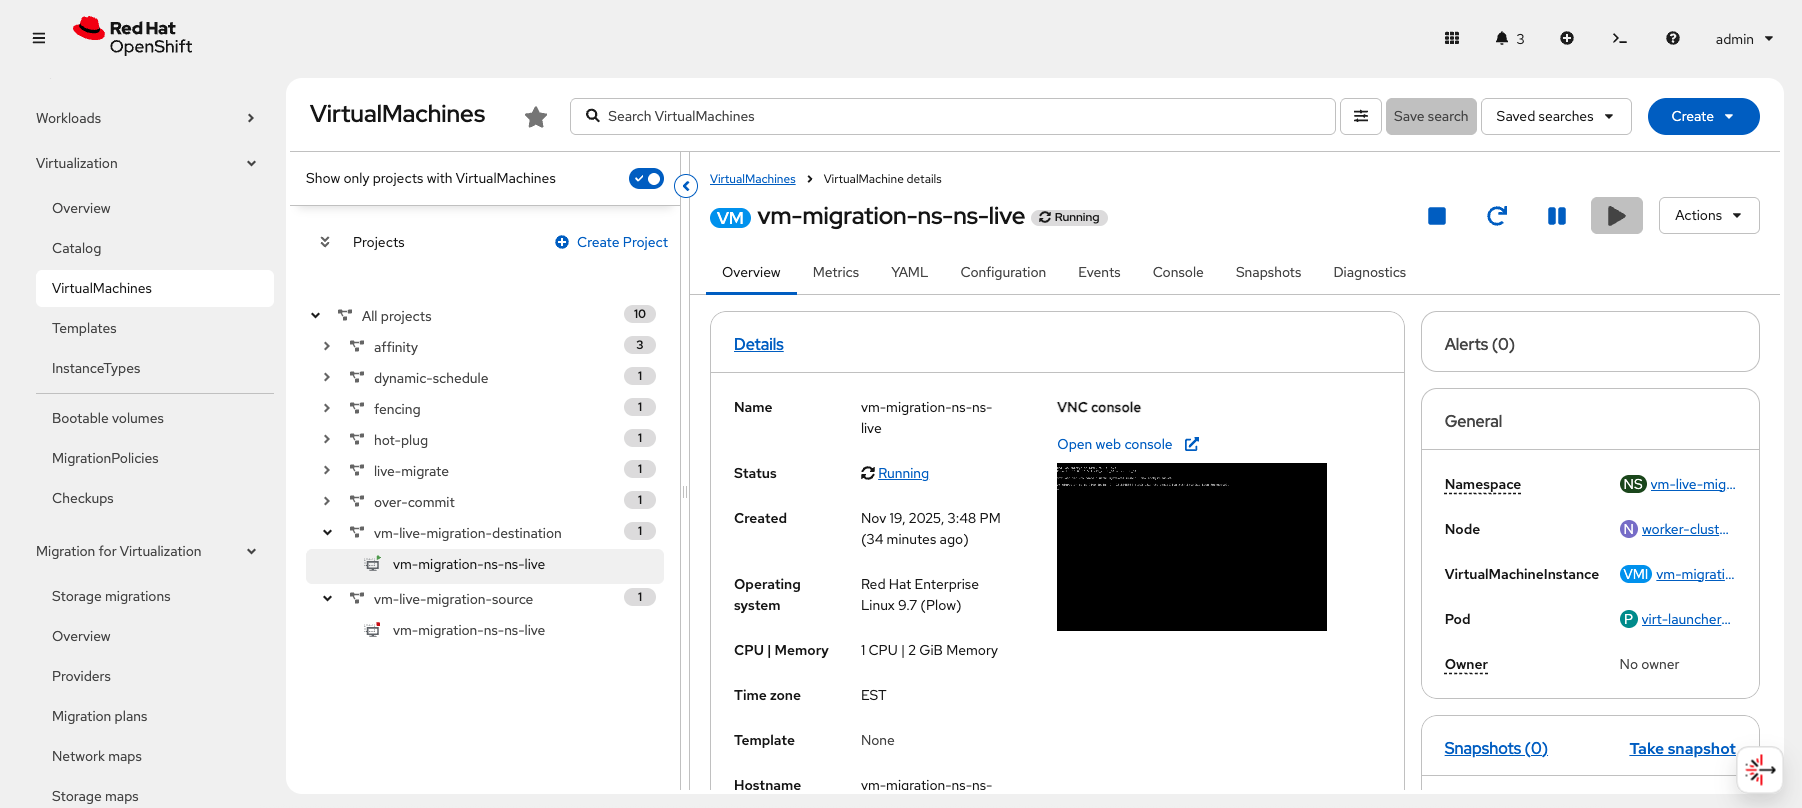 Figure 9. "Destination Virtual Machine - Running & Source Virtual Machine - Stopped
UI Based Instructions
|
The UI based workflow is not fully functional yet. The workflow is complete, but the migration will fail when the plan is created. The purpose of this section is to introduce you to the UI based workflow. |
-
Ensure you are logged in to the OpenShift Console as the admin user from your web browser and continue to the next step.
-
Before you start, cleanup and VMs from the CLI based migration.
Stop the destination VM
virtctl stop vm-migration-ns-ns-live -n vm-live-migration-destinationVM vm-migration-ns-ns-live was scheduled to stopDelete the destination VM
oc delete vm vm-migration-ns-ns-live -n vm-live-migration-destinationvirtualmachine.kubevirt.io "vm-migration-ns-ns-live" deletedStart the source VM
virtctl start vm-migration-ns-ns-live -n vm-live-migration-sourceVM vm-migration-ns-ns-live was scheduled to startMake sure the source VM is Running
oc get vmi -n vm-live-migration-sourceNAME AGE PHASE IP NODENAME READY vm-migration-ns-ns-live 113s Running 10.232.1.115 control-plane-cluster-dvddt-1 True -
From the left side panel, navigate to Migration for Virtualization and click Migration plans.
 Figure 10. Migration Plans
 -
From the Migration plans page, click Create plan.
If Create plan is greyed out, make sure you change the project to openshift-mtv or All projects from the Project: dropdown at the top of the page.
 Figure 11. Create Migration Plan
 -
On the Creation migration plan page, give your plan a name like
namespace-to-namespace.Leave the Plan project as the default value of openshift-mtv.
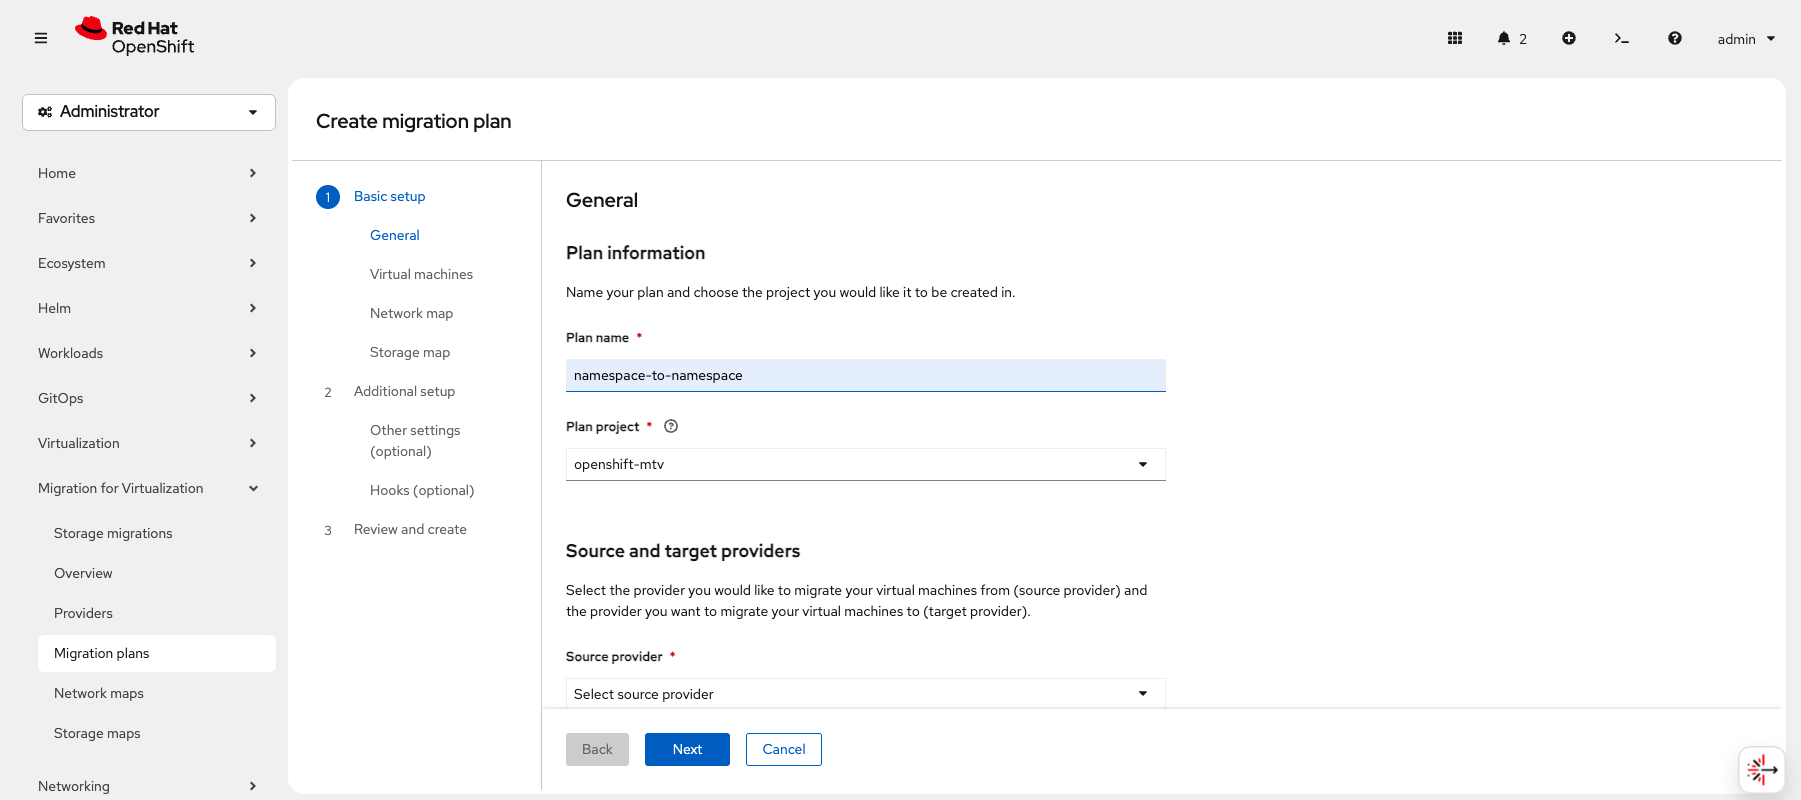 Figure 12. Create migration plan
 -
Further down the Creation migration plan page, select host as both the Target and Source provider and select vm-live-migration-destination as the Target project.
Click Next
Because we are migration our VirtualMachine between Namespaces within the same cluster, our Source and Target provider are the same. If we were migrating between clusters, we would have a different provider for the Target cluster and select that instead.
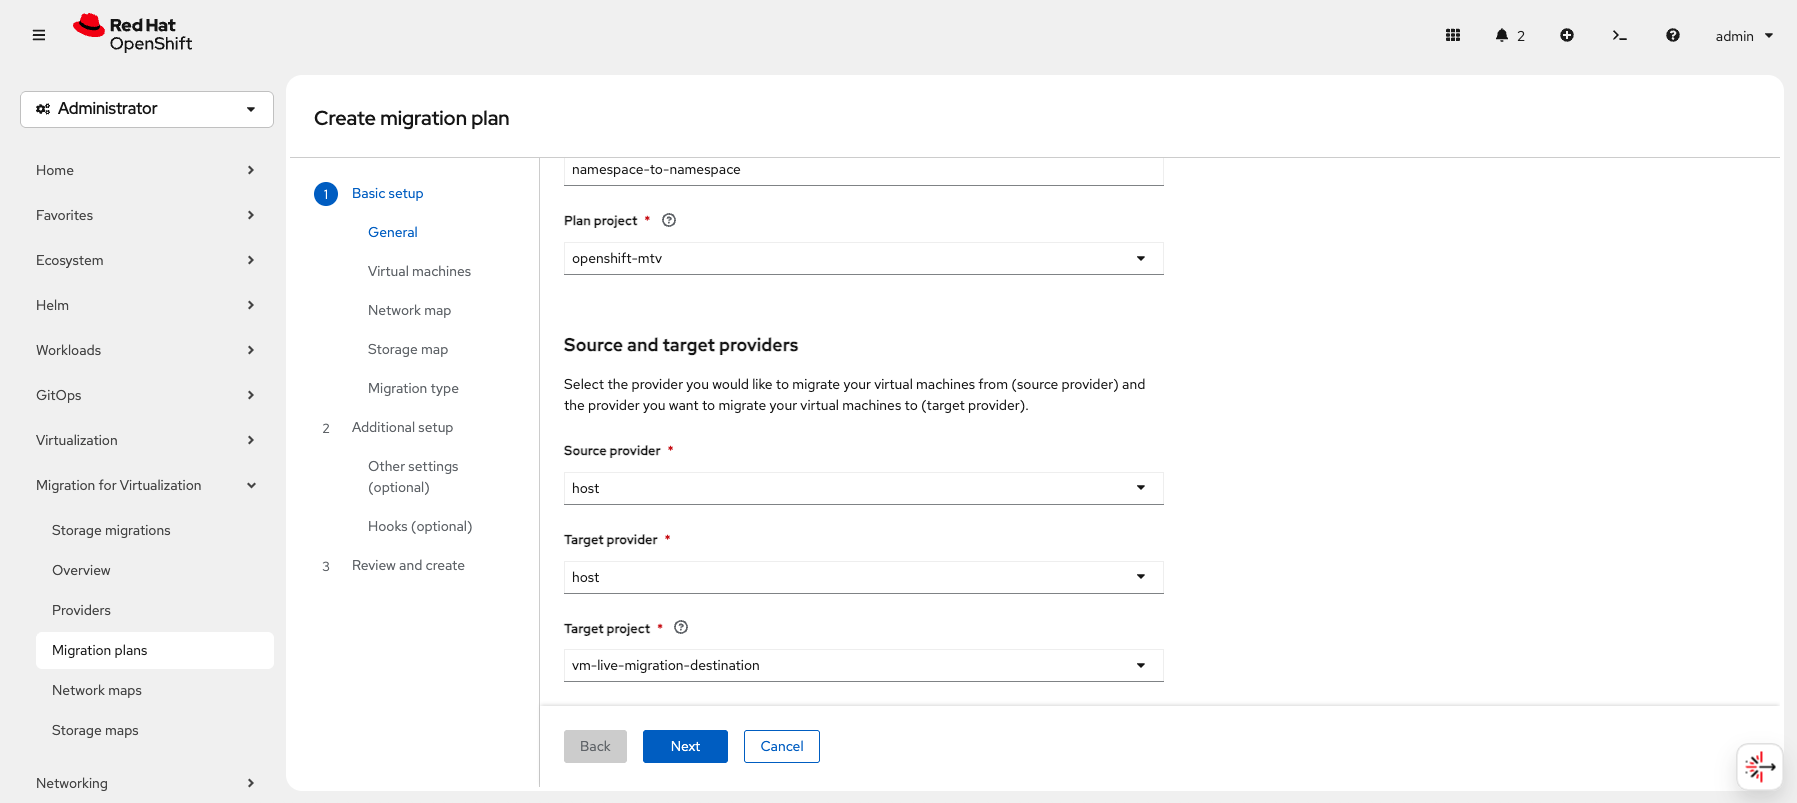 Figure 13. Create migration plan
 -
From the Virtual machines list, select vm-migration-ns-ns-live as the VirtualMachine you want to migrate.
Click Next
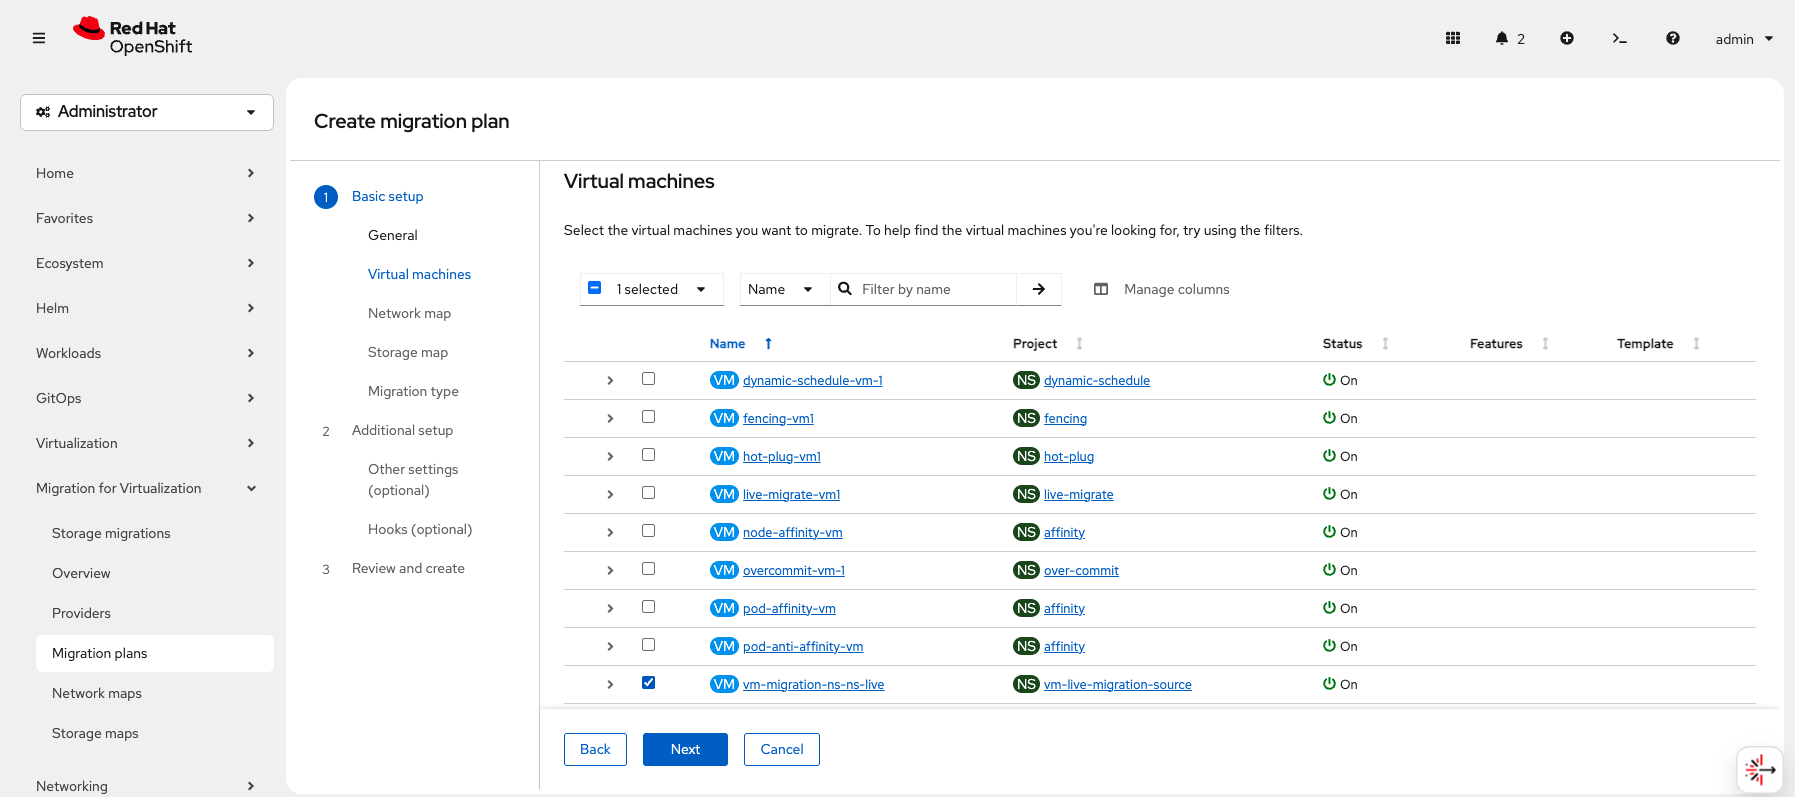 Figure 14. Select Virtual Machine
 -
On the Network Map page, select Use new network map and select /Default network as the Source network.
The Target network should already be set to Default network.
Click Next
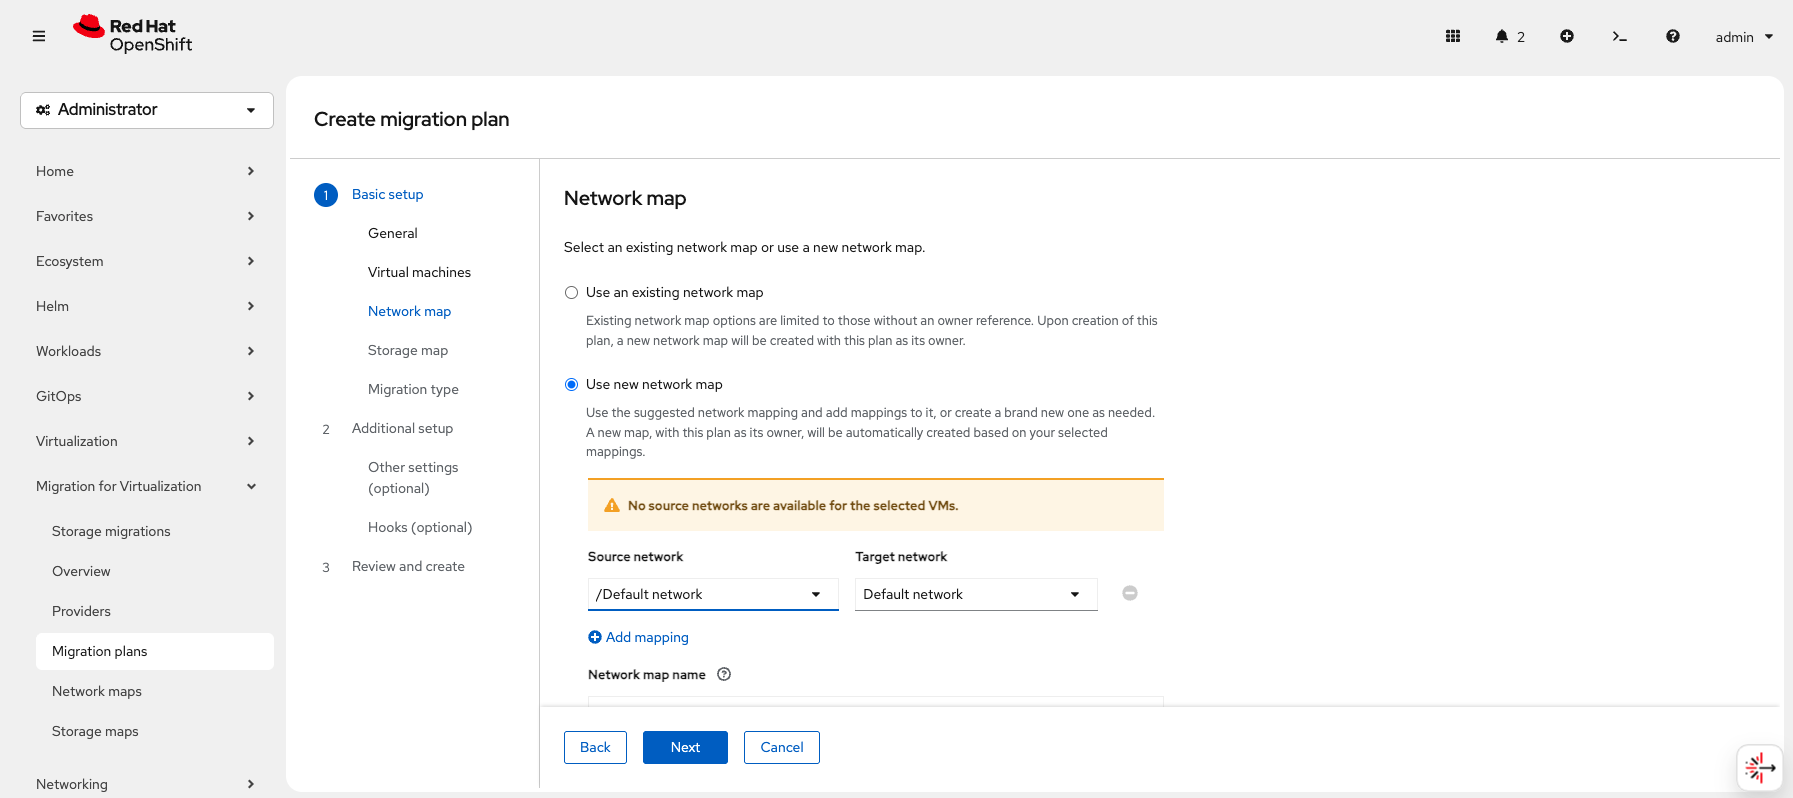 Figure 15. Create Network Map
 -
On the Storage Map page, select Use new storage map and select ocs-external-storagecluster-ceph-rbd as the Source storage.
The Target storage should already be set to ocs-external-storagecluster-ceph-rbd.
Click Next
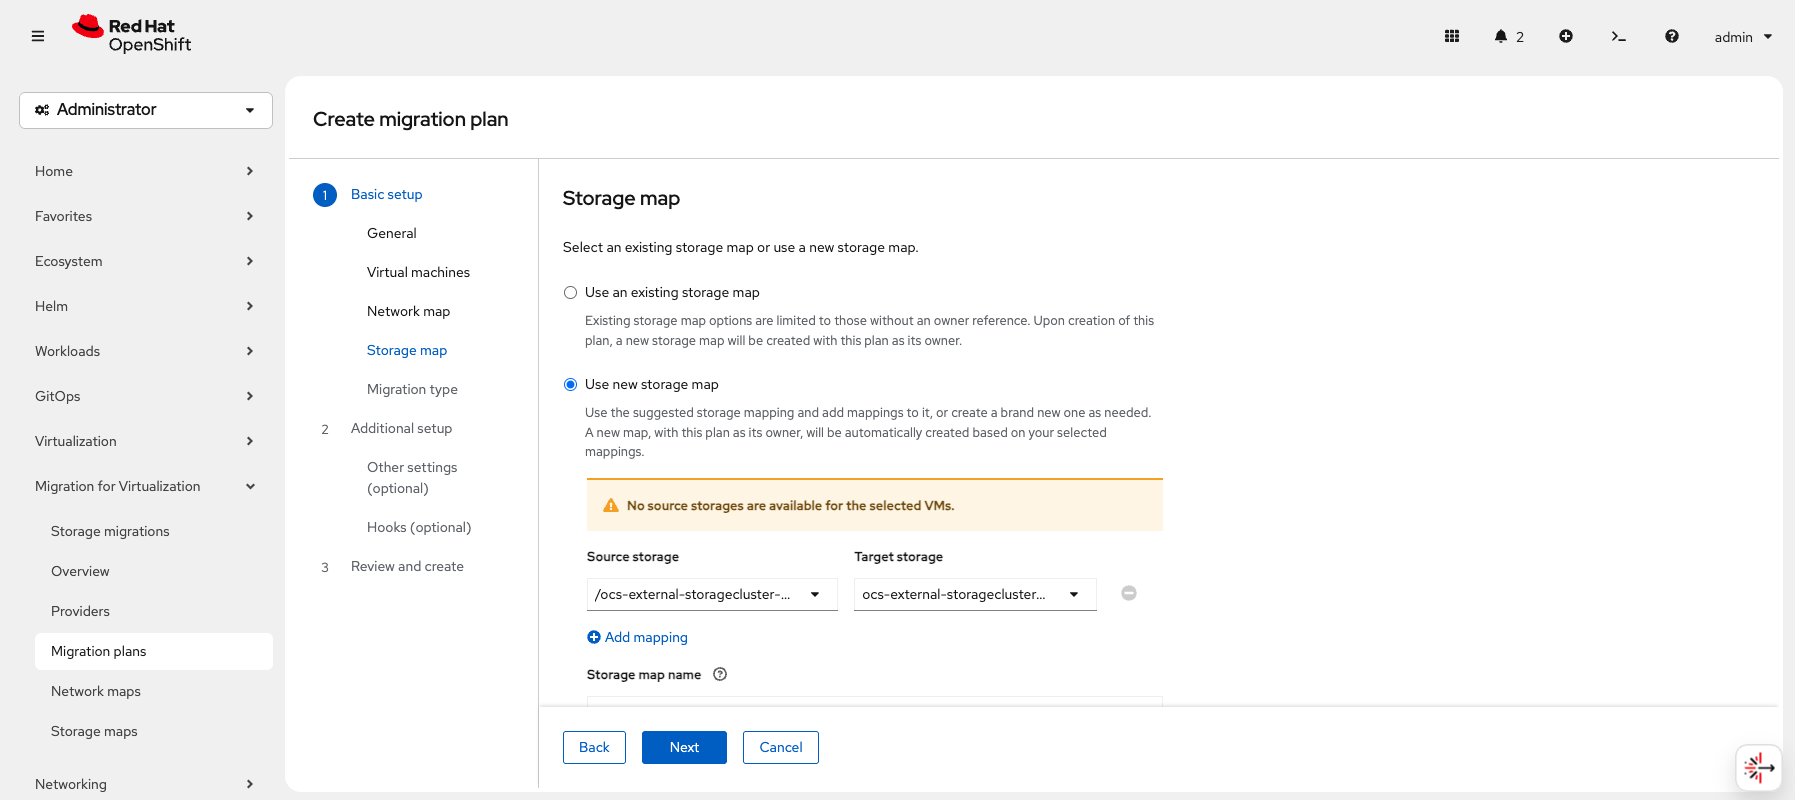 Figure 16. Create Storage Map
 -
On the Migration type page, select Live migration.
Click Next
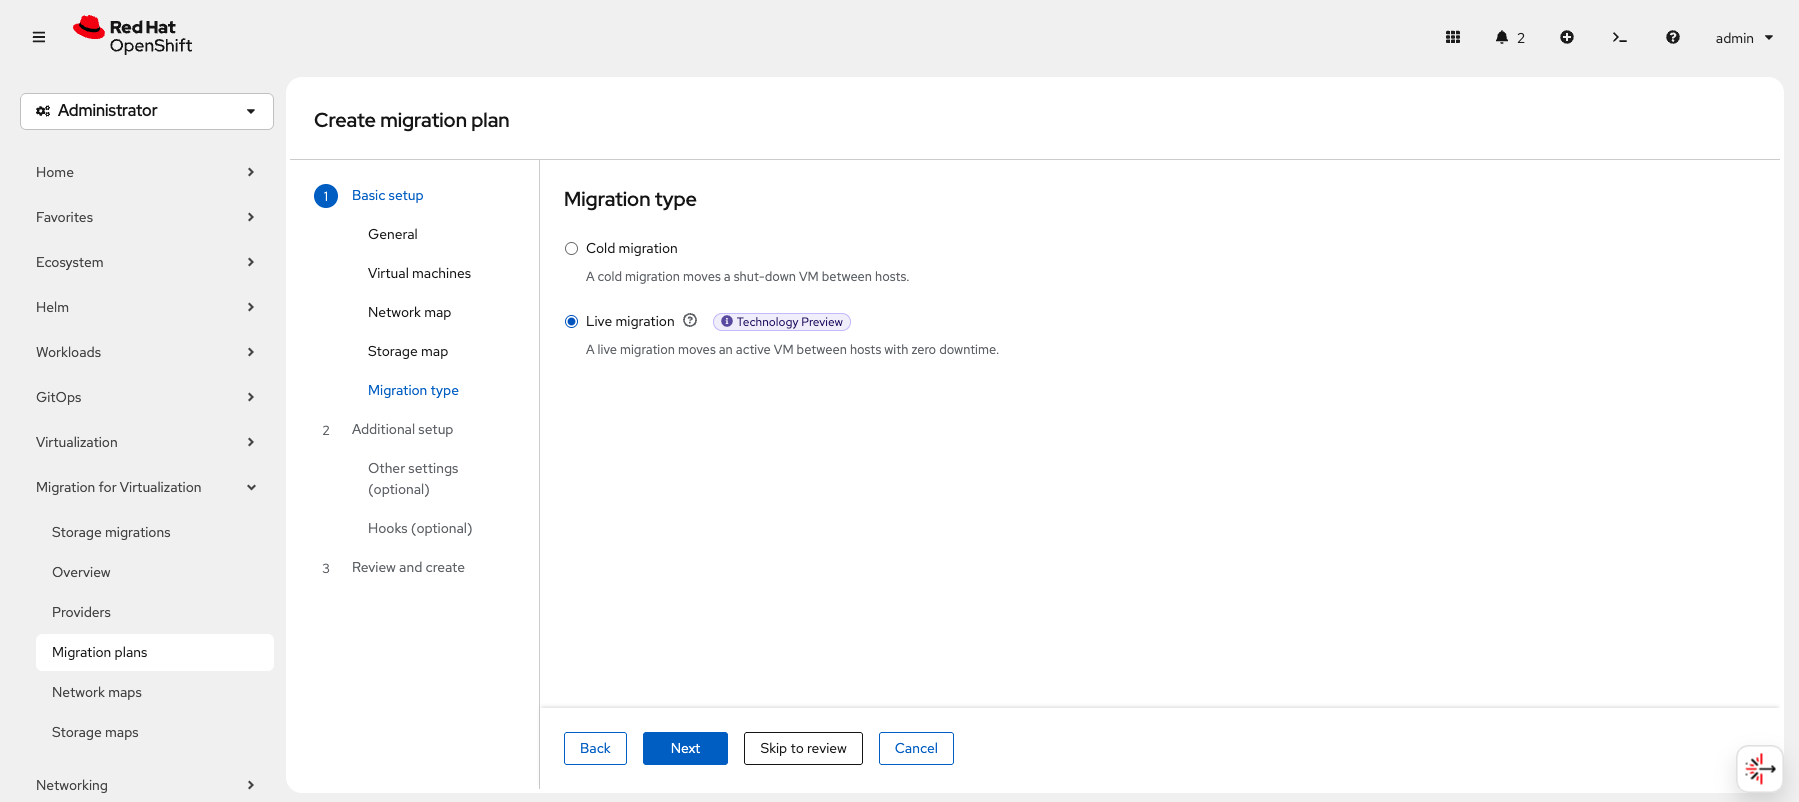 Figure 17. Migration Type
 -
On the Other settings page, leave the defaults.
Click Next
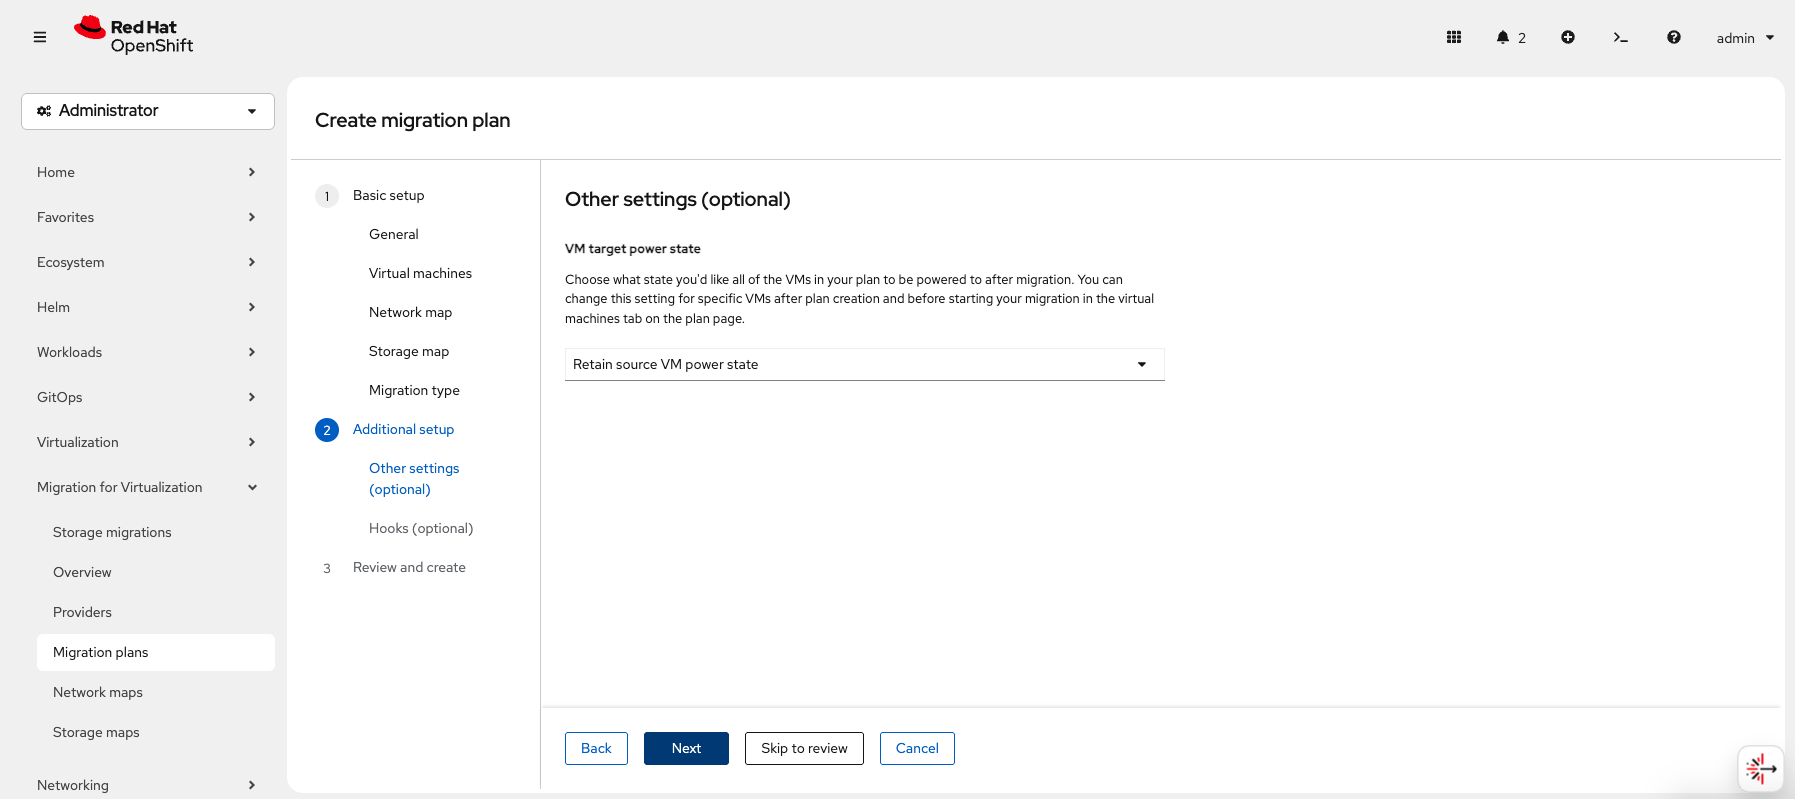 Figure 18. Other Settings
 -
On the Hooks page, leave the defaults.
Click Next
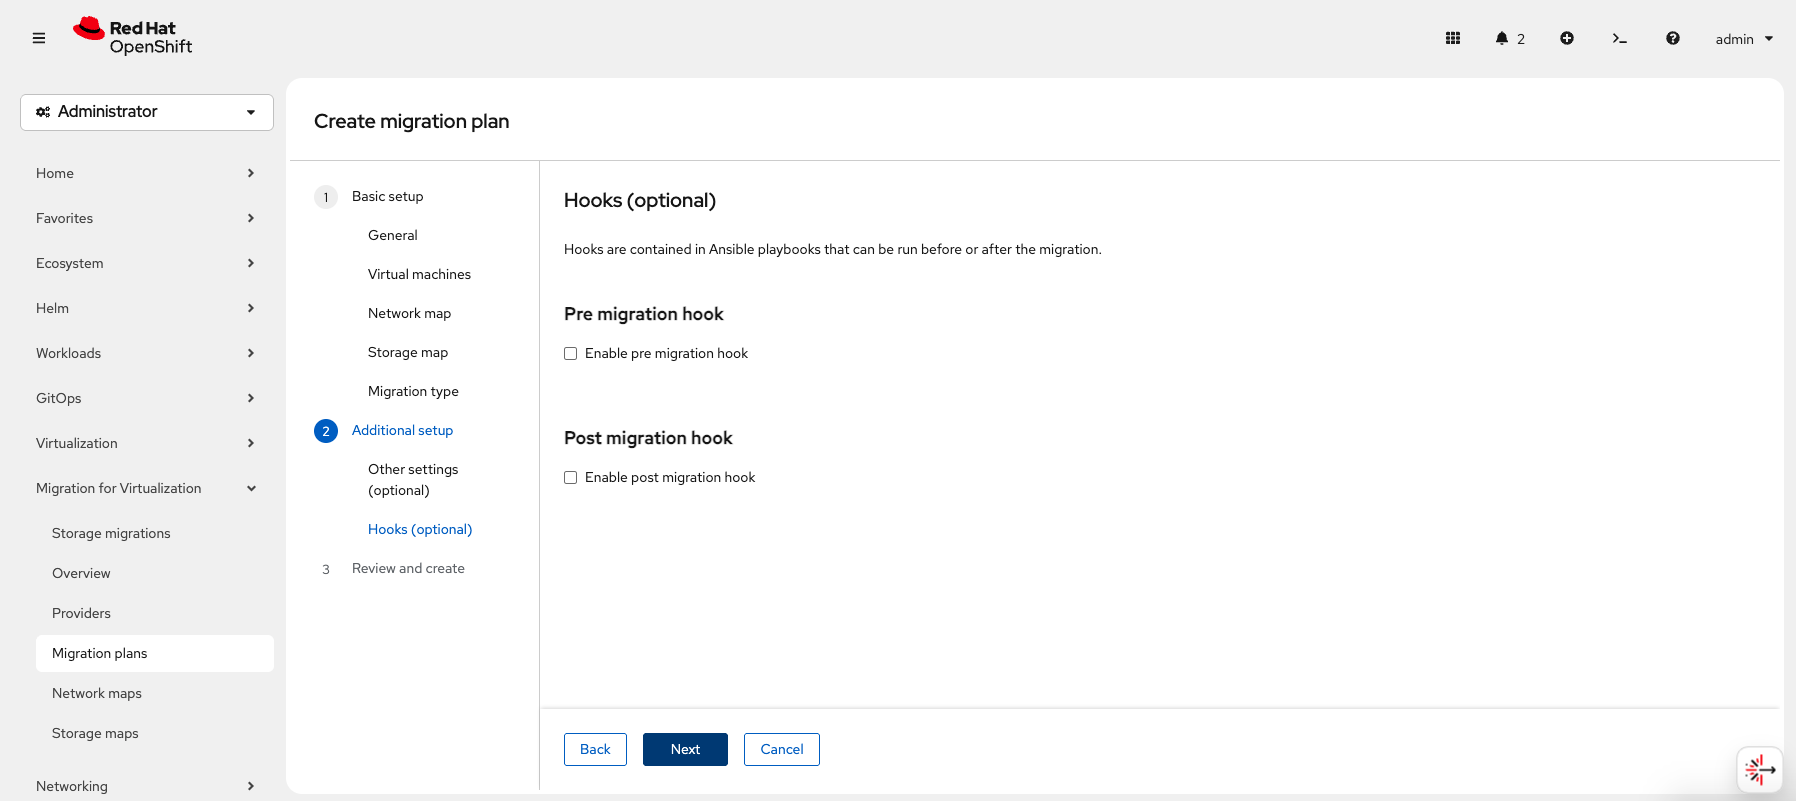 Figure 19. Hooks
 -
On the Review and create page, make sure everything looks correct.
Click Create plan
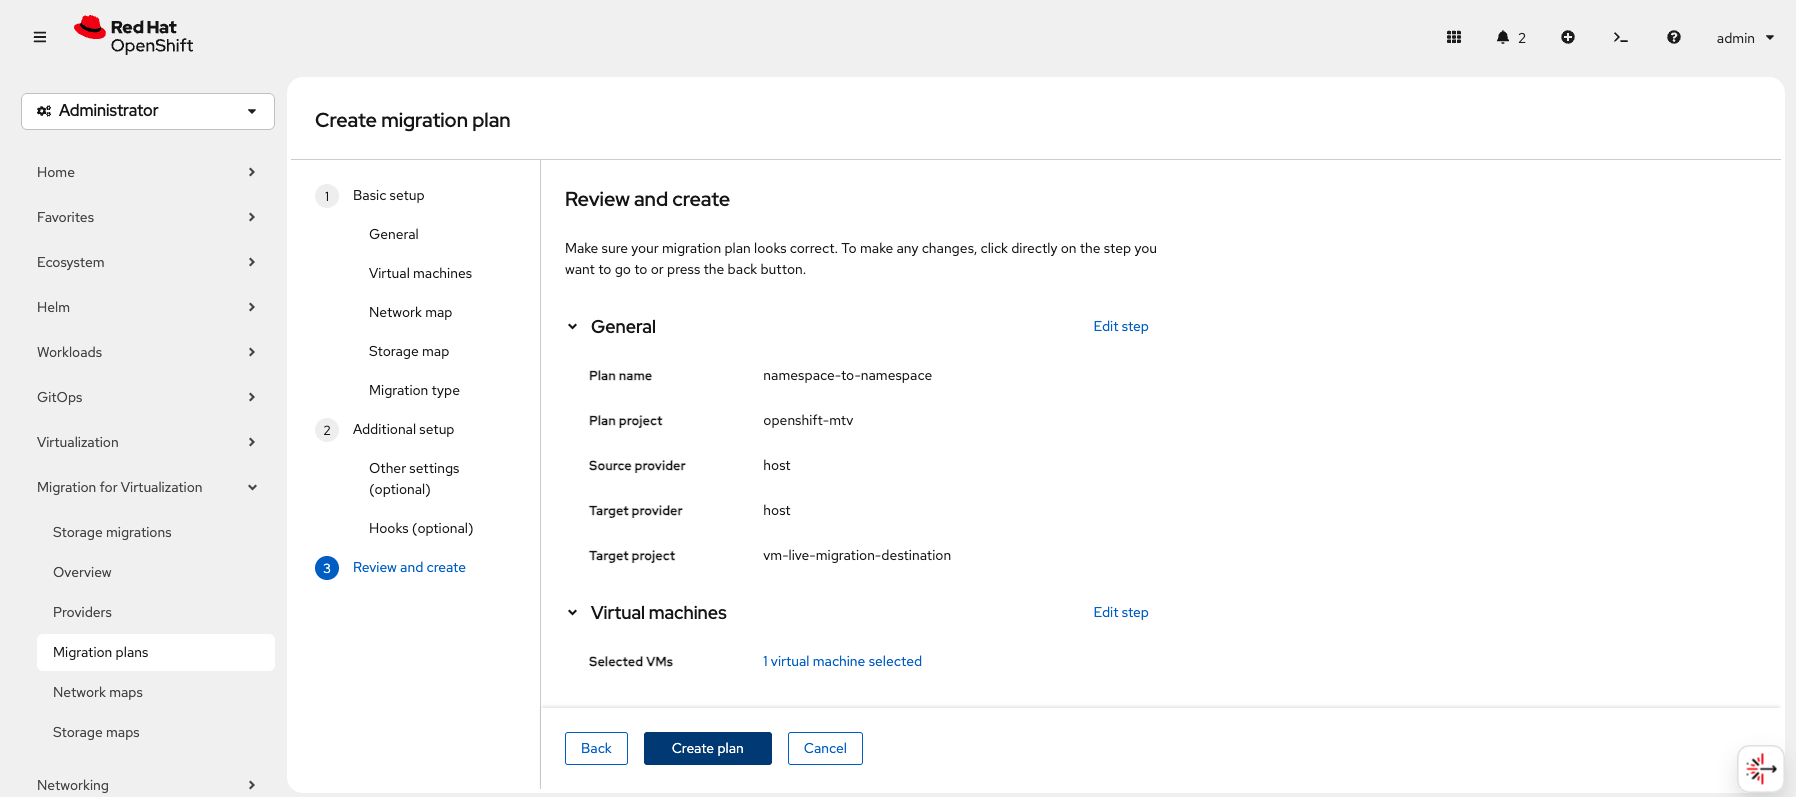 Figure 20. Review and Create
 -
When the Plan is created, you will be taken to the Plan details page where you can monitor the status and progress of your migration.
We see The plan is not ready with a status of Cannot start due to a MAC address conflict.
Once this issue is resolved, the migration will continue successfully with no changes in the workflow.
You can follow CNV-72966 - loosen (or drop) mac collision detection, targeting 4.22, for more information.
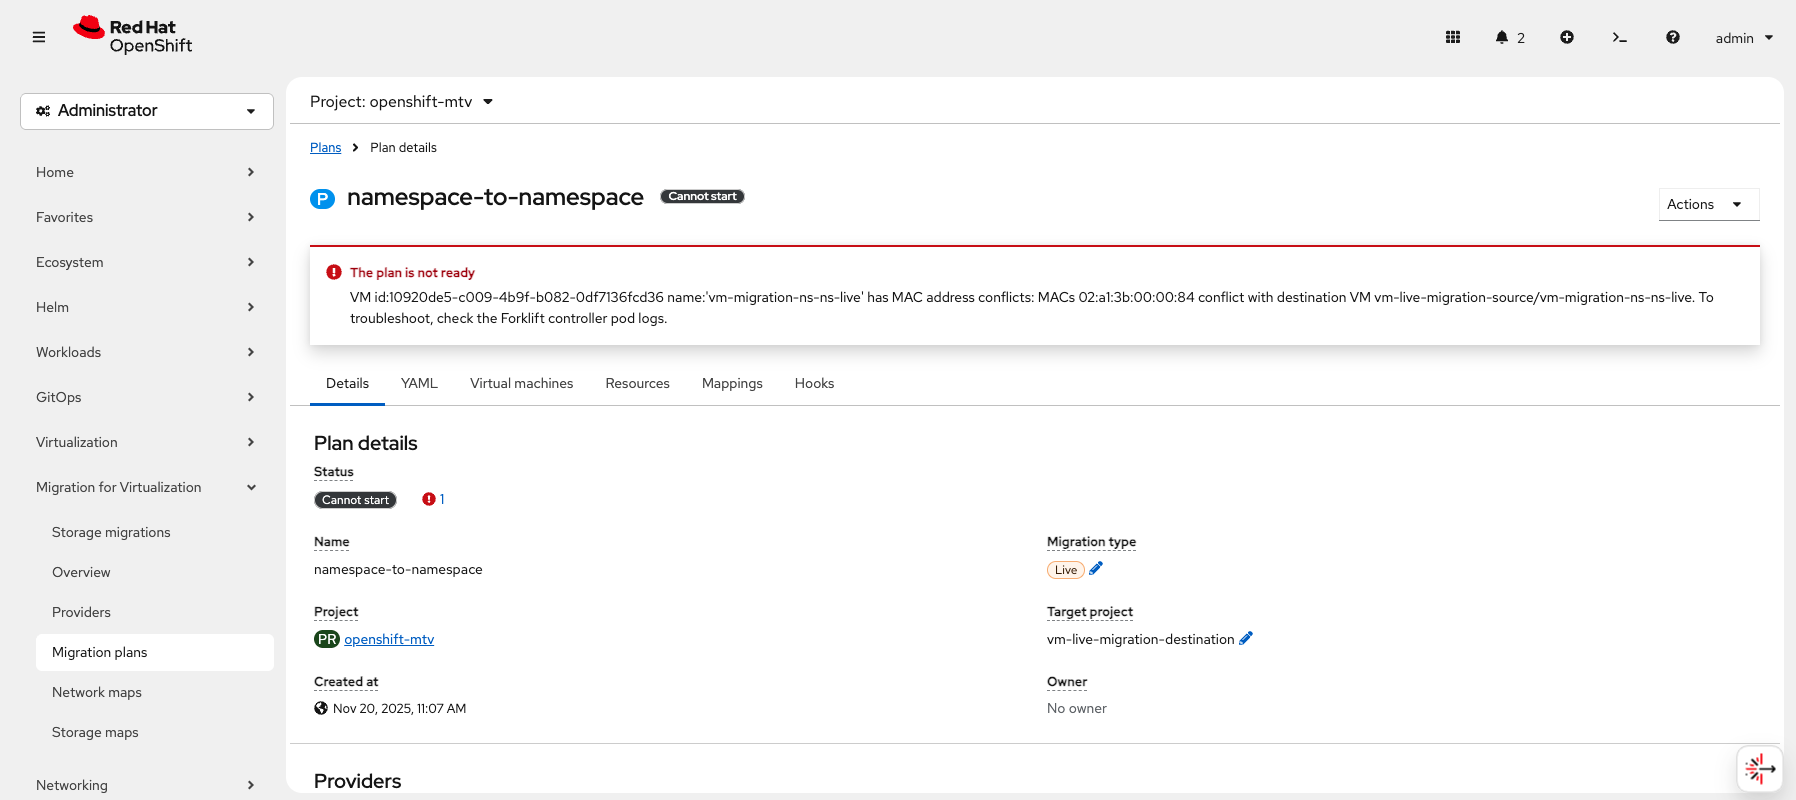 Figure 21. Plan Details
|
Stop the vm-migration-ns-ns-live VM using virtctl from your Terminal window to ensure you have enough resources for the next labs. |