Fencing and How to Handle Node Failure
Fencing is a vital mechanism that safeguards cluster resources and ensures data integrity. It works by isolating an unresponsive or failed node. This process is crucial to prevent the "split-brain" scenario, which occurs when multiple nodes try to write to shared storage simultaneously, inevitably leading to data corruption.
This lab demonstrates the capabilities of the Node Health Check Operator and the Self Node Remediation Operator. You will simulate a node failure to observe the virtual machine migration process and subsequent node recovery.
|
While this lab demonstrates fencing through the Node Health Check (NHC) and Self Node Remediation (SNR) operators, the recommendation to the field is that you strongly push customers towards Fence Agents Remediation as it provides the fastest workload recovery time. NHC and SNR are only recommended in situations where there is no management interface or if the BMC is unreachable from cluster. Work is still evolving in this space. Engineering is working on additional enhancements to bring recovery time to under 60 seconds. You can follow Fencing: Additional out-of-band health checks for faster remediation as that work progresses. |
Accessing the OpenShift Cluster
{openshift_cluster_console_url}[{openshift_cluster_console_url},window=_blank]
oc login -u {openshift_cluster_admin_username} -p {openshift_cluster_admin_password} --server={openshift_api_server_url}{openshift_api_server_url}[{openshift_api_server_url},window=_blank]
{openshift_cluster_admin_username}{openshift_cluster_admin_password}Instructions
-
Ensure you are logged in to both the OpenShift Console and CLI as the admin user from your web browser and the terminal window on the right side of your screen and continue to the next step.
-
Using the OpenShift Console, from the left side panel, navigate to Compute → NodeHealthChecks.
Click the Create NodeHealthCheck button
 Figure 1. Create NodeHealthCheck
 -
Name the NodeHealthCheck
workerhealthcheck.Leave the Remediation template set to Self node remediation.
From the Selector labels dropdown, select Worker under Role. You do not need to select any Labels.
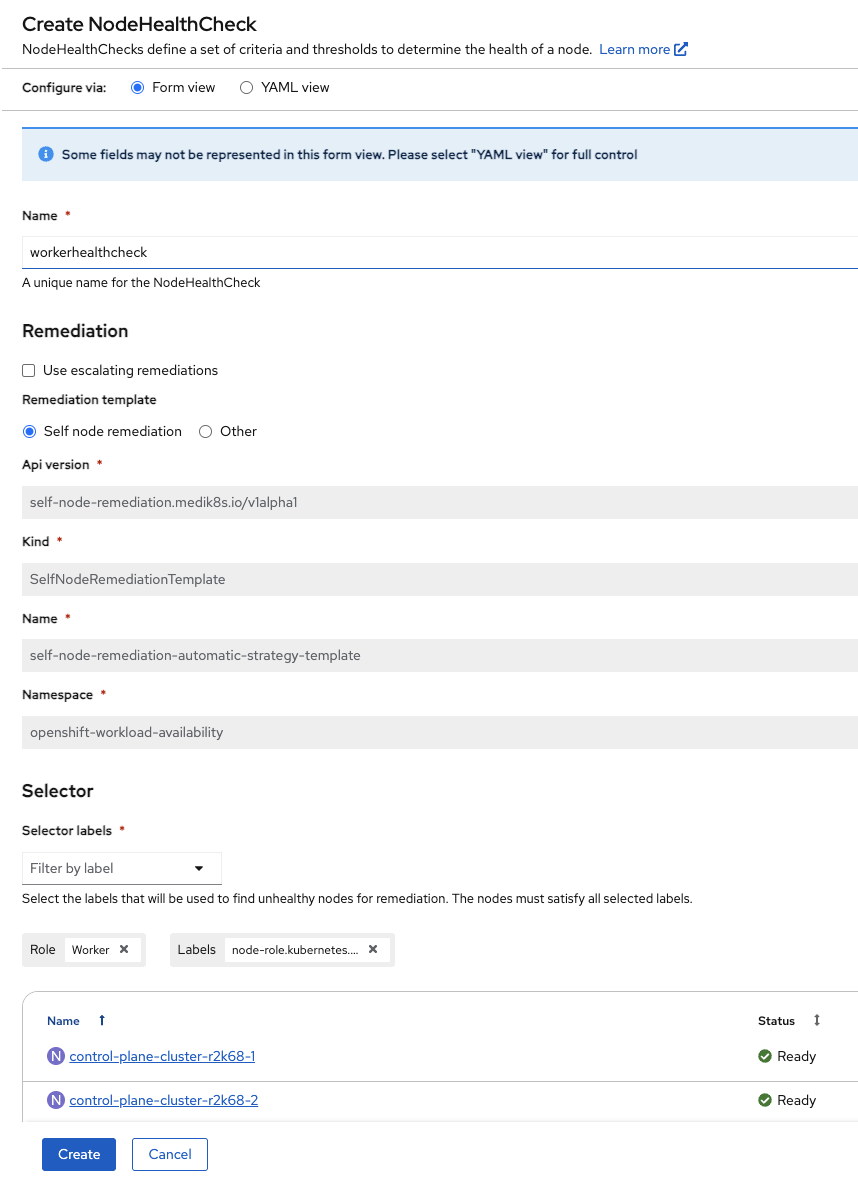 Figure 2. Create NodeHealthCheck
Further down on the same screen, leave Min healthy and both Type and Status drop downs as the default.
Change duration to 5s for both of the Unhealthy Conditions.
 Figure 3. Create NodeHealthCheck
Click Create
-
Next, find the node where fencing-vm1 is running. In this example, the node is worker-cluster-r2k68-1.
Get VM infooc get vmi fencing-vm1 -n fencingOutputNAME AGE PHASE IP NODENAME READY fencing-vm1 169m Running 10.235.0.29 worker-cluster-r2k68-1 True
To be more percise, you can use jq to only return the nodeName and assign it to a variable for later use:
Get VM info into a variablenode=`oc get vmi fencing-vm1 -n fencing -o json | jq -r '.status.nodeName'`Show node nameecho ${node}Outputworker-cluster-r2k68-1
-
Before we trigger a failure, in second terminal, start a watch to monitor the state of the nodes so you can see your worker remediate.
Monitor the worker nodesoc get nodes -w -
Create a failure condition, access the node from step 4, using the ${node} variable and oc debug, to put it into an unhealthy state by stopping the kubelet service.
Debug into the nodeoc debug node/${node}chrootchroot /hostForce the node into a unhealthy statesystemctl stop kubeletOutputRemoving debug pod ...
-
Once the debug pod exists, monitor the status of your Virtual Machine, fencing-vm1. You will see that the self remediation process is isolating the node and migrating the workloads.
Get VM infooc get vmi fencing-vm1 -n fencing -w -
Using the OpenShift Console, from the left side panel, navigate to Ecosystem → Installed Operators → Self Node Remediation Operator → Self Node Remediation.
The SelfNodeRemediation operand will not show up until the node goes NotReady, this will take a few seconds.
Here you can see the self remediation object and follow its progress against the node.
 Figure 4. Node remediation running
 -
From your two terminal windows, you will see:
-
The worker node being remediated, going from Ready → NotReady → NotReady,SchedulingDisabled → Ready,SchedulingDisabled → Ready
NAME STATUS ROLES AGE VERSION worker-cluster-r2k68-1 Ready worker 4h15m v1.33.5 worker-cluster-r2k68-1 Ready worker 4h16m v1.33.5 worker-cluster-r2k68-1 NotReady worker 4h16m v1.33.5 worker-cluster-r2k68-1 NotReady worker 4h16m v1.33.5 worker-cluster-r2k68-1 NotReady,SchedulingDisabled worker 4h16m v1.33.5 worker-cluster-r2k68-1 NotReady,SchedulingDisabled worker 4h16m v1.33.5 worker-cluster-r2k68-1 Ready,SchedulingDisabled worker 4h17m v1.33.5 worker-cluster-r2k68-1 Ready,SchedulingDisabled worker 4h17m v1.33.5 worker-cluster-r2k68-1 Ready,SchedulingDisabled worker 4h17m v1.33.5 worker-cluster-r2k68-1 Ready worker 4h18m v1.33.5 worker-cluster-r2k68-1 Ready worker 4h18m v1.33.5 -
The VM will go from a Running → Failed state when the nodes fails, followed by Pending → Scheduling → Scheduled → Running as it is remediated and migrated to a new node.
NAME          AGE   PHASE        IP            NODENAME                 READY
fencing-vm1   36m   Running      10.235.0.14   worker-cluster-r2k68-1   True
fencing-vm1   37m   Running      10.235.0.14   worker-cluster-r2k68-1   False
fencing-vm1   38m   Failed       10.235.0.14   worker-cluster-r2k68-1   False
fencing-vm1   38m   Failed       10.235.0.14   worker-cluster-r2k68-1   False
fencing-vm1   0s    Pending
fencing-vm1   1s    Scheduling                                          False
fencing-vm1   10s   Scheduled                  worker-cluster-r2k68-3   False
fencing-vm1   10s   Running      10.232.2.41   worker-cluster-r2k68-3   True
-
|
Stop the fencing-vm1 VM using virtctl from your Terminal window to ensure you have enough resources for the next labs. VM fencing-vm1 was scheduled to stop |