Introduction
It’s time for us to put our cluster to work and deploy a workload! We’re going to build an example Java application, microsweeper, using Quarkus (a Kubernetes-native Java stack) and Amazon DynamoDB. We’ll then deploy the application to our ROSA cluster and connect to the database over AWS’s secure network.
This lab demonstrates how ROSA (an AWS native service) can easily and securely access and utilize other AWS native services using AWS Secure Token Service (STS). To achieve this, we will be using AWS IAM, Amazon DynamoDB, and a service account within OpenShift. After configuring the latter, we will use both Quarkus - a Kubernetes-native Java framework optimized for containers - and Source-to-Image (S2I) - a toolkit for building container images from source code - to deploy the microsweeper application.
Create an Amazon DynamoDB instance
-
First, let’s create a project (also known as a namespace). A project is a unit of organization within OpenShift that provides isolation for applications and resources. To do so, run the following command:
oc new-project microsweeper-exSample OutputNow using project "microsweeper-ex" on server "https://api.rosa-6n4s8.1c1c.p1.openshiftapps.com:6443". You can add applications to this project with the 'new-app' command. For example, try: oc new-app rails-postgresql-example to build a new example application in Ruby. Or use kubectl to deploy a simple Kubernetes application: kubectl create deployment hello-node --image=k8s.gcr.io/e2e-test-images/agnhost:2.33 -- /agnhost serve-hostname -
Next, create the Amazon DynamoDB table resource. Amazon DynamoDB will be used to store information from our application and ROSA will utilize AWS Secure Token Service (STS) to access this native service. More information on STS and how it is utilized in ROSA will be provided in the next section. For now let’s create the Amazon DynamoDB table, To do so, run the following command:
aws dynamodb create-table \
  --table-name microsweeper-scores-${GUID} \
  --attribute-definitions AttributeName=name,AttributeType=S \
  --key-schema AttributeName=name,KeyType=HASH \
  --provisioned-throughput ReadCapacityUnits=1,WriteCapacityUnits=1
Sample Output{ "TableDescription": { "AttributeDefinitions": [ { "AttributeName": "name", "AttributeType": "S" } ], "TableName": "microsweeper-scores-6n4s8", "KeySchema": [ { "AttributeName": "name", "KeyType": "HASH" } ], "TableStatus": "CREATING", "CreationDateTime": 1681832377.864, "ProvisionedThroughput": { "NumberOfDecreasesToday": 0, "ReadCapacityUnits": 1, "WriteCapacityUnits": 1 }, "TableSizeBytes": 0, "ItemCount": 0, "TableArn": "arn:aws:dynamodb:us-east-2:264091519843:table/microsweeper-scores-6n4s8", "TableId": "37be72fe-3dea-411c-871d-467c12607691" } }
IAM Roles for Service Account (IRSA) Configuration
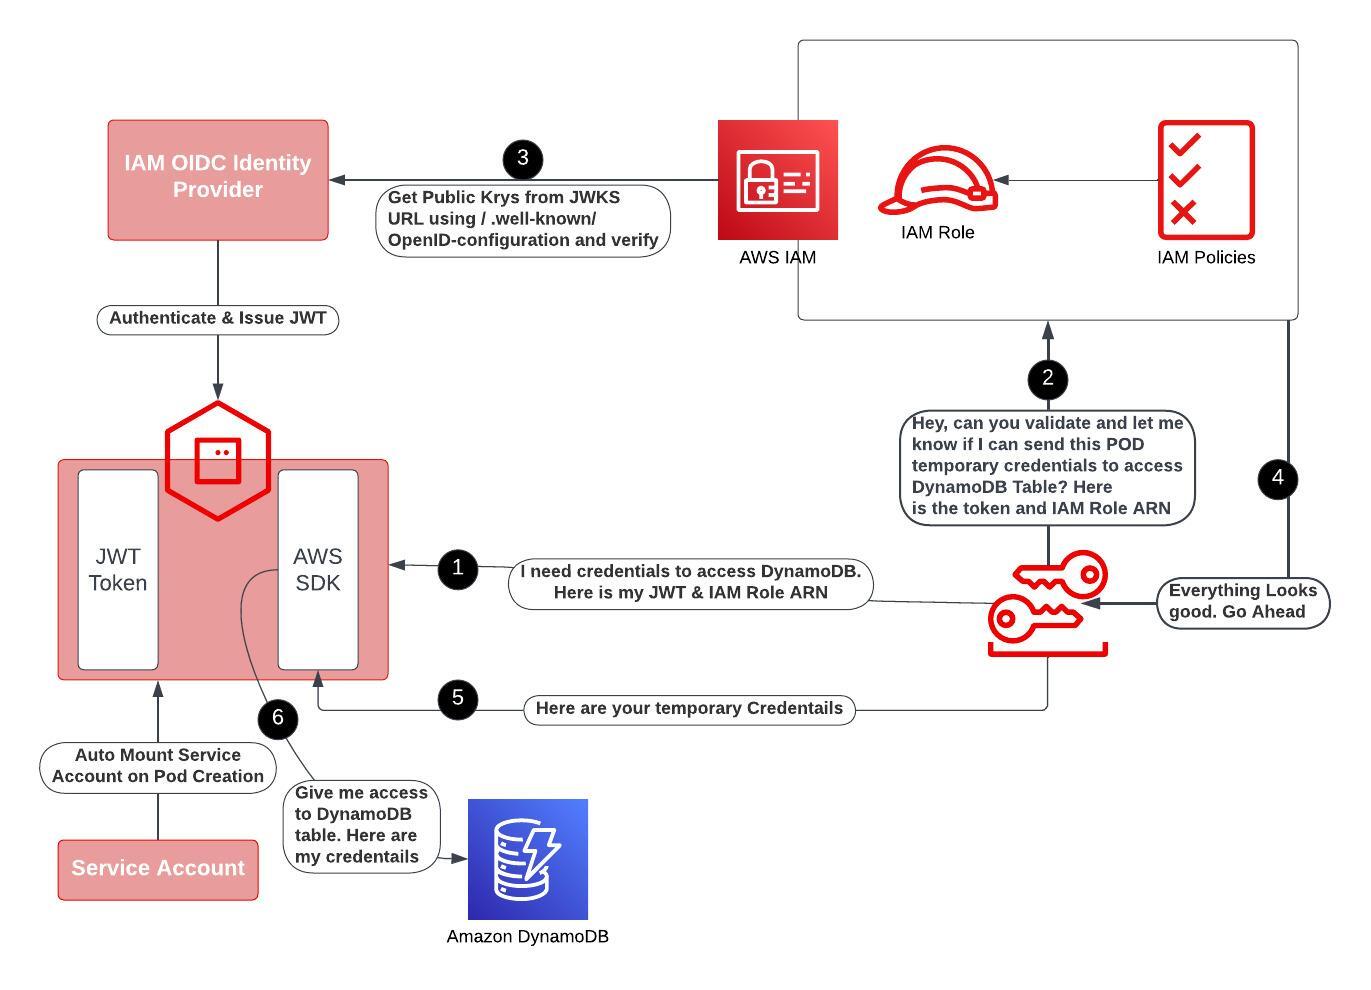
Our application uses AWS Secure Token Service(STS) to establish connections with Amazon DynamoDB. Traditionally, one would use static IAM credentials for this purpose, but this approach goes against AWS' recommended best practices. Instead, AWS suggests utilizing their Secure Token Service (STS). Fortunately, our ROSA cluster has already been deployed using AWS STS, making it effortless to adopt IAM Roles for Service Accounts (IRSA), also known as pod identity.
Service accounts play a crucial role in managing the permissions and access control of applications running within ROSA. They act as identities for pods and allow them to interact securely with various AWS services.
IAM roles, on the other hand, define a set of permissions that can be assumed by trusted entities within AWS. By associating an AWS IAM role with a service account, we enable the pods in our ROSA cluster to leverage the permissions defined within that role. This means that instead of relying on static IAM credentials, our application can obtain temporary security tokens from AWS STS by assuming the associated IAM role.
This approach aligns with AWS' recommended best practices and provides several benefits. Firstly, it enhances security by reducing the risk associated with long-lived static credentials. Secondly, it simplifies the management of access controls by leveraging IAM roles, which can be centrally managed and easily updated. Finally, it enables seamless integration with AWS services, such as DynamoDB, by granting the necessary permissions to the service accounts associated with our pods.
-
First, create a service account to use to assume an IAM role. To do so, run the following command:
oc -n microsweeper-ex create serviceaccount microsweeperSample Outputserviceaccount/microsweeper created -
Next, let’s create a trust policy document which will define what service account can assume our role. To create the trust policy document, run the following command:
cat <<EOF > ${HOME}/trust-policy.json { "Version": "2012-10-17", "Statement": [ { "Effect": "Allow", "Principal": { "Federated": "arn:aws:iam::$(aws sts get-caller-identity --query 'Account' --output text):oidc-provider/$(rosa describe cluster -c rosa-${GUID} -o json | jq -r .aws.sts.oidc_endpoint_url | sed -e 's/^https:\/\///')" }, "Action": "sts:AssumeRoleWithWebIdentity", "Condition": { "StringEquals": { "$(rosa describe cluster -c rosa-${GUID} -o json | jq -r .aws.sts.oidc_endpoint_url | sed -e 's/^https:\/\///'):sub": "system:serviceaccount:microsweeper-ex:microsweeper" } } } ] } EOF -
Next, let’s take the trust policy document and use it to create a role. To do so, run the following command:
aws iam create-role --role-name irsa-${GUID} --assume-role-policy-document file://${HOME}/trust-policy.json --description "IRSA Role (${GUID}"Sample Output{ "Role": { "Path": "/", "RoleName": "irsa_6n4s8", "RoleId": "AROAT27IUZNRSSYVO24ET", "Arn": "arn:aws:iam::264091519843:role/irsa_6n4s8", "CreateDate": "2023-04-18T18:15:48Z", "AssumeRolePolicyDocument": { "Version": "2012-10-17", "Statement": [ { "Effect": "Allow", "Principal": { "Federated": "arn:aws:iam::264091519843:oidc-provider/rh-oidc.s3.us-east-1.amazonaws.com/235ftpmaq3oavfin8mt600af4sar9oej" }, "Action": "sts:AssumeRoleWithWebIdentity", "Condition": { "StringEquals": { "rh-oidc.s3.us-east-1.amazonaws.com/235ftpmaq3oavfin8mt600af4sar9oej:sub": "system:serviceaccount:microsweeper-ex:microsweeper" } } } ] } } } -
Next, let’s attach the
AmazonDynamoDBFullAccesspolicy to our newly created IAM role. This will allow our application to read and write to our Amazon DynamoDB table. To do so, run the following command:aws iam attach-role-policy --role-name irsa-${GUID} --policy-arn=arn:aws:iam::aws:policy/AmazonDynamoDBFullAccess -
Finally, let’s annotate the service account with the ARN of the IAM role we created above. To do so, run the following command:
oc -n microsweeper-ex annotate serviceaccount microsweeper eks.amazonaws.com/role-arn=arn:aws:iam::$(aws sts get-caller-identity --query 'Account' --output text):role/irsa-${GUID}Sample Outputserviceaccount/microsweeper annotated
Build and deploy the Microsweeper app
Now that we’ve got a DynamoDB instance up and running and our IRSA configuration completed, let’s build and deploy our application.
-
In order to build the application you will need the Java JDK 17 and the Quarkus CLI installed. Java JDK 17 is already installed on your bastion VM so let’s install the Quarkus CLI:
curl -Ls https://sh.jbang.dev | bash -s - trust add https://repo1.maven.org/maven2/io/quarkus/quarkus-cli/ curl -Ls https://sh.jbang.dev | bash -s - app install --fresh --force quarkus@quarkusio echo "export JAVA_HOME=/usr/lib/jvm/jre-17-openjdk" >>${HOME}/.bashrc echo "export PATH=\$JAVA_HOME/bin:\$PATH" >>${HOME}/.bashrc source ${HOME}/.bashrc -
Double check the Quarkus CLI version:
quarkus --versionSample Output3.7.2 -
Now, let’s clone the application from GitHub. To do so, run the following command:
cd ${HOME} git clone https://github.com/rh-mobb/rosa-workshop-app.git -
Next, let’s change directory into the newly cloned Git repository. To do so, run the following command:
cd ${HOME}/rosa-workshop-app -
Next, we will add the OpenShift extension to the Quarkus CLI. To do so, run the following command:
quarkus ext add openshiftSample OutputLooking for the newly published extensions in registry.quarkus.io 👍 Extension io.quarkus:quarkus-openshift was already installed -
Now, we’ll configure Quarkus to use the DynamoDB instance that we created earlier in this section. To do so, we’ll create an
application.propertiesfile using by running the following command:cat <<EOF > ${HOME}/rosa-workshop-app/src/main/resources/application.properties # AWS DynamoDB configurations %dev.quarkus.dynamodb.endpoint-override=http://localhost:8000 %prod.quarkus.openshift.env.vars.aws_region=$(aws configure get region) %prod.quarkus.dynamodb.aws.credentials.type=default dynamodb.table=microsweeper-scores-${GUID} # OpenShift configurations %prod.quarkus.kubernetes-client.trust-certs=true %prod.quarkus.kubernetes.deploy=true %prod.quarkus.kubernetes.deployment-target=openshift %prod.quarkus.openshift.build-strategy=docker %prod.quarkus.openshift.route.expose=true %prod.quarkus.openshift.service-account=microsweeper # To make Quarkus use Deployment instead of DeploymentConfig %prod.quarkus.openshift.deployment-kind=Deployment %prod.quarkus.container-image.group=microsweeper-ex EOF -
Now that we’ve provided the proper configuration, we will build our application. We’ll do this using source-to-image, a tool built-in to OpenShift. To start the build and deploy, run the following command:
quarkus build --no-testsSample Output[...Lots of Output Omitted...] [INFO] Installing /home/rosa/rosa-workshop-app/target/microsweeper-appservice-1.0.0-SNAPSHOT.jar to /home/rosa/.m2/repository/org/acme/microsweeper-appservice/1.0.0-SNAPSHOT/microsweeper-appservice-1.0.0-SNAPSHOT.jar [INFO] Installing /home/rosa/rosa-workshop-app/pom.xml to /home/rosa/.m2/repository/org/acme/microsweeper-appservice/1.0.0-SNAPSHOT/microsweeper-appservice-1.0.0-SNAPSHOT.pom [INFO] ------------------------------------------------------------------------ [INFO] BUILD SUCCESS [INFO] ------------------------------------------------------------------------ [INFO] Total time: 02:02 min [INFO] Finished at: 2023-04-18T18:32:26Z [INFO] ------------------------------------------------------------------------
Review
Let’s take a look at what this command did, along with everything that was created in your cluster.
Return to your OpenShift Web Console.
|
Reminder that you can get the URL and |
Container Images
From the Administrator perspective, expand Builds and then ImageStreams, and select the microsweeper-ex project.
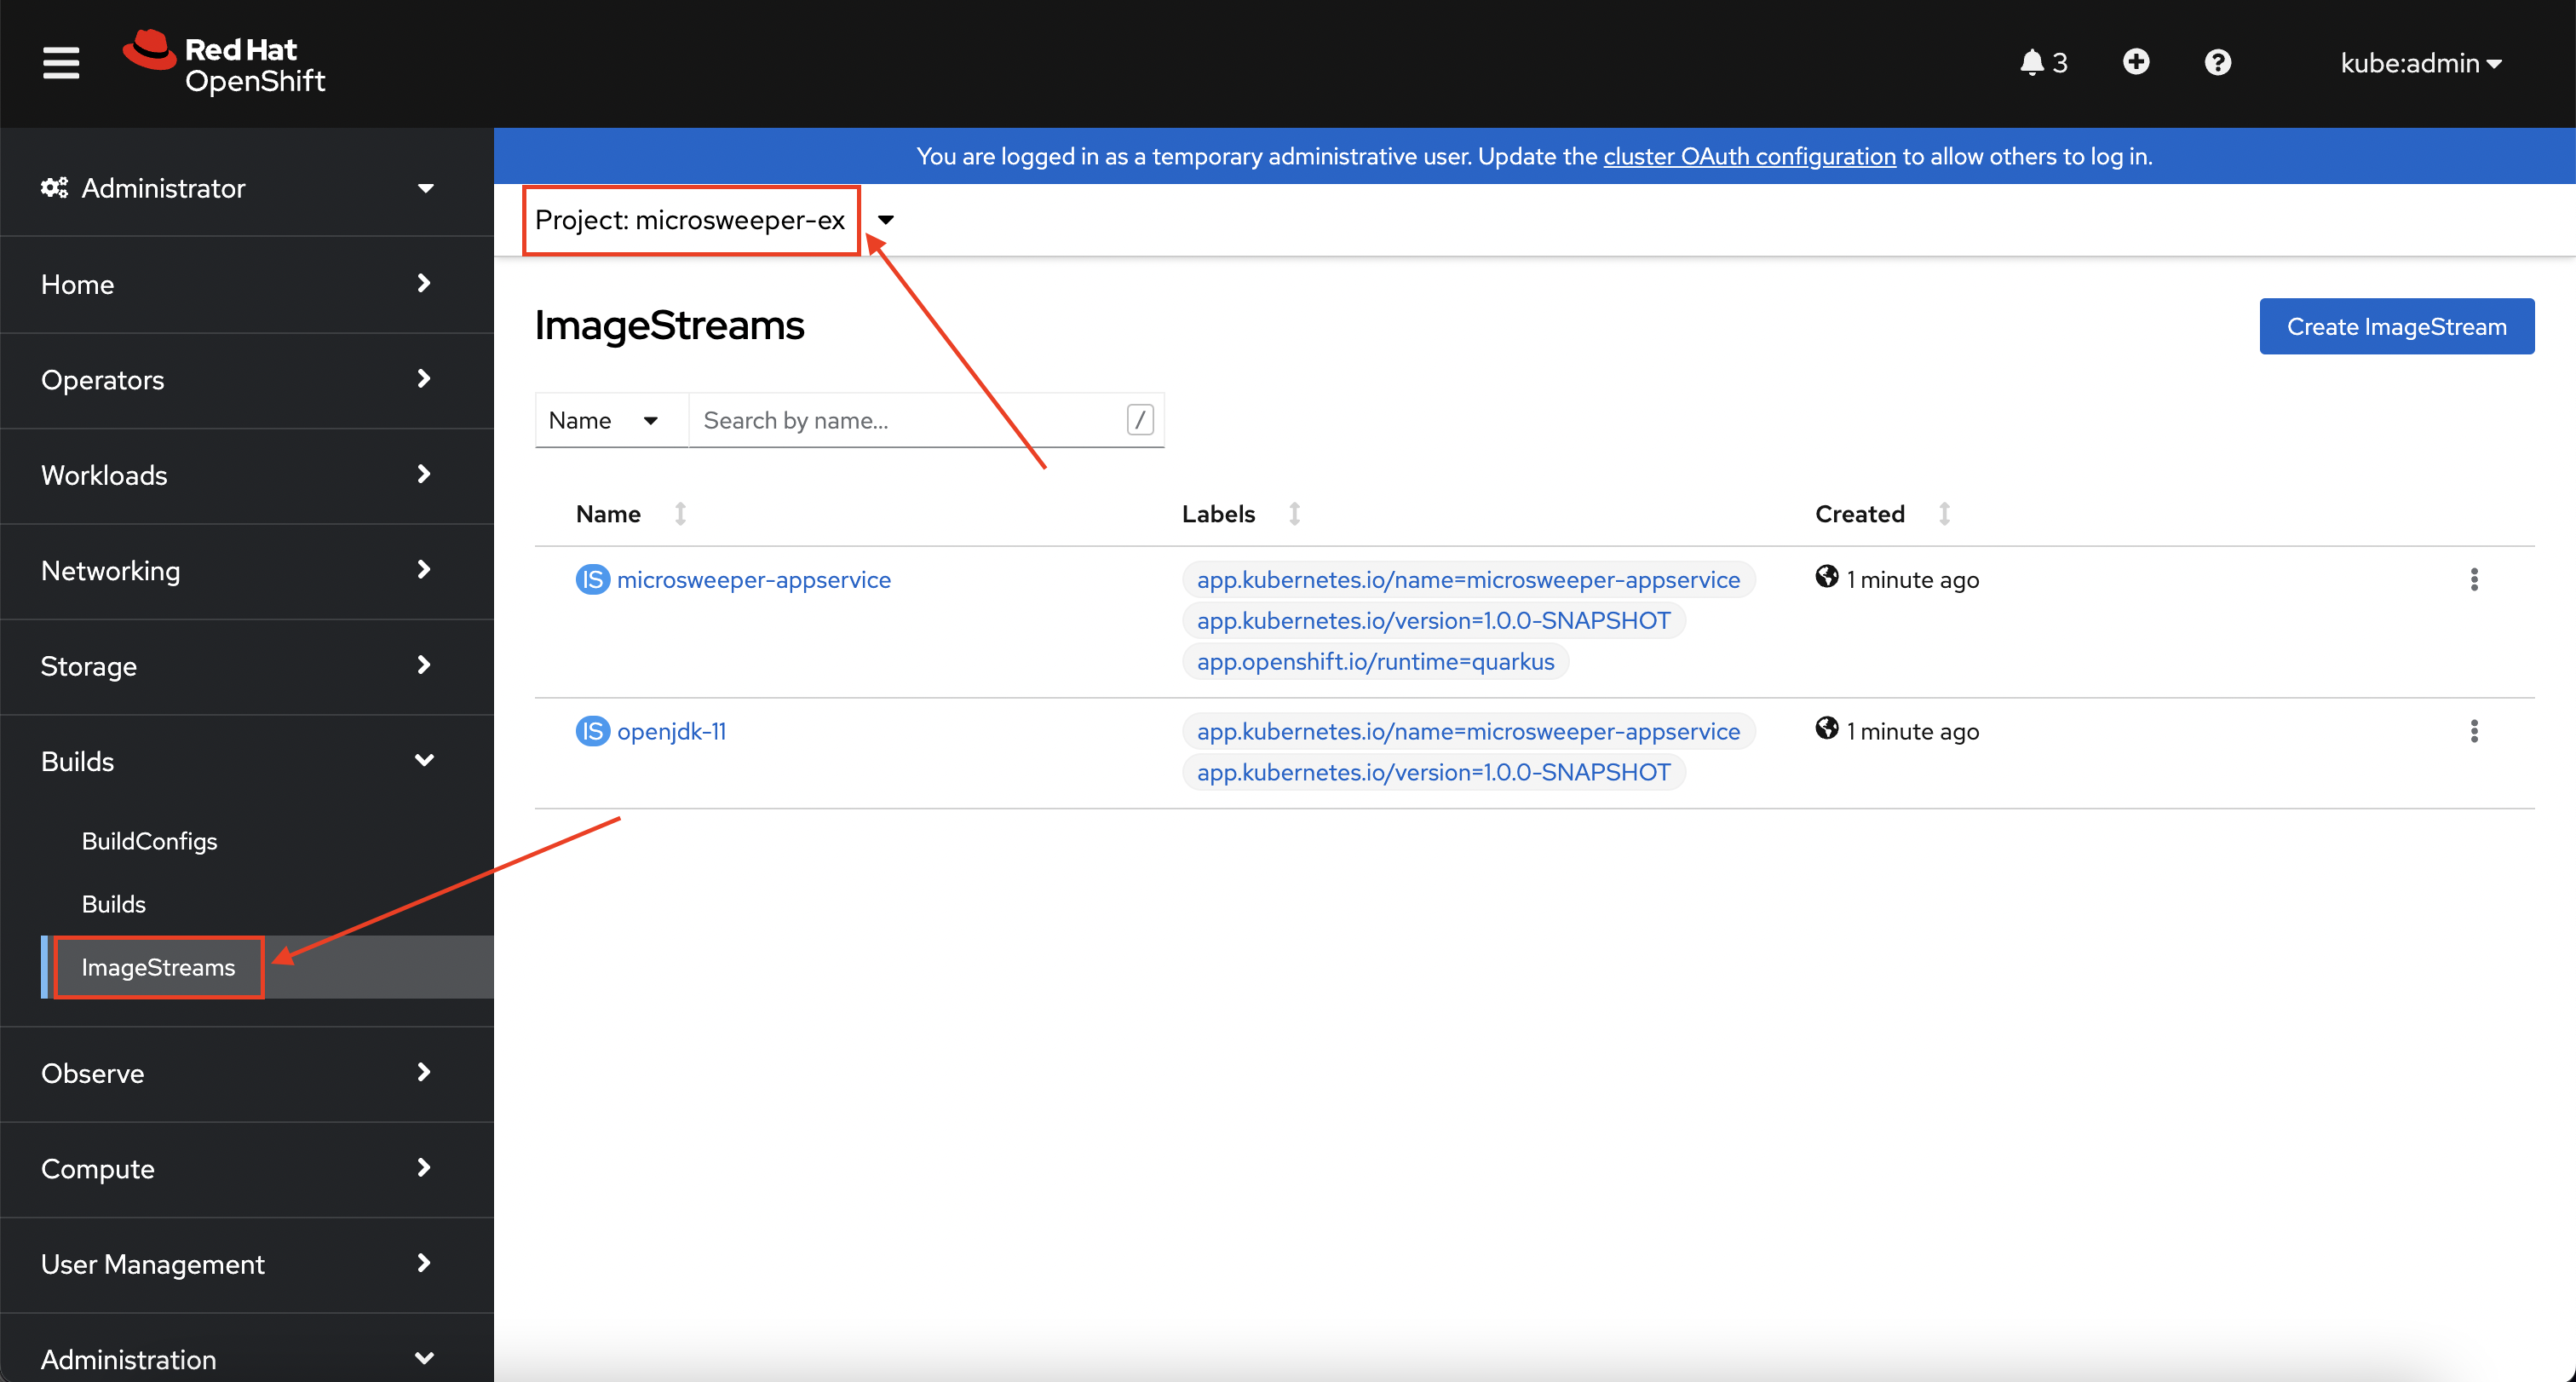
You will see two images that were created on your behalf when you ran the quarkus build command.
There is one image for openjdk-11 that comes with OpenShift as a Universal Base Image (UBI) that the application will run under.
With UBI, you get highly optimized and secure container images that you can build your applications with.
For more information on UBI please visit the UBI section of the Red Hat Ecosystem Catalog.
The second image you see is the the microsweeper-appservice image.
This is the image for the application that was built automatically for you and pushed to the built-in container registry inside of OpenShift.
Image Build
How did those images get built you ask? Back on the OpenShift Web Console, click on BuildConfigs and then the microsweeper-appservice entry.
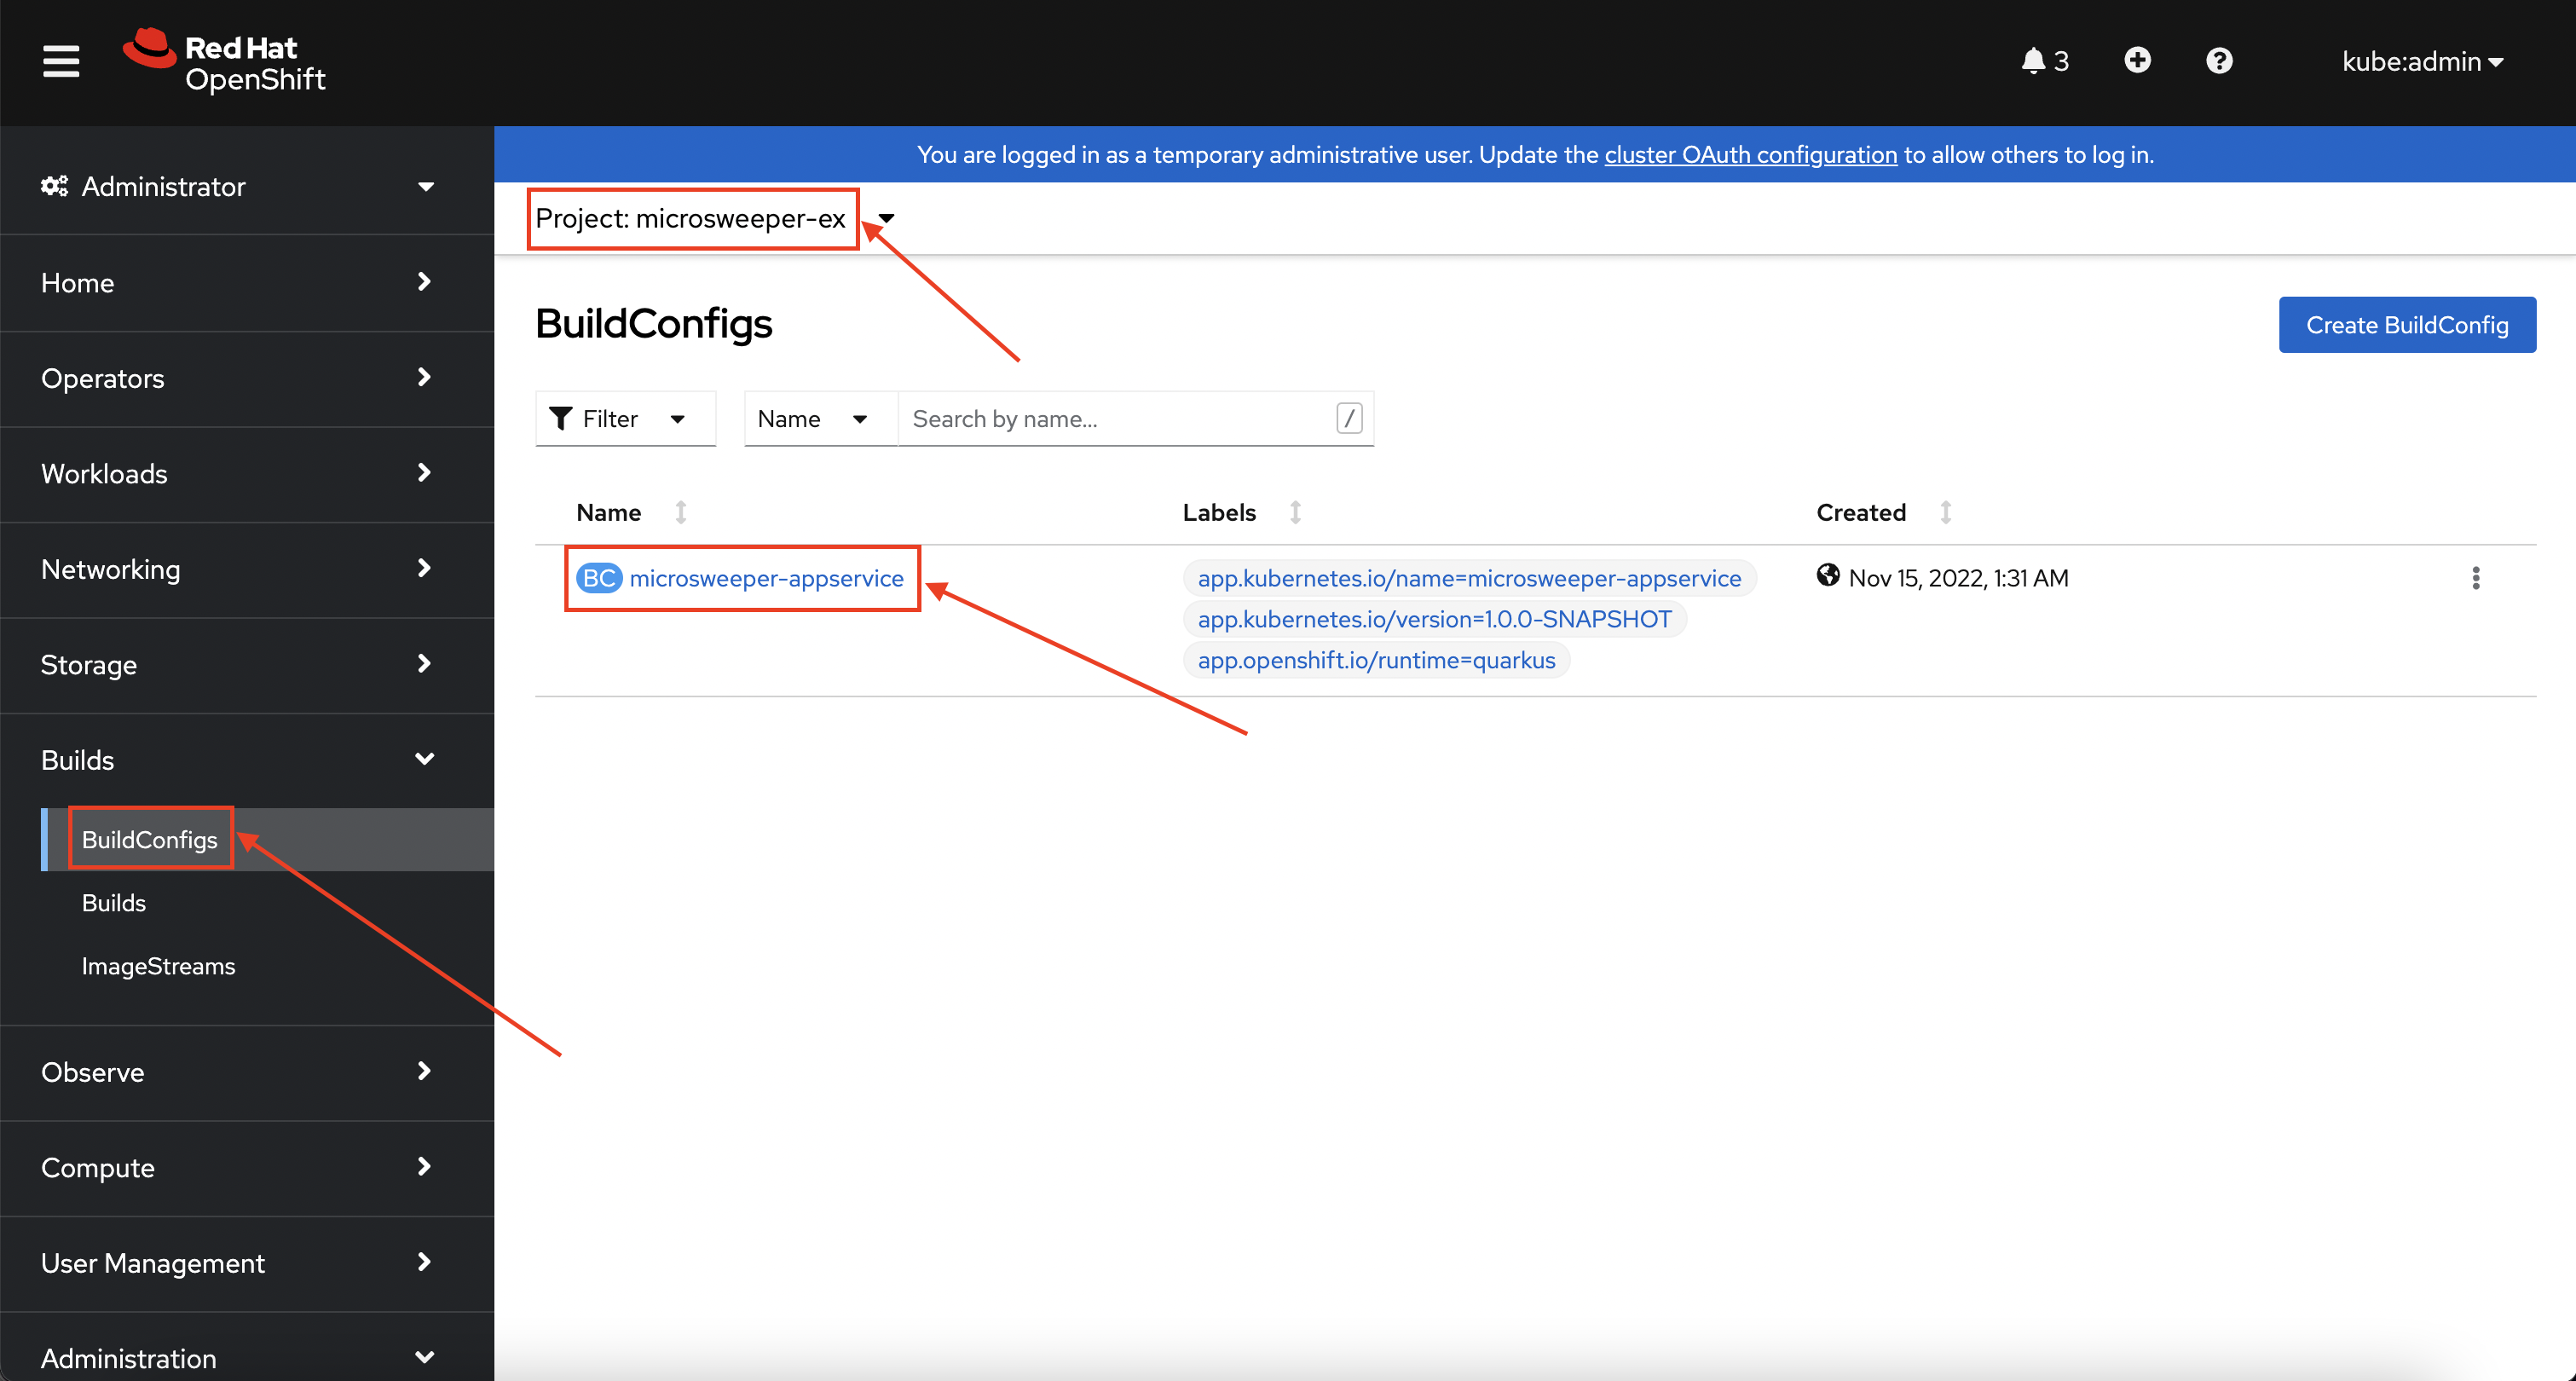
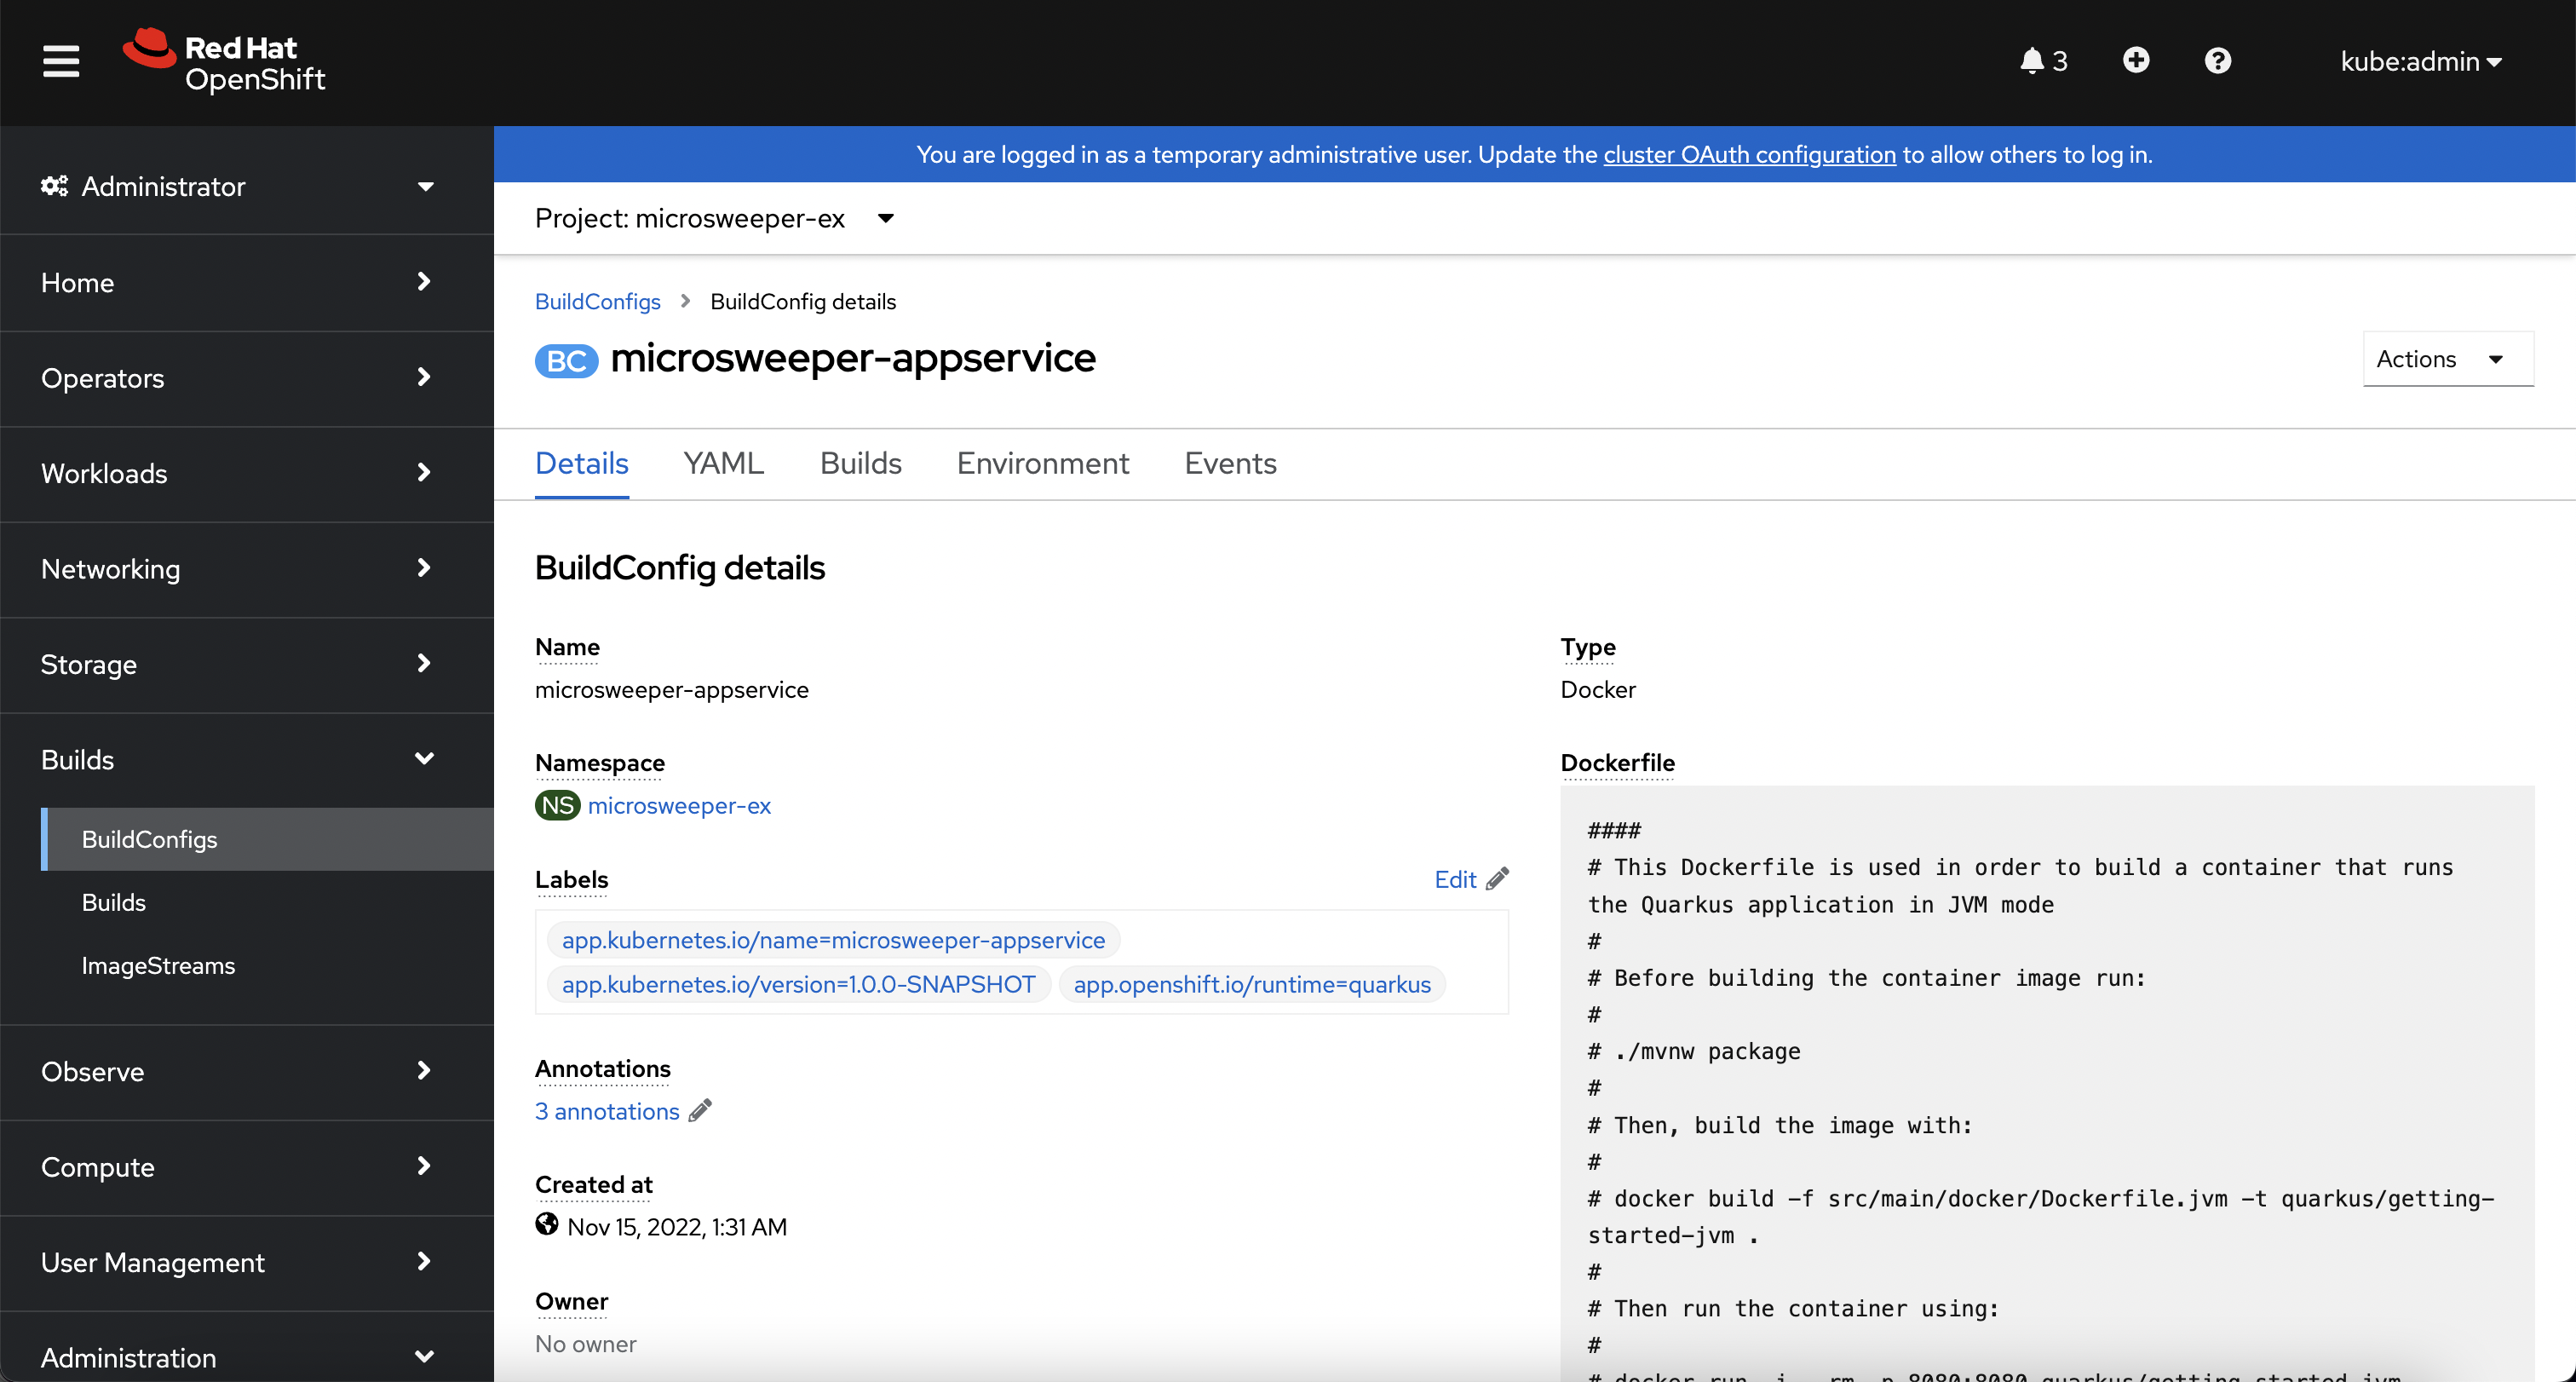
When you ran the quarkus build command, this created the BuildConfig you can see here.
In our quarkus settings, we set the deployment strategy to build the image using Docker.
The Dockerfile file from the git repo that we cloned was used for this BuildConfig.
A build configuration describes a single build definition and a set of triggers for when a new build is created. Build configurations are defined by a BuildConfig, which is a REST object that can be used in a POST to the API server to create a new instance.
You can read more about BuildConfigs here
Once the BuildConfig was created, the source-to-image process kicked off a Build of that BuildConfig. The build is what actually does the work in building and deploying the image. We started with defining what to be built with the BuildConfig and then actually did the work with the Build. You can read more about Builds here
To look at what the build actually did, click on Builds tab and then into the first Build in the list.
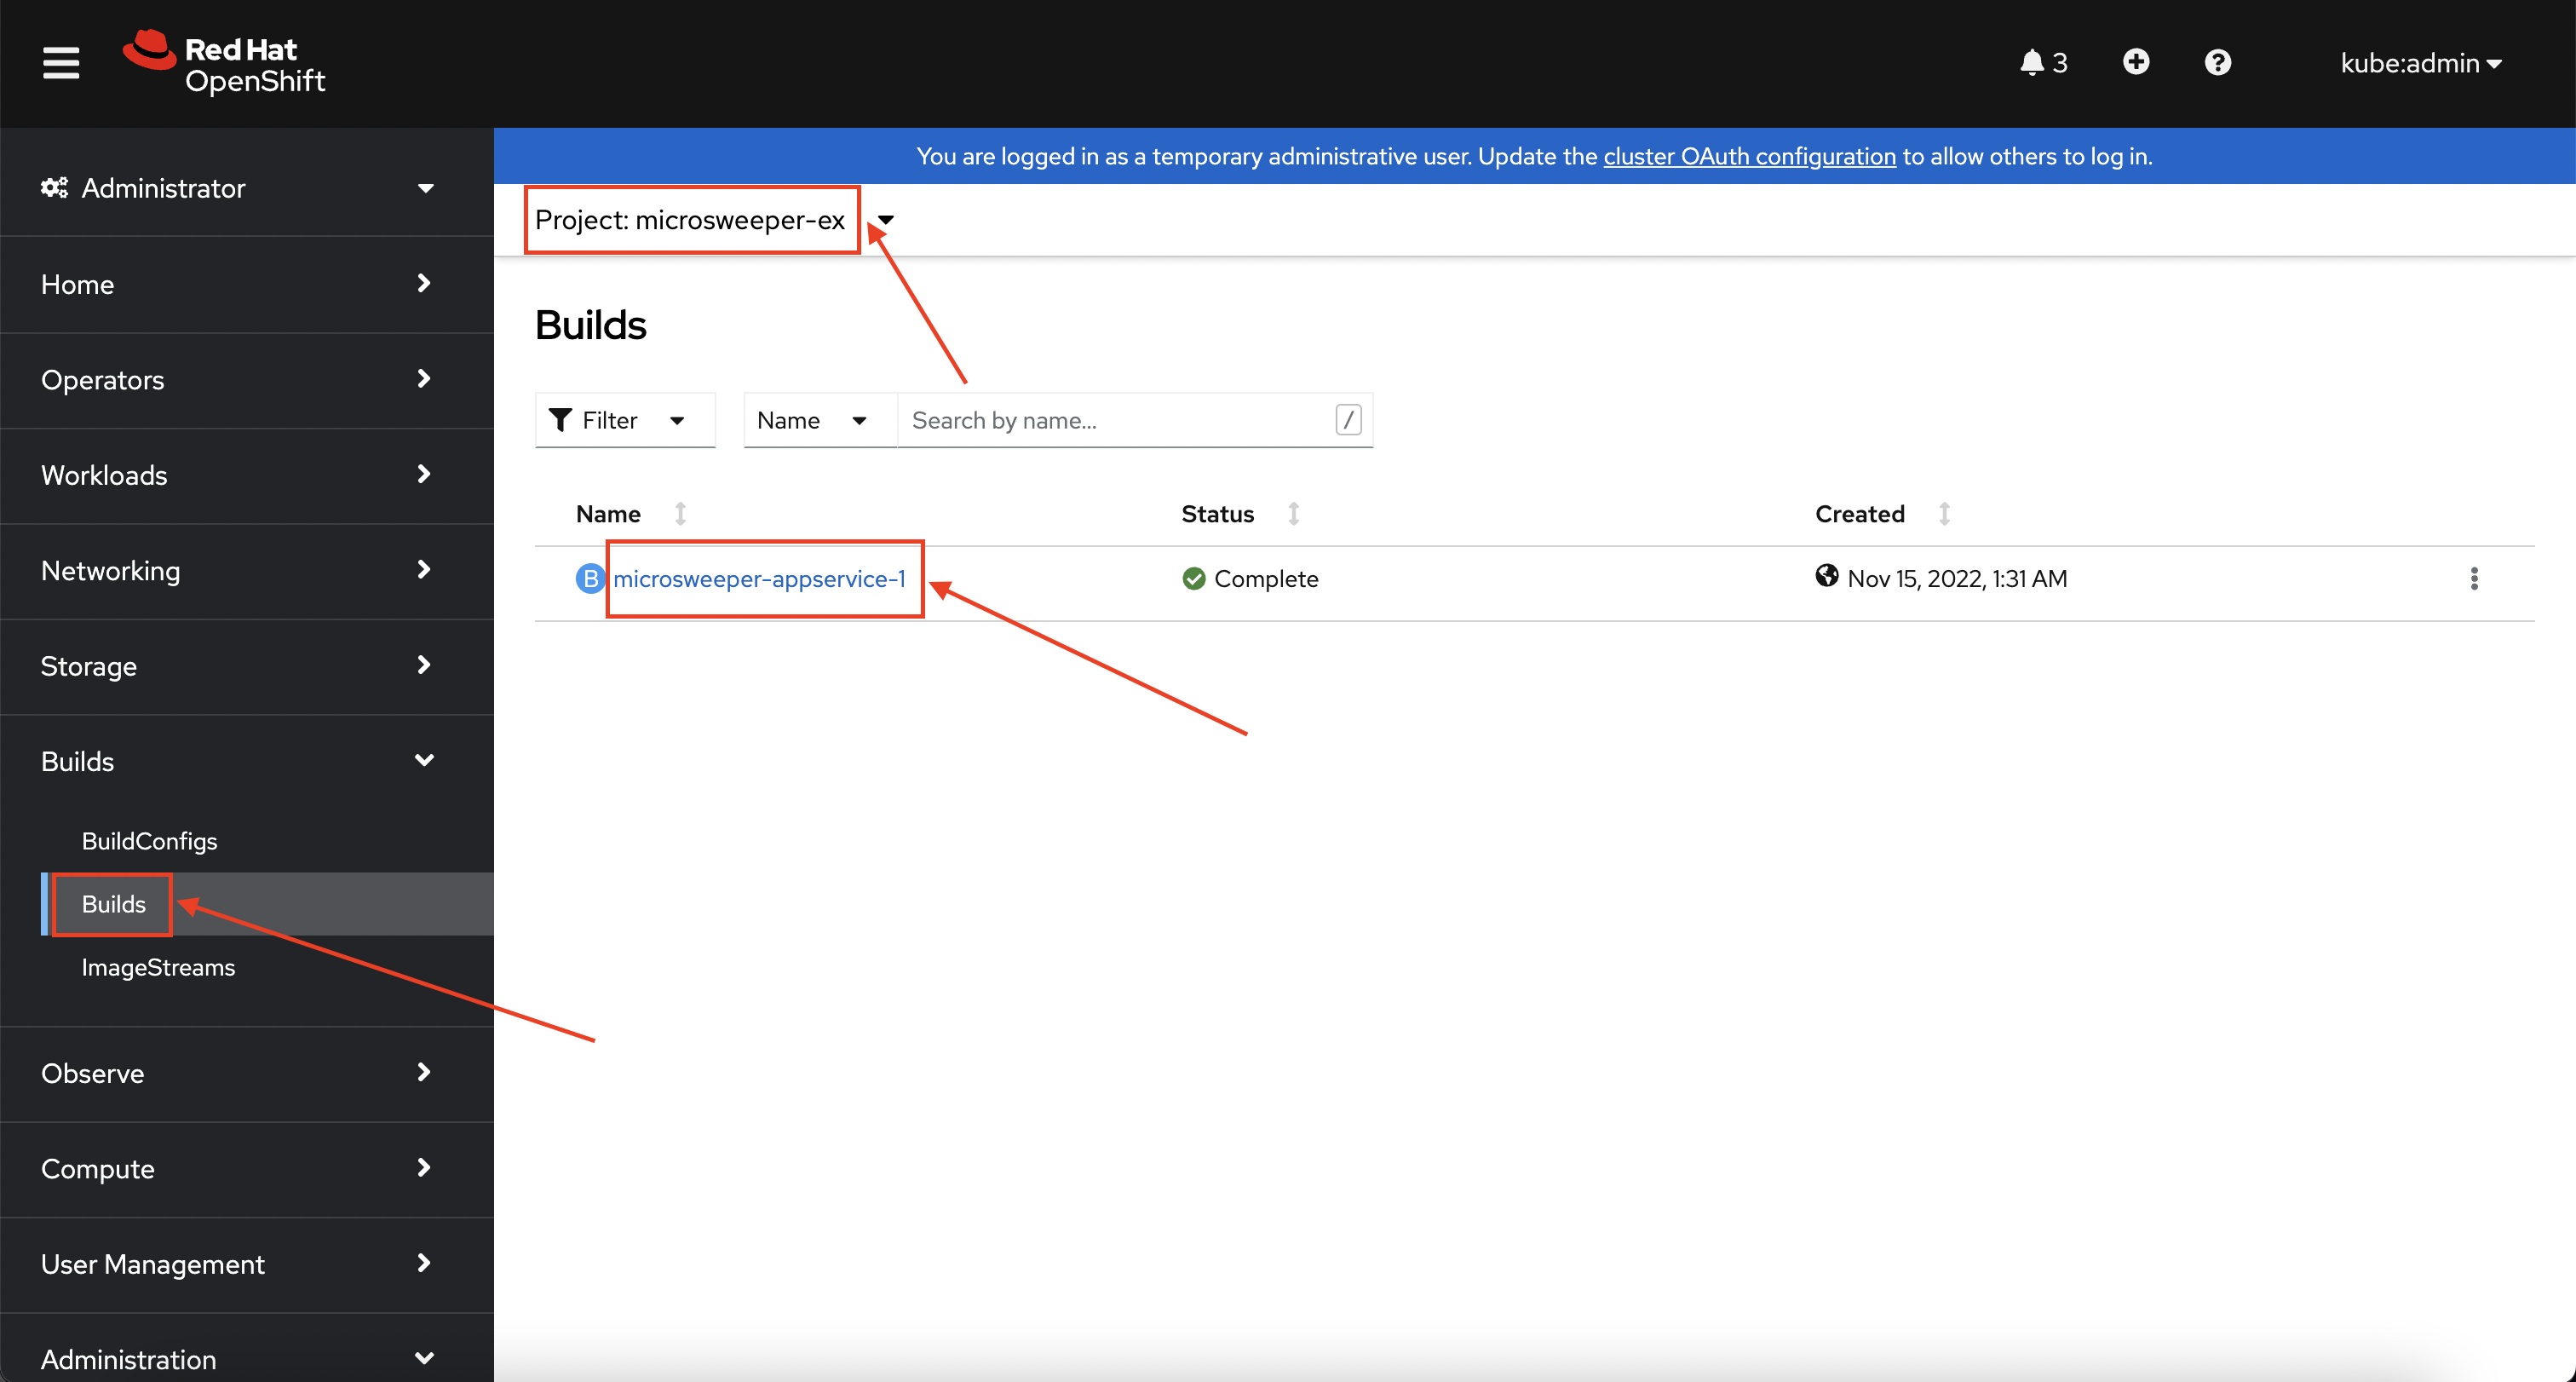
On the next screen, explore around. Look specifically at the YAML definition of the build and the logs to see what the build actually did. If your build failed for some reason, the logs are a great first place to start to look at to debug what happened.
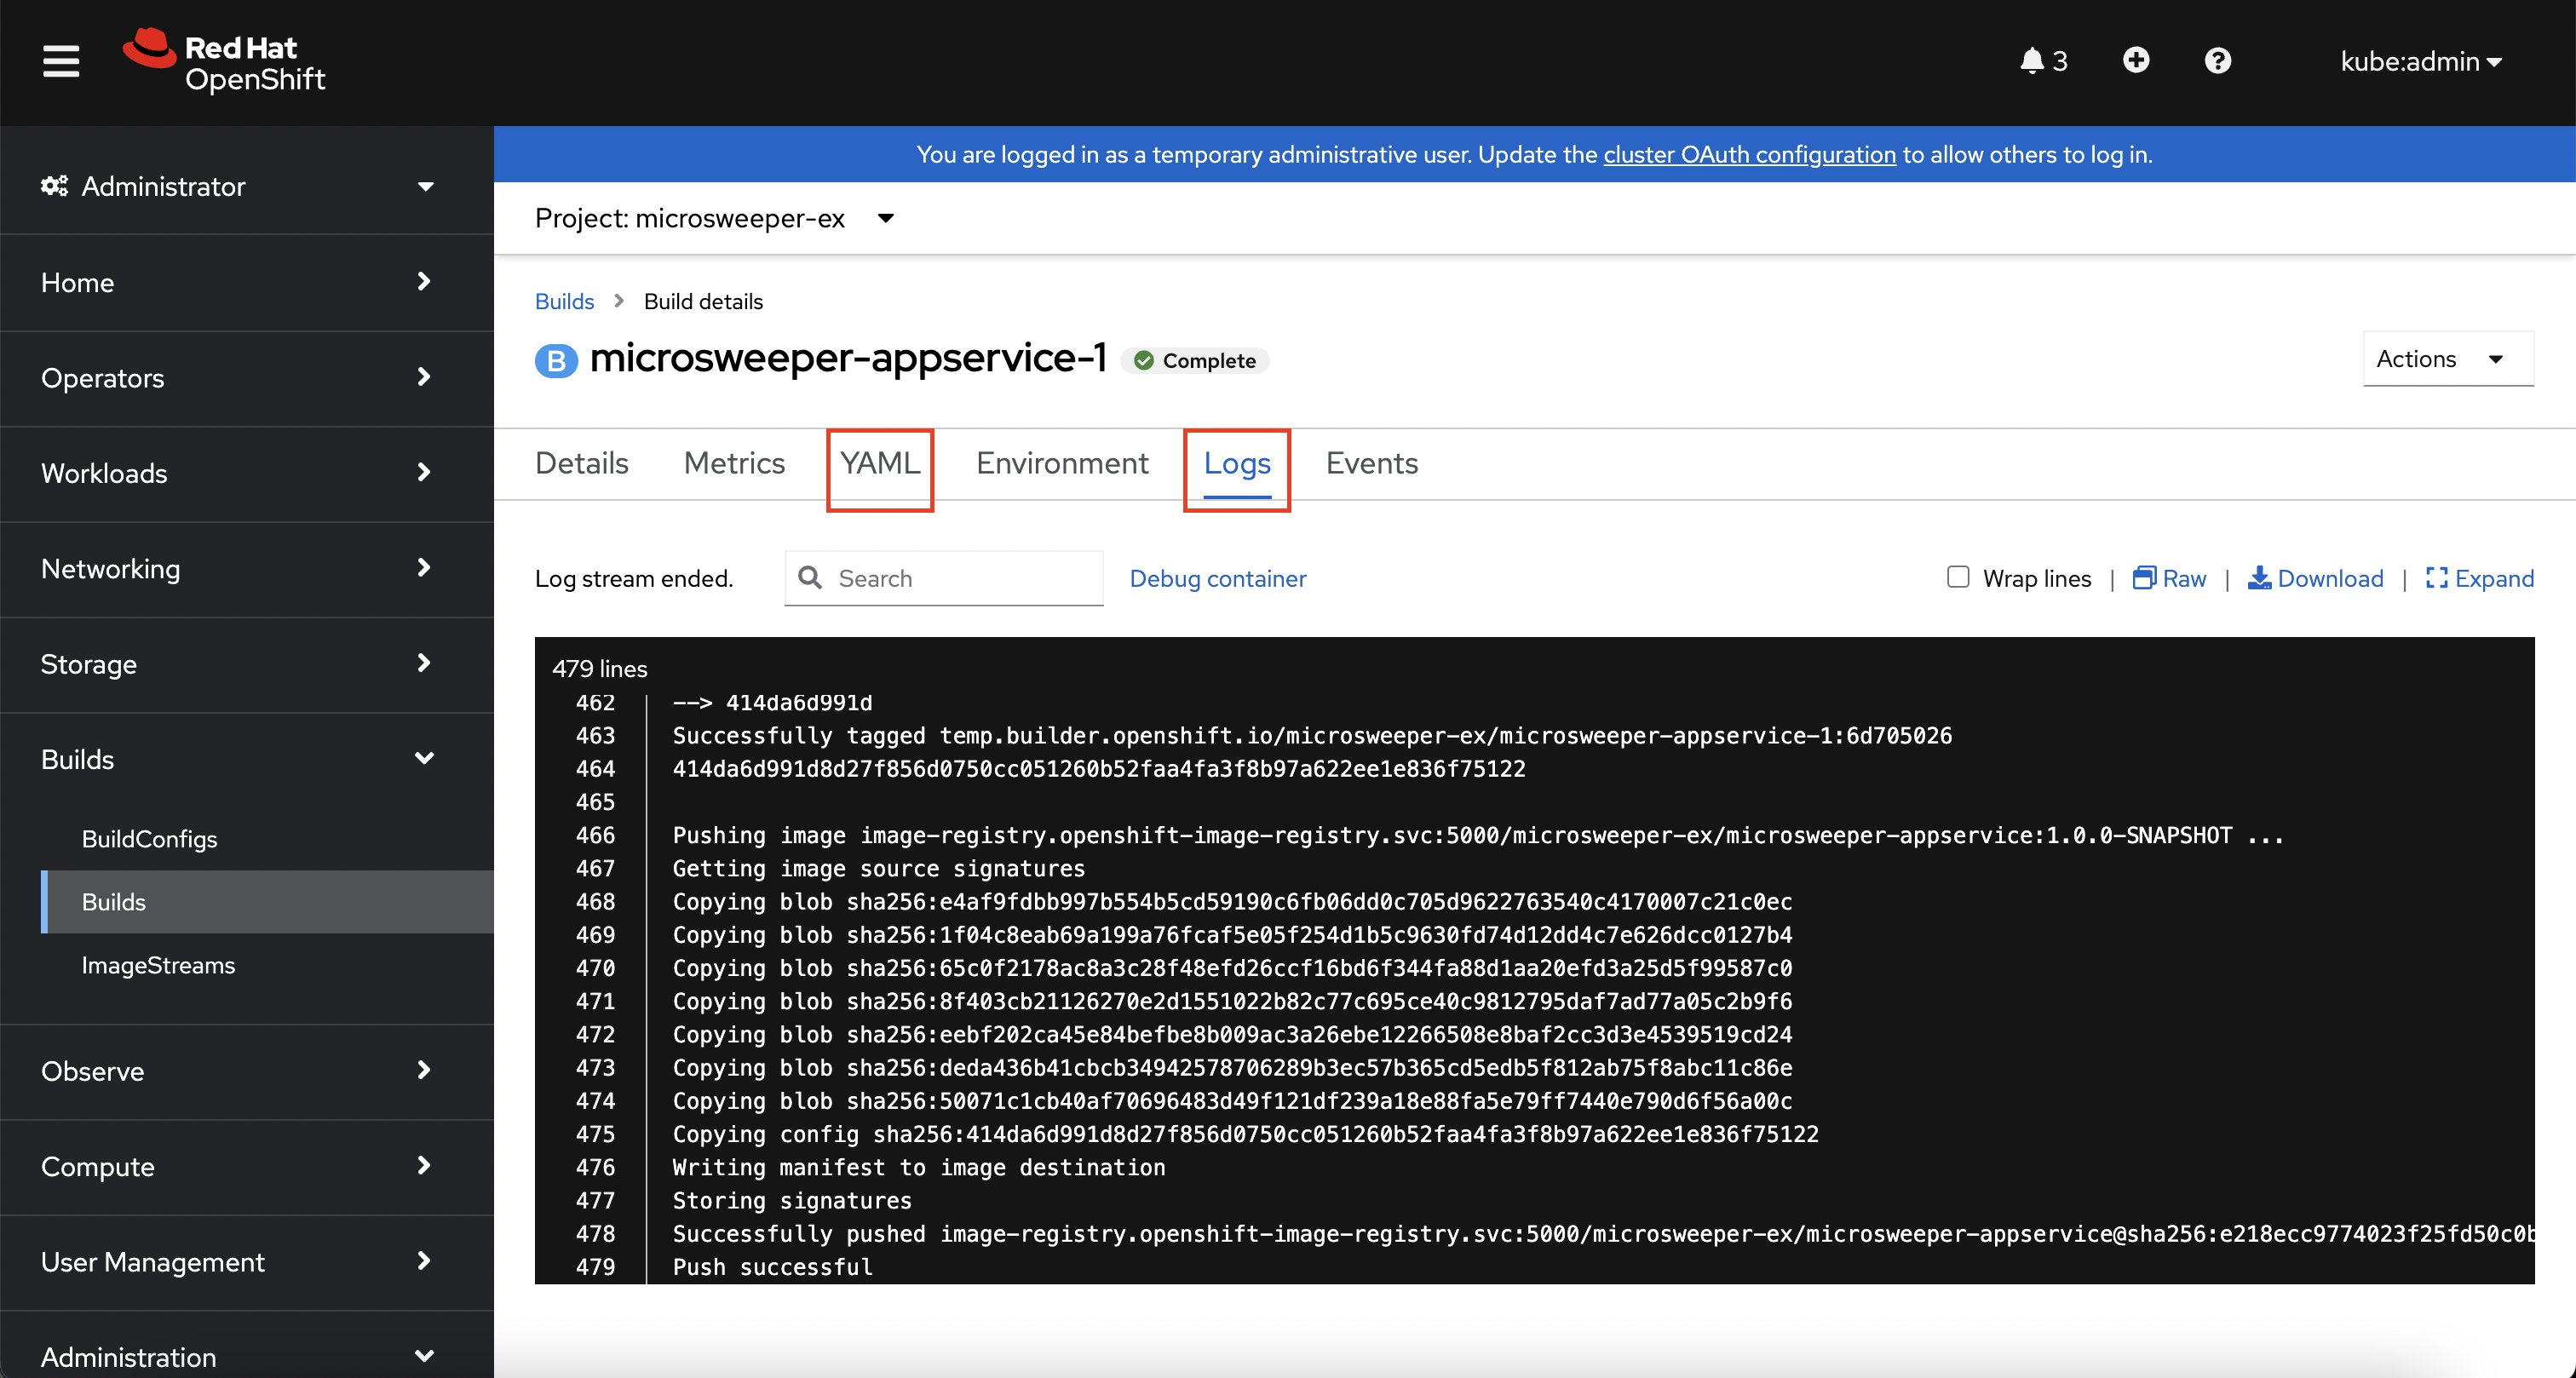
Image Deployment
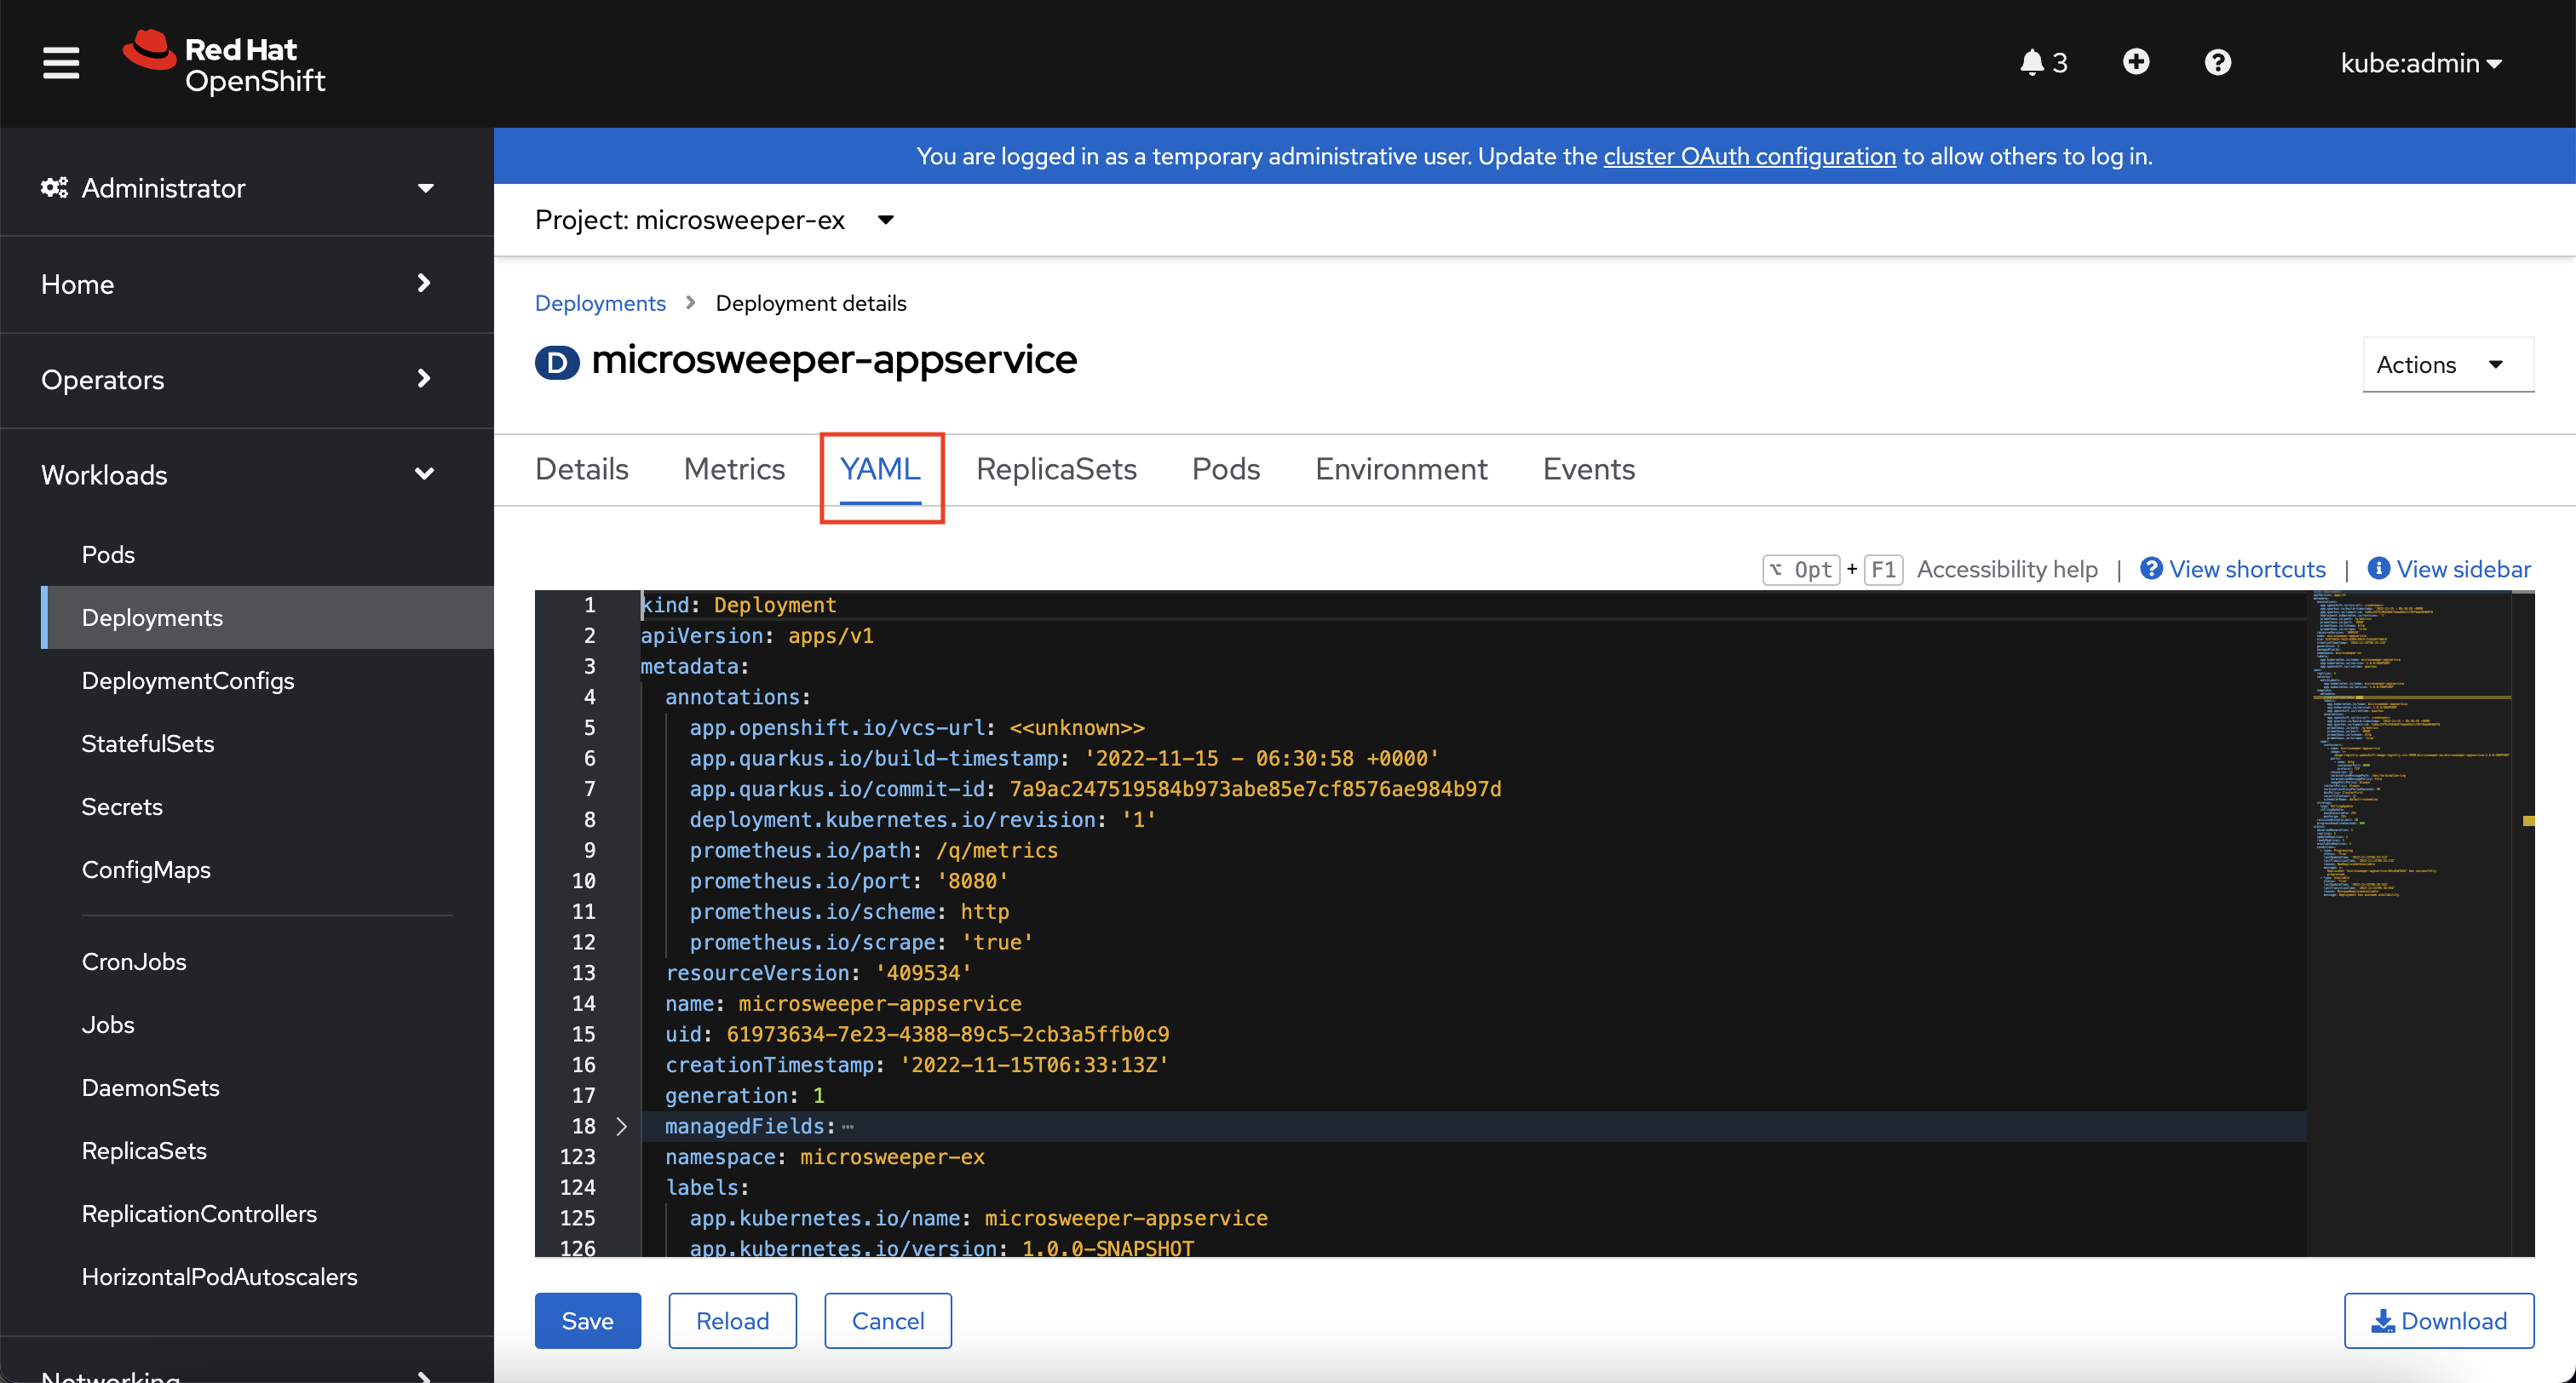
After the image was built, the source-to-image process then deployed the application for us. You can view the deployment under Workloads -> Deployments, and then click on the Deployment name.

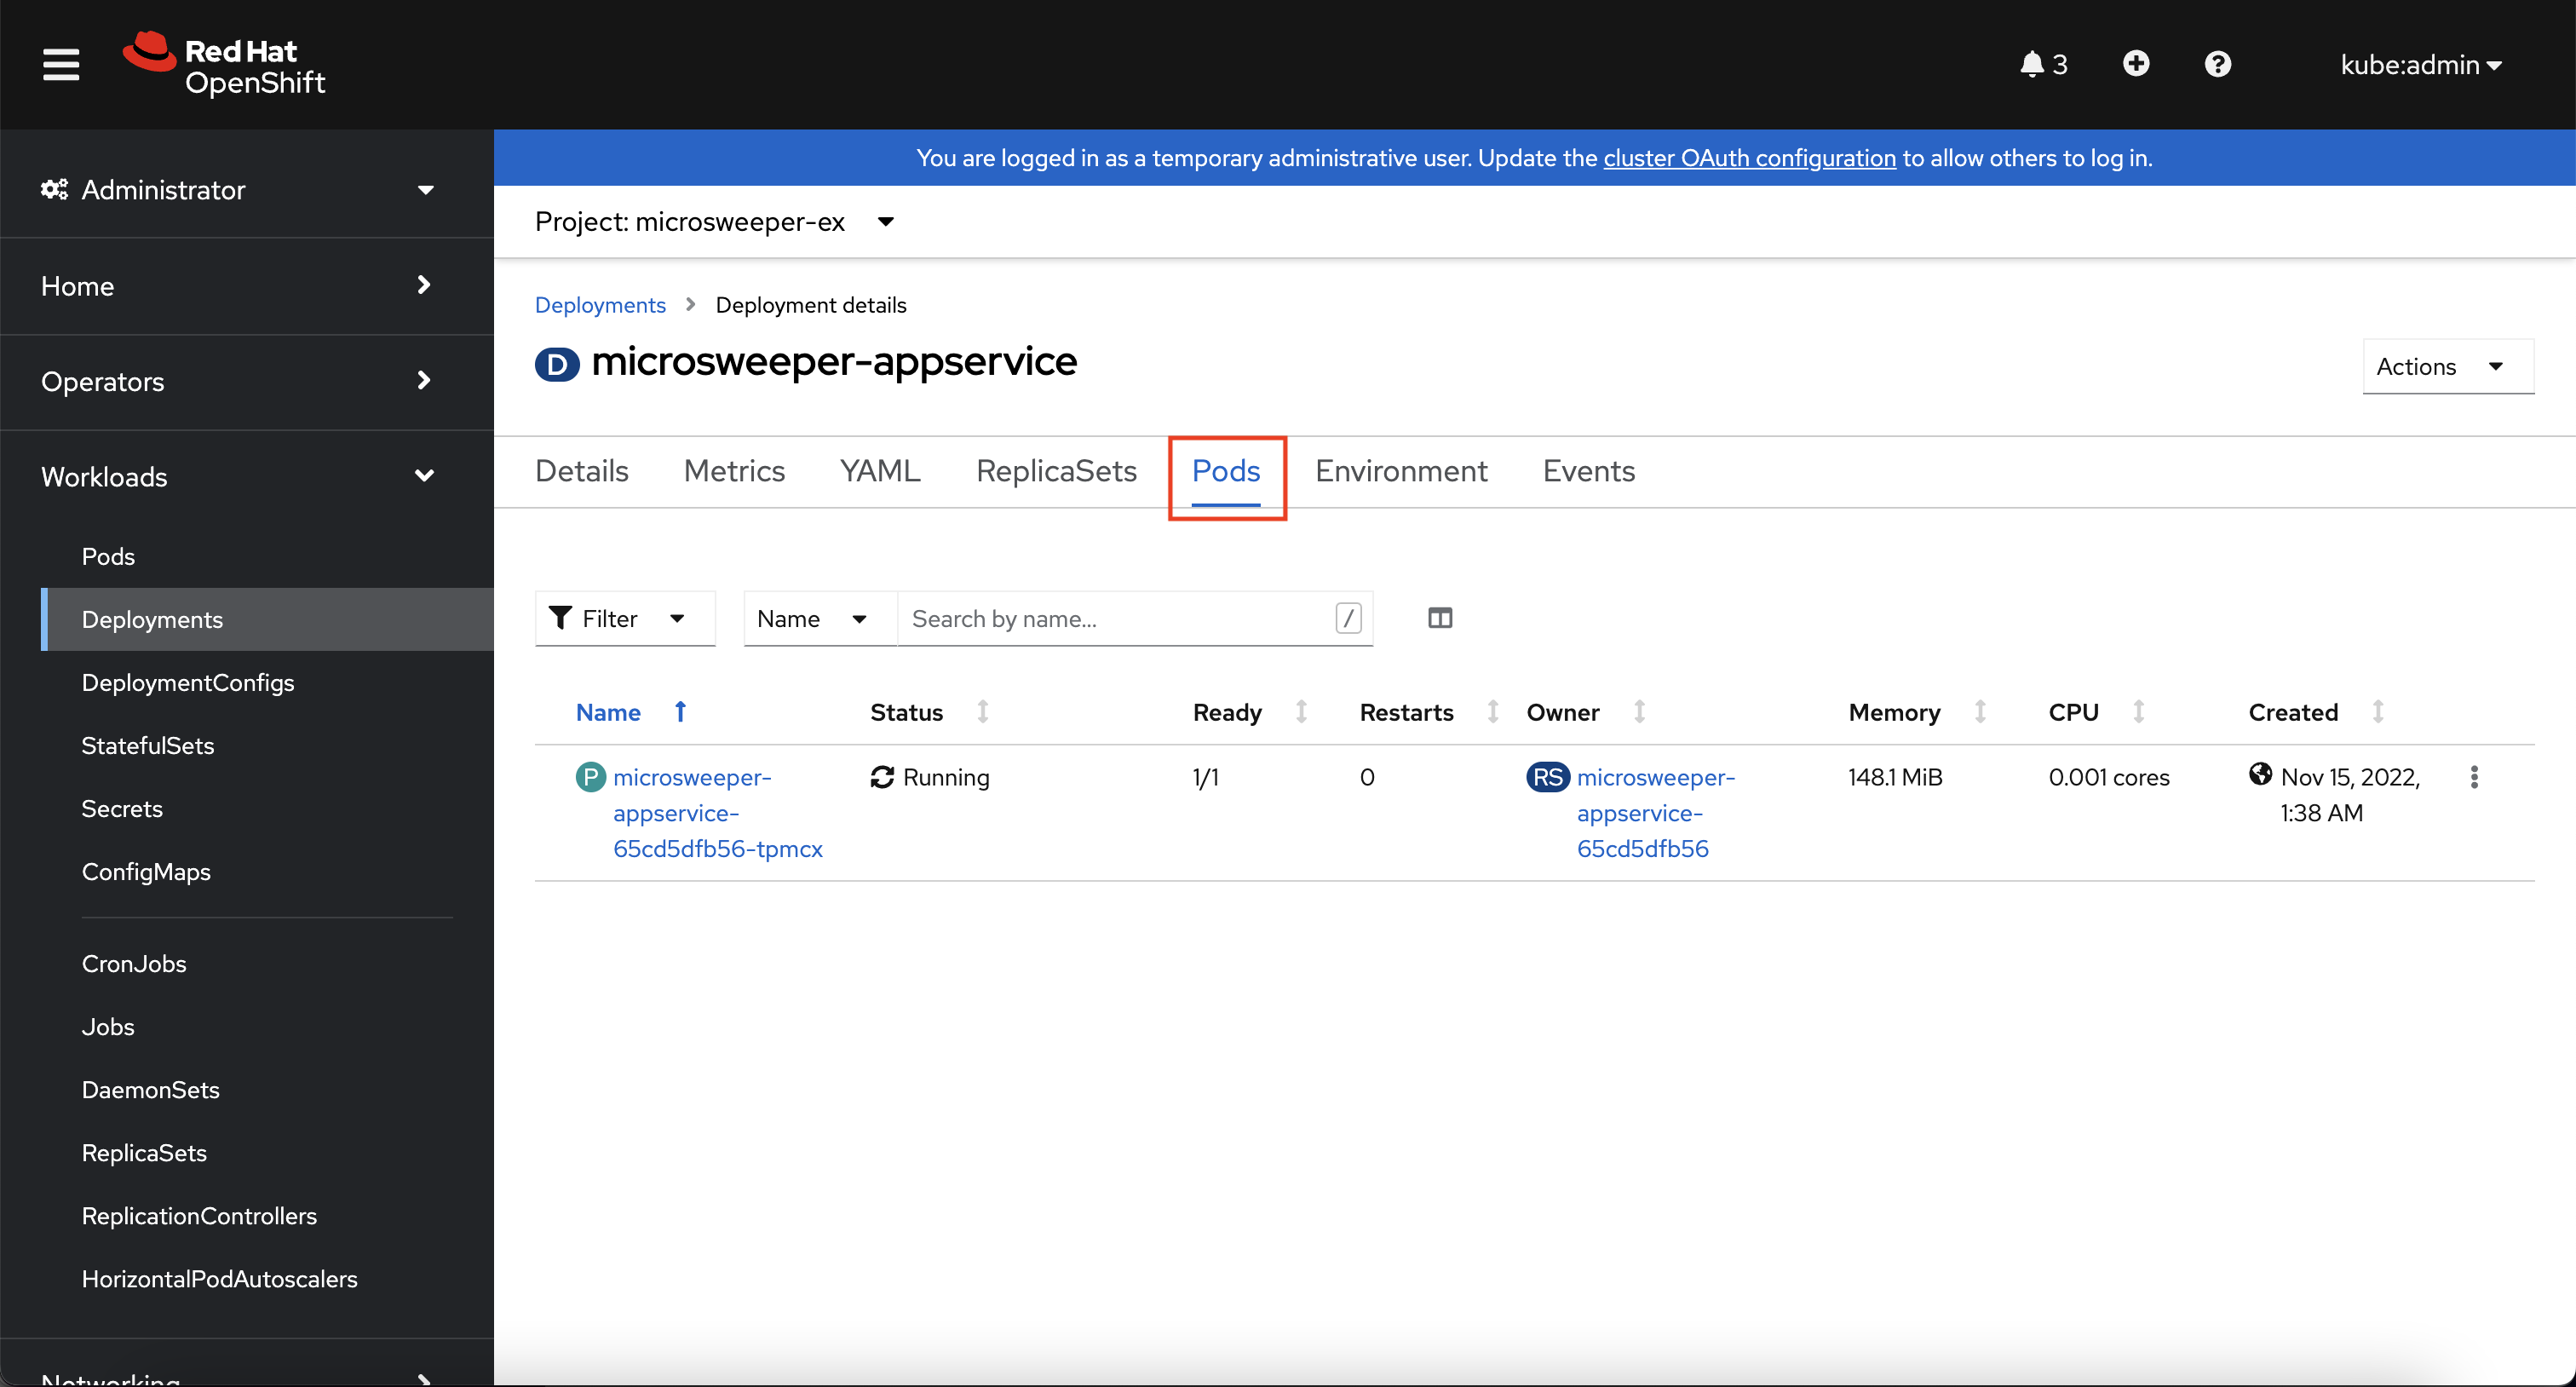
Explore around the deployment screen, check out the different tabs, look at the YAML that was created.
Look at the pod the deployment created, and see that it is running.
The last thing we will look at is the route that was created for our application.
In the quarkus properties file, we specified that the application should be exposed to the Internet.
When you create a Route, you have the option to specify a hostname.
To start with, we will just use the default domain that comes with ROSA (openshiftapps.com in our case).
You can read more about routes in the Red Hat documentation
From the OpenShift Web Console menu, click on Networking->Routes, and the microsweeper-appservice route.
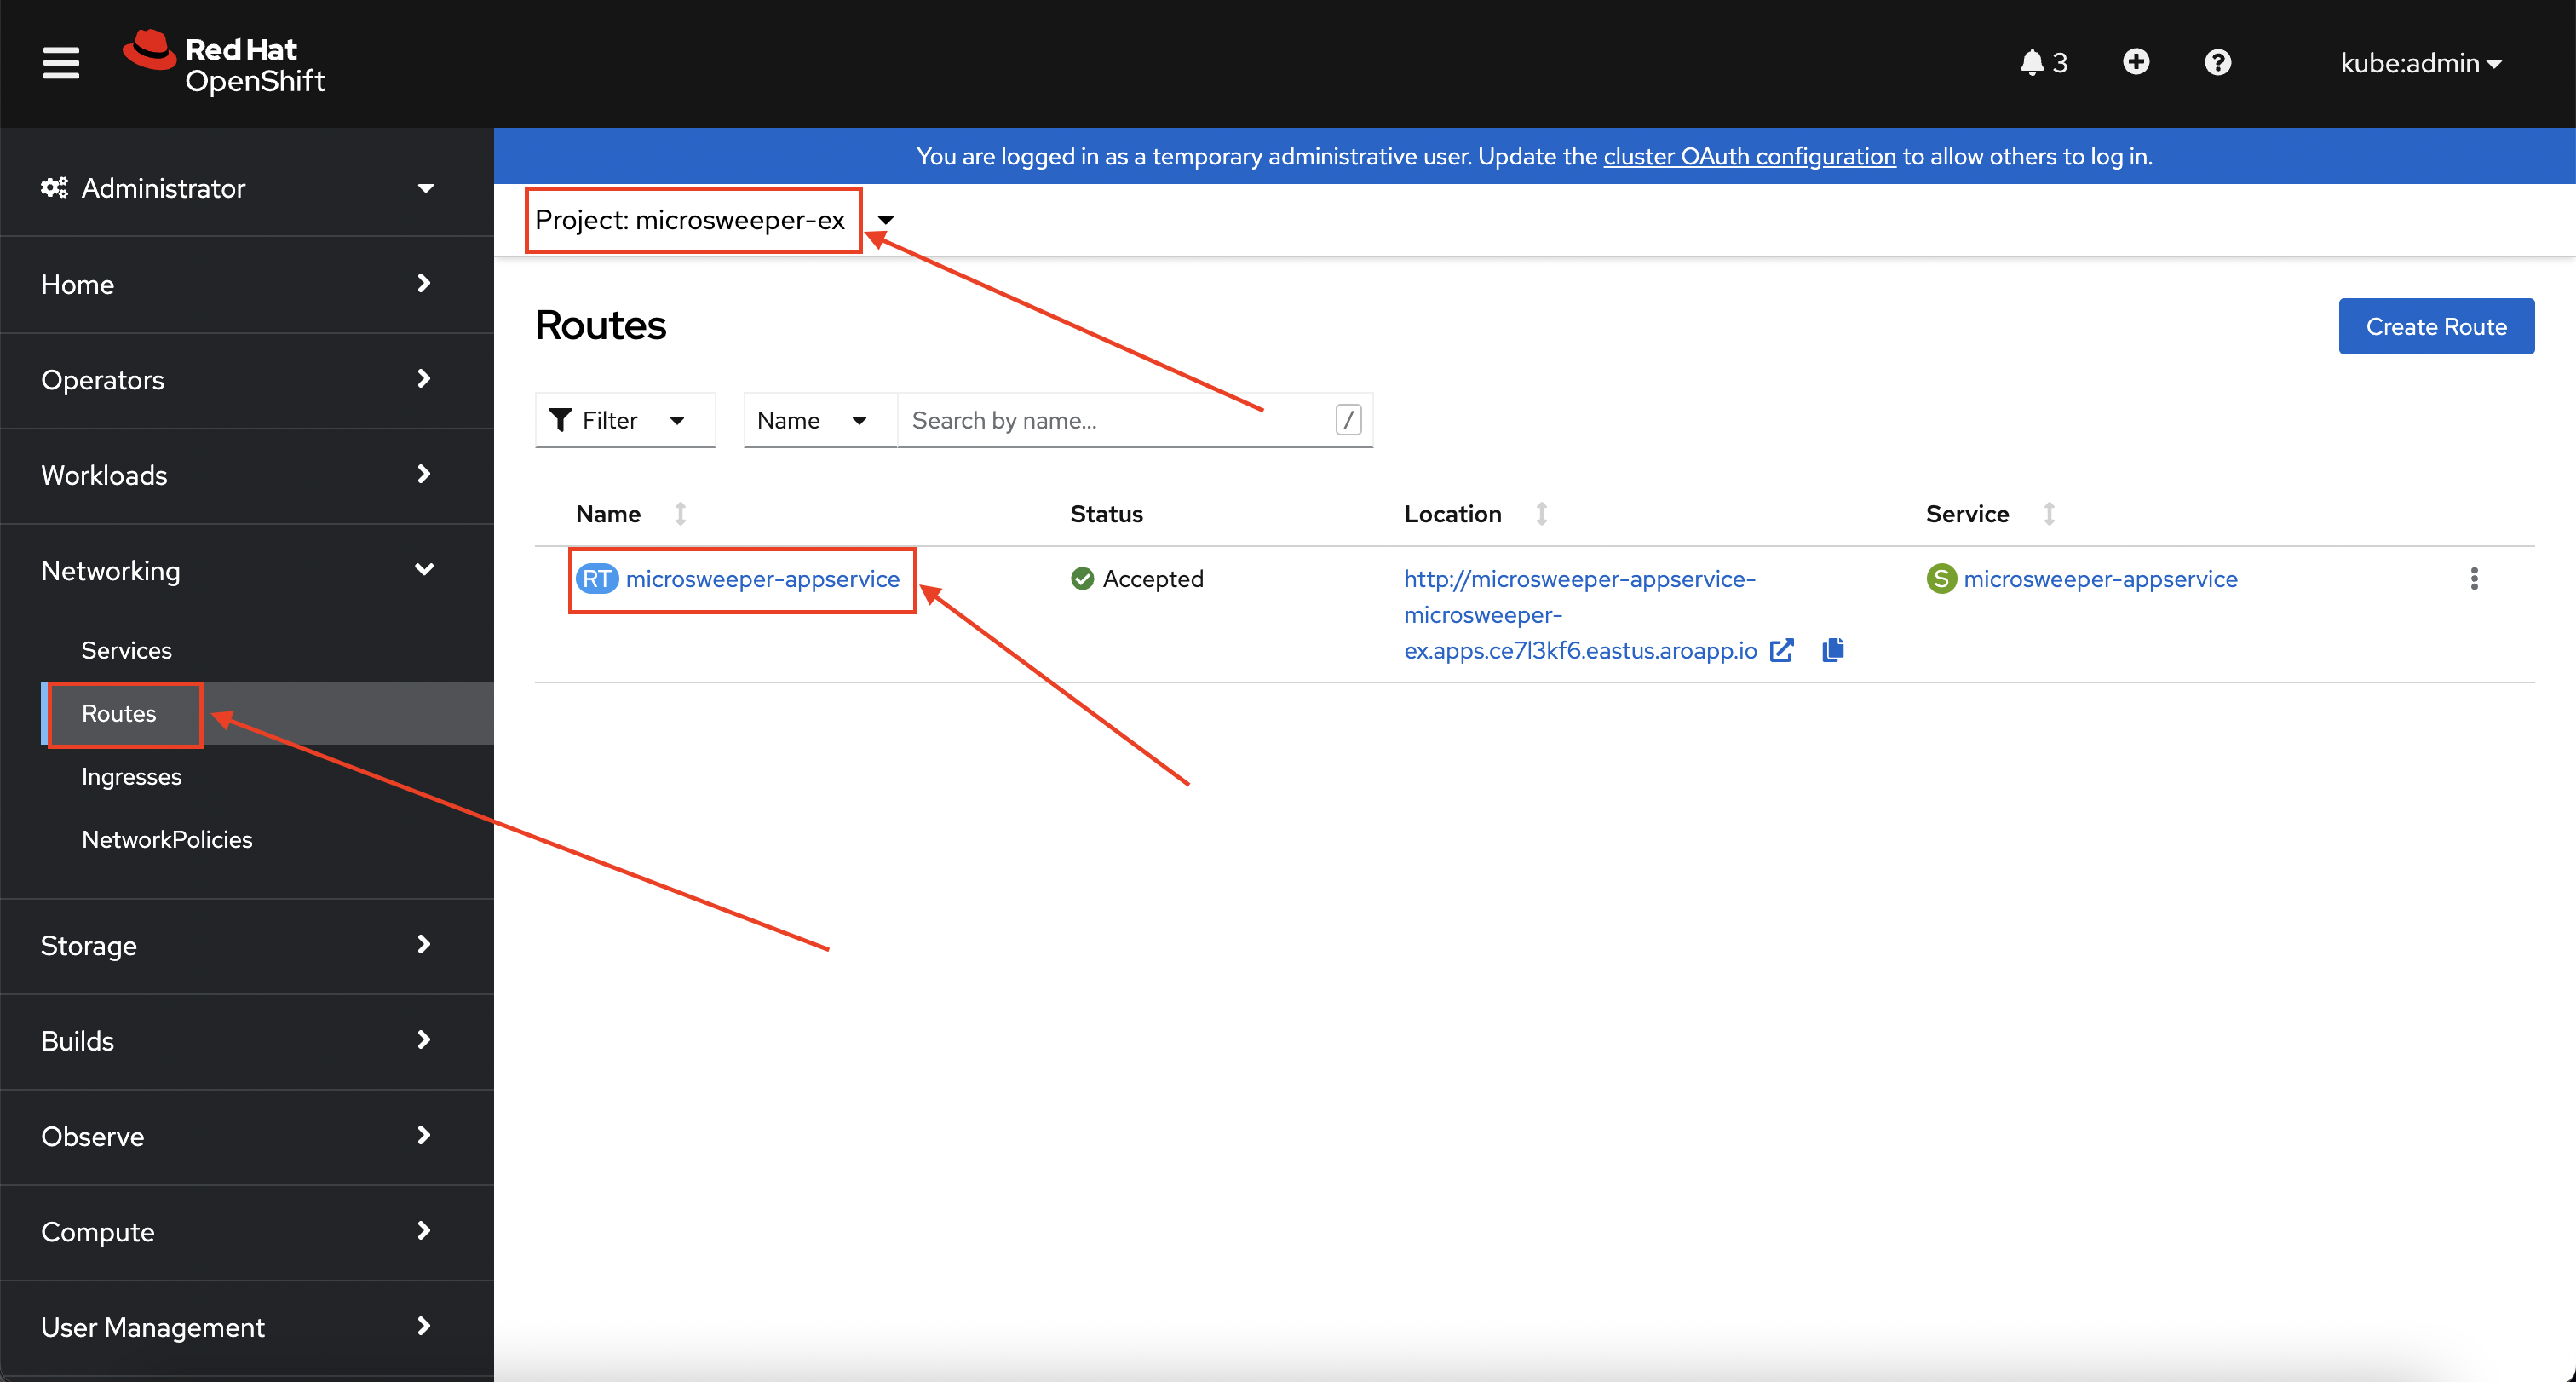
Test the application
While in the route section of the OpenShift Web Console, click the URL under Location:
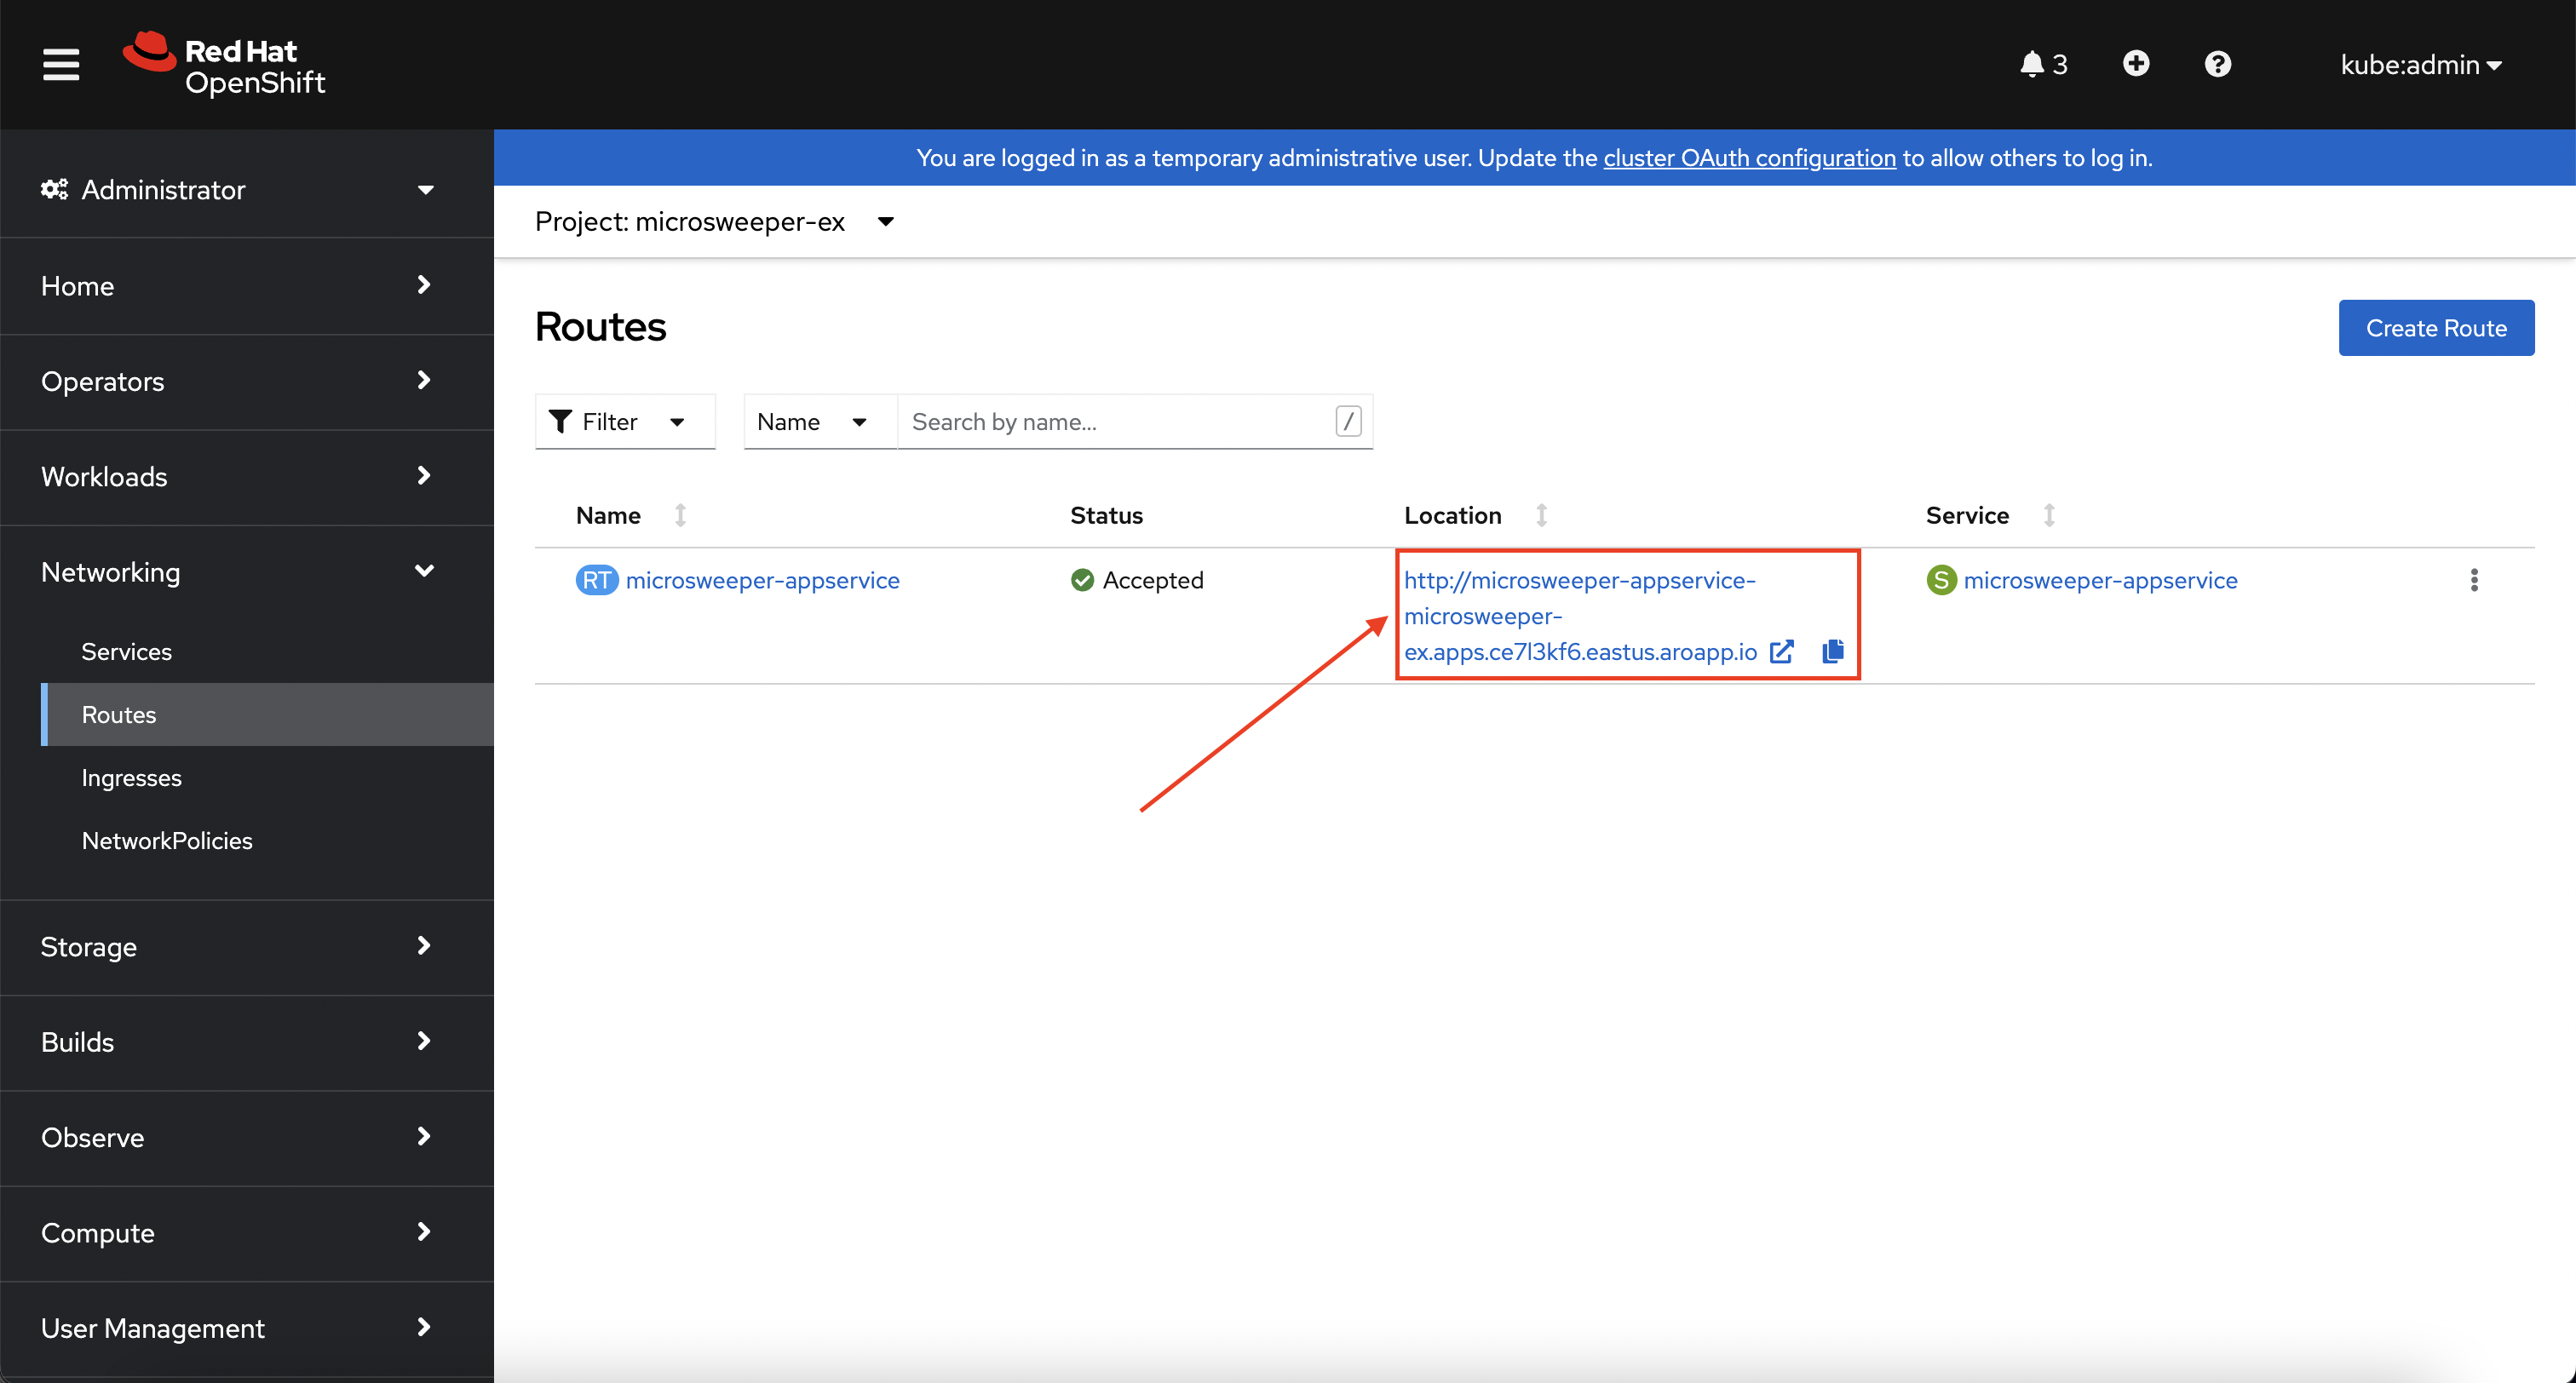
You can also get the the URL for your application using the command line:
echo "http://$(oc -n microsweeper-ex get route microsweeper-appservice -o jsonpath='{.spec.host}')"http://microsweeper-appservice-microsweeper-ex.apps.rosa-6n4s8.1c1c.p1.openshiftapps.com|
This is an |
Application IP
Let’s take a quick look at what IP the application resolves to.
Back in your bastion VM, run the following command:
nslookup $(oc -n microsweeper-ex get route microsweeper-appservice -o jsonpath='{.spec.host}')Server: 192.168.0.2
Address: 192.168.0.2#53
Non-authoritative answer:
Name: microsweeper-appservice-microsweeper-ex.apps.rosa-6n4s8.1c1c.p1.openshiftapps.com
Address: 54.185.165.99
Name: microsweeper-appservice-microsweeper-ex.apps.rosa-6n4s8.1c1c.p1.openshiftapps.com
Address: 54.191.151.187Notice the IP address; can you guess where it comes from?
It comes from the ROSA Load Balancer. In this workshop, we are using a public cluster which means the load balancer is exposed to the Internet. If this was a private cluster, you would have to have connectivity to the VPC ROSA is running on. This could be via a VPN connection, AWS DirectConnect, or something else.
Summary
Here you learned:
-
Create an AWS DynamoDB table for your application to use
-
Create a service account and AWS IAM resources to use IAM Roles for Service Accounts (IRSA).
-
Deploy the Microsweeper app and connect it to AWS DynamoDB as the backend database
-
Access the publicly exposed Microsweeper app using OpenShift routes.