Introduction
It’s time for us to put our cluster to work and deploy a workload! We’re going to build an example Java application, microsweeper, using Quarkus (a Kubernetes-native Java stack) and Azure Database for PostgreSQL. After configuring the database, we will use both Quarkus, a Kubernetes-native Java framework optimized for containers, and Source-to-Image (S2I), a toolkit for building container images from source code, to deploy the microsweeper application.
Create Azure Database for PostgreSQL instance
-
First, let’s create a namespace (also known as a project in OpenShift). To do so, run the following command:
oc new-project microsweeper-exSample OutputNow using project "microsweeper-ex" on server "https://api.c90qz1cy.eastus.aroapp.io:6443". You can add applications to this project with the 'new-app' command. For example, try: oc new-app rails-postgresql-example to build a new example application in Ruby. Or use kubectl to deploy a simple Kubernetes application: kubectl create deployment hello-node --image=k8s.gcr.io/e2e-test-images/agnhost:2.33 -- /agnhost serve-hostname -
Create the Azure Database for Postgres server resource. To do so, run the following command (this command will take ~ 5mins)
az postgres flexible-server create  \
  --resource-group openenv-$GUID  \
  --location eastus --sku-name Standard_D2s_v3 \
  --admin-user myAdmin --admin-password "M1cr0Sw33p3r!" \
  --public-access 0.0.0.0
Sample OutputChecking the existence of the resource group 'openenv-qsd7p'... Resource group 'openenv-qsd7p' exists ? : True Creating postgres Server 'microsweeper-qsd7p' in group 'openenv-qsd7p'... Your server 'microsweeper-qsd7p' is using sku 'GP_Gen5_2' (Paid Tier). Please refer to https://aka.ms/postgres-pricing for pricing details Configuring server firewall rule, 'azure-access', to accept connections from all Azure resources... Make a note of your password. If you forget, you would have to reset your password with 'az postgres server update -n microsweeper-qsd7p -g openenv-qsd7p -p <new-password>'. { "additionalProperties": {}, "administratorLogin": "myAdmin", [...Output omitted...]For the sake of the workshop we are creating a public database that any host in Azure can connect to. In a real world scenario you would create a private database and connect to it over a private link service
-
Check connectivity to the database. To do so, run the following command:
psql \
  "host=microsweeper-$GUID.postgres.database.azure.com port=5432
  dbname=postgres
  user=myAdmin@microsweeper-$GUID.postgres.database.azure.com password=M1cr0Sw33p3r! sslmode=require" \
  -c "select now();"
Sample Output------------------------------- 2023-04-24 20:44:38.088556+00 (1 row)
Build and deploy the Microsweeper app
Now that we’ve got an Azure managed PostgreSQL instance up and running, let’s build and deploy our application.
-
In order to build the application you will need the Java JDK 17 and the Quarkus CLI installed. Java JDK 17 is already installed on your bastion VM so let’s install the Quarkus CLI:
curl -Ls https://sh.jbang.dev | bash -s - trust add https://repo1.maven.org/maven2/io/quarkus/quarkus-cli/ curl -Ls https://sh.jbang.dev | bash -s - app install --fresh --force quarkus@quarkusio echo "export JAVA_HOME=/usr/lib/jvm/jre-17-openjdk" >>${HOME}/.bashrc echo "export PATH=\$JAVA_HOME/bin:\$PATH" >>${HOME}/.bashrc source ${HOME}/.bashrc -
Double check the Quarkus CLI version:
quarkus --versionSample Output3.19.1 -
Now, let’s clone the application from GitHub to our local bastion VM. To do so, run the following command:
cd $HOME

git clone https://github.com/rh-mobb/aro-workshop-app.git
Sample OutputCloning into 'aro-workshop-app'... remote: Enumerating objects: 152, done. remote: Counting objects: 100% (16/16), done. remote: Compressing objects: 100% (14/14), done. remote: Total 152 (delta 12), reused 2 (delta 2), pack-reused 136 Receiving objects: 100% (152/152), 6.57 MiB | 31.29 MiB/s, done. Resolving deltas: 100% (55/55), done. -
Next, let’s change directory into the newly cloned Git repository. To do so, run the following command:
cd $HOME/aro-workshop-app -
Next, we will add the OpenShift extension to the Quarkus CLI. To do so, run the following command:
quarkus ext add openshiftSample OutputLooking for the newly published extensions in registry.quarkus.io [SUCCESS] ✅ Extension io.quarkus:quarkus-openshift has been installed -
We also want Quarkus to be able to use OpenShift ConfigMaps and Secrets:
quarkus ext add kubernetes-configSample OutputLooking for the newly published extensions in registry.quarkus.io [SUCCESS] ✅ Extension io.quarkus:quarkus-openshift has been installed -
Create a OpenShift secret containing Database credentials for Quarkus to use:
cat << EOF | oc apply -f -
---
apiVersion: v1
kind: Secret
metadata:
  name: microsweeper-secret
  namespace: microsweeper-ex
type: Opaque
stringData:
  PG_URL: jdbc:postgresql://microsweeper-$GUID.postgres.database.azure.com:5432/postgres
  PG_USER: myAdmin@microsweeper-$GUID.postgres.database.azure.com
  PG_PASS: "M1cr0Sw33p3r!"
EOF
Sample Outputsecret/microsweeper-secret created -
Now, we’ll configure Quarkus to use the PostgreSQL database that we created earlier in this section. To do so, we’ll create an
application.propertiesfile to use by running the following command:cat <<"EOF" > $HOME/aro-workshop-app/src/main/resources/application.properties # Database configurations %prod.quarkus.datasource.db-kind=postgresql %prod.quarkus.datasource.jdbc.url=${PG_URL} %prod.quarkus.datasource.username=${PG_USER} %prod.quarkus.datasource.password=${PG_PASS} %prod.quarkus.datasource.jdbc.driver=org.postgresql.Driver %prod.quarkus.hibernate-orm.database.generation=drop-and-create %prod.quarkus.hibernate-orm.database.generation=update # OpenShift configurations %prod.quarkus.kubernetes-client.trust-certs=true %prod.quarkus.kubernetes.deploy=true %prod.quarkus.kubernetes.deployment-target=openshift %prod.quarkus.openshift.build-strategy=docker %prod.quarkus.openshift.expose=true %prod.quarkus.openshift.deployment-kind=Deployment %prod.quarkus.container-image.group=microsweeper-ex %prod.quarkus.openshift.env.secrets=microsweeper-secret EOF -
Now that we’ve provided the proper configuration, we will build our application. We’ll do this using source-to-image, a tool built-in to OpenShift. To start the build and deploy, run the following command:
quarkus build --no-testsSample Output[INFO] Scanning for projects... Downloading from central: https://repo.maven.apache.org/maven2/io/quarkus/platform/quarkus-maven-plugin/2.11.2.Final/quarkus-maven-plugin-2.11.2.Final.pom Downloaded from central: https://repo.maven.apache.org/maven2/io/quarkus/platform/quarkus-maven-plugin/2.11.2.Final/quarkus-maven-plugin-2.11.2.Final.pom (6.9 kB at 11 kB/s) [...Output omitted...] [INFO] ------------------------------------------------------------------------ [INFO] BUILD SUCCESS [INFO] ------------------------------------------------------------------------ [INFO] Total time: 02:41 min [INFO] Finished at: 2023-04-24T20:58:59Z [INFO] ------------------------------------------------------------------------Quarkus will build the .jar locally and then work with the OpenShift build system to inject it into a Red Hat UBI image, save that to the built in OpenShift registry, and then run the resulting image in OpenShift.
-
We want to see custom metrics from the Quarkus app (they’re exposed by the Quarkus micrometer plugin) so we can configure a Prometheus
ServiceMonitorresource to watch for the applications label.cat << EOF | oc apply -f - --- apiVersion: monitoring.coreos.com/v1 kind: ServiceMonitor metadata: labels: k8s-app: microsweeper-monitor name: microsweeper-monitor namespace: microsweeper-ex spec: endpoints: - interval: 30s targetPort: 8080 path: /q/metrics scheme: http selector: matchLabels: app.kubernetes.io/name: microsweeper-appservice EOFSample Outputservicemonitor.monitoring.coreos.com/microsweeper-monitor created -
Change back to your previous working directory
cd $HOME
Review
Let’s take a look at what this command did, along with everything that was created in your cluster. Return to your tab with the OpenShift Web Console.
Container Images
From the Administrator perspective, expand Builds and then ImageStreams, and select the microsweeper-ex project.
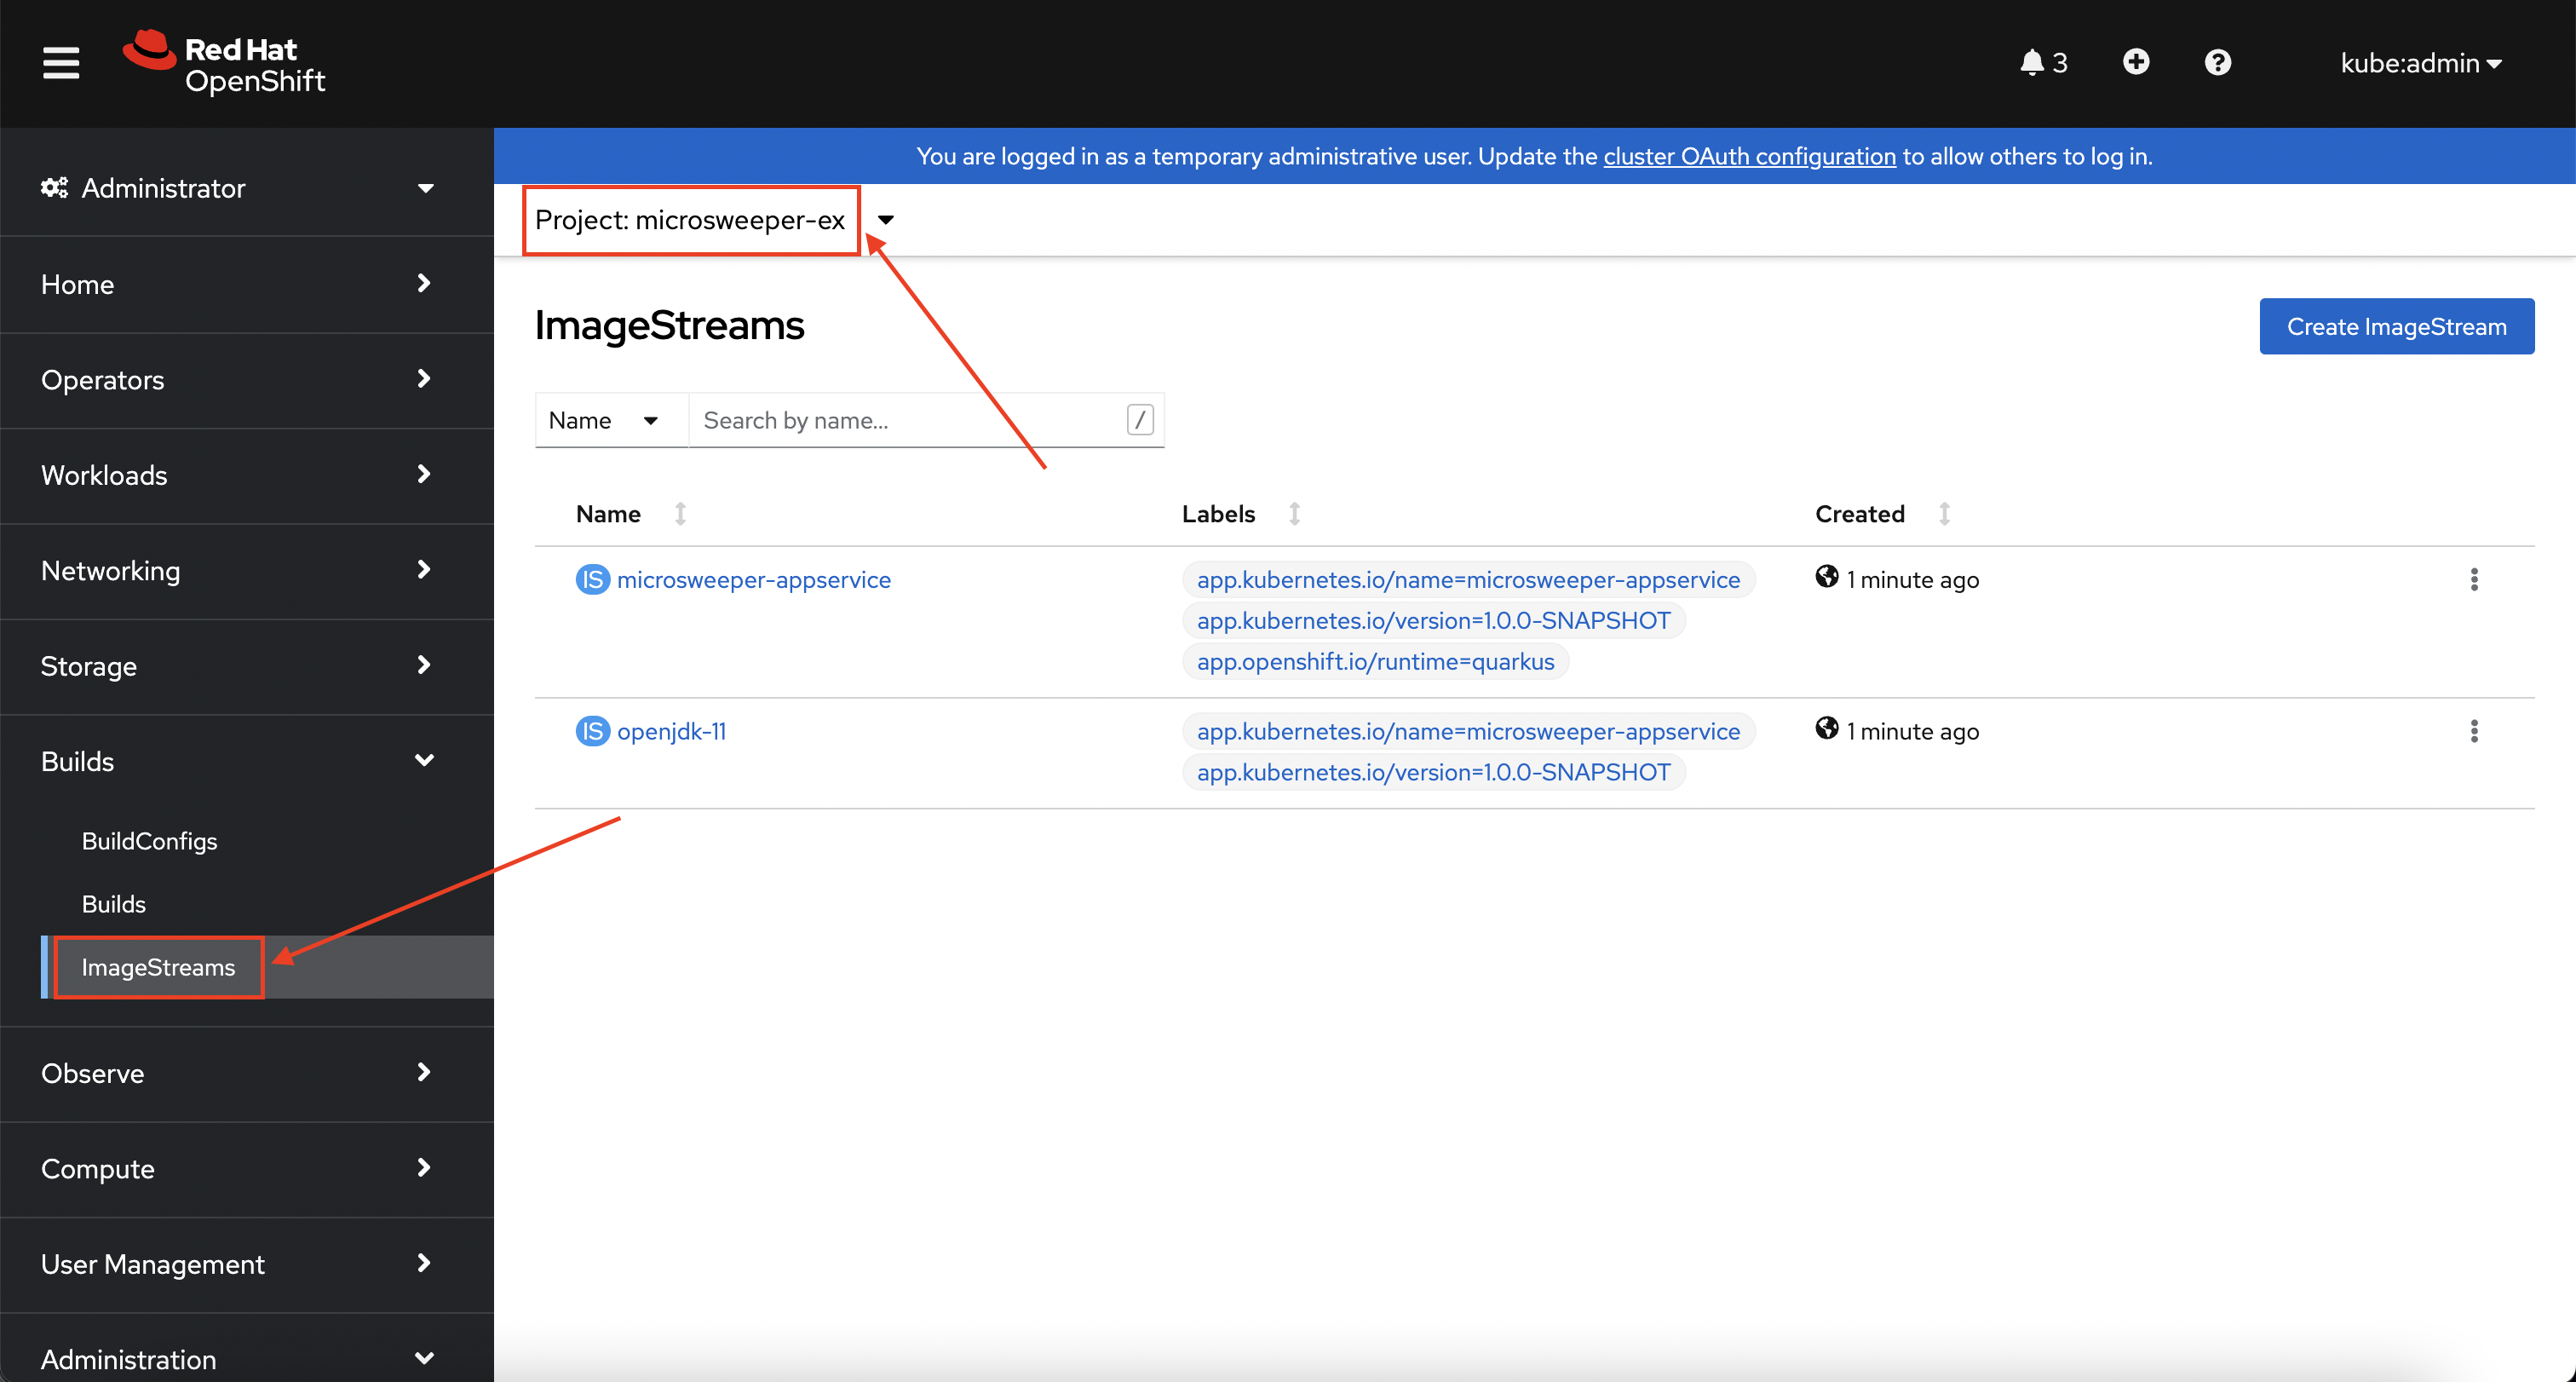
You will see two images that were created on your behalf when you ran the quarkus build command.
There is one image for openjdk-11 that comes with OpenShift as a Universal Base Image (UBI) that the application will run under.
With UBI, you get highly optimized and secure container images that you can build your applications with.
For more information on UBI please read this article.
The second image you see is the the microsweeper-appservice image.
This is the image for the application that was built automatically for you and pushed to the built-in container registry inside of OpenShift.
Image Build
How did those images get built you ask? Back on the OpenShift Web Console, click on BuildConfigs and then the microsweeper-appservice entry.
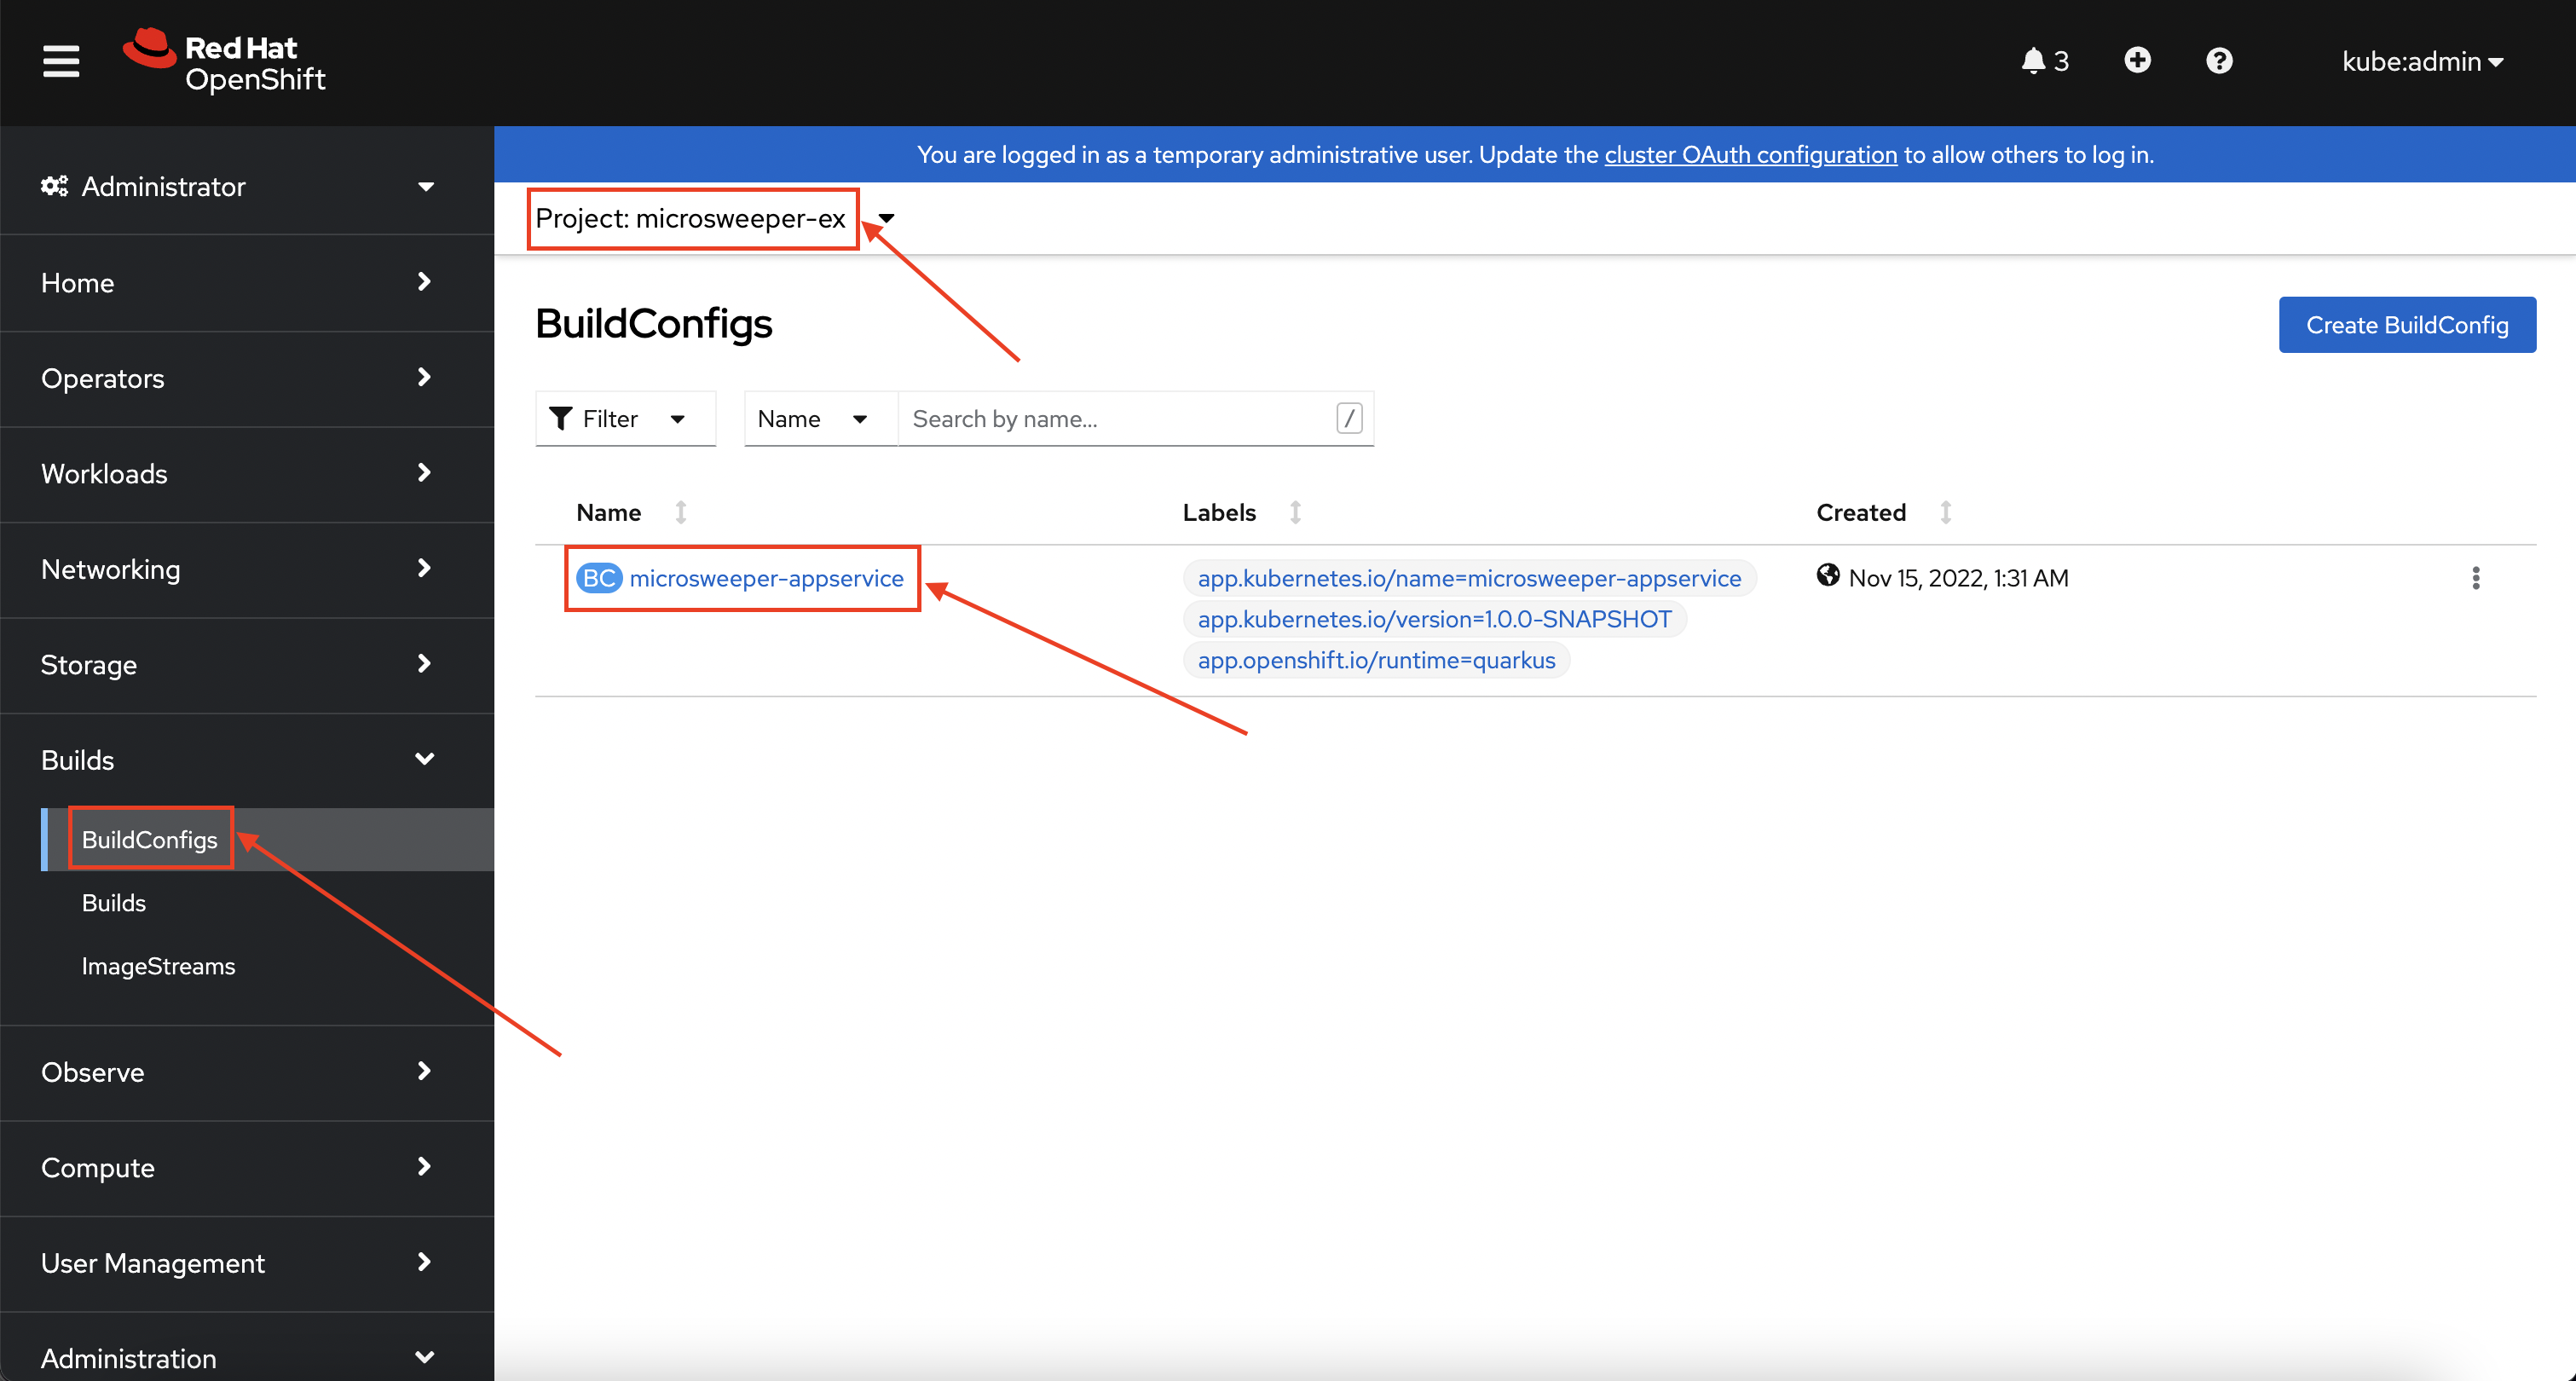

When you ran the quarkus build command, this created the BuildConfig you can see here.
In our quarkus settings, we set the deployment strategy to build the image using Docker.
The Dockerfile file from the git repo that we cloned was used for this BuildConfig.
A build configuration describes a single build definition and a set of triggers for when a new build is created. Build configurations are defined by a BuildConfig, which is a REST object that can be used in a POST to the API server to create a new instance.
You can read more about BuildConfigs here.
Once the BuildConfig was created, the source-to-image process kicked off a Build of that BuildConfig. The build is what actually does the work in building and deploying the image. We started with defining what to be built with the BuildConfig and then actually did the work with the Build.
You can read more about Builds here.
To look at what the build actually did, click on Builds tab and then into the first Build in the list.
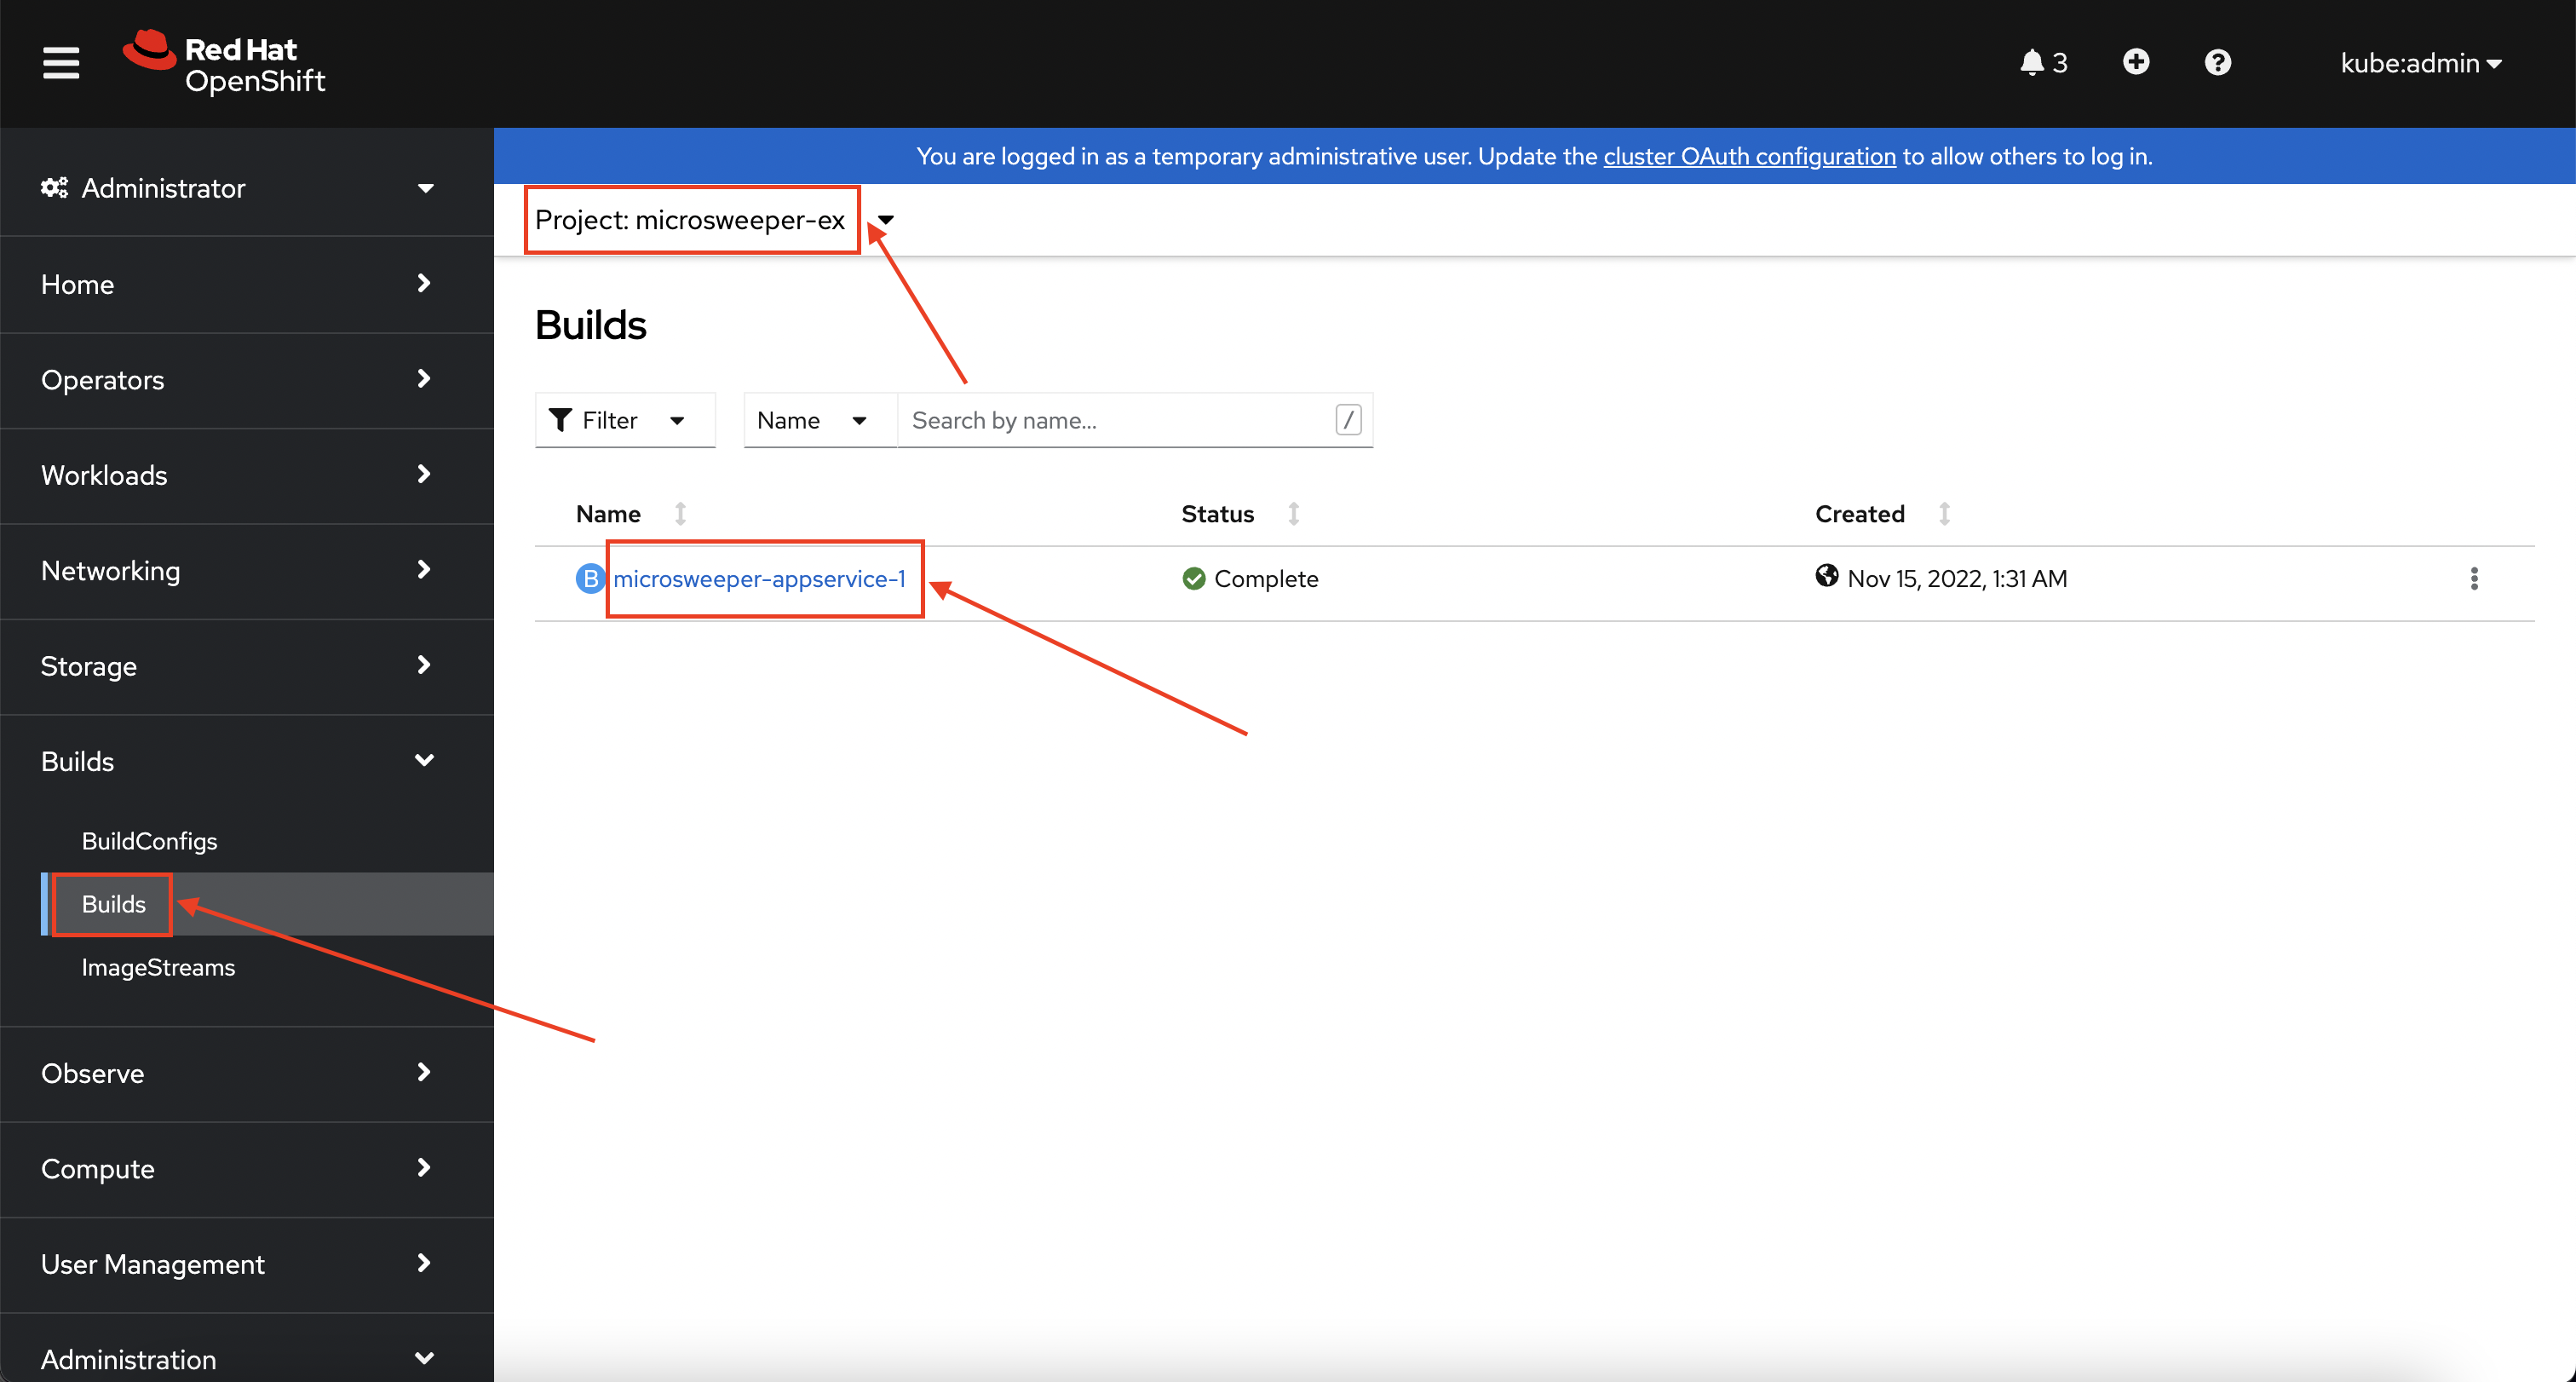
On the next screen, explore around. Look specifically at the YAML definition of the build and the logs to see what the build actually did. If your build failed for some reason, the logs are a great first place to start to look at to debug what happened.
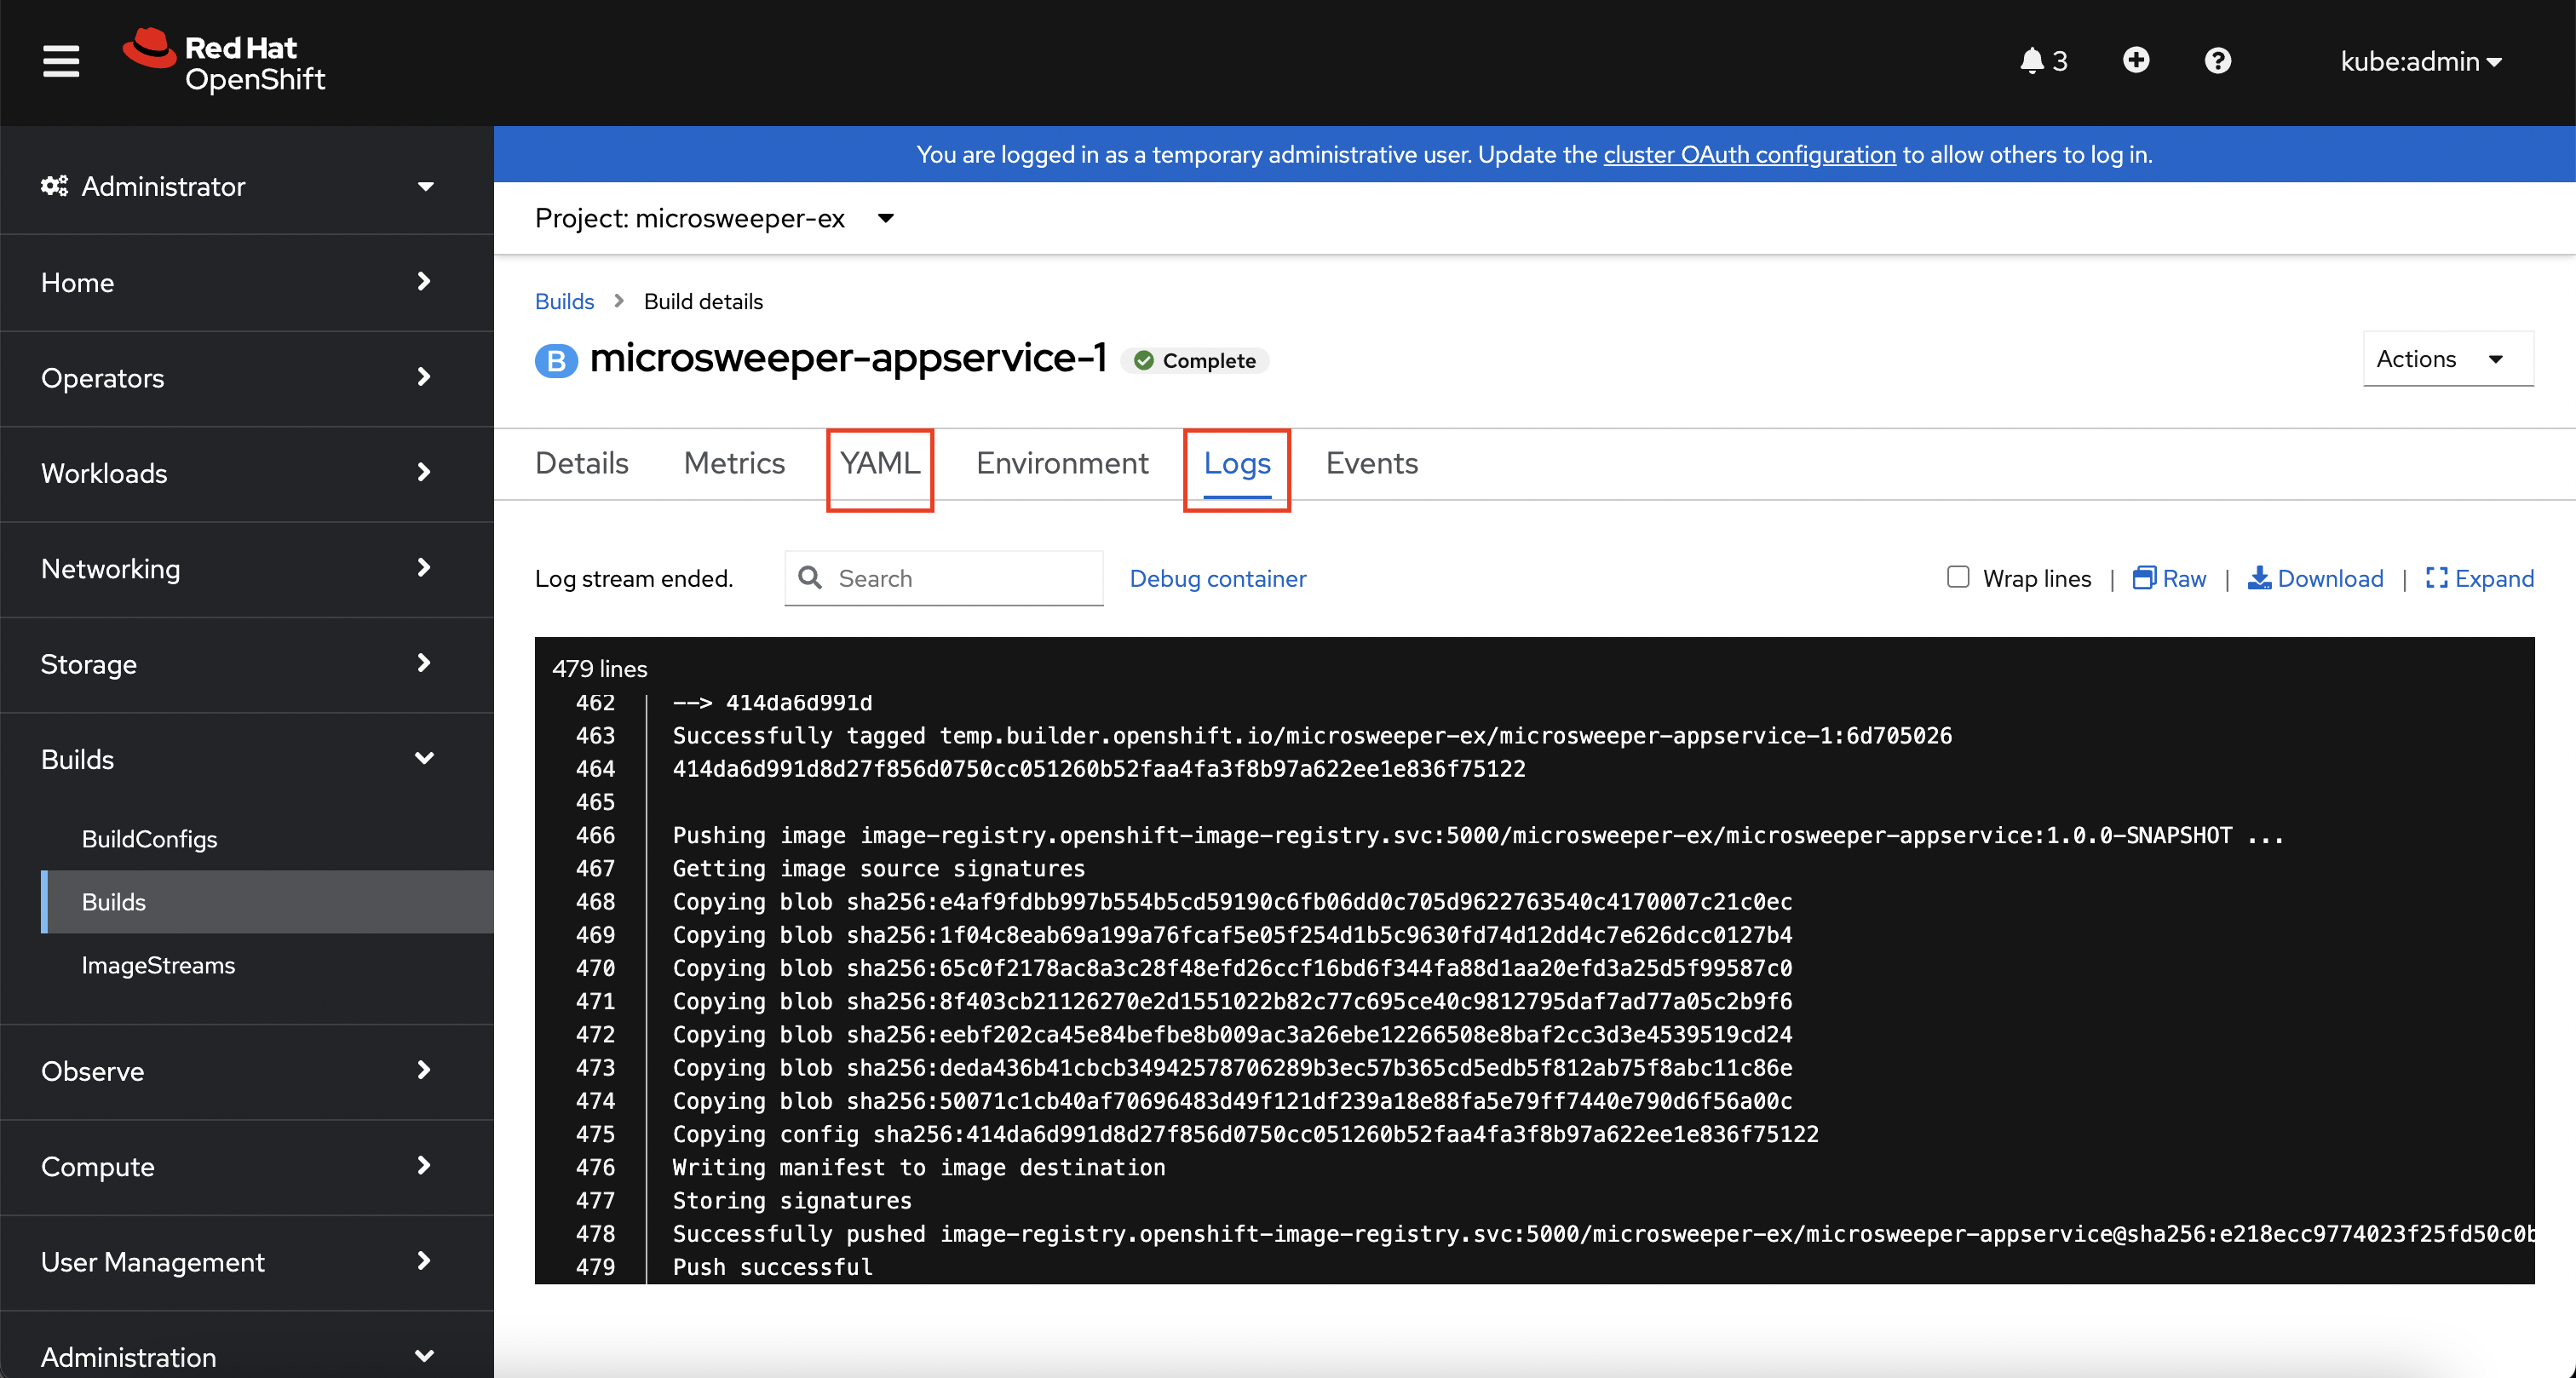
Image Deployment
After the image was built, the source-to-image process then deployed the application for us. In the quarkus properties file, we specified that a deployment should be created. You can view the deployment under Workloads -> Deployments, and then click on the Deployment name.
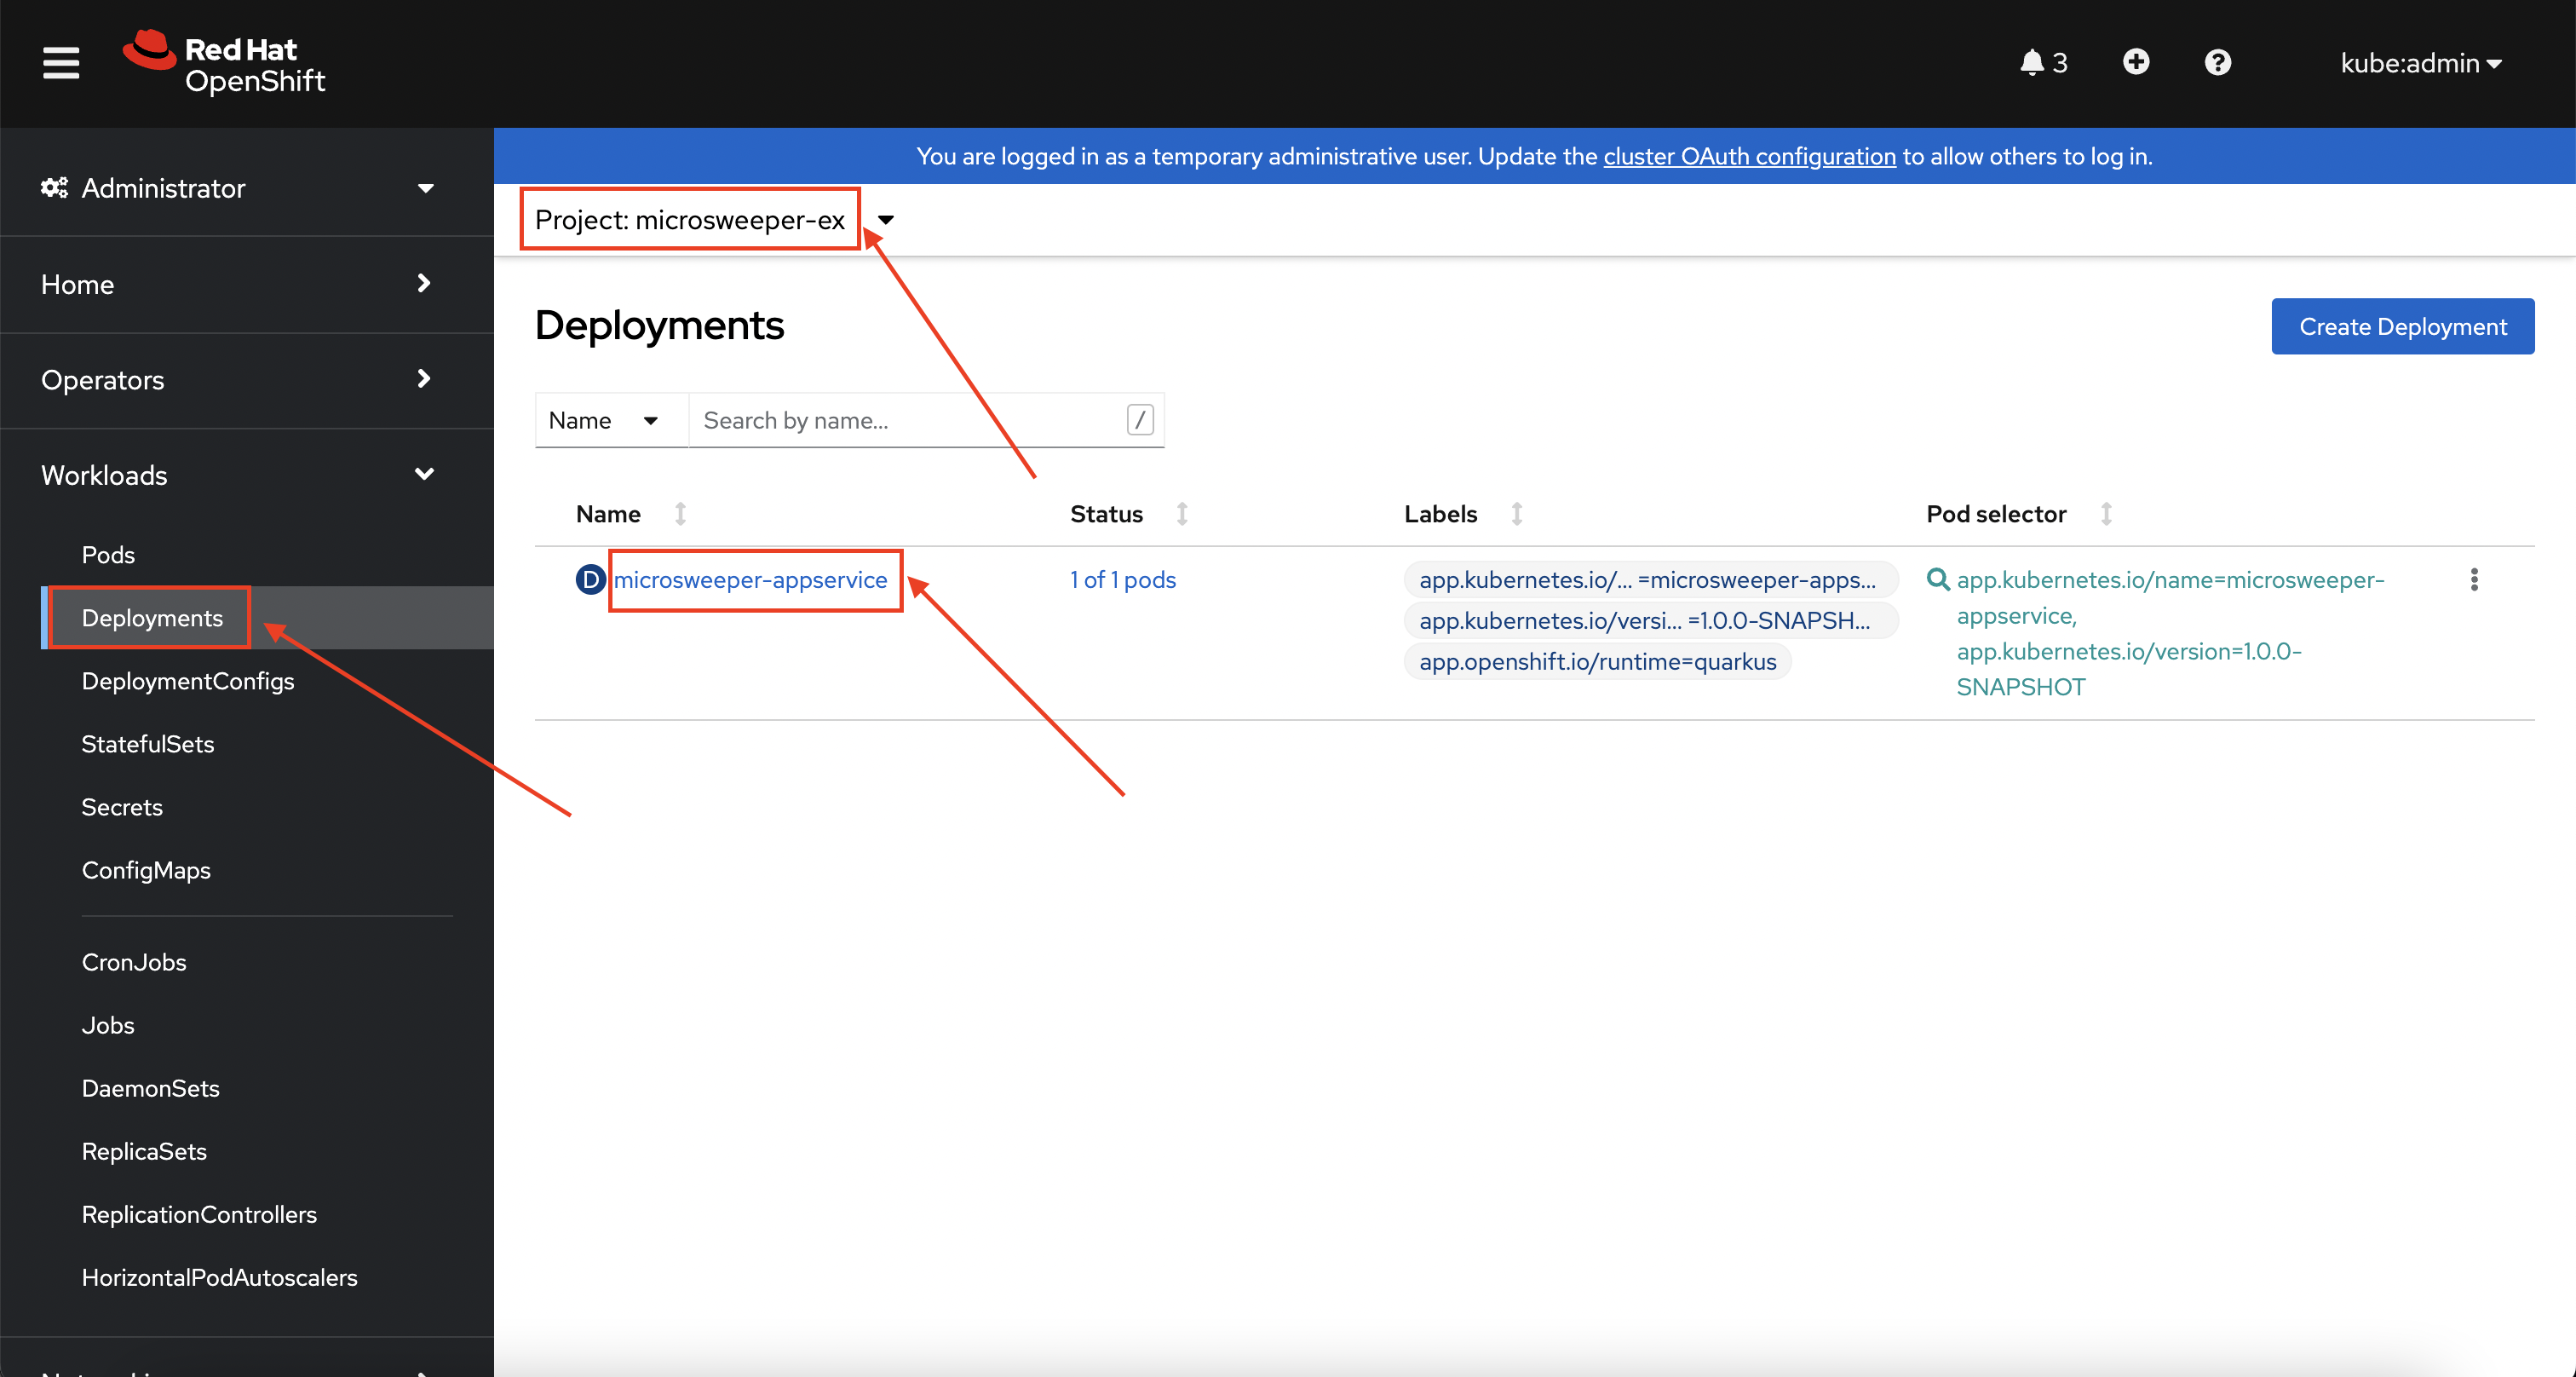
Explore around the deployment screen, check out the different tabs, look at the YAML that was created.

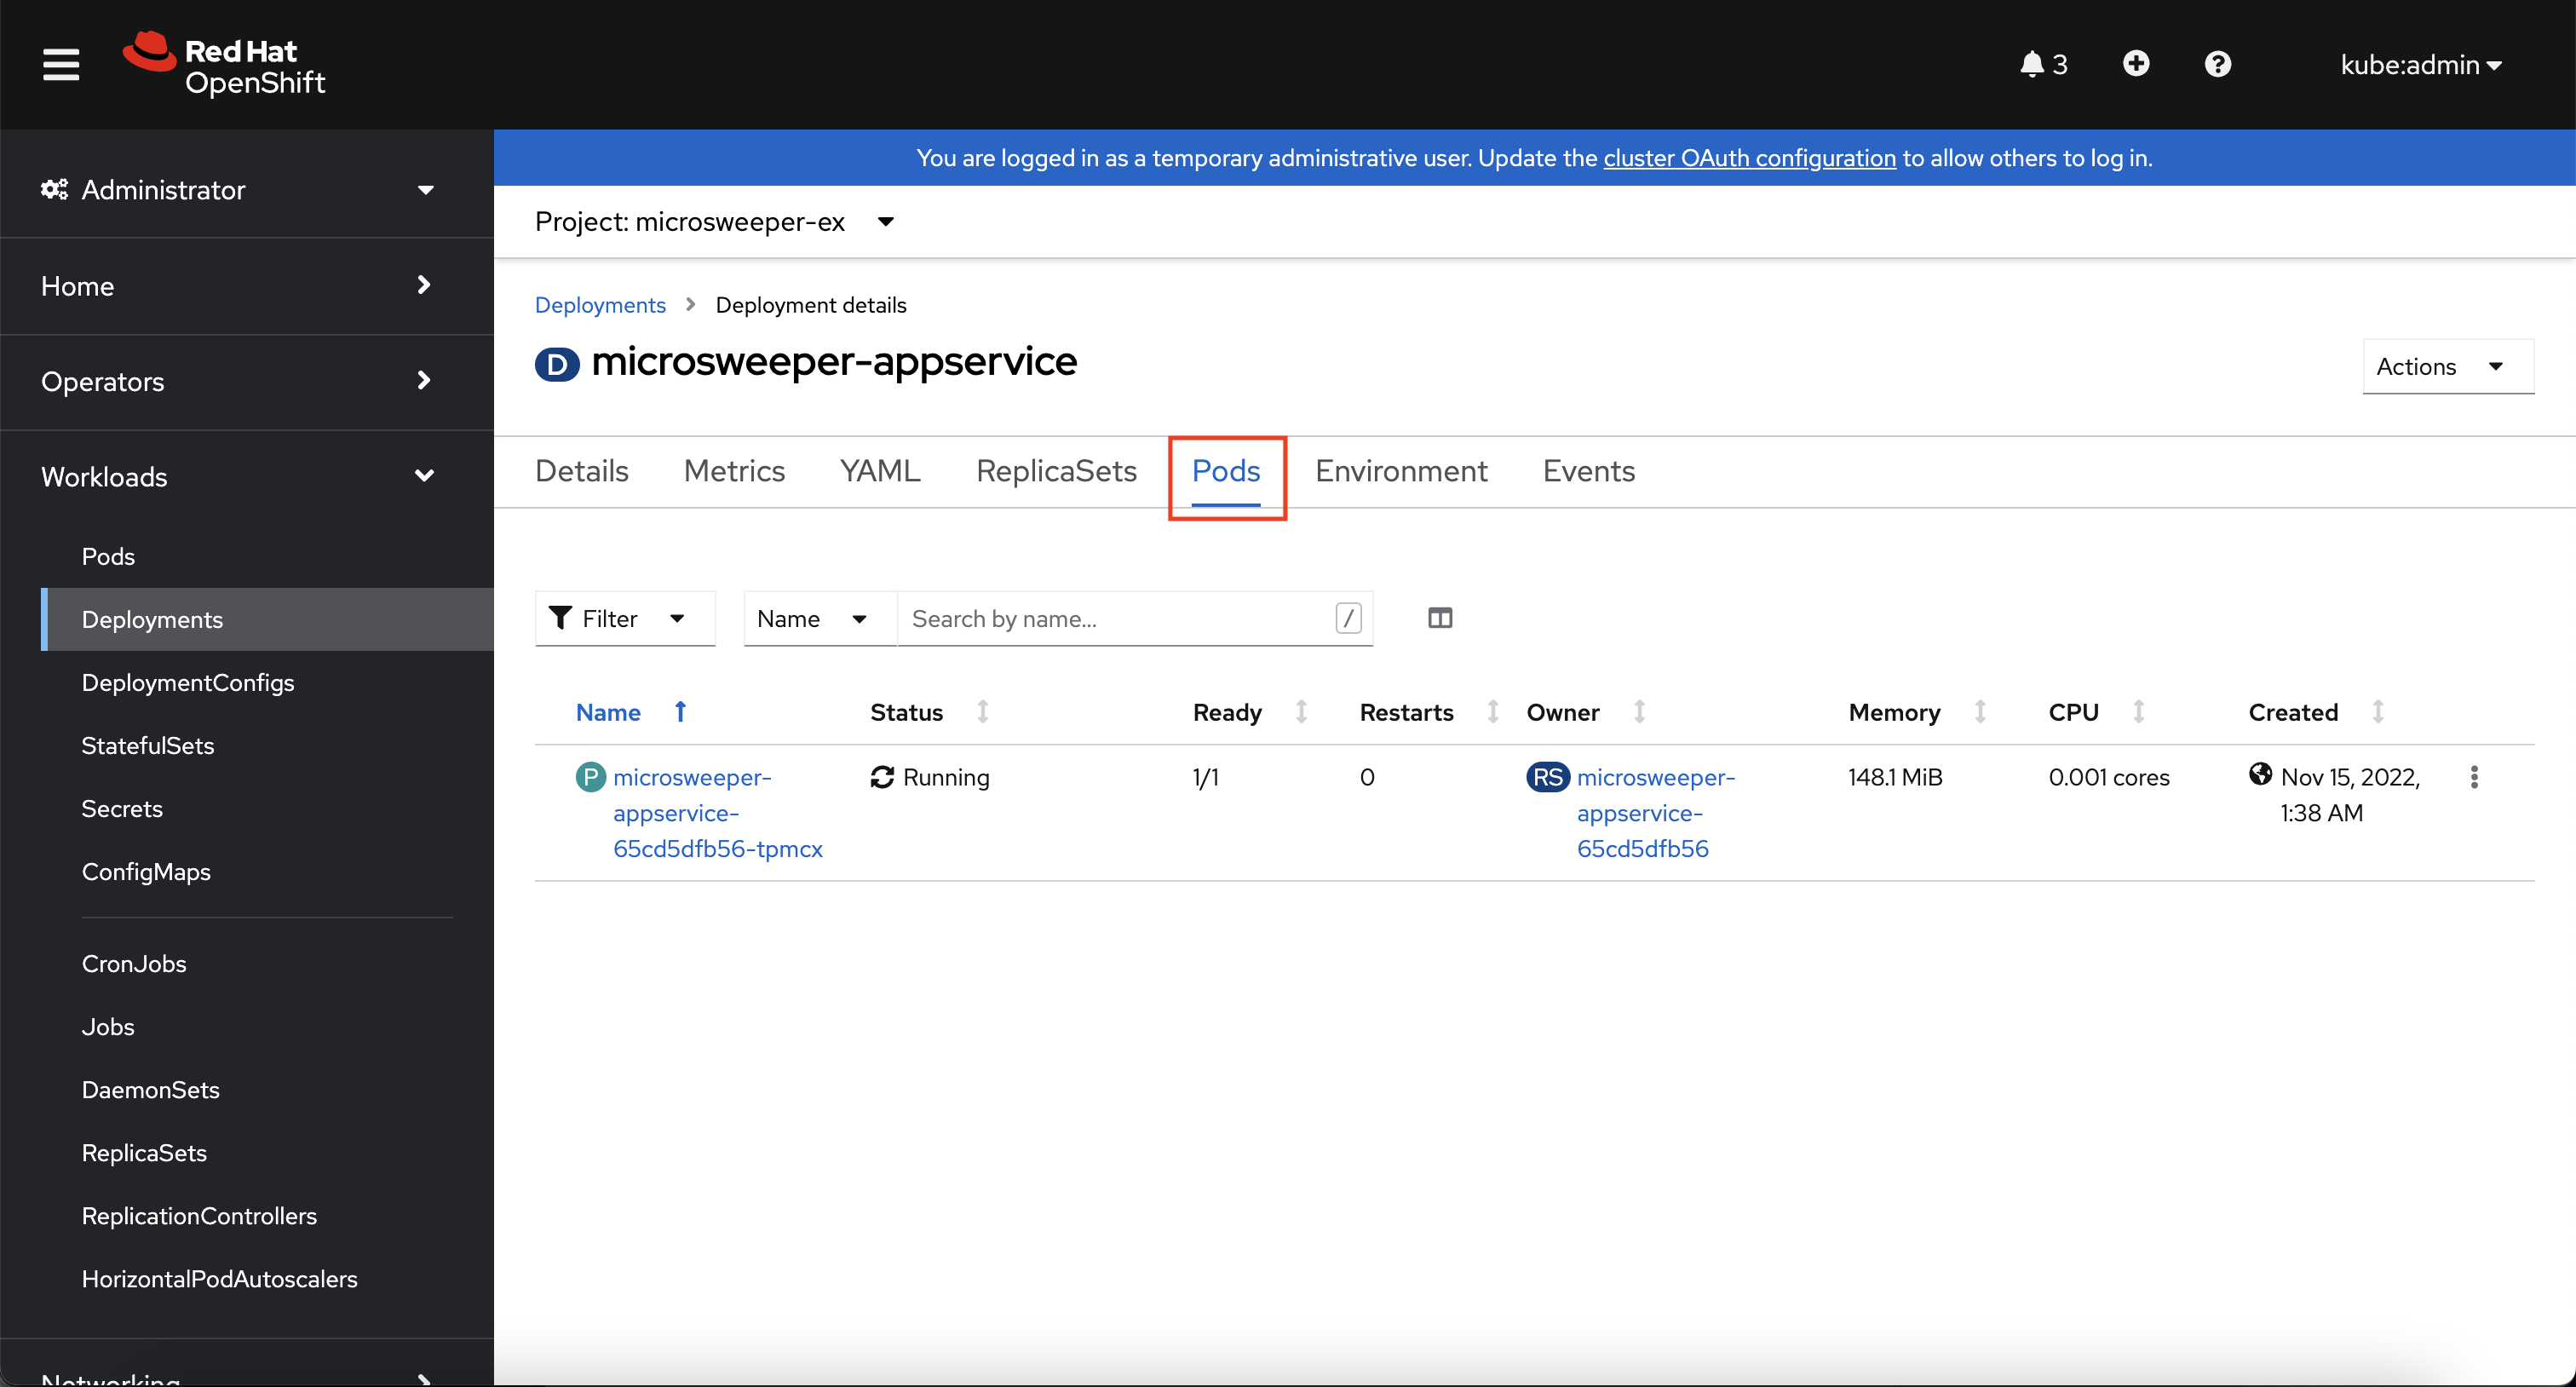
Look at the pod the deployment created, and see that it is running.
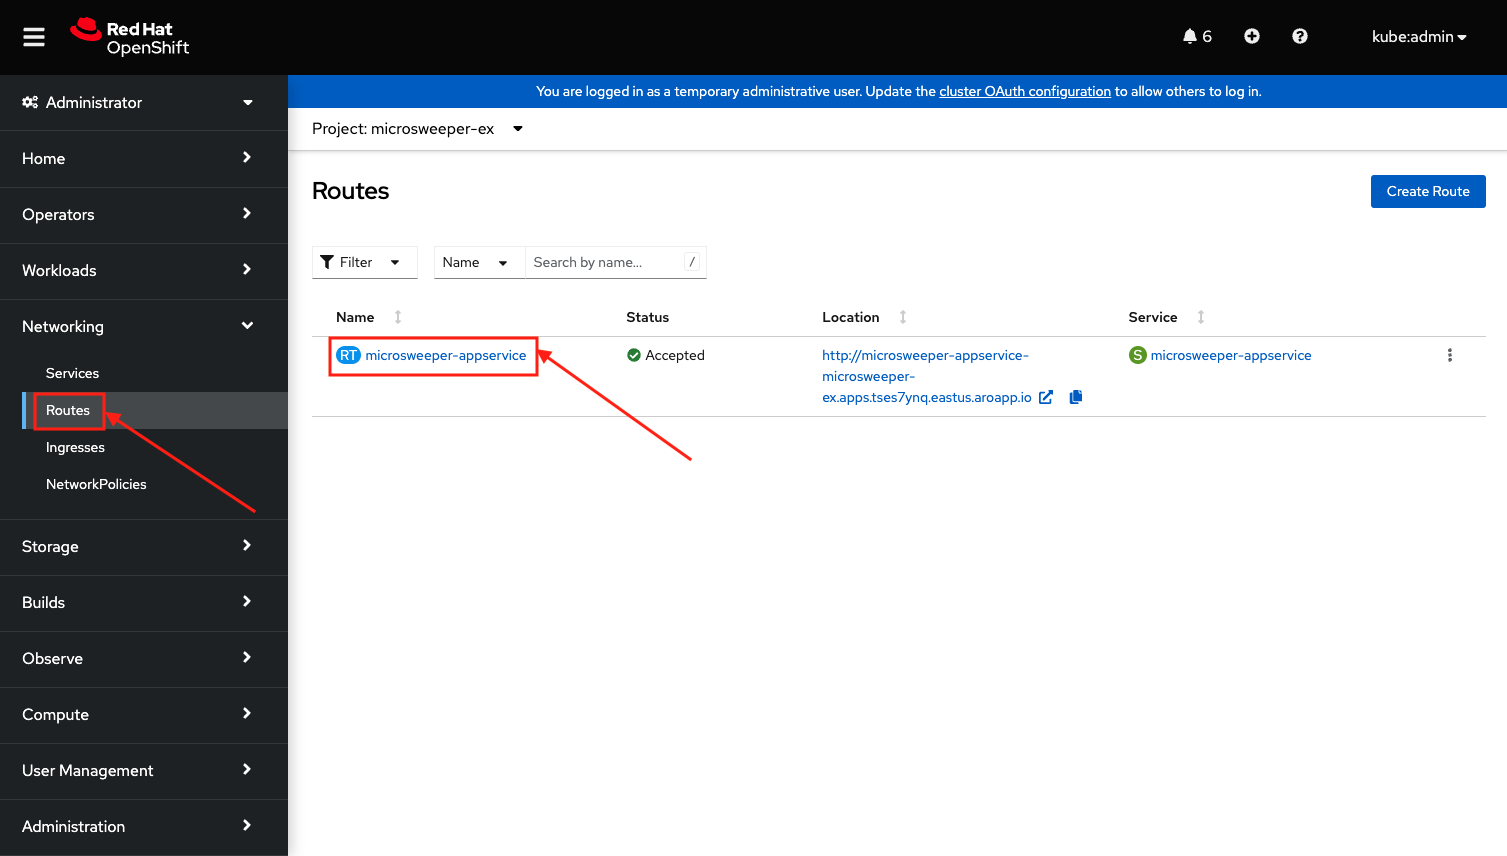
The last thing we will look at is the route that was created for our application.
In the quarkus properties file, we specified that the application should be exposed to the Internet.
When you create a Route, you have the option to specify a hostname.
To start with, we will just use the default domain that comes with ARO (useast.aroapp.io in our case).
In the next section, we will expose the same application to a custom domain leveraging Azure Front Door.
You can read more about routes in the Red Hat documentation.
From the OpenShift Web Console menu, click on Networking->Routes, and the microsweeper-appservice route.
Test the application
While in the route section of the OpenShift Web Console, click the URL under Location:
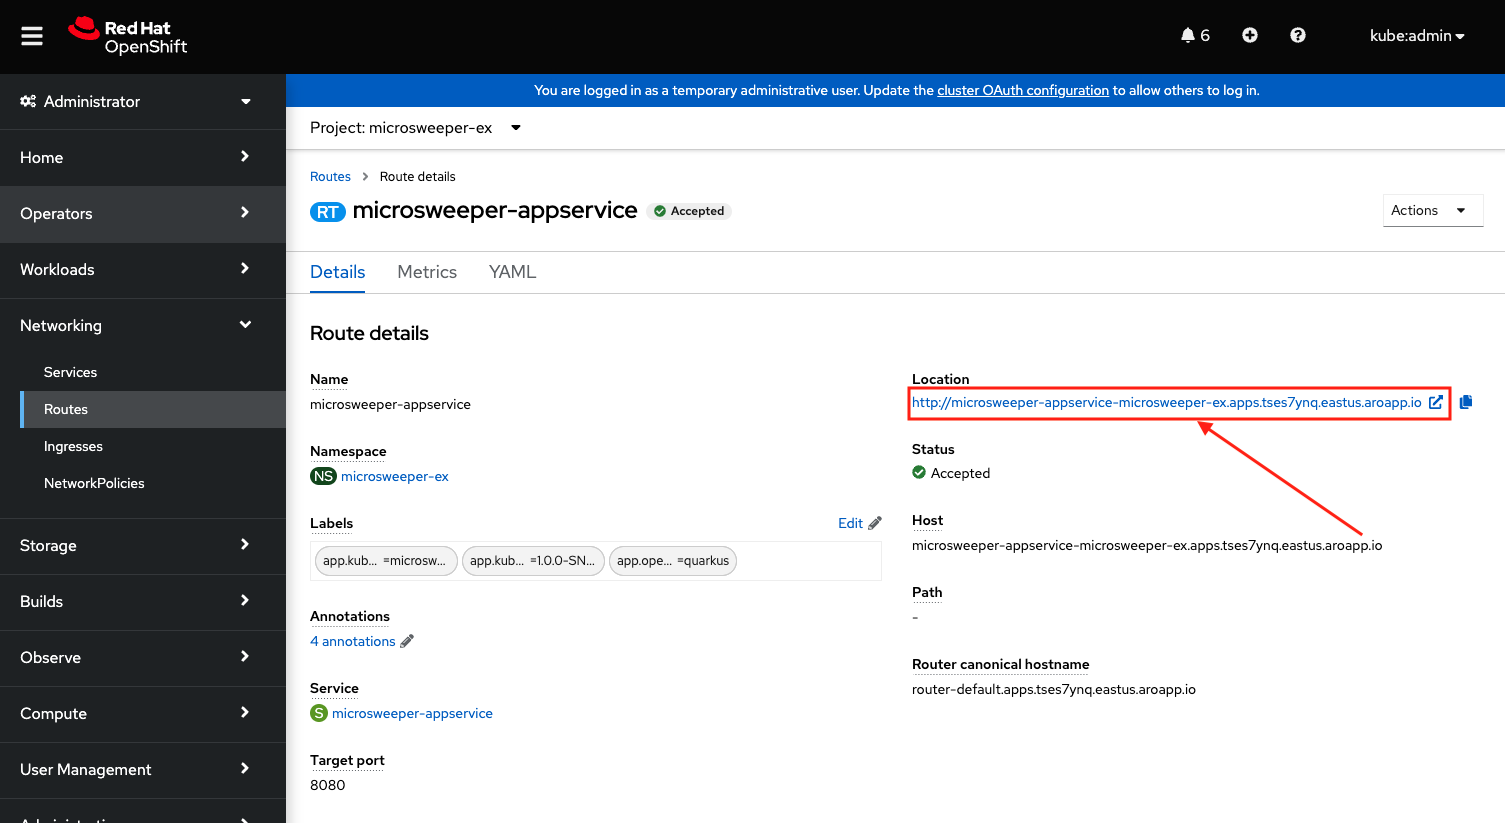
You can also get the the URL for your application using the command line:
oc get route microsweeper-appservice -n microsweeper-ex -o jsonpath='{"http://"}{.spec.host}{"\n"}'http://microsweeper-appservice-microsweeper-ex.apps.nbybk9f3.eastus.aroapp.io/|
This is an |
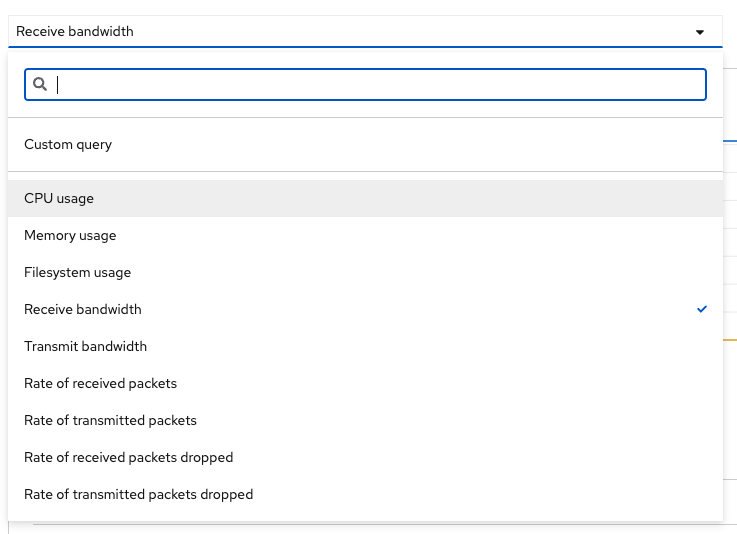
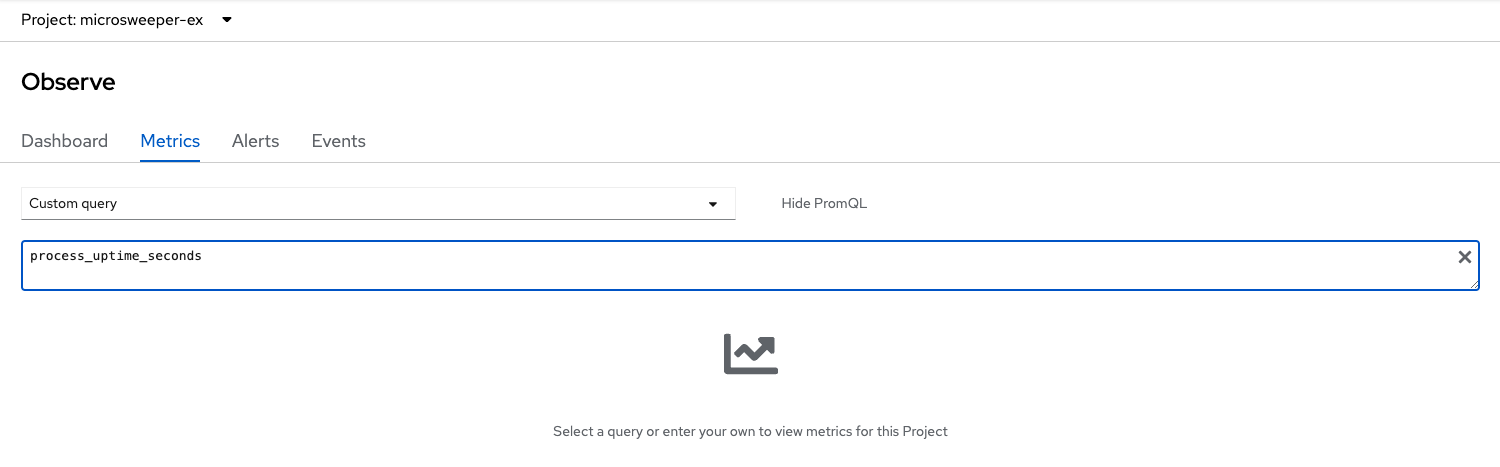
View custom metrics for the App
Switch the OpenShift Web Console to the Developer view, select the project microsweeper-ex and go to and type process_uptime_seconds into custom metrics.
Switch the timeframe to 5min.
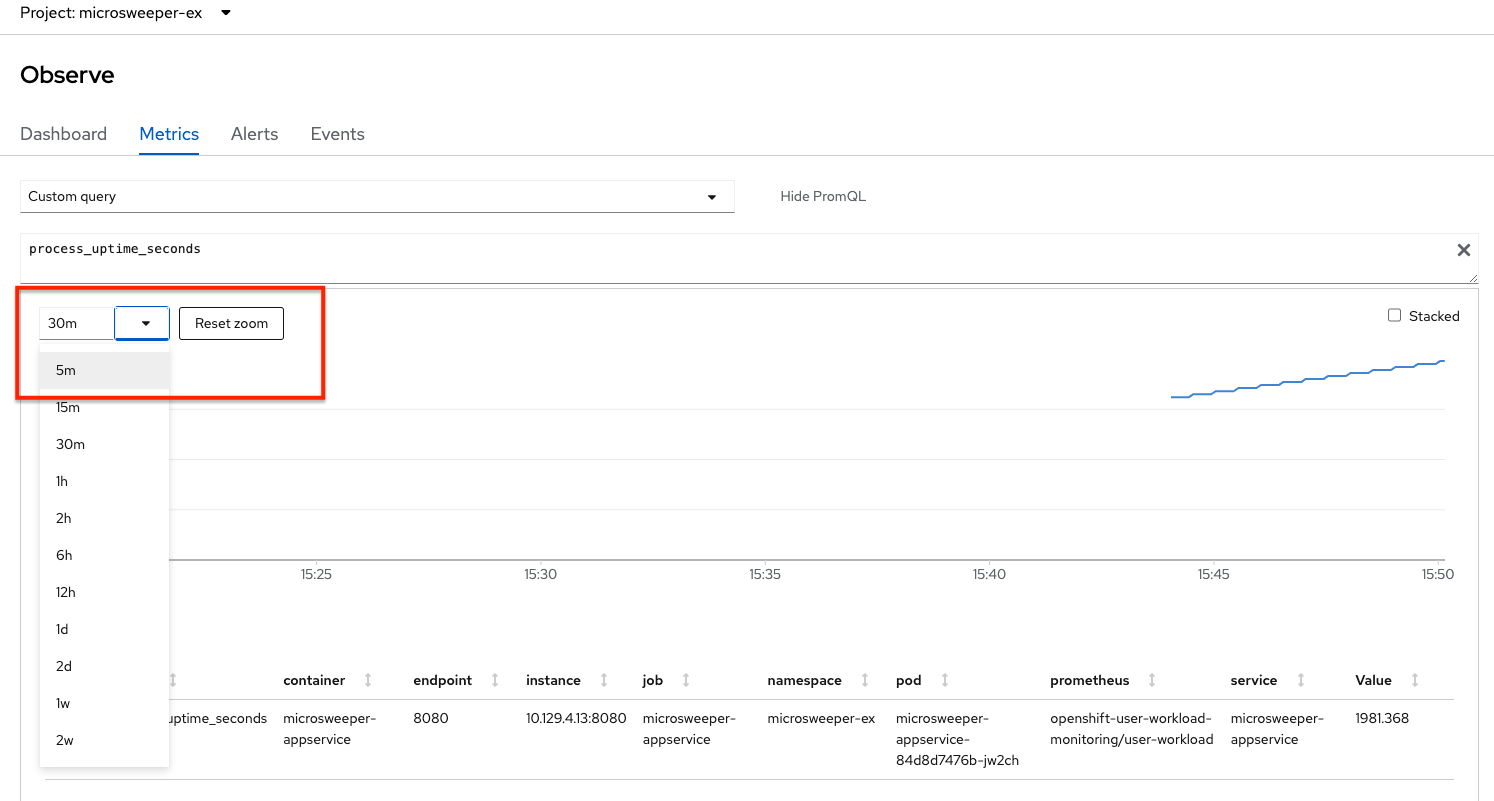
While you’re here, expore the other available dashboards to learn more about your project’s metrics.