Use surveys and the revamped access rights to give your users self-service access
Surveys allow us to build input dialogs and wizards to guide users through the process of providing the required data to run a job. There are different survey fields including drop down lists, password fields, or simple input boxes.
The Scenario
The App and Ops teams are quite happy with how you setup the workflow to combine both teams' Ansible content into one automation job. But something else came up, as the app team has a new night shift member. They would like to allow this new member to:
-
Change the content of the website NodeJS is serving
-
Run the webapp deployment job
However, the new team member should not be allowed to change anything else in AAP for now. Sounds like a job for Automation Execution Surveys and Ansible Automation Platform Role Based Access Control!
If you’ve skipped any of the previous chapters, run cd ~/playbooks-adv-controller && ansible-navigator run add-workflow-template.yml in a terminal to set the pre-requisites for the next steps.
|
Add the survey
Surveys can be used to define forms which ask the user for variable values before running a job.
The Hello World! string the NodeJS application prints is defined in the install_node_app playbook in the variable content.
Access your AAP UI from the AAP tab in Showroom, or open https://MYCTLHOST.apps.ocpvdev01.rhdp.net in a browser tab. Log in as MYCTLUSER with password MYCTLPASSWORD.
So we just need to add a survey to our Deploy Webapplication workflow template. In the AAP UI, open , then:
-
Open the Survey tab.
-
Click ⊕ Create survey question and fill in:
-
Question:
Web Content -
Answer variable name:
content -
Answer type:
Text
-
-
Click Create survey question.
-
To enable the survey, while still on the Survey tab, switch the slider from Survey disabled to Survey enabled (it turns from grey to blue).
Test the survey
Launch the Deploy Webapplication workflow template with Launch template.
| You may also click the rocket icon on . |
Before the job runs, the survey asks for Web Content. Enter any text you like and click Next. The Review step shows the launch details and, at the bottom, the text you entered in the survey. If everything looks correct, start the job with Finish.
| Note how the survey content is shown on the Details tab of the Job view in the Extra variables field. From an Ansible perspective they are actually nothing else than extra variables. |
After the job has completed, check the result. In your terminal, run:
curl http://node1/nodejsThe string returned should match what you entered in the survey.
Create a restricted user
The second part of your task is to add the new night shift user who is only allowed to execute the Deploy Webapplication Workflow, but nothing else. For this you have to leverage the RBAC (Role Base Access Control) features of AAP.
Create Role
Since AAP 2.5, access management is handled in one central place across all services offered by AAP. Automation Execution (aka controller) is only one of those services. For this reason, open .
First filter on Workflow.
You can verify that no built-in role allows to execute and approve a workflow, without being able to modify or delete them.
To do so, click on the small arrow head next to the tick box on the left of each role to drop down the actual permissions.
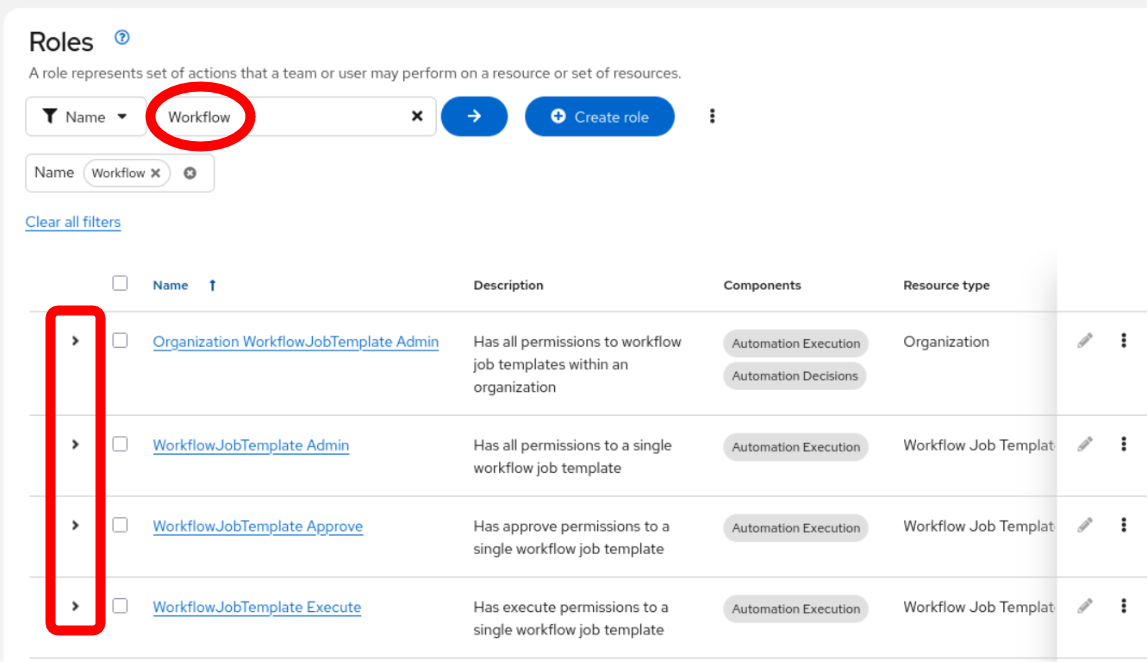
The night shift personal though is alone at night and they need to be able to circumvent approval steps or they might not be able to do their job.
| For sake of simplicity and time, our workflow doesn’t have an approval step. Feel free to add one between the two steps if you happen to have time left at the end of the session. This said, think about the fact that adding an approval step is adding a manual step in what should be an end-to-end automated workflow. |
So we decide to create our own role for them:
-
Click ⊕ Create role (it may be behind the three-dots menu), and enter:
-
Name:
WorkflowNightShifter -
Description:
Nightshift workflow -
Resource type:
Workflow job template -
Permissions: (select the following)
-
Can approve steps in this workflow job template
-
Can run this workflow job template
-
Can view workflow job template
-
-
-
Click Create role.
Back to Automation Execution Roles and again filtering on "Workflow", you can easily see that our new role is "Editable" and not "Built-in" Note the pen icon for built-in roles is greyed out, while for the new one we just created it’s bold and active.
Create User
Now create the user:
-
Open .
-
Click ⊕ Create user.
-
Fill in the fields for the new user:
-
Username:
nightshift -
Password:
MYCTLPASSWORD -
Confirm Password:
MYCTLPASSWORD -
First Name:
Night -
Last Name:
Shift -
Email:
nightshift@example.com -
User Type:
Normal user -
Organization:
Default
-
-
Click Create user.
Create Team
A Team is a subdivision of an organization with associated users, projects, credentials, and permissions. Teams provide a means to implement role based access control schemes and delegate responsibilities across organizations. For instance, permissions may be granted to a whole Team rather than each user on the Team.
Create a team:
-
Open .
-
Click ⊕ Create team.
-
Fill in the fields for the new team:
-
Name:
NightShifters -
Organization:
Default
-
-
Click Create team.
Now add the new user to the team:
-
Open the Users tab (still in the NightShifters team view).
-
Click Assign users.
-
Select the
nightshiftuser. -
Click Assign users.
User nightshift is now a member of the NightShifters Team.
| You could have reached the same objective by using the Teams tab of the user’s view instead of the Users tab of the team’s view. |
Grant Permissions
To allow users or teams to actually do anything, you have to set permissions. The members of the Team NightShifters should only be allowed to modify the NodeJS content.
Add the permission to use the template:
-
Open and select the NightShifters team.
-
Open the Roles tab.
-
Click Assign roles.
-
In the dialog, set permissions as follows:
-
Select a resource type:
Workflow job templates -
Click Next
-
Select Deploy Webapplication using the checkbox next to it.
-
Click Next
-
Choose the role
WorkflowNightShifter
-
-
Click Next, review, and click Finish.
If you open , select Deploy Webapplication, and open the Team Access tab, you will see an overview of all RBAC entries.
Test the restricted user
You’ve now set up the required user and permissions.
To test everything, log out of the AAP web UI and log in again as nightshift with password MYCTLPASSWORD.
-
Open . For
nightshift, only the Deploy Webapplication template should be visible. The user can view, launch, and approve, but not edit the template (there is no Edit button). -
Launch the template using the rocket icon. Enter survey values as you like and start the job.
-
When the job has finished, check the result again in the terminal:
curl http://node1/nodejs -
In the web UI, log out as
nightshiftand log in again asMYCTLUSERwith passwordMYCTLPASSWORD.
Conclusion
Recall what you have just done:
-
You provided the permission to execute an automation workflow to another user without handing out your credentials or giving the user the ability to change the automation code.
-
And yet, at the same time the user can still modify details based on the survey you created.